
Building a
Hanging Pot Rack
Project Level: Intermediate
Are you tired of having pots
and pans falling out of your
kitchen cabinets every time
you open them? If so, a
hanging pot rack could be the
answer to your crowded
kitchen. With a few easy steps
and a free weekend, you can
be on your way to organized kitchen bliss.
Organize your kitchen with a hanging pot
rack.
Click a text link below to shop for that item.
Click the information icon
for a product buying guide.
Tools
• Ladder
• Tape measure
• Circular saw
• Goggles
• Dust mask
• Drill/driver
• Drill bits
• Hearing protection
Materials
• 2x4 lumber
• 2x lumber (The same
dimension as your
ceiling joists.)
• 2x4 1/4" screw hooks
• 0x2 7/8" screw eyes
• 3/16" zinc plated proof
coil chain
• 3/4" dowel rods
• 2 1/2" wood screws
• Caulking
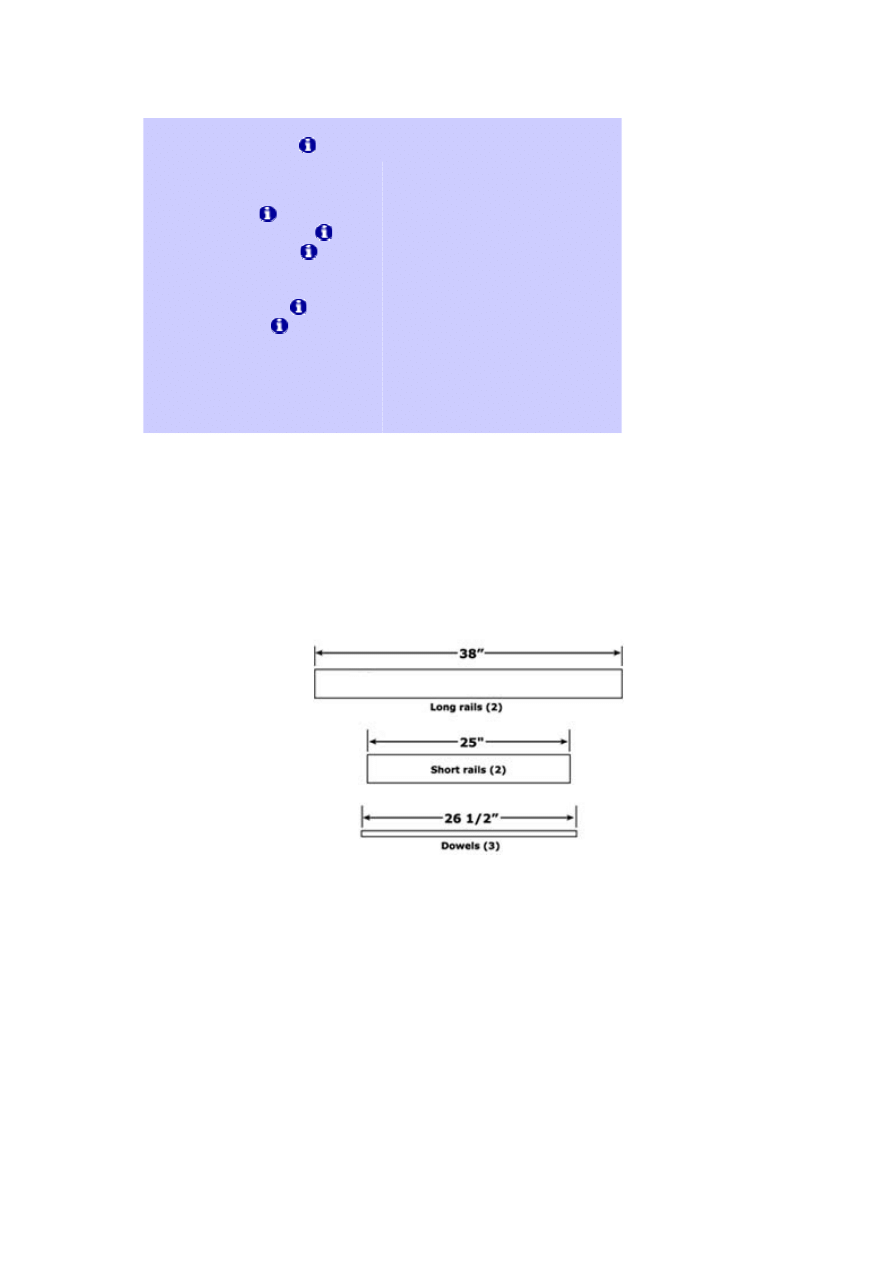
Size the Rack
Racks vary in size based on the dimensions of the rails and the
number of dowel rods. Use the following steps to determine the
size and number of parts for your rack. For clarity, we will use
38" long by 28" wide for our rack dimensions and 10" as the
diameter of the largest piece of cookware we intend to hang
from our rack.
Rail Dimensions
1.
The rails for
the long sides
of the rack
should be
equal to the
overall rack
length.
Example: Our
rack is 38"
long.
Cut two 2x4's
38" long.
2.
The rails for the short sides of the rack should be 3" less
than the overall width of the rack.
Example: Our rack is 28" wide.
Short rails are 28"- 3" = 25".
Cut two 2x4's 25" long.
3.
The dowel rods should be 1 1/2" longer than the short
rails.
Example: Our rails are 25" wide.
Dowel rods are 25"+ 1 1/2"= 26 1/2"
Cutting measurements for the examples given.
Cut each dowel rod
26 1/2" long.
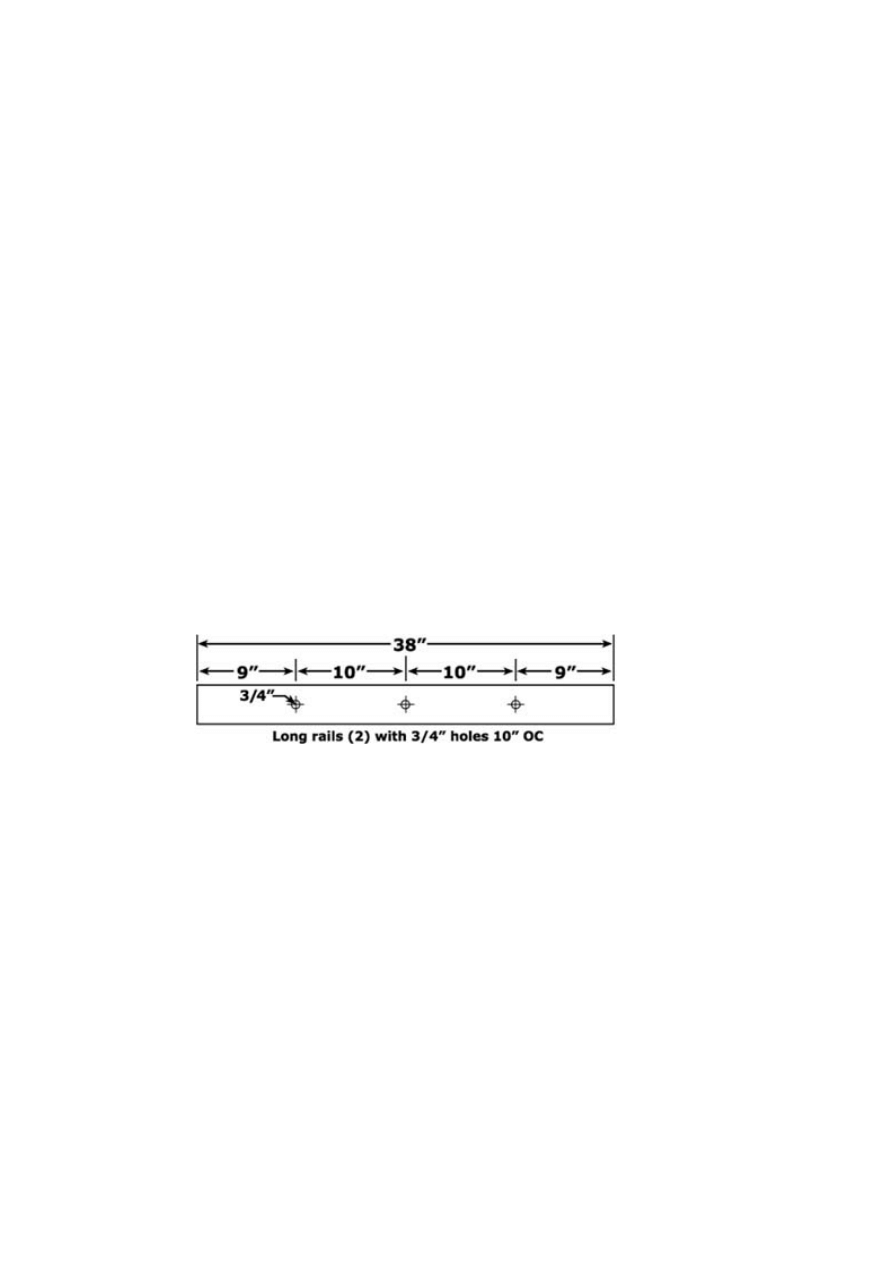
Dowel Rods and Dowel Holes
1.
Measure the diameter, in inches, of the largest item you
intend to hang on the rack. Use that measurement as the
on-center (OC) spacing for the dowel rods.
Example: Our largest piece is 10" in diameter. OC dowel
rod spacing is 10".
2.
Mark the center of each long rail and measure to the left
and right of the center mark using the OC spacing.
Continue measuring and marking until your
measurements extend past the ends of the long rails.
Example: Our long rails are 38" long and our OC spacing
is 10". Divide the length of the long rail by 2. Measure the
result (19") to find the center of each long rail.
From the left end of each rail, measure 19" minus 10" =
9". Measuring another OC spacing to the left extends the
mark past the left end of the rail so you have one dowel
rod left of the center dowel rod. Mark the right side of the
rail as a mirror to the left.
3.
Cut the dowel rods to the predetermined length. For our
rack there are three dowel rods 26 1/2" long.
4.
5.
Use a 3/4" spade or forstner bit to bore 7/8" deep dowel
holes, centered on the marks you made for the dowels.
(The drilled face is the inside face of each rail.)
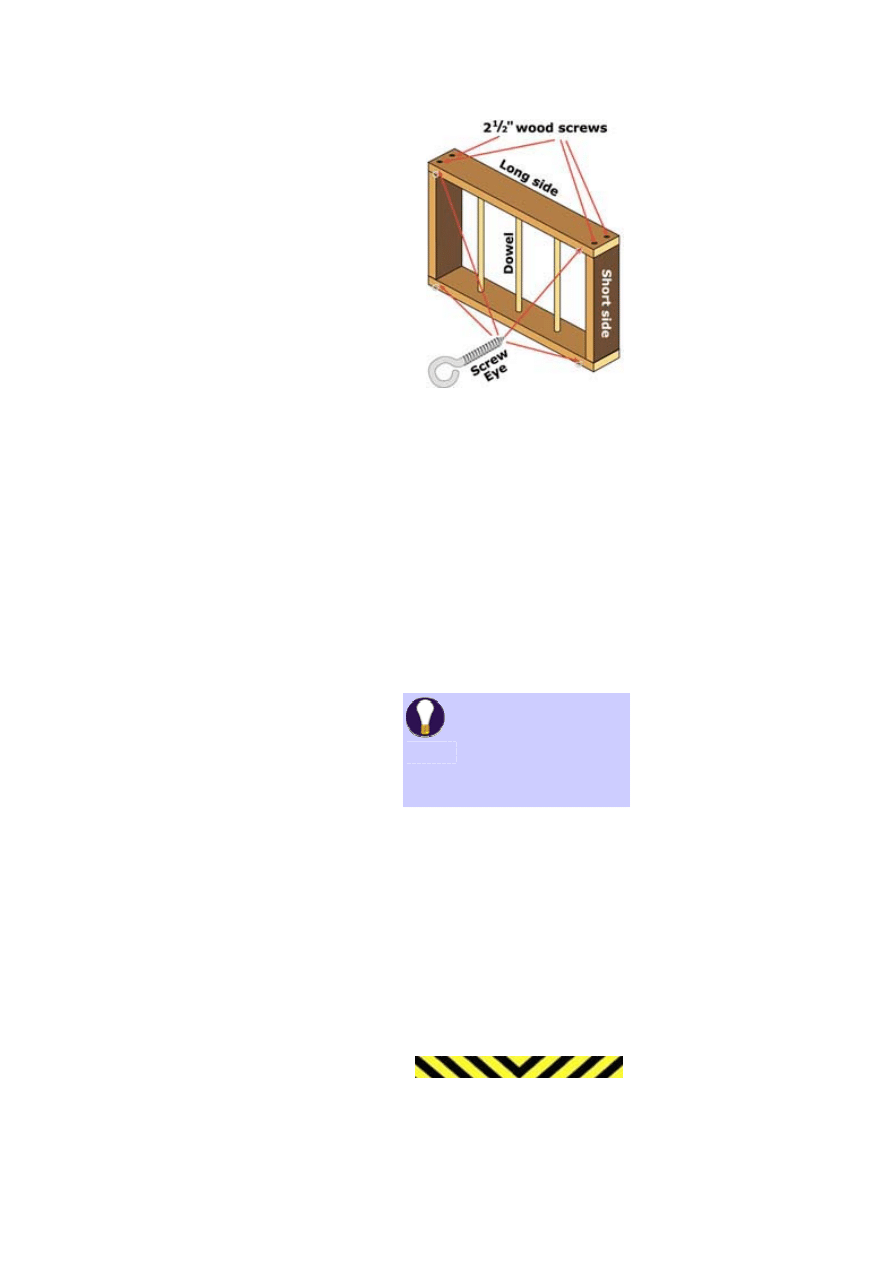
Building the Rack
1.
Butt one end of each short
rail to the inside face of one
long rail. Flush one short rail
with each end of the long rail.
Use two 2 1/2" wood screws
to secure the long rail to each
short rail.
2.
Stand the assembly on edge
with the long rail down and
insert dowels into the dowel
holes.
3.
Place the second long rail
over the assembly. Insert the
dowels into the dowel holes and align the short rails with
the ends of the long rail. Use two 2 1/2" wood screws to
secure the second long rail to each short rail.
4.
Paint or stain the assembly. Add an accent of
decorative
moulding
to the side rails of your rack.
Installing the Hardware
1.
2.
Measure in 3" from
the end of each long
rail and mark the
center of the top
edge of the rail.
Bore a pilot hole at
each mark 1/2"
shallower than the threaded portion of the screw eye.
3.
Halfway fill the pilot hole with silicone caulk and install a
screw eye into each hole. Wipe away any excess caulk
that squeezes out of the hole.
4.
Have two helpers on ladders hold the rack upside down
against the ceiling, directly above where it will hang.
Make marks on the ceiling corresponding to the screw
eyes in the rack. The marks on the ceiling represent the
locations for the screw hooks.
Pot Rack assembly.
Good idea:
If you
don't have access to
your ceiling joists,
consider hiring a
professional to install
the rack.
SAFETY:
Don't space screw eyes
5.
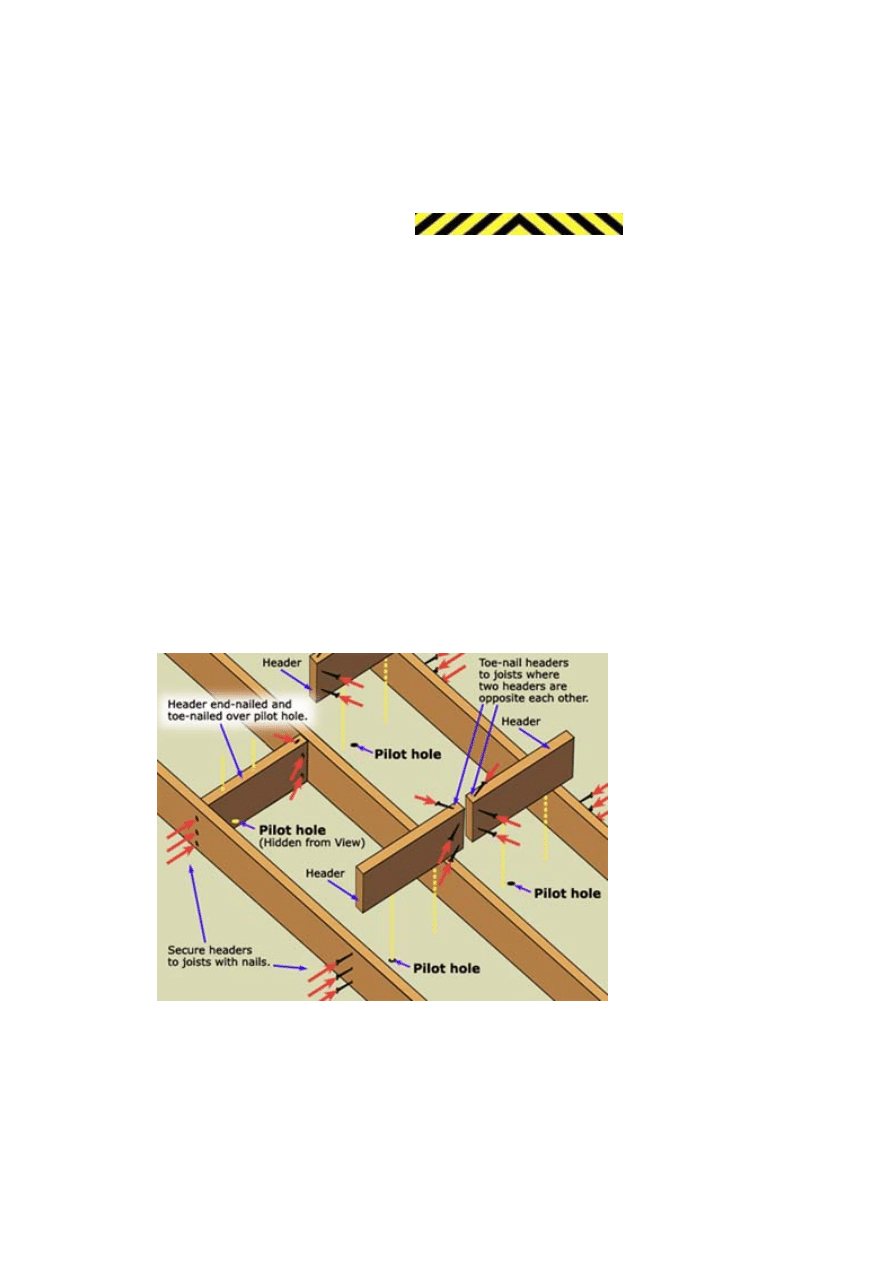
6.
Bore pilot holes into
the ceiling 1/2"
shallower than the
threaded portion of
the screw hook. If
the screw hook holes don't fall on ceiling joists, install
headers between the joists to hold the screw hooks:
o
Go into the attic and locate each hole in the
ceiling.
o
Measure the distance between the joists and cut
headers to fit between them.
o
Insert a header over each hole and secure it to the
joists with 20d nails at each end.
o
Go back and bore pilot holes in the headers 1/2"
shallower than the threaded portion of the screw
hook.
o
Fill the pilot holes halfway with silicone caulk and
install a screw hook into each hole. Remove any
caulk that squeezes out of the hole. Allow the
caulk to cure according to the manufacturer's
instructions.
Hanging the Rack
Hang the rack near the stovetop or over a kitchen island for easy
access to your pots and pans. Don't hang the rack over a
cooktop. The pots and pans will gather grease and can be a
hazard if you lean over the cooktop to reach for a pan. Be sure
and hooks more than 48"
OC. If your overall rack
length is greater than 48",
add one set of screw eyes
and hooks for each 48".

to hang the rack based on your height. The rack should be low
enough so you can easily reach a pan, but high enough so the
pots and pans are not in the way. To hang your rack:
1.
Cut four pieces of chain twice as long as the distance
from the top of the rack to the ceiling.
2.
Slip a piece of chain through each screw eye and lay it
over the top of the rack.
3.
Have two helpers hold the rack in position while you place
the end links of each piece of chain over the
corresponding screw hooks.
4.
Use S hooks to hang pots and pans from the dowels.
Bend the top of the S hooks closed to keep them from
coming unhooked from the dowel.
After your rack is up, accessorize it by wrapping artificial ivy
around the chain or placing a basket of artificial plants or flowers
on top of the rack.

Wyszukiwarka
Podobne podstrony:
Pot And Pan Rack
ladder pot and pan rack drabinka
Rack OVERHEAD POT RACK
Growing Rack
Key Rack
Herb Drying Rack
Drying Rack
Popular Mechanics Replacing A Steering Rack
Clothes Rack
62 STEERING GEAR POWER RACK & PINION
Bathroom Towel Rack
Magazine Rack
Growing Rack
wine rack
Billiards Cue Rack and Scoreboard (Part 2)
eCourse Wine Rack FAQs
Rack Fishing Rod Rack
Pool Cue Ball Rack
beginner project cd rack
więcej podobnych podstron