
OPERATOR’S MANUAL
CUSTOMER SERVICE CHECKBOOK
Valid for “e-max” versions:
August 2010

Dear Vmoto e-max riders,
We are pleased that you have chosen one of our brand name vehicles and we welcome you warmly into
the large group of Vmoto e-max riders.
This operator’s manual contains tips about
correct handling
inspections and service intervals
for your e-max scooter.
For your safety and in order to guarantee comfortable riding, we recommend that you carefully read this
operator’s manual before using your vehicle.
For problem free -operation and maintaining the value of the vehicle ensure professional servicing, follow
all the established maintenance and driving tips in this handbook and have all servicing carried out by an
authorised e-max specialised dealer at the correct time intervals as specified in this manual.
We wish you an enjoyable and safe riding experience!

1. Safety tips
Before use:
Check the scooter to make sure that:
the charger is unpacked
there is enough power in the battery
the lights and horn are functioning
there is enough tyre pressure and tread
the brakes are functioning correctly, especially that the brake fluid is full and the seal of the
braking system and brake pads are in order
the steering movement is smooth
no loosen screws or parts

While driving:
1.1 Clothing
Always drive with a well fitting helmet
Wear tight fitting and comfortable clothing
Wear appropriate footwear (no sandals or slippers)
Under some conditions, open or loose clothing can have an adverse affect on driving safety!
1.2 Riding style
Ride with foresight and consideration
Always keep both hands on the handlebars while riding
When riding around bends, the rider and passenger (when applicable) should lean with the
scooter into the curve
Ride with exceptional care on poor or wet surfaces
Use the booster function only when needed, e.g. when quick acceleration is required or on a hill
Pay attention to any unusual noises or handling of the scooter

1.3 Loading of objects and passengers
Use only the rear storage box, the storage compartment under the seat or loading hook when
transporting objects
Do not exceed the approved total weight
The scooter is certified for a maximum of 2 people!
Maximum load in the top case:
5 kg
Maximum load in the storage compartment under the seat:
5 kg
Maximum load for hooks:
3 kg
Certified total weight 90S / 110S / 120S:
300 kg / 331kg / 331kg

After trip:
Check to see whether the battery needs charging
Riding on a partially charged or empty battery will significantly reduce its life.
You can increase the life of the battery by using only the original e-max charger every time
you charge the scooter.
Overcharging the battery is impossible as the charging unit switches off when the
maximum charge is reached.
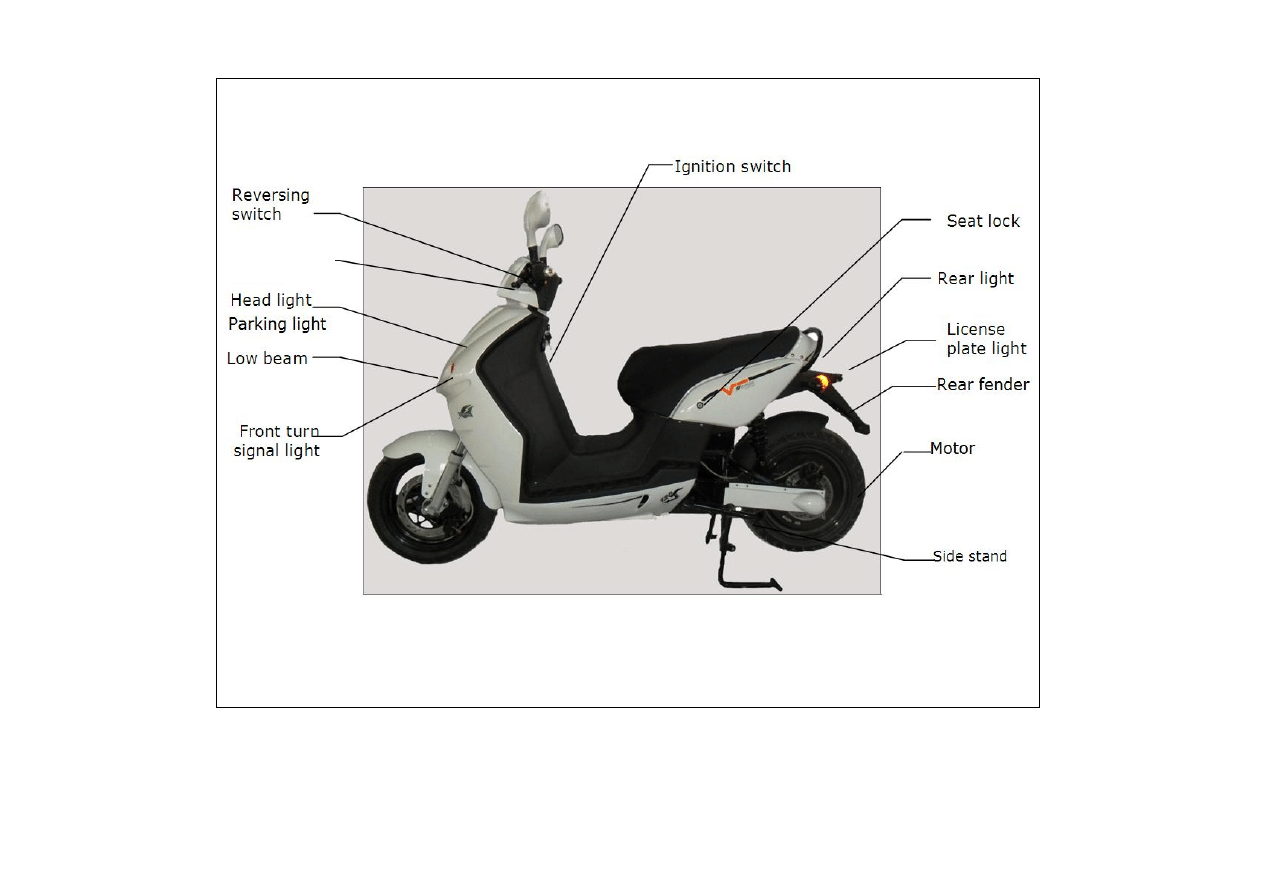
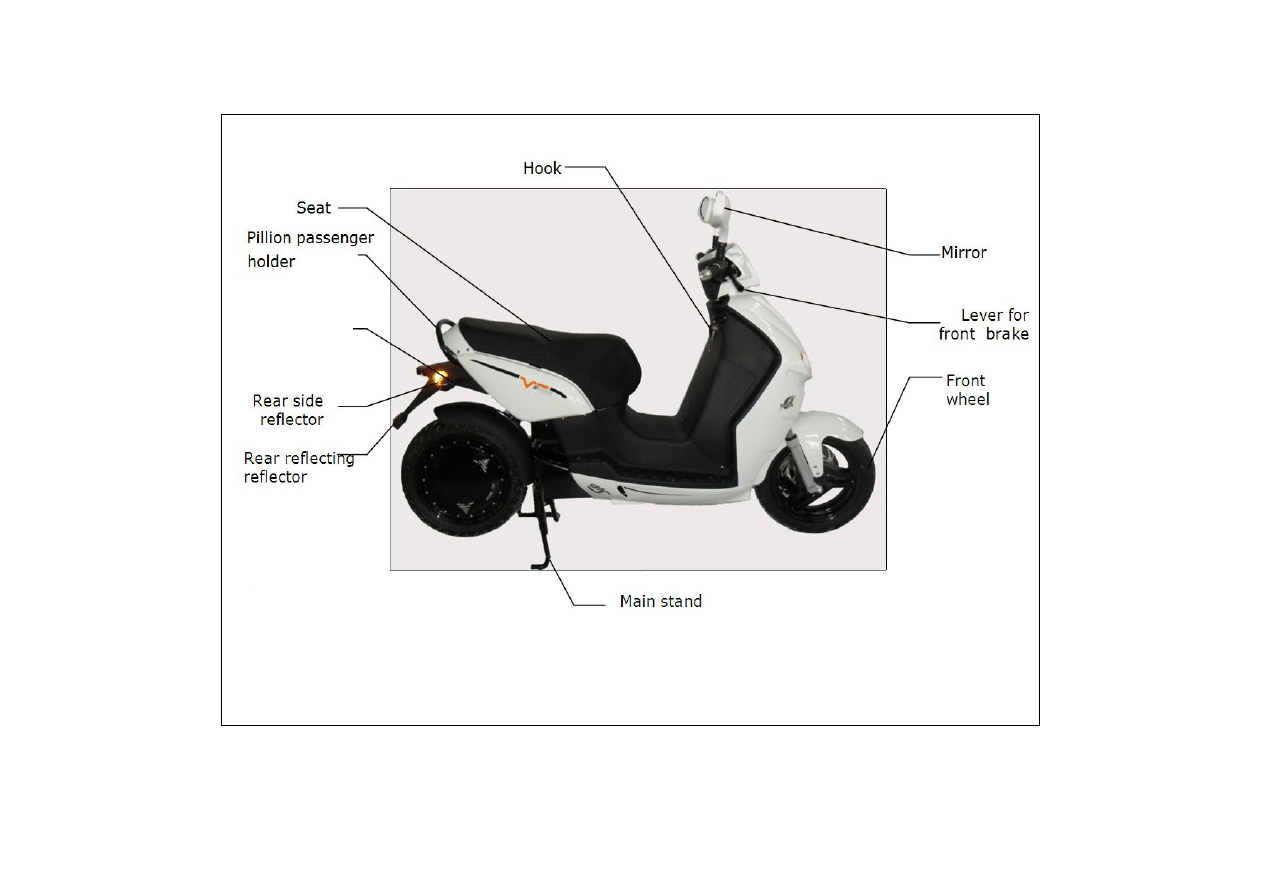
2. Attachments and Controls
Remark: This picture shows the 120S
Rear brake
Lever
Rear turn
Signal light
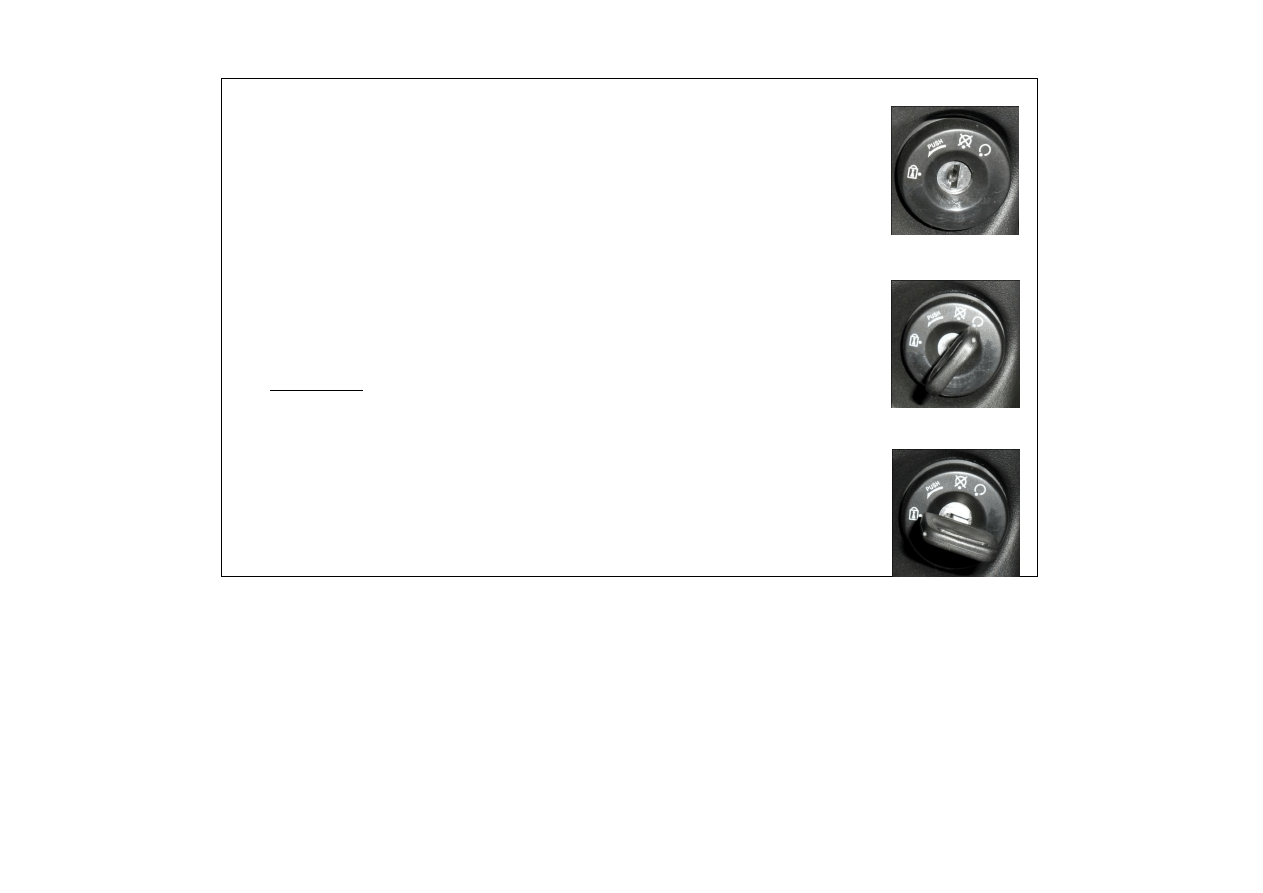
2.1 Ignition switch
Possible switch positions:
OFF position:
All functions off
Steering lock not engaged
Scooter can be moved
Work on the scooter is possible without risk
Key in the ignition and in “Drive” position:
All functions are ready for use
Scooter is ready for drive
In this position, the key cannot be removed
Warning: No engine noise!! Throttle active!!
Steering lock in position, “Handlebar locked”:
Turn handlebar to the left until it stops
Press the key one time inside and release (key moves out by
itself), now turn key to the position, "Handlebar locked" and
remove key
All functions are turned off
Scooter has limited movement
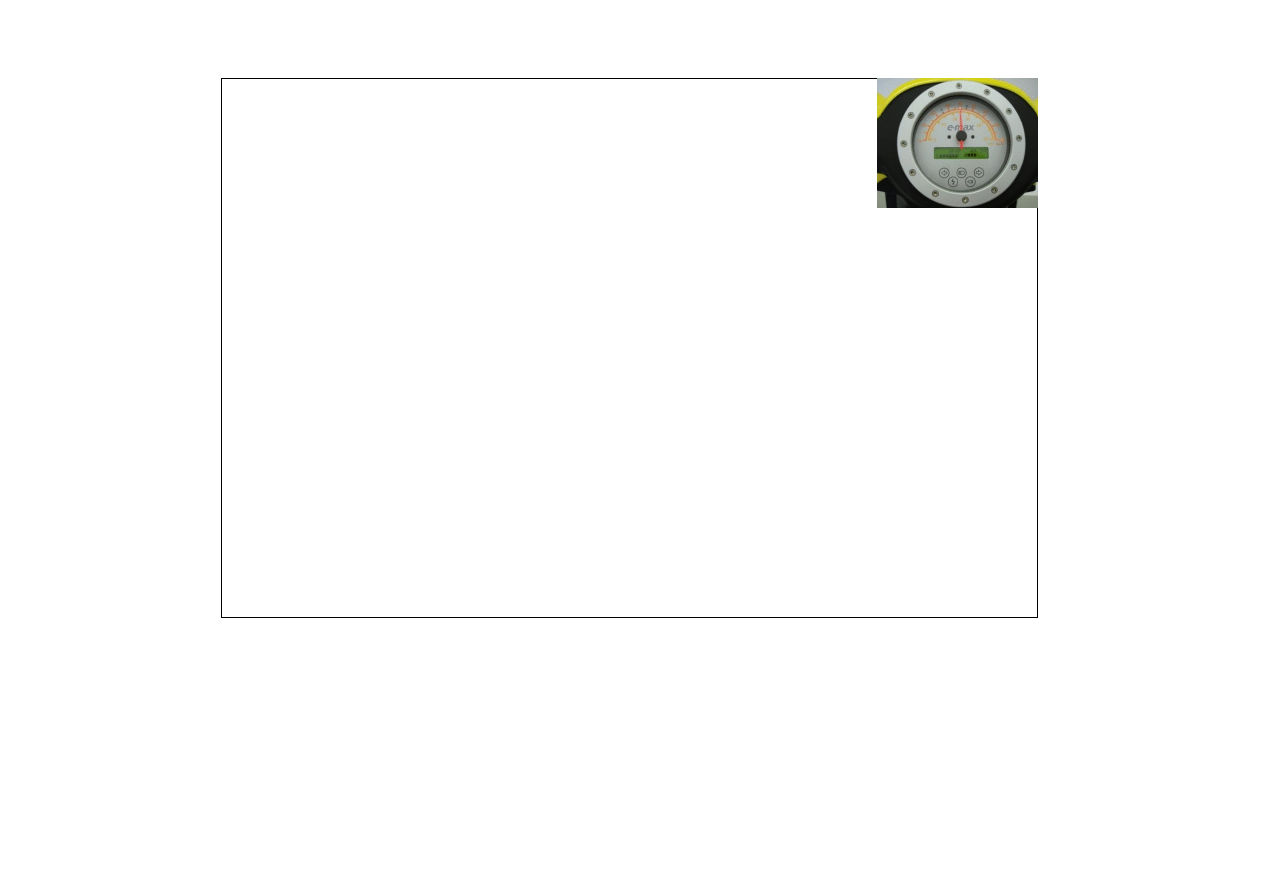
2.2
Speedometer / LCD Display
After being switched on, a welcome text appears (if activated) in the display.
In case of a malfunction: see 3.4 for the respective information. As soon as this
has disappeared and no further malfunction notification appears, the scooter is
ready for use.
Symbols in the display:
KmP:
Trip odometer function: pressing the mode switch longer than 3 seconds sets it to zero
KmT:
Total kilometre function: a short press on the mode switch changes the display to the current
battery Voltage
V:
Display for the current battery Voltage: a quick press of the mode switch changes the display
to the total kilometre function
E
: Battery capacity, max. 6 fields. When only one field is still visible, max. 2-5 km range
A
: Current power consumption, max. 6 fields (120S no such function, it’ll show the messages
below).
For 110S and 120S only:
Normal: Default status when turn on scooter. Moderate power consumption and acceleration, and
moderate vehicle speed and mileage. Recommended for level ground.
Max:
Greater power consumption and excels in acceleration. Under this mode, the vehicle speed is
faster while the driving mileage is shorter. Recommended while overtaking vehicle or driving
uphill.
Eco:
Minor power consumption and slower acceleration with extensive driving mileage.
Recommended while battery power is insufficient or driving a long distance.
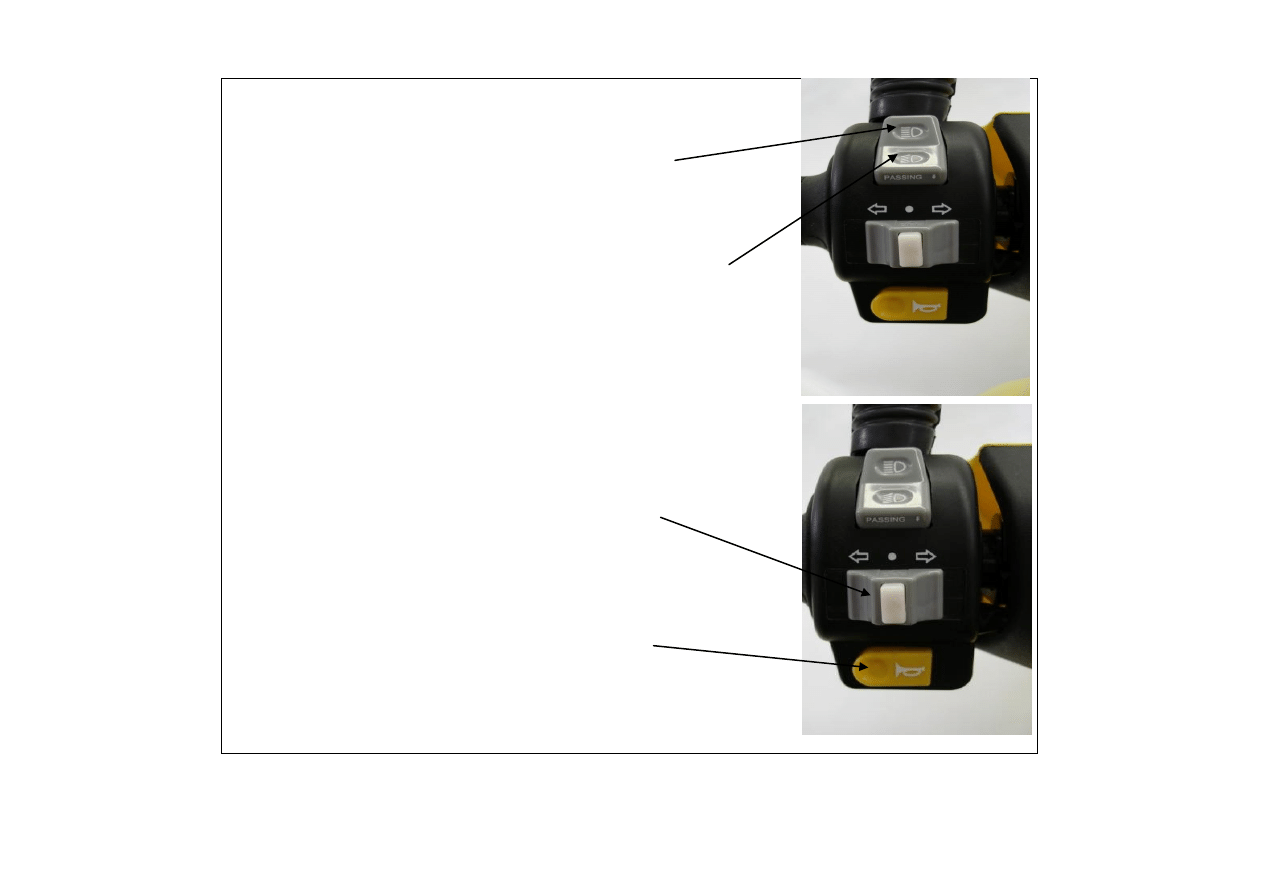
2.3
Left Switch Unit
2.3.1 High Beam switch
Position 1:
When the low beam is switched on, press the switch down will
activates the high beam as long as pressure is applied
The blue high beam LED is displayed on the speedometer
Position 2:
When the low beam is switched on, pressing the switch up
switches the high beam on permanently
The blue high beam LED is displayed on the speedometer
2.3.2 Indicator switch
Setting indicator:
Slide the switch to the left or right switches
on the indicators
Audible signal
Turn off indicator: press white button
2.3.3 Horn
Pressing the yellow switch sounds the horn
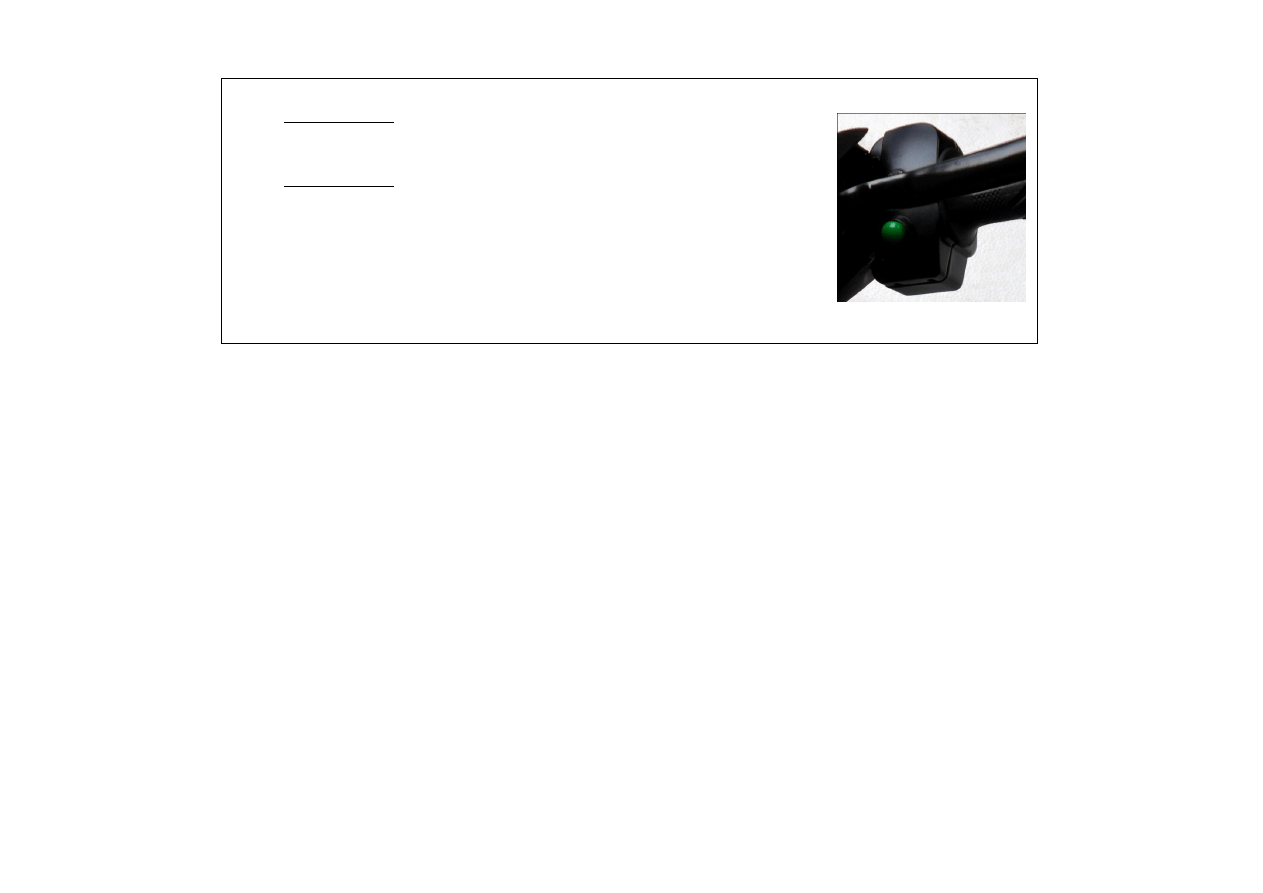
2.3.4 Reverse switch
Forward drive:
Release the Reverse switch, normal position
Reverse drive:
While pressing the Reverse switch turn the throttle to drive
backwards.
The maximum reverse speed is limited to 3 km/h.
Between forward and reverse drive the scooter must be stopped for
0.5 sec. to drive in another direction.
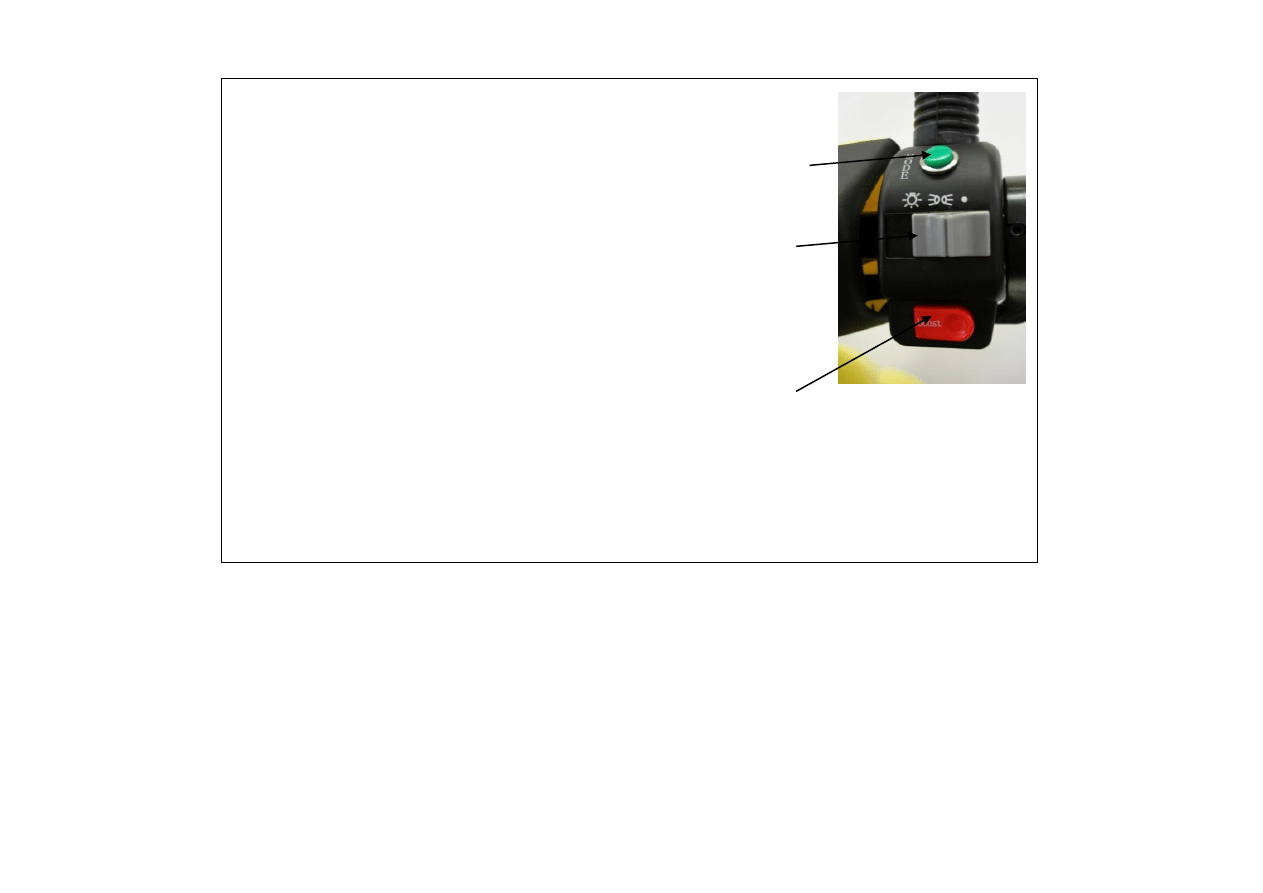
2.4 Right switch Unit
2.4.1 Mode Switch
Short press: Display in speedometer changes from trip odometer
(KmP) + battery voltage to total odometer (KmT) + KmP
Hold for min. 3 seconds: Trip odometer is set to 0 km
2.4.1 Light Switch
Right position: All lights are switched off
Middle position: Front parking lights, rear lights and
speedometer illumination are switched on
Left position:
Parking lights, low beam/high beam, rear lights and
speedometer illumination are switched on
2.4.1 Boost Switch
90S
A single press will increase power but not maximum speed
Active for 60 seconds, then it must be pressed again (if required)
Is only effective when the scooter is driving at a minimum of 1.5 km/h
Can also be pressed when standing still, then power is increased when the scooter reaches a
minimum of 1.5 km/h
Frequent use decreases the range
110S and 120S
Press boost switch can switch among Normal, Max or Eco mode.
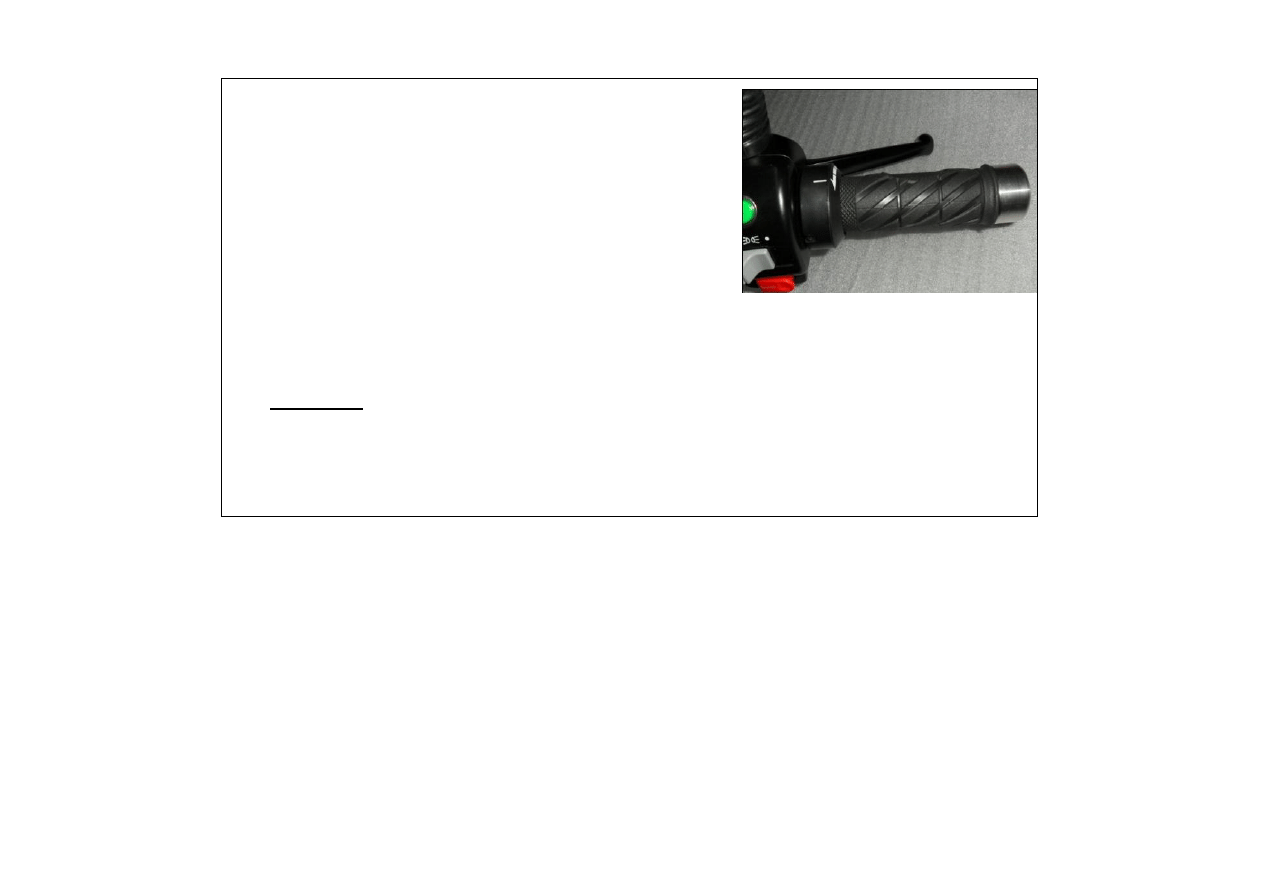
2.5
Throttle
Turning the throttle changes the speed.
Avoid turning it too quickly for a smoother ride
If the throttle is not used, a safety function will
switch off after 180 seconds when the key position is in
“Drive”
To activate:
Turn the throttle a full turn and then use it normally
or
set the key switch to “Off” and back to “Drive”.
Warning:
In the “Drive” position the throttle is active immediately!!
There is no engine sound when stopped!!

2.6
Seat lock / storage compartment
To open the seat, put the key in and turn
To lock, lower the seat and press down until it
snaps into place
Never put keys in the compartment and then
close the seat
Max. load in the compartment is 5 kg
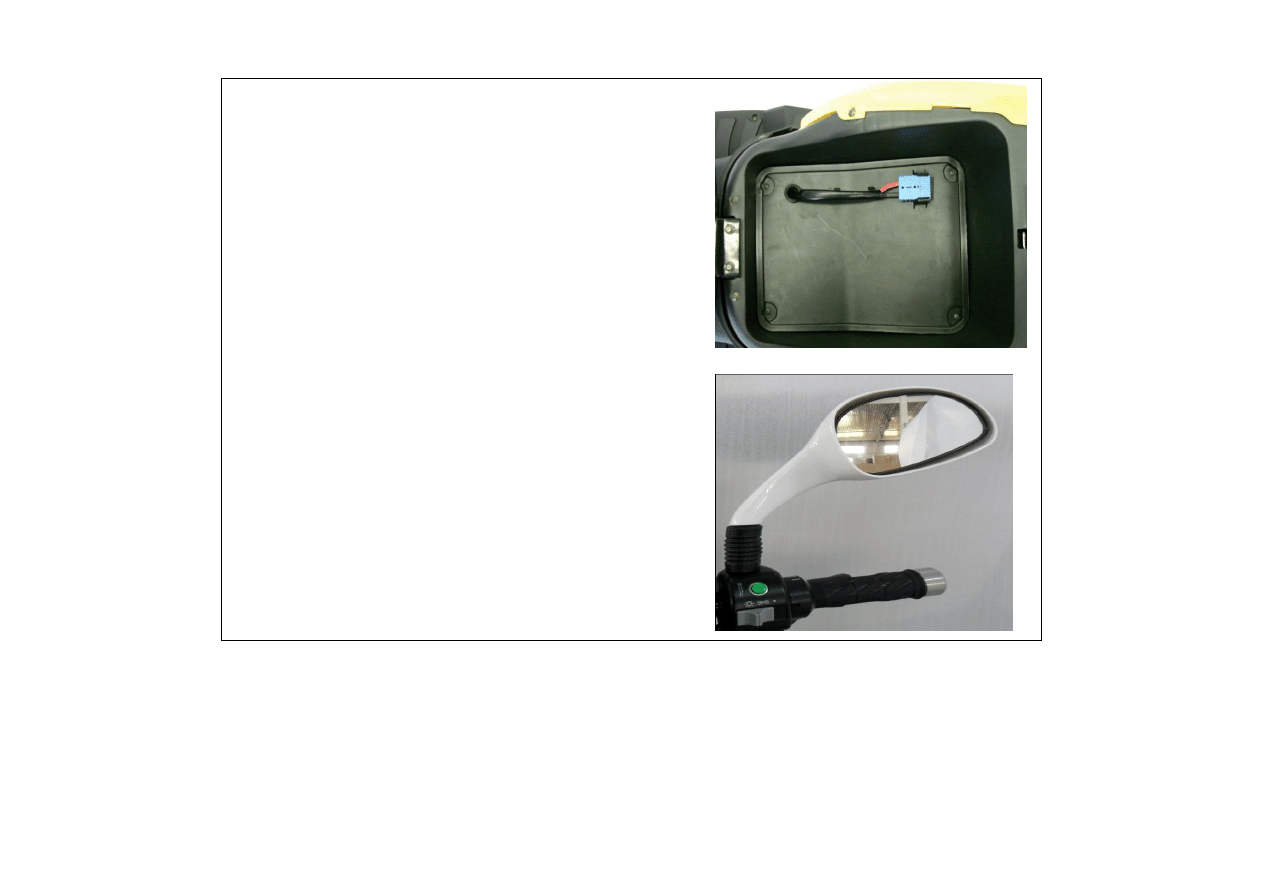
2.7
Charging Plug
The charging plug is located in the storage
compartment (to open compartment see 2.6)
After charging return the plug to its specially
designed holder
After charging the charging plug and charger
must be disconnected!
2.8
Mirror
Before riding, ensure the mirrors are adjusted
correctly
Fine adjustment is possible by moving the mirror
inside its plastic casing
For safety clean the mirrors regularly!
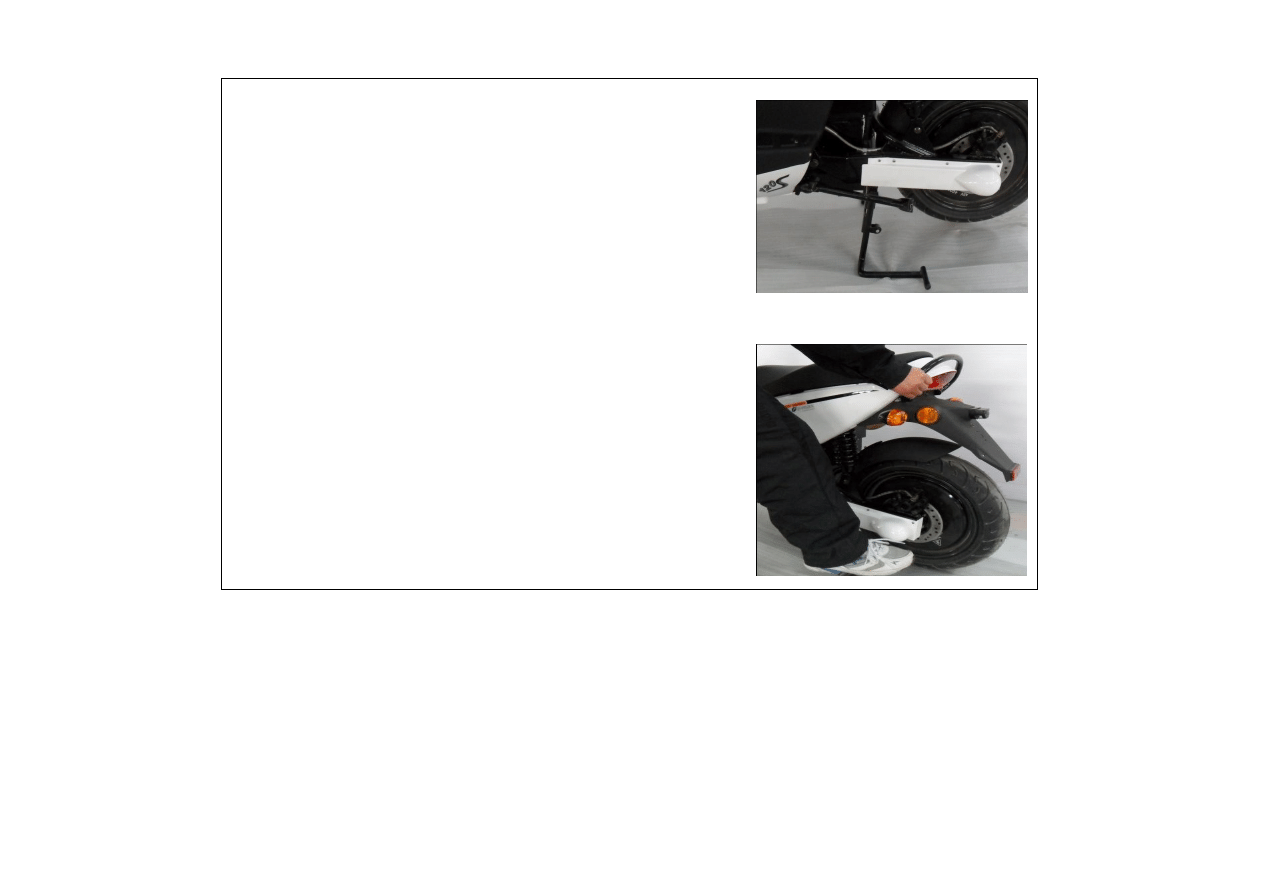
2.9
Centre/Main Stand
The main stand holds the scooter in an upright position
Use the main stand
for a long stop
when the ground is too unstable for the side stand
for servicing
Placing the scooter on the centre/main stand
Grasp the passenger holder with your right hand as
indicated
Hold the scooter with your other hand on the left handle
bar grip
Place your foot on the main stand and press it down
while lift up and move backwards the scooter with the
hand
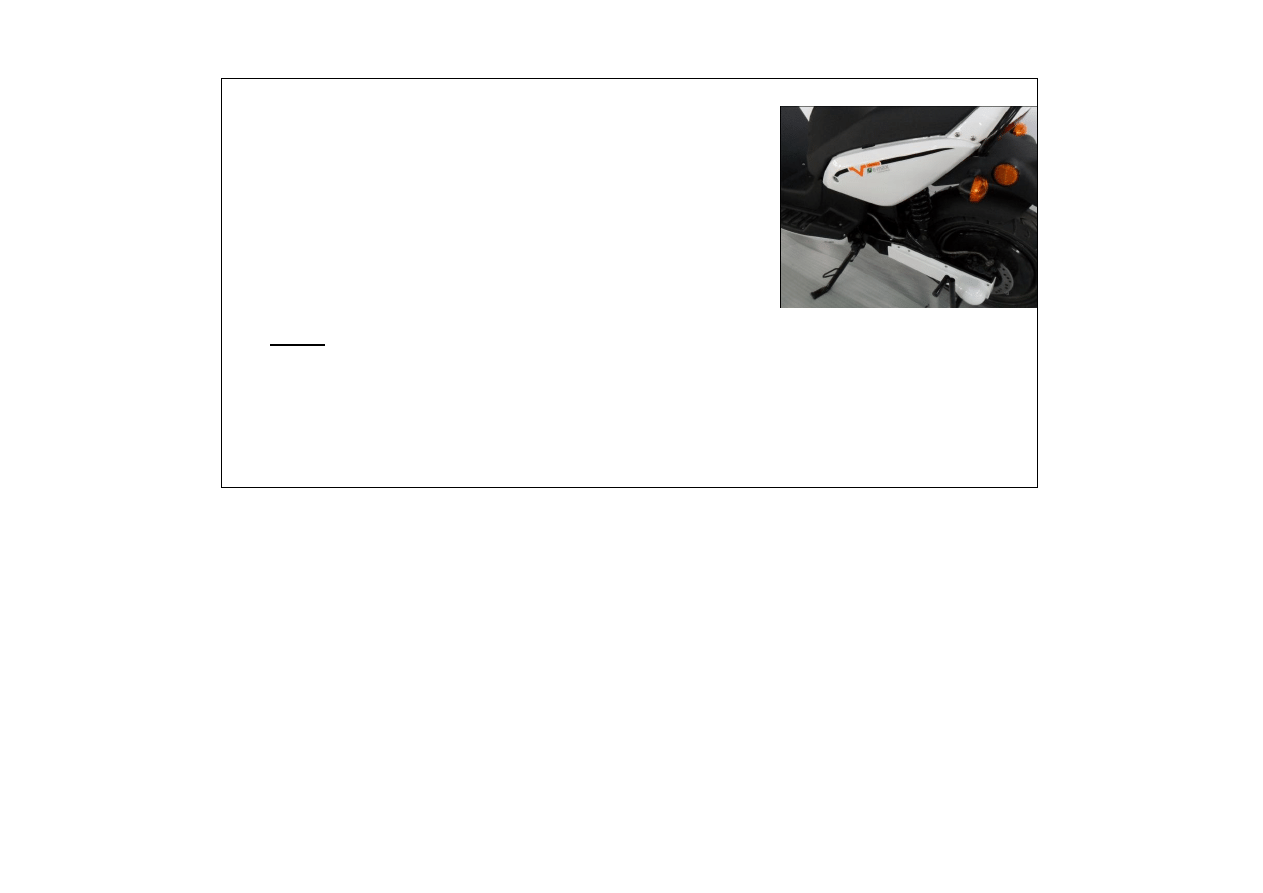
2.10 Side Stand
The side stand holds the scooter in a slightly angled position
Placing the scooter on the centre/main stand
Move the scooter to a firm surface
Fold out the side stand with the right foot and
To fold the stand in, set the scooter upright and using your
right foot, return the side stand into place out the side stand
with the right foot and
Note:
When the side stand is out and the key is in position “Drive”
the throttle is disabled
following message appears in the LCD: “Side stand out”
and the orange warning LED is on
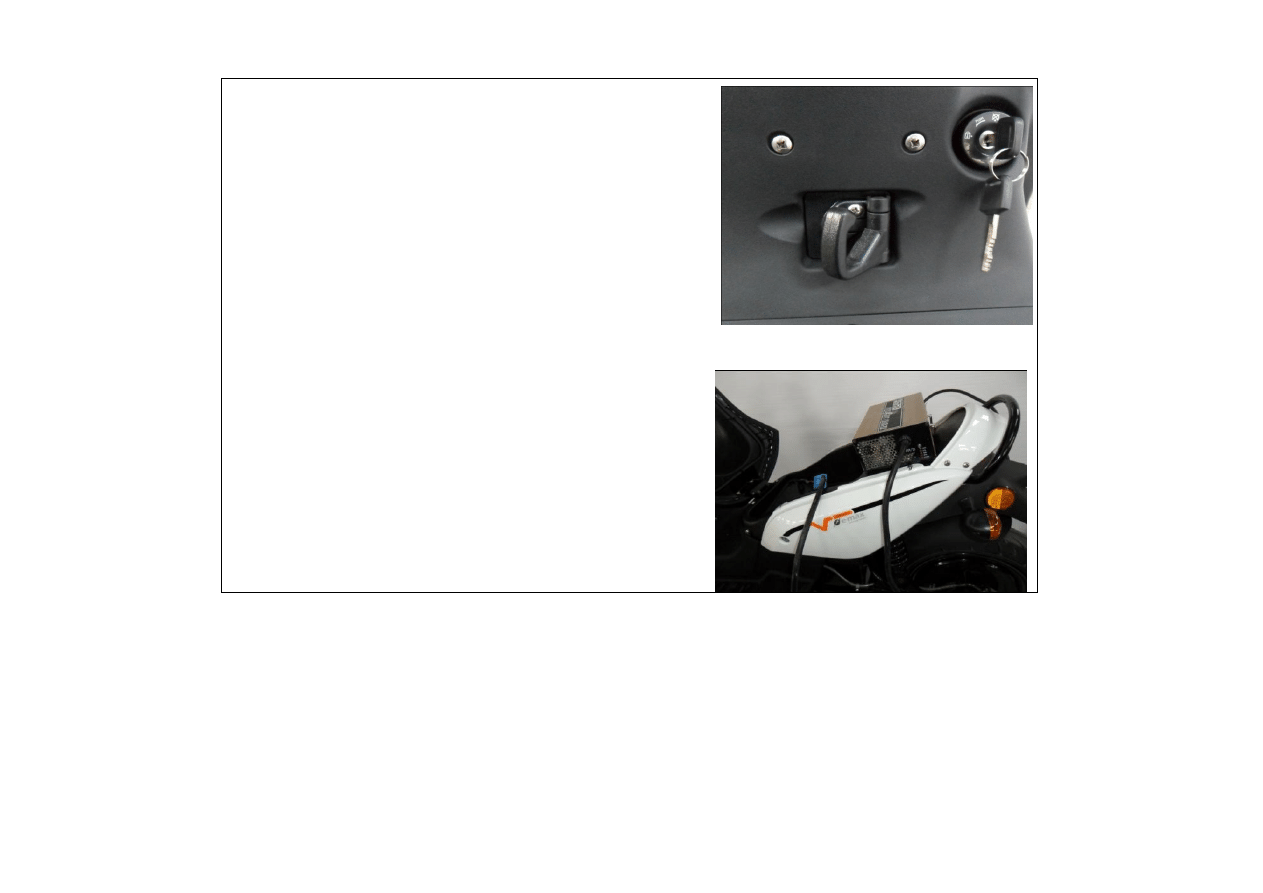
2.11 Hook
To use the hook, turn to the right and fold out
A load of up to 3 kg can be hung on the hook
2.12 Charger
Batteries are charged with the e-max charger
A safety plug with a 13-16A fuse is needed for the
connection
It is not possible to over charge the batteries
A 500W (90S) or 1000W (110S) charger is always
included in the delivery

Note:
When the charger is connected
do not turn the key switch to the “Drive” position
be absolutely certain that the charger is not connected when using the scooter
Charging the battery while its temperature is more than 50℃ may result in deformation of the
battery. The same situation could also happen if the battery is kept in an environmental
temperature over 50℃.
Charge scooter every 3 months if they are in storage or unused
Don’t park scooter directly in sunlight.
The scooter should not be used until 70% has been reached
Frequent charging of the battery increases its life significantly
Warning:
Only use e-max charger or warranty will be voided
When outside temperature lower than -5℃:
Move scooter to a place with higher environmental temperature than -5℃, Wait 1-2 hours until
scooter warms up after driving or parking outside, then charge the battery in a place with
environmental temperature higher than -5℃.
When outside temperature higher than 25℃:
Wait 1-2 hours till scooter cool down after driving or parking in the sun, then charge the
battery in a place without direct sun and temperature lower than 35℃.
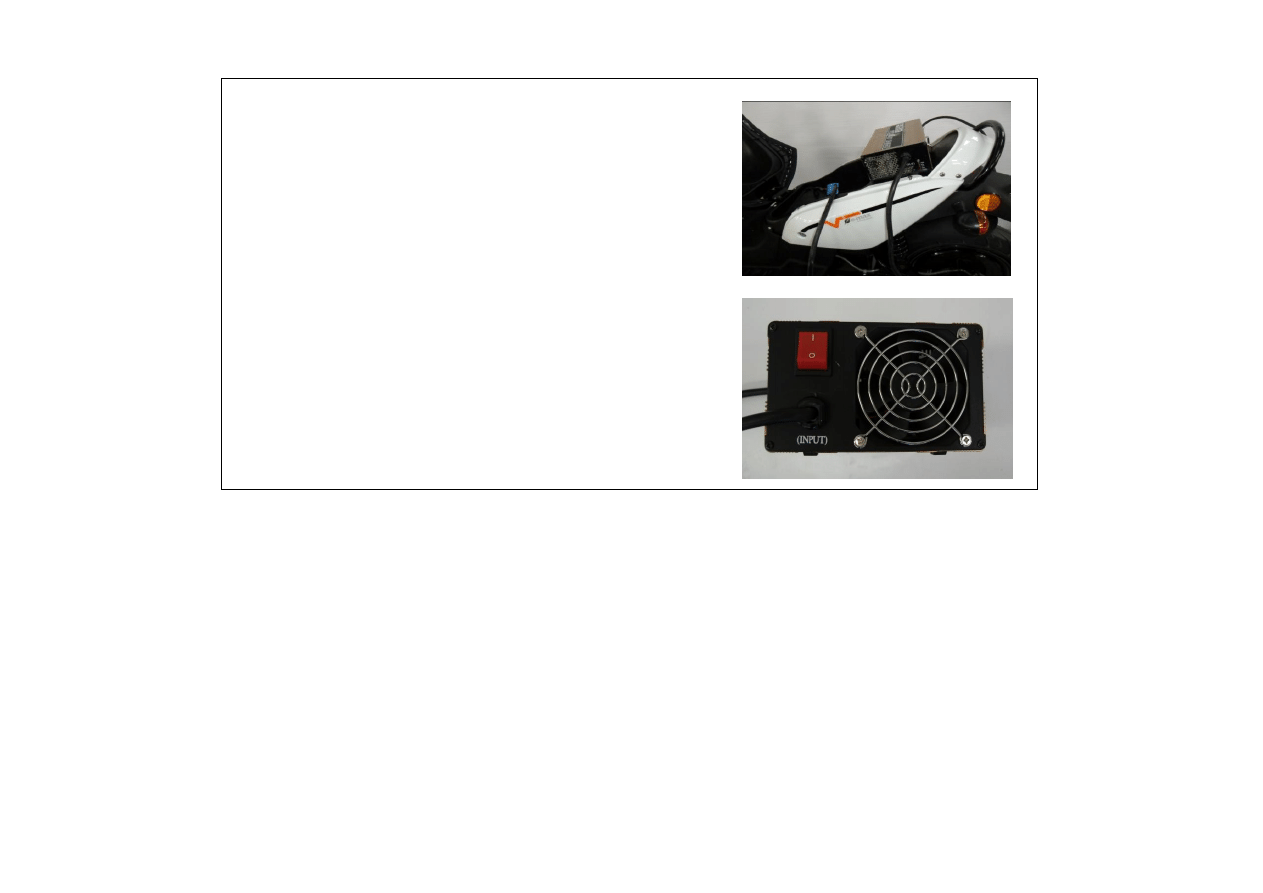
Connecting the charger:
Open the seat as described in sections 2.6 and 2.7
Take the blue charging plug out of the holder and
connect the charger as seen in the photograph
Note:
The plug only fits in one direction, therefore it is not
possible to connect it incorrectly
Connect the charger to the mains
Starting charge process:
Press the switch on the charging unit to position 1
The fan will start and the respective LED of the battery
charge level will be displayed
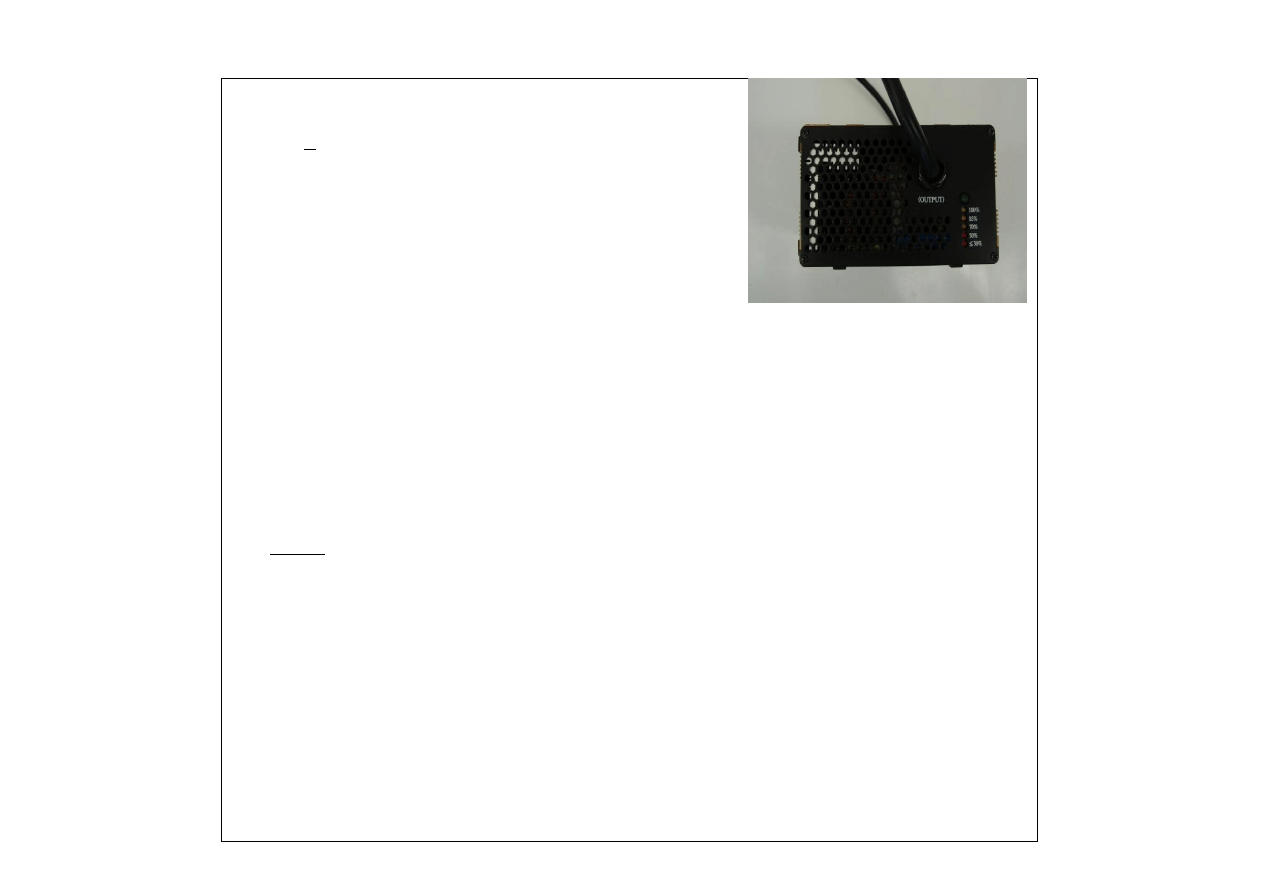
LED displays:
<30% Battery has less than 30% of its capacity
50%
Battery has 50% of its capacity
70%
Battery has 70% of its capacity
85%
Battery has 85% of its capacity
100% Battery has 100% of its capacity after finishing
the pulse charging process (fan stays off
permanently)
Charging Times:
500W charging unit (included in delivery of 90S):
30-100%
approx. 3 hrs
100%
approx. 1.5 hrs
1000W charging unit (included in delivery of 110S):
30-100%
approx. 3.5 hrs
100%
approx. 1.5 hrs
Note:
When the 100% LED lit the charger will start the “Impulse-Charging” procedure. The fan starts
and stops frequently. This process “balance” the batteries to the same voltages. This process will
never stop and the user can stop it by turning off the power switch of the charger.
Running in this “Impulse-Charging” over night is not a problem. Otherwise the charger should not
be connected to the scooter for more than 2 days.

3.
Malfunctions
For the malfunctions described here, we assume that only the end components are the cause of
the malfunction. If the fault still occurs after the end component has been replaced, then it is
necessary to pay a visit to your dealer.
3.1
Lights
3.1.1 Indicators
If a lamp is faulty, then the indicator frequency is twice as fast.
Front indicator bulb: Should only be changed by the dealer. It is necessary to remove the main
panels!
Rear indicator bulb: Unscrew and remove the cross-head screw from the indicator cover. Replace
the faulty bulb (12V, 21W).
3.1.2 Front lights
Should be changed by the dealer only. It is necessary to remove the main panels!
3.1.3 Rear light or brake light
Unscrew and remove the cross-head screw from the rear light. Replace the faulty lamp (12V,
5/21W).
3.1.4 License plate lighting
Unscrew and remove the cross-head screw from the license plate lighting. Replace the faulty lamp
(12V, 5W).

3.2
Tyres
The air pressure can be checked and adjusted if necessary at any service station.
Normal air pressure: 2.8 bar
If the tyres are worn or faulty, they may only be changed by the dealer.
Note:
Too low air pressure or worn tyres may affect handling and range!
3.3
Brakes
Squealing noises while braking indicate worn brake pads or that there is a foreign object (e.g. a
stone) in the brakes.
In this instance contact your dealer.

3.4
Malfunction messages in the speedometer display
Display Text
To overcome this problem:
Accel protection
at Power On
Release accelerator and turn key switch to “Off”
and then to “Drive”
Battery empty
recharge!
Batteries are empty and must be charged
immediately. Range of approx. 2-3 km with
automatically reduced power (max. 660W).
-- Warning --
side stand out
Fold side stand in
Error
high temperature
Electronics are too hot. Drive on carefully
Stop scoter
high temperature
Electronics are too hot. Wait until electronics
have cooled down and the display shows normal
conditions
Stop scooter
battery empty
Driving is impossible. Battery must be charged
With all other messages that appear, turn the key switch to "Off" and then turn it back to "Drive".
If the message remains, then a visit to the dealer is necessary.

4. Vehicle maintenance
All parts of a motorbike are equally at risk of corrosion because of aggressive pollutants in the air and
from the effects of salt on the road. It is the responsibility of the user to adequately protect the
vehicle from these factors. This will help to maintain the value of the vehicle and any warranty
claims.
Clean painted chassis parts with finish restorer and treat the rubber parts with special rubber
care products
Clean the vehicle regularly (do not use a high pressure cleaner)
Clean aluminium parts with a protective spray (e.g. Motoplast) in order to prevent oxidation.
Carefully remove existing spots of corrosion on aluminium with appropriate steel wool containing
soap
Always oil or grease frame and metal parts. This reduces corrosion
Never remove insects with an insect sponge or any similarly hard object
A vehicle that is constantly parked outdoors must be covered with a protective covering in order
to prevent weathering of painted panels, as well as to prevent cracking of seats and other plastic
parts
Do not use a high pressure cleaner!!
Water particles could lead to contact problems in the electronics
Seats, instrument panels, indicators, rear light and weather protection screens as well as
hardened dirt and insects are to be cleaned with an insect remover, not with an insect sponge as
this can result in scratches

Date, Signature, Stamp
Authorizied “e-max“ Dealer
5. Shipment Inspection
The following inspection work was carried out before delivery of the vehicle to the
customer:
charge batteries (note battery guidelines) and check contacts
check tyre pressure and correct if necessary
check all main screws for the stipulated torque
check screws, nuts and fastening points
check motor mountings, stand mountings, suspension struts, fork and steering-head bearing
check the functioning of the front and rear wheel suspension
check that all operating parts are in working order
check lights / headlight setting
check directional stability
check front and rear brakes
test drive
6. Vehicle delivery
Vehicle identification number:
Date of delivery:
90S 110S 120S 25km/h 45km/h 65km/h
Dealer Number:
Name:_________________________________
Street:
______________________________
City: __________________________________
Postcode: ______________________________
Telephone: _____________________________
Email:
______________________________
This document is the foundation for the processing of warranty applications. Warranty applications
cannot be processed if warranty documents are not filled out or are incomplete!
Day
Month
Year
Dealer Stamp:

7. Warranty Information
1. Liability for warranty cases is determined by the legal regulations beginning at the time of
delivery to the end user (two years)
2. Defects that are not reported to an authorised VMOTO / e-max dealer within this time period
are not subject to warranty claims
3. Wearing parts, such as glass panes, light bulbs, tyres, brake discs, brake pads are none
warranty parts
4. VMOTO Australia, subsequently referred to as VMOTO, shall decide whether faulty parts will be
replaced or repaired
5. There is no warranty claim if
a) the end user has treated the vehicle contrary to regulations, especially by overloading the
vehicle
b) the end user has had even one of the inspections stipulated in the customer service check
book or a repair performed by a workshop that is not authorised by VMOTO
c) the vehicle has been modified or changed in any way or fitted with parts that are not part of
the equipment of the vehicle that is expressly certified by VMOTO
d) the vehicle has been used in a motor sport event
e) the operating, maintenance, and service instructions stipulated in this manual have not been
followed
6. Agreements that differ from the above guarantee conditions must be confirmed in writing by e-
max to be effective
Date, Signature
Customer
I accept the guarantee conditions in this booklet.
The vehicle was received in perfect condition.
The dealer explained the guarantee conditions to me.
500 km inspection (+/- 100km)
performed at km ____________
Date, Signature, Stamp
Authorizied
“
e-max“ Dealer
8. 500 km Inspection
This inspection must be performed in a time period that is 100 km either before or 100 km
after being due, and no later than 1 year from the date of delivery.
charge batteries (note battery guidelines) and check contacts
check tyre pressure and correct if necessary
check all main screws for the stipulated torque
check screws, nuts and fastening points
check motor mountings, stand mountings, suspension struts, fork and steering-head bearing
check the functioning of the front and rear wheel suspension
check that all operating parts are in working order
check lights / headlight setting
check directional stability
check front and rear brakes
test drive
8.1 Inspections
This inspection must be performed in a time period that is 100 km either before or 100 km
after being due, and no later than1 year after the previous inspection.
Inspection
5,000 km
km: ____________
Date, Signature, Stamp
Authorizied “e-max“
Dealer
Inspection
10,000 km
km: ____________
Date, Signature, Stamp
Authorizied “e-max“
Dealer
Inspection
15,000 km
km: ____________
Date, Signature, Stamp
Authorizied
“
e-max“
Dealer
Inspection
20,000 km
km: ____________
Date, Signature, Stamp
Authorizied “e-max“
Dealer
Inspection
25,000 km
km: ____________
Date, Signature, Stamp
Authorizied
“
e-max“
Dealer
Inspection
30,000 km
km: ____________
Date, Signature, Stamp
Authorizied
“
e-max“
Dealer
8.1 Inspections (continued)
This inspection must be performed in a time period that is 100 km either before or 100 km
after being due, however and no later than1 year after the previous inspection.
Inspection
35,000 km
km: ____________
Date, Signature, Stamp
Authorizied “e-max“
Dealer
Inspection
40.000 km
km: ____________
Date, Signature, Stamp
Authorizied
“
e-max“
Dealer
Inspection
45.000 km
km: ____________
Date, Signature, Stamp
Authorizied
“
e-max“
Dealer
Inspection
50.000 km
km: ____________
Date, Signature, Stamp
Authorizied “e-max“
Dealer
Inspection
55.000 km
km: ____________
Date, Signature, Stamp
Authorizied
“
e-max“
Dealer
Inspection
60.000 km
km: ____________
Date, Signature, Stamp
Authorizied
“
e-max“
Dealer

8.2 Odometer
Odometer
changed
Displayed mileage is not the
total mileage!
km: ____________
Date, Signature, Stamp
Authorizied “e-max“
Dealer
Odometer
changed
Displayed mileage is not the
total mileage!
km: ____________
Date, Signature, Stamp
Authorizied “e-max“
Dealer
Odometer
changed
Displayed mileage is not the
total mileage!
km: ____________
Date, Signature, Stamp
Authorizied “e-max“
Dealer

9. Repair tips
Your e-max dealer would like to give you comprehensive advice and service your vehicle
competently.
Here are some tips for smooth proceedings if an inspection or repair has to be carried out.
1. Only let an authorised “e-max” dealer service your vehicle
2. Make an appointment with the workshop manager
3. Explain the work that has to be done on the vehicle or make a list
4. If something is unclear please talk to your workshop manager
5. Give clear instructions
6. Ask about the expected costs in advance
7. Leave your telephone number so that the workshop manager can reach you in case there are any
necessary questions
8. Set a price limit for any necessary additional work
9. Speak openly about any unclear items with your “e-max” dealer
10. Comply with the regular inspection intervals of your e-max vehicle

Operator’s Manual
Page
1. Safety tips ........................................................................................... 3 – 5
2. Attachments and Controls ...................................................................... 6 - 23
3. Malfunctions ........................................................................................ 24 -26
4. Vehicle maintenance ............................................................................... 27
5. Shipment inspection ................................................................................ 28
6. Vehicle delivery ...................................................................................... 29
7. Warranty information ........................................................................... 30 – 31
8. Inspections ......................................................................................... 32 – 35
9. Repair tips ............................................................................................. 36
Wyszukiwarka
Podobne podstrony:
cas test platform user manual
CARPROG Opel ECU programmer user manual
elm327 interface viecar obd2 bluetooth scanner user manual
autel power scan ps100 user manual
Chartplanner user manual
INPA User manual
all100 user manual
CARPROG user manual
FX2N 485 BD User's Manual JY992 Nieznany
mb sbc tool user manual
07 Altistart48 user manual
iphone user manual pdf
PRDM 0010 Upgrade user manual UPG 0001
TK105 GPS Tracker User Manual
ATDSK1118 User Manual
FX2N 232 IF User's Manual JY992D66701
Protek 3502C USER MANUAL
Administrator User Manual
NMS KD 0017 en V01 03 N3000 IMC and ISC User Manual
więcej podobnych podstron