By Armand O. Deblois
C
old stored fruits and vegetables
are the next best thing to fresh-
picked. Flavor and texture
change little and nutritional value
remains high. They keep for an amaz-
ingly long time. This and the great
variety which can be stored make it a
technique well worth using. Compared
to canning, and even to freezing and
drying, little is involved in prepara-
tion. This time savings greatly
increases the ability to retain valuable
produce. By cellaring a large percent-
age of the harvest, these other more
expensive or time consuming methods
can be reserved for where each is truly
superior for a particular finished prod-
uct—sweet corn frozen on the cob,
canned relish, and spicy beef jerky,
for example.
Cold storing also lengthens the time
span in which foods can be processed
for preservation by the other methods.
Fruits and vegetables can be moved at
leisure from cellar to dryer or canning
kettle and to the freezer as this space
is vacated. Even if you don’t garden,
cold storage can still be used to take
advantage of low prices of the autumn
cornucopia at local farms. Or better
yet, it can provide an opportunity to
benefit by participating more exten-
sively in community supported agri-
culture. And as a bonus, we will see
how certain roots (including the noble
asparagus) can be tricked into produc-
ing delectable sprouts in the dead of
winter.
A properly designed and well built
root cellar is a marvel of appropriate
technology. It soon returns its cost—
and will ultimately return it many
times over. However, in the begin-
ning, the problem of the initial invest-
ment can be the main drawback to
opting for a walk-in unit. Many of us,
therefore, have for a time resorted,
with varying degrees of success, to the
traditional pit/mound storage.
And even after having built a full-
size walk-in facility, pits are still often
useful in handling the overflow of a
bumper crop. When properly done,
their contents will not freeze (except
in the far north or at great elevation)
in even the coldest weather. Over
most of the northern United States and
southern Canada the temperature
inside tends to average between 50
and 55 degrees F., being moderated by
the earth below frost line. This, how-
ever, is not nearly cold enough to pro-
duce the maximum possible storage
life for most kinds of produce which
do best from just above freezing up to
40 degrees or so. It is also impossible
with the old style “squirrel job” to reg-
ulate humidity or add warmth to
counter extreme cold.
Other disadvantages of the tradition-
al pit are the difficulty of access after
a rain and hard freeze or a heavy
snowfall, and having to take all of the
contents of a particular installation at
once due to the near impossibility of
safely re-closing the mound under
these conditions. All of these limita-
tions are overcome by this new devel-
opment.
Pit storage
The crux of the system is three fold:
1. A vertical wooden duct (Figures
1 and 2) around which the pro-
duce is arranged
2. The produce contained in sacks
attached at intervals along a rope
(Figure 3)
3. A well box (Figure 4) supporting
an access hatch several feet
above ground level.
The central duct provides several
key features. It serves variously to:
(a) introduce cold outside air to the
bottom of the pit when the tem-
perature must be lowered
(b) allow the installation of a hot or
cold object when the temperature
must be adjusted
(c) admit a cloth sack containing a
moisture absorbing, desiccant
material to reduce humidity
(d) channel water to the interior
when humidity must be
increased, and
(e) to permit the temporary place-
ment of a thermometer and
hygrometer to monitor these
variables.
The sack and rope arrangement
allows easy access to a small amount
of produce for consumption, or effi-
cient removal and replacement of the
entire contents for inspection. Spacing
the bags a sufficient distance apart
along the rope permits hauling each
without having to disturb the one
behind it. A combination of two easily
tied and released knots readily fastens
sacks to the main line.
September/October 1997 Backwoods Home Magazine
61
Make a fully functional cold storage pit/mound
and enjoy your garden’s production all winter
SELF SUFFICIENCY
Figure 1. The vertical wooden duct
Construction of such a storage
involves digging a square hole encir-
cled at ground level by a shallow,
gravel filled, drainage trench,
installing the lower stage duct assem-
bly, positioning the well box, and
banking it with earth (Figure 5). At
storage time the produce is lowered
into place, the upper stage is posi-
tioned, and the space between the top
of the produce and the hatch is filled
with sacks of insulation fixed to a sep-
arate long line system. Except for
occasional inspection and monitoring,
that’s it.
Perfect control of such an installa-
tion—as with any root cellar—is a lit-
tle bit science and a whole lot of art.
But it’s really not all that complicated
or critical. The great advantages of
this decentralized storage are that it
permits tailoring conditions to perfect-
ly suit a particular kind of fruit or veg-
etable and provides a built in safety
factor against any errors. If detailed
records are kept to help in pushing the
limits from year to year, it becomes a
challenging as well as rewarding
hobby.
Managing your storage
You must watch the weather like a
hawk, taking advantage of cold nights
to lower the temperature prior to stor-
ing your produce in the fall. Moisture
may occasionally have to be added
during dry spells or regularly in very
dry climates. This applies to all but a
few varieties which require dry condi-
tions. When these are stored, the hole
should be lined with plastic sheet if
there is any appreciable amount of
ground moisture. In any case, this will
reduce the amount of desiccant which
must be used. These sacks can be
installed as necessary to remove the
moisture inevitably brought in by the
small amount of air which must be
allowed to circulate. This air is needed
to provide oxygen for respiration and
remove the waste products of plant
metabolism.
Heat may need to be added from
time to time to maintain the warmer
temperatures preferred by some vari-
eties or to keep the contents from
freezing in extreme cold. It’s also
important to inspect the contents every
couple of weeks to remove any “bad
apples.” Happily this system makes
short work of all this.
The cold storage treatment list in
Table 1 will give an overview of what
can be kept and for about how long
under specific conditions. Tips for
handling each and the general time for
planting and/or harvesting have also
been included. This schedule is for
areas where the first autumn frost
occurs around mid October and will
require adjustment north or south. The
varying number of days to maturity
for specific varieties of a given fruit or
vegetable must also be figured in.
Planting is timed so each crop is fully
mature but not overripe when stored.
This challenge is part of what makes
this game such fun. Each type of pro-
duce is put away as late in the season
as its tolerance for cold will permit.
The protracted harvest season extends
from the first light frost to just before
the ground freezes solid, and even the
onset of this condition can be post-
poned by heavy mulching. In any
case, nothing should be stored away
until after the weather has turned reli-
ably cold. Gardening for cold storage
extends your land’s potential by mak-
ing use of space vacated by early and
mid summer crops, and the later time
September/October 1997 Backwoods Home Magazine
62
Figure 3. Bags strung together that
are used to lower produce into—or
remove it from—your cold storage pit
Figure 2. Internal cutaway view of well
housing over the central duct
of sowing and reaping extends your
personal potential for satisfying work
at self-provision.
Preparing produce
A garden fork is the most efficient
tool for digging. Roots should be dug
and fruits picked in the cool morning
hours. The ground should be some-
what dry, this way there is less cling-
ing earth, and what there is can be
more gently removed without the need
for washing. Any remaining light
dusting of soil is harmless with final
washing being done just prior to cook-
ing. When circumstance necessitates
digging from wet ground, clinging soil
must be allowed to dry somewhat in
the shade before removal.
Sometimes, harvesting must
unavoidably be done later in the day.
In this case, everything should be kept
overnight in a cold sheltered place to
remove every possible degree of
remaining field heat before storage the
following morning. This is important
because warm produce will continue
to lose moisture even in a highly
humid environment.
As with most ventures, location is
important. Installations should be as
close as possible to the house for con-
venience, in well drained high ground,
and on the cooler north side of a large
sheltering object such as the house,
garage, shed, or barn. The opposite
and warmer south side would be a bet-
ter choice in the far north. Considering
location on a larger scale, any place
where the average winter temperature
is 30 degrees F. is ideal. However,
cold storage is still practical as far
south as to where the average is
around 45 degrees, but a shorter stor-
age life must be expected.
If you are new either to gardening or
to your area, statistics of first frost,
killing frost, hard freeze, and average
winter temperature can all be had
from the local weather bureau or agri-
cultural extension service. However,
these dates can vary due to micro cli-
mates produced by terrain, so your
own written records, or those of a ded-
icated gardening neighbor, will prove
more accurate. Another important
consideration, the depth of the water
table, can be provided by a local well
driller. It should be at least ten feet
below the bottom of your excavation,
and the lower the better.
It is best not to store fruits and veg-
etables together because gas given off
by fruits can cause vegetables to ripen
sooner and sprout or blanch, and the
strong odor of vegetables can taint the
delicate flavor of fruits. Everything
should be handled gently and as little
as possible. Immediately trim tops to
prevent their wilting or drawing vitali-
ty from the roots. Beware of anything
sharp—things like the protruding ends
of staples, nails, wire and splinters, as
well as your own fingernails—that can
September/October 1997 Backwoods Home Magazine
63
Figure 4. A well box that supports an access hatch above ground level
Figure 5. Top view of the storage pit: a square hole encircled at ground level
by a shallow, gravel filled, drainage trench. The lower stage duct
assembly is installed, the well box positioned and is banked with earth.
damage your produce. And again, put
off the harvest as long as possible
while yet leaving a margin for the
unexpected. This is important mainly
because cold induces the concentra-
tion of sugars and starches thus
replacing water which would more
easily be lost, and so shorten storage
life.
The roots of the plants specified in
the cellar gardening list will produce
crisp, living sprouts for salads to com-
pliment the cooked vegetables of win-
ter meals. This a good way to make
use of specimens in some way not fit
for long storage or those going soft by
late season. After being packed close-
ly in soil in wooden crates or other
suitable containers, the roots are
exposed to freezing conditions as they
would be in a natural setting. When
later introduced to the warmer envi-
ronment of a cellar or unheated room,
this artificial spring will induce them
to sprout. Though not quite as vitamin
rich as when grown in light, they are a
welcome mid-winter treat. Some vari-
eties such as dandelion, usually on the
bitter side, are more mildly flavored
when sprouted in darkness, and
blanched witloof chicory is a real deli-
cacy.
The drawing figures 6 through 9
show how to quickly make a hitch at
any point along the main line for
attachment of the individual sacks.
The neck of each sack will be secured
by a short length of rope tied in a
millers knot as illustrated in figures 10
through 14. To tie this knot twist and
pinch the gathered neck of the sack
between the thumb and first finger of
your nonprimary hand. Hold about a
third of the rope as shown in figure
10, grasping the long end with your
other hand. Bring it around, temporar-
ily pinning it between the sack and the
heel of your other hand as in figure
11. Now reach back around and bring
the end of the line over to form the
first complete turn seen in figure 12.
In the same way make a second turn
as in figure 13. Then hook the rope
with the tip of your captured finger, as
seen in figure 13, and pull it through
this space far enough so that you can
bring it all the way out with your free
hand. At this point, snug it slightly
then release your grasp on the bag
neck as you grab the original rope end
with this hand. Finally both ends are
evenly pulled to complete the tie as
seen in figure 14. Each of these free
ends is now tied in a simple overhand
knot and it is these knobs that will be
captured in the hitch in the main line.
The long planks attached to the well
box serve to distribute weight over a
larger area. One or more shorter
planks on each of two access sides
help support the weight of a person to
prevent compacting most of the insu-
lating earth. In regions of extreme
cold it would be advantageous to mix
into the earth used for banking the
well box, some natural insulating
September/October 1997 Backwoods Home Magazine
64
Figures 6-14. Tying a main line hitch and making a millers knot.
Fig. 6
Fig. 7
Fig. 8
Fig. 9
Fig. 10
Fig. 11
Fig. 12
Fig. 13
Fig. 14
September/October 1997 Backwoods Home Magazine
65
Very Cold (32-40 degrees F.) and Very Moist
(90-95 % relative humidity (RH))
Beet: Keeps into March. Plant in late June or early July.
Harvest before severe frost. Cut tops one inch from bulb, do
not cut tap root.
Carrot: Keeps until late May or early June. Plant in late
June or early July. Harvest before the ground freezes hard.
Break off tops where they join the root.
Celeriac: Keeps until late March. Plant in late May.
Harvest before frost. Remove the long, fine rootlets but
don’t cut close to the main body. Trim the tops to one inch.
Celery: Keeps into January. Plant in late April or early
May. Harvest before severe frost. Keep roots moist.
Chinese cabbage: Keeps until late February. Plant in
July. Harvest before severe frost. Remove outer leaves.
Keep roots moist.
Horseradish: Keeps until April. Plant in May. Dig large
roots just before the ground freezes.
Kohlrabi: Keeps until late January or early February.
Plant in July. Harvest before severe frost. Cut off leaves
and root. Store only those bulbs three inches or less in
diameter.
Leek: Keeps until spring. Plant in April. Harvest before
the ground freezes solid. Keep roots moist.
Hamburg-rooted parsley: Plant as soon as the ground
can be worked, otherwise treat as carrots. Parsnip: Keeps
until June. Plant in May. Harvest after several good frosts
for best flavor. Dig carefully to avoid damage and get the
full length of the root.
Winter radish: Keeps until February. Plant in late July or
early August. Harvest before severe frost. Trim tops to
where they join the root.
Rutabaga: Keeps until February. Plant in late June or
July. Harvest before severe frost. Wax with beeswax to
retard drying.
Salsify: Keeps until March. Plant in May. Harvest after
frost for improved flavor.
Scorzonera: Treat the same as Salsify.
Turnip: Keeps until April. Plant in late July or early
August. Harvest before a heavy freeze, ideally choosing
those no larger than three inches in diameter. Cut off all but
one half inch of the tops.
Very Cold (32-40 degrees F.) and Moist (80-90
% RH)
Apple: Keeps until spring. Pick mature, firm, unblem-
ished, late ripening fruit.
Cabbage: Keeps until March. Plant in May or early June.
Harvest only solid, heavy, unsplit heads for storage. Pull
the heads roots and all and remove loose outer leaves.
Citrus: Keeps up to two months.
Cranberry: Keeps up to three months. Keep them cool
(36-40 degrees F) and moist.
Grape: Keeps up to two months at 40 degrees F. and
80% RH. Cut vine ripened fruit and spread one bunch deep
in trays.
Pear: Keeps until late December. Pick when mature but
not fully ripened, when skin first turns from green to yel-
low-green and fruit separates easily from the tree.
Potato: Keeps four to six months. Plant in late May or
early June. Harvest in cool weather up to six weeks after
the tops have dried. Cure for two weeks before storing by
spreading the tubers in a protected place where the tempera-
ture is 60 to 75 degrees.
Quince: Keeps until spring. Let ripen on the tree until
they turn yellow.
Cold (35-40 degrees F) and Dry (60-70% RH)
Garlic: Keeps until spring. Plant large individual cloves
at this time. Harvest right after the tops die back. Cure in
the sun for several days to harden their skins. Clip off roots
close to the bulb. Snip off the tops.
Onion: Keeps until spring. Plant in April. Harvest after
the tops have fallen over. Pull on a dry day and cure in the
sun for a week. Cut off the tops to a one inch stub and dry
in a shady place for another two or three weeks. Do not
store bulbs with a thick neck.
Nut: Cure nuts in a cool dry place for a couple of weeks.
Store in the shell to retard oxidation of nut oil.
Cool (50-60 degrees F.) and Dry (60-70% RH)
Winter squash: Keeps until spring. Plant in late May.
Harvest when the skin is so hard your fingernail can’t punc-
ture it. Cure in the sun for a couple of weeks to further
harden the rind, bringing them indoors in rain or frost.
Leave stems on or paint the scar and any abrasions with
beeswax.
Pumpkin: Treat like squash except for a dryer (70-75%)
relative humidity.
Sweet potato: Keeps until spring. Plant in early June.
Harvest as soon as frost has killed the vines. Lightly brush
the clinging soil after it has had a few hours to dry, handle
gently. Cure for two weeks in a warm place, covered with a
damp but well wrung out towel to retard moisture loss dur-
ing this process.
Cold storage treatment list

material such as straw or dead tree
bark. A mulch over this earth will pre-
vent erosion and add even more insu-
lation.
At storage time, as the sacks are
lowered, they must be manipulated
into position. A canoe paddle, used
gently, is the best tool for this job. The
produce sacks should come up no
higher than the top of the lower stage
of the duct, which should be at ground
level. Sacks of insulation, similarly
attached to a second long line, are
then stuffed into any space remaining
between the produce and the wall of
the excavation. The upper stage of the
duct must then be wedged into the
support structure created by the four
wooden tabs on the lower stage.
Generously beveling the inside edge
corners of these tabs will help guide
the upper stage into place. The
remaining insulation sacks are then
spiraled around into place until the
well is filled. The well box should be
constructed as tightly as possible, but
any slight gap between it and the lid is
desirable in order to permit a small
amount of air exchange. If you’ve
done too good a construction job, a
small diameter nail can be placed
between box and lid to provide this
gap.
A small hatch in the center of the lid
is handy for when it is only necessary
to have access to the duct for monitor-
ing or adjusting conditions.
Monitoring is done by installing a
small thermometer and hygrometer
attached to an old broom handle. If the
inside dimensions of the duct are just
greater than the diameter of a plastic
two liter soda/pop bottle, one or more
of these containing hot water is a con-
venient way to add warmth. The neck
is perfectly shaped for attaching a
cord. Tying each end of a double
length creates a convenient handle and
balances the jug. In mild winters these
same containers can be installed
frozen to lower the inside temperature.
When humidity must be reduced,
muslin bags containing ordinary cat
box litter (unscented) will do the job.
Another desiccating material, silica
gel, available at craft shops, although
more expensive initially, can be
reconditioned again and again by slow
oven drying. These sacks can be
weighted with a fist size stone to aid
installation. Also, for this purpose, the
inside surfaces of the duct need to be
sanded fairly smooth. When humidity
must be increased—a more common
condition—simply pour a small
amount of water down the shaft and
check on the effect the next day or so.
An aluminum foil pie tin filled with
sand and placed directly below the
shaft makes a good receptacle and
evaporator of this moisture. Four
racks made of wooden lath, of a size
to cover most of the pit bottom, will
keep the produce sacks raised a couple
of inches for good air circulation. One
final design detail, small homemade
wooden cleats, strategically located,
conveniently secure the various rope
ends.
As for the size of these installations,
a well box four feet square is a conve-
nient size when working with dimen-
sion lumber and requires an excava-
tion three feet on a side. Four feet is a
good hole depth and well box height.
This depth will reach below frost line
in most places and this height will,
even after being banked with earth
and mulch half way up, remain above
snow line in most winters.
Perforated plastic bags are best for
holding varieties which require high
humidity. The larger bread wrappers
can be pressed into service for quanti-
September/October 1997 Backwoods Home Magazine
66
Cellar gardening list
Asparagus: Dig large roots two or three years old from beds that need thin-
ning. Maintain at 60 to 65 degrees F. Keep well watered.
Beet: Use those that are misshapen or for some other reason are not good
candidates for long term storage and any found to be going soft later in the sea-
son.
Cabbage: Dig roots of plants that have previously been harvested. They can
still sprout many tasty leaves.
Carrot: Excellent salad material can be grown from deformed specimens.
Celery: Roots of plants that have already been harvested can still produce
continuously if only the outer leaves are picked.
Collard: Roots will produce a continuing supply of leaves.
Dandelion: Dig large roots and treat like Endive.
Endive: French or Belgian, also known as witloof chicory. Dig before the
ground freezes, taking care not to break the brittle root. Trim the tops leaving
only the central inch long, light green leaves. Shorten the roots to eight or nine
inches and pack closely in soil to the crowns. Harvest sprouts by cutting close
to but without damaging the root crown. A second and possibly a third harvest
can then be had. Maintain at 50 to 60 degrees F. They will sprout more readily
after experiencing several good freezes.
Kale: Roots that have been producing in summer will continue in winter.
Pick only young leaves as older ones become bitter.
Kohlrabi: Use misshapen or oversize roots.
Parsley: Harvest only the outer leaves of this nutritious garnish and contin-
ued growth will proceed from the center.
Parsnip: Treat like beet for a crop of edible sprouts.
Rhubarb: Must experience freezing before it will sprout. Dig strong, large
two- or three-year old roots that have not been harvested in the spring. Maintain
at 50 to 60 degrees F. Tender pink stalks will sprout in about a month. These
roots will yield a couple of pounds each. Never eat the leaves, they are toxic.
Rutabaga: These will produce salad material all winter long.
Turnip: Has the same potential as rutabaga.
ties of a few pounds each and for
small containers of insulation. They
can efficiently be ventilated to any
required degree by folding and re-
folding until only two or three inches
square and punched a half a dozen
times more or less with a leather
punch. The cheaper models costing
six or eight dollars are plenty good
enough for this use and can be bought
at many craft or hardware stores.
Roots of some varieties (cabbage,
leek, and celery), that need to be kept
moist, can be bagged in unvented bags
and secured with string or rubber
bands. Open mesh bags are best when
dry conditions are wanted. Each
bagged specimen should ideally be
separated by something like moss or
sawdust to cushion them. Best of all is
cattail down, plentiful and free for the
taking in the fall. These materials are
also used in the insulation sacks.
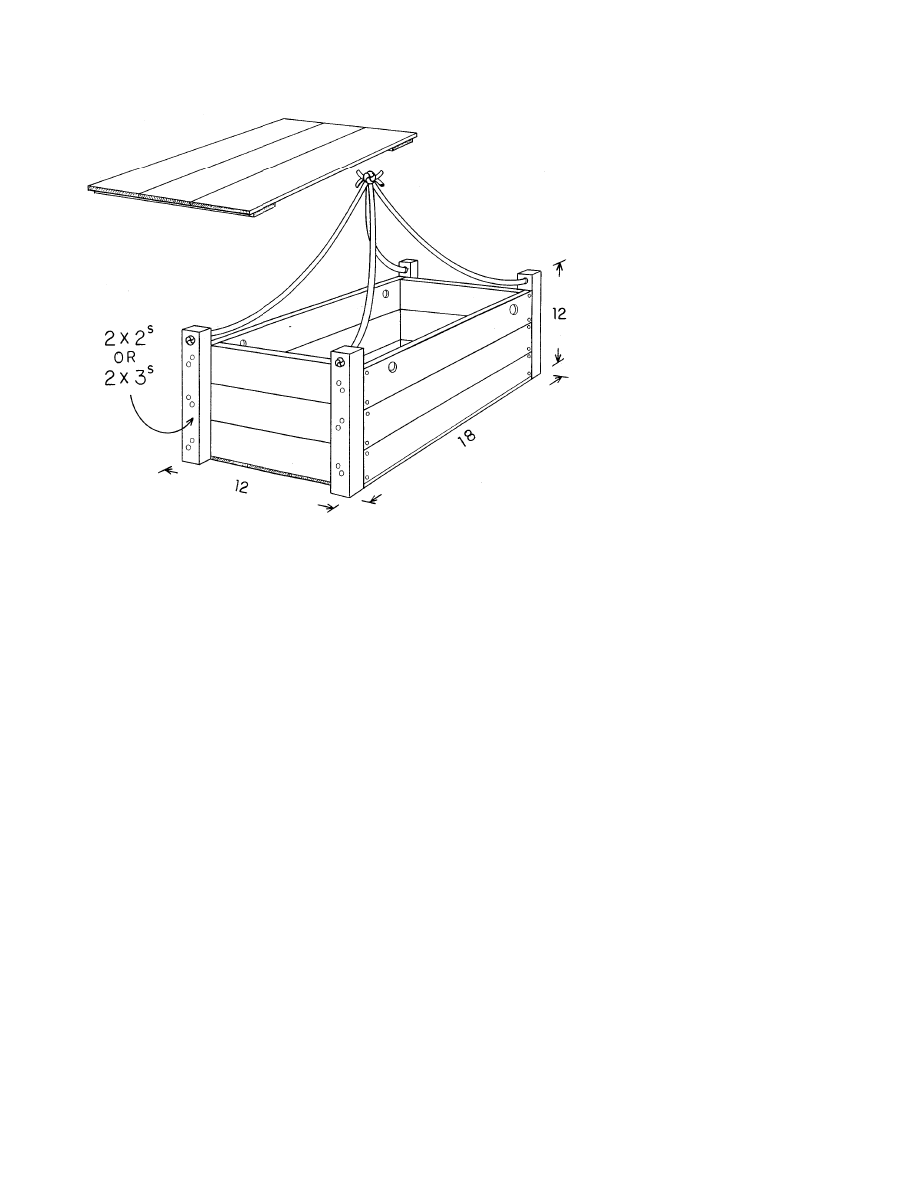
To hold roots for sprouting, four
wooden crates (Figure 15) can fit
between the struts supporting the duct
shaft. Like the sacks, they can be
stacked several tiers high on a long
line. Several holes high on the sides
provide ventilation. Braided nylon
rope is best for this application. It han-
dles and grips well. Quarter inch is
adequate for all but huge sacks of
heavy produce and three eighths is a
better choice for heavy earth filled
crates and much easier on the hands.
For the definitive word on cold stor-
age see the book Root Cellaring by
Mike and Nancy Bubel. It contains a
wealth of information including the
fine points of designing and building
full size installations.
∆
September/October 1997 Backwoods Home Magazine
67
Figure 15. Stackable crate for large items or sprouting
Wyszukiwarka
Podobne podstrony:
conceptual storage in bilinguals and its?fects on creativi
How To Make It And Enjoy It
the effect of interorganizational trust on make or cooperate decisions deisentangling opportunism de
Revealing the Form and Function of Self Injurious Thoughts and Behaviours A Real Time Ecological As
Example CV 6 Functional CV focus on qualifications and skills
Goel, Dolan The Functional anatomy of H segregating cognitive and affective components
Functional similarities between computer worms and biological pathogens
How to use format function built in U100version emulator and
Do It Yourself Make And Toke Your Own Bongs!
Ian Jackson The Economic Cold War, America, Britain and East West Trade, 1948 63 (2001)
Egelhoff Tom C How To Market, Advertise, And Promote Your Business Or Service In Your Own Backyard
the weather and what your body does, Wiedza, Anielski
!Program Guide Mind, Body and Spirit – Your Life in Balance!
How to Persuade and Influence Your Managers Colleagues and Employees
How to Learn Any Language Quickly, Easily, Inexpensively, Enjoyably and On Your Own
Danny Kopec, Hal Terrie Test, Evaluate and Improve Your Chess U S Chess Press (2003)
Raise Your Vibration and Shape Your Reality
The Art of Seeing Your Psychic Intuition, Third Eye, and Clairvoyance A Practical Manual for Learni
więcej podobnych podstron