
Headboard Fit for a King
It's not an easy task to find the perfect headboard for your king-size bed. Retail
stores often offer limited choices for such a large size, and the price tags on these
items can be frightening. But with this clever use of a mantelshelf, you can create
a customized headboard to fit any bed and any style. Lowe's is happy to provide
this information as a
(Note: This headboard is designed to fit a 76" wide king-size bed. It can be
altered to fit any width; mantels can be special ordered in many sizes from the
millwork department. Our headboard is 33" tall, but was mounted on the wall
where the base meets the mattress.)
Toolbox
Construction Materials
• 1 (76") mantel shelf
(special order in
millwork department)
• 1 sheet (3/4") birch
plywood
• 1 (6') 1 x 3 poplar
board
• 1 (8') 2 x 2 furring
strip
• 2 (8') lengths of
picture moulding
• 12 8d sinker nails
• 36 8d finishing nails
• 20 4d finishing nails
Tools
• Tape measure
• Mitre box and mitre
saw
• Hammer
• Pencil
• 3" all-purpose
paintbrush
• Cotton rags
Decorative Materials
• Wood glue
• Angled sanding sponge
• Wood putty
• Primer
• Paintbrush
• Paint (American Tradition, Belle Grove
Light Amber #94-1B, satin)
• Mocha glaze
• Polyurethane
Accessories
• 2 (30") table bases
• 2 (90") round table skirts
• 2 lamps (pearl)
• 2 (16") eggshell lamp shades
• Fabric (toile, Seabrook collection,
Chatsworth Estate, pattern #SK3672F,
special order, paired with simple cotton
duck)
Skill level: Beginner to intermediate
Rough cost estimate: $400
• Mantel: $300
• Other materials: $100
Rough time estimate: 1 day
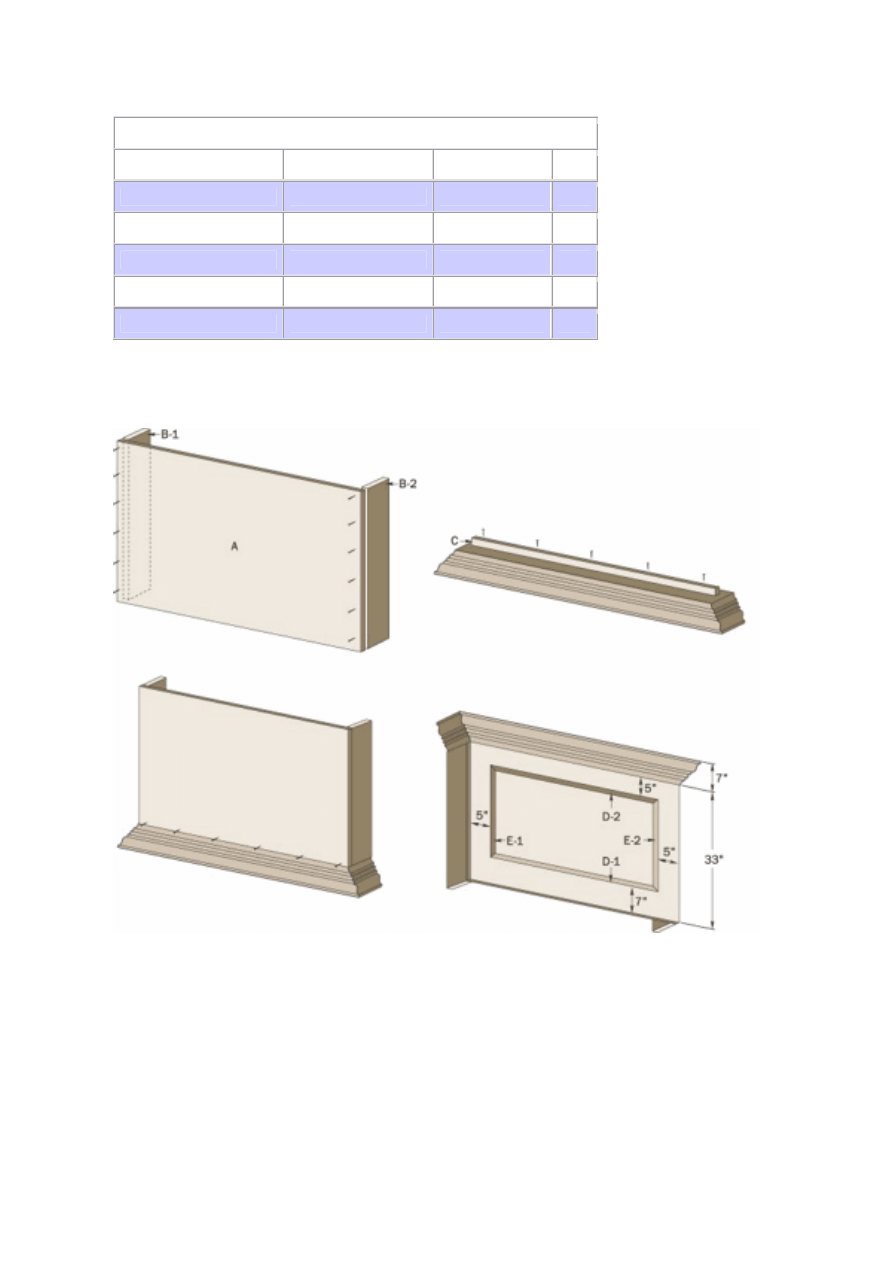
Cut List
Part
Material
Cut Size
Qty
(A) Front panel
3/4" plywood
33 x 74-1/2"
1
(B) Side panels
1 x 3 board
33"
2
(C) Nailing cleat
2 x 2 board
73-1/2"
1

(D) Moulding strips
Picture moulding
Mitre to 66"
2
(E) Moulding strips
Picture moulding
Mitre to 21"
2
Step 1:
Before cutting materials, measure the exact width of the underside of the
mantel from inside edge to inside edge. Each mantel is custom made, and you
will want your base to fit snugly against it. This will determine the width of the
front panel. The mantel pictured here begins with a 74 1/2 x 33" front panel.
Step 2:
Cut all other materials per list.
Step 3:
Attach side panels to front panel using wood glue and 2 1/2", 8d finishing
nails. Set aside for glue to dry. This will be the base of the headboard.
Step 4:
(Note: Steps 4 and 6 require at least two people.) Place the mantel
upside down on a flat work surface, and position the base on the underside flush
with the front inside edges, or lip, of the mantel. Trace with a pencil along the
base to indicate where the cleat needs to be attached. This should be
approximately 3/4" from the front and two sides of the mantel lip.
Step 5:
Attach a 2 x 2 cleat along the guideline with wood glue and 8d sinker
nails placed 6 inches apart. Allow to dry.
Step 6:
Reposition base on the underside of mantel, and attach to the cleat,
nailing from the front of the base into the cleat with 8d finishing nails every 6".
Step 7:
Mitre and attach picture moulding on the front using 4d-finishing nails.
Step 8:
Countersink nails, fill holes with wood putty, and then sand.
Step 9:
Prime and paint headboard to match the room's decor. For the look of
the one pictured, begin with a coat of American Tradition, Belle Grove Light
Amber #94-1B, satin. Next, dilute some mocha glaze with water, and brush it on
generously. Wipe away some of the glaze with smooth clean cotton rags. Apply a
second layer to darken the glaze. The more layers applied, the more aged the
headboard will appear.
Step 10
:
Allow to dry for 24 hours. Apply a coat of polyurethane to protect the
finish.
Step 11:
Hang the headboard per manufacturer's instructions for mounting
mantel.
Cut List
Part
Material
Cut Size
Qty
(A) Front panel
3/4" plywood
33 x 74-1/2"
1
(B) Side panels
1 x 3 board
33"
2
(C) Nailing cleat
2 x 2 board
73-1/2"
1
(D) Moulding strips
Picture moulding
Mitre to 66"
2
(E) Moulding strips
Picture moulding
Mitre to 21"
2
Wyszukiwarka
Podobne podstrony:
Diana Palmer Fit For A King 01 Fit For A King
PBO PD03 F03 Crew not fit for further work on board
Chenery, Marisa Wolves of East Anglia 1 Mate for a King
Robert Asprin & Linda Evans For King and Country
Stephen King One For The Road
Stephen King Night Shift One For The Road
Stephen King One For The Road
FIDE Trainers Surveys 2014 11 27, Goran Dizdar Timing for the King’s endgame activity
Stephen King For The Birds
ENCHANTED FOREST for intheplayroom copyright Johanna Basford and Laurence King
Test King Sun 310 044 Sun Certified Network Administrator For Solaris 9 (4 0)
The Scorpion King 4 Quest for Power
Figures for chapter 5
Figures for chapter 12
GbpUsd analysis for July 06 Part 1
Figures for chapter 6
więcej podobnych podstron