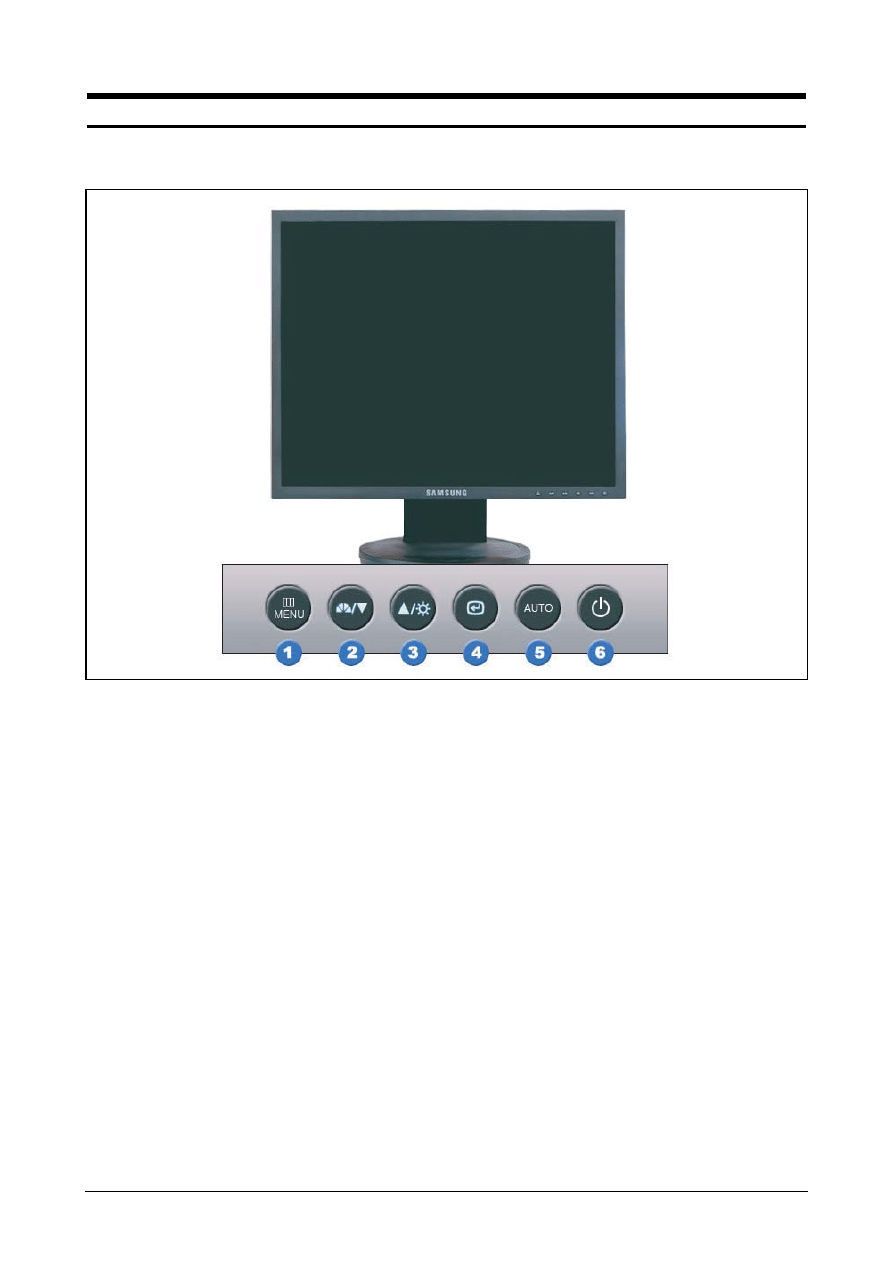
1. Menu button
Opens the OSD menu. Also use to exit the OSD
menu or return to the previous menu.
2. MagicBright button
MagicBright is a new feature providing optimum
viewing environment depending on the contents of
the image you are watching. Currently six different
modes are available: Custom, Text, Internet,
Game, Sport and Movie. Each mode has its own
pre-configured brightness value. You can easily
select one of six settings by simply pressing
MagicBright control buttons.
1) Custom
Although the values are carefully chosen by our
engineers, the pre-configured values may not be
comfortable to your eyes depending on your taste.
If this is the case, adjust the brightness and con-
trast by using the OSD menu.
2) Text : Normal brightness
For documentations or works involving heavy text.
3) Internet : Medium brightness
For working with a mixture of images such as text
and graphics.
4) Game
For watching motion pictures such as a game.
5) Sport
For watching motion pictures such as a sport.
6) Movie : High brightness
For watching motion pictures such as a DVD or
Video CD.
3. Brightness button
When OSD is not on the screen, push the button
to adjust brightness.
2,3. Adjust buttons
Adjust items in the menu.
10 Operating Instructions and Installation
10-1
10 Operating Instructions and Installation
10-1 Front
10 Operating Instructions and Installation
10-2
4. Enter button / Source button
Activates a highlighted menu item. /
Push the 'SOURCE', then selects the video signal
while the OSD is off. (When the source button is
pressed to change the input mode, a message
appears in the center of the screen displaying the
current mode -- analog or digital input signal.)
Note : If you select the digital mode, you must con-
nect your monitor to the graphic card's port using
the DVI cable.
5. Auto button
Use this button for auto adjustment.
6. Power button
Use this button for turn the monitor on and off.
7. Power indicator
This light glows green during normal operation,
and blinks green once as the monitor saves your
adjustments.
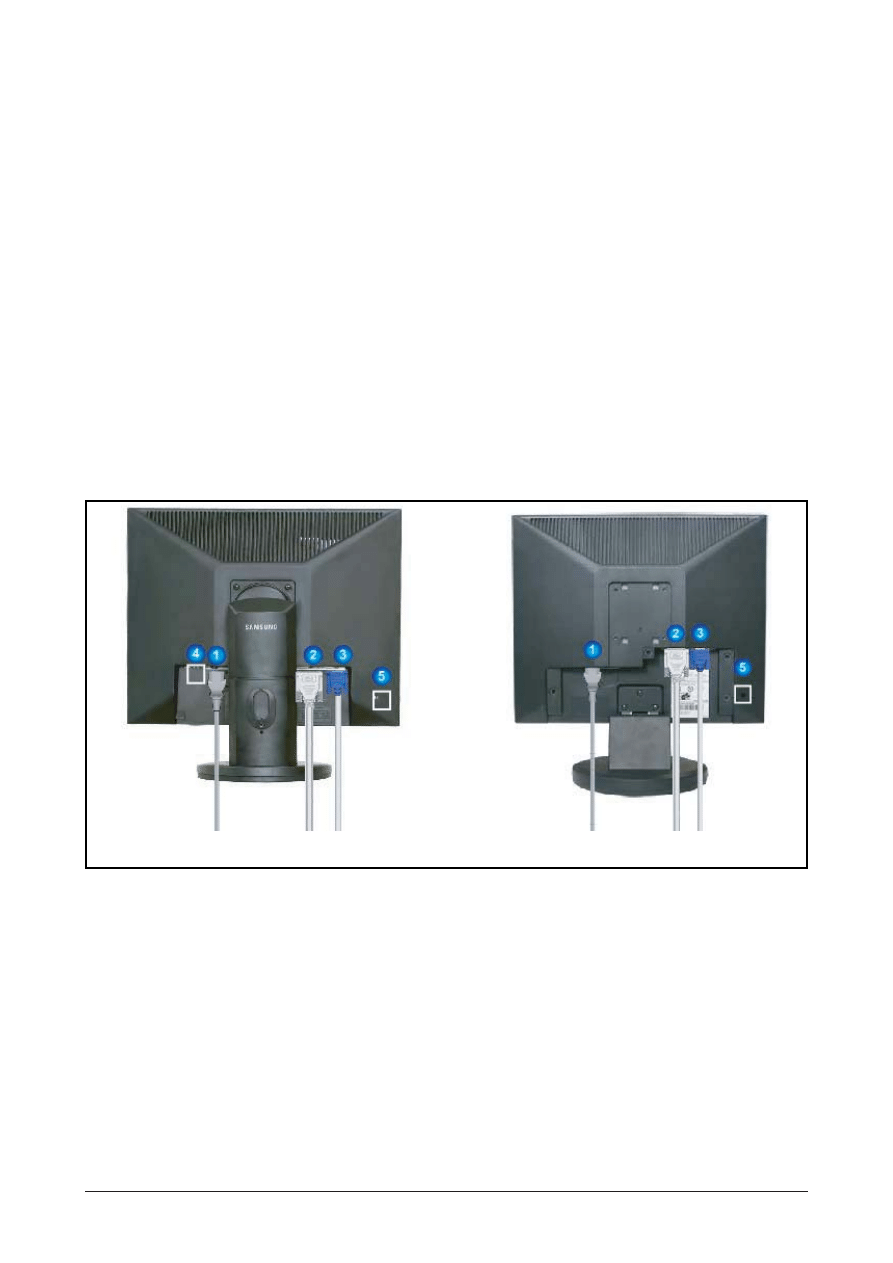
10-2 Rear
(The configuration at the back of the monitor may vary from product to product.)
1. Power port
Connect the power cord for your monitor to the power port on the back of the monitor.
2. DVI port
Connect the DVI cable to the DVI port on the back of your monitor.
3. D-sub 15-pin port
Connect the signal cable to the 15-pin, D-sub connector on the back of your monitor.
4. Power on/off Switch(option)
Use this button for turn the monitor on and off.
5. Kensington Lock
The Kensington lock is a device used to physically fix the system when using it in a public place.
(The locking device has to be purchased separately. )
To get the information on using the Kensington Lock, contact an aurhorized dealer.
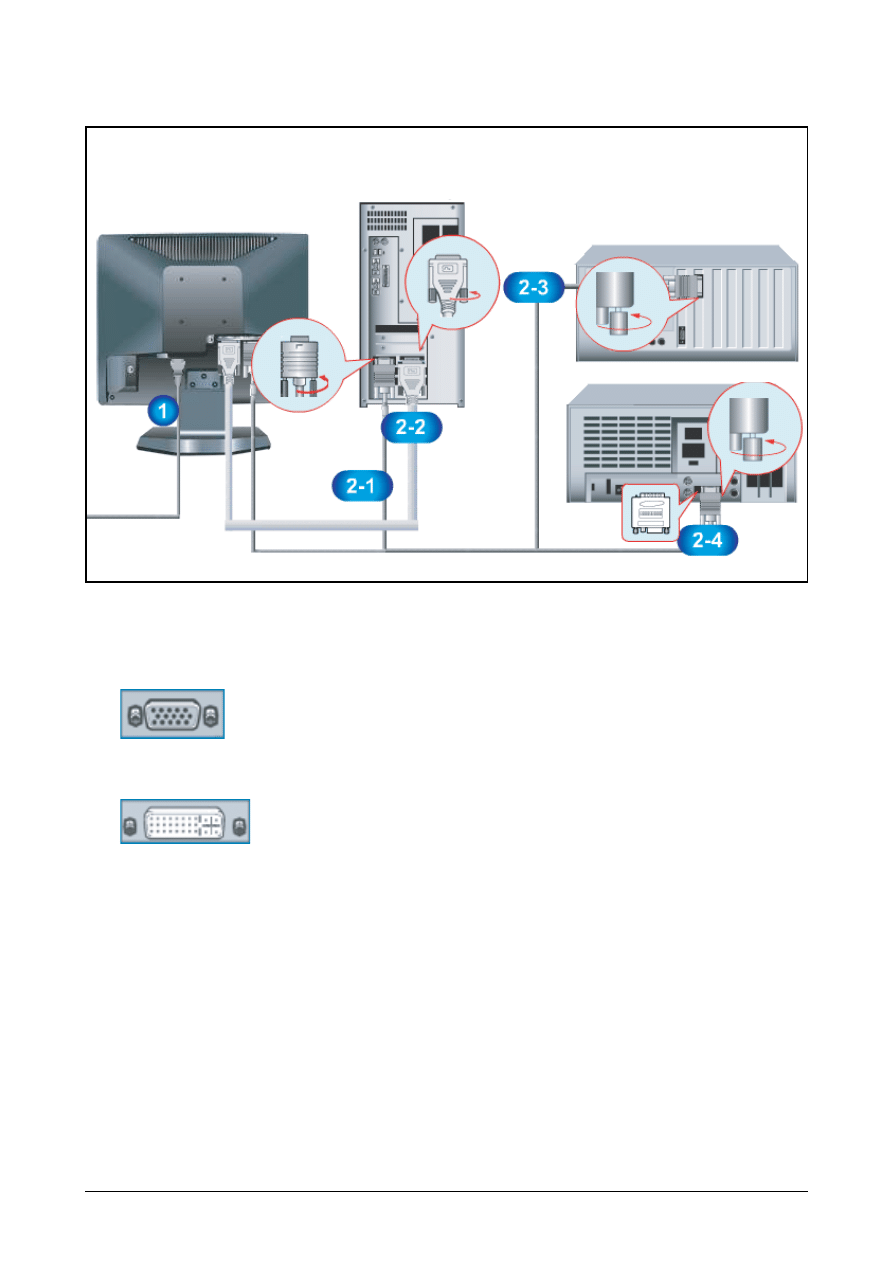
1. Connect the power cord for your monitor to the power port on the back of the monitor.
Plug the power cord for the monitor into a nearby outlet.
2-1. Using the D-sub (Analog) connector on the video card.
Connect the signal cable to the 15-pin, D-sub connector on the back of your monitor.
2-2. Using the DVI (Digital) connector on the video card.
Connect the DVI cable to the DVI port on the back of your monitor.
2-3. Connected to a Macintosh.
Connect the monitor to the Macintosh computer using the D-SUB connection cable.
2-4. In the case of an old model Macintosh, you need to connect the monitor using a special Mac
adapter.
3. Turn on your computer and monitor. If your monitor displays an image, installation is complete.
10 Operating Instructions and Installation
10-3
10-3 Connecting the monitor
Rear of monitor
Rear of Computer
New Model Macintosh
Old Model Macintosh
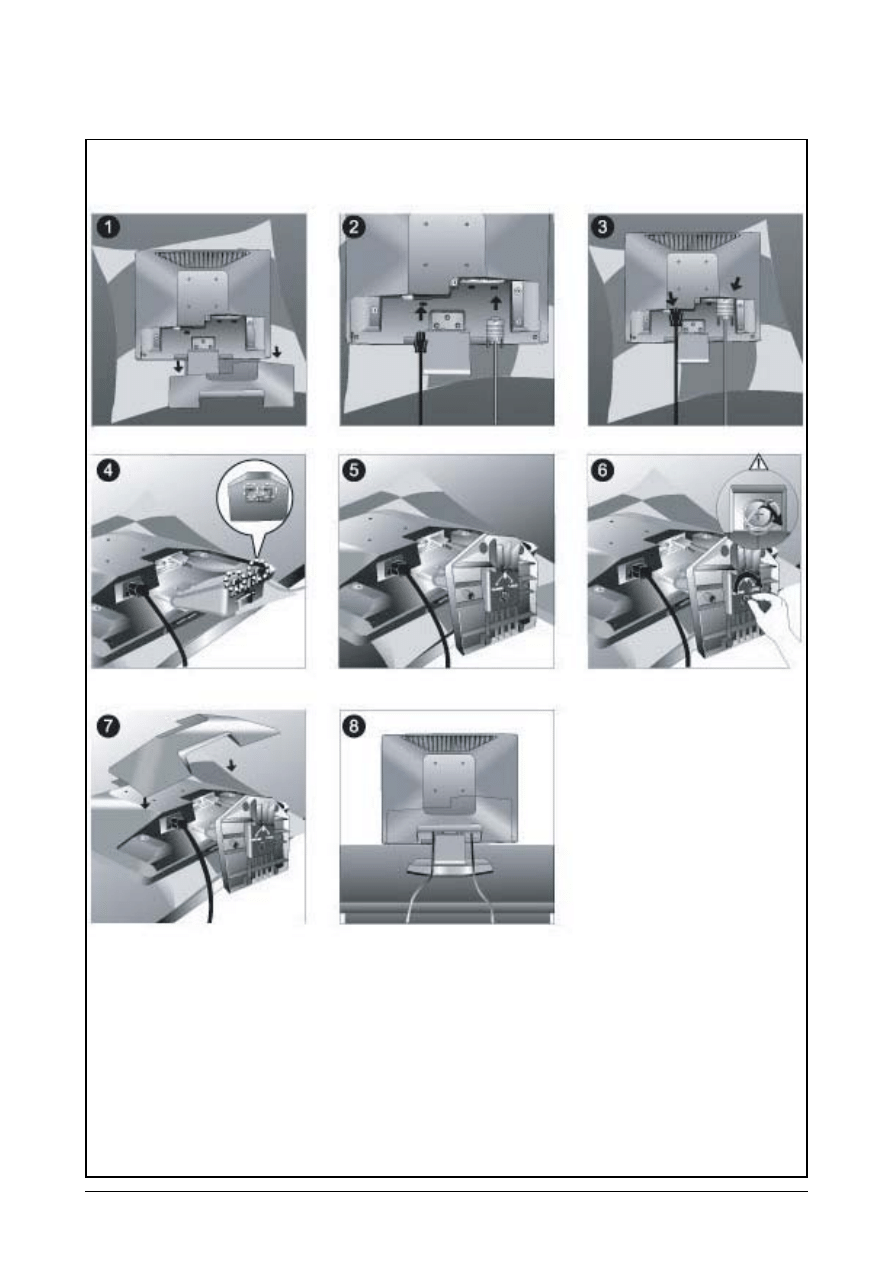
10-4 Monitor Assembly
10 Operating Instructions and Installation
10-4
10 Operating Instructions and Installation
10-5
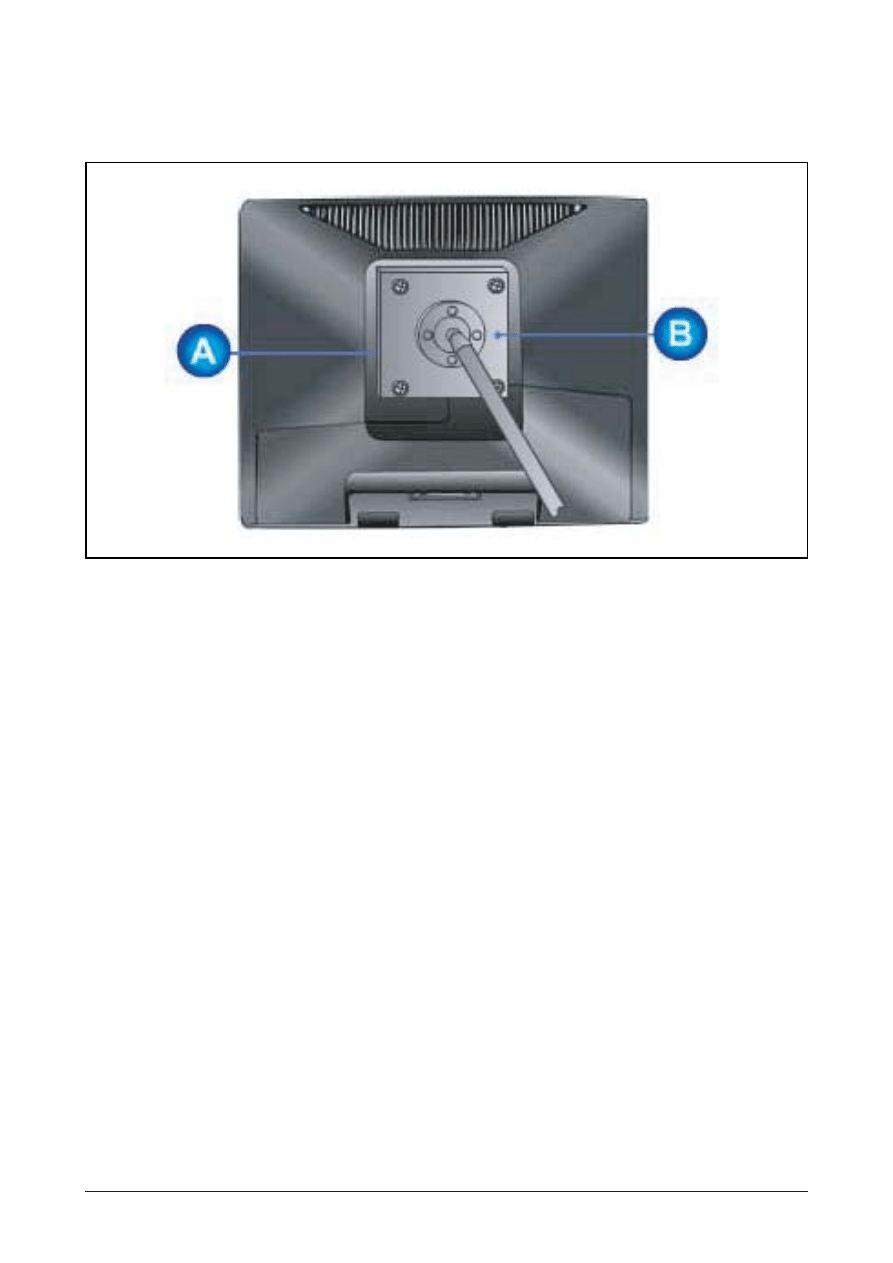
10-5 Attaching a Base
- This monitor accepts a 75mm x 75mm VESA-compliant mounting interface pad.
A. Monitor
B. Mounting interface pad
1. Turn off your monitor and unplug its power cord.
2. Lay the LCD monitor face-down on a flat surface with a cushion beneath it to protect the screen.
3. Remove four screws and then remove the stand from the LCD monitor.
4. Align the mounting interface Pad with the holes in the rear cover mounting pad and secure it with four
screws that came with the arm-type base, wall mount hanger or other base.

Memo
10 Operating Instructions and Installation
10-6
Wyszukiwarka
Podobne podstrony:
Operation Instruction & Installation
3 Operation Instruction & Installation
10 Operation Instruction & Installation
Operation Instruction & Installation 2
Instrukcja instalacji esf
lab 4 panel operatorski instrukcja
instrukcja instalacji i obsługi interfejsu
Honda EPC instrukcja instalacji
Instrukcja instalacji siateczki (bubble breaker)
Instrukcja instalacji spolszczenia INPA
Instrukcja instalacji rejestracji EPLAN PL
Instrukcja Instalacyjna NVB A PL (2)
instrukcja instalacji
Instrukcja instalacji sterownika LAN
CA 6 instrukcja instalatora
Instrukcja instalacji
INSTRUKCJA INSTALACJI INTERFEJSU OBD2
SKOK PRZEZ PŁOT INSTRUKCJA INSTALACJI
więcej podobnych podstron