RIFLE MANUAL
No.1 No.3 No.4 No.5
MKI
MKI
MKI
1
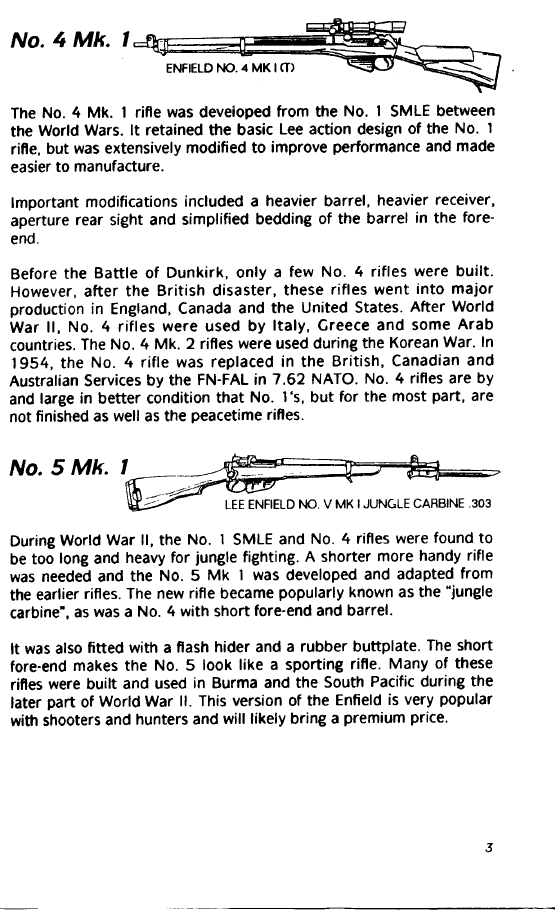
No. 4 Mk.
The No. 4 Mk. 1 rifle was developed from the No. 1 SMLE between
the World Wars. It retained the basic Lee action design of the No. 1
rifle, but was extensively modified to improve performance and made
easier to manufacture.
Important modifications included a heavier barrel, heavier receiver,
aperture rear sight and simplified bedding of the barrel in the
end.
Before the Battle of
only a few No. 4 rifles were built.
However, after the British disaster, these rifles went into major
production in England, Canada and the United States. After World
War II, No. 4 rifles were used by Italy, Greece and some Arab
countries. The No. 4 Mk. 2 rifles were used during the Korean War. In
1954, the No. 4 rifle was replaced in the British, Canadian and
Australian Services by the FN-FAL in 7.62 NATO. No. 4 rifles are by
and large in better condition that No.
but for the most part, are
not finished as well as the peacetime rifles.
No. 5 Mk.
During World War II, the No. 1 SMLE and No. 4 rifles were found to
be too long and heavy for jungle fighting. A shorter more handy rifle
was needed and the No. 5 Mk 1 was developed and adapted from
the earlier rifles. The new rifle became popularly known as the ‘jungle
carbine”, as was a No. 4 with short fore-end and barrel.
It was also fitted with a flash hider and a rubber buttplate. The short
fore-end makes the No. 5 look like a sporting rifle. Many of these
rifles were built and used in Burma and the South Pacific during the
later part of World War II. This version of the
is very popular
with shooters and hunters and will likely bring a premium price.

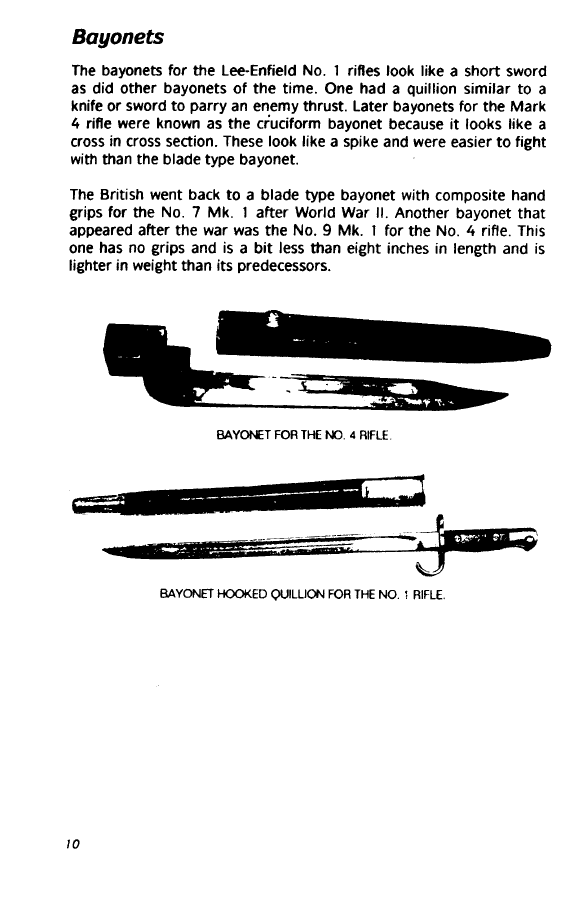
Sights
The front sights for the
were originally a barley corn sight with
a small for the rear. As improvements were made to the rifle, a
front blade was used and a u-shaped
sight replaced the old ‘v’.
Later a long range adjustable stand-up sight with a peep was used.
They were fixed to the barrel. As the rifles were further refined, the
rear sights were set over the tang to increase sight radius. These
sights have adjustments out to 1600 yards and some can be fine
tuned with a worm wheel to more precise increments.
The purpose of the long range sights was not for accuracy. The British
like to fire in volleys and were able to use this strategy to terrorize
the enemy with a hail of bullets from long range while the hapless
enemy could not return fire.
During World War II, sniper scopes were introduced along with
mounts and boxes to carry them when the scopes were not attached
to the rifle.
loading and Firing
Place the rifle on a table in the upright position or if
in the
field, place
the left hand under the receiver and with the right hand, grasp the
bolt and turn it up and to the left. Pull the bolt straight back as far as
it will go. Insert a loaded five round clip in the clip guide inside the
receiver and force the cartridges down into the magazine with the
right thumb. Take out the empty clip. Place another five round clip in
the clip guide and strip these cartridges into the magazine. There will
be ten rounds in the magazine.
With the right hand, grasp the bolt handle and push it forward and
down, (to the right). This will strip a cartridge from the magazine and
slide it into the chamber. This action also cocks the firing pin. The rifle
is now ready to be fired by squeezing the trigger. If the rifle will not
be fired immediately, set the thumb safety on the rear of the receiver
to “Safe”.
the rifle has been fired, lift the bolt handle up and to the left.
Pull the bolt straight back. This action causes the spent cartridge to
be withdrawn from the firing chamber and flipped clear of the
receiver. To reload the rifle, push the bolt handle forward and down.
fresh cartridge is stripped from the magazine and slipped into the
The rifle is now ready to fire again. This sequence may be
repeated until the magazine is empty.
Insert the t-shaped tool into the notches and turn the cocking piece
until the lower two notches are reached. The firing pin spring should
be virtually decompressed. Remove the firing pin locking screw found
in the rear of the cocking piece. Now we may finish removing the
firing pin with the special tool.
the firing pin with a
‘makeshift rig may cause damage and should be left to a qualified
gunsmith.
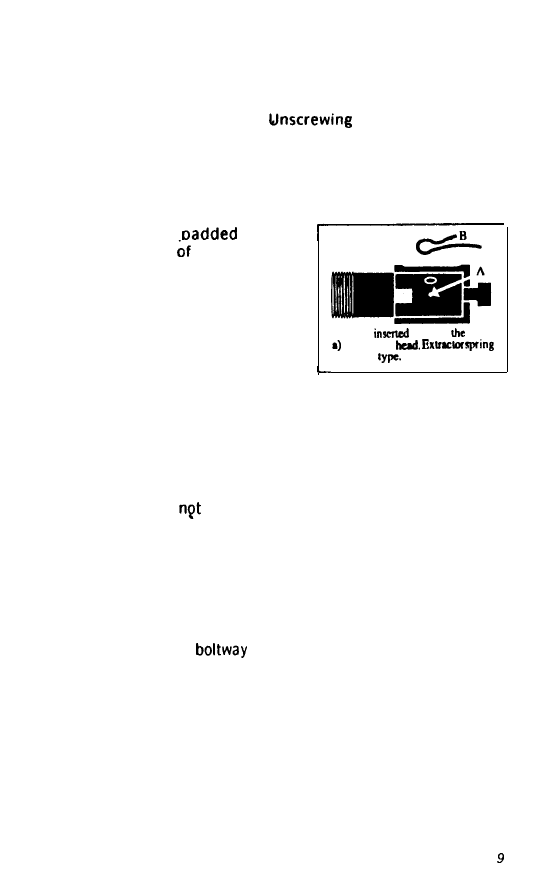
Removal of the Extractor Spring
Place the bolt in a
vice and
insert a drift punch less than 0.04
inch in diameter into the small hole
found in the bolt head adjacent to the
extractor. Push the punch into the hole
against the extractor spring and ease
the spring forward using a screw driver.
Punch is
through
hole
in the boh
b) is of V
Keep one finger over the extractor slot
to keep the spring from jumping out. To reassemble, place the spring
into the extractor slot and seat the small projection on the spring into
its seat in the bolt head.
Replacing the Bolt
Lee-Enfield bolts are
interchangeable. They have been fitted to
their respective boltways. Compare the number of the bolt with the
number of the rifle to avoid any chance that might cause you to
substitute a bolt in the wrong rifle. Check to see that there is no
cartridge in the chamber. Be sure that the bolt head is fully screwed
home and that the bolt cocking piece lines up with the lug on the
underside of the bolt.
Replace the bolt in the
and push if forward. Next, pull the
bolt to the rear to the resistance shoulders and force the bolt head
down over the spring retaining catch. Then, push the bolt forward all
the way and turn the bolt handle down. Hold the rifle so the muzzle is
pointing in a safe direction and press the trigger. The firing pin should
fall with an audible click.
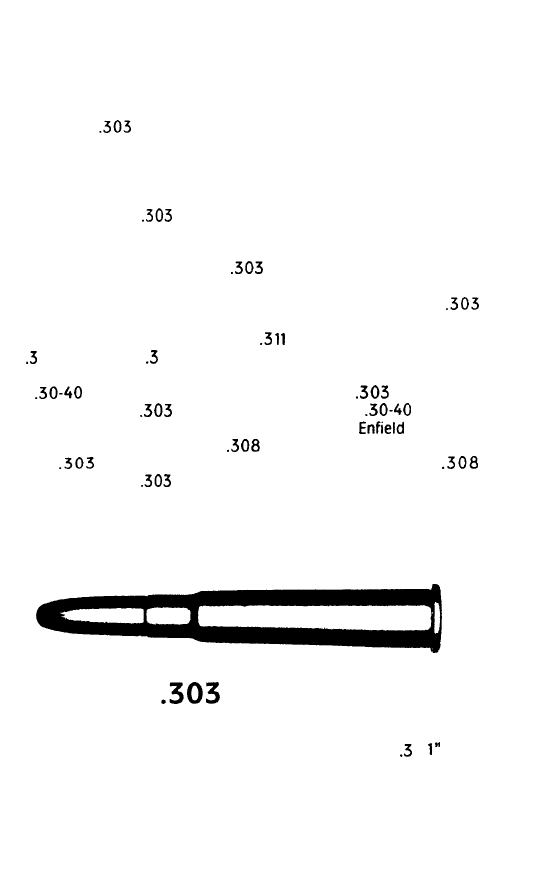
The Lee-Enfield Ballistics
In 1892, the
British cartridge was loaded with 70 grains of
black powder and had a 215 grain round nose bullet with a muzzle
velocity of 1850 fps. Muzzle energy was 1640 fp. By 19 14, with a
smokeless powder loading and a 174 grain pointed bullet, the
velocity moved up to 2440 fps. This was the Mk. VII round and was
still in use when the
was discontinued.
Used extensively in Africa, Canada and India by the military, govern-
ment, workers and settlers, the
cartridge suffered from a bad
reputation due to the use of the military full metal jacketed pointed
bullets. When sporting ammunition became available, the
became a reliable cartridge for lighter non-dangerous game. Jacketed
ammunition has a bullet diameter of
inch. Cast lead bullets can
be
12 inch or even 13 inch.
The
Krag was the cartridge by which the
was judged
early in its life. The
had a slight edge over the
and later
could take chamber pressures of 50,000 psi. The
Mk. 4 has
been successfully converted to
Winchester (7.62 NATO). The
British
is now compared with the more powerful
Winchester and the
has found its niche in the American market.
Plentiful stocks of rifles and ammunition have assured it a place for
many years to come.
British
Max. Case Length: 2.222” Trim-To Length 2.212” Max. Overall
Length: 3.075” Primer Size: Large Rifle Bullet Diameter: 1
11
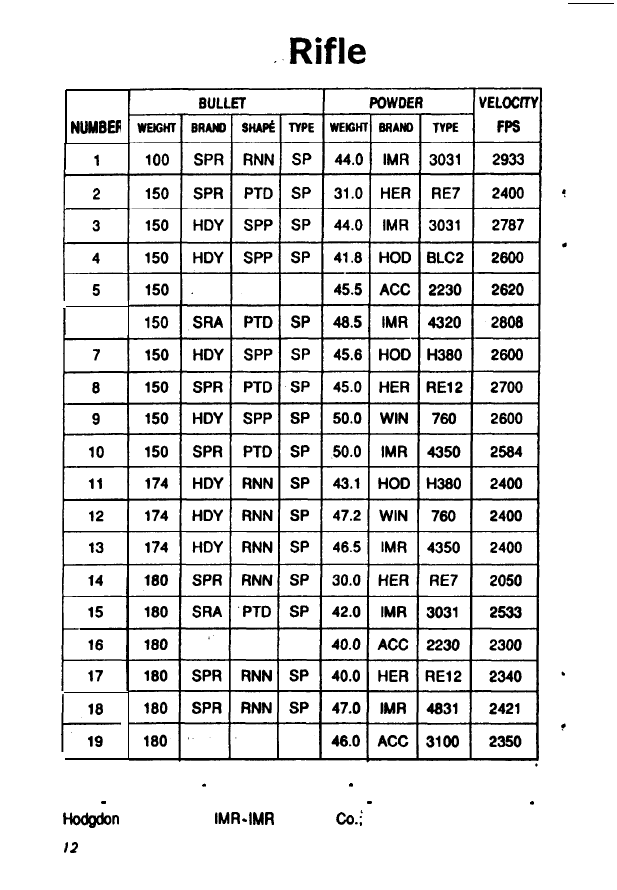
LOAD
6
Loads for
18
19
Abbreviations: ACC Accurate Arms Co.; Canadian Industries, Ltd.;
HDY Hornady Manufacturing Co.; HER Hercules, Inc.; HOD
Powder Co.;
Powder

the
British
REM
200
24
ACC
PTD Pointed; RNN Round Nose; SP Soft Point; SPP Spire Point;
SPR Speer; SRA Sierra Bullets.

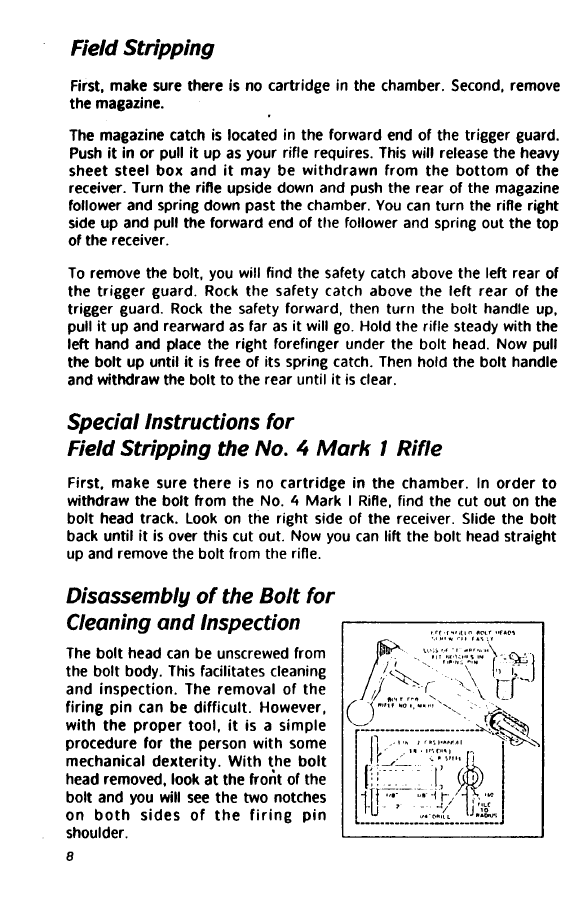
Care and Cleaning
The enemy of all weapons is rust. In order to maintain a rust free rifle,
a few simple steps must be performed periodically. All metal surfaces
should be coated with a light coat of a quality gun oil from time to
time depending on the humidity in your area.
In humid areas, more applications of oil are required. The user should
pay close attention to the patch that is run through the bore. If the
patch comes out dirty or green, a more thorough cleaning is
recommended.
After firing the rifle, the bolt should be removed and the
should
be cleaned. A cleaning rod with screw-in tips should be used for
versatility in cleaning of the bore. Other cleaning items include a
good quality bore cleaner and oil, G.I. or commercial is fine. Also at
hand should be some white cotton or blended cleaning patches, a
brass brush in the correct caliber
pipe cleaners, tooth
brush and some lint-free cloth. A bore light and rust inhibiting spray
such as WD-40 are optional.
Corrosive Ammunition
Corrosive ammunition can be manufactured using less expensive
chemicals such as fulminate of mercury. Unfortunately, these
chemicals will attract moisture, which in time will cause iron to rust.
When corrosive ammunition has been used, the rifle should be
cleaned within a day or two after firing. A rusty or pitted bore will
destroy the accuracy of any rifle.
Regular Ammunition
To clean the bore, place a clean patch in the slot of the rod tip and
saturate it with bore cleaner. Place the rod tip into the breach or
chamber area of the rifle and force the rod up the bore until the tip
with the patch comes out the muzzle. Pull the rod back through the
bore until the tip with the patch comes out the breach or chamber
end. Repeat this until the patch has gotten so dirty it will no longer
remove fouling. Replace the dirty patch with a clean one, saturate it
in gun cleaning solvent and go through the cleaning process again.

When the patches are coming out much cleaner, you have removed
the first layer of fouling. Replace the slotted patch tip with the bore
brush and run it through the bore from the breach end. Several
strokes should be done. Remove the bore brush and screw on the
patch tip. Saturate the patch with bore solvent and run it through the
bore as before.
Now the patch should look dirty again and it may possibly look green.
The green color comes from the interaction of the solvent with copper
jacketed ammunition that may have been used. This is normal and
means that the
is doing its job of removing the cooper residue
that is left after the
has been shot.
When the patches come out clean, stop rhe cleaning of the bore
leaving a heavy coat of solvent in the bore overnight.
General
Cleaning
All metal surfaces including the sights, should be wiped down with a
solvent dampened cloth. Wipe the solvent from the outside surfaces
of the metal with a dry cloth. This should remove most grime and
powder residue. A light coat of rust inhibitor such as WD-40 can be
used to spray the exposed surfaces of metal and then wiped with an
oily cloth.
We now turn our attention to the bolt and the internal area of the
receiver. The bolt can be unscrewed and placed in a container filled
with solvent to soak while you wipe down the internal magazine using
a cloth with a liberal amount of solvent. Wipe down the
and
other places in the receiver with the solvent laden cloth. Be sure to
clean the bolt latch and safety knob.
Next, take the toothbrush and dip it in the solvent and scrub inside
the receiver and boltways. Crime and fouling will be lifted.
Follow
up
with a dry cloth to remove the fouling. When this area is clean, take a
pipe cleaner and dip it in solvent. Scrub as many nooks and crannies
as possible. This done, wipe all solvent from the internal surfaces of
the receiver and magazine area with a dry cloth and pipe cleaners. A
light coat of the rust inhibitor may be sprayed here, but remember
this is not a lubricant and should be lightly wiped up. A coat of oil
should be wiped over all the internal parts just cleaned. It may be
necessary to use a pipe cleaner coated with gun oil to reach hard to
lubricate places.

Take the bolt out of the cleaning solvent and scrub the exterior with
the toothbrush. Wipe it down with a dry cloth. If it has not been
soaking, apply a liberal amount of solvent to the interior and exterior
surfaces of the bolt, Dip the toothbrush in solvent and scrub the bolt
until all fouling has been loosened. Pay close attention to the
extractor, removing all fouling.
Wipe all internal and external parts of the bolt clean with a cloth.
Coat the bolt with a light coat of gun oil and let it sit out of the rifle
overnight.
Final Bore Cleaning
The next day. the bore should be coated with a liberal amount of
solvent. The patch will be discolored with dirty powder and may be
green from the copper. This is normal. Use the bore brush to clean
out any remaining rust, fouling or copper residue.
At this time, you may wish to inspect the bore with a bore light to
look for fouling, lead build-up, rust, pits or cracks. Insert the bore
light into the breach, turn it on and look down the muzzle to view the
bore. If an unusual amount of firing has been done, it may be
necessary to repeat the cleaning process the following day.
After the bore comes out clean, dry it with clean, dry patches. Now,
coat a fresh patch with gun oil and coat the bore liberally. Finally, you
may use a cotton bore swab coated with oil to pass through the bore.
It should come out clean. Wipe all exterior metal parts with a light
coat of oil. Replace the bolt and set the rifle aside.
Document Outline
Wyszukiwarka
Podobne podstrony:
No Name in the Long Winter Mary Soon Lee
No Home, No Homeland raport
NO 04 A004 4 2010
Chopin Bourrée No 2, Op D2 No 2
No Longer White
Optimum No Rinse – czyli jak umyć samochód?z spłukiwania
29 NO trap WP5
Elektor Electronics No 10 10 2011
Ki no Tsurayuki Przedmowa do antologii ''Shinsen waka''
INTERVIEWS WITHDAVID GEMMELL no 2
INTERVIEWS WITHDAVID GEMMELL no 3
No 004 CCS Demonstration Plant fully integrated into new unit 858 MW
Nezumi no yomeiri
NO 04 A004 1 2010
no wyklad 5
Fine Homebuilding No 206 november 2009
No 115 Dunlop Beslan 2004
więcej podobnych podstron