L.C. Smith
Over/Under
Shotgun
Owner's Manual
WITH 5-YEAR
WARRANTY
LIMITED W
ARRANTY AND CER
TIFICA
TE OF OWNERSHIP
To insure warranty protection, this card must be completed and mailed within 10
days of purchase.
Model
_ _ _ _
_ _ _ _
_ _ _ _
_ _ _ _
_ _ _ _
_ _ _ _
_ _ _ _
_ _ _ _
_ _ _ _
_ _ _ _
_ _ _ _
_ _ _ _
_ _ _ _
_ _ _ _
_ _ _ _
_ _ _ _
_ _ _ _
_ _ _ _
_ _ _ _
_ _ _ _
_ _ _ _
_ _ _ _
_ _ _ _
_ _ _ _
_ _ _ _
_ _ _
Serial Number
Date of Purchase
I have read the Owner’s Manual
and request registration of my warranty.
(signature of owner)
Please Print
Owner
Address
City
State
Zip Code
Name of Store where purchased
City
State
To help us provide new and better products we would appreciate your answers to the following questions.
Your Occupation
Your Age Group
Which of these influenced your purchase?
❑
Farm
❑
Under 18
❑
18-24
❑
Previous experience with product
❑
Student
❑
25-34
❑
35-49
❑
Brand reputation
❑
Office
❑
50+
❑
Marlin web site
❑
Industrial
❑
Marlin advertisement
❑
Professional
Was this product a gift?
❑
Marlin catalog
❑
Managerial
❑
Yes
❑
No
IMPORTANT
This manual contains operating, care and maintenance instructions. To
assure safe operation, any user of this firearm must read this manual careful-
ly. Failure to follow the instructions and warnings in this manual can cause
accidents resulting in injury or death. This manual should always accompany
this firearm, and be transferred with it upon change of ownership.
The warranty card attached to the cover must be filled out and mailed
within 10 days of purchase.
WARNING: KEEP THIS FIREARM OUT OF THE REACH OF CHILDREN,
UNAUTHORIZED INDIVIDUALS, AND OTHERS UNFAMILIAR WITH THE
SAFE HANDLING OF FIREARMS.

MARLIN'S PERFORMANCE UNDER
THE ABOVE WARRANTY
1. After notice of defect in material and/or workmanship is received by The Marlin Firearms Company, Marlin shall
send instructions for shipment of the firearm; and repairs will be made and the firearm returned within a
reasonable time after the firearm is received. Cost of shipping, insurance charges, etc. involved in returning the
firearm to the company shall be prepaid by the original owner.
2. Cost of parts and labor performed shall be provided without charge by The Marlin Firearms Company.
3. If The Marlin Firearms Company, after receipt of the firearm, determines that the defects in material and/or
workmanship were the result of abuse and/or neglect, or otherwise not covered by the warranty set forth
above, Marlin shall notify such owner to that effect and give an estimate for repair. In such cases, repair, return
shipping and insurance charges, etc. shall be paid by such owner.
4. In the event that The Marlin Firearms Company is unable to make warranty repairs to the firearm, it shall, within
a reasonable time after its receipt, notify the owner to that effect and give him the option either to receive a
replacement of the same model, if then available in its inventory, or to receive a refund, either of which,
if feasible, will be made through the store of purchase.
The Marlin Firearms Company
100 Kenna Drive, North Haven, CT 06473-0905
www.marlinfirearms.com
LIMITED WARRANTY
The Marlin Firearms Company
FIVE YEAR LIMITED WARRANTY AGAINST
DEFECTS IN MATERIAL & WORKMANSHIP
This firearm warranty is good only to the ORIGINAL OWNER who has registered his own-
ership with The Marlin Firearms Company at 100 Kenna Drive, North Haven, Connecticut.
WARRANTY and CERTIFICATE OF OWNERSHIP card must be completed and mailed
to The Marlin Firearms Company at the above address WITHIN TEN (10) DAYS of
purchase to insure the protection of the warranty. NOTICE of defect in materials
and/or workmanship must be received by the company WITHIN FIVE (5) YEARS from
the date of purchase.
Normal wear, or damage resulting from neglect, abuse, alteration, or repairs not
made or authorized by The Marlin Firearms Company or use of non-Marlin parts are
not covered by the warranty.
THIS WARRANTY GIVES YOU SPECIFIC LEGAL RIGHTS, AND YOU MAY ALSO HAVE
OTHER RIGHTS WHICH VARY FROM STATE TO STATE.
MFC
P
.O. Box 248
North Haven, CT
06473-0903
PLACE
STAMP
HERE

1
Ammunition
1.
Use only high quality, original, factory-
manufactured shotgun shells. Do not use
cartridges that are dirty, wet, corroded,
malformed or damaged. Do not oil car-
tridges or spray aerosol type lubricants,
preservatives or cleaners directly onto
cartridges or where excess spray may
flow into contact with cartridges. Lubricant
or other foreign matter on cartridges can
cause potentially dangerous ammunition
malfunctions. Use only ammunition of the
gauge or caliber for which your firearm is
chambered.
2.
The use of reloaded, “remanufactured,”
handloaded, or other non-standard
ammunition voids all warranties.
Improperly loaded ammunition voids all
warranties. Improperly loaded ammunition
can be extremely dangerous. Severe
damage to the firearm and serious injury
to the shooter or to others may result.
Always use ammunition that complies
with the industry performance standards
established by the Sporting Arms and
Ammunition Manufacturers’ Institute, Inc.
of the United States (SAAMI), or the
equivalent from other countries.
3.
Firearms may be severely damaged
and serious injury to the shooter or to oth-
ers may result from any condition causing
excessive pressure inside the chamber or
barrel during firing. Excessive pressure
can be caused by obstructions in the bar-
rel, propellant powder overloads, or by the
use of the incorrect cartridges or defec-
tively assembled cartridges. In addition,
the use of a dirty, corroded, or damaged
cartridge can lead to a burst cartridge
case and consequent damage to the
firearm and personal injury from the sud-
den escape of high-pressure propellant
gas from the firearm’s mechanism.
4.
Immediately stop shooting and check
the barrel for a possible obstruction when-
ever:
•
You have difficulty in, or feel unusual
resistance in, chambering a cartridge, or
•
A cartridge misfires (does not go off), or
•
The mechanism fails to extract a fired
cartridge case, or
•
Unburned grains of propellant powder
are discovered spilled in the mecha-
nism, or
•
A shot sounds weak or abnormal. In
such cases, it is possible that a wad is
lodged part way down the barrel. Firing
a subsequent shot charge into the
obstructed barrel can damage the
firearm and cause serious injury to the
shooter or to bystanders.
5.
If there is any reason to suspect that
something is obstructing the barrel (this
can be anything – dirt, mud, snow, sand,
water, a wad, etc.), immediately unload
the firearm and look through both bores. It
is not sufficient to merely look in the
chambers. An obstruction may be lodged
some distance down the barrel, where it
can not easily be seen.
IF SOMETHING IS IN THE BORE, DO
NOT ATTEMPT TO SHOOT IT OUT BY
USING ANOTHER CARTRIDGE, OR BY
BLOWING IT OUT WITH A BLANK OR A
SHELL FROM WHICH THE SHOT HAS
BEEN REMOVED. SUCH TECHNIQUES
CAN GENERATE EXCESSIVE PRES-
SURE, DAMAGE THE FIREARM AND
CAUSE SERIOUS PERSONAL INJURY.
6.
Dirt, corrosion, or other foreign matter
on a cartridge can impede complete
chambering and may cause the cartridge
case to burst upon firing. The same is true
of cartridges which are damaged or
deformed.
2
7.
Do not oil cartridges and be sure to
wipe the chamber clean of any oil or
preservative before commencing to shoot.
Oil interferes with the friction between car-
tridge case and chamber wall that is nec-
essary for safe functioning, and subjects
the firearm to stress similar to that
imposed by excessive pressure.
8.
Use lubricants sparingly on the moving
parts of your firearm. Avoid excessive
spraying of any aerosol gun care product,
especially where it may get on ammuni-
tion. All lubricants and aerosol spray lubri-
cants in particular, can penetrate cartridge
primers and cause misfires. Some highly
penetrative lubricants can also migrate
inside shell cases and cause deterioration
of the propellant powder; on firing, the
powder may not ignite. If only the primer
ignites, there is danger that the wad may
become lodged in the barrel.
• WARNING: Discharging firearms in
poorly ventilated areas, cleaning
firearms, or handling ammunition may
result in exposure to lead and other sub-
stances known to cause birth defects,
reproductive harm, and other serious
physical injury. Have adequate ventila-
tion at all times. Wash hands thoroughly
after exposure.
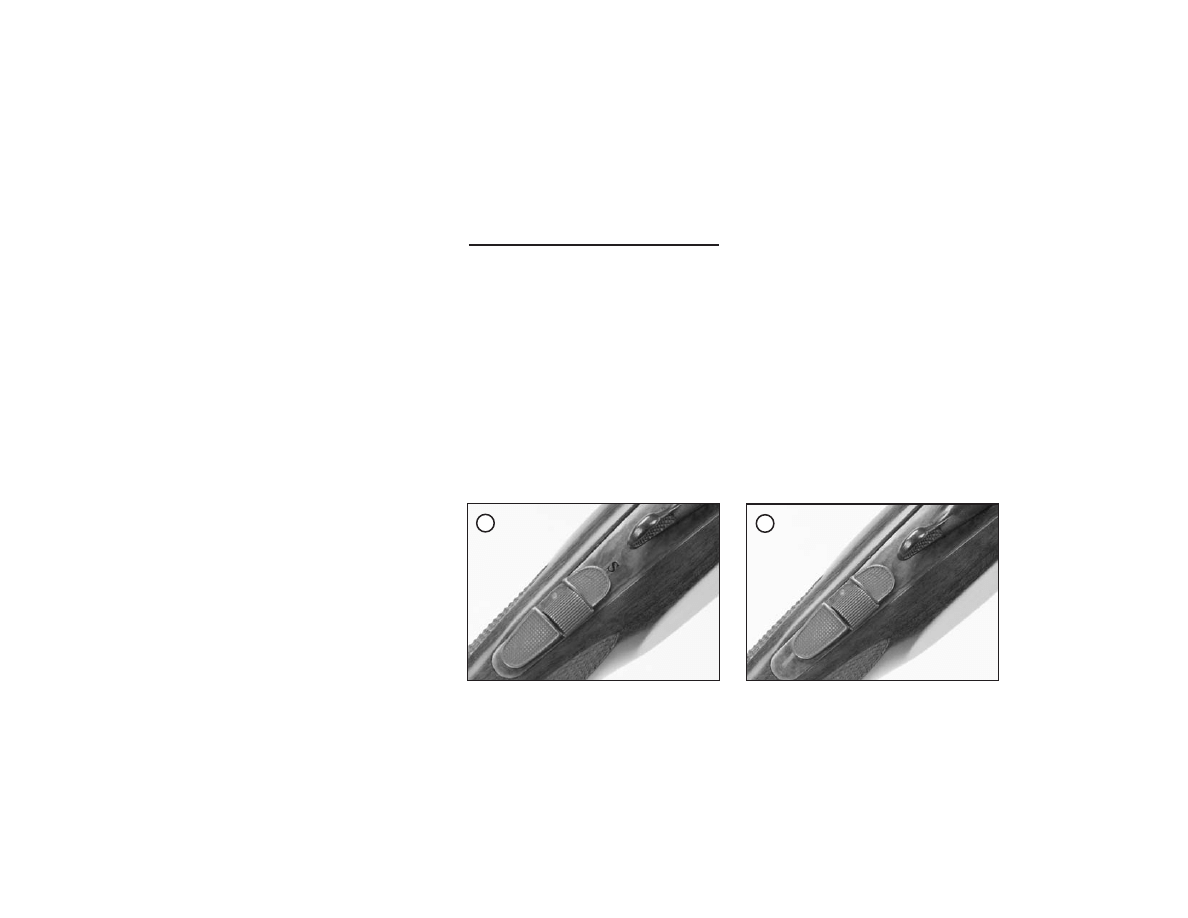
How to Operate the Safety
Prior to firing, know and understand the
operation of the safety by practicing with
the shotgun unloaded.
The safety is a rectangular switch located
on the tang of the action, directly behind
the top lever of the shotgun, which slides
forward and backward. When the switch
is at the rear end of its travel, the letter
“S”appears immediately in front of the
switch (see A). This means the shotgun
will not fire when the trigger is pulled.
When the switch is in its forward-most
position, the “S” is covered. This means
the shotgun is NOT ON SAFE and will fire
when the trigger is pulled (see B).
• WARNING: The safety switch is not
automatic. In other words, it does not
automatically go to the SAFE position
when the shotgun breech is opened and
closed. It must be manually moved to
the SAFE position.
Never try to put the safety switch between
the SAFE and FIRE positions. Unless the
safety is positioned all the way forward or
all the way to the rear, you cannot be cer-
tain whether it is on SAFE or FIRE.
The safest way to carry this shotgun is
with NO shells in the chambers. If you feel
that you must carry the shotgun with
shells in the chambers, then the safety
must be on SAFE. When you are ready to
fire, the safety can quickly be moved to
Safety OFF
B
Safety ON
A
& D). Insert one or two shells of the prop-
er gauge into the chambers.
Keeping you fingers away from the trigger
and out of the action, close the action by
pulling up on the barrels until it snaps
shut. Do not use excessive force in clos-
3
the FIRE position. The only time the safe-
ty should be placed in the FIRE position is
when you intend to shoot.
• WARNING: Never disassemble the
safety mechanism. It has been correctly
designed, fitted and tested. Any
mechanical device can fail, however, so
never rely on the safety to justify care-
less handling. Never use a firearm with
a safety that does not function properly.
How to Load
• WARNING: Never attempt to load your
shotgun with ammunition that does not
meet the cartridge designation stamped
on the inside of the action. This designa-
tion is only visible when the shotgun’s
action is open.
• WARNING: Before loading this firearm,
always check the bores to be sure they
are free of grease, oil or any other
obstruction. Be sure the chambers are
empty and the safety is on SAFE.
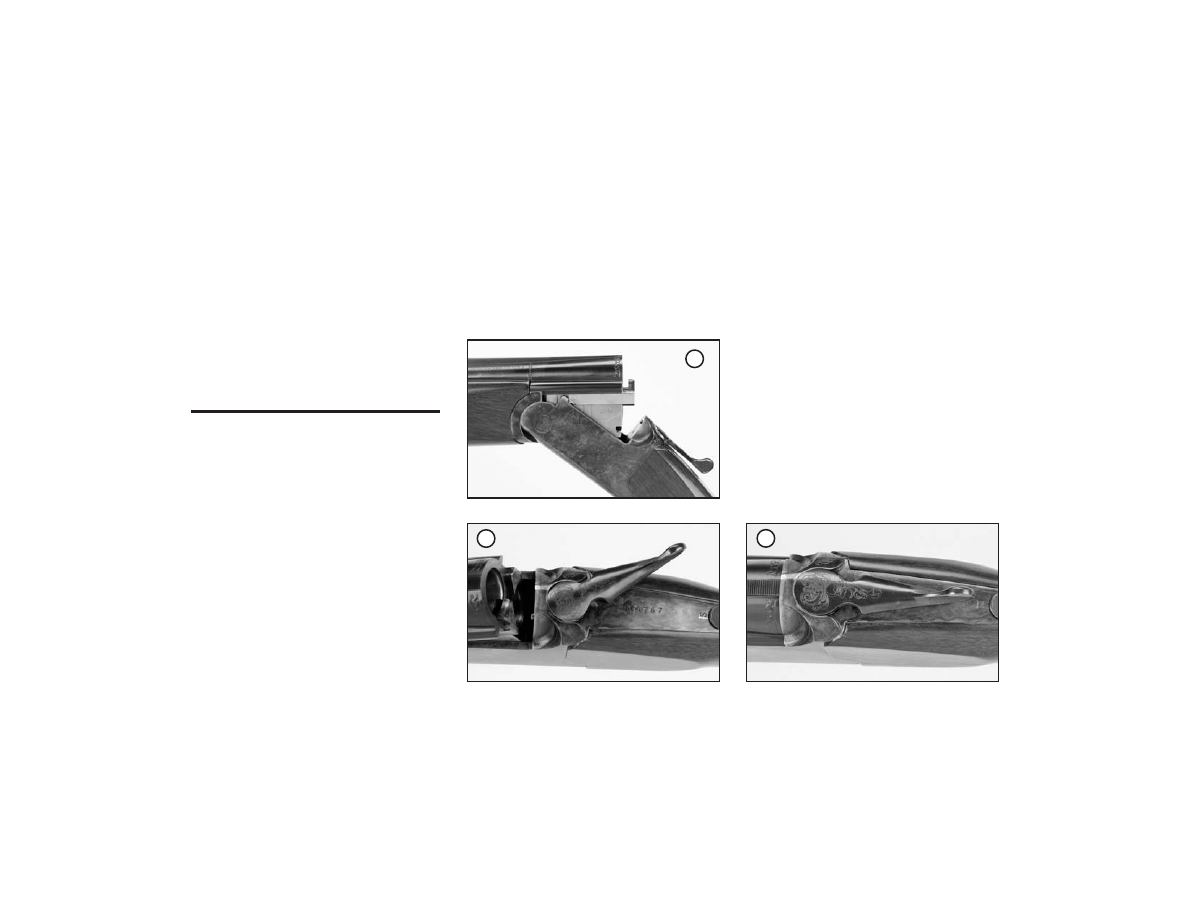
To open the action of the shotgun, first
make sure the gun is pointed in a safe
direction. With one hand, move the top
lever to the right as far as it will go (don’t
use excessive force – it should move eas-
ily). With the other hand, pull down on the
barrels until the action is fully open (see C
Action fully open
C
Top lever in action-open position.
D
ing the action – it should close easily and
you should hear an audible “click” as the
action locks. When the action is closed
and locked, the top lever will return to its
former position, pointing straight to the
rear (see E). If it does not do so, do not
attempt to fire the gun as the action is not
fully locked. Damage to the gun and seri-
ous injury to you or others may result.
Closing the action automatically cocks the
firing pins on both barrels. As soon as the
action is loaded and fully closed, the gun
is cocked and ready to fire. Unless you
intend to fire the gun as soon as it is
loaded, the safety switch should be kept
in the SAFE position.
Top lever in action-closed position.
E
4
How to Fire
With the gun pointed at the target, move
the safety to the FIRE position (all the
way forward), aim, and pull the trigger.
The selected barrel will fire. To fire the
second barrel, pull the trigger again. If
you don’t fire both shells, be sure to put
the safety on SAFE until you are ready to
shoot again.
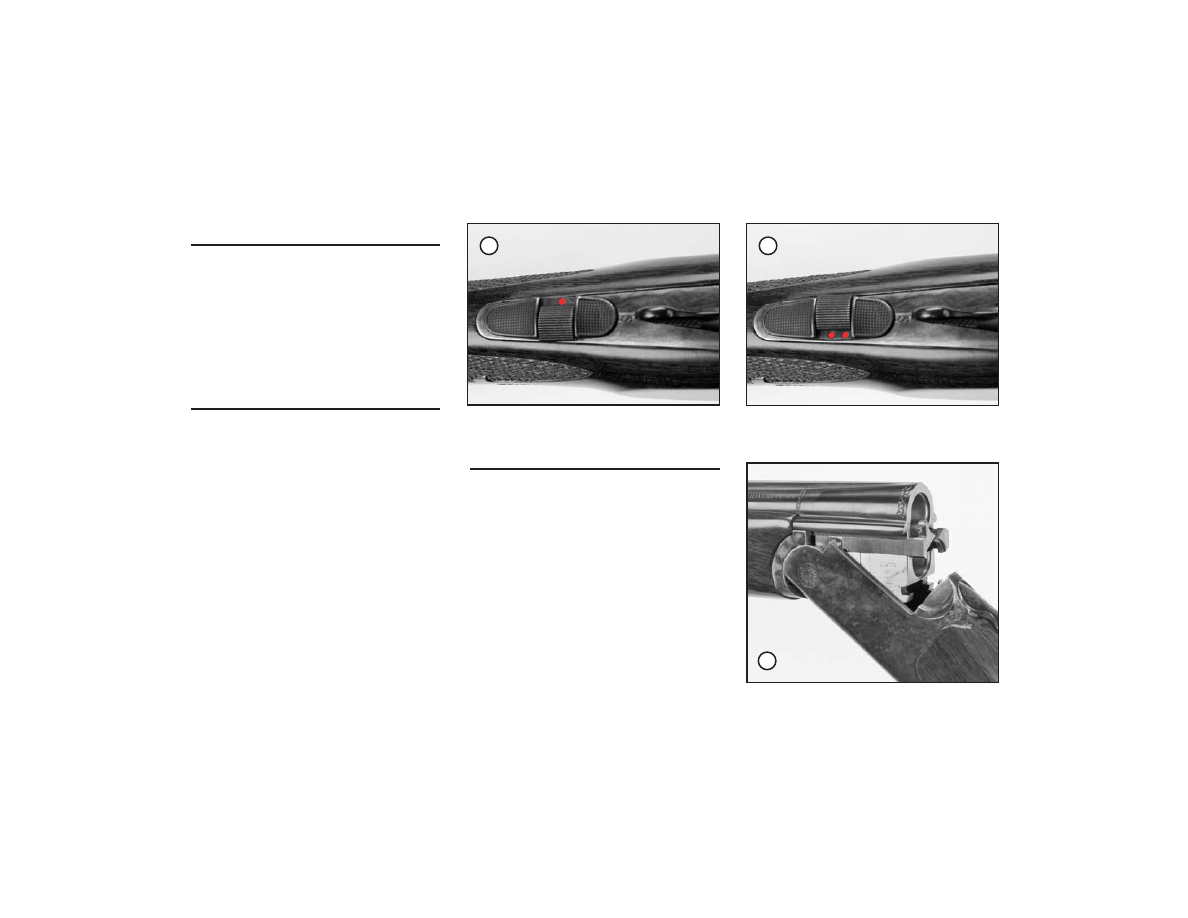
Firing Sequence Selection
The safety switch on the tang of your
shotgun has a dual function. In the center
of the switch is a button that can be
moved to the left or right. The position of
this button determines which barrel will
fire first when the trigger is pulled. When
the button is moved to the right, a single
red dot is revealed (see F). The single dot
means the bottom barrel has been select-
ed to fire first. If the trigger is pulled again,
the top barrel will then fire. If the shooter
wishes the top barrel to fire first, the but-
ton should be moved to the left, revealing
two red dots (see G).
Selective Ejectors
Your shotgun is fitted with automatic ejec-
tors that eject fired shells when the action
is opened. The ejectors will not eject
unfired shells. If two shells are loaded, but
only one has been fired, only the fired
shell will be ejected (see H).
• WARNING: Take care not to point the
rear of the action toward yourself or
another person when opening the action.
The fired shells are ejected with enough
force to cause possible eye injury.
Single dot–bottom barrel fires first.
F
Two dots–top barrel fires first.
G
Selective ejectors
H

5
How to Unload
With the safety on SAFE, and the shotgun
pointed in a safe direction, open the
action and manually remove the unfired
shells from the chambers. The ejectors
will pull the shells from the chambers far
enough that you can reach them.
• WARNING: Before placing the gun in a
vehicle or returning it to storage, always
unload it and visually inspect the interior
of the chambers to make sure that they
are empty.
What to do if
Your Shotgun Fails to Fire
1. Misfires:
If you squeeze the trigger and
the cartridge does not fire, remain in the
shooting position and count to 30. Then
move the safety switch to SAFE and open
the action to remove the misfired cartridge
from the gun.
2. Underpowered Shot:
An underpow-
ered cartridge is unusual if the ammuni-
tion is fresh, clean, and factory loaded.
However, if you hear an unusual sound or
low report, you should stop immediately
and proceed as follows: Because the wad
and powder from the shell may still be in
the barrel, you must unload the gun com-
pletely and then look through both barrels
from the action end (not the muzzle) to
see if there is any obstruction. A wad can
usually be successfully removed with a
cleaning rod. If not, it, or any other stub-
born obstruction, should be removed by
an authorized gunsmith.
How to Clean Your Shotgun
• WARNING: Before cleaning your shot-
gun, be certain it is completely unloaded
and the action is open.
Never attempt to wipe down or clean a
loaded firearm. Follow instructions under
“How to Unload” before cleaning.
Regular, proper cleaning of your shotgun
will help to extend its useful life and
assure proper functioning. Cleaning is
especially important if the gun gets wet or
if foreign material gets into the action or
barrels.
To clean the chambers and bores, you
will need a standard commercial shotgun
cleaning rod, a bronze bore brush of the
proper diameter, a commercial powder
solvent, and cleaning patches. Never use
a steel bore brush as it may damage the
bore. It is usually wise to use a solvent
that also removes the traces of plastic that
are sometimes left in the bores during the
passage of the wads.
First, run a patch saturated with solvent
through the bores and let it stand for a few
minutes. Then run the bronze brush
through the bores, followed by clean, dry
patches. Use additional dry patches until
they come out clean. If necessary, repeat
the entire procedure. Finally, run a patch
through the bores that has been saturated
with light gun oil to protect them from rust.
Dry and clean the outer surfaces of the
gun with a soft cloth, removing all mois-
ture and fingerprints. You may find an old
toothbrush useful for cleaning hard-to-
reach crevices. Finally, apply a light coat
of gun oil to the action and all external
metal surfaces. Do not over-oil. Applying
a small amount of light gun grease to the
action hinges and to the surfaces where
the metal of the forearm and the action
meet once or twice a year (more often if
the gun is heavily used) will help to make
the gun open and close smoothly.
It will help to keep the wood of the stock in
good condition and preserve its beauty by
occasionally rubbing in a light coat of lin-
seed oil.
6
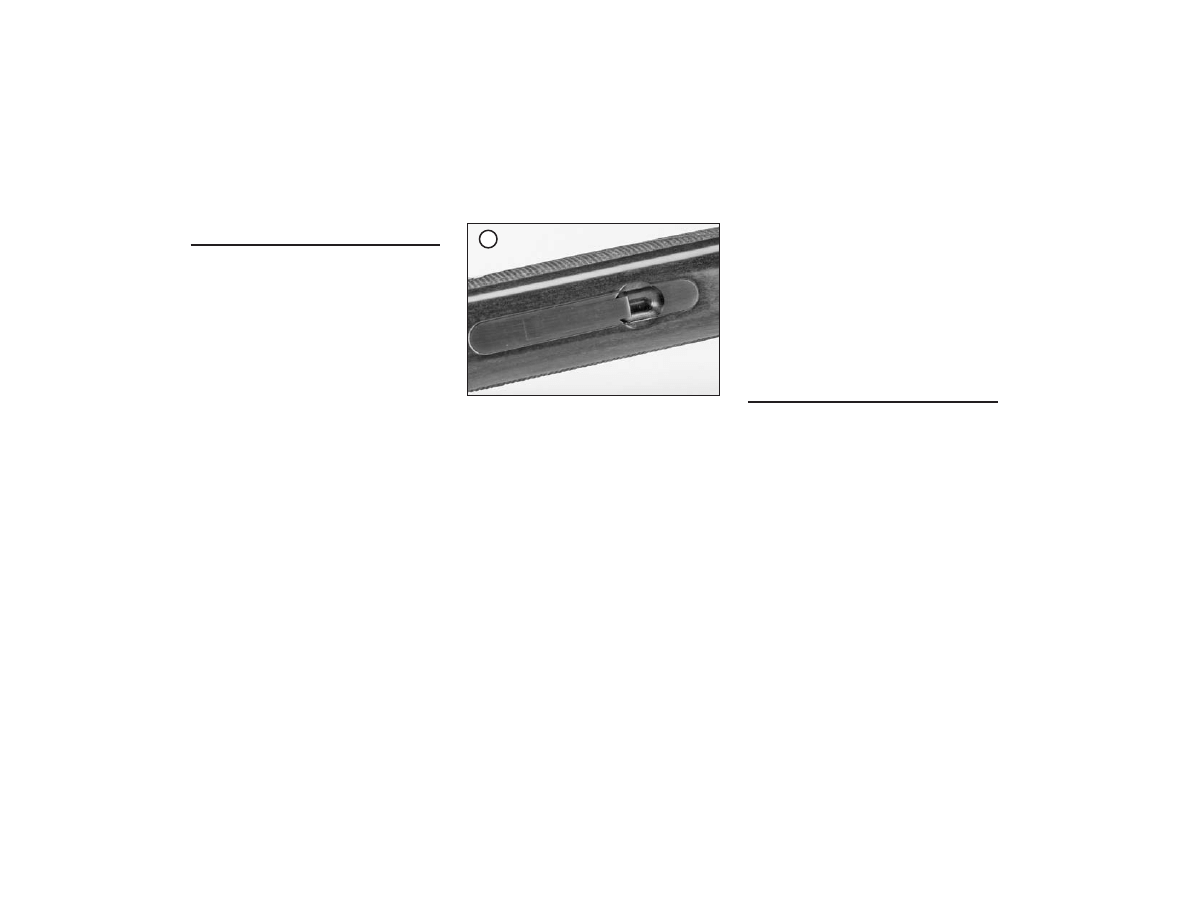
Take-Down Instructions
If you wish to take-down your shotgun for
transport or storage, proceed as follows:
1.
Place the safety switch on SAFE.
2.
Make sure the shotgun is unloaded.
3.
In the center of the underside of the
forearm stock, there is a release lever
located in an oval depression in the wood
(see I). To remove the forearm, pull the
release lever toward the rear of the gun
while pulling the front end of the forearm
away from the barrels. With the forearm
removed, move the top lever to the right
and open the action. The barrels may
then be lifted away from the action.
4.
Reassemble in reverse order. It is not
necessary to pull the release lever when
re-installing the forearm. Place the rear
end of the forearm in position, then push
the forearm toward the barrels. It should
snap easily into place. Do not use exces-
sive force.
NOTE:
Further disassembly of your shot-
gun is not recommended, and should be
done by an authorized gunsmith.
During freezing conditions, oil may con-
geal and cause sluggish operation of
your gun. It is recommended that only a
very thin coat of light oil be used in these
conditions.
Condensation droplets of water will form
soon after a cold firearm is brought into a
warm room. The gun may also become
wet during inclement weather. In these
cases, all moisture should be removed
immediately to avoid the formation of rust.
Exterior metal finish may be wiped down
with a lightly oiled cloth.
For long term storage, lightly oil the bore,
barrel and action with gun oil. Your
firearm should be completely unloaded
and stored in a dry area. Never store your
firearm in a carrying case.
Use of Steel Shot
• WARNING: Steel shot is substantially
harder than lead shot. It is enclosed in a
plastic wad in most reputable shotshells
to help protect the barrel from scoring by
the hard steel shot. However, when the
steel shot charge passes through the
choke constriction in the barrel, the bar-
rel or screw-in choke may be damaged if
a tightly-constricted choke is in place.
For that reason, we strongly recommend
that a choke of no greater constriction
than Modified be used when firing steel
shot in your shotgun. Use of an
Improved Modified or Full choke when
firing steel shot will void your warranty.
Forearm release lever on underside of stock
I

7
Choke Tube System
Your shotgun was provided with three
choke tubes (IC, M, F) to meet varying
shooting and hunting situations.
A unique notching system allows choke
tubes to be easily identified in minimal
light conditions, as shown in the following
chart.
NO. OF SLOTS
CHOKE
ON CHOKE TUBE
DESIGNATION
I . . . . . . . . . . . . . . . . .Full
II . . . . . . . . . . . . . . . . .Improved Modified
III . . . . . . . . . . . . . . . .Modified
IIII . . . . . . . . . . . . . . . .Improved Cylinder
IIIII . . . . . . . . . . . . . . .Cylinder
Your shotgun barrels are threaded to
accept any chokes with American stan-
dard 32 threads-per-inch threading.
• WARNING: Always open the action and
unload your shotgun before changing
chokes. NEVER fire your shotgun with-
out choke tubes installed. Doing so may
damage the threads and/or barrels.
Always make sure the choke tubes are
firmly screwed into the barrels, but do
not over-tighten. Never use a choke that
is bent or out-of-round.

8
Repair Instructions
Your firearm has been designed, engi-
neered and manufactured in accordance
with Marlin's rigid quality control standards.
However, any mechanical device may
occasionally require adjustment or repair.
Questions regarding the performance
and serviceability of your firearm should
be addressed to our Service Department.
You should include the Serial Number,
Model Number and a full description of
the conditions and problems involved.
Warranty Repairs
Our Warranty policy covers all our
firearms against defects in workmanship
or material for a period of five years from
the date of purchase to the original
owner. See the inside front cover of this
manual for warranty details.
Guns requiring warranty repairs should
be returned to the factory. Be sure to fol-
low the “Shipping and Handling” instruc-
tions in this manual.
Non-Warranty Repairs
Your local gunsmith may be able to
repair your gun. If not, ship it to the facto-
ry, following the “Shipping and Handling”
instructions in this manual.
After receiving your firearm, we will send
you an estimate of the repair cost.
Repairs will begin upon receipt of your
check or money order. If repairs are not
possible, your firearm will be returned.
Shipping and Handling
When sending your firearm to the facto-
ry, please follow these instructions:
1. Prior to shipping, be absolutely certain
that the firearm is completely
unloaded (See “How to Unload”).
2. Pack your firearm carefully. Use
ample cushioning material and a stur-
dy outer cardboard box. Do not ship in
a special container which you want
returned.
3. Accessories such as scopes, scope
mounts, gun case, quick-detach type
swivels, slings, etc. should be
removed prior to returning the firearm.
4. Inside the box, include the following
information: model number, serial
number, description of damage or
problem, and under what conditions
problem occurs.
5. Keep a record of your serial num-
ber when returning a firearm.
6. Clearly mark your return address on
the outside of the box and on your
instruction sheet.
7. Do not ship live ammunition under any
circumstances.
8. Ship your firearm via insured Parcel
Post or U.P.S. Shipment must be pre-
paid and addressed to:
MFC INC.
ATTN: SERVICE DEPT.
100 KENNA DRIVE
NORTH HAVEN, CONN. 06473
9
The Fascinating History of Marlin
W
ritten by the late William S. Brophy, Marlin’s Senior Technical
Manager and Official Company Historian for many years, this
prodigious book details the history of the Marlin
Firearms Co. and its products. The hardbound
volume contains more than 600 pages and
over 1000 illustrations. Must reading for any-
one interested in all the models — pistols,
rifles and shotguns — made by Marlin, and
in the story of more than a century of
firearms production in America.
For more information, write:
Marlin Firearms Co.
Department OM
100 Kenna Drive
North Haven, CT 06473
IMPORTANT
If you have any questions or problems
relating to your new Marlin, would like
additional information on safe operation,
or wish to order parts or accessories, just
call our Customer Service Center. A
Service Representative can be reached at
the number listed below, between 8 A.M.
and 4:30 P.M. (Eastern Time), Monday
through Friday.
1-800-544-8892
(Toll Free)
Please record the firearm serial number, date
of purchase and where purchased below.
Serial #: _ _ _ _ _ _ _ _ _ _ _ _ _ _ _ _ _ _ _ _ _ _ _ _ _ _ _ _ _ _ _ _ _ _ _ _ _
Date of Purchase: _ _ _ _ _ _ _ _ _ _ _ _ _ _ _ _ _ _ _ _ _ _ _ _ _ _
Purchased From: _ _ _ _ _ _ _ _ _ _ _ _ _ _ _ _ _ _ _ _ _
_ _ _ _ _ _ _ _ _ _ _ _ _ _ _ _ _ _ _ _ _ _ _ _ _ _ _ _ _ _ _ _ _ _ _ _
In case of loss or theft, supply this
information to the proper authorities.
Printed in U.S.A.
3/05
4859030-01
Health Warning:
Discharging of firearms in poorly ventilated areas
and handling ammunition may cause exposure to lead and/or lead
compounds. Exposure may cause cancer, birth defects or damage
to the kidney, nervous, blood forming and reproductive systems.
Have adequate ventilation at all times, especially in confined areas.
Wash hands thoroughly after shooting, handling ammunition, or
cleaning a firearm. Do not eat or smoke during these activities.
Safety Warning:
Marlin strongly recommends that you take a hunter
safety course, taught by a certified instructor, before you use this
firearm. Your State Fish & Game Dept. or a local gun shop can sug-
gest courses in your area.
Safety Warning:
Keep this firearm out of the reach of children,
unauthorized individuals, and others unfamiliar with the safe han-
dling of firearms.
Children are attracted to and can operate firearms
that can cause severe injuries or death.
Prevent child access by always keeping guns locked
away and unloaded when not in use. If you keep a loaded
firearm where a child obtains and improperly uses it, you
may be fined or sent to prison.
WARNING
A los niños los atraen las armas de fuego y las pueden
hacer funcionar. Ellos pueden causarses lesiones graves
y la muerte.
Evite que los niños tengan acceso a las armas de fuego
guardándolas siempre con llave y descargadas cuando no
las esté utilizando. Si usted tiene un arma de fuego cargada
en un lugar en que un niño tiene acceso a ella y la usa inde-
bidamente, le pueden dar una multa o enviarlo a la carcel.
ADVERTENCIA
1.
Read and understand the owner’s manual before using a firearm.
2.
If you are unfamiliar with firearms, attend a firearms safety class taught by a
certified instructor.
3.
Handle every firearm as if it were loaded and ready to fire.
4.
Control the muzzle, and never point a firearm at anything you don’t want to shoot.
5.
Keep the safety on SAFE until you are ready to shoot.
6.
Unless you are hunting, carry your firearm empty, with the action open.
7.
Before shooting, be sure you have an adequate backstop. All ammunition is
dangerous beyond your line of sight.
8.
Avoid ricochets by never shooting at water or any hard, flat surface.
9.
Do not run, climb, or jump over an obstacle with a loaded firearm.
10.
Do not climb into or out of a tree or tree stand with a loaded firearm.
Do not allow others to pass loaded firearms to you while in a tree stand.
11.
Do not enter or ride in a motor vehicle with loaded firearms.
12.
Do not lean a loaded firearm against anything.
13.
Do not bump, drop or jar a loaded firearm.
14.
Do not pull a firearm toward you by the muzzle.
15.
Wear hearing protectors when shooting.
16.
Wear impact-protective glasses when shooting, disassembling or cleaning firearms.
17.
Avoid alcoholic beverages and drugs before and during shooting.
18.
Use only ammunition of the correct gauge, caliber, size and bullet shape
for your firearm.
19.
Do not use damaged, dirty, modified, or improperly handloaded ammunition.
20.
Keep the barrel and mechanism of the firearm free of obstructions.
21.
Do not use a firearm that fails to function properly. Do not try to force a jammed action.
22.
Be sure no one is in the path of ejecting shells or cartridges.
23.
Do not interchange parts between firearms, and be sure disassembly and reassem-
bly are correct and complete.
24.
Before cleaning, be sure the chamber, action and magazine are completely
unloaded.
25.
Unload firearms before storing, transporting, or leaving unattended.
26.
Store firearms and ammunition separately, locked and out of the reach of children.
Failure to follow these rules, or other instructions in this manual,
can result in personal injury.
Marlin's Guide to Gun Safety
Wyszukiwarka
Podobne podstrony:
Lc Smith Side By Side Manual
F 22 Lightning 3 Voice Over Net Manual
Standards MP under scrutiny over claims
D 1 LC Technical Manual
Jeri Smith Ready WVMP Radio When The Music s Over
LC 1 Manual
The Primacy of European Union Law over National Law Under the Constitutional Treaty
PANsound manual
als manual RZ5IUSXZX237ENPGWFIN Nieznany
hplj 5p 6p service manual vhnlwmi5rxab6ao6bivsrdhllvztpnnomgxi2ma vhnlwmi5rxab6ao6bivsrdhllvztpnnomg
BSAVA Manual of Rabbit Surgery Dentistry and Imaging
Okidata Okipage 14e Parts Manual
Bmw 01 94 Business Mid Radio Owners Manual
Manual Acer TravelMate 2430 US EN
manual mechanika 2 2 id 279133 Nieznany
4 Steyr Operation and Maintenance Manual 8th edition Feb 08
Oberheim Prommer Service Manual
cas test platform user manual
więcej podobnych podstron