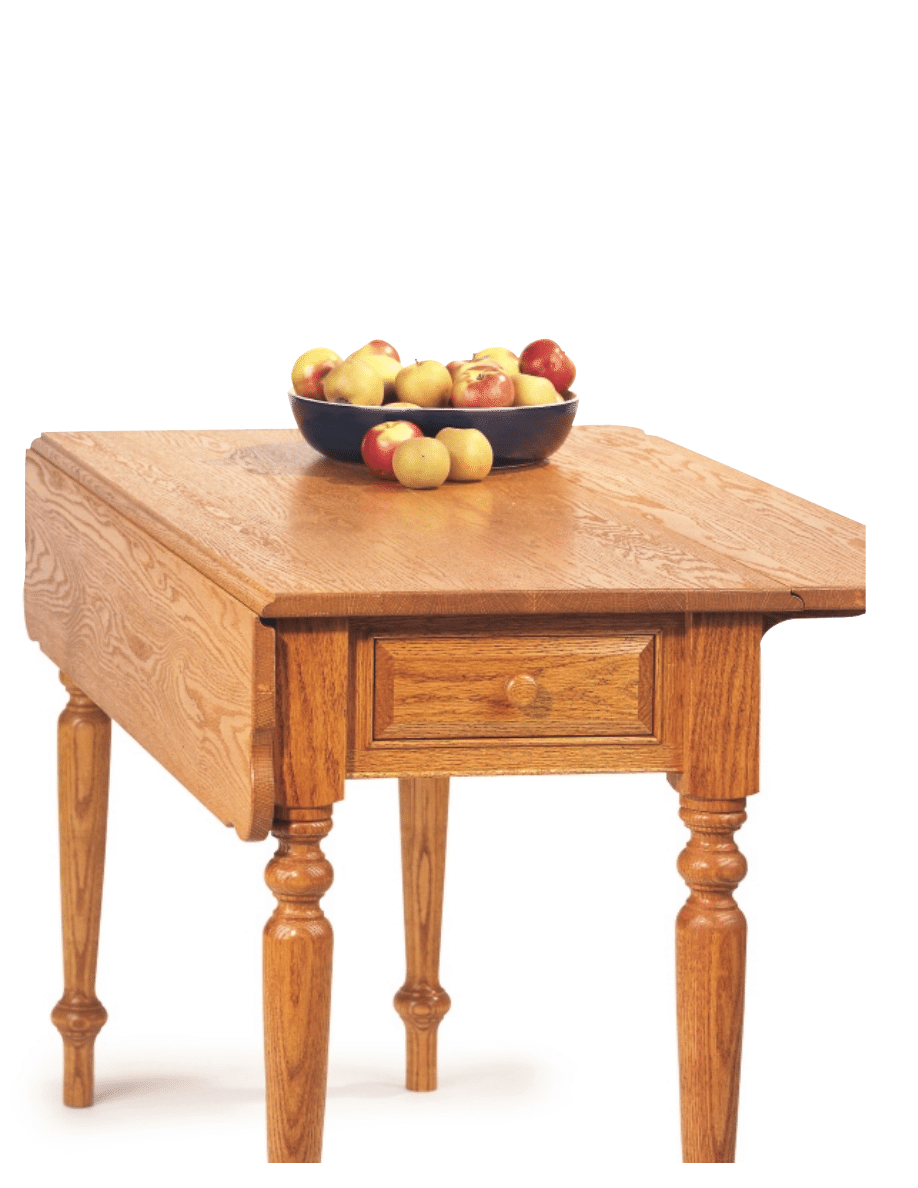
leaf table
Leaves dropped, this traditional oak table makes an ideal kitchen island.
Leaves extended, it’s a small breakfast table
Project By: Gary Walchuk
Photography By: Dave Starrett
Plan Illustrations By: Len Churchill

T
he drop-leaf table is a tra-
ditional favourite, but the
one I’ve designed takes a
few hidden, modern liber-
ties. The most helpful is
also the least obvious—ready-
turned legs. In today’s wood mar-
ket, it’s often only slightly more
expensive to buy high-quality legs
than it is to purchase thick wood at
retail prices, then turn them your-
self. I also used metal tabletop
clips to secure the top, instead of
under-table screw blocks or screws
driven into pocket holes. Clips
offer fast, easy, secure perfor-
mance, while letting the solid
wood tabletop move with the sea-
sons. Traditional furniture wasn’t
usually built with as much concern
for seasonal movement because
old-time woodworkers never
planned to accommodate the wide
humidity swings common in
today’s centrally heated homes.
Building new furniture exactly like
the old often leads to cracks
and trouble.
I planed my own 1"-
thick rough oak for
this table, creating the
7
⁄
8
" stock you see listed for most
parts on the materials list. Just
about any other wood will do fine,
too. This thicker-than-standard
stock looks much better than regu-
lar
3
⁄
4
" material for this project, and
it even costs less if you begin with
rough lumber bought directly from
the mill. This is just one advantage
of owning a thickness planer.
Maple, ash, cherry, and pine are all
excellent options. Whatever you
use, get the hinges and tabletop
mounting clips you’ll need before
making sawdust. The exact size of
this hardware will affect some
important steps along the way.
Getting Started
Whether you buy or make your legs,
they need a 2
3
⁄
4
" x 2
3
⁄
4
" square top
end that extends 7" down before
hitting any turned profile. Grain
patterns will vary from leg to leg, of
course, so take a close look and
assign each one a particular spot in
the table’s final design. Mark the
position on top with a pencil. Next,
cut a
1
⁄
2
" x
1
⁄
2
" x 5
1
⁄
2
"-long mortise in
the centre of the four leg faces
that’ll join with the side skirts. It’s
best to do this operation with a car-
bide bit in a table-mounted router,
taking
1
⁄
4
"-deep passes. Even if your
router has the power to cut each
mortise in one go, you’ll get
smoother results if you take it in sev-
eral steps. Spiral-shaped bits do an
excellent job in this application.
The end frames span the short
distance between pairs of legs,
encasing the drawer fronts. Cut the
long and short end frame members
to size, then use glue and screws to
join them into rectangles measur-
ing 2" thick x 6" high x 13" wide.
Use glue and clamps to secure these
frames to the inner faces of the legs,
the back edges of the frames flush
with the inside leg corners.
Adding Details
It’s often the little things that make
a woodworking project shine, like
the delicate beading that surrounds
each of the table’s end frame draw-
er openings. Start by cutting four,
48" lengths of straight-grained,
knot-free wood into
1
⁄
4
" x 1" strips,
then rout a half-round profile on
one edge using a table-mounted
router and featherboards. This
shape is called a bullnose, and it’s a
classic detail that’s seen most often
in old woodwork. It’s a wonderful
visual feature—just one of the great
things you can explore in a home
workshop. Install carefully mitred
strips of bullnose beading around
both drawer openings, and along
the bottom of the end frames,
between each leg. The strips’
rounded, outer edges should sit
1
⁄
8
"
proud of the frame. Although a
mitre saw is the ideal tool to cut
these parts, it’s not the best one for
fine-tuning the length of pieces that
are just a little too long. The easiest
way to shorten strips of bullnose
beading by just a few thousandths of
an inch is with a block plane.
country kitchen
Gary uses a Ryobi JS048 jigsaw to cut the corner shape on each leaf. The piece is
securely clamped, and Gary uses his thumb on the base plate to guide the saw
Peeling a few curls of wood off the
back face of bullnose beading (not
the mitred end) is often the best
way to fit a mitre.
Bring Together the
Legs and Skirts
Make the two side skirts by cutting
them to size and preparing
1
⁄
2
" x
1
⁄
2
" x
5
1
⁄
2
" tenons on each end. You’ll find a
tablesaw or table-mounted router
the best tools for this job. But before
you rush ahead and join the skirts to
the legs, be sure to cut a
1
⁄
8
"-wide x
3
⁄
8
"-
deep groove along the inside face of
the skirts and end frames. The plans
show details. These grooves allow the
tabletop clips to connect to the
skirts. The other end of the clips
screw to the tabletop. Depending on
clip design, you’ll have to cut the
grooves
3
⁄
8
" or
1
⁄
2
" down from the
skirts’ top edges. Check your hard-
ware and adjust to suit.
Dry-fit the skirts, legs and end
frames now, and reassemble with
glue once you’re satisfied with the
fit. The framework should be
square and flat before setting it
aside to dry. Put the structure on a
flat floor, leg-bottoms down, then
measure and equalize diagonal
measurements taken across the top,
outside corners of the legs. When
diagonals are equal in length, the
frame will be square. Complete the
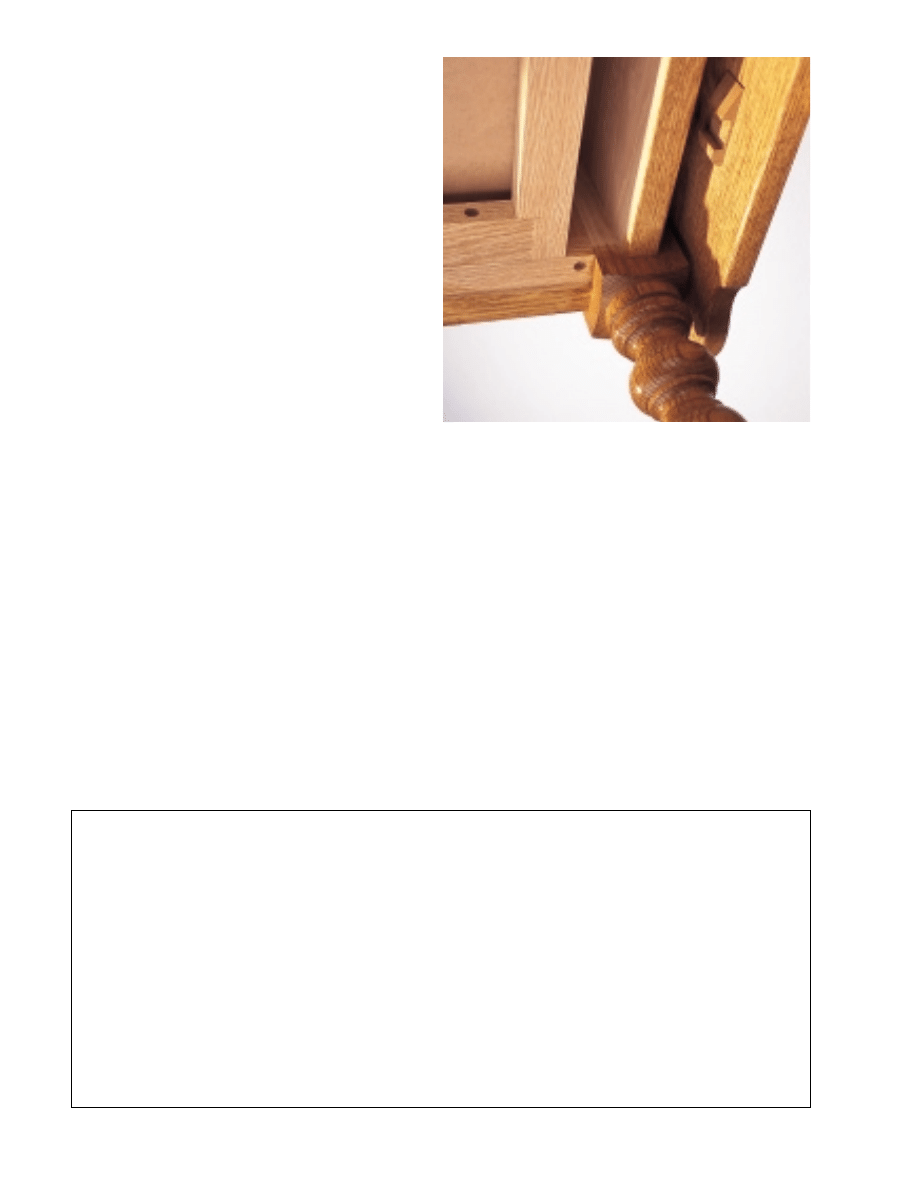
The view from underneath, showing the leg, skirt and drawer
undercarriage assembly. You can turn your legs, or buy them
factory-made, as long as the square ends are at least 7" long
Gary’s advice
I planed my own 1"-thick rough
oak for this table, creating the
7
⁄
8
" stock used for most parts.
This thicker-than-standard stock
looks much better than regular
3
⁄
4
" material for this project, and
it even costs less if you begin
with rough lumber bought
directly from a mill. This is just
one advantage of owning a
thickness planer
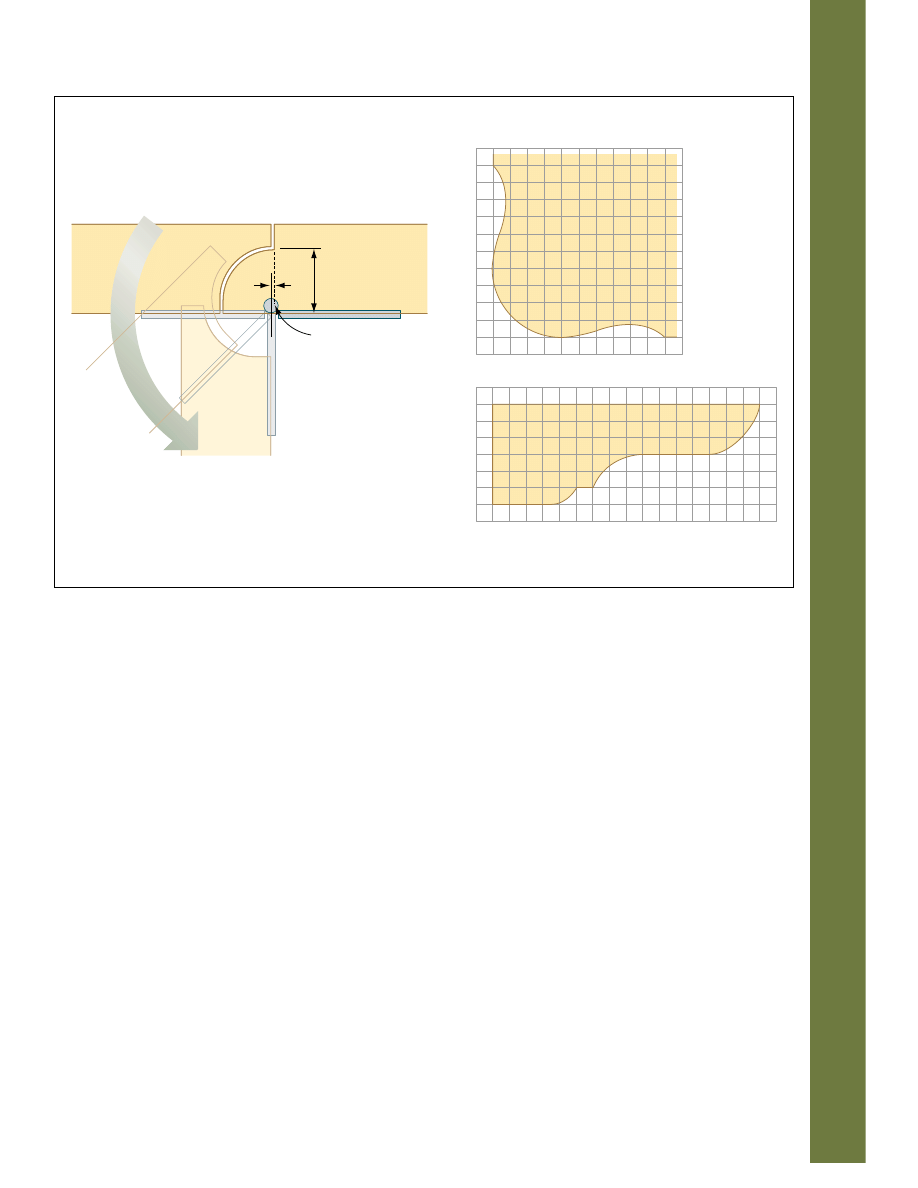
It’s no coincidence that many drop-leaf tabletops
don’t operate smoothly. That’s because there’s more
to drop-leaf hinge installation than meets the eye. If
you simply cut mortises and install hinges as usual,
your table leaves won’t operate smoothly. There are
two secrets to success.
The first is the need to install hinges so their cen-
tre of rotation is
1
⁄
32
" towards the leaf side. This
moves the leaf away from the tabletop as it tilts
down, assuring freedom from friction.
The second secret has to do with the hinge pins
up-and-down location relative to the curvature of
the routed profile on the table edge. The plans show
how the centrepoint of the hinge pins Gary used
must be slightly less than
1
⁄
2
" down from the top of
the rounded tabletop edge. This
1
⁄
2
" figure varies
depending on the radius of the router bits used to
cut the interlocking table edge details. A larger bit,
say
3
⁄
4
" radius, would require the hinge pin be locat-
ed slightly less than
3
⁄
4
" from the top of the curve.
Take a look at the plans for details.
But even with these details in mind, there’s no
substitute for practice. When you rout the edges of
your tabletop and leaves, mill the same interlocking
profile on some scrap. When it comes time for hinge
installation, take a few practice shots. There’s noth-
ing like experience to boost your confidence and
increase the quality of your work. —Steven Maxwell
drop-leaf hinging: not as easy as it looks
1
/
2
" x
1
/
2
" x 5
1
/
2
"
tenon
2"
3
/
8
"
3
/
4
"
1
1
/
4
" wide x 3" long
drop leaf hinges
10
3
/
4
"
table top
leaf
skirt
drawer
top guide
wedge
1" L-bracket
swing arm
wedge glued
to underside of leaf
long
drawer frame
member
short
drawer frame member
beading strips
leg
short end
frame member
WEDGE DETAIL
DRAWER GUIDE
DETAIL
outside corner
moulding
long drawer
frame member
long end
frame member
21"
3
3
/
4
"
drawer front
DRAWER BOX DETAILS
drawer
guides
drawer
stop
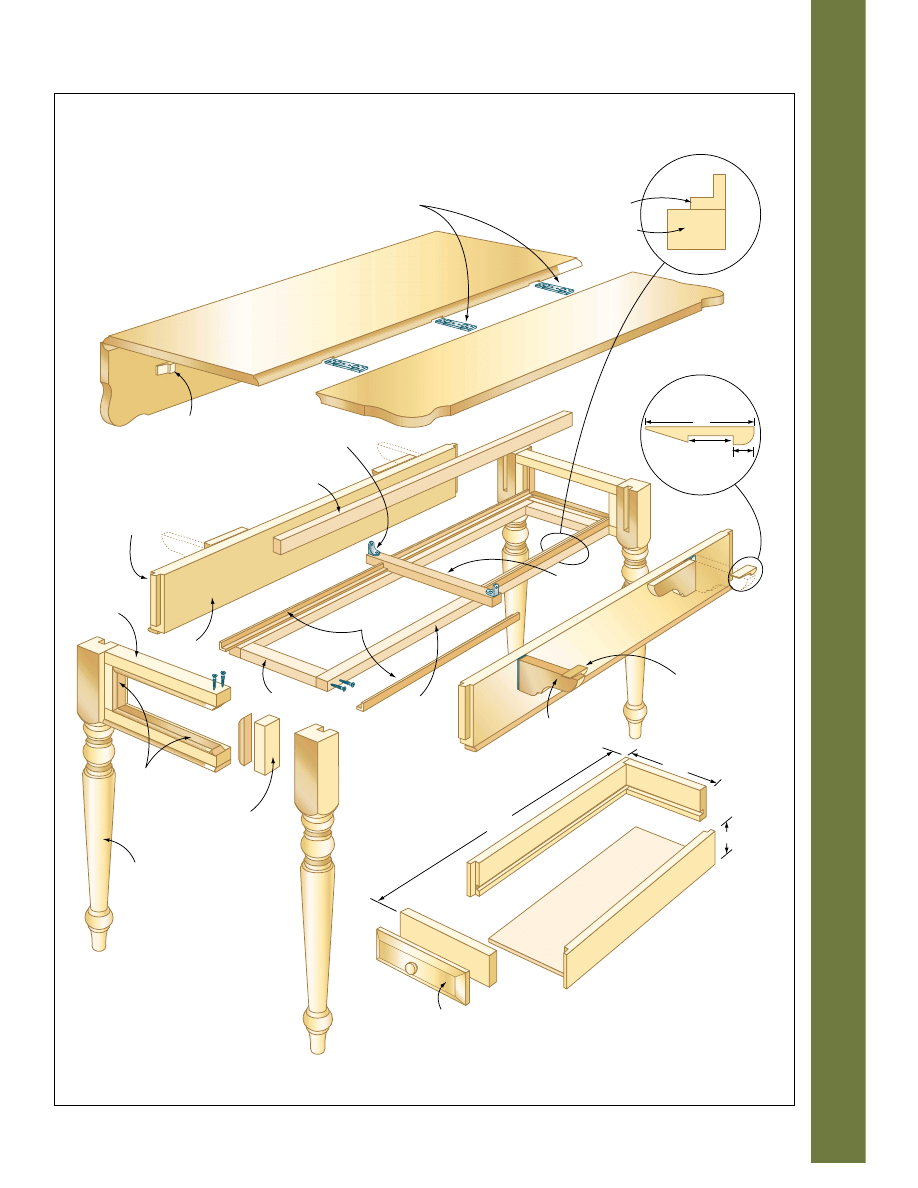
plans for leaf table
country kitchen
frame by adding bullnose beading
to the bottom edges of the side
skirts, between the legs.
Build the Drawer and Frame
The drawers rest on a frame inside
the table. Cut the long and short
drawer frame parts you’ll need and
assemble them with two #8 x 2
1
⁄
2
"
screws per corner and glue. The
rectangle should measure
7
⁄
8
" x 11
1
⁄
4
"
x 40" when you’re done. Fasten the
drawer stop strip across the top of
this frame, using one screw at each
intersection point, as shown in the
plans. Slide the frame into position
from underneath the table, butting
the drawer frame’s ends to the
inside faces of the lower end frames.
Secure the drawer frame to the end
frame with screws, counterbored to
accept tapered wooden plugs. Be
sure the drawer frame is centred
between the side skirts. You can now
strengthen the assembly by fasten-
ing the drawer stop strip to the side
skirts with a pair of 1" L-brackets.
Although the drawers are sup-
ported on the frame you just
installed, drawer travel is guided by
two pieces of commercially milled
outside corner moulding nailed to
the top of the frame. Cut and install
these four drawer guides now, out-
side edges flush with the outside
edges of the drawer frame. Silky
drawer action depends on smooth
guide surfaces, so spend some time
sanding. Applying a finish to these
guides later will make the drawers
work even better.
Measure the space between draw-
er guides and build a pair of drawer
boxes to suit. The size in the mate-
rials list is theoretically correct, but
you should custom-build drawers
for your table. Aim for a
1
⁄
16
" total
side-to-side clearance between
drawer and guide. Any less and you
run the risk of drawers sticking in
humid weather; any more and the
drawers could wobble as they move.
Complete the drawers by making
the two drawer faces and cutting
25° bevels on their edges. The outer
edge of each face should measure
1
⁄
2
" thick. Wait until later to join the
drawer boxes and faces.
part
material
size
qty
Legs
oak
2 3/4" x 2 3/4" x 29"
4
Long end frame members
oak
7/8" x 2" x 13"
4
Short end frame members
oak
7/8" x 2" x 4 1/4"
4
Beading
oak
1/4" x 1" x 16'
(total length required)
1
Side skirts
oak
7/8" x 6" x 41"
2
Long drawer frame members oak
7/8" x 1 1/4" x 40"
2
Short drawer frame members oak
7/8" x 1 1/4" x 8 3/4"
2
Drawer stop
oak
7/8" x 1" x 14 7/8"
1
Drawer guides
outside corner moulding 3/4" x 3/4" x 20 5/8"
4
Tabletop
oak
7/8" x 20 1/2" x 48"
1
Leaves
oak
7/8" x 8 1/2" x 48"
2
Drawer top guide
oak
7/8" x 1 1/8" x 40"
1
Swing arms
oak
7/8" x 3" x 8"
4
Wedges
oak
1/4" x 1" x 2"
4
Drawer boxes
plywood
3 3/4"H x 10 3/4"W x 21"L
2
Drawer fronts
oak
7/8" x 3 11/16" x 10 11/16"
2
Knobs
oak
1 1/4" diameter
2
L-bracket
metal
1"
2
Table legs: Woodturners Inc. (877-603-9663) TL-800-29. Support-arm hinges: 3" cabinet
hinges, National brand #N146-852. Drop-leaf hinges: Workshop Supply (800-387-5716)
4025-0125A. Tabletop clips: Lee Valley Tools (800-267-8767) 13K01.01
Recommended Power Tools: Tablesaw, Belt Sander, Table-mounted Router, Hand-held Drill,
Jigsaw, Bandsaw or Scrollsaw,Thickness Planer, Jointer
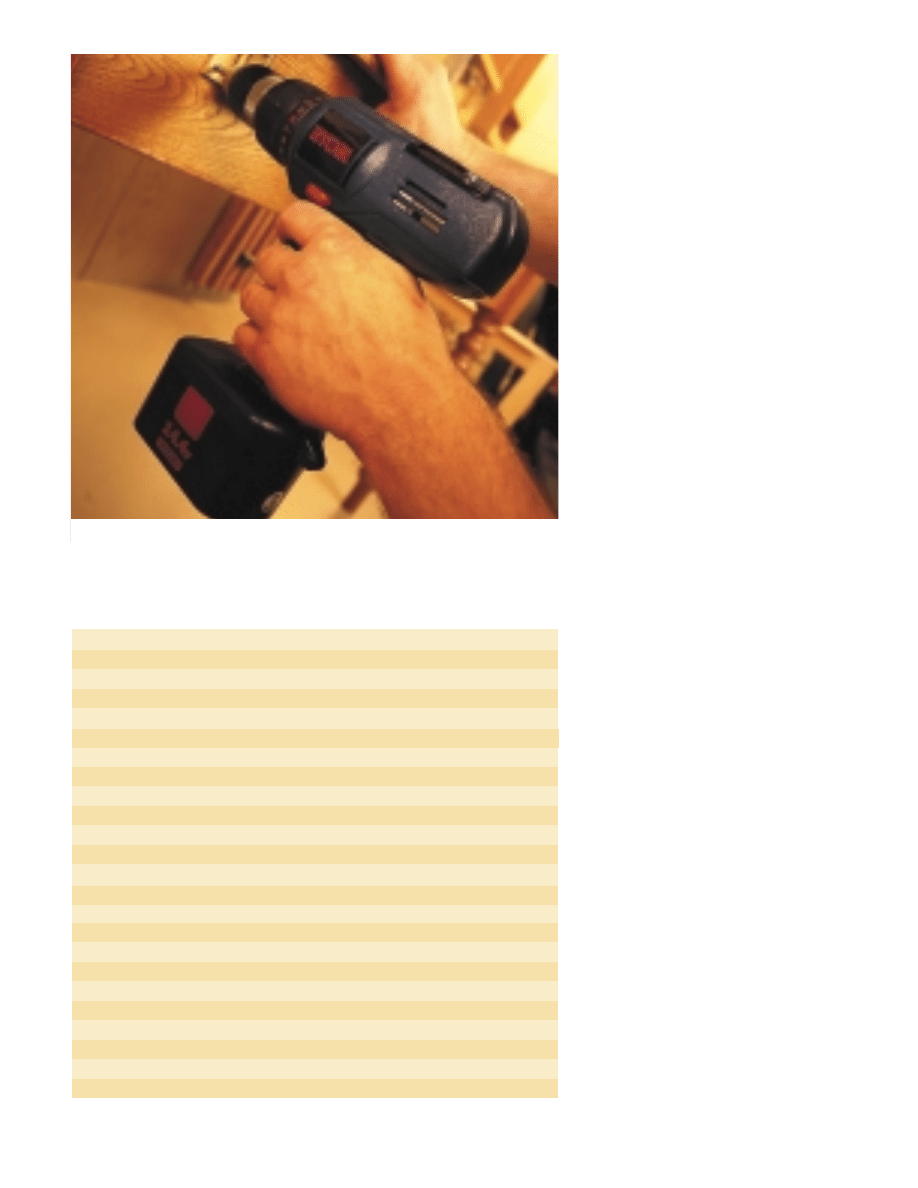
A 14-volt cordless drill has plenty of power to drill the pilots and drive the screws
for the support-wing hinges (shown here) and the special drop-leaf hinges
materials
country kitchen
17
/
32
"
table top
pivot point of
hinge
1
/
32
" towards
leaf
leaf
LEAF CORNER DETAIL
SWING ARM DETAIL
FOLDING LEAF DETAIL
1 square =
1
/
2
"
1 square =
1
/
2
"
plans for leaf table
Make the Tabletop
Edge-glue enough stock for the
tabletop and leaves, sand these
parts, then cut them to final shape
before getting ready to rout the
interlocking edge profiles. This fea-
ture is called a rule joint, and I used
standard
1
⁄
2
"-radius roundover and
cove bits in my router to create
them. Given the choice, though,
3
⁄
4
"-
dia. bits would have been slightly
better, but not many woodworkers
(me included) own them.
Drop-leaf hinge installation
requires special attention to detail,
so take a look above and read the
sidebar on page 50 for valuable tips.
I recommend three hinges per side:
one in the middle and two 6" from
each end.
When the hinges are done, soft-
en the table and leaf edges with a
1
⁄
8
"-radius roundover bit in your
router. Then flip the tabletop
upside down on your bench (put a
blanket underneath to protect it),
and install the leg-and-skirt assem-
bly using the clips I told you about
earlier. The plans show where to fas-
ten the drawer top guide to the
underside of the table. This stops
the drawer from tipping downward
as it’s fully opened. And since the
top guide also affects drawer travel,
it must be smooth and finished just
like the bottom drawer guides.
Make the Swing Arms
Four hinged arms—two on each
side—swivel out to support the
leaves when they’re extended. Cut
these now, following the outline
above, and prepare the four wedges
they work with, too. These are
designed to fasten to the underside
of the leaves, locking the swing arms
at 90° when the leaves are up. If
your swing arm hinges have too
much play in the knuckles, they may
allow the arms to droop, preventing
the leaves from being supported
horizontally. Shimming the space
between the swing arm hinges and
the side skirts solves this problem.
Cardboard or thin pieces of wood
work well for this.
Fitting and Finishing
Install the drawer faces and knobs
now, and test that every part of the
table operates smoothly. When
you’re satisfied, take it all apart and
give everything a final going-over,
sandpaper in hand. I finished my
table with two coats of Minwax
Golden Oak stain, followed by four
coats of semi-gloss, oil-based ure-
thane. Be sure to sand lightly with
240-grit paper after the second and
third coats have dried. The surface
fibres of the wood swell and stand
up as they soak in finishing liquids,
creating a rough surface that gets
rougher unless you sand after each
coat. But take care sanding around
corners. It’s easy to sand through
the finish and stain, revealing the
light-coloured wood underneath.
Wyszukiwarka
Podobne podstrony:
Drop Leaf Table
Drop leaf table
Drop Leaf Table
Shaker Single Drop leaf Table
oak dining table
Coffee Table 1
table style2, ♥Dokumenty
table cellspacin5, ❀KODY RAMEK I INNE, Ramki
table border (2)
Foresight Resolution Table
Chess Table
multiplication table
Effic Table (Table 4(V18)
Drill Press Table
table styl4, MOJE RAMKI, RAMKI 2
więcej podobnych podstron