THE WEREWOLF MASK
THE WEREWOLF MASK
THE WEREWOLF MASK
THE WEREWOLF MASK
– ASSEMBLY INSTRUCTIONS page 1.
NOTE: This model should be printed on heavy card stock.
WHAT YOU'LL NEED:
Scissors, an X-acto knife, an ink pen or sharp pencil (to use as a punch), Elmer's
glue (or a glue stick), tape (most any kind will work), a few feet of string or elastic cord, and a ruler or
other straight-edge. A black marker is optional.
ASSEMBLY:
Begin by cutting out the LEFT FRONT piece on Parts Page 1 and the RIGHT FRONT piece
on Parts Page 2. Use the X-acto knife to remove the eye hole (the white oval) in each piece. You’ll notice
each piece has a small white dot near the back edge. Use the ink pen or pencil to carefully punch a hole
in the white dot. This hole will be for tying the mask to your head, so to reinforce the area, place a piece
of tape on the back (unprinted side) of each piece, directly over the holes. Punch through the holes again,
this time puncturing the tape. If you wish, you can now use a black marker to block out any remaining
white areas around the holes.
(Continued on Next Page)

THE WEREWOLF MASK
THE WEREWOLF MASK
THE WEREWOLF MASK
THE WEREWOLF MASK
- ASSEMBLY INSTRUCTIONS page 2.
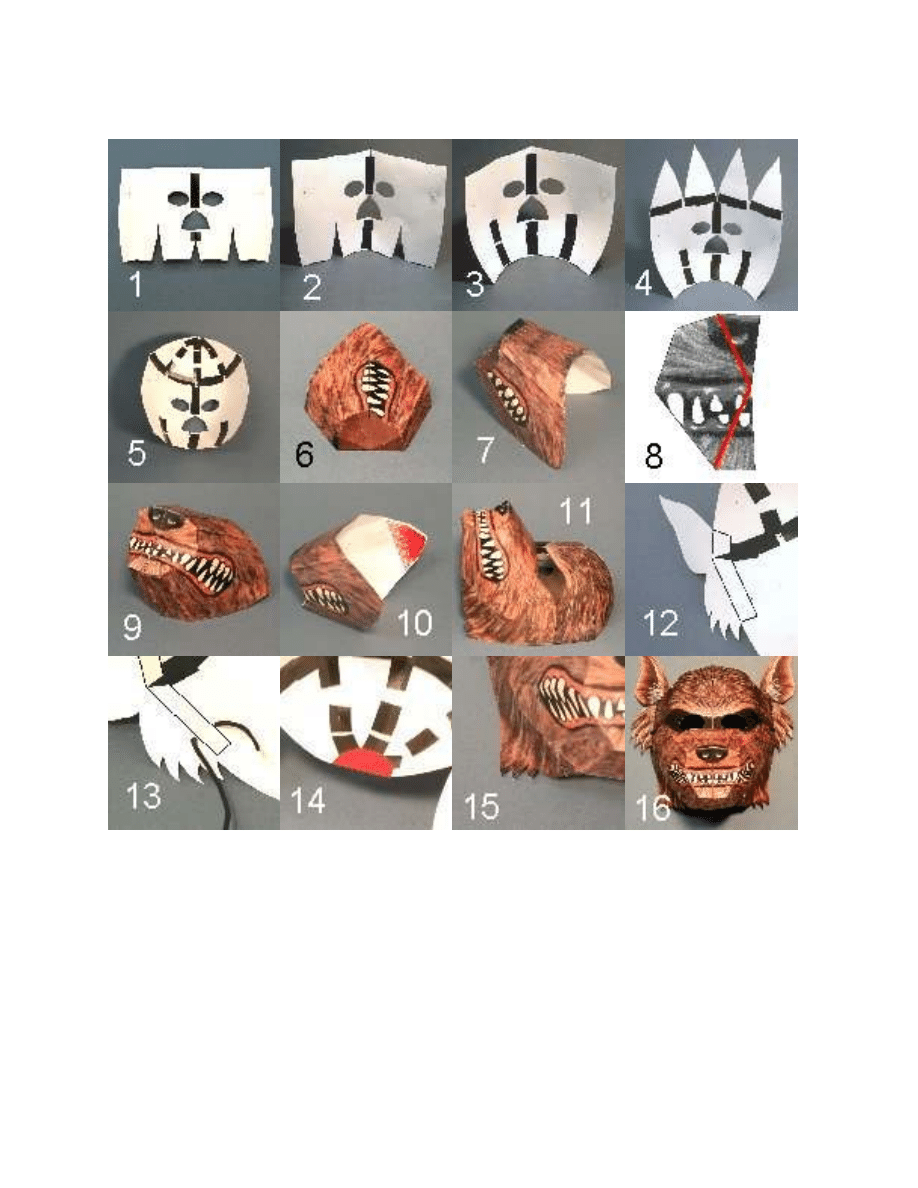
Now place the two pieces face down and tape them together above and below the nose hole, as shown in
Figure 1. When you gather together the two edges below the nose hole, the mask will curve (and that’s
what we want it to do). Next, gather together the rest of the center seam and tape as shown in Figure 2.
For the remaining gaps on either side of the mask, gather together the upper edges and tape them
together, and then gather the lower edges together and tape them as well. You should now have a curved
mask as shown in Figure 3.
Cut out the four TOP pieces on Parts Page 3. As you cut out each piece, use an ink pen or pencil to write
the piece’s number on the back of the piece (don’t use a marker, since that might bleed through to the
front of the paper). Position all four TOP pieces along the upper edge of the mask as shown in Figure 4
and tape the TOP pieces to the mask. Now tape the TOP pieces together in the same manner as we did
the gaps on the mask. Tape the inner edges first, then tape the middle edges, and finish by taping the
outer edges. Your mask should now resemble Figure 5.
Next we’ll add a snout to the mask. Cut out the SNOUT LEFT TOP piece on Parts Page 4. Fold
DOWNWARD along the two black lines and then fold all three brown tabs DOWNWARD. Cut out the
SNOUT LEFT SIDE piece on Parts Page 4. Fold DOWNWARD along the black line and then fold the two
brown tabs DOWNWARD. Tape Edge A of the SNOUT LEFT TOP piece to Edge A of the SNOUT LEFT
SIDE piece. (Don’t worry about the brown tabs overlapping, we’ll deal with that later.) Cut out the SNOUT
LEFT BOTTOM piece on Parts Page 4. Fold DOWNWARD along the black line and then fold the two
brown tabs DOWNWARD. Tape Edge B of the SNOUT LEFT BOTTOM piece to Edge B of the SNOUT
LEFT SIDE piece. Now tape each brown tab to the next adjoining brown tab, as shown in Figure 6. The
shape of the snout is difficult to explain, but after the tabs are joined, they’ll pull the snout into its proper
form.
After finishing with the three snout pieces on Parts Page4, cut out the three snout pieces on Parts Page 5
and assemble them in the same manner as we did the first three snout pieces.
Now join the two halves of the snout together, taping first the top edges (where a bit of the nose is shown)
and then the bottom edges. Finish by adding two small pieces of tape to the inside of the snout to connect
the brown tabs. The snout should now resemble Figure 7.
Cut out the LEFT NOSE piece and the RIGHT NOSE piece on Parts Page 6. Each nose piece has two
black lines, shown in red on Figure 8. Fold DOWNWARD along these lines. Curve each nose piece
inwards and then place it over the end of the snout as shown in Figure 9. Glue both nose pieces securely
to the snout.
Place glue on the inside of the snout’s side pieces where shown in Figure 10. Place the snout over the
mask and position the snout as shown in Figure 11. The snout should cover the green dots on either side
of the mask. The top of the snout will cover part of the eye holes (but should still leave enough of the eye
holes open for good visibility). The bottom of the snout should line up with the bottom of the mask. The
rear edges of the snout should rest snugly against the curve of the mask, and the snout should cover the
nose hole. When the snout is positioned correctly, glue it in place on both sides.
Next cut out the LEFT EAR piece and the RIGHT EAR piece on Parts Page 6. Each ear piece has a white
dot. Carefully punch a hole in each dot with an ink pen or pencil. Place a piece of tape on the back of
each ear piece, directly over the holes we just punched, and then punch the holes a second time, this
time punching through the tape. If you want, you can now use a black marker to block out any remaining
white areas around the holes.
For each ear piece, cut along the white line to separate the two brown tabs and then fold both brown tabs
UPWARD. Position the ears on the mask as shown in Figure 12. The large tab should attach to the
mask’s side pieces, and the small tab should attach to the mask’s top pieces. Glue both ears in place. Be
sure the holes on either side of the mask aren’t covered (punch them again if needed).
(Continued on Next Page)

THE WEREWOLF MASK
THE WEREWOLF MASK
THE WEREWOLF MASK
THE WEREWOLF MASK
- ASSEMBLY INSTRUCTIONS page 3.
Run string (or elastic band) through each ear piece (from the back) and then run the string back into the
mask (from the front) through the hole in the mask, as shown in Figure 13. If you have problems getting
the string through the holes, try making a loop in the end of a twisty and then use the twisty like a needle
to run the string through the holes. Tie the string securely on both sides of the mask. Place the mask on
your head and cut the string to the desired length (leaving several inches to tie the string together).
Depending on the size of the wearer’s head, the top of the mask may want to form a point, so we’ll add a
brace to help keep the top of the mask round. Cut out the TOP BRACE on Parts Page 6 and place inside
the mask as shown in Figure 14. Glue or tape the TOP BRACE in place.
And now a final touch to finish the mask: the lower corners of the mask have jagged edges. Curve these
edges forward around your finger so the tufts of hair can be seen more clearly from the front, as shown in
Figure 15.
You should now have a complete (and satisfyingly horrible) mask as shown in Figure 16. Wear it
whenever you feel the desire to scamper across the moonlit countryside, but be cautious if you notice any
angry mobs with torches and/or pitchforks.
CAUTION:
Wearing a paper mask can greatly reduce your field of vision, so always use caution. Never
wear this mask while you’re driving, riding a bike, skateboarding, crossing a busy intersection, or doing
anything that might be dangerous without a clear field of vision.
(Werewolves can be fun to have around. Smashed werewolves… not so much.)
Wyszukiwarka
Podobne podstrony:
cycle of the werewolf EITNCPGGIBOBU4OC7WR4L5LXCBZM7ZE6QFOTQVQ
Werewolf
Ellora's Cave Wyndham Werewolves 01 Love's Prisoner Davidson, MaryJanice
Dawn Montgomery [Holiday Howlz] Werewolf Woes (pdf)(1)
Cycle of the Werewolf
Heather Davis Never Cry Werewolf(4)
Karen MacInerney Tales of an Urban Werewolf 3 Leader of the Pack
Never say Werewolf^1 5
Never say Werewolf^1 6
Kate Steele Hoosier Werewolf 2 Who Let the Wolf Out
Davidson MaryJanice Wyndham Werewolves 2 Jareds Wolf
Cecilia Tan & Bethany Zaiatz (ed) Like An Animal Erotic Tales of Werewolves [Circlet] (pdf)
What Big Teeth You Have [Luna Werewolves Marcy Jacks
więcej podobnych podstron