
This Mission Editor tool is a slightly modified version of the actual tool used by NovaLogic Mission Designers. Although
some of the campaign programming has been disabled, you will find this tool extremely flexible when it comes to design-
ing your own missions. This manual will only cover the basic requirements for successfully creating a mission. Because
mission design has so many complex components, this tool is intended for the advanced user.
Use at your own risk.
Table of Contents
Section 1: Navigating the Tool ..........................................................................................................................2
Section 2: Editing General Information & Mission Briefings...............................................................................3
Section 3: Groups and Layers...........................................................................................................................4
Section 4: Waypoints ........................................................................................................................................5
Section 5: Inserting Items.................................................................................................................................6
Section 6: Area Triggers and Events .................................................................................................................7
Section 7: Exporting and Playing Missions........................................................................................................8
Section 8: Hints and Tips..................................................................................................................................9
Appendix A: Terrain Types...............................................................................................................................10
Appendix B: Trigger List..................................................................................................................................11
The Mission Editor Tool requires a minimum screen resolution of 800x600. For best results, we recommend that you set
your resolution to at least 1024x768. It is also recommended that you have at least 160 megs of memory free when using
the tool.
Delta Force 2
™
MISSION EDITOR
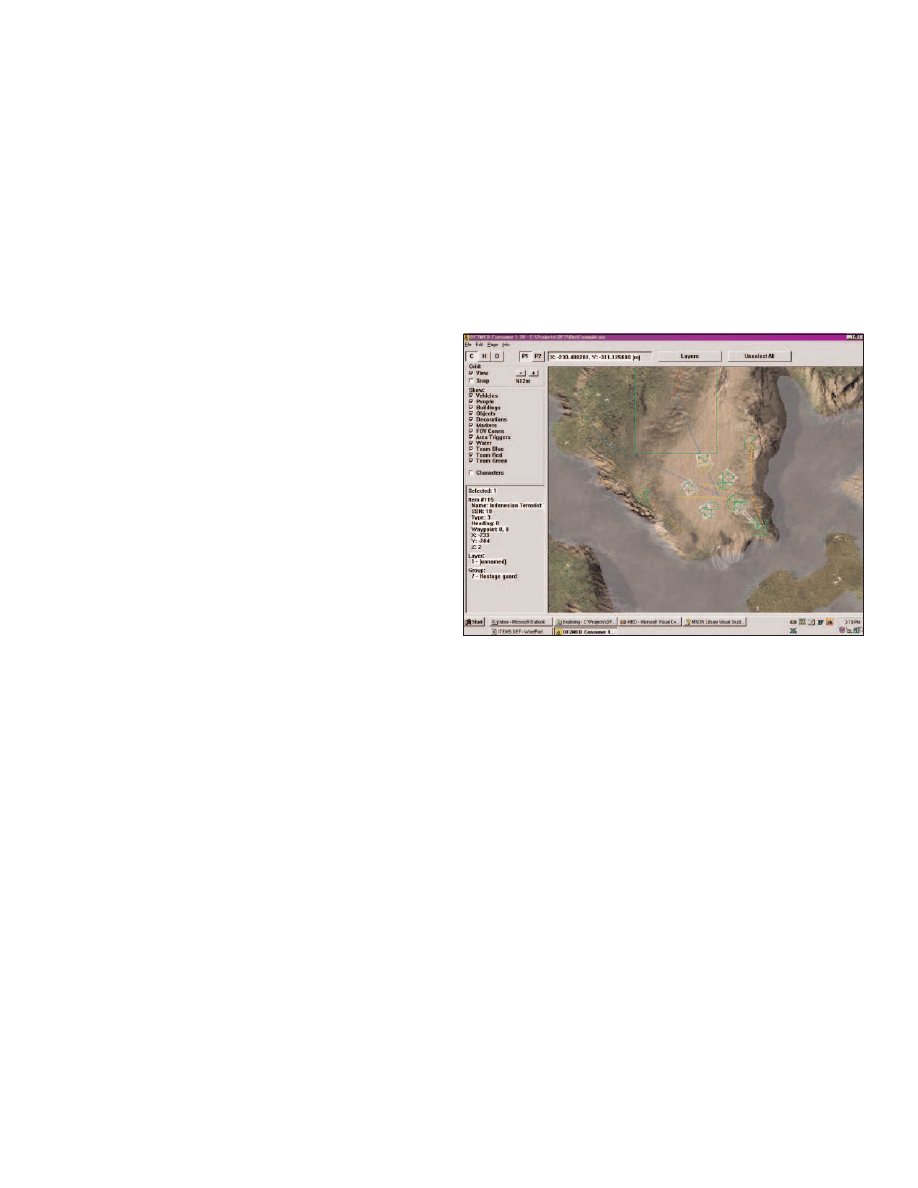
Section 1: Navigating the Tool
There are a number of keyboard controls and toolbar buttons that will help to create missions more efficiently.
Mouse Commands:
Left Button – Selects or unselects an item in Select Mode or Inserts a new item in Insert Mode. You can left click on the
Unselect All button or you can hit the U key to unselect all selected items. You can select more than 1 item at a time. As you
select items the attributes of the most recently selected item will appear in the lower left side window in the tool. While an
item is selected you can left click on the Selected Information Box in the left corner to pull up the Item Attributes window.
Left Button with SHIFT held down – Selects everything within the box you create.
Left Button with CONTROL held down – Unselects everything within the box you create.
Right Button – Brings up a menu for copying, pasting and selecting.
Right Button with SHIFT held down – Click and move right
or left to quickly zoom in and out of the map.
Right Button with CONTROL held down – Centers the map
at the point you clicked on
Keyboard Commands:
ARROW keys - Scrolls map up, down, left and right.
Page Up, Keypad 9, Keypad Plus - Zooms map in.
Page Down, Keypad 3, Keypad Minus - Zooms map out.
INSERT - Toggles between Insert Mode and Select Mode.
DELETE - Delete selected items.
ALT – Hold to use hotkey listed in the toolbar menu.
Screen Buttons:
C – Character Map – Press this button or the F1 key to
show a full color representation of the terrain.
H – Height Map – This button and the F2 key will bring up
a topographical view of the terrain where the lighter the
color the higher that part of the terrain. Solid dark areas are usually low, flat spots which is good for bases or airfields.
D – Depth Map – This view simply shows the contour map of the terrain. The closer the lines are to each other, the steeper
the grade. Solid black represents perfectly flat areas. You can also use the F3 key to see this map.
P1 – Page 1 – The Delta Force 2 Mission Tool allows you to have two different missions open simultaneously.
This feature is good for comparing missions or for copying/pasting elements out of one mission into another.
P2 – Page 2 – Press this button to display the second mission that you opened. Note you must be on this page when you open
the second mission or it will replace your page 1 mission.
XY Coordinates – This gives you the grid location of the center of your screen. Click on this to type in new coordinates and
the screen will center on them. The units are in meters.
Layers – This option brings up a box that allows you to select which layers you would like to see and which ones are hidden.
See Section 4 for more information on Layers.
Unselect All – This button (or the U key) will automatically unselect all items.
Grid – Items that you insert while the Snap box is checked will move to the nearest grid intersection. This is particularly use-
ful when you want to line items up precisely. The View box will toggle the grid overlay on and off. Use the Plus and Minus
symbols to increase and decrease the grid resolution (size).
Show – By checking the appropriate boxes, you can choose which items you see and which are hidden from view. This is
useful for finding specific items in a map full of various item types.
Selected Information Box – When you select an item, its most important statistics appear in the lower left corner of the
screen. Click anywhere in this area to bring up the Item Attributes window.
The red box on the terrain map displays the maximum size of the terrain. Any items you place outside the red box will be forced to
the inside edge of the red box when you export that mission. The green box shows you the suggested area in which to make your
mission. Placing items outside of the green box may make the mission excessively long.
Mission Editor Manual
p2
S
Se
ec
ct
ti
io
on
n
2
2:
:
E
Ed
di
it
ti
in
ng
g
G
Ge
en
ne
er
ra
al
l
I
In
nf
fo
or
rm
ma
at
ti
io
on
n
&
&
M
Mi
is
ss
si
io
on
n
B
Br
ri
ie
ef
fi
in
ng
gs
s
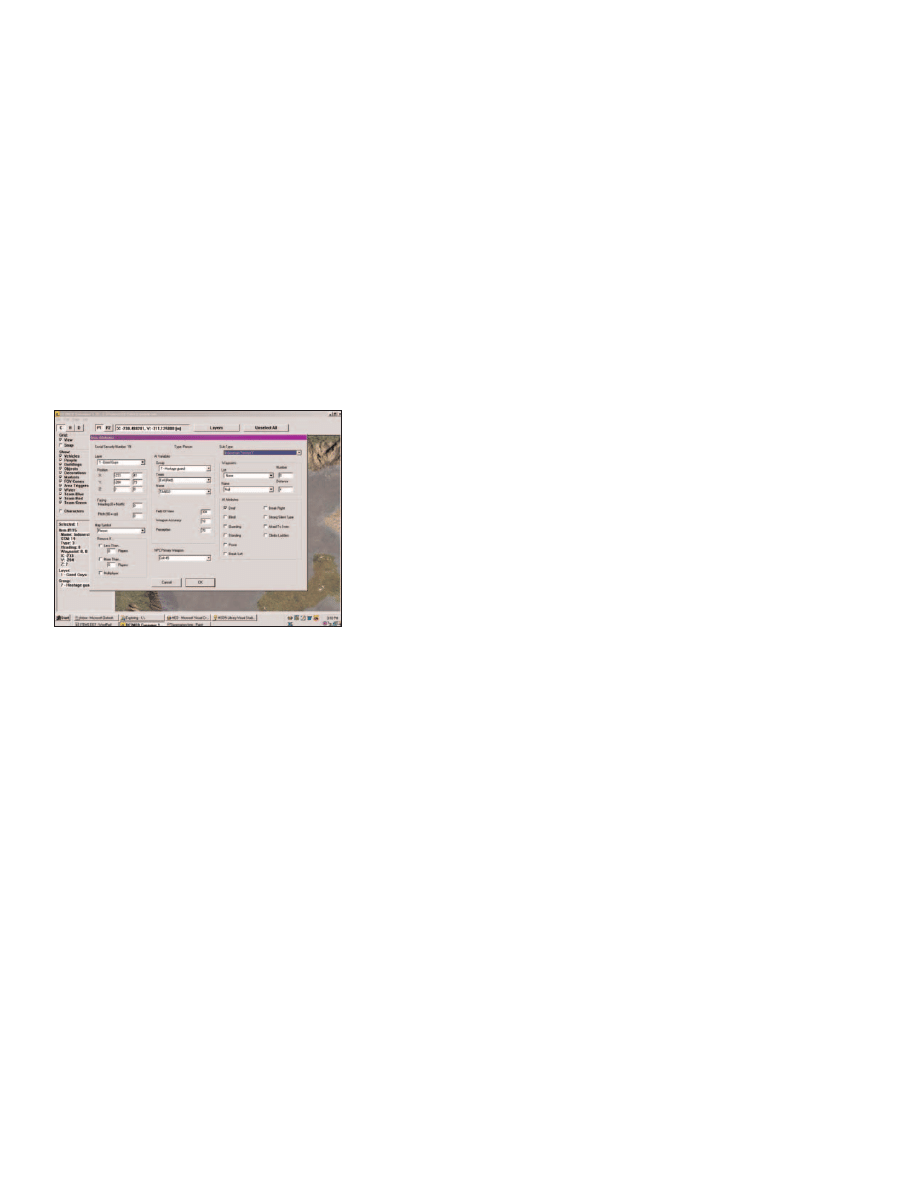
Under Edit in the Tool Bar, select General Information to set the basic mission details. Select Briefings to edit the text that play-
ers will see on the mission briefing screen before the mission begins.
Mission Name – This is the unique name that people will see when selecting your mission.
Mission Designer – Put your name here.
Mission Terrain – Consult with Appendix A for a list of all ter-
rain available and select the one that best fits the location of
your mission.
Item Colors - Items choose from 3 different camouflage styles:
Green (for grassy terrain), Brown (for desert terrain), or White
(for snow terrain). Choose the one most appropriate for your
mission. All items with multiple camo settings will use the one
color selected here when the mission is exported.
Default Equipment – Select the gear that is most appropriate
for the player in your mission. They will be able to change this
gear before entering the mission or at an armory if one is
available.
Wind Settings – If you want wind to play a part in your mis-
sion, set the wind speed and direction here.
Mission Type – Select what type of mission you are making.
Terrain Overrides – You can raise the water level in your mission (measured in
1
/
2
meters). We recommend that you do not go
over 130 for most maps or the entire mission may take place underwater. If you want fog in the mission, select its level here (1-9).
0 is off, 1 is extremely thick and 9 is so thin it appears as an overcast day. Between 5 and 7 is best for missions with fog. You can
also alter the color of the fog by manually setting the Red, Green and Blue settings. Fog is best when Gray (50,50,50). Other exam-
ples of colors:
Bright Red = 255,0,0
Yellow = 0,100,100
Medium Green = 0,120,0
Black = 0,0,0
Dark Blue = 0,0,25
White = 255,255,255
Sky Settings – With these settings, you can add weather effects such as rain or snow and set the position and brightness of the
sun or create a night mission. Be sure to check the Night box in addition to selecting a night sky, as this will properly adjust certain
art elements.
Win and Lose Conditions – You can set up to four win or lose mission goals in this area. The win and lose conditions are for goal
information text only. The actual win and lose conditions are set up through the events.
Fire Missions Available – Indicates the number of fire support strikes you can call with the laser designator.
Mission Editor Manual
p3
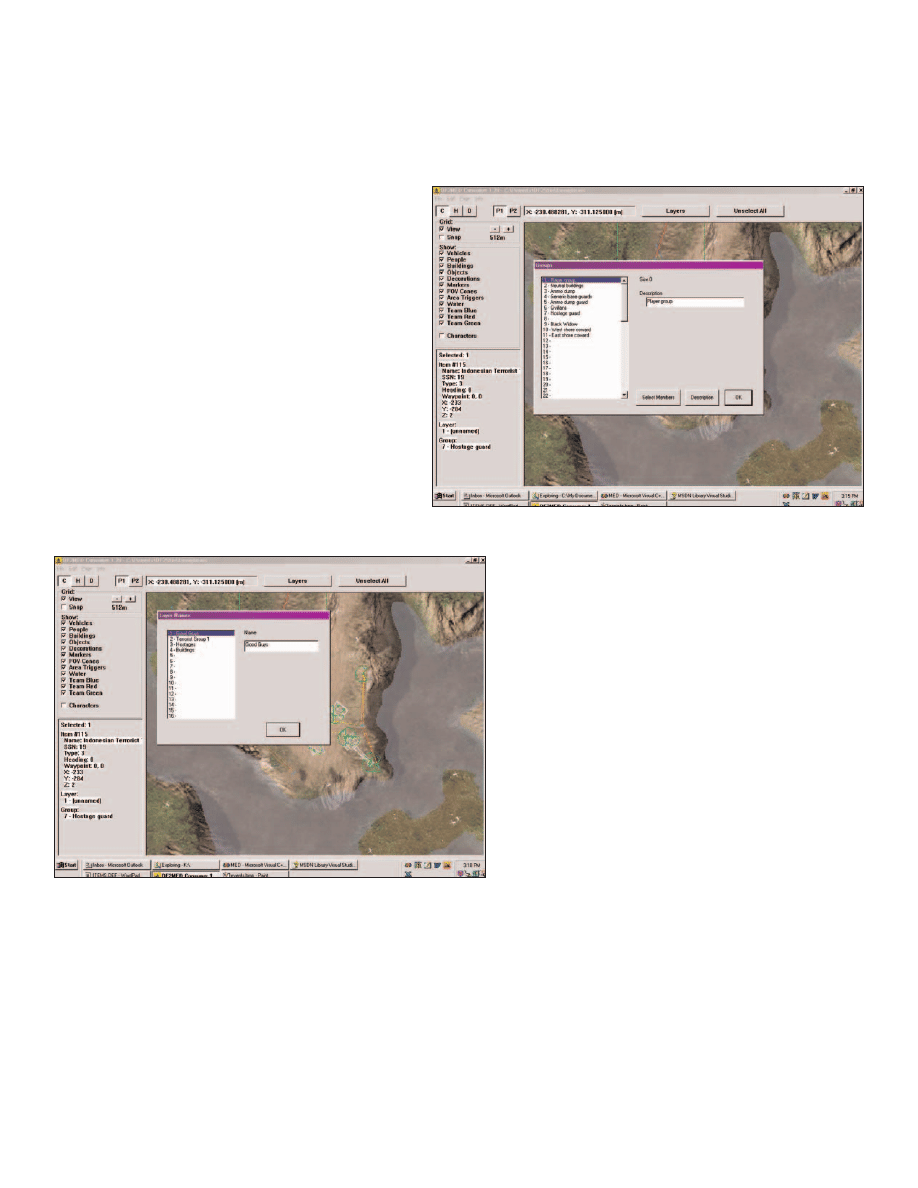
Section 3: Groups and Layers
The most important part of building a good mission is organization. You can quickly get lost in a sea of meaningless numbers
unless you take the time to properly label things. A little work in the beginning saves a lot of headaches later on.
Groups
Groups are used to classify related items such as a squad
of enemy soldiers and identity for Events and Waypoints. It
is often better to give each unit its own orders so that it
doesn’t interfere with other units, however, placing multi-
ple units in a group may save you time setting up the mis-
sion. You can rename the group to any name you want
and automatically select all units within a group from the
Group window, under Edit. Click Save As to save the list
to a text file for printing.
Layers
Layers are vital to sorting out all of the items within a mis-
sion. You can create up to 16 individual layers for sorting.
Under the Edit menu, you can change the Layer Names
to whatever has meaning to you. Some examples of
names are Enemy Base, Friendly Waypoints, and Foliage.
When you just want to see a certain layer of items, hit the
Layers button on the main screen and check the ones you
want to see.
Mission Editor Manual
p4
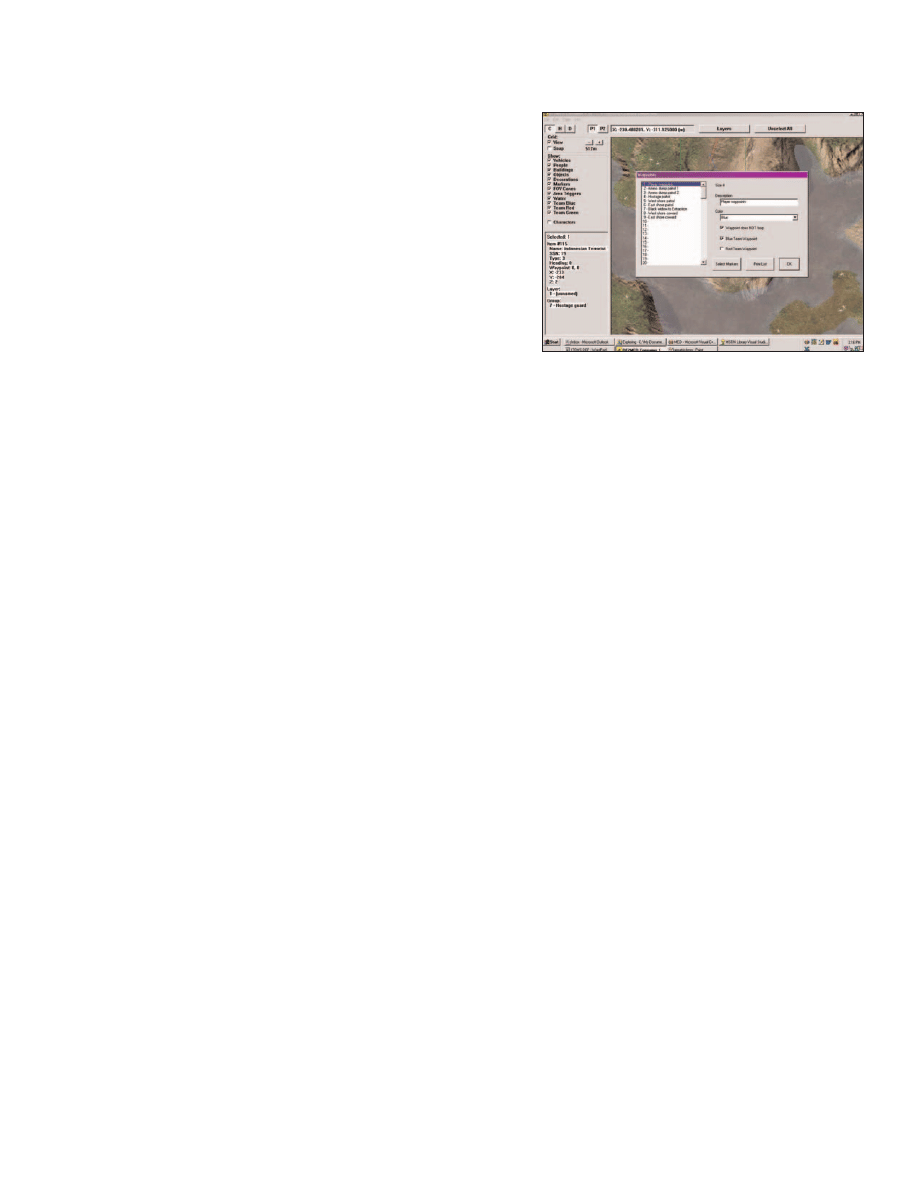
Section 4: Waypoints
Waypoint groups tell vehicles and soldiers where to go. Set up Waypoints
under the Edit menu. Again you can name a waypoint group with whatever
name you chose. The Waypoint window will show you how many individual
waypoints are part of a waypoint group. If you check the “Waypoint does not
loop” checkbox, then the vehicle will come to a stop at its last waypoint.
Otherwise vehicles reaching their last waypoint will attempt to head back to
their first waypoint and start again. You place waypoints (found under
Markers in the Insert Item window), as you would insert other objects.
Click Save As to save the list to a
text file for printing.
Placing Waypoints
A waypoint is designated by 2 numbers, such as waypoint 1-1 or 2-4. The
number before the dash indicates its Waypoint List number. The number after the dash indicates its Waypoint Number. Waypoints
are numbered from 0 up, not 1 up. The “reached waypoint” triggers follow this logic. So to the trigger, the second waypoint in a list
is “1” no matter what they numbered the object as.
Setting up a waypoint list:
1.
Go to Edit in the menu and then select Waypoints
2.
Waypoint List One should already be selected. Click in the Description box and type “Enemy’s Waypoints”
3.
Below that is a box to select a color for the lines connecting the waypoints. Select a color if you feel like it.
4.
Below the Color box is a small check box. This determines whether or not your waypoint list will loop.
We don’t want our first waypoint list to loop. Click on it so that it is checked. Then click OK.
5.
Go to Insert Mode
6.
Click on the map somewhere near your enemy to add the first waypoint.
7.
In the Insert Item window, click on Markers then select waypoint.
8.
Click somewhere else on the map to place your next waypoint.
9.
Notice that Markers and waypoint are already selected. Just click on OK.
10.
Repeat steps 8 and 9 a couple more times.
11.
Get out of Insert Mode
12.
Select all of the waypoints you just placed and then click on the Selection Information Box to bring
up the Item Attributes window.
13.
Change the Waypoint List box to “1 – Enemy’s Waypoints”. Click OK.
14.
You should now see a series of connected lines. This is your waypoint list.
15.
Unselect All
16.
Select your first waypoint and bring up the Item Attributes window.
17.
Change the Number attribute (located near the bottom of the window in the center) to “0”. Click OK.
18.
Now unselect the waypoint and select another one. Give that one a “1”.
19.
Repeat step 18, giving each waypoint a successive number.
20.
Now your waypoints are numbered and ready to go. We just have one last thing to do.
21.
Select the enemy unit and bring up the Item Attributes Window. Under the Waypoints section, Select List “1 - Enemy’s
Waypoints” like you did for the waypoints in Step 13. Click OK.
Mission Editor Manual
p5
Section 5: Inserting Items
After you have established some waygroups, you can begin placing items. Items represent every thing your player can encounter,
from enemy vehicles and buildings to scenery such as trees and water towers. While in Insert Mode, left click to set a new object
down. This will bring up the Insert Item window where you can select the type and sub-type of item that you want to place. Note
that Markers include Player/team start positions, waypoints, and King of the Hill areas.
After placing an item, switch back to Select Mode by pressing the INSERT key and left click on an item. The basic statistics of the
item will come up in the Selection Information Box. Click on this area to open up the Item Attributes window.
While in the Item Attributes window, you can only alter attributes that pertain to the unit(s) selected. You will not necessarily need
to fill in every field available. Note that any attribute you modified will be changed for all items currently selected (where possible).
Social Serial Number (SSN): The tool automatically sets this number when an item is placed. It represents the item number
of the unit. Every unit has a SSN. The SSN is also used when you are triggering actions to happen to or happen because of that
specific unit.
Layer: All units belong to a layer. Selecting an appropriate layer will help you to better organize the mission. See Section 3 for
more information on Layers.
Position: This is the precise coordinates of where you placed the unit on the map.
Facing: This is used to change the direction an item is facing. It can be set from 0
to 360 degrees, with 0 representing North, 90 representing East, 180 representing
South and 270 representing West. Pitch is the degree the object is pitched for-
ward or backwards; something pitched at 90 will be pointed straight up rather
than forward.
Map Symbol: If you want the item to show up on the player briefing map and
Commander’s Map, select the appropriate icon here.
Remove if: This is used when changing the difficulty of a mission for multiple
players. For example: If a 4 is placed in the Remove If Less Than… field, that
particular unit would only appear in that mission if more than four player were in
the multiplayer game.
Sub-type: This is the item itself. The attributes previously set will be retained if the item sub-type is changed.
Group: All Squads and Air Support are in groups. You can name groups whatever you want by clicking on Edit in the top left corner
of the tool and then clicking on Group.
Team: This designates good guys, bad guys and neutral guys. Red will target/attack blue and vice-versa whether marked goals or
not. Neither blue nor red will target a neutral item.
Name: This name shows up if you select the unit on the commander’s map. If the person with the name is blue team, This will also
show when you point at the unit or show friendly tags, if they are on your team.
Field of View: This tells you the extent that people and vehicles can see around them. 10 degrees would be like someone with
tunnel vision. A soldier with 360 degree FOV would have eyes in back of his head.
Weapon Accuracy: This number represents how well the unit shoots. Lousy shots are 10 and under, good shots are around 30,
great shots are anything over 50. However, anyone will hit fairly quickly at close range. Also, the longer someone continuously fires
at a target, the more accurate they will get.
Perception: This is a rating of how well the AI can see, 30 is near sighted, 50 will notice most stuff at short ranges, 80 will notice
you across a valley.
NPC Primary Weapon: If the item can hold a weapon, this is where you assign the type.
Waypoint list: This is how the player assigns groups to waypoints. You can name and organize waypoint lists the same as groups
(Left click on Edit and Waypoints). The number field is used to number waypoints. For King of the Hill centers adjust the Distance
to increase the size of the hot zone.
AI Attributes: You can select several different attributes for the item.
Mission Editor Manual
p6
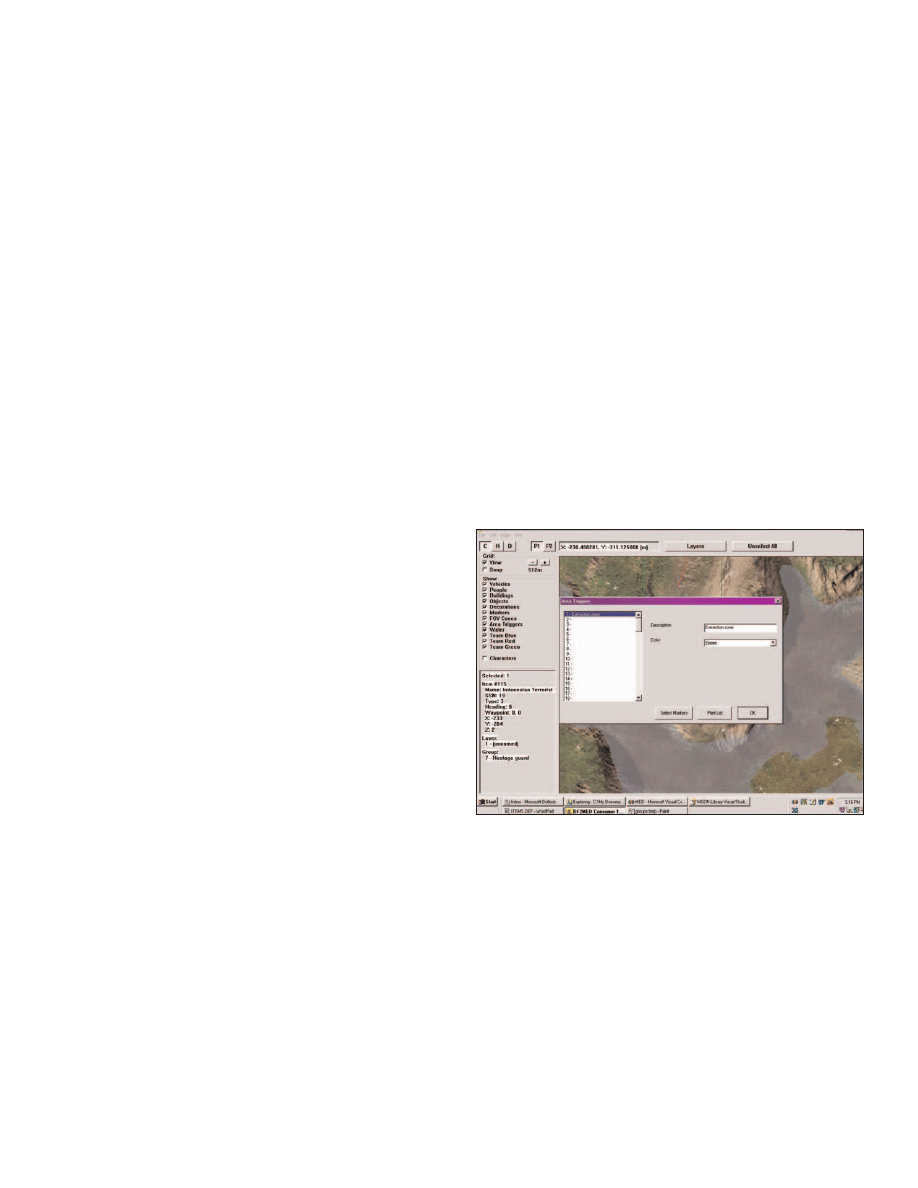
Section 6: Area Triggers and Events
Area Triggers
Area Triggers are rectangular areas that can be used to trigger actions to occur whenever a member of a Group is within its bor-
ders. See Events below for more information about Triggers.
Events
One of the most complex and powerful parts of the mission editing is creating events. With this tool, you will be able to set up a
series of actions that only occur when certain conditions are triggered. Each event is set up as an IF-THEN statement; in other
words IF a condition is met by the game, THEN the event takes place.
Here is an example of how to set up a win condition for Delta Force 2. Say you wanted the player to win the game if they destroy
a certain building:
1.
While in INSERT MODE, place a building on the map.
2.
Return to SELECT MODE and select the building. Make note of its Group #.
3.
Open the Events window and click on << New Trigger >> to open the Event Triggers window
4.
Select Group for the Trigger Type
5.
Select All Destroyed for Trigger Condition
6.
Under Trigger Variables select the building’s group # that you just placed then hit OK
7.
Now click on << New Action >> to open the Event Actions window
8.
Select Mission Result for the Action Type
9.
Select Blue Win for Action Subtype
10. Finally, for ease of identifying it, give the event a unique
name such as “Win by destroying building”
Reset after (seconds): Once this event has been triggered, the
mission can be set to automatically reset the trigger after a speci-
fied number of seconds has elapsed.
Delay (seconds): This is how many seconds must pass before the
actions will execute. 0 delay means that the actions will be carried
out as soon as the trigger conditions are met.
See Appendix B for a complete list of Triggers and Actions:
Mission Editor Manual
p7

Section 7: Exporting and Playing Missions
When you are at a point where you would like to test your mission, go to Export Binary Mission under the File menu. Your custom
mission (.BMS file) must be located in the same directory as your Delta Force 2 game for it to be seen by the program.
You are limited to the number of different types of items you can have in one mission. When you export, the tool will indicate if you
have too many different items.
The following Warnings can show up when exporting the file:
The total number of Decorations and Buildings (X) exceeds the maximum (1024)
The total number of Vehicles and Objects (X) exceeds the maximum (1024)
The total number of Markers (X) exceeds the maximum (512)
The total number of People (X) exceeds the maximum (256)
The file will still export, but only the first Y objects of that type will be exported (Y being the maximum number allowed for each
category). The number of objects should be reduced to the limit or unpredictable things could happen as a result of the excess
items not being exported.
To play your custom mission, start your Delta Force 2 game. In Quick Mission or NovaWorld Hosting Screen, select your mission
from the list of games.
Mission Editor Manual
p8

Section 8: Hints and Tips
•
For your first mission, open the example.mis mission and begin tweaking aspects of it. This mission was created to give you
a head start on creating a mission. Looking at how a mission designer lays things out may help you understand specific por-
tions of a working mission.
•
For ease in viewing units, use the Height Map view (F2 key). The items will stand out more against this background.
•
Using the layering functions can help save a lot of time when fine tuning missions. Putting items in Layers may seem like a
hassle for smaller missions, but when more and more items are added, you will really wish that you had done it.
•
When you right click the mouse with no items selected, you can choose to View by Side; this will turn all of the bad guy’s
items red, all of the good guy’s items blue and all of the neutral items green for ease of game balancing.
•
The best method for laying down waypoints is to insert one, change to select mode, set its waylist group, and change its dis-
tance to 0 (this causes people to follow the path exactly). Then copy that waypoint and paste it where you want the next to be.
Since the freshly pasted waypoint is already selected, just input its waypoint number, then paste the next and repeat.
•
When placing buildings, use the F3 view to find a good flat spot, then switch back to F1 and check the characters checkbox
under Show. This allows you to see any grass or other special terrain features in the area that you should avoid putting things
on top of.
•
In Capture the Flag missions, it’s a good idea to drop a “null” marker on top of any flag you put down, then set the null mark-
er to the team color of the flag. This allows you to see your flags from a zoomed out perspective, where they’d normally be
hard to see.
•
A good rule of thumb for placing objects is whenever you want to place an object which has others like it already in the mis-
sion, it’s simpler to copy and paste it, then modify the new one (rather than switch to insert mode and create a new one).
•
Soldiers with “hip” in their name will fire from the hip rather than from the shoulder, and they may move towards their target
as they fire. Soldiers who shoot from the hip will not be effective if they are in bunkers or behind low walls. For best results,
place these units in open areas away from buildings.
Save and export your mission often.
Mission Editor Manual
p9
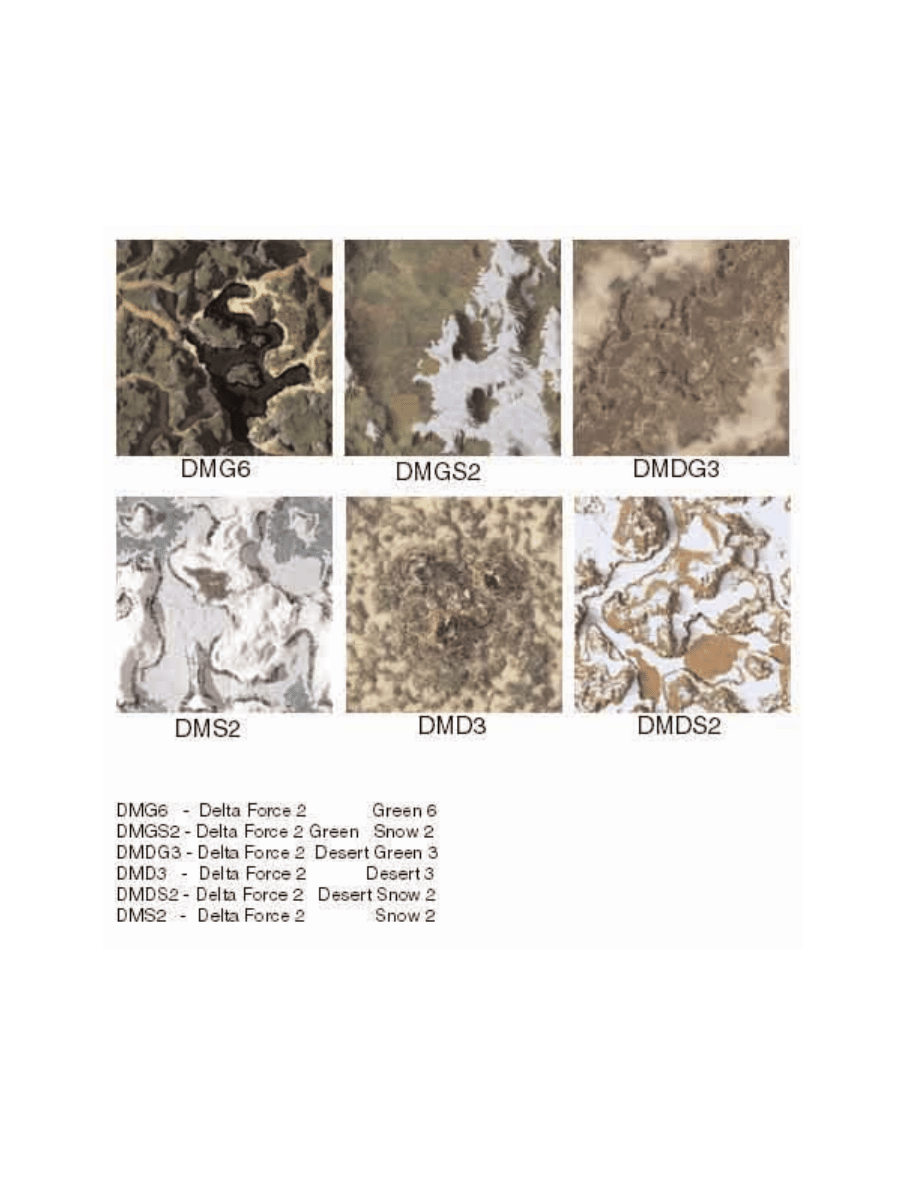
Appendix A: Terrain Types
There is a pull down menu for your mission terrain. Maps created for single player start with “Df” whereas the maps created for
multiplayer start with “Dm”. The second set of letters indicates the terrain type (d=desert, g=grass, s-snow)
Mission Editor Manual
p10

Appendix B: Trigger List
Trigger Types
Null: Always False. Can be used as a temporary placeholder.
Group: Triggers affected by Groups. Needs a Trigger Condition.
Event: True if the Event has been triggered.
2ndTime: True if this is the even numbered time to play the mission.
SquadMates: True if Squad Mates are “on”.
Group Trigger
Null: Nothing. Can be used as a temporary placeholder.
Has Targeted: True if Group X has targeted Group Y.
Condition Red: True if Group has been alerted.
All Destroyed: True if all members of the Group are killed/destroyed.
Any Alive: True if any members of the Group are still alive.
Lost X Units: True if X number of units in Group have been killed.
Reached Waypoint: True if Group reached waypoint.
Area Trigger: True if Group is within the Area Trigger.
Holds Item: True if Group is holding the specified item.
Has X Units: True if Group has X or more members alive.
Shot Enemy: True if Group X shot at and hit Group Y.
Action Types
Null: Always False. Can be used as a temporary placeholder.
Redirect Group To: Make Group go to Waypoint X-X.
Kill Group: Immediately kill all members of Group.
Change Group AI: Change an AI attribute of Group (See AI subtypes) to “On” or “Off”.
Vaporize Group: Remove the Group from the game.
Blue Win: Blue wins!
Red Win: Red wins!
Group Velocity: Change the movement speed of group.
SubGoal Won: Sub Goal X has been achieved.
SubGoal Lost: Loss Condition X has occurred.
Change Team: Change the team of Group.
Action Subtype: AI
Null: Nothing. Can be used as a temporary placeholder.
NewWeapon: Change the current weapon
Guard: If he has waypoints, he will follow them and never stop to shoot at or follow
an enemy unit. If he has no waypoints, he will not move, but he will shoot at enemy units.
Stander: Will shoot while standing (default is to crouch and shoot).
Proner: Will shoot while prone (default is to crouch and shoot).
RedAlert: Be alert for enemies.
GreenAlert: Everything’s clear.
FOV: Change the angle of Field of View.
Accuracy: Change the accuracy level.
Perception: Change the Perception level.
Silent: Won’t call for help (but may make noise while dying).
Blind: Doesn’t see anything.
NoWater: Doesn’t go in water.
Deaf: Doesn’t hear anything.
Mission Editor Manual
p11
Wyszukiwarka
Podobne podstrony:
Delta Force Black Hawk Down Mission Editor Manual
Delta Force 4 Task Force Dagger Mission Editor Manual
F 22 Lightning 3 Mission Editor Manual
F 16 Multirole Fighter Mission Editor Manual
Kody do Delta Force, Kody
DELTA FORCE
Kody do Delta Force black howk Down
editor manual
Conflict Zone Level Editor Manual
Delta Force in Afghanistan Michael Moore
Delta Force
Delta Force Addendum
NBC Attack Air Force Manual
Manual Delta Chicago Blues Jam Tracks
więcej podobnych podstron