Author: John M Blain
2.54+
Blender 3D
Computer Modeling and Animation
Blender 3D is a an open source freeware program maintained by the Blender
Foundation. The program can be downloaded, free of charge, from
Blender is not an easy program to learn to use but it has limitless possibilities and
will give you an understanding of the complexities of computer animation. Due to the
complexity of the subject it is not possible to cover everything. This manual is
designed for beginners to help with the very basics of computer animation using
Blender 3D. The subject matter in this publication is aimed at removing some of the
frustration from the learning process. Blender 3D is a wonderful application,
especially at the price, but one major drawback is the lack of basic instruction.
Documentation has always lagged behind development. There is a multitude of free
information available on the INTERNET from various sites in the form of tutorials.
Much of the information is relevant to earlier versions of the program an since there
has been a dramatic change to the interface with version 2.50+ I believes that a new
student would find learning Blender difficult. This manual is an attempt to remove
some of the pain and relieve frustration by setting out the basics.
The manual has been written by trial and error in finding the way between Blender
2.49 and Blender 2.50+. I trusts you will find the information informative and useful.
This Manual Is Written Using Blender 2.54+

Blender Versions
Blender 3D has been around for a considerable time. On starting the program the
Graphical User Interface show a panel with the version number in the center if the
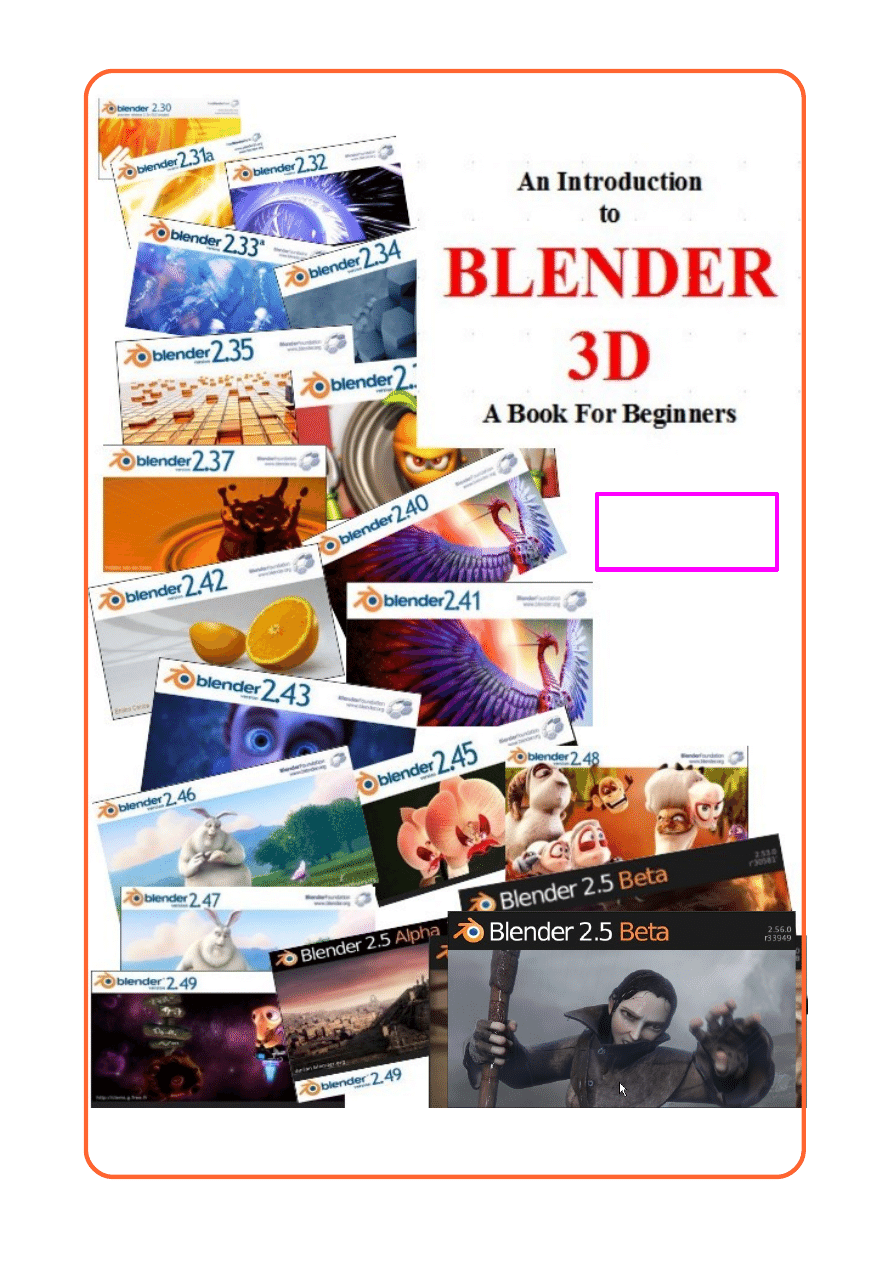
screen. On each release this panel has been changed to identify the version. The cover
of this manual shows the historical array of version number panels . Blender has
developed over time and as that development has evolved new releases (versions) of
the program have been made available. The program reached the stage where the
developers considered that a complete overhaul of the Graphical User Interface (GUI)
was called for. Version 2.49 was the last of the old and at the time of writing version
2.56 beta is the current version. The GUI of 2.5+ is completely different to 2.49 and
the frustration of learning the new interface without documentation has prompted the
writing of this manual.
Graphical User Interface
The Graphical User Interface (GUI) is the arrangement of Windows, Panels and
Buttons which allow you, the user, to interact with the program. The interaction takes
place through inputs via the computer keyboard and mouse.
In giving instructions in the use of the program with reference to keyboard and mouse
actions a series of commands has evolved. The list of commands is extensive and it is
not recommended that a new user attempts to memorise the list without
understanding of the meaning. As you progress through this manual many of the
commands are repeated over and over and you soon find that it becomes second
nature. Of course you will forget the obscure commands therefore a is listing is
provided in the Appendix to this manual.
Omissions and Errors
Your serious comment and criticism are welcome and may be directed to the author
at:
silverjb12@gmail.com
Good Luck
and
Enjoy the Experience.
John M Blain
How to Get Blender
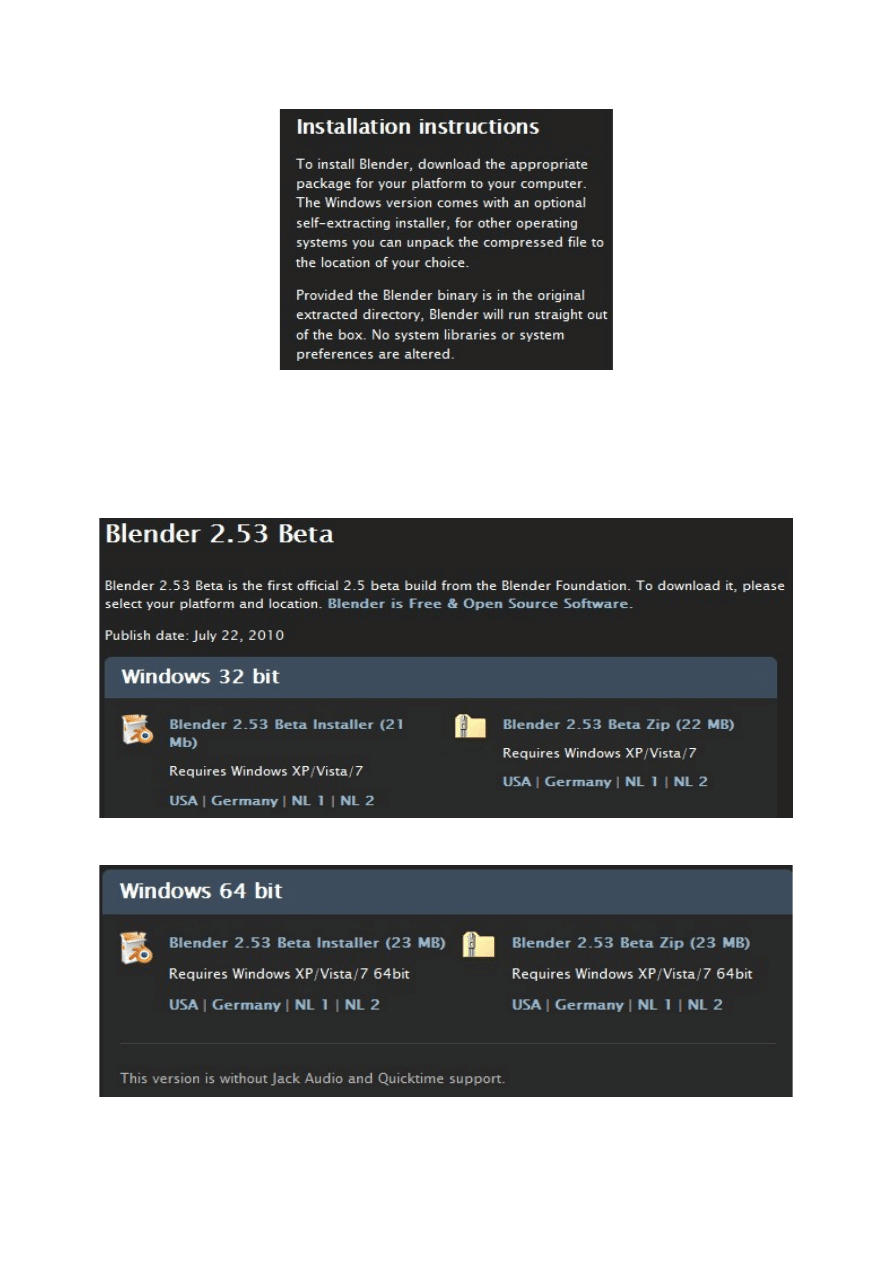
Blender can be downloaded from
www.blender .org
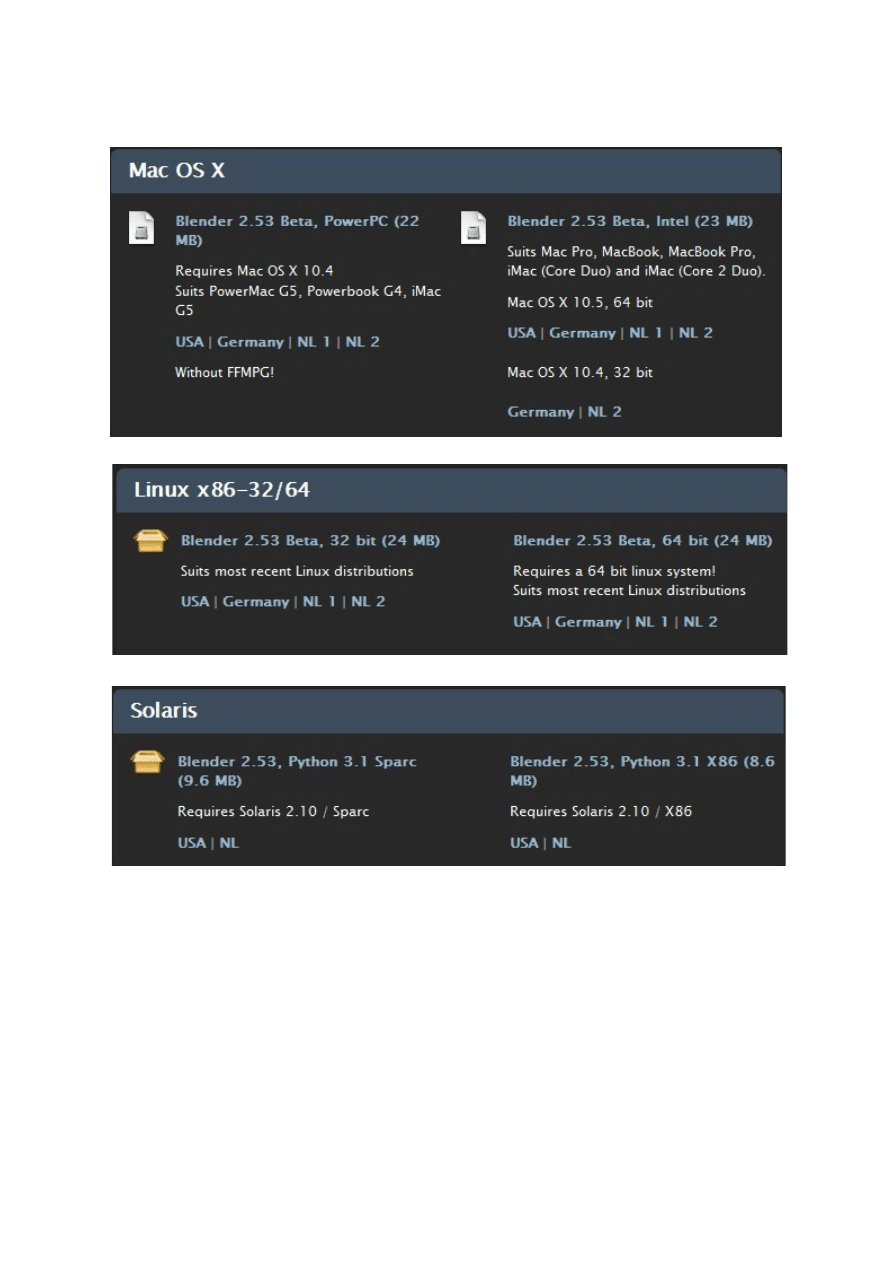
Note: The above download information is referring to version number 2.53 of the
Blender program. During the course of writing this document the program has been
amended and the current version is 2.56 beta. The goal is to reach a new release of a
stable version that being 2.60. The Blender download site will reflect the most current
version release and it is expected that the download procedure and installation will
remain unchanged.
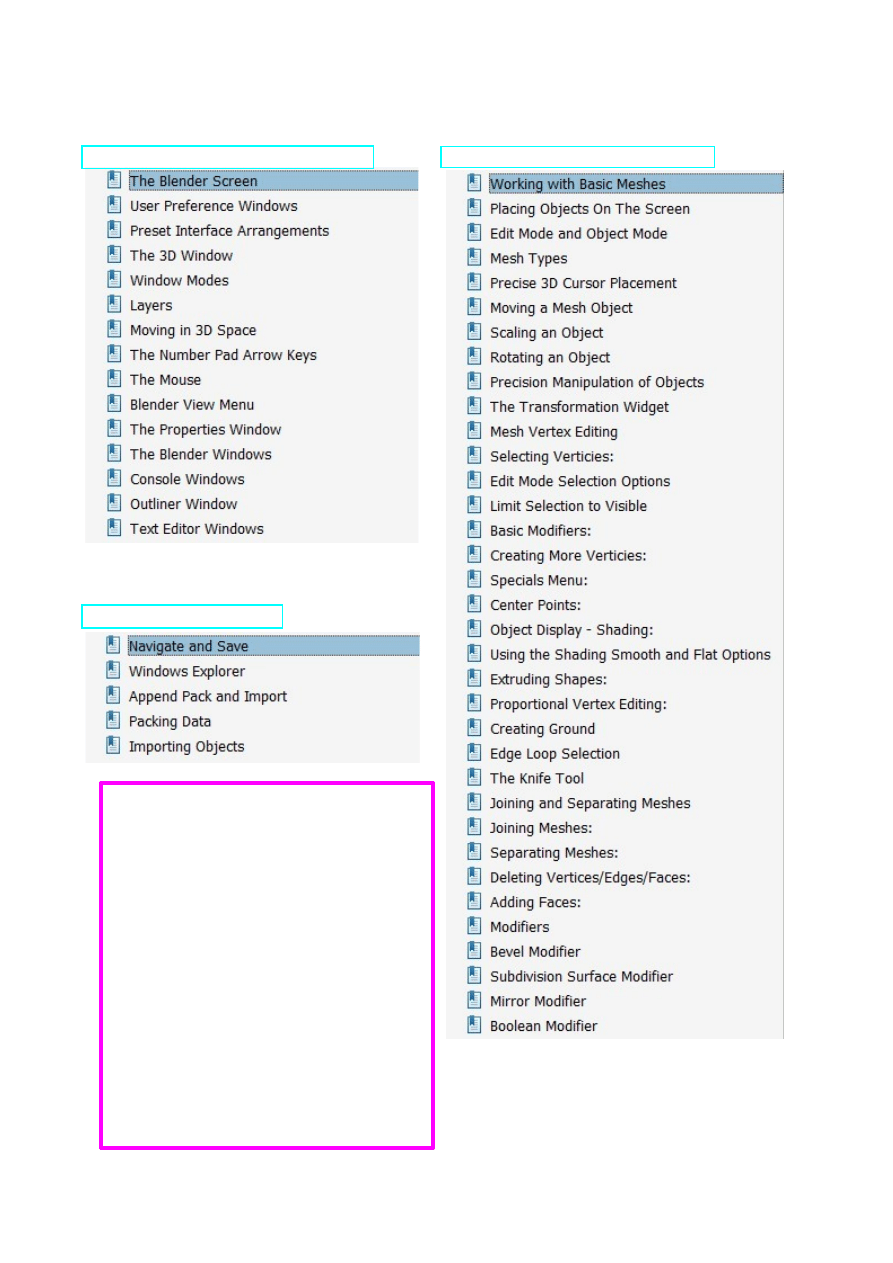
Contents
Chapter 01 The Blender Interface
Chapter 03 Create Edit Objects
Note: The Contents Pages refelect the
electronic bookmarks provided with the
PDF files of the indavidual chapters.
The Chapter Titles are links to the
indavidual Chapter Pages.
Suggestion: Hold 'Ctrl' on the keyboard
when clicking on a link. This will cause
your browser to open the Chapter Page in
a new Tab instead of a new window. To go
back to the Contents Pages simply click
on the first tab or close the tab that is
displayed.
CH01- The Blender Interface
01-Blender Screen
02-User Preference Window
03-Preset Interface Arrangement
04-3D Window
05-Window Modes
06-Layers
07-Moving in 3D Space
08- Blender View Menu
04-Properties Window
05-Blender Windows
06-Console Windows
07-Outliner Window
08-Text Editor Window
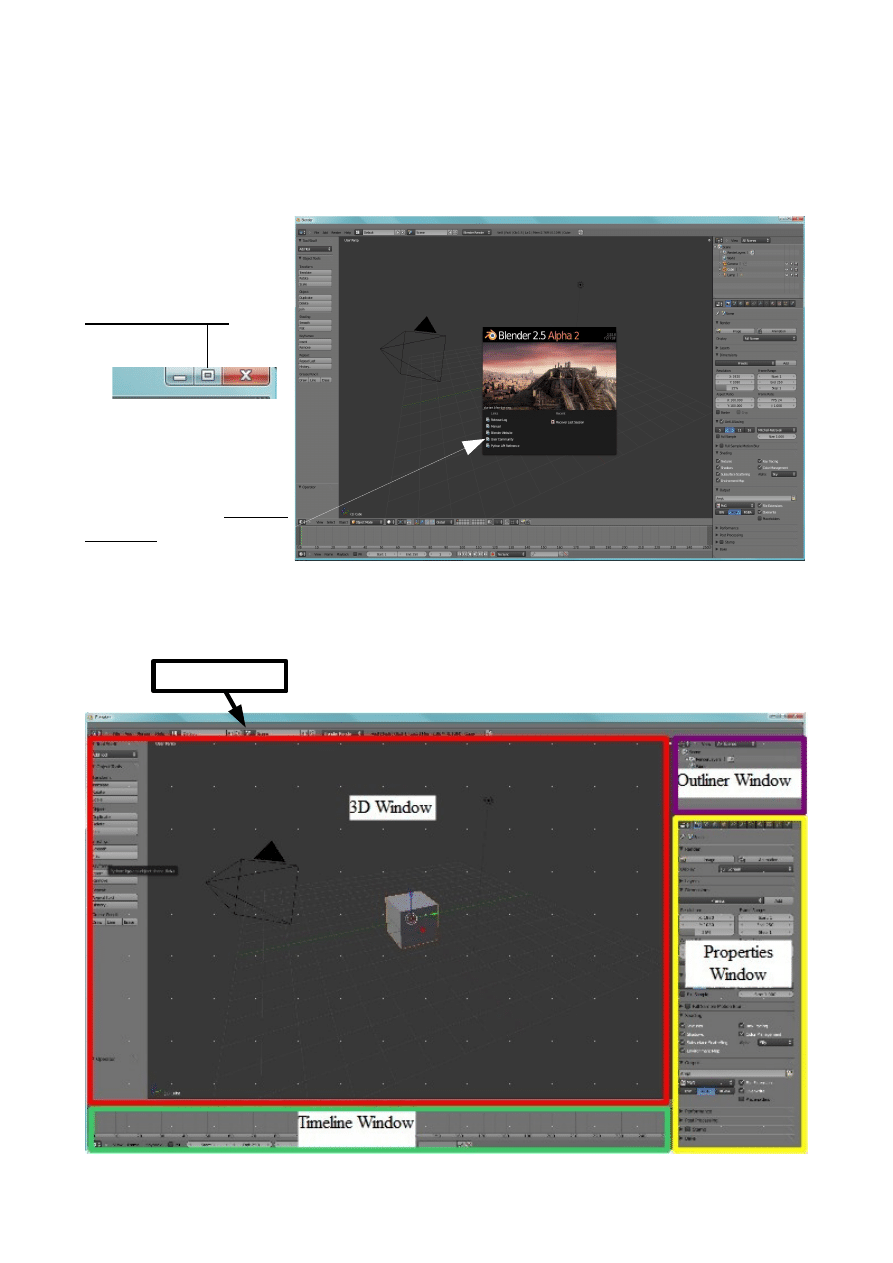
The Blender Screen
When Blender first opens the screen displays as shown below. The screen shows the
Graphical User Interface (GUI) fore Blender.
On some operating
systems the screen may
not display full size on
start up. Click on the
expansion button
in the upper RH corner
of the screen.
The Blender screen
opens with the Version
Window slap bang in
the middle . Click
anywhere in the screen to remove this window.
The Default Blender Screen is displays with five windows opened.
Info Window
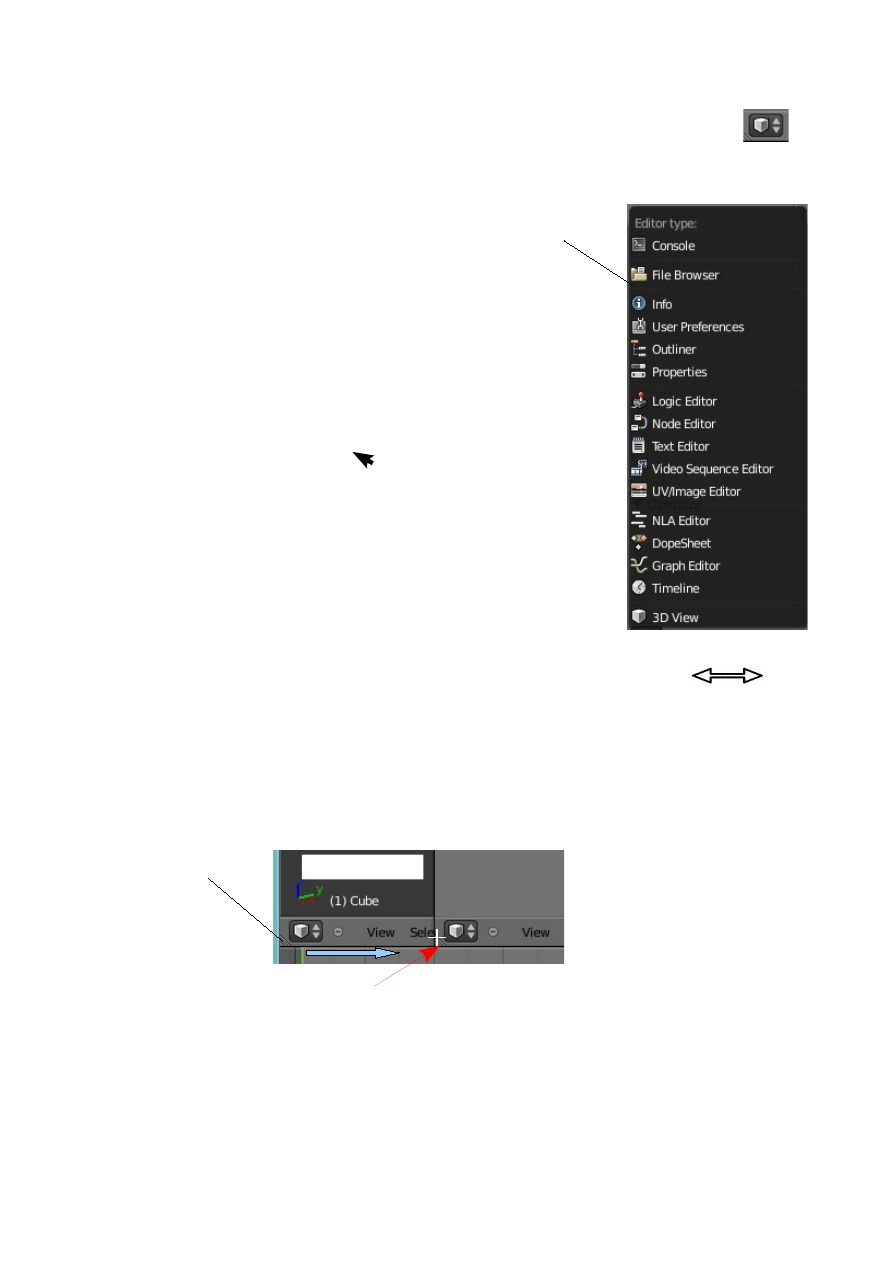
Besides the windows displayed there are eleven other window types available for
selection. Look at the lower LH corner of the 3D Window and note the Icon .
This is the Icon representing the 3D Window. Each window has an Icon
displayed in the upper or lower LH corner of the window representing the window
type.
Clicking on any of the window Icons displays a drop down
selection menu for selecting a different type of window.
Selecting a different window from the menu changes the
current window into the type selected.
Example: In the lower LH corner of the 3D Window click on
the icon with the mouse curser select (click) 'Graph Editor'.
The window change to the Graph Editor window. Click on the
Graph Editor icon – select 3D View. The window reverts to the
3D Window.
Any window may be changed to a different window type in this
way.
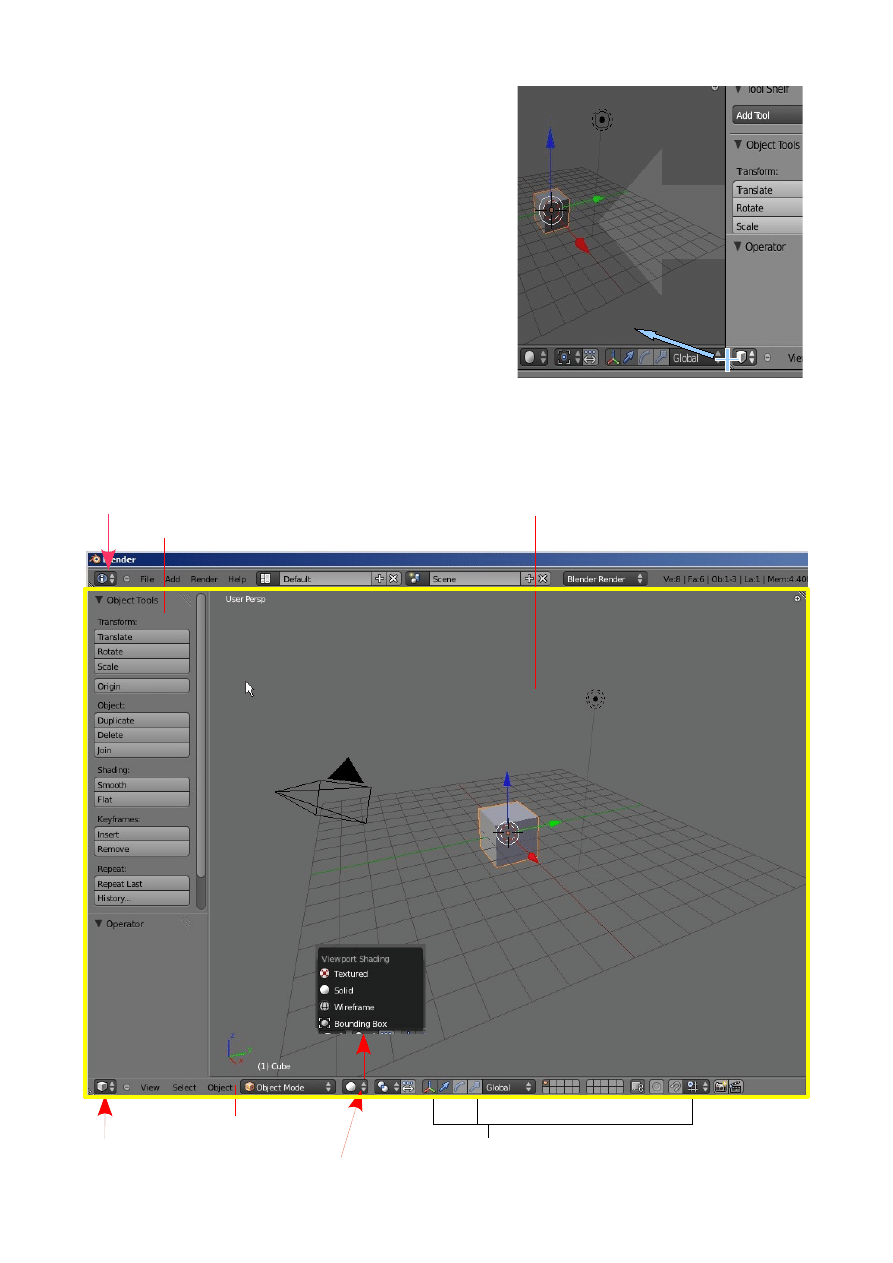
Every window and panel within a window may be resized. Place the mouse curser on
a window or panel border and it changes to a double headed arrow.
Click and hold with the LH mouse button ( Clk LMB for future ) and drag the arrow
to resize the panel or window. This works on both horizontal and vertical borders.
Every window is able to be divided to form a new window. In apposing corners of
each window there is a small cross hatched triangle.
When the mouse curser is placed on the cross hatching it changes to a white cross.
Click, hold and drag the cross into the window and the window divides in two
forming identical copies of the original window. One copy may then be changed to
another window type as previously described.
Mouse curser on
cross hatching
Click Hold and Drag to make new window
Window Type Selection Venue
New Window
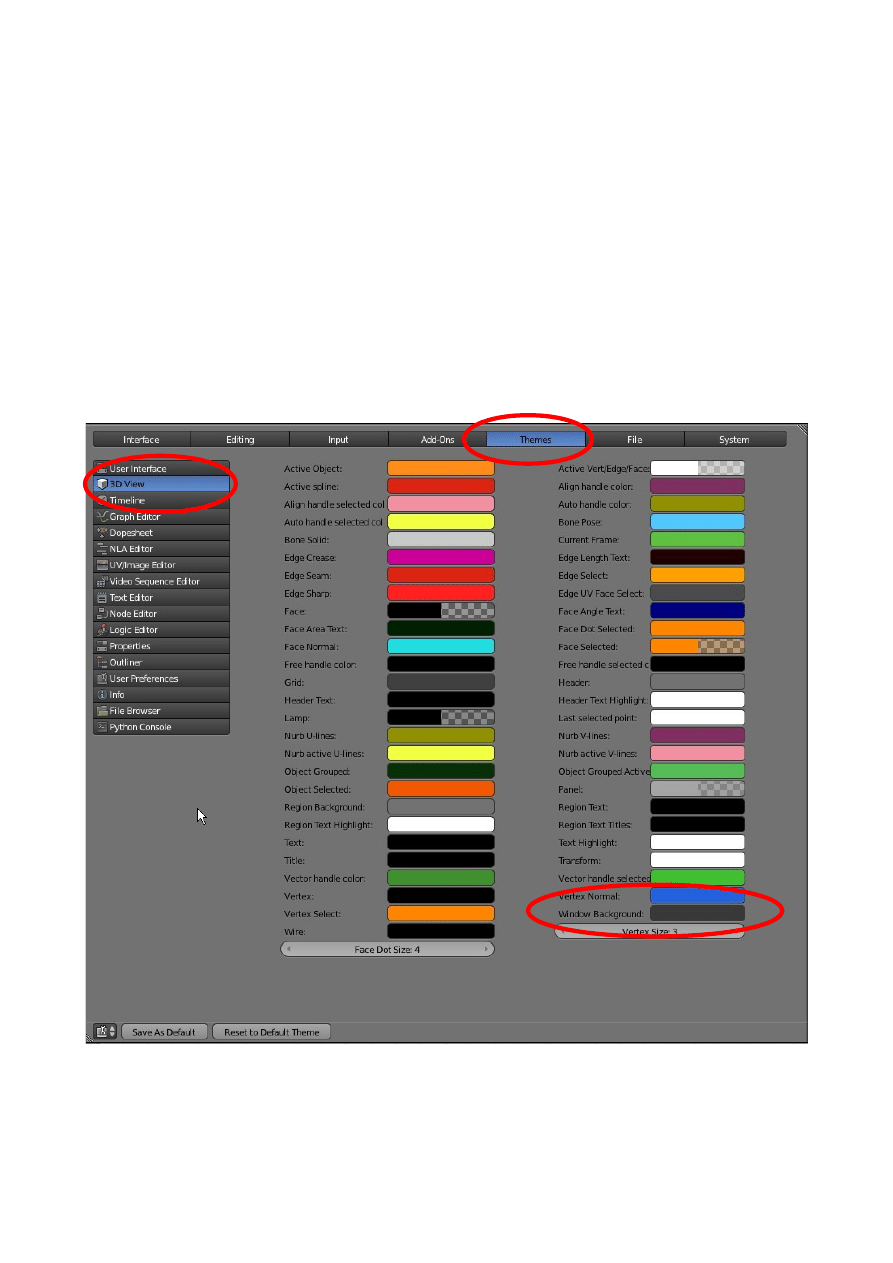
To cancel a window place the mouse curser on the
cross hatching ( changes to cross ) and drag it out
of the window into the window to be canceled. A
large arrow appears pointing into the window to
be canceled. Release LMB and the window
cancels.
The individual windows will be explained as we progress through the document but
first we need to understand the components of a window in general terms.
Window Type Icon
Window Type Icon
Header
Drop Down Selection Menu
Buttons
Window
( Info Window )
(3D Window)
Window (3D Window)
Panel (Tool Shelf Panel)
One of the great features of Blender is that the GUI ( Graphical User Interface) can
be modified to suit the preference of individual users. We have mentioned how to
resize windows and panels and how to split and cancel windows. There are many
other features which can be changed. At this stage we will demonstrate an example
just to show how this is done. The possibilities are endless so like many things in
blender you will have to learn to experiment and figure out things for yourself. That
may sound like a cop-out but as with life you can't be lead by the hand and spoon fed
all the time. The example will introduce you to the User Preference Window.
User Preference Windows
If you are like me and sometimes find it difficult to see things on the screen
especially against Blender's sexy sultry dark 3D Window background then you can
fix it.
Divide the 3D Window in two (See the section on that) and make one part the User
Preference Window.
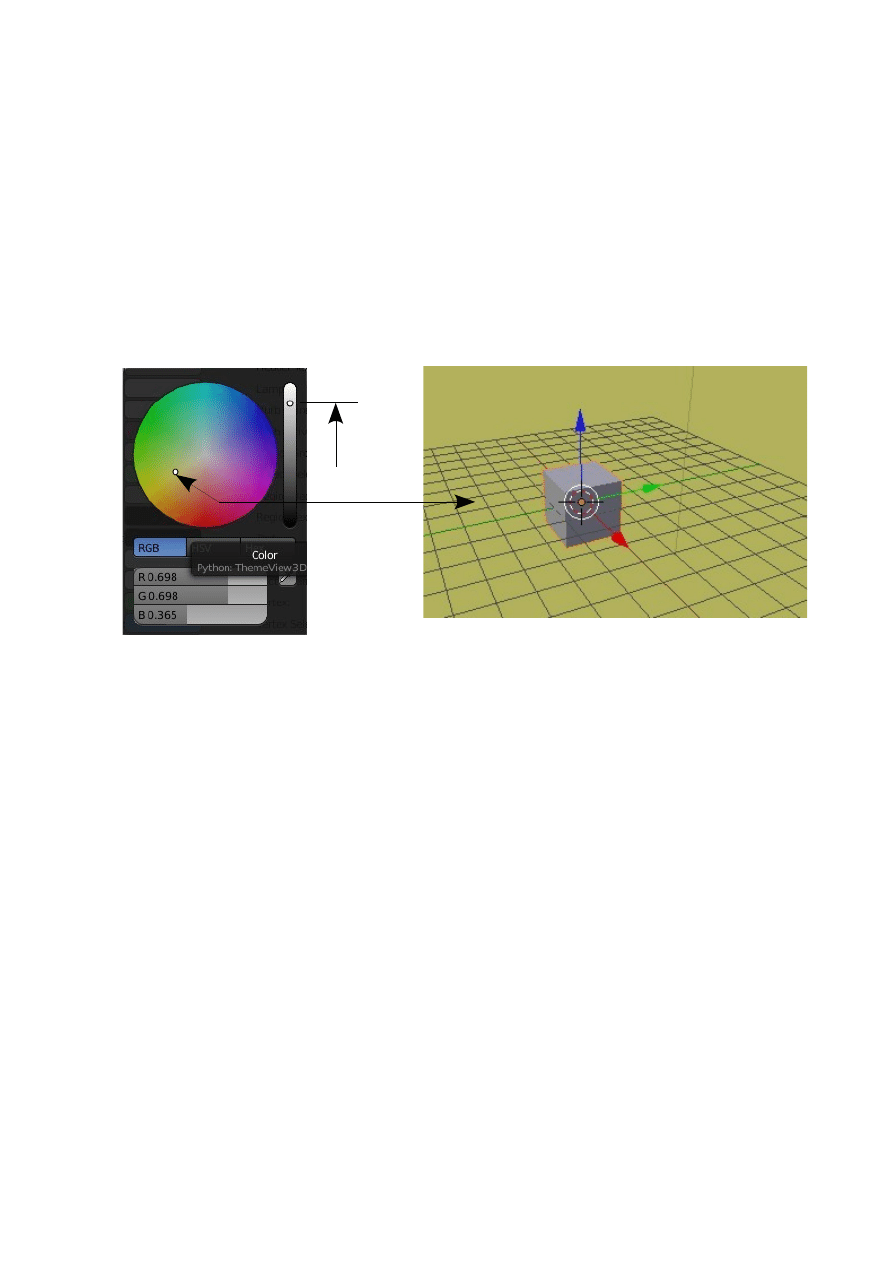
Go to the top of the window and click on 'Themes'. At the RHS of the window you
see a list of the different windows. Click on '3D View'. You will see a whole bunch of
colored panels with headings next to them. At the bottom of the second column you
will see 'Window Background'. This is the grey colored panel which is the color of
the 3D Window background. Click on the panel and a color picker will display.
At the RHS of the picker is a vertical bar showing a color gradient from white at the
top to black at the bottom with a white dot in the middle. Click on the dot and drag it
upwards. See the background color of the 3D Window lighten up. The color picker
also lightens up. You can click anywhere in the colored circle to change the 3D
Window to any color you like. At the bottom of the User Preference Window click on
'Save As Default' and this sets the background color for the remainder of the session.
If you click around the User Preference Window you will see that there are many
many options. Feel free to experiment. If you goof up just press 'Reset to Default
Theme' also at the bottom of the window.
Note: When you press 'Reset to Default' in the User Preference Window you
obviously have the User Preference Window open. Blender takes the command
literally and assumes that you want the User Preference Window displayed the next
time you open Blender. If you don't want this to happen cancel the User Preference
Window by clicking on the cross hatch in the corner as previously described then in
the Info Window Header click on 'File' – 'Save User Settings'.
3D Window with Color Selected
Drag
Up
Preset Interface Arrangements
While still on the subject of Graphical User Interfaces we will point out that Blender
as some preset arrangements for working on different aspects in the program.
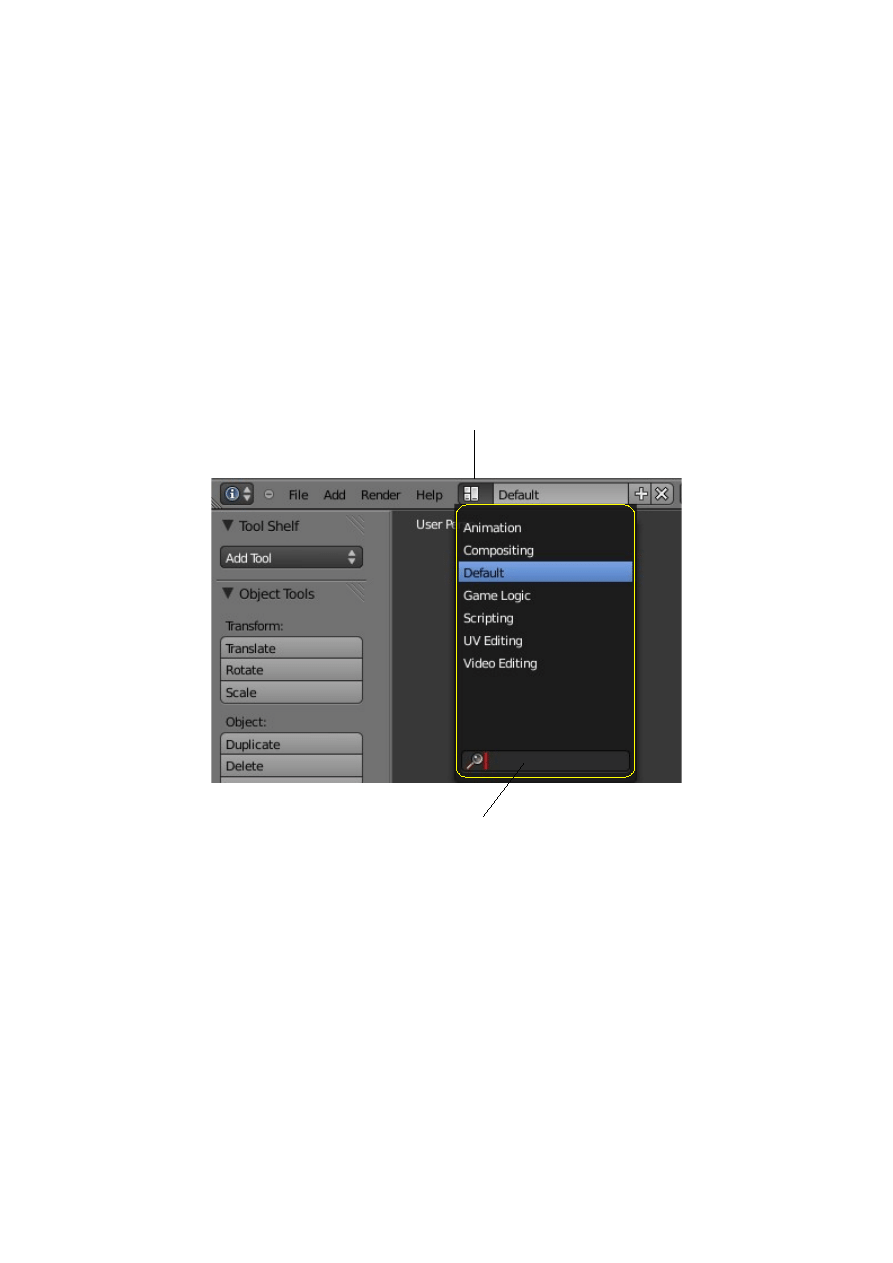
In the 'Info Window' header at the top of the default screen arrangement to the RH of
the 'Help' button there is a little window button with a panel with 'Default' in it.
Default is referring to the default Blender screen arrangement or GUI. Placing the
mouse curser over the window button displays 'Choose screen layout'. Clicking on
the button displays a drop down selection menu with a choice of screen arrangement
options. You will see that 'Default' is highlighted in blue. Clicking on any of the
options changes the screen arrangement with window types appropriate for the named
aspect of the program.
Window Button
Search Bar – Type in a Word to Search
The 3D Window
Before we can actually create anything in Blender we need to understand the 3D
Window. This is where we create a scene. No we are not going to loose our blocks
and cause a disturbance. Its a scene like in a movie.
To start we should understand the basic concept of creating something with computer
graphics. To start a scene is created. The scene may be static or animated. In either
case the scene is rendered to make a computer image, in the case of a static scene or
to create a computer animation in the case of an animated scene. Images are rendered
to a number of file formats such as JPEG or PNG while animations are rendered into
video files. The scene is set up in the 3D Window.
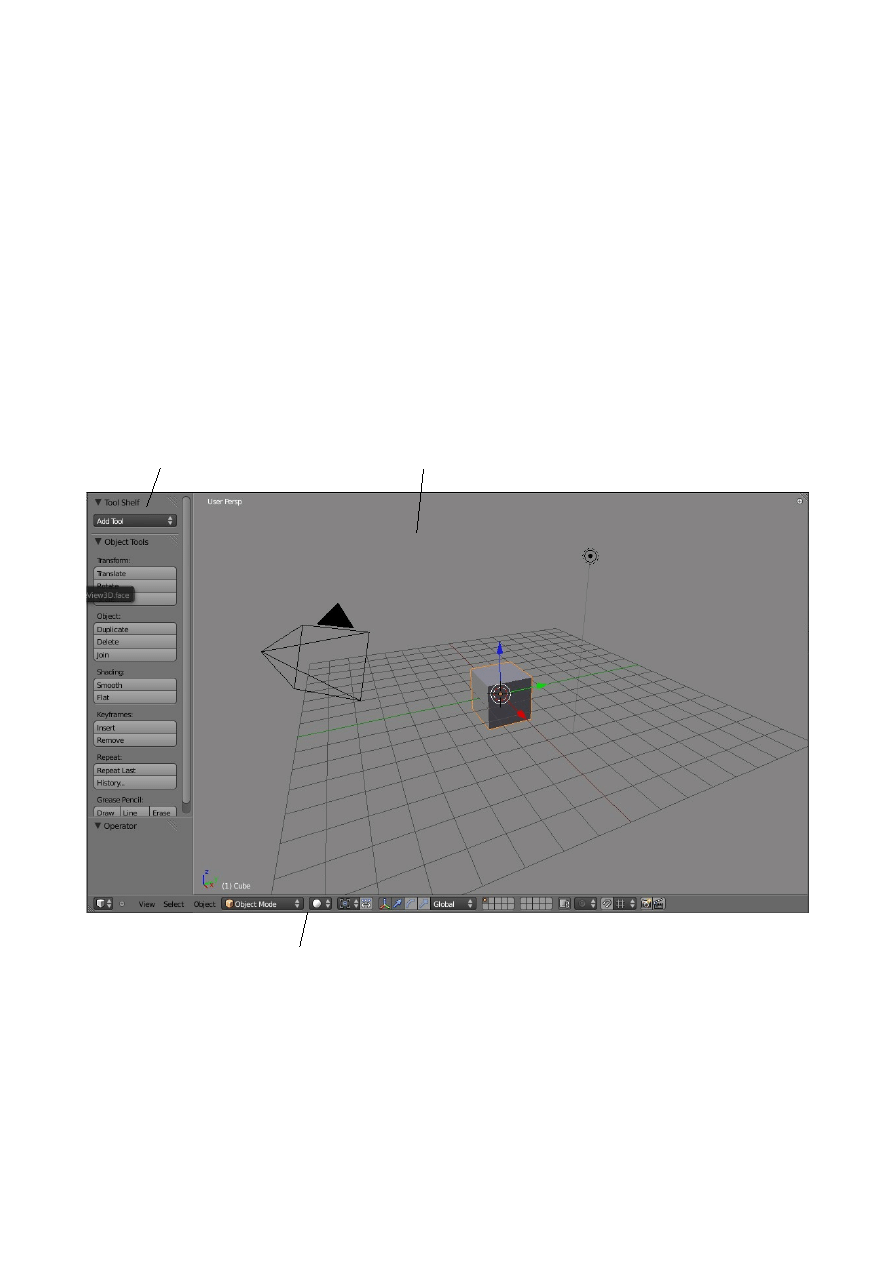
The default 3D Window in Blender is shown below.
The 3D Window comprises a Main Window panel and a side Tool Shelf panel. The
3D Window Header is the strip across the bottom of the window with all the buttons.
The default 3D Window contains a Cube object, a Lamp and a Camera. Without the
lamp or camera nothing will render which makes sense because if there is no light
and nothing to see anything with, it make life pretty difficult.
Tool Shelf Panel
Main Window
Header
Camera
Lamp
Cube Object
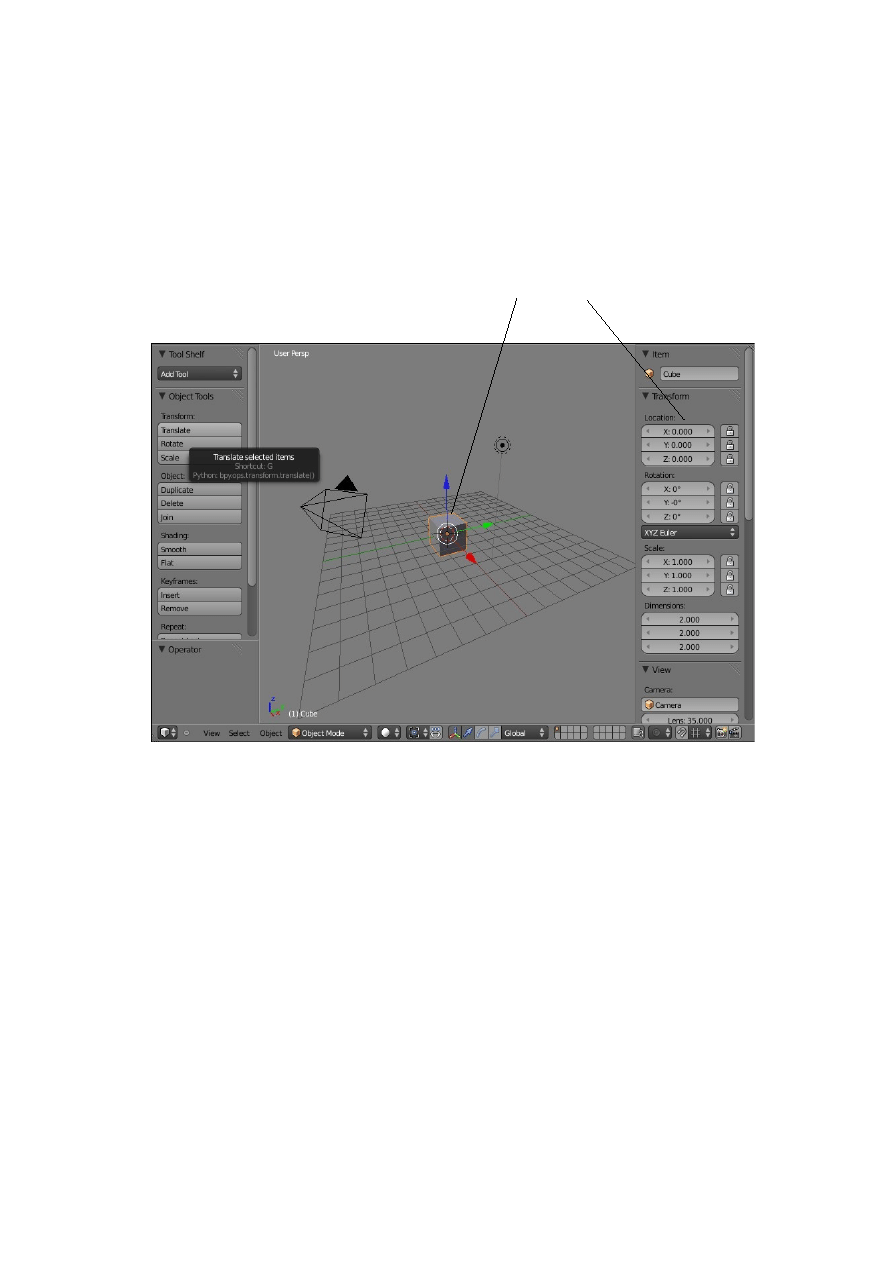
The Tool Shelf panel can be hidden from view by pressing the T Key on the
keyboard. Press T Key again to show the Tool Shelf. This process is referred to as
'Toggling'.
Besides the Tool Shelf there is another panel, the Object Properties panel, which by
default is hidden. Press the N Key to show the panel. Here you see values pertaining
to the Object that is selected in the 3D Window.
By default the Cube is selected as shown by the orange outline around the cube. An
Object is deselected by pressing the A Key and selected by clicking on it with the
right mouse button (Clk RMB).
Try it out: A Key(deselect) – Camera, Clk RMB (select Camera) -A Key (deselect) –
Cube, Clk RMB ( selects the Cube again). I'm trying you out with my abbreviations
for later.
Note that if you A Key (deselect) then A Key a second time you will select everything
in the 3D Window.
Note also that with the Object Properties panel displayed the values change according
to which object you have selected. At this stage do not be concerned with the values
we are just getting the broad outline of the interface.
Remember that in the 3D Window we are seeing a three dimensional representation
of a World. The squared grid in the scene represents the horizontal mid plane of the
Values pertaining to Cube Object
world on the X and Y axis. The green line on the grid is the Y axis and the red line is
the X axis. The vertical axis is the Z axis. If you look at the lower LH corner of the
window you see these axes displayed. You also see in white the name of the Object
selected.
The red green and blue arrows on the Cube object are a 3D manipulator which is a
device for moving the object about in the scene. This will be discuses in detail later
but for now we will use it to move the cube. Click on the green arrow and holding the
mouse button down drag the mouse to the right. The Cube outline turns white in the
process indicating that it is in 'Grab' mode. Release LMB (left mouse button) and the
Cube stays where it is placed.
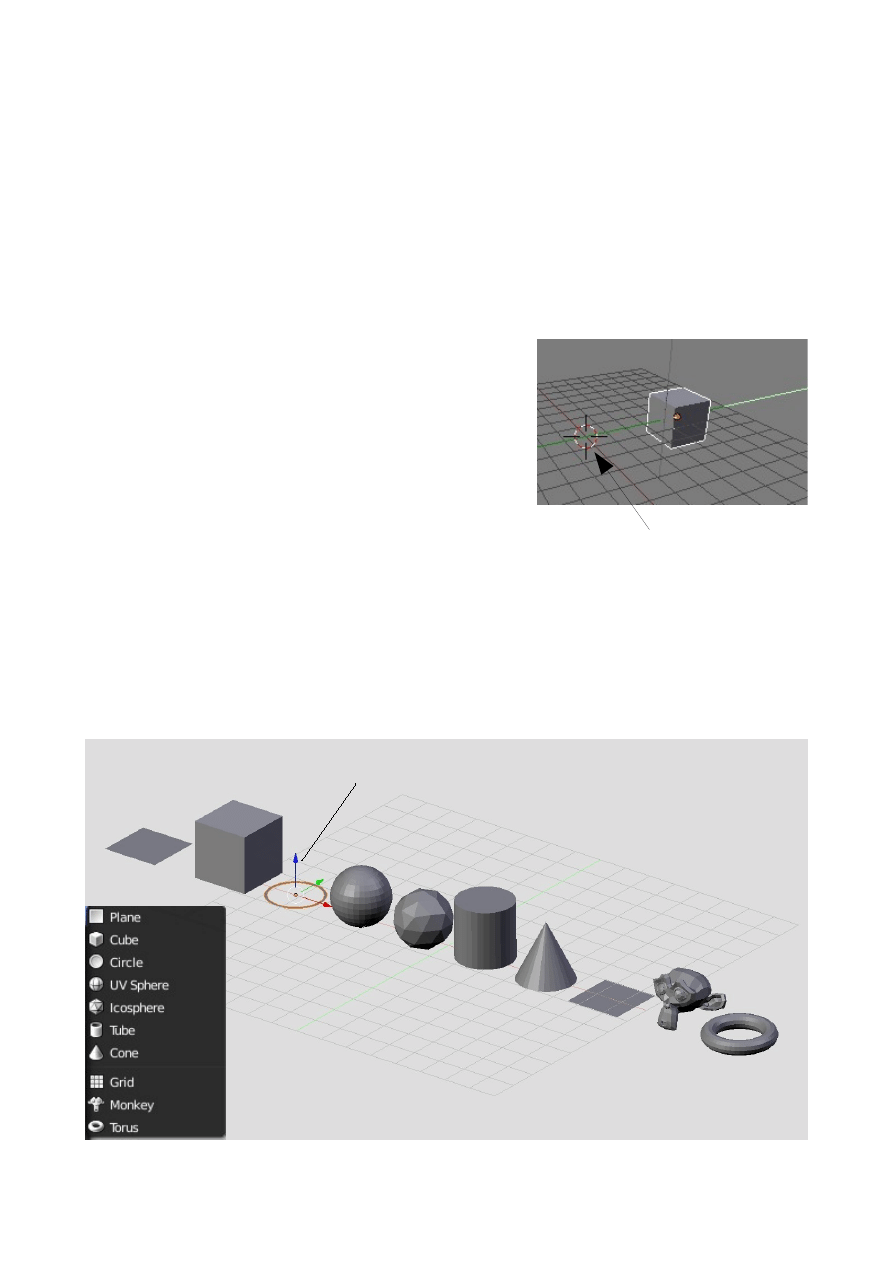
We moved the Cube so that you can see the small
circle with the cross hairs at the center of the world.
This is the 3D Cursor ( Not the Mouse Cursor). If
you click anywhere in the scene with the mouse the
3D Cursor relocates to wherever you clicked. If you
were to introduce another Object into the scene that
object would be located at the location of the 3D Cursor.
The Cube Object is called a 'Primitive' which is one of ten basic shapes available in
Blender from which to commence modeling. Click on 'Add' in the Info Window
header then in the drop down place the mouse cursor on 'Mesh' to see the list of
Primitives. You can click on one to add it to the scene. Another way to do this is to
Press Shift + A Key on the keyboard to display the same list.
Manipulator shown on Circle
3D Curser
Blender Primitives
Window Modes
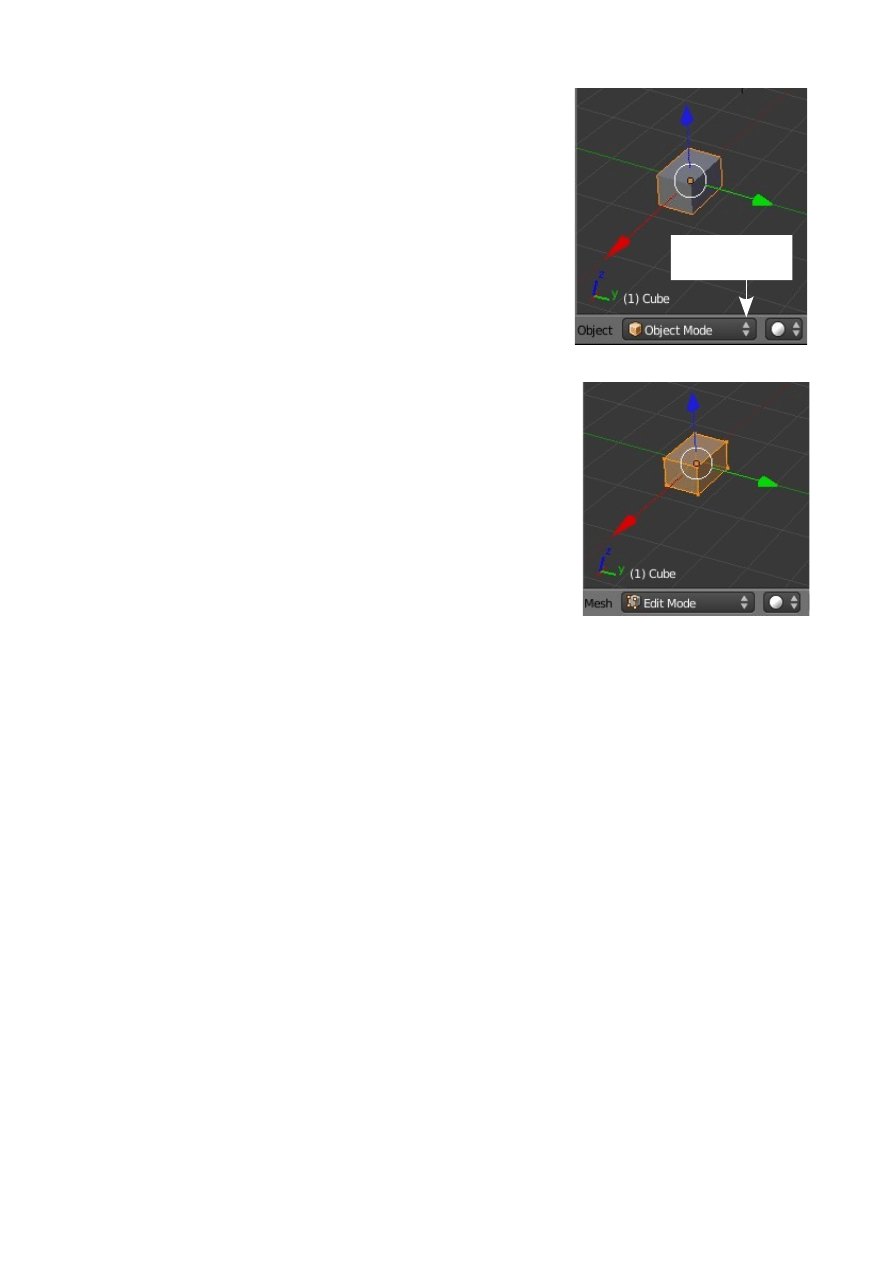
The 3D Widow by default is opened in Object Mode. You
will see this in the window header. By clicking on the
drop down selection menu it is able to select one of the
other modes.
At this stage we only need be concerned with the Edit
Mode option. Object mode allows us to move, rotate and
scale an object in the scene while edit mode allows us to
change the shape of the object.
To change between the two modes you can select the
mode from the drop down in the header but since it is
common to be switching between Object and Edit mode
pressing the Tab Key toggles between modes
With the Cube selected in the 3D Window and the mouse
cursor positioned in the window press 'Tab'. You will see
the object shown with its edges drawn in orange with dots
at each corner. The significance of this will be discussed
in detail later. For now toggle back to Object Mode.
Layers
Like many other graphics programs Blender uses layers to aid in constructing
complex scenes. Note the display in the 3D Window header. This represents 20
separate layers. Imagine sheets of transparent drawing paper with different items on
each sheet being placed one on top the other. Each square represents one sheet. The
orange dot in the first square indicates that the selected object is on the first layer. The
fact that the first square is shaded tells us that we are looking at the first layer.
To move to another layer click on one of the squares. It becomes shaded indicating
the layer is being seen in the window. If you click on square 2 the screen shows an
empty layer. The orange dot remains in square 1 indicating that there is an object
selected in layer 1. Go back to square 1.
Click for Drop
Down Menu
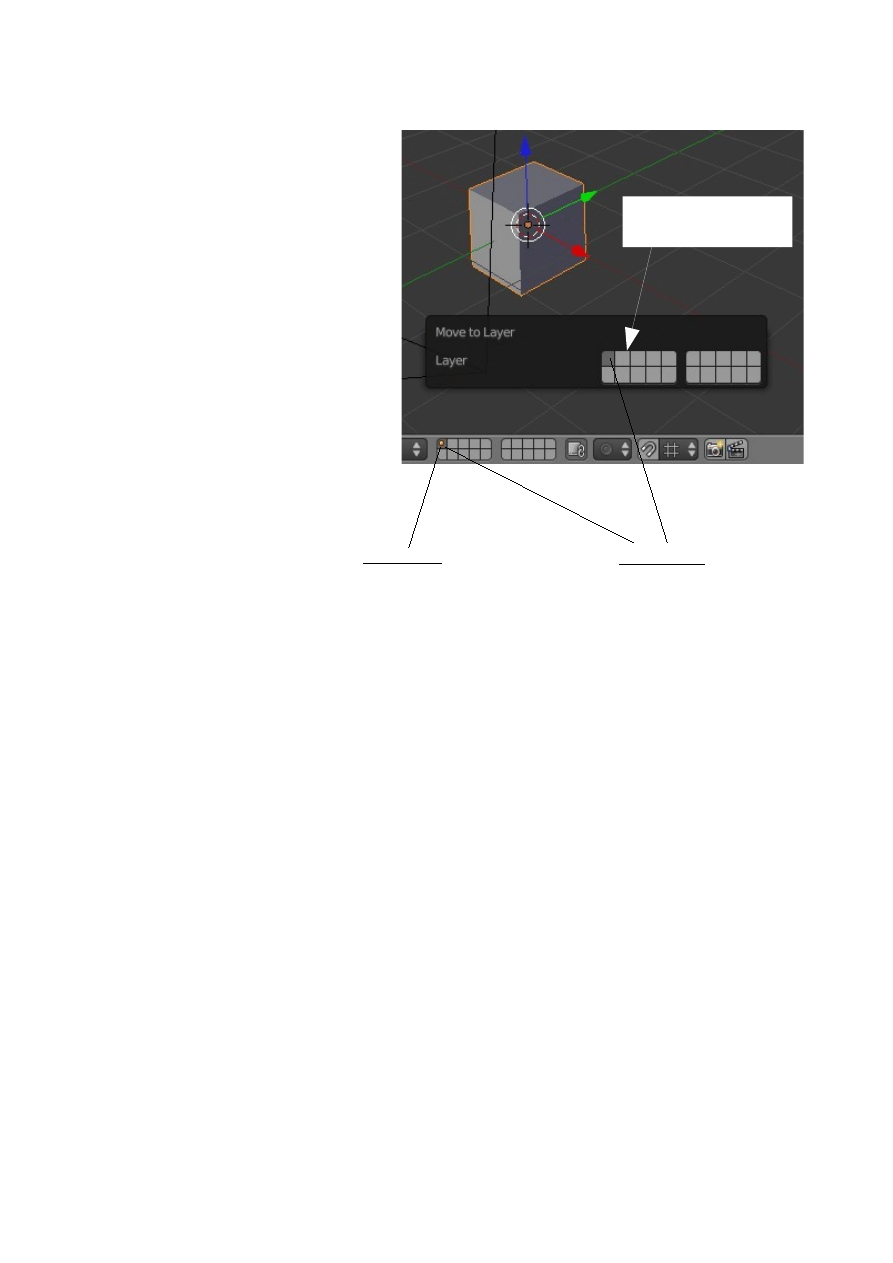
To move the Cube object to layer 2 first select the Cube in the 3D Window. Press M
Key and the 'Move To Layer'
window appears. Click on square 2
and the Cube is moved to layer 2 as
indicated by the orange dot
displayed in square 2 in the window
header.
Note there is still a dot in square 1.
This shows that there are objects on
layer 1 (the Camera and the Lamp).
To replace the Cube in layer 1 click
on square 2 in the header, press M
Key with the cursor in the window
and click on square 1 in the 'Move
To Layer Window'.
Click to move Cube to
layer 2
Orange dot shows Object on layer 1 Shaded square
indicates Layer 1 being viewed.
Moving in 3D Space
In a 3D program, not only do you have to worry about where you are in 2 dimensions
(height and width), but you also need to consider depth (how close or far away).
Before you can work in 3D space, you should have some skills in 2D drawing and
layout. Moving around in the 3D window is controlled by the mouse and the
keyboard number pad.
The Blender default scene opens in what is termed User Perspective view. Which
allows you to move objects about in a 3D window. Sometimes it is more convenient
and easier to see how far objects are separated by using separate orthographic views.
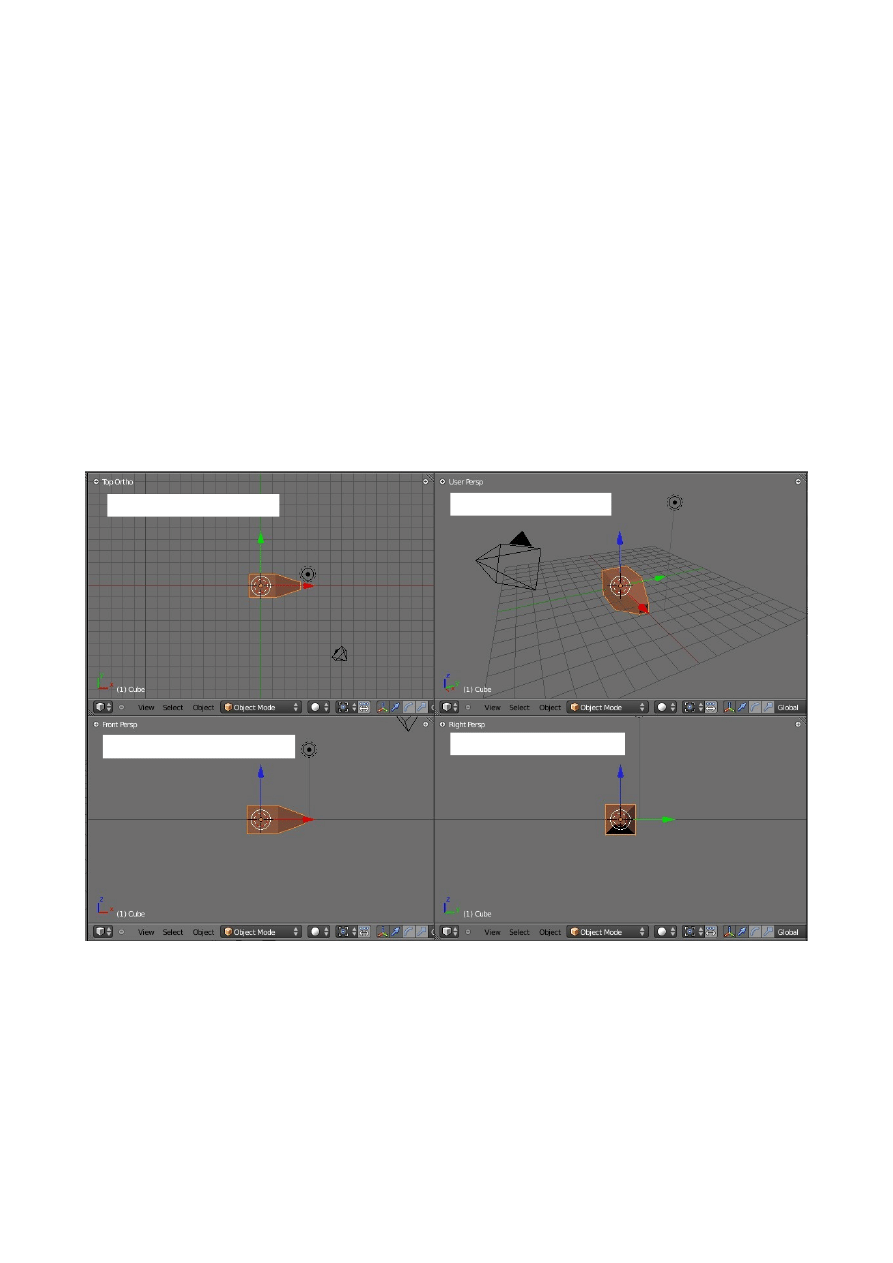
Think of a standard 3-view orthographic drawing - top, front and right side views.
These views match up with the number pad 7,1 and 3 keys (look at their
arrangement on the keyboard- just like the views). Put your cursor in the 3D window
and try typing those numbers.
Note however that when moving from the User Perspective view to either of the
orthographic views, at first you get a Top, Front or End perspective view. Look at the
Lamp and you see a line pointing towards the Cube. Press on Num Pad 5 to get the
true orthographic view. Pressing Num Pad 5 again toggles back to the perspective
view. Pressing Num Pad 0 will put you into camera view (what the camera sees). To
get back to the User Perspective view press Num Pad 5 twice. One press gets a User
Orthographic view the second press gets the User Perspective view. But hey! Its not
quiet the same as we had in the default scene. We need to rotate the view a bit. Click
Num Pad 7 – Top View
User Perspective
Num Pad 1 – Front View
Num Pad 3 – End View
and hold the middle mouse button and wiggle it around a bit. NOT TOO MUCH!
You will see the scene rotating in the window. Wiggle and practice is the best way to
learn. This all sounds a bit complicated but you will soon get used to it.
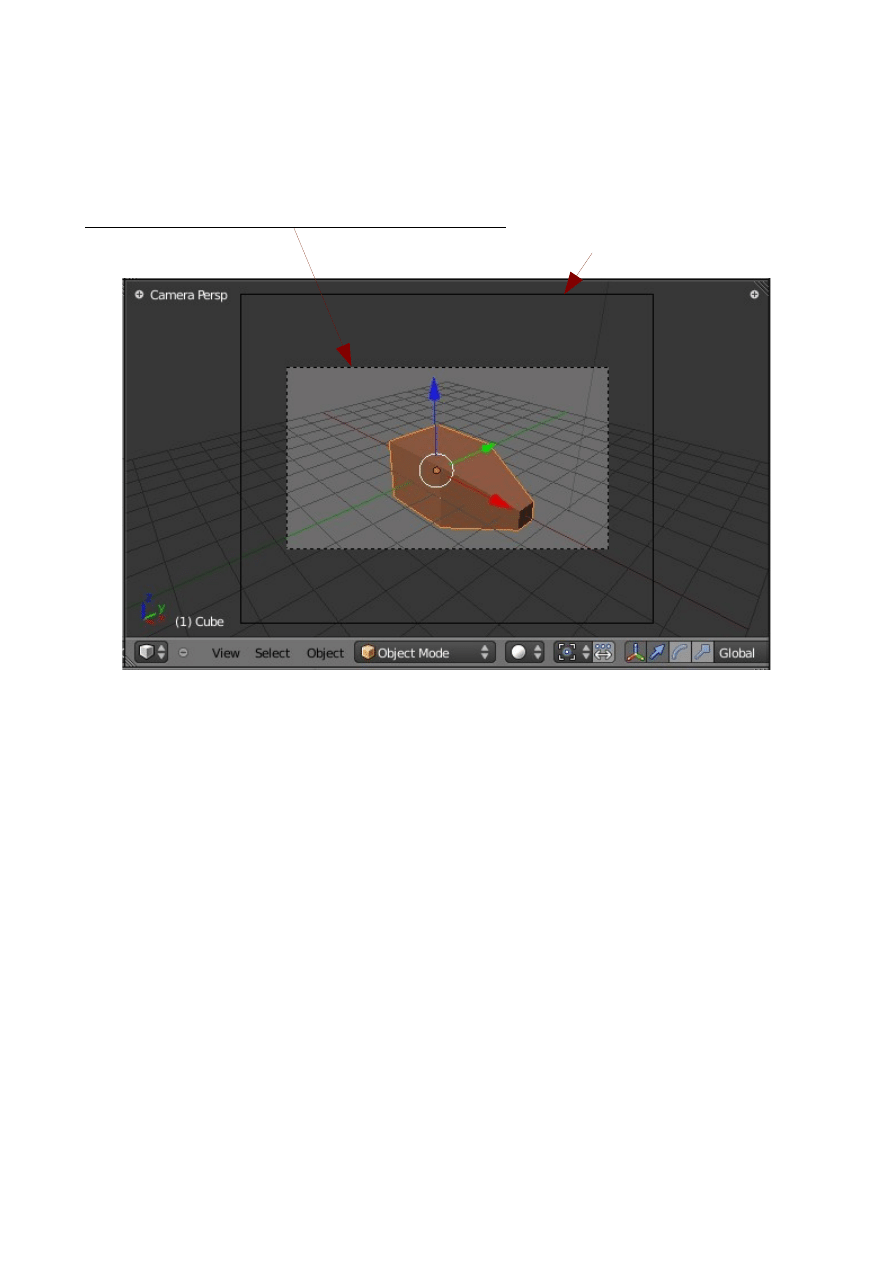
When you go to Camera view most of the window gets shaded in leaving a small
window in the middle with a dotted line around it.
This is the part that will actually render to an image. The other solid rectangle is the
camera itself. Right click on the outer line and it turns orange. You have the camera
selected. You can now move and rotate the camera like any object in any view. We
haven't actually covered that yet so hold fire for while. The shading in the camera
view is called 'Passepartout' and can be removed to let you have a clear view of
everything in the scene. We will show you how later.
The Number Pad Arrow Keys (2,4,6,8) will rotate you around in 3D space (Not in
Camera View). The “+” and “-” keys on the number pad will zoom in and out. The
number pad “.” (period) key will center your view on the selected object on your
screen.
The Mouse serves a number of functions. Clicking the Left Mouse Button (LMB) in
the 3D Window repositions the 3D Cursor in the scene. Wherever the 3D Cursor is
positioned is where the next object you add to the scene is located. Clicking the Right
Mouse Button (RMB) on an object selects that object. Similarly in Edit mode
clicking RMB on a vertice will select that vertice. Pressing the B Key on the
keyboard then click LMB ( Cross Hair Lines Display ) and drag a rectangle over an
object will select that object. Pressing the C Key on the keyboard changes the mouse
cursor in the 3D Window to a circle. Scroll the mouse wheel to change the size of the
circle. Position the circle over an object and click LMB selects the object. Press the
Clk RMB to select Camera
Esc Key to cancel the circle selection. Click and hold the mouse wheel rotates the 3D
View. Scroll the mouse wheel zooms in and out on the scene.
Don't attempt to memorise all the combinations they will become second nature with
practice since they are used over and over.
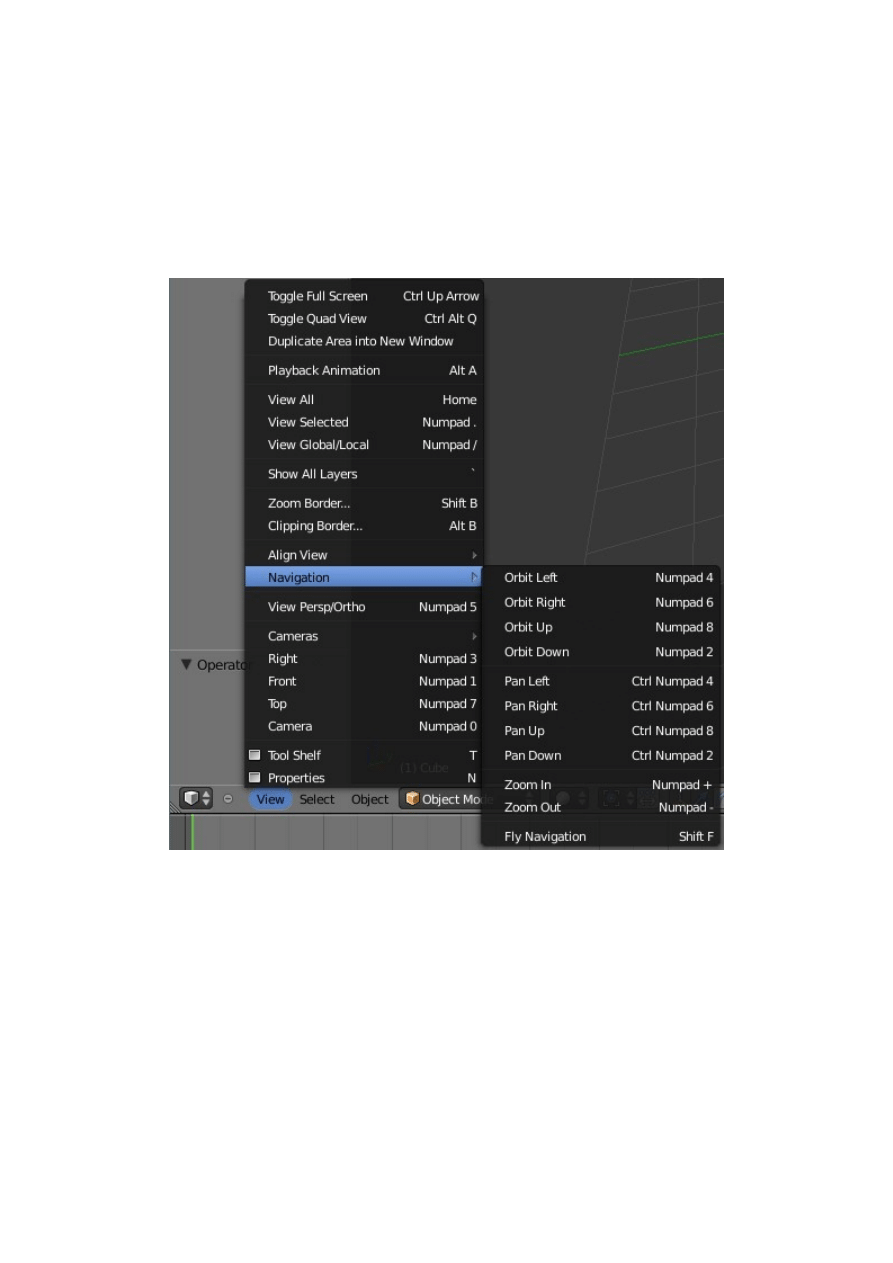
Blender View Menu
The View Menu showing the full range of options to manipulate viewports.
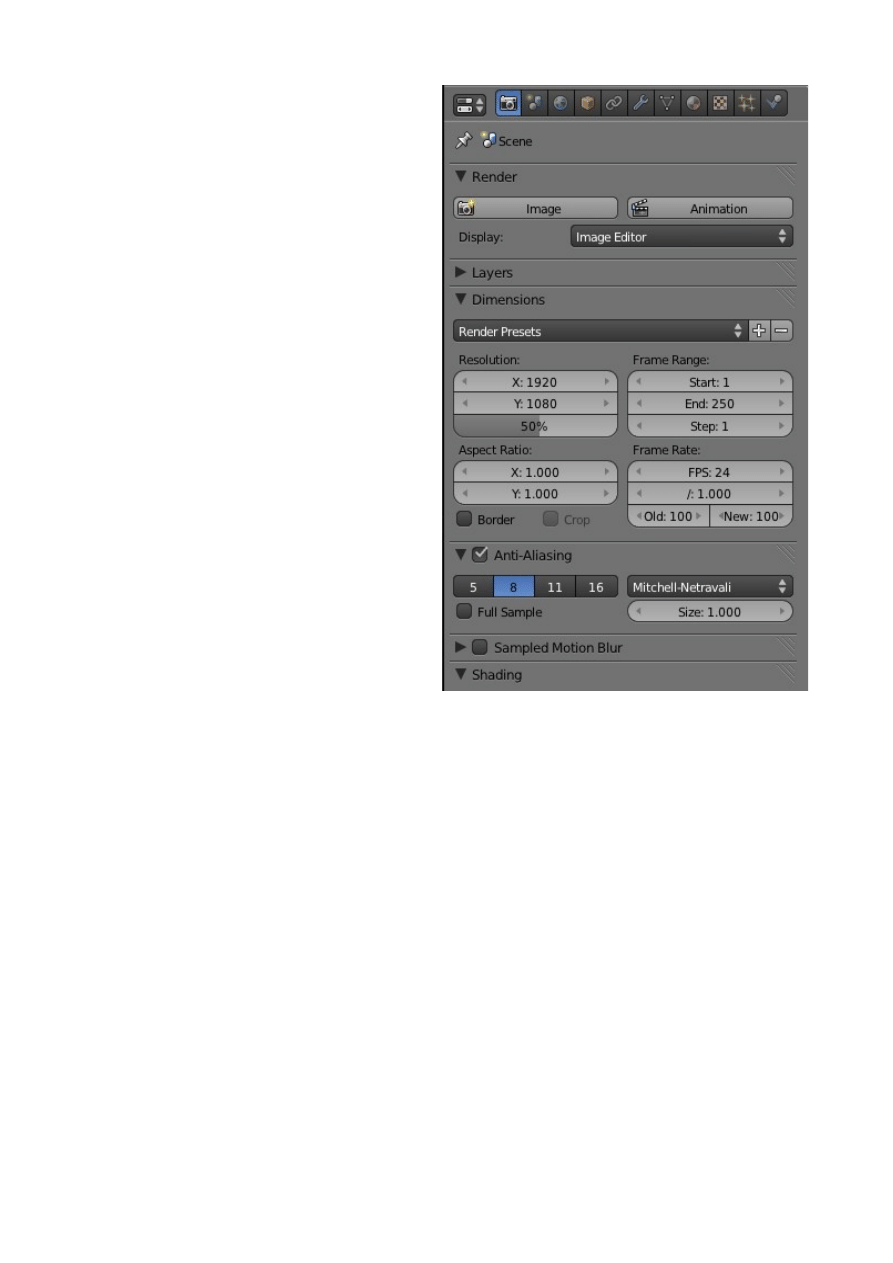
The Properties Window
The 3D Window is the place where you
set up your scene and see what you are
creating and where you are going. The
Properties Window on the other hand is
the engine room with all the controls that
drive everything.
The Properties Window is the main part
of the vertical panel at the RH of the
screen.
The Properties Window controls what
you see in the 3D Window, how objects
move and behave and finally how the
scene renders. It controls how your
artificial world is configured, how
everything in the scene appears, moves
and interacts with everything else.
To get an insight into what the Properties
Window does in practical terms we can
look at the row of buttons displayed in
the window header. These buttons are the
starting point for everything that
happens.
By default Blender opens the Properties Window in the default screen arrangement
with the Render button active and with the window containing all the render buttons
and values. The render button is seen highlighted in blue.
The following diagram shows the default Properties Window Header
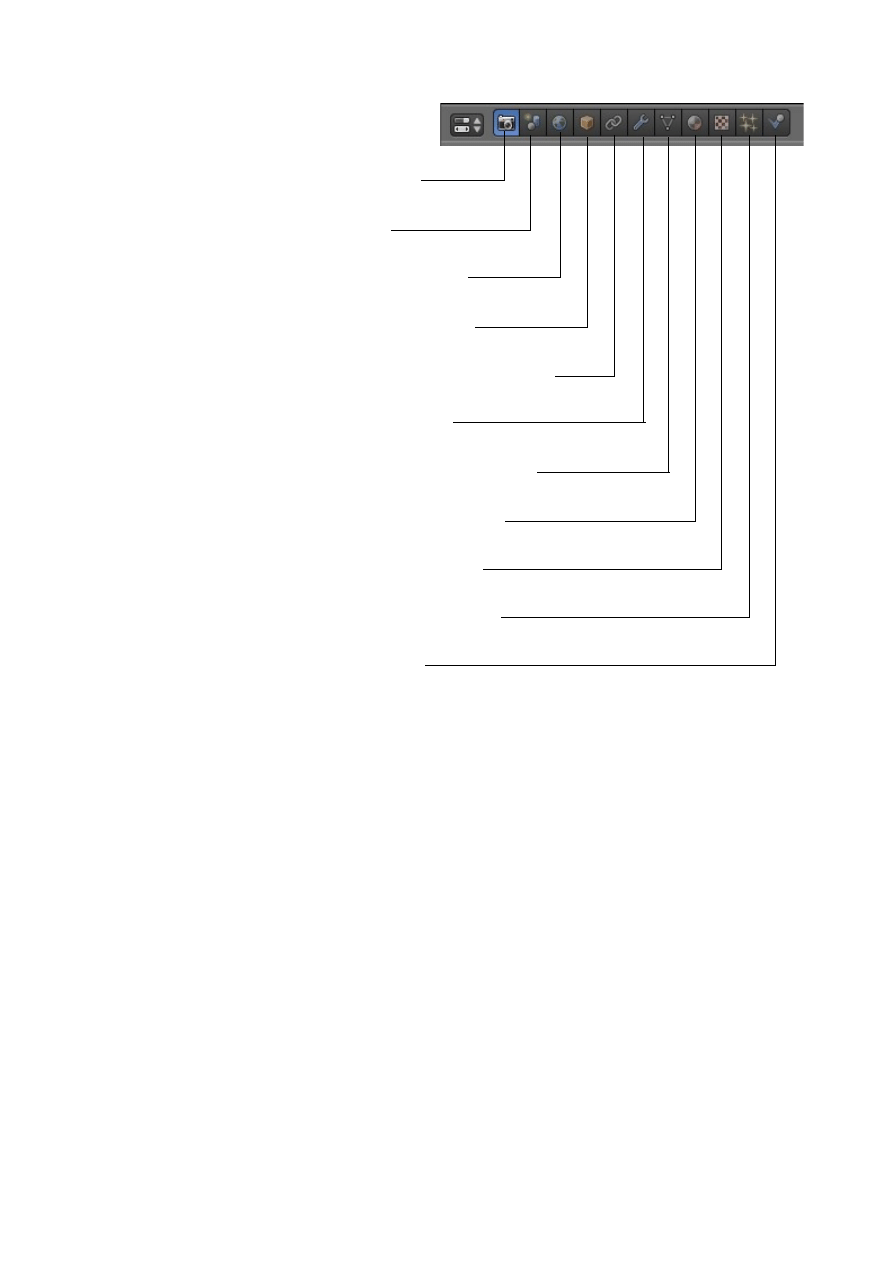
Render: How the screen renders.
Scene: Basic scene functions.
World: Controls for scene background.
Object: Controls for the selected object.
Object Constraint: Interaction with other objects.
Modifiers: Effect the selected object.
Object data: Data effecting the selected object.
Materials: How the object appears ( color ).
Textures: How the objects surface looks.
Particles: Object can emit particle effects.
Physics: How the object behaves.
Note: In the 3D Window the default Cube object is selected as seen by the orange
outline. Buttons that display in the Properties window header vary depending on what
is selected in the 3D Window. Try clicking RMB on the Camera then the Lamp and
back on the Cube. You will see the buttons in the header change.
It is not the intention to describe the function of every button and value in the
Properties window. The specific operation of buttons and controls will be
demonstrated as you progress through this document and even then it will be up to
you to experiment and record as you go.
Clicking on each of the buttons in the header changes the display of buttons and
controls in the main window. The buttons and controls are separated into panels
called Tabs. Some tabs are open and some are closed. Clicking on the little triangle in
front of the tab name toggles the tab open or closed. With some buttons selected there
are too many tabs to fit in the window. When this happens a scroll bar appears at the
RHS of the window.
The Properties window may be resized by dragging the border and may be changed
to another window type if required.
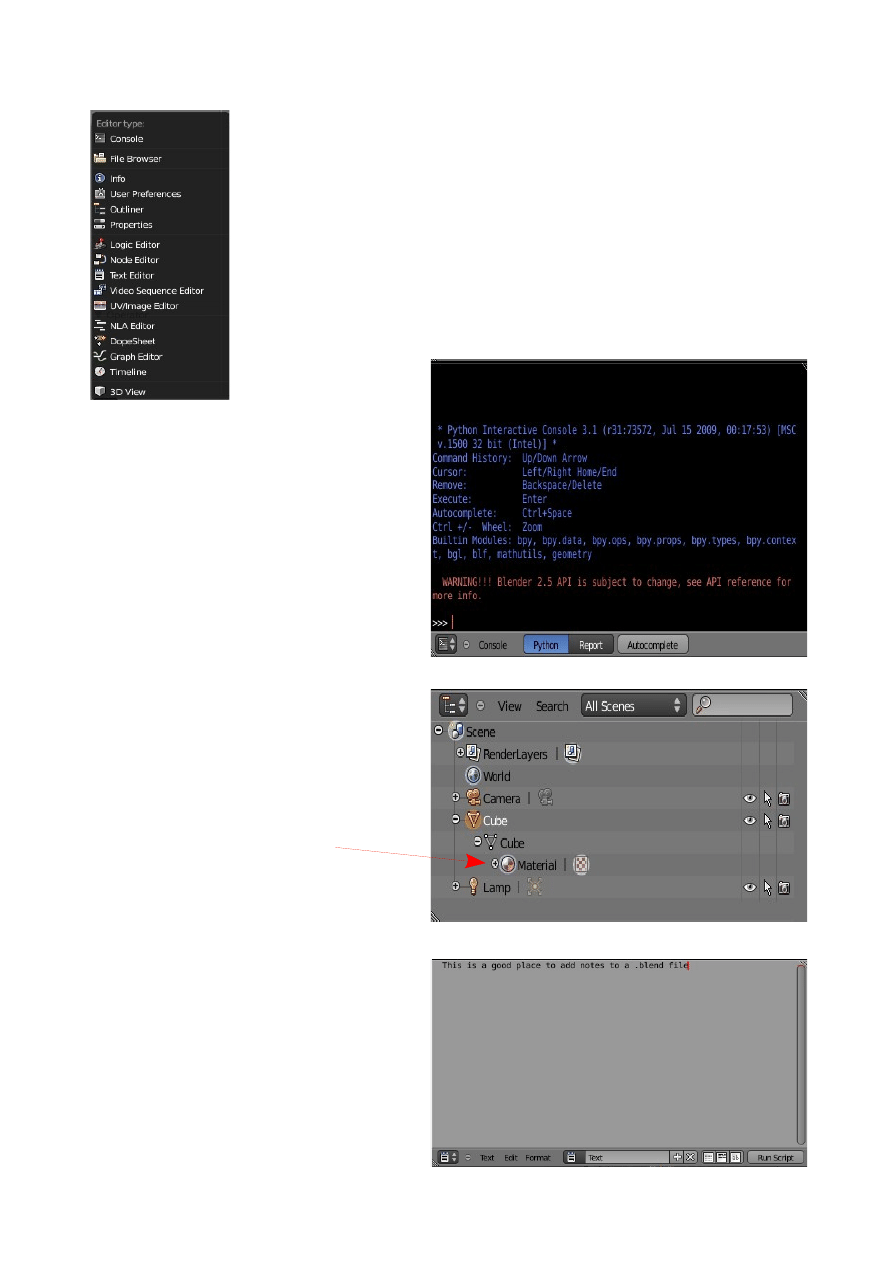
The Blender Windows
The application of the Blender Windows will be explained as you
progress through the different sections of the manual. There are
some windows however that require special mention since they
have a more general application rather than applying to a specific
topic. For that reason, when sticking to the basics, they can be
overlooked.
They are worth a mention here to make you aware.
Console Windows
The console window is where you wold
go if you get into the writing of the
program using Python Script. Python is
the programing language of Blender.
Outliner Window
The Outliner Window gives you a
visual display of everything in your
scene and shows how the different
items are connected. For example if you
click on the little cross next to 'Cube'
you get 'Cube' and if you click again
you see that it has a material.
Text Editor Windows
The Text Editor is just that, a text editor.
When you create something in Blender
and save the .blend file to use again
later you can write yourself notes in the
Text Editor and what you write will be
saved in the .blend file. This is very
handy for a bad memory.
CH02- Navigation
01-Navigate & Save
02-Windows Explorer
03-AppPacImp
04-Packing Data
05-Importing Objects
Navigate and Save
This section has been titled 'Navigate and Save' since it is most important to
understand where you are saving your work. As with all computer work being
organised will save you a lot of frustration down the track when you have created
many files and want to find something. Blender is all about building up your own
library of things that you have created or things that you have downloaded and want
to use in future Blender masterpieces.
It is impossible to teach everything so we will assume that you know how to navigate
around your computer system and create places where you store your stuff (If
unfamiliar with this see the section on Windows Explorer). In a Windows system
'Windows Explorer' is an invaluable tool for doing just that. It is recommended that
you become familiar with your computers file system. At some stage you will want to
save files, images, web pages, audio files and obviously your Blender files and movie
files.
We will discuss how you navigate in the Blender File Browser and save your work to
a location of your choice. The assumption is that you have created a file to save and a
folder in which to save it. The creation of the folder is where Windows Explorer
comes in. Sorry but I'm a Widows guy. (See the page on making a new folder in
Windows Explorer)
As a demonstration we will use the default Blender scene with the Cube object, the
Lamp and the Camera. I know thats not very exciting but we haven't learned to do
anything at this stage.
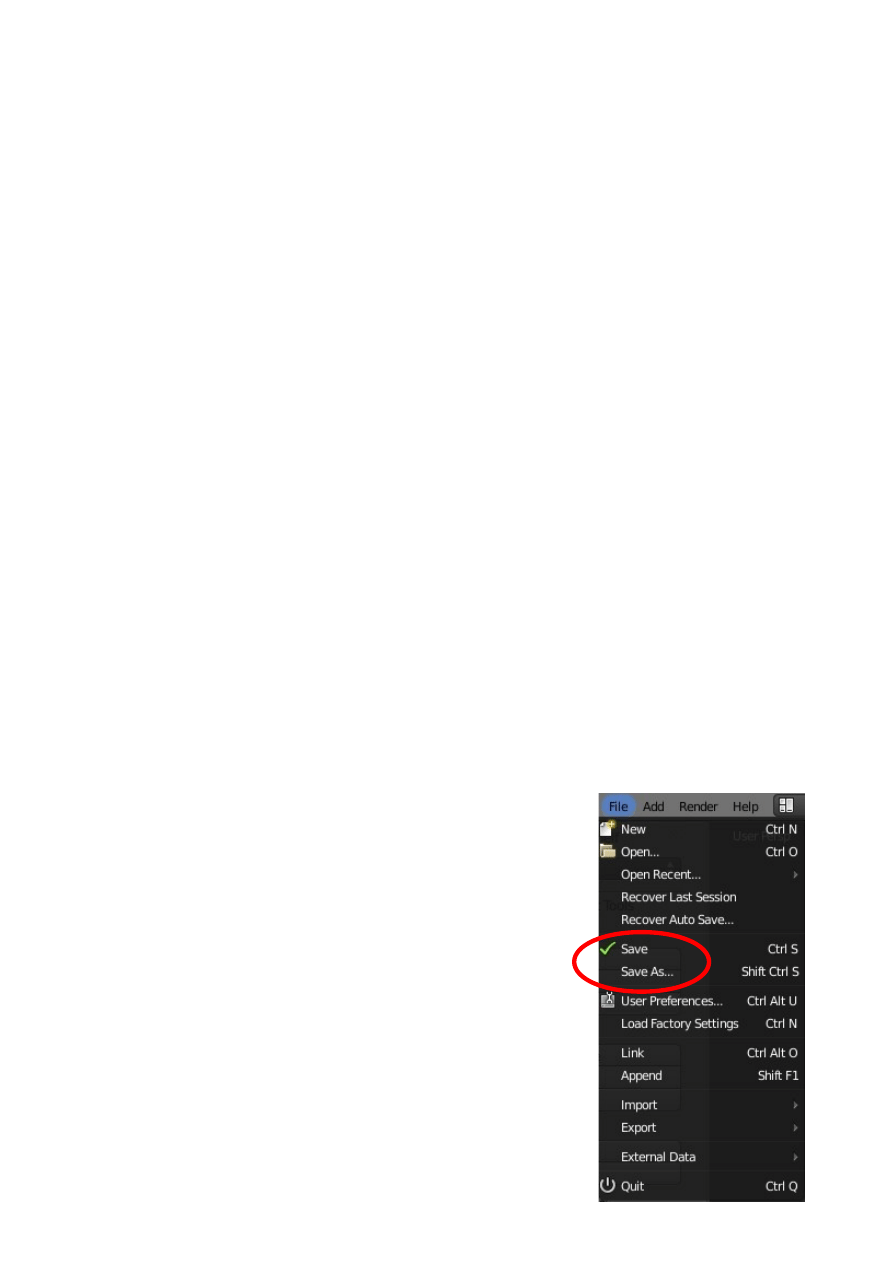
Open Blender with the default scene. In the Info Window header click on 'File'.
In the drop down that is displayed you will see 'Save' and
'Save As':
Use 'Save' to save a new file or to save work you have
added to a file.
Use 'Save As' to save a copy of a file. You will have to
give this a new name.
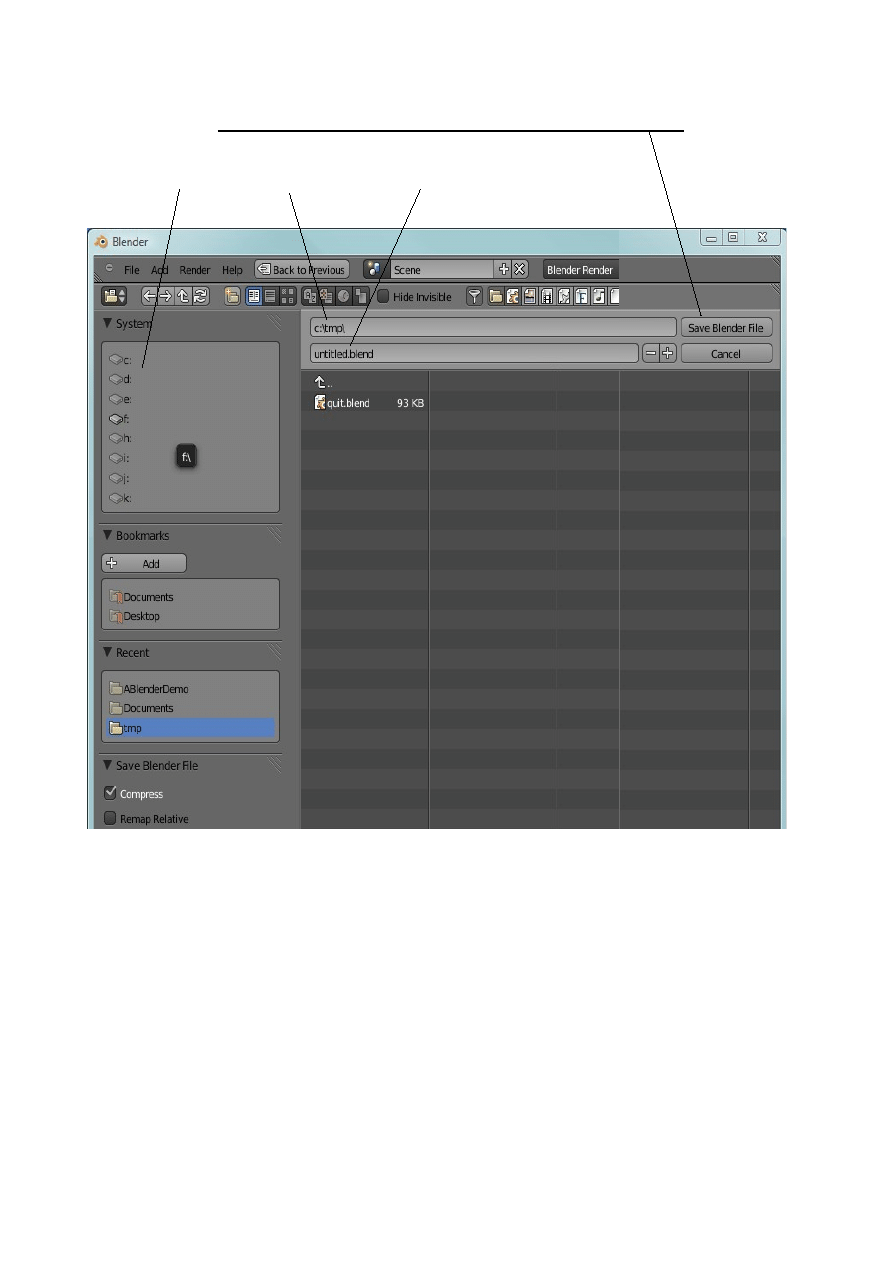
With our new default scene click on 'Save'. The Blender File Browser window opens
with the option 'Save Blender File' in the top RH corner of the window.
Where you see 'untitled.blend' is the name of your file. Blender automatically names
the file 'untitled.blend'. Click on the name to highlight it, press delete on the keyboard
then type in a new name and hit 'Enter'. I have named my file 'Demo.blend'. Don't
forget to add the '.blend' suffix. Blender will not automatically add this.
Just above where you have typed the name you will see the file path to where your
file will be saved. On my computer this is 'c:\temp\'. Blender has automatically
decided that if I do not say otherwise my file will be saved in the 'temp' folder on the
'c:' drive. You can see there is previous '.blend' file already saved to this folder.
FilePath
File Name
Drives on my PC
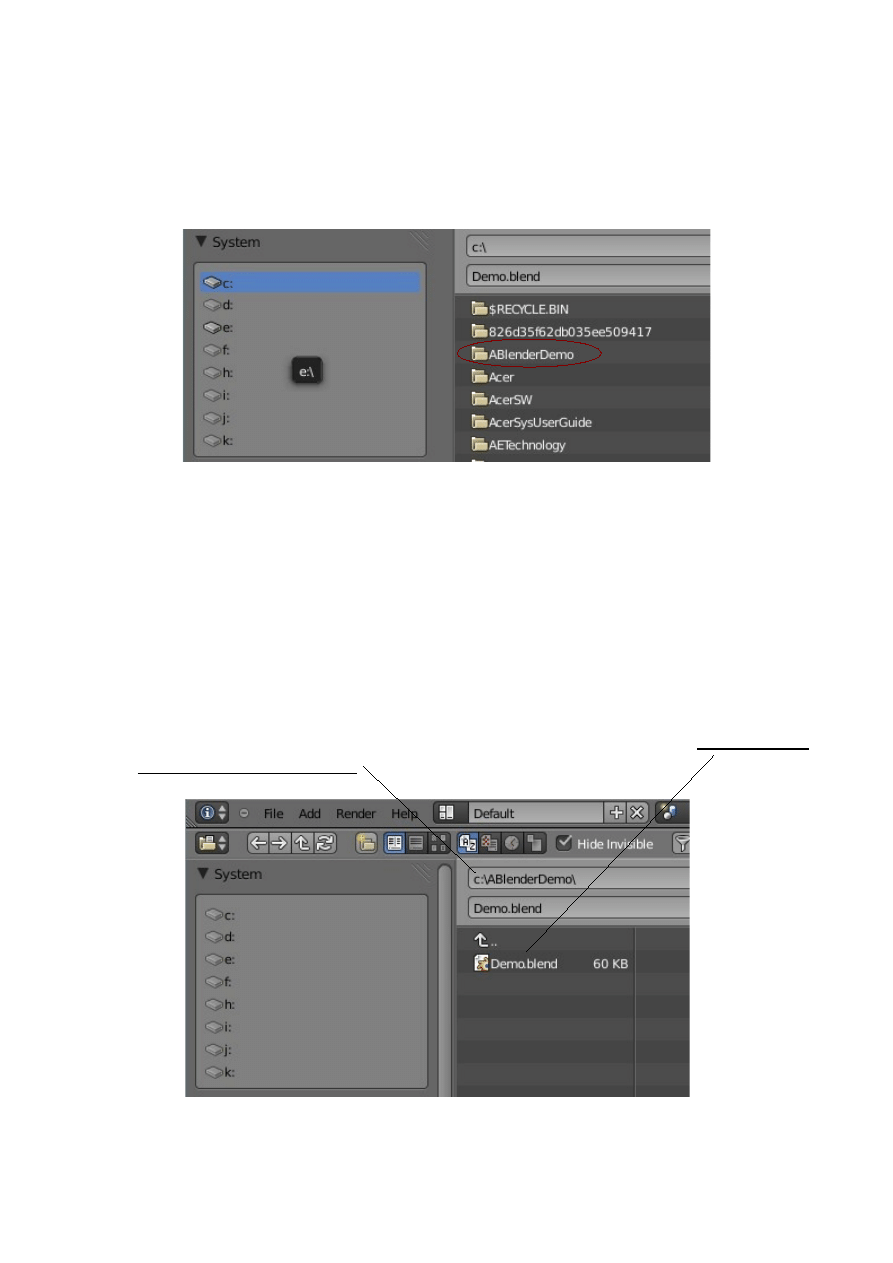
The 'temp' folder is not where I want my file to go.
I have made a new folder named 'ABlenderDemo' on my C: drive for this new file. To
navigate to this folder I go into the System panel at the top LH side of the screen. In
the panel you see all the drives on my computer listed, the top one being 'c:', the C:
drive.
When I click on the 'c:' in the panel all the folders on my C: drive display in the main
browser window. 'AblenderDemo' is third from the top of the list. Note that just
above where I typed in my file name 'Demo.blend' 'c:\' is displayed. This tells me that
I am looking at the 'C:' drive. To put my new file into 'AblenderDemo' I click on it in
the window. The main window is now empty as it should be since I haven't put
anything into it. Now I click on 'Save Blender File' at the top RH side of the screen.
Blender displays the default blender scene again.
If you have followed these directions on your computer and want to prove that you
have saved your file change the window type to the File Browser window. Click on
the 3D Window header Icon and chose 'File Browser'. Hey there we are 'Demo.blend'
in the c:\ABlenderDemo\ folder.
That should keep us out of trouble for the time being as far as saving our work but it
is a good idea to play around and find out what all the buttons in the File Browser
window do. I know you will hit on one that says create a new directory and it does
but you would have to go out of Blender into Windows Explorer to name it. Blender
just names it 'New Folder' which isn't all that helpful. Tell me if you find a way to
rename a new folder in Blender.
This has given a brief insight into navigating in the File Browser window as well as
showing how to save your work. Of course you can use the File Browser to find other
stuff as well. Just click on a folder in the window and it opens showing what's inside.
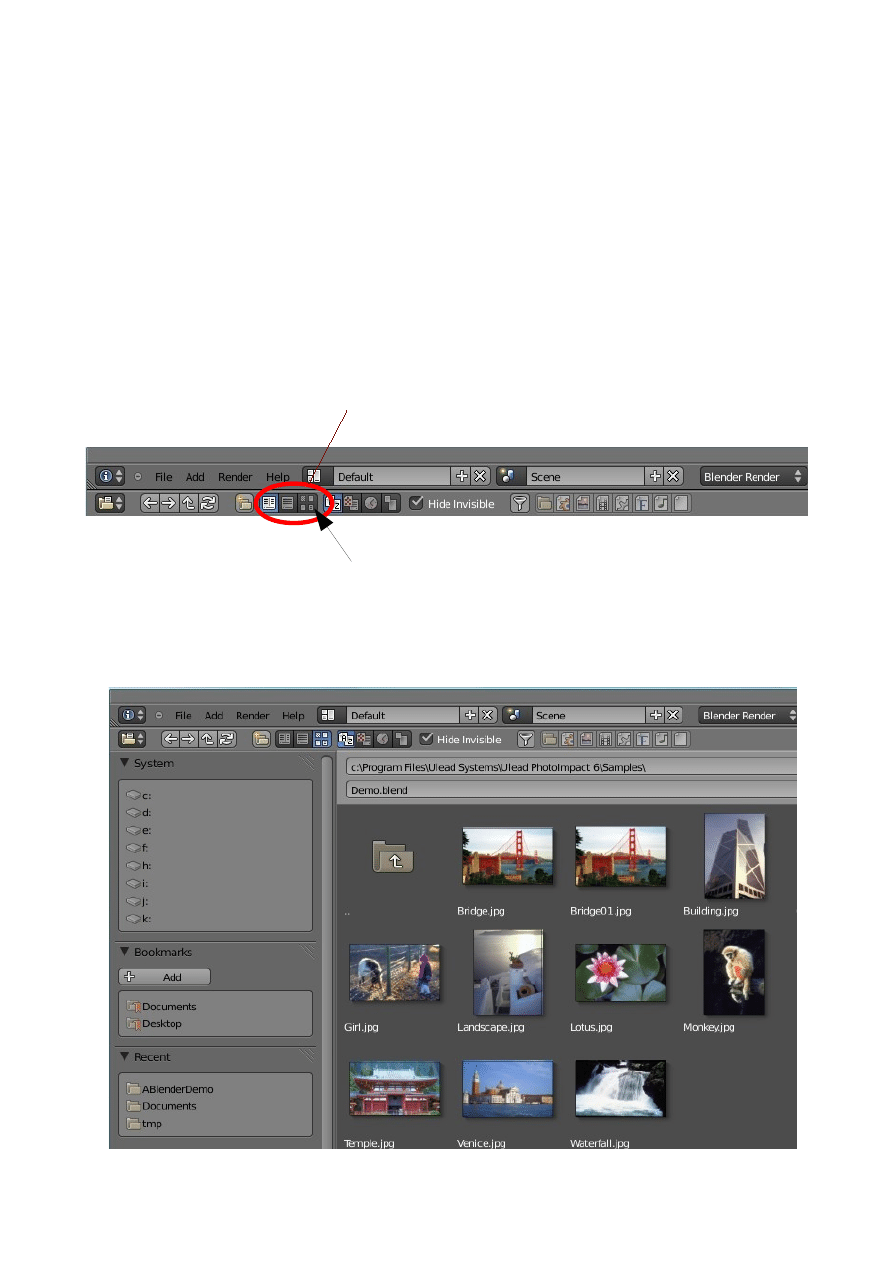
There are some buttons at the top of the window which let you choose how the
content's of folders are displayed.
One nice one lets you see files as thumbnails ( pictures ) so if you have photo images
you can see them from within Blender.
Choose how files are displayed
Thumbnails
Windows Explorer
Lets make a folder where we can save our stuff.
Open Windows Explorer. There are several ways of opening Explorer depending on
what version of Windows you are using. You can usually find the application by
clicking the 'Start' button, clicking open 'All Programs' and going to Accessories.
Windows Explorer is usually in Accessories. You could have a quick start icon
somewhere else.
If your computer is like mine it persists in opening Widows Explorer showing my
'Documents' folder. You can save your stuff there but it will soon accumulate and get
all mixed in with your letters to Grandma and the Tax Man. This is not a good thing.
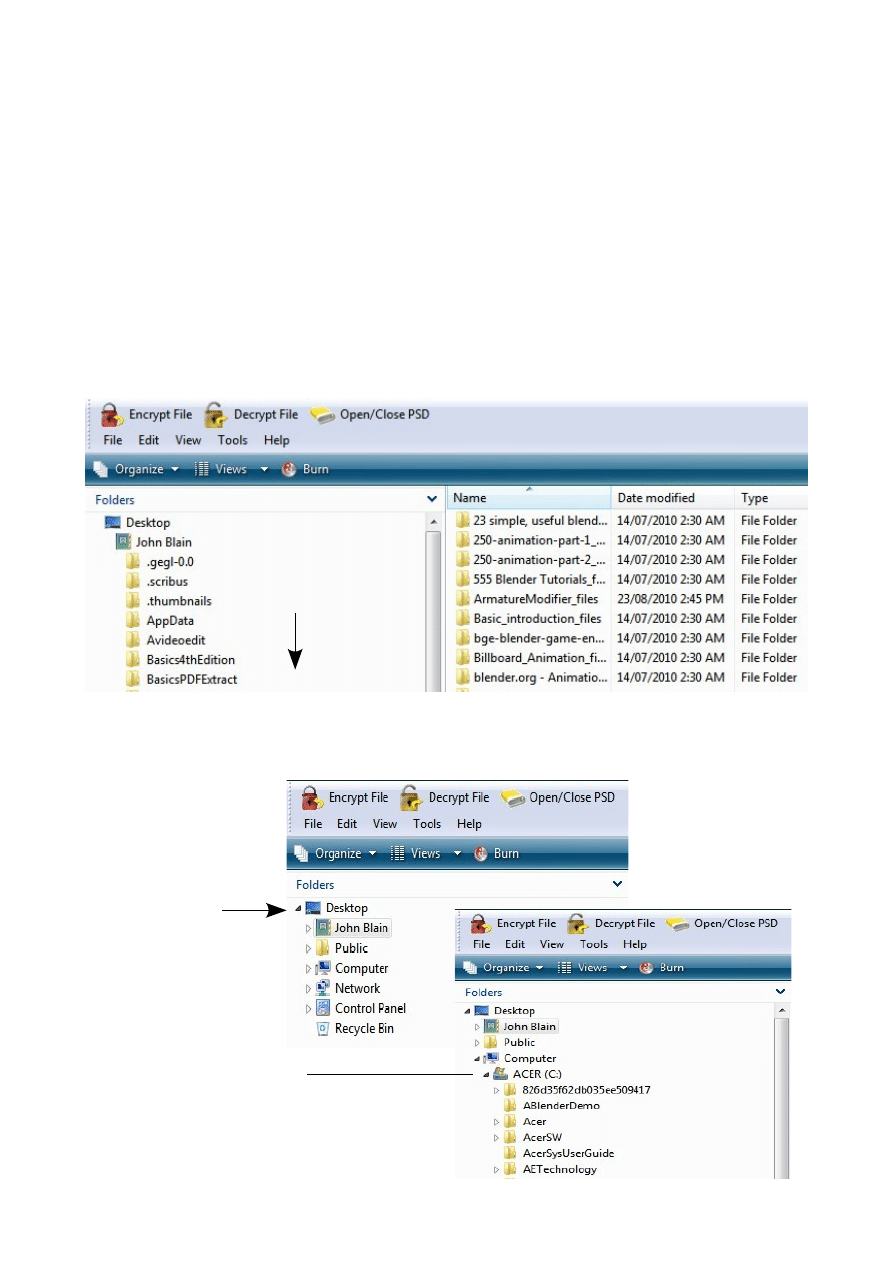
We will make a new folder in the C:\ drive. Close the folder list and get back to the
basic directory.
Documents Folder
way down the list
Click to close or
expand the Directory
Desktop-Computer-Acer (C:)
Directory opened.
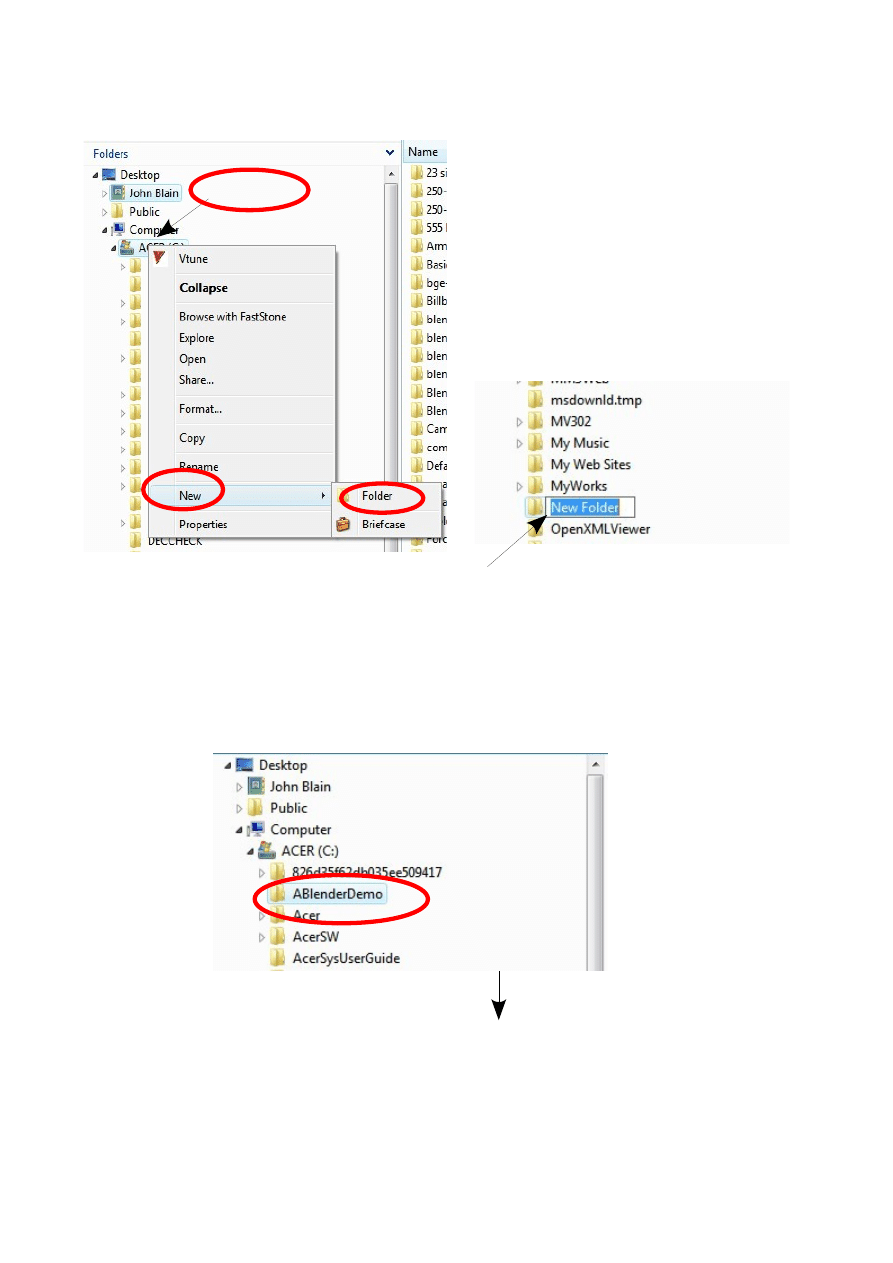
Right click on your C:\ drive and in the drop down that displays click on 'New' and
then click on 'Folder'.
Windows enters a new folder and names it 'New Folder'. At this stage you can edit
the name. Press 'Delete' to delete 'New Folder' and type in your new name. I have
named my folder 'ABlenderDemo'. I have put the 'A' at the beginning of the name so
that Windows will put it at the top of the directory list. If I named it 'Xanado' it will
go way down the bottom (Alphabetical Order). When you have typed in your name
press 'Enter' and way you go you have a new folder.
IMPORTANT: Remember your name and where it is. This makes life easier later on.
Right Click
Xanado way down
the bottom
Append Pack and Import
The Append or Link Command
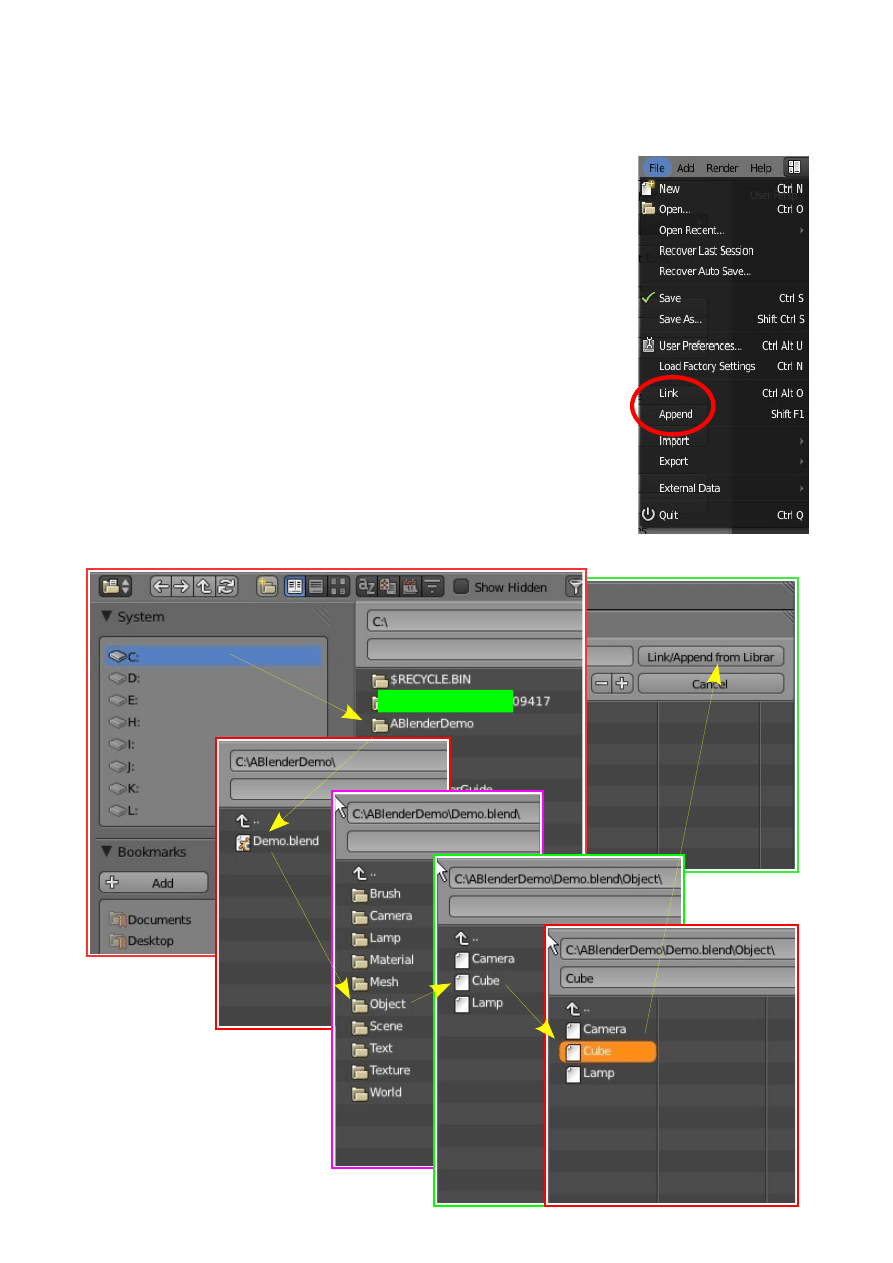
When you need to insert elements from one Blender (.blend) file
into another one, you need to use the Append or Link command
from the file pull-down menu.
While in Append, you need to navigate to the Blender file you
wish to insert from, then select what you want to append into the
open file. You can append anything from cameras, lights meshes,
materials, textures, scenes and objects. For most purposes, use
the Object option. By appending objects, any materials, textures
and animations that are linked to that object will automatically
come in with it. Right Mouse Button (RMB) clicking on objects
will select\deselect them. Typing “A” will select them all. After
you select all objects to append, click the “Load Library” button
in the upper right corner of the screen.
Folders in C: drive
Click on C:
Click on ABlenderDemo
Click on Object
Click on Cube to select
Click on Link/Append from Librar
The Link option allows you to link to another Blender file rather than inserting it into
the open file. This option allows for changes to the linked file that will be
automatically updated when the other file is opened.
Packing Data
If you plan to open this file on other
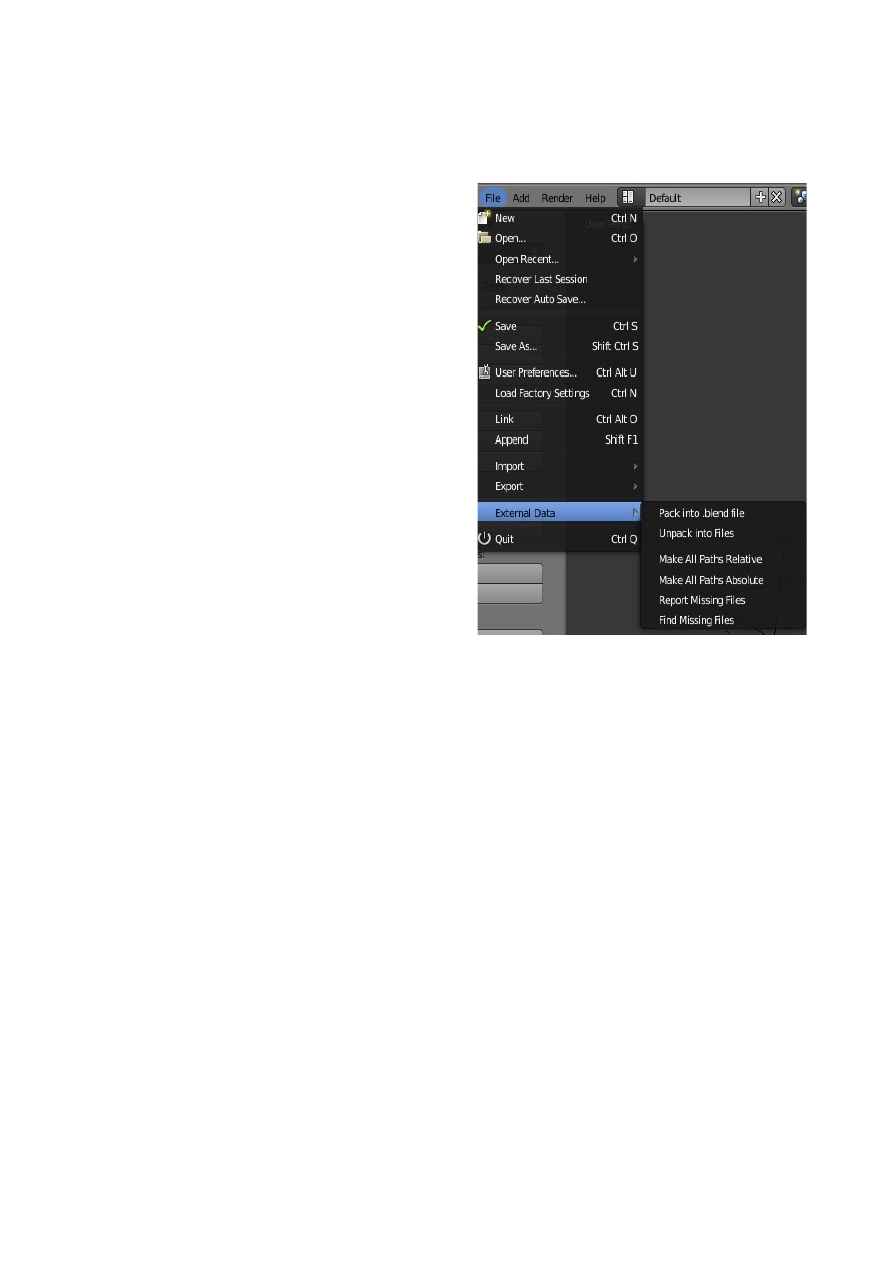
computers, you will need to select the “Pack
into .blend file” option in the file menu under
“External Data”. Textures and sounds are not
automatically included in your Blender file in
order to keep the file size down. Every time
your file opens, it looks for the textures and
sounds
and
places
them
into your model. If it can’t find the files, you
won’t have any textures and sounds. If you
pack data, those files are included with the
.blend file so they can be opened anywhere,
however, your file size may explode. When
data is packed, a small package shows up on
the top of your screen letting you know
that the file is packed. You can also unpack
data to bring the file size back down.
Importing Objects
One of Blender’s strong points is the program’s ability to accept several generic types
of 3D files from other programs. The most popular used are:
VRML (.wrl) files- Many programs are able to export their files as VRMLs.
SolidWorks is a good example that we use. These files
import into Blender without any problems in most cases.
.DXF files-
A very popular file format for exporting and sharing.
AutoCAD and SoftPlan architectural software
traditionally exports with .dxf formats. Again, Blender
usually accepts these files flawlessly.
To save a file as one of these types from another program, you will need to find an
export command or a “save as” option. This will vary depending on the program you
are using. Refer to that program’s help files. To import a VRML or DXF file into a
Blender scene, open a new drawing or one you wish to insert the object(s) into. You
will simply need to use the Open command in the File pull-down menu. The program
knows that you are trying to open something other than a .blend file and will insert it
into your current scene. Now you need to find the object(s) you just inserted.
Depending on how that object was drawn, it may need to be resized or rotated.
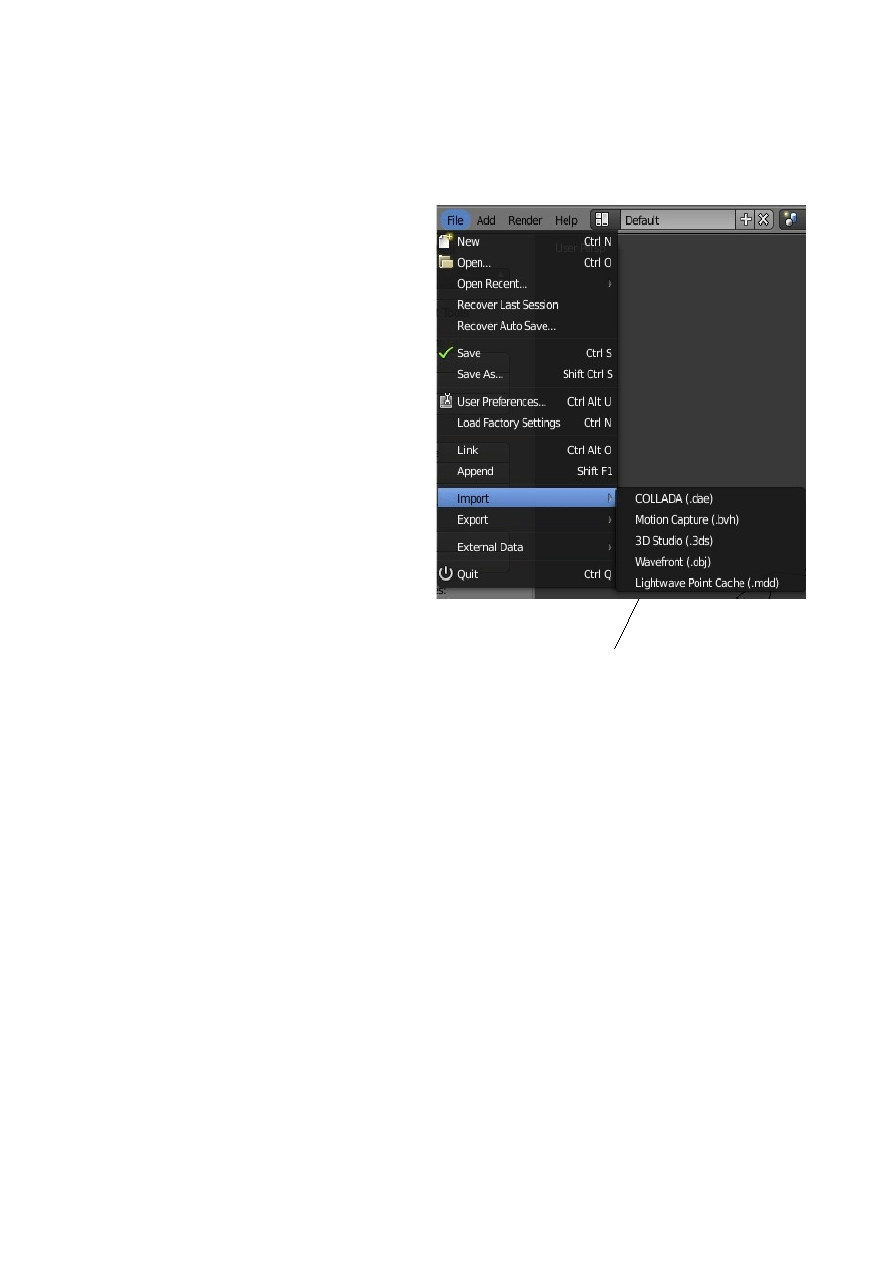
With every new release of Blender, the
import/ export format options list
changes. This makes Blender
compatible with a variety of other 3D
modeling and animation software
programs. You should be able to find a
format in the list that will work with
your other programs.
When importing Blender files into other
Blender files, remember to use the
Append command instead of import. In
the Append command, select the file,
then select what you would like to bring
into the current file. You will usually
want the “Objects” option.
File Types
CH03- Create Edit Object
01-Basic Mesh
02-Placing Objects
03-Edit/Object Mode
04-Mesh Types
05-Cursor Placement
06-Moving Objects
07-Scaling Objects
08-Rotating Objects
09-Precision Manipulation
10-Transformation Widget
11-Mesh Vertex Editing
12-Selecting Verticies
13-Edit Mode Selection
14-Creating Verticies
15-Center Points
16-Object Display
17-Shading Smooth/Flat
18-Extruding Shapes
19-Proportional Vertex Editing
20-Knife Tool
21-Creating Ground
22-Edge Loop Selection
23-Tool Shelf
24-Joining/Separating Meshes
25-Modifiers
Working with Basic Meshes
Now that we know how to move around in Blender, let’s start doing some basic
building and shaping. In this section we will talk about creating basic shapes and
using modifiers to form them. There are a lot of different types of things to draw in
Blender. Right now we will only discuss Meshes.
Start a new drawing in Blender and save it in your 'Documents' folder. Name it
Sculpture. You can save your work wherever you like as long as you remember where
you put it. In Windows the 'Documents' folder is usually accessible from the Desktop
so its easy to find. Its best to be familiar with saving and creating files and folders so
go back and read the section on that subject.
Note: Blender will not prompt you to save you file when exiting the program.
Remember to always save your work often! Don't forget the
.blend
Placing Objects On The Screen
The 3D Cursor (bullseye) location is used to place new objects. Click with the Left
Mouse Button where you want your Object located and the 3D Cursor locates to that
position. When you have it in a good location, press Shift + A Key to bring up the
insert menu. Select Add, then Mesh and select UV Sphere.
Note : We previously stated that we were discussing Meshes. An Object in Blender is
a Mesh Object. Think of a sphere made out of chicken wire or fishing net and you get
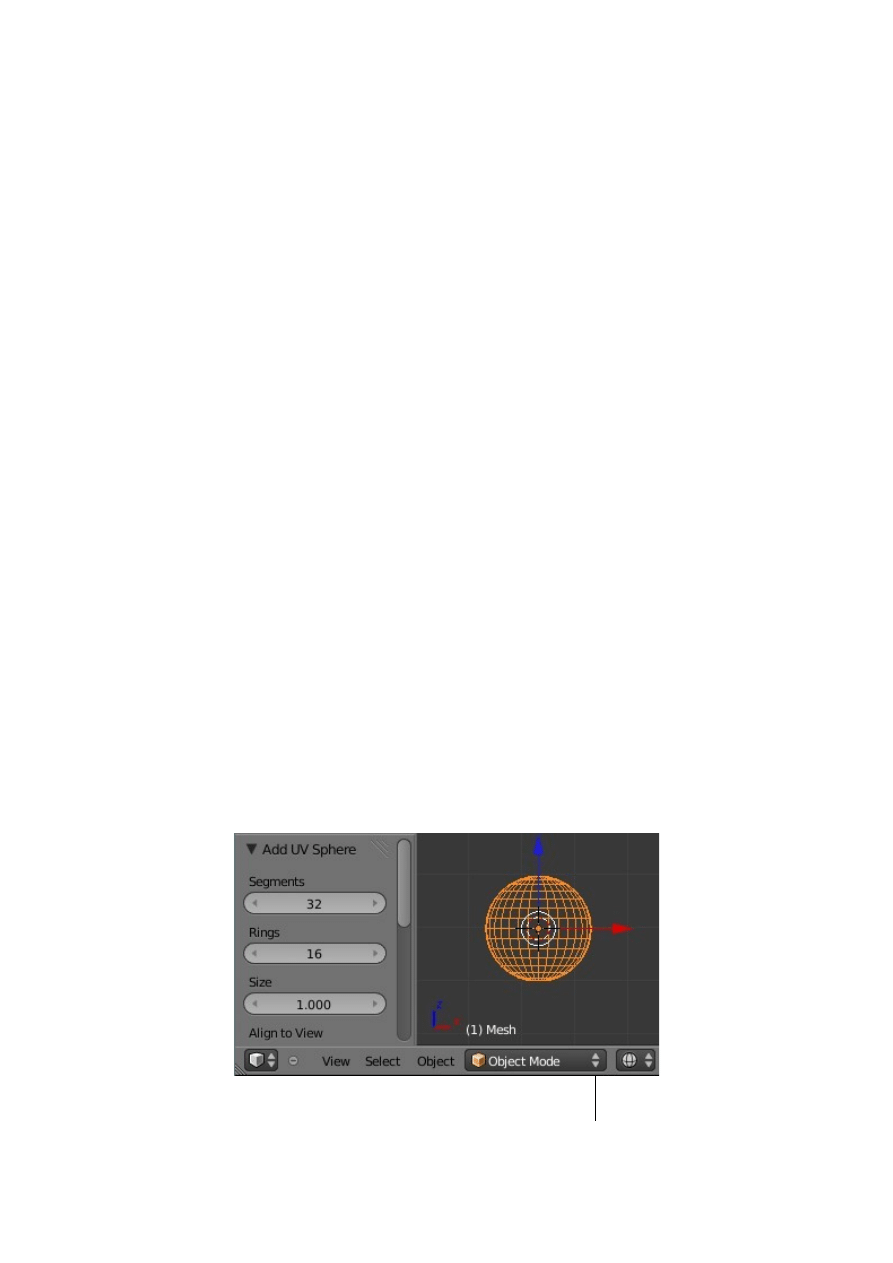
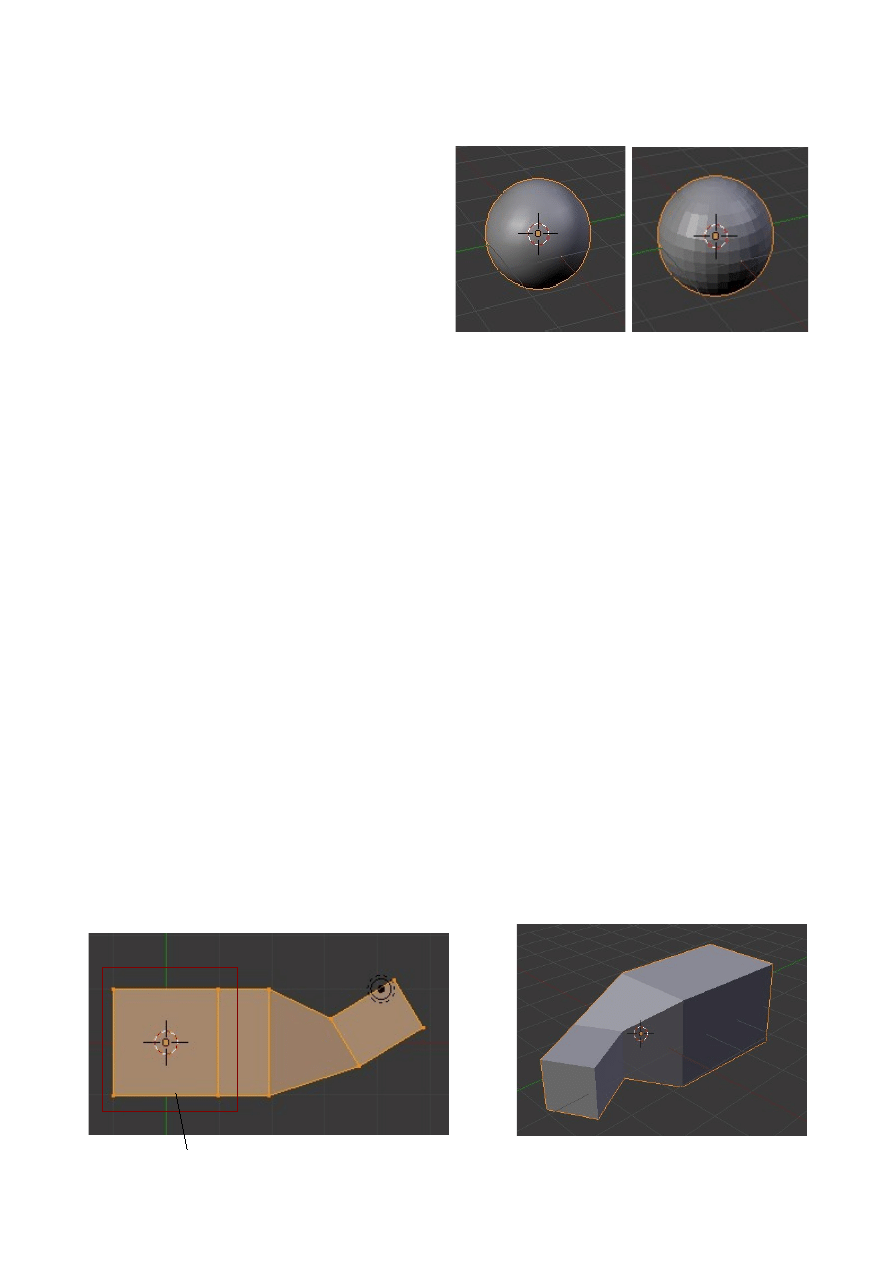
the idea. A sphere in Blender has a mesh with vertical and horizontal divisions called
segments and rings. Vertical segments like the inside of an orange and horizontal
rings. The default UV Sphere has 32 segments and 32 rings. You can change these by
altering the values in the panel at the bottom of the Tool Shelf which displays when
you add the Sphere to the scene. You can keep it at 32 for now.
Display Modes
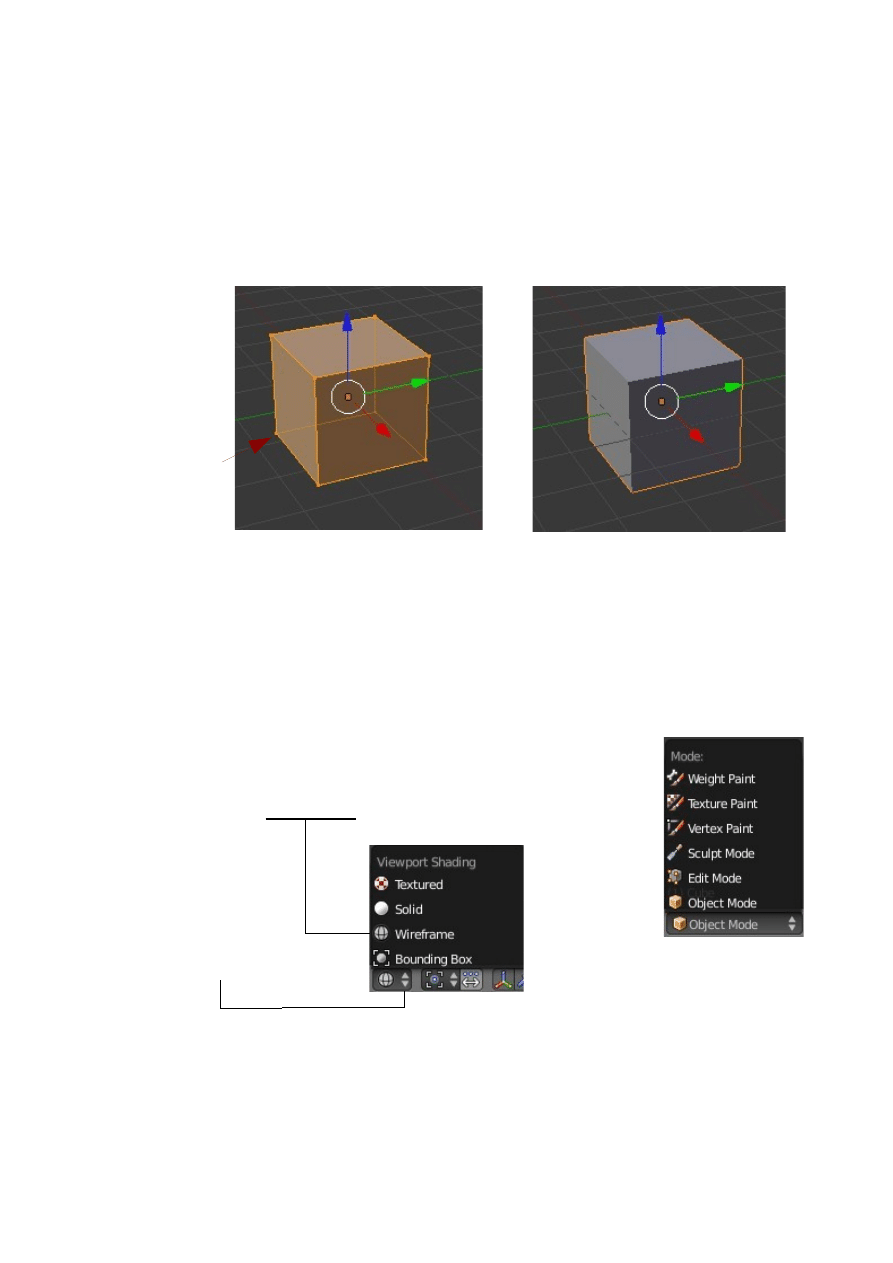
Edit Mode and Object Mode
When you place an object in Blender, it comes into the scene in Object Mode and is
selected as shown by its orange outline. There are basically two states in Blender-
Edit Mode and Object Mode. Edit mode is intended for modifying the shape of the
object by selecting vertices on the object. Vertices are the joining points of the mesh.
Object mode affects the object as a whole. The Tab button toggles you between the
two states.
Before entering a new object into your scene make sure any other objects are not in
edit mode otherwise the objects will be joined.
Another way to switch between modes is to use the Mode selection drop down in the
window header. You will see that besides Object and Edit there are other modes
available.
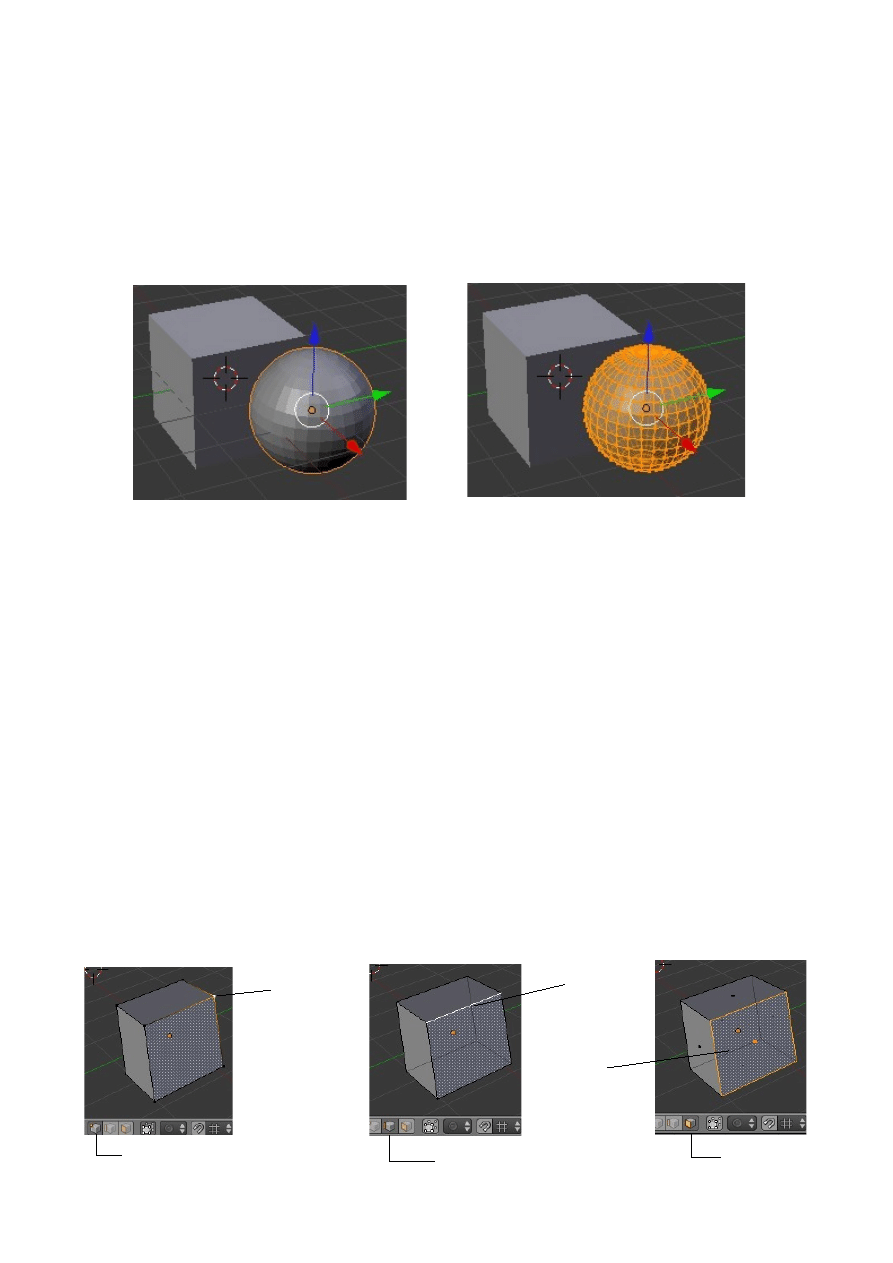
In our diagram showing the Sphere with segments and rings the
Sphere was drawn in Wireframe mode.
The default draw mode is Solid. Other modes are accessed from the dropdown in the
window header.
Edit Mode
Object Mode
Vertices
Draw Modes
Display Modes
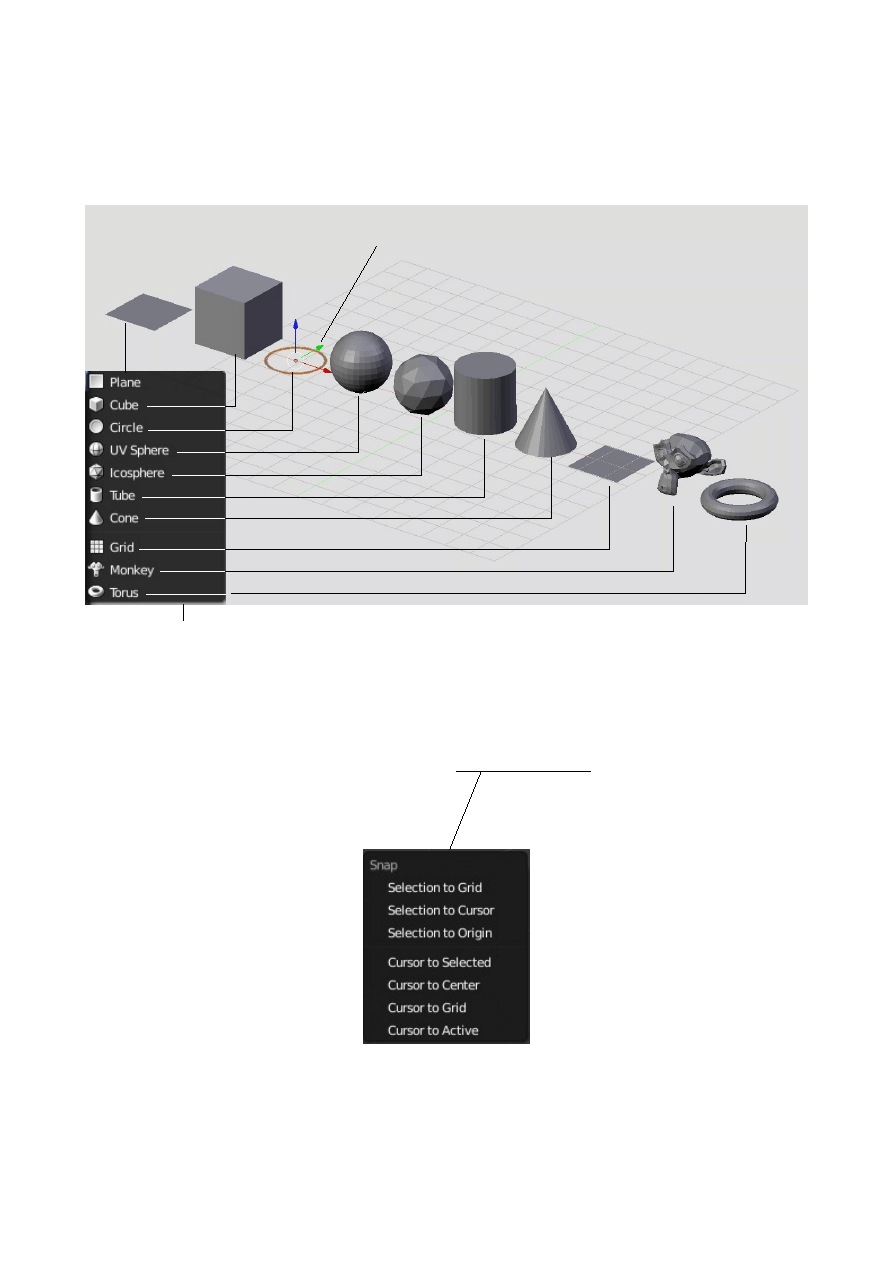
Mesh Types
Press Shift + A Key to reveal Mesh types selection menu. Mesh types ( Primitives )
available are shown below.
Primitives are basic shapes from which you can start modeling.
Precise 3D Cursor Placement
To precisely place the 3D cursor, use the Shift + S Keys for options to move the
cursor to objects, grid etc.
3D Manipulator shown on Circle Object
Mesh Types Venue
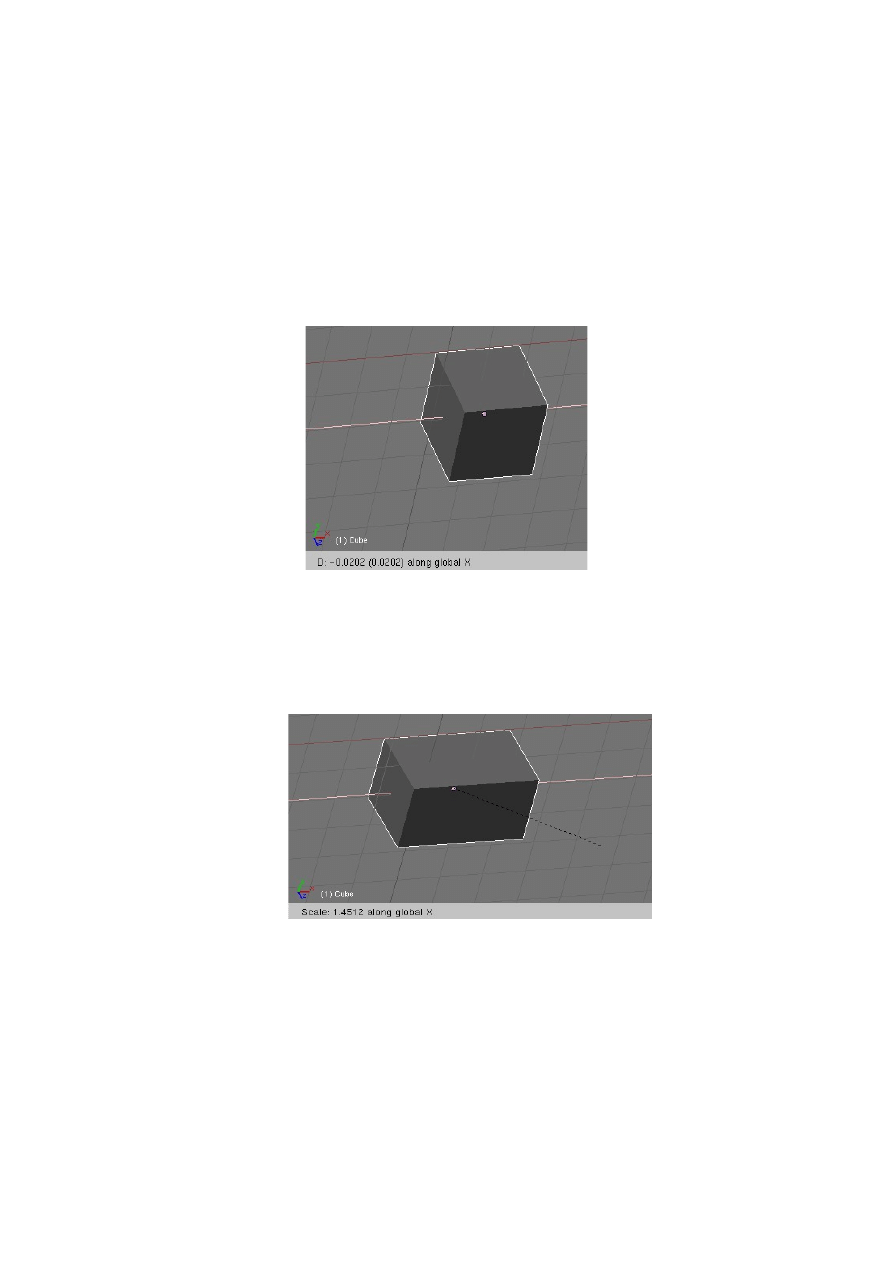
Moving a Mesh Object
The three basic controls (Modifiers) are: G Key (Grab), S Key (Scale), R Key
(Rotate)
To move an object freely in the plane of the view press the G Key with the object
selected and drag the mouse.
To lock the movement to a particular axis press G + X , Y or Z
Scaling an Object
To scale an object freely press the S Key and drag the mouse.
To lock the scale to a particular axis press S + X, Y or Z
Rotating an Object
To rotate an object press the R Key and move the mouse about the objects center.
To lock the rotation to an axis press R + X, Y or Z
To rotate a set number of degrees press R + 30 rotates the object 30 degrees.
R + X + 30 rotates the object 30 degrees about the X axis.
Scale locked to the X axis
Movement locked to
the X axis
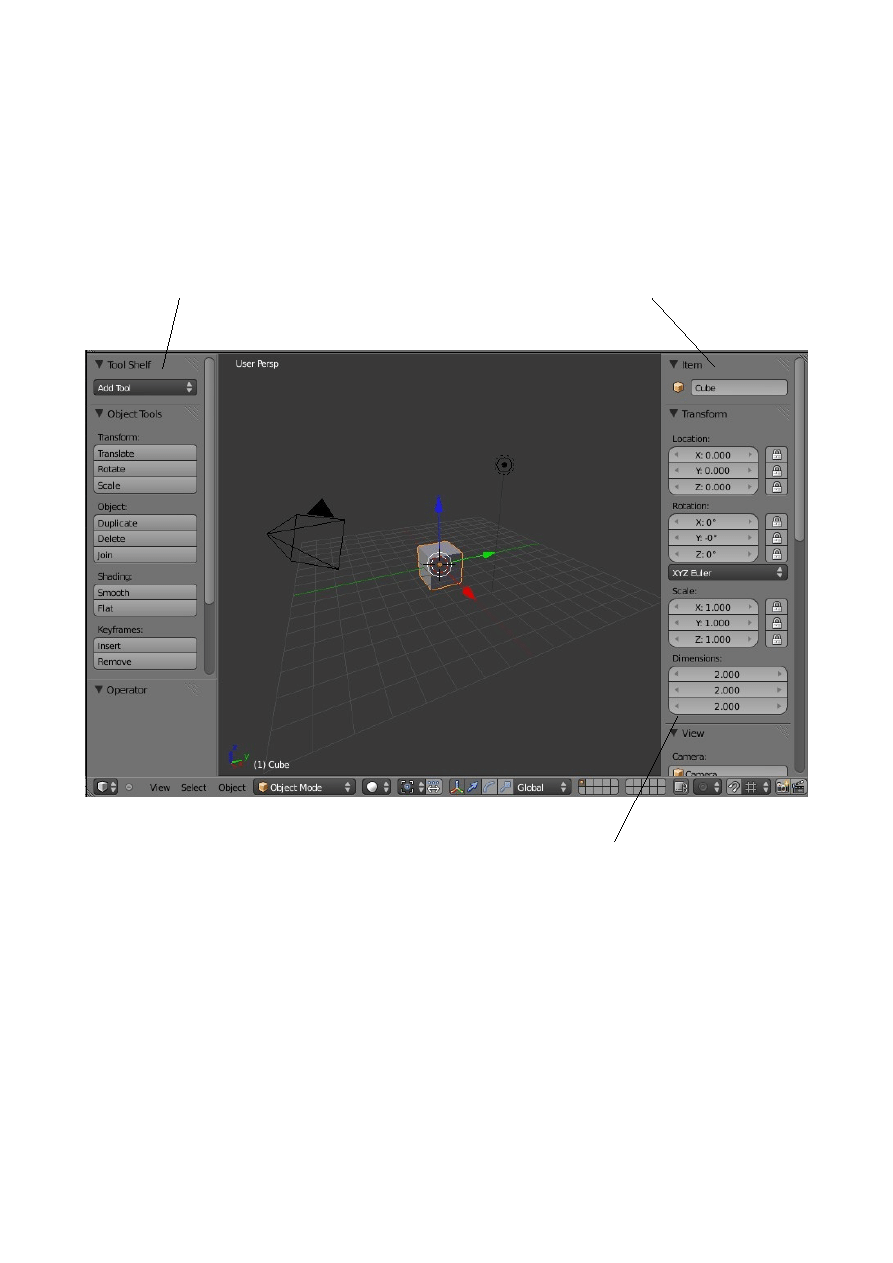
Precision Manipulation of Objects
To manipulate an object in the scene to a precise location, scale or angle of rotation
alter the values in the object data numeric panel. By default the panel is hidden in the
3D Window. The N Key toggles hide and display. The panel displays at the RH side
of the 3D Window and the values therein are pertaining to the object selected in the
window.
To change a value in the numeric panel:
Click on the value LMB – Press Delete – Retype Value – Press Enter
or
Repeatedly click on one of the little arrows either side of the value.
or
Click and hold LMB in the value box and drag the mouse right + Left -
Tool Shelf -T Key toggles hide display
Numeric Panel – N Key toggles hide display
Numeric values for the Cube object
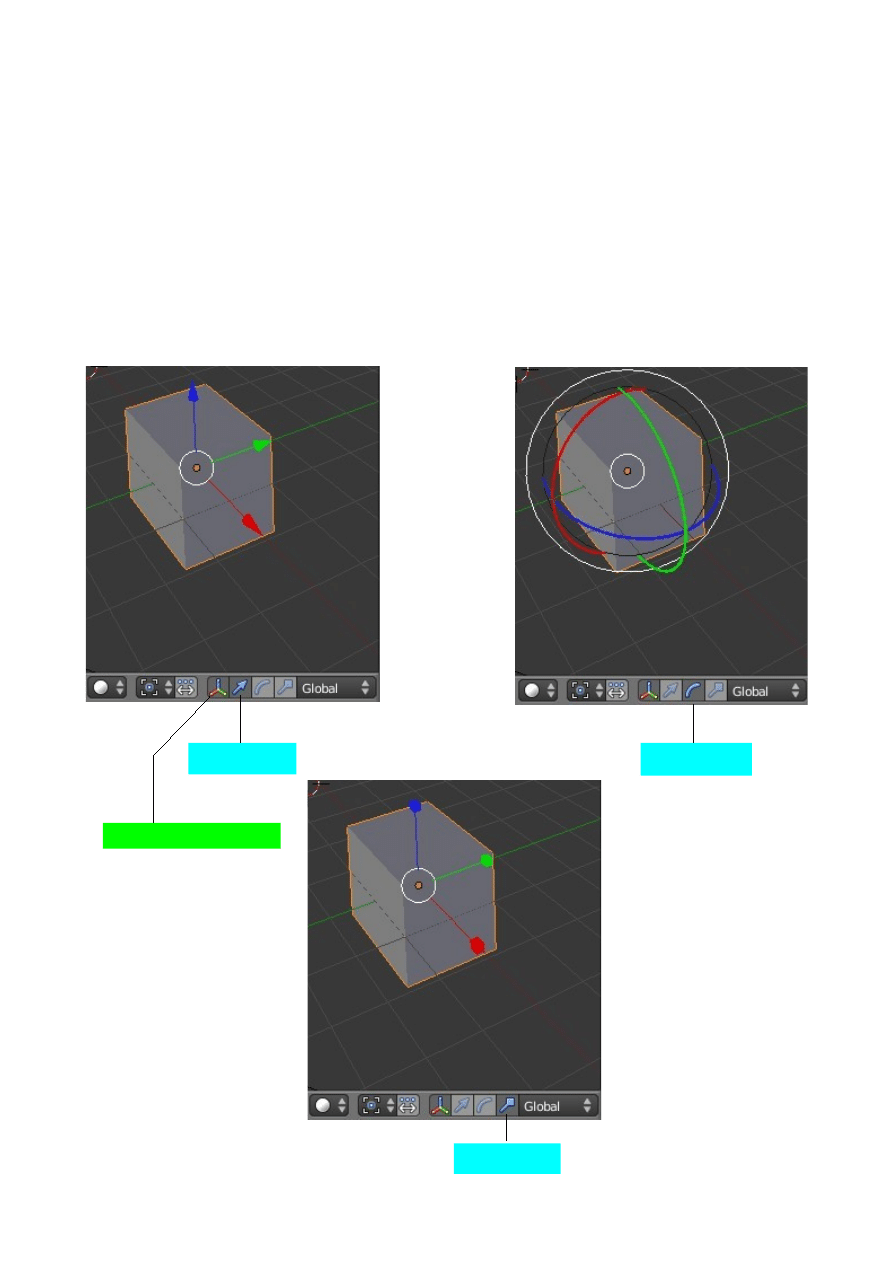
The Transformation Widget
The transformation widget is a handy way of performing the manipulation operations
of the G, S and R Keys described above. By default the widget is displayed in the 3D
Window in Grab mode.
Clicking on the red, green or blue handles (Arrows, Ring, Box) with the LMB and
holding while dragging the mouse moves the object in the window. The widget
sometimes obstructs the view but it can be turned off in the window header. As well
as turning off the widget rotate and scale modes are accessed in the window header.
G Grab Mode
R Rotate Mode
S Scale Mode
Toggle Widget On- Off
Mesh Vertex Editing
After you have added a mesh to your scene in object mode, you can go into Edit
mode (Tab key) and change its shape. In edit mode, you can work with the shape’s
individual verticies (mesh intersections) to create the shape you want. You know
you’re in edit mode when you see orange lines and dots on the selected object. When
you tab into Edit mode the whole of your selected object is in Edit mode. Orange dots
are selected verticies while black dots are unselected verticies.
Selecting Verticies:
While in edit mode, to select a single vertex, first press A Key to deselect all the
vertices. In Edit mode this does not deselect the object, only the vertices. RMB click
on a vertex to select it. To select multiple verticies, hold down the Shift key while
RMB clicking on them. You can also drag a window around verticies. Press B
Key(Box Select) and drag a window to select a group of vertices. Pressing C Key
will bring up a circular selection tool. Holding the LMB and dragging the circle
selects vertices on the move. The circle can be sized by pressing the + or - Keys on
the Number Pad or scrolling the center mouse wheel . Pressing Esc will get you out
of the circular selection tool. In order to select all verticies or deselect currently
selected ones, press the A Key (for all) once or twice.
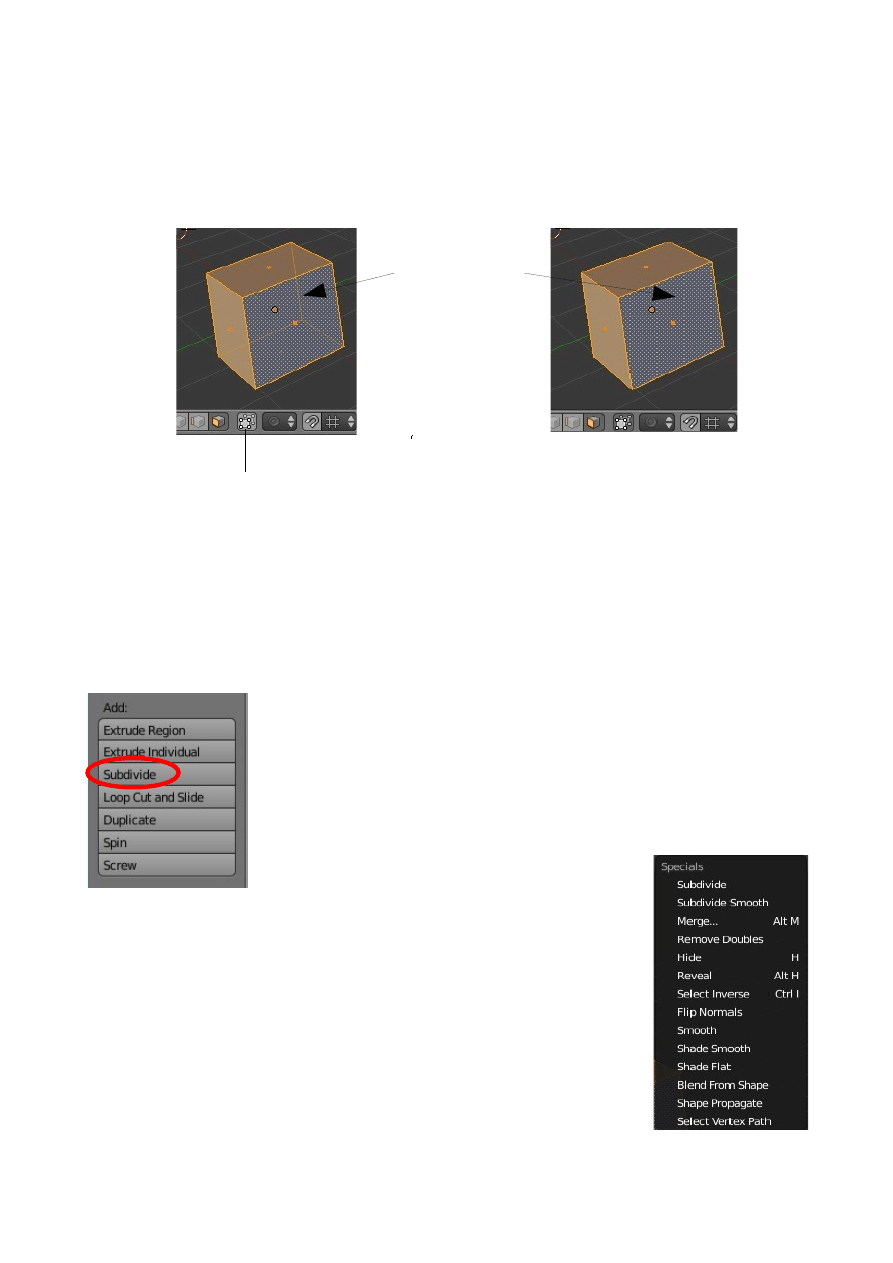
Edit Mode Selection Options
By default in Edit mode, the selection mode is Vertices. You can also select Edges or
Faces. These options are available in the window header.
Object Mode
Edit Mode
Vertices
Selected
Edge
Selected
Face
Selected
Vertices
Edge
Face
Also by default only visible vertices or faces are available for selection. This means
that you can only select the vertices or faces on the front of an object. Blender has a
Limit Selection to Visible function which means that with this activated you can
only see the front surface and only select vertices or faces on the front. This function
is toggled on off in the window header.
Basic Modifiers:
After selecting the verticies, edges or faces you can use the same basic modifiers we
talked about previously (“G”-grab or move, “S”-scale, “R”-rotate).
Creating More Verticies:
Sometimes you need to add more verticies to some or all of the
mesh in order create detail. To do this, you must first select all
the verticies in an area that you wish to add vertices to, then go to
the Tool Shelf at the LH side of the screen (T Key toggles hide-
display) and find the Subdivide button. Click it as many times as
you need to divide the area selected.
Specials Menu:
In edit mode, pressing the “W” key will bring up a shortcut menu
that will give you a variety of editing options. Most of these
options can also be selected in the Tool Shelf.
Toggle Limit Selection to Visible On/Off
Background Not
Shown
Box selecting faces with the Limit Selection to
Visible ON will only select the front three faces of
the cube.
Center Points:
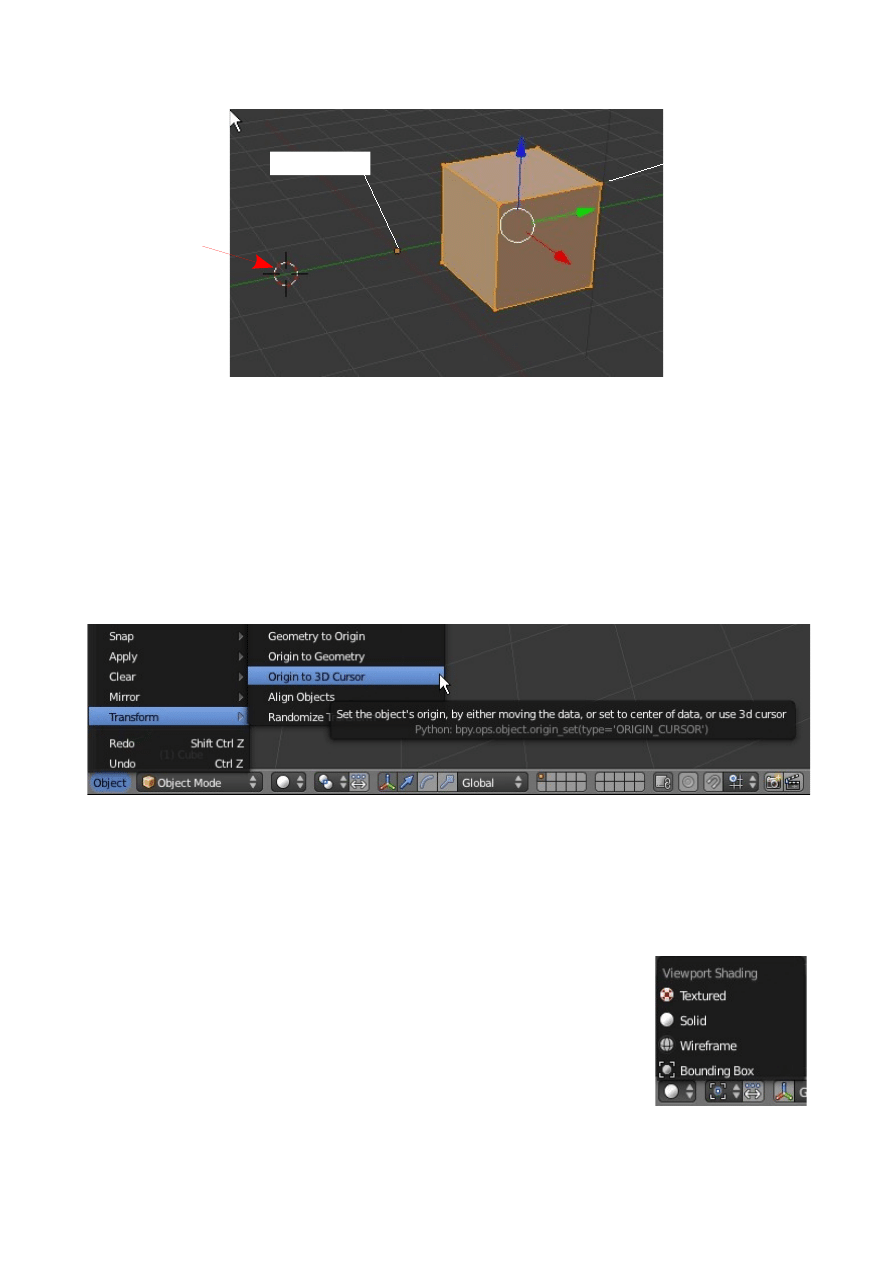
Every object you create in Blender has a small dot somewhere in the center (by
default, usually in the center of that object).This is the object’s center, or pivot
point. Beginners in Blender often get these center points moved around to points
other than where they want them. This happens because they move all the verticies of
the object in Edit mode, but the center point fails to move. If you want to move an
entire object, hit tab to get out of Edit mode and into Object select mode. Using the G
Key to move the object in Object mode will move the center point along with the
object. If you ever need to relocate an object’s center point, move the 3D cursor to the
desired center location
In Object mode click on 'Object' in the window header then 'Transform' then 'Origin
to 3D Cursor'. This will move the center point to the cursor. Now repeat the process
selecting 'Geometry to Origin' which moves the vertices to the center.
Object Display - Shading:
Usually by default, the selected object in the window is set to
Solid shading. Many times, you will need to work with your
objects in Wireframe mode. All shading does is change the way
you see your objects. Shading also affects the way you can select
verticies in Edit mode. In solid shading, only visible verticies can
be selected. In Wireframe, all verticies can be selected. To change
between Solid and Wire modes, press the Z Key or select the
shading mode from the header toolbar. You will notice several other shading options
in the menu. Experiment with the other options.
Viewport Shading Selection
Object Center
3D Curser
Vertices moved
away from the
objects center in
Edit mode
Using the Shading Smooth and Flat Options
As you add objects and view them in Solid
shading, you will notice that circular
objects are not being displayed smooth. In
the Tool Shelf you will see two buttons
under the heading Shading. Clicking these
smooths or reverts to flat shading.
These buttons not only effect the
way things look on the screen, but how
they will be rendered in a final image. Be
aware that the appearance of objects on the screen are not displayed at the same
quality as a final rendered image. The computer needs to conserve memory because
3D applications can be very memory intensive on your computer. There are other
smoothing options available in the Tool Shelf .
Extruding Shapes:
Shapes can be altered by selecting vertices (RMB Clk, B Key or C Key), either single
vertice or group, then G Key to move the vertices, S Key to scale or R Key rotate.
Clk LMB to leave them in position. Scaling and rotating are however relative to the
objects center.
A more refined method of altering a shape is by extrusion. Select the vertices as
above. Press the E Key. The selected vertices are duplicated and by default placed
into grab mode ready to be moved. Also by default the movement is confined to a line
normal to a plane defined by the selected vertices. This line displays on the screen.
Moving the mouse moves the vertices along the line. If you want to freely move the
vertices Clk MMB (Middle Mouse Button) and then move the mouse. The vertices
will follow wherever you go. You can constrain the extrusion to the X,Y or Z axis of
the scene by pressing E Key + X, Y or Z. by Clicking LMB when you have finished
moving releases the vertices from grab mode but they remain selected. You can now
rotate them and scale them but in this case the rotation and scaling takes place about
the mid point of the selected vertex group.
Smooth
Flat
Original Cube
Extrusion Rotated
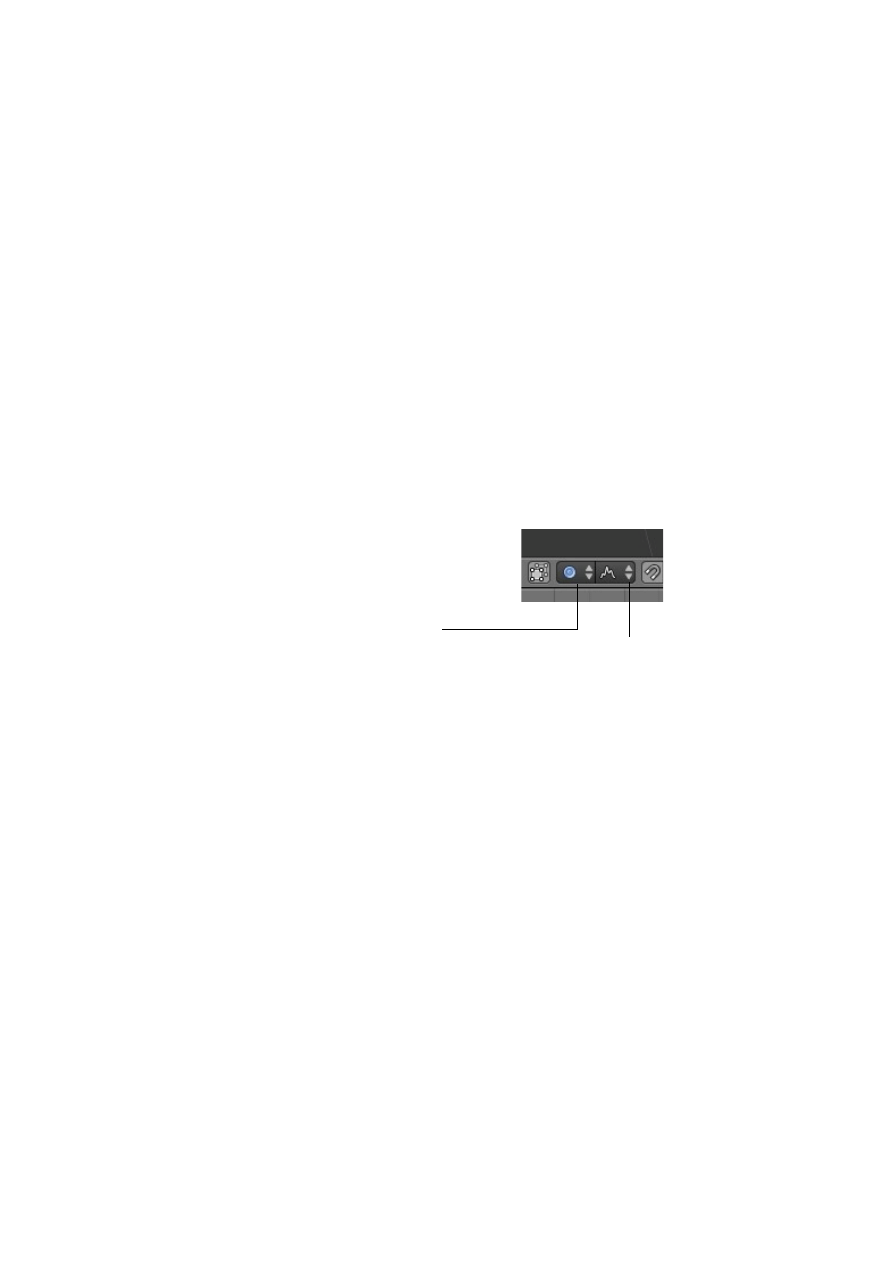
Above is an example of a cube, extruded from the right side several times using scale
and rotate.
Basic Cube Extrude is a great command for making long tubes and tunnels. It is also
good when you don’t want to subdivide an object too much in order to add detail.
Proportional Vertex Editing:
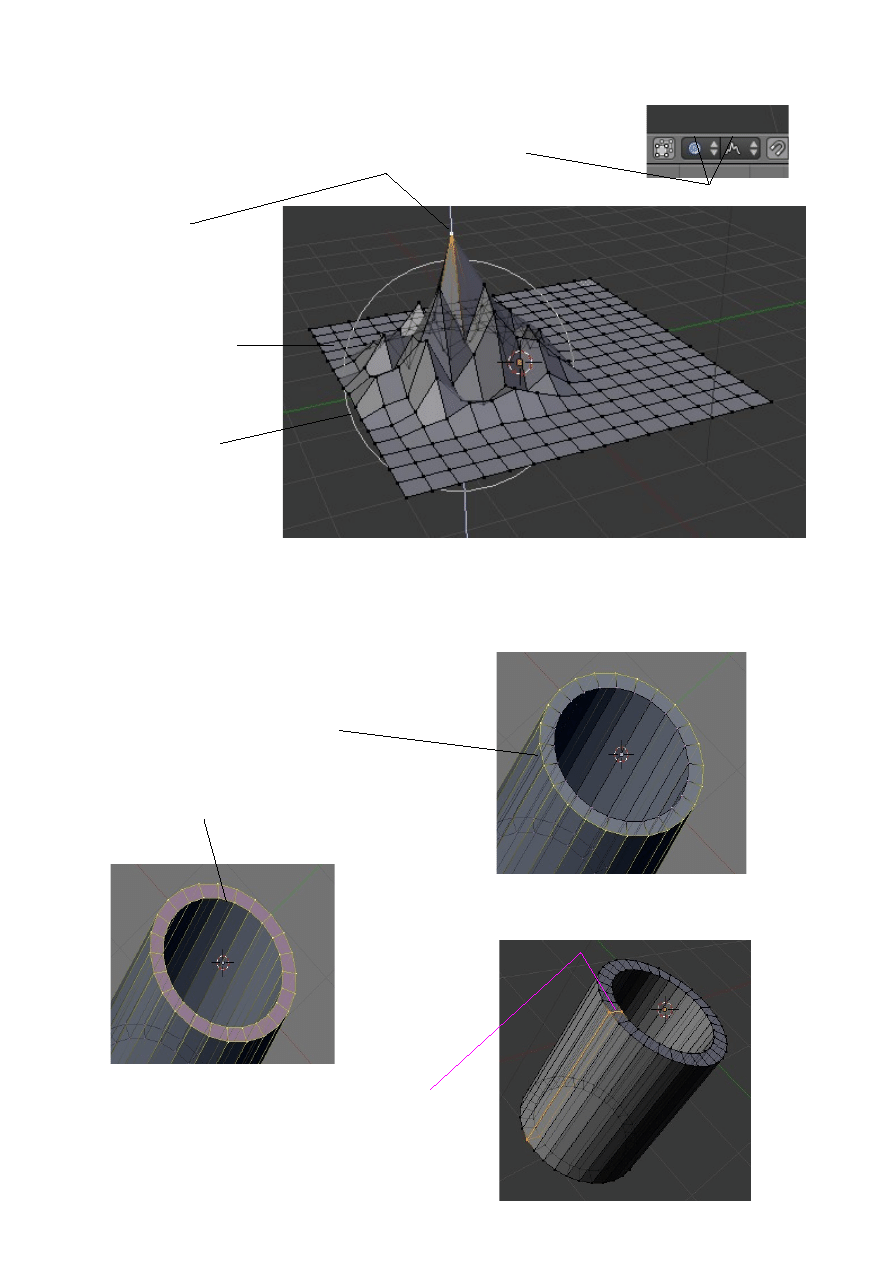
Proportional Vertex Editing is used to create a flow in the shape when editing
vertices. To turn proportional vertex editing on, press the O Key while in edit mode
or by selecting the small circle button on the toolbar.
Note: you will only be able to select this option while in edit mode.
You have several options for effecting verticies in proportional editing. We usually
use Sharp or Smooth fall off, but feel free free to experiment with the other options.
Creating Ground
You can use proportional vertex editing to create landscape easily. The first thing you
need to do is create a plane in the top view (Num Pad 7 ). While in Edit mode, make
sure all verticies are selected (verticies are orange). You can use the A Key to select
them all. Press W Key for specials menu, then select 'Subdivide' or click subdivide in
the Tool Shelf. Do this a few times. Select a single vertex somewhere near center.
Next, switch to a front view (Num Pad 1) and press the O Key to enter Proportional
Vertex Editing mode. Select sharp or smooth falloff depending on what effect you
want. Press G Key to grab (move) the vertex or drag the arrows on the manipulation
widget. Use the scroll mouse wheel to change the size of the proportional selection if
you have used the G Key. Experiment with different size selections and different fall
offs. To see your final work in a smooth display, exit Edit mode (Tab key) and with
the object selected go to the Tool Shelf and find the 'Set Smooth' button. This will
smooth the mesh in the display and final output.
Turn Proportional Editing On / Off
Select type of Fall Off
Edge Loop Selection
When working with vertices it is sometimes useful to be able to select edge loops.
Perform the following in Edit Mode.
Click on outer ring Alt + RMB to
select the outer ring.
Shift + Alt + RMB on inner ring to
add to the selection.
Click on the edge with Alt + RMB
to select the loop shown here
Ground terrain created by subdividing a plane. Then selecting
a single verticie and moving it up the Z axis with the
Proportional Editing tool on with Random Fall Off
Single verticies selected
Plane subdivided
Scrole mouse wheel
to vary size of
influence circle
The Knife Tool
As Blender is developing some things seem to disappear from the interface. One such
usefull tool is the Knife Tool.
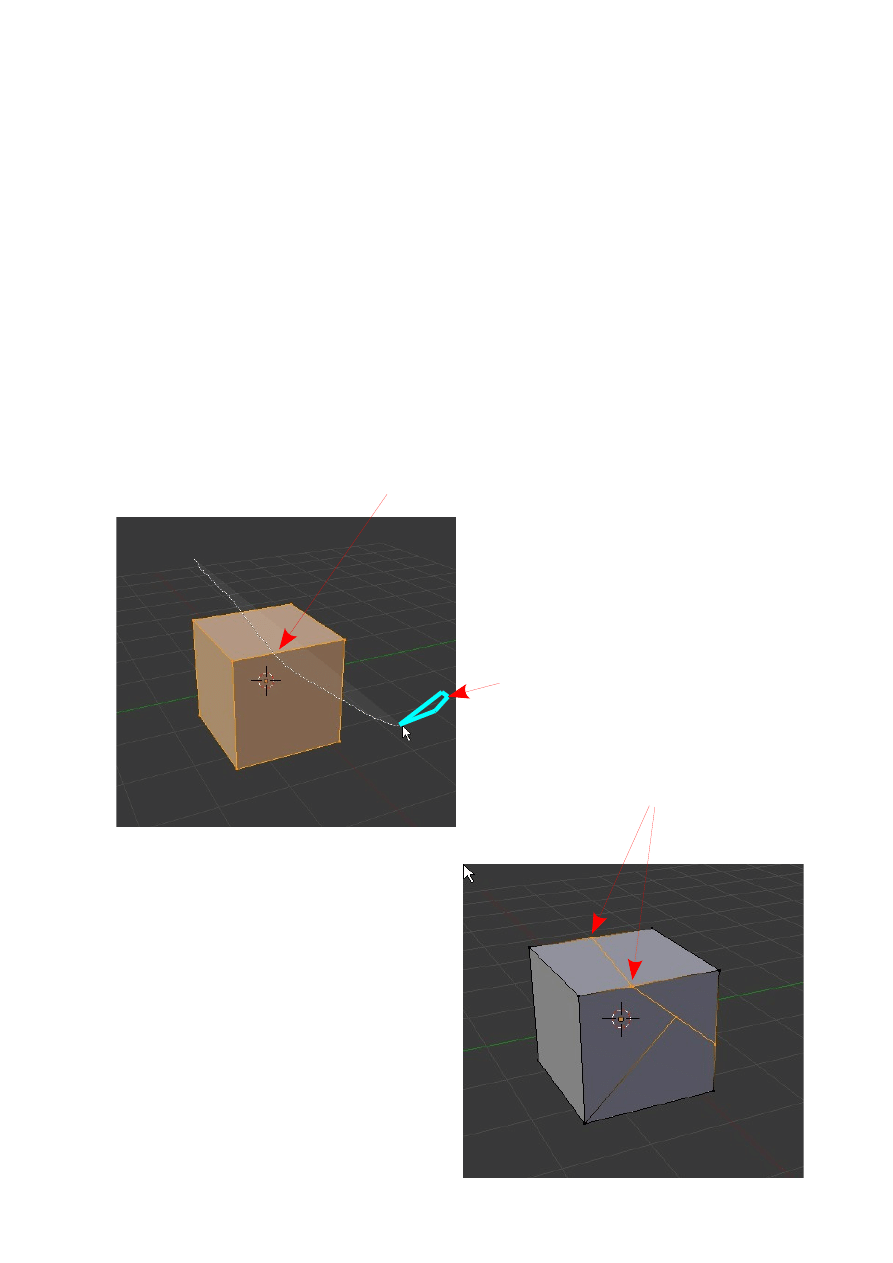
The Knife Tool is used to create additional vertices on the surface of an object while
in Edit mode. It allows you to add vertices by drawing a line across a series of edges
much like subdividing but limiting the subdivision to a specific region.
As an example using the default Cube object tab into Edit mode and leave all the
vertices selected ( Vertices and edges showing in orange ).Hold down the K Key and
click and hold LMB. The mouse cursor turns into a neat little knife. Drag the knife
over some of the edges on the Cube. Release the mouse button and the vertices on the
plane are deselected except for new vertices which have been created where your
knife cut the edges. The new vertices may now be manipulated to modify the surface
of the Cube object.
Knife Tool
Drag Knife to cut edges of Cube
New Vertices added at intersections
Joining and Separating Meshes
Now that you have some experience with basic editing, here’s a few more options:
Joining Meshes:
To join 2 or more meshes together, hold down the
Shift Key and click RMB to select them, then press
Ctrl and J to join them. They will retain any materials
you have placed on them, but will be one object.
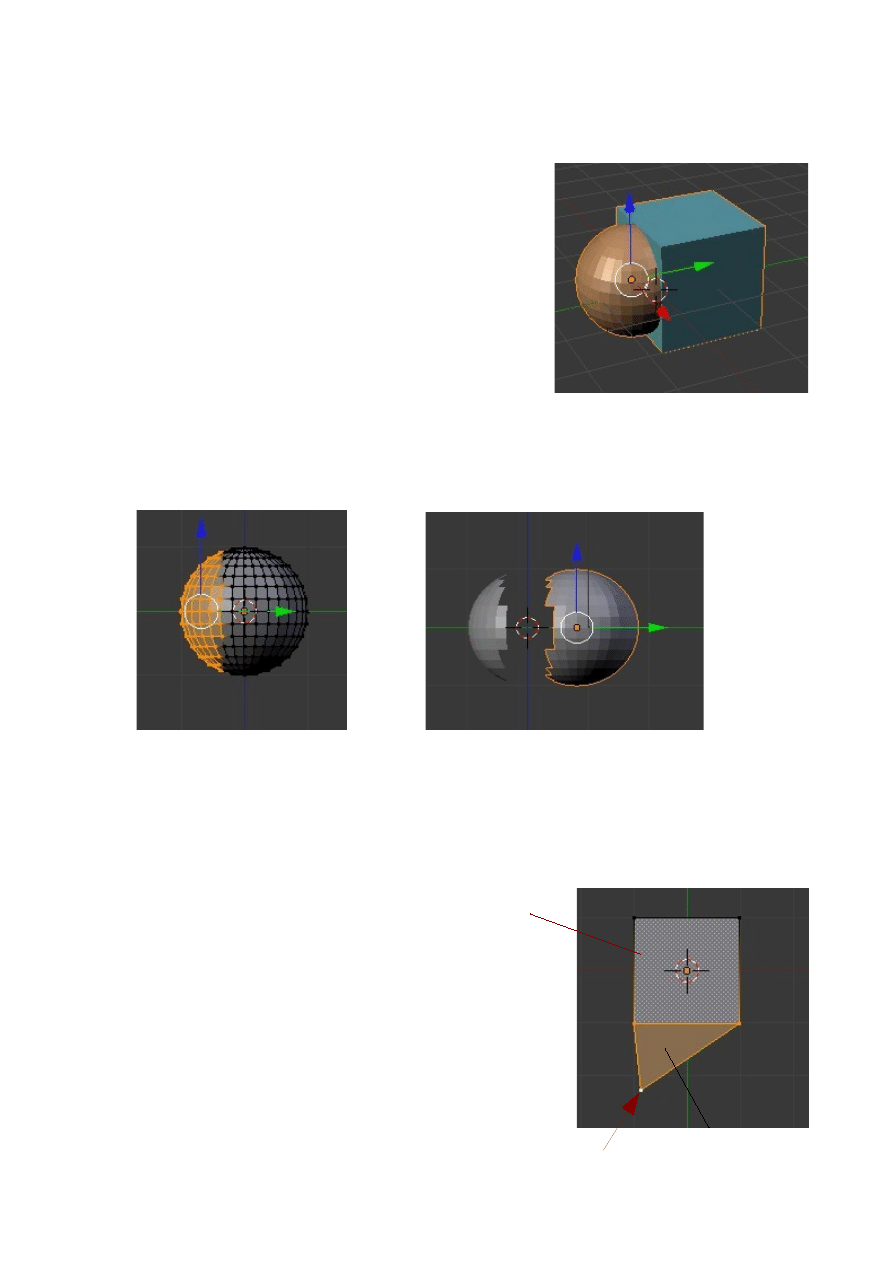
Separating Meshes:
In order to break up a mesh, you need to be in Edit mode (Tab Key) and select the
verticies you wish to separate from the rest of the mesh. With the verticies selected,
type the P Key ( Partition) and select your option. You also have an option to separate
all loose parts.
Note: Pressing P Key in object mode deletes the scene background. Press Esc.
Deleting Vertices/Edges/Faces:
If you want to make a hole in a mesh, select the verticies, edges, or faces you wish to
remove, then hit the Delete key.
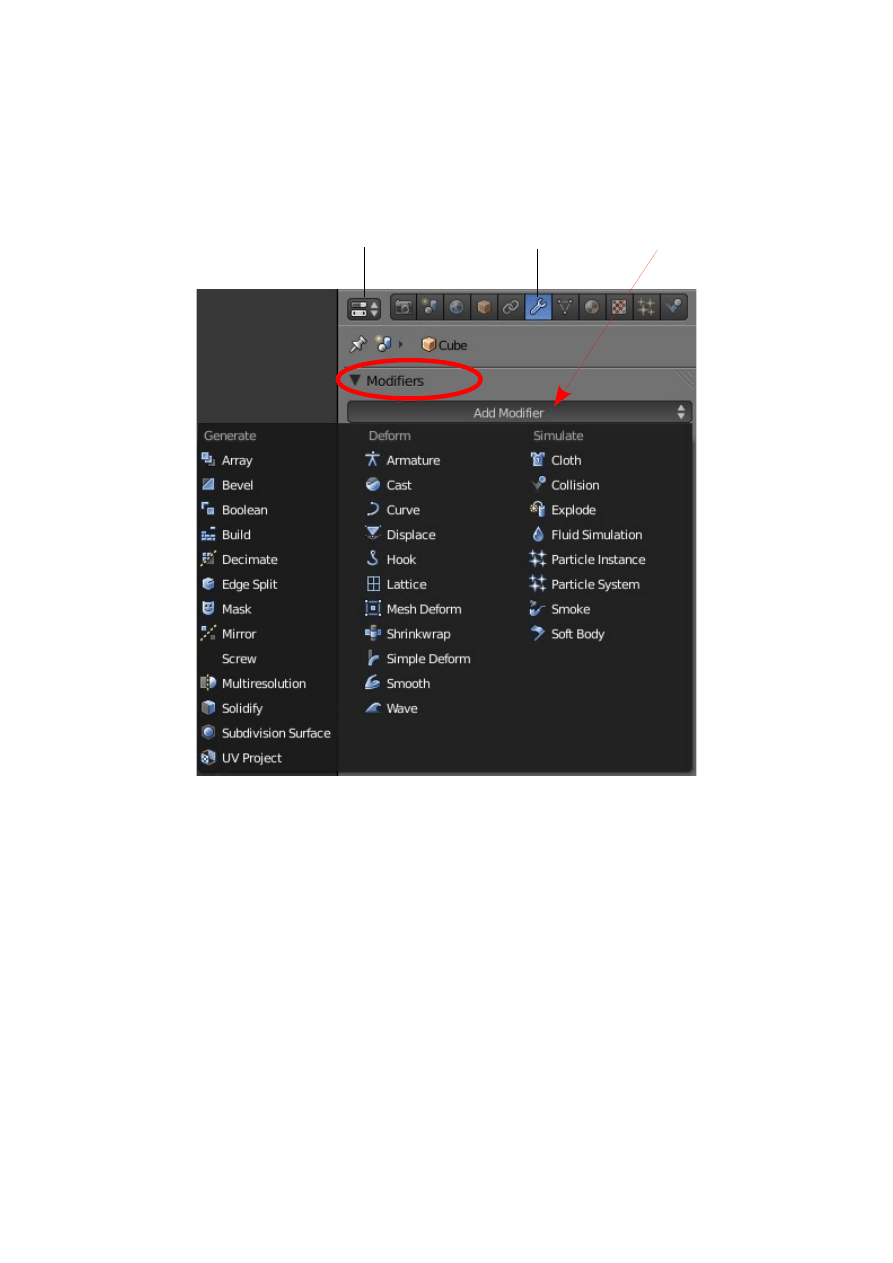
Adding Faces:
Sometimes you need to fill in holes in a mesh by creating
your own faces. To do this, go into edit mode and select
the verticies you wish to face together (you are limited to
4 verticies in a group). With verticies selected, hit the F
Key. A face will be formed. Here is an example. A simple
Plane object has been added to the scene. In Edit mode a
single vertices is added (Ctrl + Clk LMB). Shift select or
box select two vertices on the Plane and the new vertice.
Press the F Key (Face).
Vertices selected
Separated: P Key By Selection
New Vertice Added
Select 3 Vertices
Press F Key
Plane
Modifiers
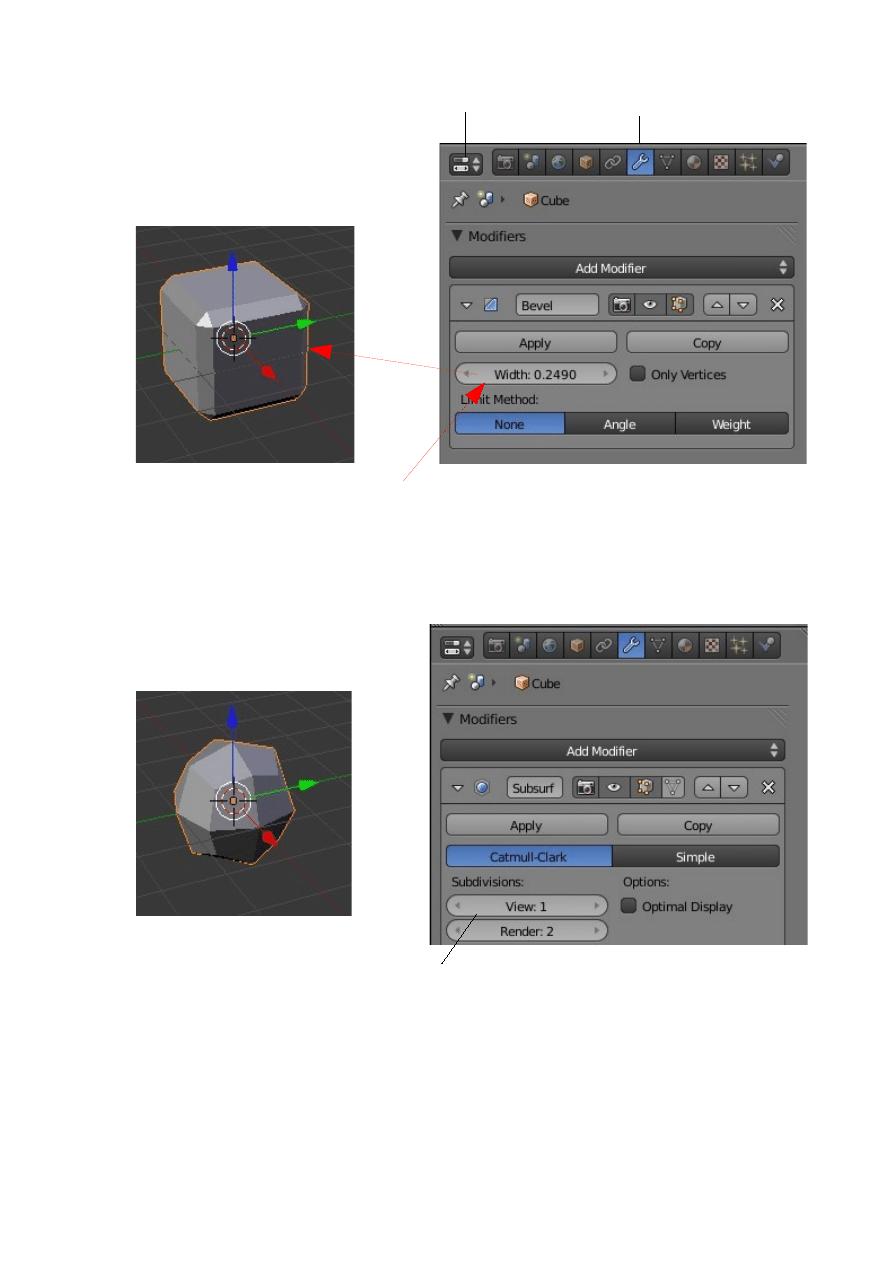
Mesh objects can have their shape modified by using Blenders Modifiers.
Modifiers are accessed from the Properties Window on the LH side of the screen.
With the object selected in the 3D Window go to the Properties Window – Modifier
button and click on 'Add Modifier to display the modifier Selection menu.
A modifier may be selected from the menu to change the shape of an object. As you
can see there are a number of modifiers to choose from. At this stage we will
demonstrate a few.
Properties Window
Modifier button
Click 'Add Modifier'
Modifier Selection Menu
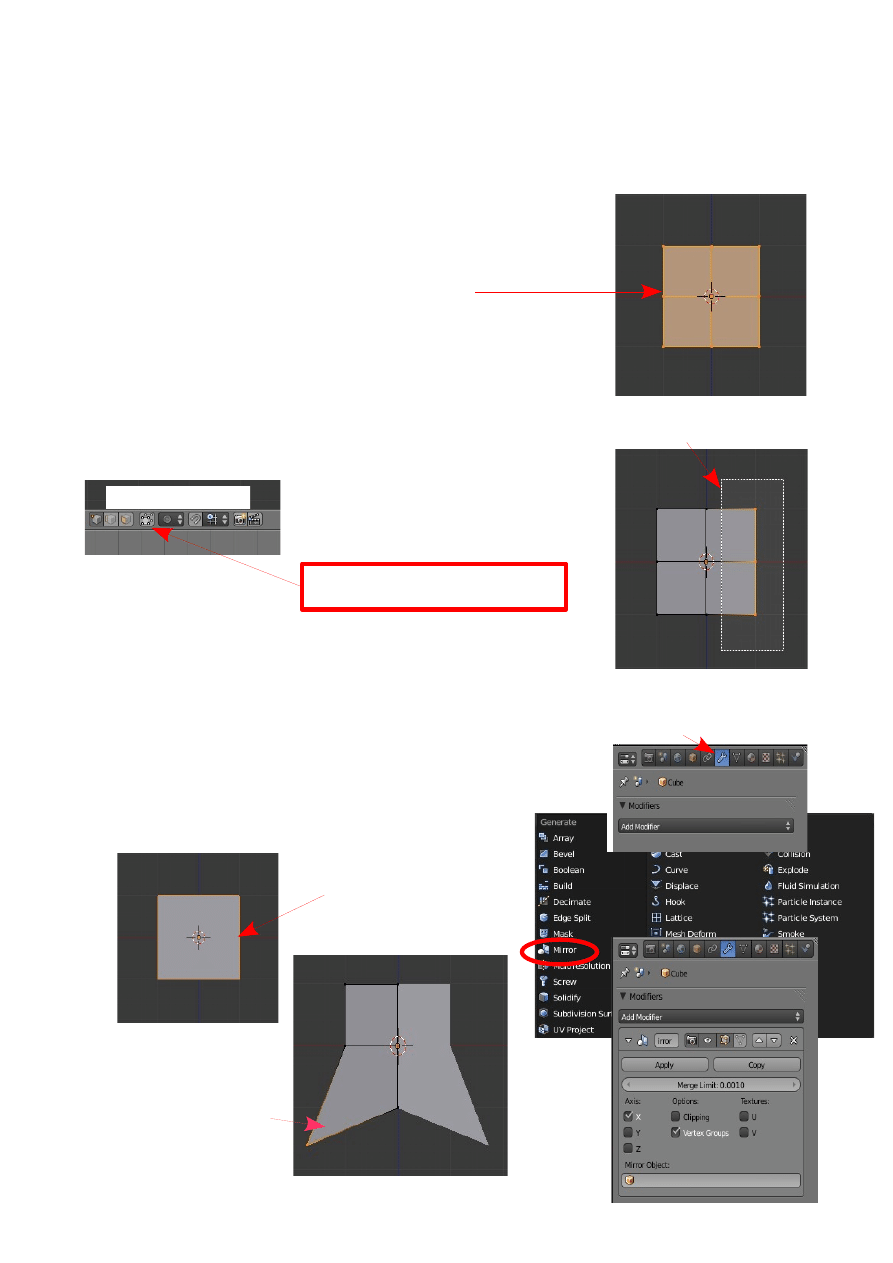
Bevel Modifier
Subdivision Surface Modifier
Cube with Bevel Modifier Added
Change Width value to Increase/Decrease Bevel
Modifier button
Properties Window
Cube with Subserf Modifier Added
Change View value to Number of Subdivisions
Value: 3 Cube becomes a Sphere
View: 1 = 4 divisions
View: 0 = Cube
Mirror Modifier
Sometimes when creating a complex shape you want it to be symmetrical either side
of a centerline. The Mirror Modifier is a very useful tool for achieving this.
To demonstrate this start a new scene and place the default
cube in front view (Num Pad 1). Tab into Edit mode and in
the Tool Shelf click on Subdivide once. The surfaces of the
Cube have been subdivided into four squares.
It is important to note that only the surfaces of the Cube are
subdivided not the Cube itself. The cube is not divided into
four cubes only the surfaces of the original cube are divided.
Still in Edit mode deselect all vertices (A Key). Box select (B Key – Drag a
rectangle) over one side of the cube and delete the selected
vertices ( X Key ) so that you are left
with half the cube. Tab to Object
mode.
If you rotate the scene (Clk Hold Center Mouse Wheel and
Drag ) you will see that you have half an empty box with one
side missing. Hit Num Pad 1 to get back to Front View.
Remain in Object mode and go to the Properties Window – Modifiers buttons. Click
on 'Add Modifier' and select 'Mirror' in the drop down menu.
Hey presto you have the solid cube back again. Any
modifications you make to the one side of the Cube in Edit
mode will be duplicated on the other side.
Deselect 'Limit Selection to Visible'
Before selecting
3D Window Header
Solid Cube after applying
Mirror Modifier
Vertice selected and
moved mirrored on
other half of Object
In Edit mode
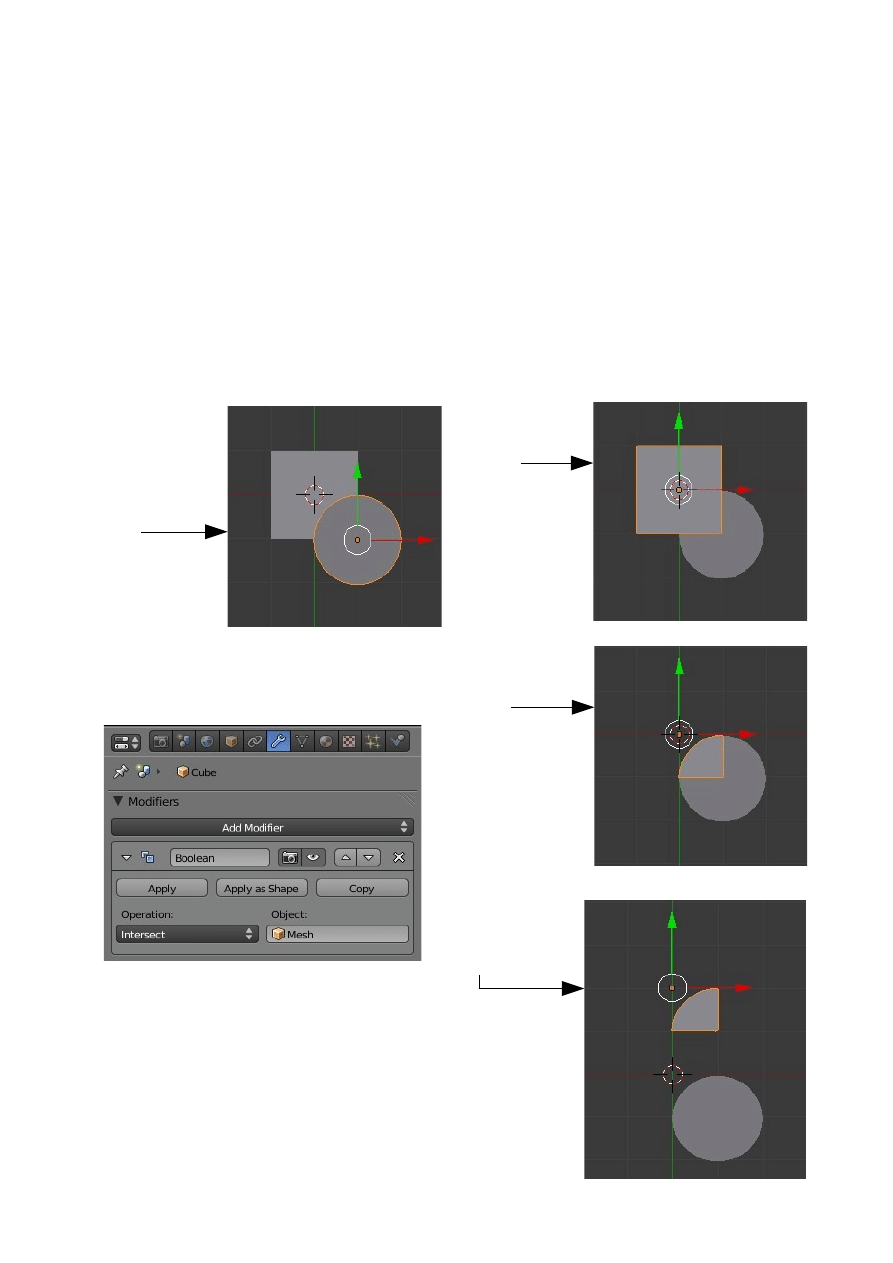
Boolean Modifier
Boolean Operations
Boolean Operations allow you to cut and join meshes by using other meshes. The
operations are implemented by employing Boolean modifiers.
An Object selected in the 3D Window has a Modifier applied to it and the Modifier is
given the instruction to use another Mesh to perform an operation. The operations
performed are described as Intersection, Union and Difference. The following
example demonstrates the Intersection Boolean Operation.
2. Default Cube
selected in 3D
Window
3. With the Cube selected a Boolean Modifier
is added and Type Intersect selected
4. Apply button
clicked
5. Result after applying
the modifier and
separating the meshes.
The original Cube has been modified to the shape of
intersection (overlap)
1. The default Cube
in the 3D Window
with a Tube object
added and
positioned as
shown.
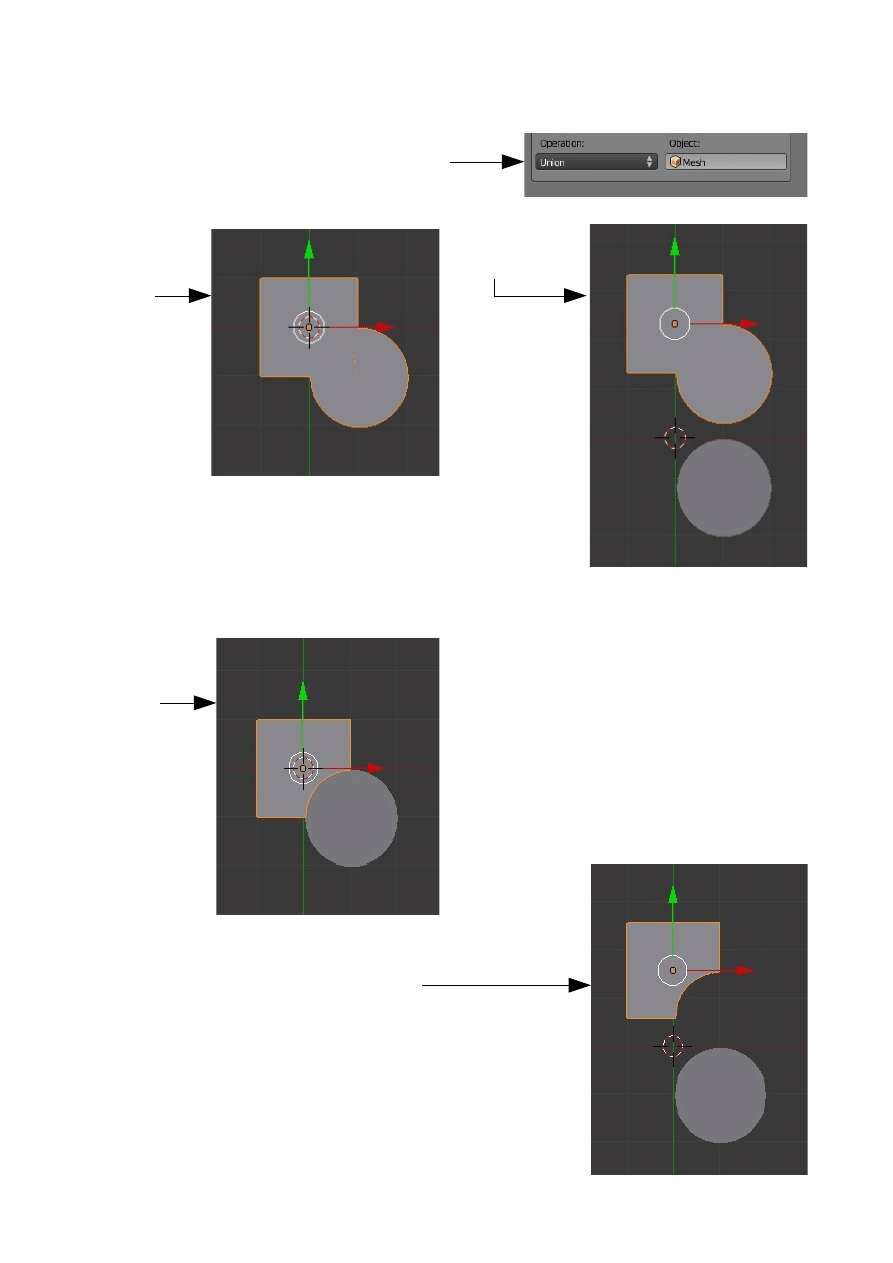
Example of the Union Boolean is shown commencing with the same setup with the
Default Cube and tube object.
Example of the Difference Boolean .
Boolean Union Type selected
Result after
applying
modifier
Result after
separating meshes
Result after
applying
modifier
Result after separating
meshes
Two meshes joined together
Overlap of meshes subtracted
For more on Modifiers see CH-14
CH04- Materials
01-Blender Material Slot
02-Materials
03-Material Settings
04-Preview Tab
05-Materials Buttons
06-Material Colors
07-Adding a New Material
08-Diffuse Tab
09-Specular Tab
10-Hardness
11-Ramp Shaders
12-Transparency
13-Halos
The Application of Materials and Material Slots
To simplify the understanding of the application of materials in Blender it may be
easier to think of materials as colors. The color of an object in a Blender scene is set
by values entered using a color picker, typing RGB values or moving sliders.
A Blender scene may have multiple materials and these materials are stored in a
cache for use by any of the objects which are introduced to the scene or any object
in any scene in the Blender file. A Blender file may contain multiple scenes.
To demenstrate the application of materials in Blender set the screne to include the
3D View and the Properties Window with the Materials Buttons active .
When a new Blender scene is opened the 3D View displays a cube mesh object which
has a dull grey color. The Properties Window opens with Render Buttons active.
Change the Properties Window to set the Materials Buttons active.
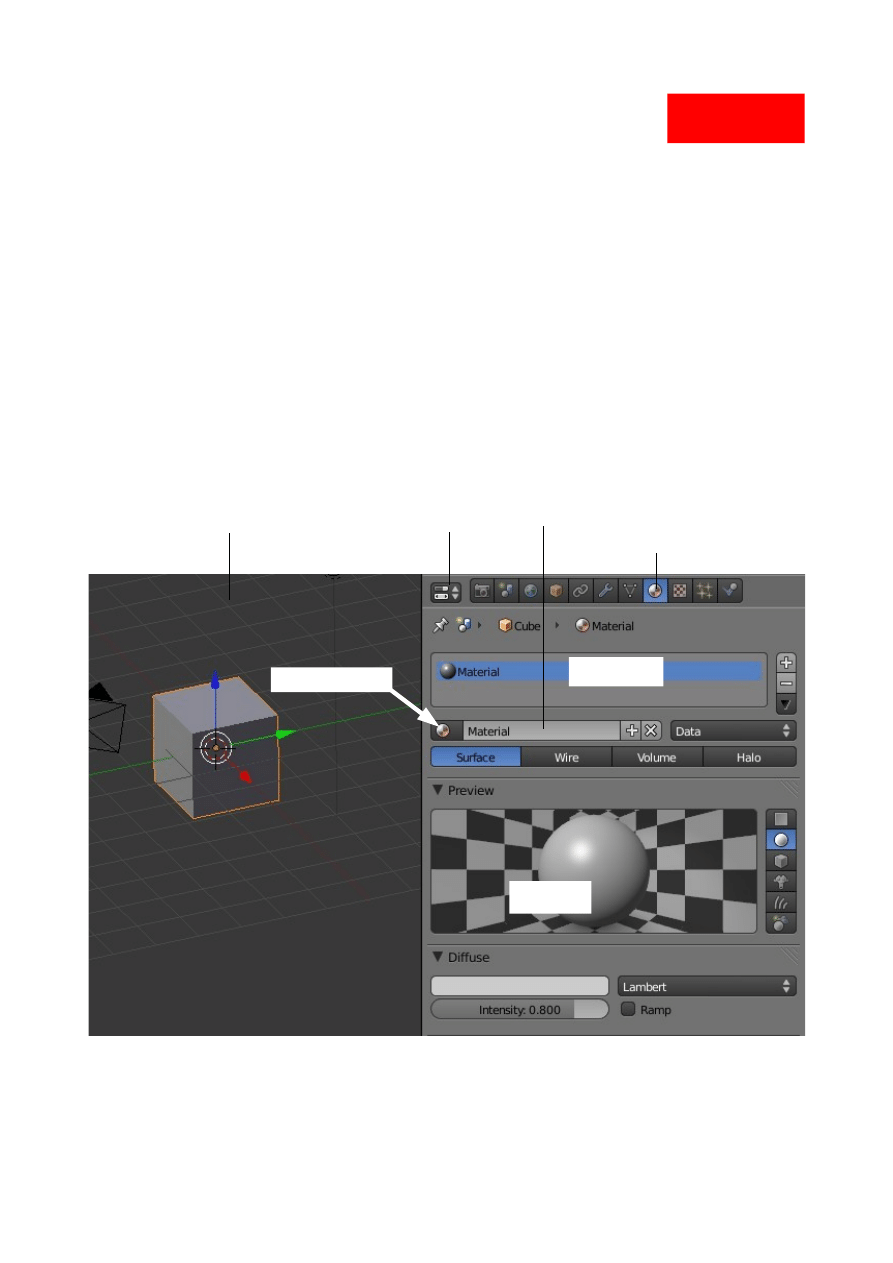
With the Materials Buttons active it is seen that:
1. A preview pane shows a dull grey color on a sphere.
2. There is a material named “Material” in the Unique Datablock ID name.
3. There is one Material Slot active showing the material named “Material”.
3D View
Properties Window
Material Button
Unique Datablock ID name
Preview
Material Slot
Browse ID data
Beginners skip this
section
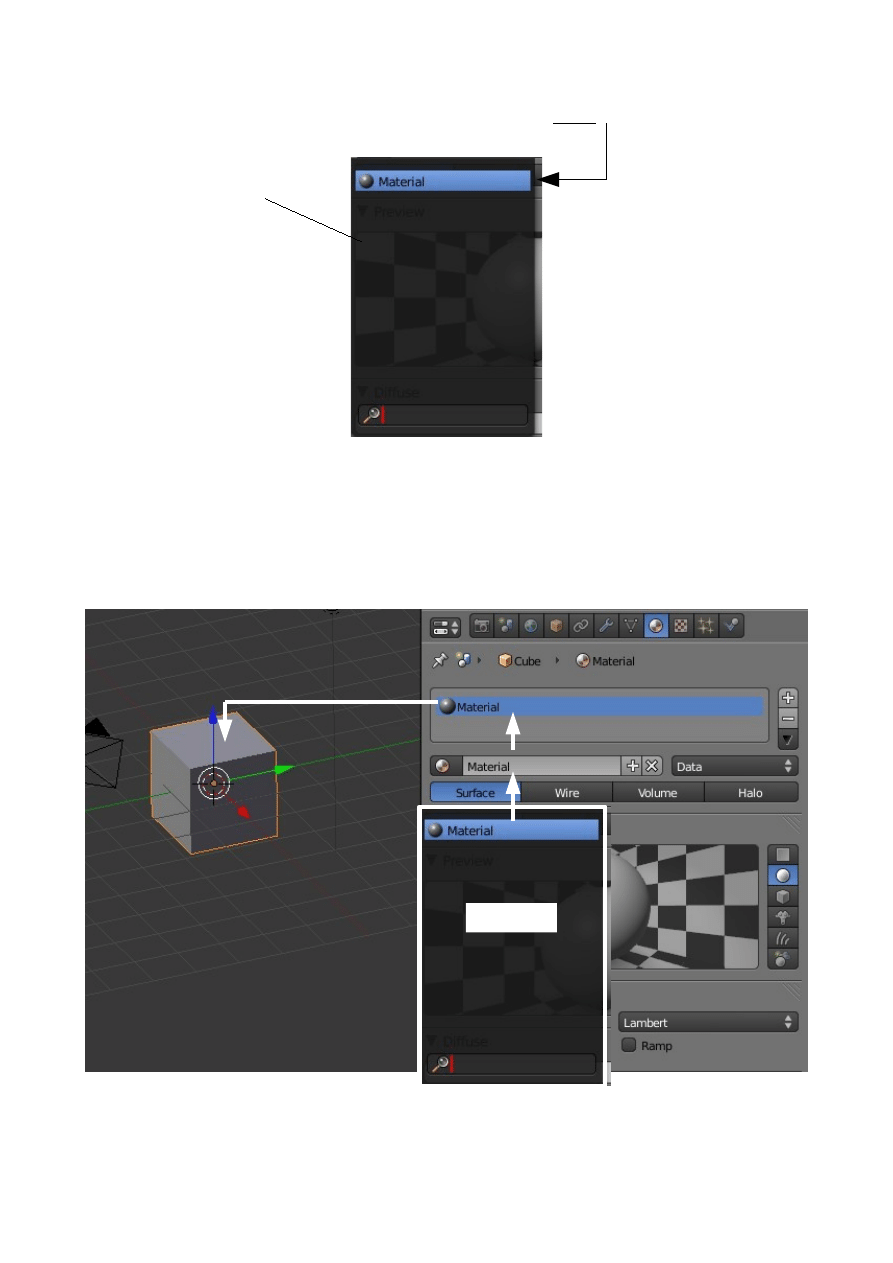
By clicking the Browse ID data button a drop down displays, showing the Materials
Cache containing the single material named “Material”.
The relationship between the Material, the Material Slot and the Object in the 3D
View may be considered as shown below.
Material data stored in the Cache is entered in the Material ID which is linked to the
Material Slot. The Slot is assigned to the object selected in the 3D View.
To further explain the relationship continue with the following procedure.
Delete the Cube in the 3D Window then add a new Cube Object.
Material Cache
Cache
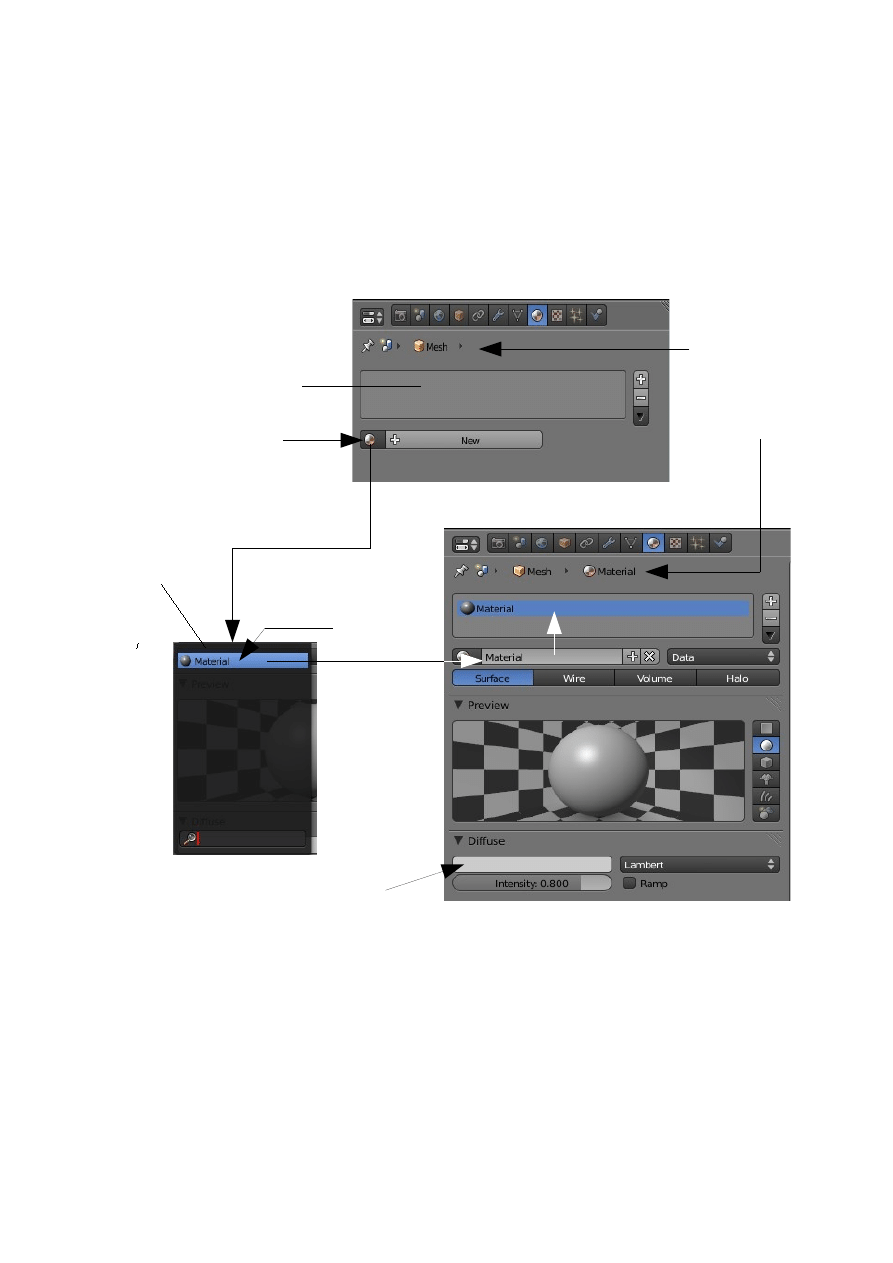
Observe that the Properties Window Material buttons now show no reference to any
material data. The cube in the 3D Window still displays as a dull gey color. By
clicking the Browse ID data buttion it will be seen that “Material” is still in the cache.
It follows that that there must be a hidden material slot with “Material” linked to it
and the slot is assigned to the cube in the 3D Window. Click on “Material” in the
cache to display the material properties with the slot.
The relationship between the material and the object is applied wheather the object is
selected in the 3D Window or not. If there is more than one object in the window the
relationship will be applied to the last object that was selected.
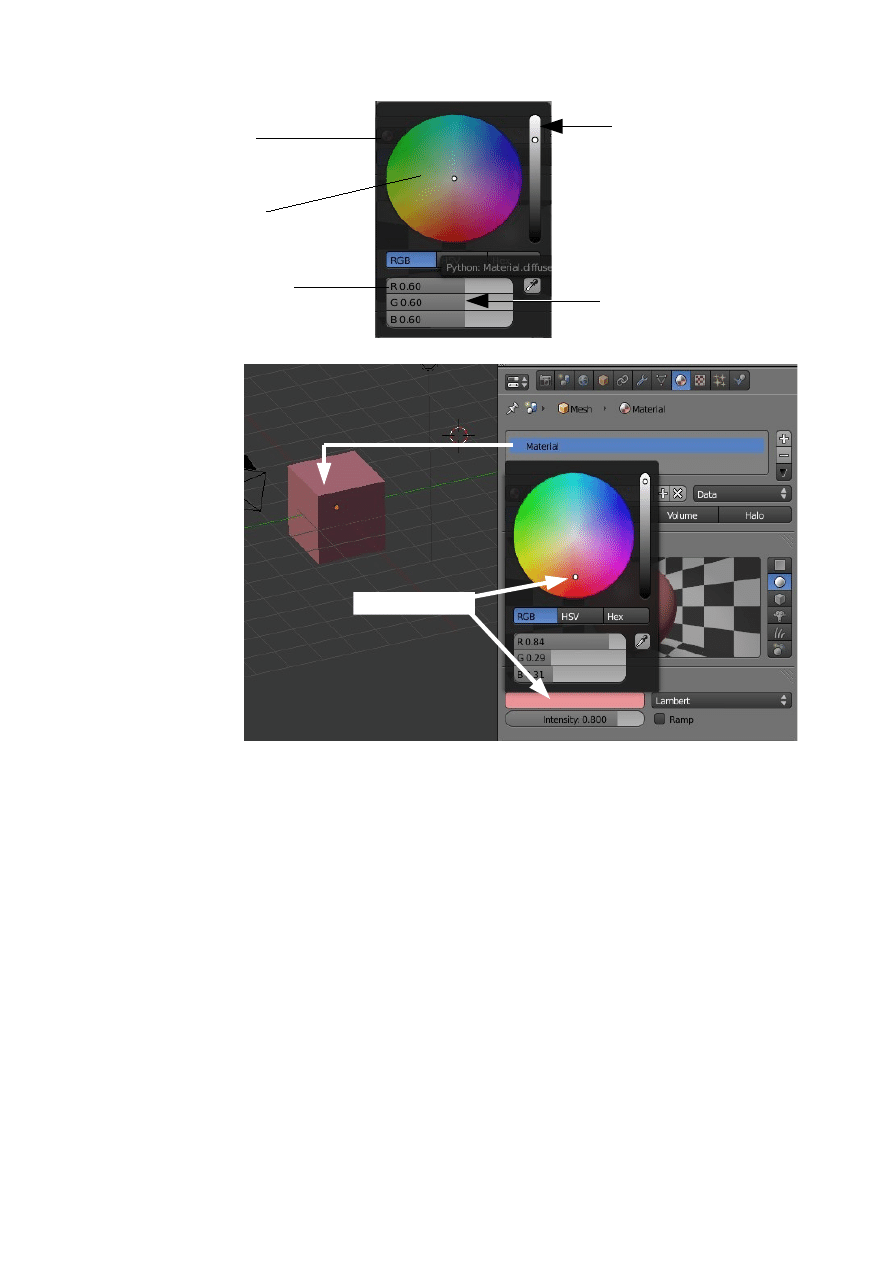
To demonstrate this deselect the cube in the 3D Window. Click in the Diffuse color
bar to display the color picker and then click in the multi colored circle to select a
new color. The color of the cube changes despite the fact that is is not selected. The
material is still named “Material” but it has been given new data. The material is still
linked to the slot and the slot is still assigned to the cube object.
No reference to material
Click Browse ID data
Material in
Cache
Material Properties no material data reference
Material Properties with material data reference
No Material
data
Material data
Click on
Material
Click on Diffuse color bar
to display color picker
It is important to understand that with an object selected in the 3D Window the
Properties Window shows the materials buttons and data that is relevant to the
selected object only. For example the Material Slot is relevant only to the selected
object. Selecting a different object in the 3D Window changes the Properties Window
and the data from that of the previous object to the new object selected. This may
seem to be expressing the obvious but the concept must be understood.
The exception to the foregoing is that the materials cache and the materials contained
therein are relevant to any object in any scene in the Blender file.
Multiple Materails may be added to the Cache.
Click on the + Add New Material button and a new material named “Material.001”
will show in the Datablock ID which is linked to the slot and therefore assigned to the
cube. Blender creates an duplicate of the previous linked Material. “Material.001” is
identical to “Material” i.e. it is the same color.
Color Picker
Brightness Slider
Click in Circle
Type RGB values
Drag Sliders
Color Selected
RGB values
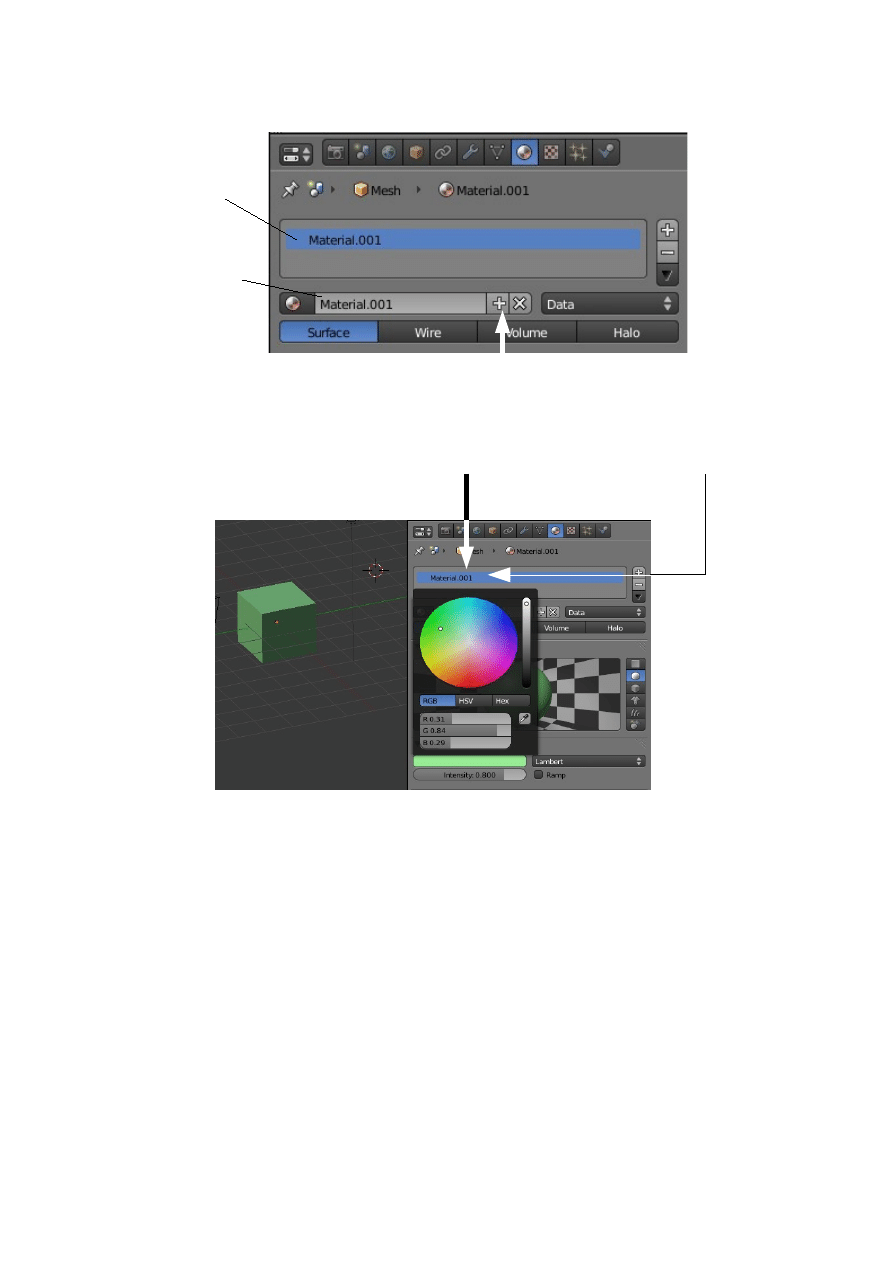
Click on the Browse ID data button to reveal the cache. “Material.001” is now stored
in the cache. With the color picker, click and change the color. The color of the cube
will change in the 3D Window since “Material.001” is linked to the slot and assigned
to the cube.
Go to the cache again and click on 'Material'
By using the color picker and changing the color the material data is changed and
therefore the color of the cube is changed. Clicking on “Material” has linked it to the
slot and with the slot assigned to the cube the color of the cube changes.
Therefore by selecting “Material” or “Material.001” from the cache linking the
material to te slot the color of the object cube can be changed at will.
Adding a new object to the scene creates a new material slot and by default the
origional material with its dull grey color is linked. As previously stated when a new
object is introduced into a scene a new set of material data comes with it.
The cache retains the material colors previously used and they may be selected and
linked to the new slot changing the color of the new object.
Material.001 in slot
Material.001 after
adding new material
Add New Material Button
Material.001 data
linked
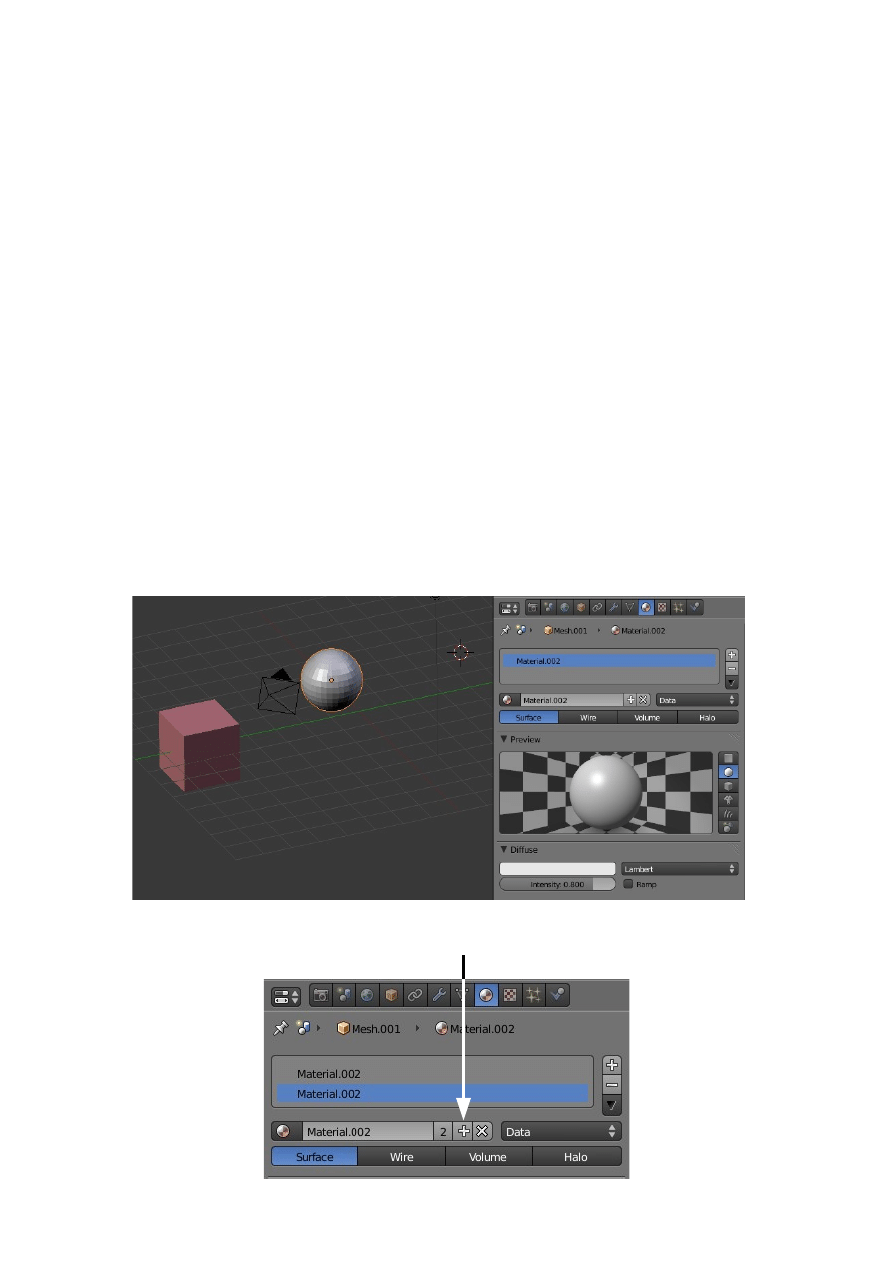
Up to this point only one material slot has been employed linked to an object.
Multiple material slots may be introduced for each indavidual object in the scene.
The application of multiple material slots can be demonstrated by showing how a
single mesh object can have multiple colors.
Follow this procedure.
Add a UV Sphere Mesh Object to the scene. The sphere will be in Object Mode and
selected in the 3D View. Have the Properties Window with the Material buttons
active. The sphere will be the default dull grey color and the materials properties
window will be blank.
Remember the cache is still available for selecting materials if you wish.
Click on the 'New' button to create a new material. By default it is the dull grey color
but note its Datablock ID name in the window 'Material.002'. Click on the Browse ID
button and it will be seen added to the cache. The name is 'Material.002' since
'Material' and 'Material.001 already exist.
Now click on the Add Materials Slot button.
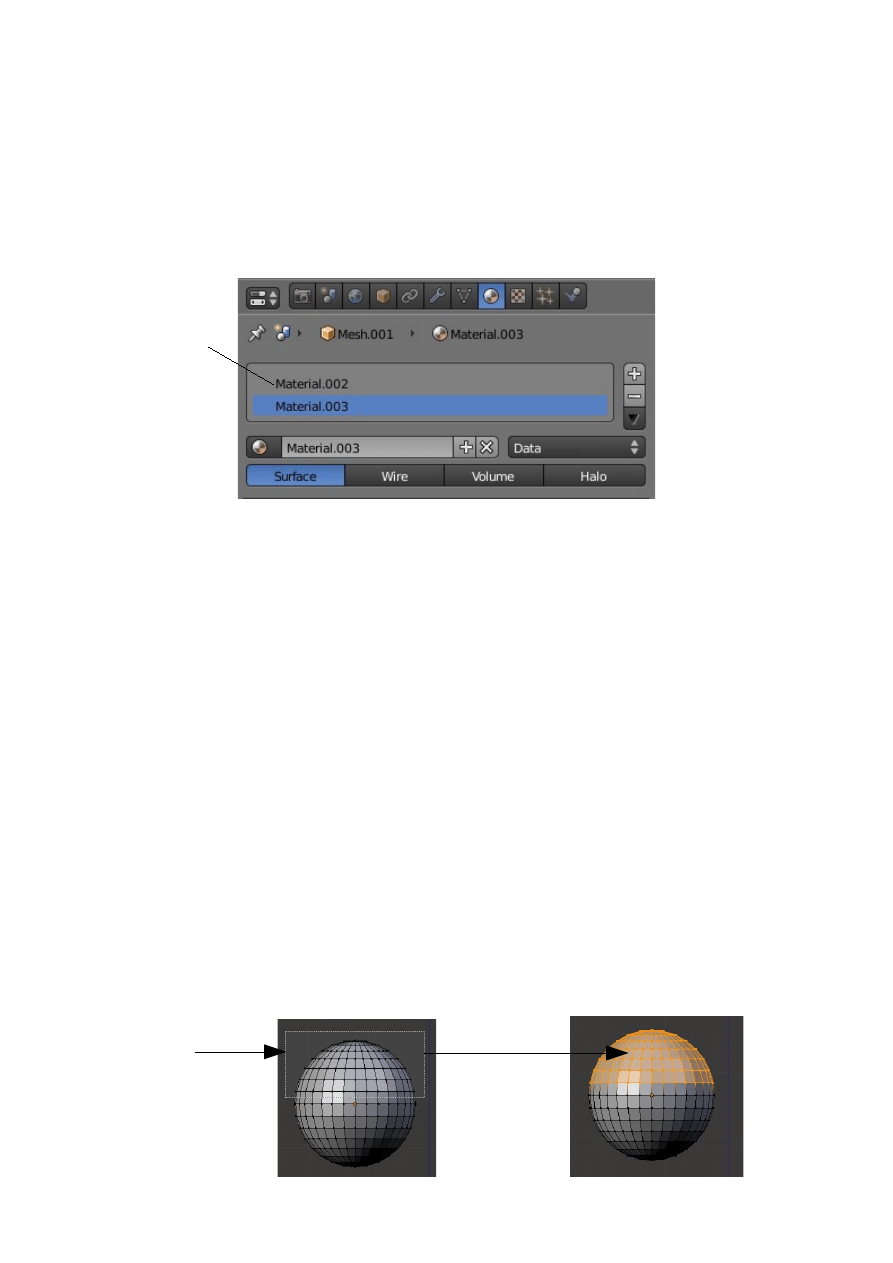
A new slot is created but note it contains the same material ID name as the first slot.
Blender has created a duplicate of the first slot . The new slot is not linked to an
object in the 3D View.
Note the number 2 which has appeared next to the material ID datablock name. The 2
is stating that the material has two users, that is, it is being used by the two slots. By
clicking on the 2 it is made single user which means it is only linked to the selected
slot.
Blender achieves this by automaticly creating a new material as seen in the material
datablock ( Material.003). Again a duplicate of the previous material is created so at
this point the new material is identical to the previous.
There are now two color slots, one is linked to the sphere, the other is not linked.
Remember, the information in the Properties Material Window is only relevant to the
sphere selected in the 3D View. If the sphere were deselected the the first slot remains
assigned to the sphere since it was the last object selected.
More slots may be added and single user materials linked. There is no indication
showing which slot is linked other than it is the uppermost slot in the stack.
Now, the reason for the second slot.
Change the 3D View to a side view (1 key or 3 key on the num pad) so the sphere is
visible. Enlarge the view by + key on the num pad. Tab to Edit Mode (This is with the
sphere selected). In Edit Mode the sphere will have all its vertices selected.
Press the A key to deselect the vertices. B key and drag a rectangle around part of the
sphere selecting some of the vertices ( A vertex Group).
Upper slot
linked to sphere
New
Material.003
B key Drag
Rectangle
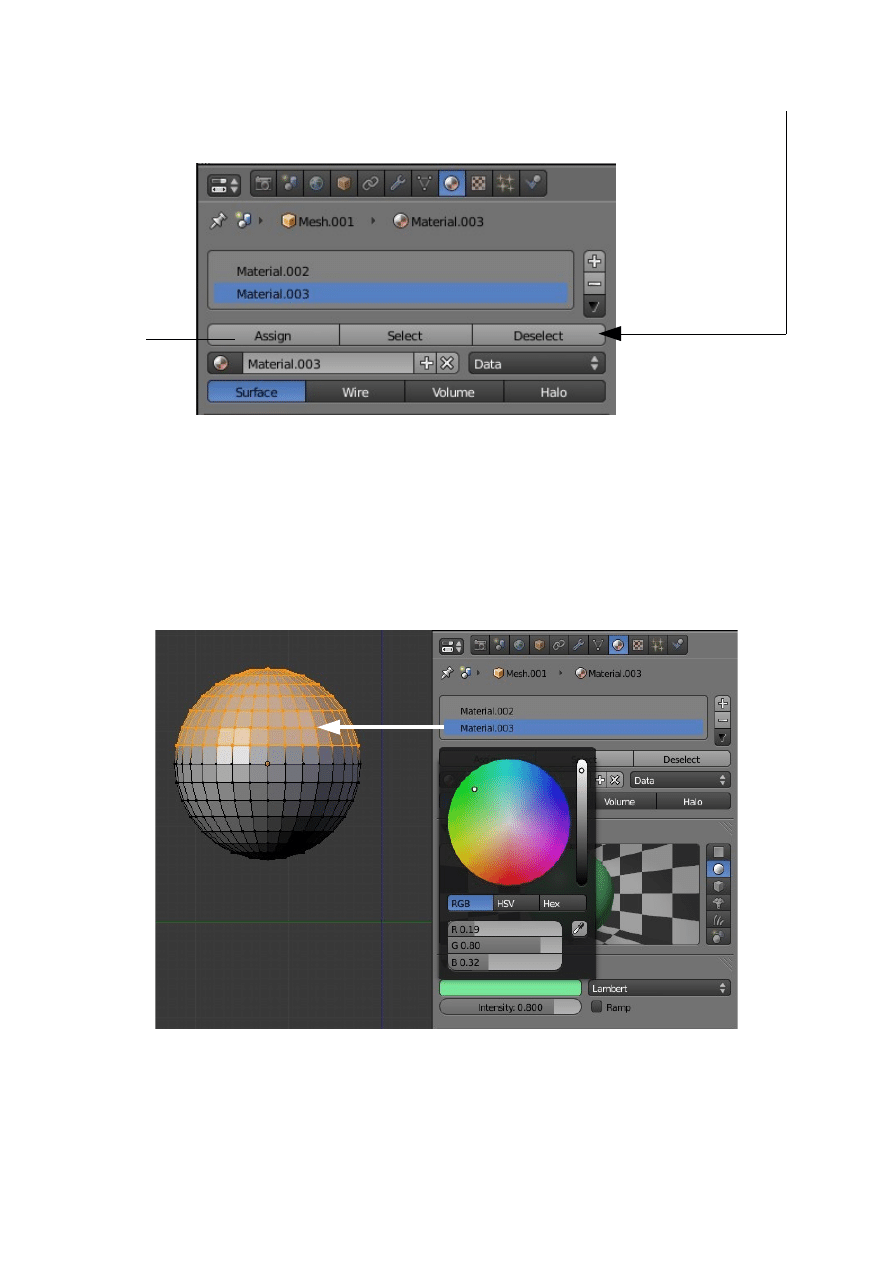
Note that on entering Edit Mode with the sphere selected “Assign - Select –Deselect”
buttons have displayed below the slot window in the Properties Material Window.
Now with your new slot selected click on the Assign button. Blender assigns the slot
and thus links the material to the selected group of vertices. Make sure that the color
for the material linked to the slot is something different to the material linked to the
first slot or this will not be evident.
Assign
Button
Material.003 green – Material.002 grey
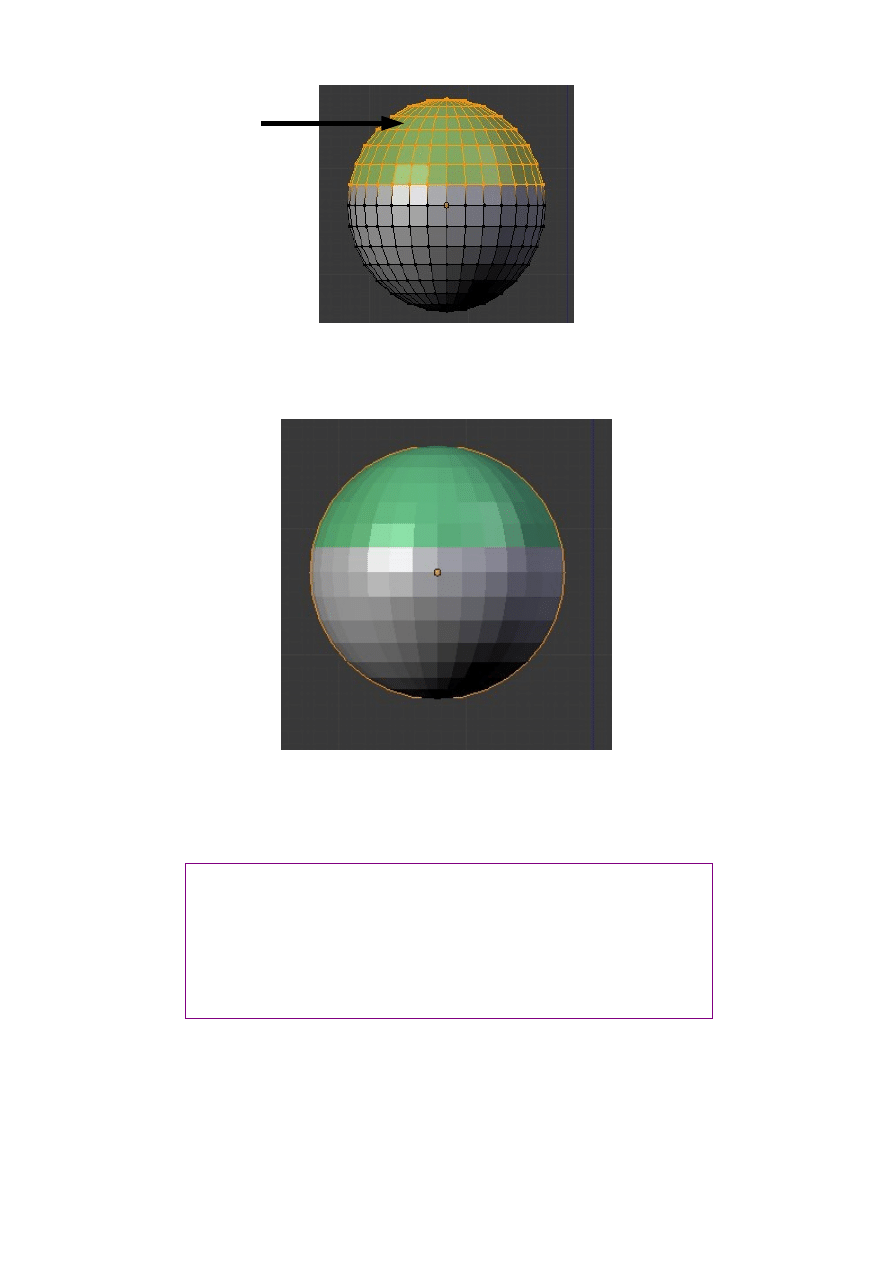
Tab to Object Mode in the 3D View to see the sphere with two colors ( Multiple
colors ).
Nothing is difficult when it is explained.
Some things are very simple.
Why is it so difficult to explain something so simple?
New Material.003
assigned to vertex group
Sphere in Object Mode
Materials
What is a Material? A material is a color but it is much more than just a color. Think
of the color red. It could be dark red or light red or any shade of red you could image.
The color can be shiny or dull or it could be transparent or it could gradually fade
from one shade to another. The possibilities are endless. That is a material.
Basic Material Settings
The default Blender scene has a Cube object which displays as a dull grey color.
Color is the way your eyes interpret the reflected light from an objects surface. If
there is no light you see nothing so Blender has placed a Lamp in the default scene
and assigned data to the Cube which says, show the Cube as being grey with this
light. Every object added to the scene will also be given the same data as the Cube so
you will see them as grey. When you add a material to an object you are modifying
the default data.
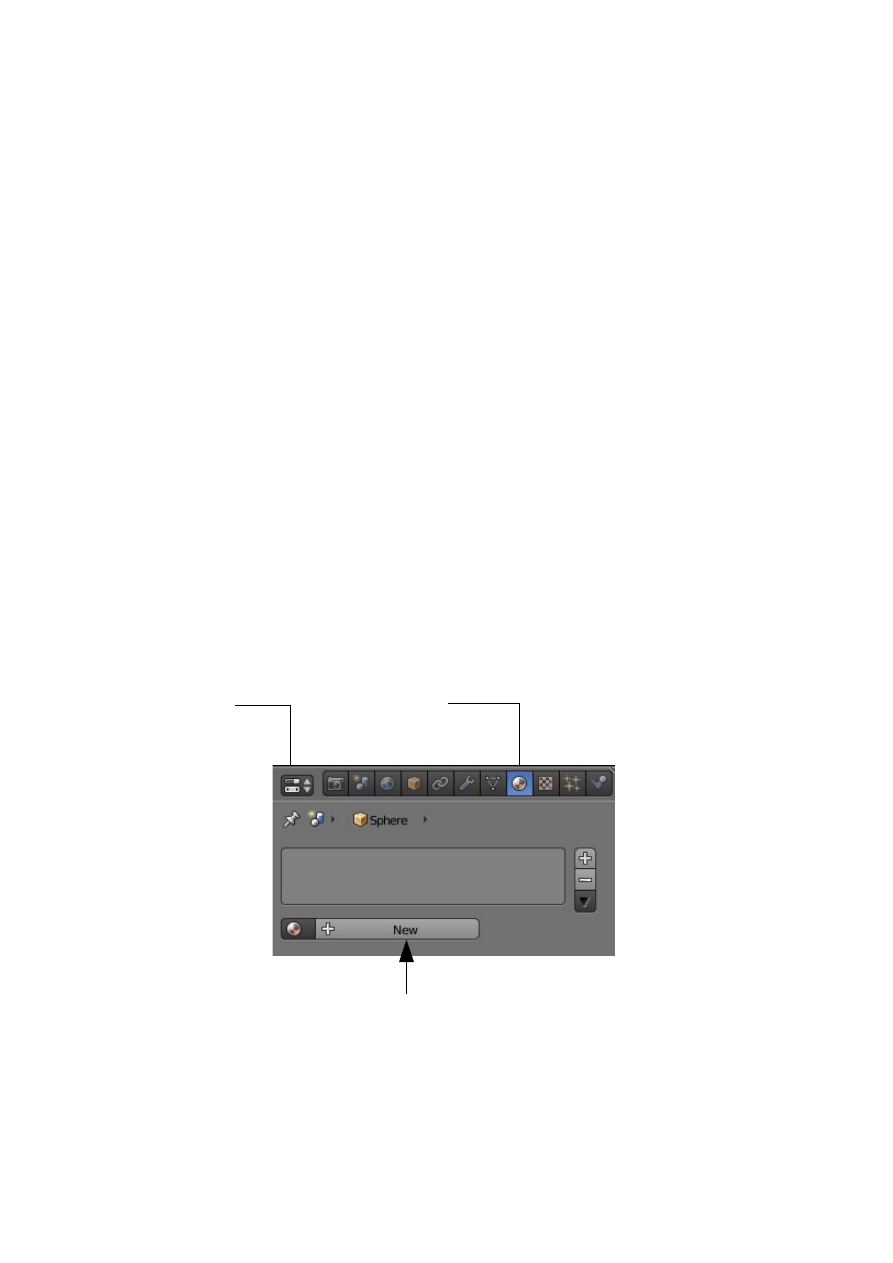
Adding a material is done in the Properties Window with the Material button
activated.
To add a material to an object, first select the object you want to work with (The
default cube comes with a material added). In the Properties Window header click the
Material button, then click the 'New' button. You will see the Material Properties
buttons open up.
Note: In the default Blender scene the default Cube object has been given a default
Material as seen by the grey color displayed. Subsequent objects added to the scene
also have this same Material although the Material buttons do not display. Click on
'New' to display the buttons.
Properties Window
Material button
When a new object is added to the scene click on
'New' to display the Materials buttons
Materials Buttons
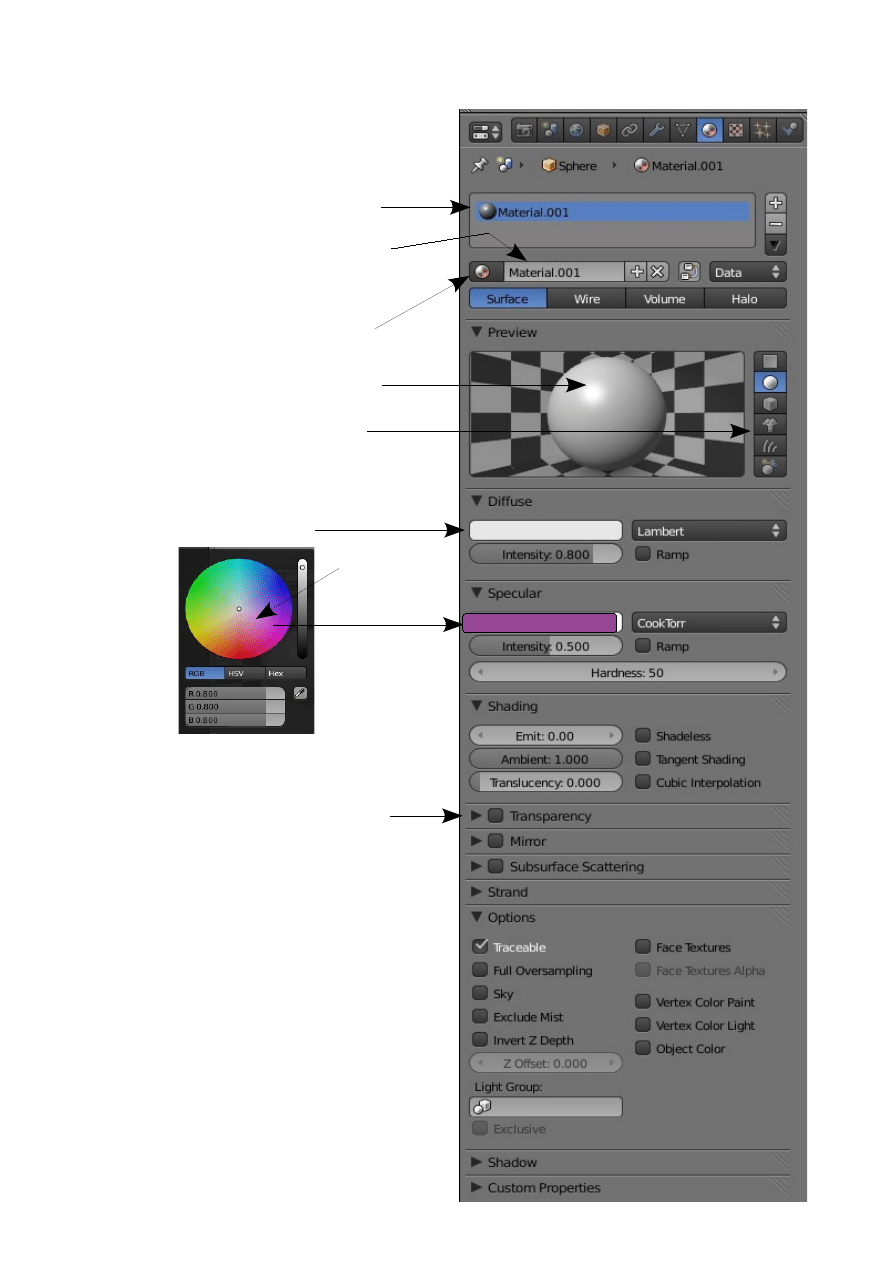
The material panel is used to change some
of the physical properties of the object in
the way it looks. If you plan on using just
straight color and no texture, this is where
you set the object’s color. Here is where
you set other properties such as: Shading
,Transparency, Glossy or Flat, Reflective,
Halo Effect Etc.
A brief example of setting a Material will
follow.
Material Slot: See separate section
Material Name: Click here to
delete the name 'Material.001' and
type a new name for your Material
Preview Panel: Shows a preview of
your Material when rendered. Click
the buttons to the right for different
preview options.
Material Stack: Click here to see
all your materials
Color Picker: Click in the color bar
to display the color picker.
Click to
select color
Tabs: Click to open the tab and
display buttons.
Material Colors
Each material can exhibit three colors;
The basic Diffuse overall color which is seen when a surface reflects light..
The Specular color which gives a surface highlights or a shiny appearance.
The Mirror color which is color used to fake mirror reflections.
It is important to remember that the material color is only one element in the
rendering process. The rendered color of an object is a product of the material color
and the emitting light color. An object may have a yellow material color but put it
under a blue light or a red light and you get something else altogether.
Adding a New Material
We will demonstrate the basics of adding a material by an example.
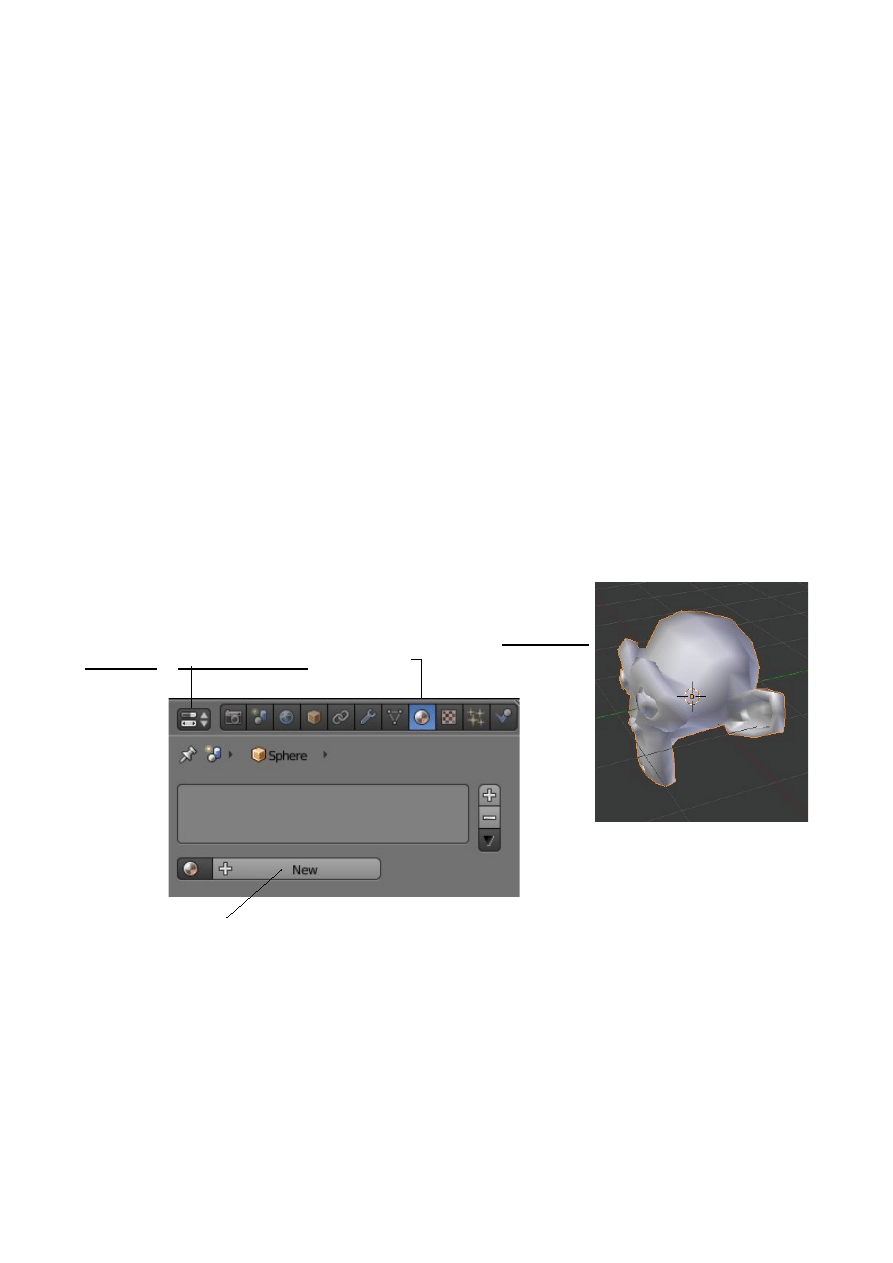
Start a new Blender scene and add a Monkey object. Monkey always comes laying on
his back so with him selected press R + X +90 ( Rotate about X axis 90 degrees).
Hit the Num Pad
+
and zoom in a bit. Go to the Tool Shelf and under 'Shading' click
on 'Smooth'.
Make sure the Monkey is selected then go to the Properties
Window – Material button.
Click on the 'New' button to display the Material Properties buttons.
When the monkey is added to the scene Blender assigns it the properties for the grey
color even though the Material Properties are not displayed. After clicking 'New' you
can modify the properties to achieve the look you want.
Note: We selected the smooth option from the Tool Shelf to better display the
modifications to the Material. Some of the effects are very subtle so a nice smooth
surface is best for the demonstration.
Remember that color is the light we see reflected from a surface. Different
surfaces reflect different colors.
The Preview Tab
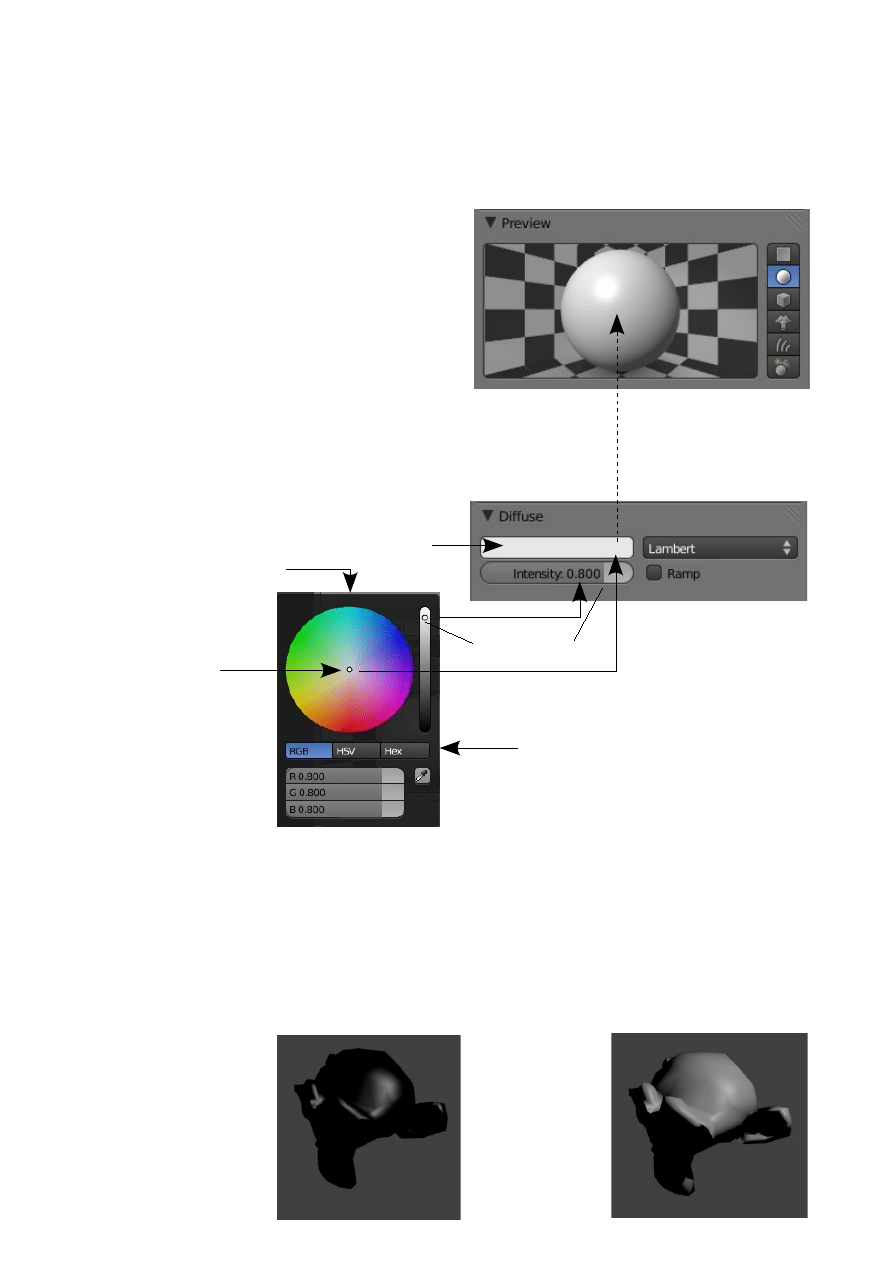
Have a look at the Preview tab in the Material Properties Window. This preview gives
an indication of what you will see in a
Render of the 3D Window. To save computer
memory Blender does not display everything
in the 3D Window. On the LH side of the
Preview tab there are options for viewing the
preview in different formats. One of the
options is Monkey but for simplicity I have
left my preview as the default Sphere.
The Diffuse Tab
We previously stated that the Monkey object had been assigned a grey color. This is
the Diffuse overall color of the Material.
Note the R: 0.800, G: 0.800, B: 0.800 values. These are the numeric values which
denote the Grey color in the RGB color system. RGB stands for red,green and blue
primary colors. Mixing the three 0.800 values produces the grey color. There are
three color system options available. RGB, HSV and Hex.
What is Intensity? Intensity of a color is the shade of the color going through a range
from absolute no light to maximum light.
Color Bar showing the Diffuse color. Click to
display the Color Picker.
Default color
Color System Options
Intensity Slider
Intensity 0.000 No light
Intensity 0.800
Rendered Images
GreyColor
The two images demonstrating Intensity also serve to show that light has a major
effect in a rendered image. When Monkey was added to the scene it was added at the
center of the World and then rotated on the X axis through 90 degrees. This has meant
that the position of the default lamp is above and behind Monkeys head. This
explains why Monkeys face is in shadow.
OK! How come we see the Monkey when the Intensity is 0.000 no light? We will
come back to that a bit later. For now let's make Monkey a bit more colorful.
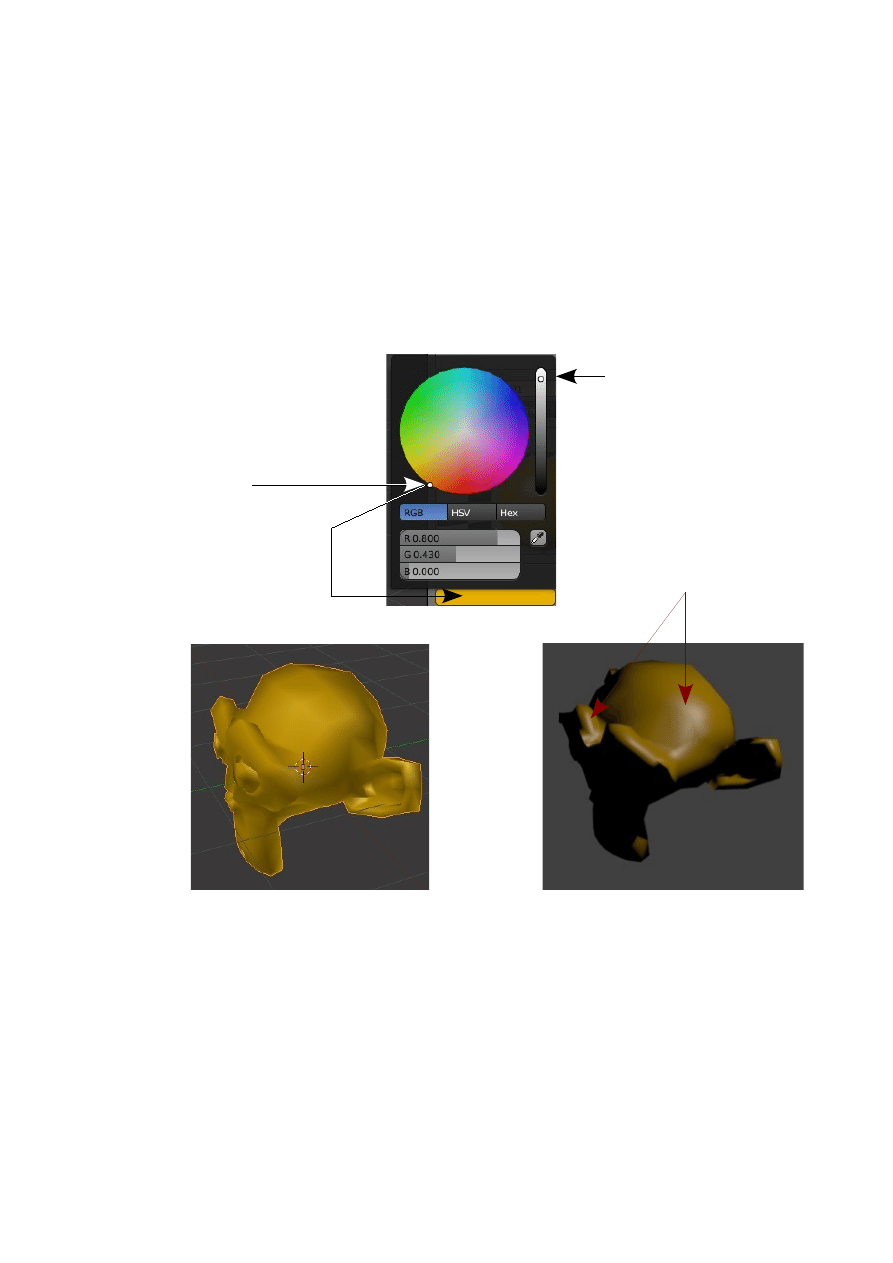
Get the color picker again and select something pretty. If you want to get exactly
what I will show you enter the RGB values: R:0.800, G:0.430, B:0.000
We now have a pretty golden Monkey. You can see the difference between what you
see in the 3D Window and the rendered image. The 3D Window has some shadowing
effect so that you can see a three dimensional image. This is also evident in the render
but you can also see some shiny highlights.
The shiny highlights are there since by default Blender has added Specular color to
the Monkey. Thats why we could see the Monkey when we turned the Diffuse color
intensity down to zero. We in effect canceled the Diffuse light reflection but there
was still Specular light reflection.
Intensity 0.800
Color selected
3D Window
Rendered Image
Note: Shiny Highlights
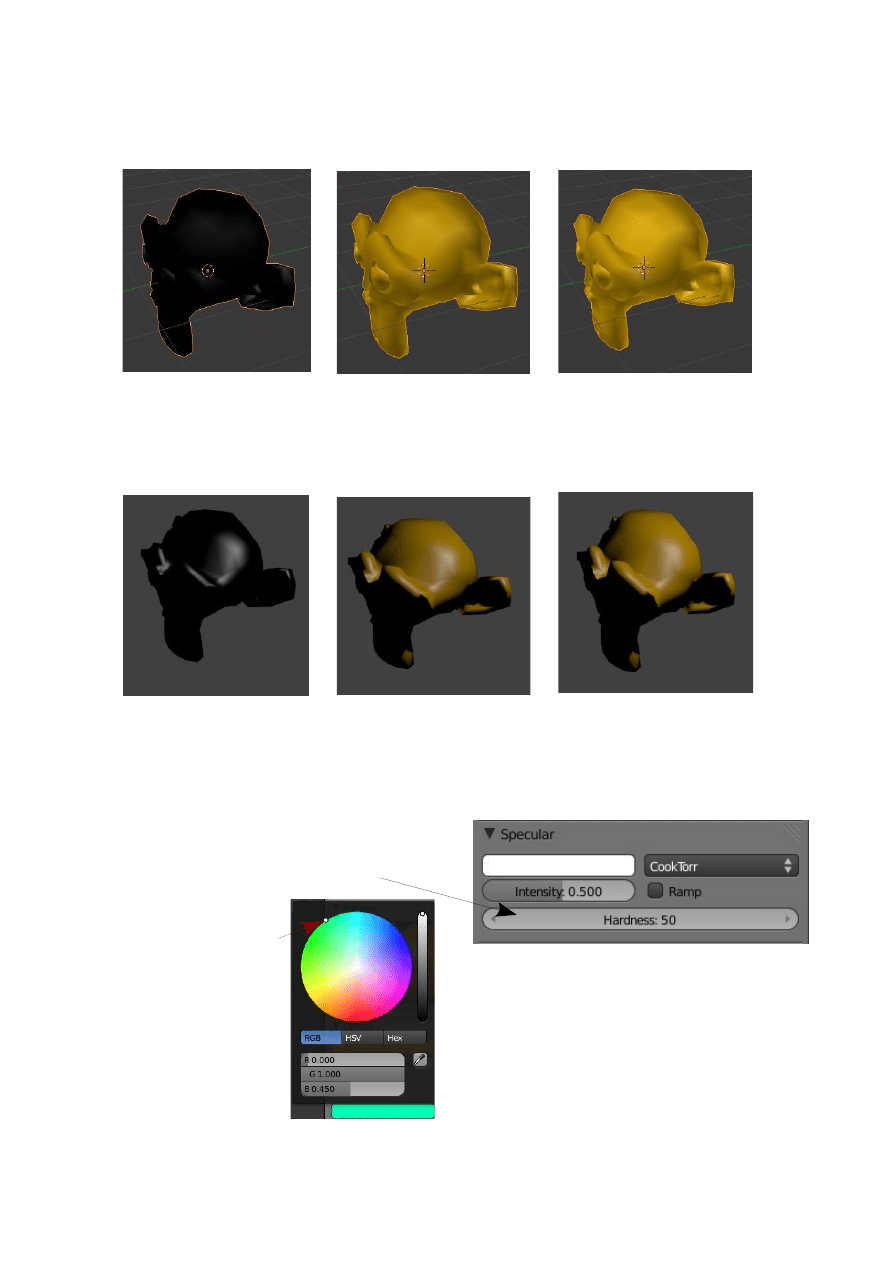
Intensity Effect for Diffuse Color
3D Window Views
Rendered Images
The Specular Tab
We will demonstrate the effect of Specular color which adds a highlights to a
material. The Specular tab is similar to the Diffuse tab with a color bar which when
clicked displays a color picker. The
difference between the two tabs is that the
Specular tab has a hardness value.
Select the green color with R:0.000, G:1.000, B:0.450
Intensity 0.000
Intensity 0.500
Intensity 1.000
Selected Specular Color
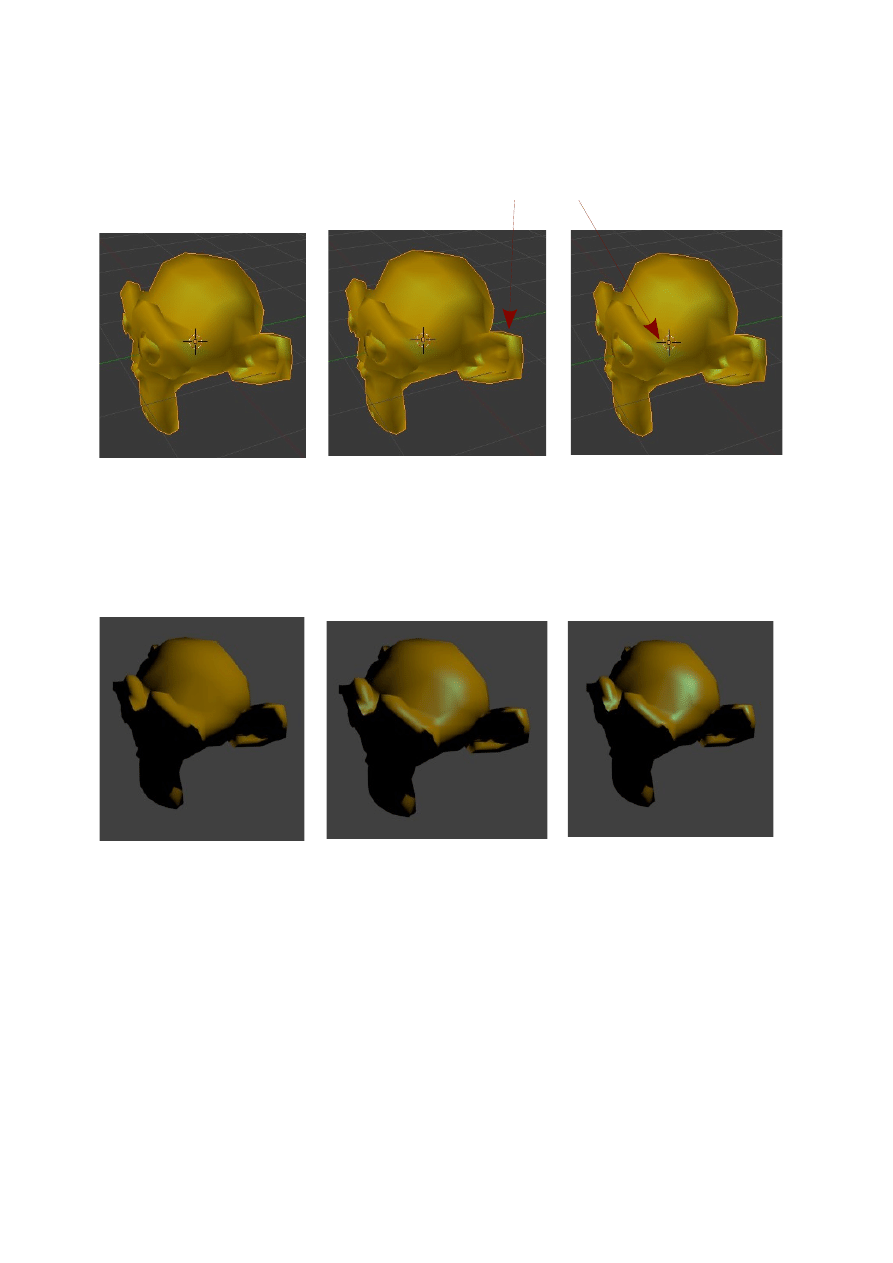
When you add a Specular color to an objects material there is no dramatic effect in
the 3D Window. The difference will be the Specular Highlights. The following
comparisons demonstrate the differences with varying Intensity values.
3D Window View
Rendered Image View
The Hardness Value
The best way I can describe the effect of the Hardness value is to say that the effect
spreads the specular color across the surface of the object. The default Hardness value
is 50. The value range is 1 to 115. The most visible effect when altering the value
occurs in the lower region of the range. The following examples demonstrate this
effect.
Intensity 0.000
Intensity 0.500
Intensity 1.000
Specular Highlights
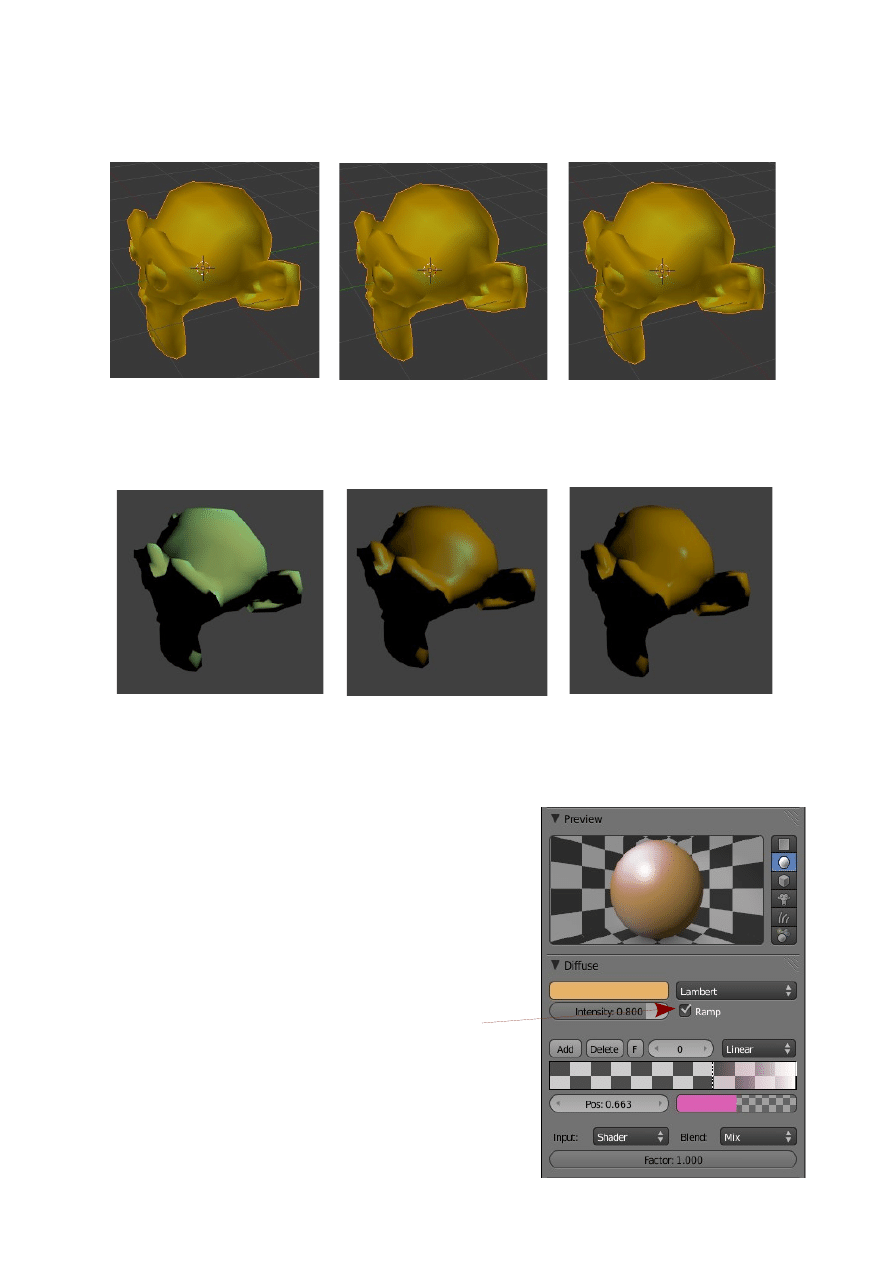
Hardness Value Variation
3D Window View
Rendered Image View
As you see in the rendered images there is a relatively small change between
Hardness value 115 and 50 but a huge difference between 50 and 1. It is hard to see
any difference in the 3D Window.
Ramp Shaders
Besides having control over Diffuse and Specular
Intensity and Specular Hardness there is Ramp
Shader system to integrate color shading over a
surface. We will not attempt to give instruction in its
use here only to point out its existence.
The ramp shader produce very subtle effects of color
mixing but it must be used in conjunction with
lighting and lamp positioning.
Hardness: 1
Hardness: 50
Hardness: 115
Tick to turn Ramp Shader on
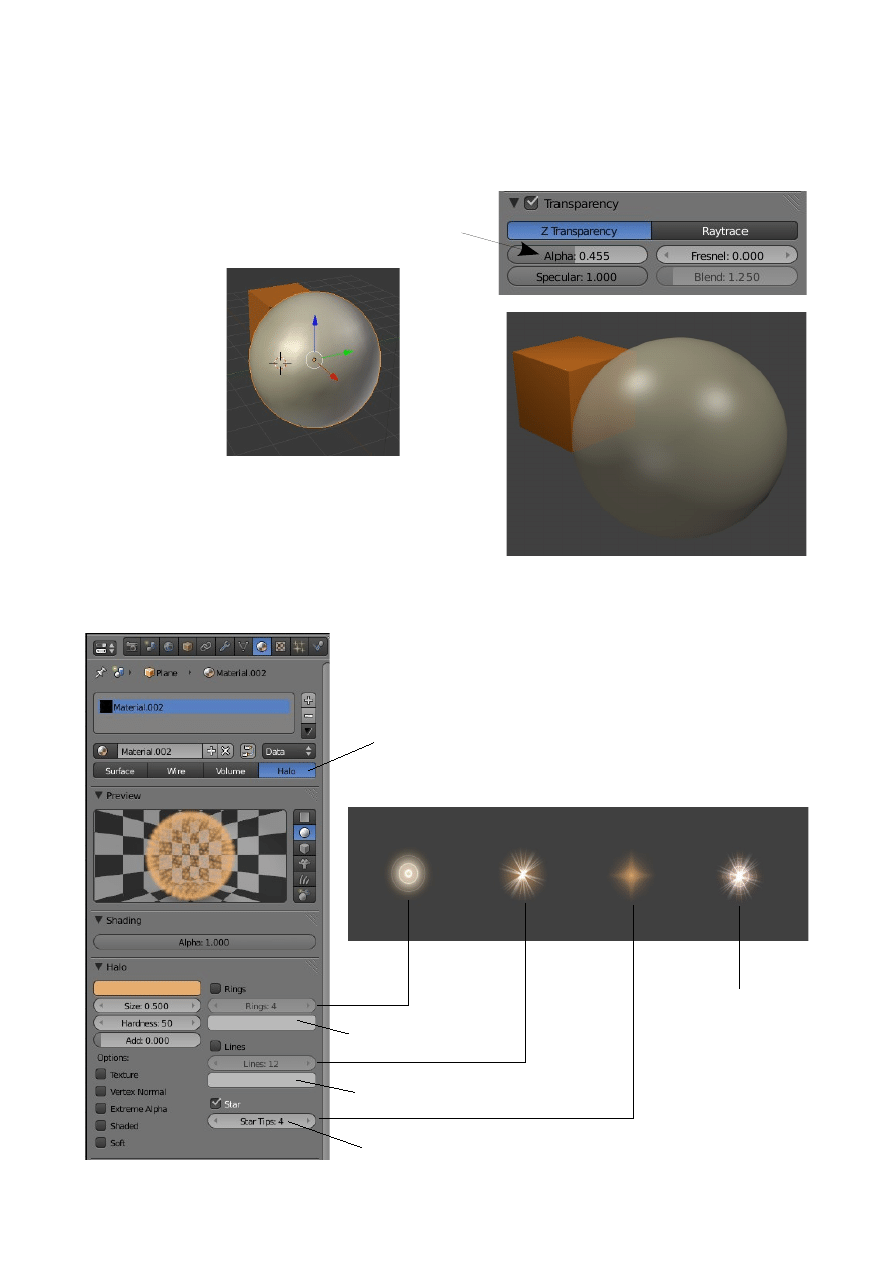
Transparency
To make an object transparent go to the Properties Window – Material button –
transparency tab. Tick transparency to display the controls.
Halo Settings
By using Halo settings only the Vertices of a mesh object will be visible when
rendered. The vertices will display as points of light
which look like rings, lines or stars or a combination.
With the Sphere selected in the 3D Window
tick Transparency and reduce the Alpha
value
3D Window View
Rendered Image
With the Cube selected, in the
Shadow tab untick 'Receive'.
Rings
Lines
Stars
Combined
Halo Selected
Mirror Color
Specular Color
Change values as required
Cube placed in
background
CH05- Textures
01-Textures
02-Texture Mapping
03-Displacement Mapping
04-UV Texture Mapping
05-Selective UV Mapping
06-Unwrapping with Seams
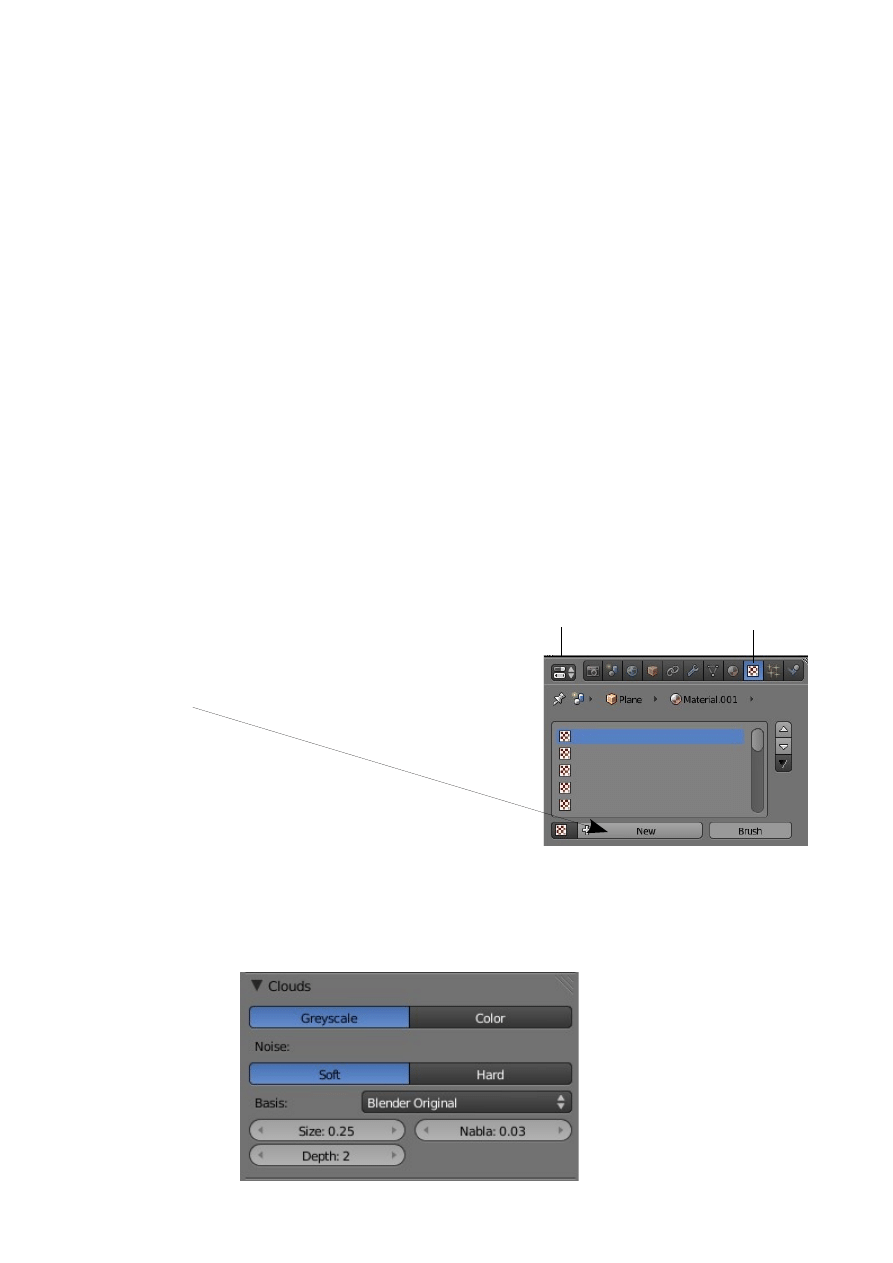
Textures
In the Materials section we considered the effect of light reflecting off a smooth
surface. Textures are the physical characteristics of a surface such as the surface of
bricks, carpet, woodgrain etc.
Before you can add a Texture to a surface you must first add a material since by
default, Blender textures are set to influence the material. See Influence tab.
Textures are applied to an objects surface using the buttons on the Properties Window
– Texture button. Clicking the Texture button displays a panel where you can add a
new texture .
Blender comes with a series of built in Textures from which to chose or you can use
any photo image stored on your computer. Blender can also place movies on a surface
and you can animate the textures.
To demonstrate the placing of a Texture follow this example:
Open a new Blender scene and replace the default Cube with a Plane. Scale the Plane
up by five. Add a Material R: 0.800, G: 0.767, B: 0.495.
Go to the Properties Window – Texture button and
click 'New'.
The texture buttons display with a default texture type 'Clouds' shown in the 'Preview
tab' panel. With a 'Clouds' type texture a 'Cloud' tab has displayed. This tab contains
settings for altering the characteristics of the texture. The tab will change depending
on what texture type is selected.
Properties Window
Texture button
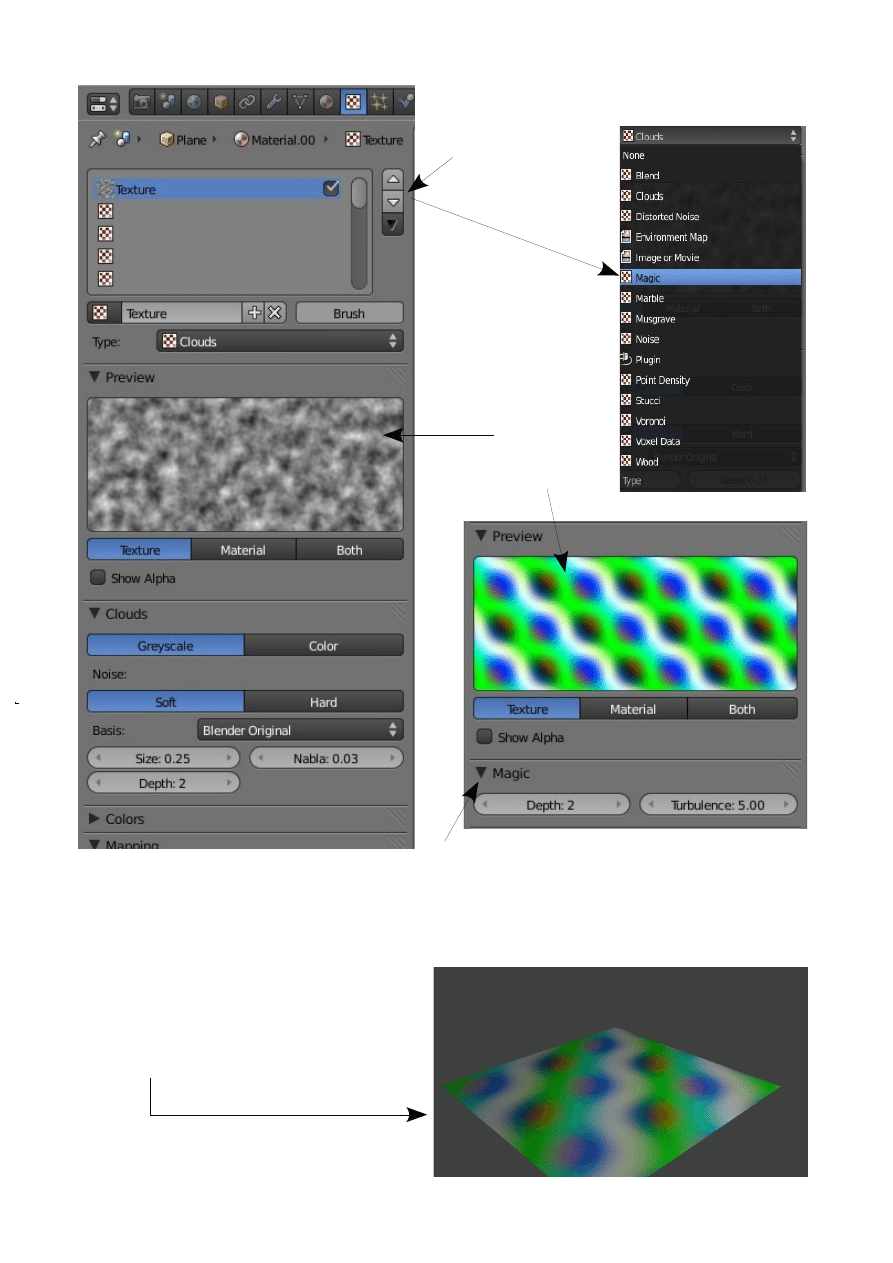
Click on the texture
type drop down and
select type 'Magic'.
Tab.
'
The Cloud texture is replaced by the Magic texture and the Cloud tab is replaced by
the Magic tab. This tab contains only two values for altering the characteristics of the
texture, Depth and Turbulence.
Note the 3D Window does not show the
texture on the object. This is where
Blender conserves memory. Render,
press F12, to see the texture.
Texture type drop
Down
Clouds
Magic
Magic tab
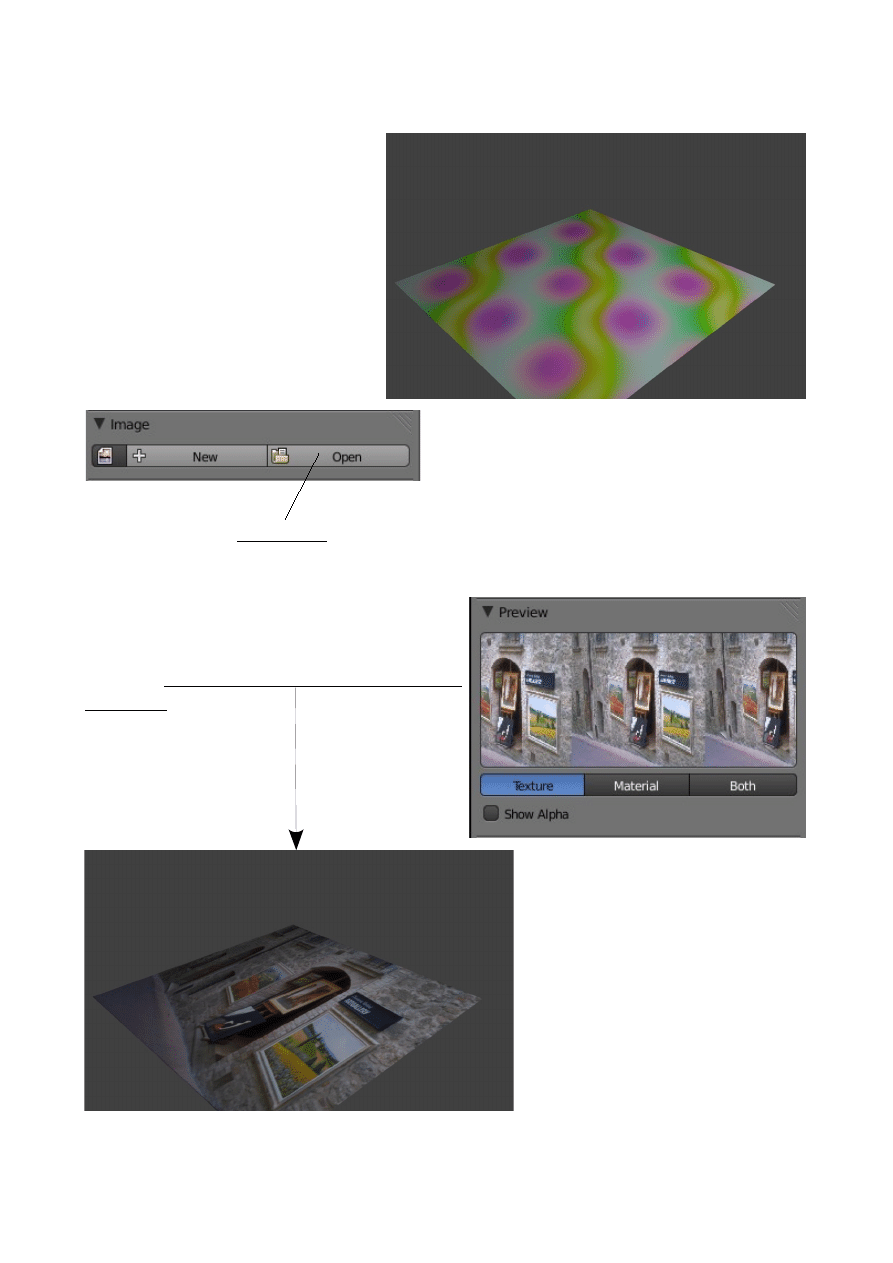
Change the Depth value to 4 and render again to see the alteration.
Go back to the texture type drop
down selection and select 'Image
or Movie'.
An 'Image' tab displays instead if
'Magic' and the preview shows a
black window. We haven't told
Blender what image to use.
In the Image tab click open. The File Browser window displays. Navigate to a file
containing a picture. I have a picture named 'Street.jpg' in my Documents folder.
Click on the picture file then click 'Open' (Top RHS of screen).
You will see your picture in the preview
panel ( probably multiple images). Render to
see your picture displayed on the surface of
the plane.
Render with Depth: 4
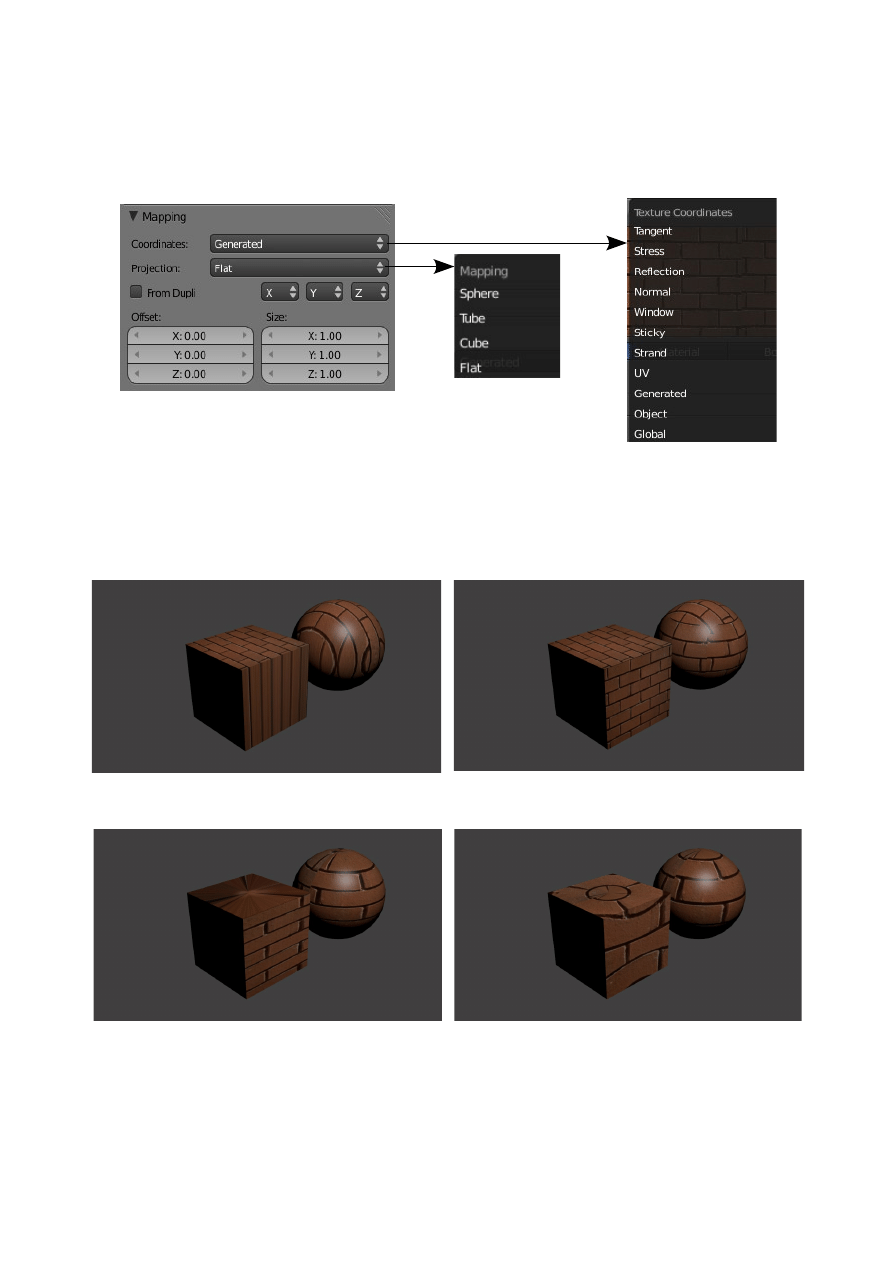
Mapping the Texture
Weather you use one of Blenders built in textures or an image you may want to adjust
how the texture is positioned on the object. The 'Mapping' tab is the place to do this.
Offset and Size are self explanatory. Either can be controlled on the X, Y and Z axis.
The Coordinates drop down gives you a selection of coordinate systems and the
Projection drop down has a choice of mapping options to suit the shape of your
object.
There are a lot of buttons and settings to experiment with in the Texture buttons and
the best way to find out what they do is play around and record results for future
reference.
Flat
Cube
Tube
Sphere
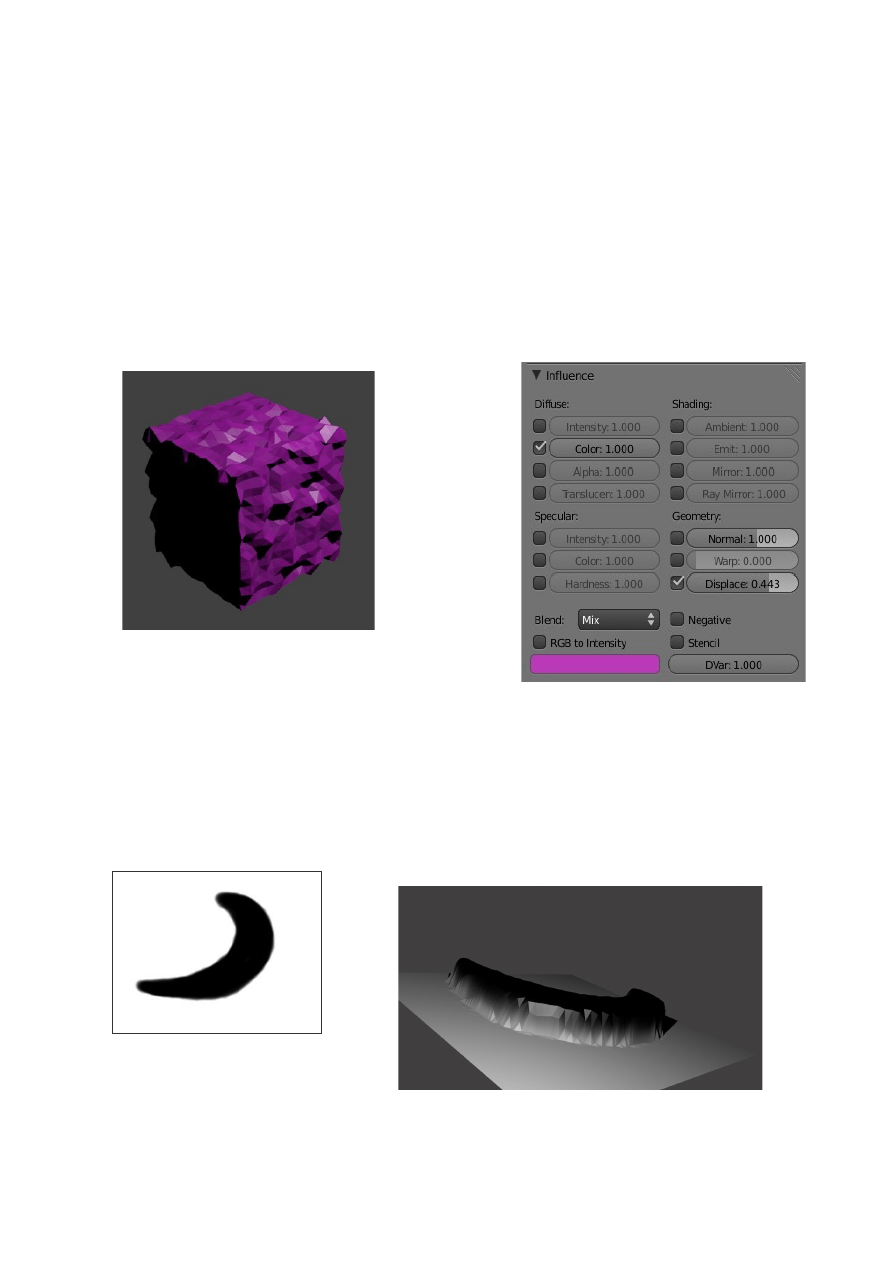
Displacement Mapping
Displacement Mapping is using a Texture to deform a mesh. You can make a Cube or
a Sphere et. Look wrinkled without having to move verticies around.
Start a new Blender scene with the default cube. Make sure the Cube has a material
then in Edit mode subdivide the Cube a number of times. The texture is going to
displace vertices so you need a whole bunch of vertices to work with.
Put a Cloud Texture on the Cube then go to the Influence tab. Leave the Diffuse
Color ticked and under the Geometry heading tick 'Displace'. Render to see the effect.
Moving the slider next to the Displacement tick varies the amount of displacement.
The 'Blend' drop down displays options which influence the Material. Try 'Add' and
'Subtract' and render to see the difference. Another example is shown below. This
time a black and white image texture has been used on a plane. Don't forget to
subdivide the plane. Negative Displacement values raise the surface up positive
values depress the surface.
Experiment with other features and record the outcome for future reference.
Black and White Image
Rendered Image with Negative Displacement Value
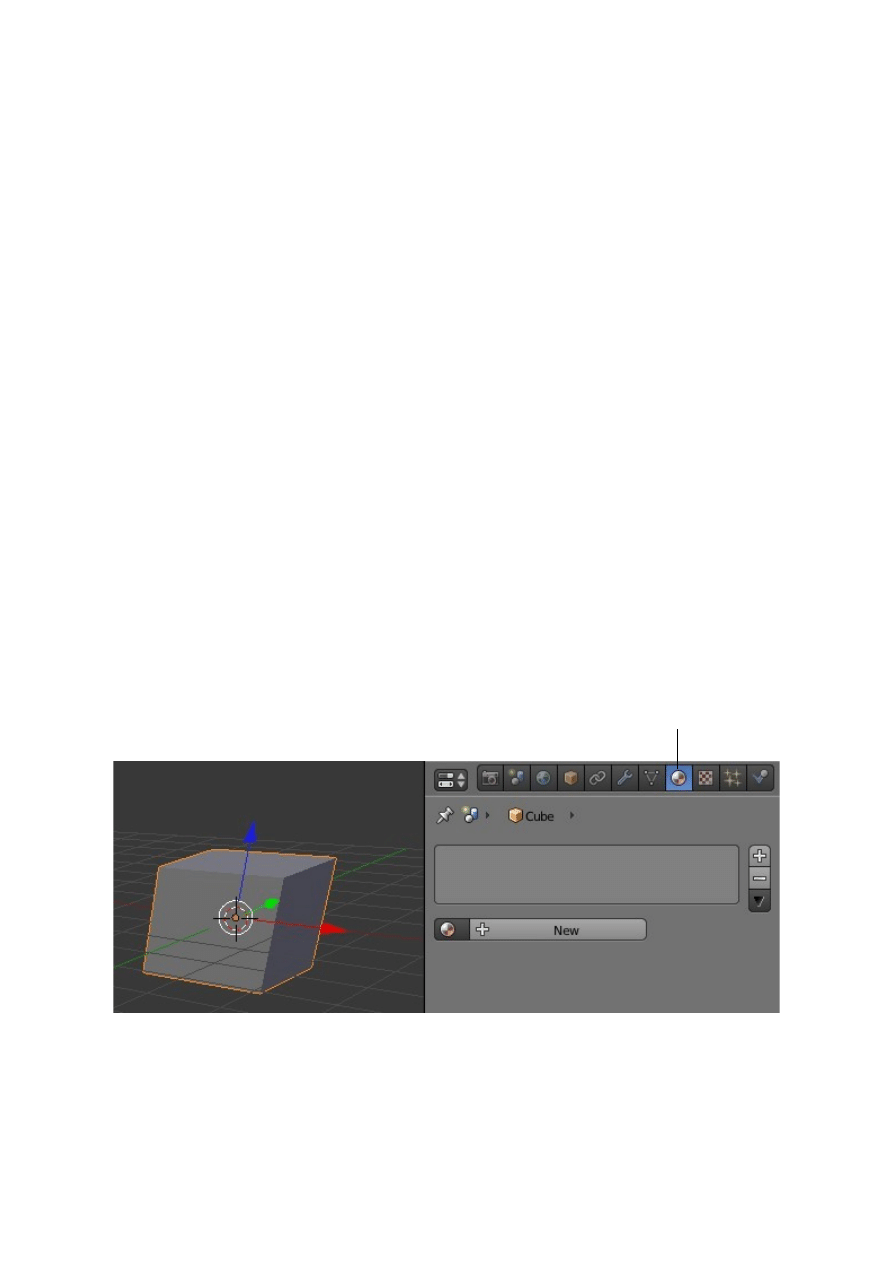
UV Texture Mapping
For complex models regular Cubic, Cylindrical or Spherical texture mapping is not
sufficient to accuratly place the texture on the surface or part of the surface. This is
where UV Mapping can help.
The coordinates U and V are used simply to destinguish from the XYZ coordinates
used in the 3D Window.
UV Mapping is accomplished by taking the surface of an object ( Model ) , peeling it
off as you would a skin from an orange and laying it out flat on a 2D surface then
superimposing an image as a texture over the flattened surface (Mapping). The suface
for laying out the flattened object is the UV/Image Editor Window.
As with every basic instruction in Blender it is best to begin with something simple.
Although the process we are describing is for complex surfaces anything other than
simple is going to be confusing at first.
Start with a Cube object in Blenders default 3D Scene but first delete the cube that is
loaded automatically and add a new cube.
The default cube comes pre loaded with a material and a texture channel. In our
previous discussion on material and textures it was stated that before a texture could
be applied an object had to have a material. Adding a new cube to the scene which
does not have a material or a texture will demonstrate that neither are necessary when
applying UV Texture Mapping.
With the new cube added divide the 3D Window in two and change one half to the
UV/Image Editor. In the 3D Window zoom in on the cube. When you divide the
window the cubeis a bit small.
New Cube added – no material applied
Properties Window – Material Button
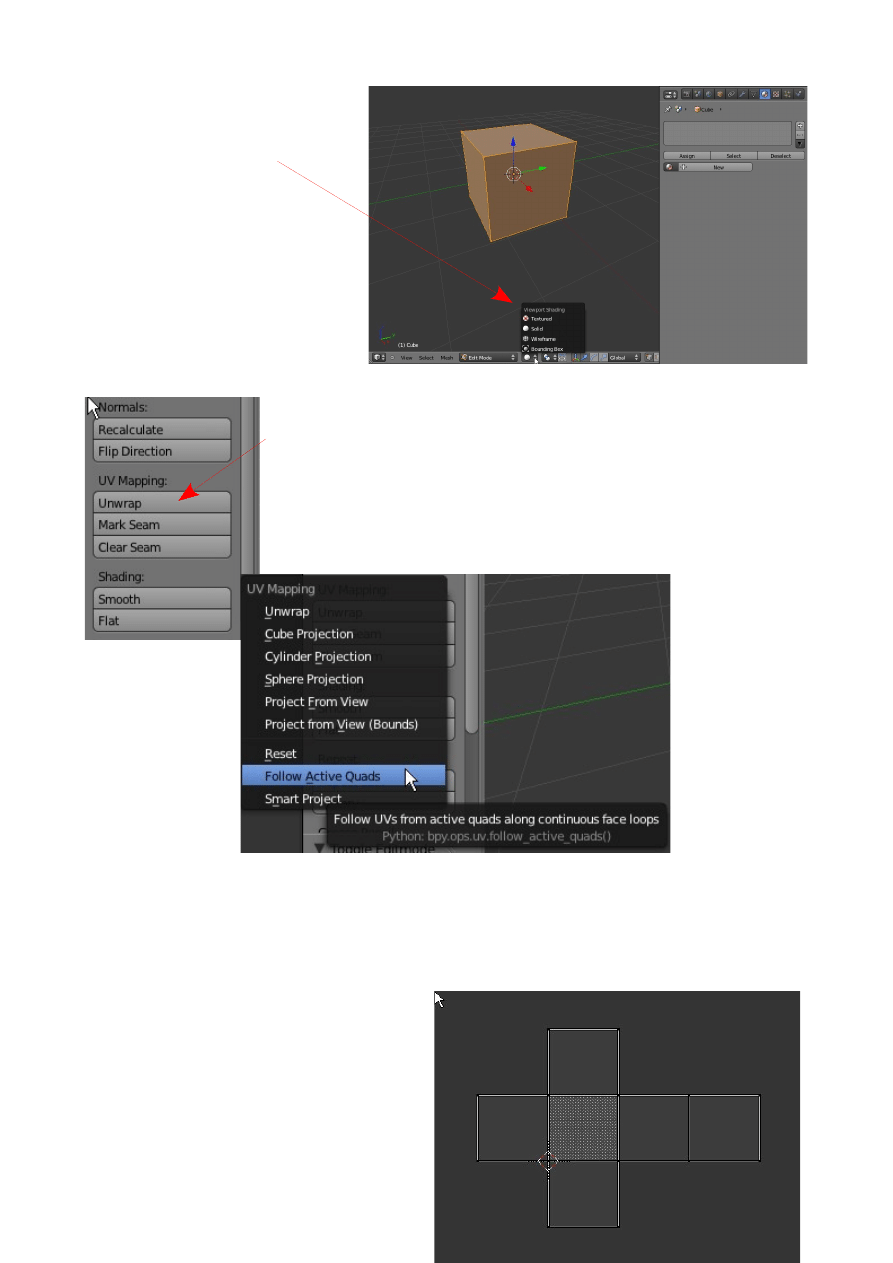
Change the 3D Window to Edit
mode and select 'Textured' as the
Viewport Shading Type.
Selecting 'Textured' will allow
you to see the superimposed
texture in the 3D Window while
in Edit mode.
In the 3D Window Tools Panel under 'UV Mapping' click on
'Unwrap' to display a 'UV Mapping' unwraping type selection
menue. These options allow you to unwrap the surface of the
selected object in a variety of ways. Some of the unwrapping
methods aredifficult to visualise so I will let you play with them
and figure out the results for yourself. I'm still scratching my
head.
To keep things simple select the 'Follow Active Quads' method for unwrapping the
cube. This method should lay out the surface of the cube as if you had unfolded one
of those post office mailing boxes. The
surface should consist of six squares.
The UV/Image Editor window will
probably require you to zoom out to see
the whole arrangement ( Num Pad –
Key, the same as the 3D Window).
Now the flattened surface is displayed
it's time to load a texture image.
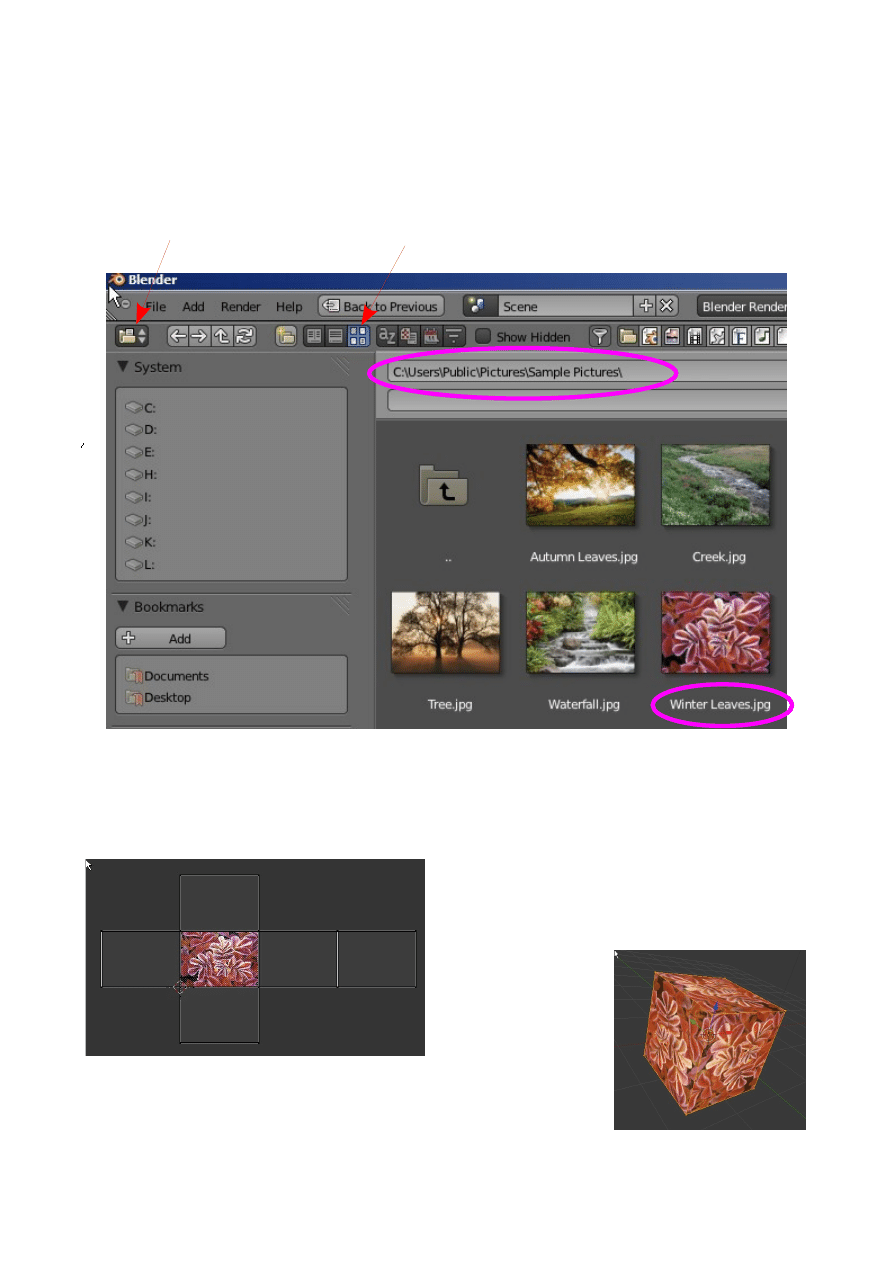
In the UV/Image editor Window header click on 'Image' and select 'Open'. This will
display the File Browser Window where you can navigate and find an image to use as
a texture. Once you have located your image file click on it to select and then click on
'Open'.
In my case I have selected a picture file named 'WinterLeaves.jpg' in my
C:\Users\Public\Pictures\SamplePictures\ directory.
The image displays in the UV/Image editor window.
Zoom out again if the image is too large.
The image shows in the center face but you
will see that it is mapped to each surface of
the cube in the 3D Window. Go ahead and
rotate the cube to
see if I'm right.
With the curser in the UV/Image editor press the A Key to
select all the surfaces then G Key (Grab) and move the
selected surfaces around. As you move the surfaces you will
see that the image is repositioned on the surfaces of the cube in the 3d Window.
Click to display files as thumbnail images.
File Browser Window
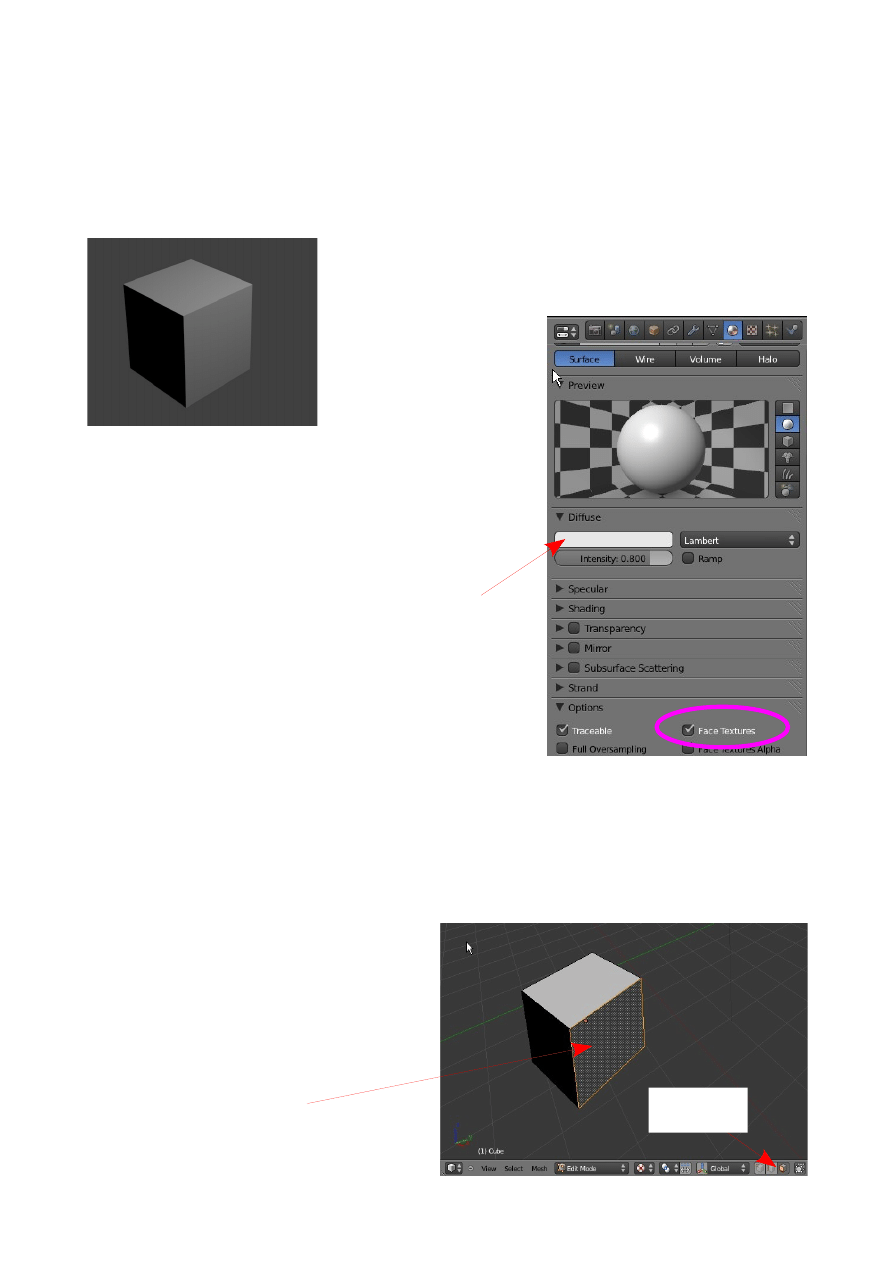
The outline of the surfaces in the UV/Image Editor can be scaled and rotated the
same as you would edit a mesh in the 3d Window. Indavidual vertices on the mesh
may be selected then grabbed and moved also. As you see by manipulating the
surface outline in the UV/Image editor you can accuratly position the texture image
on the surfaces of your object.
If you were to render an image of the object (F12) at this
stage you would be dissapointed to see that the image
texture does not render.
To render the image texture you have to activate
'Face
Texture'
( Tick ) in the 'Options tab of the Materials
buttons in the Properties Window. OK, now you have
to apply a material. The default dull grey color will
do.
Now press F12 to see the rendered image.
Selective UV Texture Mapping
So far the image texture has been mapped to all the surfaces of the object but
Suppose you wish to place the texture only on one face of the object.
Create a new scene and leave the default cube selected. Divide the 3D Window as
before and set up the UV/Image editor. In the 3D Window tab to Edit mode and select
'Textured' Viewport Shading.
In the 3D Window change from Vertex
Select mode to Face Select mode.
Deselect all faces then select only one
face ( Right click on the face ).
Default Grey
One face selected
Face Select
Mode
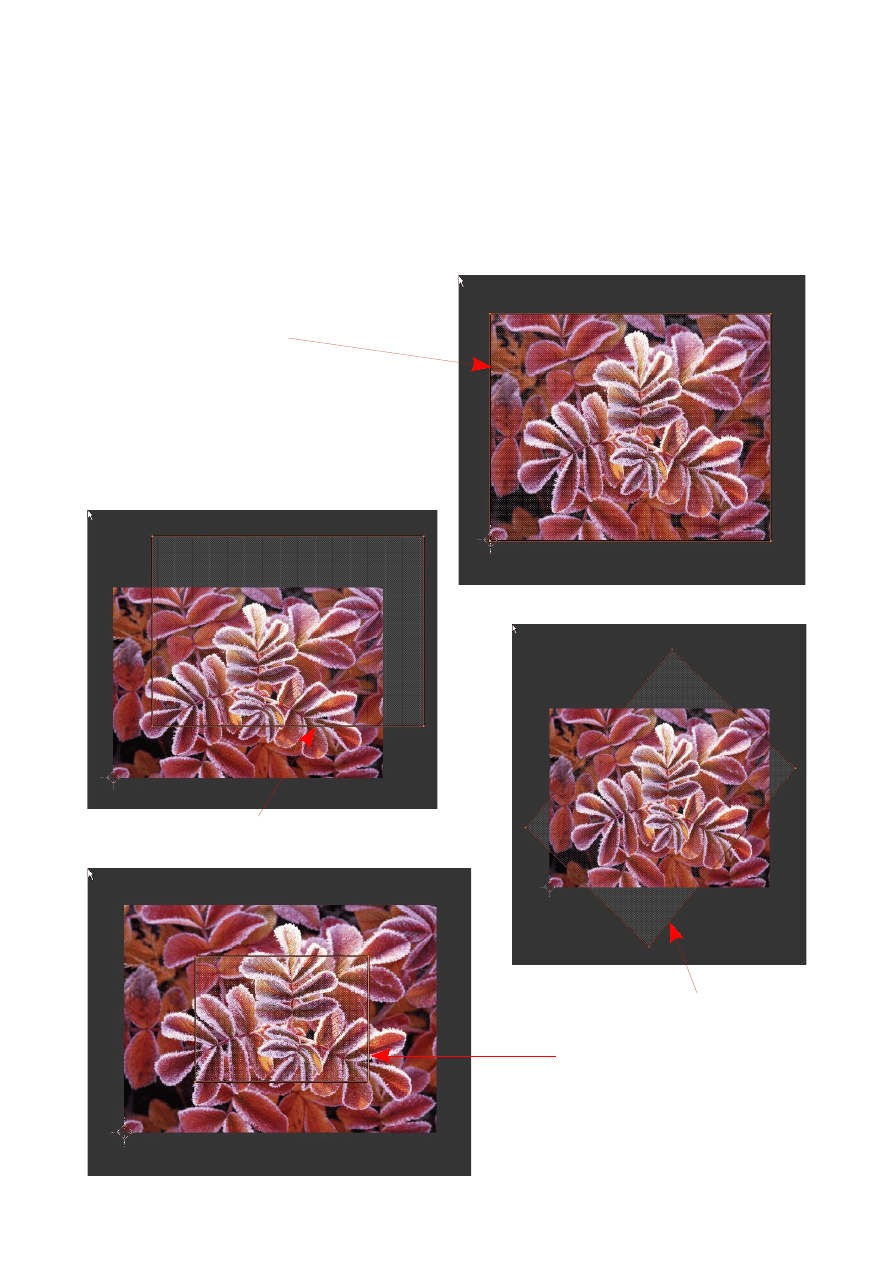
In the UV/Image Editor select and enter an image for your texture as before.
You will see the image mapped to the face you selected in the 3D Window. The other
faces display a white.
In this case we didn't do any unwrapping but as soon as the image was entered in the
UV/Image Editor Blender automatically mapped the single face.
With the cursor in the UV/Image Editor
pressing the A Key will select the face. The
white outline turns red.
You can then manipulate the face map to
position your image the way you want.
G Key - grab, R Key – rotate, S Key –
scale.
Grab – Move
Rotate
Scale
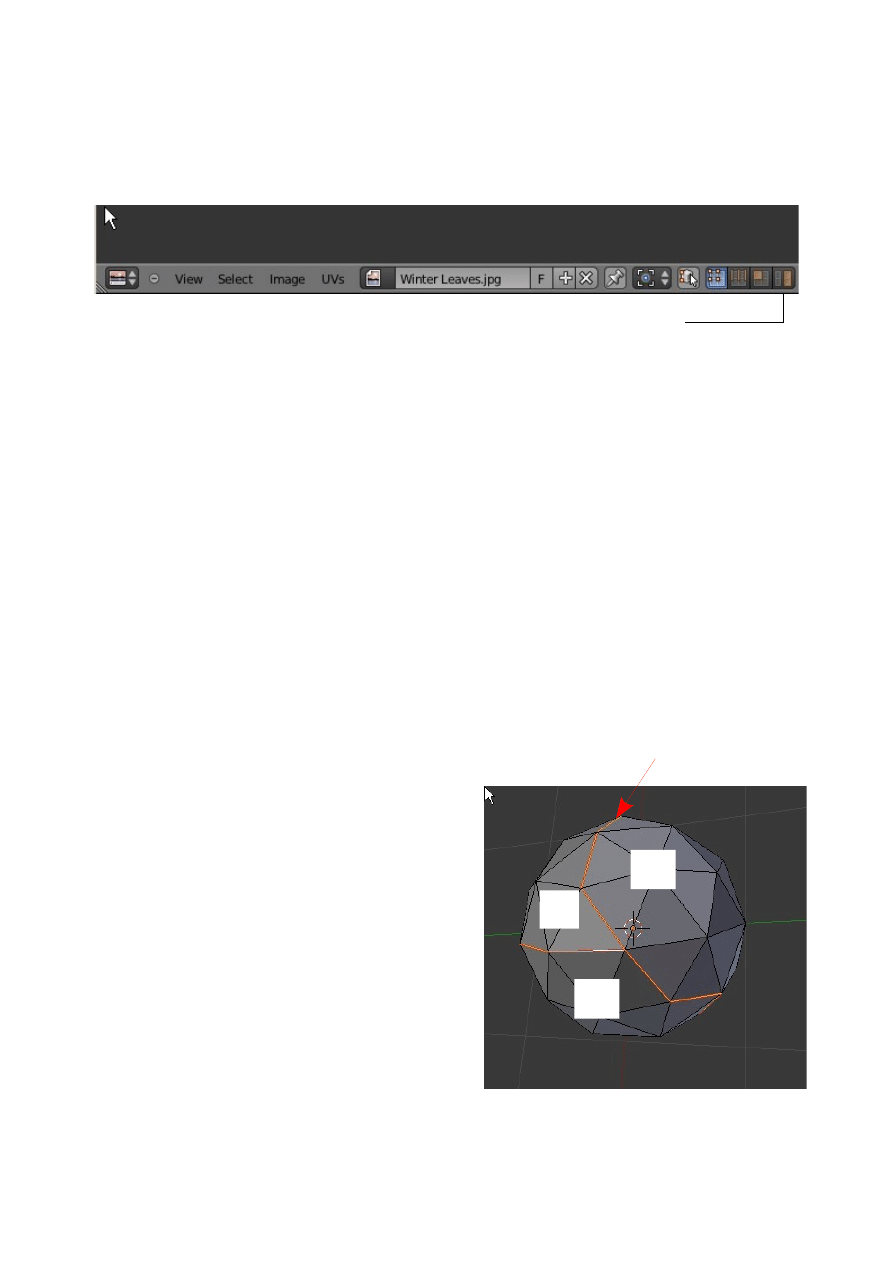
Note the face map in the UV/Image Editor is in Vertex Select mode. There are also
the options to select Edge and Face modes similar to the selections in Edit mode in
the 3D Window. There is also a fourth option which is 'Island Select' mode. Some
unwrapping operations seperate the face mesh into seperate parts and Island Select
allows selection of these parts.
By selecting different faces on the cube and adding different images to the UV/Image
Editor you can place the different image textures on the indavidual faces. You can
also shift select multiple faces or shift select edges or vertices to tell Blender which
part of an objects surface you want the image texture placed.
Let's go back and consider the mesh unwrapping. Pressing the Unwrap button gives
you different options. Again I will opt out of trying to explain what results these
unwrapping methods produce but a further method is available where you mark a
seam on the surface of the object which tells Blender how to unwrap that part of the
mesh on which you wish to place your texture.
Unwrapping Using Seams
In a new Blender Scene add an Isosphere. An Isosphere is chosen since by default it
comes with just enougth vertices for us simpiltons to play around with.
Set up the UV/Image Editor Window as we did previously.
In the 3d Window with the Isosphere selected
tab to edit mode then press A Key to deselect
all vertices. Change to Edge select mode and
shift select edges dividing the surface of the
sphere into three parts. It's best to zoom in on
the sphere and rotate the view while selecting
the edges. With the edges selected press 'Mark
Seam' in the tools Panel. The selected edges
will turn red showing that a seam has been
marked.
Island Select Mode
1
2
3
Seam
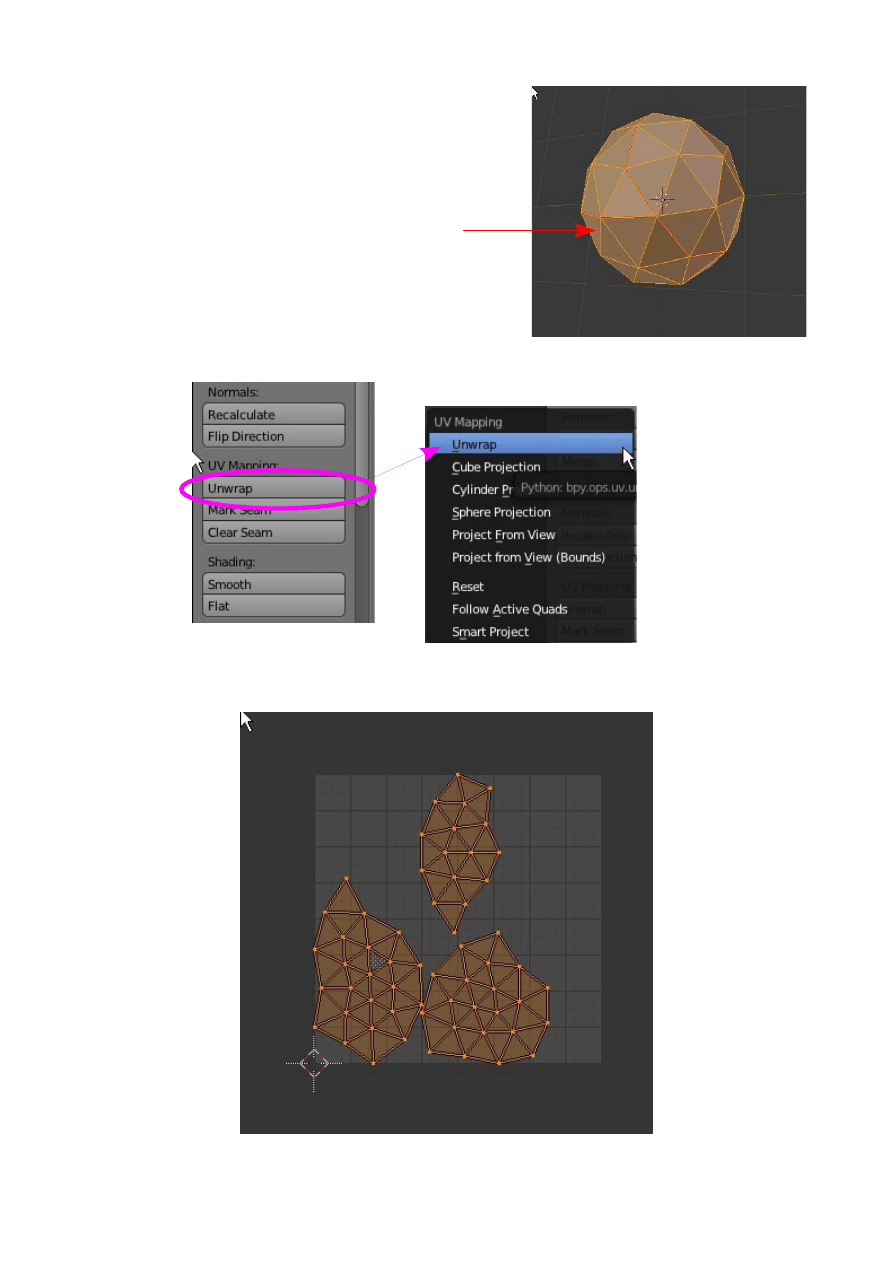
The next trick is to select all the edges of the faces
of the sphere not just the edges marked as the seam.
A Key to deselect the seam edges then A Key to
select all edges.
Having done, press 'Unwrwap' in the Tools Panel then in the drop down select
'Unwrap'.
The seperated parts of the spheres surface will be mapped in the UV/Image Editor.
All edges selected
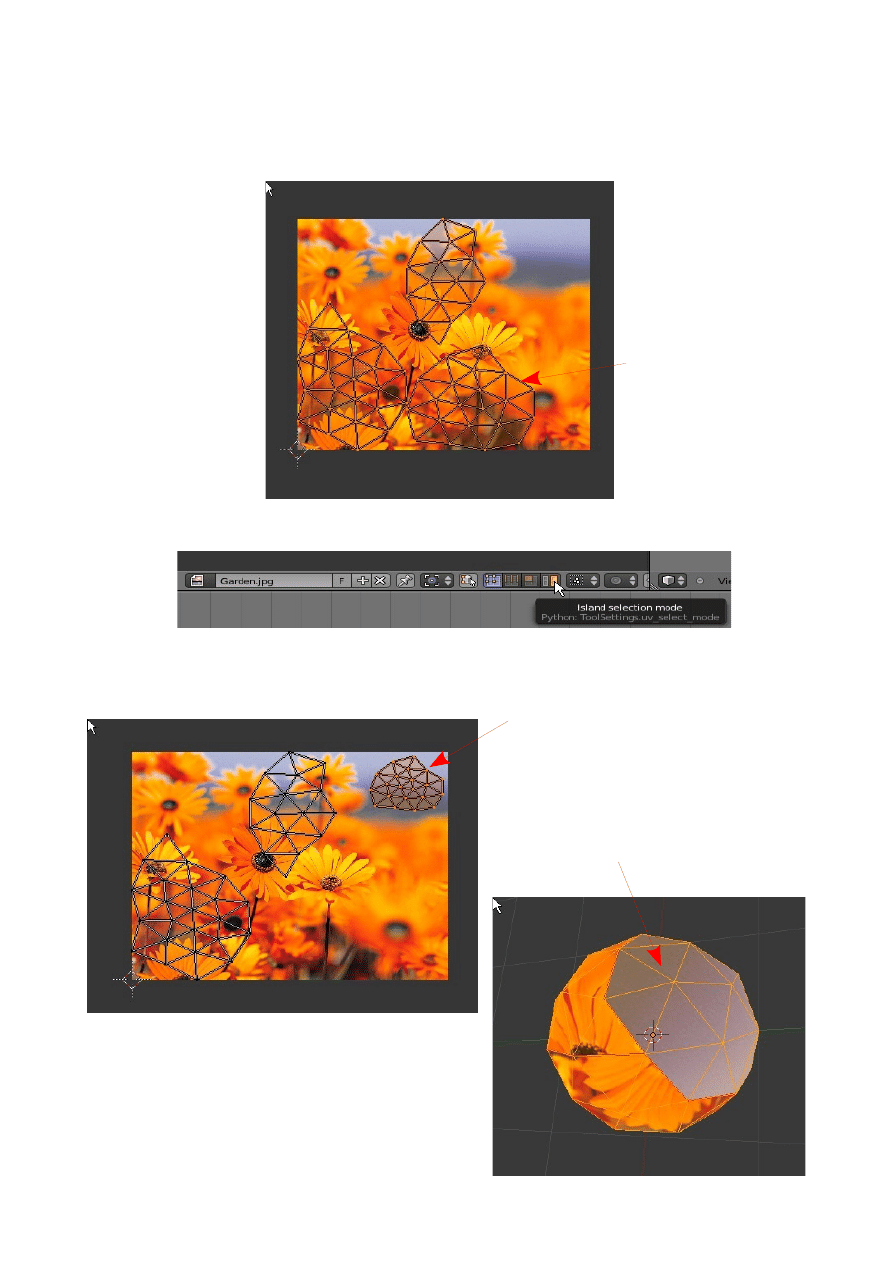
You can now go ahead and open an Image as a texture. In the 3D Window in Edit
mode with 'Textured' viwport shading you will see the image on the surface of the
sphere mapped to the three parts you set up with the seam.
In the UV/Image Editor select 'Island select' mode in the header.
This will allow you to select seperatly each of the three surface parts. With a part
selected you can manipulate it to position the texture on that part.
Island to be selected
Selected Island scaled down and
positioned over grey blue part of the
image.
Part 3 of the Sphere
Blue grey part of the image applied
as texture to Part 3 of the Sphere
This has been a very brief introduction to UV
Texture Mapping. The possibilities are endless
therefore it is over to you to experiment and
discover the capabilities of the procedure.
CH06- World Settings
01-World Settings
02-Mist
03-Stars
04-Texture as Background
05-Image as Background
06-Image as Template
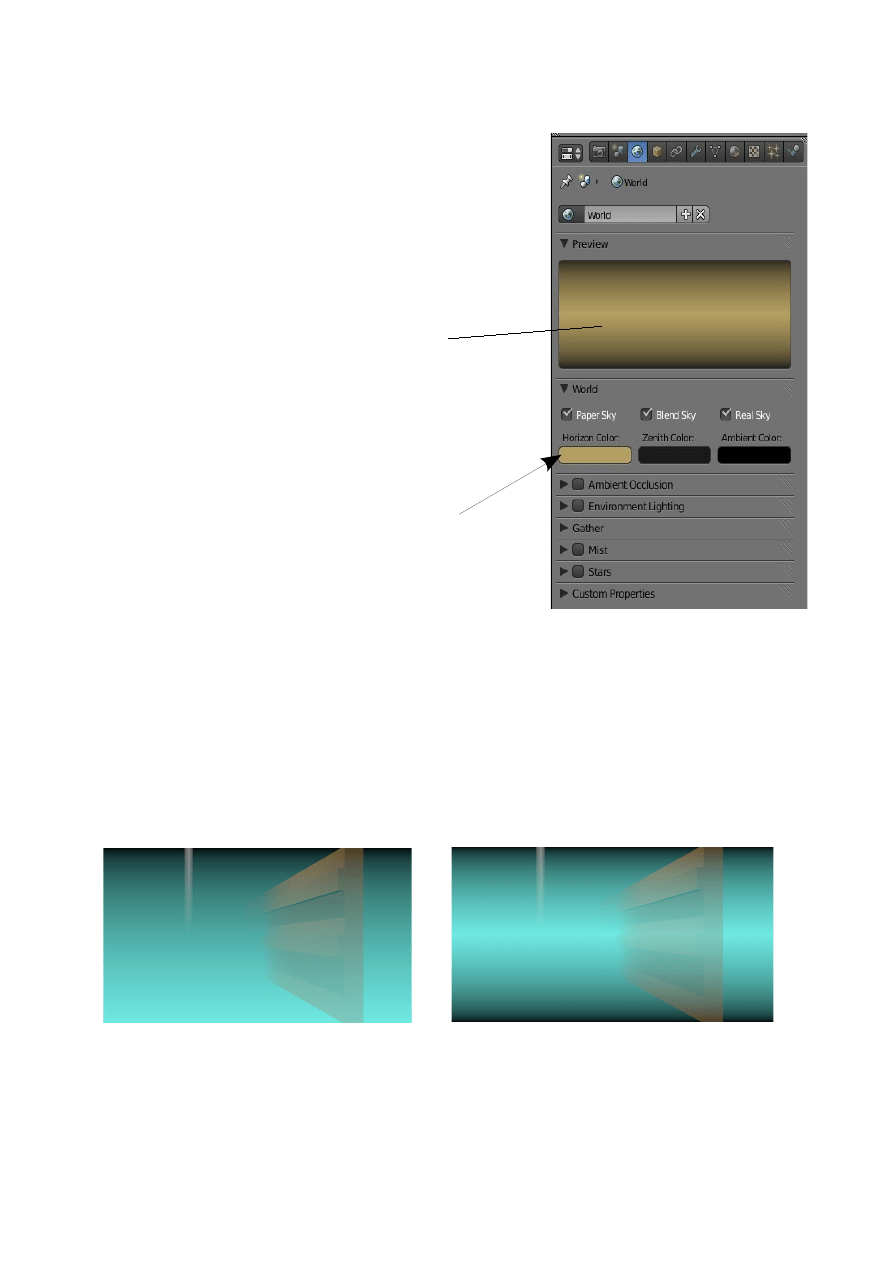
World Settings
The World Settings allow you to set background for
your scene. The default World setup is the dull grey
which displays when an image is rendered. The
background in the render is not the same as the
background in the 3D Window. The World button in
the Properties Window displays the settings tabs the
first one being a Preview panel.
You only see the gold background when you render an
image of your scene.
Click on the color bars in the World tab to display
color pickers for setting background color.
Horizon Color: Color at the horizon.
Zenith Color:
Color at the top of the scene.
Ambient Color: Provides an overall lighting effect. An object in the scene will
reflect this color regardless of its own Material Color.
Sky:
Paper, Blend, Real. These options provide combinations of
color gradient across the rendered image.
The examples of Sky background combinations shown have a Mist effect added.
Preview Panel showing Horizon Color
set to gold with a combination of
Paper Sky, Blend Sky and Real Sky
Paper Sky + Blend Sky
Paper + Blend + Real Sky
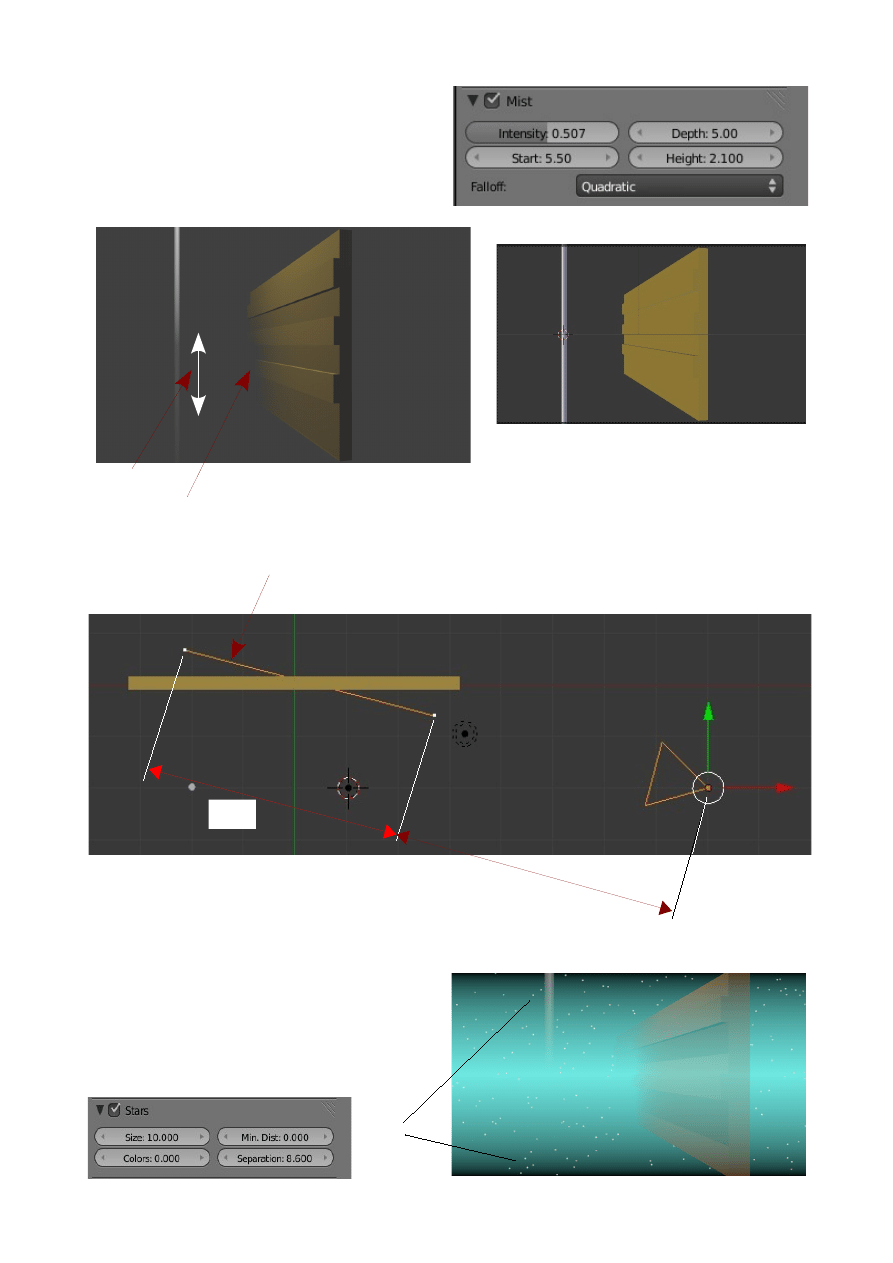
Mist
Mist settings allow you to introduce a mist
or fog effect to your scene
Start: Distance from the Camera where Mist starts.
Depth: Distance over which Mist increases from 0% to 100%
Height: height of the Mist.
Stars
The Stars tab allows you to introduce stars
to your background.
Rendered Image
Mist
3D Window Camera View
3D Window View
Camera set on Mid Pane
To see Mist Limits select the Camera - go to properties Window – Object Data button
In the Display tab click the Mist box.
Depth
Start
Mist Height
Stars
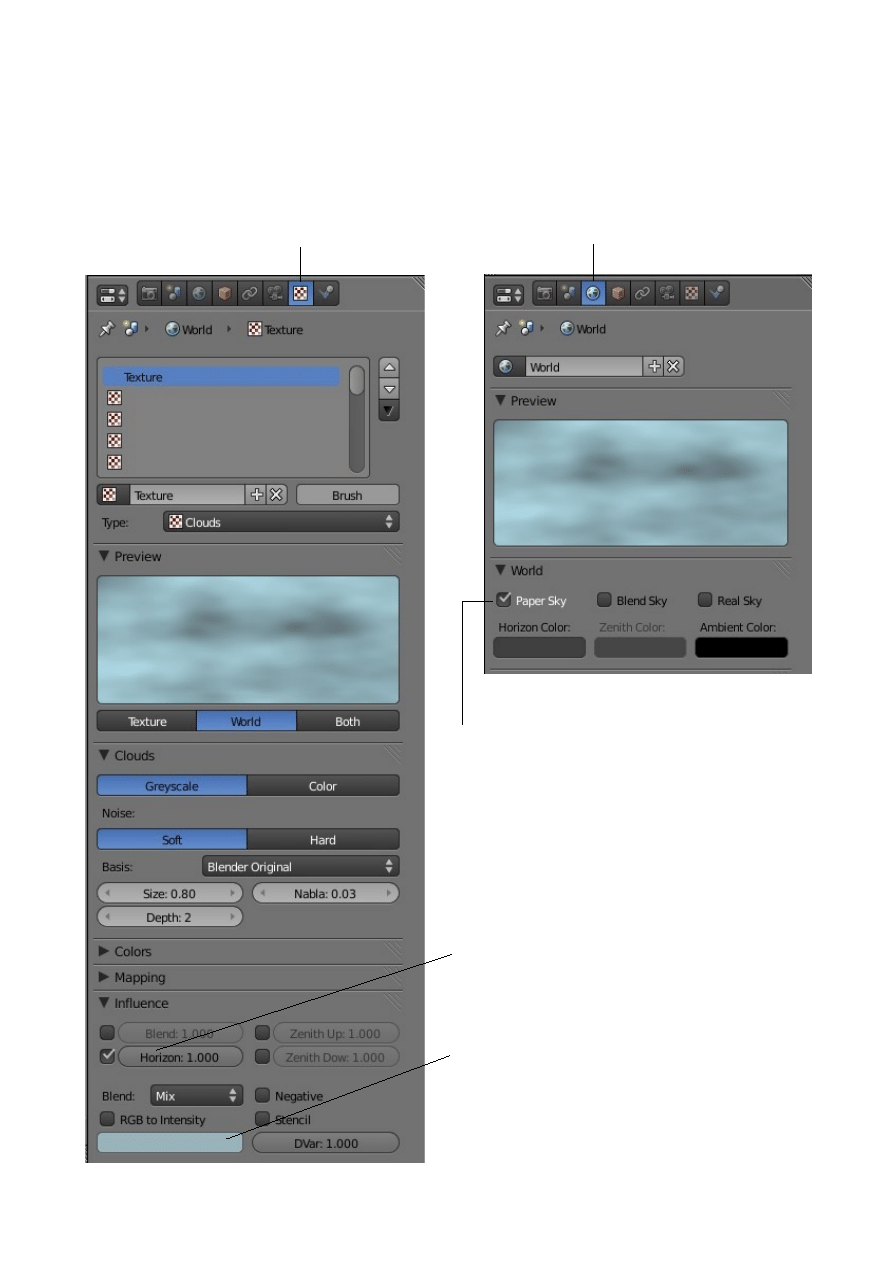
Texture as a Background.
You can use Blenders inbuilt Textures to create a Background. The following settings
create a cloud background by using Blenders Cloud Texture. Delete or deselect
objects in the 3D Window
Texture button
World button
Make sure Paper Sky is ticked
Horizon and Zenith colors Grey
Color bar set to Blue
Horizon ticked
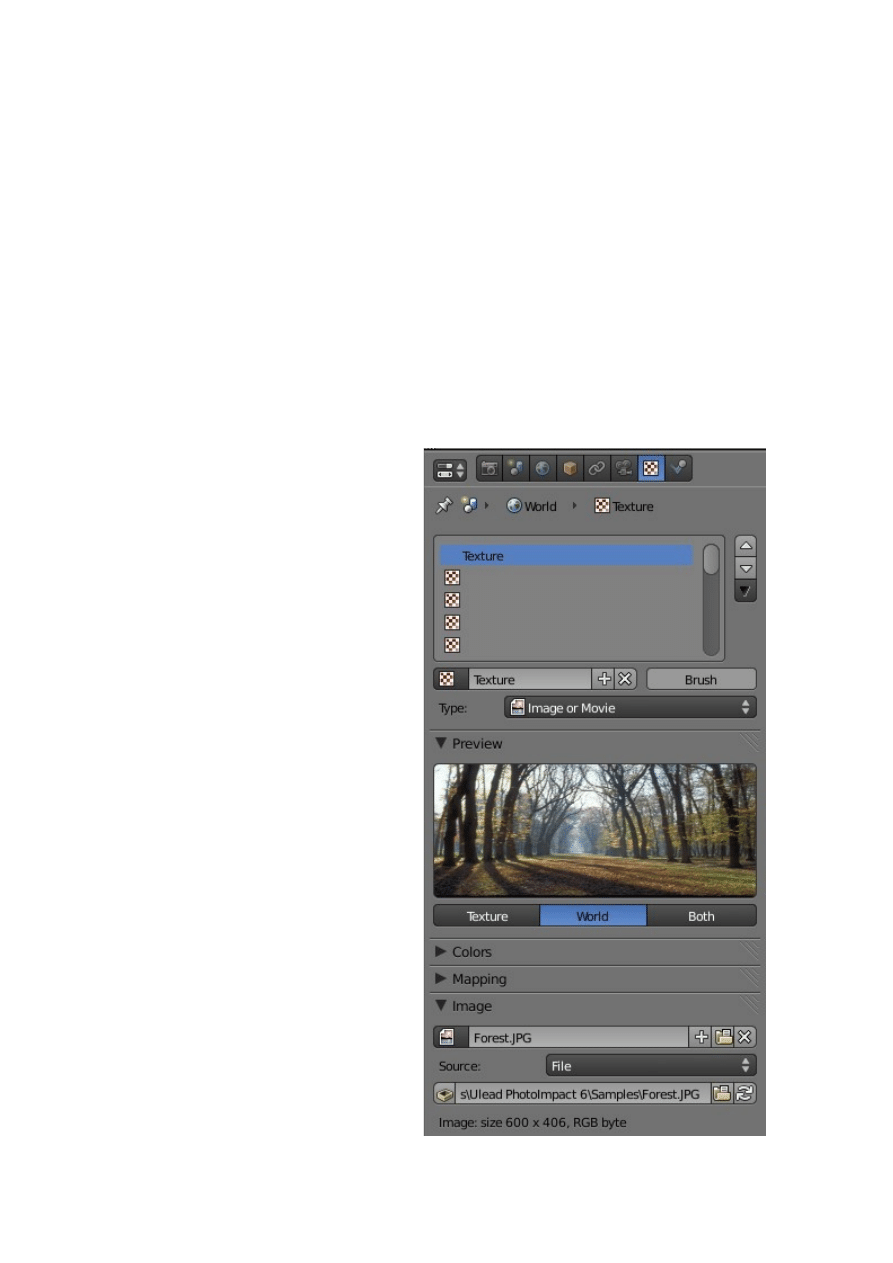
Image as a Background
You can use any image stored on your computer as a background.
Deselect objects in the scene.
In the Properties Window – World buttons – tick Paper Sky
In the Properties Window – Texture buttons – click 'New' to add a Texture.
Select Texture type : Image or Movie in the Image tab click Open then navigate
and select your Image.
In the Texture buttons – Influence tab click Horizon.
The Image will display as the background to your scene when you render.
Image renders as background to the scene.
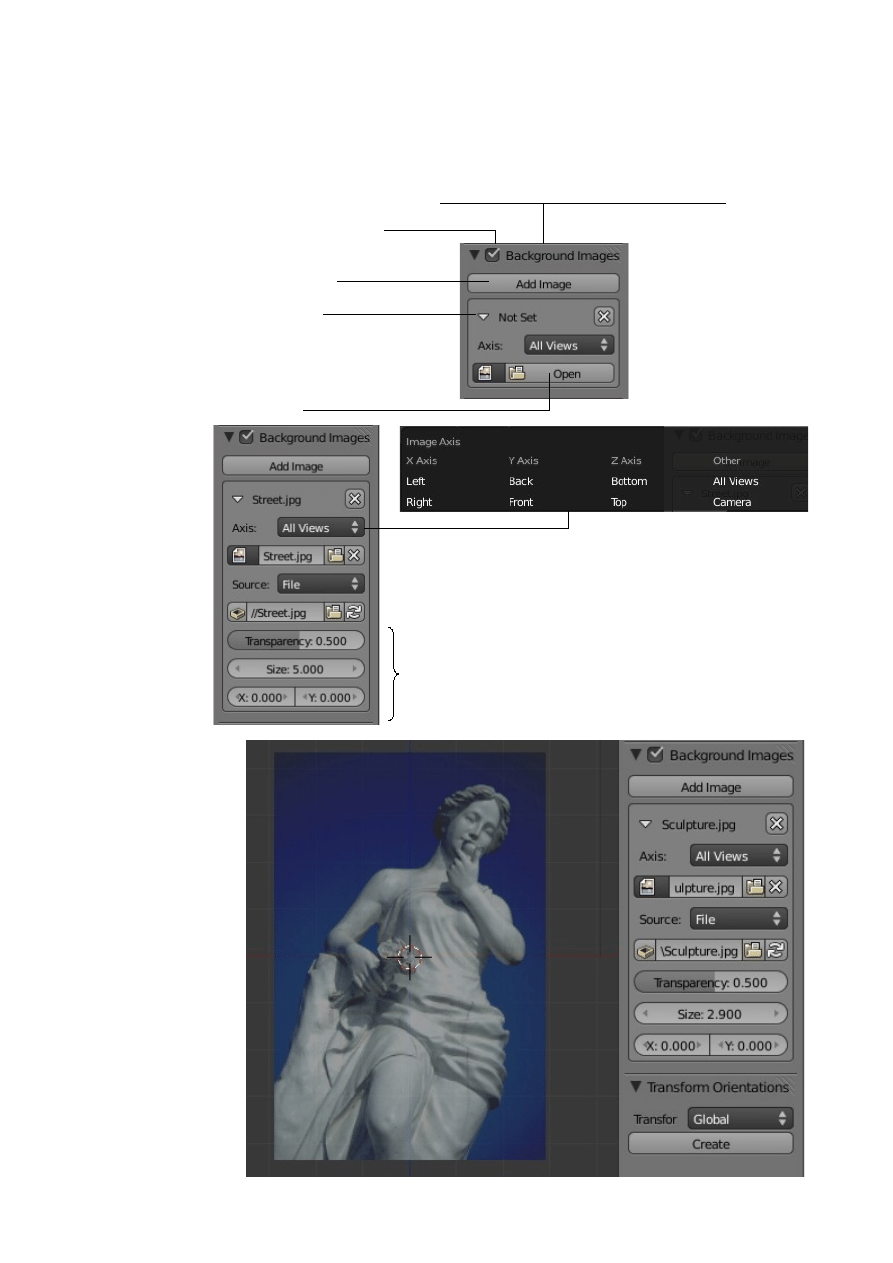
Using an Image as a Template
An image can be displayed in a scene as a template to aid in modeling
With the mouse cursor in the 3D Window press the N Key on the keyboard.
Tick Background Image
Click Add Image
Click Not Set
Click Open
Select Views for Displaying Image
Controls for adjusting Transparency Size
and Offset if Image in 3D View
Image in 3D View
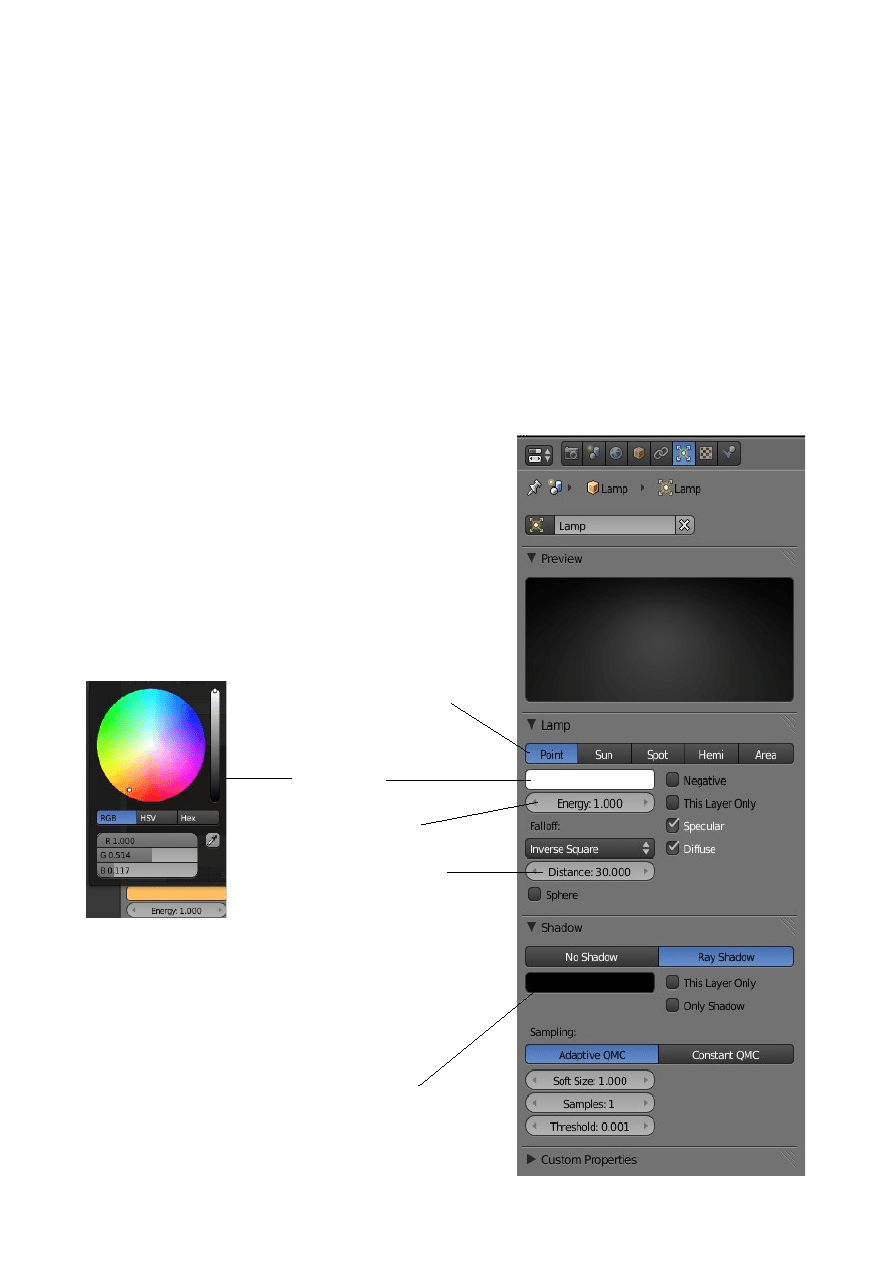
Lighting and Cameras
Lighting Types and Settings
The default scene in Blender starts with a Cube object, a Camera and a Lamp. What
the camera sees is what will render out as a picture or movie depending on what you
tell the program you want as a final output. To get a simple rendered view, press the
F12 Key. This will open a window that will display the rendered output of what the
camera is focused on. If the picture shows the Cube object as a black silhouette you
do not have a lamp or the lamp settings or placement is incorrect. To exit the render
window, press the Esc Key.
In most cases, you will need more than one lamp in order to properly illuminate your
scene. Be careful not to use too many lamps! Instead of adding too many lights,
experiment with the Distance and Energy settings.
Most scenes usually require 3-4 lamps.
Lamp Settings:
To create or add a lamp to the scene, position the
3D cursor in a desired location and press the Alt
+ A and select 'Lamp' from the drop down menu.
The lamp will be placed in the scene.
With the lamp selected go to the Properties
Window – Lamp button to display the setting
options. The options displayed vary depending on
what type of Lamp you select.
Lamp Type Selection
Light Color
Shadow Color
Brightness
How far the light shines
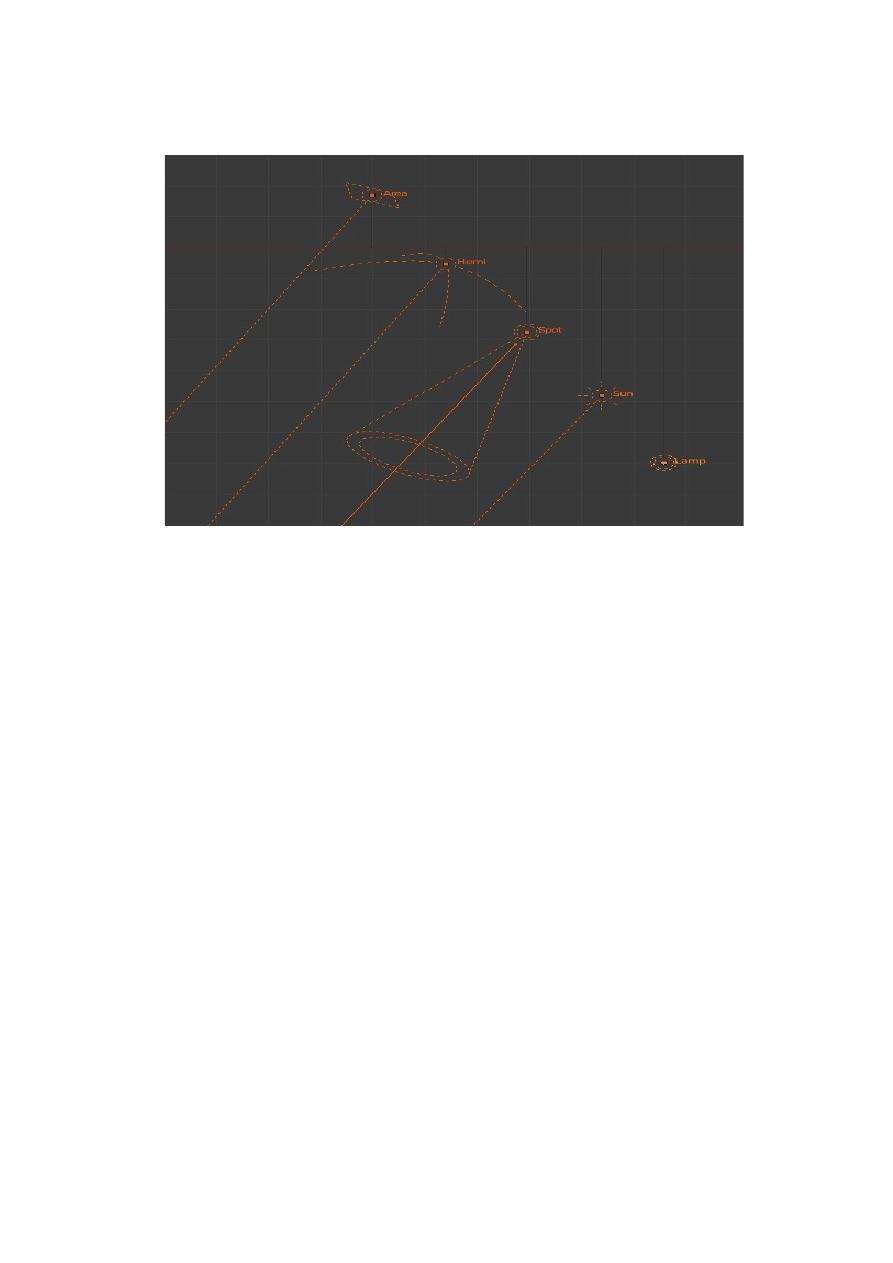
The diagrammatic representation of the Lamp in the 3D Window also varies
depending on the type.
If you decide that the Lamp you have selected is not correct for what you want to
achieve you can change the type in the Properties Window.
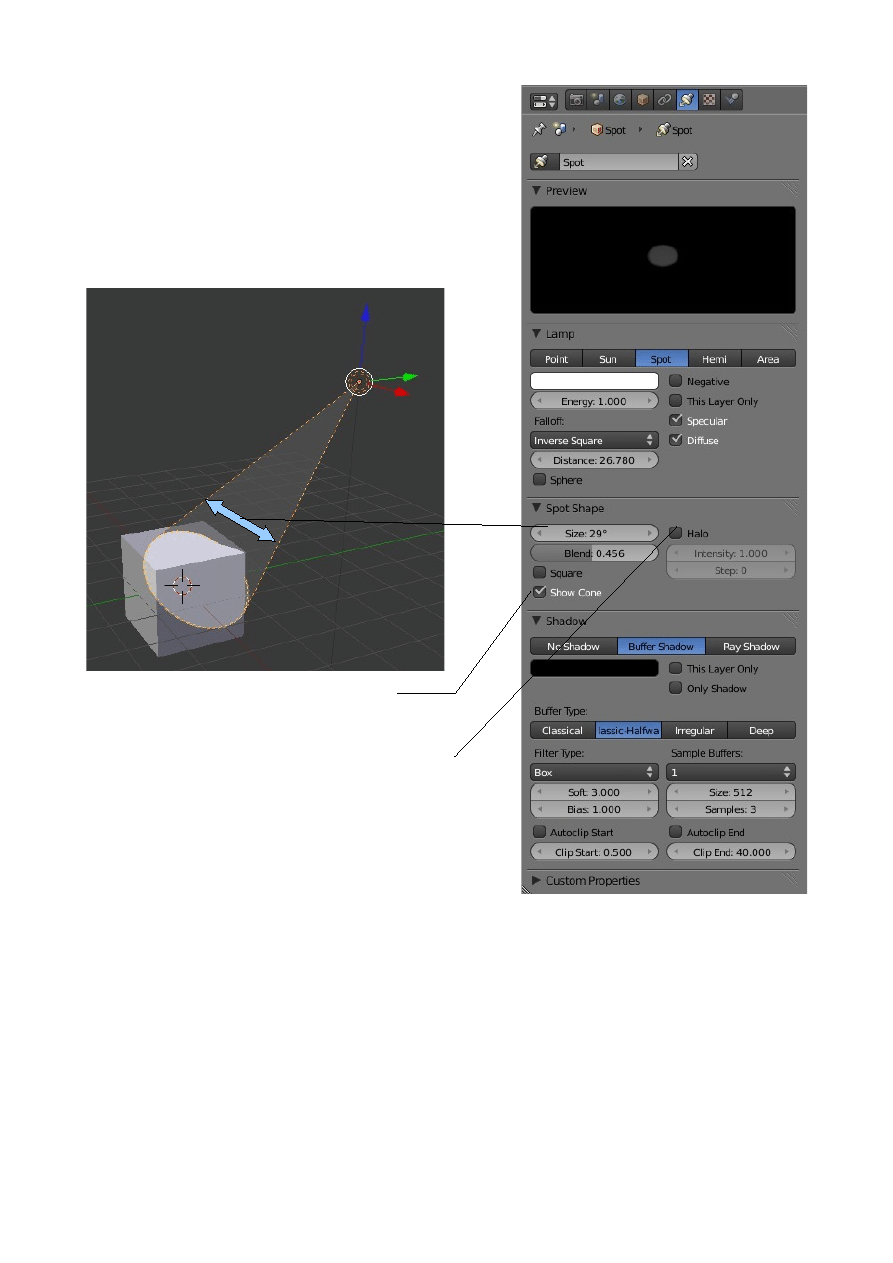
Spotlights are particularly useful in creating great
effects. As with all Lamps spotlights can be
scaled, rotated and positioned to cast shadows and
they can also be used with a halo effect giving a
simulation of a light shining through a fog.
With all lamps experiment with settings and record
results
Spotlight with Show Cone turned on
Tick for Halo Effect
With Halo on adjust Intensity for
smoky effect
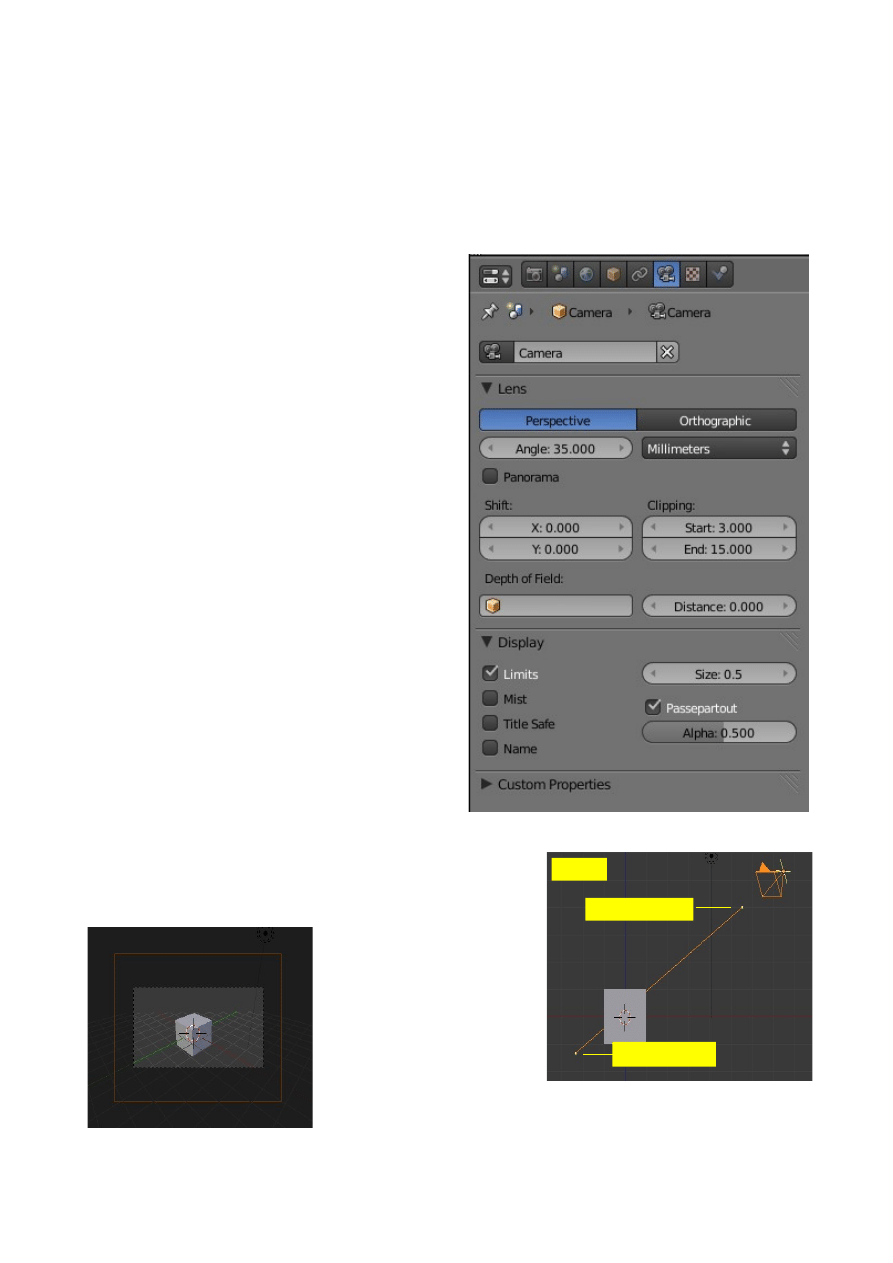
Cameras:
By default, your scene already has one camera and that is usually all you need, but on
occasion you may wish to add more cameras. You add more cameras by pressing 'Alt
+ A' like creating all other objects discussed up until now. Too change which camera
is active, you need to select that camera and press “Ctrl + Num Pad 0”.
Settings options :
Perspective Orthographic -
Used to set the camera from showing
a true-life perspective view to an
orthographic view.
Lens Angle -
Set-up a lens length much like a real camera.
35mm is a good, safe setting, but wide and
tight angle setting work for different needs.
Shift- Pushes the camera’s view in a direction,
without changing perspective.
Clipping Start -
How close an object can get to the camera
and still be seen.
Clipping End -
How far away objects can be seen by the
camera. In very large scenes, this needs to
be set higher or things “disappear” from
view.
Depth-of-Field-
Used with nodes to blur foreground and
background objects. Working with Nodes
This will be discussed in a later chapter.
Limits- Draws a line in the scene to help you
visualize the camera’s range
Mist - Show Mist
Used to give you a visual display of how far the camera sees if using Mist.
Title Safe-
Displays the inner dashed box to help with placement
of objects and text.
Name- With all objects, the name of the object or camera can
be displayed on the screen,
but this will display the name
in the camera view.
Size - How big to draw the
camera on the screen. You can
also control size with scale.
Passepartout- Shades the area on the screen outside of the
Cameras view
.
Alpha – Control the darkness of the shaded area with the slider
Limits
Clipping Start
Clipping End
CH09- Rendering
01-Render Settings
02-Rendering a JPEG Image
03-Creating a Video Clip
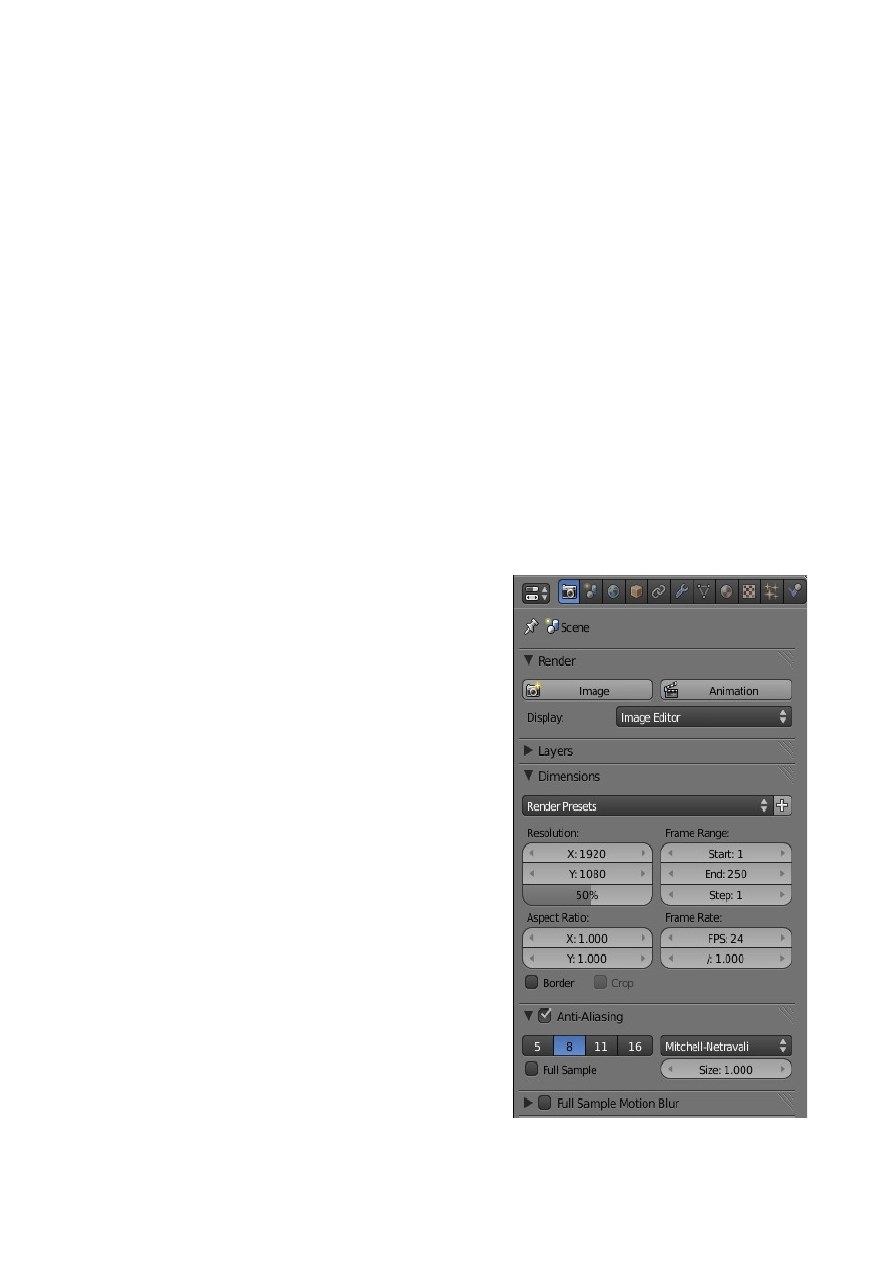
Render Settings
Basic
Setup Options:
The render window is where you tell Blender what you want as an output for your
scene. Do you want a JPEG picture image or a movie? What size do you want the
output to be? Do you want a high quality output or a draft style format? Do you want
shadows or Raytracing effects? How about motion Blur? If you’re doing a movie,
how many frames-per-second do you want the movie to run? Last, but not least,
where do you want to save the file? All of these issues are addressed in the Render
Buttons . Obviously, the higher the quality of the output, the slower it will render and
the larger the file size will be when finished.
The Rendering Settings:
There are many options that need to be addressed in order to save your work as an
image or movie. For now, we are just interested in saving basic images in JPEG (.jpg)
format and movies in the Windows (.mpg) movie format. Be aware that other options
exist and more are added every few releases.
The Render settings are found in the Properties Window – Render button.
Render:
Image- Renders an image the same as pressing F12.
Animation – Renders a movie or simple files of
your
animation. This can take considerable
time
depending on the animation size.
Display: Dropdown menu for render display options.
Dimensions:
Dropdown- Venue for Preset Rendering Sizes for
different output formats.
Resolution- Manual input of X and Y values for
rendering size instead of using presets.
Percentage- Slider for setting size of render display
in the 3D Window.
Frame Range- Set the start and end frame for render
Frame Rate- Animation playback rate.
25 FPS for PAL output 30 FPS for NTSC output.
Anti-Aliasing: Output quality settings. Normally set at 8
to give a nice output without loss of render time.
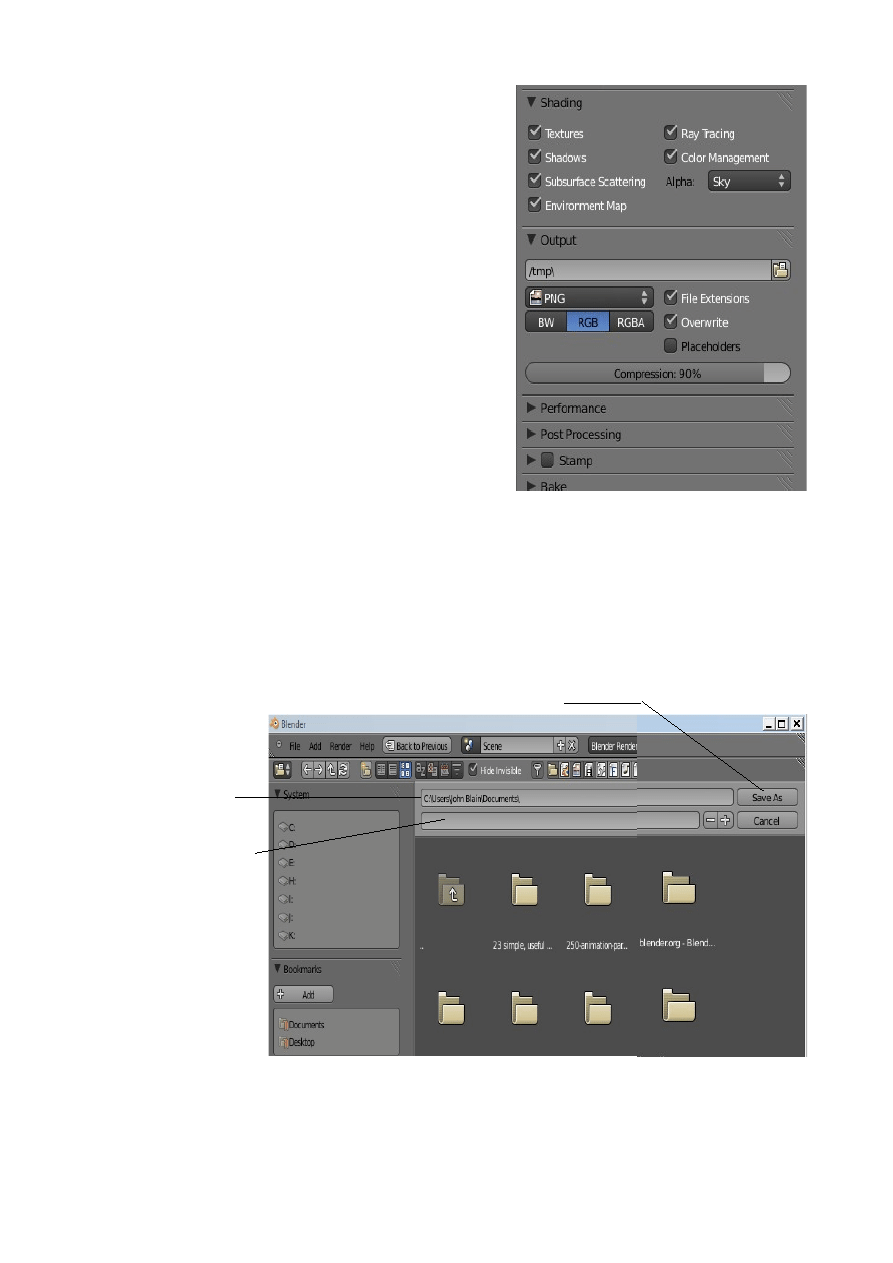
Shading:Settings that can be turned off to exclude
features from the render. The Alpha Sky drop
down gives options for the render background.
Output: The output bar allows you to set where you wish
your render to be saved. The default location is the
'tmp' folder. The file type dropdown menu
provides options for the type of file to be rendered.
The default file type is 'PNG'.
Rendering a JPEG Image
To render a simple JPEG image set all the options previously discussed. In fact the
default settings will do just fine except for the output file type in the Output tab of the
Properties Window. Change the default PNG to JPEG. With your scene created in the
3D Window press 'F12' or the 'Render Image' button. With the default settings the
Render Window will display. Press 'F3' to open the Save Window. In the Save
Window type in a file name for image, press 'Enter' then 'Save As'
In the Save Window you can navigate to a different folder for saving other than that
in the Output tab of the Properties Window. Note: If you forgot to change PNG to
JPEG it will not suffice to add a .jpeg extension to the file name. If you entered
'FileName.jpg' it will be saved as 'FileName.jpg.png' and remain a PNG file type.
File Path for Saving
Enter File Name Here

Creating a Video Clip
After you have created your scene with an animation sequence you will be ready to
make a movie file. A movie, weather it is a full length three hour feature or a short
thirty second television add is made up of a sequence of Clips (Movie Files) spliced
together to tell a story. The following steps are the basics for creating a file.
1.
In the Output tab select the file format from the format selection dropdown
menu. File formats for television are 'NTSC' for the US or 'PAL' for Europe
and Australia. You can also select 'AVI' for playing on your computer.
2.
Change the file type from the default 'PNG' to 'FFMPEG'
3.
Also in the Output tab set the path name to the location for saving the file.
4.
Make sure 'Anti-Aliasing' is ticked and that 8 is selected.
5.
Check that the 'Start' and 'End' frames of the animation are selected.
6.
Check the frame rate is correct. 30 for NTSC or 25 for PAL.
7.
In the Shading tab make sure Shadow and ray tracing are ticked.
8.
Finally press the 'Animation' button in the render tab.
The Video clip (Movie file) will take some time to compile depending on the length
of the animation. Each frame of the animation has to be rendered and saved.
Depending on the complexity of the scene a frame can take from a few seconds to
several minutes to render. To begin it is best to keep everything very basic and
simple. If you get to the stage where you have created a wonderful movie you can
send the animation files to a render farm on the Internet to have them rendered. It
saves you time but it costs you money.
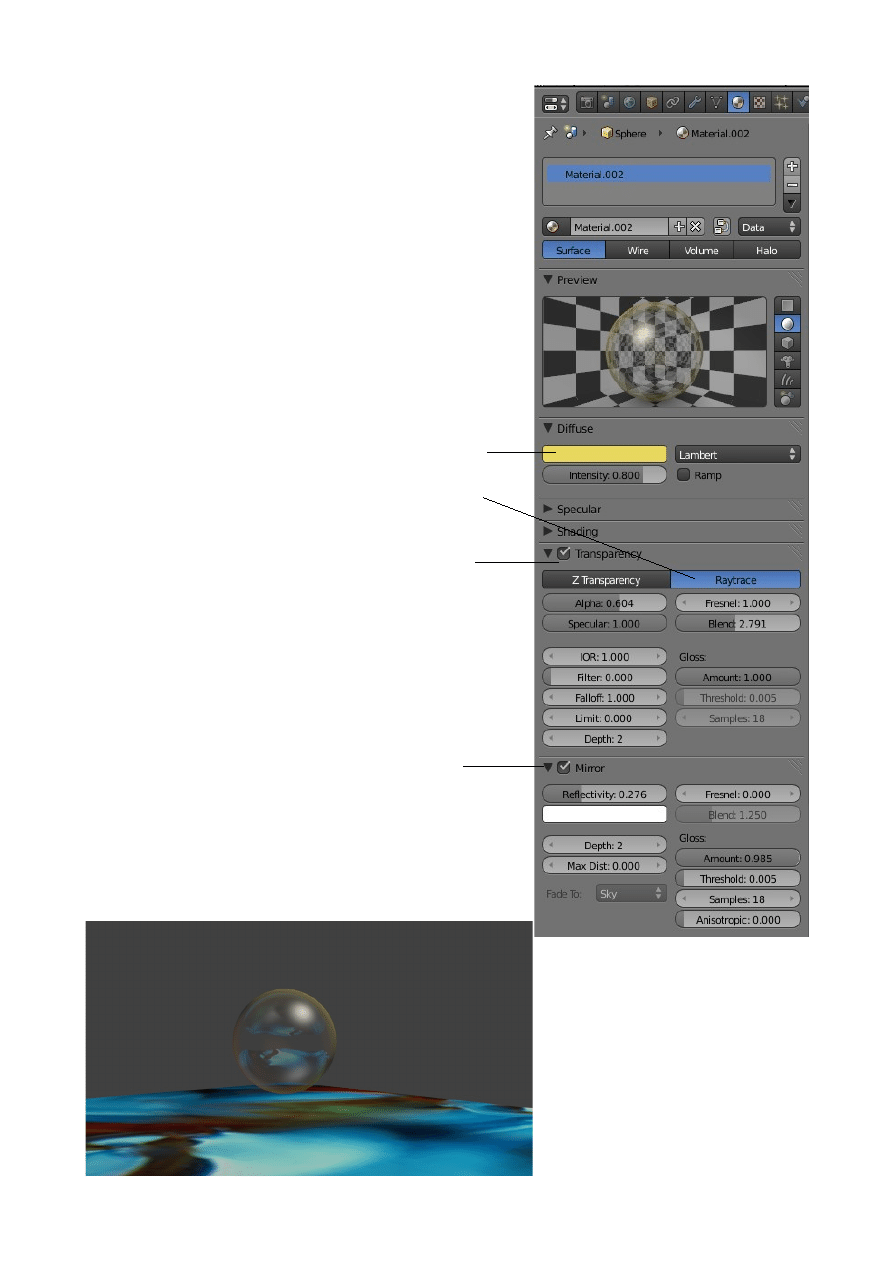
Raytracing
Raytracing is used to produce mirrored and
reflective surfaces. It is also used to create
transparency and refraction (bending of images
through transparent surfaces like a magnifying glass
or lens). Raytracing can create stunning effects but
can incur a high cost in render time. Use it
sparingly. Don't attempt to Raytrace everything. You
can get some great shadow and texture effects with
spotlight and material settings.
The image below has been created using the settings
shown in the Sphere's Properties Window – Material
buttons on the RHS.
A Sphere has been added to the scene positioned
above a Plane. The Plane has a Material and an
Image Texture added. The Sphere Materials button
settings are shown on the right.
With the settings as shown an image has been
rendered as shown below
Sphere Diffuse Color
Transparency with
Raytracing selected
Mirror Effect On
Raytracing Selected
CH11- Animation Basics
01-Animation Basics
02-Moving,Rotating & Scaling
03-Viewing Your Animation
04-Graph Editor Window
05-Editing The Curve
06-Curve Types
07-Constant Extrapolation
08-Curve Modifying
09-Automatic Keyframing
10-Animating Other Features
11-Keying Sets
12-Wind Strength Animation

Animation Basic:
Now that we know how to make stuff and make it look good, it is time to figure out
how to move it around in your scene. This is a big section with lots of things we can
do and talk about. Many of the features will become understandable with practice and
will then allow you to progress beyond the basics. This is a highly developed section
and new features are being added all the time so it is inevitable that before this
document is printed new features will be available. Such is the nature of Blender and
consequently we will deal only with the basics.
To begin go back and read the section on Rendering .
Next consider what an animation is. In Blender we are talking about a method of
making something appear to move on a computer screen which may later be
transformed into a movie file. This is accomplished by creating a series of still
images each one slightly different to the next which when displayed one after the
other in quick succession create the allusion of movement. Each still image is a single
frame of the animation. Each frame (image) is rendered which means the data you
enter in the Blender program is correlated and turned into the digital image. This is
usually in a JPEG format. Finally all the images are compiled into one movie file.
After you set up your scene with the object that you wish to animate ( The Actor )
consider what the actor is required to do and how long it should take to do it. Also
consider what format you will use in the final render. The render format determines
how many Frames Per Second the animation should run at ( NTSC – US 30 fps,
PAL- Australia 25 fps ). One of the problems that beginner animators experience is
making the motions occur in an appropriate time. Remember to look at the frames per
second and relate it to time. For example if you want a movement to take 3 seconds
and you are running at 25 frames per second then the animation has to happen in 75
frames.
In Blender 2.50+ the animation method could be considered as being in two stages.
The first stage is to set up what you want your actor to do in a given time such as
move, change size or rotate. The second stage is to set up how your actor behaves
during the process of moving, changing size or rotating. The first stage is
accomplished by inserting Keyframes in the animation. Keyframes are exactly what
the name implies that is they are Key Frames. Think of a 10 second animation which
when running at 25 frames per second would consist of 250 frames. If you want your
actor to go from point A to point B and then to point C within the 250 frame
animation you first insert a Keyframe at point A. This is giving Blender data which
says at the frame nominated locate the actor at position A. Then at the next frame
nominated locate the actor at position B and so forth for position C. These are the
Keyframes for the animation.
The Keyframes will also include the data for scaling and rotating the actor as well as

other features. This may be stating the obvious but it is important to understand the
concept.
Moving, Rotating and Scaling:
Moving, Rotating and Scaling along with other features are accomplished by what is
termed applying modifiers to the actor. Moving, Rotating and scaling are the three
basic modifiers to use in an object animation. When you create keyframes in Blender
with these modifiers, that is tell Blender where and how to display the actor at
specific frames in the animation, Blender will figure out all the data for the location,
scale and rotation at the in between frames.
Figuring the in between data is called Interpolation.
By default Blender uses what is called Bezier type interpolation which gives a nice
acceleration and deceleration between keyframes but Constant and Linear type
interpolation may be selected if appropriate. Selection of interpolation types will be
discussed later in this section.
Using the term Bezier to describe interpolation is an anomaly. Bezier actually
describes a type of line. A Bezier line or curve in Blender is a line which has control
points on it which allows the shape of the line to be altered or edited. In Blender the
control points are located at the position of the keyframes. Interpolation or the
figuring out of in between frames is done according to a mathematical formula which
determines the shape of the line. When the data for the frames in the animation is
drawn as a line on a graph the line conforms to that mathematical formula. The shape
of the line drawn is much like a sine curve therefore the Interpolation could be
considered as being type sine.
For the moment we will accept the default bezier type interpolation and demonstrate
the insertion of keyframes and the creation of a simple animation.
We will use the default Blender screen with the 3D Window containing the default
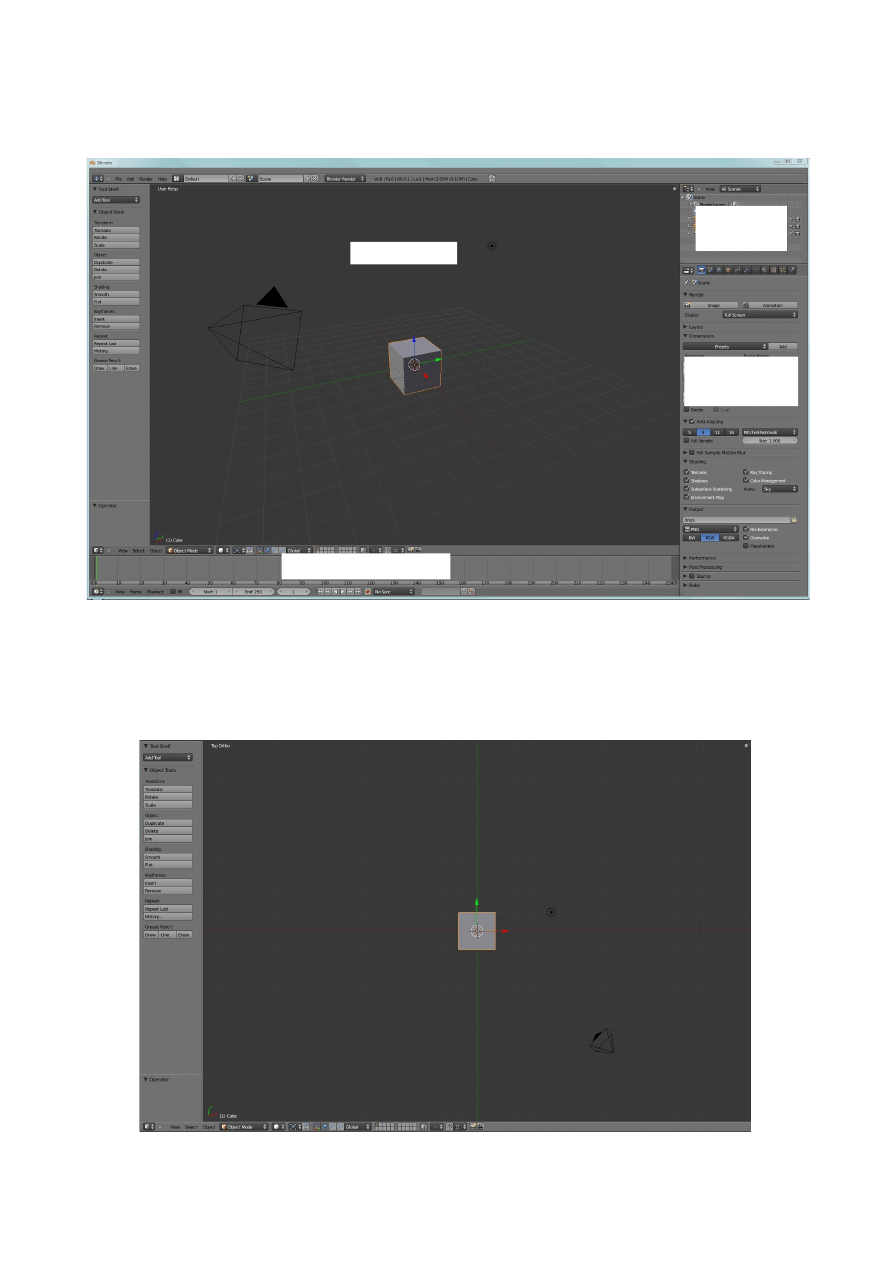
Cube object as the actor. The default screen also displays the Outliner Window and
Properties Window at the right hand side of the screen and the Timeline Window
across the bottom.
To set up our animation first change the 3D Window to top view with orthographic
projection ( With the cursor in the 3D Window – 7 Num Pad key – 5 Num Pad key ).
This just keeps the view simple so we can see where we are going.
The first step in an animation is to decide what you want your actor to do in a given
3D WINDOW
TIMELINE WINDOW
PROPERTIES
WINDOW
OUTLINER
WINDOW
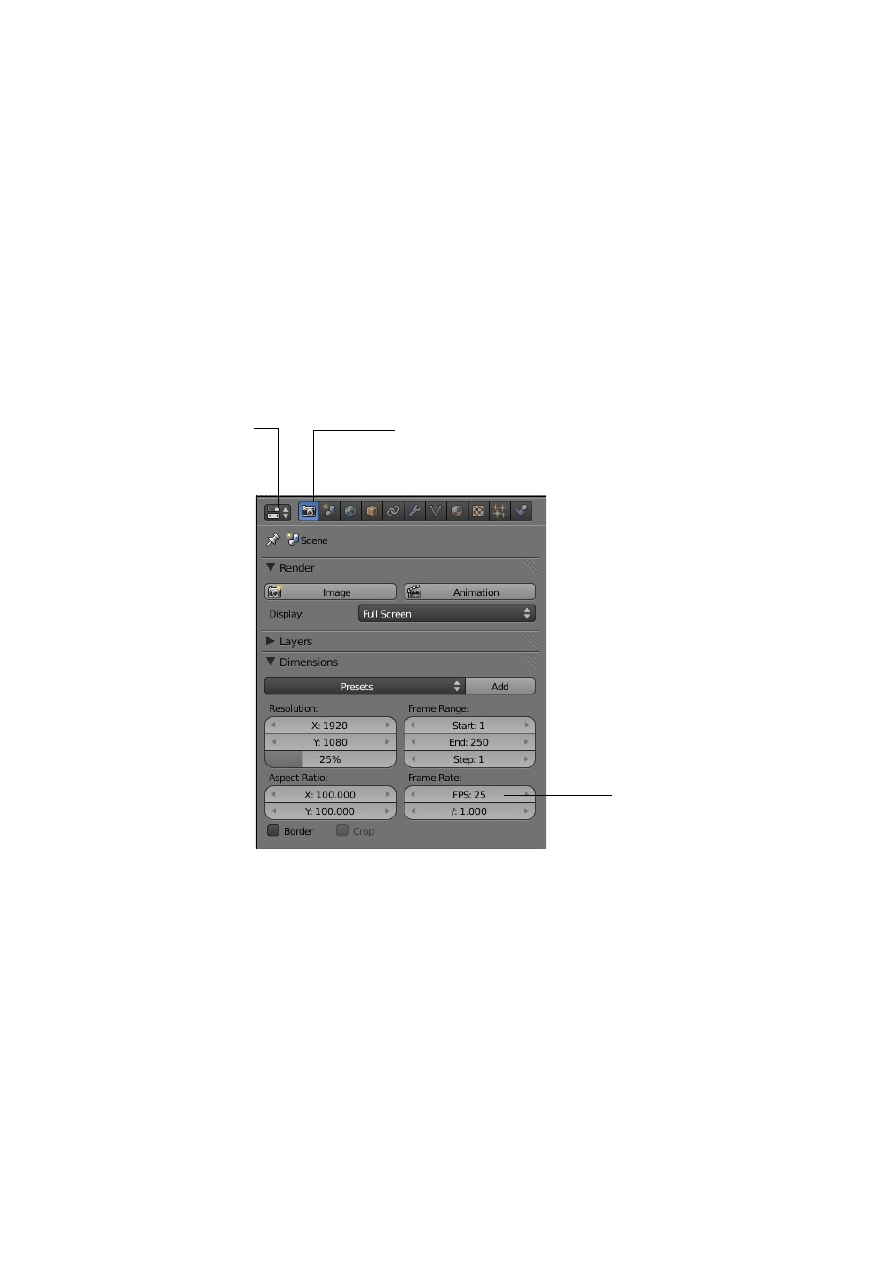
time. In this case the actor is the cube object.
How long it takes your actor to do something will depend on how many frames per
second your animation is run at and this is determined by what format your final
render will be in.
Let's set our animation to run at 25 frames per second which would be good for PAL
format ( Go to: Properties Window – Render button – Dimensions tab – Frame rate ).
Note the Frame Range settings: Start:1 , End: 250. This says that our animation will
begin at frame 1 and end at frame 250. Running at the rate of 25 frames per second
will give an animation time of 10 seconds. If you think about it, 10 seconds is quite a
long time for a single action to take place in a video clip.
To make things relatively simple we will only make our actor ( The Cube ) move in a
straight line across the screen along the X axis and at the same time increase in size.
Make sure the cube is selected in the 3D Window.
We will now insert keyframes, only two to start with, just to keep it simple.
Properties Window
Render Button
Frames Per Second
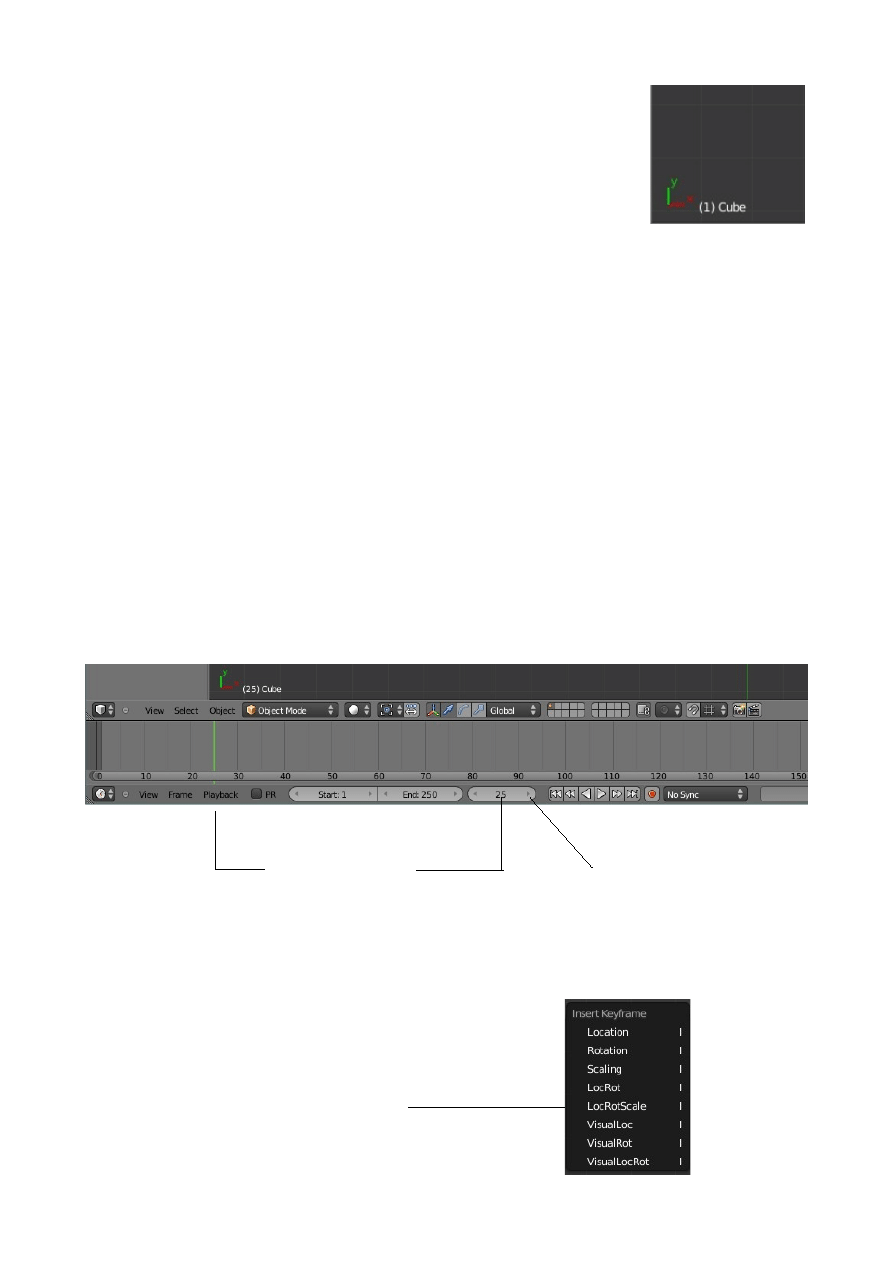
The default scene is set at frame 1. In the lower left hand corner
of the window you will see (1)Cube in white lettering. This says
you have the Cube selected at frame 1. Obvious?! If you had ten
objects in the scene all of which were actors with maybe some
hidden, it would be nice to know what was selected .
Before we insert a keyframe change to frame 25. Go to the Timeline Window at the
bottom of the screen. In the header you will see buttons with Start:1, End:250 then
1. This shows the start frame and end frame that we previously set for the animation
and the current frame of the animation. Above the header with these buttons you will
see a scale going from 0 to 250 ( The length of the animation in frames ). At the 0
point you will see a vertical green line showing that you are at frame 1. Click on the
green line with LMB and drag the line across to frame 25. Note the number change
next to Cube at the lower LH side of the window and in the header bar of the
Timeline Window. Another way to change the frame is to click on the little arrows
either side of the 1 in the timeline header or click on the button with the 1 and drag
the cursor to the right or click on the 1, hit delete and retype the required frame
number. “There is always more ways than one to skin a cat”.
Now you are at frame 25, with the cursor in the 3D Window press the 'I' Key. In the
selection list that displays select (click on) 'LocRotScale' which covers us for
moving, rotating and changing the size of the object.
Located at frame 25
Click to change frame
LocRotScale
Selection List
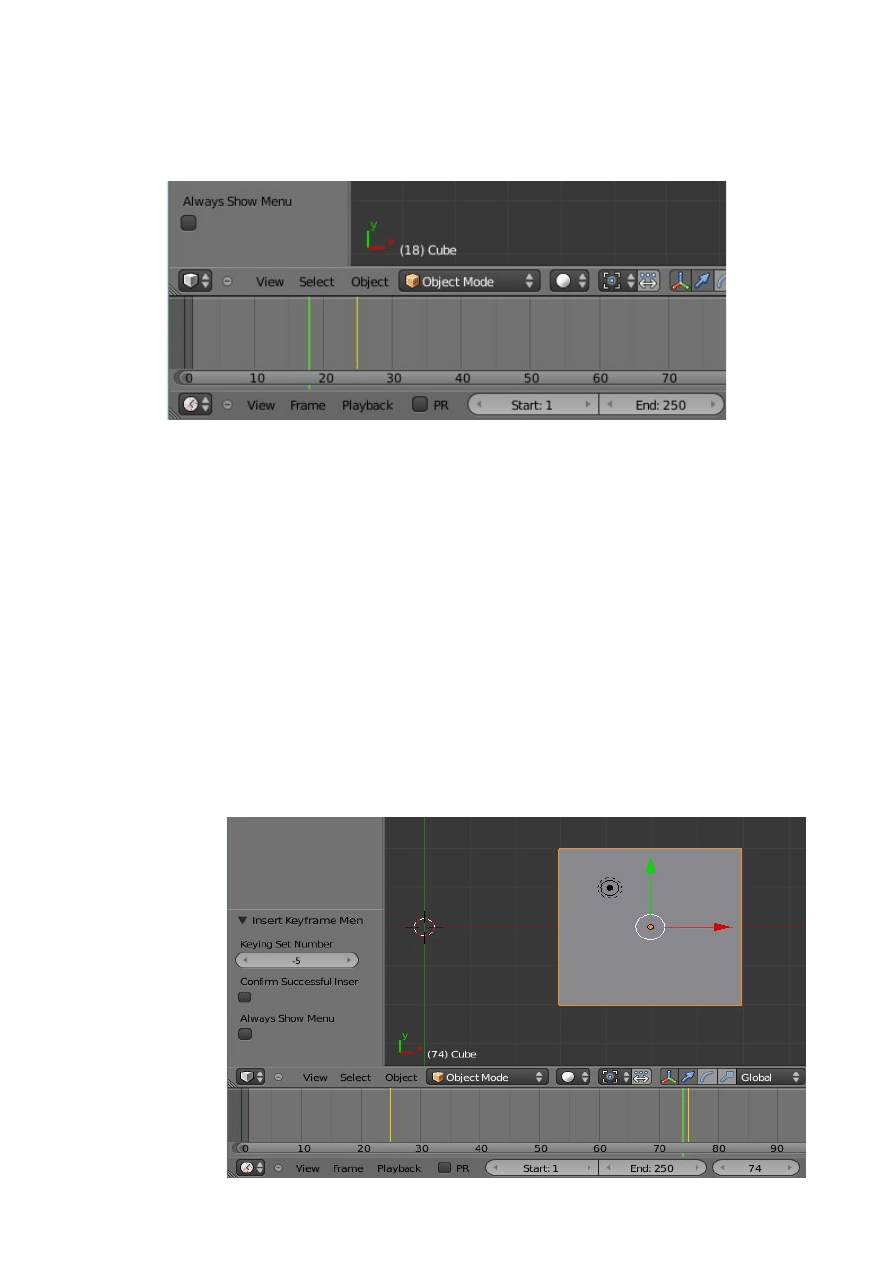
You have just inserted a keyframe. At this stage the only way to see this is to click on
the green line in the timeline window and drag it away from frame 25. By doing this
you will see a vertical yellow line at frame 25. This indicates a keyframe.
So far we have only inserted one keyframe, our actor hasn't done anything as yet.
This is like pulling the curtains on a stage play and the actor just stands there doing
and saying nothing for the first second (A pregnant pause ). Going from frame 1 to
frame 25 at 25 frames per second equals 1 second. Clicking and dragging the green
line in the timeline is called scrubbing the animation and is actually manually
playing the animation but since we haven't told our actor to do anything nothing
happens.
Continue by changing to frame 75 (drag the green line ). In the 3D Window grab and
move the cube 5 blender units to the right and scale it up to twice its original size.
With the cursor in the 3D Window press the I key and select 'LocRotScale' again to
insert a second keyframe.
If you move the green line in the timeline window you will see another yellow
keyframe line.
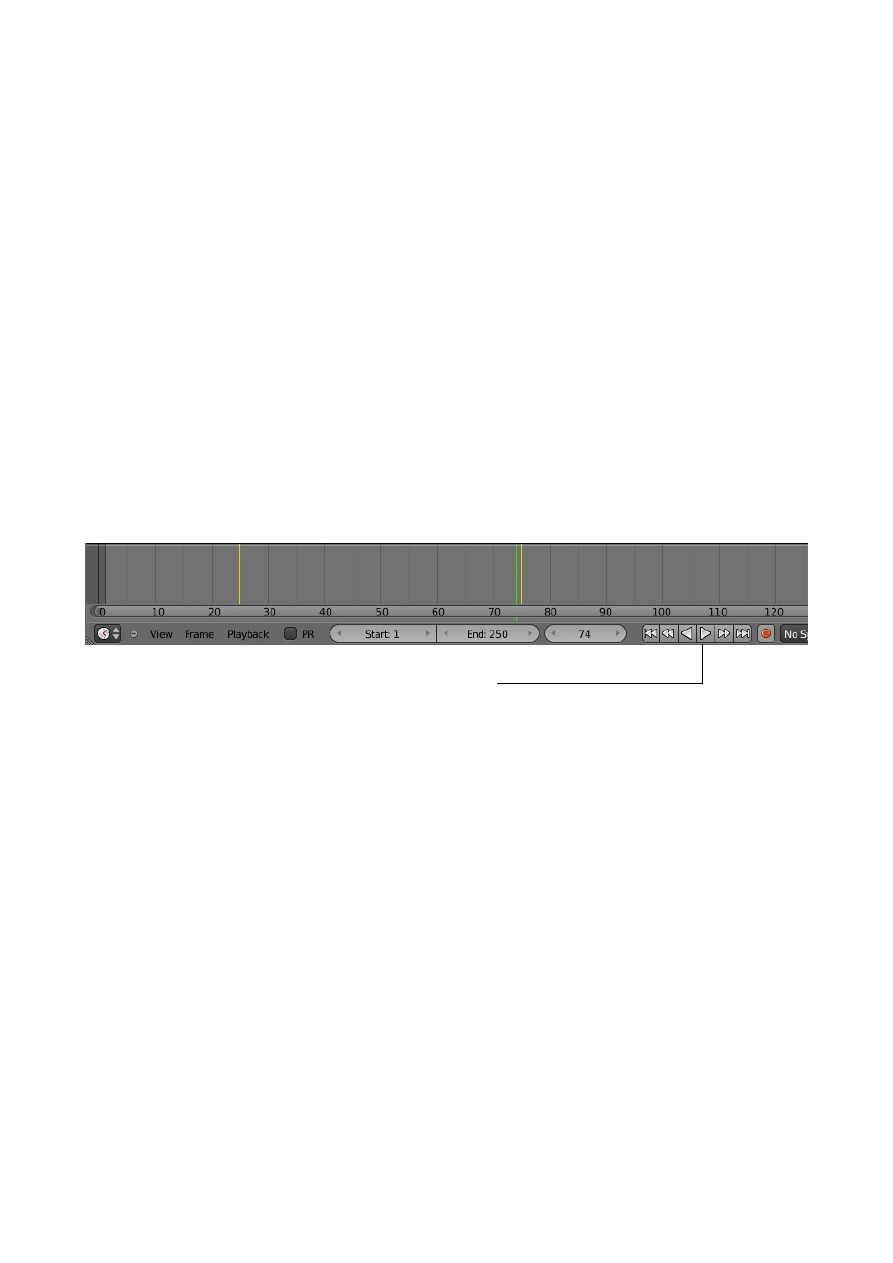
If you continue moving the green line between frame 25 and 75 you will see the cube
move and change in size. You are scrubbing or manually playing the animation. Note
the action only takes place between frames 25 and 75, the location of our keyframes.
Either side of the keyframes no action takes place.
Viewing Your Animation:
To actually play a preview of the animation move the green line in the timeline to
frame 1 then press 'Alt+A' with the curser in the 3D Window. Say “o n e t h o u s a n
d” to yourself slowly ( counting one second, while the green line in the timeline
moves across to frame 25 ) and you will see the cube move and increase in size. At
frame 75 it stops moving and changing size. The green line in the timeline continues
on to frame 250 then jumps back to frame 1 and the preview of the animation plays
again. Press 'Esc' to stop playing.
Another way to skin this cat is to press the play buttons in the timeline window.
These buttons are much like the play buttons an any video or audio player.
You can add more keyframes to your animation to move scale and rotate your actor
around the screen. For the most part, location and size keys work flawlessly but care
needs to be taken with rotation keys. If you try to rotate an object too far in one set of
keys the object may not rotate in the direction you want it to and it may rotate oddly.
Try small angular movements between keys while rotating. There are ways to control
this better and tools to simplify the process which will be discussed later.
Besides rotation, the movement of your actor may not be exactly as planned. Blender
automatically defaults to trying to create a smooth flow through the keyframes
( Interpolates ).
Working With The Graph Editor Window:
The Graph Editor Window displays the actions of your actor and your keyframes on
the timeline in a graphical form and allows refinement and modification of the
animation.
Play Buttons
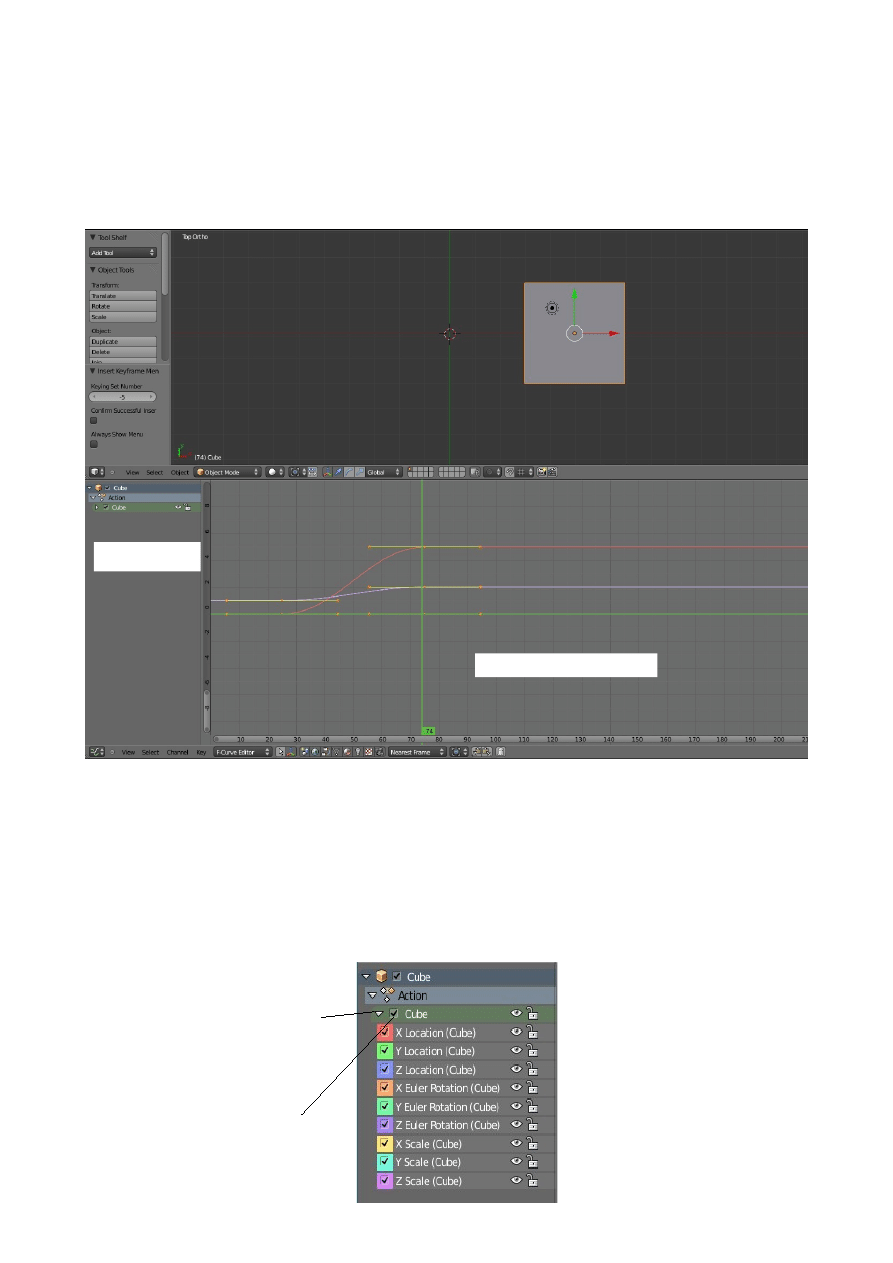
Split the 3D Window vertically and change the lower section to the Graph Editor
Window. You will now see a window with two panels. The left hand panel is called
the Dope Sheet and the right hand panel is the Graphical Display of your animation.
Even for our simple animation there is a whole bunch of graph lines shown.
To make sense of this first consider the Dope Sheet. Click on the little black tick
arrow in front of 'Cube'. Either of the ticks above and below the word 'Action' will do
the same thing at this stage, that is toggle the graphical display on and off. Now click
on the little white arrow in the lower green Cube bar. Clicking here opens up the
display and reveals a list of 'Action Channels' relating to the Cube actor. Clicking the
tick in the colored boxes in each channel toggles on/off the display of that particular
channel in Graphical Display.
DOPE SHEET
GRAPHICAL DISPLAY
Click to Toggle on/off
Expand/Collapse Display
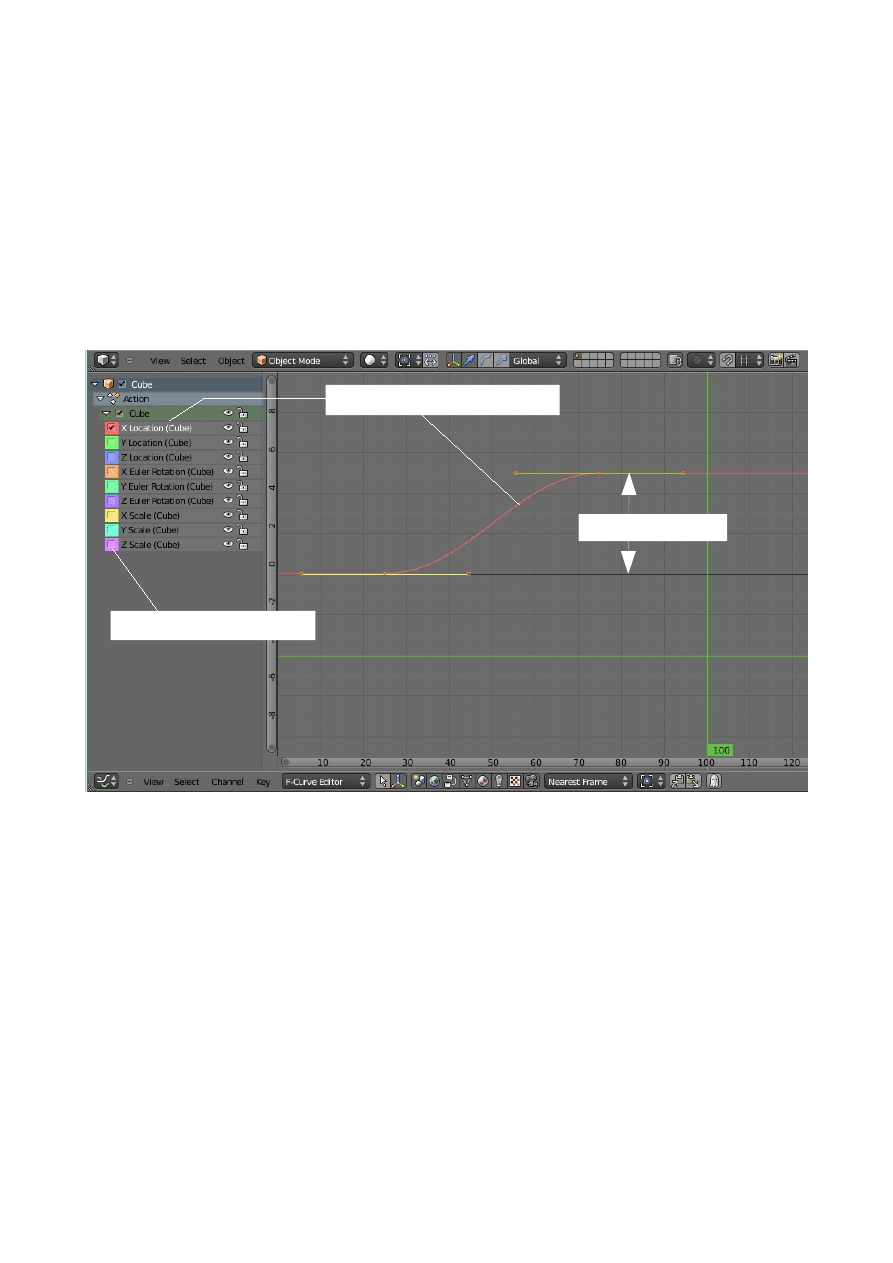
Lets discover what we actually have in the Graphical Display. Click on the tick,
removing it, in each colored box in the dope sheet channels except for the first X
Location(Cube) channel. Now click on X Location (Cube) which selects that
channel ( Highlights the channel in white ). You now see only one graph in the
Graphical Display panel which shows as a red line. The green horizontal and vertical
lines are a 2D cursor. Click somewhere in the graphical display panel and the green
lines will relocate. This is similar to clicking in the 3D Window and positioning the
cursor in that window. With the green lines relocated you can better see the red line
representing the animation of the cube object ( Actor ) along the X Axis in the 3D
Window.
The red line has two short yellow lines attached to it. Each yellow line has a dot at the
center and a dot at each end. The yellow lines are called handles. What we are
looking at is what is termed a Bezier Curve and the yellow lines are called control
handles. The control handles are used to change the shape of the curve. We
mentioned this type of curve before and will come back to this topic later.
The location of the vertical green line of the curser represents the frame number of
the animation. You will see it aligns with the frame numbers across the bottom of the
window and at the lower end of the line a green box holds the frame number. You can
click on this line and scrub through the animation the same way as you can in the
Timeline Window.
At the left hand side of the Graphical Display is a vertical bar with positive and
negative numbers representing displacement from the mid point of the 3D Window.
Click to Remove or Add Tick
Click to Select Channel & Graph
Displacement 5 Units
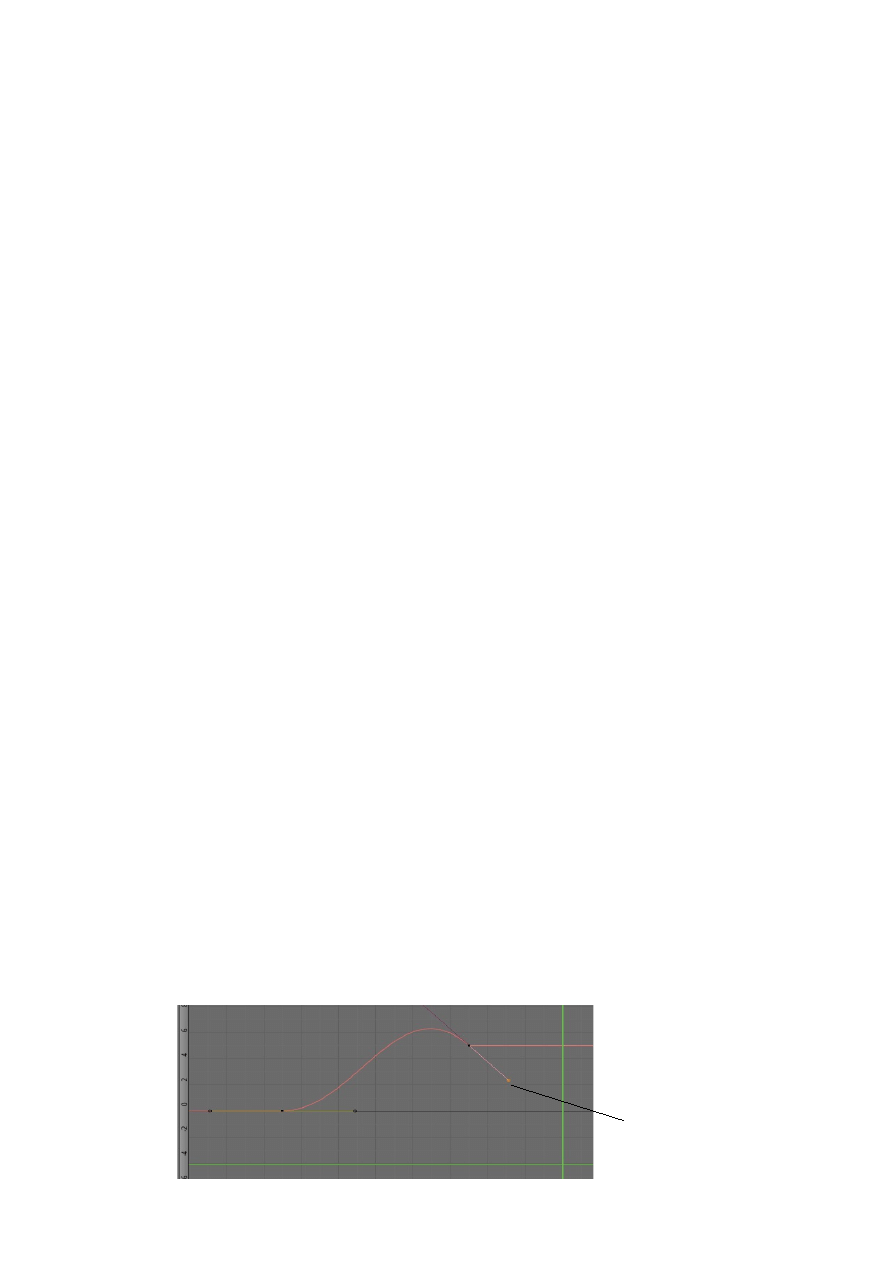
On my screen these numbers appear to be a little out of alignment with the
background scale lines. This varies depending on how the Graphical Display panel is
scaled. Like all windows in Blender, with the curser located in that window pressing
the Num Pad + and – Keys will scale the panel up or down.
Lets get back to the red line. The red line shows that from frame 1 to 25 there is no
displacement of the actor from the mid point. From frame 25 to frame 75 the actor
moves from the mid point of the 3D window to 5 Blender units along the X axis.
From frame 75 to frame 250 the actor remains displaced from the mid point by 5
Blender units. This is the movement observed when we play the animation.
If you now click on the tick in any one of the Scale (Cube) channels in the Dope
Sheet you will see a yellow, turquoise or purple lines representing the fact that the
actor change from size 1 Blender unit to 2 blender units between frame 25 and frame
75. The three lines represent the X,Y & Z axis.
Editing The Curve:
So far we have introduced Keyframes to set up how we want our actor to behave
during the animation and we have seen how that action is graphically represented. We
will now see how we can alter the behavior of our actor by altering the shape of the
curve representing that action. Remember the type of curve being considered is a
Bezier curve which is designed to be edited.
Go back to the red line. With the cursor in the Graphical Display panel press the A
Key twice to make sure you have the line selected. If the line shows solid red with the
two yellow handles you are in Edit Mode if not press the Tab key. If you are not in
Edit Mode the line will be a broken red line without handles.
Select (Clk RMB) the red line in Edit Mode ( Solid red with handles ). Now press A
Key to deselect the line. You will have a faint red line with black handles. Select the
handle at frame 75 (Clk – RMB, Click right mouse button on the center dot of the
handle). The handle will be yellow and the line will be bright red.
OK , now click on the right hand dot on the end of the handle (RMB). The left hand
half of the handle fades. Now RMB Clk on the Right hand dot on the end of the
handle and while holding the mouse button pressed drag the end of the handle down
and to the left. The shape of the curve arches up.
RMB Click and Drag
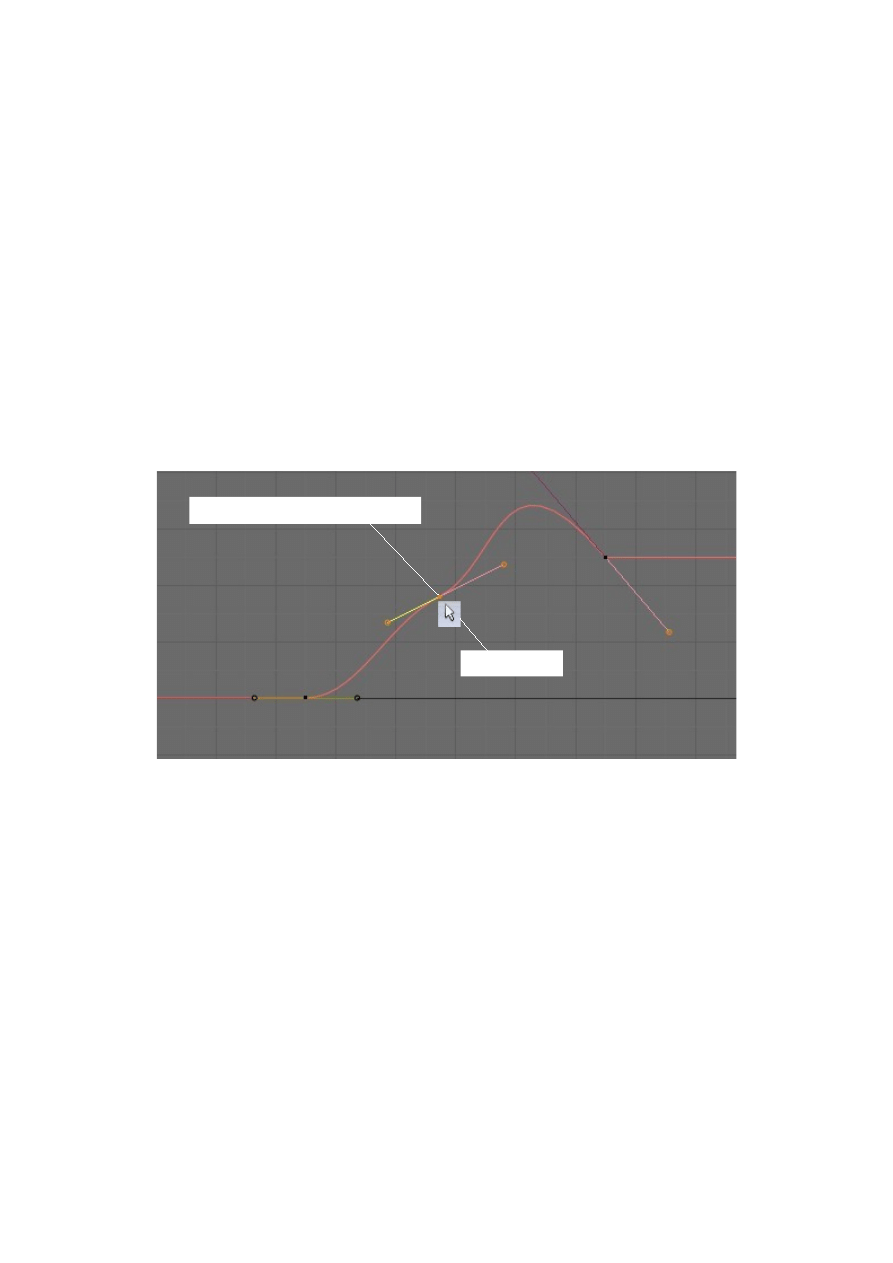
Now, if you scrub through your animation between frame 25 and 75 you will see the
actor move along the X axis from zero displacement at frame 25 to something more
than 5 Blender units then return to 5 Blender units at frame 75. The movement of the
actor is being dictated by the shape of the curve. The shape of the curve can thus be
altered by moving the ends of control handles. By selecting the center point of the
control handle then pressing the G Key and dragging the whole handle the shape of
the curve will also be altered thus changing the movement of the actor.
Another feature of the Bezier curve is that control handles may be added anywhere
on the curve. In the Graphical Editor panel with your X Location (Cube) graph (Red
Line) selected place your arrow cursor on the line between frame 25 and 75, hold
the Ctrl key and click on the line with the LMB. Another control handle is created.
This is actually another Keyframe. You can actually enter a new Keyframe this way
anywhere on the red line in the animation. Another way to skin the cat.
Other Types Of Curves:
We had previously made note that by default Blender selects the Bezier type
Interpolation to insert frames between keyframes. At this point it should be noted that
there are two other options. In the Graphical Editor Window select all the channels in
the Dope Sheet panel by clicking in the colored boxes. All the graphs will display in
the graphical Editor panel. Now A Key twice to make sure they are all selected.
Go to the Graphical Editor Window header – Key – Interpolation Mode and you will
see the option to select Constant, Linear or Bezier. Clicking on Constant or Linear
will change the type of graphs and therefore change the action of the actor. 'Constant'
results in a dramatic quick change from one state to the other at a given frame while
'Linear' produces a change following a straight line graph between points.
Ctrl + LMB to Add Control Point
Arrow Curser
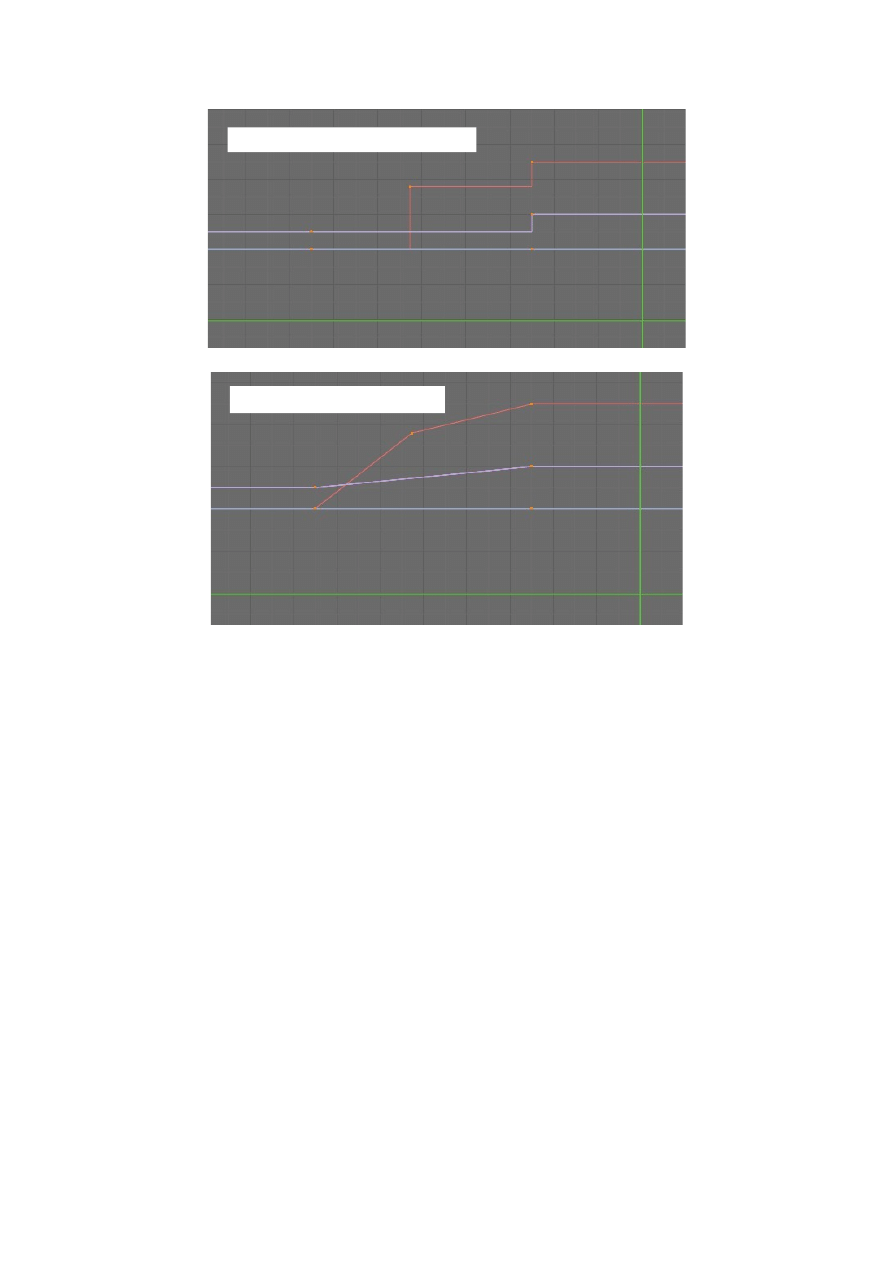
The choice of these types of graphs and hence motions depends on how you want
your actor to behave in the animation. Both of the alternatives to Bezier give the
option to grab and move points and to add additional points on the graph but Bezier is
by far the more flexible.
Blender Interpolates to add frames between the keyframes according to which of the
above options were selected. Blender also figures out what to do with the frames of
the animation before the first keyframe and what to do after the last keyframe.
Figuring this out is called Extrapolation. There are two options in Blender, Constant
and Linear. By default Blender selects Constant.
Constant Extrapolation can be seen with the X Location (Cube) channel selected
in the Dope Sheet. With Keyframes at frame 25 and frame 75 Blender has
Interpolated the in between frames according to the default Bezier method. That is
Blender has inserted frames which comply with a bezier curve. Either side of the
keyframes you see horizontal lines which dictate no further change in status. This is
Constant Extrapolation. If you go to the Graph Editor header – Key button –
Extrapolation Mode and select Linear Extrapolation notice what happens to the
CONSTANT INTERPOLATION
LINEAR INTERPOLATION
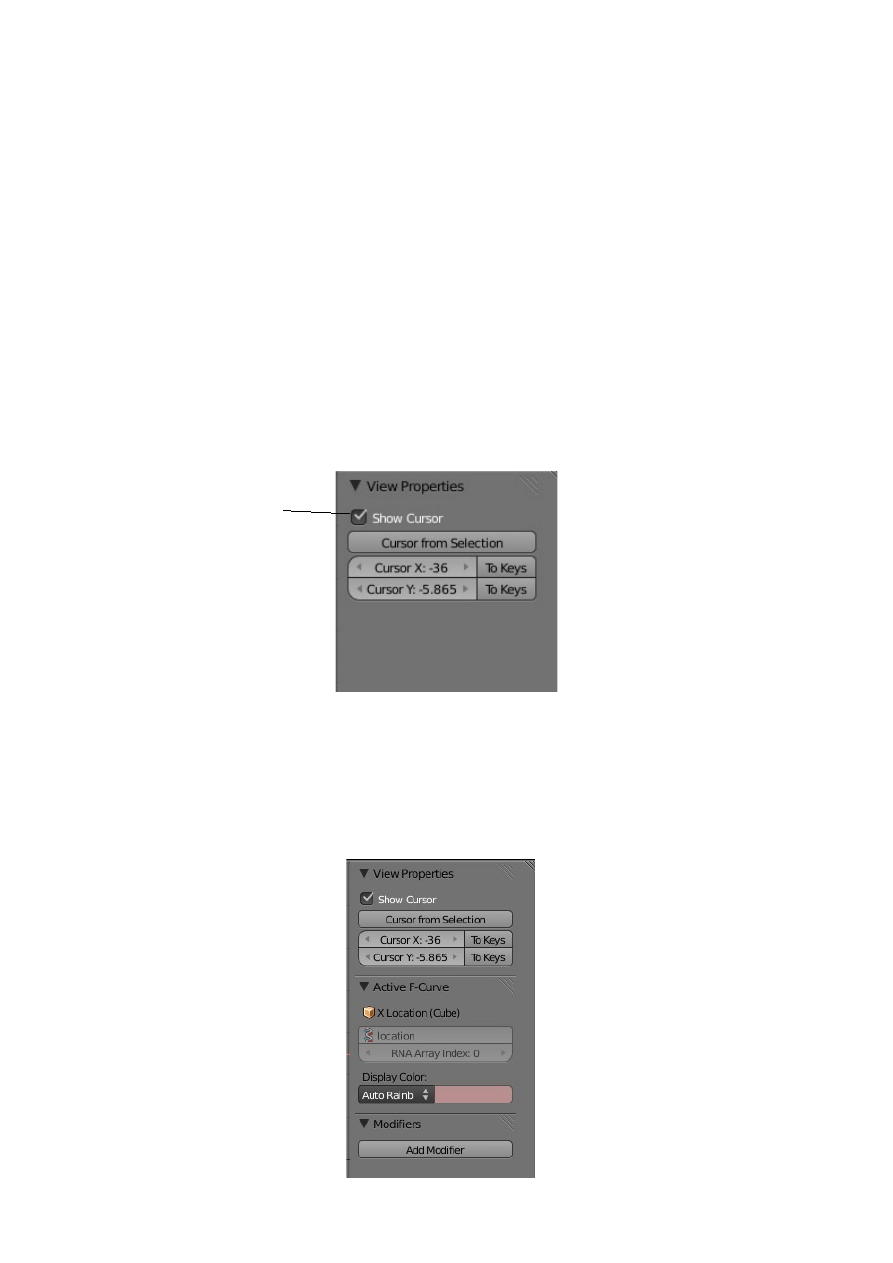
curve. Blender takes a look at frame 25 and 26 and from the data plots a straight line
coming up at an angle . Blender also looks at frames 74 and 75 and plots a straight
line curve leaving the curve . The action of the actor before and after the two
keyframes will follow these straight line curves.
Modifying Curves:
We have so far discussed creating graphical curves and how to change them or
modify them thus changing how our actor behaves in the scene. Blender has more
options for more subtle control of animation.
In the Dope Sheet panel, display all the channels and have them all selected. With
your arrow cursor in the Graphical Editor Window press the A Key until all channels
are highlighted in white and all the colored boxes are ticked. Now press the N Key to
display a panel with a View Properties tab.
To begin with this panel will only provide the option to show or hide the curser ( The
Green horizontal line ). In the Dope Sheet untick all but the the X Location (Cube)
channel. In the Graphical Editor panel Clk A Key twice to ensure all channels are
selected but since only the X Location (Cube) is ticked only that graph will display.
Toggle Green Line On/Off
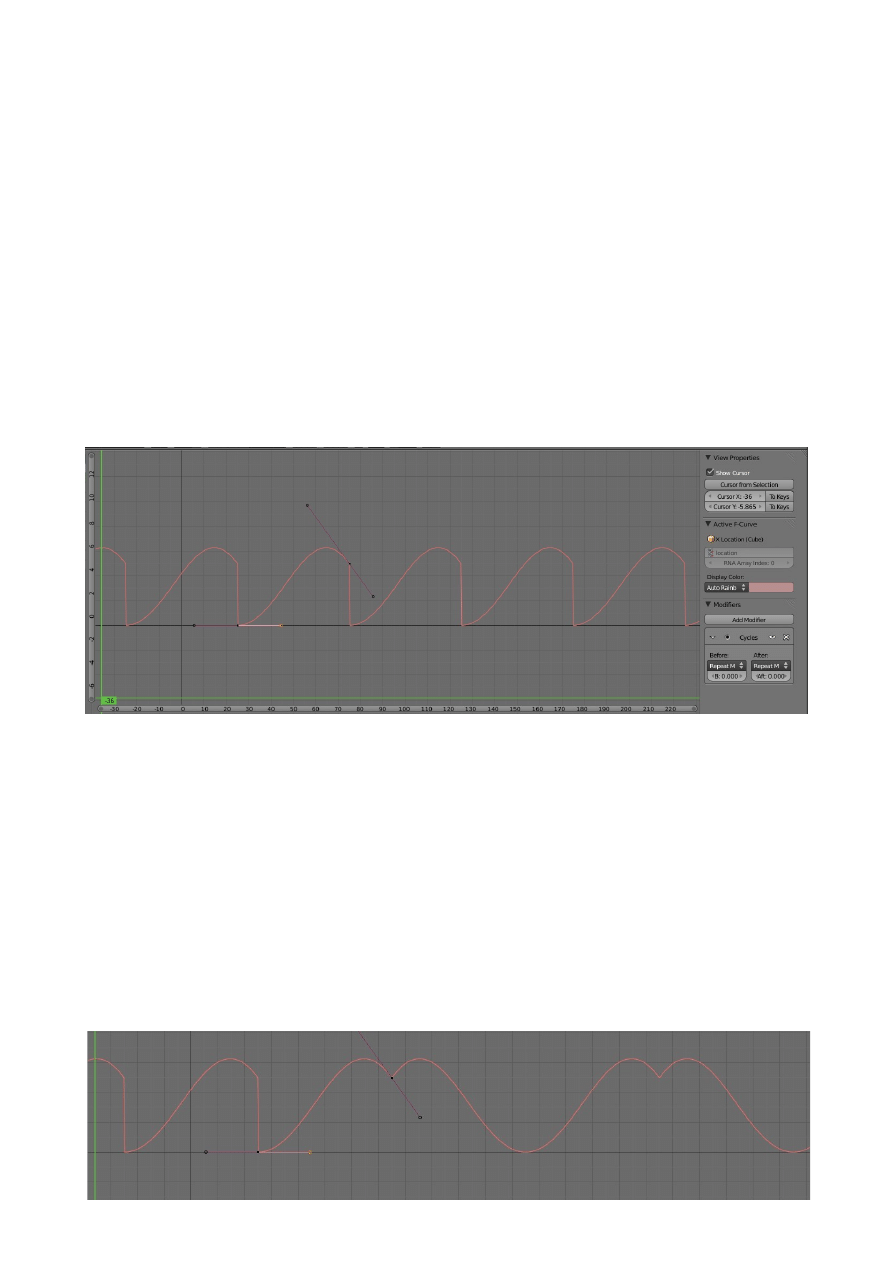
The new panel will now display three tabs. The View Properties, Active F-Curve
and the Modifiers tab. The Active F-Curve tab shows that the X location curve is
selected and that it is displayed in a Auto Rainbow color. This color may be changed
by clicking on the drop down menu under 'Display Color'. It could be advantageous
to change the color of a curve if it is required to distinguish it from another.
We are at this point interested in modifying our curve not changing its color. Note the
Modifier tab with its Add Modifier button. Clicking on this button produces a drop
down menu with seven options. We will not attempt to demonstrate all of these
options at this time but several are of particular interest.
We have the X Location (Cube) channel curve selected in the Graph Editor panel.
Now click on Add Modifier and select 'Cycles'.
The graph changes rather dramatically. The curve between frame 25 and frame 75 is
the same but instead of straight lines either side of this, Blender has duplicated this
curve. In selecting Cycles we have made the movement of the curve cycle in 25
frame increments either side of the frame 25 – 75 block.
We are starting to get into the complexity of Blender and its multiple options.
Look at the little Cycles panel which has displayed under the Add Modifiers button.
Note the Before and After options. Each of these have drop down menu buttons
which give options for how the Cycles are to be repeated before and after the frame
block. Click on the After button and select Repeat Mirrored.
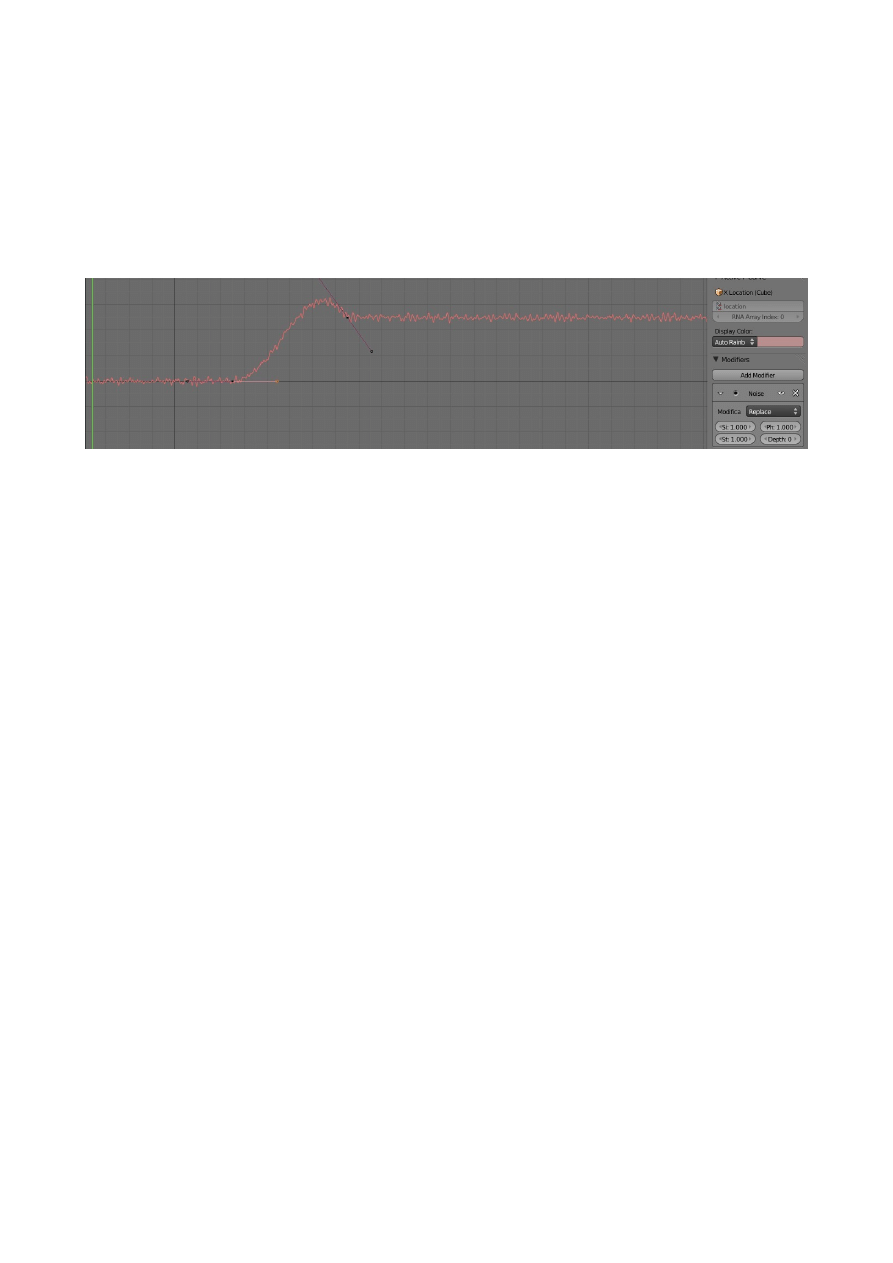
Blender alternately reverses the cycle curve. Scrub the animation to observe the
motion of your actor.
Lets have another demonstration. Click on the X at the top right hand corner of the
Cycles panel to delete the modifier. Click on Add Modifier again and this time select
Noise.
Wow! We now have our original graph with the jitters and if you scrub your
animation you will see thats exactly what you get in the movement of the actor. Of
course it doesn't stop there the noise modifier contains a drop down to select sub
options and buttons to alter values for the options. You have plenty to play with.
Good luck.
For another demonstration delete the noise modifier and select the Built In Function
modifier. This produces a straight sinusoidal graph. Check out the drop down in this
modifier panel for the selection of graphs based on various mathematical functions.
All selections have buttons to control values being introduced. More stuff to play
with.
To get more evolved try adding multiple modifiers to your curve. Just click on the
Add Modifier button without deleting what you already have.
Automatic Keyframing:
Previously Keyframes have been inserted in our animation by having our curser in
the 3D Window, moving the timeline to a particular frame, changing the status of our
object and then pressing the I Key and selecting a keyframe option.
Besides this method after the frame has been selected and the object status changed
we can press the Insert Keyframe button in the tool bar at the Left hand side of the
3D Window. The T Key toggles hide and show this panel.
There is another method which makes life a lot easier when multiple keyframes are
required.
In the Timeline Window header you will see a red button next to the play control
buttons.
Clicking on this button toggles automatic keyframing on/off. With auto on whenever
you move,scale or rotate your actor object in the 3D Window a keyframe will be
inserted at whatever frame you have selected. Remember to turn this off after using it.
Animating Other Features:
Having an understanding of animation basics allows us to look at some of the other
things that can be animated in Blender besides movement, rotation and size of an
object. It is also possible to animate among other things Materials, Textures, Lamps
and World settings.
The following is a list of some of the features which can be animated:
Material Animation Options:
Material RGB Values
Color can be animated to change.
Alpha
Transparency of an object can be animated.
Halo Size
A halo can grow or shrink in an animation.
Setting a halo to zero will make it disappear.
Texture Offset
Texture applied to an object can be animated.
It can move across the face or change in size.
Lamp Animation Options;
Lamp RGB Values
The color of light can be animated to change.
Energy
The intensity of light can vary.
Spotlight Size
The angle of beam can be animated to change.
Texture
Texture can be applied to a lamp and animated.
World Animation Options;
Zenith RGB
Color of the zenith (top) can be animated.
Toggle Auto Keyframing On/Off

This is great for sunsets or sunrise.
Horizon RGB
Color of horizon (bottom) can be animated.
Mist
Fog can be animated for interesting effects.
Stars
Stars can be made to move.
Texture Offset & Size
Texture applied to a world can be made to move.
The above are only some of the features which can be animated in Blender. To give
you an idea how this is possible we will take a look at a couple.
Example 1 Color
Let's start with the color of an object.
Open up a new scene in Blender. (The default scene with the cube object will do).
Go to the Properties Window at the left hand side of the screen and click on the
Material button. When you open the default scene in Blender the cube object in the
scene is selected. Make sure it is selected before clicking on the material button. After
all we are concerned with the material of the cube object.
The Properties Window with the Material button activated show a whole bunch of
tabs for controlling how the surface of the object displays in the 3D Window. To
begin note the Preview tab showing a dull grey sphere and below that the Diffuse tab
with a button showing the same dull grey color. Actually on my screen the diffuse
color button looks a lot lighter in color than the sphere in the preview or the cube in
the 3D Window. The values for all three are however identical.
Look at the Timeline Window across the bottom of the screen. The green line shows
at frame 1 of a 250 frame animation ( 0 to 250 scale along the bottom of the window
above the header).
We are again going to insert Keyframes on the Timeline. We will make the color of
our cube object change from Grey to Red over 50 frames of the animation.
You could change the starting color of the cube by clicking on the diffuse color
button (LMB)to display a color picker, click anywhere in the colored circle to change
the color. Let's just leave things alone for the time being and stick with dull old grey.
Instead of clicking (LMB) on the diffuse color button click(RMB) and in the menu
that displays click on 'Add Keyframes'. You have inserted a keyframe at frame 1 on
the timeline. Change to frame 50 ( Scrub the green line in the Timeline Window).
Now click (LMB) on the diffuse color button and in the color picker that displays
click on the red part of the colored circle. This changes the color of the cube to red.
Click on the diffuse color button again, this time (RMB) and then click on 'Add
Keyframes' to insert a keyframe at frame 50. Now when you scrub the timeline you

will see the color of the cube change from grey to red over the 50 frames. Hitting Alt
+ A will play this animation. If you open the Graphical Editor Window you will see
the graphical representation of this animation.
Example 2 Spotlight Size:
To show how the spotlight may be animated we first need to put a spotlight into the
Blender scene. Let's start again with the default Blender scene with the cube. Change
the 3D Window to show the front side view and deselect the Cube (A Key). With the
cursor in the 3D Window hit the 1 Num Pad key then hit Shift + A then select Add –
Lamp – Spot. You will see some orange lines appear in the 3D Window. Hit the G
Key (Grab) then Z Key and move the mouse up. The G Key lets you grab the spot
light so you can move it and the Z key confines the movement to the Z axis. You
could also have clicked (LMB) on the blue arrow of the 3D manipulator widget and
moved the spotlight up the Z Axis. Another way to skin the cat . You will see that you
have actually moved a cone in the screen. Hit the S Key and move the cursor towards
the apex of the cone to scale the spotlight down a bit. The light is at the apex of the
cone and the circle at the bottom represents the circle of light it would generate.
Now go to the Properties Window and press the Object Data button to display all the
buttons which control the properties of the spotlight. Look for the Spot Shape tab and
see the button with' Size: 45' in it. 45 degrees is the angle of the cone.
The Timeline Window is again across the bottom of the screen and the green line
indicates that we are at frame number 1.
Right click on the Spot Shape Size button and select Insert Keyframes from the menu
that displays. The Size button will turn yellow indicating that you have inserted a
keyframe in the Timeline. Scrub the green line in the Timeline to frame 50. The Size
button turns green (No keyframe at frame 50 yet). Left click on the Size button and
holding the mouse button move the mouse to the left decreasing the value of the cone
angle. The angle of the cone in the 3D Window will decrease accordingly. Right click
on the Size button and select Insert Keyframes again. Button turns yellow. We now
have a keyframe at frame 50. Scrub the green line in the Timeline Window between
frame 1 an 50 to see the angle of the cone change. You have animated the spotlight
size.
Many properties can be animated this way by inserting keyframes and changing
property values. You have lots of experimenting to work on.
Keying Sets:
You can add multiple properties to a group called a Keying Set which allows you to
animate whole bunch of stuff at one time. You do this by defining a Keying Set.

We will again look at our Cube actor in the default Blender Window. Let us say you
want to have the cube move along the X axis and change color at the same time. Not
too difficult? Just add a bunch of keyframes. Exactly! But consider if you had a lot of
property changes. Adding all those keyframes one by one could become tedious. It
would be nice if you could do the property changes then hit a button to add all the
keyframes in one go. Let's do it.
With the Cube selected in the 3D Window go to the Properties Window. We will look
at the movement part of the exercise first. Click on the Object button in the header
and in the panel that displays find the Transform tab and the Location buttons. You
will see X:0.000, Y:0.000 and Z:0.000. This shows that the Cube is at the center of
the 3D Window in all planes. OK we are concerned with the movement on the X axis.
Right click on X:0.000 and in the panel that displays click 'Add Single to Keying Set'.
If you look at the Timeline Window header you will see a button with
'ButtonsKeyingSet' in it and two little Key icons next to it. One of them has a red line
across it. Note in the Timeline you are at frame 1. You have just entered the
information into a Keying Set telling Blender that at frame 1 the Cube is located on
the X axis at position 0.000.
Now consider the color part of the exorcise. In the Properties Window click on the
Material button. Right click on the Diffuse color button then click on 'Add All to
Keying Set'. Make sure you click on 'Add All' not 'Add Single' Now the information
for the color has been added to the Keying Set.
In the Timeline Window header click on the first of the little Key icons (Not the one
with the red line). You have entered a Keyframe for the location and color of the
Cube. You can see this in the Graph Editor Window by opening up all the headings in
the Dope Sheet.
Now move to frame 40 or wherever you wish on the timeline.
Change the value for the Transform Location X axis in the Properties Window Object
buttons. Right click the new value and click 'Add Single to Keying Set'.
Do the same thing for the Material color value but make sure you click on 'Add All to
Keying Set”. Now click on the first of the Key icons again to add the new Keyframe
at frame 40.
Scrub the timeline to see the Cube move and change color.
Why it is necessary to click 'Add All to Keying Set' for the color instead of 'Add
Single to Keying Set' is not known at this time.
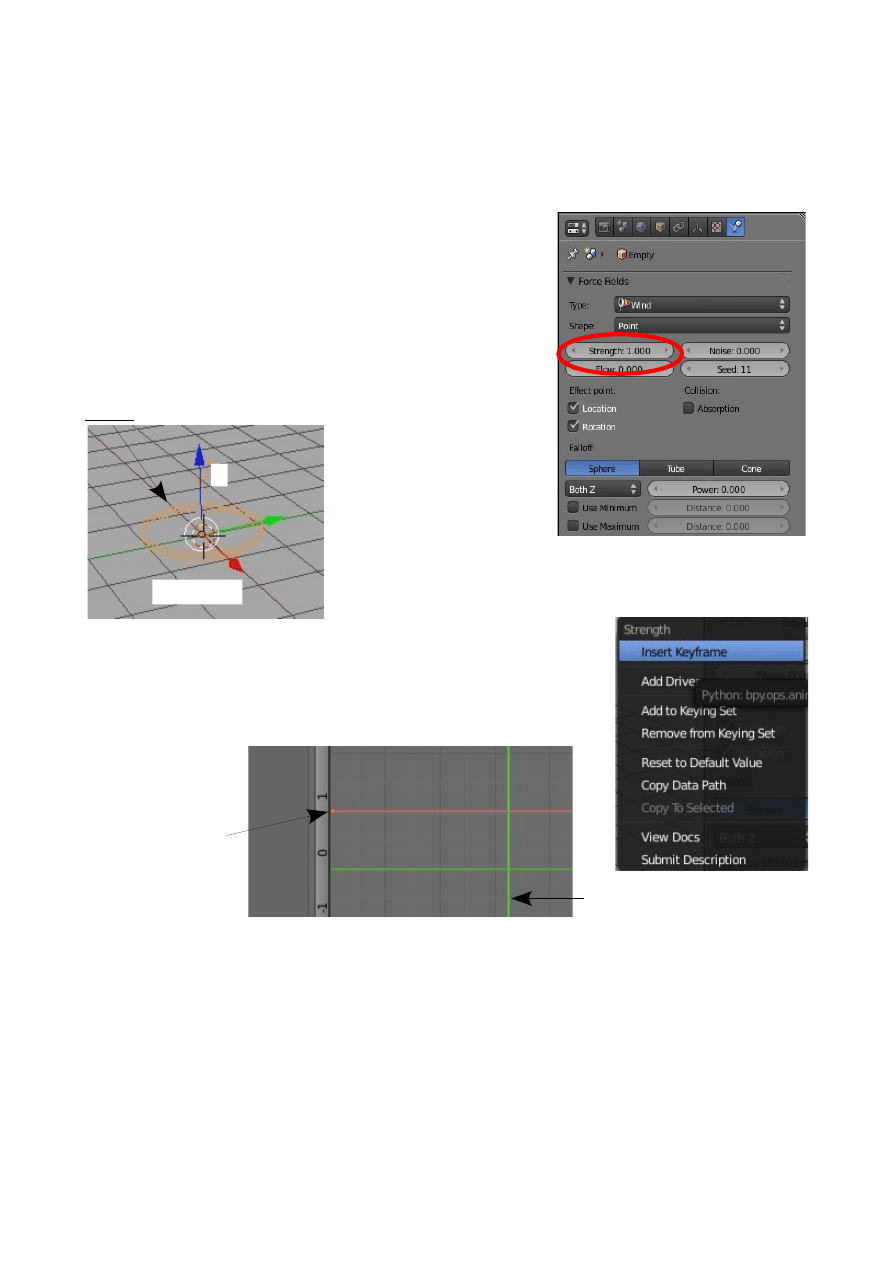
Wind Strength Animation
Wind force can be applied to particles and cloth. The Wind Strength is able to be
animated to provide a realistic reaction due to varying wind strength.
In the 3D Window add an 'Empty'. Split the 3D
Window in two and make one half the Graph editor
Window. With the Empty selected in the 3D Window
go to the Properties Window-Physics button. In the
Force Field tab click on the 'Type' panel to display the
dropdown selection panel and select 'Wind'.
The wind force is displayed in the 3D Window as a
stack of circles along the positive Z axis.
In the Physics Force Field tab the 'Strength' value refers
to the wind strength. Increasing the value causes the
circles in the 3D Window to move apart showing the
increase.
Starting with the Strength = 1.000 at frame 1 on the Timeline
right click in the Strength panel and select 'Insert Keyframe'
in the drop down that displays.
A Keyframe is added in the Graph Editor Window. Click on the vertical green line
and drag it along to frame 41. You will see your first Key shown as the orange dot at
frame 1. With the green line at frame 41 alter the Strength value to 7.000 and right
click in the Strength panel again.
Green Line at frame 41
Keyframe Added
Graph Editor
Window
3D Window
Z
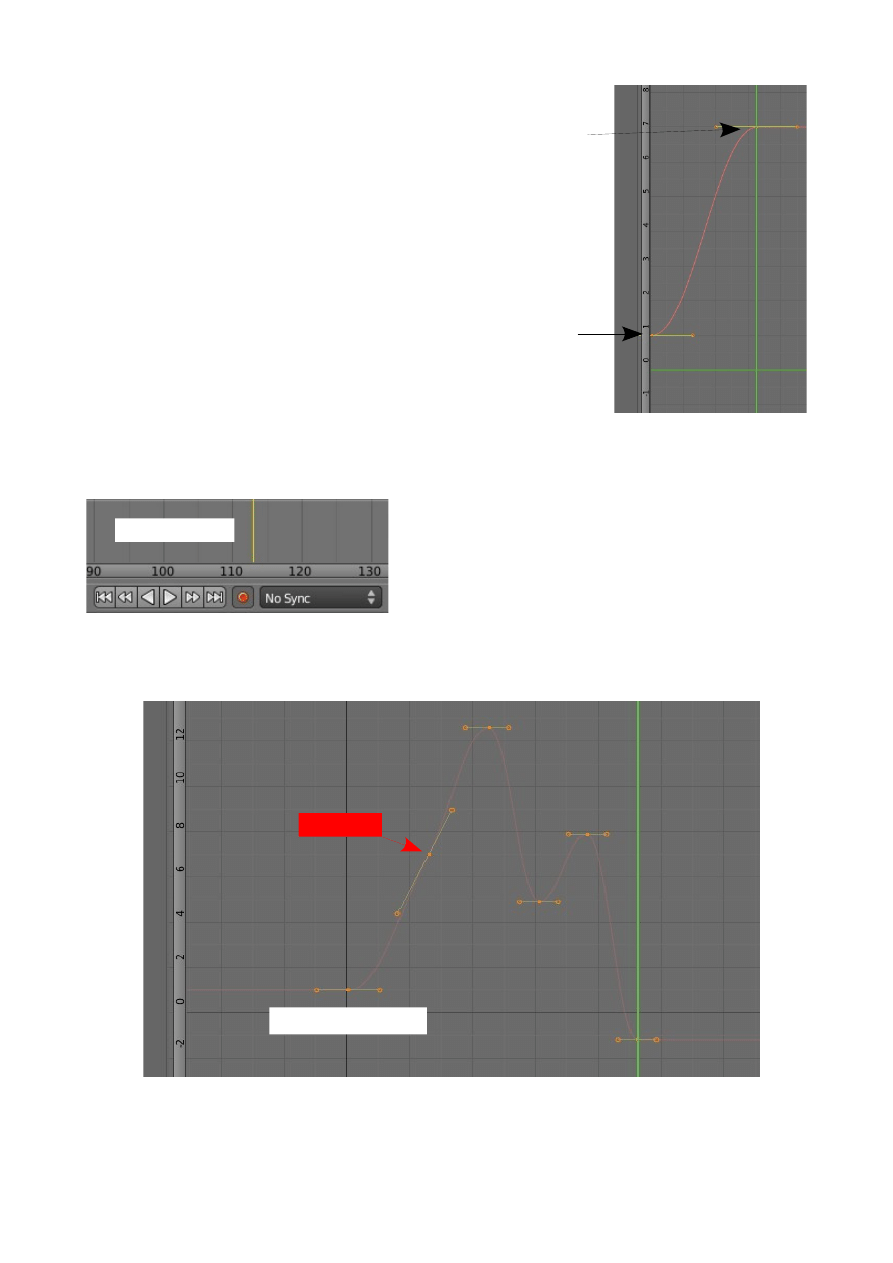
Select 'Insert Keyframe' and a second Key is added in the
Graph Editor Window.
By moving (Scrubbing) the green line in the Graph Editor
Window back to frame 1 you will see the wind strength alter
in the 3D Window.
Move the green line back to frame 1. With your curser in the
3D Window press Alt+A. You will see the wind strength
animated.
The above method show you the manual insertion of
keyframes. To make life easier there is an automatic insertion
of keyframes method.
Go to frame 41 (You can start where you like but lets build on to what we already
have). In the Timeline Window at the bottom of the screen click on the Red button
next to where it says 'No Sync'. Move the green
line along the timeline and change the Strength
value. A third keyframe is added in the Graph
Editor Window. Repeat this a few times
increasing and decreasing the strength value. By
scrubbing through the animation you see the wind strength animated in the 3D
Window. Move the green line back to frame1 and press Alt+A and play the
animation.
With the Wind Strength animated you can direct it at Particles or Soft Body objects
which influences how they behave in an animation.
Second Key
Graph Editor Window
First Key
Timeline Window
Graph Editor Window
Keyframes
CH12- 3D Text
01-3D Text
02-Creating 3D text in Blender
03-Properties Window-Object Data
04-Creating Text on a Curve
05-Converting to a Mesh Object
06-Converting to a Curve
07-Elefont 3D Text
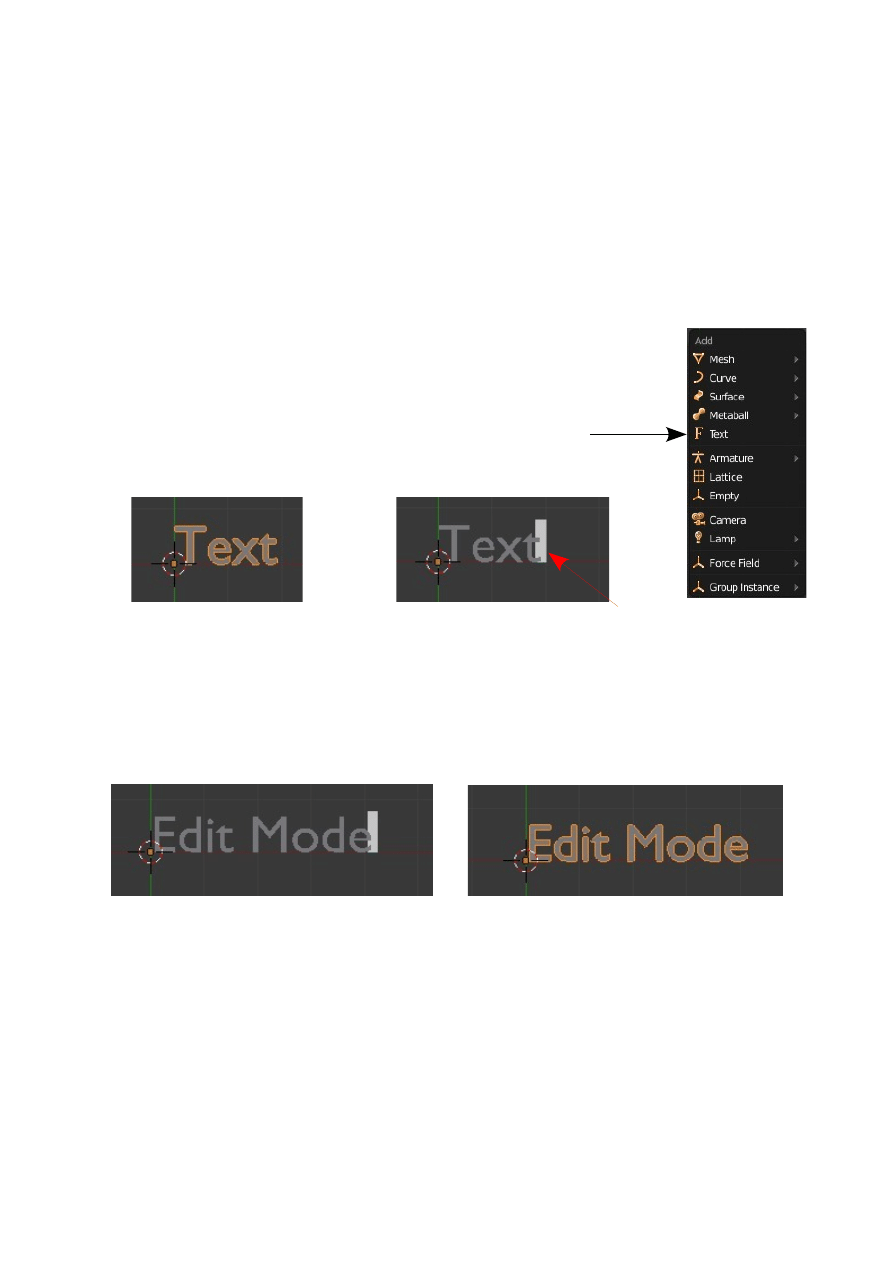
3D Text
3D Text can be considered a very important element to add into a scene. Think of all
the television advertisements that contain text and how it is animated. There are two
ways of adding text to a scene in blender. One way is to use the inbuilt text generator
and the other is to use an external program to generate the text. Text made in Blender
can be easily edited in the Properties Window. Text made in an external program like
Elefont may give you additional options and different fonts.
Creating 3D text in Blender
To create text in Blender put your scene into top view orthographic
projection (Num Pad 7 then Num Pad 5). Text is entered into the scene
in the top view. Locate the cursor at the point in the scene where you
want your text to go. Press 'Shift + A' and select 'Add Text'.
The word 'Text' displays in the 3D Window in Object mode.
Tab into Edit mode. The word 'Text' will now have a typing cursor at the end of the
word. You can now backspace to delete letters and type in your own words just like in
a text editor. Don't worry about the Font style or size at this stage. When you have
typed in the words you want, tab into Object mode. This is where you shape and
color the text.
Before you do any shaping or coloring you can move, rotate and scale just like any
Object in Blender.
Changing the text into something interesting is done in the Properties Window.
Select the text in the 3D Window then go to the Properties Window – Object data
buttons.
Object Mode
Edit Mode
Typing Curser
The word 'Text' deleted and 'Edit Mode'
typed in its place
Tab to Object Mode
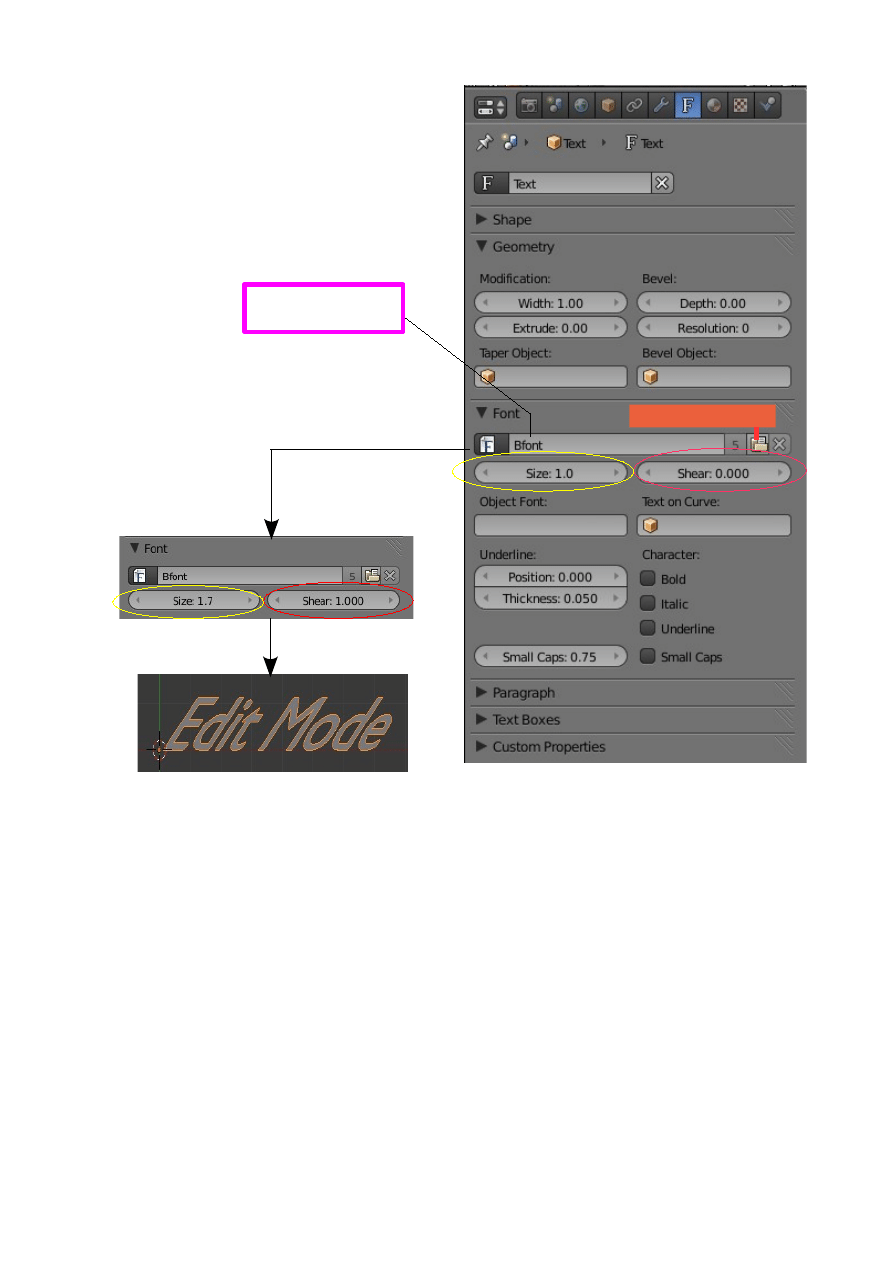
Properties Window – Object data
Width, extrude and bevel depth sliders
control exactly what they say.
Width: The text width.
Extrude: Extrudes text to a 3D shape.
Depth: Bevel size.
Experiment with the settings to modify the
shape of the text
The default Font Style is entered as Bfont. You can change this to whatever Font
Styles you have on your system. If you are using a Windows operating system you
can find Font Styles in the Windows Fonts folder. (C:/ Windows /Fonts). To change
the Font style click on the
S
earch Folder Icon
and in the search window navigate to
your Fonts folder and select a different Font. Blender will accept any of the Windows
fonts but some may be distorted when they are extruded into 3D shapes.
In the Fonts tab, the Underline Position and Thickness values only operate when
'Underline' is ticked under Character: Underlining occurs as you type your text in
Edit mode.
Default Font Style
Search Folder Icon
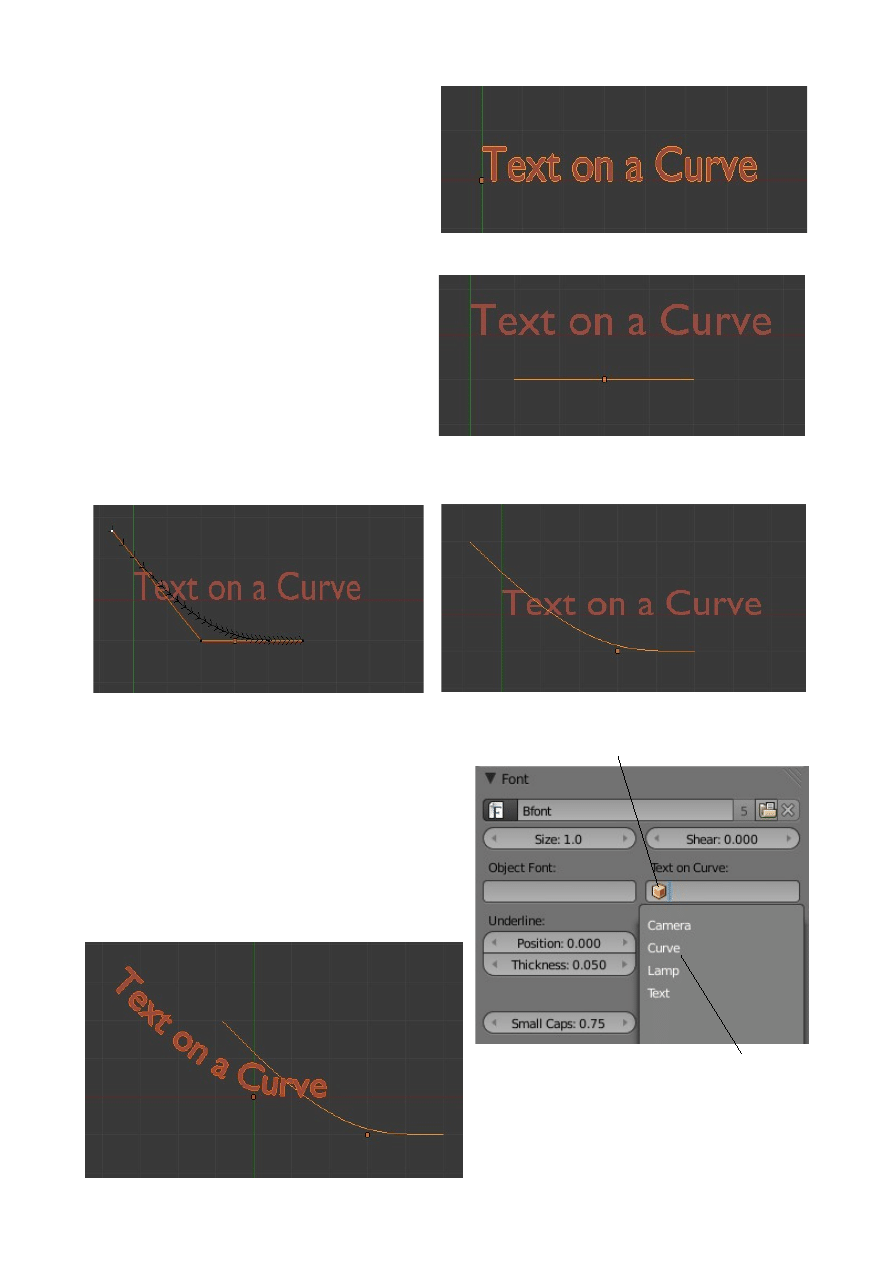
Creating Text on a Curve
Text in Blender can be made to follow
the shape of a Curved Path. Begin by
adding text to your scene as previously
described then when it is in Object mode
deselect it . A Key.
Add a curved path to the scene. Shift +
A – Curve – Path. Note that by default
the Path is named 'Curve'. The curve
path is added to the scene in Object
mode and appears as a straight line. You
can scale it to make it longer and
reposition it in Object mode but you will
have to Tab to edit mode to extrude or shape it into a curve. With the curve shaped to
whatever you want Tab back to Object mode and deselect it.
Select the text Object. In the Properties
Window – Object data buttons – Font tab
find the 'Text on Curve' panel. Click on the
little cube icon and in the drop down that
displays select 'Curve'. The text is shaped to
follow the profile of the curve.
Curve
Edit Mode
Object Mode
Select 'Curve'
Click on Cube icon
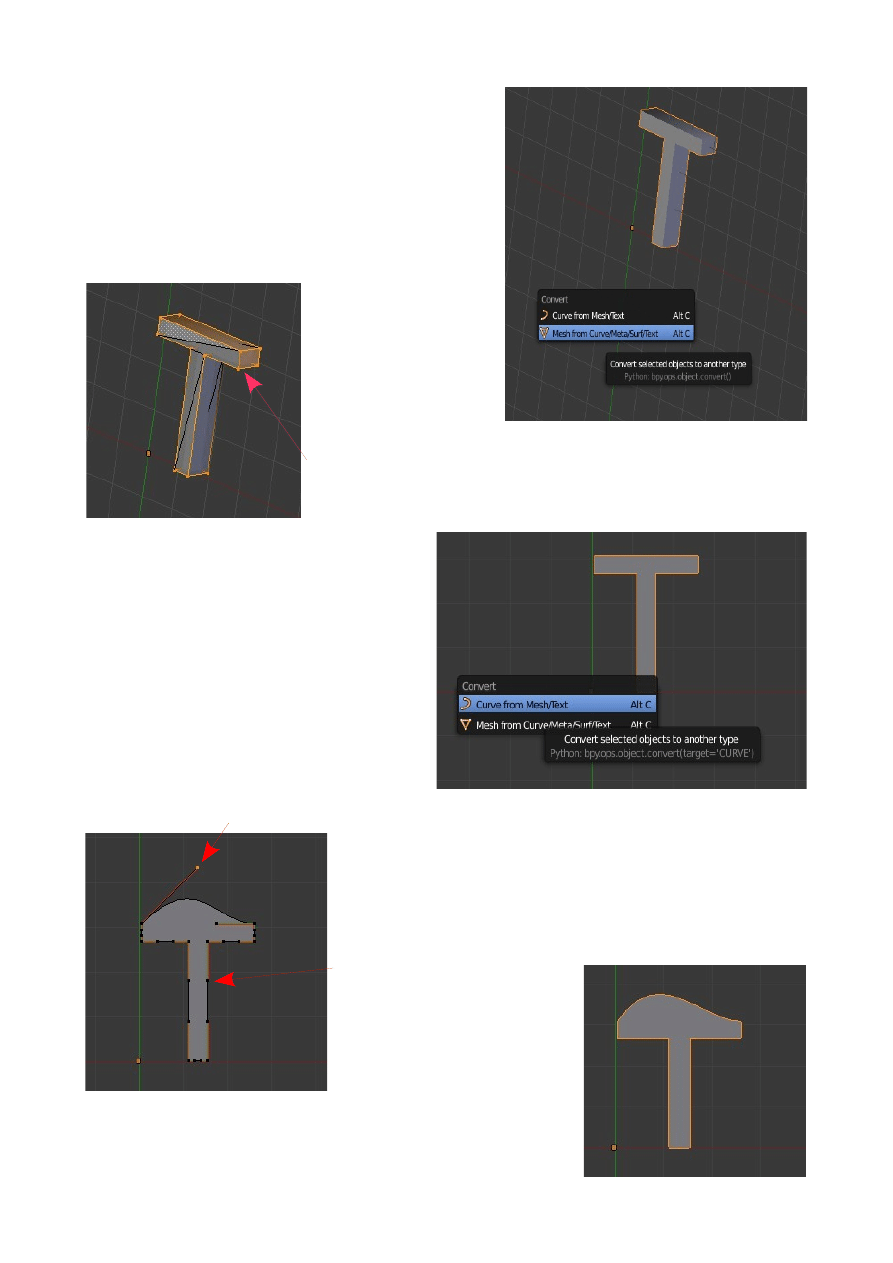
Converting Text to a Mesh Object
There is only limited functionality in the text
Object data buttons geometry tab for modifying
the text shape. Unless you have extruded the text
it remains a two dimensional plane object.
Entering edit mode only allows you to retype a
text change. To perform editing which actually
changes the shape of
the text you have to
convert to a Mesh
object. To do this
select the Text in
Object mode then
press Alt + C and in the drop down menu that displays
select ' Mesh from Curve/Meta/Surf/Text'. Tab to Edit
mode and you will see that the text is now a mesh object
with vertices that can be moved, rotated and scaled.
Converting Text to a Curve
If you would like to perform some fancy
editing of a single letter you can convert
the letter ( Text ) into a curve. The
outline of the letter becomes a curve
with handles which allow you to
manipulate the shape into anything you
wish.
Add Text then in edit mode delete and retype your
letter. Scale it up, rotate and move it where you like
then Tab to Object mode. Press Alt + C and select
'Curve from Mesh/Text'. Now in Edit mode you will
see the outline of your letter as a curve with
manipulating handles.
Drag Handle
Edit Mode
Object Mode
Edit Mode
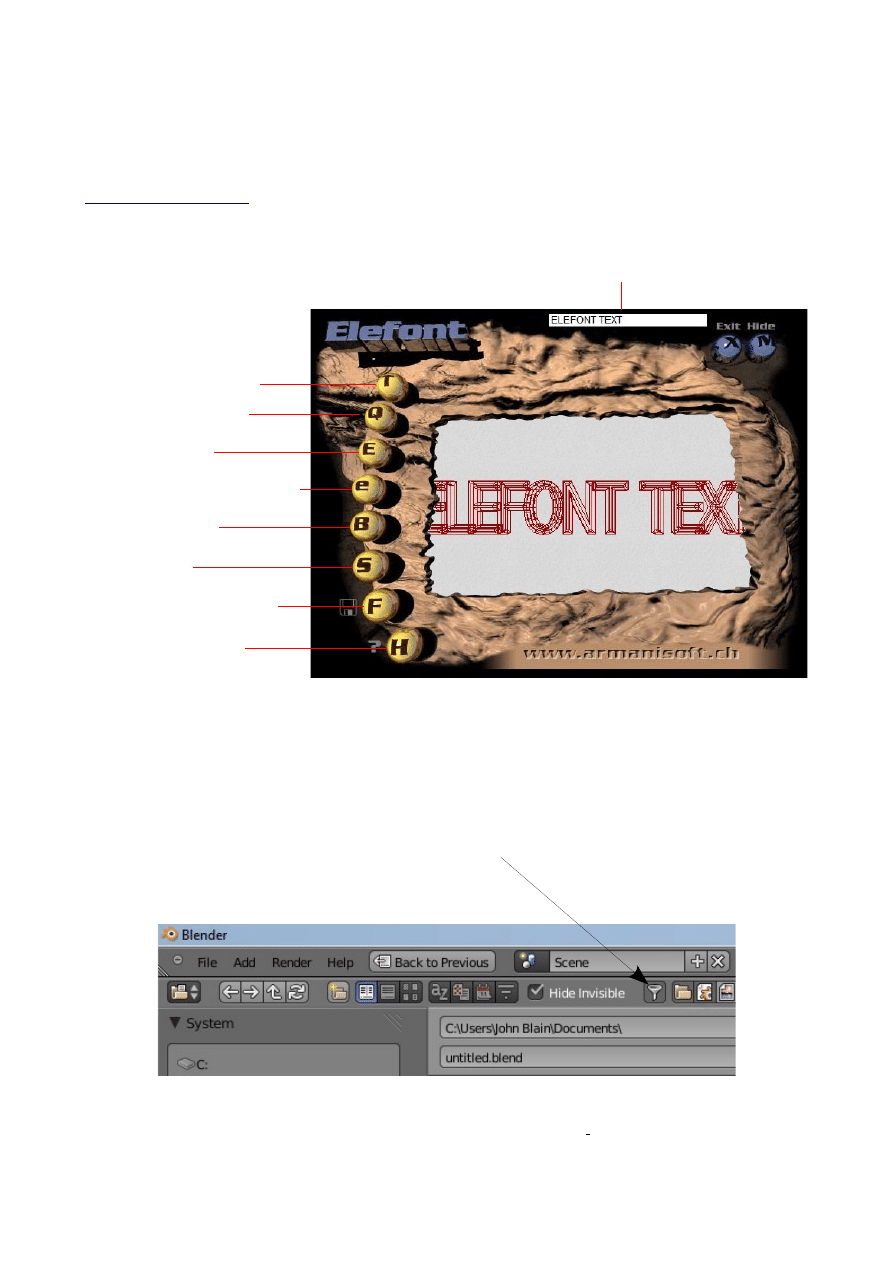
Elefont 3D Text
Text can be created in an external 3D Text Editor and imported into Blender. A
popular program to use is the freeware program Elefont available at
. This is a simple to use program that saves the file in a .DXF
format. Any program that exports 3D text as .DXF or VRML(.wrl) will work.
The Elefont interface is shown below.
After you have created your text in Elefont save the .dxf file and make note of where
you saved it. Open Blender and go into Top View in the 3D Window. In the
information Window header click on 'File' then 'Open'. The blender File Browser
Window will open. Navigate to the folder where you saved your file. Note: By
default Blender does not display all files in the Browser Window. Go to the header at
the top of the window and click on 'Enable Filtering'. This will display all the files
in any folder.
Click on your .dxf file and then click on 'Open Blender File' ( Upper LH Side of
window). Your text will be displayed in the Blender 3D Window but note each letter
is a separate Object.
Type text here
T- Select the Font Style
Q- Set Curve Quality
E- Extrude depth
e- Bring up Extruder Window
B- Bevel Options
S- Bevel Size
F- Save ( Export as DXF)
H- Help Information
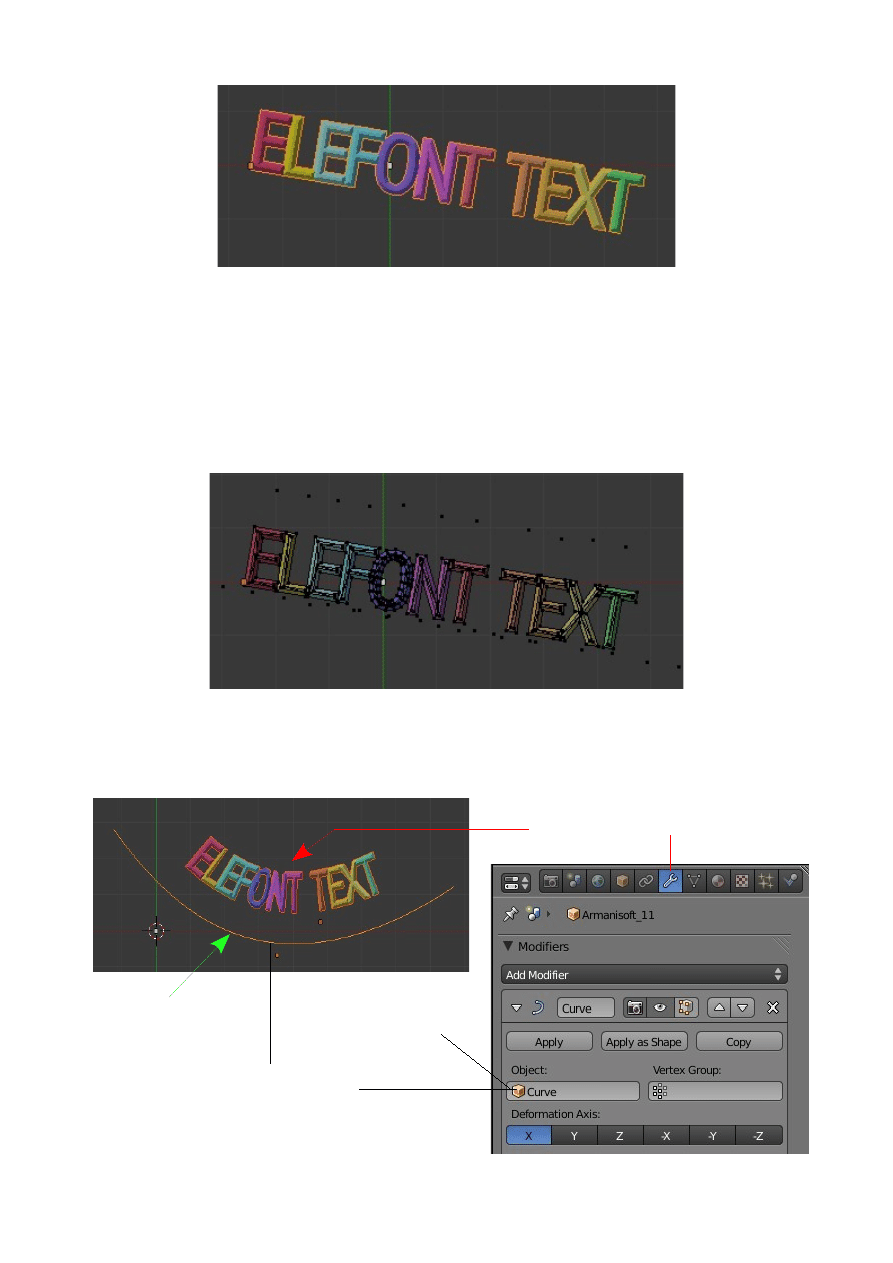
Since each letter is a separate object you can apply a different material color to each
letter. To join all the letters into a single object, shift select all the letters then press
'Join' in the Tool Shelf ( Alternative Ctrl + J ).
Tab to edit mode to see the mesh object.
The text can now be edited as a single object and made to follow the profile of a
curve by adding a Modifier to the Text Object. Modifiers will be discussed later.
Edit Mode showing Mesh
Object Mode Letters Joined
Modifier Applied to Text Object
Curve Path Deformed
Click on Cube Icon
select curve
Curve Path
Named Curve

CH13- Nurbs and Metashap
01-Using Nurbs
02-Creating a Lofted Tunnel
03-Meta Shapes
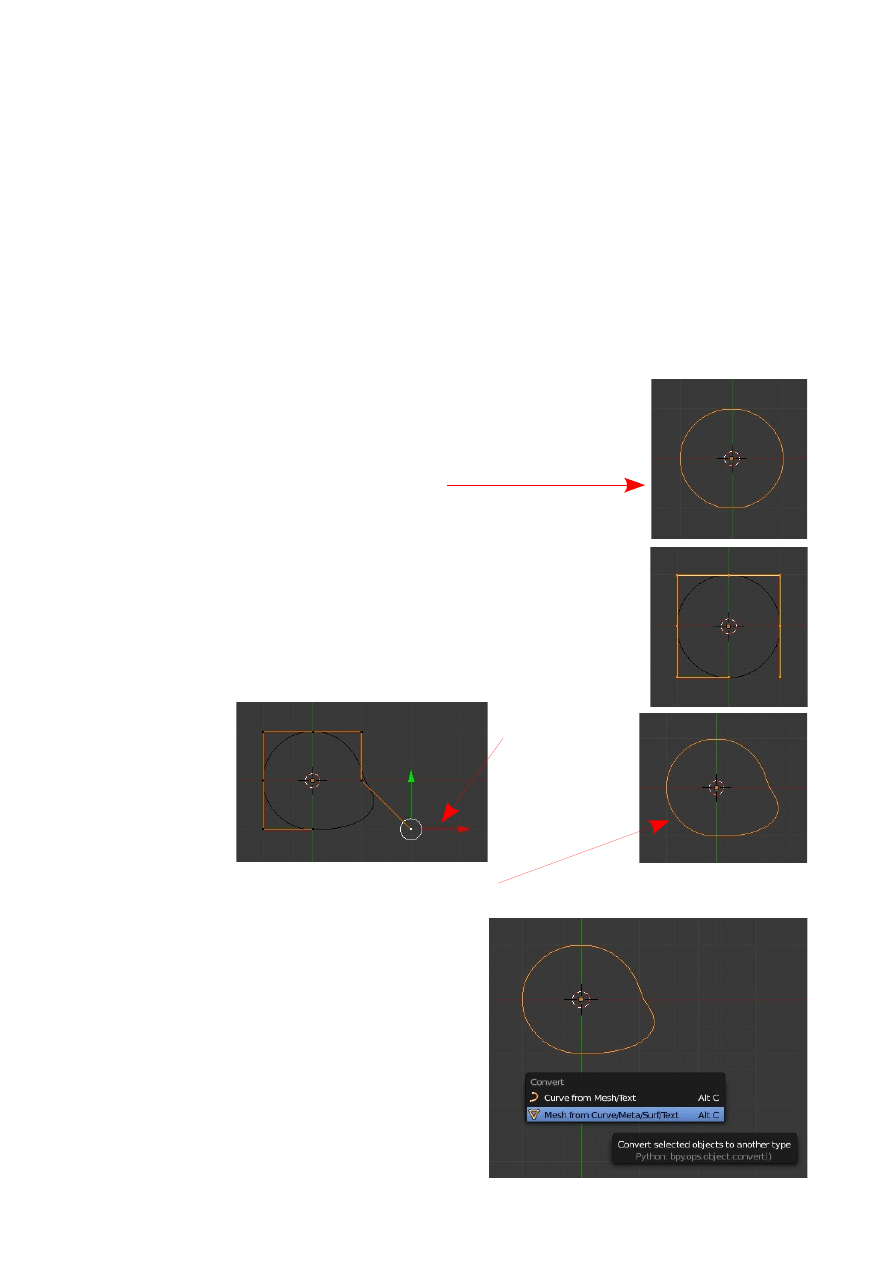
Nurbs
When you press the 'Shift + A' and select ' Add', you will notice other object types
beside meshes, cameras and lights that can be created. One type of object that can be
created is Surface (NURBS).
Using NURBS
If you look at the Surface menu, you will see a variety of shapes that can be created.
These shapes can be used as they are or converted to meshes so you can work with
verticies. To get you started and give you the idea how this is achieved follow the
procedure outlined below.
Start a new scene in Blender and delete the default cube. Place the
scene in top view ( Num Pad 7). Add a Nurbs Circle (Shift + A
Key – Add – Surface – NURBS Circle). The NURBS Circle will
be displayed in the scene in Object mode.
Tab to Edit mode and you will see the circle surrounded by
manipulation handles which by default are all selected. Deselect
the handles (A Key). Right click on a handle to select it. If you
have the manipulation widget turned on you can use it to move
the handle and deform the circle. Alternatively G Key and drag
the mouse.
Tab into Object mode to see the deformed circle.
The deformation may be what you want or you
may wish to further refine the shape. You can
do this by converting the NURBS shape
(Surface) in to a Mesh object. With the shape
selected in Object mode press Alt + C and in
the drop down select ' Mesh from Curve/Meta/
Surf/Text'. We are converting 'Surf' (Surface)
into a Mesh. Obviously this same command is
applicable to converting Curve, Meta and Text
into a Mesh object.
Widget
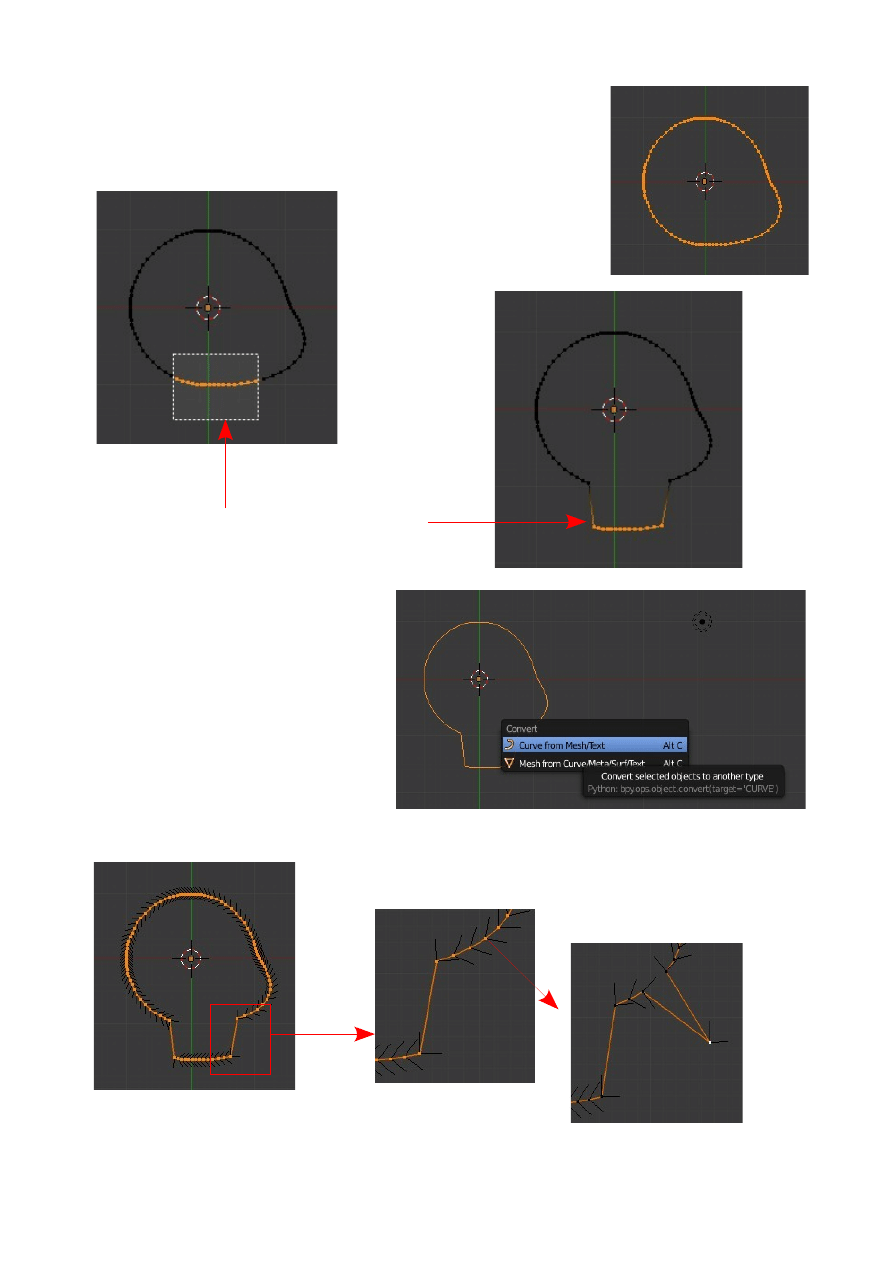
Tab to edit mode and you will see the shape now has
verticies applied which you can select and manipulate to
further modify the shape. A Key will deselect the vertice you
have just moved and A Key again will select all verticies.
Tab to Object mode then Alt + C
and this time select 'Curve from
Mesh/Text'. This is creating a Mesh
Curve object from the Mesh Object.
Tab back to edit mode and you now
have a Curve Circle object. You
can now use the Geometry values in
the Properties window – Object
data buttons to manipulate the
objects shape or select verticies and move them. Since this is a Curve circle it can be
used as a path in animating.
This is simply showing that by converting from one type of object to another gives
different options for shape manipulation.
Single Vertice Selected and
Moved
Vertices selected and Moved
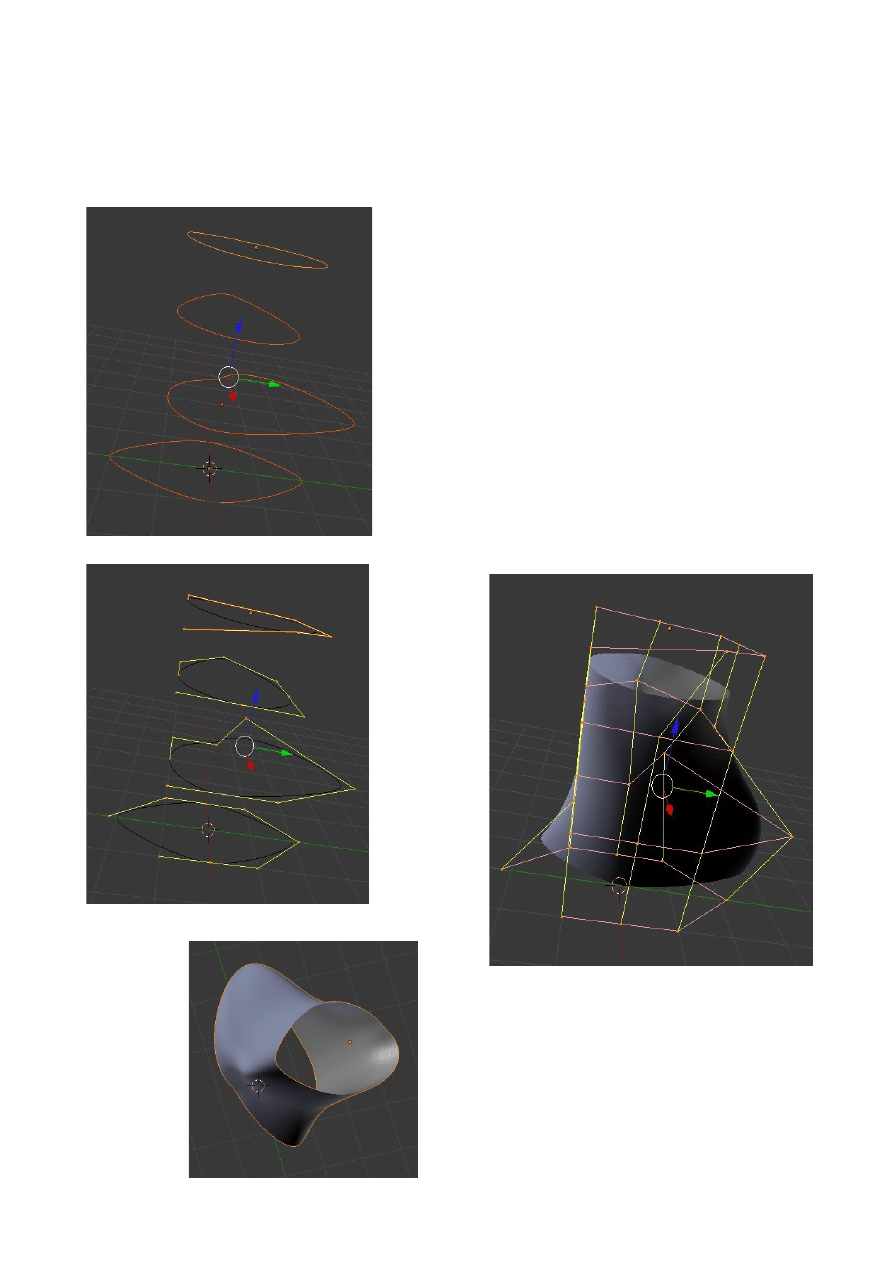
Creating a Lofted Tunnel
This process will take several profiles of a NURBS Circle which are all manipulated
to different profiles and connect them together forming a hollow object (Tunnel).
The first thing you need to do is create a NURBS
Circle as previously described. The circle is
entered in the scene in Object mode. Tab into Edit
mode. Select the points and shape the circle a bit.
After shaping go back into Object mode. Change
your view so you are looking down on the circle
(Top view Num Pad 7). Use the “ Shift-D ” keys
to duplicate the circle several times and position
them. Then rotate your view so you can select
each circle. In Edit mode edit the shapes . After
shaping the circles, exit edit mode and select them
all by RMB clicking on them while holding
'Shift'. Join them together, pressing Join in the
Tool Shelf. For the final step press Tab for Edit
mode then A Key to select all vertices then F
Key.
All Vertices selected
Shift select Circles and Join
F Key Creates Lofted Shape
Shape Rotated
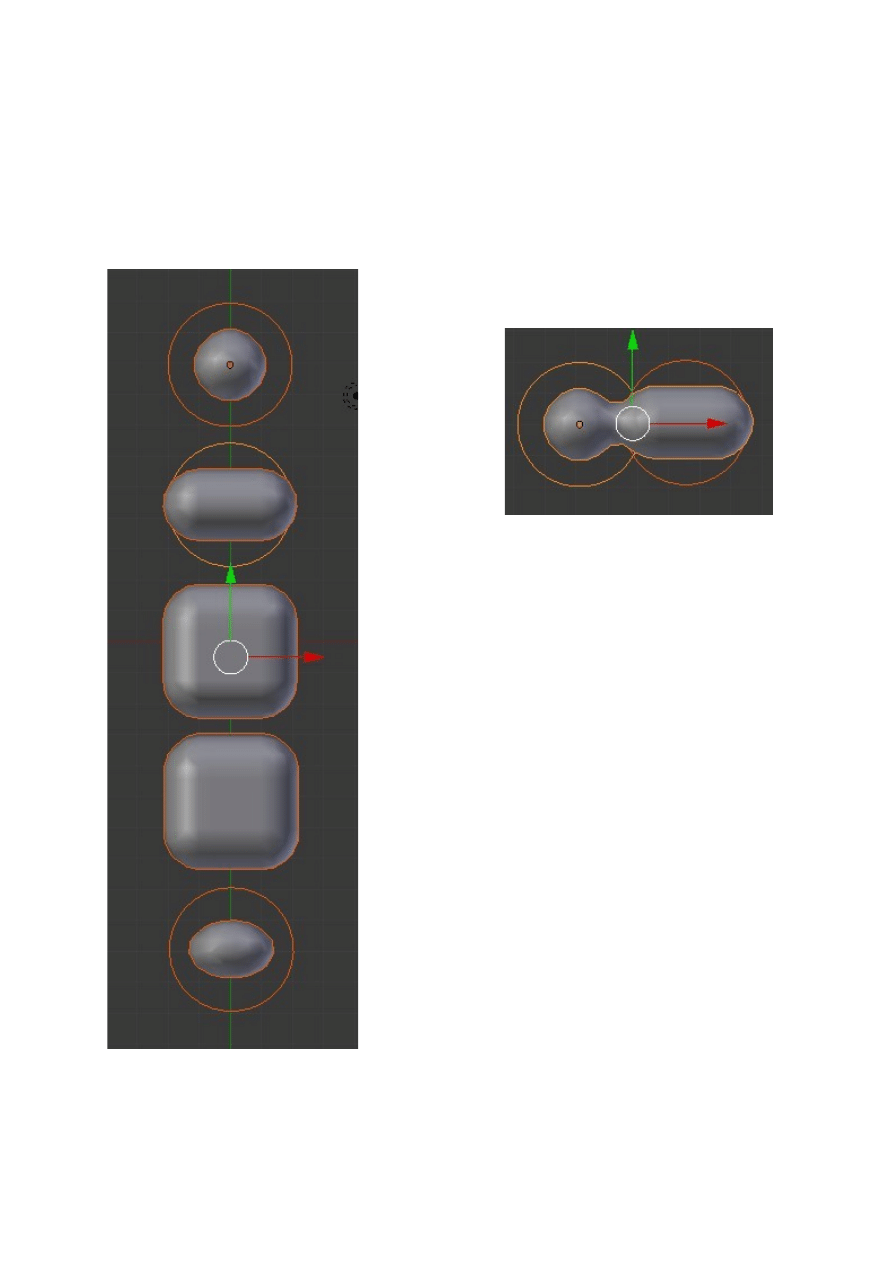
Meta Shapes
There are several Meta Shapes you can use in Blender. When Meta Shape get close to
one another they begin to pull and flow together like droplets of liquid. The shapes
can be animated, textured, and reflection and transparency can be applied to create
some stunning effects. Meta shapes are added to a scene like any other object.
Meta Shapes are added to a scene in Object mode. Remember to deselect one shape
before adding another otherwise they will be joined.
Meta Ball
Meta Tube
Meta Cube
Meta Plane
Meta Ellipsoid
Meta Ball and Meta Tube
In close proximity
CH14- Modifiers
01-Modifiers
02-Modifier Stack
03-Array Modifier
04-Object Offset Modifier
05-Bevel Modifier
06-Boolean Modifier
07-Build Modifier
08-Decimate Modifier
09-Mask Modifier
10-Mirror Modifier
11-Screw Modifier
12-Subdivision Surface Modifier
13-UV Project Modifier
14-Cast Modifier
15-Curve Modifier
16-Displace Modifier
17-Hook Modifier
18-Lattice Modifier
19-Mesh Deform Modifier
20-Shrinkwrap Modifier
21-Simple Deform Modifier
22-Wave Modifier
23-Explode Modifier
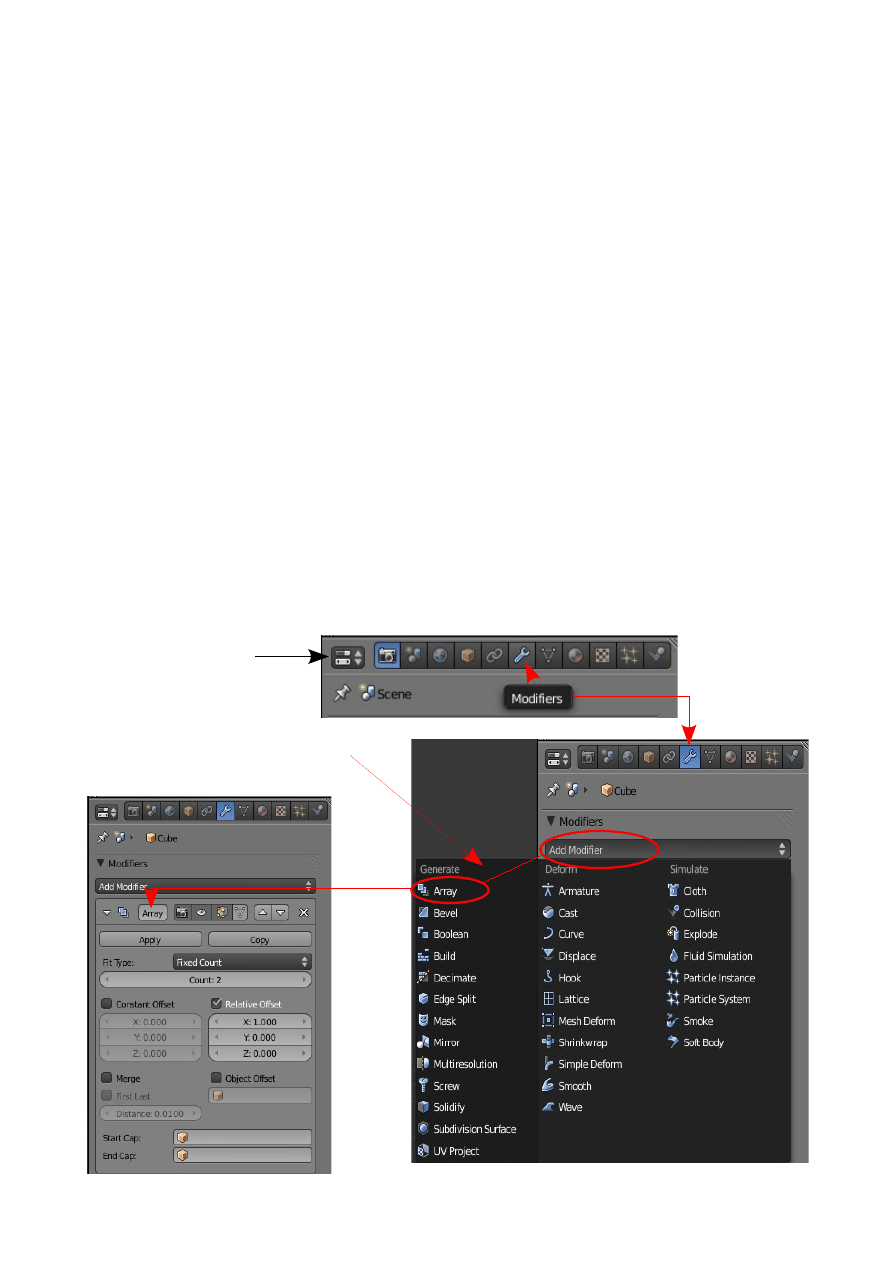
Modifiers
A Modifier is defined as the application of a “process or algorithm” upon Objects. In
other words once you have created an object in the scene you can apply a neat little
and sometimes not so little set of data that will change the shape or way the objects
behave. The modifiers are designed to take some of the hard work out of shaping an
object. Be warned though that applying some of Blenders modifiers is not straight
forward and has to be performed in conjunction with other processes. Without some
instruction in how to apply the modifiers a lot of hit and miss, trial and error, messing
about can be involved. To save you all that trouble the following section on Modifiers
is offered as a guide. You will still have to experiment and record your findings to
become proficient in the application of modifiers.
To begin with Modifiers are found in the Properties Window – Modifiers button. The
Modifier button is only displayed when an object is selected in the 3D Window and
only when it is possible to apply the modifier to that object.
Start with the default Blender scene with the default Cube object. Select the Cube. Go
to the Properties Window – Modifier button and click on 'Add Modifier' to display
the Modifier drop down selection menu. You will see there are quite a number to
choose from, some of the names seem self explanatory some not so clear in their
meaning.
Properties Window
Modifier Panel Displayed
Drop Down Selection Menu
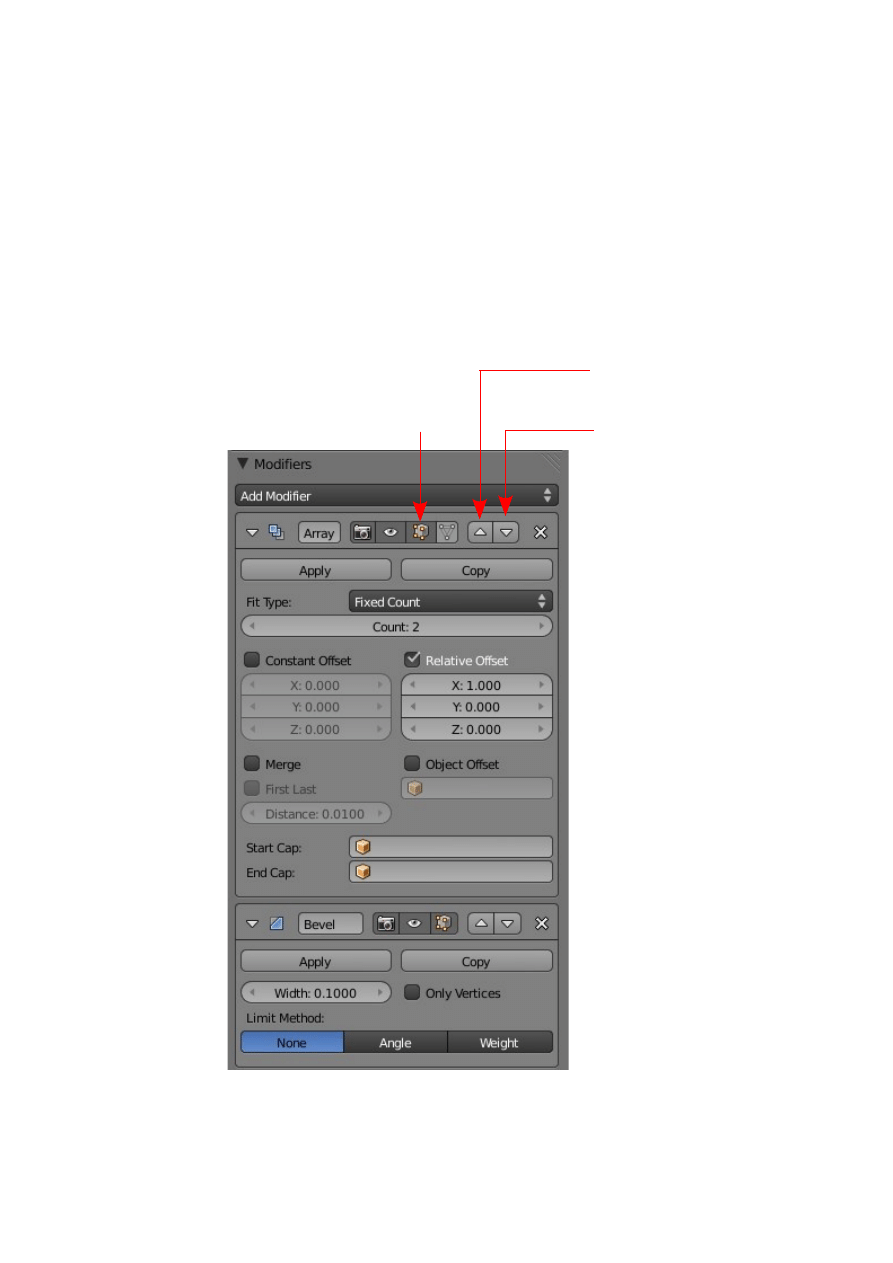
Modifier Stack
Before explaining the individual modifiers it should be noted that in some cases it is
appropriate to apply more than one modifier to an object. When this is done the
modifiers are placed in a stack in order of priority. The priority can be changed by
moving a modifier up or down in the stack.
Also note that although modifiers are generally applied in Object mode some may be
used in Edit mode.
This Screenshot shows an Array Modifier and a Bevel Modifier applied.
Array Modifier
Bevel Modifier
Click to enable Modifier settings
to be applied in Edit mode
Click to move Modifier up in
the Stack
Click to move Modifier down
in the stack
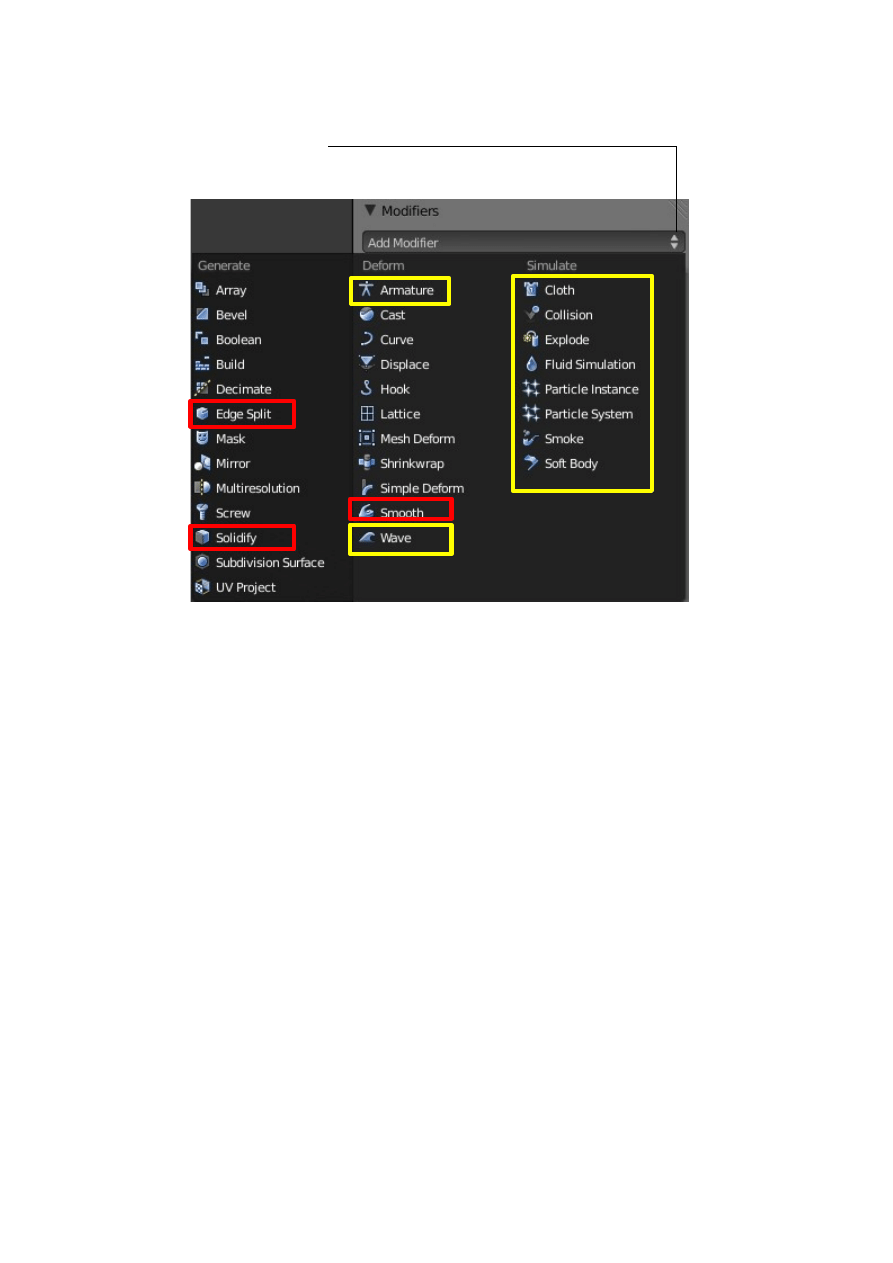
The following pages will give a basic insight into how some of the modifiers are
employed. The full listing of modifiers available are as shown in the modifier
selection drop down menu.
The modifiers marked in yellow will be covered in later sections relating to
Armatures, Particles and Physics. The modifiers marked in red will be added when I
figure out what and how they are used.
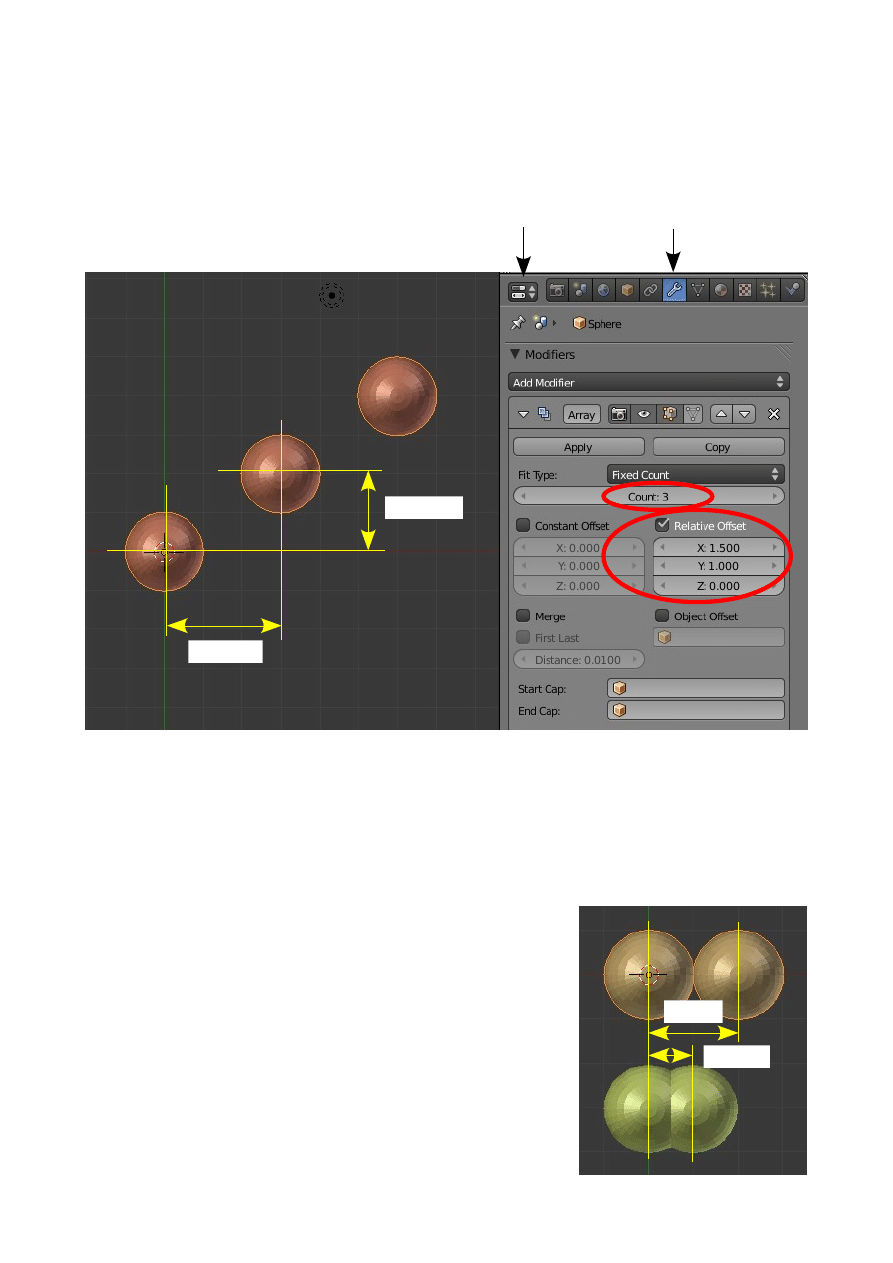
Array Modifier
The Array Modifier creates an array of copies of the base object with each copy being
offset in a number of possible ways.
UV Sphere object with Array Modifier applied with Count = 3 ( the base object plus
two copies equals an array of three) and X and Y Offsets.
Note the above is using the Relative Offset function.
There are three types of offset functions available. Relative, Constant and Object.
With a Count value of 2 and offset along the X axis of 1
the difference between Relative and Constant is shown
here.
The third offset option 'Object' is show as follows and is
combined with the addition of a second Array Modifier..
Properties Window
Modifier button
Y = 1.000
X = 1.500
Relative
Constant
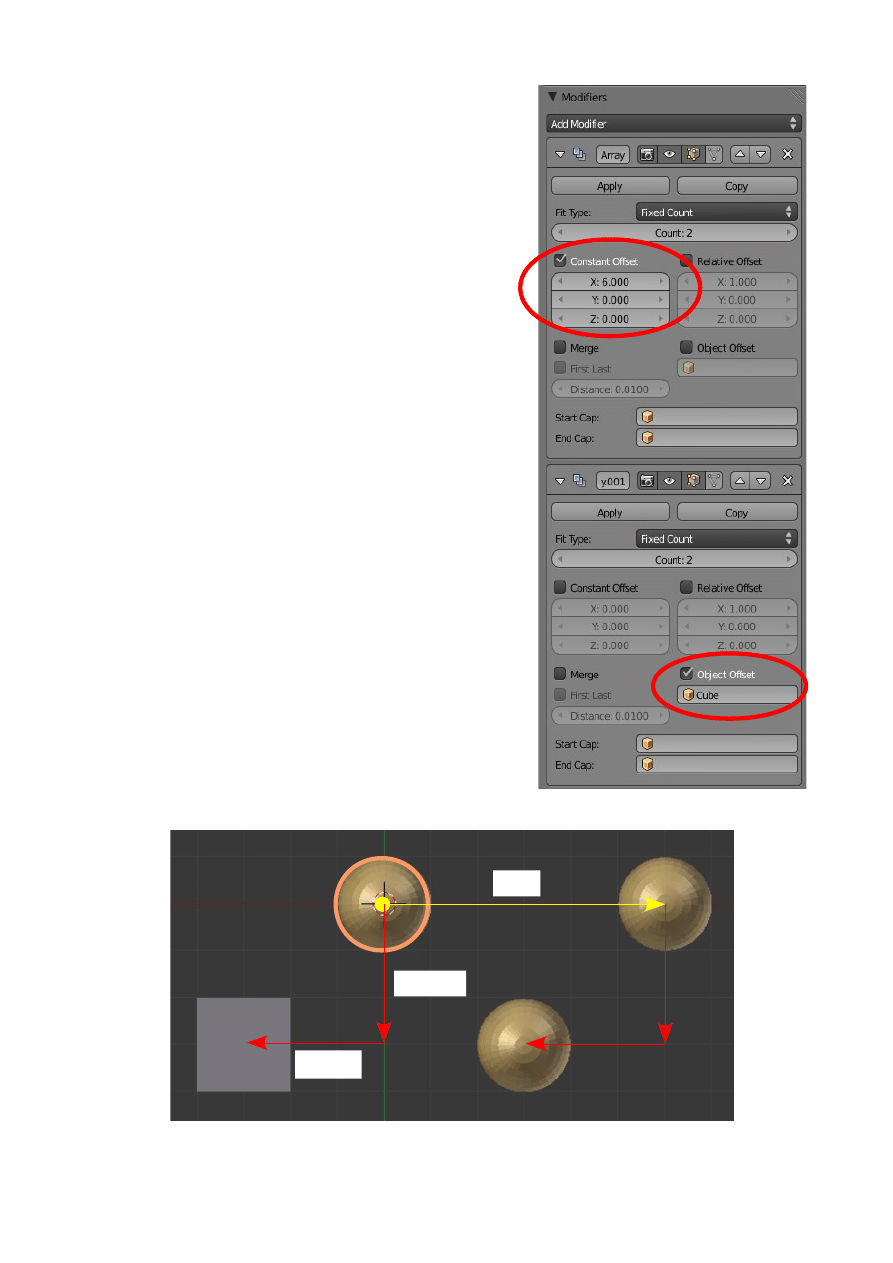
Object Offset
In this example the Sphere has an Array modifier
with Count = 2 and a Constant offset x = 6. In
addition a second Array modifier is added with an
Object offset.
The Object Cube is located at x = -1.5 and y = -1.5
The first Array modifier places a second Sphere at
x = 6. The second Array modifier uses the
coordinates of the Object Cube to place a third
Sphere relative to the second Sphere at x = -1.5 and
y= -1.5
Remember Count 2 means an Array with two objects
the original object plus one. Adding a second
modifier with Count 2 still tells Blender to make an
Array comprising the original plus one. We therefore
have the original plus one and the original plus one.
Three.
1
2
3
X = 6
Y = -1.5
X = -1.5
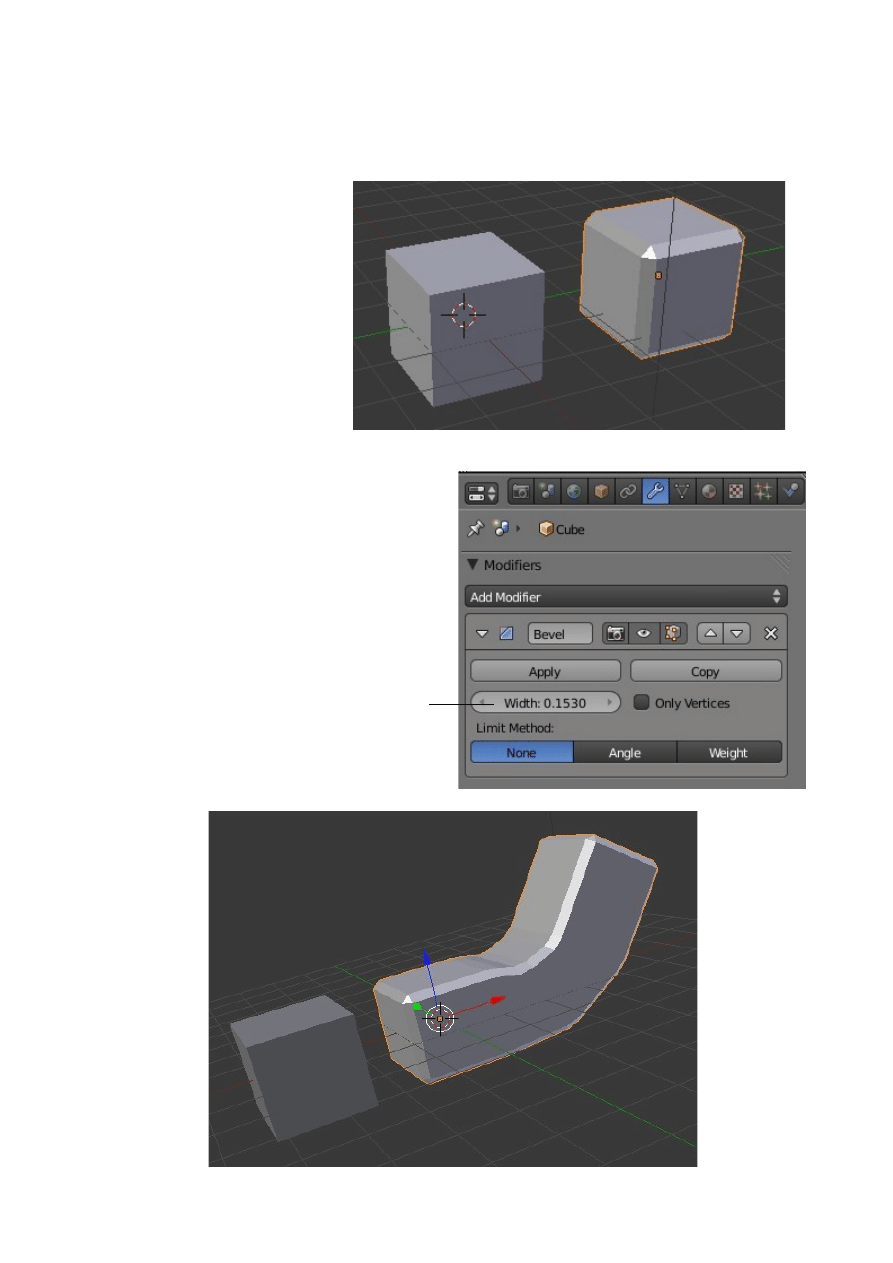
Bevel Modifier
The Bevel modifier simply adds a bevel to the corners of an object.
Default Cube with Bevel
Modifier applied
Extruded Cube with Bevel Modifier applied
Width of Bevel
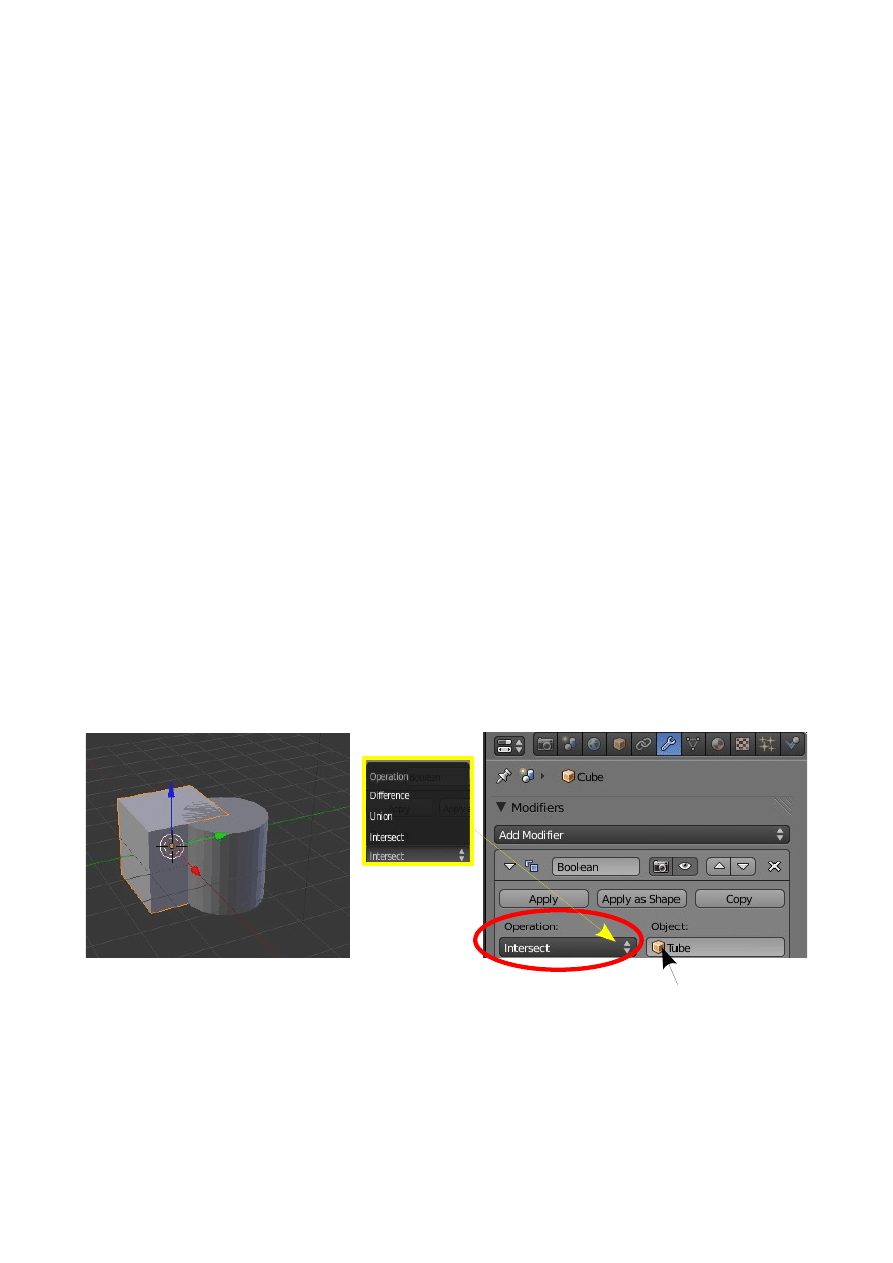
Boolean Modifier
Boolean Modifiers are used to create shapes by using a Difference, Intersection or
Union between Objects. To demonstrate this we will use the default Cube and a Tube
object.
Be warned that unless you have a super fast computer some calculations can take
several seconds.
Start with the Cube and Tube and position them as shown. This will be the same set
up for all three Operation types. Begin with the Boolean type 'Intersect'
To make sure the procedure works set the verticies count to 16 when you add the
Tube. My old clunker of a computer stalls if I try the default 32 verticies. Add the
Tube then change the verticies in the Tool Shelf.
Intersect
( Creating an Object which is the shape of the overlap of two objects. The Cube will
be the object that is modified ).
Select the Cube. In the Properties Window – Modifier button – Click 'Add Modifier'
and select type 'Boolean'.
The Operation type by default is 'Intersect'. In the Object panel click on the little cube
icon and select 'Tube' in the drop down menu. ( Note this panel allays shows a little
cube icon despite the shape of the actual object being selected ).
in the 'Display' tab click on 'Apply'. The modifier panel disappears. In the 3D
Window move the selected object to reveal the new object being the shape of the
overlap. The Tube object remains in the scene.
Start position for Cube and Tube
Boolean Modifier
Click to add Tube
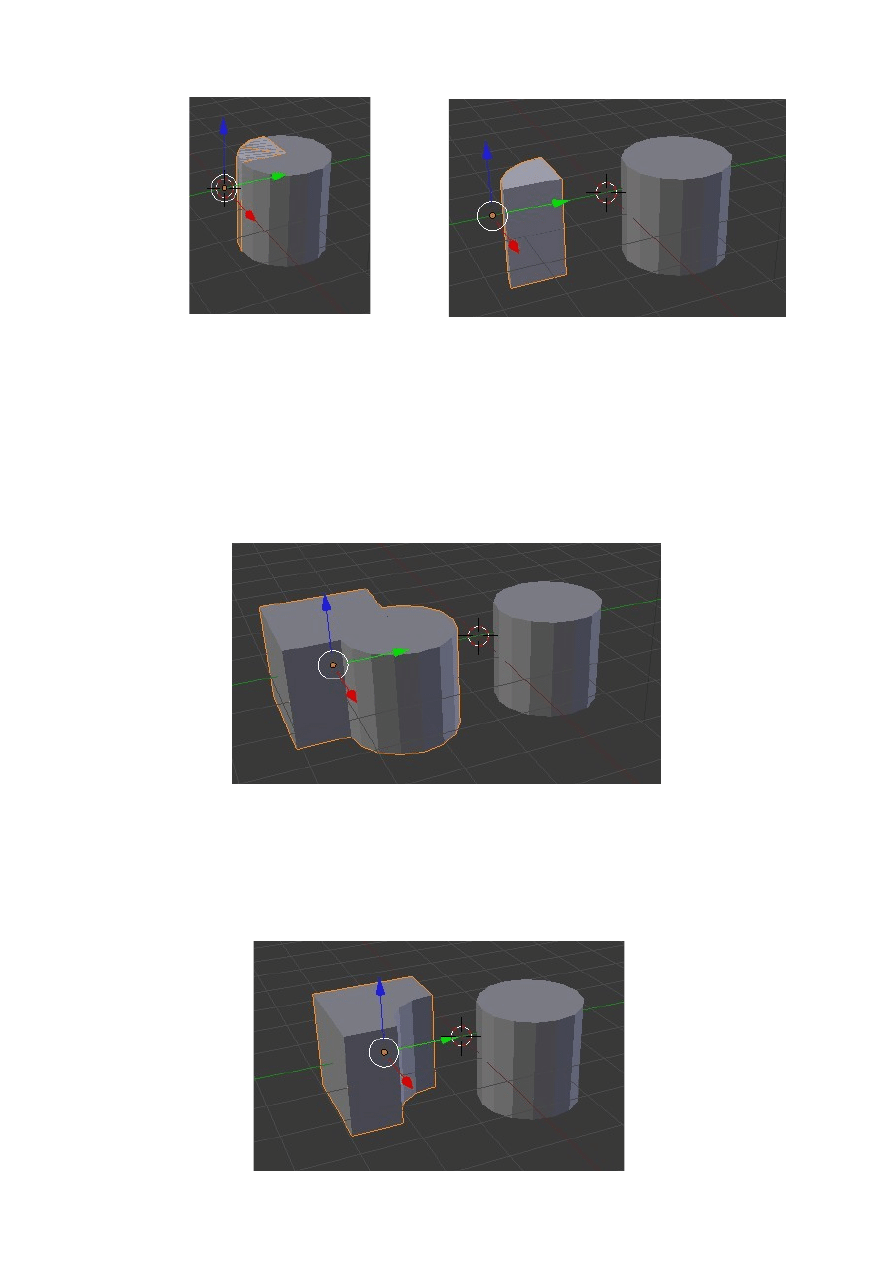
Union
( Creates a shape which is a union of two objects ).
Add a Modifier to the Cube and select Operation type 'Union'. In the Object panel
(Little cube icon) click and select 'Tube'. Click “Apply'. Move the selected object in
the 3D Window.
Difference
( Creates a shape which is the difference of the two objects. In other words subtract
the overlap of the objects from the object being modified ).
Follow the same procedure as the foregoing examples selecting Operation type
'Difference'.
3D Window after applying
modifier
Separate the objects to see the Intersection
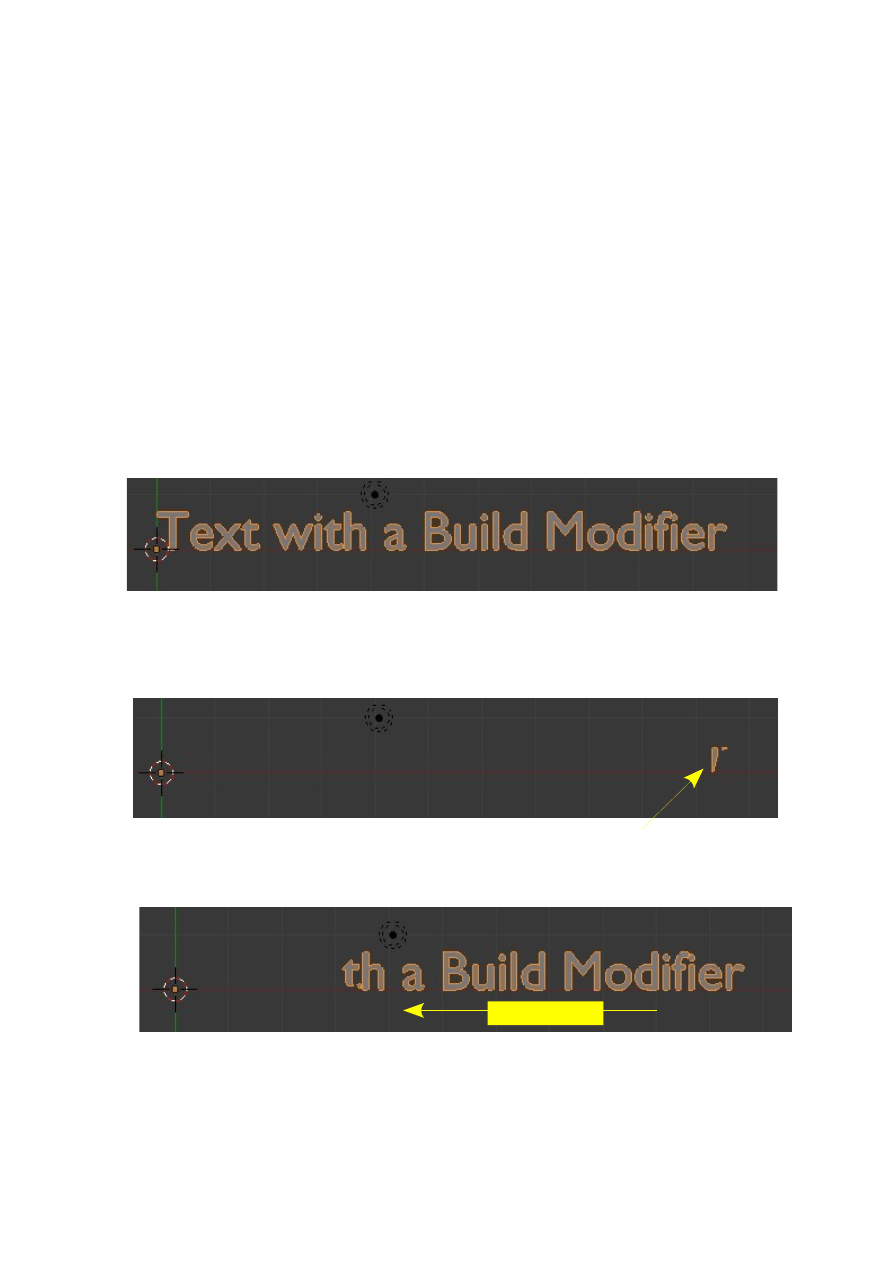
Build Modifier
The Build Modifier creates the effect of something building linearly over a period of
time.
For example Text can be animated to build across the screen. Any object can have a
Build Modifier but to see a nice affect a high vertices count is required.
Add some text to the scene ( See the section on 3D Text ).
Select the text in the 3D Window and add a Build Modifier.
As soon as you add the modifier the text disappears from the screen. Press Alt + A to
see the animation of the text building.
Text in the 3D Window selected in Object mode.
Text with the Build Modifier added.
Text building while playing the animation
Part of the text showing
Build direction
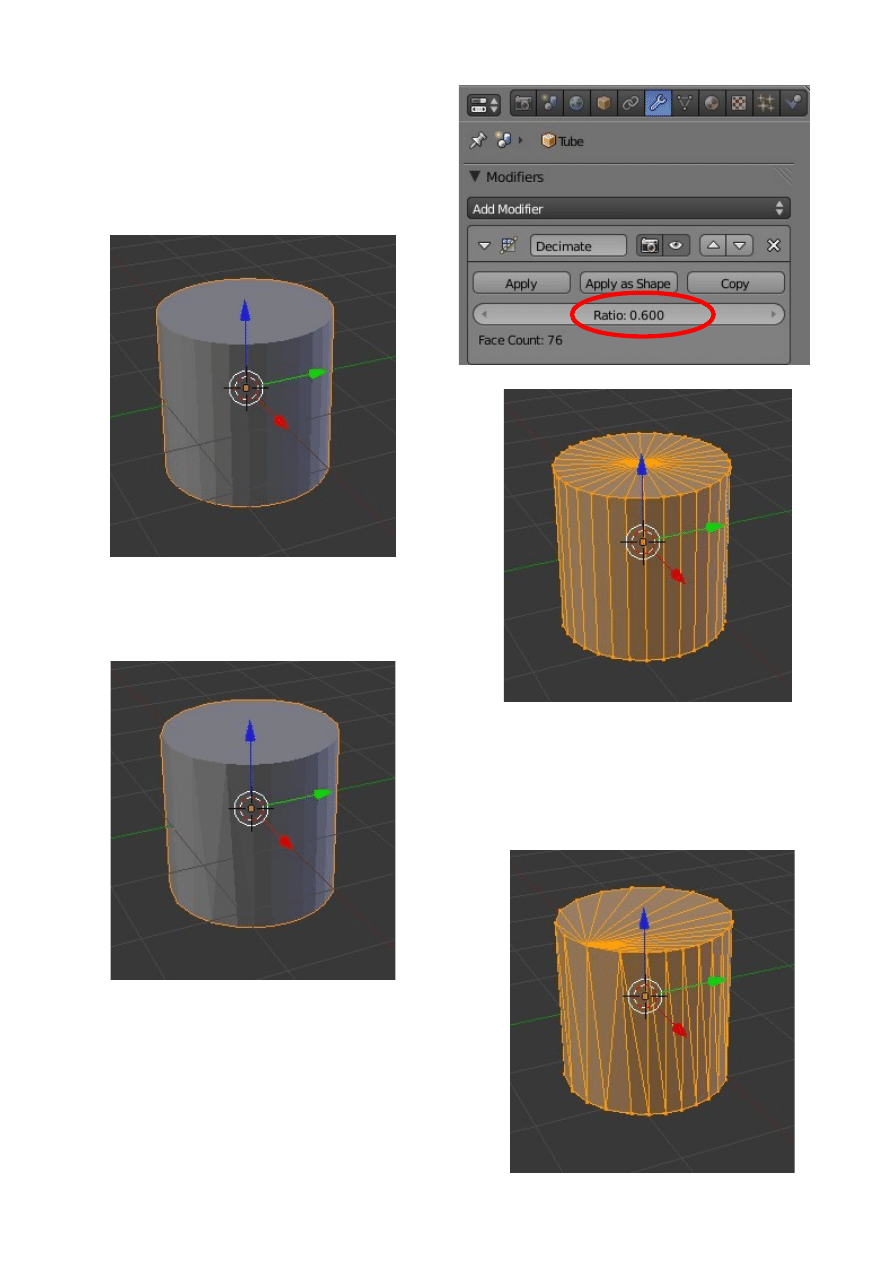
Decimate Modifier
The Decimate Modifier allows reduction in
vertices count without too much alteration
to shape.
Default Tube before Modifier applied
Default Tube in Edit mode showing
vertices before Modifier applied
Tube after Modifier applied with Ratio:
0.600. There is not too much change to
the appearance.
Edit mode shows the reduction
in the number of vertices
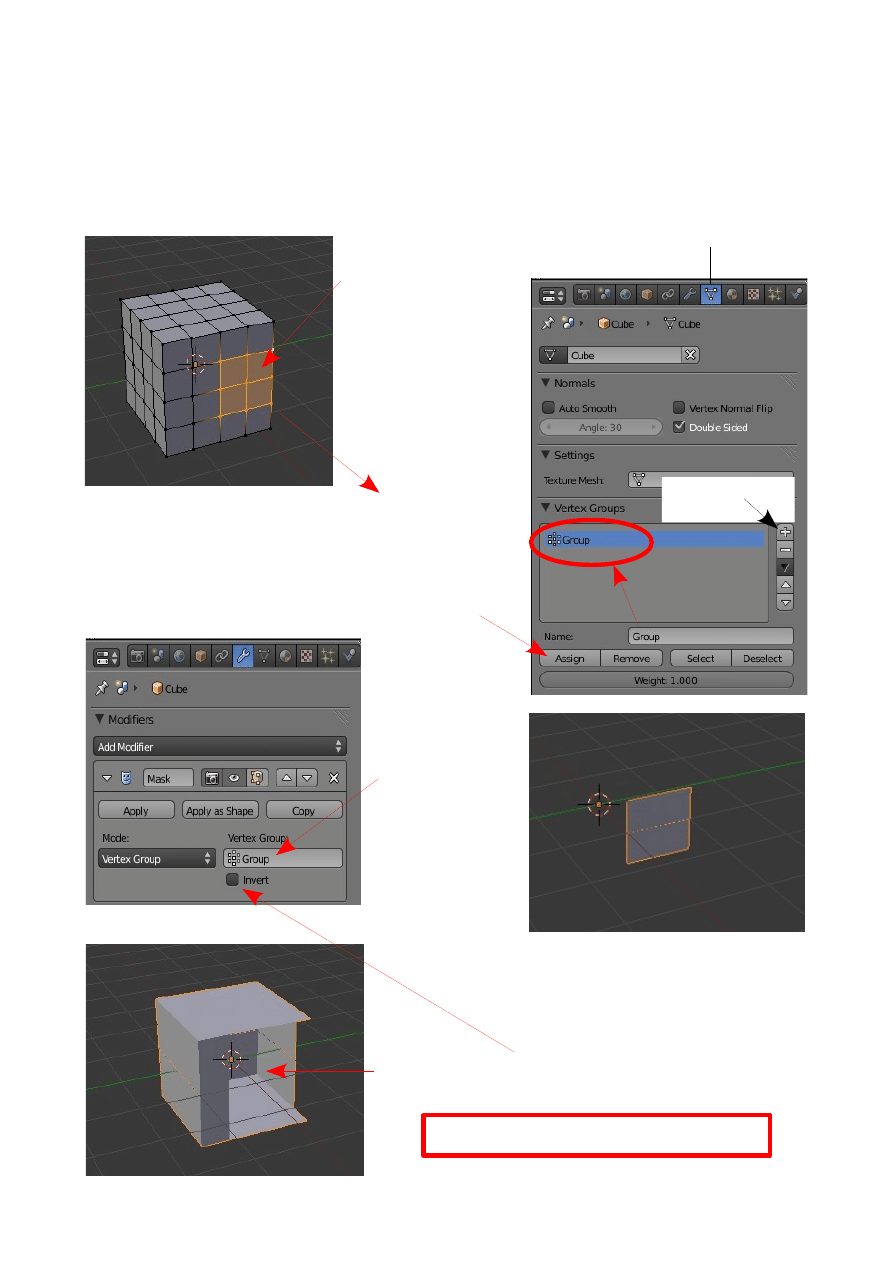
Mask Modifier
The Mask Modifier allows portions of a mesh which are defined by Vertex Groups to
be the only part of the mesh that is visible or inversely to be the only part of a mesh
that displays. By using the modifier visibility can be controlled without removing
verticies.
Vertices selected in Edit
mode
Vertices assigned to the
Vertex Group named
'Group'
Object data button
Click to assign
vertices to 'Group'
Click to add Group
Mask Modifier added to Cube
Group entered
Only Group visible with modifier applied
Group invisible with 'Invert' ticked
No vertices have been removed from the Cube
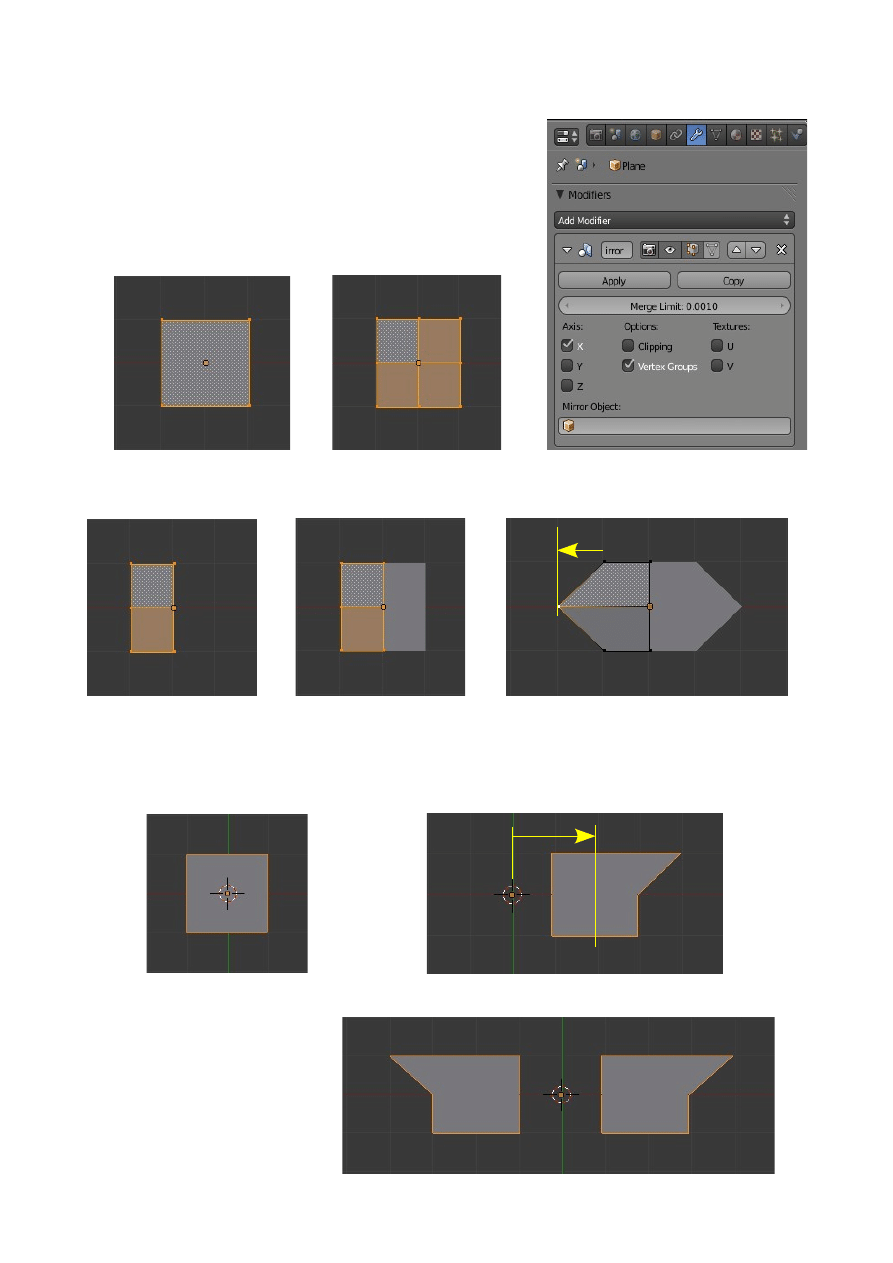
Mirror Modifier
The Mirror Modifier allows the construction or
deformation of a mesh on one side of a center point to
be duplicated (Mirrored) on the opposite side.
Example 1.
Example 2.
1. Plane in Edit Mode
2. Plane Subdivided
3. Vertices removed on
one side
4. Mirror Modifier
applied
5. Mesh deformed by moving
vertice with Mirror applied
Mirror Modifier
1. default Plane
2. Plane deformed and moved from center
3. Mirror Modifier Applied
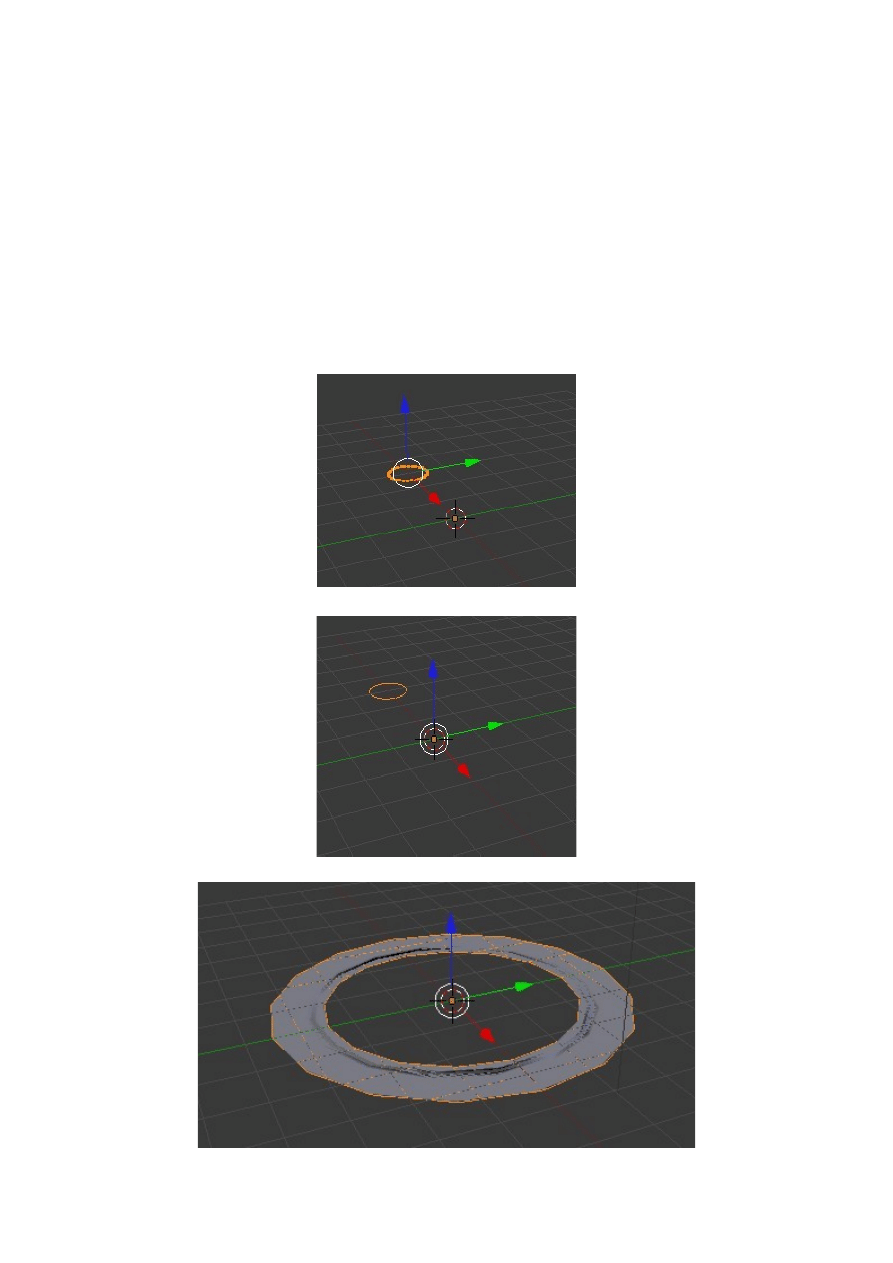
Screw Modifier
The Screw Modifier allows a shape to be generated by revolving a profile around an
axis. To demonstrate this we will construct a spring.
All operations are conducted in the default camera view.
Follow the steps in the exact order listed.
1. Delete the default Cube object and add a circle. Scale the circle down 0.500.
2. Tab to Edit mode and move the circle along the X axis ( N key to display the
Transform panel, Median: -6.000).
3. Tab to object mode.
4. Add a Screw Modifier to the Circle.
Circle revolved about the default Z axis
Edit Mode
Object Mode
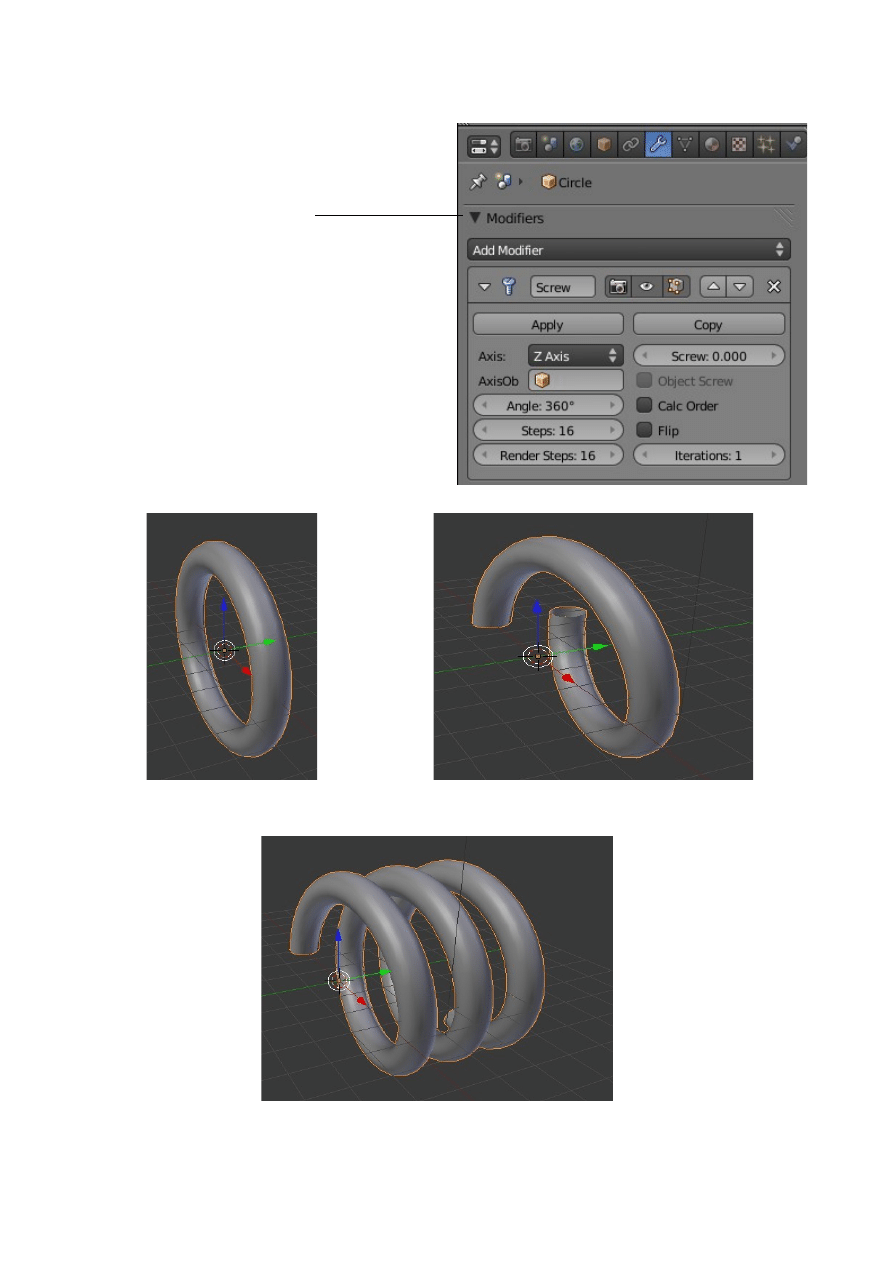
5. Change the settings in the modifier panel.
6. Axis: y ( Revolve about the Y axis )
7. Steps: 100 ( To produce a smooth
surface )
8. Screw: 10 ( Offsets the revolution )
9. Angle: 1000 ( Number of revolutions
)
Modifier panel shown with the
default settings
Revolved about Y axis
Screw: 10 Offset
Angle: 1000 Revolved
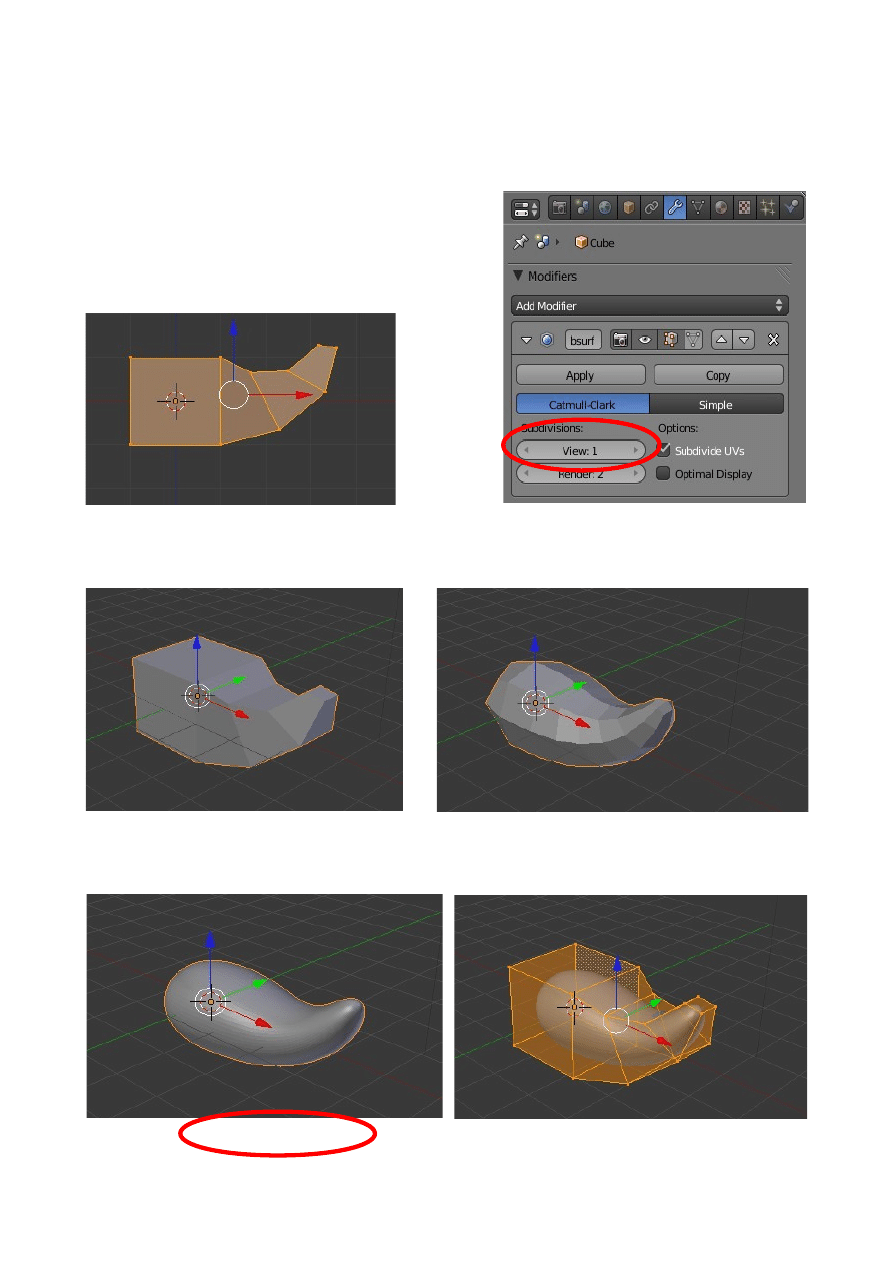
Subdivision Surface Modifier
The subdivision Surface Modifier is used where the Smooth button in the Shading
section of the Tools Shelf does not quiet do the job and you do not want to subdivide
your mesh adding more vertices.
This example shows the method.
1. Default Cube with one face extruded
Front view Num Pad 1- edit mode.
2. Sub Serf Modifier Panel
Default settings
3. User perspective view of extrusion
Object mode
4. User perspective view
With Sub Serf Modifier added ( default settings)
5. View value 1 changed to 4
6. Tab to edit mode to show
Origional number of Vertices unchanged
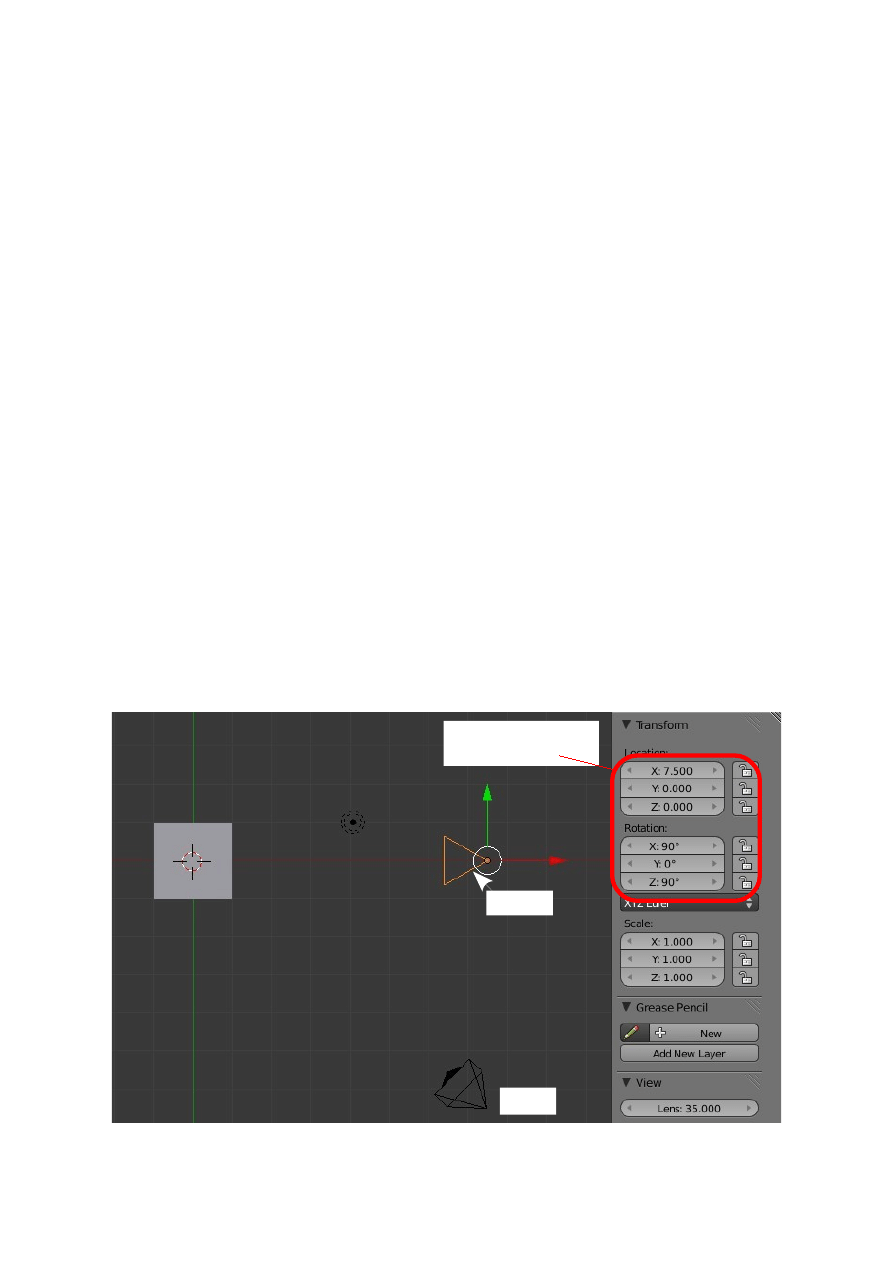
UV Project Modifier
The UV Project Modifier allow projection of an image on to the surface of an object.
Before the modifier can be applied the scene must contain the following items and
settings are required. To demonstrate the very basics of the process we will project an
image on to one face of the Cube in the default Blender Scene.
Before we begin we must have the following items.
1. An Object on which to project the image (Default Cube).
2. An image to be projected ( Know the location of an image on your computer).
3. A Camera to see what is being projected and to allow rendering.
4. A Projector to do the projecting.
Start with the Default Blender scene and go to top view (Num Pad 7) in Top
Orthographic projection (Num Pad 5).
The scene already contains a Cube object, Camera and Lamp. For this exercise the
Lamp isn't necessary since the image we will be projecting will be self illuminating.
We will leave the Lamp in place anyway.
The first thing to do is add a Projector. Any object can be used as a Projector and it is
common to use an Empty or a Camera for the purpose. Since we already have a
Camera it is very simple to duplicate it ( Shift + D ). When the Camera is duplicated
Blender automatically names it Camera.001. Go to the Properties Window – Object
button and rename 'Camera.001' 'Projector' ( Click on the name, delete, retype, press
'Enter' ).
In the 3D Window move the Projector and position it as shown above.
Transform Panel
Values
Projector
Camera
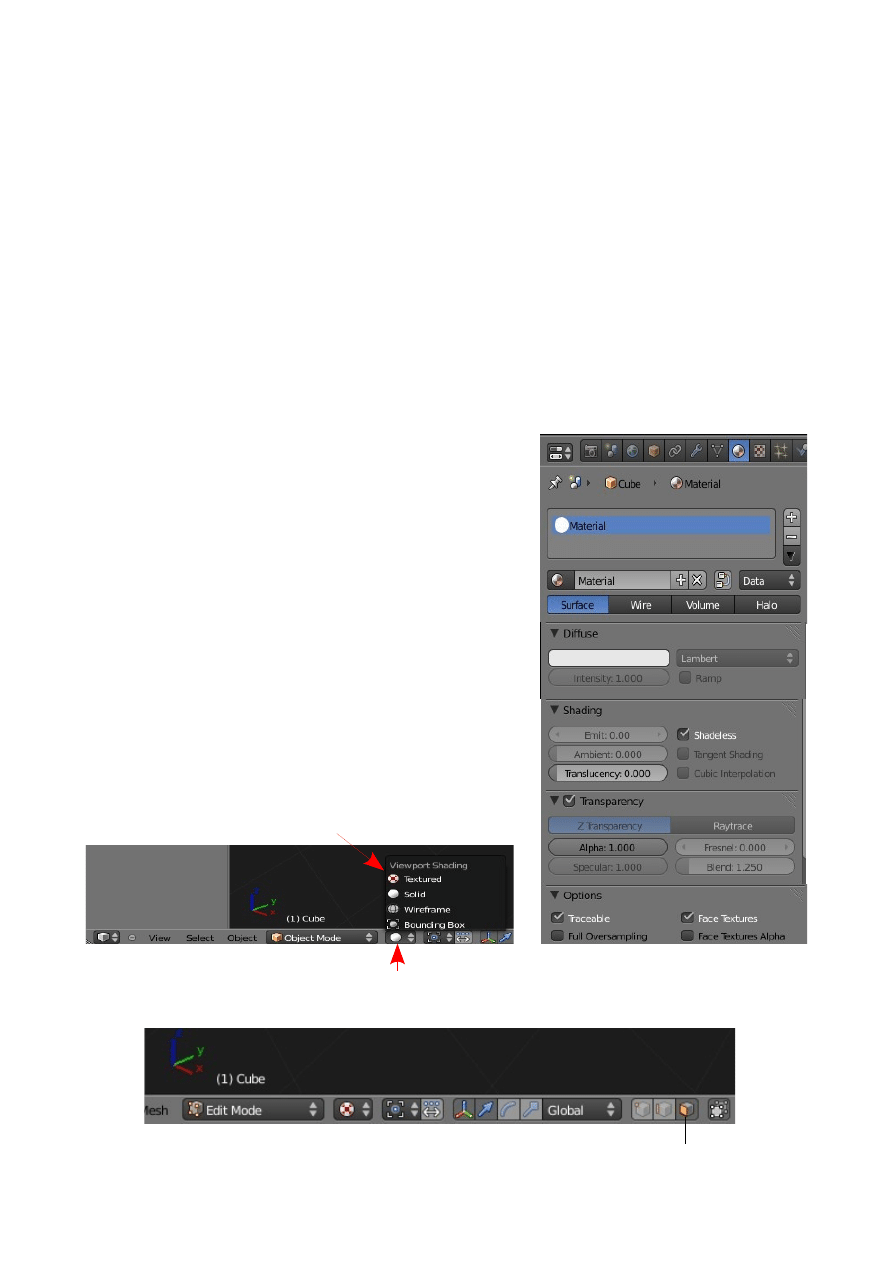
You may position the Projector anywhere you like but it will make this demonstration
easier to follow if you copy the demonstration exactly. To precisely position the
Projector use the Transformation panel and enter the values as shown. This will put
the Projector squarely pointing at the Cube on the X and Y axis.
Deselect the Projector and change the 3D Window to Camera view (Num Pad 0).
To perform Image projection the Object being projected on must have a Material with
some unique settings. In the 3D Window (Camera View) select the Cube. Go to the
Properties Window – Material button. The default Cube in the default scene comes
preloaded with a material. Thats the dull grey color that you see. If you have added a
new Cube object you will have to add a new material.
With a material added change the following settings in the Material buttons.
1. In the Diffuse tab set - 'Intensity: 1.000'
2. In the Shading tab tick – 'Shadeless' and set
'Ambient: 0.000'
3. In the Transparency tab tick – 'Transparency'
and check ' Alpha: 1.000' is set.
4. In the Options tab tick – 'Face texture' ( Leave
'Traceable' ticked )
We now have to tell Blender what image we want
projected and give some coordinates to project to.
Split the 3D Window in two and make one half a UV
Image Editor Window.
In the 3D Window with the Cube selected change
Viewpoint Shading to 'Textured'.
Tab to Edit mode and set it in Face select mode. Press A Key to deselect all faces then
R Click on one face of the cube to select one face.
Face select mode
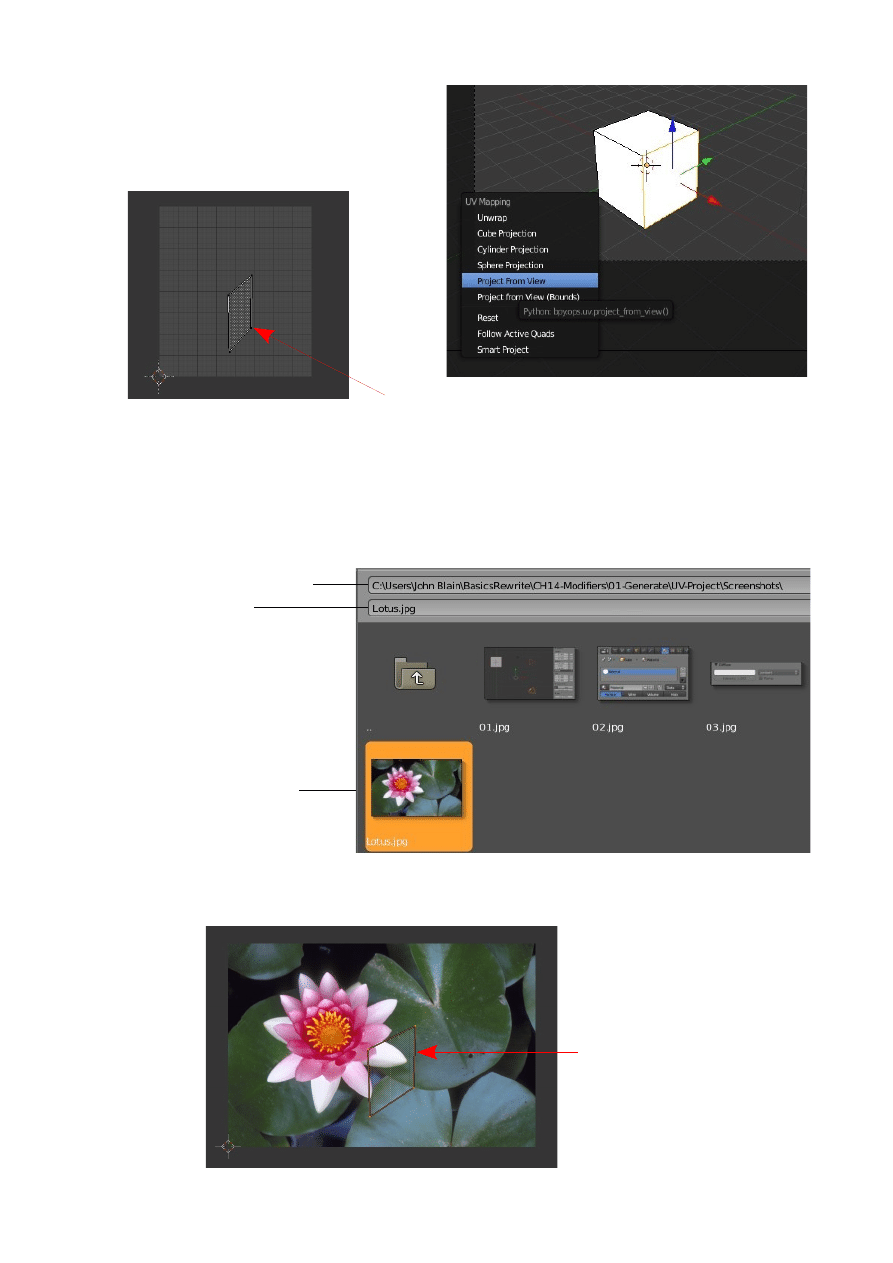
With the cursor in the 3D Window press
U Key and select 'Project From View'.
You will see the face you have selected
appear in the UV Image Editor.
In the UV Image Editor load your image. In the header click 'Image' then select
'Open'. This opens a file browser window where you navigate to the folder containing
you image. Click on the image file and click on 'Open' ( Upper RHS ).
Your image displays in the UV Image Editor window. You can still see the outline of
the face you have selected.
UV Image Edit Window
Outline of Selected Face
Image File Location
File Name
Image File selected
Outline of Selected Face
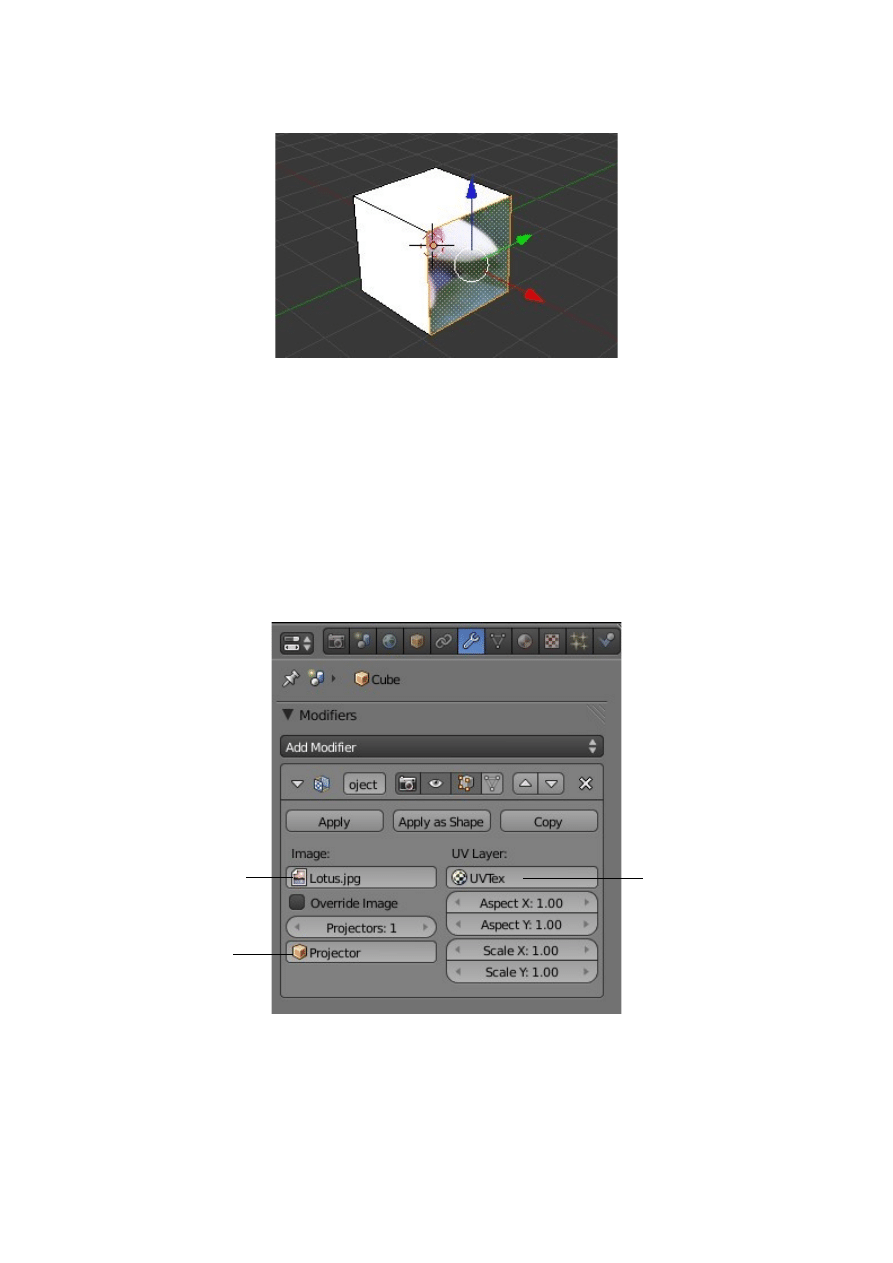
If you Press A Key to select the face outline and G Key and move the mouse you will
see the image projected on the face in the 3D Window move at the same time.
If you press F12 and render with the cursor in the 3D Window you will see whatever
portion of the image is covered by the face outline in the UV Image editor is rendered
on to the selected face of the Cube. You can also scale the face outline to capture
more or less of the image.
This shows you one method of projection but that is not where we were heading to
begin with. We want to use our projector but we have given Blender the information
about our image and have established some mapping coordinates.
At long last we can add our UV Project Modifier.
The Cube remains selected. In the Properties Window – Modifier button click 'Add
Modifier' and select 'UV Project' to display the modifier panel. In the modifier click
on the panels shown and select your Image ,the Projector and the UV Tex
coordinates.
Image on selected face
Click and select your
Image file
Click and select
Projector
Click and select UV
Tex
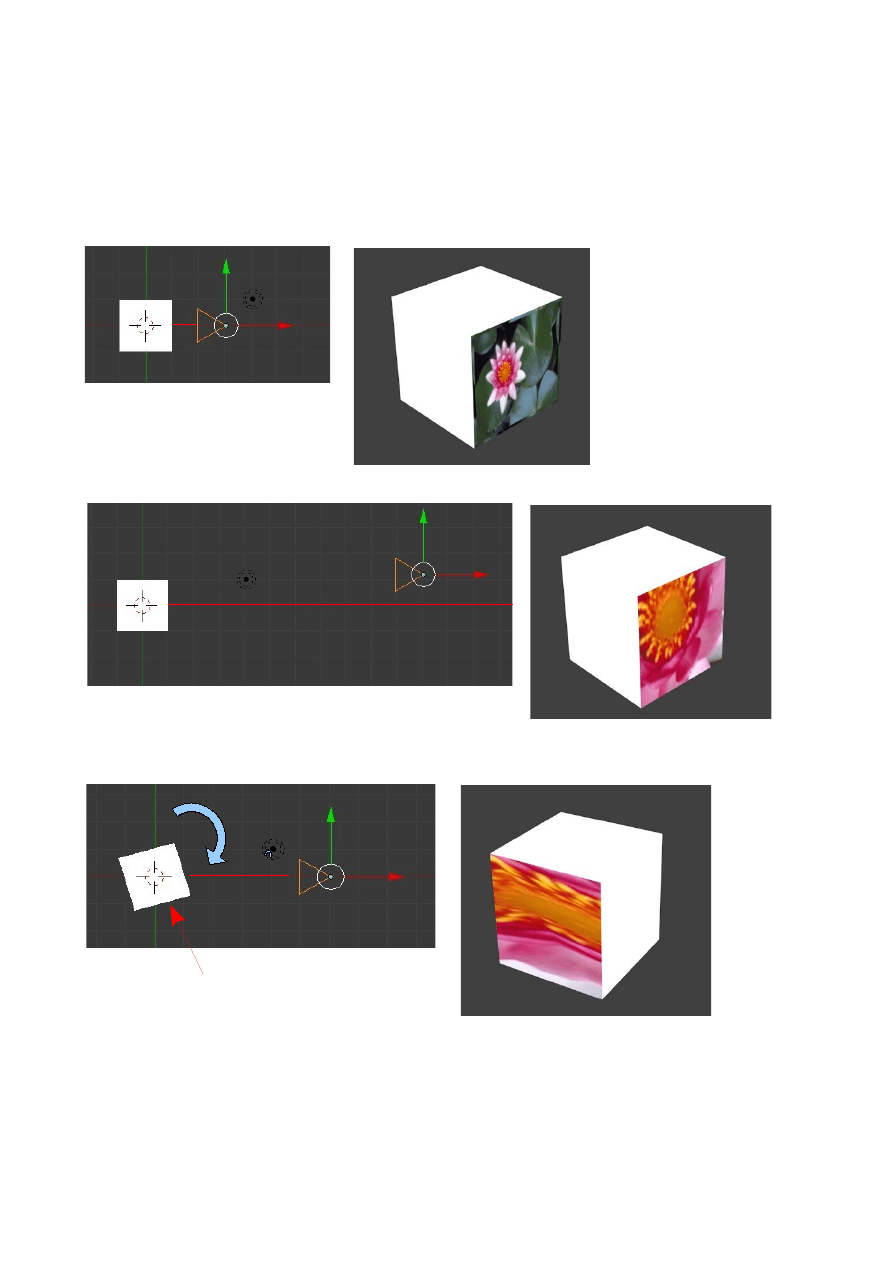
Render (Press F12) to see the image projected on to the face of the Cube.
By moving the Projector in the 3D Window relative to the Cube or moving, rotating
or scaling the Cube relative to the Projector the portion of the image displayed can be
controlled.
Selected Face
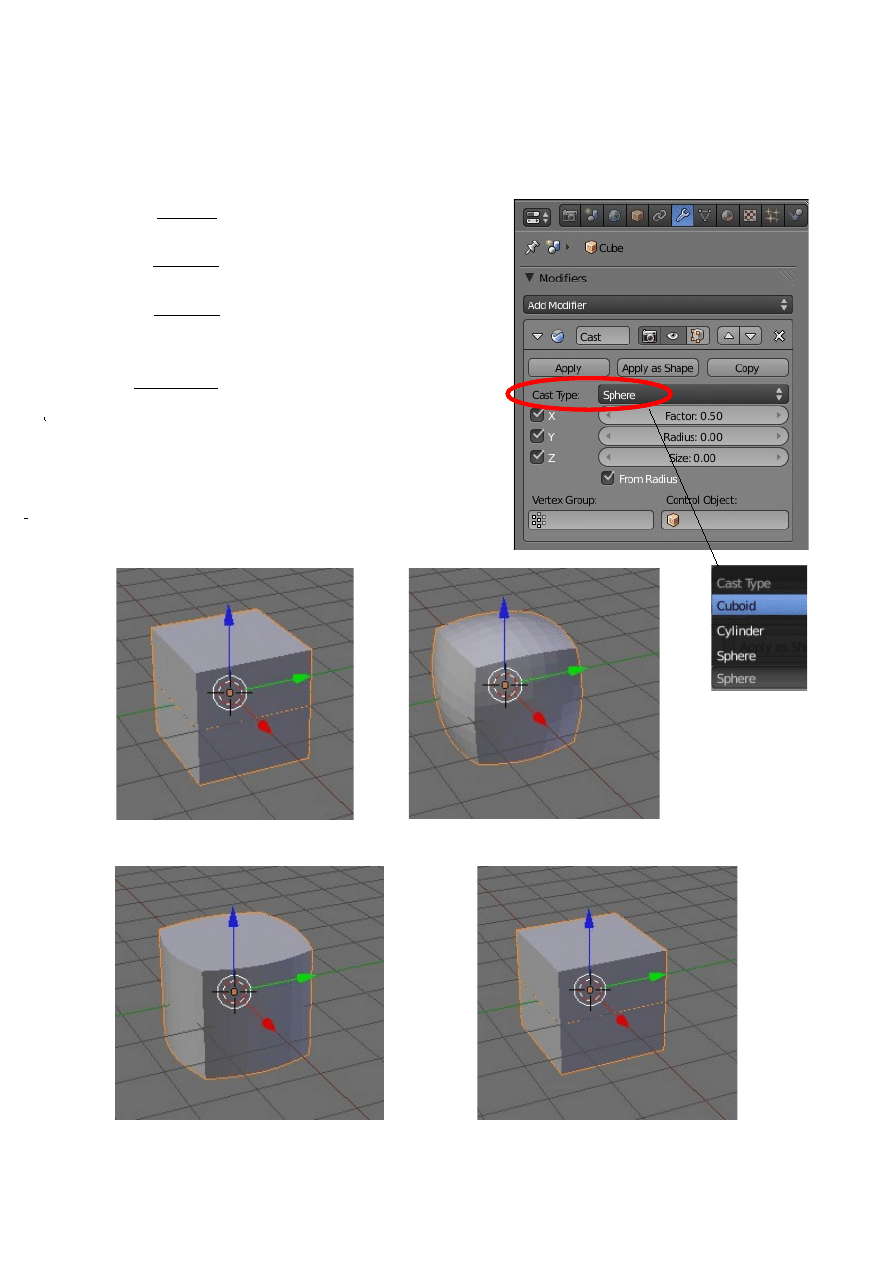
Cast Modifier
The Cast Modifier shifts the shape of a mesh, curve, surface or lattice to any of the
predefined shapes included in the modifier ie. Sphere, cuboid or cylinder.
X, Y, Z:
Untick to disable the deformation
on that axis.
Factor:
Slider controls the deformation. 0
= original + or – to deform.
Radius:
Only deform verticies within this
distance from the center (0 =
infinite).
Size:
Size of the projection shape (0 =
automatic).
Vertex Group: If verticies are assigned to a
vertex group only those verticies
will be effected.
Control Object: If a control object is used it
determines the center of the
effect.
Default Cube
Subdivide x3 in Edit mode
Cast Type Sphere
Cast Type Cylinder
Cast Type Cuboid
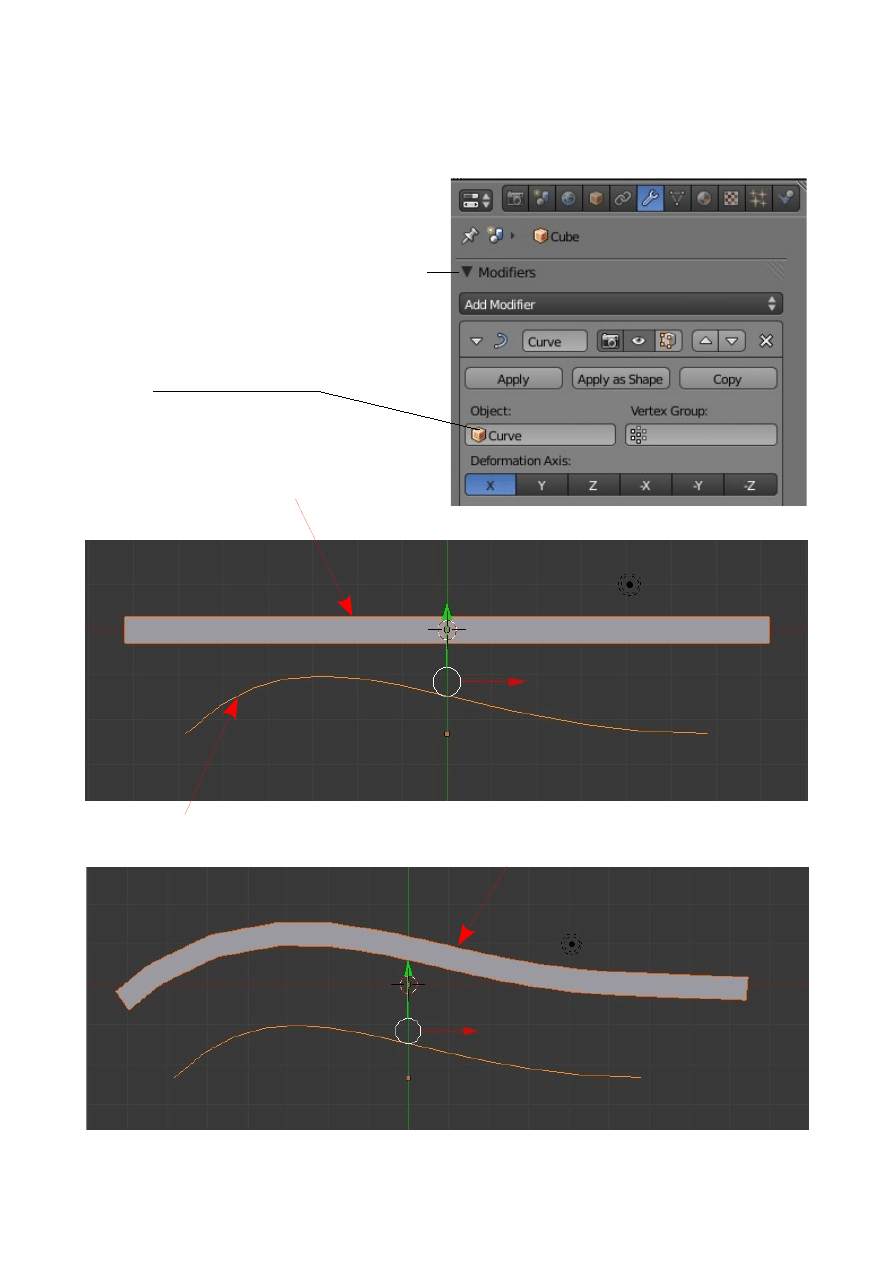
Curve Modifier
The Curve Modifier uses a Curve to deform a mesh.
Curve Modifier
Default Cube scaled on X axis and
subdivided six times in Edit mode.
Bezier Curve scaled on the X axis
Scaled Cube with Curve Modifier added
Scale and subdivide Cube mesh. Add a Bezier
Curve to the scene and scale up.
Add Curvr Modifier to the scaled Cube and
enter the name of the Bezier Curve in the Object
panel
Name = 'Curve'
Select the Curve and change its shape in Edit mode to manipulate the shape of the Scaled Cube
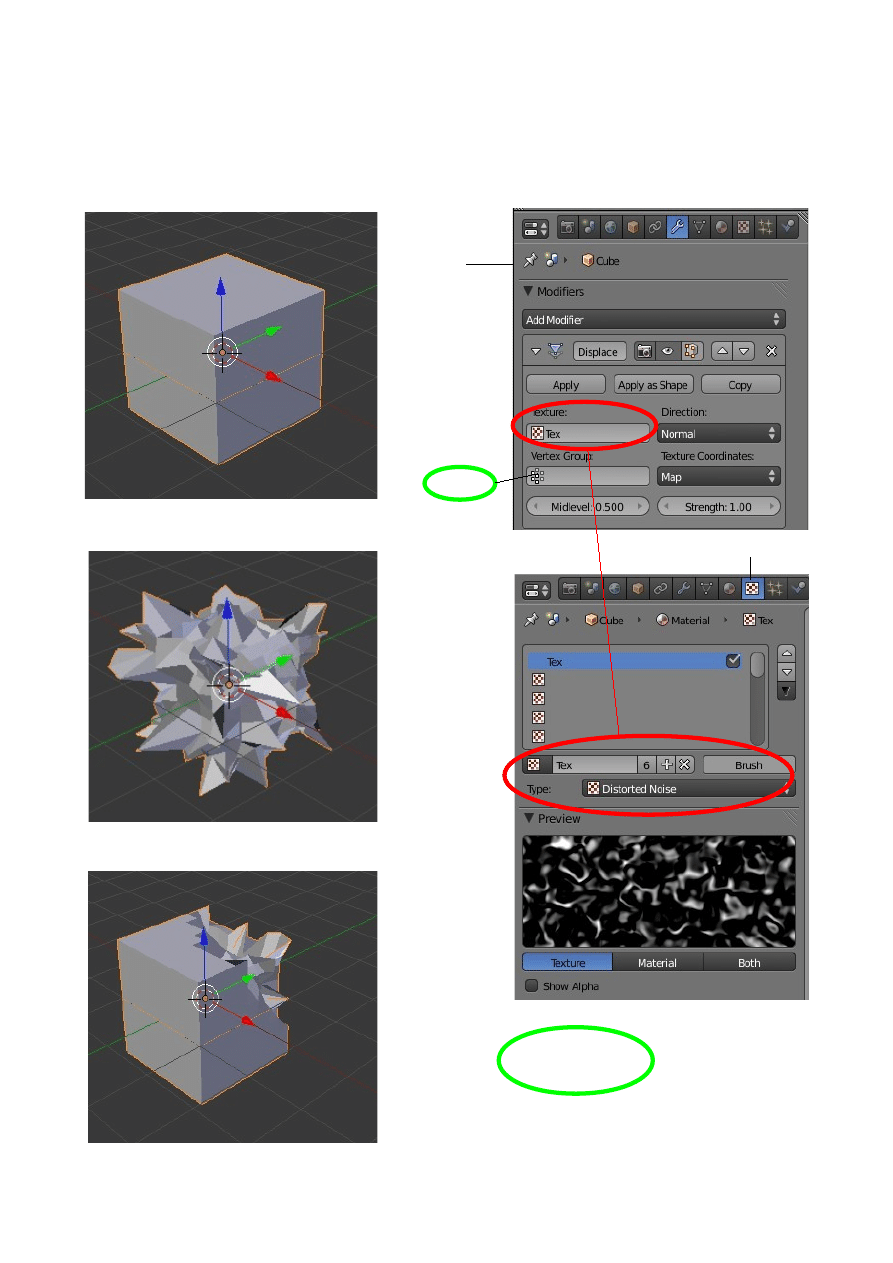
Displace Modifier
The Displace Modifier uses a Texture to displace the verticies of a mesh. If verticies
are assigned to a Vertex Group and the group is entered in the modifier only the
verticies belonging to the group will be effected.
Default Cube
Subdivided in Edit mode
Texture
Modifier
Vertex Group Selected
Select vertices in Edit mode and assign to
Vertex Group. Enter 'Group' in the modifier
Enter 'Group'
Default Cube with Displace Modifier
Distorted Noise Texture entered
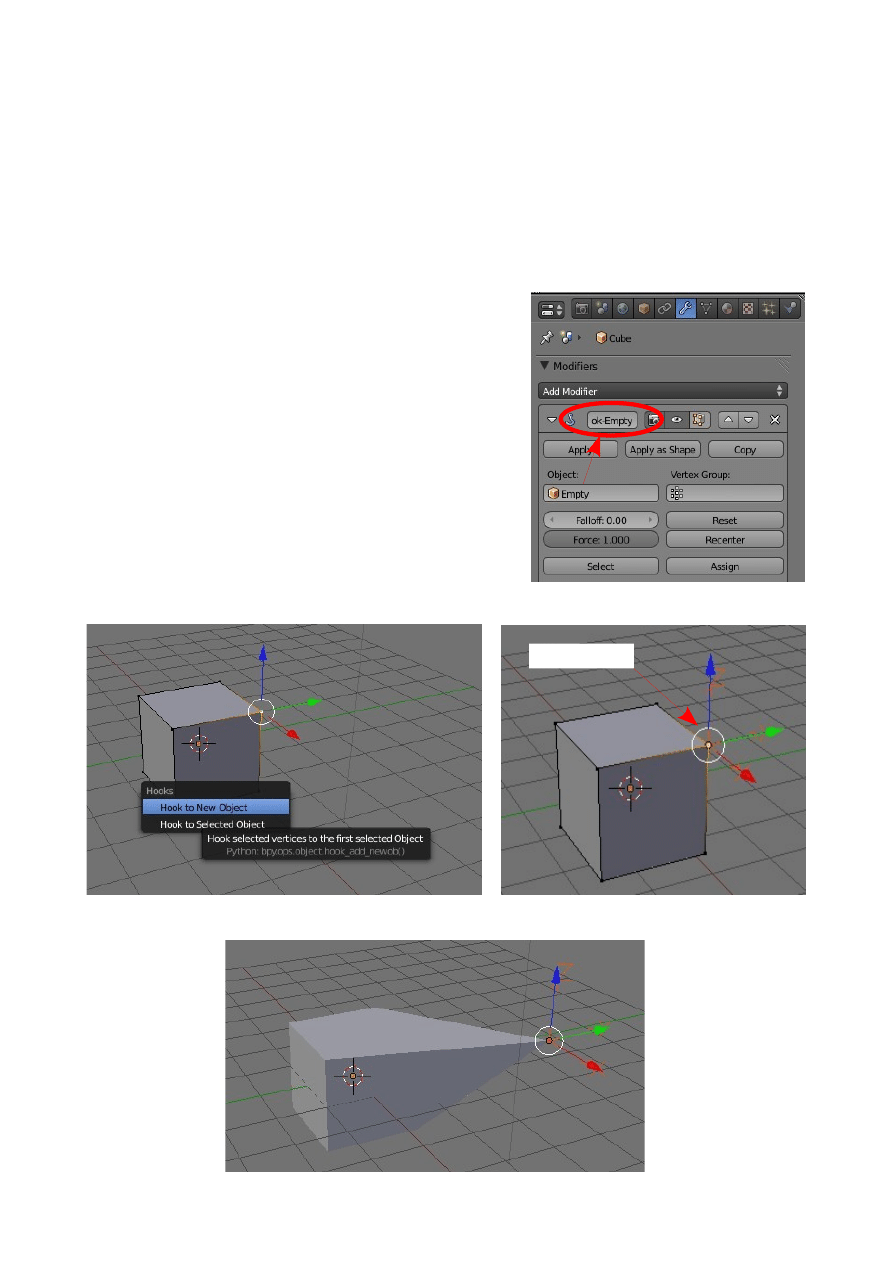
Hook Modifier
The hook modifier allows you to manipulate or animate selected verticies of a mesh
while in Object mode. Verticies are assigned (Hooked) to an Empty object which can
be moved in Object mode pulling the selected verticies with it. This can be use for a
static mesh deformation or the movement can be animated.
Simple Example: Moving one corner of a Cube.
Start with the default scene with the Cube object
selected. Tab to edit mode and deselect all verticies
then select one vertice (Corner). Press Ctrl + H Key
and select ' Hook to New Object'.
An Empty is added to the scene and by going to the
Properties Window – Modifier buttons you will see
that a Hook Modifier has been added named 'ok-
Empty'.
Select and move the Empty in Object mode and the Cube is deformed.
Empty added
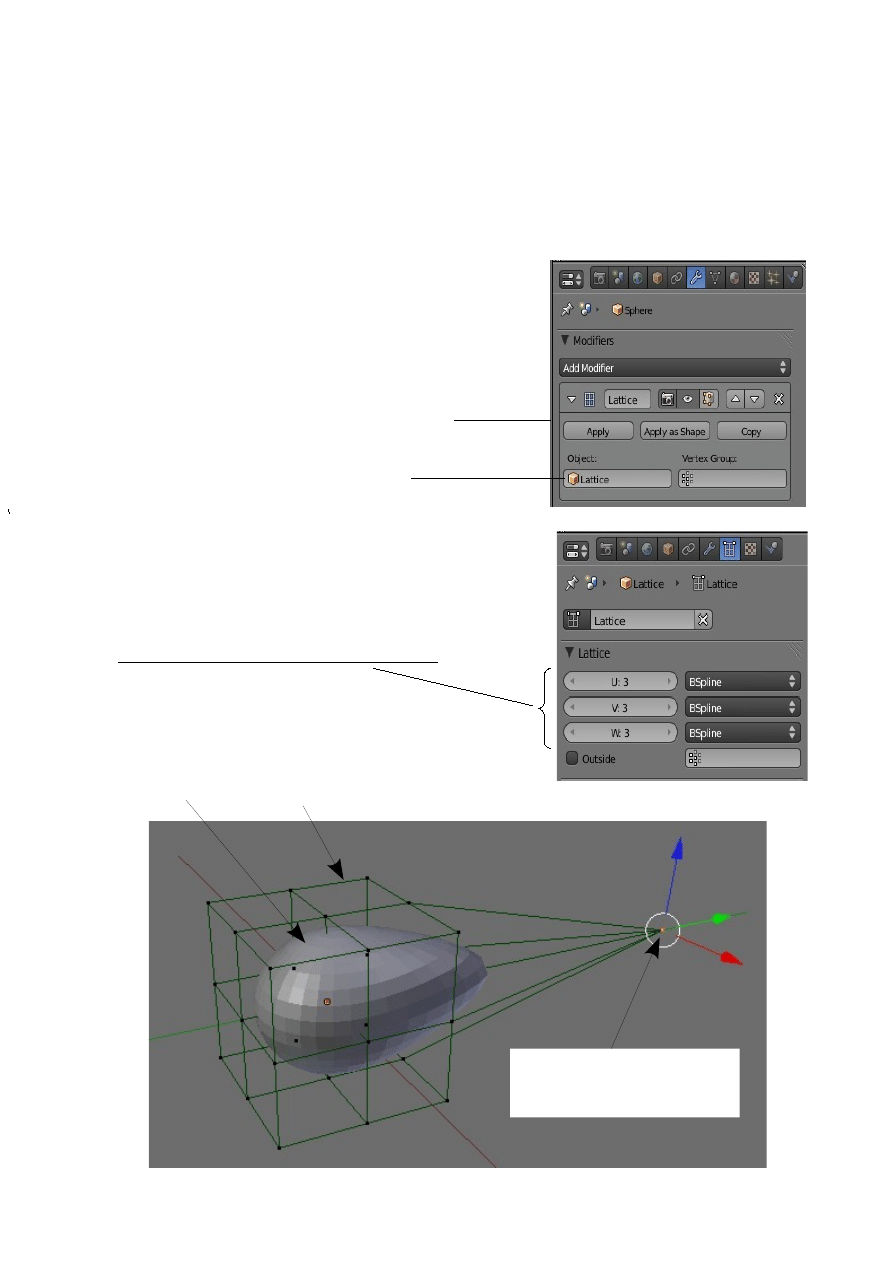
Lattice Modifier
The Lattice Modifier is used to deform a mesh object or to control the movement of
particles. By using the modifier it is simple to shape a mesh object that has many
verticies. A Lattice is a non renderable grid of verticies therefore it does not render in
the scene. You can use the same lattice to deform several objects by giving each
object a modifier pointing to the lattice.
Example: Deform a UV Sphere object with a Lattice.
Add a UVSphere to the scene then add a Lattice.
Before you can see the Lattice mesh you will have to
scale up (S Key – Drag Mouse).
The Lattice is entered as a simple mesh cube. Go to the
Object data button in the Properties Window and alter
the U, V and W values in the Lattice tab to subdivide
the Lattice mesh.
Lattice Modifier added to
Sphere
Enter 'Lattice' here
Single Lattice vertice selected and
moved deforming the UV Sphere
mesh.
UV Sphere
Lattice Mesh
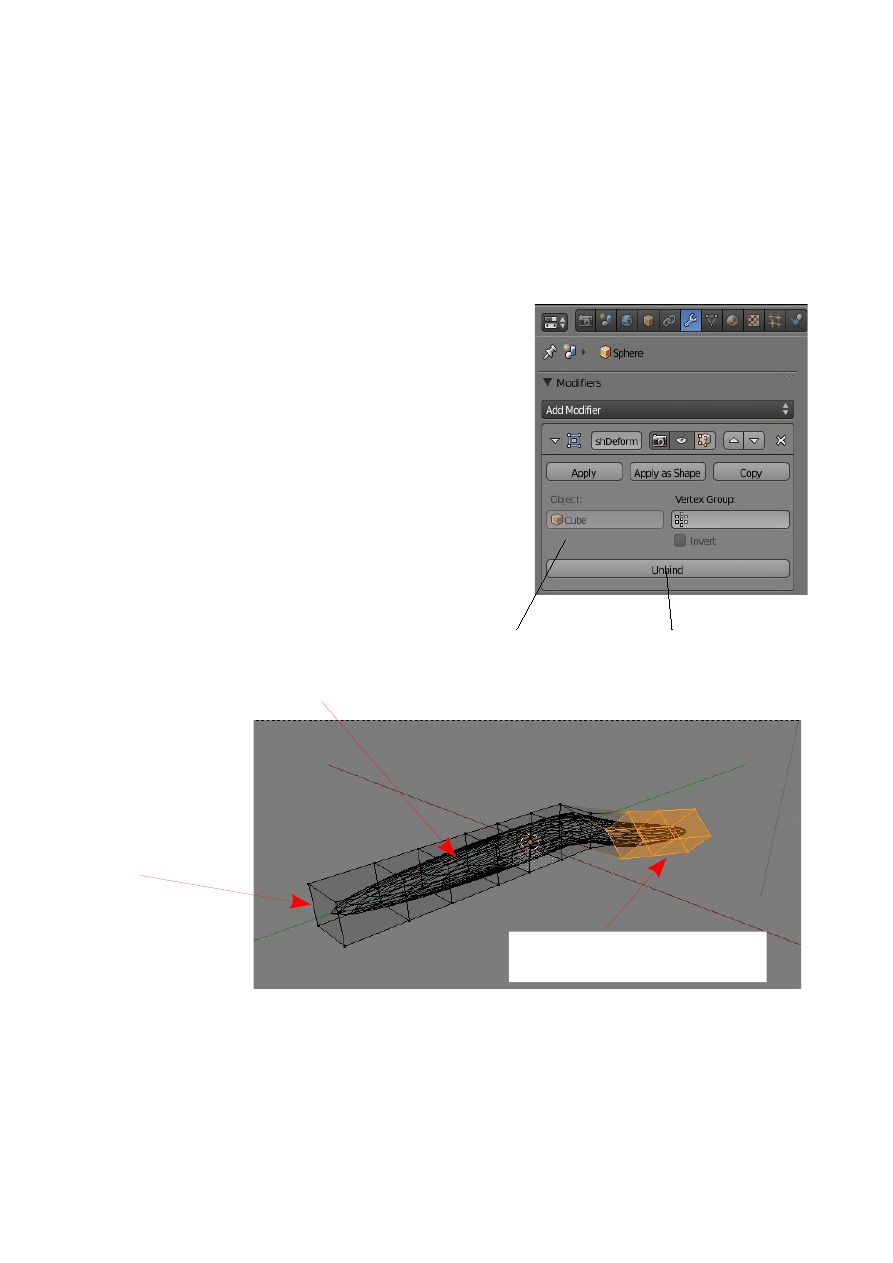
Mesh Deform Modifier
The Mesh Deform Modifier can deform one mesh with another 'cage' mesh. This is
similar to a Lattice Modifier but instead of being restricted to the regular grid layout
of a lattice the cage can be modeled to fit around the mesh object being deformed.
The cage mesh must form a closed cage around the part of the mesh to be deformed.
Only verticies within the cage will be deformed. Typically the cage will have far
fewer verticies than the mesh being deformed.
After modeling your object surround it with a
simple cage mesh and apply a Mesh deform
modifier to the original object. Enter the name of the
cage mesh and press 'Bind' to link the two meshes.
The 'Bind' operation may take several seconds to
calculate depending on the complexity of your
model. Wait until 'Bind' changes to 'Unbind' before
selecting verticies on the cage. By dragging scaling
and rotating the selected verticies the original mesh
will be deformed. The proximity of the cage to the
original object has an influence on how to
deformation reacts.
Note: The cage mesh will render in the scene therefore with the cage surrounding the
elongated sphere all you will see is the cage. You can select the cage and move it
away from the sphere keeping the deformation but the cage will still render. To see
the elongated sphere deformed without the cage click on 'Apply' in the modifier tab.
The modifier is applied to the sphere and removed. You can now delete the cage and
the elongated sphere remains deformed.
Mesh deform Modifier applied to Sphere.
UV Sphere scaled to form an
elongated worm shape.
Cube extruded to form
cage
Part of cage selected moved and
rotated deforming the Sphere
Click on 'Bind' and wait until
it changes to 'Unbind'
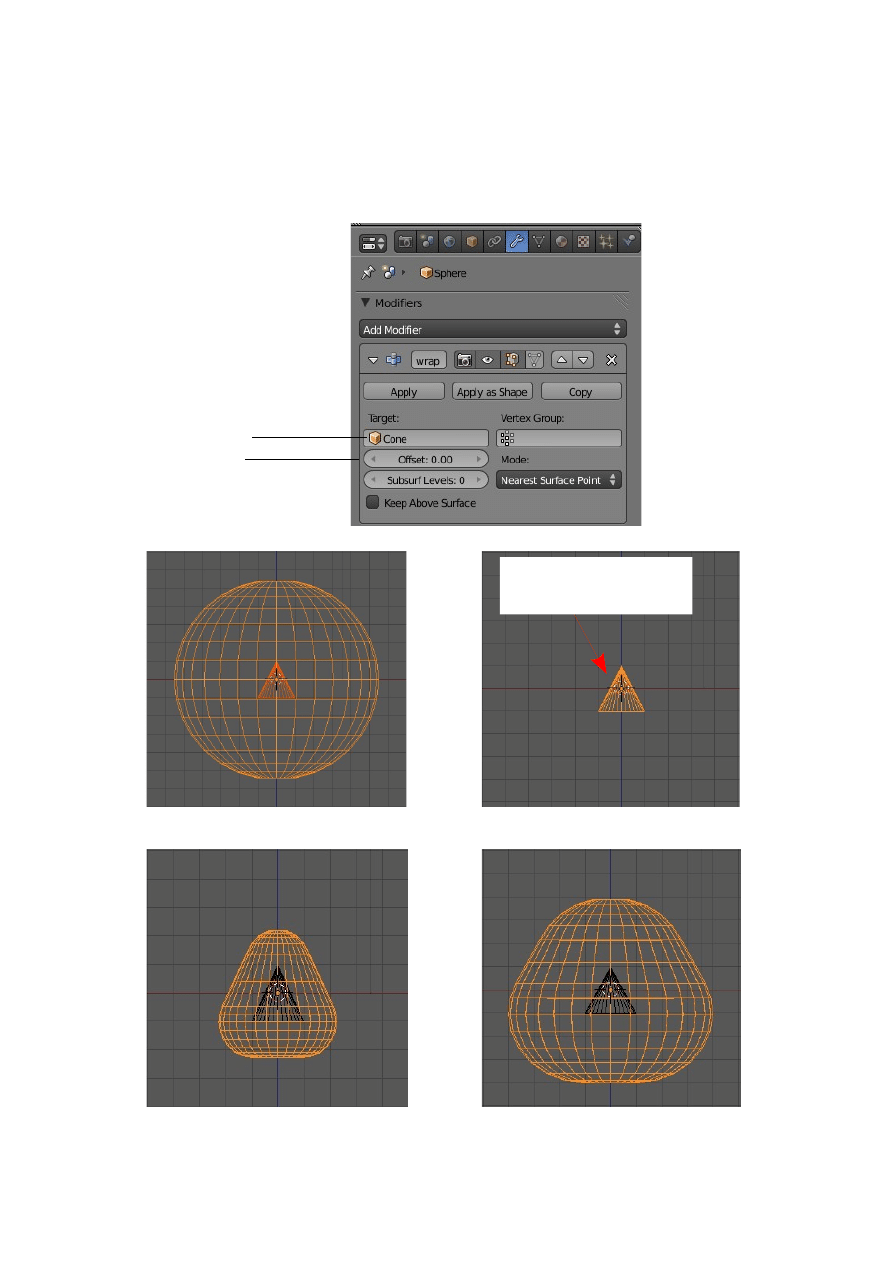
Shrinkwrap Modifier
The Shrinkwrap modifier takes a mesh and shrinks it down wrapping the mesh
around another object. The deformed mesh can then be offset to produce shapes in
between the original shape and the deformed shape.
UV Sphere with Cone inside
Shrinkwrap Modifier added
Offset increased to 1.25
Offset increased to 3.00
Shrinkwrap Modifier added to UV
Sphere
Enter 'Cone” here
Increase 'Offset'
UV Sphere wrapped
around the Cone
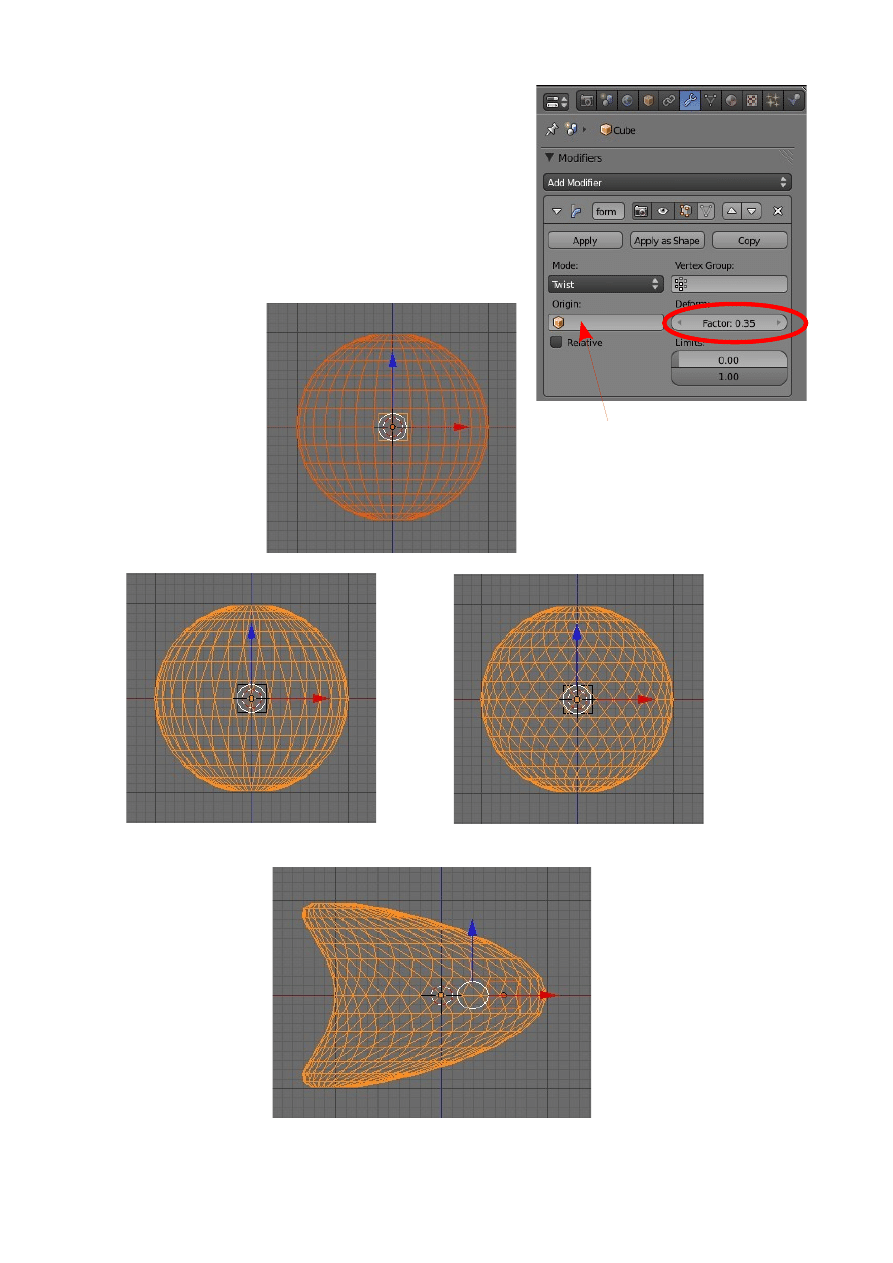
Simple Deform Modifier
The Simple Deform Modifier deforms a mesh by
increasing factor values in the modifier and having a
second object having an influence.
To see this modifier in action have a UV Sphere in
the scene with a scaled down Cube located on the
center inside the sphere.
Sphere with Cube
inside on the center
Wirefreme Mode
Modifier added Factor: 1.25
Factor: 3.00
Cube entered in Origin and moved sideways.
Enter 'Cube' as Origin
Front View
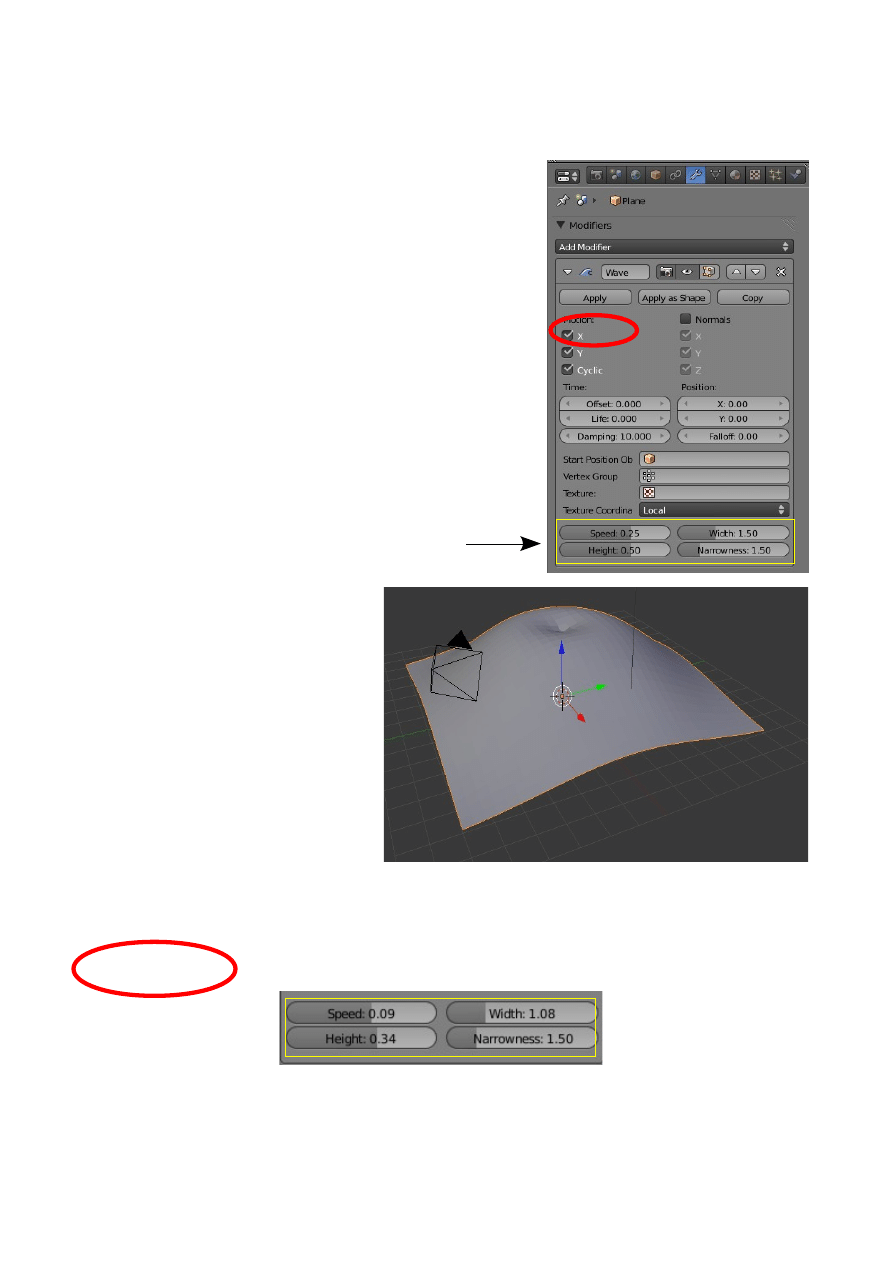
Wave Modifier
The Wave Modifier applies a deformation in the form of a wave. To demonstrate we
will apply the modifier to a Plane.
In the default Blender scene delete the Cube and add
a Plane. Scale the Plane up
(S key+6). Tab into Edit mode and subdivide ( Click
'Subdivide' in the Tools Panel 5 times). Tab to Object
mode. You have to subdivide the Plane to get a nice
affect.
Go to the Properties Window-Modifier button and
click 'Add Modifier' to open the drop down selection
menu. Select 'Wave'.
In the 3D Window you
immediately see the Plane deform.
It is pulled up in the middle and
punched in at the top of the bulge.
The Wave Modifier has been
applied on both the X and Y axis.
In the Modifier tab you see x, y
and cyclic ticked. X and Y are the
axis and cyclic means that an
animation of the wave will repeat
over and over.
With your curser in the 3D Window press Alt+A to see the animation play. Press Esc
to stop.
Untick the X axis in the Modifier tab and play again. A wave along the Y axis results.
At the bottom of the Modifier tab change the 'Speed' to 0.09, the Width to 1.08 and
the 'Height' to 0.34. Play the animation again. You can change these values to
whatever you want. In fact, go ahead and play around with different values to see
what happens. Its the only way to get the idea.
Change Values
Wave Form Control Values
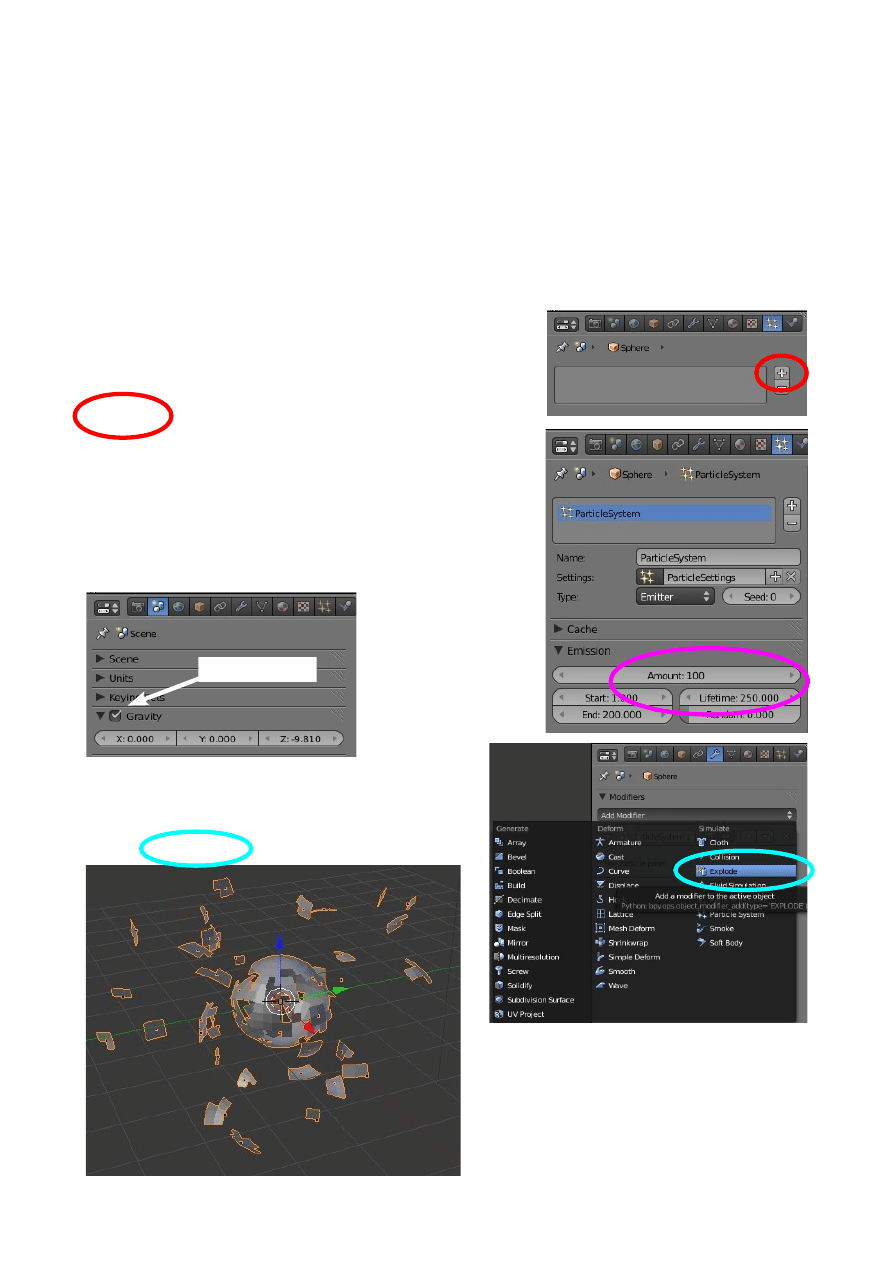
Explode Modifier
The Explode Modifier lets you make a mesh object fly apart or explode. Before you
can apply an Explode Modifier you must have an Emitter Particle System applied.
If you are working methodically through this manual you haven't come to that yet so
maybe put this on hold for a while. We will write the procedure anyway since it is
such a neat modifier.
In the 3D Window delete the Cube and add a UV Sphere. Leave the default number
of segments and rings. Zoom in on the Sphere a bit.
With the Sphere selected go to the Properties
Window-Particles button and in the panel click on the
plus sign to add a Particle System.
In the Emission tab change the Amount value to
100
and the Lifetime value to
250.
In the Properties Window- Scene button-Gravity tab
untick Gravity.
In the Properties Window-Modifier button
click 'Add Modifier' (You will see that there is
already a Particle System modifier applied).
Select 'Explode'.
With your curser in the 3D Window
press Alt+A to see the Sphere Fly
Apart
Remove the Tick

CH15- Particle Systems
01-Overview
02-Nomenclature
03-Setup
04-Settings & Material Influence
05-Particle Buttons
06-Starting a System
07-Material on Particles
08-Interaction
09-Wind
10-Sample Settings
11-Keyed Particles
12-Boids Particles
13- Hair Particles
14-Assignment Tab
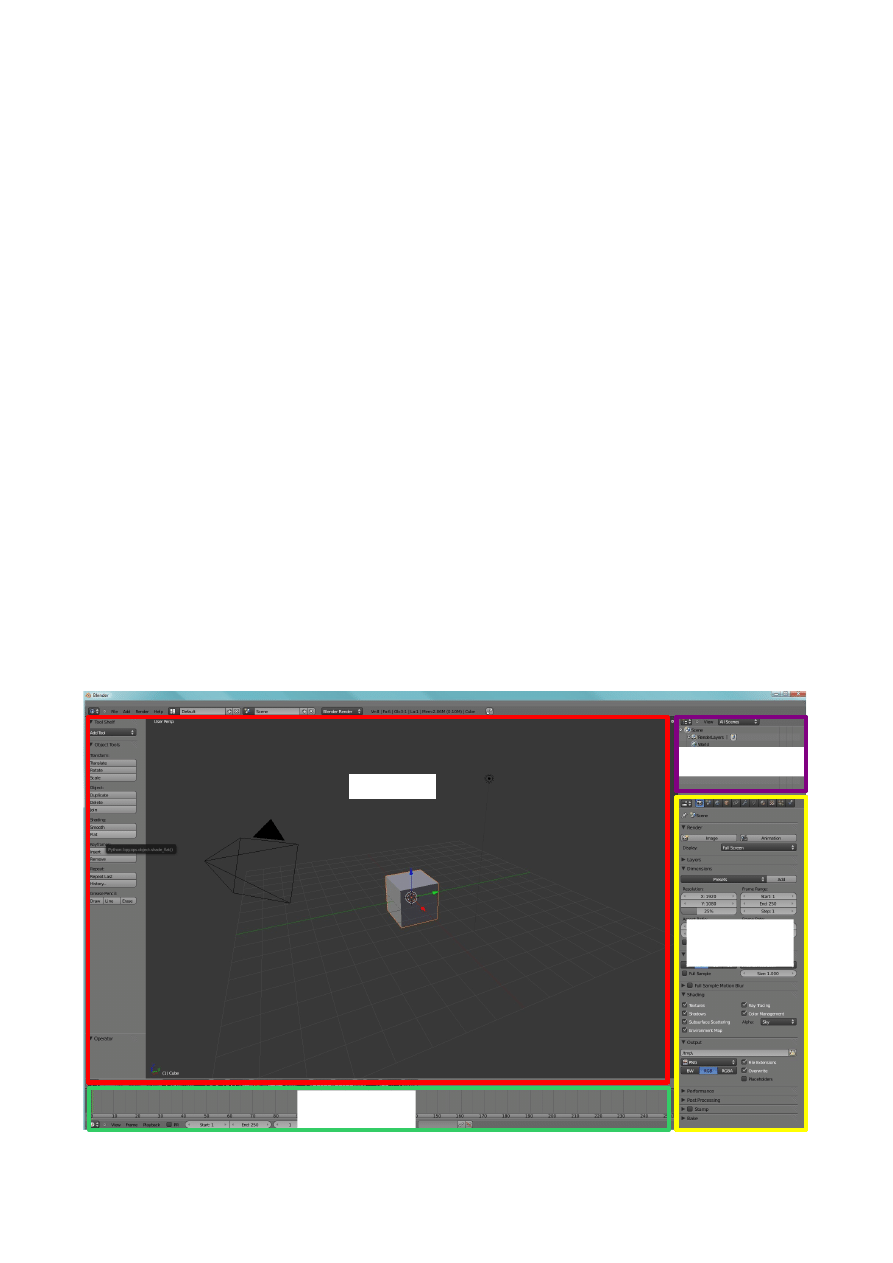
Particle Systems and Interactions
Overview.
This overview is intended as an introduction to the Particle Systems in Blender.
The first question that must be answered is, 'what are particles'? My dictionary tells
me that a Particle is a minute portion, piece or amount. That's fine but when
considering Blender, a particle is a small piece of what? For simplicity we will
consider a particle to be a small dot on the computer screen. The dot is able to be
displayed in a variety of ways but for now think of it as just a dot.
In Blender particles ( dots ) are emitted from an object and can be manipulated to
produce varied effects . Particles can be used to simulate snow, fire, smoke, clouds,
sparks and hair to name just a few. To produce particles an object selected in the
scene must have a Particle System assigned to it. The emission of the particles is
played as an animation and then rendered to produce the simulation effect. The best
way to see how this is accomplished is to follow a few simple instructions and run a
particle system.
Before setting up a Particle System we should establish a nomenclature so that we are
able to understand the instructions that are given. Let's begin with the default Blender
scene. The main Windows are outlined as follows.
Blender Default Scene
3D Window
Outliner Window
Properties
Window
Timeline Window
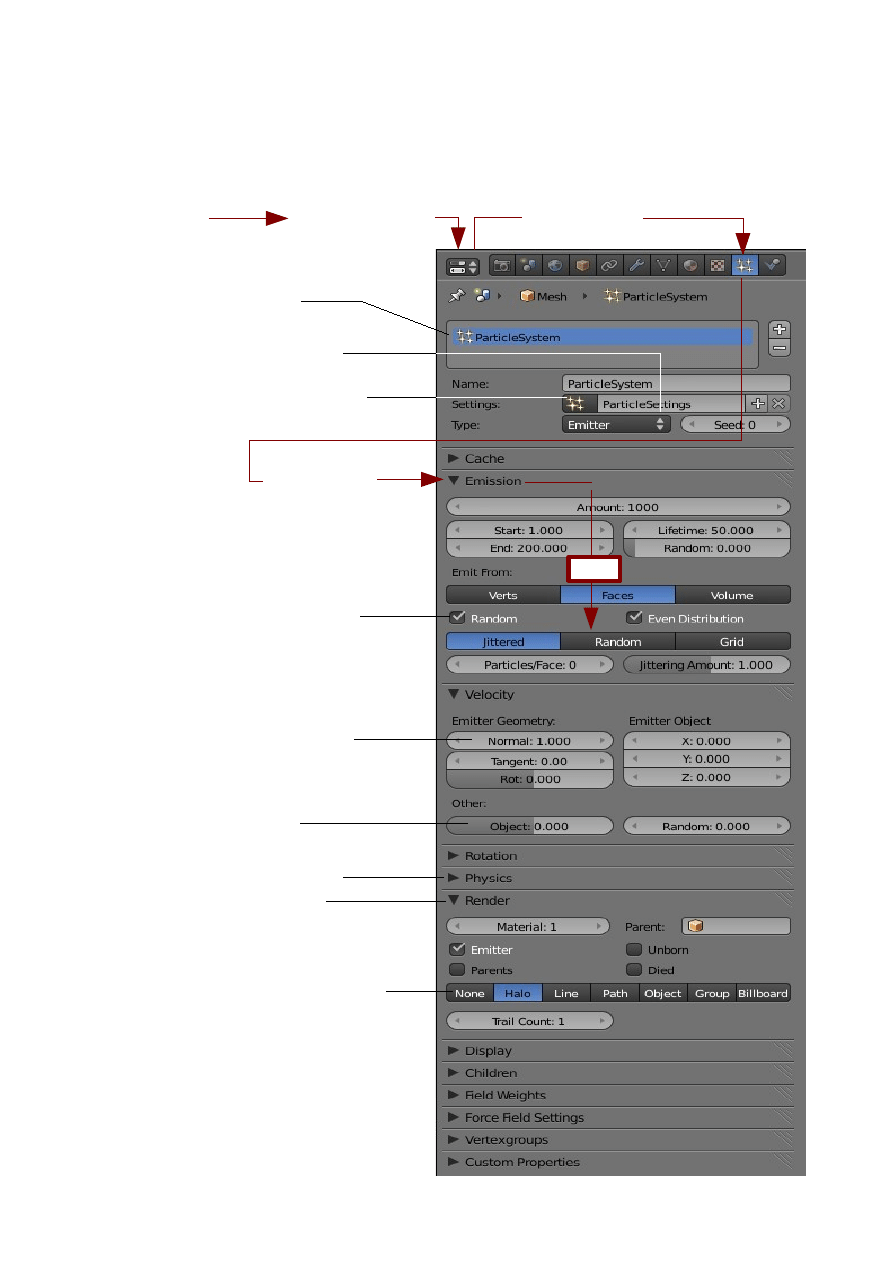
Nomenclature
When referring to the Properties Window – Particles buttons panel the following
nomenclature will be observed.
Navigation Path
Properties Window Particles button
Button
Emission tab
Slider
Selection box
Value button
Drop Down
Data ID button
Selection buttons
Tab Closed
Tab Open
Panel
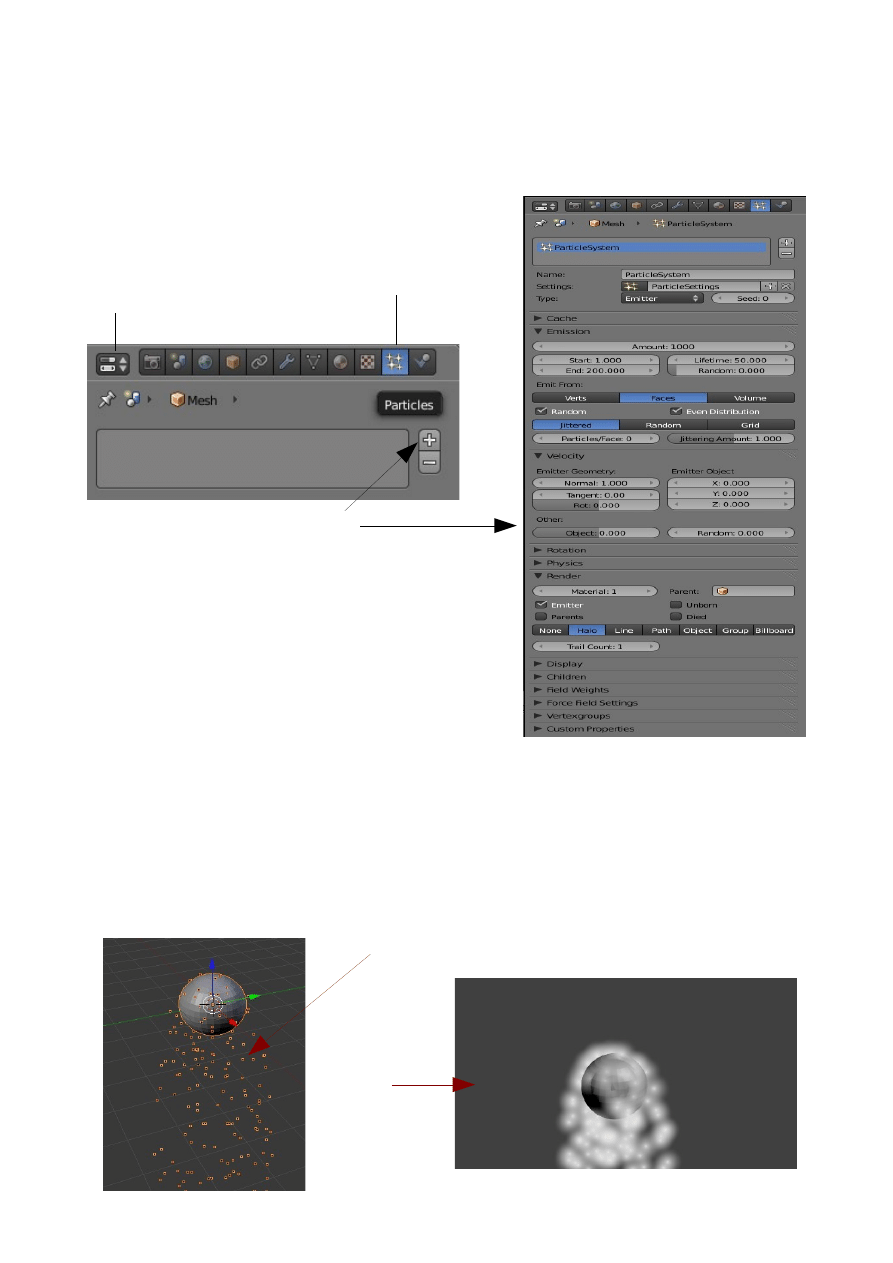
Setting up a Particle System
Open Blender and delete the default Cube object from the scene and then add a new
UV Sphere. Leave the default values for the Sphere as they appear in the Properties
Window. With the Sphere selected go to the
Properties Window and click the Particles button.
Click on the white plus sign next to the empty
panel to 'Add a particle system'.
The window will display with an array of tabs and
buttons which allow the set up of the system. This
appears daunting to say the least but Blender has
automatically created a system with default setting.
The first thing to note is the Type: Emitter right at the top of the Particle System
panel. Type Emitter is what we will discuss to start with. Clicking on the panel where
the word Emitter is displayed will display a drop down with the selection options
Emitter and Hair. Type Hair is a separate system which will be discussed later.
With the cursor in the 3D Window press Alt + A to run an animation showing
particles being generated. Note the Timeline Window is displayed across the bottom
of the screen and will show a green line moving as the animation plays..
Properties Window
Particles button
Add Particle System
Rendered image at
frame 100
Particles emitted as orange squares as seen
in the 3D Window with the sphere selected
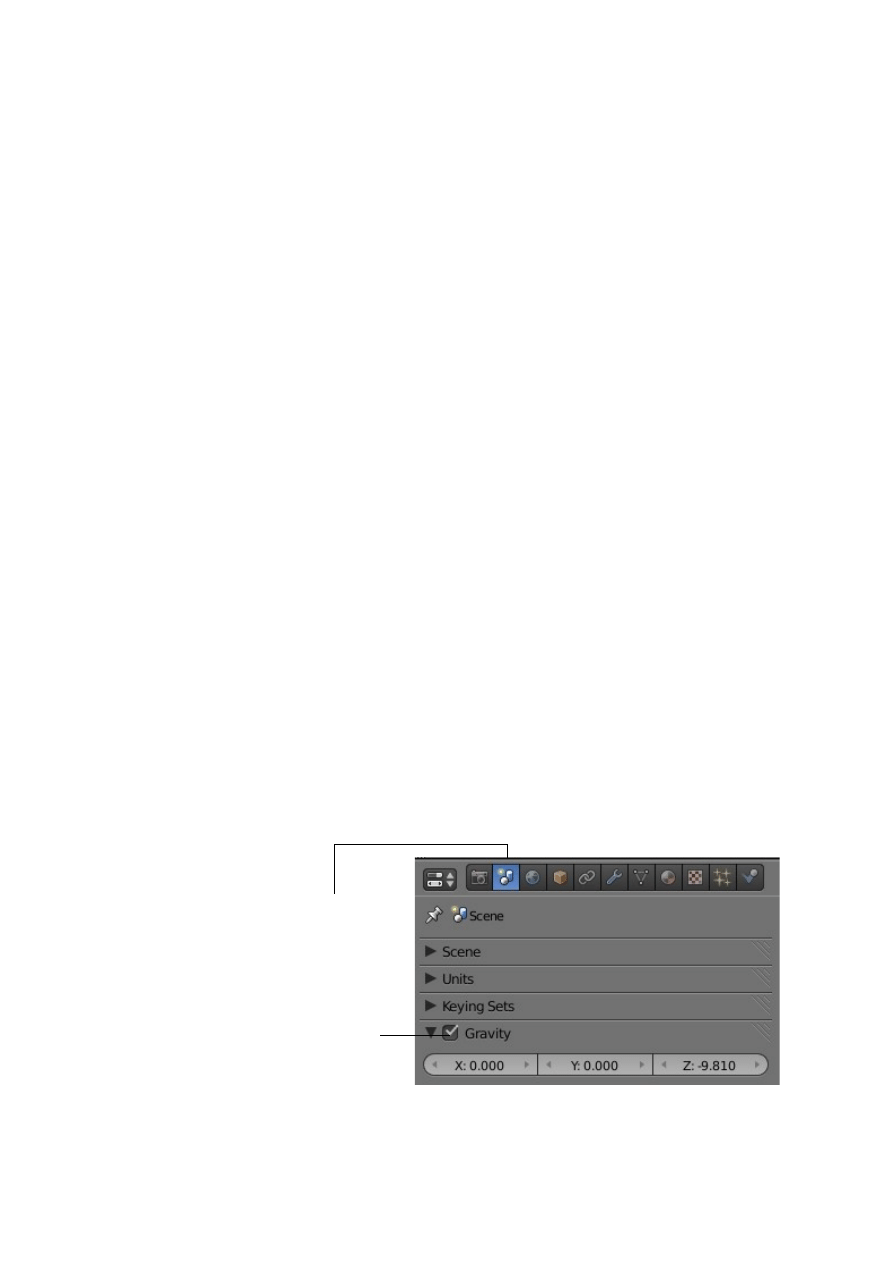
With the emitter object selected the animation will play showing particles as small
orange squares being emitted from the UV Sphere and then falling towards the
bottom of the screen. If the emitter object is not selected the particles show as small
black dots. The animation will play for 250 frames then repeat itself. Press Esc to
stop the animation. Using the Up – Down arrows on the keyboard or by dragging the
green line in the Timeline, move the animation forward to say frame 100. The
particles will now be displayed as they occur at frame 100. Render the scene ( press
F12 ). An image will be rendered showing the UV Sphere and the particles as halos
( fuzzy balls of light merged together ) cascading downwards. If the animation were
to be rendered as a video you could play this in action.
Press Esc to cancel the image and return to the 3D Window.
Note that particles emit their own light therefore it is not necessary to have a lamp in
the scene. If the default lamp is deleted from the scene the image rendered will show
the halos but the emitter object will be black. The reason that the emitter is seen at all
is because the render has a default grey background. If the background were black
you would not see the emitter.
By default Blender renders an image at 25% of the 3D Window size. If you want
something different go to the Properties Window – Render button and in the
Dimensions tab – Resolution button change the percentage value ( Drag the slider ).
You can also alter the X and Y values above the percentage slider to vary the aspect
ratio of the image.
That in essence has demonstrated a particle system being applied. It is now time to
progress and discover how to manipulate the system. The fun begins.
In the demonstration, the particles emitted from the sphere cascade downwards. This
was to create reality in the scene by having a gravitational effect applied. We will
now turn that effect off.
Go to the Properties Window – Scene button and remove the tick from the little box
in the Gravity tab.
Click to remove tick and turn gravity off
Scene button
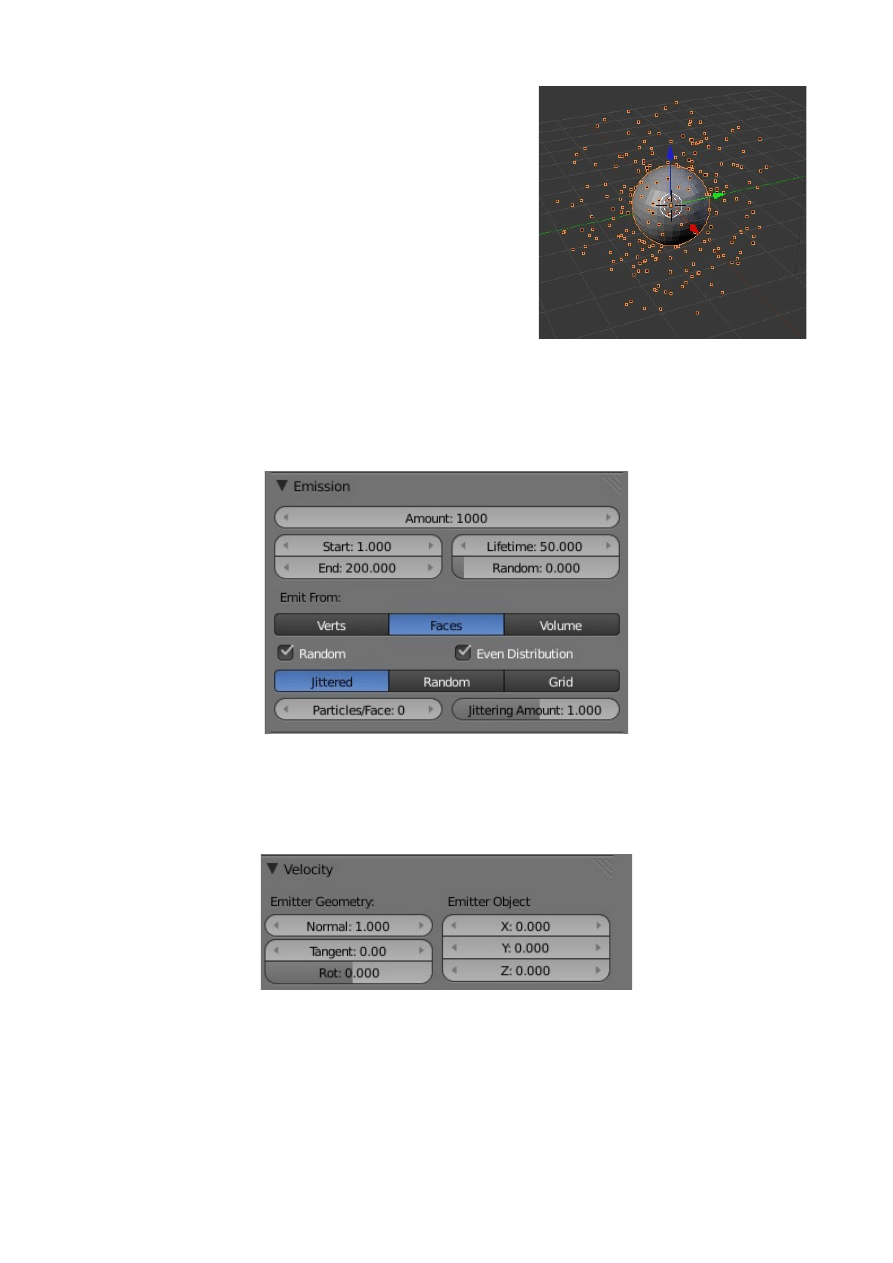
Set the animation in the Timeline back to frame 1
and replay the animation ( Alt + A ). This time the
particles emitted from the UV Sphere disperse in all
directions away from the sphere. Note that the
particles seem to only move for a certain time and
disappear before the end of the animation. Obviously
there is something happening to cause this.
Take a look at the Properties Window with the
Particles button activated and look at the Emission
tab. You will see the following values:
Amount :1000, Start :1.000, End : 200.000 and Lifetime : 50.000. These values say
that 1000 particles will be emitted starting at frame 1 and stopping at frame 200 but
each particle will only be visible for 50 frames. Particles therefore disappear after 50
frames.
Also look at the Velocity tab and the Normal: 1.000 value. This says particles are
being emitted at a speed of 1 unit per second normal to the surface of the sphere ( at
90 degrees to the surface ).
Increase the Lifetime value to 200 and replay the animation. Now particles are
displayed for the whole 250 frame animation since particles emitted at frame 200 stay
visible until frame 250 ( 50 frames ).
Just to demonstrate another particle emission control feature, in the Velocity tab
change the Emitter Geometry Normal value to 0.000 and the Emitter Object Y value
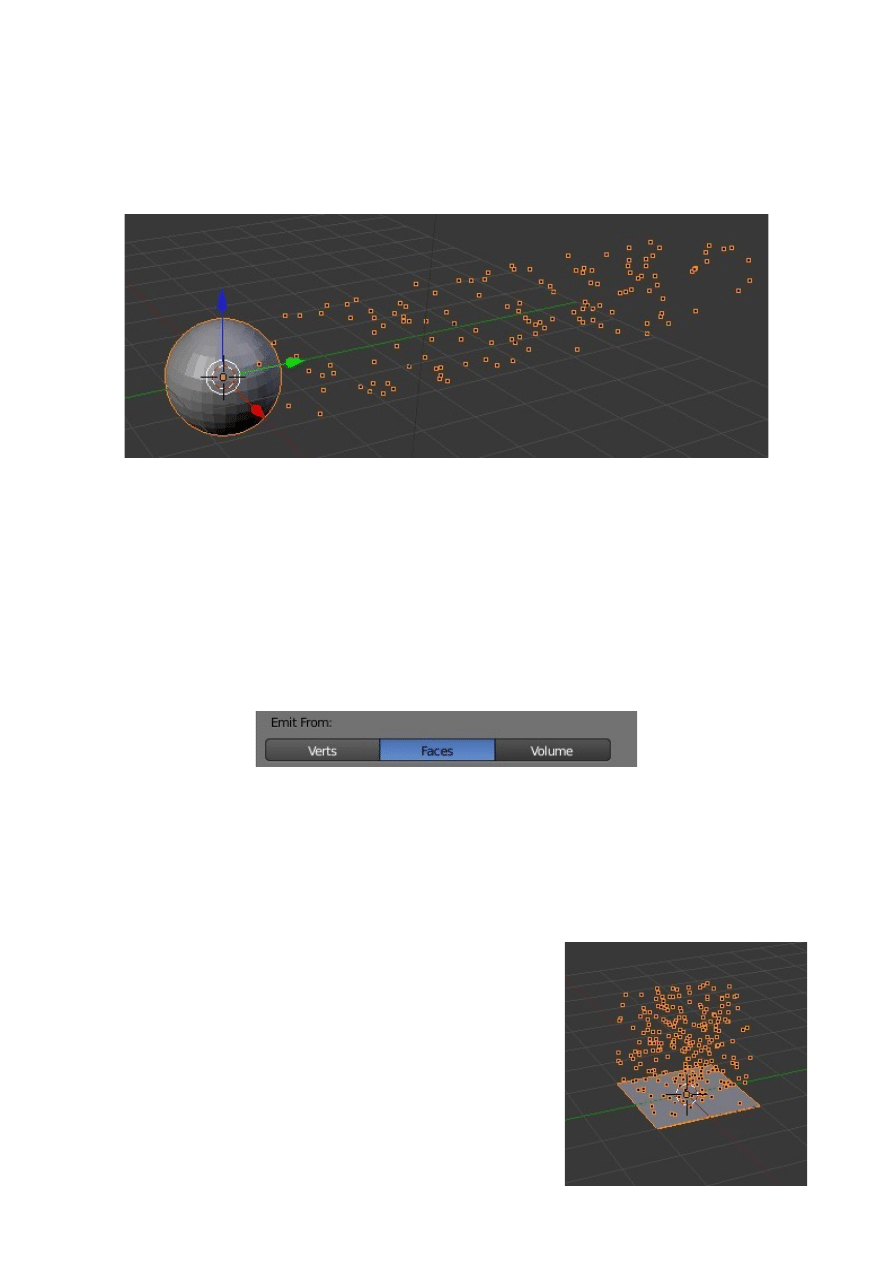
to 10.000. Replay the animation and see all the particles emitted move fairly rapidly
along the Y axis of the scene. You have just told Blender to emit the particles along
the Y axis at 10 units per second instead of emitting them at 1 unit per second at 90
degrees (Normal) to the a face on the surface of the sphere. Note that in the Emission
tab 'Emit From Faces' is activated ( Highlighted in Blue ).
The forgoing has demonstrated how a particle system is instigated and can be
controlled by values in the Particles buttons window. We will leave the buttons alone
for the time being and come back later.
We will now have a look at some detail of where and how particles are emitted from
an object. In the Properties Window – Particles buttons – Emission tab note the Emit
From buttons Verts, Faces and Volume. The default value Faces is ( Highlighted in
blue ).
To see what this means start with a new Blender Scene and delete the default Cube.
Add a Plain object and remove the 3D Manipulator Widget. Removing the Widget
will let us see more clearly what is happening when particles are emitted. Untick the
Gravity button in the Scene buttons. Add a particle system to the Plane. Press Alt + A
and play the animation showing the particle generation.
You will see the particles being generated on the face of
the Plane object. The Plane only has one Face. The
particles are being generated at an initial velocity of 1
unit per second normal to the face of the plane ( At 90
degrees to the surface ). This is in accordance with the
default values in the Velocity tab.
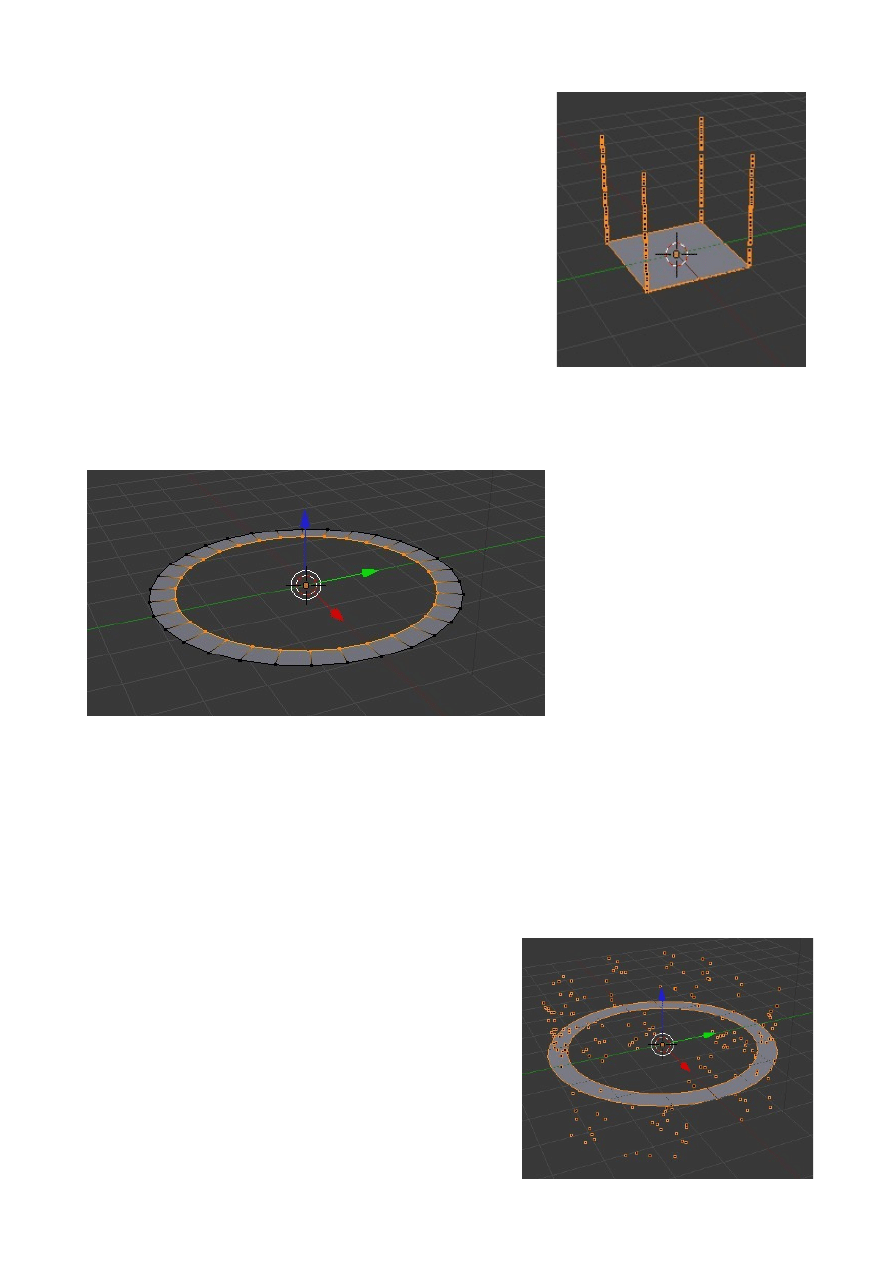
In the Emissions tab – Emit From buttons select Verts
and replay the animation. You will now see the
emission of particles from the verticies located at the
four corners of the plane ( 4 verticies).
Selecting Faces or Verts depends on what you want to
see in your final render.
We will now have a look at a little more detail of particle generation. Start over with a
new Blender scene and delete the default Cube object. We will now create a circular
plane object to use in this example.
Add a Circle object to the scene and scale it up 3 times. Go into edit mode and with
all verticies selected press the E Key ( Extrude) then click LMB followed by S Key
( Scale ) and move the mouse towards the center of the circle. With the E Key you
have extruded ( created a new set of verticies ) and the S Key has allowed you to
scale the set of new verticies. Change to object mode and add a particle system. Go
to the Scene buttons and untick gravity. Play the animation.
You will see particles being generated but some
are moving up and some are moving down. Note
that the default Emission – Emit From value is
'Faces' and the Velocity – Emitter Geometry –
Normal value is 1.000. We are therefore emitting
particles from the faces of the object at 1 unit per
second normal to the face. In modeling the circular
plane object some faces have been assigned a
negative normal value and some have been
assigned a positive normal value , hence the
Outer vertices Extruded and
Scaled down to form inner ring
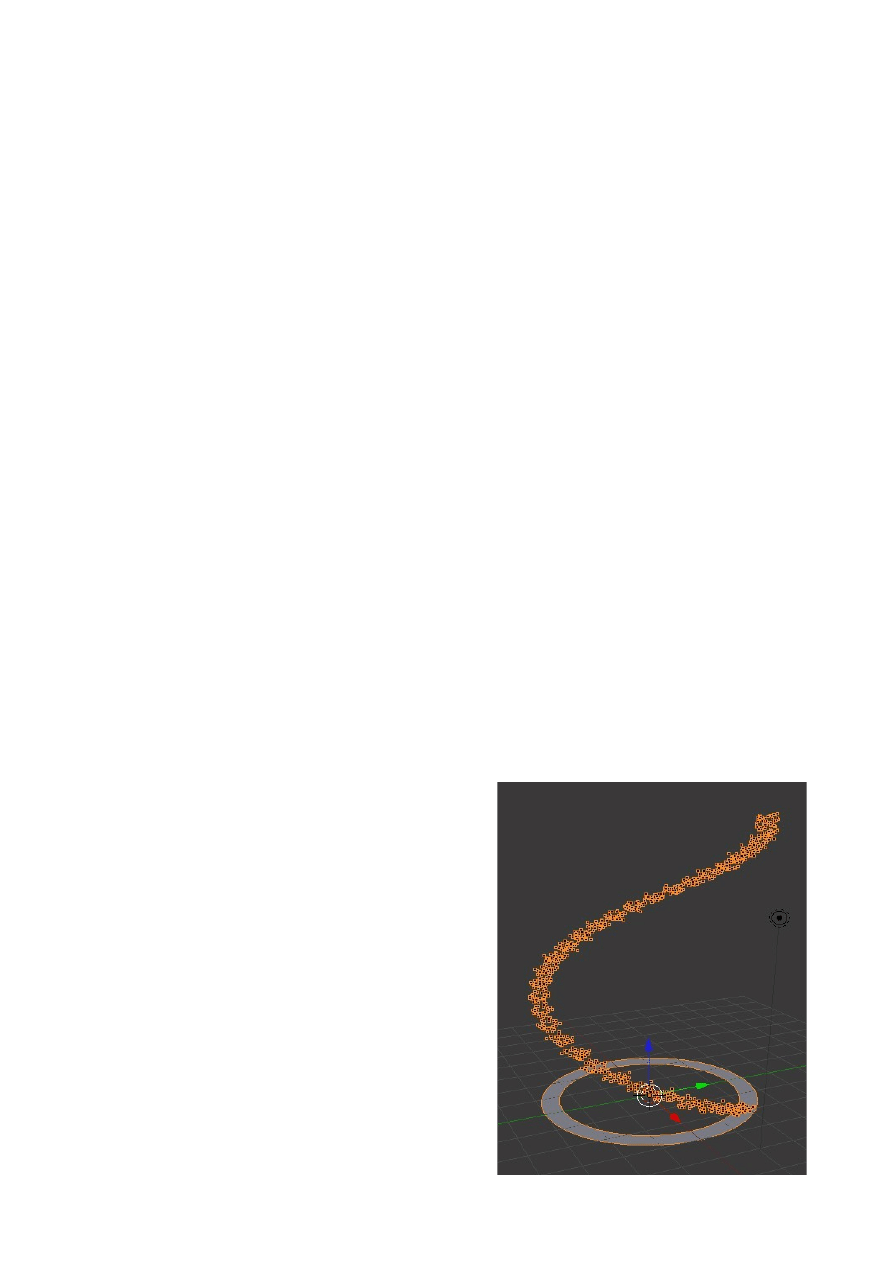
movement of the particles as seen in the animation. The normal values need to be
recalculated to align them in the same direction.
To realign the normals go into edit mode and select all the verticies. With the cursor
in the 3D Window, press Ctrl + N Key. Make Normals Consistent will display in the
side panel at the lower LH corner of the screen.
Go back to object mode and replay the animation. All the particles will move in the
same direction but not necessarily upwards. Note that if the normal value is changed
to -1.000 ( Minus one ) the particles will move in the opposite direction. Set the
normal value to move up.
OK let's have a close look at what is happening to the particles. If you look at the
values in the Particles Emission tab you see that 1000 particles are being generated
starting at frame 1, ending at frame 200 with a lifetime of 50 frames. You will also
see Random and Even Distribution boxes ticked so the particles are being spread
between the faces in a random order as they are generated. Random would appear to
take precedence over Even Distribution. Note the value Jittered highlighted in blue.
Jittered means that in any one face on the object particles appear in a random
position.
Untick the Random box and play the animation. The particles are now generated
from one face after the other around the circle plane object.
Increase the Lifetime value to 200 to make the particles display longer in the
animation.
Note if the animation is played without the object being selected the particles will
appear as small black dots instead of the little orange squares.
Cycling the animation in the Timeline to frame
200 produces a spiral array in the 3D Window
which may be rendered as an image. You will
however have to relocate the camera in the
scene to render an image of the complete spiral.
Another feature worth mentioning at this time is
the fact that by default Blender renders an
image of a particle system which includes the
emitter object. To render without the emitter
object go to the Render tab and untick the
Emitter box.
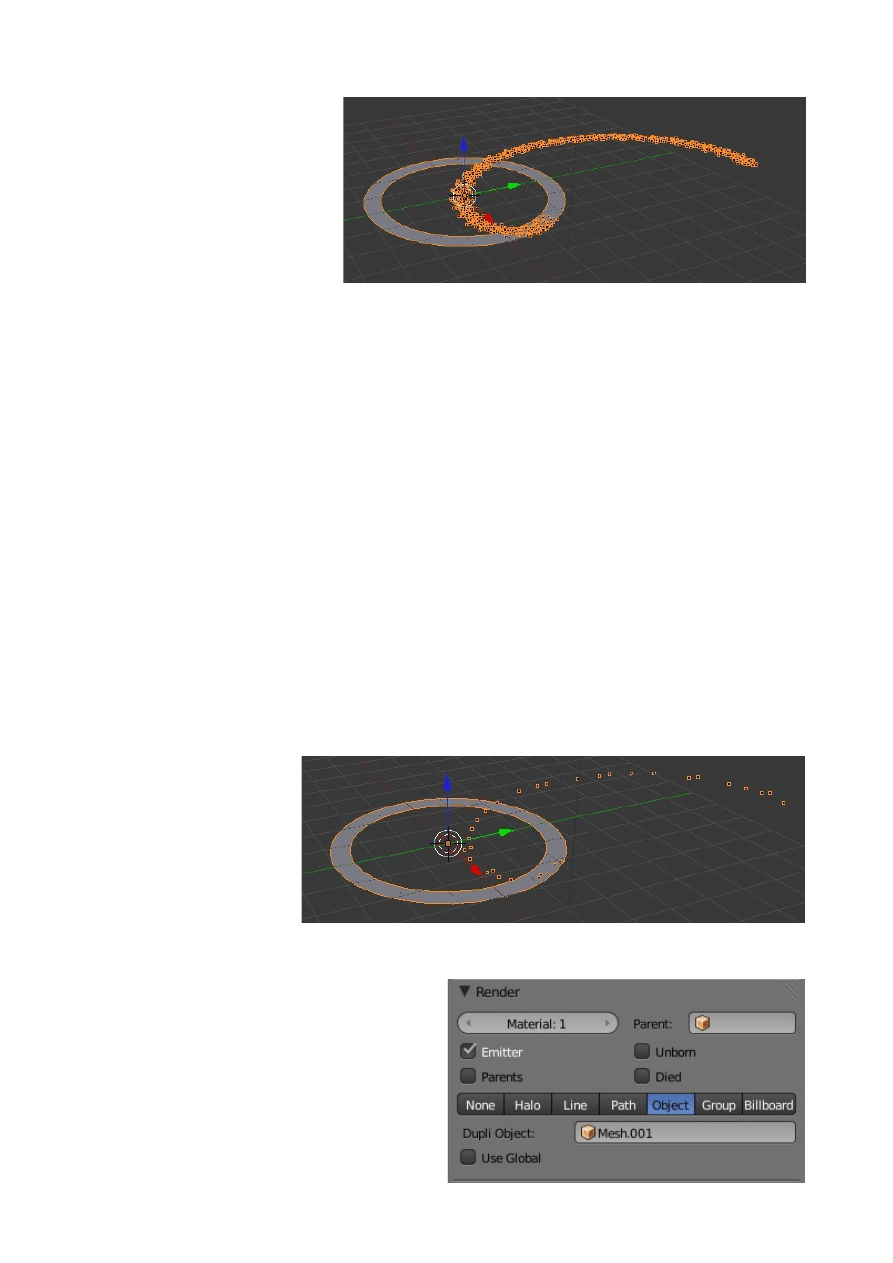
The spiral has been generated
with Normal Velocity value
of 1.000. If this value is
deleted and still in the
Velocity tab the Emitter
Object Y value is set to 1.000
then when the animation is
replayed the spiral will
generate on the flat along the
Y axis. This demonstrates that how the array of particles is generated is controlled by
the values entered Velocity tab.
At this point we are attempting to only give an overview of particle generation and it
is not intended that every function of the control buttons be detailed.
We will demonstrate two more features in this overview.
So far the particles that have been generated have been displayed as dots or little
orange squares in the 3D Window and have been rendered as halos In the Render tab
you will a selection of render options. None, Halo, Line, Path, Object, Group,
Billboard. We will have a look at the Object option. Go ahead and select it. Now
reduce the number of particles in the Emission tab Amount to 32. Our plane circular
ring object was created from a circle with 32 verticies therefore it has 32 faces.
Reducing the particle amount to 32 gives us approximately one particle per face. This
is approximate since at this point the generation of the particles follows an animation
curve which accelerates and decelerates. Play the animation again to regenerate the
particles then cycle through the animation and at frame 200 you will see 32 particles
but they are not evenly spaced along the spiral. This is showing the influence of the
acceleration change in the generation. We are only concerned with reducing th
particle count just now.
Deselect the ring in the
3D Window. Add a UV
Sphere object and note
that it is called
Mesh.001 ( See lower
LH corner of window).
Deselect the sphere and
reselect the ring. In the Particle button – Render tab look for the Dupli Object: box.
Click in the box and in the drop down
panel that displays select Mesh.001. The
particles are now displayed in the 3D
Window as tiny little spheres. Go to the
Physics tab and increase the Size:value to
increase the size of the tiny spheres in the
3D Window. Render to see an image of
the spheres.
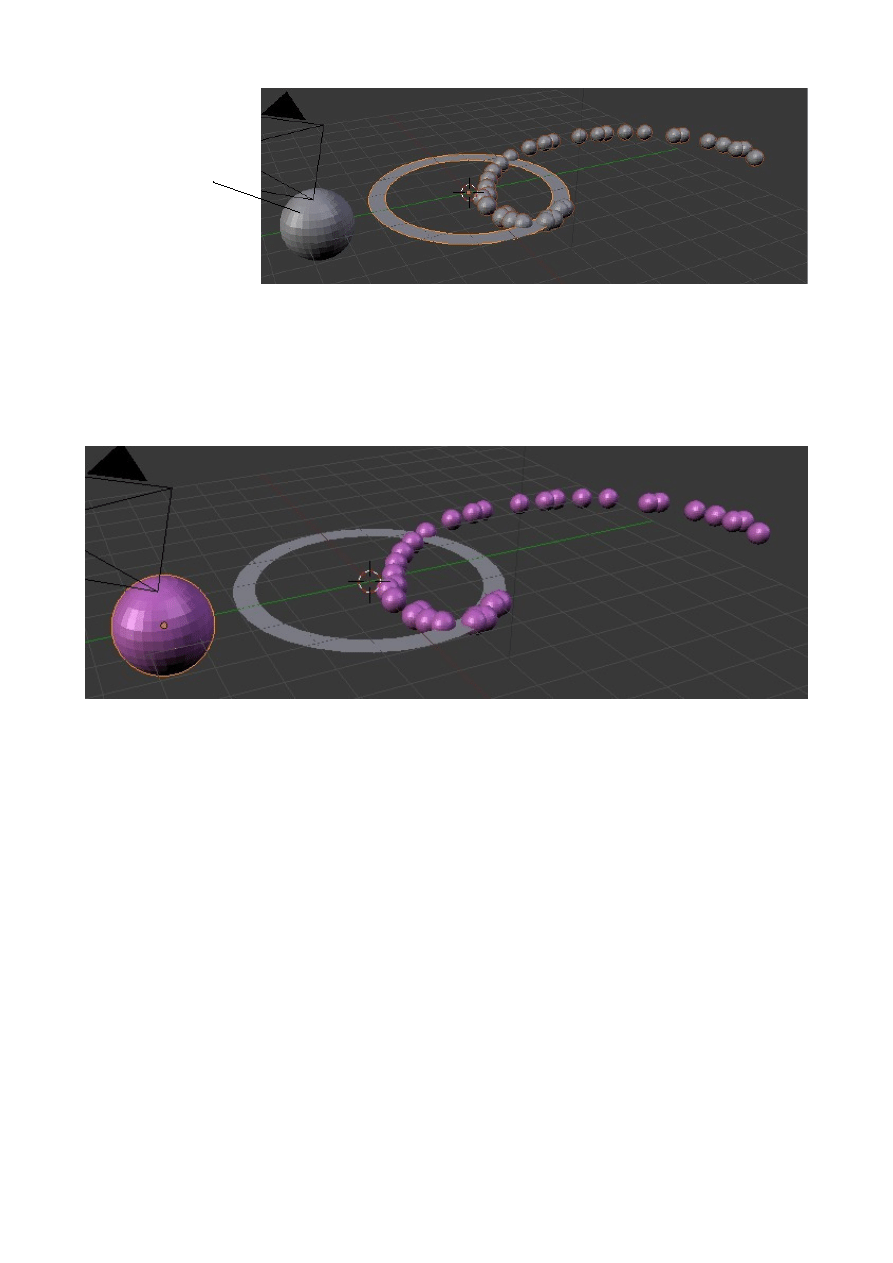
Up to now everything created and rendered has been the default dull grey color.
Adding a new material color to the sphere we have just added will cause the array of
spheres to display and render in that material color. Adding a material to the ring in
the 3D Window will cause the particles with a halo value to render in that material
color.
This demonstration of particle system applications has touched on the tip of the
iceberg. We now require to make a detailed study of the Particle buttons window to
ascertain the function of each tab and button and formulate the logic of particle
systems interface. There are many excellent tutorials available to compliment this
study but it is recommended that an understanding of the buttons be attained to allow
the transition from an operator of the program to creative artist.
UV Sphere Added
Mesh.001

Particle Settings and Material Influence
We will continue the study of the Particle System by examining the Particle Settings
and Material Influence and seeing how settings are entered to create effects. The
possible effects that can be created are endless and only limited by the imagination.
Particles can be deflected off other objects, be blown by the wind, be displayed
before they are built and many more options. It would be impossible to demonstrate
everything and only by experimentation and recording settings for future use will you
become proficient.
Remember that a particular effect can be saved as a Blender file which can be
imported into a scene in another Blender file. When you create something interesting
its worth saving and recording for future use. Blender doesn't come prepacked with
instant goodies so the objective should be for a Blender Artist to compile a library.
The Particle Setting are controlled by the Particles buttons which consist of a series
of tabs housing buttons and sliders allowing values to be entered. As we have already
seen Blender automatically created a Particle System when the Add button is
pressed. What we do next is to modify that system to produce the particular effect
that we require. The system is then saved to a cache to be used.
The tabs of the buttons window have a logic in setting up a Particles System so if
each is examined and understood separately the overall picture will become evident.
It is not intended to undertake that study here instead we will demonstrate some
settings which produce examples.
Note: On the following diagram we have taken the liberty of labeling the first part of
the Buttons Window as the Assignment tab. This part of the window is always open
unlike the remainder of the tabs which are opened and closed by clicking on the
triangles at the upper left hand corner of each tab.
Our Assignment tab controls what we do with a Particle System when we have
created ( modified the default ) a system. We will therefore postpone the discussion
of this tab until last.
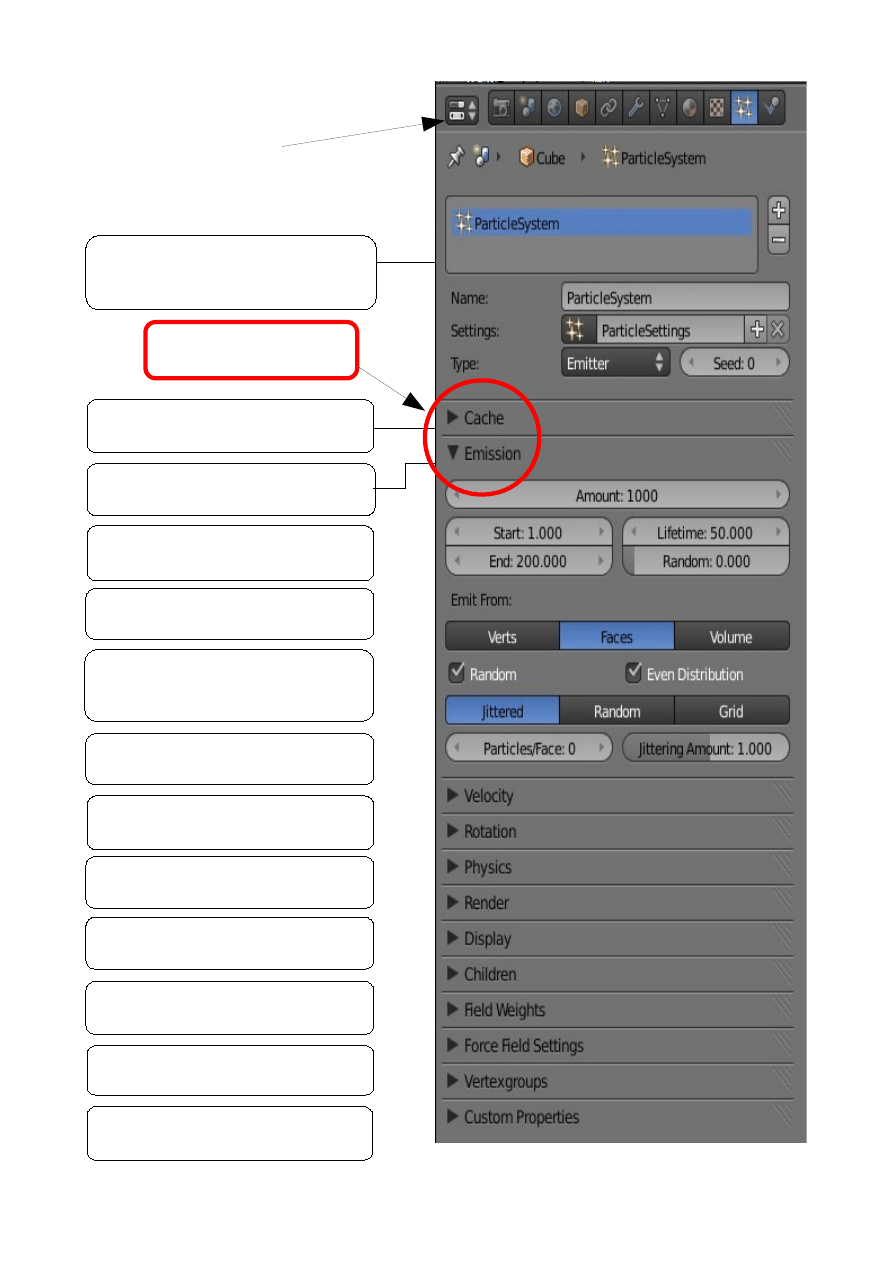
Particles Buttons – Panel
Assignment tab
How particles are assigned
(The missing tab)
Cache tab
Saving the particle system
Emission tab
How particles are generated
Velocity tab
How fast and in what direction
Rotation tab
How particles rotate
Physics tab
Rules of animation
Rules of interaction
Render tab
How images and video display
Display tab
How particles display on screen
Children tab
Particles generate other particles
Field Weight tab
Values effecting Force Fields
Force Fields Settings tab
Modifiers effecting particles
Vertex groups tab
Where particles originate
Custom Properties tab
Cache closed Emission open
Click on triangle open/close
Properties Window
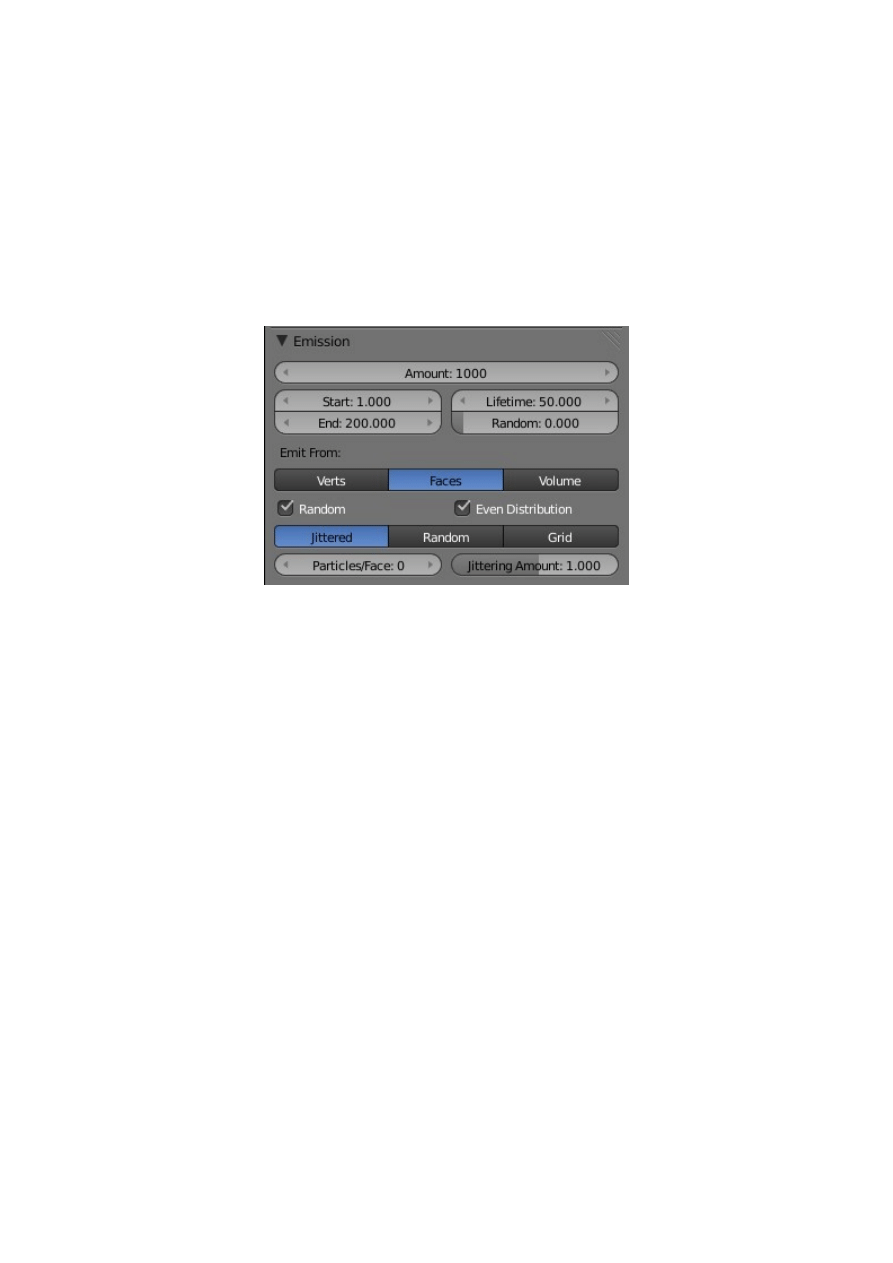
The Particle Buttons Panel
The Particle Buttons panel displays all the options relating to how particles are
generated and displayed. To understand how we create specific effects using particles
we will first require to look at some of the Buttons tabs.
Emission tab.
The Emission tab controls how particles are emitted.
Amount: The number of particles emitted in the animation between the start and the
end frame settings.
Start: The frame number in the animation where particles will start to be emitted.
End: The frame number in the animation where particle emission will stop.
Lifetime: How long each particle will be visible ( number of frames) in the
animation.
Random: Particles are emitted from Faces in a random order.
Emit From: Particles may be emitted from either Verticies, Faces or the Volume.
Faces is selected in the screenshot as indicated by the blue highlight.
The remainder of the options in the tab control the order of particle generation.
Random: Even Distribution: Jittered: Random: Grid: Particles/Face: Jittered Amount:.
These options permutate depending on which of the Emit From options has been
selected.
Experimentation and recording of results are required to establish combinations for
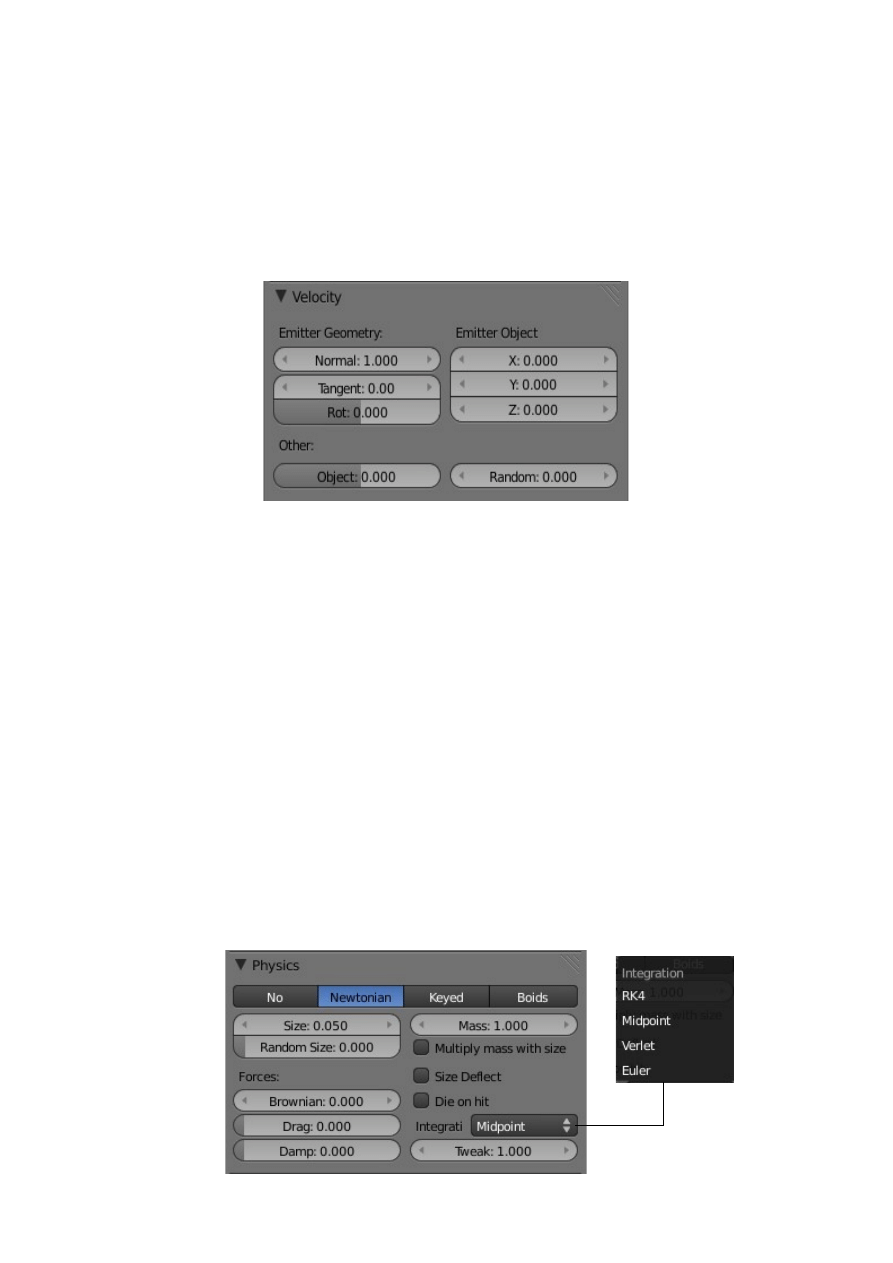
specific application.
Velocity tab
The Velocity tab settings control how fast and in what direction particles are emitted
from a mesh object.
Emitter Geometry
Normal: Velocity of particles normal (at 90 degrees) to the emitting surface
Tangent: Velocity of the particles parallel to the surface.
Rotation: Value rotates the direction of the surface tangent.
Emitter Object
The velocity of particles along the X, Y & Z axes in the scene.
Note all values may be entered as positive or negative reversing direction.
Other:
Object: The object gives the particles a starting speed and direction.
Random: Gives the starting speed direction a random variation.
Note: The 'Other' values are best demonstrated with particles being displayed as
objects. See: Render Tab.
Physics

Physics determine the way particles move and interact with the world around them.
Note the selection bar at the top of the Physics tab with Newtonian highlighted in
blue. Newtonian is the normal particle physics which we will consider at this time.
The other options are:
No
Particles stick to their emitter for the whole lifetime.
Keyed
Allows particles to be directed from one emitter to another setting
up a chain of particles moving from one place to the other.
Boids
Allows particles to be given rules of behavior which allow them to
represent flocks, swarms, herds and schools of various kinds of
animals.
Just for the moment the only setting we need concern ourselves with in the
Newtonian system is the Size value which controls the size of the particles as seen in
the 3D Window and as rendered in an image or movie.
Display
The display tab controls how particles are seen in the 3D Window. The options in this
tab are useful when multiple particle systems are in play and it is desirable to
distinguish between the particles in the different systems.
Lets work with our examples and begin by recapping starting a Particle System.
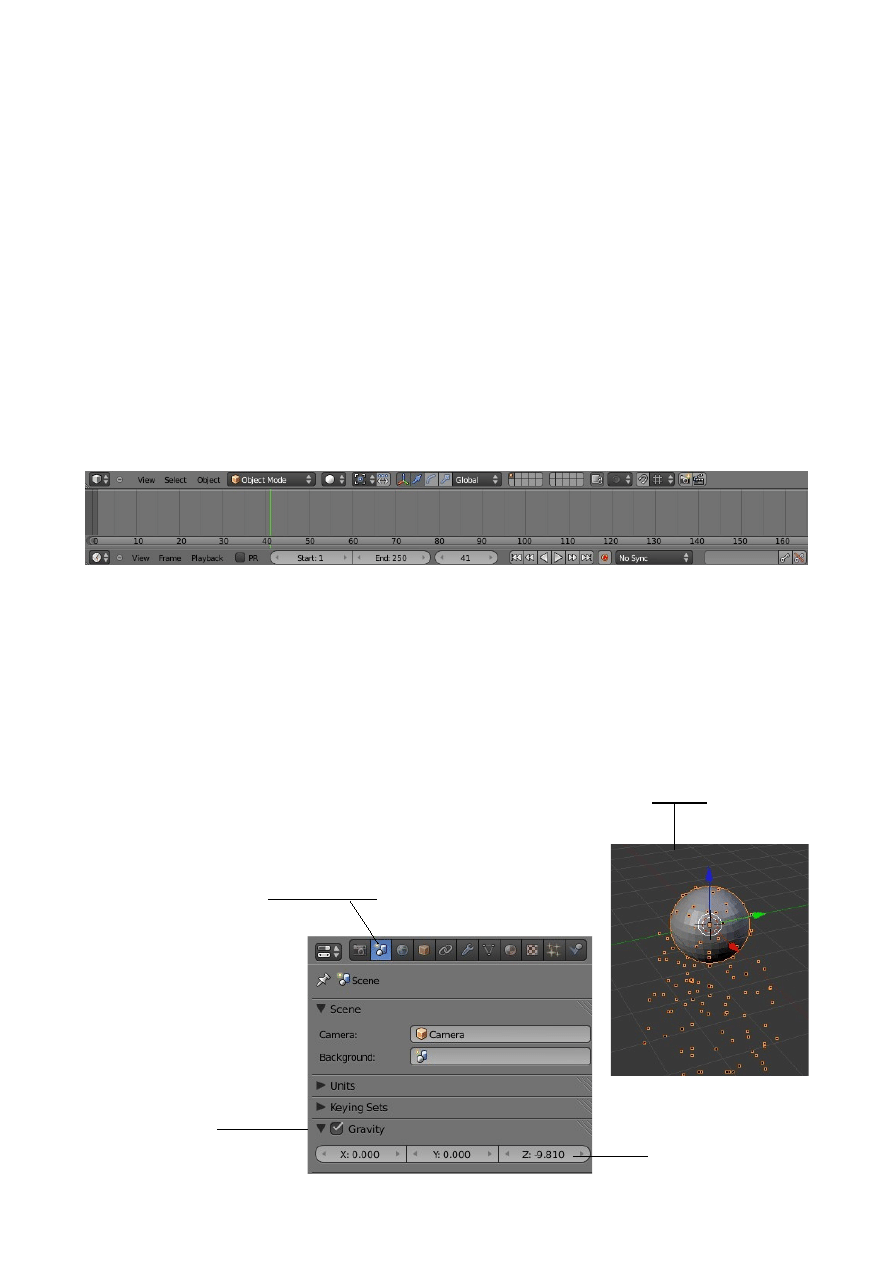
Starting a Particle System
Open Blender with its default scene containing a mesh Cube object. Delete the Cube
and add a UV Sphere. Keep the segments and rings at 32. The number of segments
and rings may be altered in the Tools Panel (T Key toggles hide/show) at the lower
left of the screen.
With the Sphere selected in the 3D Window go to the Properties Window – Particles
button and click the Add Particle System button ( The white plus sign ). The Particle
System tabs display as shown in the previous Particle System Buttons diagram.
Blender has created a complete Particle System which we can modify to produce
whatever effect we want.
Note the Timeline Window displayed across the bottom of the screen.
The timeline show a 250 frame animation window as seen by Start:1 and End:250.
Note the green line positioned at frame number 41. You will see why in a moment.
With your cursor in the 3D Window and with the UV Sphere selected press Alt + A to
play the animation of particles being generated. The particles emit from the surface of
the Sphere in a random order and fall towards the bottom of the screen. The
animation plays for 250 frames then repeats. Press Esc to cancel.
Click on the green line and drag it over to frame 41 to see the view below.
The particles behave in this manner since there is a
gravitational force being applied. Have a look at the
Properties Window – Scene button and note the tick in the
Gravity box.
Gravity ticked
Gravity Force -9.810
Earths Gravity
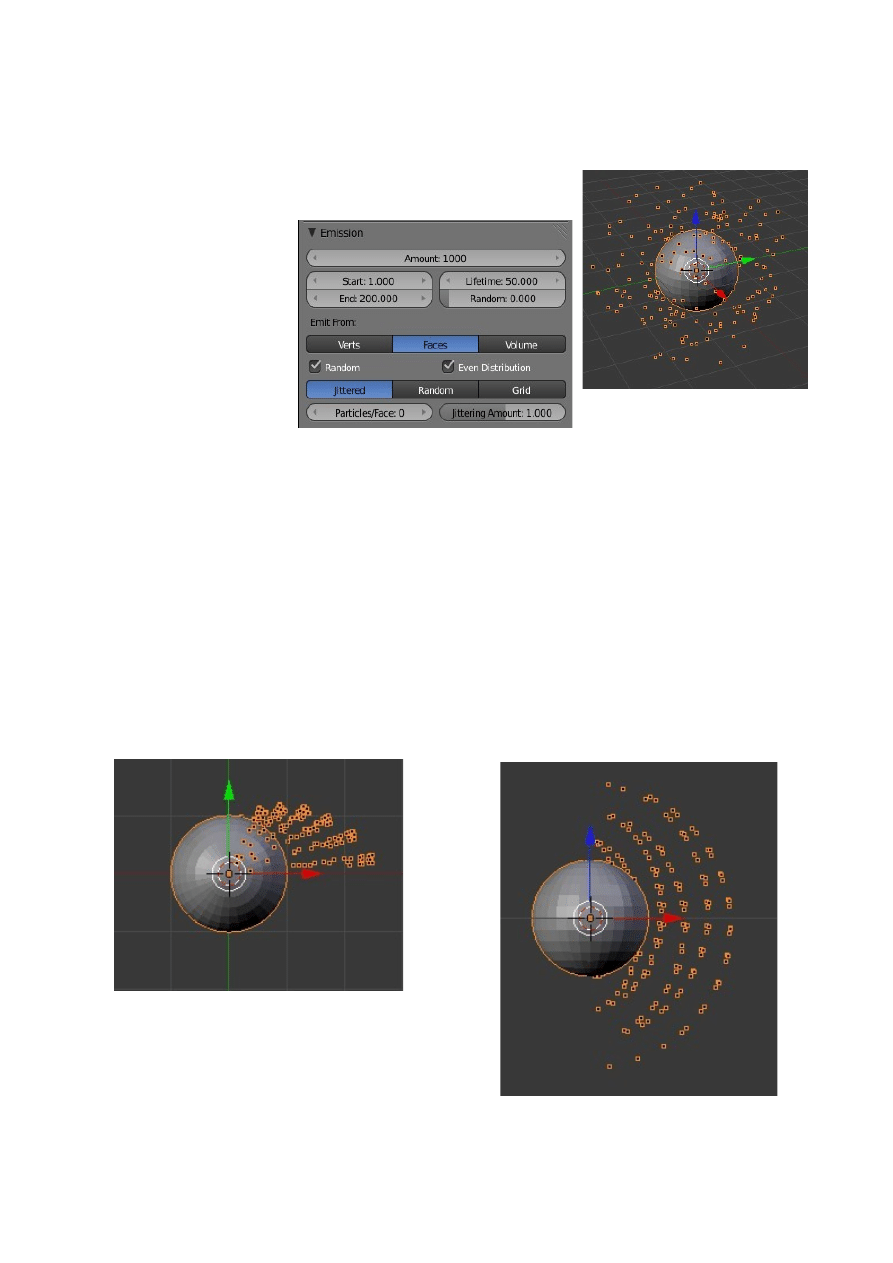
Click on the tick to remove it and play the animation again.
This time the particles emit from the sphere and float off into space. They still emit in
a random order from the faces of the Sphere.
Look at the Emission tab and note the values inserted.
These values tell us that 1000 particles will be generated in the animation starting at
frame 1 and ending at frame 200 during the animation. The animation is 250 frames.
There is also a Lifetime value which tells us that when a particle is generated it
remains visible for 50 frames. Therefore a particle generated at frame 200 will remain
visible until frame 250.
Note the tick in the box labeled Random. This is giving the random order of
generation of the particles. Click on the tick to remove it. Play the animation again.
Esc to cancel. The 3D Window is in User Perspective view therefore it is difficult to
see what has been achieved by removing the Random tick. Change the view to Top
View (Num Pad 7) then to Front View (Num Pad 1). With the Timeline advanced to
frame 41 you will see an ordered array of particles.
Top View
Front View
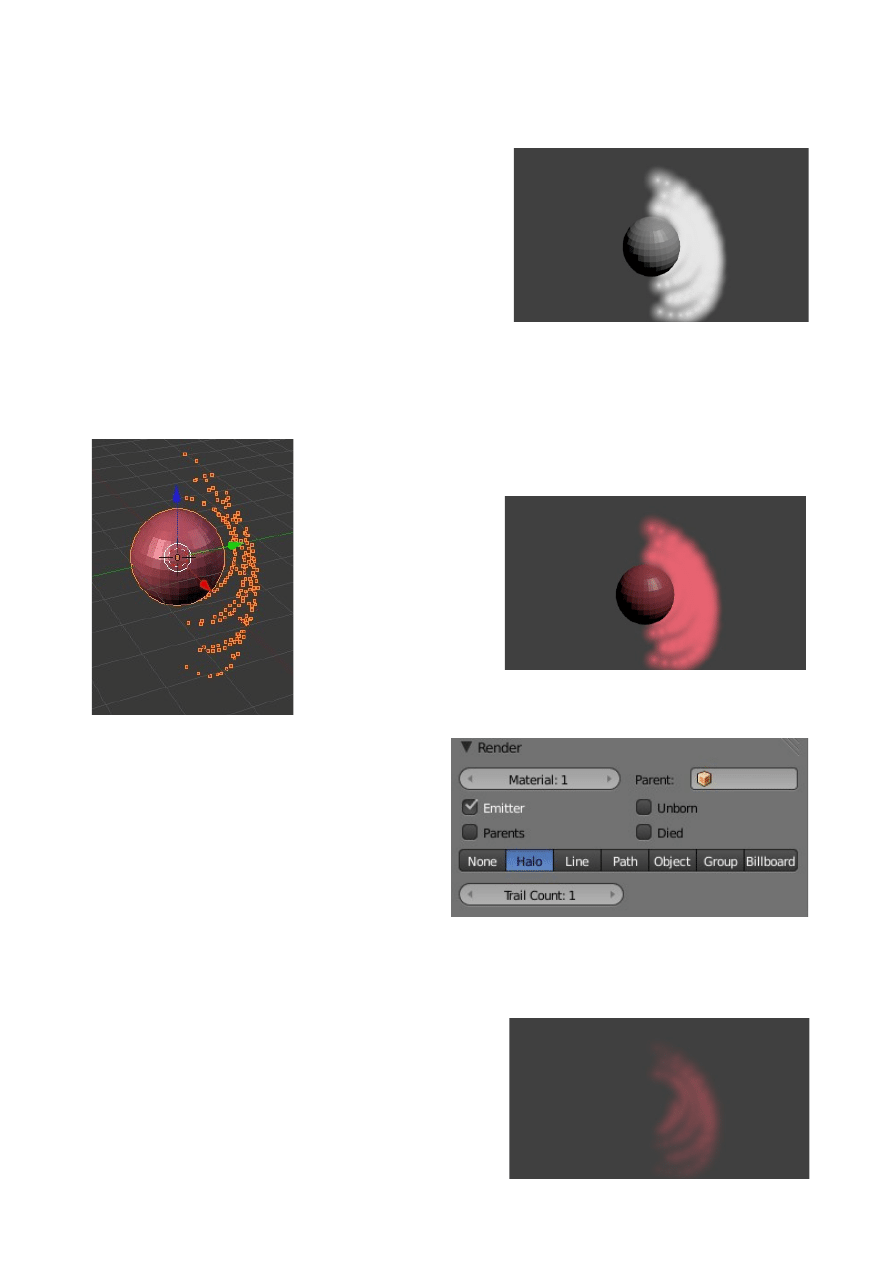
Material Influence on Particles
Particles emit their own light so it isn't necessary
to have lamps in the scene when particles are
rendered. To give particles color you have to add
a material to the emitting object. We could render
an image of frame 41 of what we have already
created by pressing F12 on the keyboard. Go
ahead and do it. What we get is a plain grey and
white picture. Press Esc to cancel the image.
With the Sphere selected in the 3D Window go to the Properties Window – Material
button. Press Add New to display the Button tabs and click on the Diffuse color bar to
display the color picker. Select a color then render the image again.
We see the emitter
object (Sphere) and the
particles rendered in
the same color. To
advance this subject a
little further go to
Particle buttons and
find the Render tab.
In the Render tab you will see Halo
highlighted in blue. This is telling Blender
to render the particles as halos. Since there
are a considerable number of particles
visible at frame 41 close together our
rendered image shows us a colored blob.
Note the tick in the Emitter box. This tells
Blender to render the emitter object in the image. Click in the box to remove the tick.
Go back to the Material buttons and find the Transparency tab. Click and add a tick in
the Transparency box. Reduce the Alpha value to 0.050 and render again.
Now only the particles are rendered and they are
transparent.
This has demonstrated some of the effects of
materials on particles. There are many more
combinations to play with.
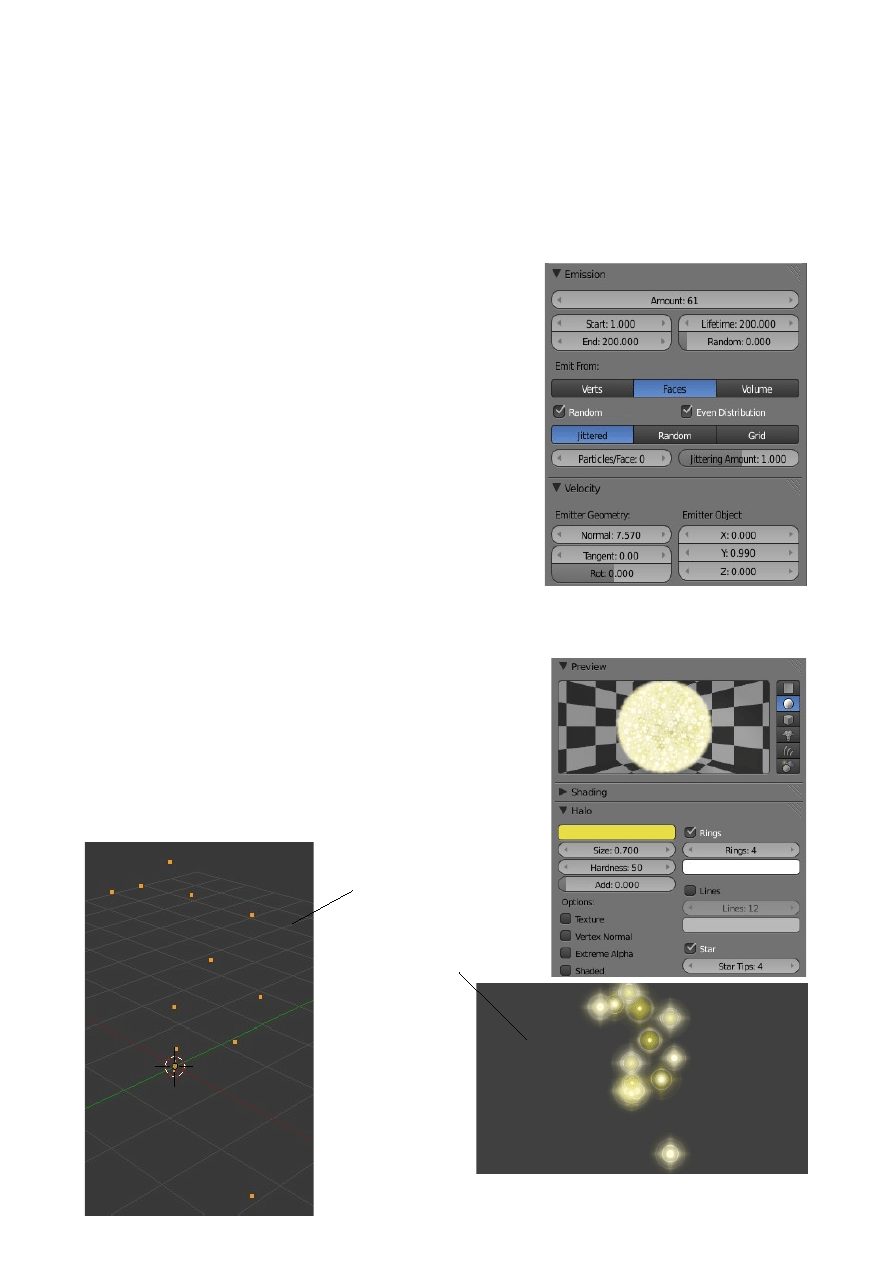
We will have a look at adding halo effects to particles and at the same time introduce
a few more tricks to give you the feel for the the versatility of the Particle System.
Open a new Blender scene, delete the cube and add a Plane object. Leave the gravity
setting in the Scene button ticked to maintain a gravity effect. With the Plane selected
Go to the Property Window – Particle button and add a Particle System. In the
Emission tab change the following, Amount: 61, Lifetime: 200. in the Velocity tab
change Normal: 7.500 and Emitter Object Y: 0.990.
At the bottom of the Velocity tab set Random approx
2.
We are decreasing the amount of particles so we are
not flooding the scene but changing the lifetime
makes the particles visible longer in the animation.
We still have gravity working but with normal
velocity at 7.500 the particles will project up a way
before descending. Setting Emitter Object Y: 0.990
gives the particles a slight horizontal velocity along
the Y axis making them move in an arc.
Now let's jazz the particles up a bit. With the Plane
still selected go to the Material button.
Just above the Preview tab change to a Halo material.
Click on the color bar and select a nice bright color
(Yellow). Change th Halo size to 0.700, tick Rings
and Stars.
Press Alt + A and run the animation. Esc to exit then
cycle to animation to frame 41. if you select some
other frame you wont see what I do. Render an image.
3D Window at Frame 41
Rendered Image
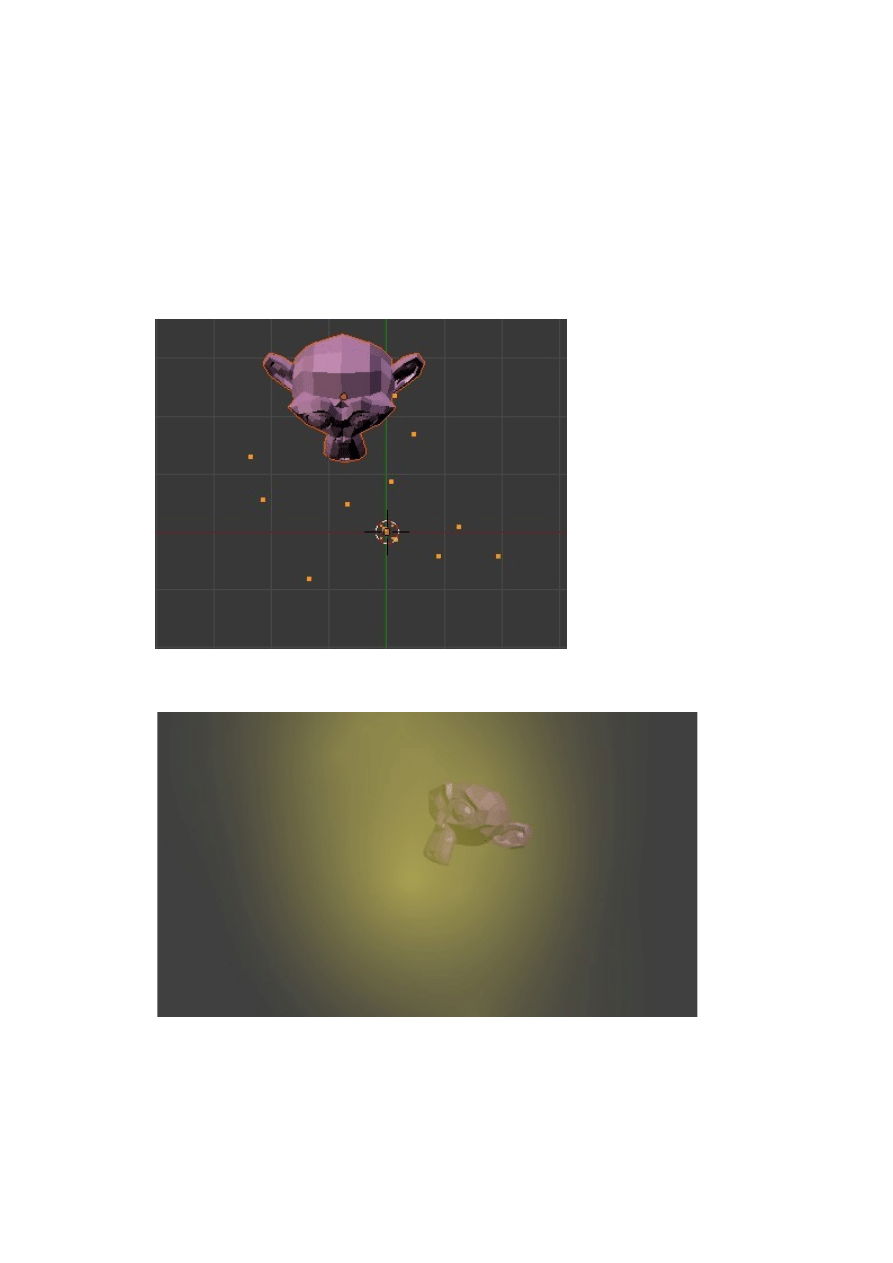
Experiment with Rings, Lines, Stars and Halo size. For example in Material untick
Rings and Stars to change the particle render back to a plain halo. Set the Size to 4 to
increase the halo size to something that fills the camera view. In the Shading tab
decrease the Alpha value to 0.100 to give the halo a transparent look. This should
produce something that looks like a cloud of smoke. If you place an object in the
scene and position it where the particles are at frame 41 the object renders in the
smoke cloud. There are many many combinations all producing different effects.
Monkey positioned behind Particles
Rendered Image
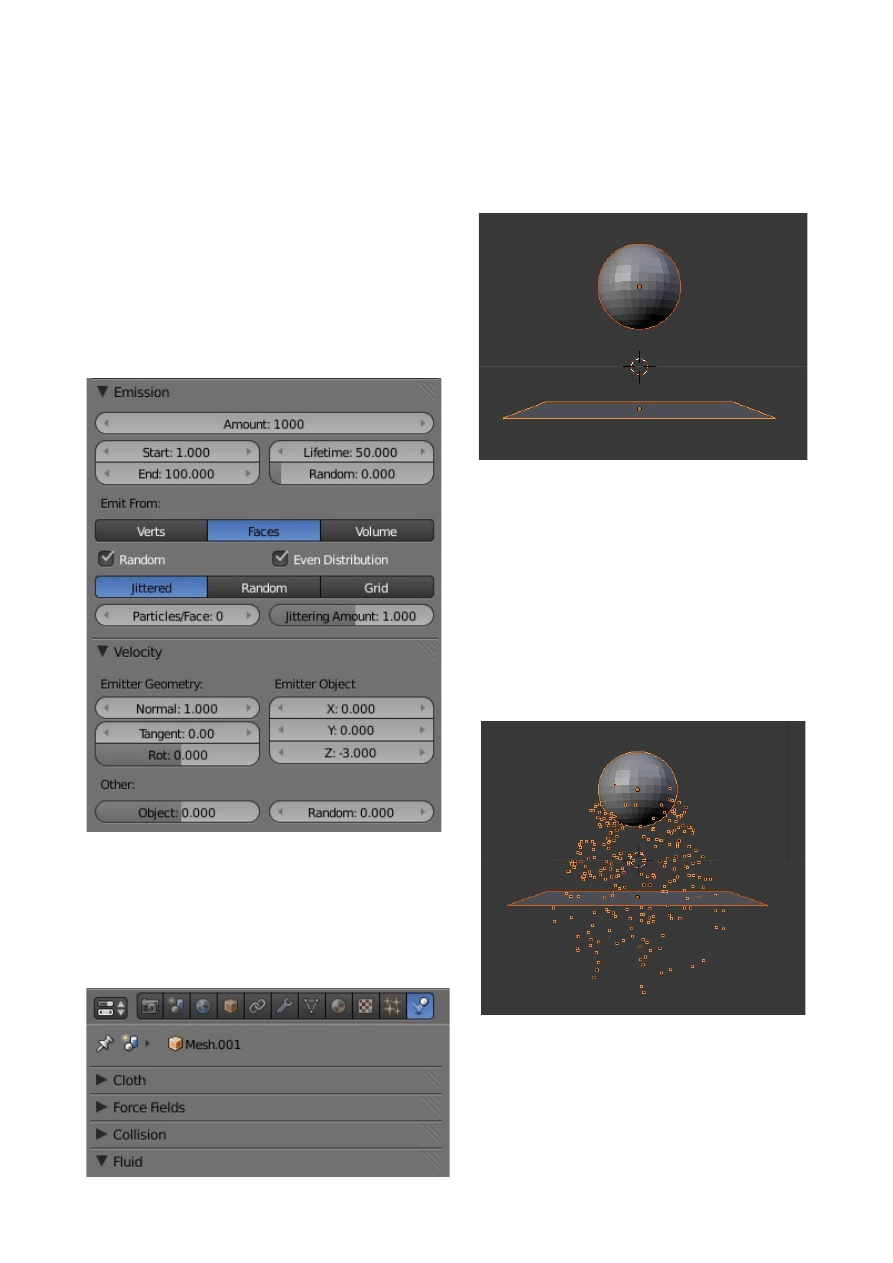
Particle Interaction With Objects And Forces
Particles can interact with other objects and be affected by forces like wind. Particles
can bounce off other objects and act like sparks or droplets. To show how these
features work set up a scene with a Sphere positioned above a Plane as shown below.
Don't forget to scale the Plane up.
With the Sphere selected go to the Properties
Window – Particle button and Add a Particle
System. In the Emission tab set the End value
to 100 and in the Velocity tab set the Emitter
Object Z: -3.000.
In the Properties Window – Scene button
untick the Gravity box.
With your cursor in the 3D Window press
Alt + A to play the animation of the
particle generation. You will see the
particles fall and pass through the Plane as
below.
The next step is to stop the particles falling
through the Plane.
Select the Plane and go to the Properties
Window – Physics button.
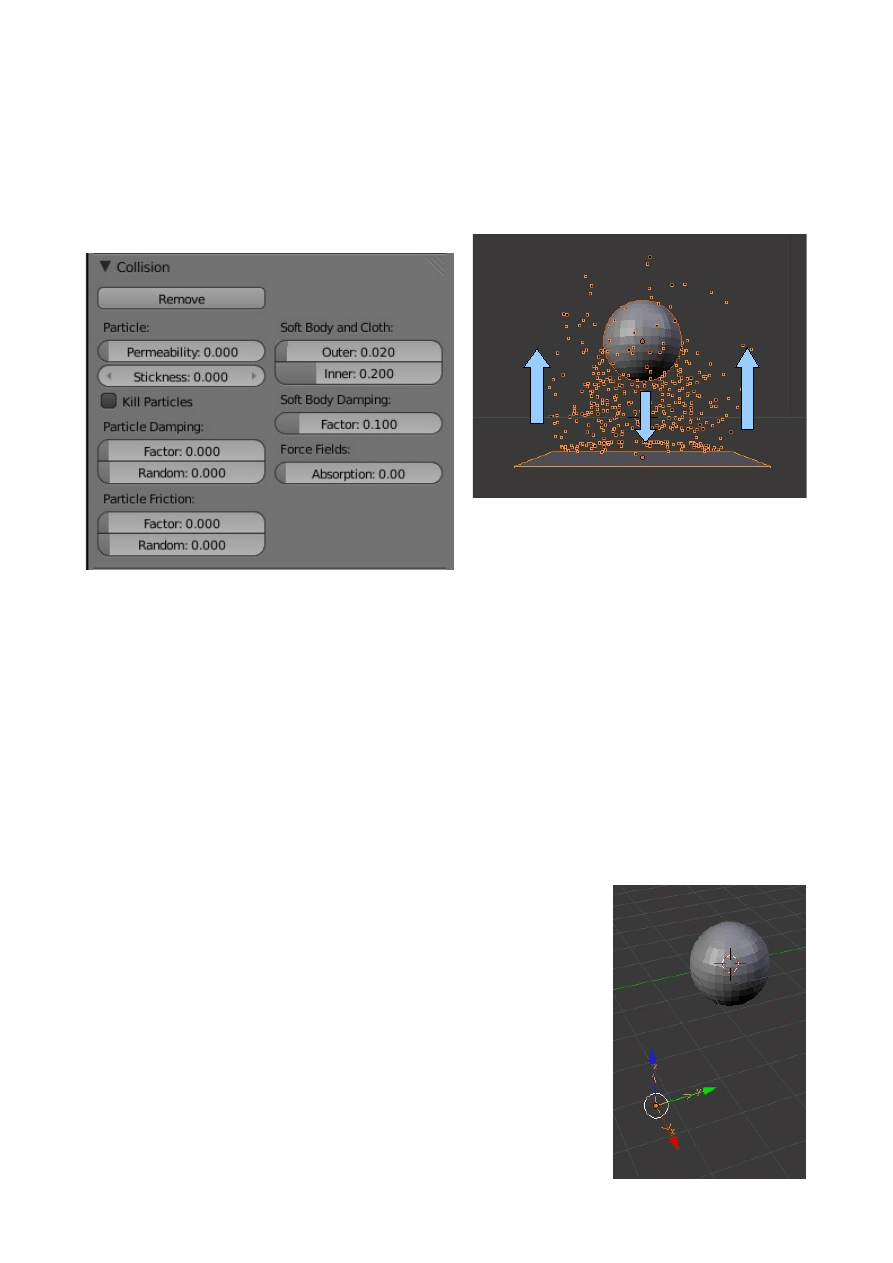
Click on the triangle in the Collision tab and click on Add to activate a collision
modifier to the Plane. Press Alt + A again to replay the animation. Remember you
must be at frame 1 before you replay.
You will now see the particles bounce up from the surface of the Plane. (Tip: Shift
select the Sphere and the Plane to better see the particles)/
By increasing the Particle Damping factor in the Collision tab to 1.000 the particles
will land on the Plane but no longer bounce.
By experimenting with other particle and collision settings and by applying materials
with halos, line and stars you can simulate sparks bouncing with high quality results.
Wind
Blender allows particles to be influenced by a simulated wind force. To create a wind
effect you have to place an object in the scene and assign a wind force to it. An object
called an Empty is great for this since it doesn't render. Begin by opening a new scene
and deleting the Cube replacing it with a UV Sphere. Add a Particle System to the
sphere and leave the default settings. Add an Empty to the
scene. Shift + A and select Empty. Position the Empty just
below the Sphere off to one side as shown to the right.
The Sphere will emit particles which will fall downwards
since the gravity effect is ticked in the Scene buttons
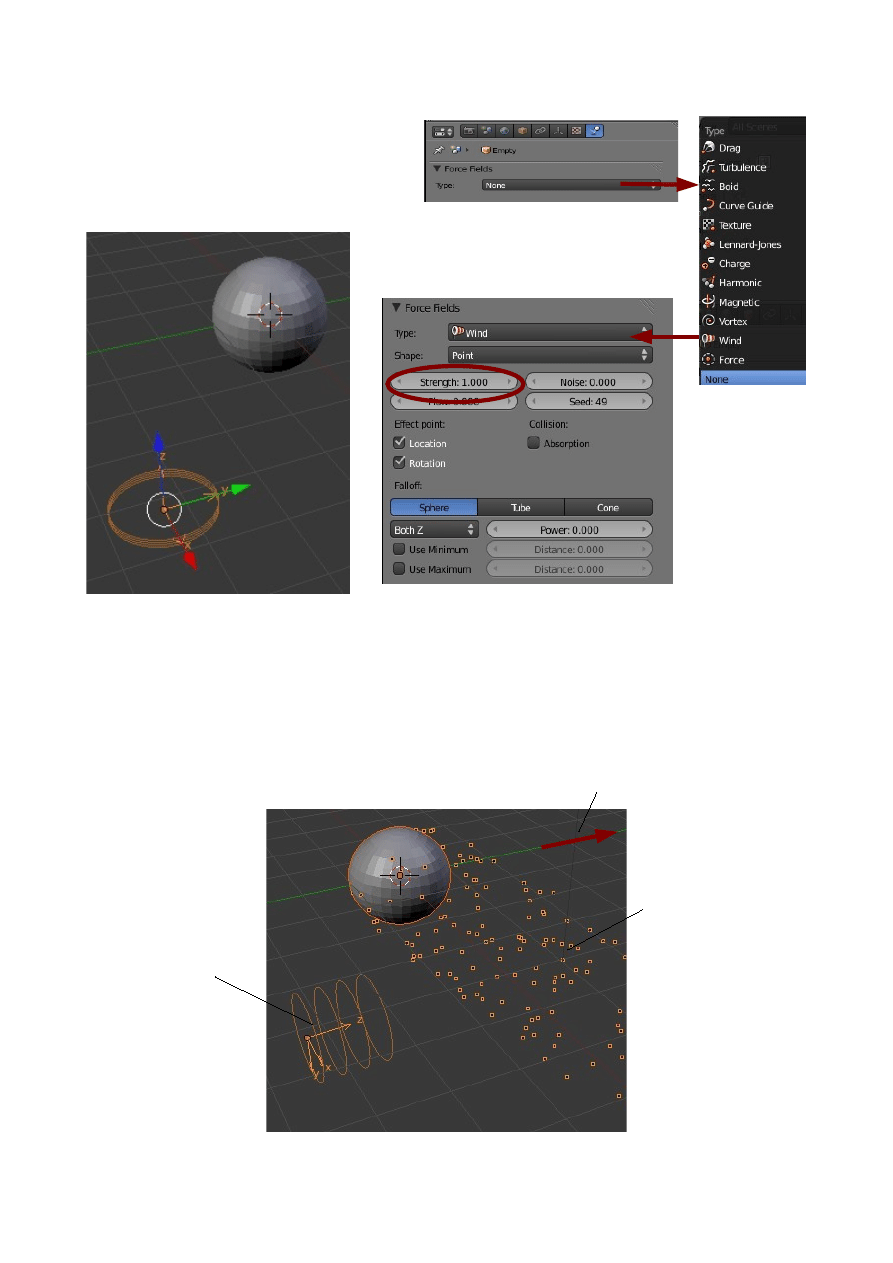
with the Empty selected in the 3D Window go to the Properties Window – Physics
button and click on the drop down
selection. Select Wind to display the
Force Field type Wind settings. You
will see the wind force field in the 3D
Window attached to the Empty object.
The Wind force is acting along the Z axis of the Empty object at strength 1.000. We
want the wind to blow the particles falling from the sphere along the Global Y axis.
With the Empty selected rotate it about the X axis so that the Empty local Z axis
points in the same direction as the global Y axis.
Increase the Force Field Strength value to 10. Play the animation to see the Spheres
particles being blown.
Wind strength is able to be animated which creates a realistic wind effect.
Particles blown along
Global Y axis
Empty Wind Force
rotated about X axis
with Strength 10
Global Y Axis
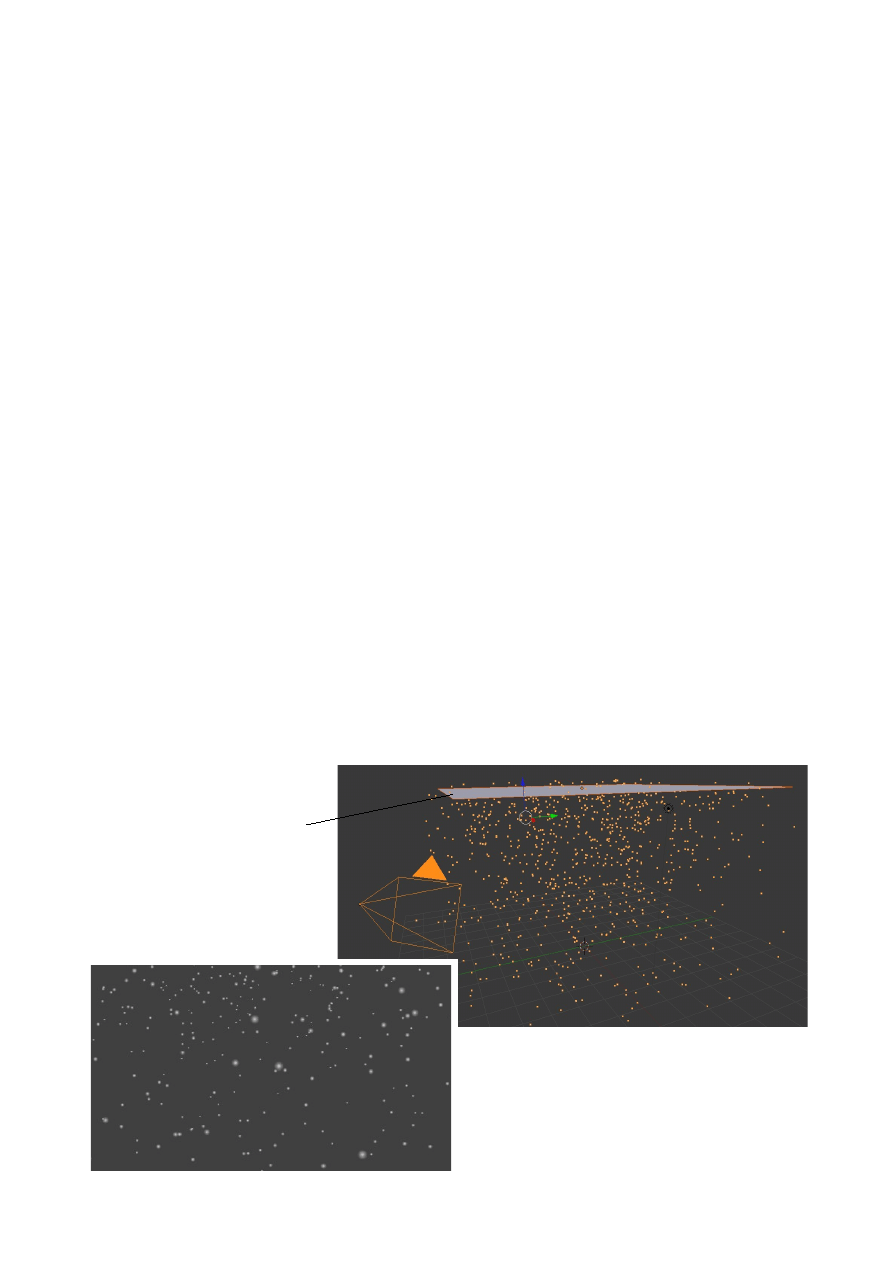
Sample Particle Settings
The following are some sample settings for various uses. Follow the settings carefully
otherwise you will not get the results as demonstrated. Settings can be tweaked to
produce whatever results you want and only by experimentation will you discover
what can be achieved. Remember to record settings for future use when you discover
something really neat.
Snow Effect
In a new scene delete the Cube and add a Plane. Scale the Plane up 5 times and
subdivide the surface 4 times. Position the Plane at the top of the screen above the
Camera out of camera view. The Plane is there to emit particles not to be included in
the rendered image or movie.
Go to the Properties Window – Scene button and set Gravity Z: -0.210. This is a low
value since we want our snow to float down gently. Remember though if there are
other objects in the scene which are effected by gravity they will also float.
Add a Particle System to the Plane. In the Emission tab set Lifetime: 200 and in the
Velocity tab set Normal: 0.010 and Random: 0.320. We want the particles to display
for a fair while, not go careering off at a hundred miles an hour and have a random
speed at start up.
In the Material button add a Material (White is appropriate) and set it as Halo. Set the
halo size to 0.050 (Small snowflakes)
Run the animation to generate particles then advance the animation to about frame
230 and render an image.
Snowflakes
Plane above Camera
out of view
Animation as seen at Frame 230
Rendered Image
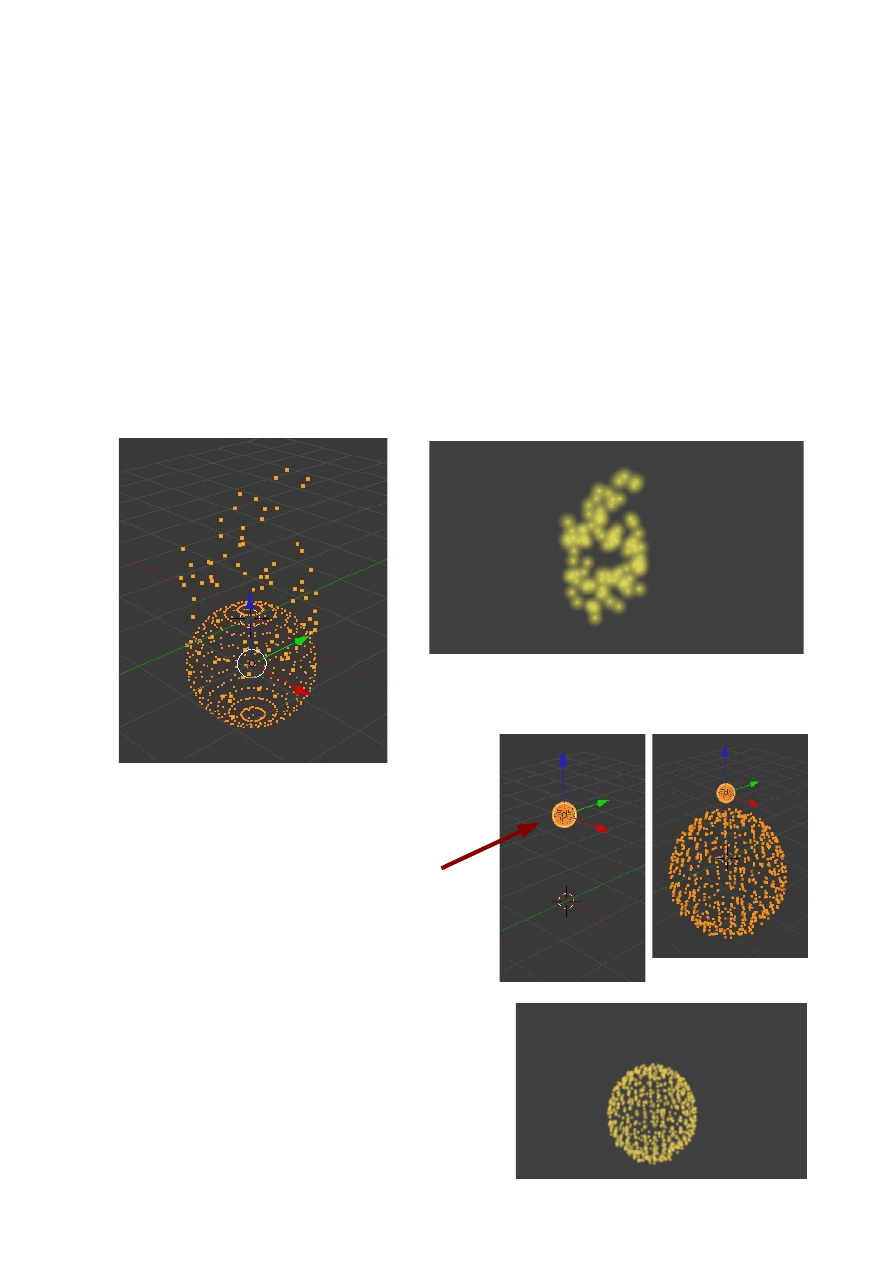
Fire
In a new scene delete the Cube and add a UV Sphere. Add a material Halo type and
make it a nice yellow or red color. Set the Halo size to 0.300.
In the Scene button untick the Gravity box.
Add a Particle System to the Sphere and in the Emission tab set Normal: 0.000. Set
Emitter Object Z: 2.870
In the 3D Window move the Sphere down the Z axis a touch to position it at the
bottom of the camera view.
Run the animation then cycle forward through the frames and render an image.
Simple Fireworks
New scene with UV Sphere scaled down.
Position Sphere at top of Camera view.
Material button – Add material- Halo type
Color – Yellow, Halo Size :1.000
Particle button – Add Particle System.
Emission – Lifetime: 100, Start: 50, End: 51
Velocity – Normal: 2.000
After animation run advance frame to 67.
Render tab – untick Emitter.
3D Window
Rendered image
3D Window
Camera View
Rendered Image
Emitter Not Shown
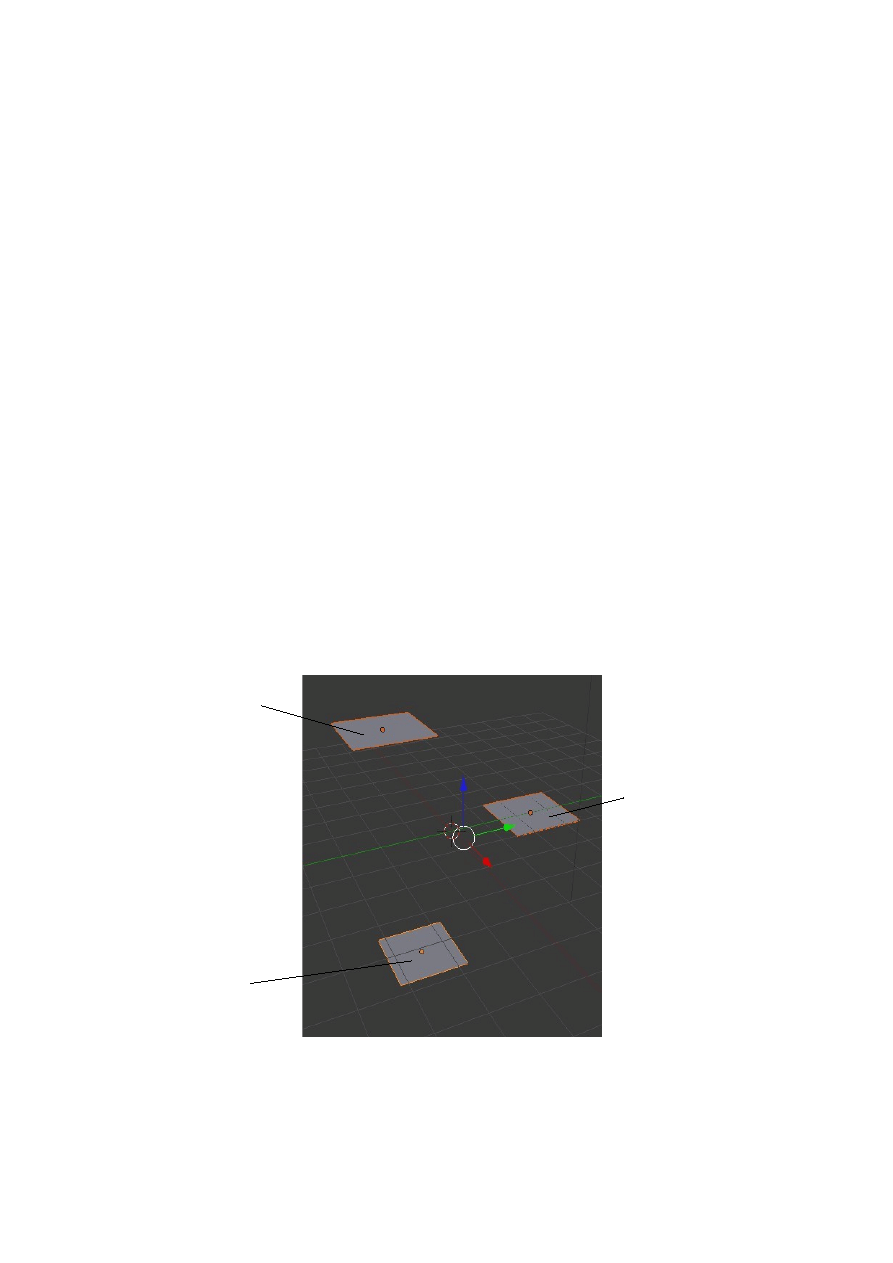
Keyed Particle Systems
So far we have looked at Particle Systems of Type: Emitter with Newtonian Physics.
We will now consider type: Emitter with Keyed Physics which we call Keyed
Particles.
Keyed Physics is a way of controlling the movement of particles by directing them
from the original emitter object to a second object and on to a third and subsequent
objects. The flow of particles may be used as an animation or used to create a static
image.
The following procedure for setting up a Keyed system will demonstrate the
principals involved.
Open a new scene in Blender and delete the default cube. Add three separate Plane
objects and position them as shown in the diagram. A simple way to do this is to add
one Plane then with the Plane selected press Shift + D to duplicate . the new Plane
will be in Grab mode ( White outline ) so hit Y Key to confine movement to the Y
axis and drag it to one side. Click mouse to exit Grab mode. Repeat the process to
add a third Plane.
Note the first Plane was named 'Mesh' by Blender ( see names at lower left of screen
when selected ). The second Plane is named 'Mesh.001 and the third 'Mesh.002.
Arrange them in the 3D Window in order of name. It will help later on.
Just as an aside you could go to the Properties Window – Object data button and edit
the name in the Name box at the top of the window. You could use any name you like
say, 'Borris”, 'Clive' and 'James'. Since they are all identical triplets it's probably best
to stay with the 'Mesh' names.
Mesh
Mesh.001
Mesh.002
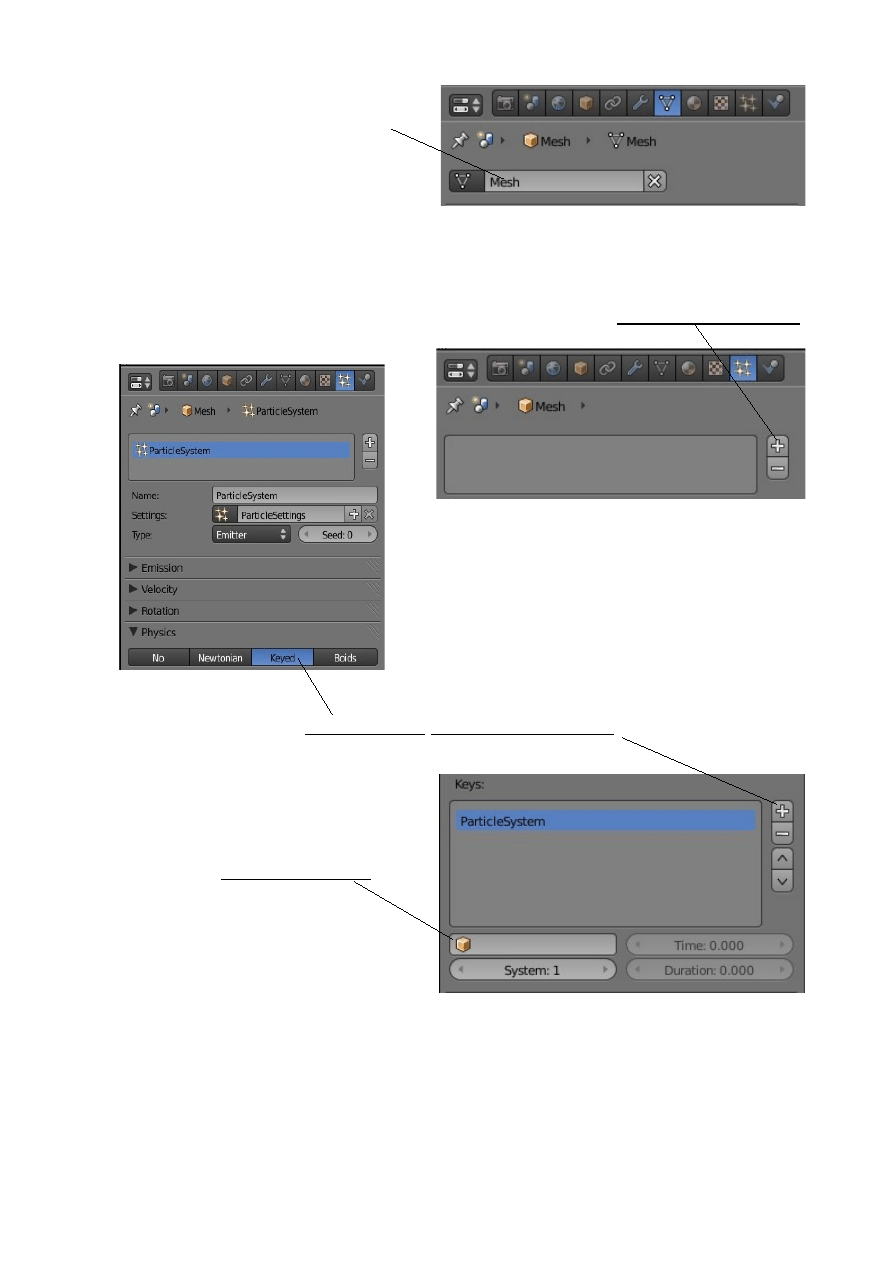
By the way the Planes have been arranged in a vertical stack with 'Mesh' at the
bottom left, 'Mesh.001' middle right and 'Mesh.002' top left.
Select 'Mesh' and in the Properties Window – Particles buttons click on the plus sign
to add a Particle System.
Go to the Physics tab and select 'Keyed'. Click on the plus sign next to the Keys panel
to add a new Particle Target.
Blender enters this in the panel and
names it 'Particle System'. Note the small
panel with the little cube in it just below
the Keys panel. Leave this empty for the
time being.
The Plane named 'Mesh' is going to be
our Emitter.
Deselect 'Mesh' in the 3D Window and select 'Mesh.001'. Repeat the process to add a
Keyed Particle System to 'Mesh.001'.
Tip for Newbies: When you select 'Mesh.001' all the buttons in the Particle buttons
panel disappear if you happened to scroll down the buttons window with a few tabs
expanded. Drag up the scroll bar at the right hand side of the window to reveal the
plus sign to add a new system. Sound silly but it fooled me for a bit.
Rename Object here if required
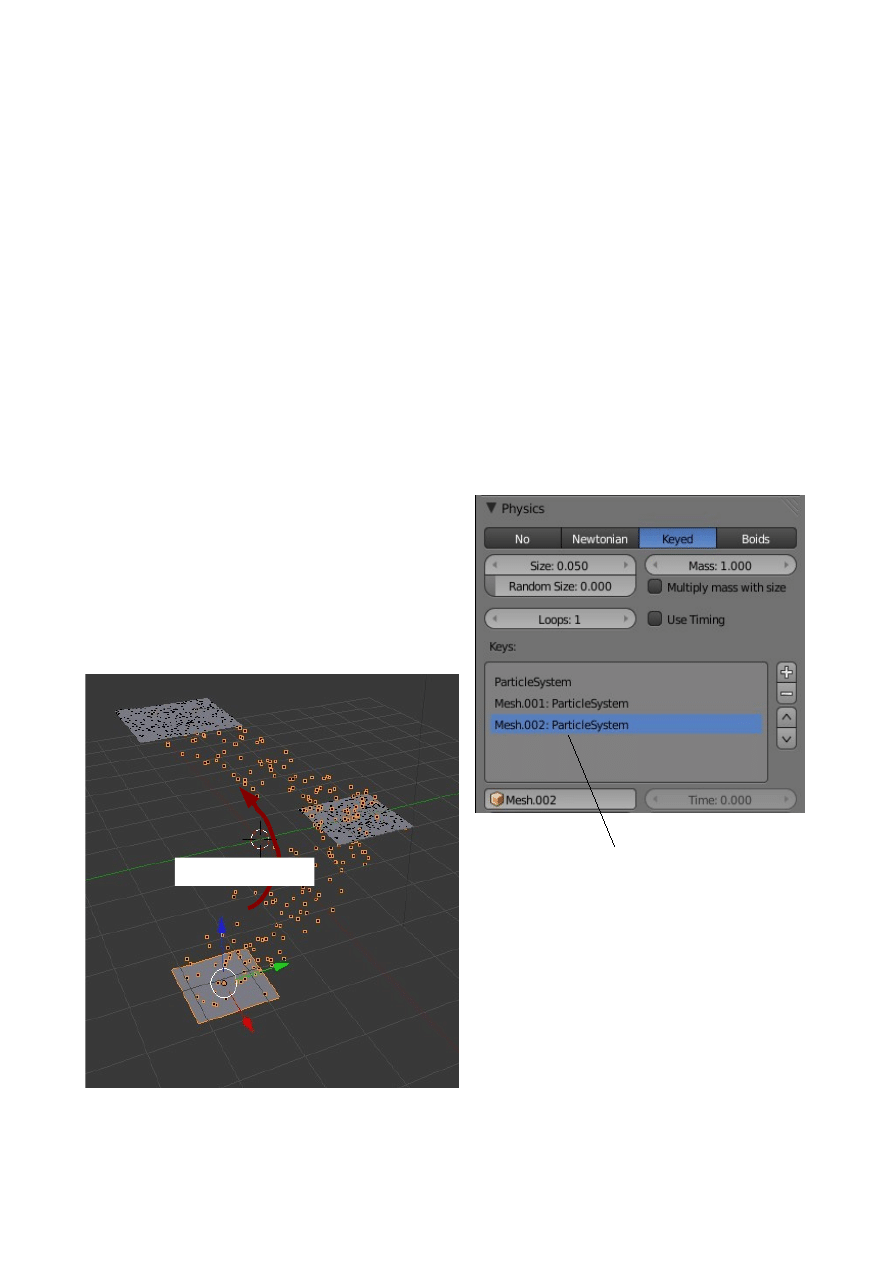
Select 'Mesh.002' and Add a Keyed Particle System to 'Mesh.002'.
Now go back and select 'Mesh'. In the Particles buttons - Physics tab click on the plus
sign next to the Keys panel to add a new Particle Target. Blender enters Particle
System again. Remember the small panel with the little cube in it. Click on the cube
to display a drop down selection panel. Click on 'Mesh.001'. Blender changes the
target to 'Mesh.001:ParticleSystem'
You are telling the particle target for 'Particle System that the target object is
'Mesh.001'.
Still with 'Mesh' selected in the 3D Window click on the plus sign next to the keys
panel again. Again Blender enters 'ParticleSystem'. Click on the cube and select
'Mesh.002'.
We now have Particle targets named 'ParticleSystem', 'Mesh,001: ParticleSystem' and
'Mesh.002: ParticleSystem'.
This is simply telling particles emitted from
'Mesh' to go to 'Mesh.002' and then go on to
'Mesh.002'.
Hit Alt + A to see it happen.
Remember all the rules for number of particles, lifetime, start, end and normal
velocity etc. apply.
Particle Movement
Particle Targets
Particles flow from one
mesh to the other

Boids Particle Systems
Boids particle systems are used to simulate flocks, swarms,herds and schools of
various kinds of animals or anything that acts with similar behavior. Boids particle
systems are of Type: Emitter but have Boids Physics applied. Boids particles in one
particle system can react to particles in another system or they can react to particles
within their own system. Boids are given rules of behavior which are listed in a stack.
The rules at the top of the stack take precedence over rules lower down in the stack
but the stack is able to be rearranged once it is written.
Since only a certain amount of information is able to be evaluated if the memory
capacity is exceeded rules lower down the stack are ignored.
The procedure for setting up Boids Particle Systems will be demonstrated with a few
examples.
Example: A Flock of Birds
Remember we are sticking to basics so don't get too excited. Our particles will act
like a flock of birds not look like birds.
Open a new Blender scene and stick with the default Cube. This will be our particle
emitter. In the Properties Window – Particle buttons – Add a new Particle System.
Let's try a new innovation as far as instruction is concerned. Leave all buttons
settings as default values except for the following. Change these values.
Emissions tab
Amount: 30 We will have a small flock.
Lifetime: 250 The default animation length in the Timeline.
Physics tab
Select Boids Physics
Boids Brain tab
Blender default rules are: 'Separate' and 'Flock'. With 'Separate' highlighted hit
the minus sign to delete it. Click on the plus sign at the right hand side of the
window to display a selection drop down for Boids Rules. Select ' Follow
Leader'. With 'Follow Leader' highlighted click on the up arrow below the
minus sign to move 'Follow Leader' to the top of the stack.
We have told the particles to follow the leader while flocking together. We will now
give the particles a leader to follow.
Deselect the Cube in the 3D Window ( A Key ) and add an 'Empty'. An 'Empty' is a
location point which can be animated to move in the scene but which does not render.
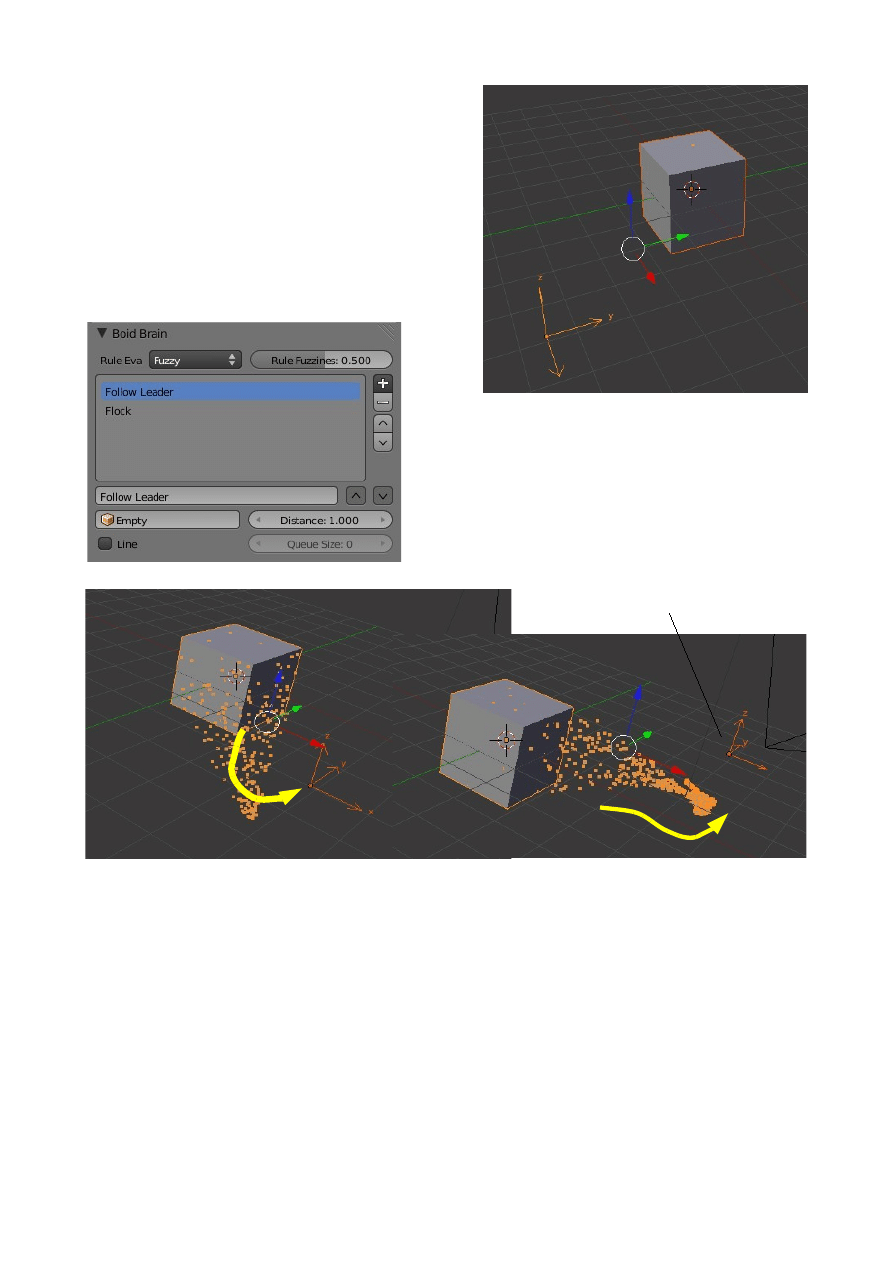
Grab the 'Empty' and move it to the side.
Deselect the 'Empty' and select the 'Cube'. Go
back to the Boids Brain tab and make sure
'Follow Leader' is highlighted. Below the
stack window you will see a name box where
you can rename the rule if you wish and
below that an empty box with a little cube at
the end. Click in this box and select 'Empty'
from the drop down which displays.
We have told the particles to follow the
'Empty'.
Animate the 'Empty' to move across the screen
( See the section on animation).
When the animation is played have the Cube selected in the 3D Window. Particles are
emitted from the Cube, head towards the 'Empty' and attempt to follow it as it moves
across the screen. Having the Cube selected displays the particles as little orange
squares. If it isn't selected all you get are black dots which are hard to see.
Note: With a high particle amount Blender may crash due to overload when
calculating data. This of course depends on the capability of your computer.
Particles emitted from Cube swarm and follow Empty as is moves
Empty
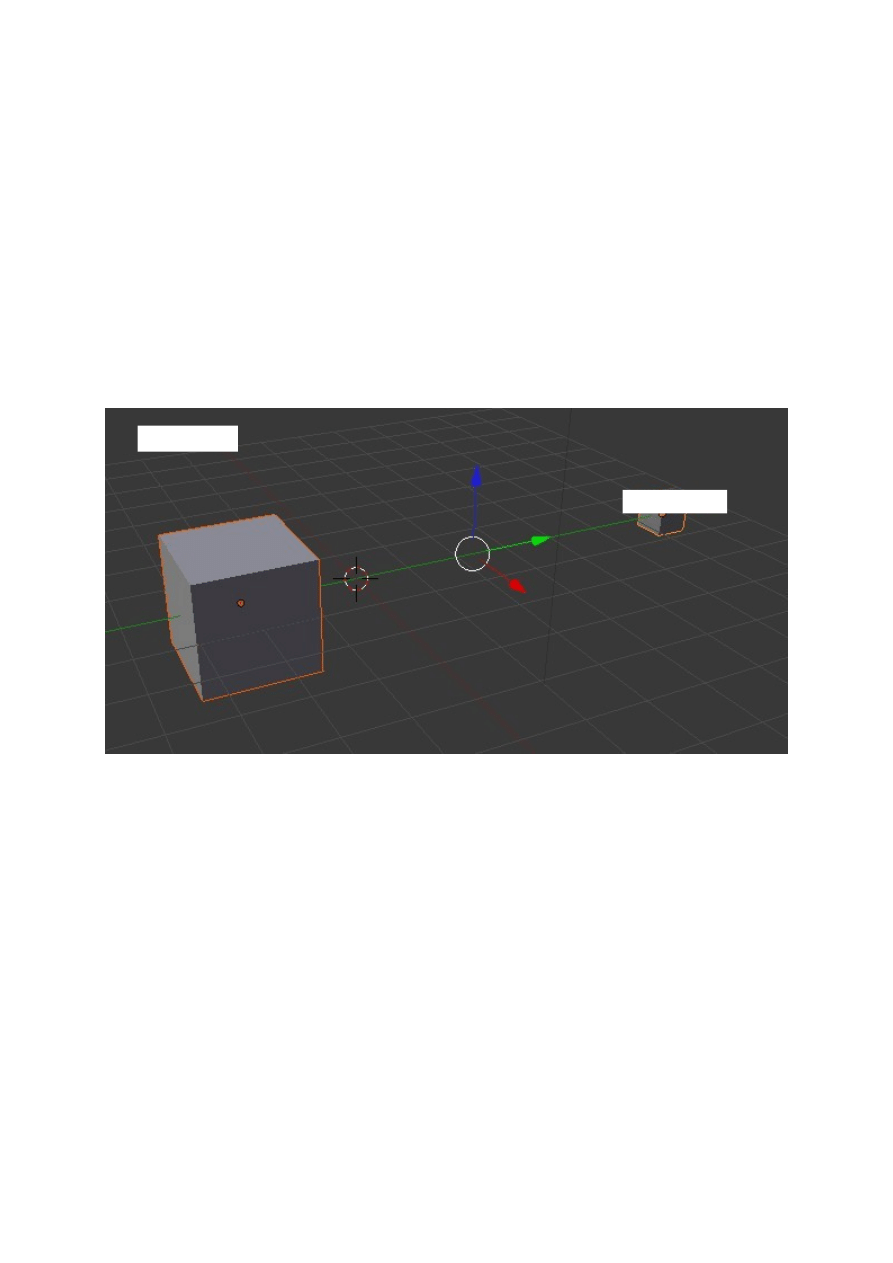
Example: Directing Movement
In this example we will demonstrate how to direct particles to move from one object
to another.
Start a new scene and add a second Cube object. Note the default cube is named
'Cube' ( see lower left of 3D Window ) and the new Cube is named 'Mesh' that is if
you added it by going Shift + A. If you duplicated the default Cube by Shift + D then
it is named 'Cube.001'. Remember the names.
Position the Cubes as shown in the diagram scaling the new cube down.
Select 'Cube' and add a particle system with Boids physics. In the emission tab reduce
Amount to 10 and set Lifetime to 1500. We want to keep the number of particles low
and have them visible for a fair amount of time in the animation.
Go to the Timeline Window and and set the animation at 1500 frames.
Let's display the particles in a different way. In the Display tab select Cross' and set
the Draw Size to 10. You will see a biggish cross appear on the Cube.
Now for the Boids Brain tab. Remove 'separate' and 'Flock' and add 'Goal'. Click in
the Object box below the rule window and select 'Mesh' or 'Cube.001' as the case
may be. This tells the particles emitted from 'Cube' to go and find the target.
Cube
Mesh
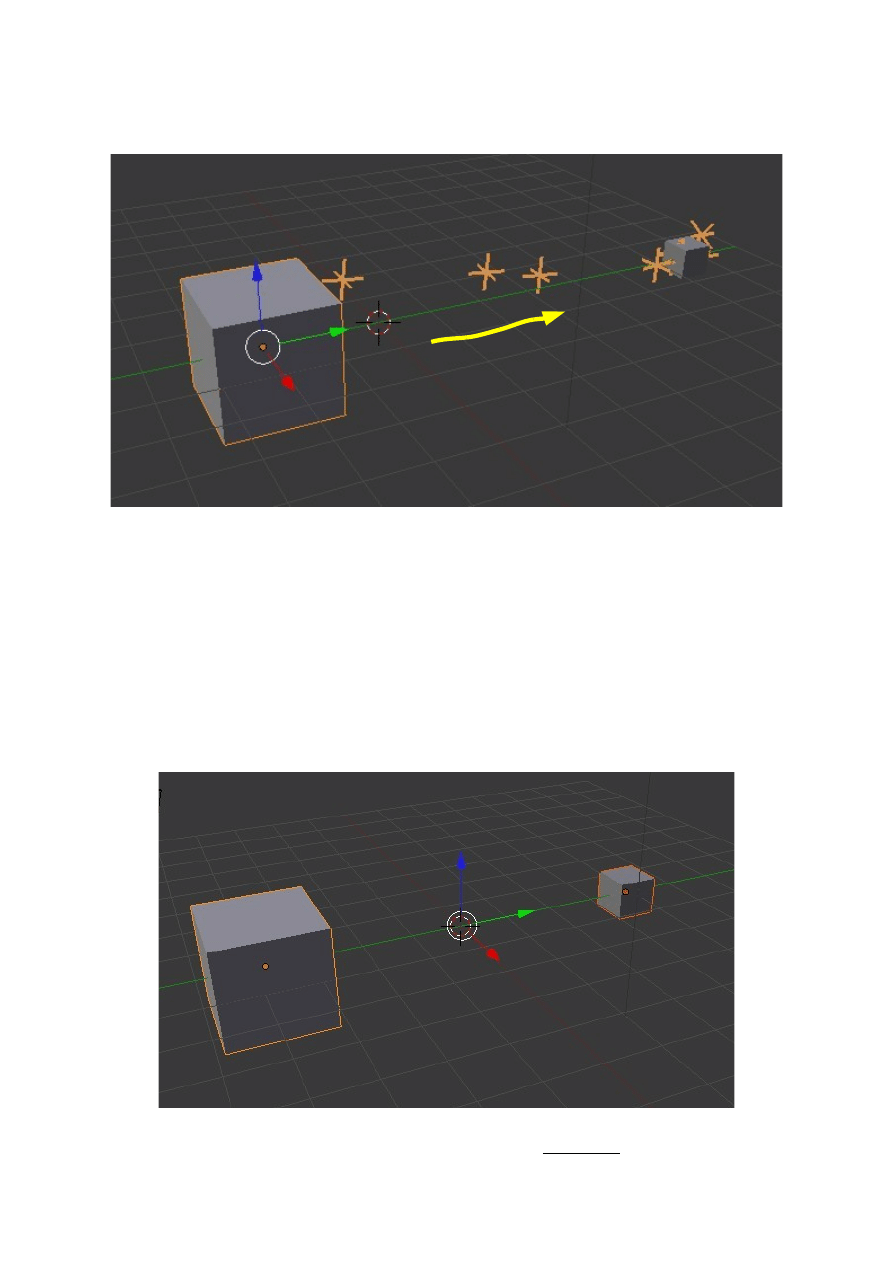
Play the animation to see the result.
Crosses emitted from 'Cube' migrate across to and accumulate on the target.
Remember the location of either or both of the cubes in the scene may be animated at
the same time.
Example: Prey Predator Relationship
Boids particles will not only act like swarms or flocks in their movement they can
also be made to react to one another. An example would be one flock of birds chasing
off another flock.
We will set up an example in a new Blender scene with two cubes as shown in the
diagram. Make the larger cube 5x the smaller Predator Particles

Predator Particles
Select the small cube (Predator) in the 3D Window then in the Properties Window –
Particle buttons add a Particle System. Change the following settings:
Emission tab
Amount: 100 ( Observation: Larger number becomes the aggressor)
Lifetime: 1500 ( Allows particles to be visible for duration of the animation)
Display tab
Select 'Point' and set Draw Size to 3.
Physics tab
Select 'Boids'
Size: 0.0300
Max Air Speed: 7.000 ( Gives an advantage over the slower Prey particles)
Select: Enemy (Click on the 'Pluss' sign next to the 'Relatins' panel.)
Boids Brain tab
The default Separate and Flock rules are applied. Add a Fight rule and move it
to the top of the stack.
Prey Particles
Select the large cube ( Prey ) in the 3D Window and add a particle system.
Change these settings:
Emission tab
Amount: 10
Lifetime: 1500
Display tab
Select 'Cross' and set Draw Size to 10.
Physics tab
Select 'Boids'
Size: 0.030
Max Air Speed: 5.000 ( Combined with size makes bigger and slower)
Relations: Click the Plus sign ( Invalid target displays) then click in the target
selection box below the window ( little cube ) and select 'Cube'. Now 'Cube:
ParticleSystem' displays in the window.
Select 'Enemy'.
Boids Brain tab
Repeat the same set up as the Predator system.
Go back to the Predator and repeat the 'Relations' setup this time selecting 'Cube.001' as
the target. (Note: You can not set up Relations until the other object has a particle
system)
Still in the Physics tab with the larger cube selected change to Newtonian Physics
then tick in the Die on hit box. Change back to Boids Physics.
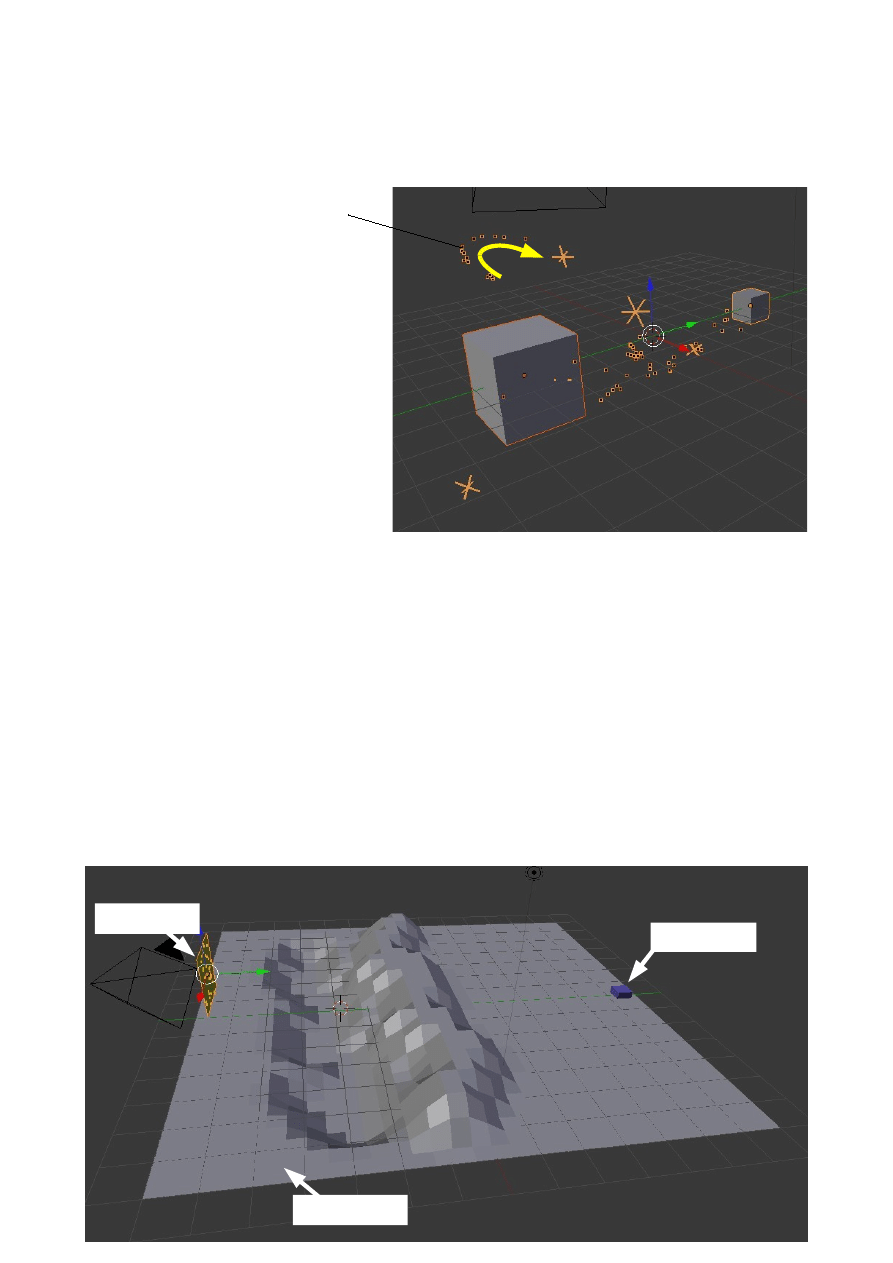
Shift select both cubes in the 3D Window and play the animation to see the result.
Selecting both cubes draws orange lines around the particles and makes them more
visible.
The Cross particles emitted from
the large cube are attacked by the
swarm of small particles from the
small cube. The Cross particles die
when they are hit. By observation,
on my machine, this is a hit and
miss process and I am unable to
define accurately at what frame a
particular particle dies.
For simplicity we are showing only
dots and crosses as seen in the 3D Window. A render could show anything you wish
by choosing 'Object' in the Render tab and assigning a preconstructed mesh object. A
complex single frame can take a while to render and a complex animation can take an
eternity.
Example: Follow Terrain
Boids particles can be made to emulate herds following a terrain.
Set up a new Blender scene as shown in the diagram. The Cube object is the default
Cube and will act as a target to which the particles will be directed. The other two
objects in the scene are two Planes with one being scaled up and shaped to act as our
terrain.
Dot particles attacking Cross
Mesh.001
Mesh
Cube
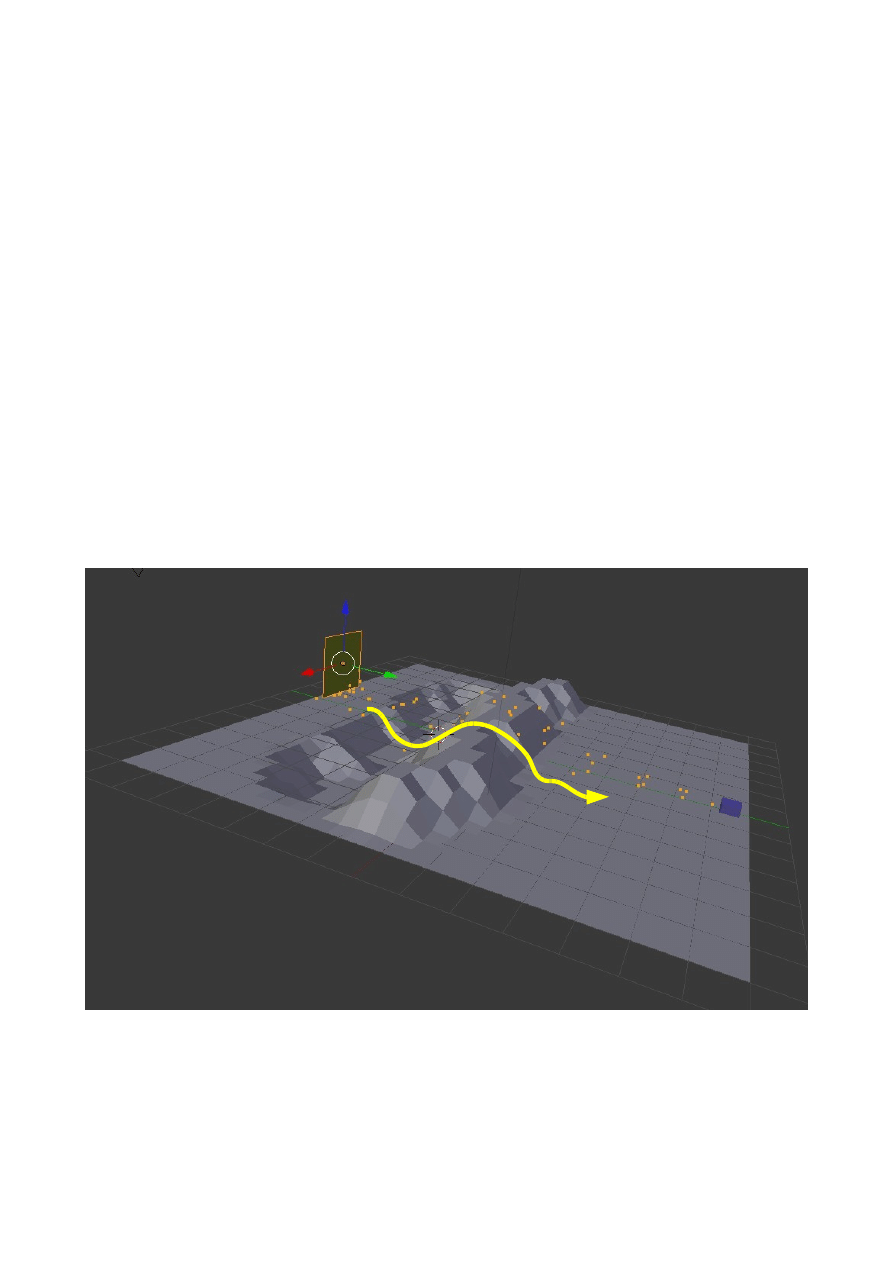
With the scene assembled select the objects as listed and perform the following set up
in the Properties Window:
Select Mesh.001 ( The small plane rotated – The emitter )
Add a Particle System with Boids Physics untick Allow Flight and tick Allow
Land.
In the Emission tab: Amount: 100, Lifetime: 1500 ( Change the animation
length in the Timeline to 1500 frames.
In the Boid Brain window add a 'Goal' rule, move it to the top of the stack and
select 'Cube' as the goal.
Select Mesh ( The Terrain )
In the Properties Window – Physics buttons – Collision tab – click Add.
The Cube ( Target ) requires no action other than to scale it down a bit.
Select 'Mesh.001 and play the animation.
The particles emitted follow the contour of the terrain as they move to the target.
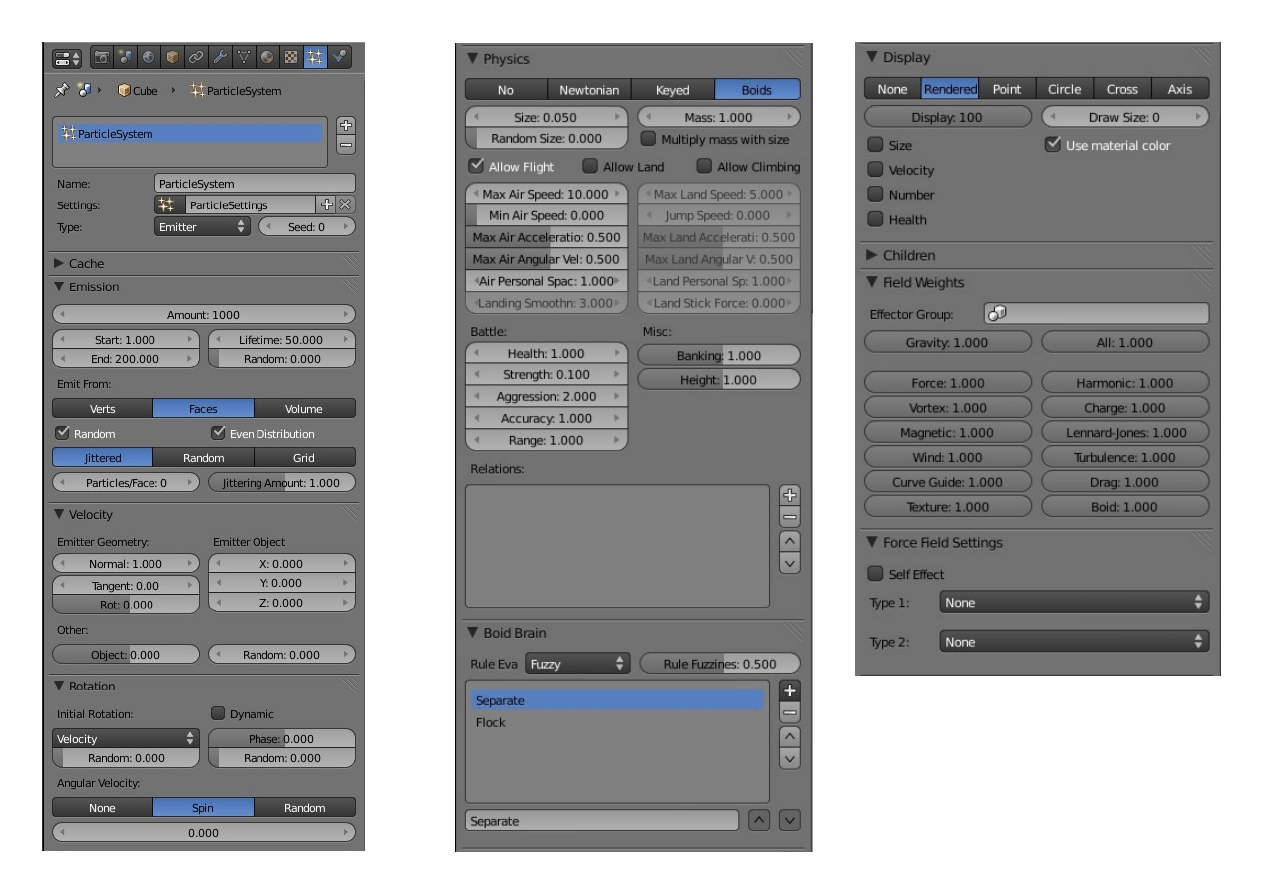
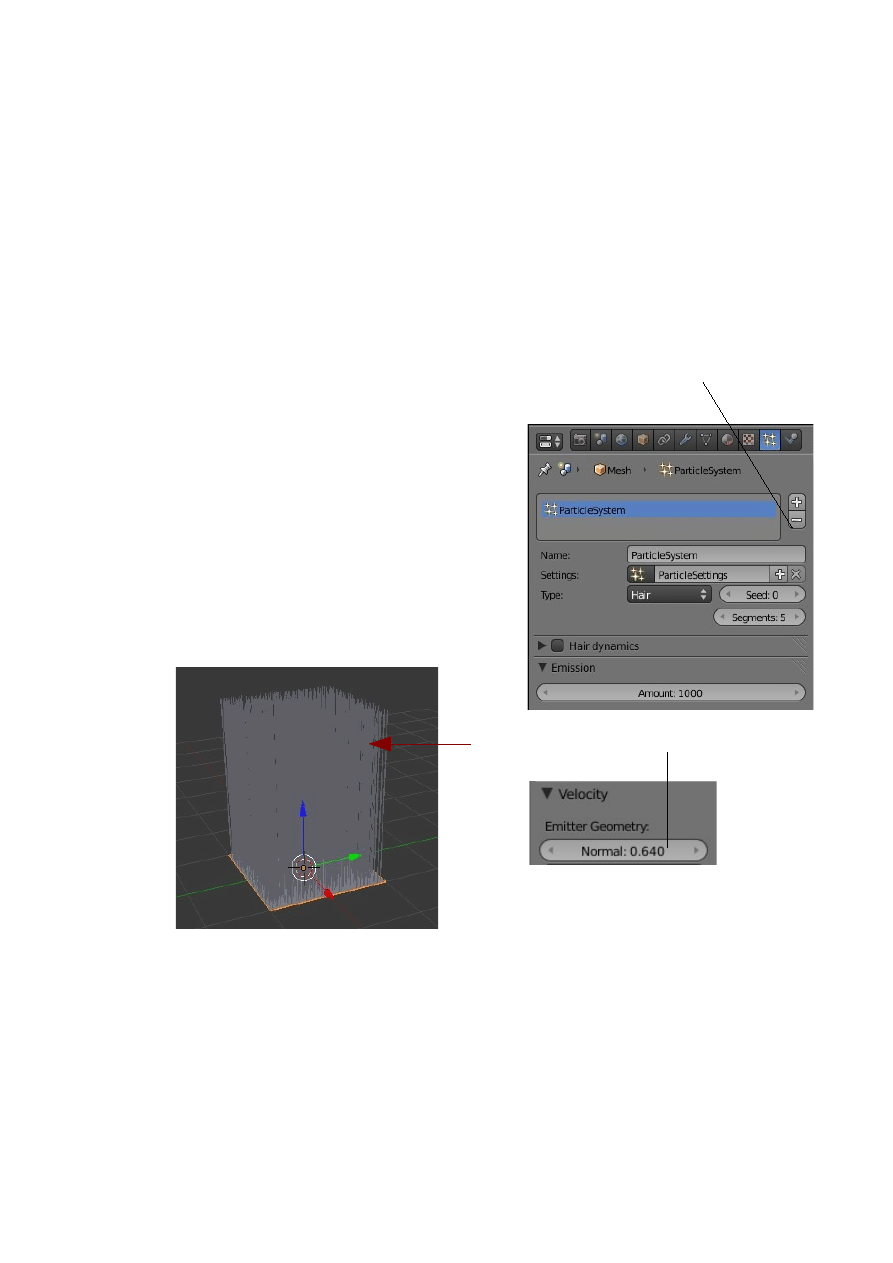
Hair Particles
The previous pages describing particles have introduced particles of Type: Emitter
with Physics types No, Newtonian, Keyed and Boids. We will now take a look at
particles Type: Hair, where particles are rendered as strands and may be edited in the
3D Window. Hair type particles may be used to represent such things as grass and fur
as well as hair or anything which has a surface with fibrous strands.
We will perform a quick demonstration to show what is meant by Hair Particles.
In the 3D Window delete the default Cube object and add a Plane. Zoom in a bit.
With the Plane selected go to the Properties
Window – Particle button and click on the plus sign
to add a Particle System. At the top of the Particles
window click on the drop down where it displays
Type: Emitter and select Hair. The Plane in the 3D
Window will show long strands sticking up from
the surface of the plane. Go to the Velocity tab and
decrease the Normal:1.000 value and you will see
the length of the strands shorten. We have a Hairy
Plane.
That just shows you what Hair Particles look like in essence.
Let us proceed with something a little more exciting. Start a new Blender scene,
delete the Cube and add a Monkey. The monkey head always loads looking upwards.
Put him with the top of his head pointing up. R Key – X Key – 90 – Press 'Enter'.
That means Rotate about the X axis 90 degrees.
If we just go ahead and add a Hair particle system we will get a hairy headed monkey
with hair sticking out all over everything. We know a lot of our friends look like this
but let's try for a more clean cut look with some hair on the head and a beard.
Click to Add Particle
System
Reduce Normal to Shorten Hair
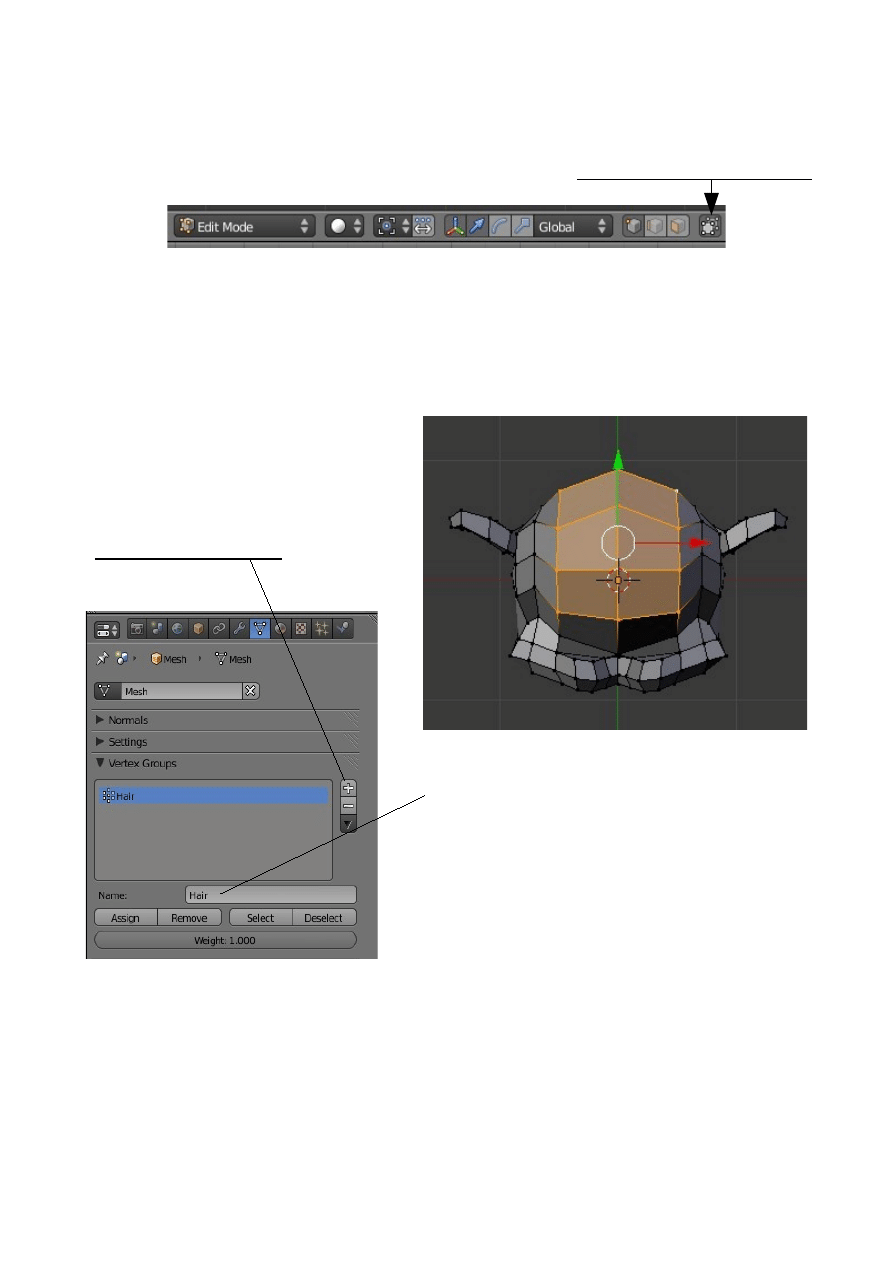
Press the Num Pad 7 key to get into top view looking down on monkey's head. We
will designate where we want the hair to grow by selecting a bunch of vertices. This
bunch is called a Vertex Group. Tab into Edit Mode, zoom in so you can see what you
are doing and in the 3D Window header click on the Limit selection To Visible
button.
Press the A key to deselect all verticies then go ahead and select a group on the top of
monkey's head. You can do this by Shift + Right Click individual verts, B Key and
Left Clik to drag a box to select or C Key and Left Clk to drag the circle to select
( Scroll MMB to change circle size and press Esc to cancel when selection finished ).
Leave the vertices selected and in the
Properties Window click on the Object
data button. In the Vertex groups tab
click on the plus sign to add a Vertex
Group.
In the name box click on Group and delete it
( Blender names every new vertex group
'Group' ). Type in 'Hair' and press enter to rename
the group. You will note that the group
highlighted in blue in the window changes.
Remember we still have our verticies selected. Now in the Vertex group tab just
below 'Name' click on the Assign button. This assigns the selected verticies to the
Vertex group named 'Hair'.
So far we have a head and we have nominated an area on the head by selecting a
group of verticies. We do not have hair.
Go to the Particles button and click on the plus sign to add a particle system.
Plan view of Monkey Head with
vertices selected
Group renamed Hair
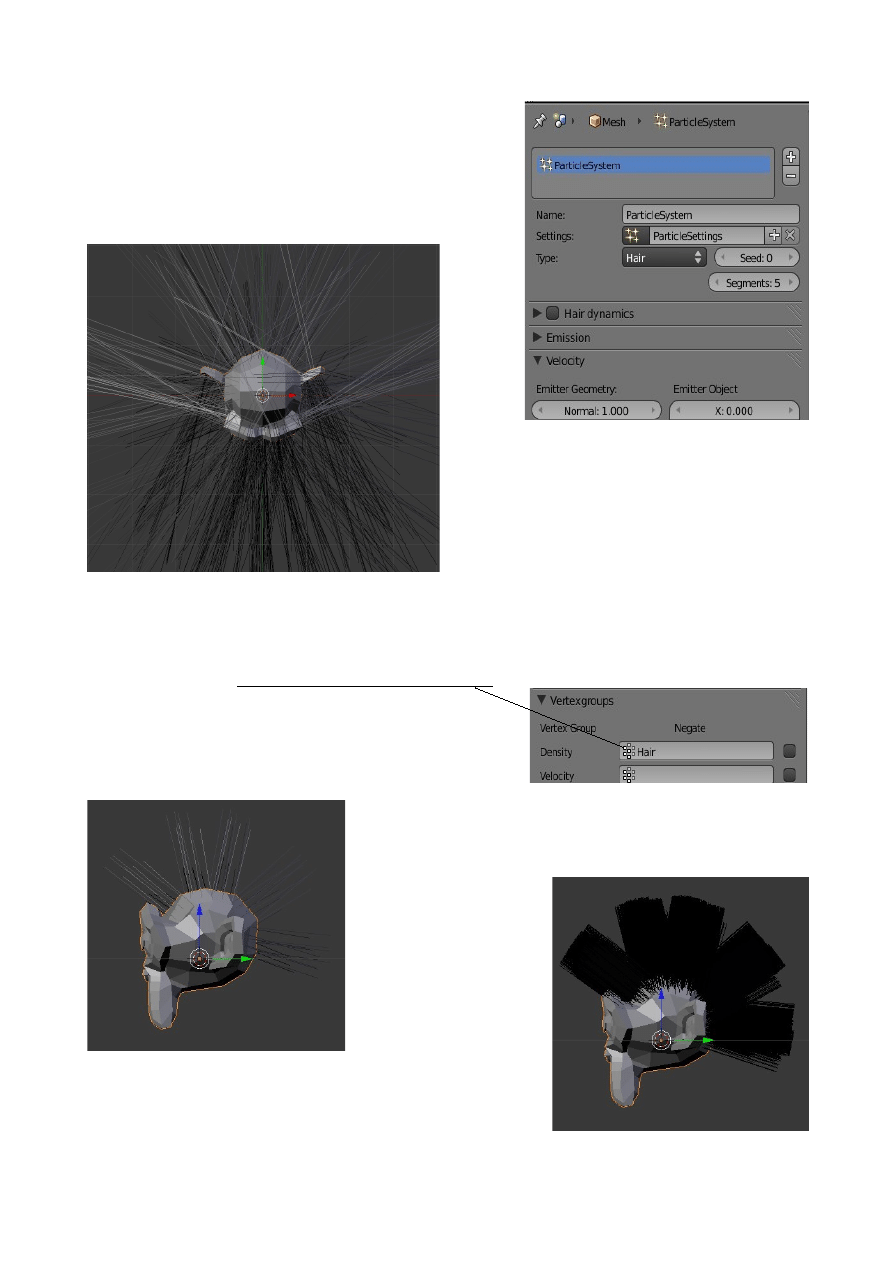
Change Type: Emitter to Hair. What! Nothing
happened? Thats because we are in edit mode.
Note Blender has named the particle system
'Particle System'.
Tab to Object mode in the 3D Window and
Yay! plenty of hair. In fact we have hair
everywhere. Long hair all over the place
just like our friends we mentioned earlier. We will correct this look. To start with in
the Velocity tab decrease the Normal value until the hair strands look reasonable say
about 0.270. Next, still in the Particles buttons, go down to the Vertexgroups tab and
in the box next to Density click and select 'Hair'.
We now have hair only on the area we selected.
Press Num Pad 3 to get a side on view. What a
scrawny bunch of hair. Thats not so impressive is it.
To fix the scrawny look go to the Children tab and
click on Particles. Wow! Now we have a bushy sticky
out
sort
of
mowhawkey hairdo.
Well you would if you
selected the same
verticies as I did. It
still probably looks
like your friends.
Plenty of Hair
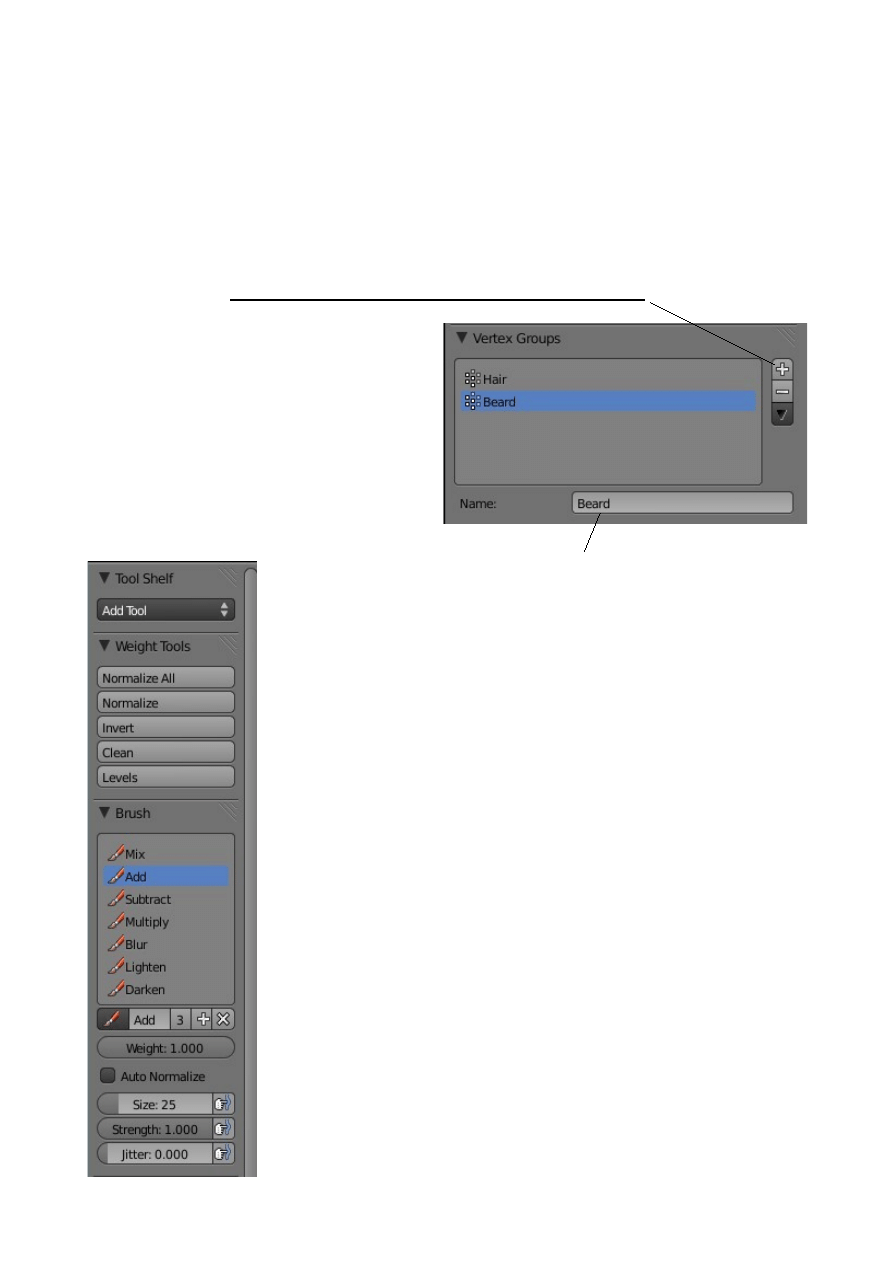
We will continue on and add a beard as promised. Does your friend have a beard?
To make proceedings interesting but hopefully not difficult to understand we will
vary the procedure just a little. We previously selected a bunch of vertices then
created a Vertex Group and named it then assigned the selected vertices to the group.
Lets create a new Vertex Group first this time. With Monkey selected in Object mode
in the 3D Window go to the Object data button in the Properties Window and in
Vertex group tab click on the plus sign to add a new Vertex group.
Blender again names the new group
'Group'. Rename this to 'Beard' as we did
before for Hair.
Now we need to select the verticies to
assign to the new group. We could use
the procedures as outlined previously but
lets do it a different way.
First Tab into Edit Mode and deselect all verticies.
In the 3D Window header change to Weigh Paint mode. Our
monkey turns blue in the 3D Window. This is showing that no
verticies are selected. Note 'Beard' is highlighted in blue in the
Vertexgroups tab in the Object data buttons. Click on 'Hair'. If
you look closely in amongst all that black hair ( Rotate the
view ) you will see red scalp. This is showing the area
previously selected by selecting individual verticies. Tab to Edit
mode and click on Select in the Vertexgroup tab and you see the
verticies that were painted. Press the A Key in the 3D Window
to deselect. Click on 'Beard' again in the Vertexgroup tab, Object
data buttons.
Now look at the tools panel at the left hand side of the screen.
See the Brush tab and click on 'Add' go below this and drag the
Strength slider all the way to the right to Strength:1.000. In the
3D Window drag the circle that appears as the mouse curser
over the monkey's chin.
Group renamed Beard
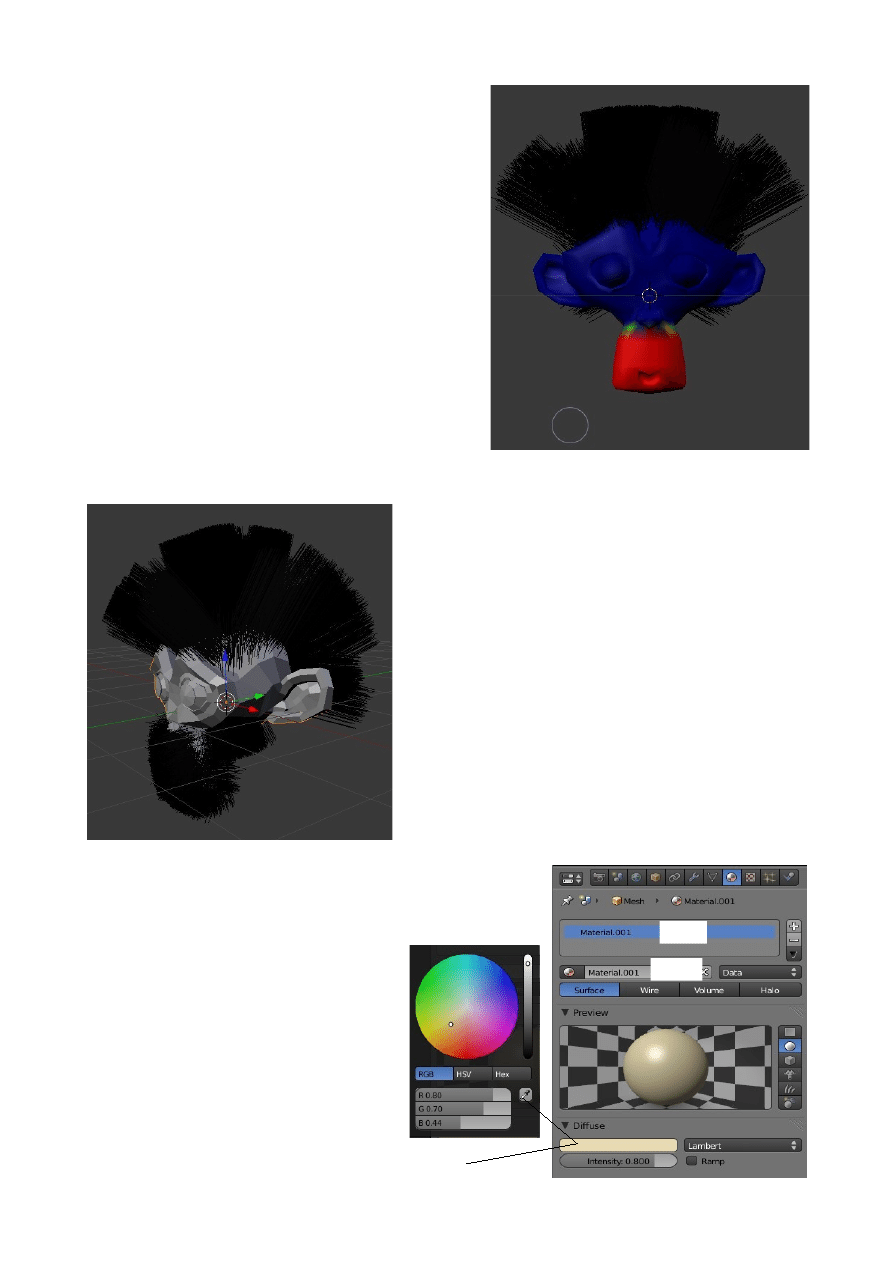
You will see the color change as you drag.
Keep dragging until the chin is all red which
means that you have selected this area as the
new Vertex Group for the Beard. Tab to Edit
Mode, make sure all verticies are deselected,
then in the Vertexgroup tab click on 'Add' to
assign the painted vertices to the Beard
Vertexgroup. Click on 'Select' to see them.
Go to the Particles buttons and add a new
Particle System. Note Blender names this
system 'Particle System 2'. Select Type: Hair,
decrease the Normal value in the Velocity tab,
go down to the Vertexgroups tab and click in
the density box selecting 'Beard'. We now have
scrawny hair on the monkeys chin. Go to the
Children tab and click Particles for a real hairy guy just like your friend.
It doesn't matter in which order you do it the
procedure is the same. Select verticies defining
area, create Vertex Group, assign verticies to
Vertex Group, create Hair Particle System and
assign it to the Vertex group.
A grey monkey with black beard and hair in the
3D Window is fine but in a render isn't all that
exciting. Let's jazz it up a bit.
Select monkey in Object mode in the 3D
Window. Go to the Materials button in the
Properties Window. Click on 'New' to add a
material. Click in the Diffuse color bar and
select a diffuse color for the monkey with the color
picker that displays. To start with this will be applied
to everything monkey, skin, hair and beard.
At the top of the Material buttons
window note 'Material' highlighted in
blue and just below that 'Material'
again. The blue highlighted 'Material'
is a material slot and the lower
'Material' is a material datablock.
SLOT
DATA
Click to display Color Picker
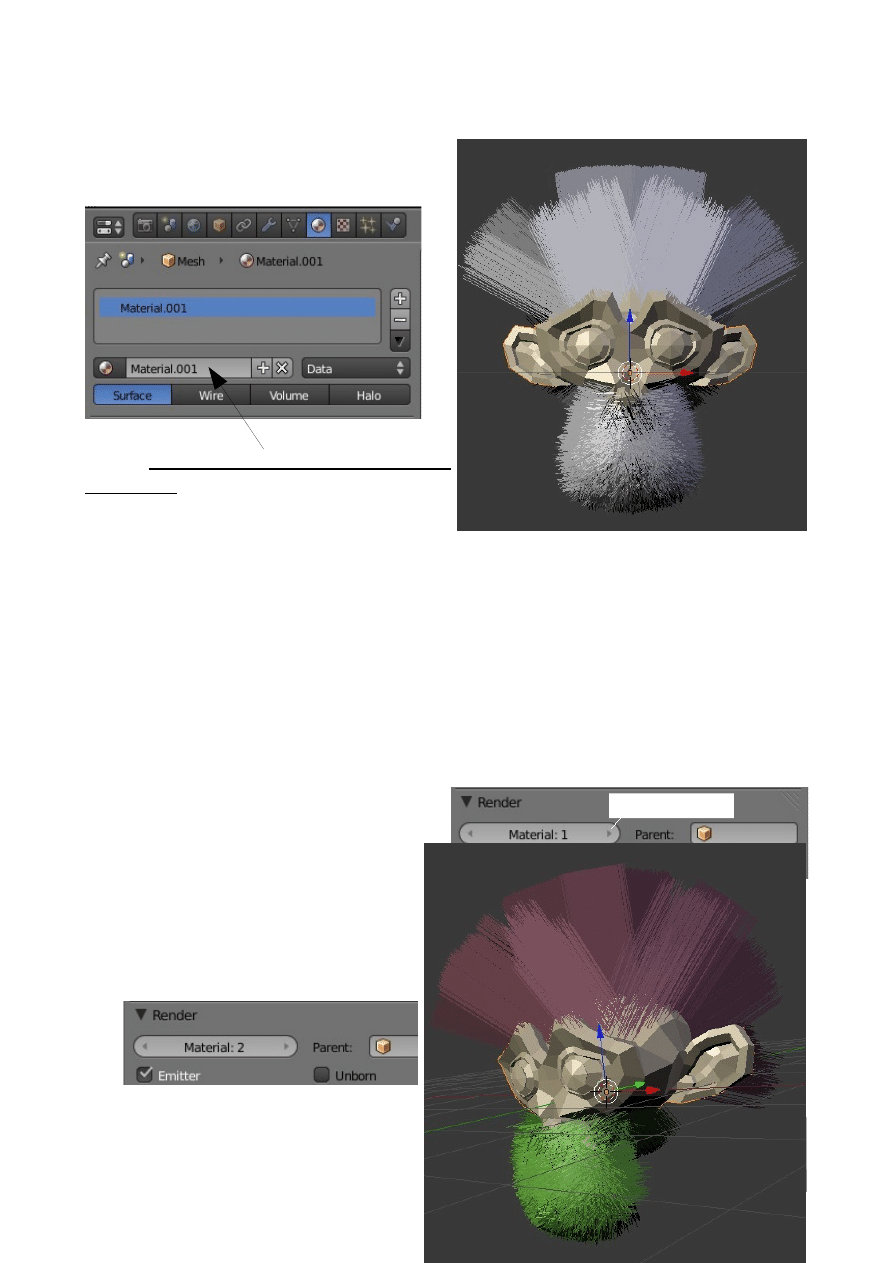
To understand this see the section on Material Datablocks but if you haven't read that
or can't quiet remember what it was all about just follow on.
In the Material buttons unique datablock
ID name click on 'Material', delete and
rename it 'Skin'. Click on the plus sign to
add a new slot. Note the number 2 appears
next to the ID name. Click on the 2 to make single user then as before rename it
'Hair'. Repeat the process again and rename 'Beard'. You will now have three slots.
Remember 1 is Skin, 2 is Hair and 3 is Fur. You just have to remember the order
number or write it on the back of your hand.
There are now three material slots each with a separate datablock. At the moment
they are all the same color which is what we originally chose. Click on slot Hair and
Beard in turn and choose colors.
Go to the Particles button and at the top you will see Particle System and Particle
System 2. Remember the first is the Hair
PS and the second is the Fur PS. Select
'Particle System' (Hair) and in the
render tab Material button click on the
little triangle at the RHS until you get
Material:2 (Hair). Now do the same for
'Particle System 2' selecting material:3
(Beard).
Weird beard and weird hair but its
pretty.
Color Added
Click on Triangle

Just to introduce you to some more fun stuff with hair go to Particle mode in the 3D
Window and play around with the Brush tools. Somewhere about two thirds the way
down the tools panel there is a X Mirror switch which lets you comb or add or
whatever on both sides of the model at once.
Note: Select the Particle System in the Particle System Buttons Window. When a
particle system is selected in Particle Mode the 3D Window shows the particles
(Hair) without children. Use the Brush Tools then switch to Object Mode to see the
effect.
As allays there is much much more to play with in Blender. Try the Hair tutorials at
A Final Note On Hair Particles
Adding hair to an object can add an awful lot of vertices which when rendering can
take an awful lot of time and may even cause your computer to stall out. If you are
not doing anything serious and have a slow machine to start with keep the number of
strands low.
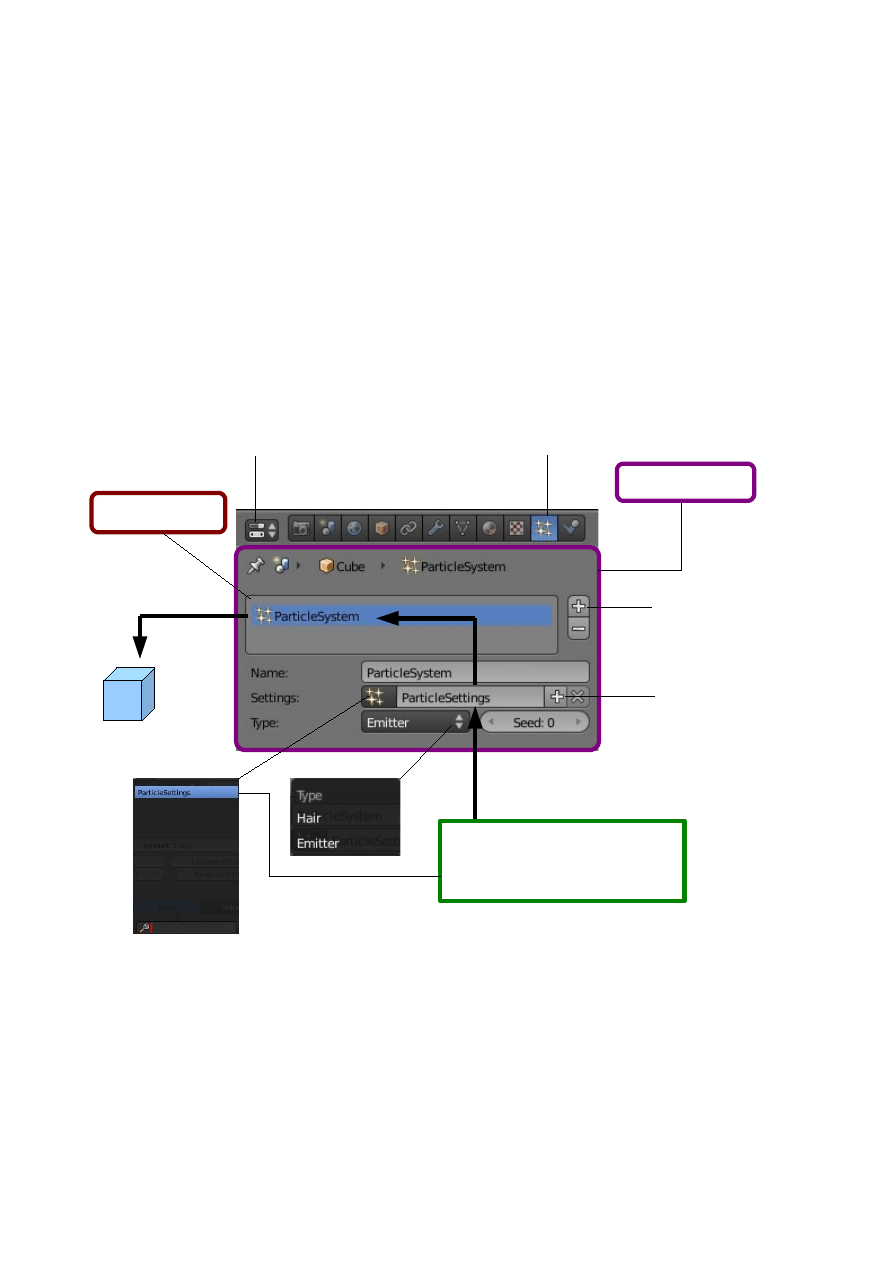
Assignment Tab
When a particle system is first added to a scene by clicking on the white cross 'Add
Particles System' Blender introduces a block of data to the scene which comprises a
default particle system. Blender names this datablock 'ParticleSettings' as seen in the
Settings panel. The datablock named 'ParticleSettings' is automatically linked to the
default particle system which is named 'ParticleSystem'. 'ParticleSystem' is placed in
the Assignment Panel where it is assigned to an object in the 3D Window.
This analogy may be viewed in the following diagram. There is no Assignment tab
or Assignment Panel as such but for the purpose of this discussion we will consider
the area marked in
magenta
as the Assignment tab and the panel displaying
'ParticlesSystem' highlighted in blue as the Assignment Panel.
The analogy may not be strictly correct in accordance with the program structure but
it is used to describe the logic of the graphical user interface.
The information in the Particle Settings datablock may be altered by changing
settings in the Particle Buttons tabs of the particle systems buttons window to create
varied effects.
Properties Window
Particle button
Add Particle System
Add Particle Settings
Object
Particle Settings Datablock
Assignment Tab
Assignment Panel
See Outliner Window
In Datablock Mode

Datablocks with all of their settings may be viewed in the Outliner Window in
Datablock Mode.
In the assignment tab there is a Type drop down button which displays the options
Emitter and Hair. Type Emitter is the default selection which means that with the
particle system assigned to an object in the scene that object becomes the emitter of
the particles. In either case the object becomes an emitter with a particle system
assigned. Hair type may be viewed as a specialised static emitter which will be
described later in the section.
Note that the name 'ParticleSettings' and the name 'ParticleSystems' may be renamed
by clicking in the panels deleting the name and retyping a new name. This is useful
when there are multiple objects, datablocks and particle systems.
Multiple objects in the 3D Window can each have a different particle system
assigned. Each object may have more than one particle system.
When a new particle system datablock is added to the scene Blender creates a new
name for the datablock. The default ParticleSettings datablock is named
'ParticleSettings' as previously stated. When a second datablock is added it is named
'ParticleSettings.001, a third would be named 'ParticleSettings.002 etc. Renaming
datablocks to something more relevant to objects in the scene would be an advantage.
When new datablocks are created they are stored in a cache for reuse by other particle
systems ( See the Outliner Window – Datablock Mode ).
When a new particle system is added to the scene Blender assigns that system to the
object that is selected in the 3D Window. If no objects are selected the new particle
system is assigned to the last object that was introduced to the scene.
Particle systems added to a scene initially have the default ParticleSettings datablock
linked and a new name applied as described above. At this point the datablock
settings may be altered to create a new unique datablock or a previously created
datablock may be selected and linked to the new particle system. Clicking on the icon
in front of the ParticleSettings panel reveals a drop down showing the cache
mentioned above with datablocks for selection.
The foregoing statements may seem confusing and not easily related to what has been
labeled the Assignment Tab. The following exercise will attempt to clarify the
statements and at the same time demonstrate the application of particle systems in
practical terms.
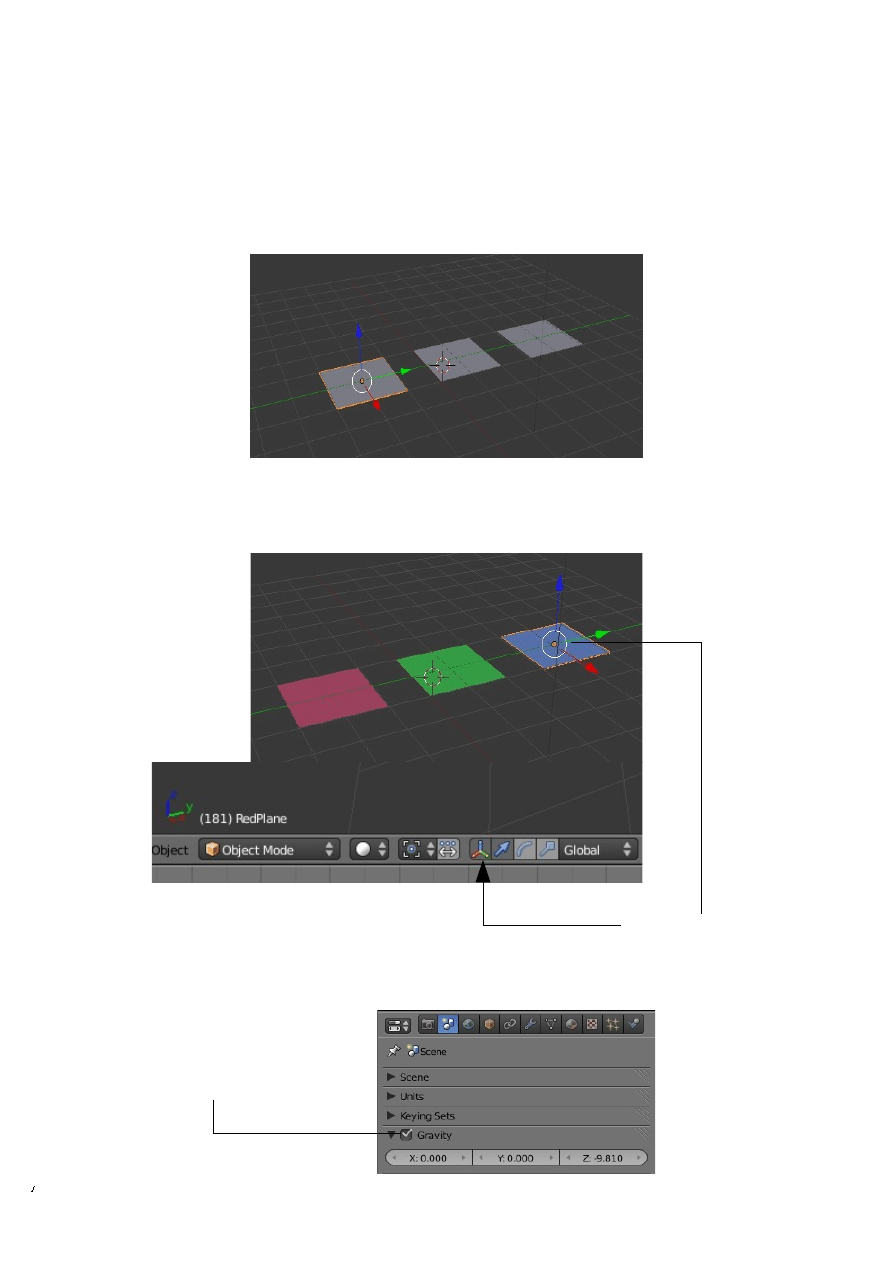
Practical Exercise
Open a new scene in Blender and delete the cube from the 3D Window. Add three
separate Plane objects and position them at the center of the scene so that in camera
view they are all visible and an image containing all three may be rendered.
Add a diffuse material color to each of the Planes. We will make them Red, Green
and Blue. The colors do not have to be accurate.
Turn off the Gravity setting from the Scene buttons and turn off the 3D manipulator
Widget in the 3D Window.
Click in 3D Window
Header to turn Widget off
Click to untick and remove Gravity
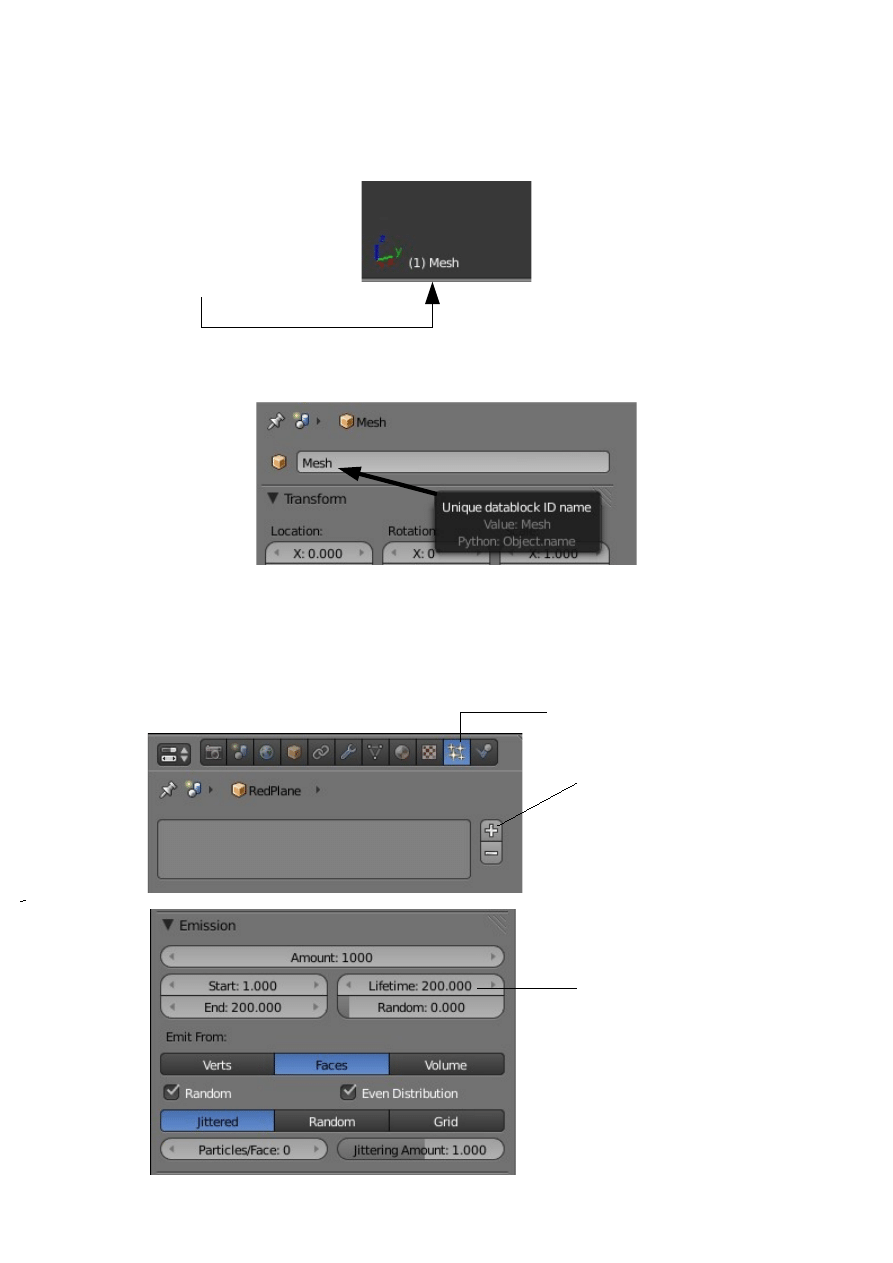
At this time the three Plane objects have been named by Blender as Mesh, Mesh.001
and Mesh.002 as seen in the lower left hand corner of the 3D Window as each is
selected. This naming is not all that relevant to what we have in the scene so we will
rename the objects.
In the 3D Window select the red plane. Go to the Properties Window - Object button.
At the top of the buttons window you will see 'Mesh' in the Unique Datablock ID
Name panel. Click on the name to highlight it, hit delete and type in 'RedPlane'. Press
Enter. Select the green plane in in the 3D Window and rename it 'GreenPlane' and
then similarly for the blue plane.
Object Name
Click on the Cross to
add a Particle System
Particles button
Change Lifetime from 50 to 200
Lower Left Corner of 3D Window
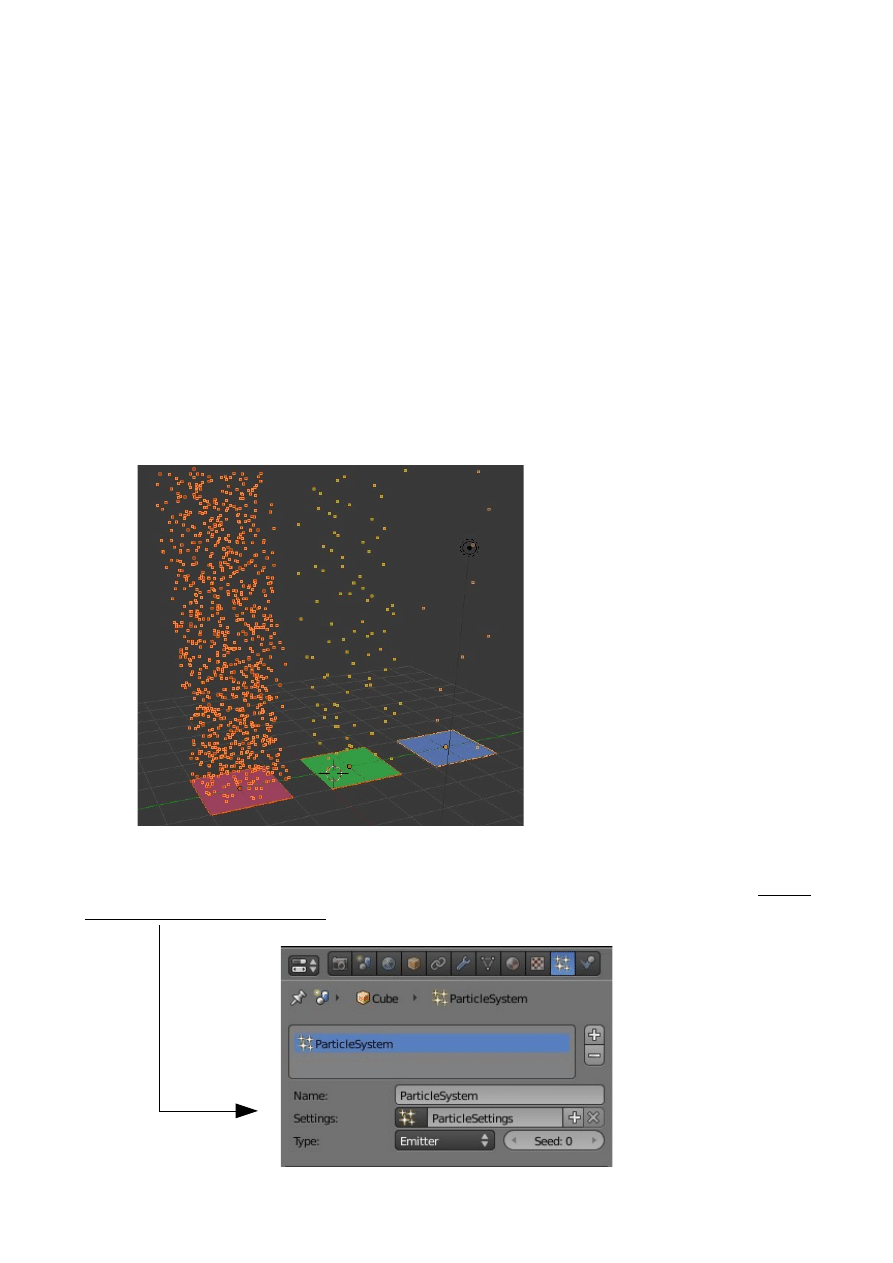
We will now add particle systems to the planes. Select the red plane and in the
Properties Window click on the Particles button. Click on the white cross to add a
particle system. The particle system panel displays with all the Tabs and buttons for
controlling the settings and has been set up with default values. Leave all the values
as set except for the Lifetime value in the Emission tab. Change this from the default
50 frames to 200 frames. This will give us a better view of particles being generated.
Do the same for the other two planes and in addition change the Amount value in the
Emissions tab to 100 for the green plane and 10 for the blue plane.
Shift select all three planes in the 3D Window hit Alt + A to play the animation of
particles being generated. Cycle through the animation in the Timeline Window to
about frame 180 and observe the particles. Red plane 1000 particles, green plane 100
particles blue plane 10 particles. We have three different planes with three different
particle systems.
Now in the 3D Window select each plane separately and note in the Properties
Window – Particles buttons – Assignment tab, the names that display in the Name
panel and the Settings panel.
The number of particles emitted
from each plane object show the
different systems.
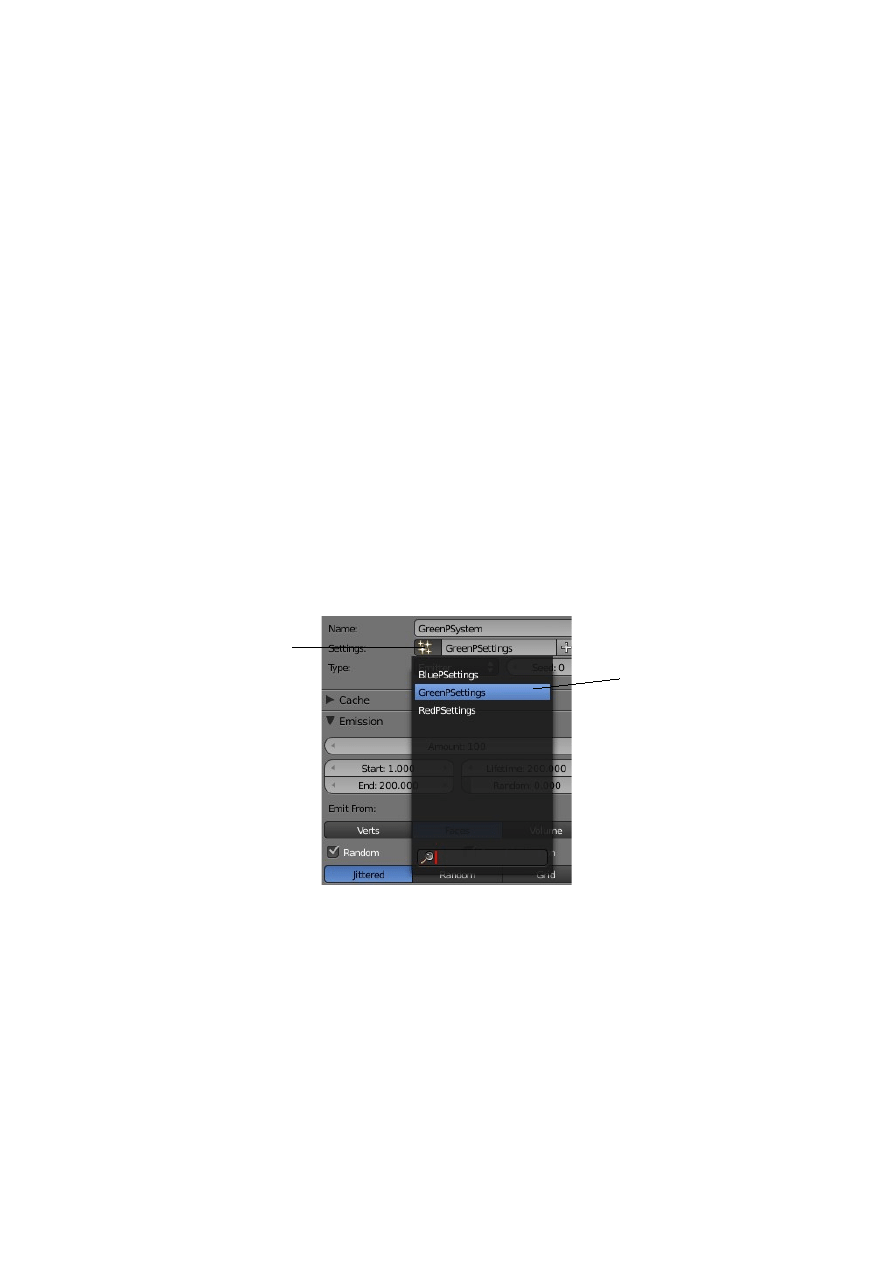
Red Plane:
Name: ParticleSystem
Settings: ParticleSettings
Green Plane:
Name: ParticleSystem
Settings: ParticleSettings.001
Blue Plane:
Name: ParticleSystem
Settings: ParticleSettings.002
We previously stated that we have three separate particle systems but now we see
three names all being ParticleSystem but each one has a different settings name.
Probably a good idea to do some renaming. Change the names to the following.
Red Plane:
Name: RedPSystem
Settings: RedPSettings
Green Plane:
Name: GreenPSystem
Settings: GreenPSettings
Blue plane:
Name: BluePSystem
Settings: BluePSettings
We should be able to see where we are now.
To continue, in the 3D Window select the green plane. We are going to reassign some
settings. In the Properties Window – Particles button – Assignment tab, next to
Settings click on the button just in front of the name panel. The thing that looks like
four tiny stars in a box. The drop down that displays has the names of the three
Particle Settings Datablocks.
Whenever a new group of particle settings are created Blender puts them into a cache
for reuse. You can see these datablocks in the Outliner Window in Datablock Mode.
The green plane is selected so in the datablock drop down click on BluePSettings. We
now have the BluePSettings assigned to the GreenPSystem. If you replay the particle
generation animation the green and blue planes generate the same number of
particles. Note that in the settings panel a number 2 has appeared. This tells us that
BluePSettings is being used by two systems. The color of the particles is controlled
by the color of the Plane object. The number of particles emitted is set by the
ParticleSystem Settings.
Click to reveal drop down
ParticleSettings names
Click in name panel to highlight the name – Hit Delete – Retype the new name.
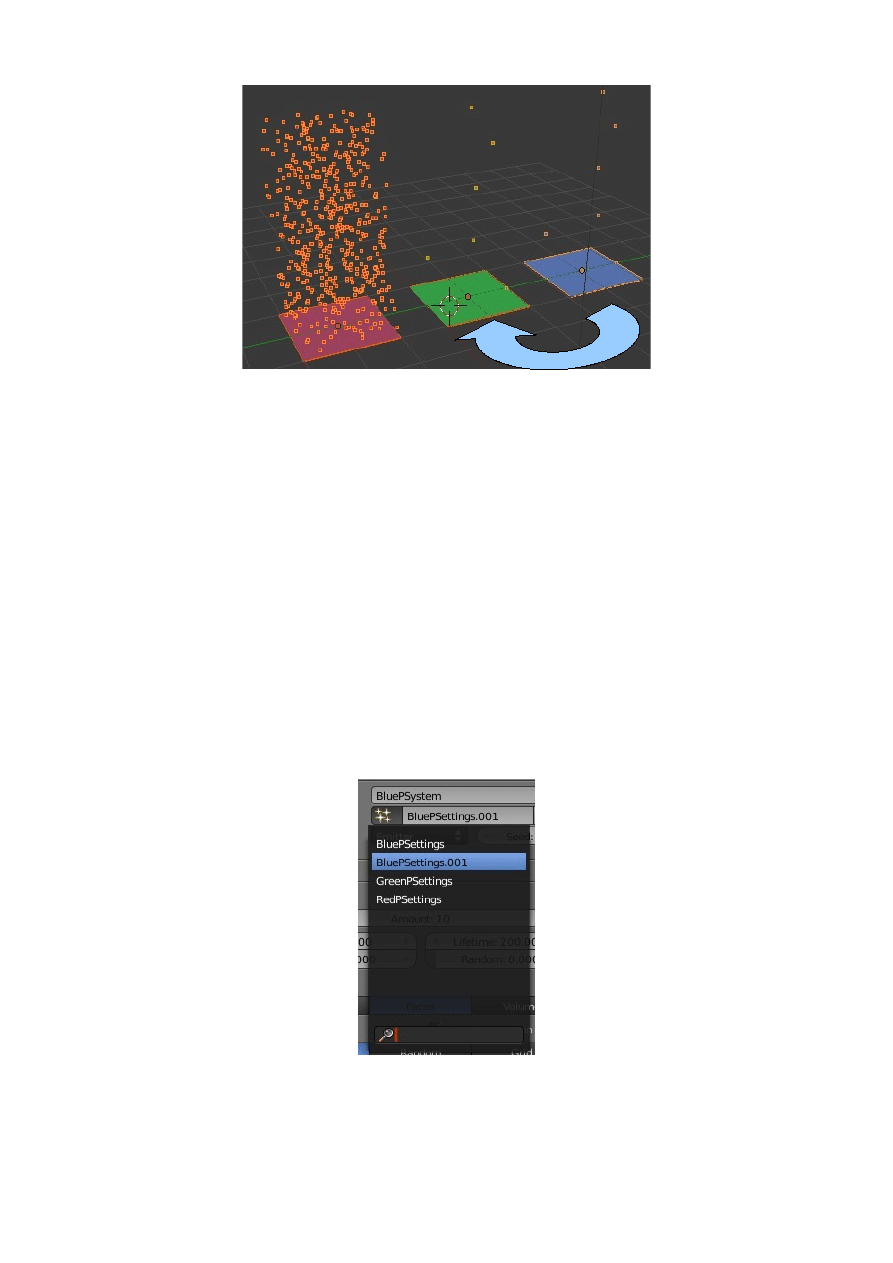
Suggestion: Shift select all three planes when replaying the animation to make the
particles visible in the 3D Window. If a plane is not selected the particles appear as
tiny little dots.
We have demonstrated that you can select any datablock of settings and assign it to
any particle system.
Continue by clicking on the number 2. This makes the datablock a single user.
Blender does this by leaving the original as it is and creating a new datablock. The
new datablock is however identical to the original. You see that the settings name is
now BluePSettings.001. Lets change some data in this new datablock.
Find the Render tab in the Particle buttons window ( Scroll down a bit ). In the bar
containing the render type selection, that is None, Halo, Line, Path, Object, Group,
Billboard click on Object.
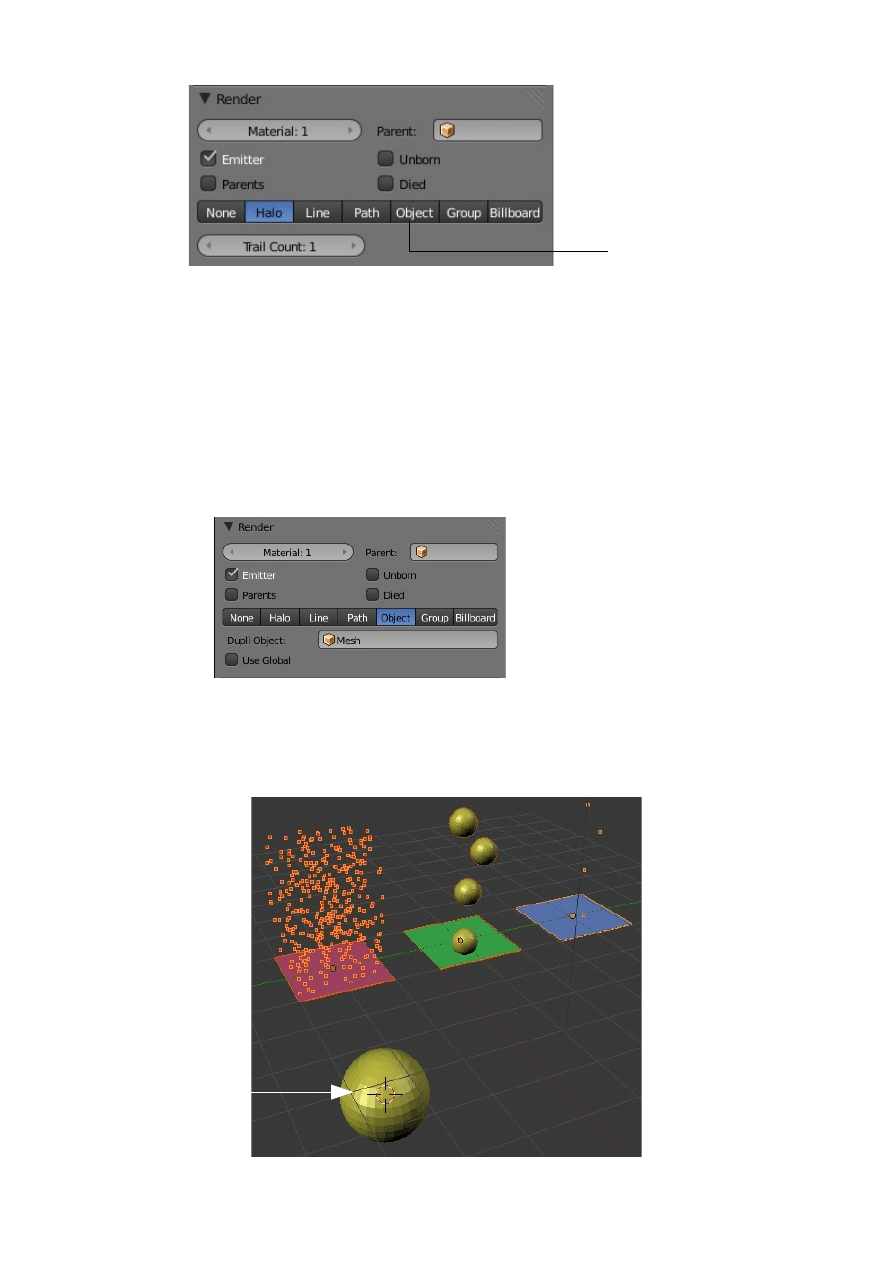
In the 3D Window add a UV Sphere to the scene and give it a yellow color ( or any
color ). Note Blender has named the sphere 'Mesh'. Make sure it is off to one side in
the scene away from the planes.
Reselect the green plane in the 3D Window and then go back to the Particles button
on the Properties Window. Check that you still have GreenPSystem and
BluePSettings.001. Now go back to the Render tab for BluePSettings.001 and where
it says Dupli Object: click on the little cube icon and then click on Mesh in the drop
down. We are telling Blender to display and render the particles as spheres.
Scroll up to the Physics tab and slightly increase the Size value. You will see a sphere
appear on the green plane. Play the particle generation animation and you see yellow
spheres being generated.
Click on Object
Sphere object
named Mesh
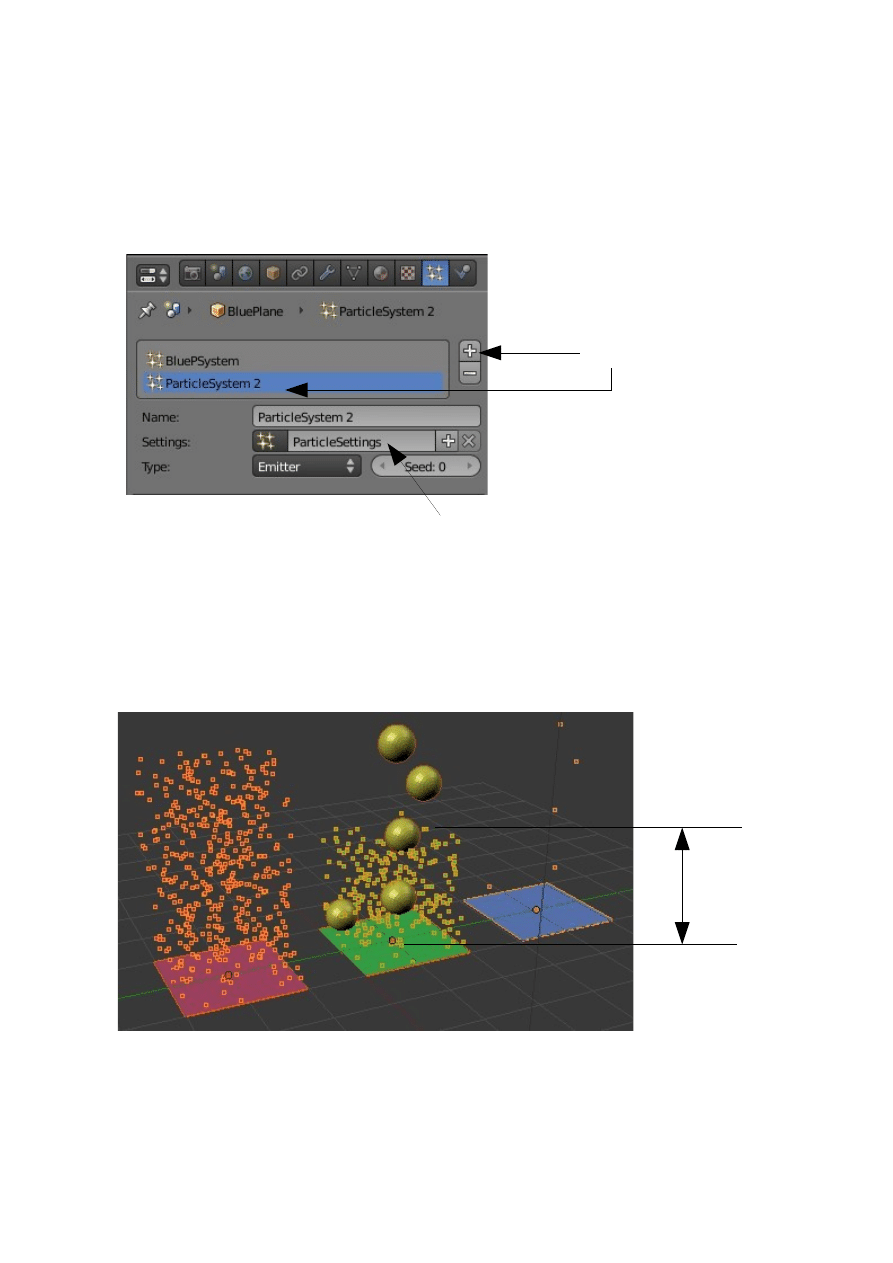
There is still more to play with.
With the green plane selected in the Properties Window – Particles buttons –
Assignment tab click on the Add Particle System cross. You will see a new particle
system highlighted in blue named ParticleSystem2 with particle settings name
ParticleSettings. This has created a new particle system.
With the green plane selected in the 3D Window play the animation again. The green
plane now emits yellow spheres and original particles together. The original particles
only display for a short while since on particle settings named ParticleSettings the
Lifetime value is 50 frames.
We have two separate particle systems with separate settings datablocks assigned to
the same object.
The best way to get the hang of all this is play, play and more play.
Add Particle System
Original default ParticleSettings
50 frames
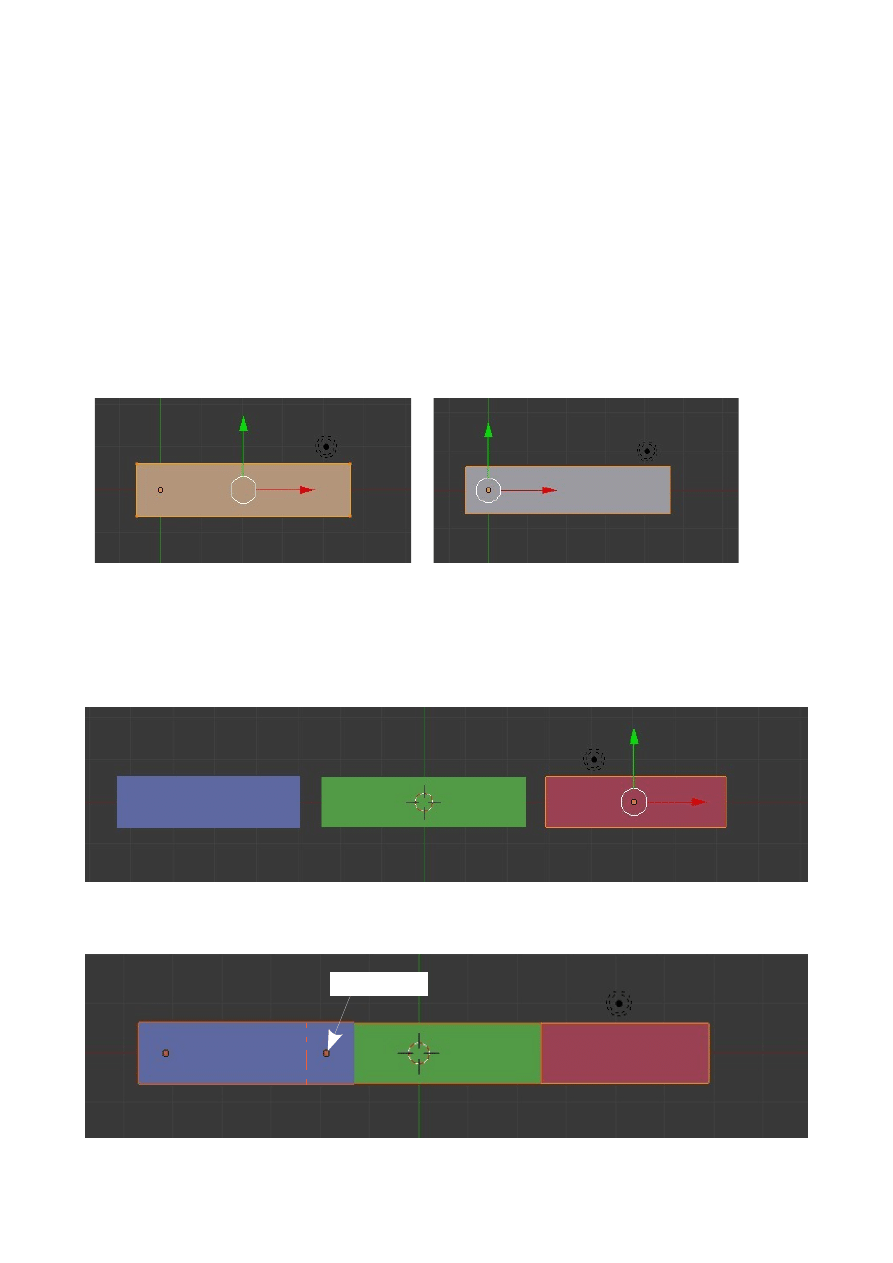
Child Parent relationships
Child parent relationships are used where there are several parts connected together
which are required to move independently. Examples are a robot arm or a humanoid
limb. The components of the arm move but are connected to the body. An arm raises
and the hand waves in the process. The concept of a child parent relationship is where
a hand is a child of a forearm and the forearm is a child of biceps and the bicep is a
child of the body. They are all linked together but move separately in their own way.
We will demonstrate the application of this in Blender by connecting several scaled
cubes together. Start with the default Blender scene,. Scale the Cube as shown then
Tab to edit mode and shift the verticies positioning the center towards one end.
Duplicate the scaled Cube twice (Shift + D x 2).
Note: In the diagrams a separate Cube has been added to the Scene instead of
duplicating. This has allowed different Material colors to be applied. If you duplicate
an object you also duplicate its Material and the objects are all the same color.
Shift each Cube and overlap the ends.
Green Center
Edit Mode
Object Mode
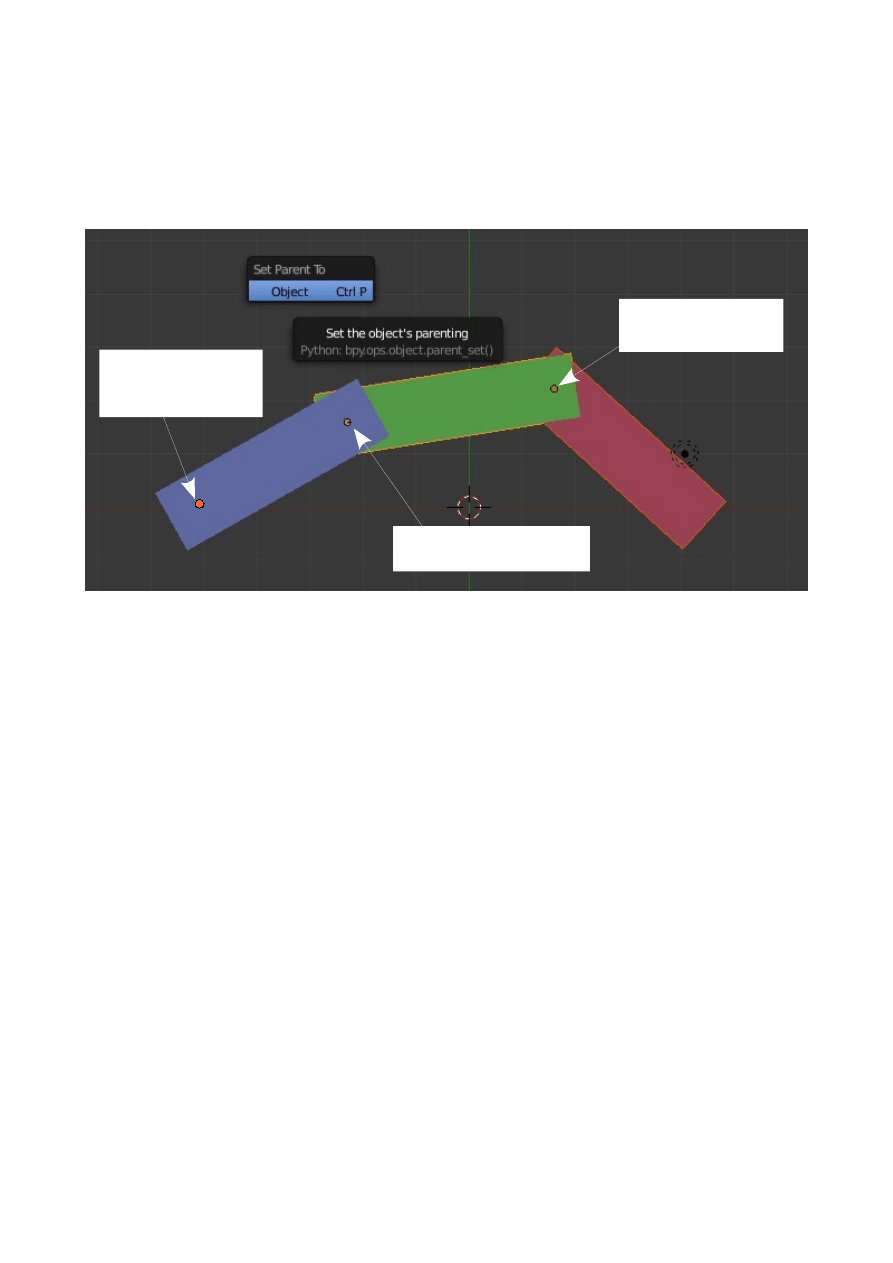
Create the Child Parent Relationship by first selecting the red cube then shift select
the green cube then press Ctrl + P and select 'Object' in the 'Set Parent To' panel that
displays. Deselect then repeat the process for the green and blue cubes. The first
object selected is always the child of the second object selected. Therefore in the
diagram red is the child of green which in turn is the child of blue.
To see the relationship in action select red and rotate. Select green and rotate and red
will follow. Select blue and rotate and both red and green will follow.
You can child parent any object to another in Blender. A Camera can be parented to
another object so that when the object moves the Camera moves with it. For example
you could place a Camera inside a model of an aircraft cockpit and create simulation
of what the pilot would see. A useful technique it to parent a Camera to an Empty.
Child of Constraint
Note: There is another method of creating a Child Parent relationship which is to add
a 'Child of' constraint to the child object. This is discussed in the section on
Constraints.
Red rotates alone about
this center point
Green and Red rotate about
this center
Blue, Green and Red
rotate about the center
here
CH17- Constraints
01-Introduction
02-Constraint Stack
03-Transform
04-Tracking
05-Relationships
06-Duplicating on Curves
07-Extruding on Curves
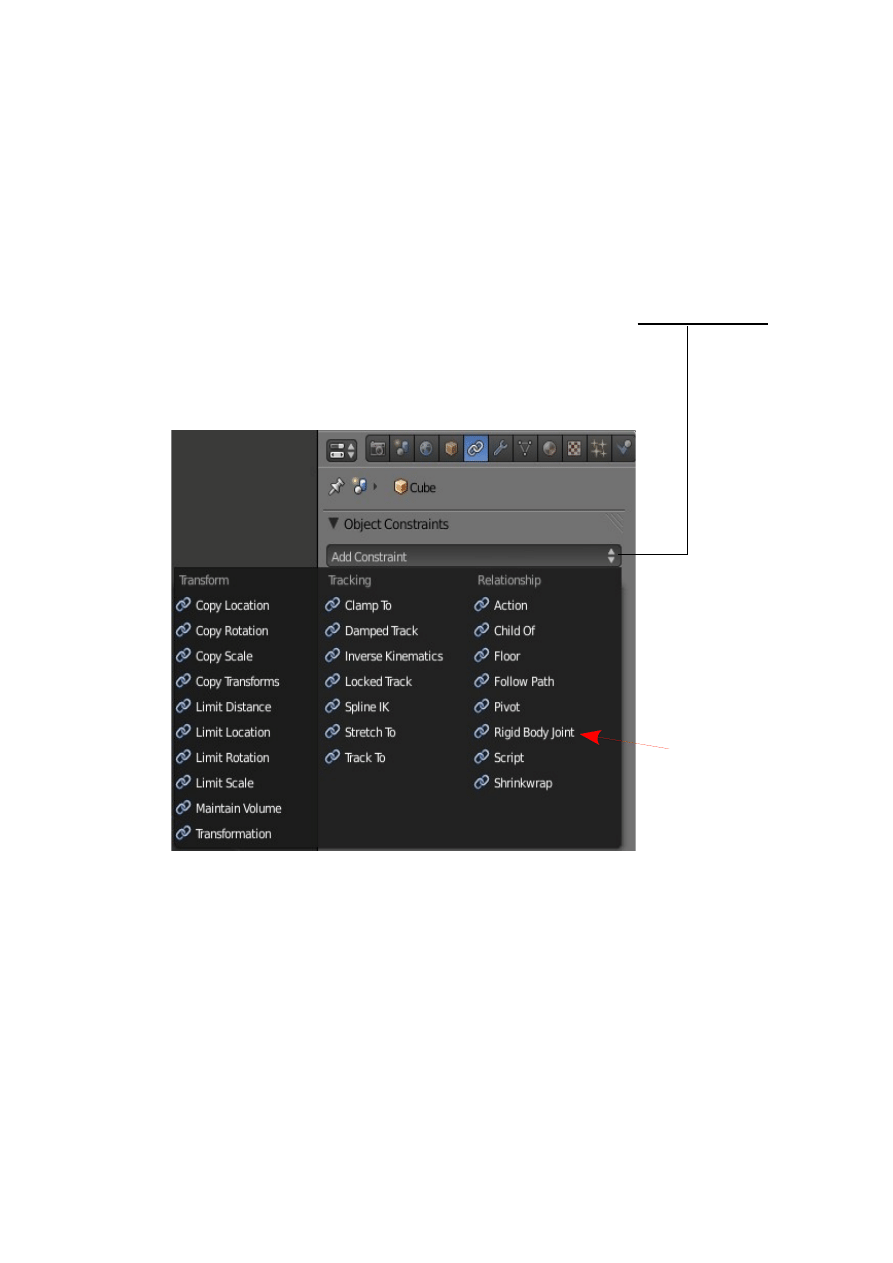
Introduction
Constraints are object features that define spatial relationships between objects. They
are the standard method for controlling characters among all 3D animation packages
that still implement a more traditional approach to digital character animation. In
Blender, constraints can be associated with object. Note however that not all
constraints work with all objects.
Constraints are associated with an object by selecting the object in the 3D Window
then In the Properties Window – Constraint buttons clicking on 'Add Constraint' and
selecting the constraint from the drop down menu that displays.
The following pages in this section contain a brief description of constraint
functions. Most constraints are self explanatory therefore a detailed explanation will
only be given for a few common constraints or where it is not self evident.
The general method of application of constraints is to select the Object in the 3D
Window then in the Properties Window – Constraint button - Click on 'Add
Constraint' and select the appropriate constraint. In many cases a control object will
be required to make the constraint function. There are control values to be inserted to
regulate the function.
Click to select
Constraint
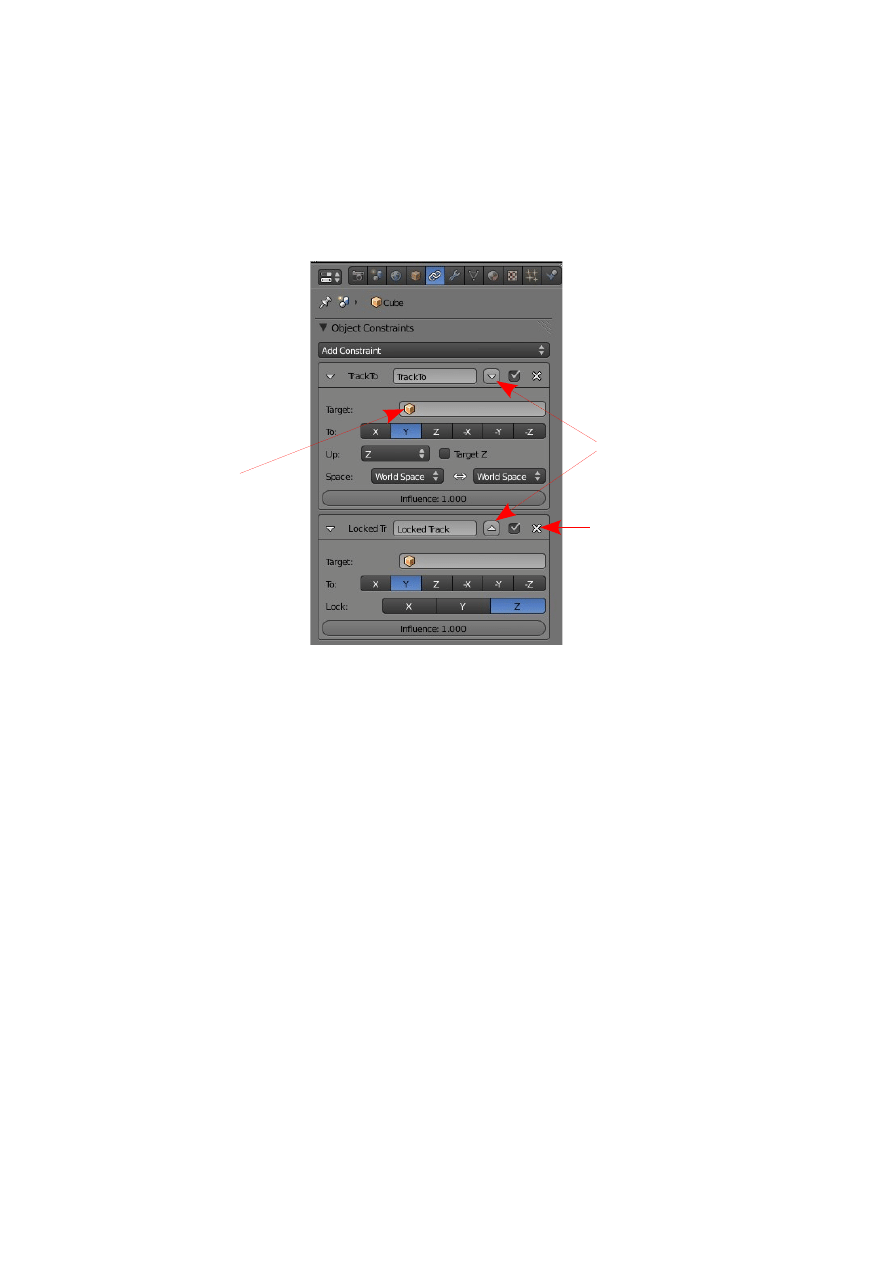
Constraint Stack
It should be noted that in some cases it is appropriate to apply more than one
Constraint to an object. When this is done the Constraints are placed in a stack in
order of priority. The priority can be changed by moving a Constraint up or down in
the stack.
Track To and Locked Track
Constraints in a Stack.
Click to move up or down in
the stack.
Enter Target
Object
Click to remove
constraint

Transform Constraints
Copy Location
Forces the Object with the Constraint added to take up the location of the
Target Object.
Copy Rotation
Forces the Object with Constraint added to copy the rotation of the Target
Object. When the Target rotates the Object rotates.
Copy Scale.
Forces the object with the Constraint added to copy the Scale of the target
Object
Copy Transformation
Similar to Copy Location.
Limit Distance
Constrains the Object to remain within a set distance from the Target Object.
The distance is a spherical field surrounding the Target. The Object is
constrained within the spherical field or outside the field.
Limit Location
Constrains the Objects location between a minimum and maximum distance on
a specific axis. The distance is relative to either the World center or a Parented
Object.
Limit Rotation
Constrains an Objects rotation about a specific axis between limits.
Limit Scale
Constrains the scale of an object between limits on a specified axis.
Maintain Volume
Constrains the dimensions of a side on a specified axis.
eg. Default Cube Vol: 1 Dim x = 2, y = 2, z = 2
Scale Vol to 4 with
axis y constrained Dim x = 4, y = 2, z = 4
Transformation
To be advised.
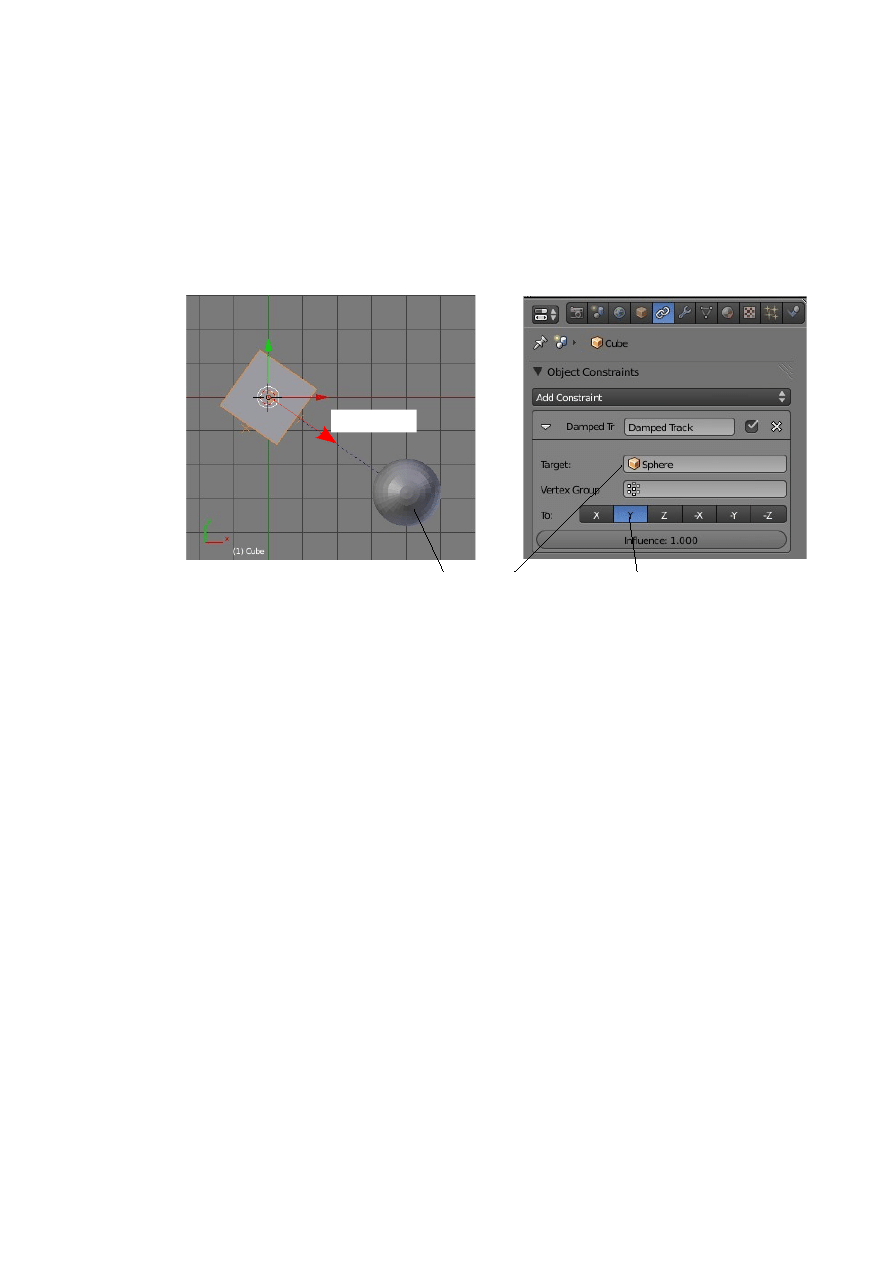
Tracking Constraints
Clamp To
Clamps or locks the position of the Object to a Target Curve.
Damped track
Constrains one local axis of the Object to always point towards the Target
Object.
Inverse Kinematics
Can only be applied to Bones. See Armatures section.
Locked track
Similar to damped track with more axis control.
Spline IK
can only be applied to Bones. See Armatures section.
Stretch To
Stretches the Object towards the Target Object or compresses the Object away
from the target Object.
Sphere Target
Cube Y axis
Cube Y axis constrained to always point towards the Sphere
Y axis
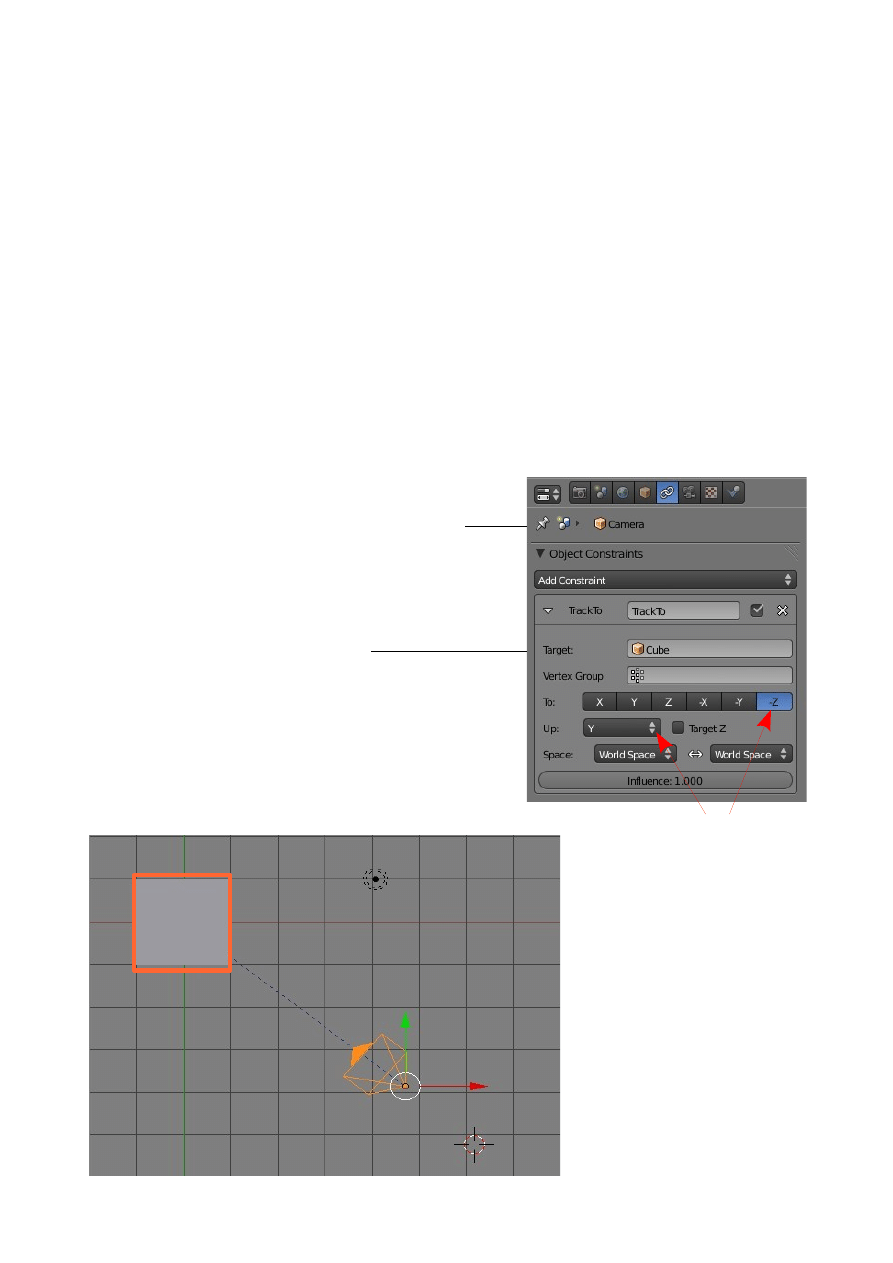
Track To
Causes the Object to always point towards the Target Object no matter where
either the Object or the target is positioned.
Example: Tracking a Camera to follow an Object that is animated to move.
Start with the default blender Scene in Top View (Num Pad 7 + Num Pad 5).
Select the Camera and press Alt + R to clear the rotation and align the Camera
axis with the World axis.
Go to the Properties Window – Object Constraint button – Click 'Add
Constraint' and select 'Track To'.
Enter the Cube as the Target Object.
Set Axis To = -Z and Axis Up = Y to orientate the camera in the World.
The Camera will now point at the Cube when the Camera or the Cube is
moved and during an animation playback.
Track To constraint added to Camera
Cube as Target Object
Axis Values
Camera Orientated to Point at Cube

Relationship Constraints
Action
To be advised
Child Of
see Child Parent Relationships
Floor
Allows the Target Object to obstruct the movement of the Object.
Example: A sphere animated to descend in a scene will not pass through a
Plane that has been set as a target Object.
Follow Path
Causes the Object to be animated to follow a Curve Path nominated as the
Target. This constraint also has the feature to Follow Curve which means that
the Object will rotate and bank as it follows the Curve.
This constraint can also be employed to duplicate objects along a curve path.
See : Constraints and Curves – Follow Path.
Pivot
Causes the Object to leapfrog to the opposite side of the Target Object along an
axis between the Object and the target centers. The location can be offset either
side if the axis by inserting offset values.
Rigid Body
to be advised.
Shrinkwrap
To be advised.
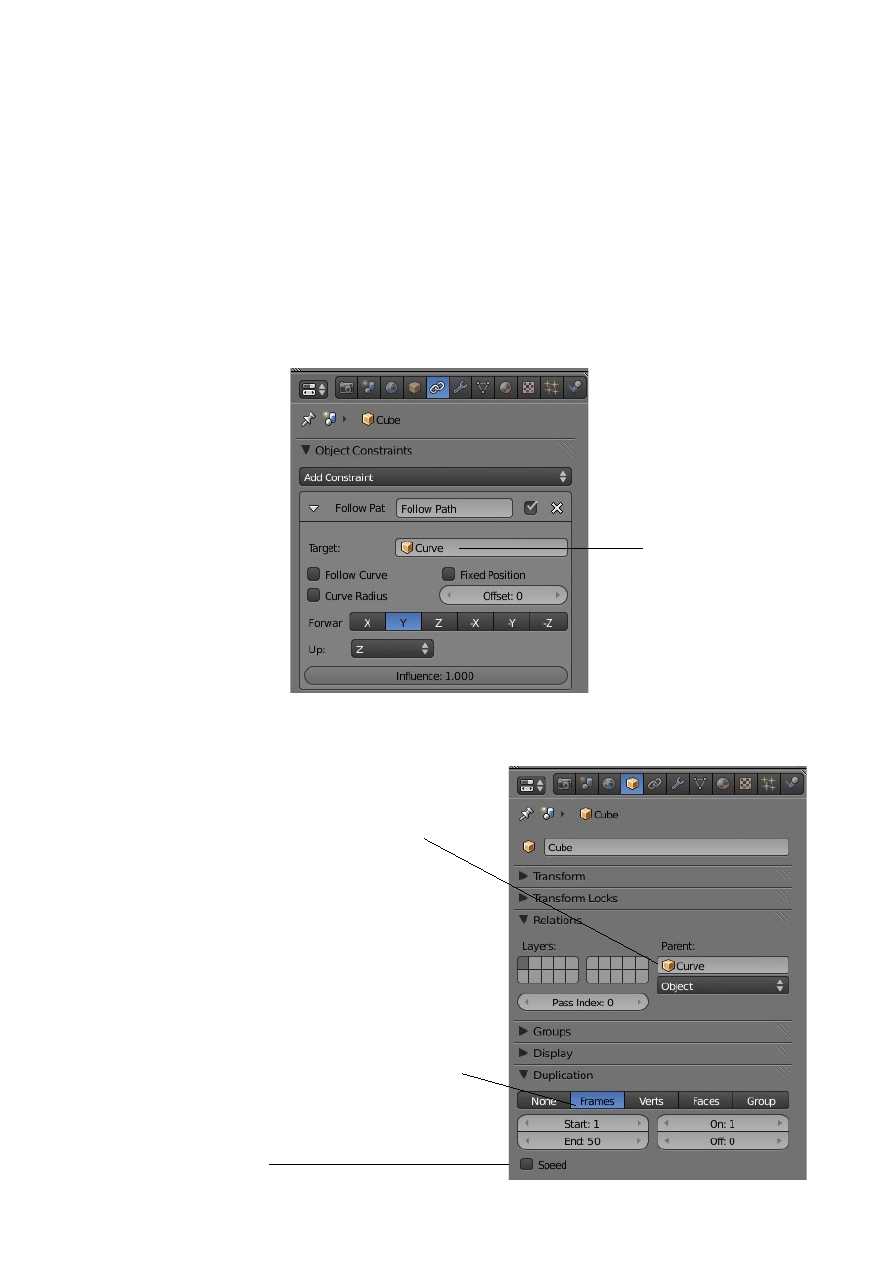
Duplicate Object Along Curve
The Follow Path constraint can be used to duplicate an Object along a Curve.
Example:
Start with the default scene with the Cube Object selected. Add a Bezier
Curve to the scene and shape it in edit mode. Select the Cube and scale
the
cube down ( very small). In the Properties Window – Object Constraint
button– Press 'Add Constraint – select 'Follow Path'.
In the Constraint panel set the Target Object as 'Curve'.
In the Properties Window – Object
button – Relations tab – Parent – add
'Curve'.
In the Duplications tab select 'Frames'.
Untick 'Speed'.
Target Object
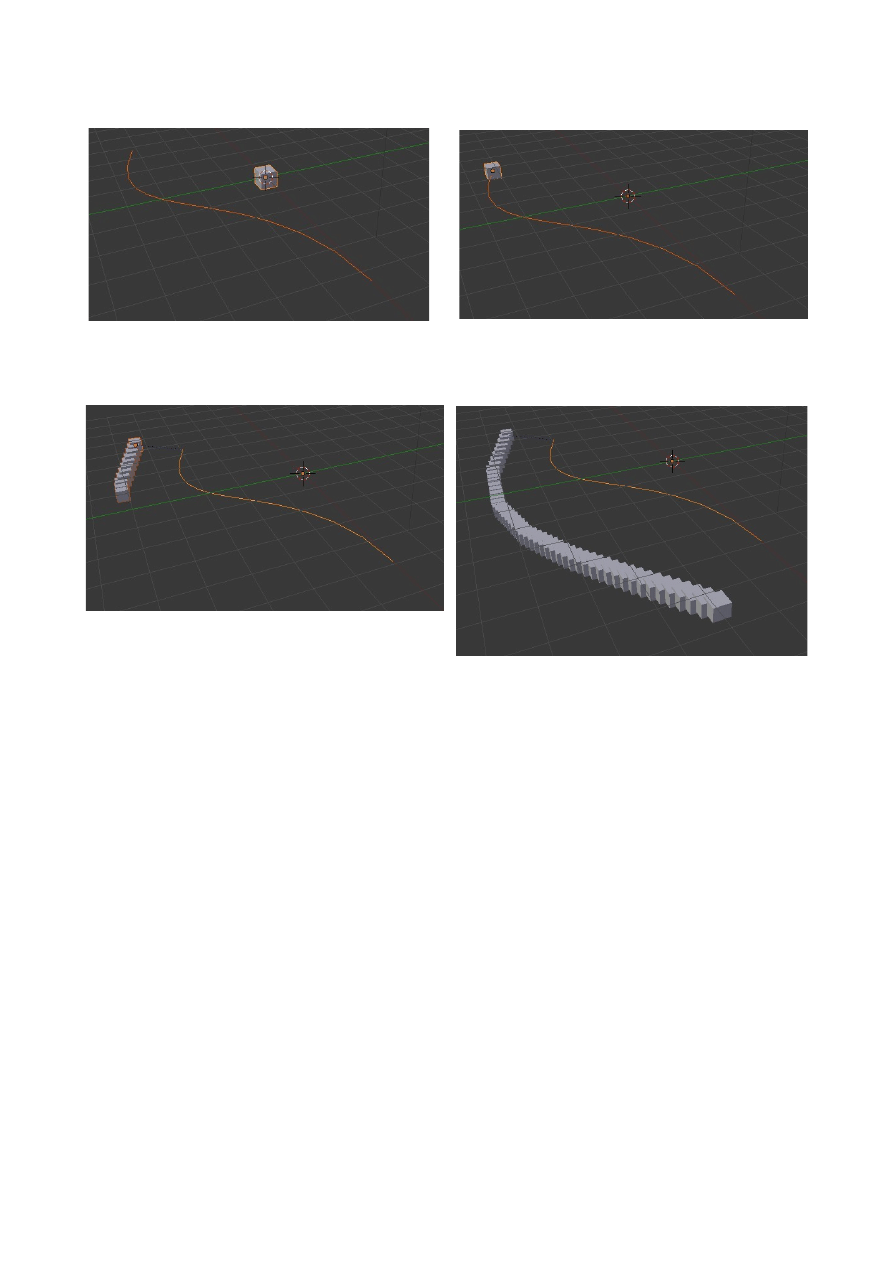
Default Scene with Cube and Bezier Curve
Target Object Added in Constraint Panel
Curve added to Parent panel and 'Frames' selected
in the Duplication tab. You may have to scale and
reposition the Cube at this point. The view shows
the Cube duplicated at 10 Frames.
Cube duplicated at 50 frames
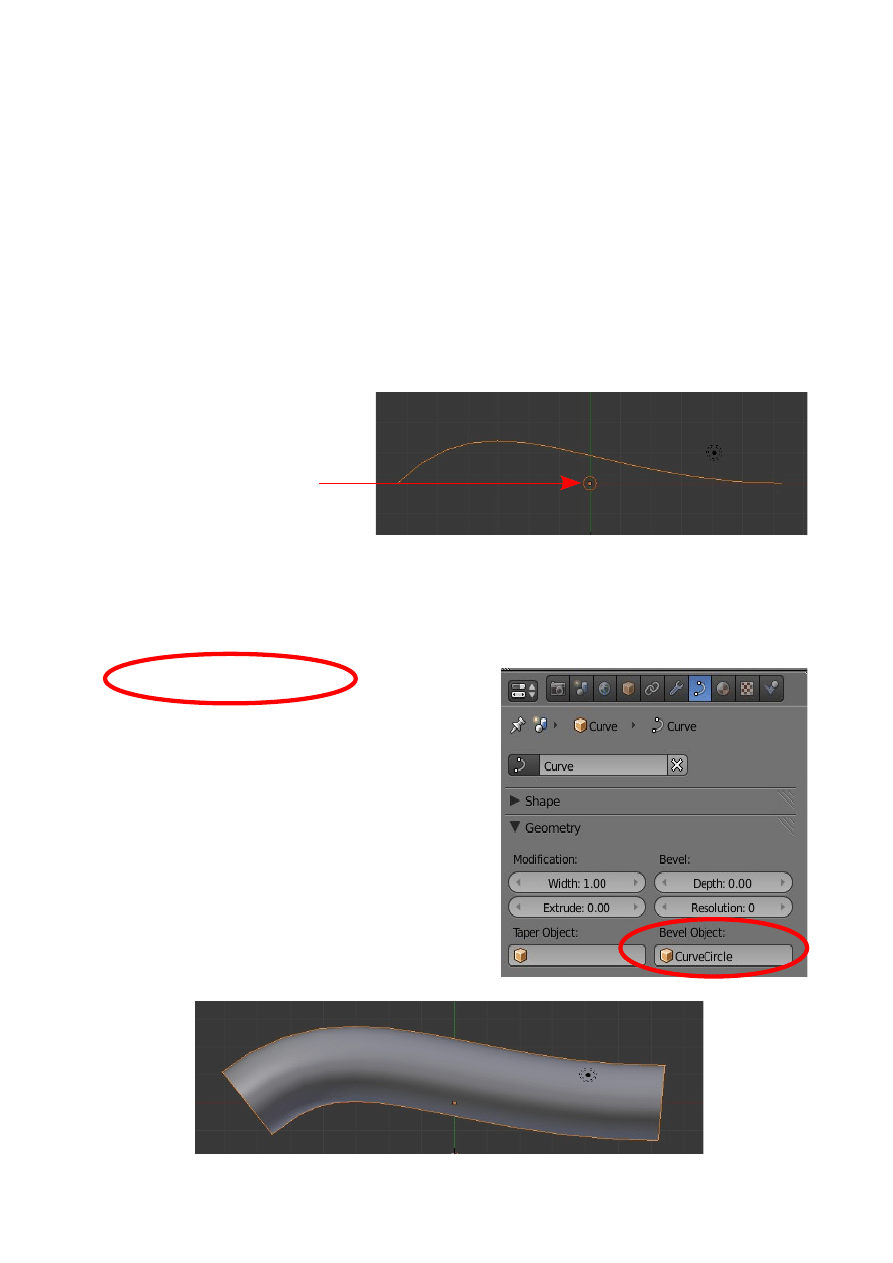
Extrude Along Curve
A shape can be extruded along a curve to produce a shape.
Example:
Start with the default Blender Scene and delete the Cube Object. Add a Bezier Curve
and scale it up along the X axis. For simplicity put the window into Top View (Num
Pad 7 + Num Pad 5). The Curve may be scaled and shaped in Edit mode to produce a
shape for your extrusion to follow.
Deselect the curve and add a Bezier or Nurbs Circle. The circle may be shaped in edit
mode to produce a cross section
shape for your extrusion.
Scale the Circle way down.
Deselect the Circle and select the
Curve.
Rotate the Circle standing it up perpendicular to the Curve (R Key + y + 90 – Enter).
In the Properties Window – Object data button – Geometry tab enter 'Curve Circle' in
the Bevel Object data panel.
Adjust the scale as required.
CH18- Armatures
01- Armatures
02-Manually Assign Verticies
03-How to Assign Verticies
04-Vertex Groups
05-Adding Armatures
06-Armature Display
07-Editing Bones
08-Automatic Keyframing
09-Inverse Kinemetics
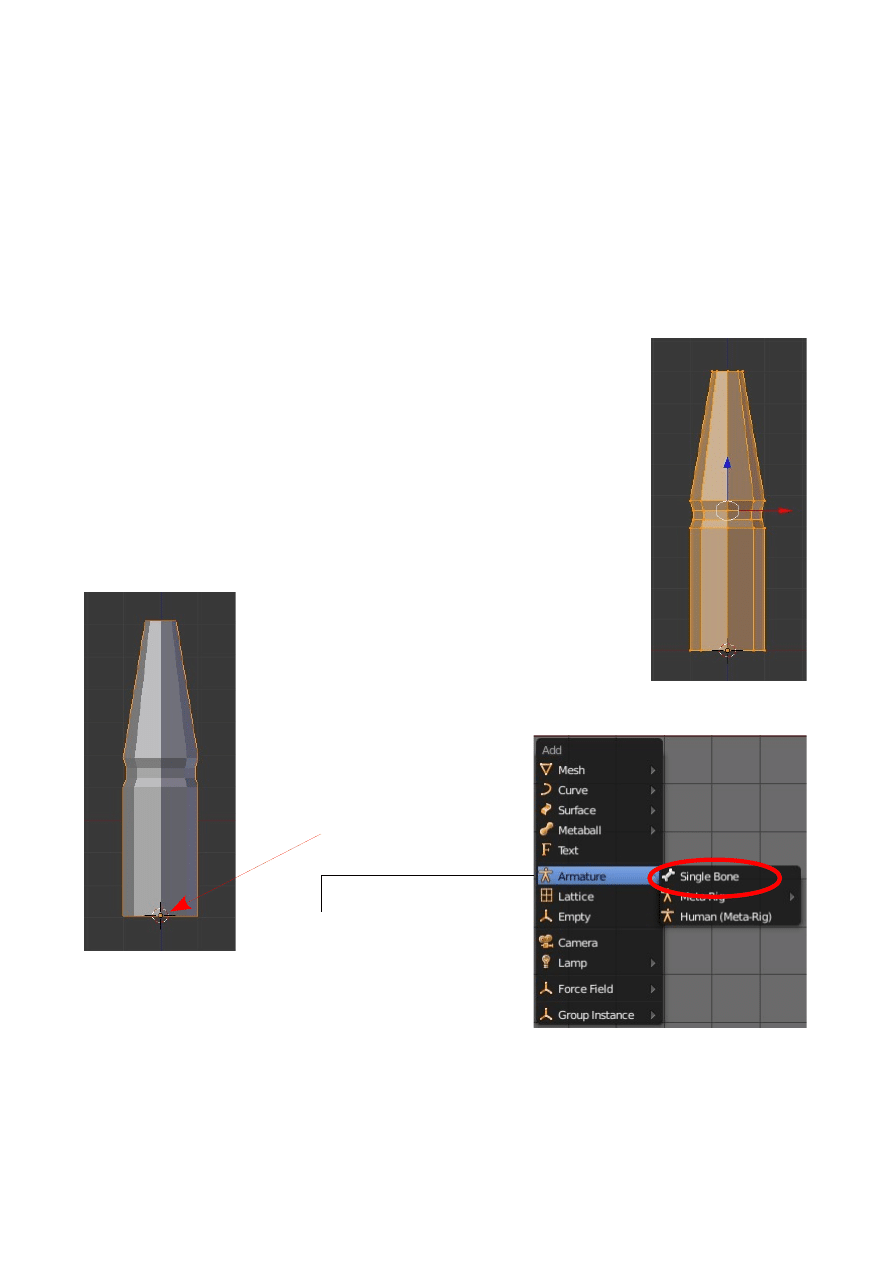
Armatures
My dictionary defines 'Armature' as being a protective covering but in Blender the
term appears to have a different meaning altogether. In Blender, 'Armature' refers to
an Object type which is used to deform a mesh. Think of your finger and the skin
covering it and the bones inside. The skin would be the mesh and the bones are the
'Armature'. When the bone moves the skin moves with it. Obviously the analogy is
not quiet correct but it give you the idea.
To demonstrate the 'Armature' principal in Blender we will make something akin to a
finger and make it deform with an 'Armature'.
Start with the default Blender Scene and delete the Cube. Add a
Mesh Circle. In the Tool Shelf (Panel at LHS of 3d Window)
reduce the number of vertices from 32 to 8. Extrude the Circle on
the Z axis to create a simple mesh as shown in the diagram. The
finger will only have two parts with a joint in the middle. The
vertices close together in the middle of the mesh are where the
joint will be. They act like a part of a concertina hose on a vacuum
cleaner allowing the mesh to bend.
Note: When creating a mesh for use with
Armatures use as few vertices as possible. Too
many vertices will slow down the computer
considerably. This is the reason for reducing the
number of vertices in the Circle.
Select the mesh and go into Object
mode
Place the 3D Cursor as shown
Add 'Armature' – Single Bone.
Go to the Properties Window – Object button – display tab and tick X Ray (Obj) this
makes the Armature visible in Object mode -Solid display. It actually makes the
Armature display on top of the Mesh.
With the Armature selected – Tab to Edit mode.
Edit Mode
Object Mode
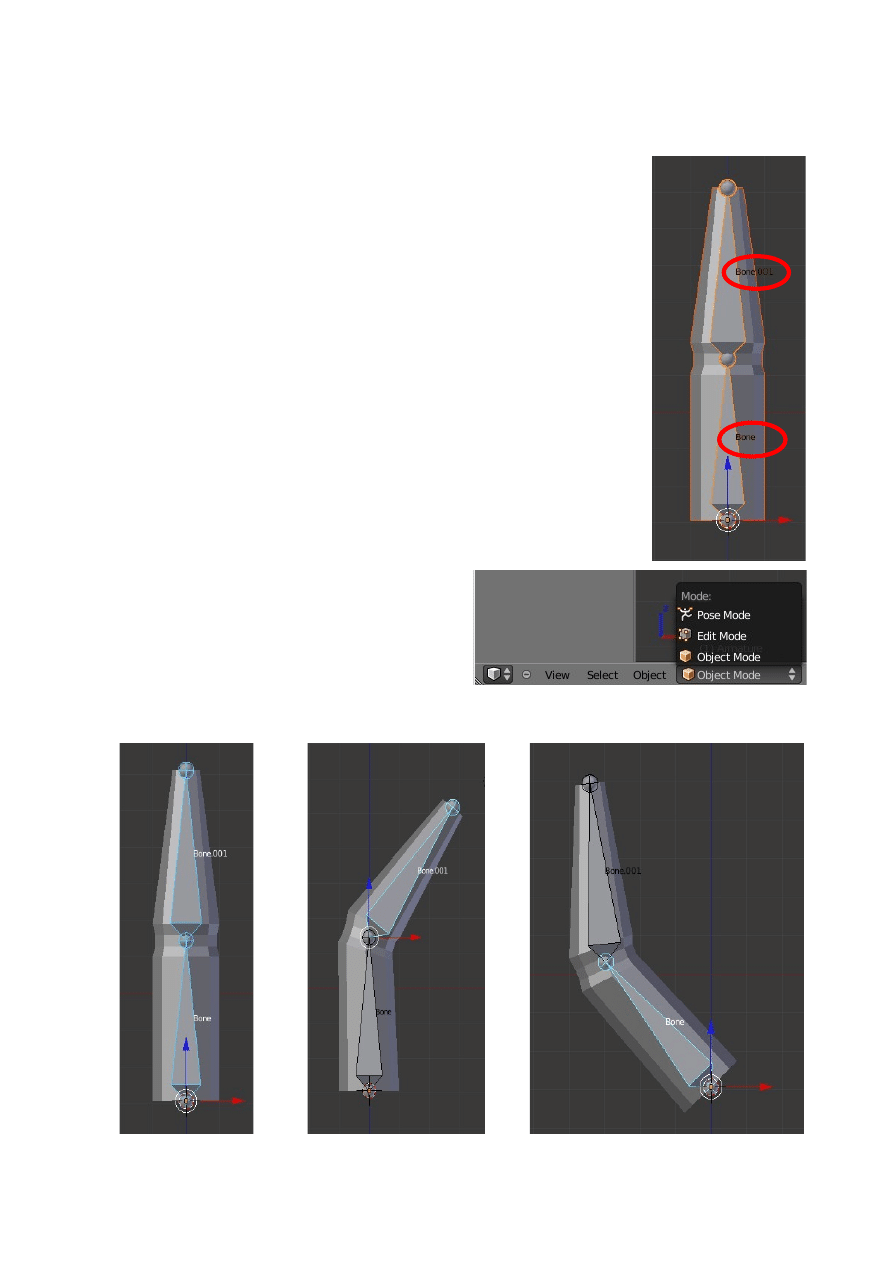
Select the top end of the Bone and drag it up to the middle of the bend point.
Press the E Key and extrude the bone ( Creates a second bone) up to the top of the
mesh.
In the Properties window – Object data – Display tab – tick
'Names' to show the names of the bones in the 3D Window. The
names will be 'Bone' and 'Bone.001'.
Press A Key to deselect the bones – Remain in Object mode.
We will now set up a Child Parent relationship between the Mesh
and the Bones.
Shift select the Mesh object (Child) and then the Armature bone
(Parent).
Press Ctrl + P and select 'Armature Deform'.
To prove the relationship press A Key to deselect – Right click on
the Armature (Mesh selects) – R Click again to select the armature.
In the 3D Window header select 'Pose Mode' (This is only
available when the Armature is selected).
R Click (Select) Bone.001 – R Key (Rotate) –
Rotate the bone.
The Mesh deforms as the Bone is rotated.
Blender has automatically assigned vertices to each bone.
Pose Mode
Bone.001 Rotated
Bone Rotated
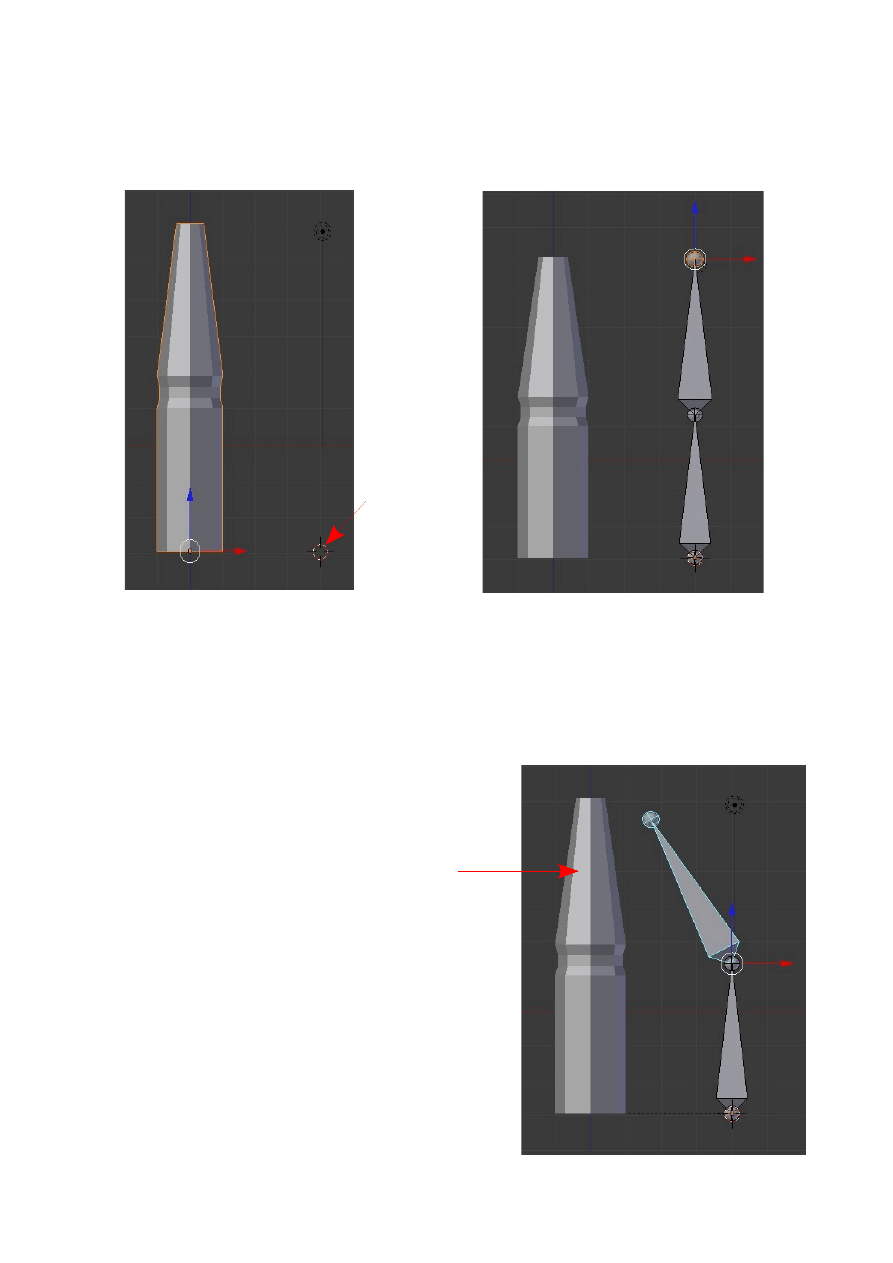
Manually Assign Vertices.
Create the mesh as before – Leave in Object mode.
Place the 3D Cursor off to one side.
Add – Armature (Shift + A – Armature – Single Bone).
As before Tab to Edit mode select the top point of the bone and extrude it up.
Tab to Object mode – A Key (Deselect).
Create a Child Parent relationship as before.
To prove the relationship deselect all (A Key)
select the Armature – Pose mode – Select top bone,
R Key (Rotate) – THE MESH DOES NOT
DEFORM – No vertices have been assigned
3D Curser
Mesh in Object Mode
Armature Added and Extruded
Top Bone Rotated
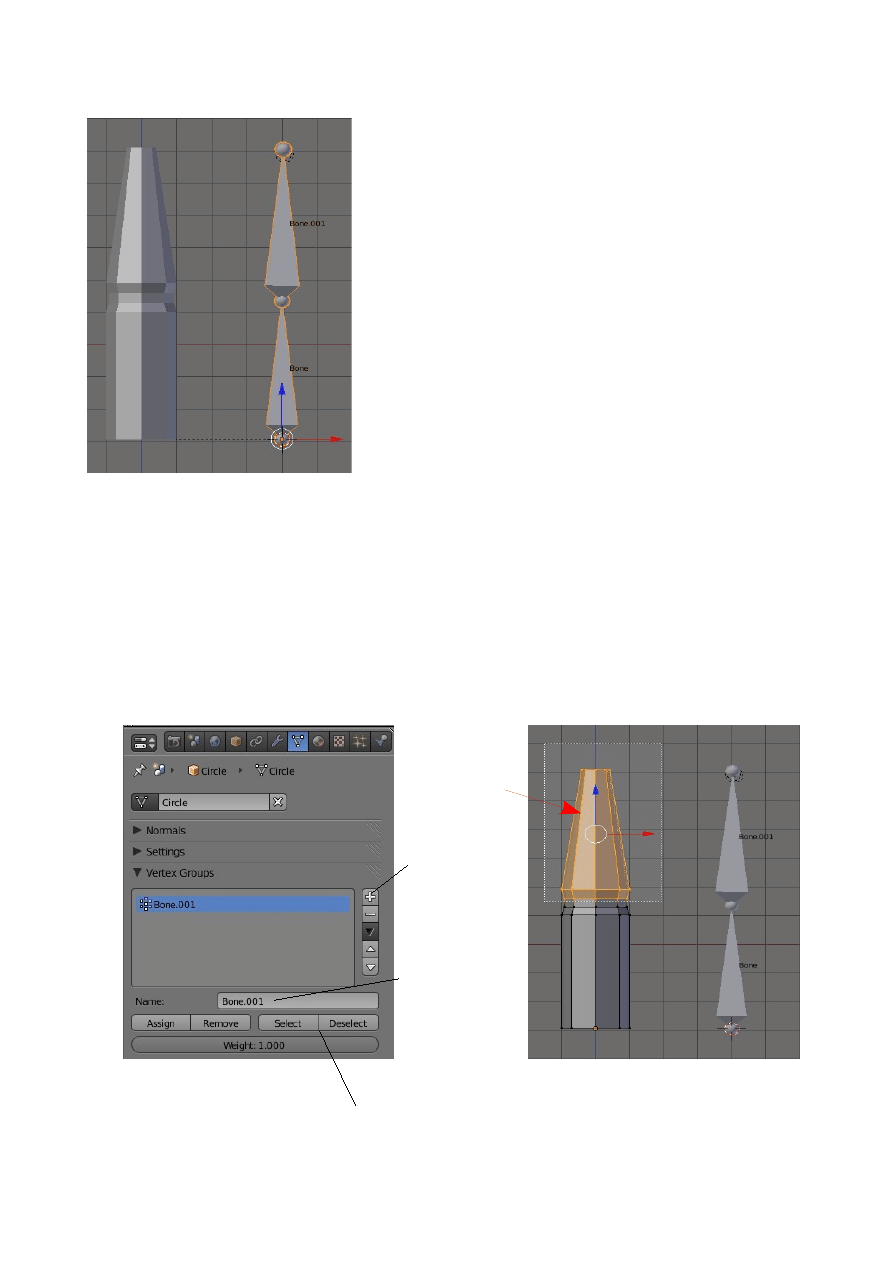
How to Assign Vertices
Put the armature in Object mode.
In the Properties Window – Object data – Display
tab – tick 'Names'. (See: Bone and Bone.001)
A Key (Deselect) Armature – R Click Mesh object to
select.
Assign Vertices to a Vertex Group
With the mesh selected Tab to Edit modeling the Properties Window – Object data
button - - Vertex group tab – Click + to add Vertex Group.
In the Name panel – delete 'Group” and retype 'Bone.001'.
In the 3D Window select the vertices you wish to assign to the Group.
In the Properties window – Object data – Vertex group tab – click 'Assign' (By
clicking on Deselect and Select you will see the vertices in the 3D Window selected
and deselected.
Select Vertices
Click to Add
Vertex Group
Click Select and Deselect to Show
and Hide Vertex Group in the 3D
Window
3D Window
Delete 'Group'
Retype 'Bone.001'
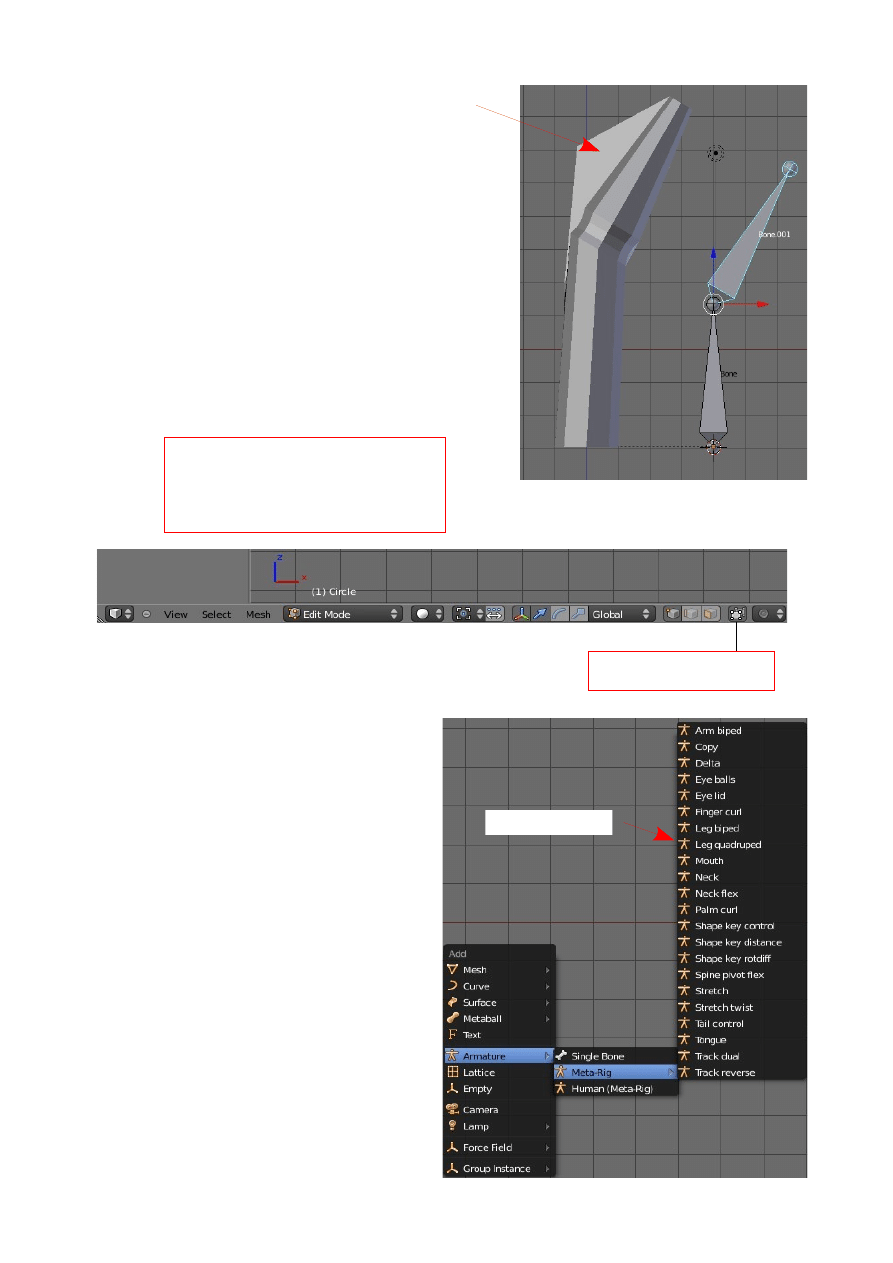
Tab to Object mode – A key to deselect all.
R Click the armature (Select)
In the 3D Window header – Click Pose mode.
With Bone.001 selected – R Key (Rotate) the bone.
The mesh deforms as the bone is rotated.
Adding Armatures.
To add an Armature press Shift + A key –
Armature.
Note: Incorrect Deformation
Armature in Pose Mode
The incorrect deformation noted above
has occurred since the 'Limit Selection
to Visible' button was in the wrong
mode.
Limit selection to Visible
3D Window Header
Not all vertices were selected
Meta Rig Options
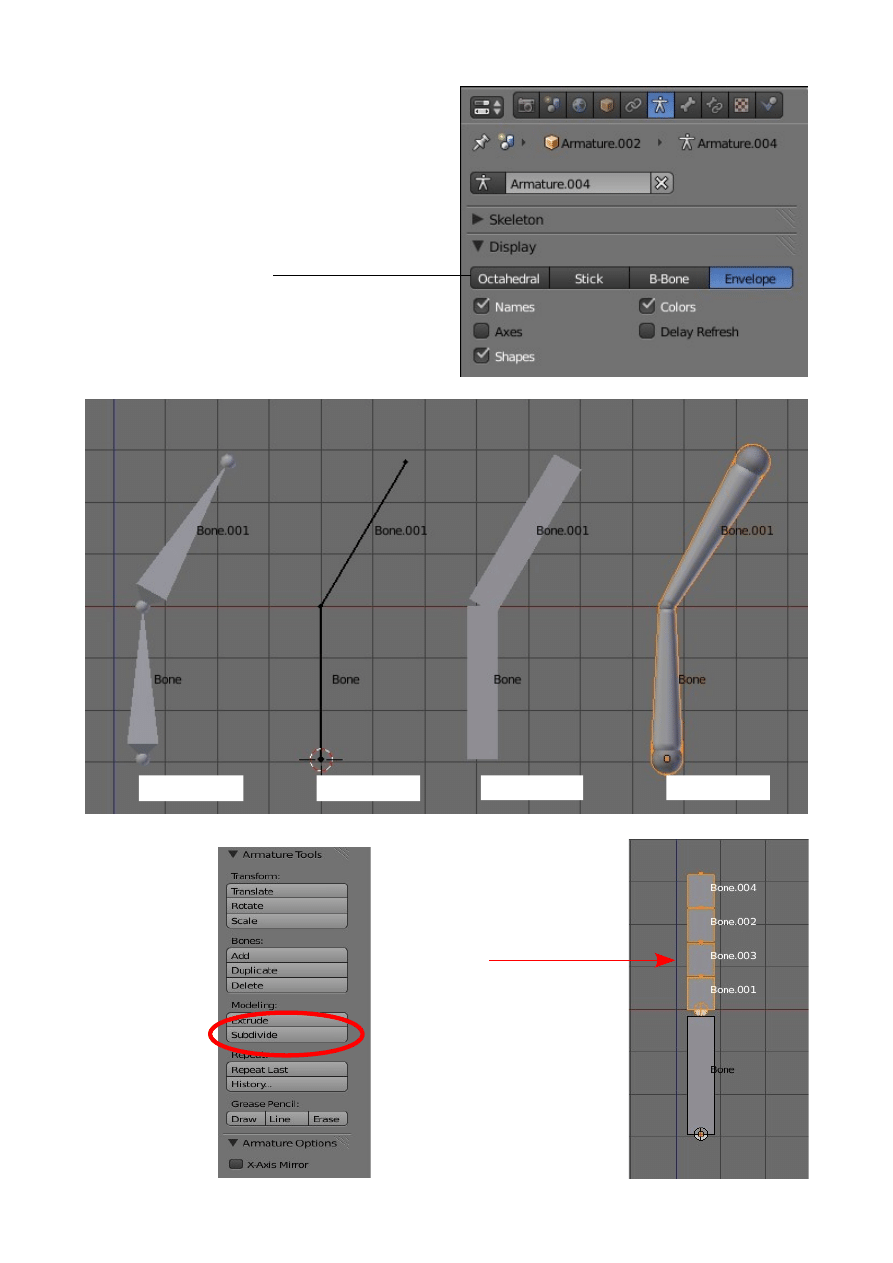
Armature Display
In the Properties Window – object data
button - Display tab – the choices for
different displays are.
Editing Bones
Octahedral
Stick
B-Bone
Envelope
B-Bone Armature in Edit Mode
Click on 'Subdivide' in the
Tool Shelf at the LH Side of
the 3D Window to create
more Bones
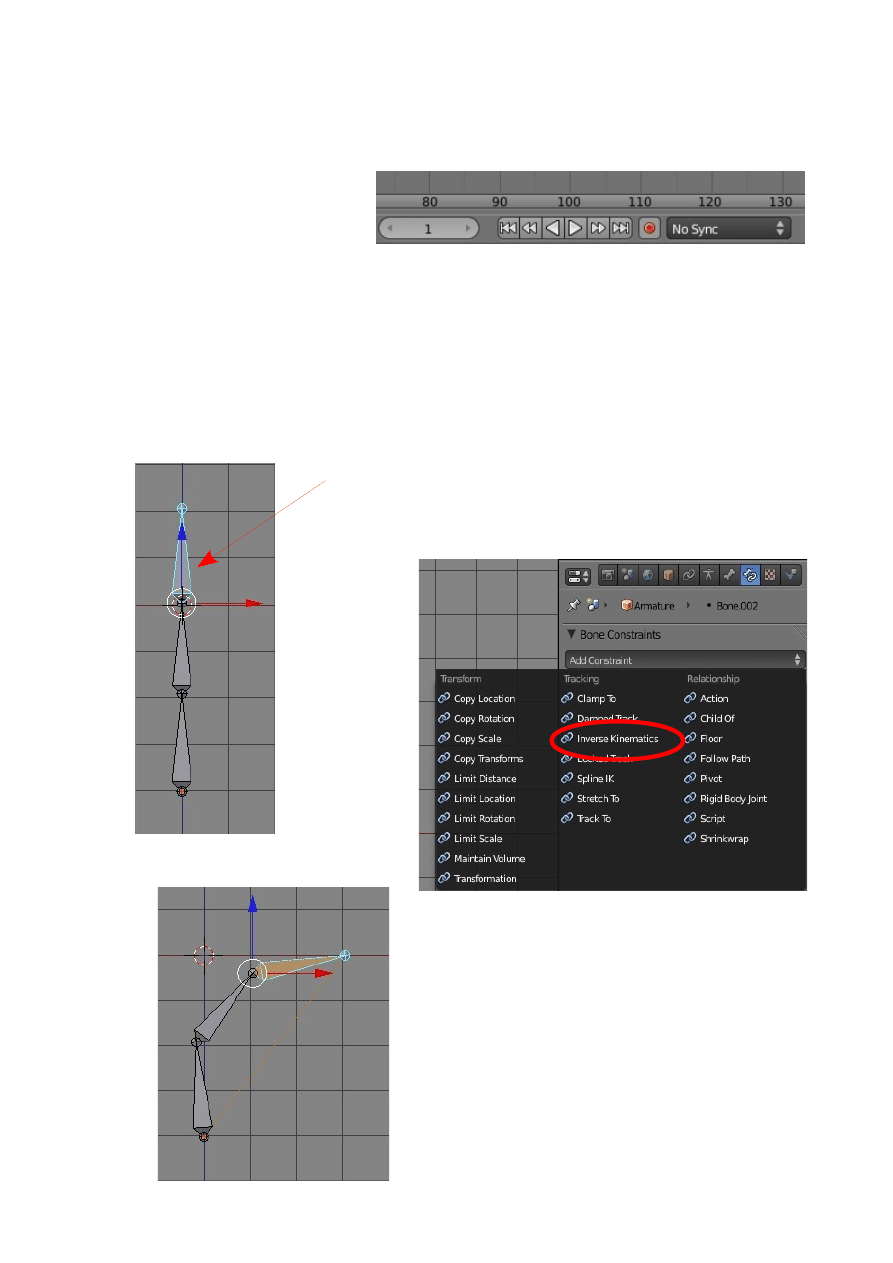
Automatic Keyframing
Automatic Keyframing allows you to quickly animate the movement of complex
Armature arrangements,
With the Armature selected in
Pose mode – Select the bone.
Click on the red button in the timeline Window – Move frame + move bone.
Keyframe is automatically applied.
Inverse Kinematics
Inverse Kinematics is used when you want to manipulate an Armature by simply
grabbing (G Key) the end Bone of a chain and moving it with all the connected bones
following.
Armature Bone Chain with top Bone
selected in Pose Mode
In the Properties Window – Bone Constraints button – Click 'Add
Constraint' – Select 'Inverse Kinematics
Drag the Bone to see the chain follow
CH19- Relative Shapes Keys
01-Shapes Keys and Action Editor
02-Shapes Key Editor
03-Action Editor
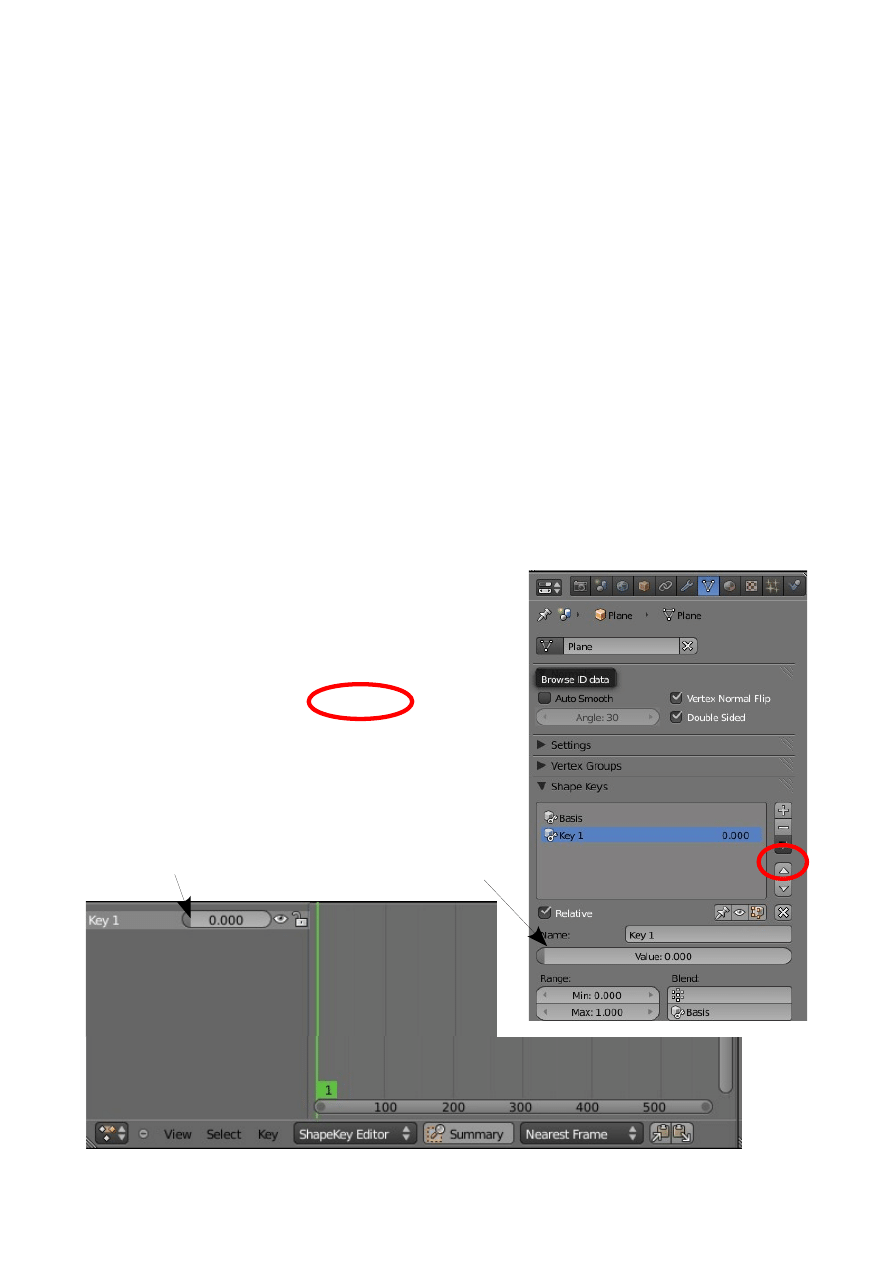
Shapes Keys and Action Editor
Shapes Keys and Action Editors provide an easy method of animating shapes and
objects. Both Editors are located in the Dope Sheet Window. The Shapes Key Editor
allows you to control the animation of vertices or groups of vertices while the Action
Editor allows you to set up an animation of an Objects movement and scale.
To demonstrate both methods we will use a simple Plane Object with only four
vertices.
Start with the default Blender scene, delete the Cube and add a Plane. Go into Top
View (Num Pad 7 + Num Pad 5). Zoom in on the view (Num Pad +).
Split the 3D Window into two windows and change one to the Dope Sheet Window.
Shapes Key Editor
In the Dope Sheet Window click on the drop down mode selection and select 'Shapes
Key Editor'. With the Editor selected the window has now become an animation
timeline.
Select the Plane in the 3D Widow.
In the Properties Window – Object data buttons –
Shapes Keys tab click on the plus sign. The tab
expands showing a 'Basis Key' inserted. Click on
the plus sign again and 'Key1” will be added. Note
that in the Dope Sheet Shapes Key Window 'Key1'
is also displayed (Upper LH side of window).
Dope Sheet Shapes Key Window
Slider
Slider
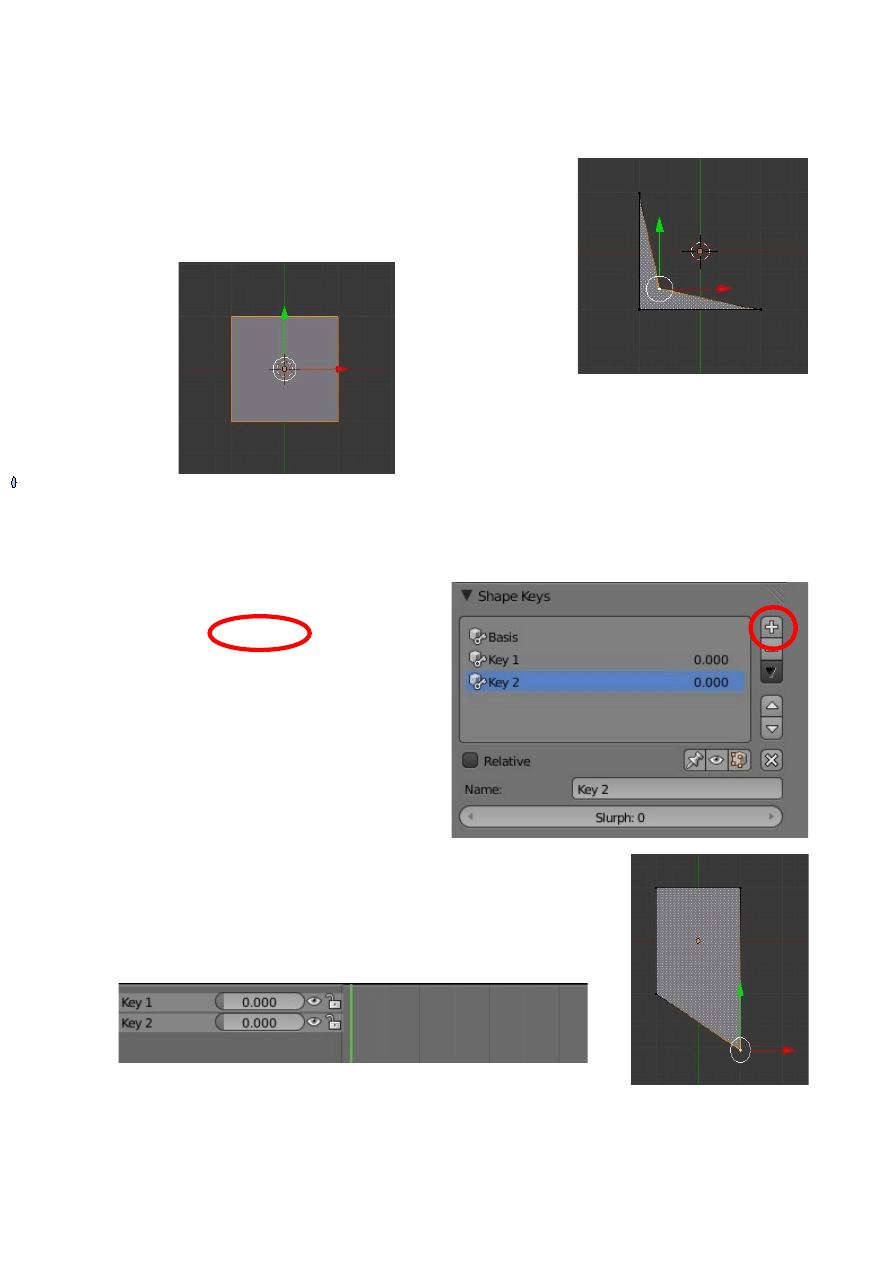
With the cursor in the 3D Window Tab to Edit mode. Deselect all vertices (A Key).
Now select one of the vertices and drag it (G Key drag
mouse). Tab to Object mode.
The plane reverts to its original shape.
In the Properties Window – Shapes Key tab – Changing the 'Value' by moving the
slider changes the shape of the Plane in the 3D Window. You can also change the
shape by moving the slider next to 'Key1' in the Dope Sheet Shapes key Editor.
In the Properties Window – Shapes Key
tab click on the plus sign again to add
'Key2'.
In the 3D Window Tab to edit mode select another vertice and
move it somewhere. Tab back to object mode. Key2 has been
added to the Shapes Key Editor.
Edit Mode with Vertice Moved
Object Mode
Origional Shape
Shape Key Editor – Key2 Added
Edit Mode
Vertice Moved
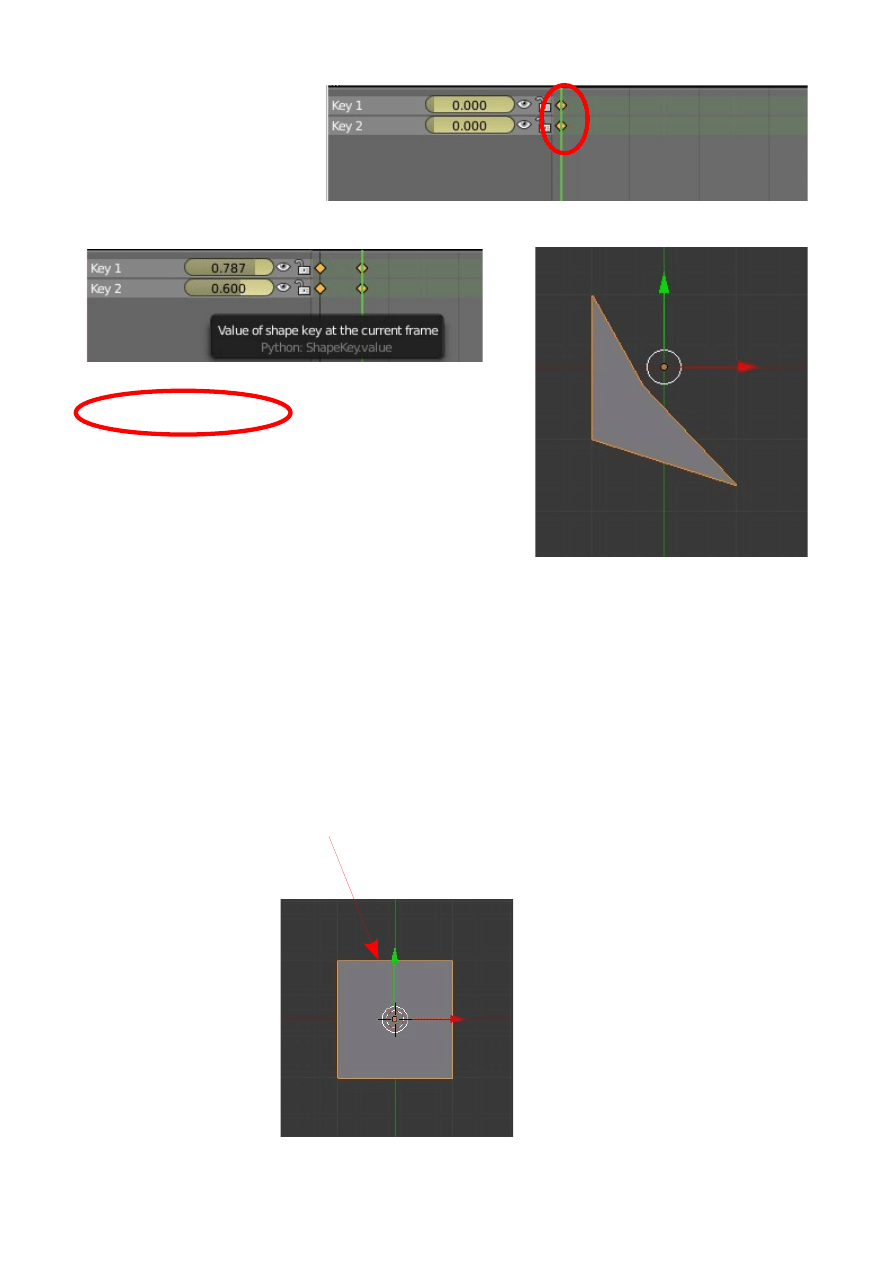
In the Shapes Key Editor
click on Key1 then Shift
click on Key2. This has
selected both keys as
indicate by the white
highlight of the names.
Move each slider to see the Plane change shape in
the 3D Window then return each slider to the 0.000
position. Moving the sliders has inserted key
locations in the timeline of the Shapes Key Editor as
indicated by the orange diamond shapes. Press 'I
Key' and select 'Only Selected Channels'. This inserts
Keyframes in the animation timeline. Drag the green
line to a new frame, move the Key sliders and press
'I Key' again selecting 'Only Selected Channels'. New Keyframes are inserted. Scrub
the timeline (Drag the green line) to see the animation. You can also press Alt + A
with the cursor in the 3D Window to play the animation.
Action Editor
To demonstrate the Action Editor begin with the same set up as use for the Shapes
Editor except this time select 'Action Editor' mode in the Dope Sheet Window.
Select the Plane in the 3D Window in Object mode and insert a keyframe (I Key)
type 'LocRotScale.
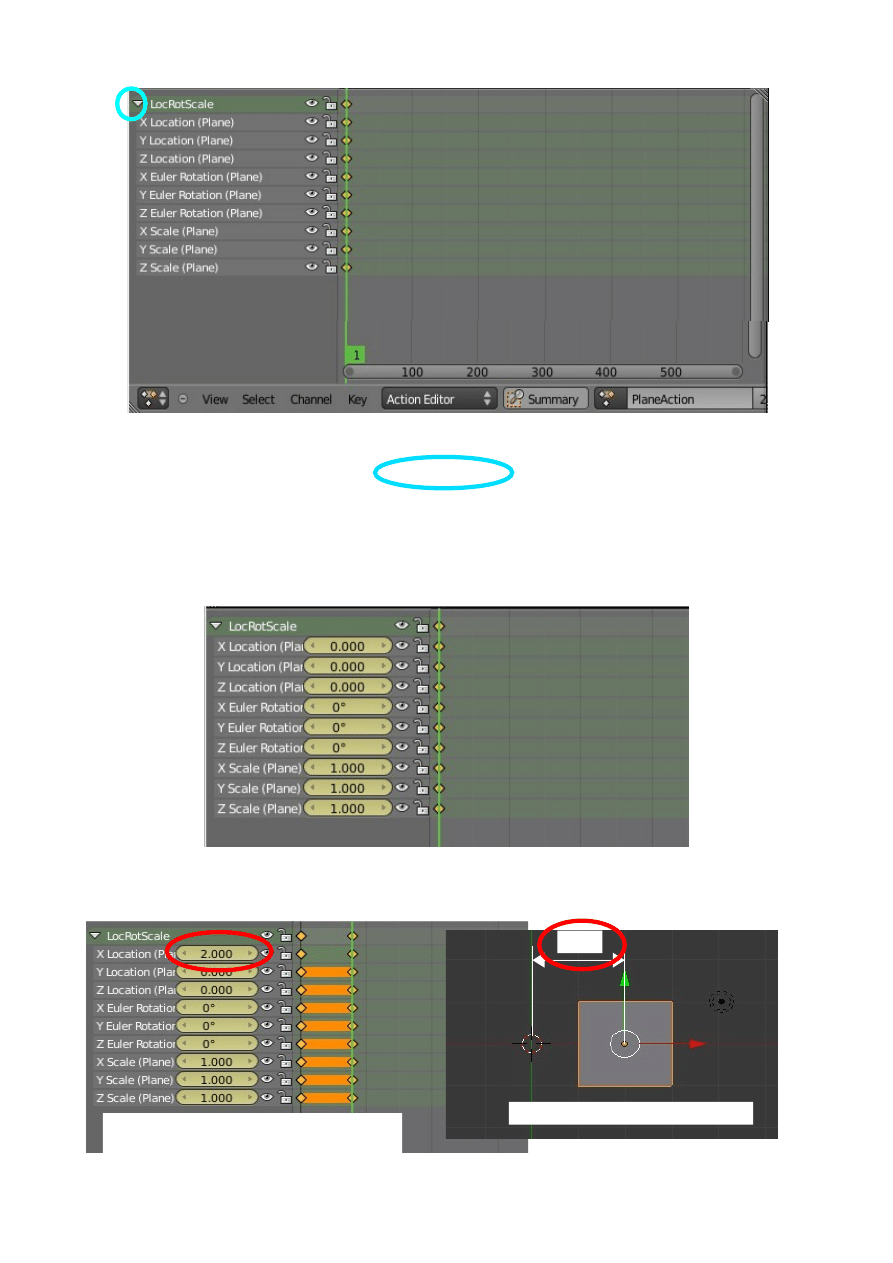
In the Dope Sheet Action Editor you will see the keyframe displayed in the upper
LHS of the window. Clicking on the little triangle in front of the LocRotScale
expands the keyframe to show the individual components.
In the Action Editor Window header click on 'View' and tick 'Show Sliders'. There
will now be value sliders in each component of the keyframe. By moving the sliders
you can manipulate the Plane in the 3D Window.
Inserting Keyframes (I Key) with each change of frame produces an animation. As
previously you can scrub the animation or Alt + A play the animation.
2.000
Plane Moved 2.000 in 3D Window
X Location Slider set 2.000 in Action Editor

CH20- Fluid Simulation
01-Fluid Simulation
02-Basic Setup
03-Domain Object Setup
04-Fluid Object Setup
05-Inflow Object Setup
06-Obstacle Object Setup - Trough
07-Obstacle Object Setup – Cup
08-Outflow Object Setup
09-Fluid Simulation – Particles
10-Fluid Simulation - Control
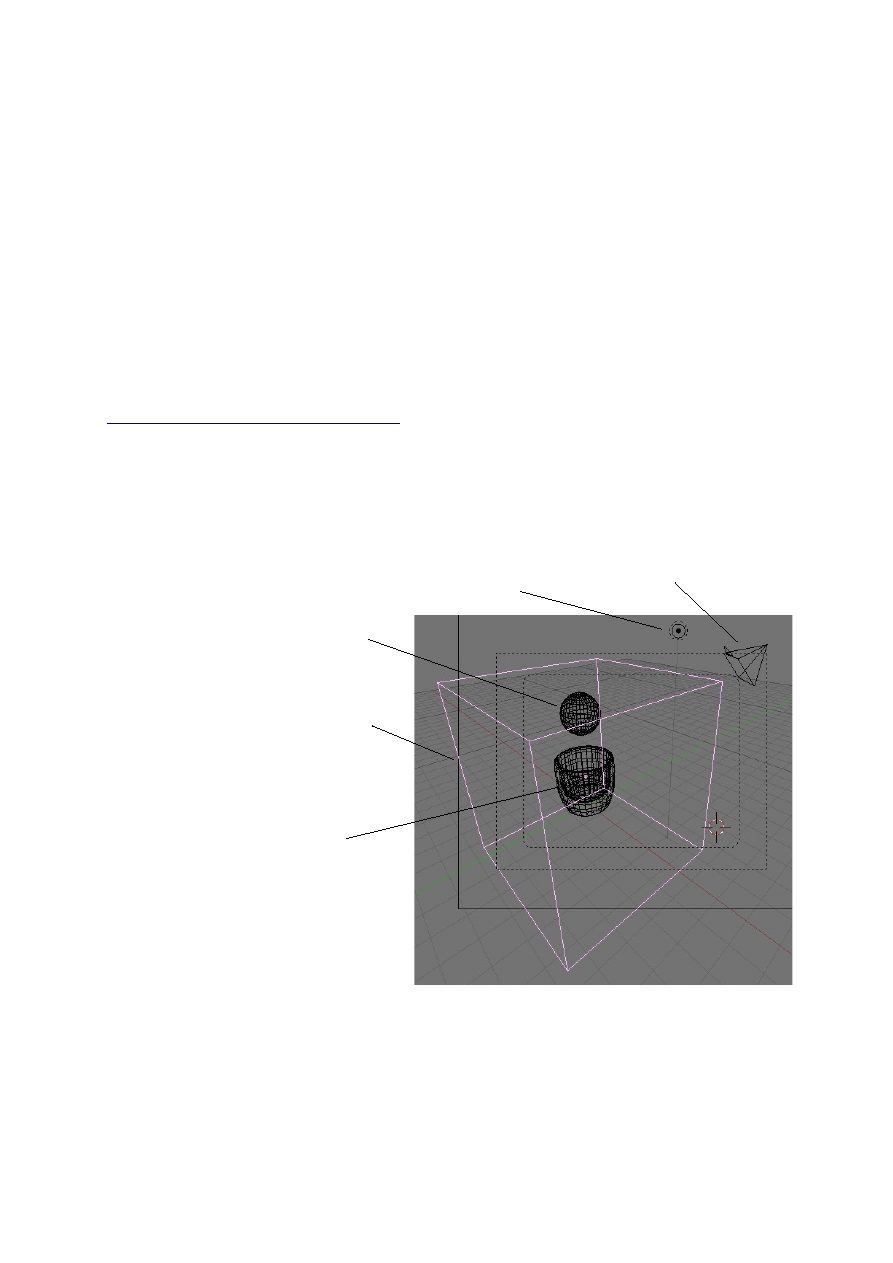
Fluid Simulation
Fluid Simulation Physics provides a means of simulating fluid flow. In this
discussion we will consider two scenarios.
The first scenario is animating a volume of fluid such as a droplet of water or
larger single volume which is initially suspended in space and allowed to drop
into a container or on to a surface.
The second scenario is animating a stream of fluid such as fluid running from a
tap or out of a container in a controlled flow. This scenario will recap on the first
scenario.
For detailed procedure see Blender Wiki PDF Pages 1059 to 1071 obtainable at
http://www.letworyinteractive.com
. (Note: These pages refer to Blender 2.49)
Basic Setup fore Fluid Simulation ( First Scenario )
Blender 3D Window scene.
This setup represents a basic scene constructed for a fluid simulation. As with all
blender scenes there must be a light to provide illumination and a camera before
anything can be rendered.
The scene has been constructed with:
Fluid Object – Sphere – Default Sphere 32 segments and Rings.
Domain Cube – default Cube scaled up x 4.
Obstacle Object – Cup – Extruded from a Circle (See next page).
Camera
Light
Fluid Object Sphere
Domain Object Cube
Obstacle Object
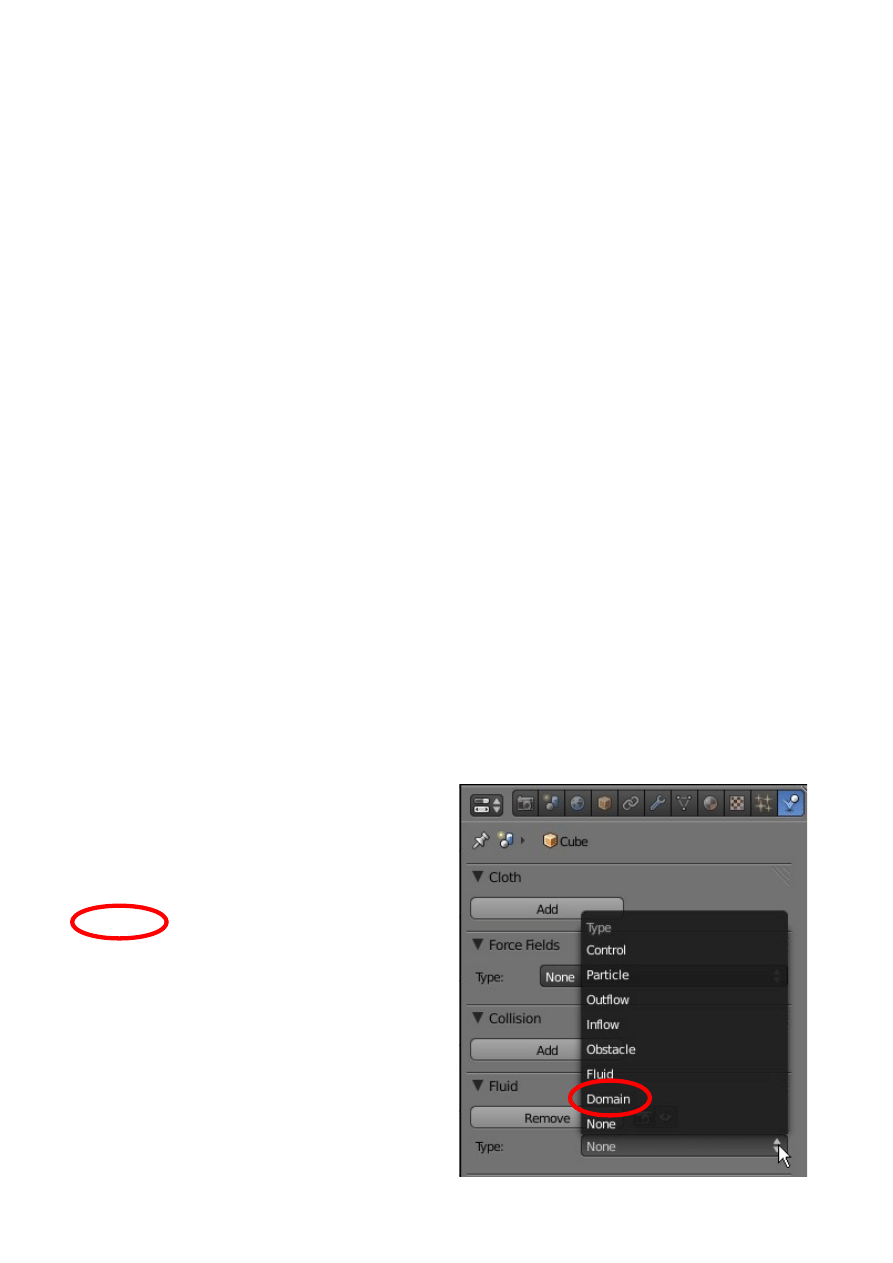
In the scene a volume of liquid ( Fluid Object ) suspended in space, it will be released
and then dropped into a Cup ( Obstacle Object ). The falling fluid ( Fluid Simulation )
takes place within the confines of the Domain. The domain is a segment of space
defined by a cubic volume ( The Cube ).
There must be a Domain for a simulation to take place and all Objects participating in
the simulation must be within the Domain. Any Object partially outside of the
Domain will not function.
In this simulation the fluid is represented by a Sphere positioned somewhere towards
the top of the Domain and immediately above the Cup. The size of the Sphere
relative to the Domain and to other objects within the Domain determines the volume
of the fluid. A large sphere relative to the Domain and the Cup produces a large fluid
volume.
The Cup is an obstacle which obstructs the movement of the Fluid. In this example
the Fluid is simply falling in space until it is obstructed by the Cup. If the Cup did not
exist the Fluid would fall until it reached the bottom of the Domain and then come to
rest as if enclosed in a transparent rectangular container which is defined by the shape
of the Domain.
With the objects placed in the scene nothing will happen until all the Objects have
values assigned. This sets up the simulation.
Domain Object Set Up
In this example the Domain is a Cube which has been scaled to enclose the Sphere
( Fluid Object ) and the Cup ( Obstacle Object ). To assign fluid simulation values to
the Domain first select the Cube in the 3D
View.
Go to the Properties Window -Physics
button – Fluid tab. Click 'Add New' to
display the Fluid tab properties. Select
'Domain' from the Type drop down
selection menu.
The Fluid Domain settings panel displays.
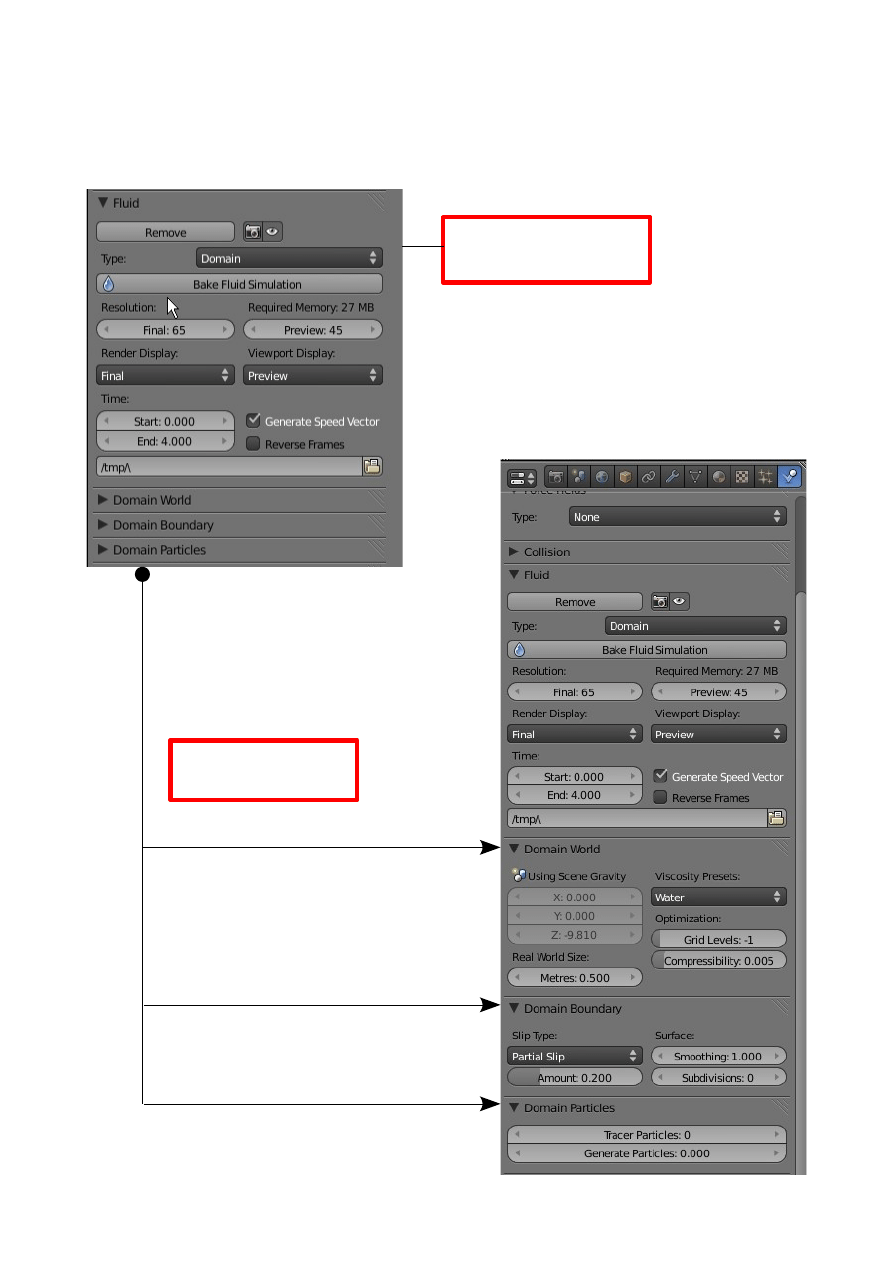
Selecting the Cube in the 3D Window applies the Domain characteristics to the Cube
and displays Domain options. Three further tabs can be opened.
Three additional tabs
Domain Settings Panel

In discussing this first example of fluid simulation default values will be used with
the exception that in the 'Time' settings the 'End' value will be changed to 0.03.
The default time settings are Start and End times default values. Start: 0.0 End: 4.0
Changing the End value to 0.30 is done to reduce the Bake time to something
reasonable for a demonstration.
Baking is similar to rendering images for an animated movie. Baking is the process of
simulating a fluid flow and can take a considerable time depending on the complexity
of the simulation set up .
When baking Blender looks at the Start and End times set in the Fluid tab, calculates
the time period, then computes how the volume of fluid would react to the
environment during that time. In our example the time period is 0.30 seconds
(Start:0.00 End:0.30).
The Start and End time values have nothing to do with how many frames will be
produced in the animation of the fluid flow but instead are concerned with the
physical force and the fluid viscosity. In other words how the fluid will react to its
environment in the given time period.
In the Properties Window-Render button-Dimensions tab the default animation length
is set at 250 frames (Frame Range Start:1 End:250) and will display at 24 frames per
second. The animation Frame Range is also displayed in the Timeline Window. These
values produces an animation of appx.10 seconds. The behavior of the volume of
water in this example over 0.30 seconds will be spread over the animation time of 10
seconds. Imagine dumping a cup of water and observing its action over 0.30 seconds
then stretching that behavior over 10 seconds. A slow motion effect will result.
A 0.30 second bake takes a considerable time a 4.00 second bake will take forever.
A 0.30 second bake will suffice to demonstrate simulating a fluid flow even though it
does not produce a real time animation.
What is real time animation? Real time animation with respect to fluid flow is an
animation which shows precisely how the fluid reacts in real time as apposed to our
slow motion effect. If you want real time, set the Time Start and End values in the
Fluid tab to match the length of the animation. For example with the default
animation of 250 frames at 24 frames per second equaling approx 10 seconds you
would set the Fluid tab Time values to give a 10 second period. Be warned: Make the
Bake process coincide with your summer vacation. You will have a long wait while
you Bake your cake. You may as well go on holidays.
Varying the Start and End time of the fluid action therefore affects how the behavior
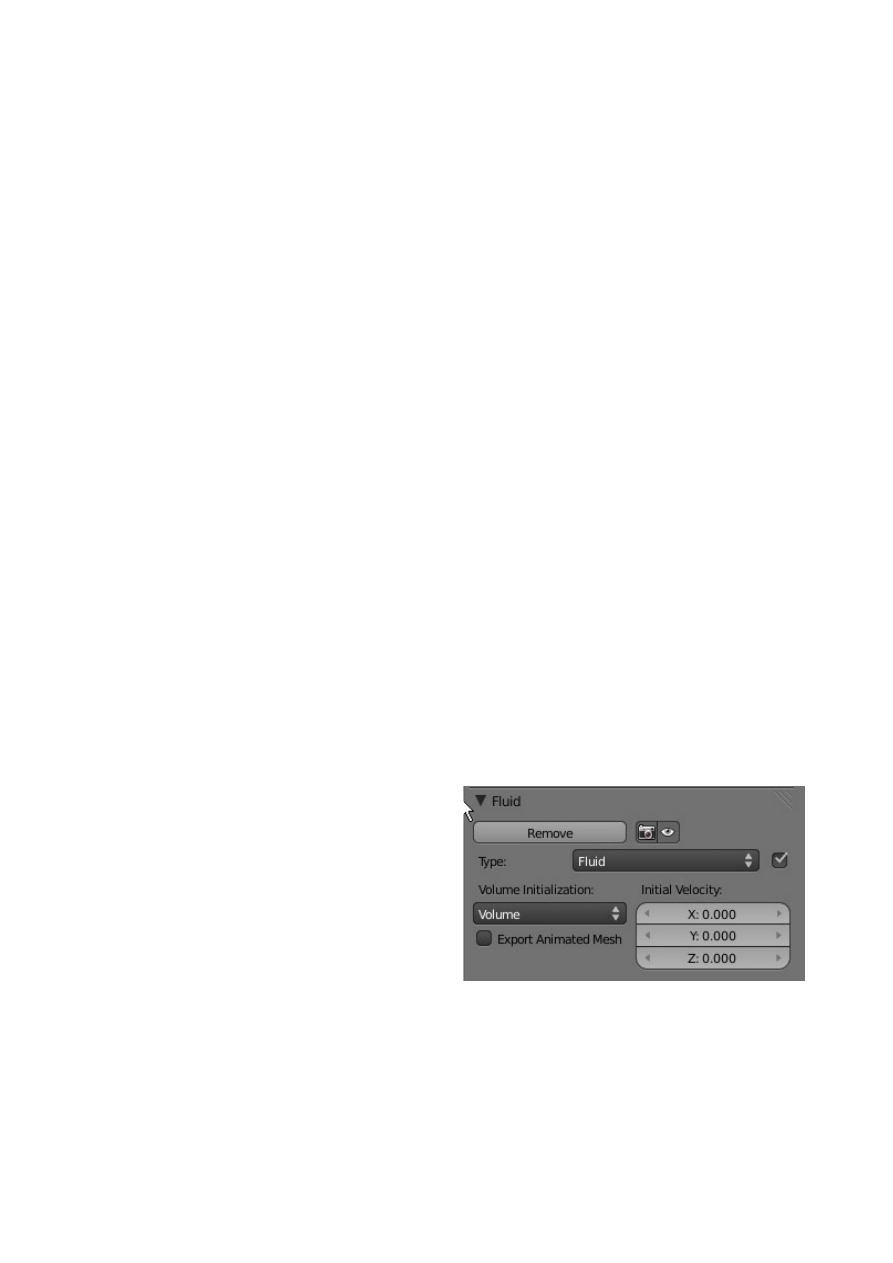
of the fluid is seen in the final animation. For now leave all the values in the standard
Domain tab set per the defaults except for the End Time setting.
One last point in the Domain settings for now. Note the directory name at the bottom
of the Fluid tab. This gives the location where the Bake files will be saved. The
default location is /tmp/\ but you may change this to whatever you wish. We have
already noted that Baking takes a long time and with that comes a terrible lot of files.
If a simulation is rebaked the files are overwritten but after messing about with some
trial and error in the learning process you will still accumulate a whole swag of files.
The best way to clean them out is to delete the 'tmp folder and replace it with a new
one. In Windows 'Windows Explorer' is a good place to do this.
Fluid Object Setup -
Reference: process Step 2- blender Wiki PDF P1060.
In this example the fluid is represented by a Sphere which has been placed in the
Domain immediately above the Cup.
The size of the Sphere relative to the Domain and the Cup determines the volume of
the fluid in the simulation. Big Sphere big volume. Small Sphere small volume. For
the demonstration make sure the Sphere is smaller than the Cup otherwise you will
have some mopping up to do.
Select the Sphere in the 3D Window. Go to the Properties Window – Physics button –
Fluid tab. Click 'Add' and in the selection dropdown select Type 'Fluid'.
You can leave the settings as they are but it is worth noting that the Initial Velocity
values will give your fluid a kick start in whatever direction you set.
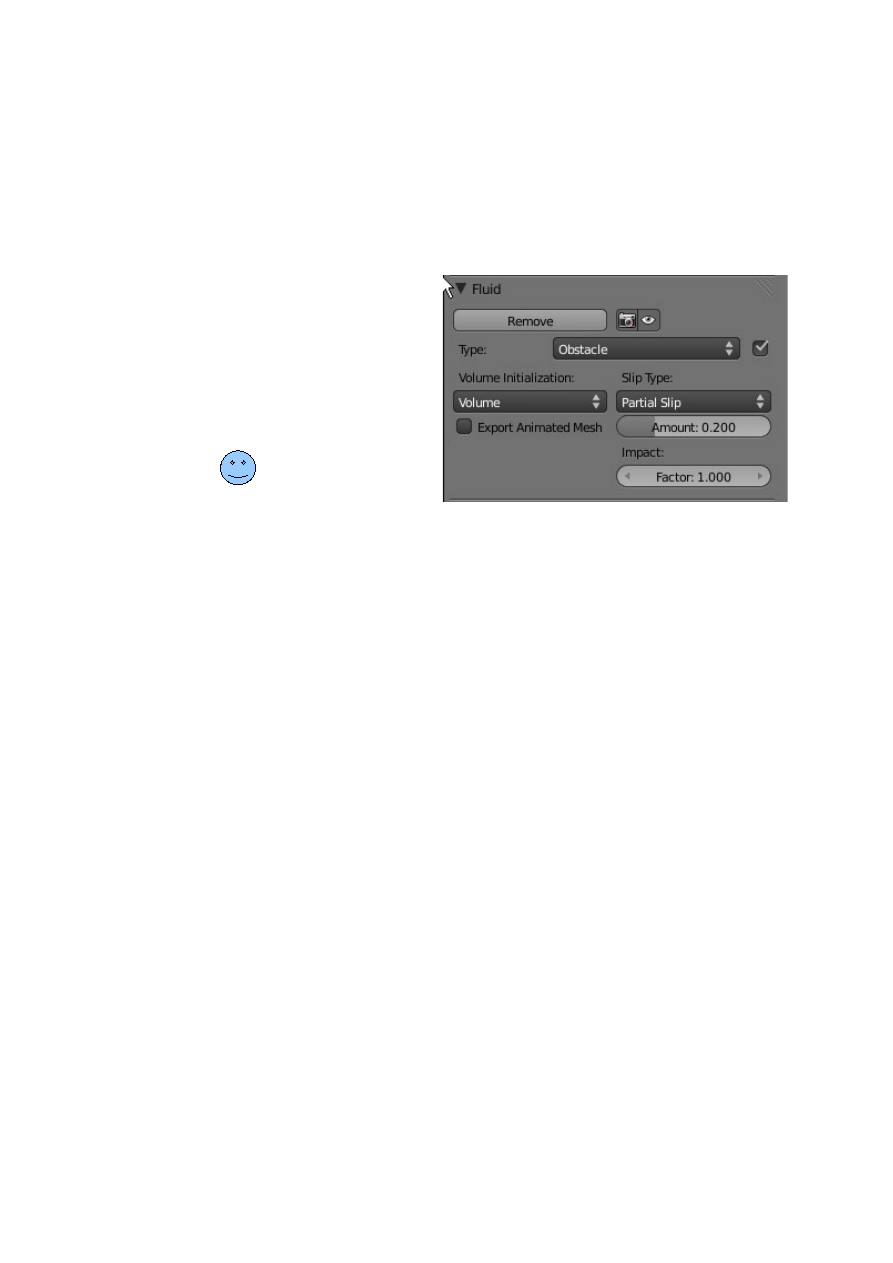
Obstacle Object Setup
Reference: Process step 2 – blender Wiki PDF Manual P1060
In this example the Obstacle to the fluid flow will be the Cup.
With the Cup selected in the 3D Window go to the Properties Window – Physics
button – Fluids tab. Click 'Add' and select Type Obstacle.
With all the objects required for the
simulation having settings assigned the
Fluid Simulation Setup is now
complete and ready to be BAKED.
Baking
In the 3D Window in wireframe mode select the Domain cube. The domain
properties tab will be displayed with the values that were previously set.
Make note that Baking a simulation can take a long time depending on the
complexity of the simulation, the resolution, the length of the animation and the
speed of the computer. For the purposes of this example, where the default
values have been used, set the length of the animation to 50 frames in the
animation Timeline Window. At a display rate of 25 frames per second this will
produce an animation lasting 2 seconds.
Go back to the Properties Window – Physics button – Fluid tab.
With the Domain Object selected (The Cube) in the 3D Window click on the
'Bake Fluid Simulation' button.
The Bake progress can be observed at the top of the 3D Window in the Fluid
Simulation progress bar. The bar only appears when you bake and will be
located in the Information Window header adjacent to 'Blender Render'. If you
want to cancel a Bake click on the cross next to the bar.
The Bake takes a considerable time. It is akin to creating an image for each
frame of an animation so be prepared to sit back and wait a while
See Blender Wiki PDF Manual P 1062
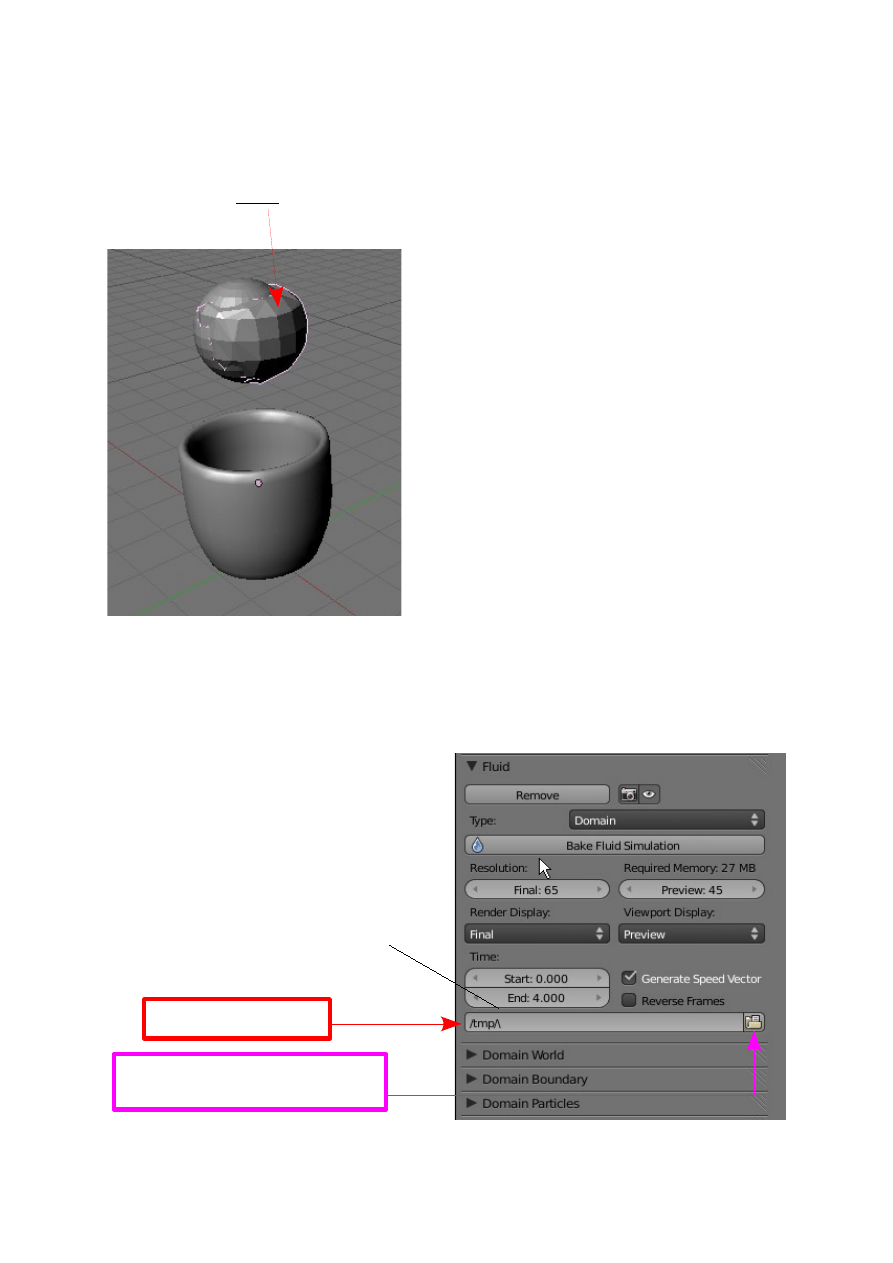
In this example the BAKE should take about 30 seconds.
Note what happens in the 3D Window. The Domain seems to disappear
changing into a blob which attaches itself to the Sphere Fluid Object.
The blob then descends, deforming as it goes and splashes into the Cup.
The progress of the BAKE can be observed
in the header bar of the Information
Window. If the BAKE is not performing as
expected it can be terminated by pressing the
Esc Key or the cancel button (Cross) in the
header and settings can be adjusted to
correct the action. To rebake the simulation
select the Domain (Which is now the blob
attached to the sphere) and press BAKE
again in the Domain properties tab.
When the BAKE is completed change to
solid mode and press Alt + A to view the
animation of the simulation.
When a simulation is BAKED it is similar to rendering files for an animation
sequence. Files are created and saved to a folder on the computers hard drive.
Blender Wiki PDF Manual P1062 briefly describes this operation. The path to
the folder where the BAKED files are saved can be seen in the Domain Fluid
tab. (Yes I know I'm repeating myself)
Baked files located here
Click to open file browser window to
change Bake destination folder
Change Time: End: to 0.300

The folder for the storage of BAKE files can be changed to any folder you wish by
clicking on the file browser icon and navigating to a folder in the file browser
window.
See the navigation section CH02-Navigate and Save.
If the BAKE is executed without altering the Path the BAKE will be saved in the
default tmp folder.
When a simulation is BAKED without altering the destination folder any existing
BAKE is overwritten. To delete a BAKE, select the storage folder and delete the files
or shred the folder.
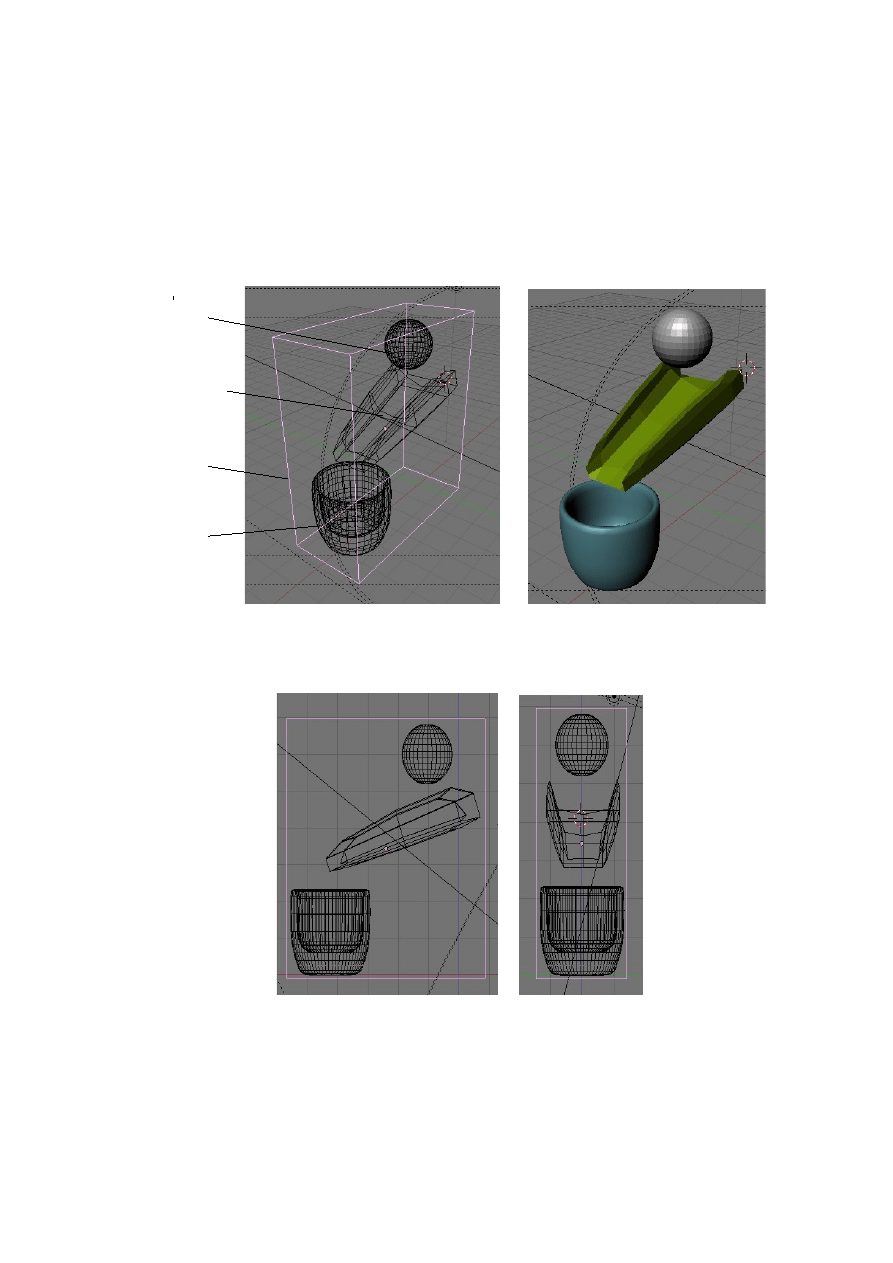
Basic Set Up for Fluid Simulation ( Scenario Two )
Blender 3D Window Scene
The setup in the view below is a basic scene configuration to demonstrate a fluid
simulation in accordance with scenario two. The camera and light are not shown
in the screenshot but they must exist in the scene.
In this scenario the fluid will flow in a stream from the Inflow Object Sphere
down the Obstacle Object Trough into the Obstacle Object Cup. All Objects
participating in the simulation must be within the confines of the Domain.
Inflow Sphere
Obstacle Trough
Domain Cube
Obstacle Cup
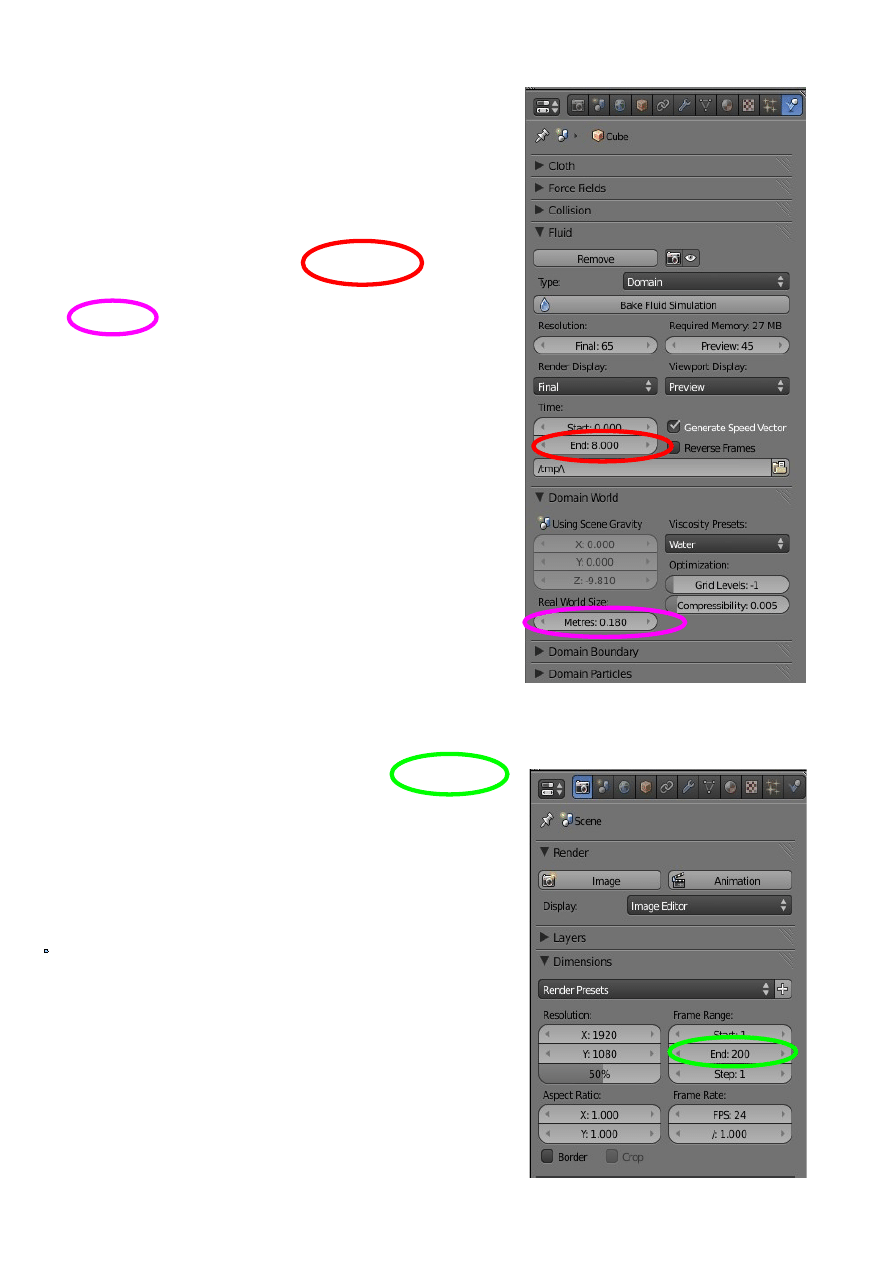
Domain Object Setup
The Domain cube has been scaled to confine the
participating Objects in a restricted volume of
space. The procedure for assigning the Cube as
Domain and setting values is identical to that of
scenario one with the exception that the End Time
value has been changed to 8.00 in the Standard
settings and the 'Real World Size' has been set as
0.180 in the Domain World tab.
In setting up a fluid simulation the length of the
final animation in real time and the physical size of
the scene in real terms must be considered. The
Blender scene viewed on the computer screen is
seen in Blender units and an animation is measured
in the number of frames viewed at a set frame rate.
In this simulation the animation will be 200 frames
long viewed at 24 frames per second as seen in the
Properties Window–Render button–Dimensions
tab.
200 frames at 24 frames per second produces an
animation of approx. 8 seconds duration.
Setting Start at 0.00 and End at 8.00 in the Fluid tab
computes the action of the fluid over an 8 second
time period i.e. over the length of the animation.
This produces a real time animation. If for example
the End value was set at 4.00 seconds then how the
fluid behaved in 4.00 seconds would be spread over
the 8.00 seconds of animation.
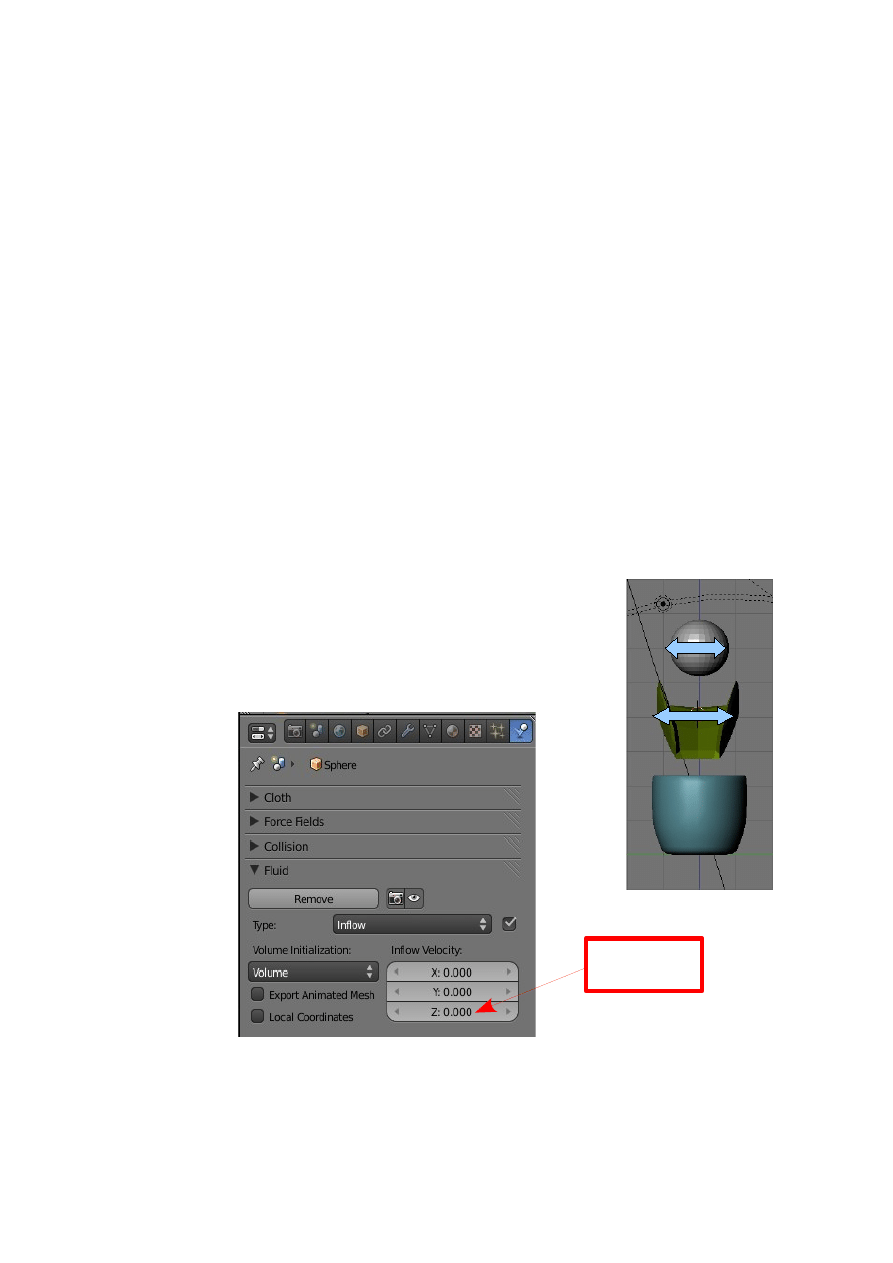
In regard to the size of the scene consider that the diameter of the cup is
something like 8 or 9 centimeters and the horizontal length of the trough
extending past the edge of the cup is also 8 or 9 centimeters. Taking the
maximum we then require a Domain length of 18 centimeters. Thus the
Real_World_Size is set at 0.180 ( 0.180 M = 18 cm ) which is the longest side of
the Domain.
Fluid Objects Setup
In this scenario there is no Fluid Object instead we use an Inflow Object which
provides a continuous flow of fluid.
Inflow Object Setup
Make particular note of the scale of the Inflow object relative to the Obstacle
Objects. The scale of the Inflow Object determines the physical volume of the
fluid in the scene. If the Inflow Object is too large the volume of fluid will spill
over the sides of the trough and cup.
With the Inflow Object selected in the 3D Window go to
The Properties Window-Physics button-Fluid tab .
Since the Domain Object has been previously set the Fluid
options in the Field tab should already be available. Select
Inflow to display the Inflow options.
To give the fluid a small amount of momentum set the Z initial velocity at 0.20
In doing this the fluid is moving before the acceleration due to gravity take hold.
Leaving the Z velocity at zero produces a rather sluggish Fluid flow.
Set Z: 0.20
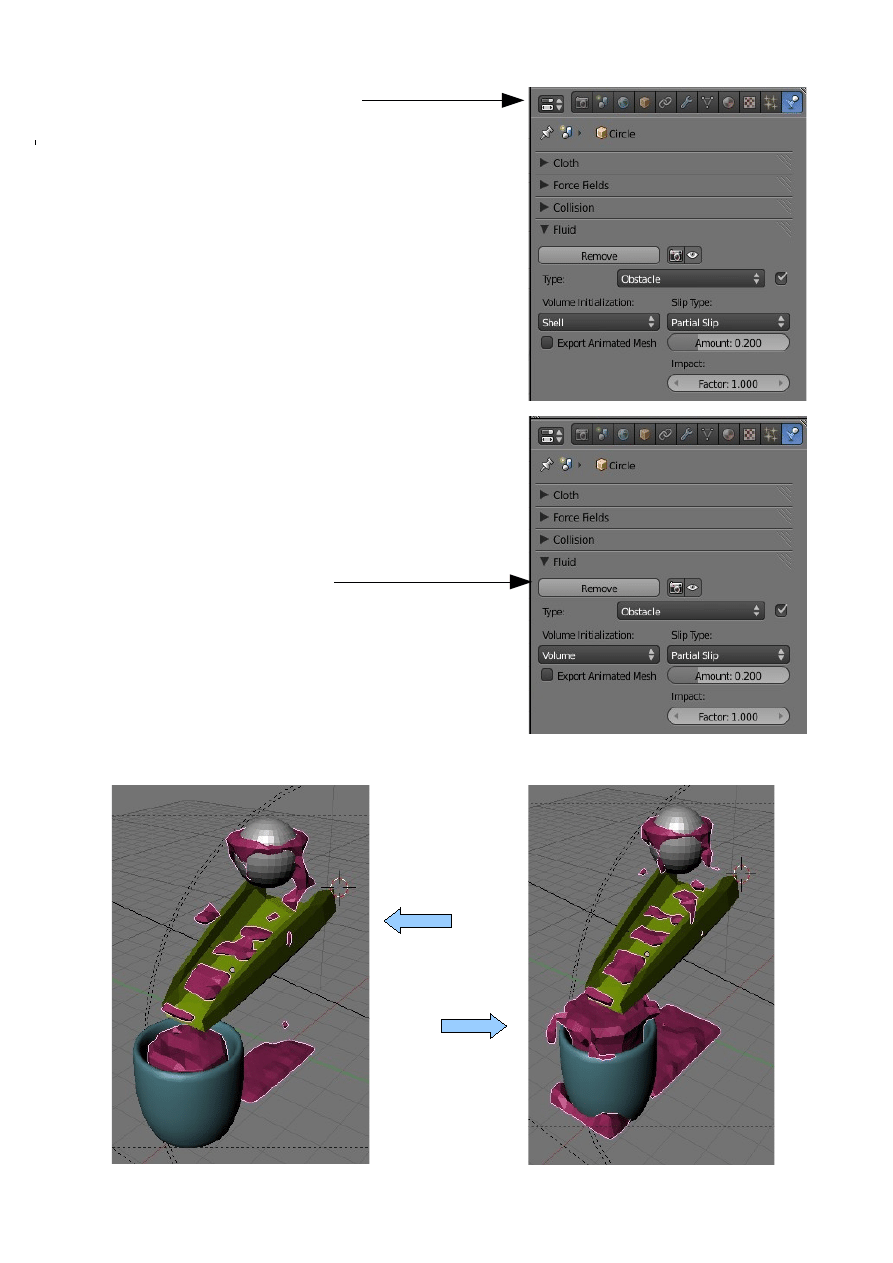
Obstacle Object Trough Setup
Make particular note of the construction of the
Trough. It has been modeled by extruding and
scaling a cube into a rectangular U-shape and then
rotating to provide an incline and positioned below
the Inflow object and above the Cup. After
modeling a Subserf Modifier has been applied.
Without the modifier the Fluid tends to break
through the Trough surface.
With the Trough constructed select it in the 3D
Window then go to the Fluid tab and select
Obstacle. Set the Volume init value to Shell and the
Boundary type to Free. Volume init Shell initializes
a thin layer for all faces of the mesh preventing
fluid breakthrough. Foundry type Free allows fluid
movement along the obstacle. For other options see
Blender Wiki PDF P1065.
Obstacle Object Cup Setup
The model of the Cup is identical to that used in the
first scenario.
Set the value options the same as for the Trough
Obstacle Object.
All objects included in the simulation have been assigned and the process can be
BAKED. Follow the procedure as outlined in the first scenario.
Frame 100
Frame 200
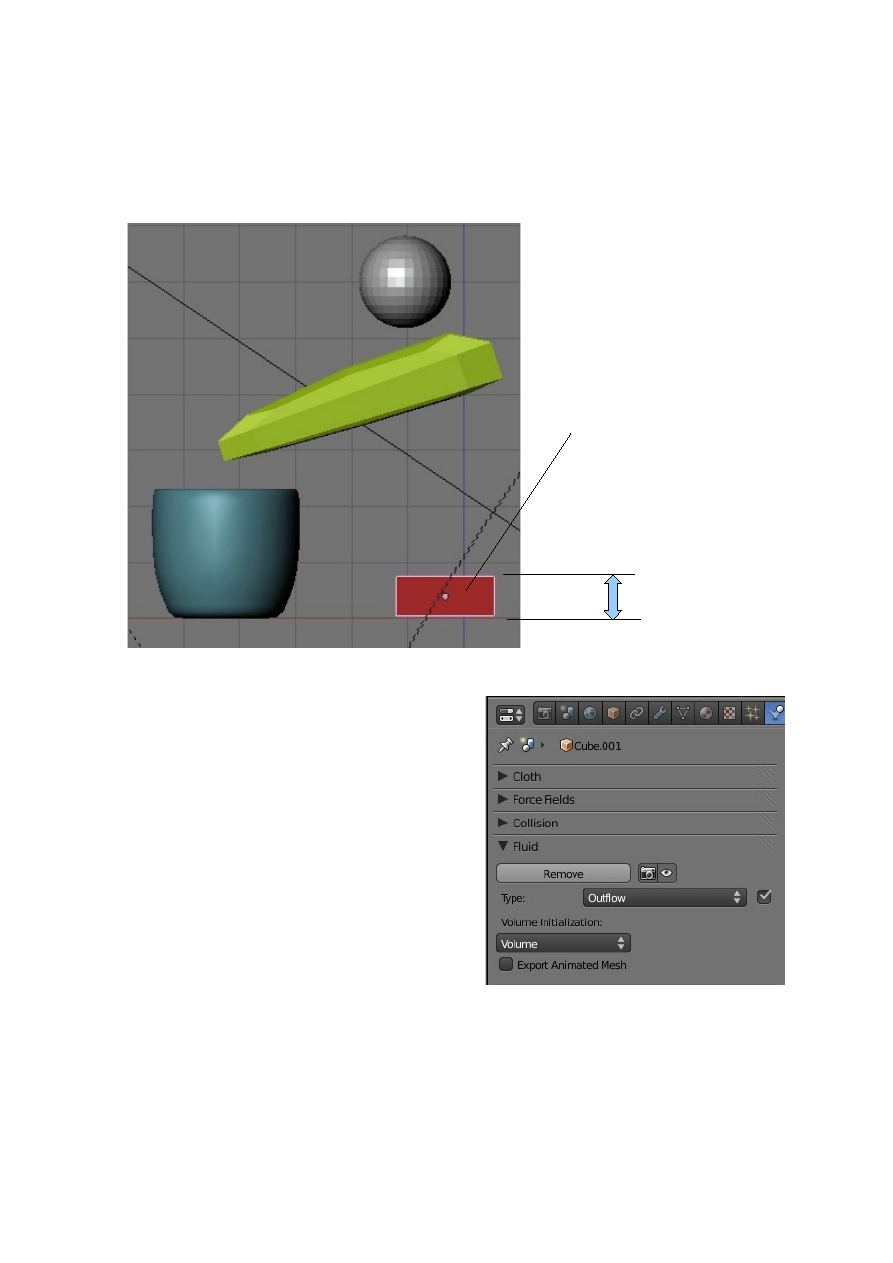
Outflow Object
An Outflow object is used to limit the build up of fluid to a certain level within
the confines of the Domain.
Outflow Object settings tab.
The outflow would be used if it was
intended that the fluid overflowed from the
Cup and you only wanted the fluid level in
the Domain to reach a certain level.
Outflow object
Limit of fluid level
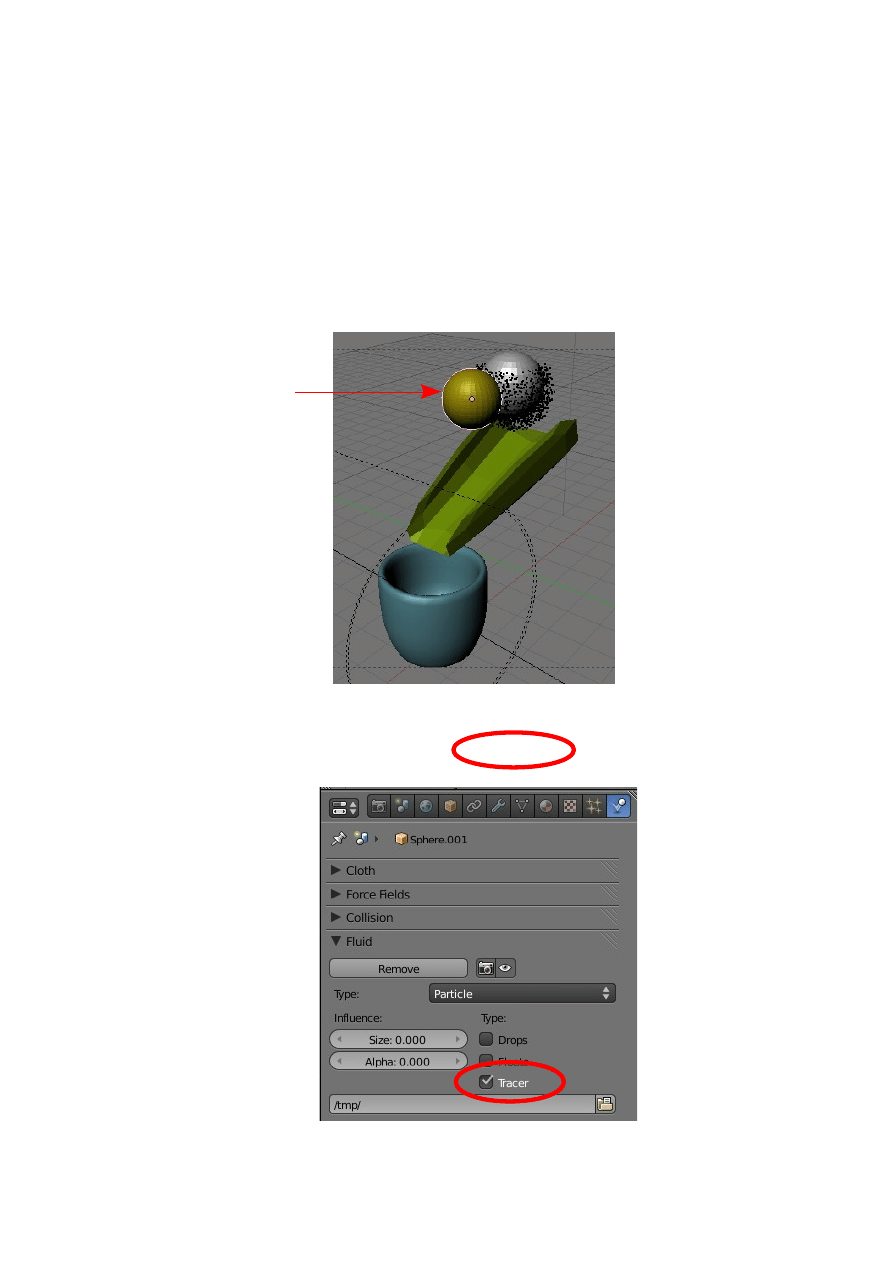
Fluid Simulation – Particles
So far Domain, Obstacle, Inflow and Outflow Objects have been considered. Now
consider the application of Particle Objects.
Note : Blender Wiki states that only Tracer Particle Objects are supported at this time.
Start with the fluid system as set up for the second scenario.
Add a Sphere to the scene and position it within the confines of the Domain as
shown.
With the Sphere selected in the 3D Window go to: Properties Window–Physics
Button–select Fluid – select Type Particle – Tick 'Tracer'
New Sphere
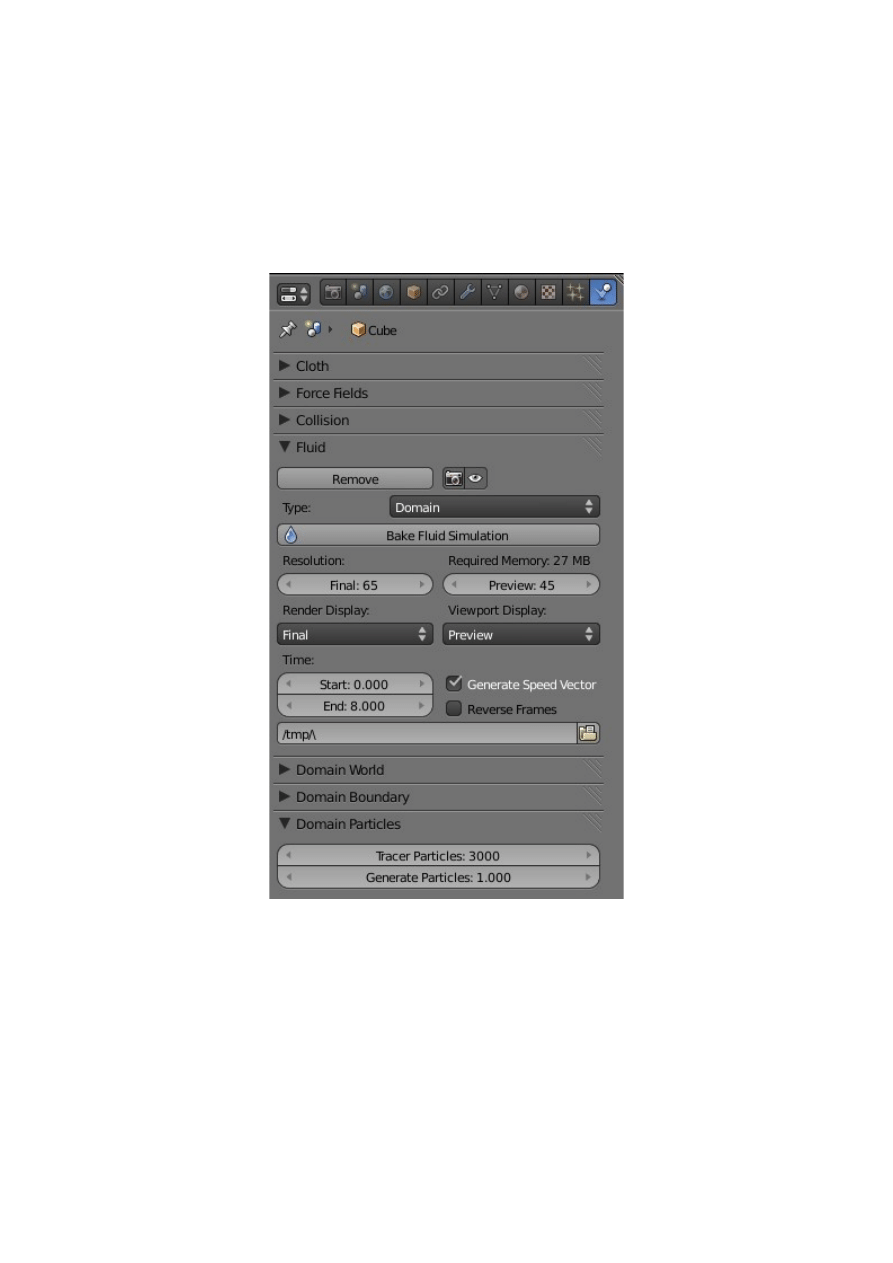
In the 3D Window select the Domain which is now the blob attached to the side of
the Inflow Sphere Object.
Go to the Fluid tab. Set tracer Particles to 3000 and Generate Particles to 1.000.
Setting these values instructs the system to generate 3000 particles over the length of
the animation and turns the generation on to normal (0=off, 1=normal, >1=more).
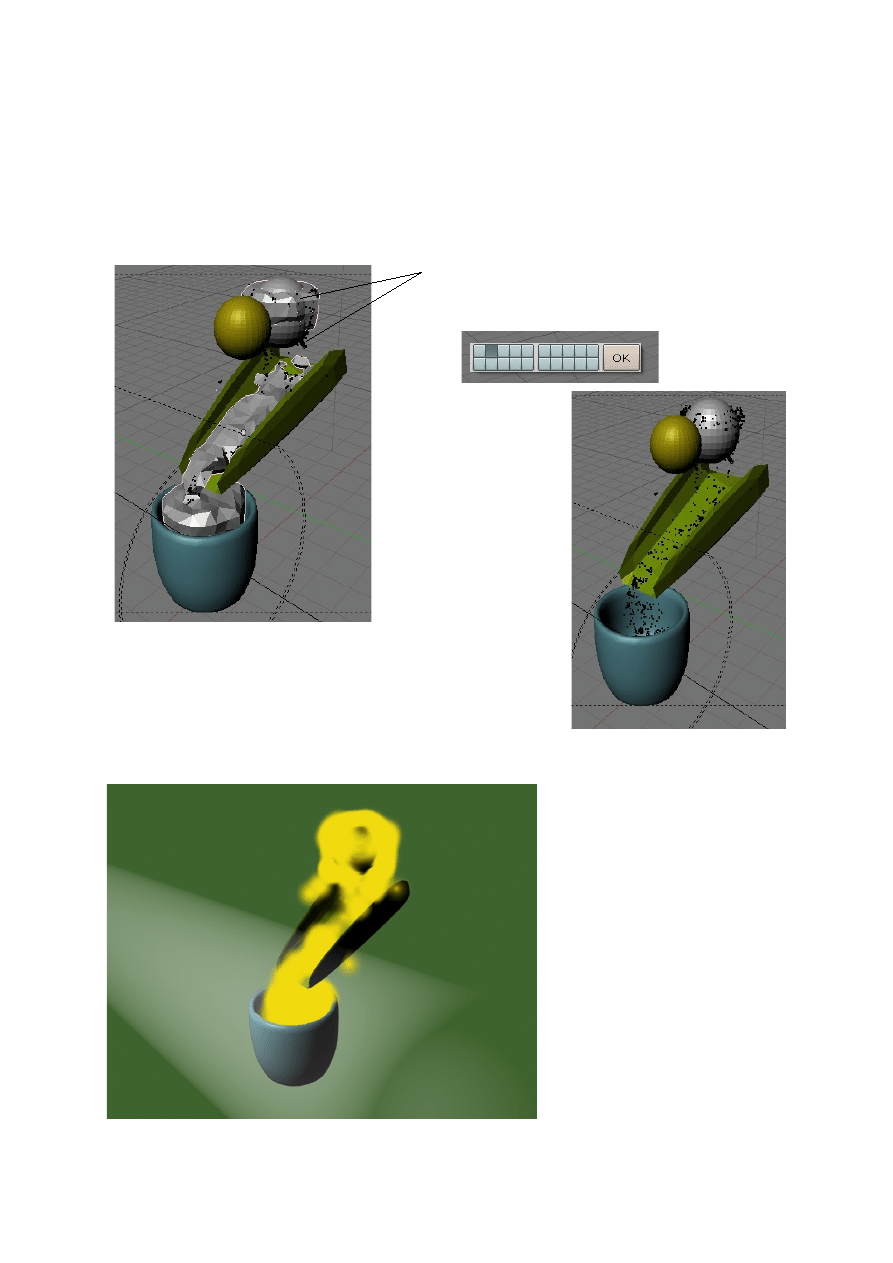
In the Domain Particle tab option window click on 'Bake Fluid Simulation”
The system will now REBAKE the simulation taking as long as it did the first
time. Notice that as well as the fluid being generated there are black dots
distributed randomly amongst the fluid. These dots are the particles and when
rendered will show as halos.
When the scene is rendered the particles display as halos. In the following view
material color has been added and also a spotlight.
Note: The Domain has been
left on level 2 therefore only
the particle halos render.
Particles show as black dots
Particles can be better
seen with the Domain
moved to level 2
Move Domain to level 2. Select Domain in 3D
Window- M-Key -click level 2 then OK
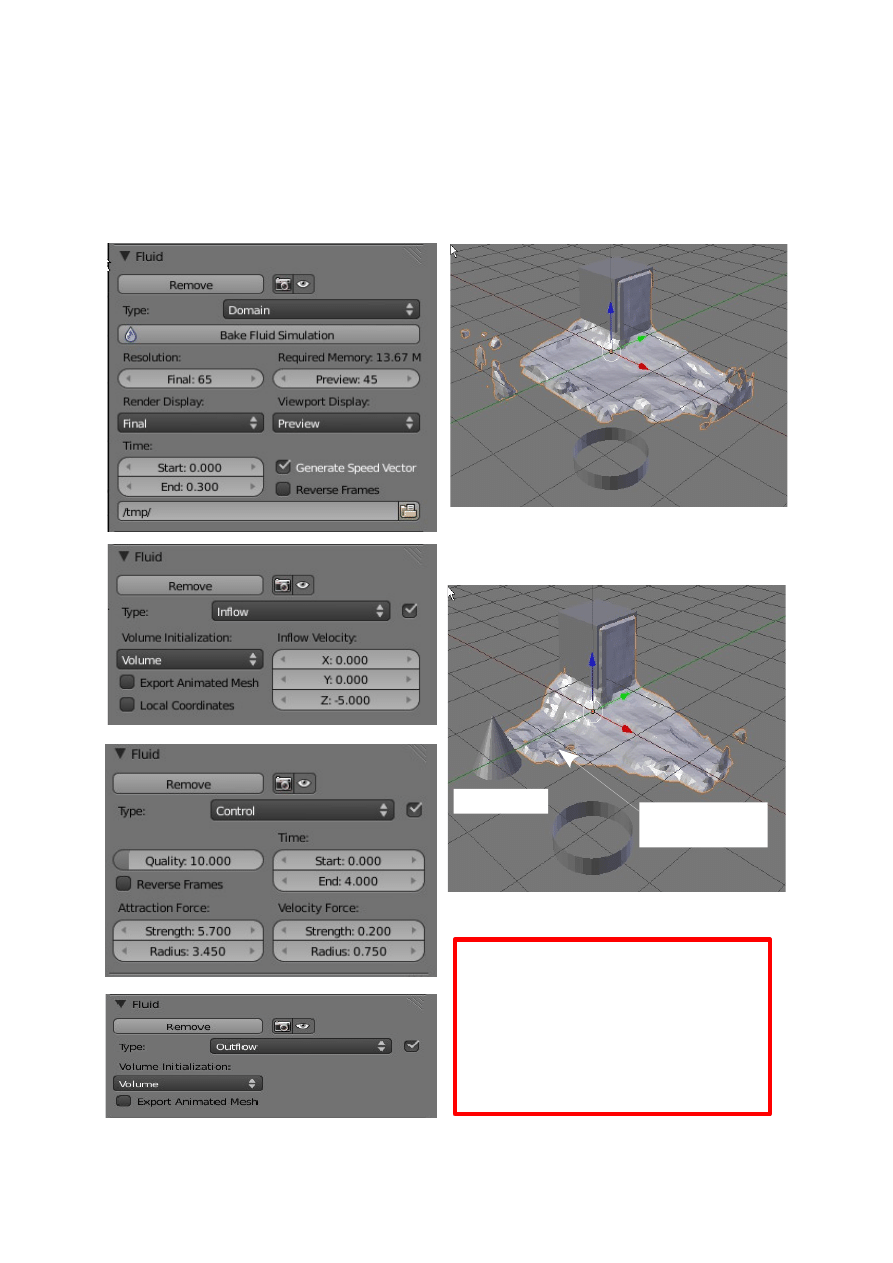
Fluid Simulation – Control
Besides Domain, Fluid, Obstacle, Inflow and Particle Objects there is also the
Control Object. Control Objects are placed in the scene within the Domain to
influence the flow of Fluid.
Scene at Frame 110 without Control
Scene at Frame 110 with Control
Control Cone
The Scene contains:
Domain Cube scaled x and y times 2
Inflow Cube
Outflow Extruded Circle
Control Cone
Settings shown at LHS
Fluid attracted to
Cone
CH21- Nodes
01-Nodes
02-Resize Node
03-Expand & Collapse Nodes
04-Moving & Arranging
05-Zoom Window
06-Connecting & Unconnecting
07-Node Groups
08-Naming groups
09-Getting Started
10-Material Nodes
11-Texture Nodes
12-Compositing Nodes
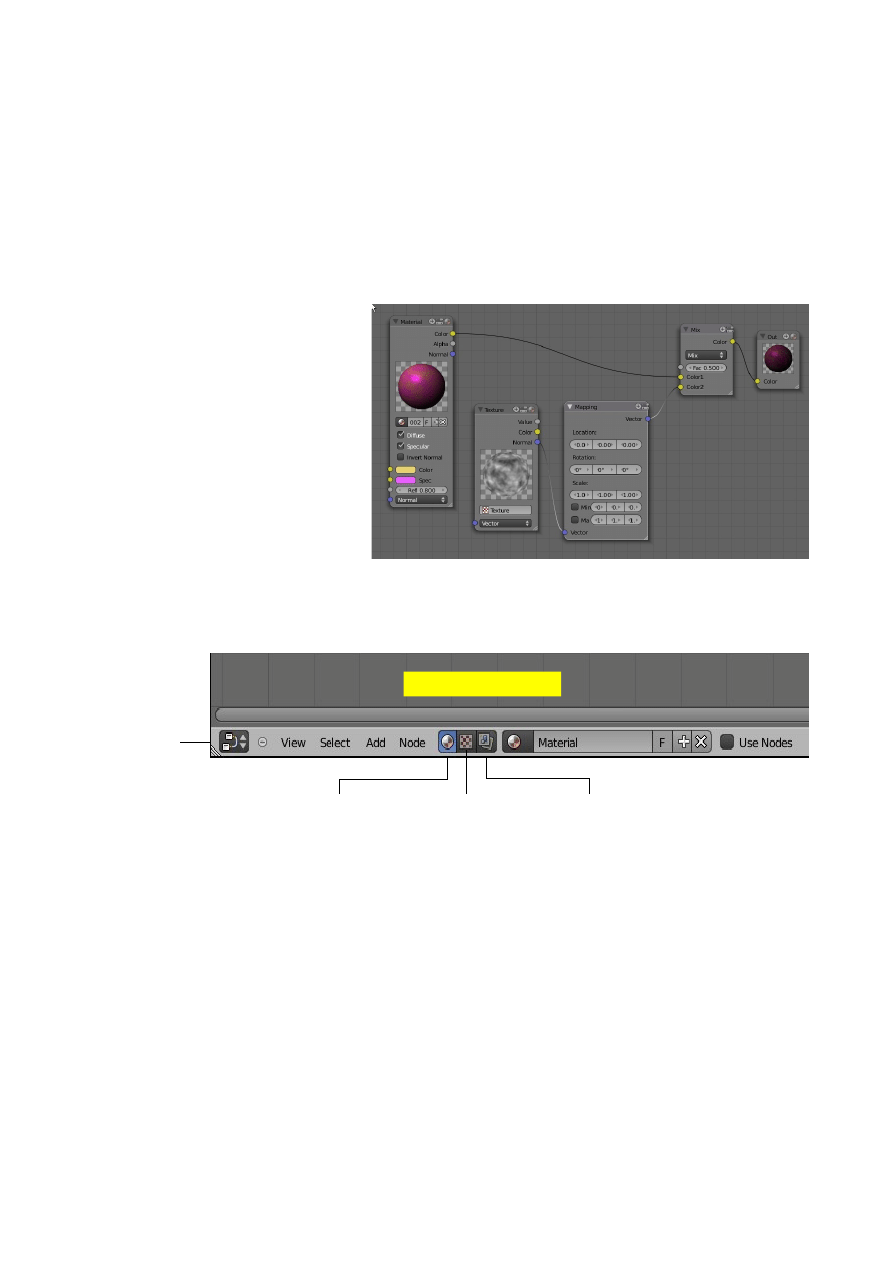
Nodes
The Blender node system allows the creation of materials and textures for application
to objects and the output of data effecting the rendered image or movie.
In Blender every button, value slider, pop-up menue, tick box etc. provides the user a
means of entering data which effects the programs output display. Nodes do exactly
the same thing. They are graphical displays where data can be entered. The displays
can be arranged and linked togeather in combinations providing an array of options.
Nodes are accesed using the
Node Editor Window
Start a new Blender scene and
leave the default Cube object
selected. Change the 3D
Window to the Node Editor
Window. The window will
display as a blank window.
Blender Nodes are arranged in three catagories. Material Nodes, Texture Nodes and
Composite Nodes. Each category can be selected in the windows header.
Material Nodes allow the creation of materials, Texture Nodes allow the creation of
Textures while Composite Nodes provide a means of assembling and enhancing
images or movies.
Before attempting to use Nodes for any specific task it is esential to know how to
add, arrange and link nodes. The first step is to open the Node Editor Window.
By default the Material Node category is selected, so to demonstrate the process of
using Nodes we will start with this category. Make sure an object is selected in the
3D Window and that a Material has been assigned. If you use the default Blender
scene the default Cube object is selected and in the Properties Window – Material
buttons the Preview panel shows a grey sphere. The sphere is showing the default
color of the default materaial named 'Material' which is applied to the Cube.
Node Editor
Material Nodes Texture Nodes Composite Nodes
Node Editor Window
Nodes
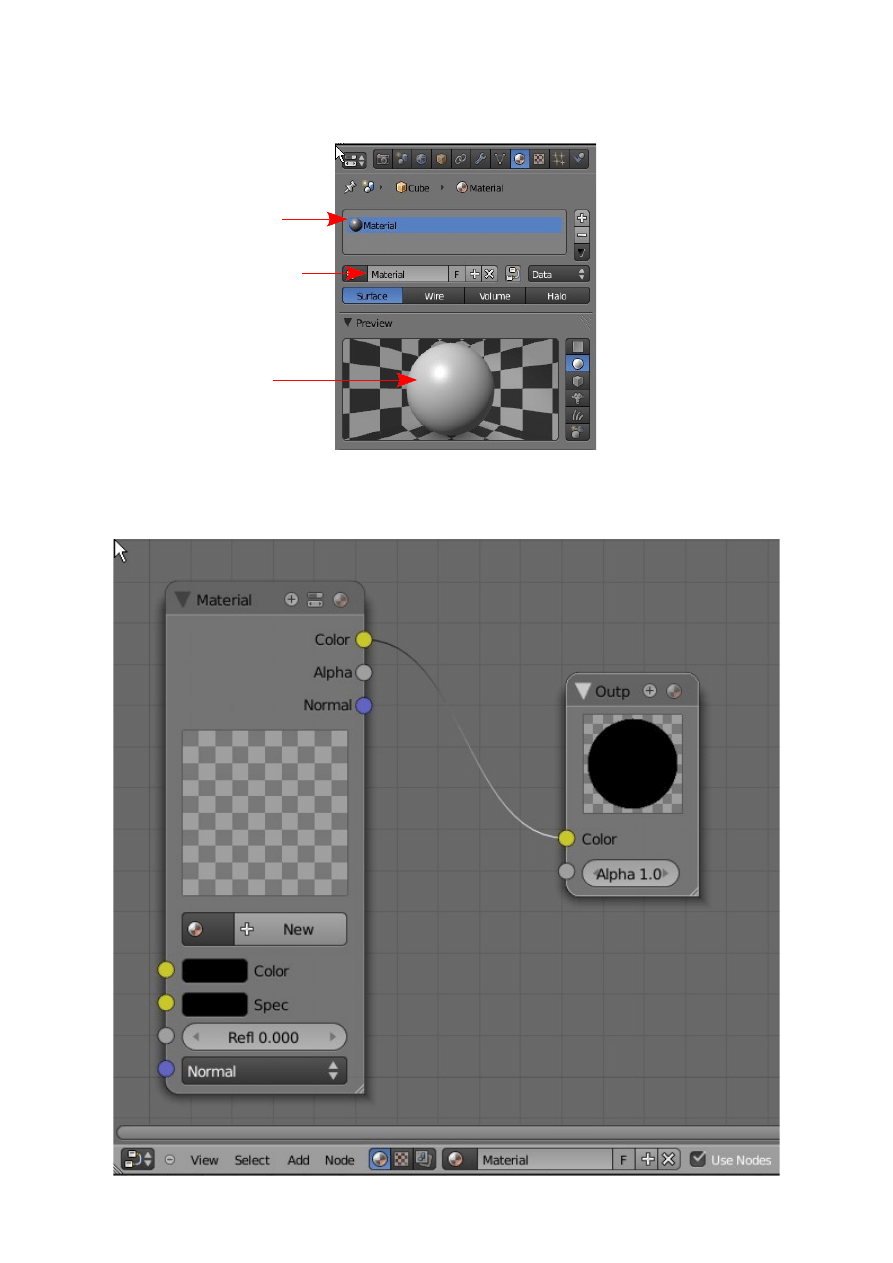
The Node Editor can not be activated unless a material has been applied to the
selected object in the 3D Window.
In the Node Editor Window header tick the 'Use Nodes' box. Two Nodes will display
in the window. The nodes are 'Material' and 'Output'.
Default Material Color
Material named 'Material'
selected
Material in Slot applied to
Cube object
Properties Window
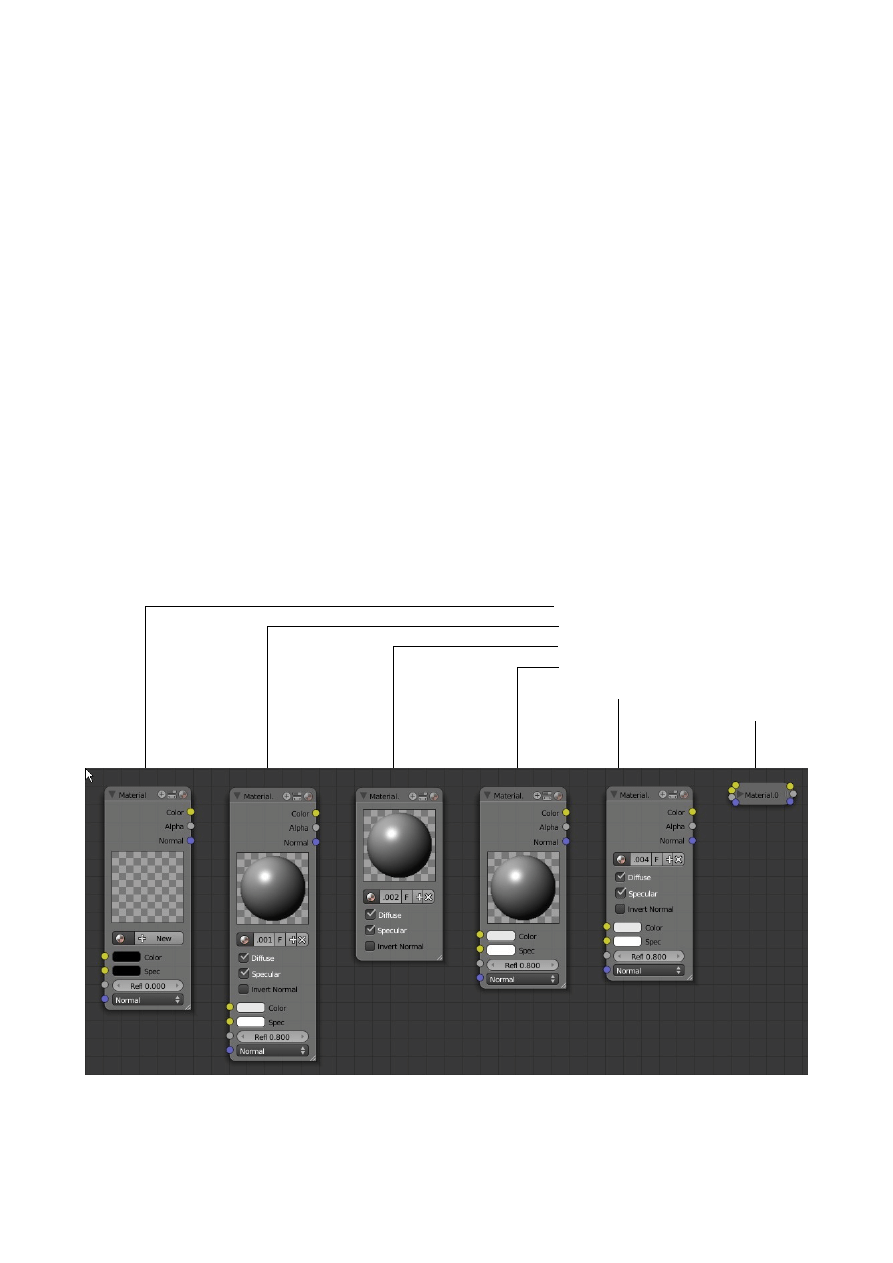
Note that the sphere in the Materials button -Preview panel is now a black circle
which what is showing on the Output Node. Your Output Node is probably showing
'Outp' in its header.
Resize a Node
Click and hold on the little cross hatched triangle in the lower RH corner of the node
and drag your mouse to resize the node panel. You shold now see 'Output' in the
header.
Expand and Collapse Nodes
Besides changing the size of a node they can also be expanded and collapsed to save
space on the screen. Look at the 'Material' node header. There is a pluss sign in a
circle, an icon like the Properties Window icon and a sphere like the Materials button
icon. Clicking on either of these icons will toggle expand and collapse of the node in
different ways. Click and experiment to determin the difference. Node systems can
become very complex so it is very handy to be able to minimize the size of the nodes.
To toggle expand/collapse node entirely click on the white triangle at the LHS of the
header.
Default Material Node
New Clicked
Plus Sign Clicked
Bars Clicked
Sphere Clicked
White Triangle Clicked
Moving and Arranging Nodes
Click and hold anywhere in the node panel and drag the mouse will move the node .
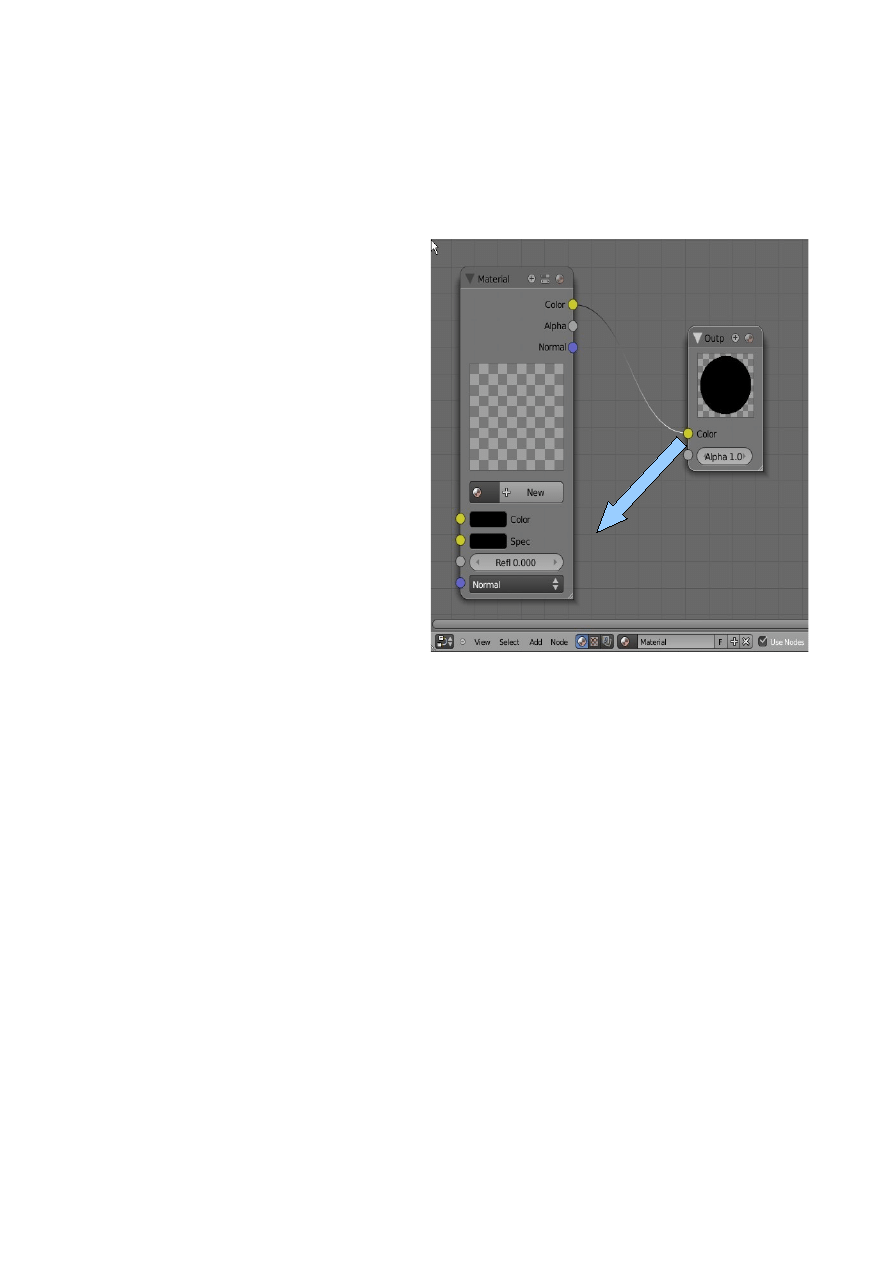
Zoom Window
Scrolling the mouse wheeel or pressing the Num Pad Plus/Minus Keys will zoom in
and out in the Node editor Window. Click and hold MMB will pan the window.
Connecting and Unconnecting Nodes
You will see that the 'Material' node is
connected to the 'Output' node by a
curved line between the two yellow
'Color' sockets. Click and hold on the
'Output' node yellow socket and drag
your mouse away from the socket.
Release the hold and you will have
disconnected the nodes. The connecting
line dissapears. Click and hold on the
'Material' node yellow socket and drag
the mouse to the 'Output' node yellow
socket realease hold to connect the
nodes.
In general sockets should be connected
yellow to yellow, grey to grey and blue
to blue.
Node Groups
Several nodes amy be grouped together. Again this is a way of saving space on the
screen since the group is able to be expanded and collapsed.
To group nodes press B Key and drag a rectangle around the nodes you wish to group
then press Ctrl + G . Selecting the group and pressing Alt + G ungroups the selection.
Pressing 'Tab' toggles Expand/Collapse of the group.
Grouping nodes provides a means of saving a particular node combination and thus
the means of creating an effect and then appending this for use in other Blender files.
In this way you can build a library of node combinations for reuse.
Once a node group is created you can select it and then add, remove, link and unlink
and move nodes around within the group. In other words you can edit the group.
When you have finished editing a group press 'Tab' to collapse it the 'A Key' to
deselect it. You can now add more nodes to the screen.
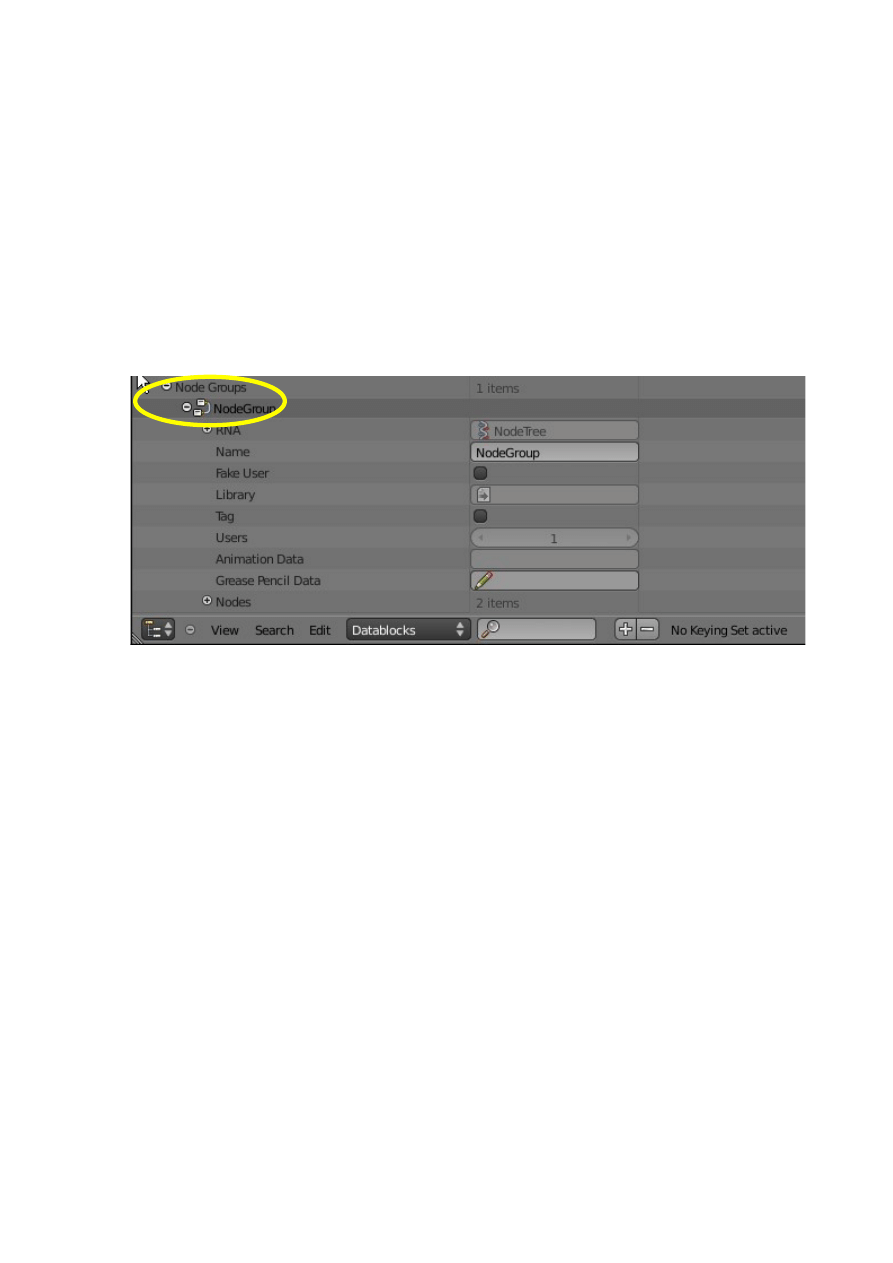
Naming Node Groups
Its all very well having a library of node groups but if they are all named
'NodeGroup', 'NodeGroup.001', 'NodeGroup.002' etc. which is the names Blender
applies then it would be difficult to destinguish their use in the future. You may wish
to change the names to something more meaningfull.
You change the node group name in the Outliner Window. Blenders default scene
opens with an Outliner Window in the upper RH side of the screen but this is an
abriddged version of the full window. Divide one of your larger windows in two and
change one part to the Outliner Window. It should display in Datablock mode
showing entries for everything in your scene.
Scrole down and find 'Node Groups'. If you have just created a node group you will
find it as a sub entry. Expand the sub entry and you can change the name of the group
in the 'Name' panel. A namechange here will be reflected in the Node editor Window.
Getting Started
Way back before all the diversion about adding, naming, moving and linking nodes
we made the statement that by default Blender opens the Node Editor Window with
the Material Node mode selected. We will therfore continue with a discussion on
Material Nodes.
Material Nodes
Material Nodes allow the creation of Materials and just like adding any material once
it is created in Blender it is saved for future use in the Blender file. You use an object
which is selected in the 3D Window in conjunction with the Node Editor when
dealing with Material Nodes.
We will work through a simple exercise and create a material using nodes.
Start with the default Blender scene with the default Cube object selected. The cube
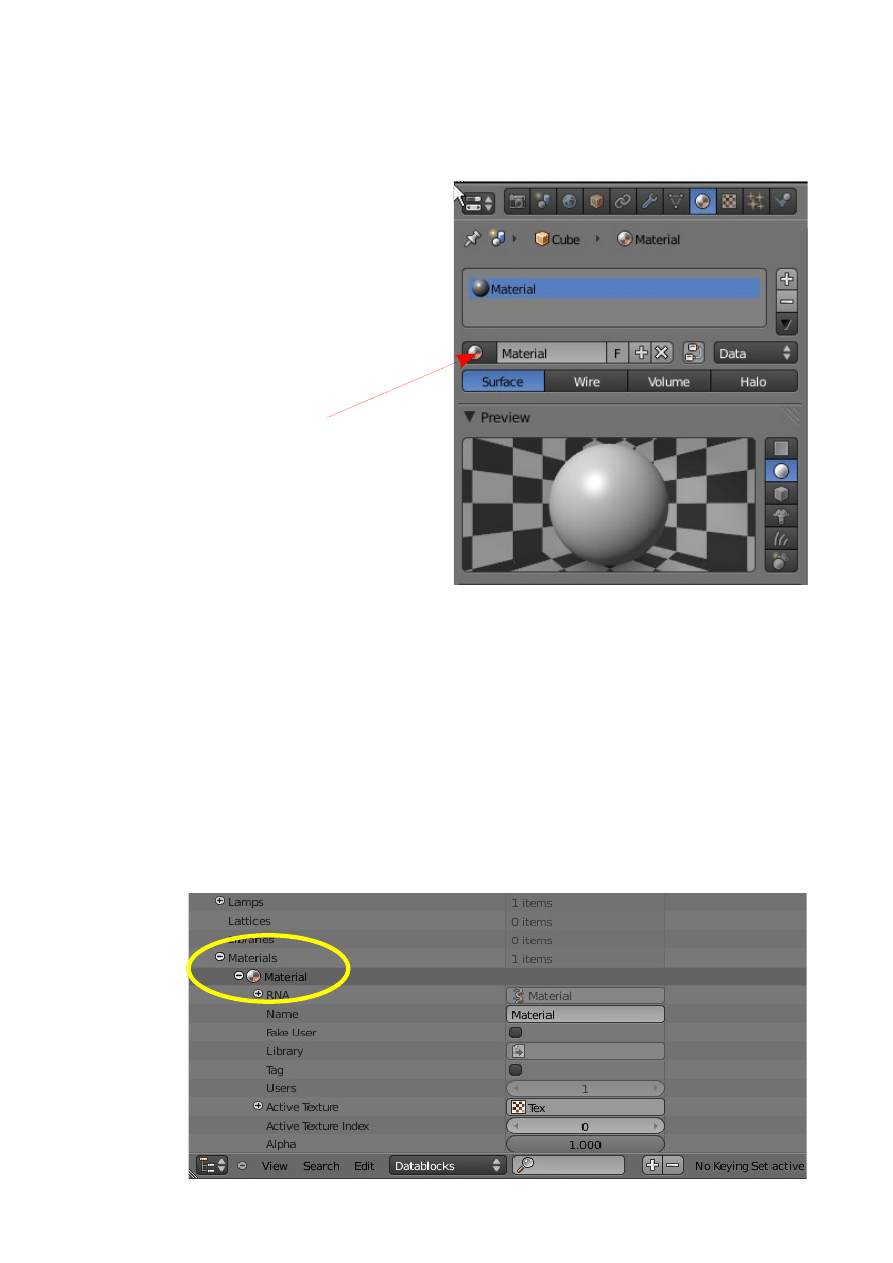
will have the default material applied as seen in the Properties Window – material
buttons. The material displays the default grey color.
At this point it is worth having a look at what we have in terms of material.
Look at the Properties Window – Material
buttons. The Preview tab shows a sphere
with the grey color, a material named
'Material' is selected and assigned to the
Material Slot. The Material Slot is linked
to the selected Cube object in the 3D
Window which renders as the grey color.
Clicking on the 'Browse ID data” button
shows the material cache with only the
material named 'Material' stored.
What is a Material?
A material in Blender is a bunch of data which tells the program to display the
surface of an object in a certain way, i.e. grey in color ( Diffuse color ), reflecting a
certain color under a light source ( Specular color ), having bumps, spots etc. etc.
The data is grouped together in a block, a Data Block.
Datablocks
If you change the 3D Window to the Outliner Window in Datablocks mode you will
see the Materials Datablock as one of the entries. Click on the pluss sign next to
'Materials' to see the Datablock for the material named 'Material'. Click on the pluss
sign next to 'Material' to expand the datablock and see all the materail data .

Note that Blenders default screen arrangement has an Outliner Window in the upper
RH side of the screen. This window is an abridged version of the full Outliner
Window.
Its worth mentioning here that you can change the name of the material in the name
slot in the datablock. Just click in the slot, delete and retype a new name. The name
change will be reflected in the Properties Window Materials buttons. This is very
usefull when creating multiple materials. Blender starts with a default name which is
'Material' then adds 'Material.001', 'Material.002', 'Material.003' etc.etc. which are not
very meaningfull or descriptive.
OK! we know what a material is and where the data for the material can be found.
Change the Outliner Window to the 3D Window to get us back to square one. Make
sure the Cube is selected and make note that Blender has assigned the material named
'Material' to the Cube. Material nodes will not work unless a material has been
assigned to the selected object.
Change the 3D Window to the Node Editor Window. You will get a blank window.
At the start of this section we said that Nodes were accesed through the Node Editor
Window. By default Material Nodes mode is selected but to activate the Nodes you
must tick the 'Use Nodes' box in the window header.
Ticking 'Use Nodes' introduces two Material Nodes to the window, 'Material' and
'Output'. The nodes are connected together via the Color sockets, yellow to yellow.
The Material node shows a blank checkerboard preview panel, the Output node
shows a black circle and in the Properties Window – Material buttons Preview tab
you see the same black circle.
If you click on the 'Browse ID data' button you will see that the default material
named 'Material' is still the only thing in the cache and note that 'Material is still
shown selected and in the Material Slot. If you render an image (F12) however all
you get is a black profile of the Cube.
Activating 'Use Nodes' has taken over the render process and at this stage we have
not created any new material.
In the Material Node click on 'New'. The Material Node expands and the Color and
Spec color selection bars show white. If you click on the 'Color' bar you will see
RGB values 0.800 ( grey ) and the 'Spec' bar shows RGB 1.000 ( white ). This is why
you see grey spheres in all the preview windows. Render an image (F12) and you see
a grey cube. The Cube is selected in the 3D Window.
Note that in the Materials buttons 'Material' is still showing as selected and in the
material Slot. Click on the 'Browse ID data' button and you will see two materials,
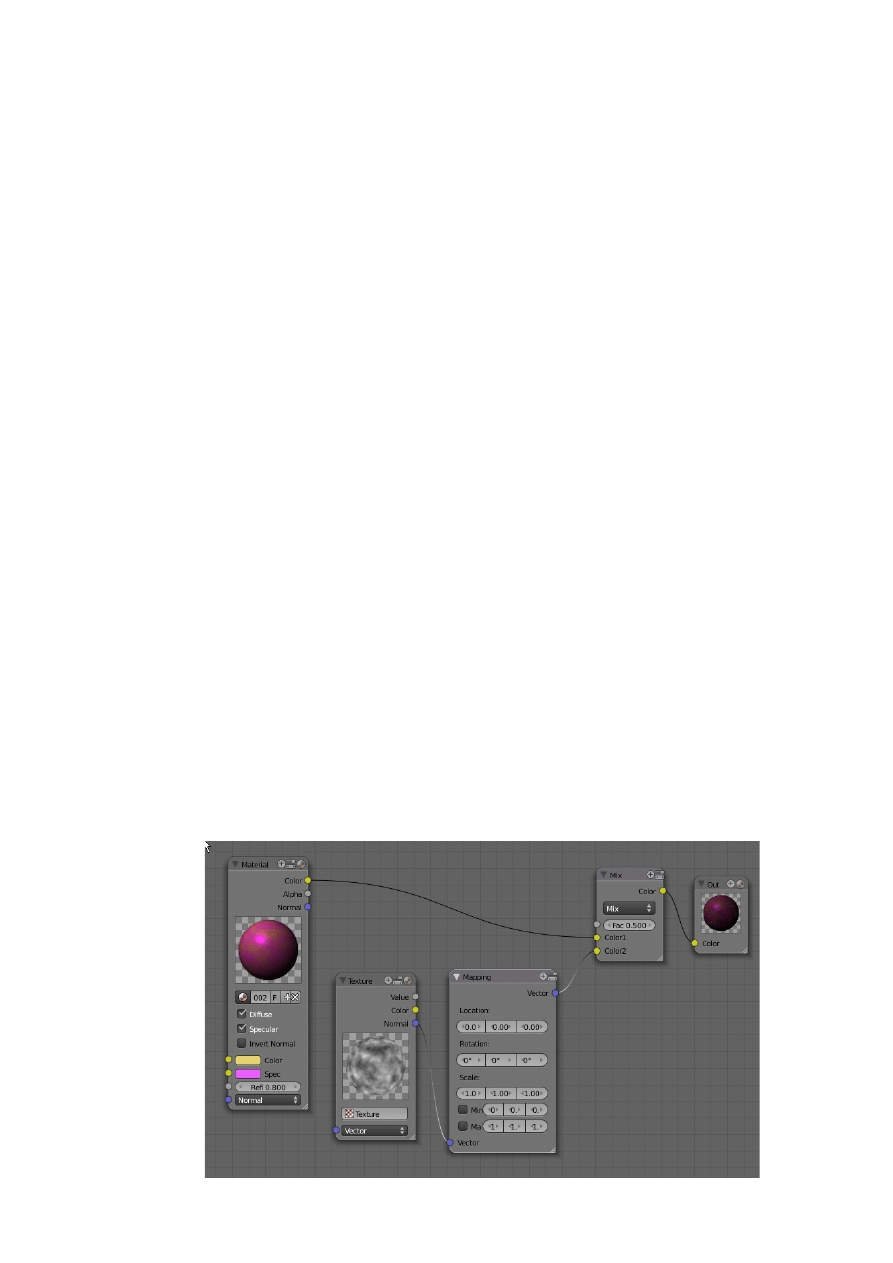
'Material' and 'Material.001'. Clicking on 'New' in the material Node has created a
new material but as allways Blender creates a new material identical to the last
material selected which in this case was our old friend 'Material'. Since 'Material' and
'material.001' are identical you can only render a grey Cube.
Click on the the color selection bar in the Material node and pick a new color. All the
previews display the new color. In the 3D Window the Cube is still grey.
Note that in the Material Node the name of the material is showing 'Material.001'.
This shows that the node is editing 'Material.001. Untick 'Use Nodes' in the header.
Go to the Material buttons in the Properties Window and in the 'Browse ID data'
button drop down select Material.001. This places Material.001 in the material slot
and assignes it to the Cube in the 3D Window. The Cube will display the color you
chose.
Tip: Untick 'Use Nodes' before selecting the new material in the 'Browse ID data'
dropdown.
There you have it, the very basics of using Material Nodes but of corse there is much
much more.
Clicking on 'Add' in the Node editor Window header reveals a pop up selection
menue with seven categories of node types. Each category has indavidual Node type
options. It is not possible to demonstrate all of the possible node combinations but the
following examples should give you the idea. Remember when you have created a
node arrangement which produces a desired result, create a Node Group and save
the .blend file for future use. The Node Group can be appended to any new Blender
scene and applied to any object in the scene. It is therefore possible to create a
single .blend file containing many Node Groups for future appending.
Example 1.
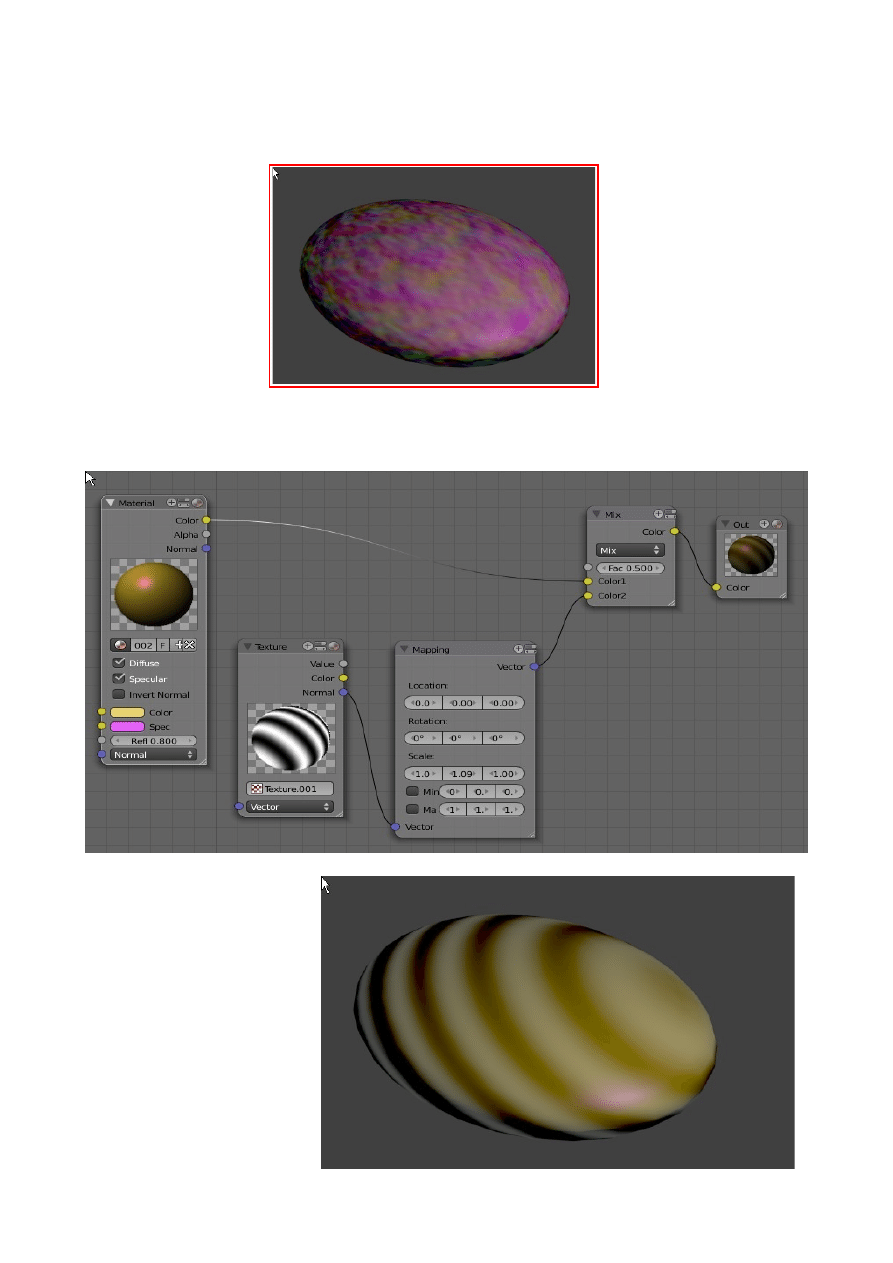
Example 1 shows Material Color mixed with Texture which has Map settings applied.
The new material has been applied to a sphere which has been scaled down along the
Z axis to create a disk.
Example 2
Example 2 shows another variation on example 1
Rendered Image
Rendered Image
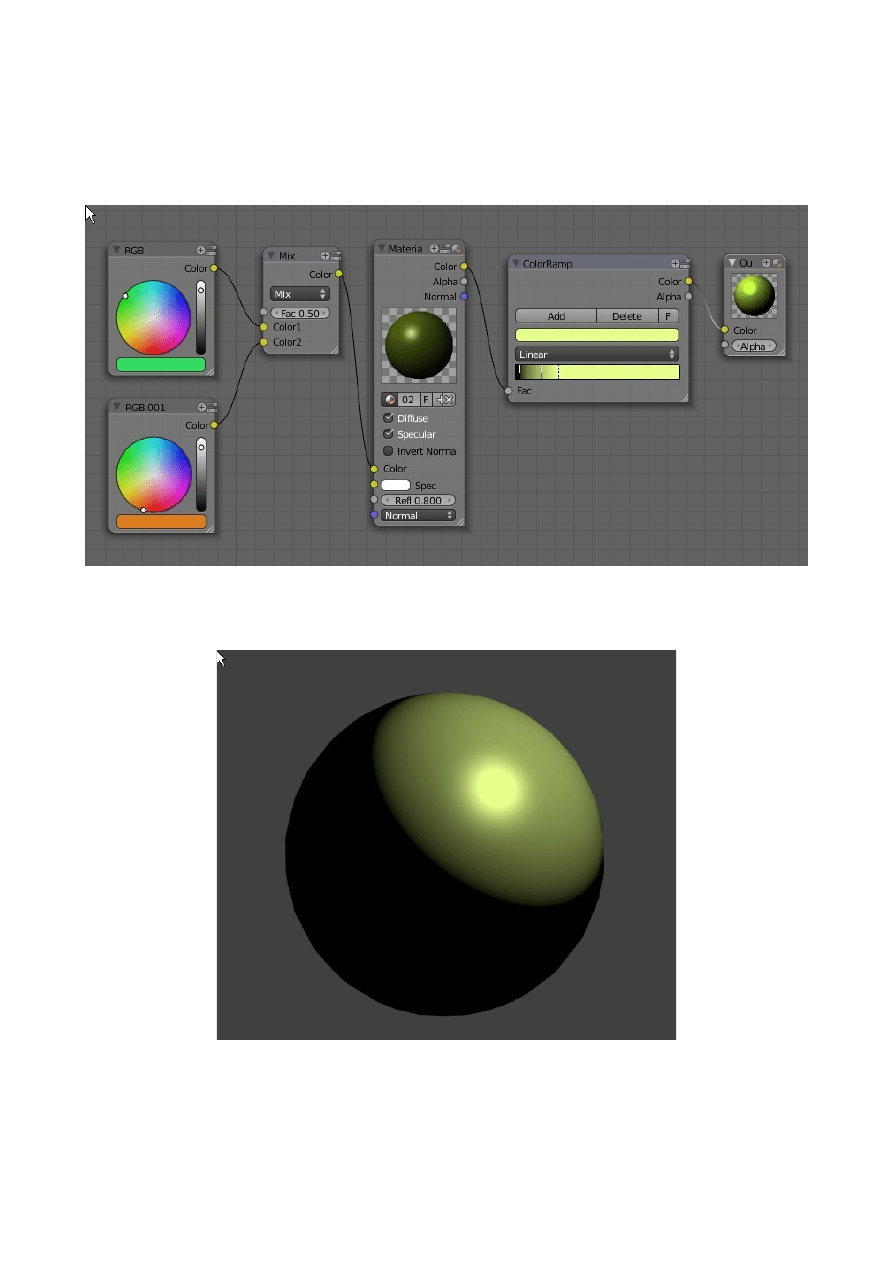
Example 3
This example shows two RGB inputs mixed to a Color and then having a Color
Ramp applied
Note that the three examples shown so far simply create a material and apply it to a
selected object in the 3D Window. The default settings for the Lamp and Camera are
used with no other influence.
Rendered Image
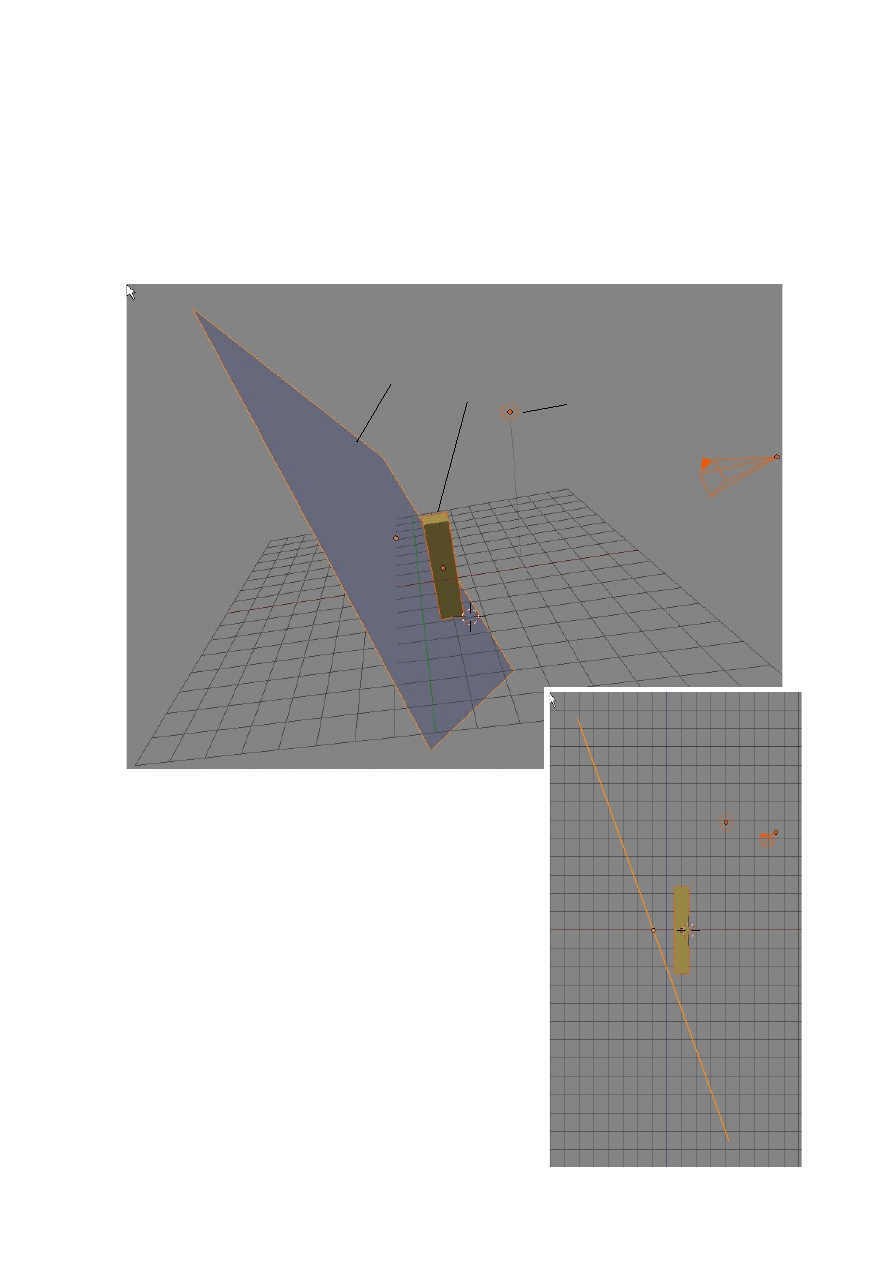
Example 4
Example 4 demonstrates the use of Material Nodes in combination with other objects
in the scene.
The objective here is to create a simple graduated Material.
First we have to set up the scene as shown.
The default Cube has been elongated into a vertical
column. A simple Plane object has been added to the
scene, scaled up and positioned behind the elongated
cube forming a backdrop in the camera view.
Important: Make sure the Lamp is positioned on the
camera side of the Plane.
Select the Plane in the 3D Window and assign the
default material to it in the Properties Window –
Material buttons. Add a marble texture.
Deselect the Plane then select the elongated Cube.
Plane
Elongated Cube
Lamp
Camera
Side View on Scene
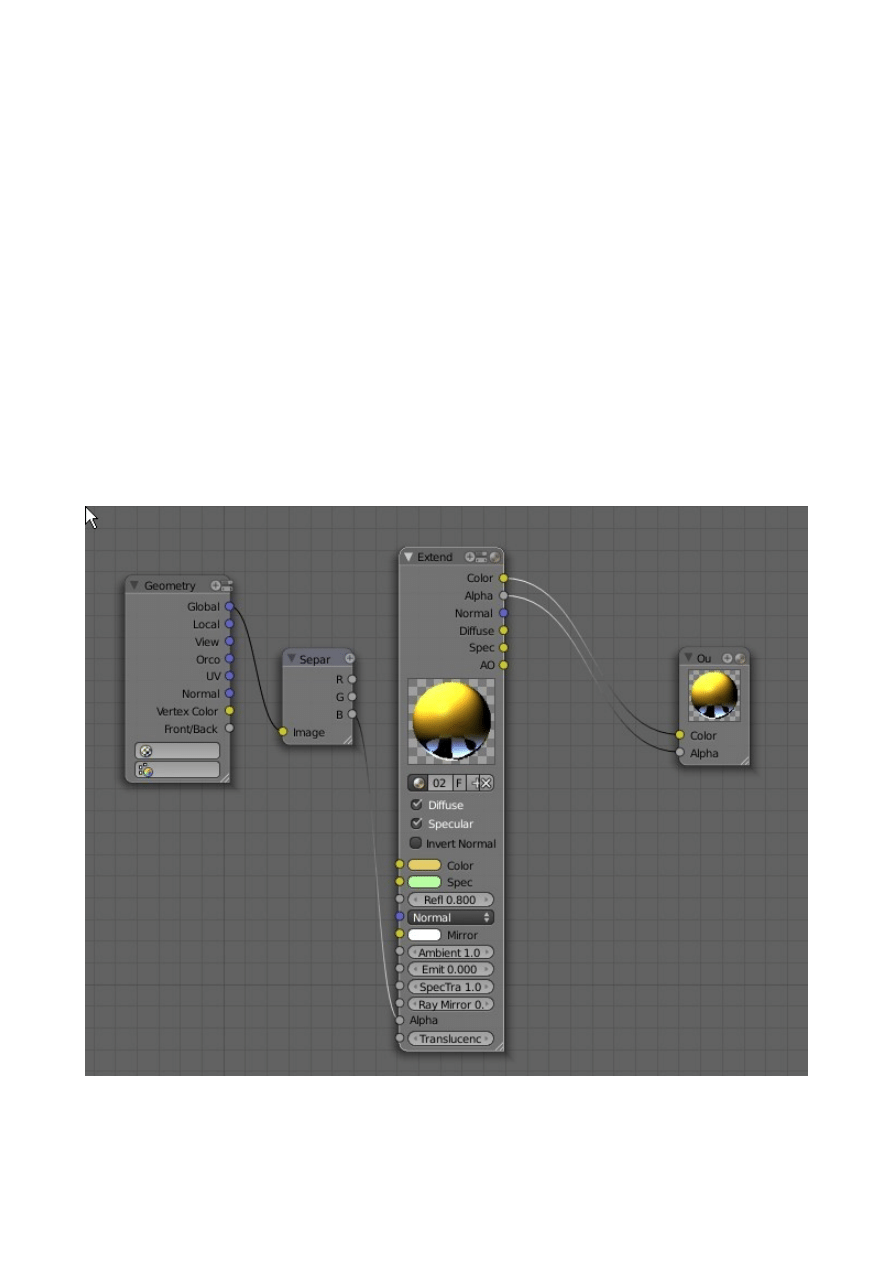
In the Properties Window – Material buttons – Diffuse tab pick a diffuse color and in
the Specular tab pick a specular color. In the transparency tab tick transparency,turn
the Alpha value to 0.000 and set the IOR value to 1.2. still in the transparency tab
click 'Raytrace'.
In the Properties Window – Render buttons Shading tab untick 'Shadows'.
The Diffuse and Specular colors can be anything you want. Obviously Transparency
makes the Cube transparent with Alpha at 0.000 it is fully transparent. The IOR value
is an angular index of refraction for raytraced refraction. Value 1.200 is something
like glass. Raytracing clicks you up a knotch when it comes to rendering an image.
Only by experimenting with different values will you understand how to achieve the
outcome you want.
Make sure the Cube is selected in the 3d Window and then in the Node Editor
Window – Material Nodes mode, tick 'Use Nodes' and set up the following
arrangement.
Note: The 'Separ' node in the diagram is actually 'Separate RGB', the 'Extend' is
'Extended material' and 'Ou' is 'Output'. Increase the size of the nodes to see the full
names.
Note also all the unconnected sockets on the Extended material node. The rule here is
that an uconnected input socket will relay the value in it's adjacent panel to the
output. If an input node is connected then that node overides the value. Fore example
Refl 0.800 is the value used since there is no input connected to the socket.
Its worth remembering that in any scene the Lamp or number of Lamps, the type of
Lamp and the enrgy settings and color of Lamp light can have a dramatic effect on
the rendered image.
Something else to note in this example is that the rule of connecting like colored
sockets has been broken. The blue Global socket on the Geometry node is connected
to the yellow Image socket on the Separate RGB node.
'Separate RGB' means saparate the red, green, and blue values. Geometry – Global
would suggest that it is intended to do the saparation using global coordinates but the
Global output coordinate value is connected to an Image input?!?!
What is happening?
'Geometry' – 'Global' is saying use global coordinates. 'Saparate RGB' is being used
to saparate the coordinates which are vector values. RGB in this case represents XYZ
coordinate values which are fed to the Alpha value in the 'Extended Material' node.
B corisponds to the Z value, the vertical coordinate. We are applying the material to a
vertical cube column. The value is fed into the Alpha socket on the 'Extended
Material' node which is the value that controls transparency so the combination is
telling Blender to apply the Diffuse color and the transparency to the elongated cube
on the Z axis.
We have raytracing applied and we have given the
elongated cube the charisteristics of glass. The cube is
therefore refracting the light reflected from the bckdrop
in the scene ( The Plane )
The rendered image shows the application.
This example shows how you can mix and match nodes
, lamp settings and objects in the scene to produce
stunning efects.
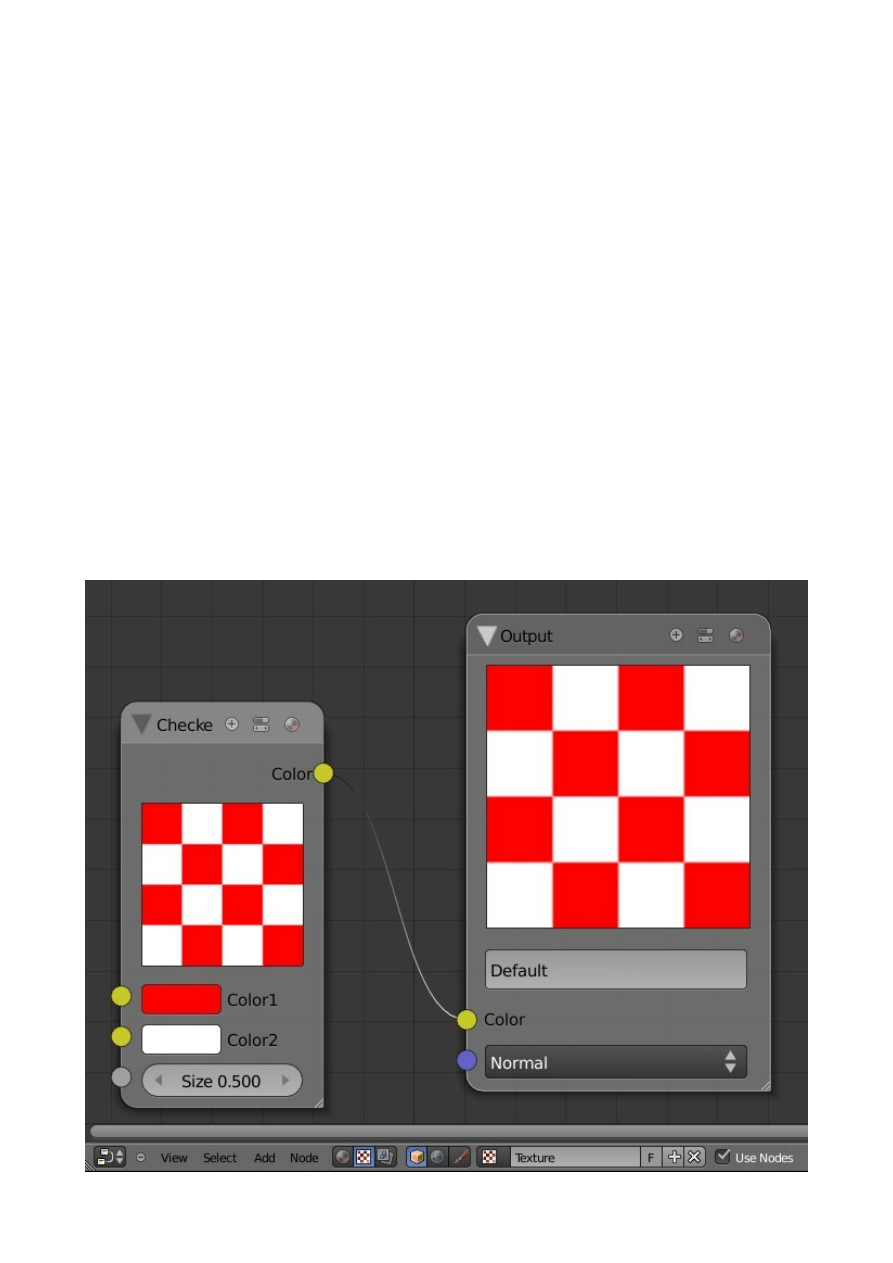
Texture Nodes
Texture Nodes allow you to create textures and apply them to a selected object in the
3D Window
As far as adding nodes to the Node Editor and manipulating them and connecting the
process is the same as for Material Nodes however activating the Node Editor in
Texture mode is slightly different.
Start a new Blender scene and delete the default Cube object. Add a simple Plane
object and scale it up a bit. A Plane will provide a nice flat surface on which to place
the texture. In the Properties Window – Material buttons click 'New' to add the
default Material. As with Material Nodes, Texture Nodes can not be activated unless
a material has been applied to the selected object.
Change the 3D Window to Node editor. Note that the Material Node option in the
header is selected by default. Change this to Texture Node mode. Click on 'New'.
This is the same as clicking on 'New' in the Properties Window – Texture buttons.
Now tick 'Use Nodes'.

Two nodes appear in the Editor Window, Checker and Output. In all Texture node
arrangements there must be an Output node.
If you render an image (F12) you will see the Checker texture applied to the Plane
object which is selected in the 3D Window.
In the Properties Window – Texture buttons you will see that a texture named
'Texture' is selected and placed in the Texture Slot. Click on the 'Browse ID data'
button and see that there are two textures in the cache. 'Tex' and 'Texture'. 'Texture' is
the new texture you have just created using Nodes and 'Tex' is Blenders hidden
default texture datablock. As with everything else in blender entering data for a new
material or texture is in fact modifying something that pre exists.
At this stage you have 'Use Nodes' active so the Node editor is applying the new
texture to the object. If you untick 'Use Nodes' a render will only show the Plane
object as having the default grey Material color.
In the Properties Window – Texture buttons click on the 'F' next to 'Texture' to save
the texture datablock. A 2 appears indicating that there are two users of the data.
Click on the 2 to make single user. The 2 dissapears and if you look in the cache
( Click Browse ID data ) you will see Tex, Tex.001 and Texture. Tex and Tex.001 just
render a grey Plane while Texture displays the nodes in the Node Editor. You still
have to tick 'Use Nodes' to render the checker texture to the object.
The foregoing is an observation and at this point no explanation can be offered for the
the procedure.
This has demonstrated the basic application of texture Nodes. There are many
combinations of node arrangements which will produce many many textures. The
following examples will show simple arrangements.
Note that complicated node arrangements consume computer power and unless you
are working on a powerfull machine rendering an image will take forever or just
never happen.
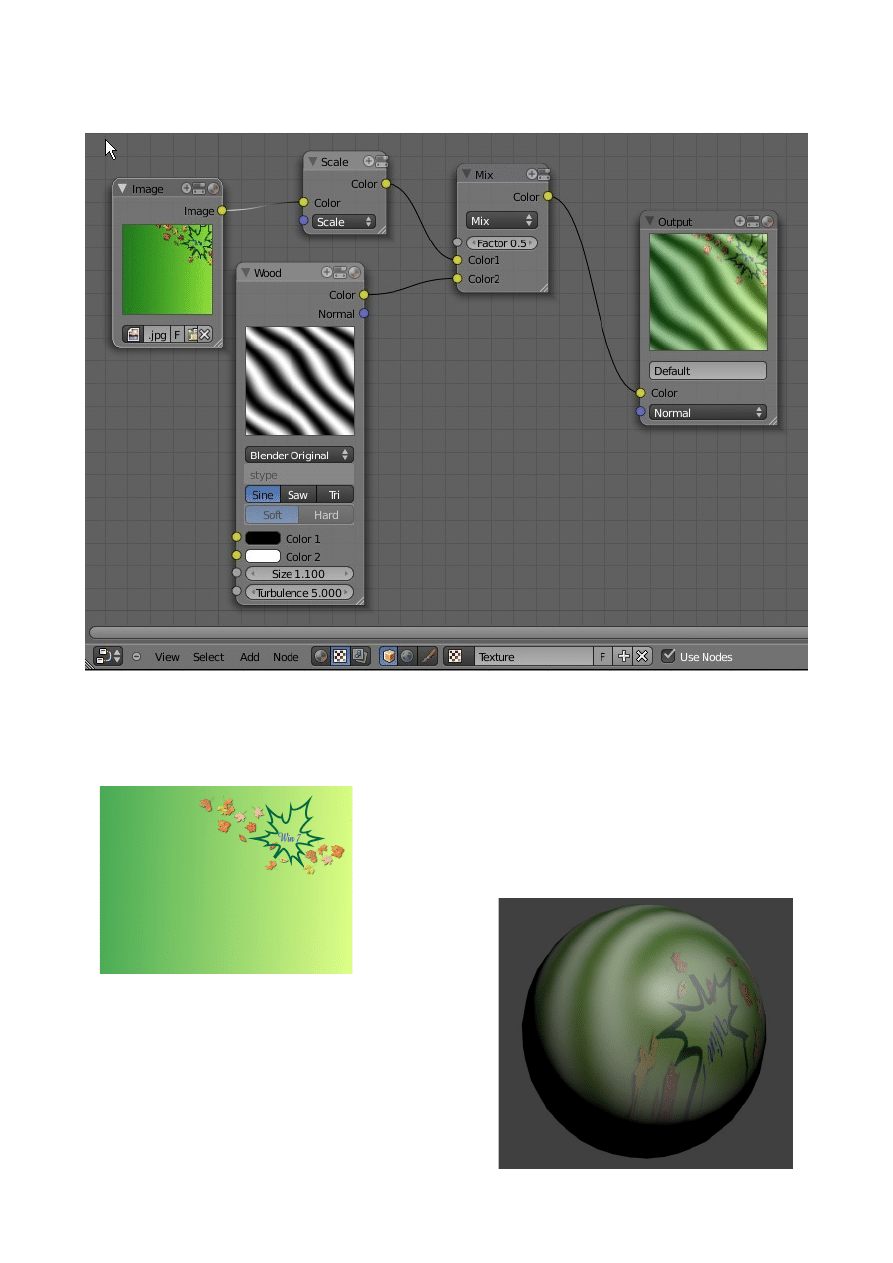
Example 1
In this example an image has been loaded into the Image Node andmixed with a
Wood Texture Node. The scale node resizes the image. The texture created is mapped
on to a Sphere object selected in the 3D Window
Image loaded into the Image
Node
Rendered Image
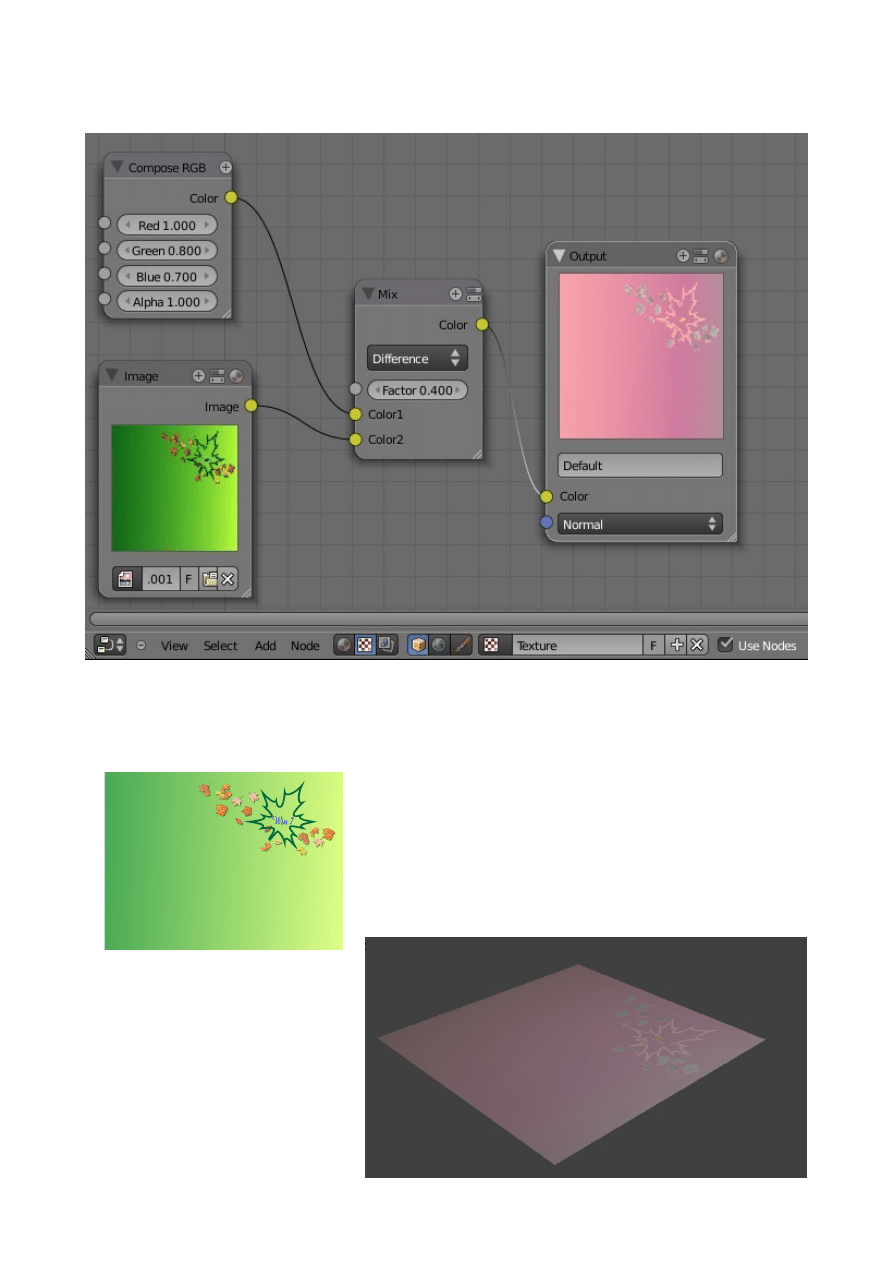
Example 2
Here the Compose RGB node created a color. The Mix node combines the color with
an image from the Image node to produce a texture as seen in the Output node. The
texture is applied to a Plane object selected in the 3D Window.
Image loaded into the Image
Node
Rendered Image
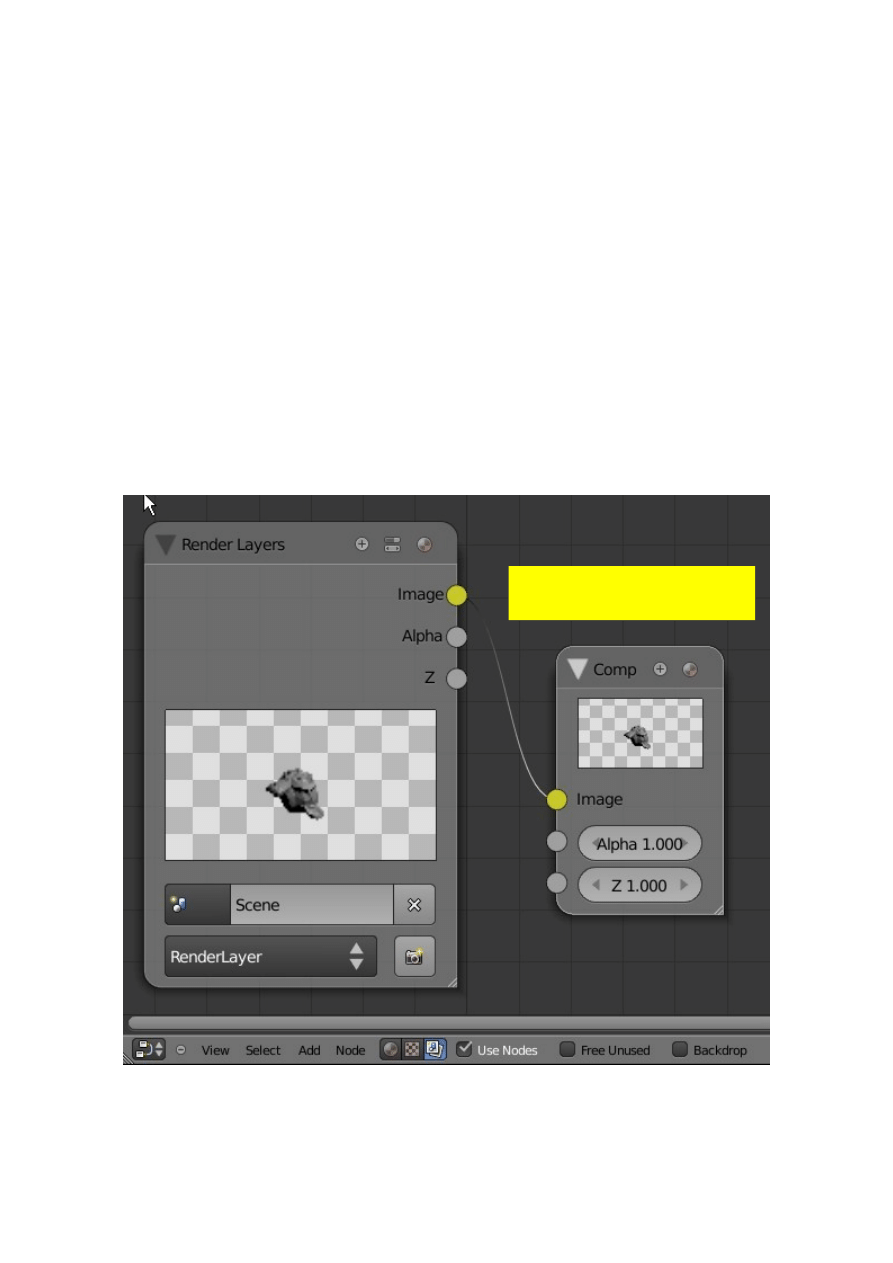
Compositing Nodes
Compositing nodes or composit for short allow you to create and enhance an image.
The contents of the Blender scene can be the basis for the image or an image already
saved on the hard drive can be used. A presaved image can be combined with other
images or the Blender scene to create a new image.
Unlike Marterial and Texture Nodes it is not necessary to have an object selected in
the 3d Window or to have a material applied to an object. Of corse by default any
object added to a scene has the default material even though this does not display in
the Properties Window until the 'New' button is pressed. To demonstrate the
activation of the Compositing Node Editor start with a new blender scene and delete
the default Cube. Add a Monkey object ( Any object will do ). Deselect the object in
the 3D Window.
Change the 3D Window to Node editor and select the Compositing mode in the
window header. Tick 'Use Nodes'.
Two nodes display in the window. 'Render Layer' and 'Comp'. Increasing the size of
the 'Comp' node will recveal that it is actually 'Composite'.
The Monkey only displays after an
image has been rendered.
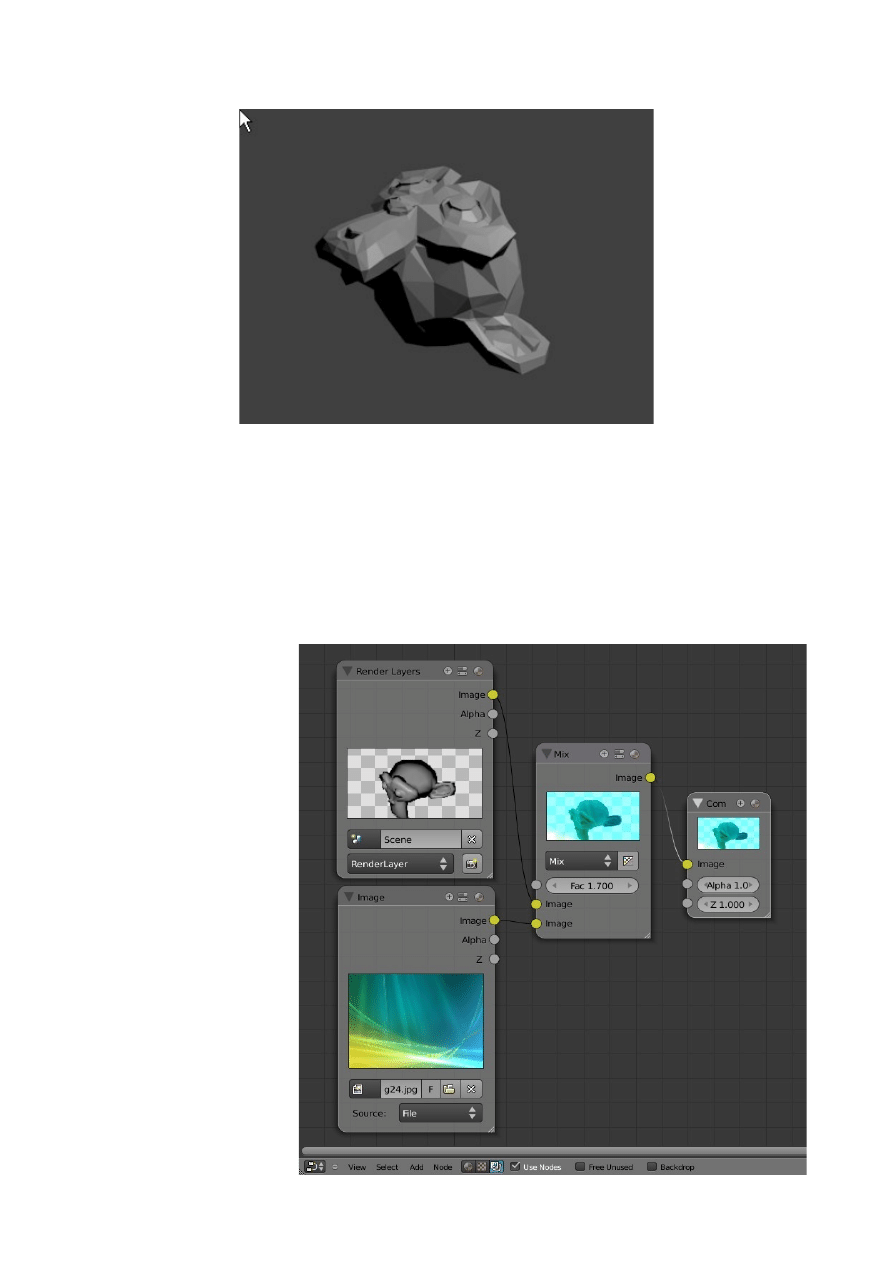
Render an image (F12) to create a picture of the Camera View with the Monkey.
Remember the Monkey is not selected in the 3D Window and no material has been
applie. Through the “Render Layer' and 'Composit' nodes Blender is rendering an
image of the Camera view in the scene.
Note for Blender to render an image there must be a 'Composit' node in the Node
Editor.
The following are two examples of simple Compositing Node arrangements.
Example 1
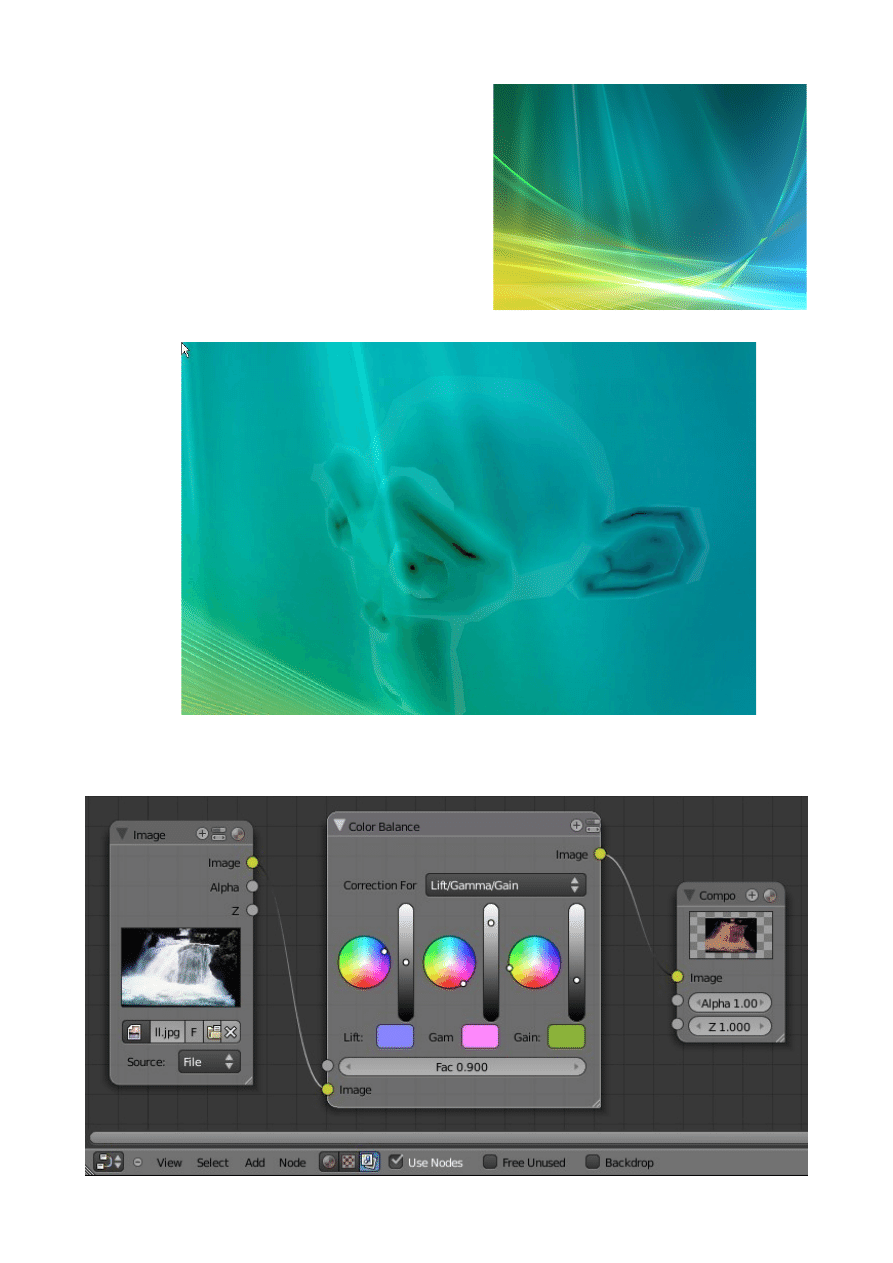
The image to the right has been loaded into the
'Image' node' then using a 'Mix' node has been
combined with the Blender scene containing a
Monkey object to produce the rendered image
below.
Example 2
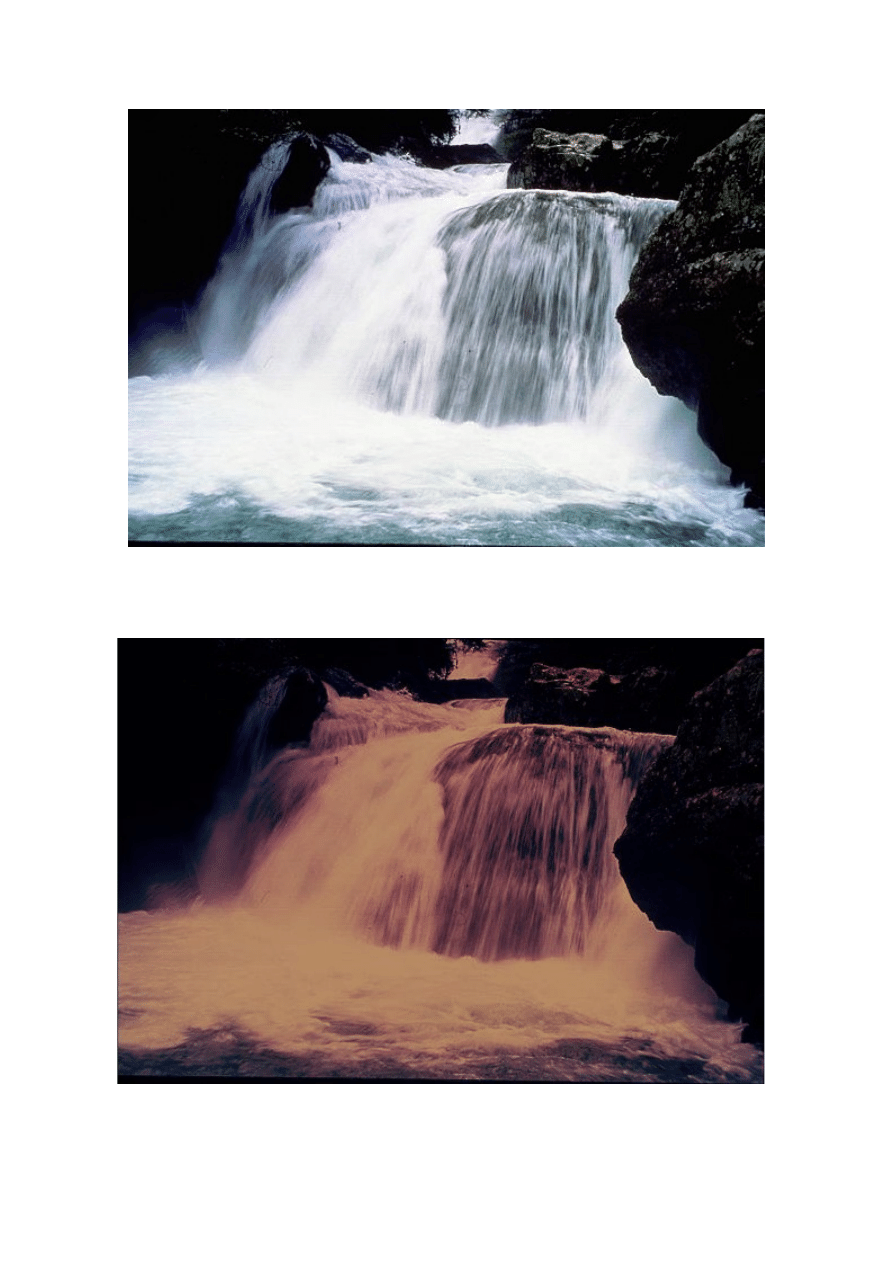
The image above has been loaded into an 'Image' node then enhanced using a 'Color
Balance' node to produce the render of the image below.
The combination of nodes is endless and requires experimentation, studying tutorials
and recording of results to aquire an understanding of what can be achieved using the
node systems.
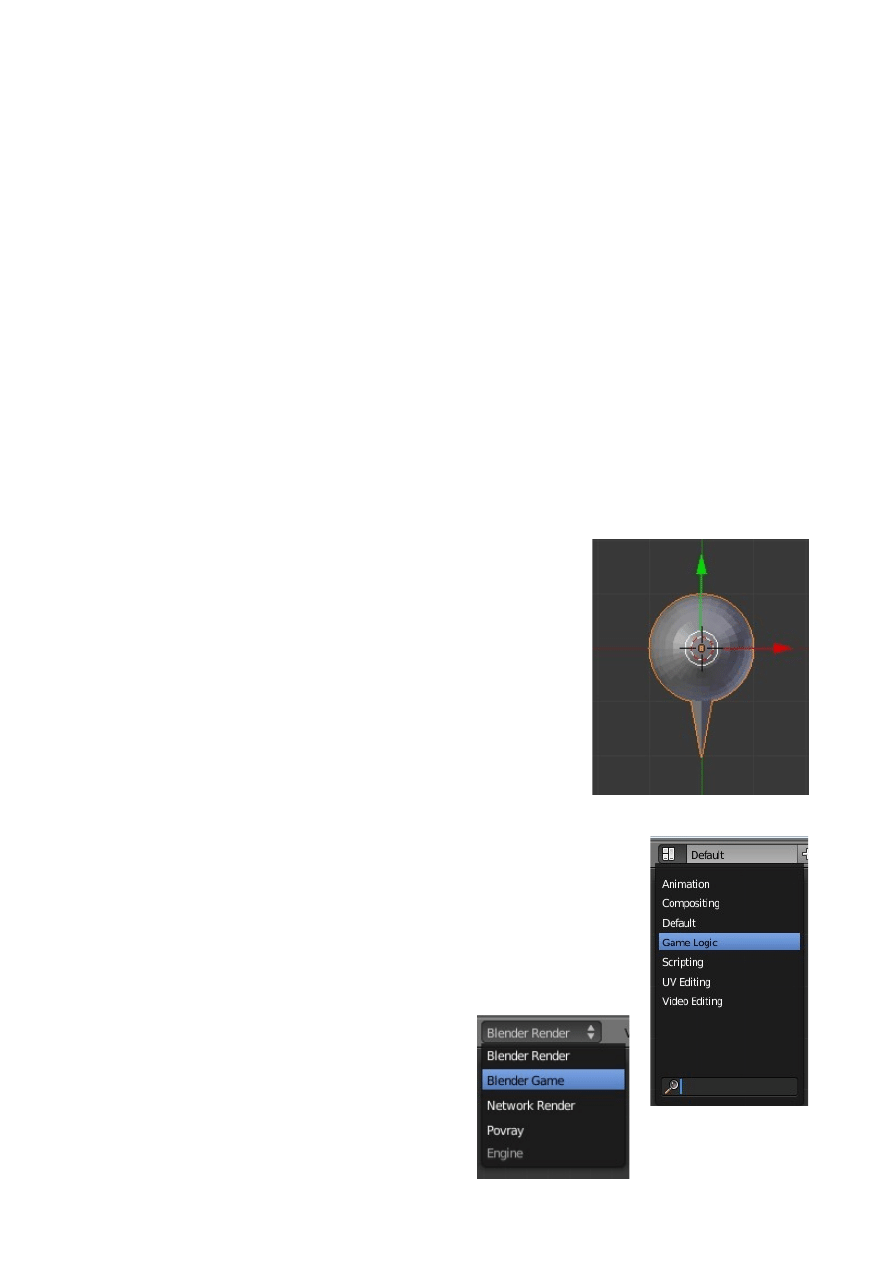
Game Engine
Blender has the functionality to create interactive video games. The program
integrates real-time motion with physics and logic blocks allowing you to turn objects
into actors and move them around. This process also incorporates character animation
and allows interactive walkthroughs to be created where doors open and close.
The Game Engine is extensive in its application and it is not possible to cover all of
its intricacies in this document. You will have to research and experiment beyond the
scope of this very brief introduction to become proficient.
To get you started and wet your appetite for Gaming follow this very basic example.
At least it will show you how to open the door to the Game Engine.
Begin with the default Blender scene, delete the Cube and add a UV Sphere. Gaming
is a form of animation therefore as with all animation it is best to keep animated
objects with a low vertex count. To keep things simple the default UV Sphere will
suffice.
In the 3D Window Tab into edit mode with the Sphere
selected and grab ons single vertice on the side and make a
pointer as shown in the diagram. This will give an indicator
showing which direction you are pointing when moving
around. The Sphere with the pointer will be our Actor.
Go to the Information Window header and change the screen
arrangement from the Default screen to the Game Logic screen.
This arrangement has the Logic Editor Window, 3D Window,
Properties Window and the Outliner Window displayed. The
Information Window header is across the top of the Screen.
The screen is configured for setting up the
Game Engine but Blender is not ready yet. In
the Information Window header change
Blender Render to Blender Game.
Vertices Grabbed and Moved
To form a Pointer
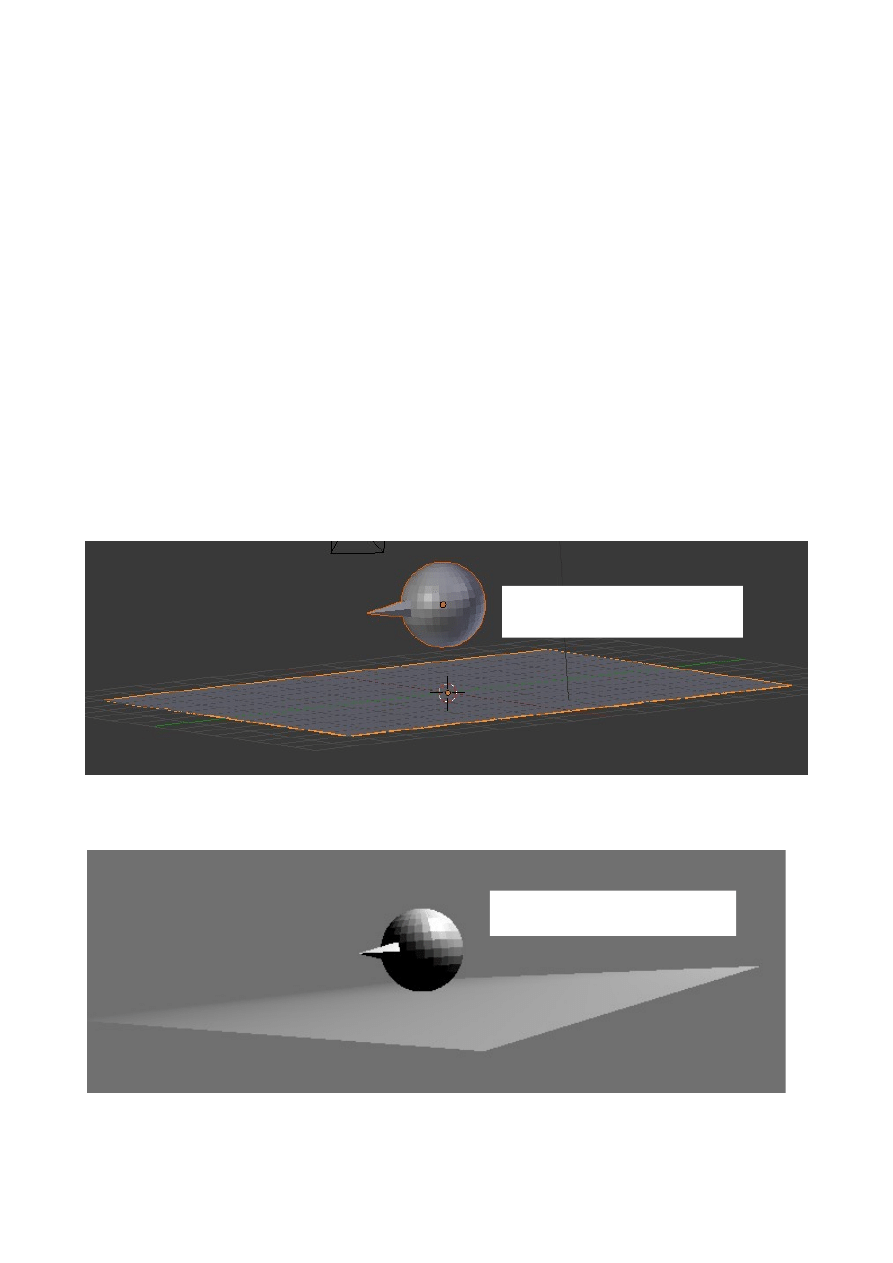
With the Sphere selected in the 3D Window go to the Properties Window-Physics
button- Physics tab and set the Physics Type : Dynamic. Note that in doing this the
'Actor' box is ticked indicating that the Sphere is an Actor. If it is not ticked, tick it.
O check if the Sphere is behaving itself and is going to cooperate as an Actor in this
little drama, set the 3D Window to front View (Num Pad 1) and with the cursor in the
3D Window press the P Key. This puts the 3D Window into Play mode (Play the
Game). The Sphere should be seen to descend in the window and disappear out of
sight. Press Esc to return the Sphere to center stage in the window.
You have proved that the Sphere actor is behaving itself. Gravity has taken hold of
the Sphere and caused it to fall. Since there is nothing below the Sphere to obstruct its
motion it falls to infinity. We had better do something to correct this.
Put the 3D Window into Top view and add a Plane to the scene. Scale the Plane up
six times. Go back to front View and move the Sphere up above the Plane. Move to
User Perspective View (Num Pad 0 for Camera View then Num Pad 5 for Camera
Perspective then Num Pad 5 again for User Perspective).
Press the P Key to see the Sphere descend and sit on the Plane.
Press Esc to go back to Object mode.
Above the Plane
3D View
Sitting on the Plane
Game Play View
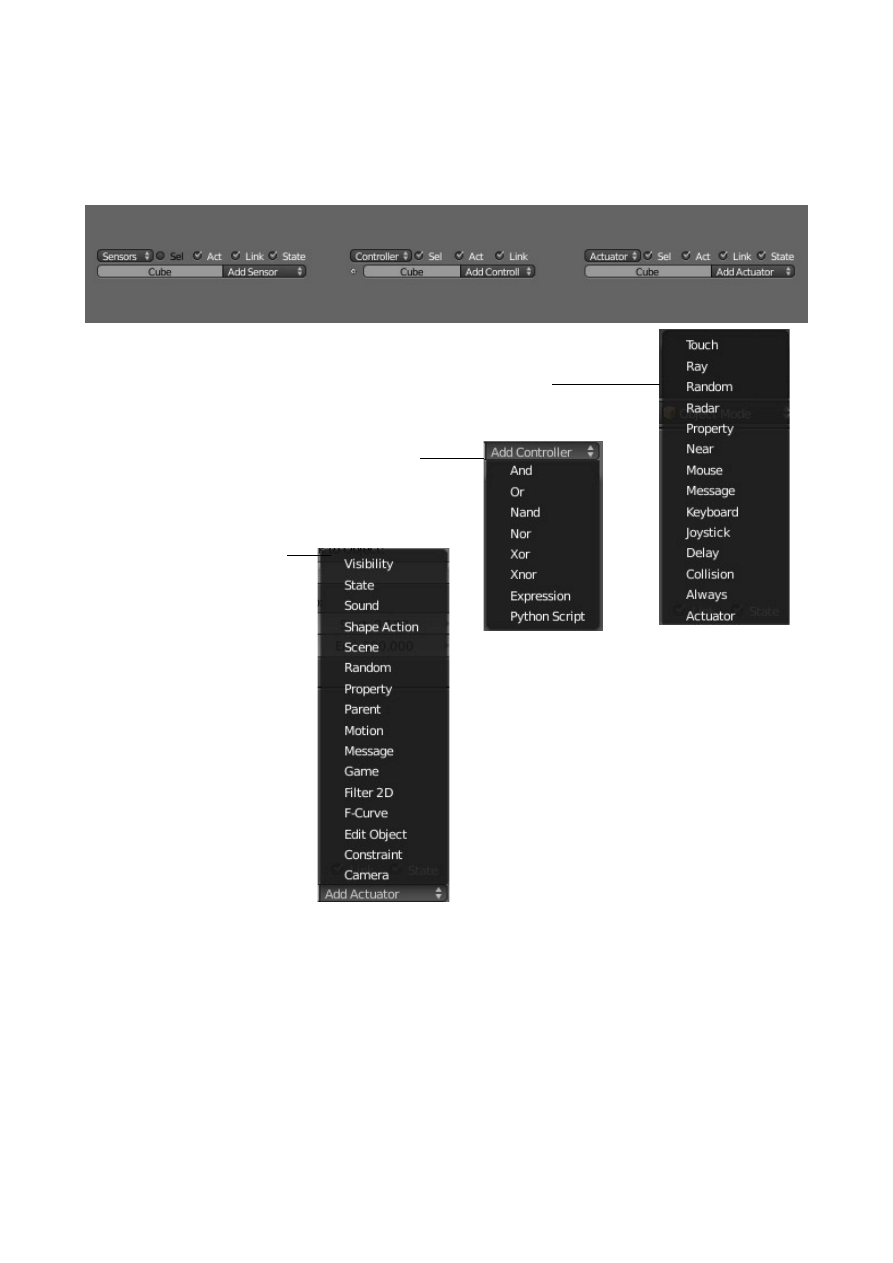
It is time to tell Blender when and how we want our Actor to move.
In the Logic Editor Window you see the Logic Blocks, 'Sensors', 'Controllers' and
'Actuators'.
The Sensor is what will trigger an action.
Click on the 'Add Sensor' dropdown to see the options.
The Controller is what will control the action
click on 'Add Controller' to see options.
They probably are meaningless.
The Actuator tells the Actor what to do.
Click on 'Add Actuator'
Again meaningless.
We will make some settings and make something happen to give you an idea how this
all works.
In the Sensors Logic Block click 'Add Sensor' and select 'Mouse'. Our mouse will be
the device we use to trigger the action. If you want to change your mind about this
click on the drop down where it says 'Mouse' and you can select something else. Let's
stick with Mouse.
This is assuming that you
haven't done this before.
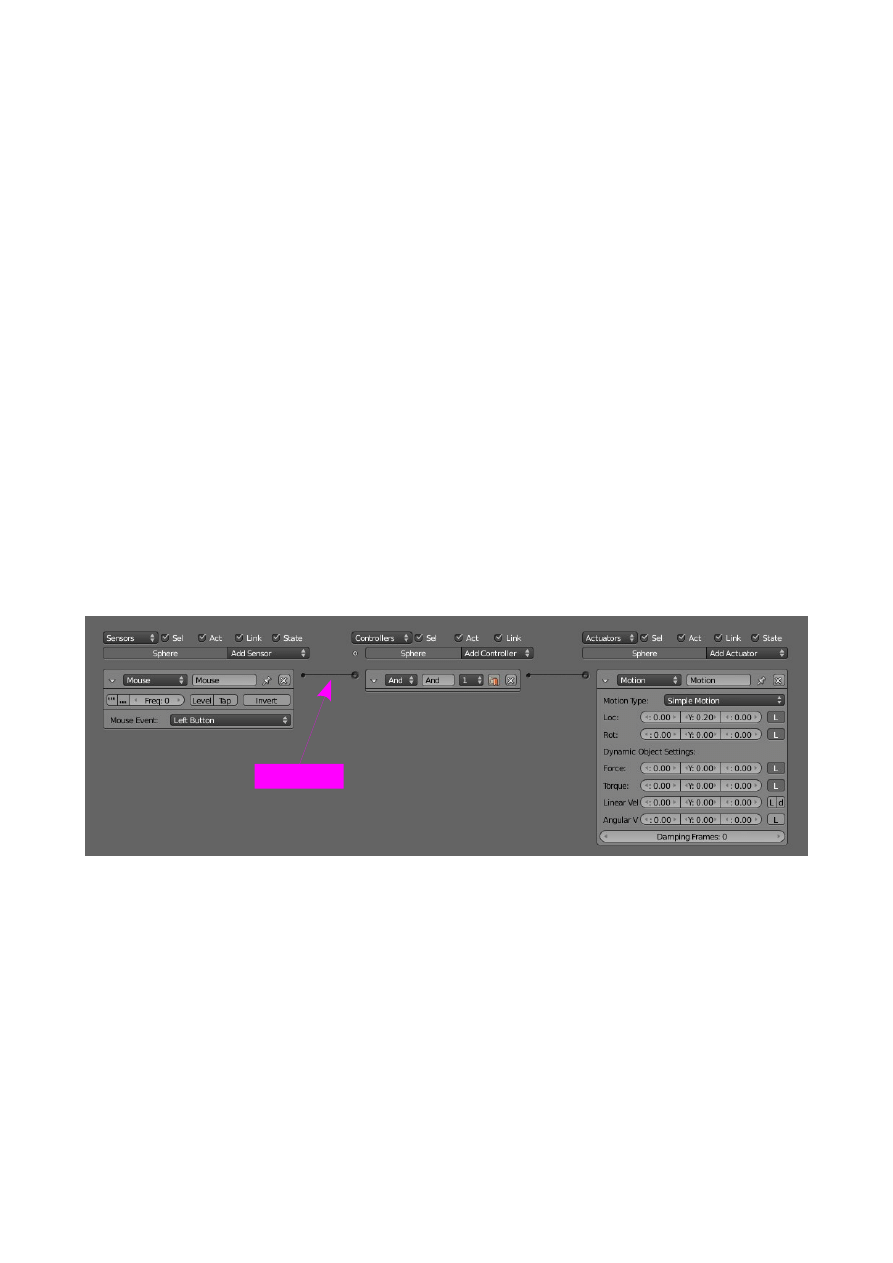
Where it says 'Mouse Event' in the Sensor panel you select what part of the mouse
will be responsible for the trigger. Click 'Left Button' to see options but stick with
'Left button'.
In the Controller Logic Block click 'Add Controller' and select 'And'. Why? will have
to be explained later.
In the Actuator Logic Block click 'Add Actuator' and select 'Motion'. Motion because
we want our Actor to do some moving about. Leave the Motion type as 'Simple
Motion'. Its not time to go complicated.
In the Motion type there are two slots: Loc (Location) and Rot (Rotation) with x, y
and z values. x, y and z are the axis and the value will give the speed of the action.
Enter 'Loc' y:0.20 which means move along the y axis at speed 0.20. Note this is in
the positive y direction. To move in the opposite direction enter -0.20.
The last step for now is to connect the Logic Blocks. Click on the little black dot at
the RHS of 'Sensor and drag over to the little circle on 'Controller. Do the same
between 'Controller' and 'Actuator'.
Time for a test run. Put your mouse in the 3D Window and press 'P Key' (Play the
game). Give your mouse LMB a click. Just a click. You will see the Sphere in play
mode move. It may not be in the direction of the pointy bit on the Sphere but that can
be adjusted. If you hold LMB down the Sphere will continue moving and fall off the
side of the Plane and disappear into infinity. Press 'Esc' to end the game.
We will add a few more controls.
Adding controls ( Logic Blocks ) soon fills up the Logic Editor Window so to save
space you can click on the little triangles at the upper LHS of the panels and collapse
them. Click again to expand
Connections
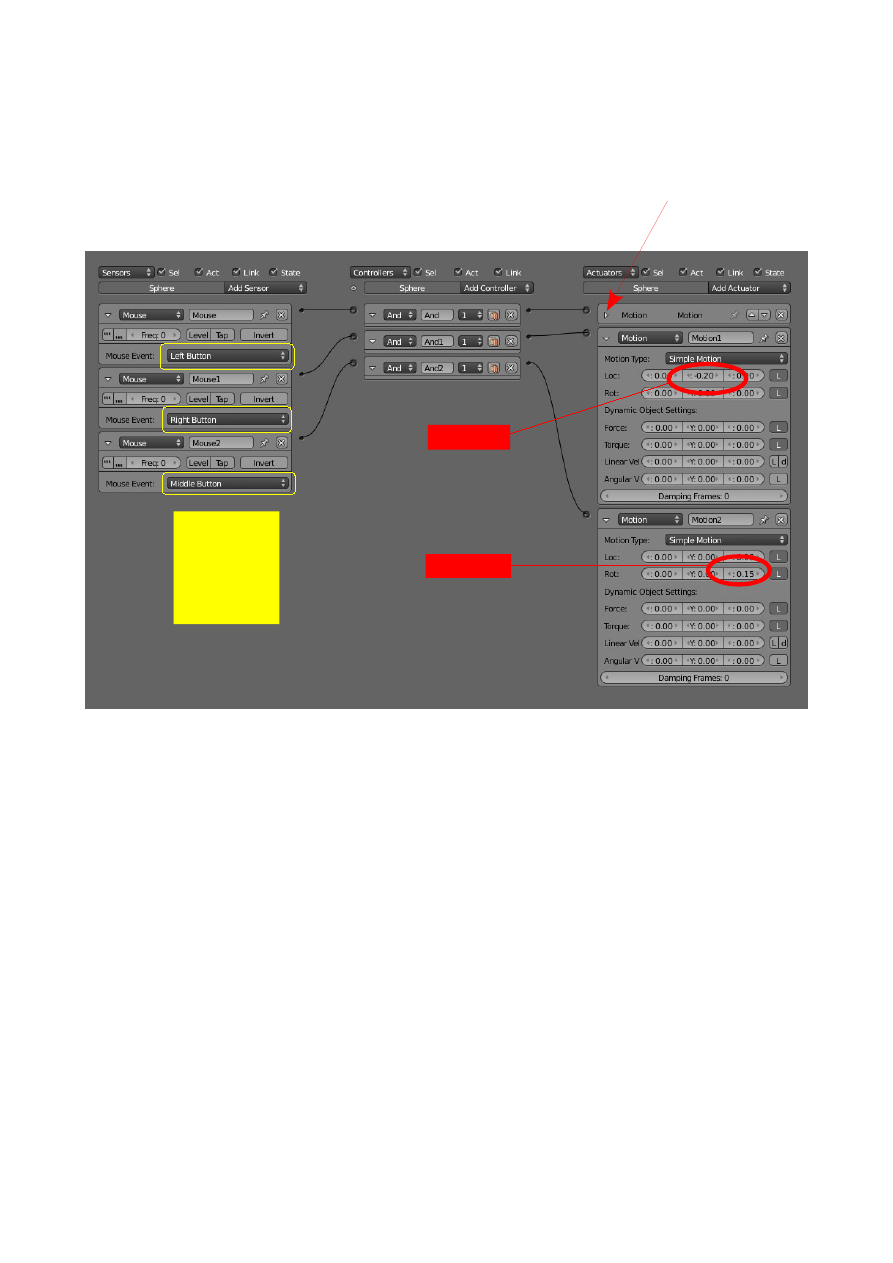
Add more Sensor,s Controllers and Actuators as shown below taking particular
attention to the values in th Motion Actuators. Do not forget to connect them
together.
With the controls set as show above you can drive the Actor around the Plane. Play
with the Mouse buttons and you will soon get the hang of it. Note the Sphere only
rotates in one direction. You can add another set of controls to rotate in the opposite
direction. Maybe change the Mouse sensor to Keyboard and use the A an S keys for
rotation. You could change all the Sensor controls to Keyboard and use a pattern of
keys.
The foregoing is about as simple as it gets so its over to you to research and
experiment.
Motion Actuator Collapsed
Left button
Right Button
Middle Button
0.20
0.15
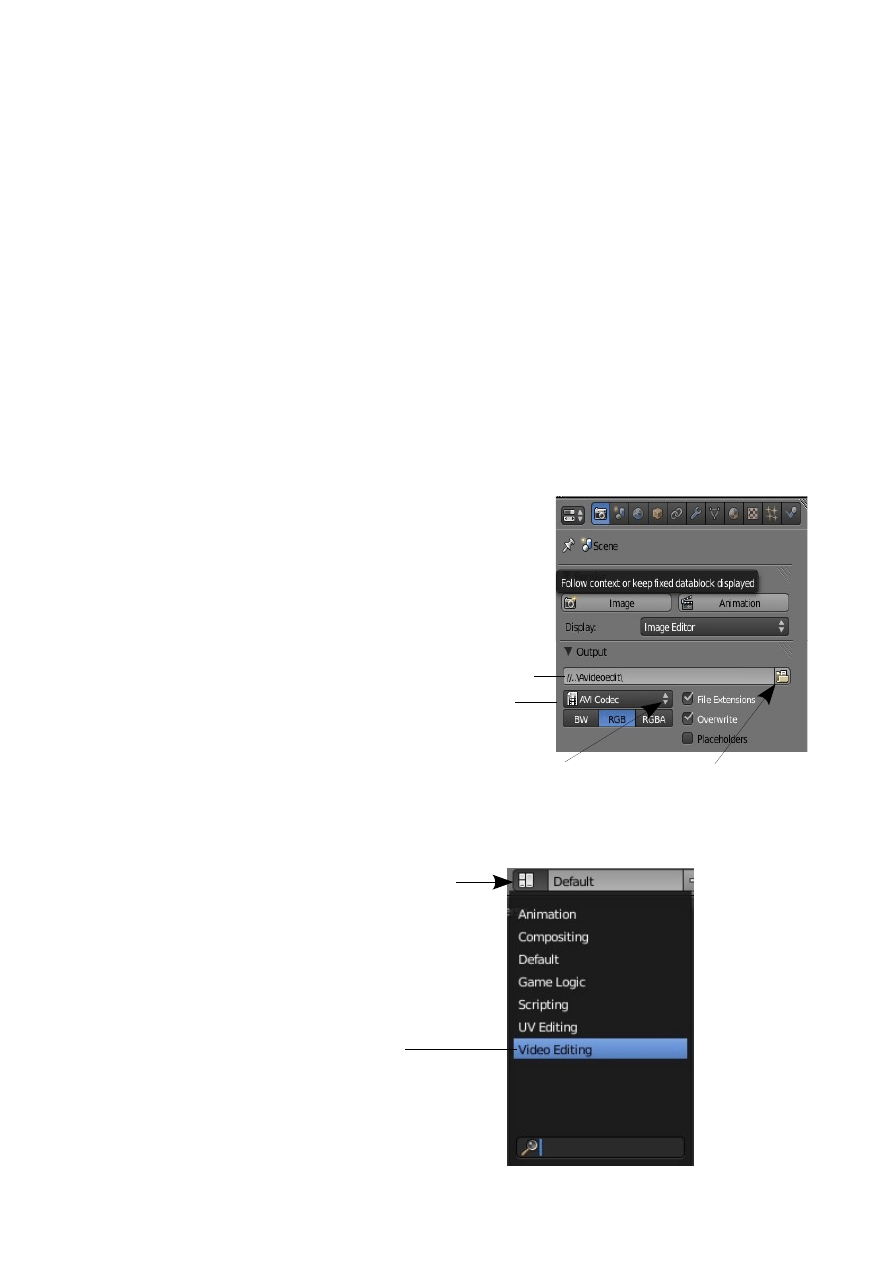
Video Sequence Editor
Making a Movie
Movies are made by piecing together video clips. A video clip is the short segment of
video you produce when you render an animation. It follows that you can only make
a movie when you have video clips saved on your computer. How to render
animation to video has been covered in a previous section and we will assume that
you have some clips saved. Make a note of where you have saved your clips and
make suer you are conversant with the File Browser Window.
The first step in the movie making process is to set the video output format you want
your movie to be in and to set the file path to the folder where you want to save the
movie file.
Start Blender and in the Default Screen Arrangement go to the Properties Window-
Render button. In the Output tab set your file path by clicking on the Browse Folder
button.
In the File Browser navigate to your folder.
Next set you Movie Video file type. The default
output setting is 'PNG'. Change 'PNG' to 'AVI Codec'.
AVI Codec will give you a file you can
burn to DVD and play in a video player.
Having set the above options open the Video Editing Screen.
Browse Folder Button
File Path
Click to select File
Output Format
Output
In the Information Window
header click here to display
the Screen options
Select: Video Editing
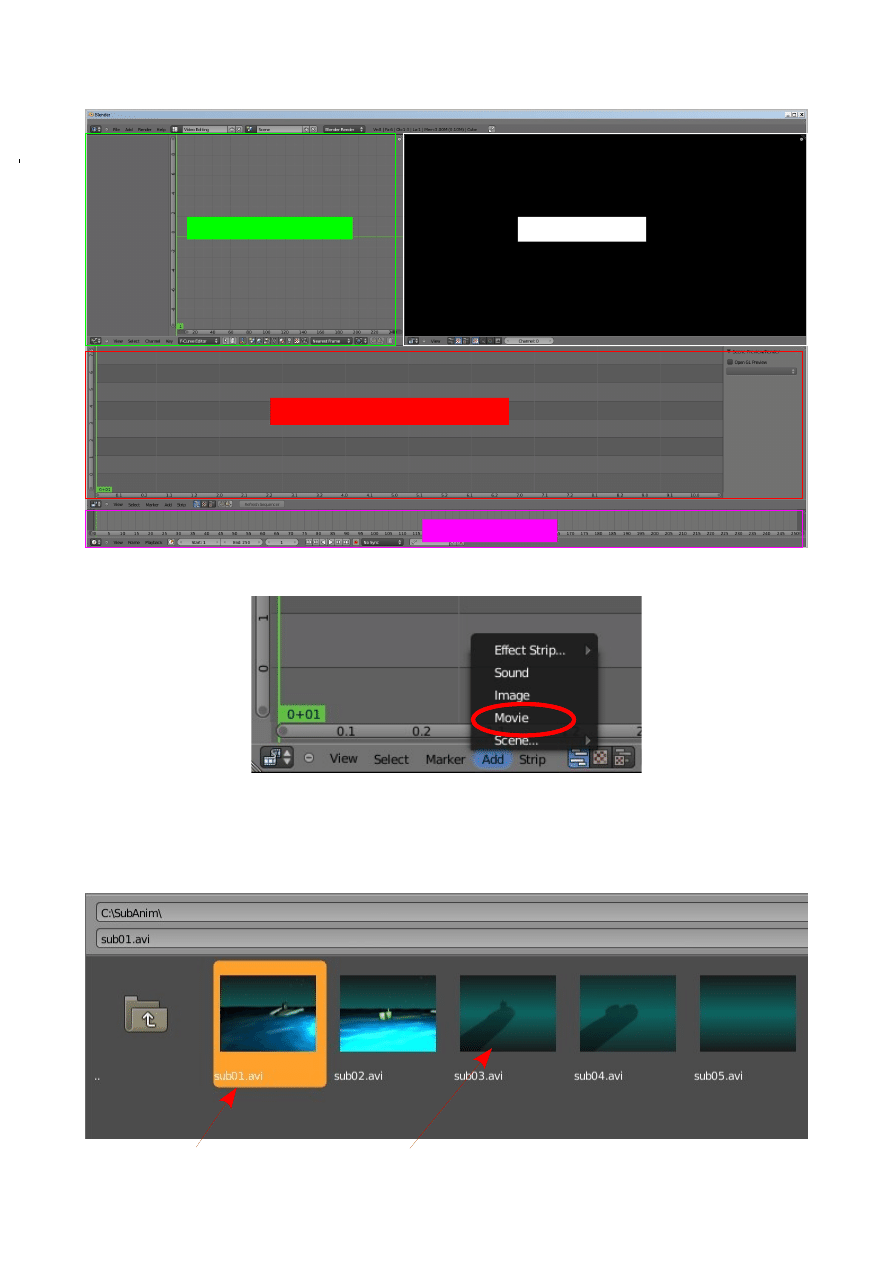
The Video Editing Screen
In the Video Sequence Editor click on 'Add' in the header and select 'Movie'
The File Browser window displays. Navigate to the folder containing your video
clips. On my computer my clips are in 'C:\SubAnim\'. You can see that I have five
clips which form a movie when spliced together.
Graph Editor Window
Preview Window
Video Sequence Editor Window
Timeline Window
File Selected
Video Clips
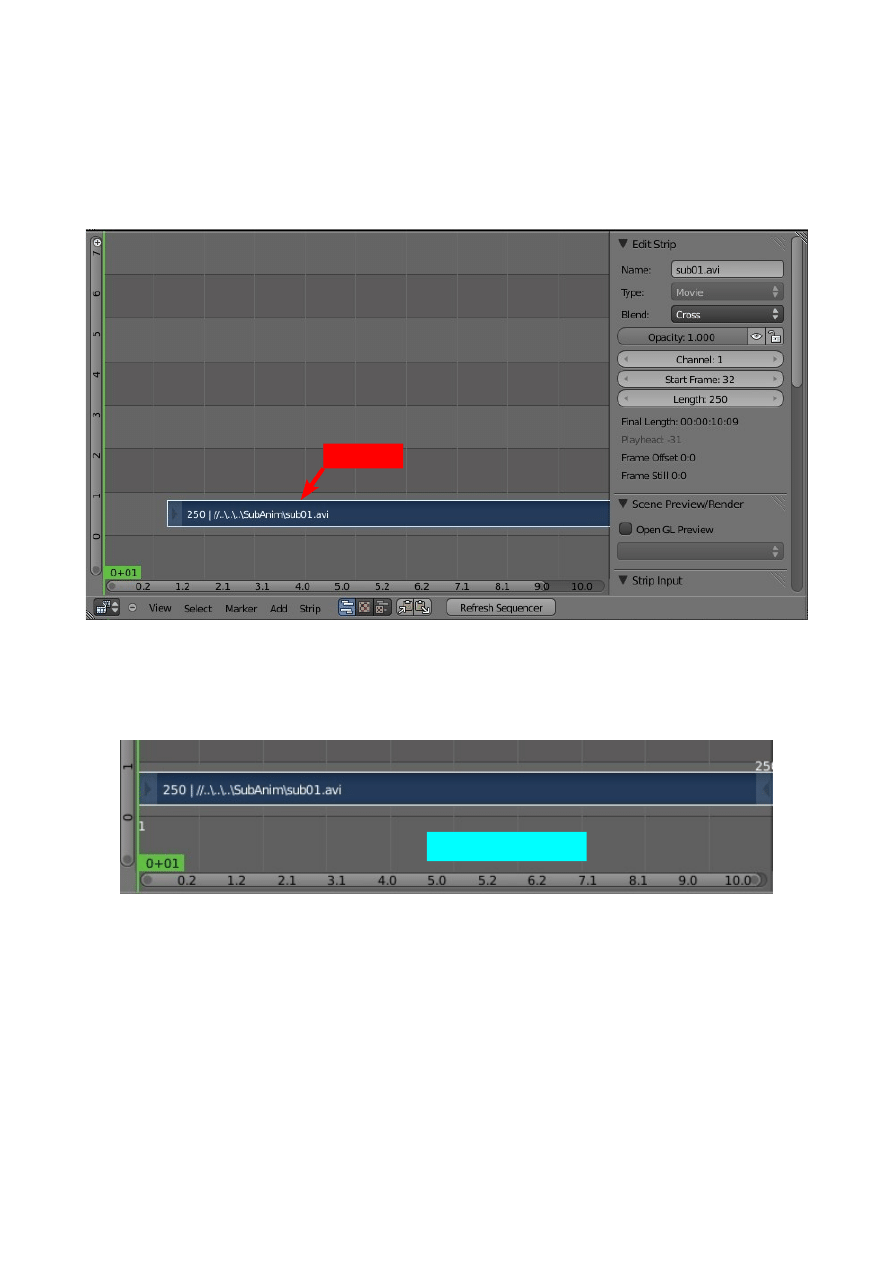
Click on your first clip to highlight (Clip shown in orange) then click on 'Add Movie
Strip' in the upper RH corner of the File Browser.
The video clip is is entered into the Video Sequence Editor as a blue strip with a
white border. The white border indicates that it is selected.
If you press the E Key you can drag the clip R or L along the screen. The vertical
green line is a cursor and as shown is located at position 0+01 which is the beginning
of the timeline. Drag the clip until the start of the clip is at position 0.00.
After positioning the clip at the start of the timeline move the green cursor to the
right. At position 0.00 you will see thin vertical black line. This is the marker for
position 0.00. Dragging the green cursor allows you to scrub through your video clip
which you will observe in the Preview Window. With your normal cursor in the
Preview Window pressing Alt + A plays the clip.
The graduations across the bottom of the Video sequence editor are seconds (Time
values).
Video Clip
Time Values - Seconds
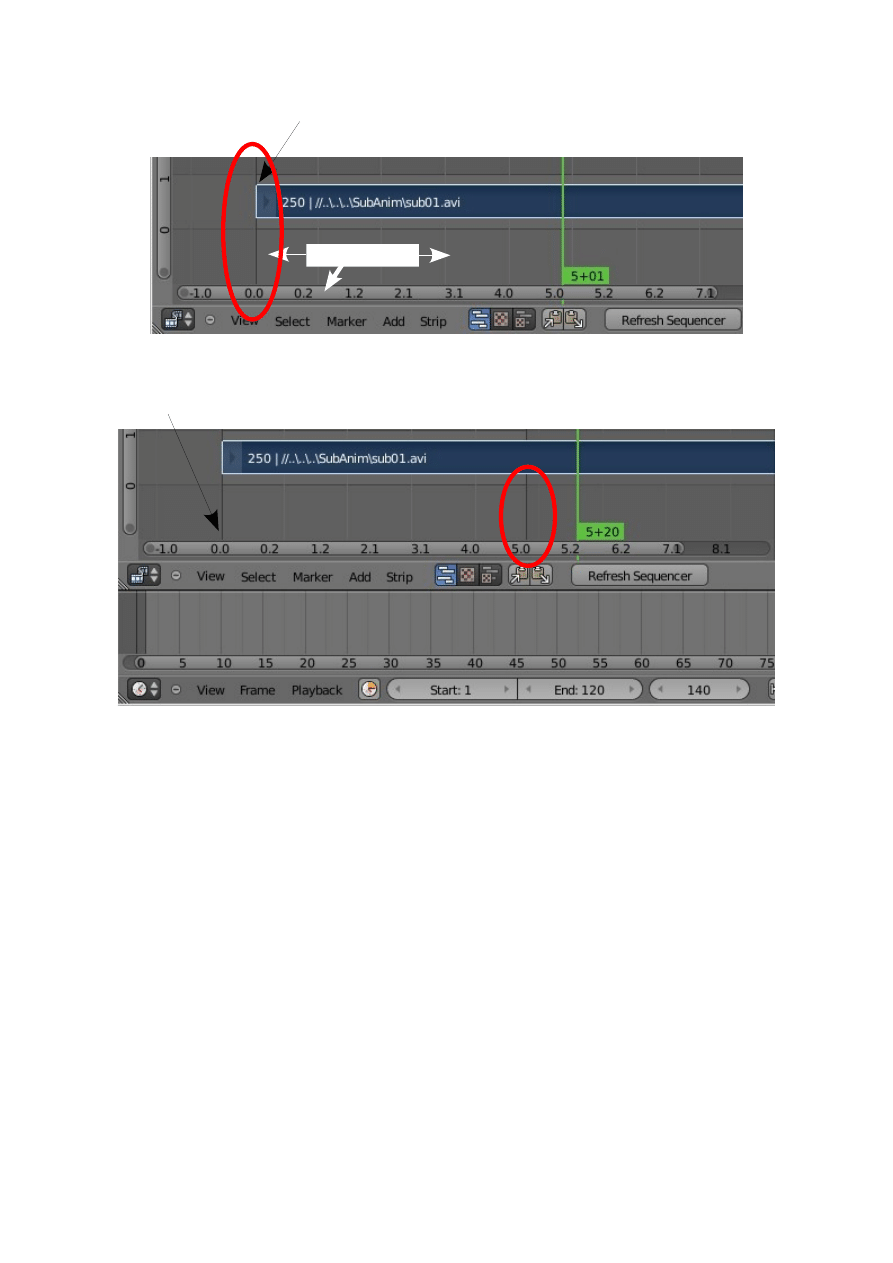
In the Timeline Window at the bottom of the screen change the 'End' value to 120.
You will see a another thin black line move in from the RHS of the window and
locate at position 5.00 seconds. This line will represent the end of the render in the
final movie output.
Remember that in the render set up in the Properties Window the frame rate for the
animation was 24 frames per second. 120 frames played at 24 frames per second
equates to 5 seconds.
Place the cursor in the Video Sequence Editor Window and zoom in (Num Pad Plus ).
Click on the time graduation bar and drag to the right to move the Editor Window to
the left.
Click on 'Add' again and select your second video clip. The second clip is placed on
the same line as the first clip. The lines are called 'Channels'. At the RHS of the
window is an 'Edit Strip” tab. Change the channel number in the 'Edit Strip' from 1 to
2 and you see your second clip move up a line (Channel). Another way to do this is to
R Click on the clip and drag it up.
Beginning of Clip at 0.00
Beginning of Movie 0.00
Click and Drag
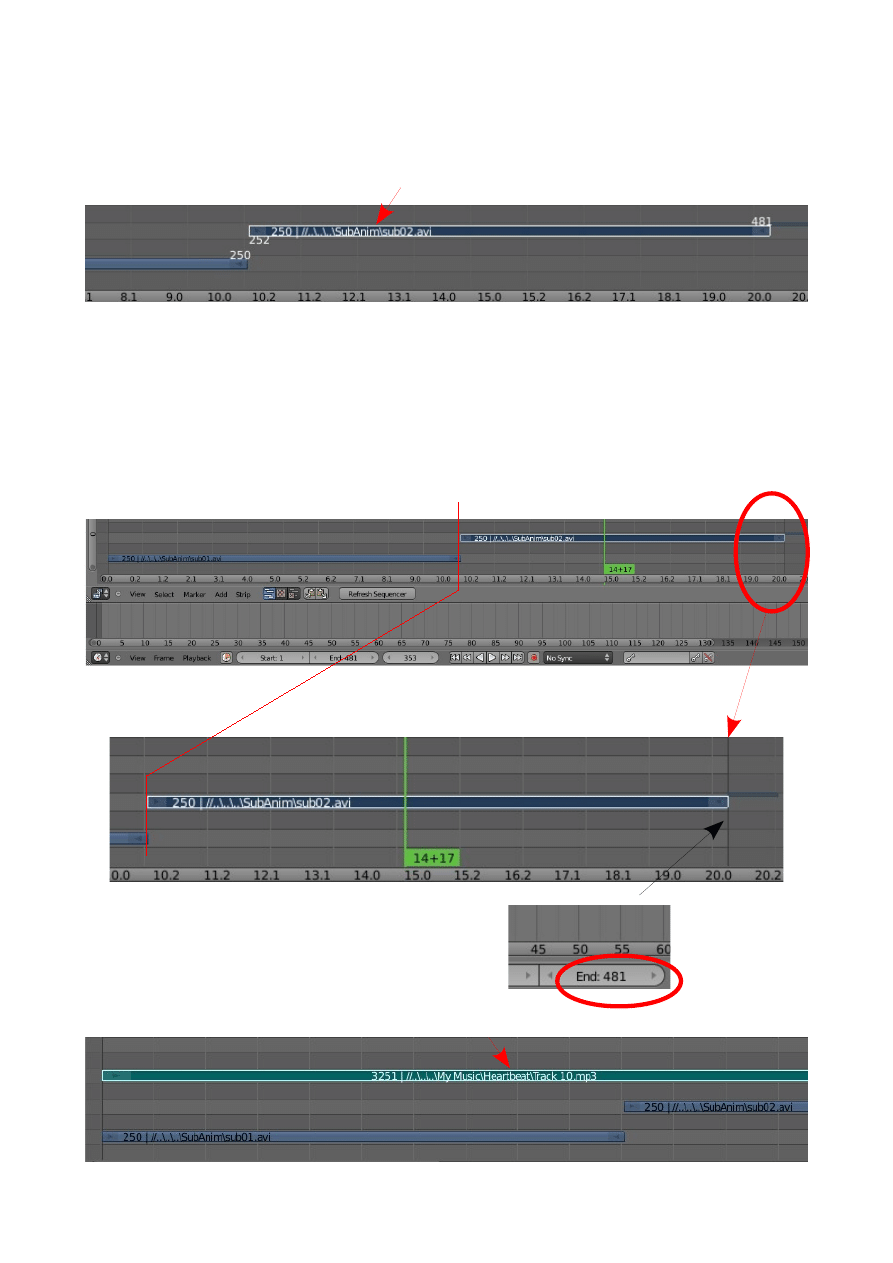
You have to line up the end of Clip 1 with the start of Clip 2. R Click on Strip 2 and
drag it. Numeric values showing the end and start frames of the clips display allowing
you to accurately align the ends. For example end of Clip 1 frame 250 and start of
Clip 2 frame 252.
You can align the clips on the same frame number or a slight gap is tolerated or you
can overlap the clips slightly.
After aligning all your clips (I'm only using two clips for this demo.) go to the
Timeline Window at the bottom of the screen and change the 'End' frame so that the
thin vertical black line in the Video Sequence Editor Window line up with the end of
your last clip. This sets the end frame for the movie file render.
Before you render the movie you can add a sound file. (MP3 or Wave)
Second Clip
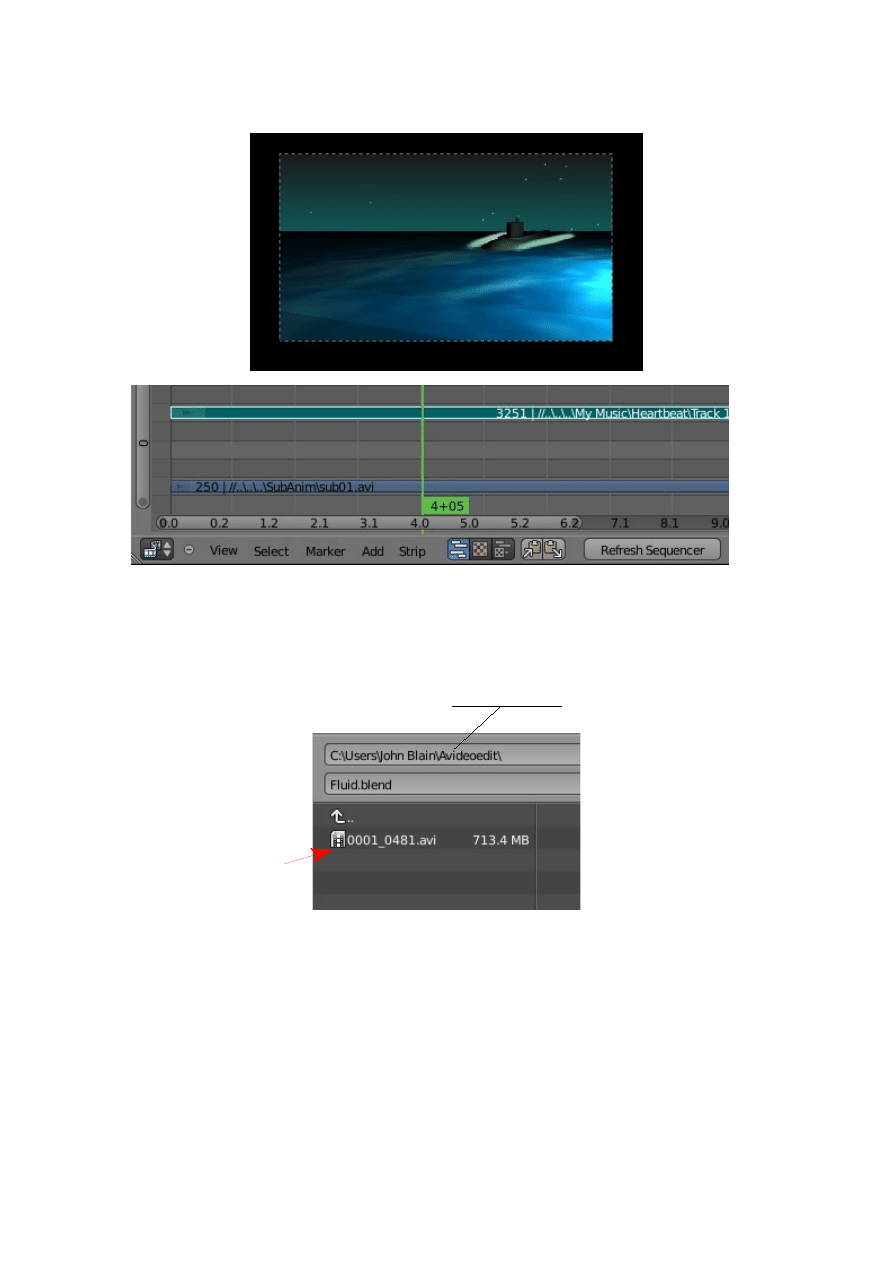
Before rendering you can play a preview by putting the cursor in the Preview
Window and pressing Alt+A.
Its time to render.
In the Information Window header click on 'Render' and select 'Render Animation'.
Wait for the render to complete. The render plays as it proceeds in the editor Window.
After completion find the movie file in the output folder you set and give it a test run
in a media player.
This has been a brief introduction to the Video Sequence Editor to get you started.
Preview Playing
Movie File in Output Folder

Basic Blender Commands
This is just a partial list of Blender commands. Please visit the Blender.org website
for more details.
TAB key Toggles between edit mode (vertex editing) and object select mode.
Ctrl+ Z
The global UNDO command. With each press, one step will be undone
(up to 32 steps possible by default). If in edit mode, it will only undo
editing steps on the selected object.
Z key
Toggles view from wireframe to solid
Alt Z key Toggles a texture/shaded view.
R key
Press R key and drag mouse to rotates an object or selected verticies.
S key
Press S key and drag mouse to scales a selected object or verticies.
G key
Press G key and drag mouse to move the object or selected verticies.
A key
While in edit mode selects all verticies for commands like remove
doubles and subdivide. A key twice will clear selected and reselect.
Alt +A
Plays animation in selected window. Your cursor must be in that window
for it to play.
Ctrl +A
After an object has been resized and/or rotated, brings up the Apply
menu, this can reset the object’s data to 1 and 0.
W key
Brings up a “ Specials ” menu while in edit mode of specific edit mode
options
Shift+D
Duplicates or copies selected objects or selected vertices.
Shift+RMBMultiple select objects or verticies
Shift+A
Displays the Add menu. Add objects to scene.
Shift+S
Displays the Snap Menu eg. Snap object to cursor.
Shift+Space Toggles multiple windows to full screen window.
E key
While in edit mode, selected verticies can be extruded .
O key
The “O” key (not zero) will put you into proportional vertex editing
while in edit mode.
B key
Gives you a box (window drag) to select multiple objects In edit mode.
C key
Circle select gives you a circle to select multiple verticies, that can be
sized by scrolling the mouse wheel. Press Esc to cancel.

Alt + A
Brings up the tools menu where you can add meshes, cameras, lights,
etc.
Num Pad Number Pad controls your views.
“7” top, “1” front, “3” side, “0” camera, “5” perspective, “.” Zooms on
selected object, “+ and –“ zoom in and out. The + - buttons also control
affected verticies size in proportional vertex editing.
LMB
Left mouse Button click to manipulate using the 3D Manipulator
Widget. Click in the 3D Window to locate the 3D Cursor. Click in the
Tools Panel to activate functions. Click in panels to enter values etc.
RMB
Right Mouse Button click to select.
MMB
Middle Mouse Wheel Button click to manipulate specified options.
Scroll wheel to zoom in and out.
Scroll to expand-contract selection options.
Shift key
Hold down the shift key while clicking RMB to make multiple
selections.
Arrow keys Used to advance frames in an animation. Left and Right 1 frame
increments. Up and Down 10 frame increments.
P key
In edit mode, separate selected verticies. In Object mode Game Engine
enters Play mode.
U key
In Object mode brings up Make Single Users menu.
M key
Brings up Move to Layer option.
N key
Toggles numeric data display for the selected object.
Ctrl+J
Joins two selected objects.
X key and Delete key Delete.
Function
F1 – Opens File Browser Window.
F2 – Save File.
F3 – Save rendered image.
F12-Render.
I key
Insert animation key.
Ctrl+T
Displays Make track menu.
Ctrl+S
Opens File Browser to save file.
Alt+C
Opens convert menu. Convert Mesh/Curve.
Ctrl+Tab Various functions depending on Window mode type.
The following web sites are recommended as sources of information for Blender 3D.
The Blender Site
http://www.blender.org
Wiki Users Manual
http://wiki.blender.org/index.php/Doc:Manual
Blender Nation
http://www.blendernation.com
Below are a few examples of the many free graphics programs available on the
internet. You may find them usefull or just interesting.
FastStone Image Viewer
A usefull tool for organising your image files.
http://www.faststone.org/download.html
Make Human
Creates the Human Figure.
http://sites.google.com/site/makehumandocs/Home
Pov Ray
A way of creating graphics.
http://www.povray.org
Serif Draw Plus
Graphics drawing programs.
http://www.freeserifsoftware.com
Lohmuller
An interesting graphics site.
http://www.f-lohmueller.de/
Ivy Generator
Grow Ivy on everything.
http://graphics.uni-konstanz.de/~luft/ivy_generator/
References
Document Outline
- introtoblender3d.pdf
- introCH01.pdf
- introCH02.pdf
- introCH03.pdf
- CH03- Create Edit Object
- Working with Basic Meshes
- Placing Objects On The Screen
- Edit Mode and Object Mode
- Mesh Types
- Precise 3D Cursor Placement
- Moving a Mesh Object
- Scaling an Object
- Rotating an Object
- Precision Manipulation of Objects
- The Transformation Widget
- Mesh Vertex Editing
- Selecting Verticies:
- Edit Mode Selection Options
- Limit Selection to Visible
- Basic Modifiers:
- Creating More Verticies:
- Specials Menu:
- Center Points:
- Object Display - Shading:
- Using the Shading Smooth and Flat Options
- Extruding Shapes:
- Proportional Vertex Editing:
- Creating Ground
- Edge Loop Selection
- The Knife Tool
- Joining and Separating Meshes
- Joining Meshes:
- Separating Meshes:
- Deleting Vertices/Edges/Faces:
- Adding Faces:
- Modifiers
- Bevel Modifier
- Subdivision Surface Modifier
- Mirror Modifier
- Boolean Modifier
- CH03- Create Edit Object
- introCH04.pdf
- CH04- Materials
- The Application of Materials and Material Slots
- Materials
- Basic Material Settings
- Materials Buttons
- Material Colors
- Adding a New Material
- The Preview Tab
- The Diffuse Tab
- Intensity Effect for Diffuse Color
- The Specular Tab
- The Hardness Value
- Hardness Value Variation
- Ramp Shaders
- Transparency
- Halo Settings
- CH04- Materials
- introCH05.pdf
- introCH06.pdf
- introCH07.pdf
- introCH08.pdf
- introCH09.pdf
- introCH10.pdf
- introCH11.pdf
- CH11- Animation Basics
- Animation Basic:
- Moving, Rotating and Scaling:
- Interpolation.
- Viewing Your Animation:
- Working With The Graph Editor Window:
- Editing The Curve:
- Other Types Of Curves:
- Extrapolation.
- Modifying Curves:
- Automatic Keyframing:
- Animating Other Features:
- Keying Sets:
- Wind Strength Animation
- Example 1 Color
- Example 2 Spotlight Size:
- Wind Strength Animation
- CH11- Animation Basics
- introCH12.pdf
- introCH13.pdf
- introCH14.pdf
- CH14- Modifiers
- Modifiers
- Modifier Stack
- Array Modifier
- Object Offset
- Bevel Modifier
- Boolean Modifier
- Build Modifier
- Decimate Modifier
- Mask Modifier
- Mirror Modifier
- Screw Modifier
- Subdivision Surface Modifier
- UV Project Modifier
- Cast Modifier
- Curve Modifier
- Displace Modifier
- Hook Modifier
- Lattice Modifier
- Mesh Deform Modifier
- Shrinkwrap Modifier
- Simple Deform Modifier
- Wave Modifier
- Explode Modifier
- CH14- Modifiers
- introCH15.pdf
- CH15- Particle Systems
- Particle Systems and Interactions
- Nomenclature
- Setting up a Particle System
- Particle Settings and Material Influence
- Particles Buttons – Panel
- Starting a Particle System
- Material Influence on Particles
- Particle Interaction With Objects And Forces
- Wind
- Sample Particle Settings
- Snow Effect
- Fire
- Simple Fireworks
- Keyed Particle Systems
- Boids Particle Systems
- Example: A Flock of Birds
- Example: Directing Movement
- Example: Prey Predator Relationship
- Example: Follow Terrain
- Hair Particles
- A Final Note On Hair Particles
- Assignment Tab
- Practical Exercise
- CH15- Particle Systems
- introCH16.pdf
- introCH17.pdf
- introCH18.pdf
- introCH19.pdf
- introCH20.pdf
- CH20- Fluid Simulation
- Fluid Simulation
- Basic Setup fore Fluid Simulation ( First Scenario
- Domain Object Set Up
- Fluid Object Setup
- Obstacle Object Setup
- Baking
- Basic Set Up for Fluid Simulation ( Scenario Two
- Domain Object Setup
- Fluid Objects Setup
- Inflow Object Setup
- Obstacle Object Trough Setup
- Obstacle Object Cup Setup
- Outflow Object
- Fluid Simulation – Particles
- Fluid Simulation – Control
- CH20- Fluid Simulation
- introCH21.pdf
- introCH22.pdf
- introCH23.pdf
- introCH24.pdf
Wyszukiwarka
Podobne podstrony:
263umaczenia manuala Blendera 2 3x
263umaczenia manuala Blendera 2 3x
PANsound manual
als manual RZ5IUSXZX237ENPGWFIN Nieznany
hplj 5p 6p service manual vhnlwmi5rxab6ao6bivsrdhllvztpnnomgxi2ma vhnlwmi5rxab6ao6bivsrdhllvztpnnomg
BSAVA Manual of Rabbit Surgery Dentistry and Imaging
Okidata Okipage 14e Parts Manual
Bmw 01 94 Business Mid Radio Owners Manual
Manual Acer TravelMate 2430 US EN
manual mechanika 2 2 id 279133 Nieznany
4 Steyr Operation and Maintenance Manual 8th edition Feb 08
Oberheim Prommer Service Manual
cas test platform user manual
Kyocera FS 1010 Parts Manual
juki DDL 5550 DDL 8500 DDL 8700 manual
Forex Online Manual For Successful Trading
ManualHandlingStandingAssessment
więcej podobnych podstron
