http://www.407owners.com
© www.407owners.com
REPAIR for:
Sidelamp Bulb(s) Faulty, Left Tail Lamp Faulty, Right Tail Lamp Faulty, Directional
Indicator Faulty, Left Hand Stop Bulb Faulty
DIFFICULTY LEVEL:
**
***
Drilling, Wire Crimping, Tight Spaces, Plastic Clips
SOLUTION/FIX:
*****
Permanent Fix
TIME NEEDED TO FIX:
30 – 60 Mins
30 Mins per side approx.
SELF REPAIR COST:
£2 + 1 Hour
Basic spare parts required
MAIN DEALER COST:
£220-£250
Usually replace the rear light units to clear the error
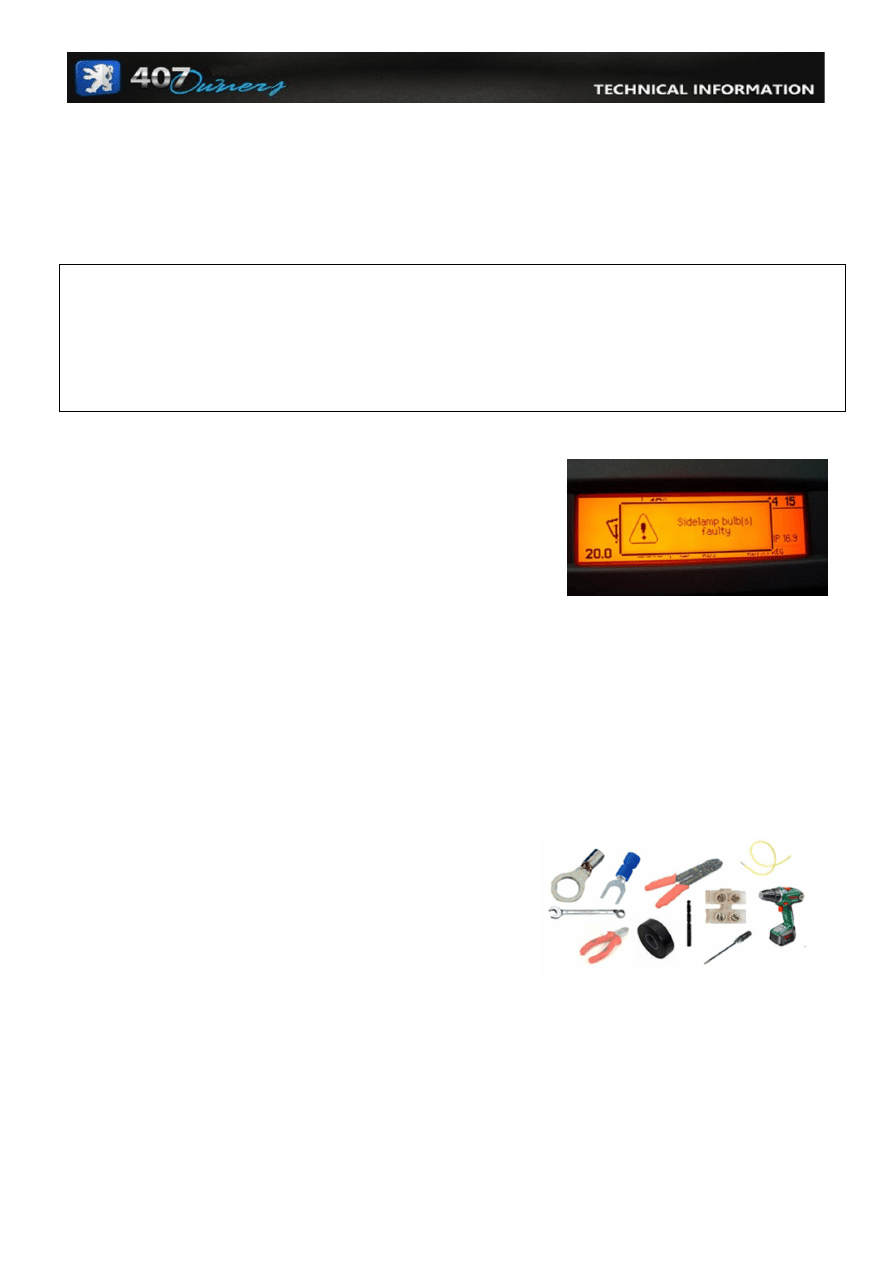
Description of the Fault:
You will notice this fault when applying the brakes or using the
indicators (left or right depending on fault root)
These messages always come with a BEEP and display a fault
message on the Message Display Screen.
The fault usually starts with the odd message and can go away for a few days or weeks until it finally
occurs every time you use the indicators or press the brake pedal.
Cause of the Fault:
A short circuit from the car wiring harness (earth) to the rear light cluster. The wire used is very thin and
possibly not up to the job. The earth pin on the plug seems to burn up causing a continuity problem to the
cluster causing the car to have an intermittent connection to the cluster. This throws the faults listed above
as the car self diagnostics thinks the bulbs are blown.
Tools Required:
10mm Ring Spanner (with open end too)
2 x Electrical Connector Blocks (1 per light cluster/side)
4mm Drill Bit (HSS/for metal)
Drill
Electrical Crimp Tool
Insulation Tape (electrical)
2 x Open Ended Crimp (blue coloured) (1 per side)
2 x Circle Crimp (1 per side)
2 x 240mm Earth Wire (1.5mm thick) (I used an old computer power lead and took out the earth wire)
Wire Cutters
Small Flat Screwdriver / Terminal Driver
http://www.407owners.com
© www.407owners.com
The Repair / Instructions:
Diagnosing the problem area
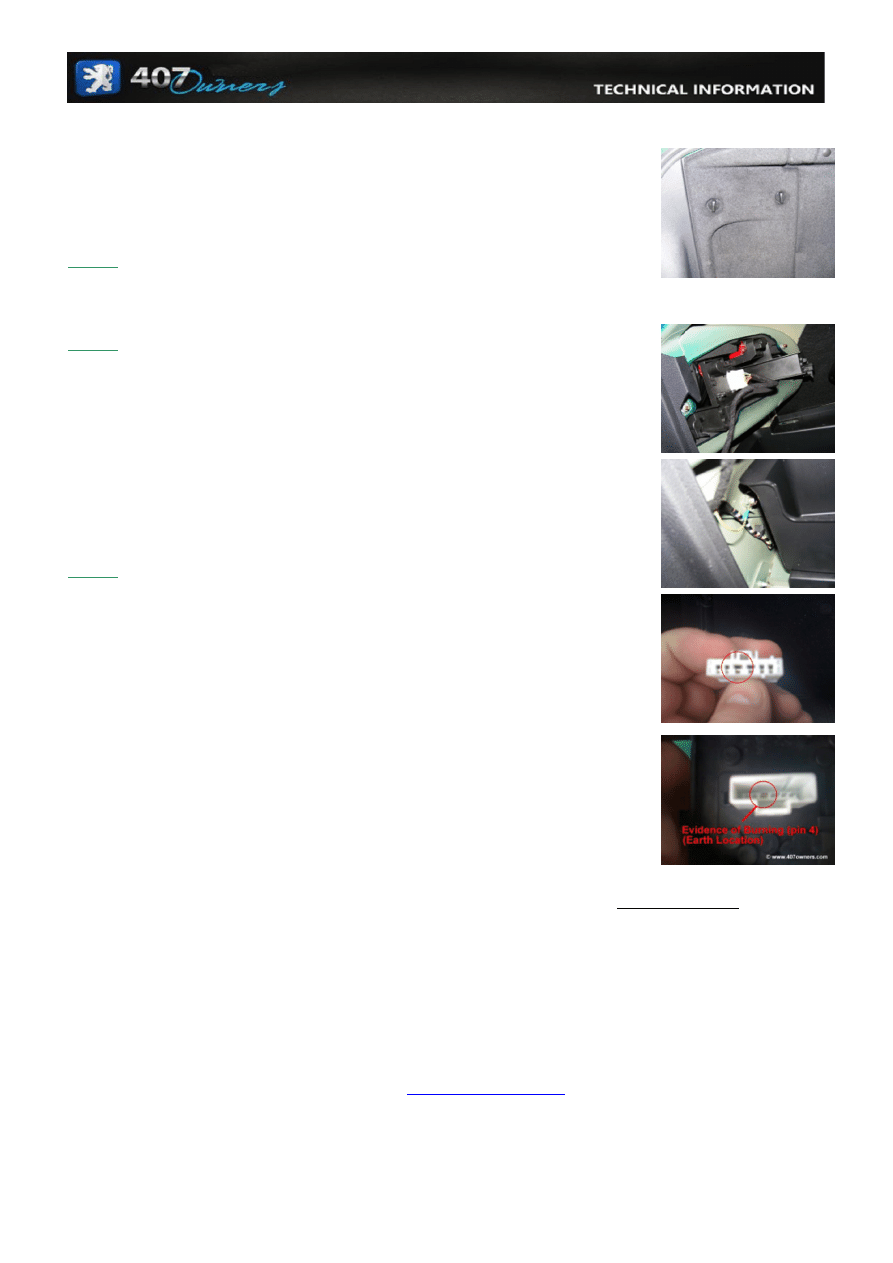
Step 1:
Remove the side panel by turning the plastic screws to the vertical position and pull the cover away.
Step 2:
You will now see the light cluster, wiring harness with plug (into the light) and
if you look down between the rear storage basket and rear panel, you will see the
current earth wire attached to the back panel of the car (factory earth point).
I kept my original earth point connected onto this point and just added a new
Earth line into the car.
Step 3:
Remove the plug from the light cluster and inspect the pins carefully. Look for
burning (discolouring around the pins/melting plastic). Mine was browning
on “Pin 4”, the earth point.
If you don’t find a problem here on the plug, you need to check the actual cluster
for problems. Check the plug and look for burning/browning again.
I had burning on both plug and cluster. See the image here à
“Pin 4”, the earth pin was burnt, clearly demonstrating an earth issue.
If you don’t have any signs on the cluster plug or harness plug, please repeat
steps 1 to 3 on the opposite light cluster. If there is still no sign, I would still
personally carry out this modification because it is 100% reversible back to
how the factory arranged it before the car was sold. We don’t cut into the existing looms.
At least you will be 100% sure that it is or isn’t this problem and again, it is 100% reversible.
If you have seen any burning issues, you are now ready to carry out the modification required to remove
the error messages and fix the problem.
Before proceeding onto the repair, please ensure you have all tools above and please ensure that the
vehicle is switched off with the keys removed from the car.
Only attempt this modification if you are competent enough to complete each step. Only you can be the
judge of your technical / mechanical skills and
www.407owners.com
will not be responsible for any
damage incurred to your vehicle as a result of following these simple repair instructions.

http://www.407owners.com
© www.407owners.com
IF IN DOUBT, DO NOT ATTEMPT TO CARRY OUT THIS MOD.
SEEK PROFESSIONAL AUTO ELECTRICIAN/REPAIR CENTRE HELP.
The Repair / Instructions:
Repairing the problem
You should now be in the position of having removed the harness plug from the cluster you are working
on. The cluster should still be in situ.
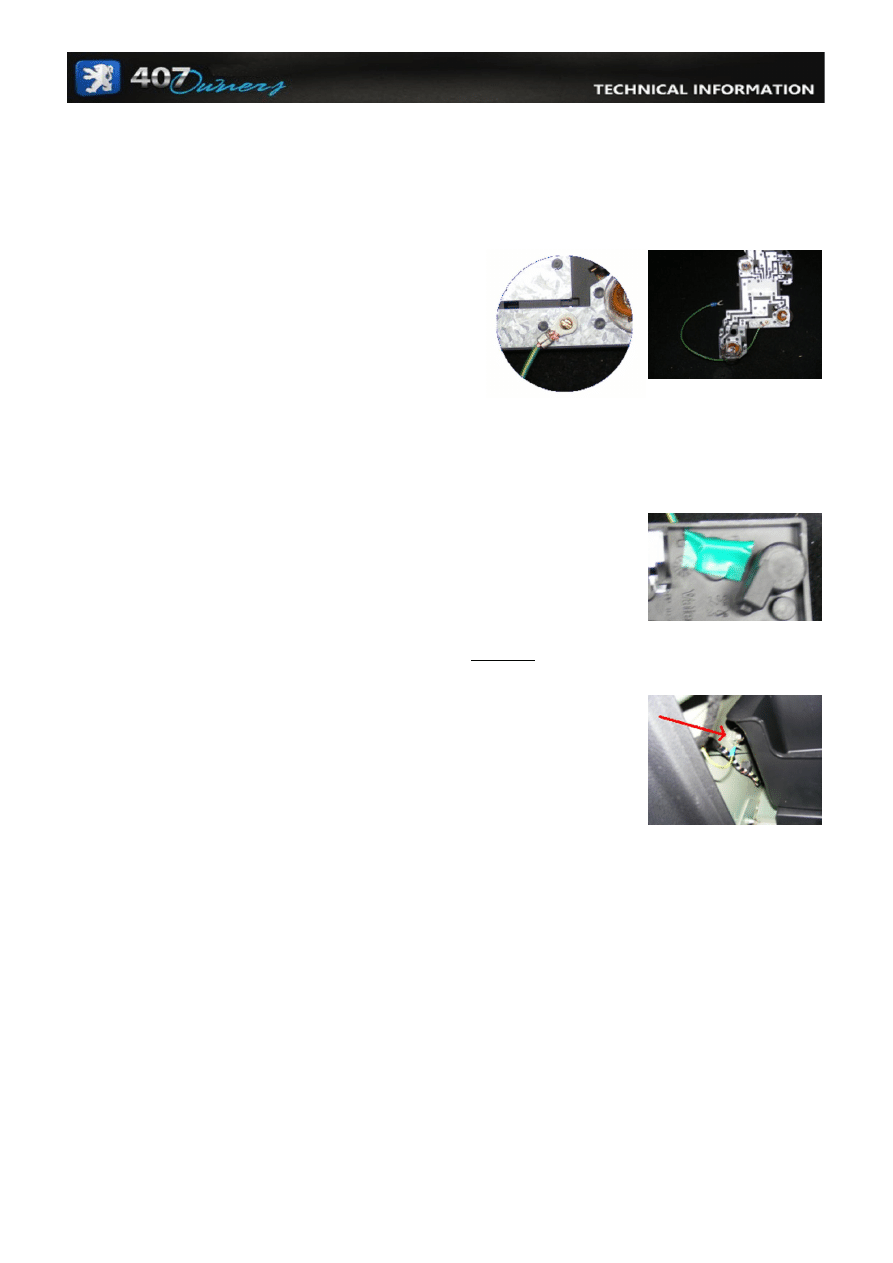
Step 1:
This is a tricky procedure. You need to release the 5 retaining clips to allow
the cluster to pull forward and out. Ease them out 1 at a time. I have
highlighted in Red Rings where these points are on the image à
It is pretty difficult but just persevere with it. It will come out. Don’t rush it!
Step 2:
Once out, you will need to get your drill bit (4mm) and drill to make a small hole in the metal circuit
board.
Step 3:
Make up a wire (240mm crimp to crimp).
Step 4:
Using one of the terminal block connectors and your wire cutters, remove all of the plastic
from around the inner contact to leave the brass connector tube and screws only.
Discard one of the screws and just remove the other to leave the base and screw seperated.
http://www.407owners.com
© www.407owners.com
Step 5:
Using your new earth wire, fit the screw through the looped crimp and push it through the hole you made
with your drill into the metal circuit board of light cluster.
Then from the underside, use the base of the
electrical contact and screw the screw in like you
would for a nut and bolt. Make sure its hand tight
only then slightly twist the connector on an angle
as shown in the image à
Step 6:
Apply insulating tape to the rear of the light cluster (where the brass contact base will be showing).
There is no risk of anything touching it but just to be safe really. I personally prefer to leave things safe
for others in future and you never know what people will do to their cars at a later point. Be SAFE!
Fit the tape to the back as shown. All you are trying to do here is cover
the brass contact.
Once you have done that. You are ready to fit the cluster back into the light
assembly/lens.
Take your time to line the bulbs up and press into place carefully. Ensure your earth wire is free.
Step 7:
Undo the 10mm earth bolt.
Note: Don’t remove it, just loosen it off 4 or 5 turns to allow you to slide the
“U” crimp behind it.
Once it’s behind and all the way down, re-tighten the bolt (tight).
Just give the wire a little tug afterwards to make sure it’s safely attached to the nut.
If everything is OK, WELL DONE! That’s the hardest bit out of the way.
Now just a simple mod to the plug (removal of the old earth wire).
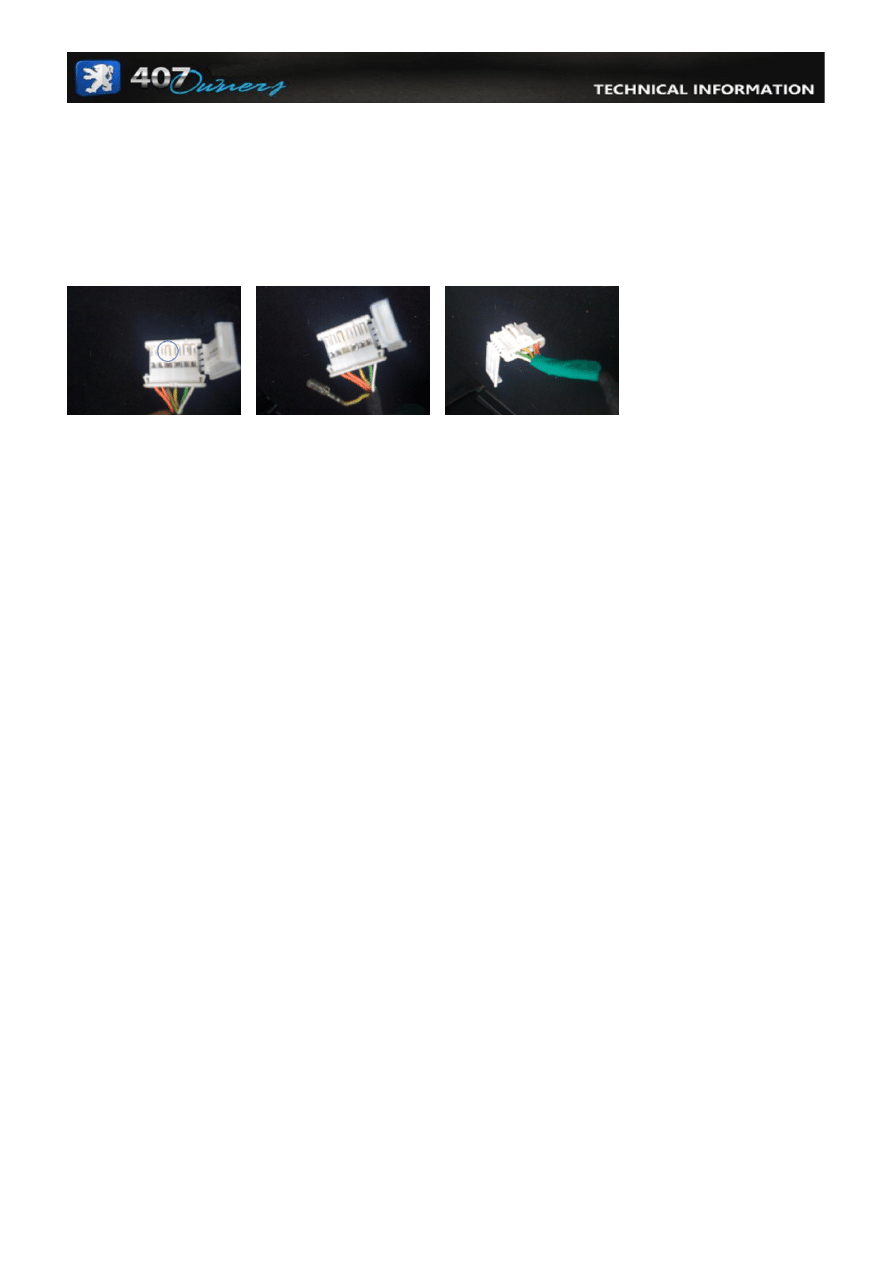
Step 8:
Open the plug up (theres a push up ledge on the side of the plug). Its like a plastic wrap around.
This will expose the wires and the release clips.
http://www.407owners.com
© www.407owners.com
Step 9:
Using a small flat blade screwdriver, lift up “Pin 4” plastic release clip and pull out the metal connector
and wire. Once you have done that, wrap some insulation tape around the wire and metal connector to the
wiring harness (protecting it from any other wires). Plug it back into the light cluster once done.
That’s it.
JOB COMPLETE
Now, repeat on the opposite side to ensure there are no problems there. When I did mine, there were no signs of
any problems. No burning, no errors etc. Within 1 week, the right side started to play up so it’s best really to
replace both earth wires as it will surely start on the weaker side afterwards.
This modification is totally reversible. You can refit the original earth connector back into the OEM plug and
remove your earth wire from the cluster and the earth point leaving it the way the Peugeot made it should you need
to.
The other solution is to not carry out the mod and replace both back light units. At a cost of approx £250 for both
lights from the main dealers, I would surely consider this modification.
You could always try local scrap yards/2
nd
user car part dealers for 2 rear clusters (providing you are not burning up
on your plugs).
www.407owners.com
www.407owners.com
Wyszukiwarka
Podobne podstrony:
zadania dodatkowe - masa cząsteczkowa, …………………&hell
407 B1KI04K1 Napelnianie Zbiornik dodatku Nieznany
407 B1GG015AP0 Demontaz Montaz Czesci skladowe zespolu ogrzewania dodatkowego Nieznany
407 B3BG27K1 Demontaz montaz Zespol sprezyny amortyzatora (Tyl ) Nieznany
ang- dodatkowe, STUDIA, WZR I st 2008-2011 zarządzanie jakością, J.ANG semestr II-V
Atesty lamp przód i tył, Citroen C5
407 B1KD0108P0 Sprawdzenie Cisnienie pompy dodatku do paliwa i szczelnosc wtryskiwacza dodatku N
407 B3BG2BK1 Demontaz montaz ( ) drazek stabilizatora (Tyl ) Nieznany
407 B3FG4FK1 Demontaz montaz Tarcze hamulcowe (Tyl ) Nieznany
407 B1KG0UK1 Demontaz montaz Zbiornik dodatku Nieznany
407 B1GG014MP0 Demontaz Montaz Zespol ogrzewania dodatkowego Nieznany
407 B1GG014QP0 Demontaz Montaz Pompa paliwowa (Ogrzewanie dodatkowe ) Nieznany
407 B3DF00K1 Regulacja Układ jezdny (Tył )
więcej podobnych podstron