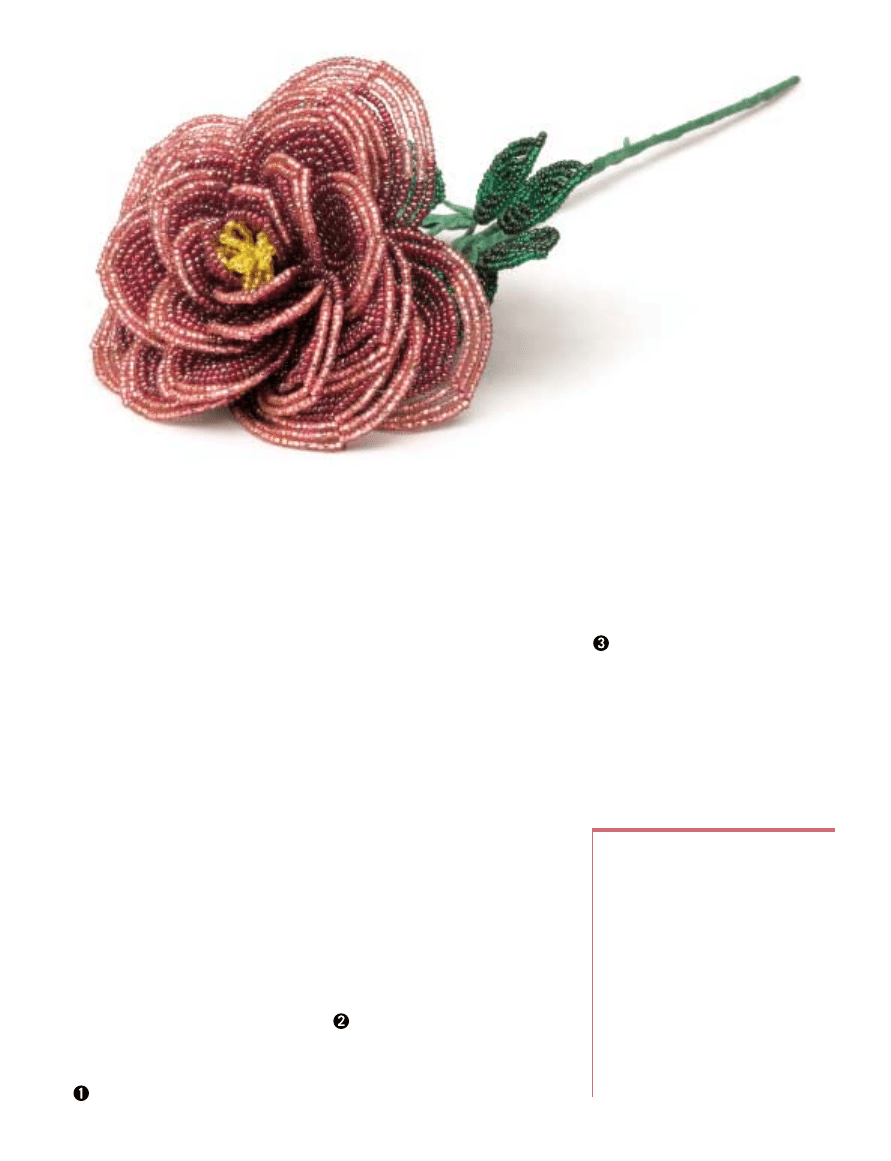
After making the roses for Cheryl
Phelan’s wedding bouquet (“Your
Work,” B&B #48), I wanted to make
more for my niece’s wedding. Meagan
didn’t want to carry all those beads, but
she couldn’t say no to a bouquet of
beautiful, bi-color bead roses.
I adapted my rose pattern from Vir-
ginia Nathanson’s cabbage rose in The
Art of Making Bead Flowers and Bouquets
(reissued by Dover). Virginia’s rose is
enormous, 7 in. (18cm) across, and
takes at least three full hanks of beads.
Mine is about 3
1
⁄
2
in. (9cm) across, takes
a little more than one hank, and can be
completed in an afternoon.
step
by
step
When making bead flowers, you usually
string 4-5 strands of beads from a hank
onto the appropriately colored wire. But
since these flowers have two colors in
most of the petals, you have to string as
you go. For this flower, make a looped
center of gold beads, 24-25 petals, 5
sepals, and 10 leaves. Don’t cut the wire
off the spool until instructed to do so.
center
String 1 strand directly from the
gold hank onto the gold wire. To string
beads from the hank, unwind the wire
from the spool for a foot or two (30-
61cm), but don’t cut it off the spool.
Straighten the end for about 6 in.
(15cm). Insert the end of the wire along
the thread of beads from the knot
toward the bottom of the hank strand
for 2-3 in. (5-7.6cm) (photo a).
Carefully cut the thread just below
the knot. Don’t let it drop, but slide it
out of the beads that are also on the
wire. Now, catch the end of the thread
between the middle and index finger of
your non-dominant hand and lay the
beaded part of the thread over the space
between the top of your index finger
and your thumb. Slide the wire straight
through the beads toward your thumb
(photo b). You can transfer 3-4 in. (7.6-
10cm) of beads at a time this way.
Never pull the thread out of the knot
at the top of the hank, or the hank will
eventually disintegrate. Always cut away
empty threads a bit below the knot to
prevent their tangling.
Slide 7-10 beads about 3 in. from
the end of the wire and form them into
a loop. Twist the wire together about 3
times at the base of the loop (photo c).
Slide another 7-10 beads up to the twist
and make another loop. Twist it about 3
times (photo d). Always twist the wire
in the same direction so you don’t undo
previous work. Make a center bunch of
7-10 loops.
Cut the wire from the spool about 3
in. past the last loop and twist both 3-in.
lengths together to form a stem. Secure
the remaining beads on the spool of
wire with a single twist.
petals
Make the first 2-3 petals with red beads
only. The top outer rows of the other
petals will be gold or pink and the rest
materials
• 2 Hanks 11
0 seed beads, red
• 1 Hank 11
0 seed beads, silver-lined gold
or yellow
• 1 Hank 11
0 seed beads, silver-lined green
• 1 Hank 11
0 seed beads, pink
• 1 Spool 26-gauge craft wire, gold
• 1 Spool 26-gauge craft wire, green
• 1 Spool 26-gauge craft wire, red if making
red and pink roses
• 1 18-gauge Stem wire (I like the thread-
wrapped green ones)
• 1 Roll green floral tape
Tools: wire cutter, chainnose pliers
Bi-color
hybrid tea
rose
Create a memento that will last a lifetime
by Alice Korach
of the petal will be red. All petals have
round tops and bottoms.
To make the first 2-3 petals, string 1
strand of red beads onto the wire.
a. Push 3 beads to about 2 in. (5cm)
from the end of the wire. (This is called
the basic or the base row, and it is one
of the two counts you’ll need to refer to
as you make beaded flowers. The other
is the row count.) Make a tiny twist at
the end of the wire so the beads don’t
fall off. The basic forms the line of
beads at the center of the petal. Keep it
straight as you wrap each petal.
b. Hold the wire in your non-domi-
nant hand, pinching it just below the
basic. Wrap the wire from the spool
around the four fingers of your hand.
Where the wrapped wire crosses the
bottom of the basic, pinch both wires
together with your dominant hand.
c. With your fingers spreading the
loop, begin twisting it toward your body
to twist the wires together. Allow them
to twist together tightly for about
1
⁄
2
in.
(1.3cm), working toward the bottom of
the wire loop. You may have to remove
one finger from the loop to complete
this twisted base (photo e).
d. The beaded wire coming from the
spool is just below the 3 beads of the
basic. Extend the wire at a right angle to
the basic and push enough beads
against the twist to reach around one
side of the basic and meet the wire
above the top bead (photo f). Hold the
wire at a right angle to the basic and
twist the wire once around the wire
above the top bead.
e. With the wire at a right angle to
the top of the basic, push enough beads
to the twist to reach the bottom of the
basic and wrap the wire below the basic
once. To make rounded petal ends,
always enter and leave a twist with
the wire at a right angle to the basic.
Counting across the petal, You now
have 3 rows.
f. Wrap around the basic at top and
bottom until you have a total of 7 rows.
Wrap the wire 3-4 times tightly over
itself at the base of the petal (photo g),
then cut it from the spool.
g. Leave 2-3 tight twists in the bot-
tom loop and cut one of the wires below
the bottom twist (photo h). You now
have a 4-6 in. single wire stem below
the petal.
h. Cut all but
1
⁄
4
in. (6mm) of wire off
the top of the basic and fold the short
piece down on the back of the petal.
i. Make 2-3 more petals.
For each of the next 3 petals, start
with a 3-bead basic. There will be a total
a
b
c
d
e
f
g
h
i
of 9 rows. After you’ve completed the
first 7 rows, measure the amount of
wire you’ll need to go around two more
times plus about 6-8 in. (15-20cm). You
don’t want to run out! String enough
red beads to go about two-thirds of the
way to the top of the 8th row. Then
string enough gold or pink beads to
reach the top of the basic wire and wrap
(photo i). String about the same num-
ber of gold or pink beads then enough
red beads to reach the bottom of the
basic. End the petal as in photos g and h.
The third group of 4 petals has a 5-
bead basic and 11 rows. String gold or
pink beads at the tops of the last 4 rows.
Don’t measure too perfectly or your
flower won’t look natural.
The fourth group of petals has a
7-bead basic and 13 rows. Use gold or
pink beads on the tops of the last 4
rows. Make 5 petals.
The fifth group of petals has a 7-
bead basic and 15 rows. Again, put gold
or pink beads on the tops of the last 4
rows. Make 5 petals.
The last group of petals has a 7-bead
basic and 19 rows. Put gold or pink
beads on the tops of the last 6 rows.
Make 5 petals.
sepals (optional)
Make 5.
String 4 strands of green beads on
the green wire.
Begin with a 15-bead basic as for a
petal. The sepals have round bottoms
and pointed tops.
When you reach the top of the basic
with the first wrap, bring the wire to the
basic at a 45 degree angle. The last bead
on the wrap row sits atop the basic
(photo j). Bring the beaded wire down
from the top of the basic at a 45 degree
angle, positioning the first bead atop the
last bead of the previous row (photo k).
Work a total of 7 rows.
assembling the rose
Cut the stem wire to the desired
finished length of your flower and wrap
it with floral tape. (For a stiffer stem,
use 2 wires.) Start the tape in a ring
around the top of the stem then stretch
it and wrap diagonally down the length
of the wire (photo l).
Place the gold center loops on top of
the stem wire and twist the gold wire
around the stem (photo m).
Cup the 2-3 smallest red petals and
arrange them around the gold-loop cen-
ter. Twist all the stems together around
the stem wire (photo n).
Cup the second group of petals less
tightly and tip their tops outward slightly.
Repeat with the third group of petals.
Arrange the second group then the third
group around the initial bunch. Overlap
each subsequent petal, but when you
place the petal that completes a circle,
j
k
l
m
n
o
p
q
r
tuck its outer edge under the first petal
of the circle (photo o). Twist the stems
together to retain the flower’s shape.
Wrap a yard (.9m) of scrap green
wire around the base of the flower.
Make a few wraps after every petal
group to retain the petal placement
(photo p). On the last two groups, wrap
after every petal.
Cup the fourth group of petals even
less and tip their tops outward a bit
more. Arrange them around the flower
and twist the stems.
Repeat with the fifth group of petals.
The 6th group of petals will tip out-
ward the most. When you like the way it
is arranged, twist the stems tightly
together around the stem wire for their
length and wrap the top inch (2.5cm) of
the stem again with floral tape.
Curve the sepals into a rounded L-
shape and arrange them around the base
of the rose. Twist their wires around the
rose stem and wrap with the green scrap
wire (photo q). Then wrap the entire
stem again with floral tape to cover all
the bare wires.
leaves
Make 10 and arrange in 2 groups.
String 4 strands of green beads on
the green wire.
Begin with a 5-bead basic and work
as for a sepal. The leaves have a round
bottom and pointed top.
Work a total of 9 rows. Do not cut
the bottom loop open. Instead, twist the
wires together for a stiffer stem.
Wrap the stems of each leaf with
flower tape and twist them together as
shown in photo r.
Wrap the main stem of the leaves
with flower tape to hide the twists.
finishing
Wrap the ends of the leaf stems
around the rose stem, setting the first
leaf 2-3 in. below the rose and the other
leaf group about
1
⁄
2
in. below and oppo-
site the first.
Wrap below the leaf joins with
floral tape to cover the twists.
Now fiddle with the curves of the
rose petals, sepals, and leaves to make
the flower look lifelike.
w
Alice is editor of Bead&Button.

Order online at
Enter code I3D2
or call 800-533-6644
Monday-Friday, 8:30am-5:00pm Central Time. Outside the U.S. and Canada, call 262-796-8776.
With every issue of Bead&Button
magazine, you’ll get 20+ beading
projects, complete with step-by-
step illustrated instructions.You’ll
also get shortcuts, solutions, tips,
techniques, and inspiration for
your work.
Creative Ideas for the Art of Beads and Jewelry
Create
stunning gifts
20+
projects
in every
issue
Make fashionable jewelr
y
Stylish designs for
necklaces,
bracelets,
and earrings
Projects for all levels-
from beginner to advanced
www.beadandbutton.com
IT’S FUN! Make jewelr
y like a pro
Create Fashionable Jewelry with
Bead&Button Magazine!
Subscribe
Today!
Wyszukiwarka
Podobne podstrony:
bead&button tattoo necklace
Beading Bead & Button Primary Twist netted necklace
bead&button petite bead ed basket
2006 Bead&Button Show Art Bead Necklace
bead&button peyote ribbon lariat
bead&button huichol bracelet
bead&button fringed fairies and angels
bead&button three sided amulet
bead&button necklace of many facets
bead&button pearls add pizazz to a peyote stitch bangle
bead and button bead crochet feb 2003
Beading Bead And Button3 branzoletka, nudy
Bead And Button Free Project July 2006
Beading Bead And Button2 naszyjnik wąż, nudy
Beading Bead And Button4 perły, nudy
M 5202 Small color dress
Color Healing Meditation Room
BI blackrobodog
BI Ref 4
więcej podobnych podstron