2
b e a d a n d bu t t o n . c o m
by Mindy Brooks
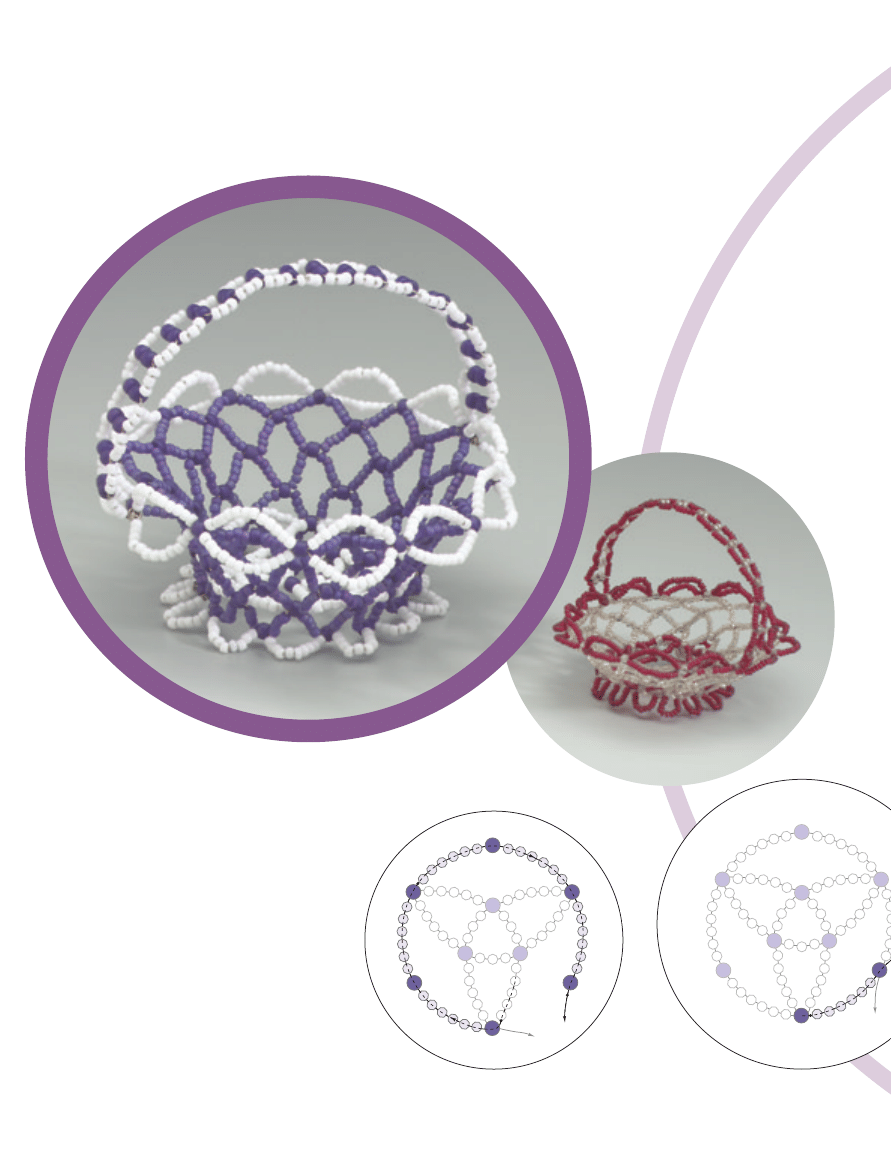
Jean Atter, one of our readers, found the
delicate red-and-clear basket shown
above crumpled up at a flea market, and
she sent it to us for help in figuring out
how it was made. She thought other
readers might also be interested in the
instructions, and we agreed.
a
b
c
Petite
beaded
basket
Make an easy basket with
wire and beads
figure 1
figure 2
1
step
by
step
Start with a circle of netting to form the
basket’s base, then stitch the sides. Add
a handle and trim the basket’s upper
edge with a double row of netting.
Create a small pedestal by adding
beaded loops around the base.
If at any point you need to end one
wire and add another, here’s what to
do. Work through the nearest 8
0
, then
make two or three tight wraps with the
working wire around the wire between
the 8
0
and the neighboring bead, as
shown in photo g. Trim the excess wire
close to the beadwork. Start a new wire
by making several tight wraps on the
other side of the 8
0
. Take the new wire
through the 8
0
and continue beading.
base
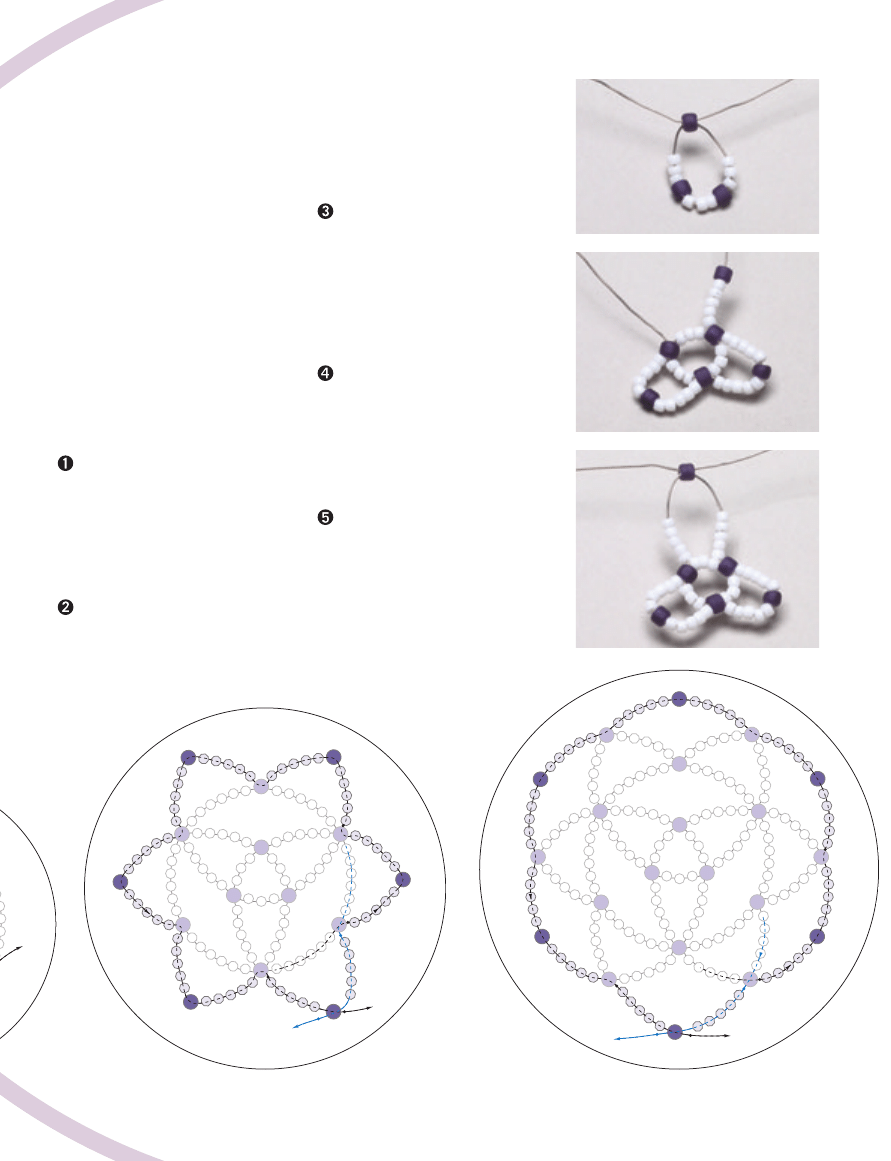
Cut a 6-ft. (1.8m) length of wire and
fold it loosely in half. String 3 color A
beads, an 8
0
, 3 As, an 8
0
, and 3 As and
slide them to the fold. String an 8
0
on
one end of the wire and go through it in
the opposite direction with the other
end of the wire (photo a). Pull both wire
ends to tighten these beads into a ring.
Pick up 5 As, an 8
0
, and 5 As on one
wire end. Go through the next 8
0
along
the ring. Pull the wire to tighten the
beads into a loop. Repeat using the same
wire, then pick up 5 As and an 8
0
(photo b).
Using the other wire end, pick up 5
As and cross through the last 8
0
strung
(photo c). Tighten the wires to complete
the loop.
Pick up 6 As, (note the change in
bead count) an 8
0
, and 6 As on one wire
and go through the closest 8
0
strung in
the previous round (figure 1, a-b).
Repeat, passing through the next 8
0
of
the previous round. Pick up 6 As and an
8
0
(b-c). Pick up 6 As on the other wire
and cross through the last 8
0
strung (fig-
ure 2).
Start this and all subsequent rounds
with the longer of the two wires. Pick up
5 As, an 8
0
, and 5 As and go through the
next 8
0
(figure 3, a-b). Repeat, making a
total of 5 loops (a-c). Then pick up 5 As
and an 8
0
(c-d). Pick up 5 As on the
other wire and cross through the last 8
0
strung (e-f).
Pick up 5 As, an 8
0
, and 5 As. Go
through the next 8
0
along the previous
round (figure 4, a-b). Repeat, passing
through the next 8
0
of the previous
round. Make a total of 5 loops (a-c).
Then pick up 5 As and an 8
0
(c-d). Pick
up 5 As on the other wire and cross
through the last 8
0
(e-f).
B e a d
&
B u t t o n
3
a
b
c
d
f
e
a
b
c
d
f
e
b
c
figure 3
figure 4
a
2
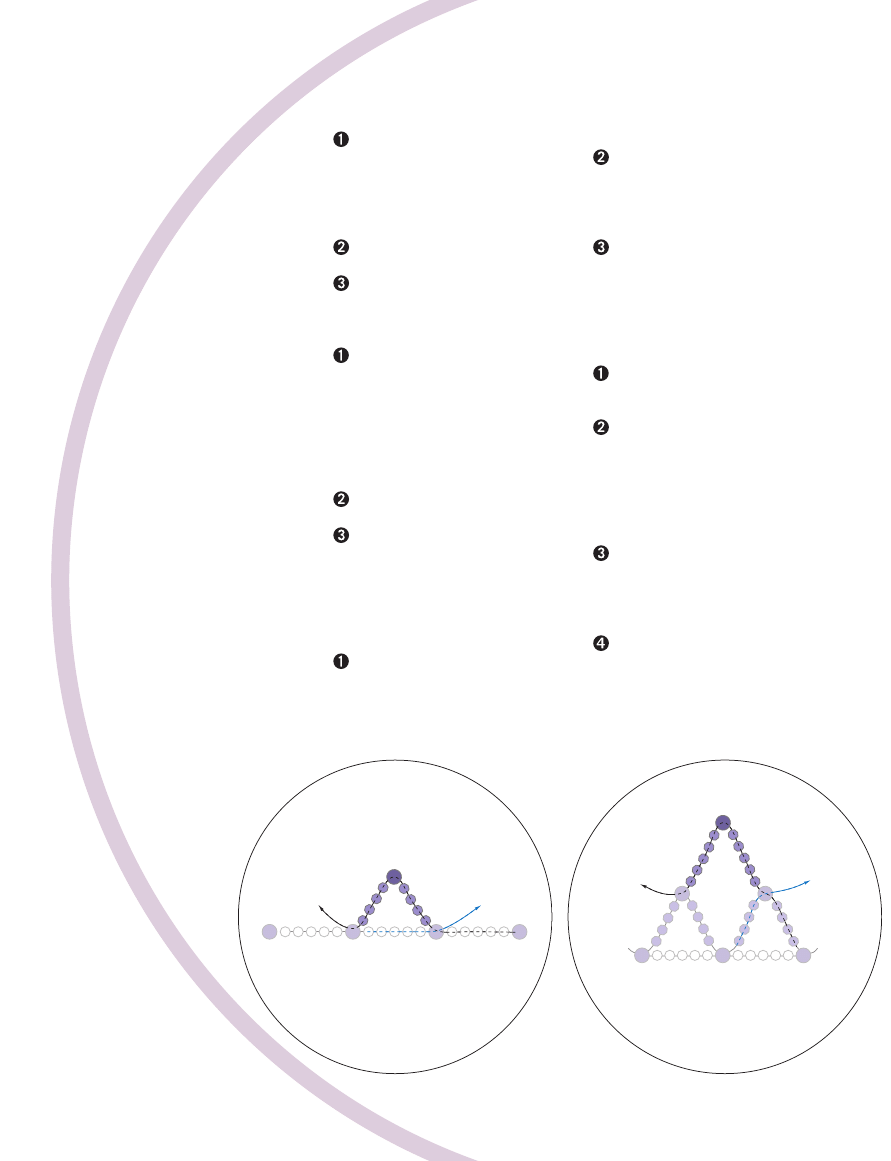
sides
Pick up 4 Bs, an 8
0
, and 4 Bs and go
through the nearest 8
0
in the previous
round (figure 5). Repeat, making a
total of 11 loops. Then pick up 4 Bs and
an 8
0
. Pick up 4 Bs on the other wire
and cross through the last 8
0
strung.
Pick up 5 Bs, an 8
0
, and 5 Bs and
work this round as in step 1 (figure 6).
Repeat step 2 twice. Leave the wire
ends unfinished for now.
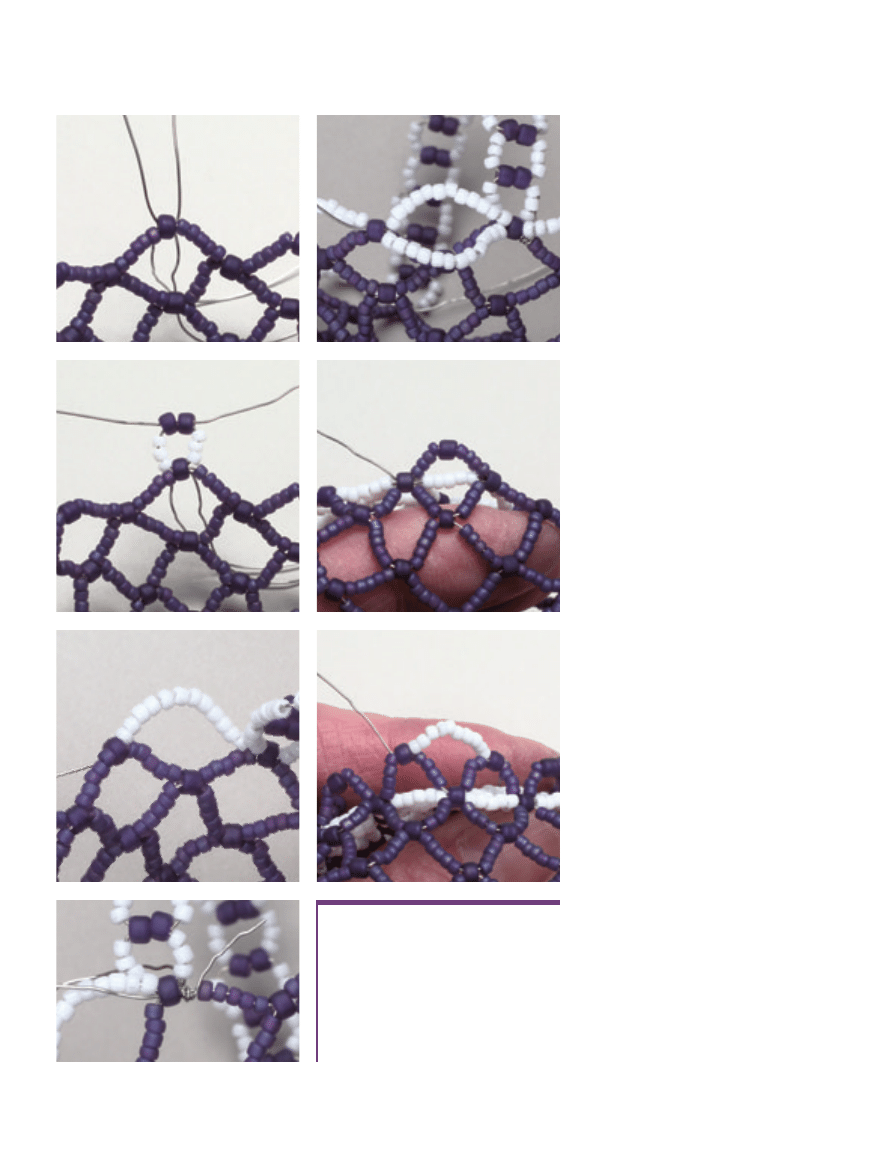
handle
Cut a 4
0
-in. (1m) length of wire
and pass it through the 8
0
where the
unfinished wires cross. Fold the wire in
half (photo d). String 3 As and 2 8
0
s on
one wire end and 3 As on the other.
Cross this wire through the 8
0
s (photo
e). Tighten the wire to form the first
small square of the handle.
Repeat, making the handle 18
squares long.
To attach the handle to the basket
edge, string 3 As on each wire and
cross the wires through the 8
0
directly
across from the starting point. Leave
the wire ends unfinished.
decorative edge
Measure the unfinished wires from
the basket’s sides and handle. You need
each wire end to be at least 6-in. (15cm)
long to make the netted edge. If your
wire is shorter than 6 in., secure it and
add a new piece as described in the
introduction to these instructions.
String 12 As on one wire. Go
through the next 8
0
(photo f). Continue
until you reach the 8
0
at the starting
point. Go through this 8
0
and secure the
wire with a few wraps (photo g).
Repeat step 2 with the remaining
wires to form two rows of contrast-
color netting that cross through the 8
0
s
on the basket’s top edge (photo h).
Trim the wire close to the beadwork.
pedestal
Cut a 2 ft. (61cm) length of wire.
Pass the wire through any 8
0
on the
outer row of the base and center it.
Working with one of the wire
ends, pick up 4 Bs, an 8
0
, and 4 Bs. Go
through the next 8 (photo i). Repeat,
making a total of 11 loops. Pick up
4 Bs and an 8
0
. Pick up 4 Bs on the
other wire end and cross through the
last 8 strung.
Pick up 10 As and go through the
next 8
0
(photo j). Continue until you
cross through the 8
0
at the starting
point. Secure the wire ends on each side
of the 8
0
as before and trim.
Pinch the B loops inward against
the basket base. Then adjust the A
loops so they point down to form the
pedestal base.
w
Mindy is senior editor of Bead&Button.
4
b e a d a n d bu t t o n . c o m
figure 5
figure 6
3
B e a d
&
B u t t o n
5
materials
• 15g Japanese seed beads, size 11
0, color A
• 15g Japanese seed beads, size 11
0, color B
• 15g Japanese seed beads, size 8
0, color B
(choose cylinder-shaped beads with holes
large enough to accept 4 wires)
• 1 Spool 26-gauge craft wire
Tools: chainnose pliers, diagonal wire cutters
d
e
g
h
i
j
f
4

Order online at
Enter code I3D2
or call 800-533-6644
Monday-Friday, 8:30am-5:00pm Central Time. Outside the U.S. and Canada, call 262-796-8776.
With every issue of Bead&Button
magazine, you’ll get 20+ beading
projects, complete with step-by-
step illustrated instructions.You’ll
also get shortcuts, solutions, tips,
techniques, and inspiration for
your work.
Creative Ideas for the Art of Beads and Jewelry
Create
stunning gifts
20+
projects
in every
issue
Make fashionable jewelr
y
Stylish designs for
necklaces,
bracelets,
and earrings
Projects for all levels-
from beginner to advanced
www.beadandbutton.com
IT’S FUN! Make jewelr
y like a pro
Create Fashionable Jewelry with
Bead&Button Magazine!
Subscribe
Today!
Wyszukiwarka
Podobne podstrony:
bead ed crochet et rop e instruction
bead ed crochet rop e
bead&button tattoo necklace
bead and button bead crochet feb 2003
Beading Bead & Button Primary Twist netted necklace
Beading Bead And Button3 branzoletka, nudy
2006 Bead&Button Show Art Bead Necklace
Bead And Button Free Project July 2006
bead&button bi color hybrid tea rose
bead&button fringed fairies and angels
Beading Bead And Button4 perły, nudy
bead&button three sided amulet
bead&button necklace of many facets
bead&button pearls add pizazz to a peyote stitch bangle
Artistic Wire Green or Magenta Single Spiral Bead Necklace & Earrings
la twins bead
więcej podobnych podstron