1
weater Cabinet
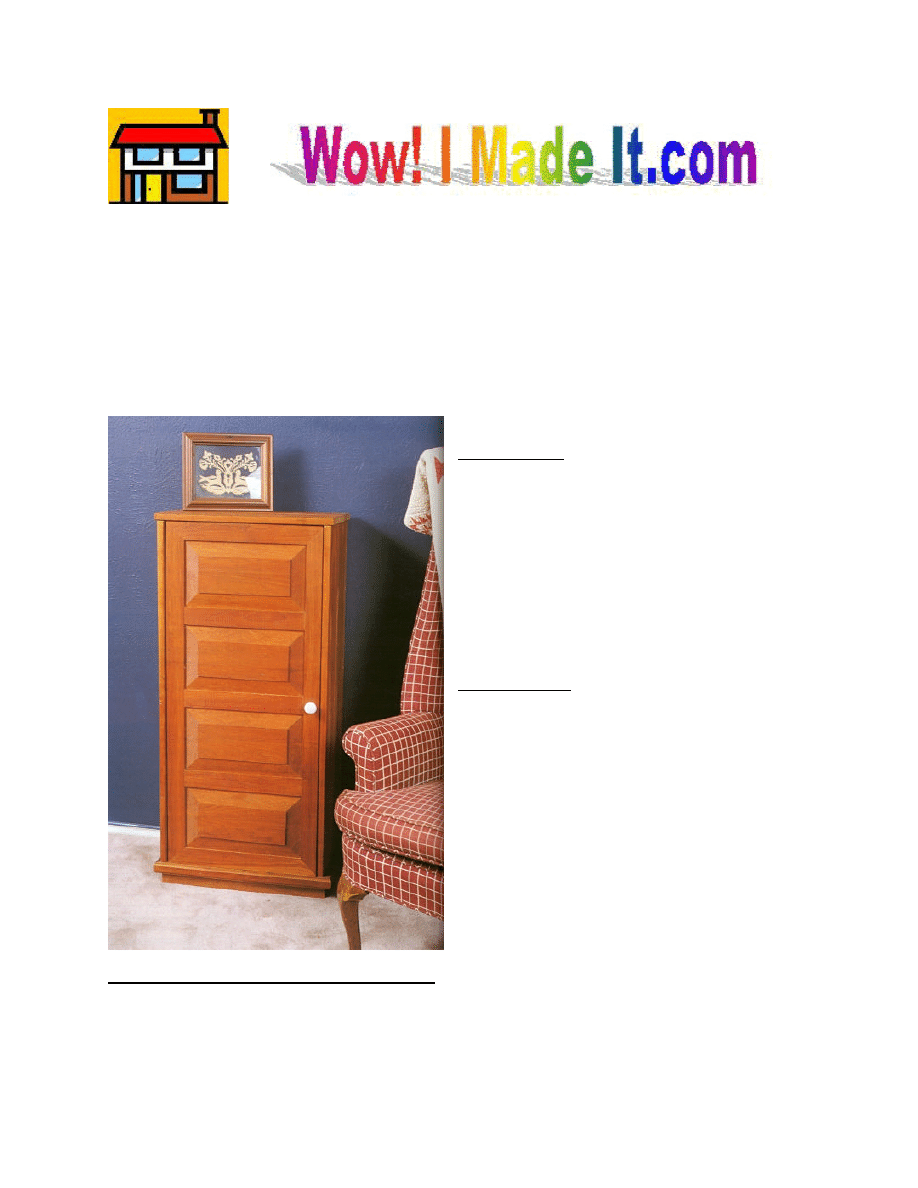
Almost anyone can use an extra cabinet in the bedroom, the closet, or any other room. I
needed more space to store my sweaters, and this pretty addition to my bedroom has two shelves
inside, so it provides lots of room. Made with laminated pine sides, back, and top, the cabinet
doesn’t take long to build, and the elegant-looking paneled door is easier to construct than you
might expect. The finished cabinet is approximately 22 inches wide, 12 inches deep, and 44
inches tall.
Materials
§ 4 pcs. Laminated pine:
§ 2 pcs. 10-1/2” x 35-1/2”
§ 1 pc. 18-1/4” x 35-1/2”
§ 1 pc. 11” x 20-3/4”
(or 43 linear feet of 1 x 4 pine)
§ 5 linear feet of 1 x 10 pine
§ 3 linear feet of 1 x 2 pine
§ 12 linear feet of 2 x 4 pine
§ 5 linear feet of 1 x 8 pine
Hardware
§ Approx. 25 8d finishing nails, 2-1/2” long
§ Approx. 75 #6 1-1/4”-long flathead wood
screws
§ Approx. 20 #6 2”-long flathead wood
screws
§ Approx. 50 #6 2-1/2”-long flathead wood
screws
§ 2 concealed hinges*
§ 1 door pull
§ 1 magnetic cabinet catch (optional)
Special Tools and Techniques:
§ 2 or 3 bar clamps (optional)
§ miters
§ bevels
§ dadoes
S
2
*See “Notes on the Materials,” below
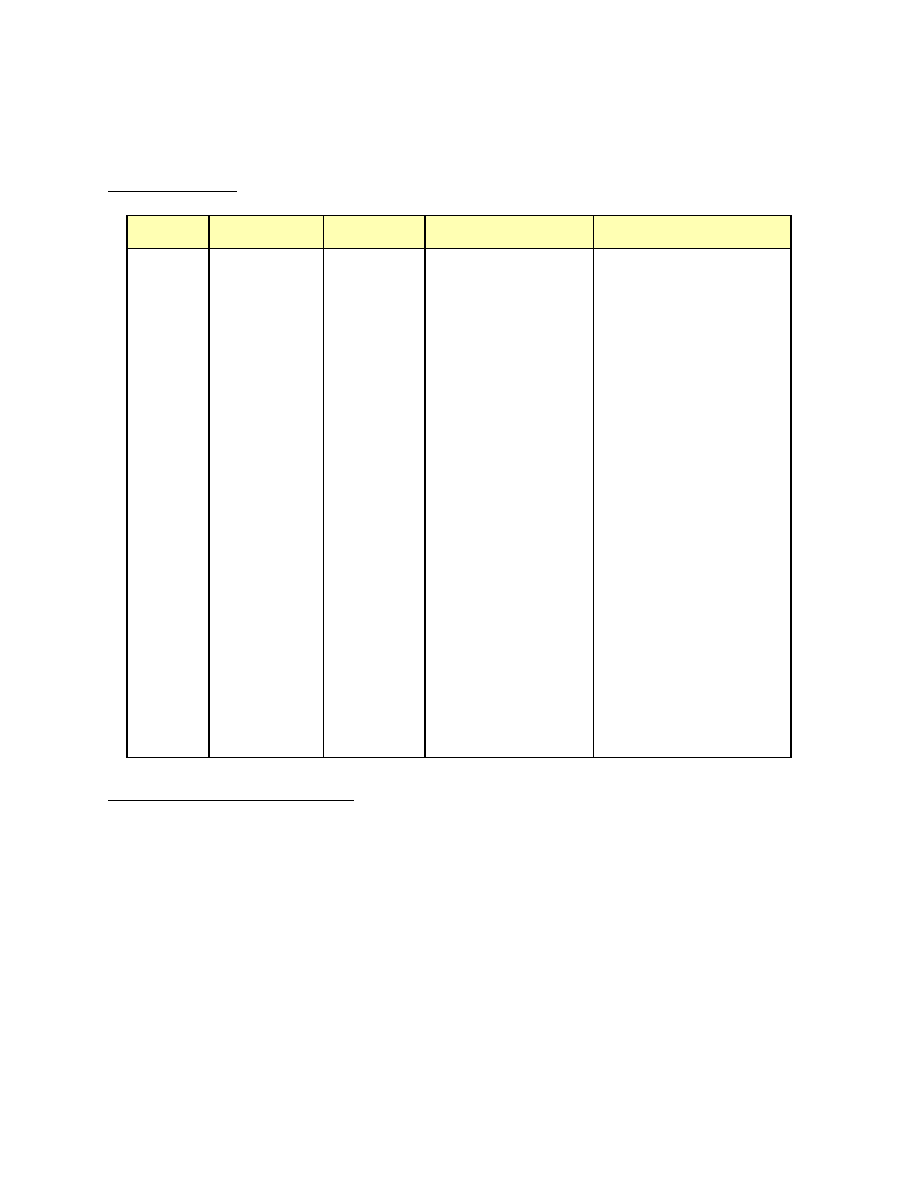
Cutting List
Code
Description
Qty.
Material
Dimensions
A
Side
2
Laminated pine
10-1/2” x 35-1/2”
B
Back
1
Laminated pine
18-1/4” x 35-1/2”
C
Top
1
Laminated pine
11 x 20-3/4”
D
Bottom
1
1 x 10 pine, ripped
18-1/4” long
E
Shelf
2
1 x 10 pine, ripped
18-1/4” long
F
Shelf
Support
4
1 x 2 pine
8-7/8” long
G
Lower Base
Side
2
2 x 4 pine, ripped
10-1/2” long
H
Lower Base
Front/Back
2
2 x 4 pine, ripped
19-3/4” long
I
Upper Base
Front/Back
2
2 x 4 pine
21-3/4” long
J
Upper Base
Side
2
2 x 4 pine
11-1/2” long
K
Panel
4
1 x 8 Pine
7” x 14-5/8”
L
Side Frame
2
1 x 4 pine, ripped
35-1/2” long
M
Top/Bottom
Frame
2
1 x 4 pine, ripped
18” long
N
Inner Frame
3
1 x 4 pine, ripped
14” long
Notes on the Materials
The two sides, back, and top of this cabinet are constructed from laminated 1 x 4 pine. Most
building-supply stores sell sections of pine that have already been laminated. If you want to
laminate the sections yourself, you need a total of 43 linear feet of 1 x 4 pine and two or three bar
clamps.
I used concealed hinges for this cabinet because I wanted the hinges to be invisible from the
outside. If you don’t mind seeing the pin portion of the hinge when the cabinet is closed, you
can substitute butt hinges. I don’t recommend using surface-mounted hinges for this project.
Making the Cabinet Sides, Back, and Top
1. If you purchased boards already laminated, simply cut two sides (A) each 10-1/2” x 35-
3
1/2”, one back (B) 18-1/4” x 35-1/2”, and one top (C) 11” x 20-3/4”. Then skip down to
Making the Bottom and the Shelves,” below.
If you laminate the boards yourself, it is a good idea to rip a minuscule amount from each
edge to be joined before gluing the wood lengths together. Use this procedure in each of
the following assemblies to ensure a solid bond in the lamination process.
2. To assemble the laminated sides (A), cut six boards from 1 x 4 pine, each measuring 35-1/2
inches long.
3. After ripping each edge to be joined, place three
of the boards side by side. Wipe glue on the
meeting 35-1/2-inch-long edges, and clamp the
three boards together using at least two bar
clamps. (Refer to the "Tips and Techniques"
section of our website if you need assistance with
clamping procedures.) Leave the assembly
clamped for at least 24 hours. You now have one
side assembly (A) measuring 10-1/2” x 35-1/2”.
4. Repeat Step 3 to assemble the second side (A).
5. To make one laminated back (B), cut six boards
from 1 x 4 pine, each 35-1/2”.
6. After ripping the edges to be joined, place the six
boards side by side. Wipe glue on the adjoining
35-1/2-inch-long edges, and clamp the six boards
together with bar clamps. Leave the assembly
clamped for at least 24 hours.
7. You now have a laminated section that measures
21 x 35-1/2 inches. Rip one long side of the
lamination to make a back (B) measuring 18-1/4”
x 35-1/2”.
8. To assemble the laminated top (C) cut four
boards from 1 x 4 pine each 20-3/4” long.
9. After ripping the edges to be joined, place the four boards side by side. Wipe glue on the
meeting 20-3/4-inch-long edges, and clamp the four boards together with bar clamps.
Leave the assembly clamped for at least 24 hours.
10. You how have a laminated section that measures 14 x 20-3/4 inches. Rip one short side of
Figure 1
4
the lamination so that the resulting top (C) measures 11 x 20-3/4 inches.
Making the Bottom and the Shelves
The cabinet bottom (D) and two shelves (E) are identical. Each measures 8-7/8” x 18-1/4”.
1. Rip a total of five feet of 1 x 10 pine so that it measures 8-7/8 inches wide.
2. Cut one cabinet bottom (D) and two shelves (E) from the ripped 1 x 10 pine, each
measuring 18-1/4 inches long.
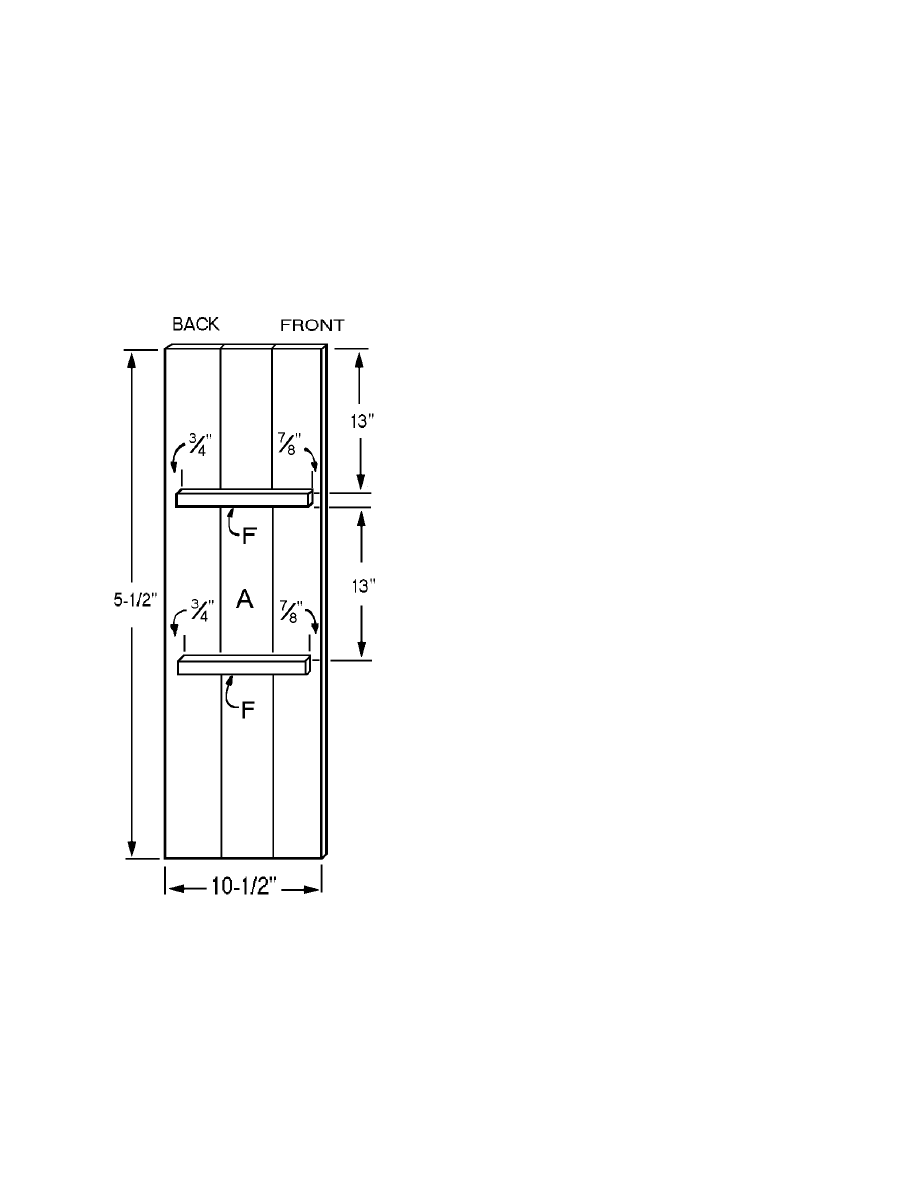
3. The two shelves (E) are supported by
shelf supports (F) that are screwed to the
inside of the cabinet sides. The actual
placement of the shelves inside the
cabinet is optional. I placed my first
one 13 inches from the top, and the
second shelf 13 inches below that.
Figure 1 shows the placement of the
shelf supports.
4. Cut four shelf supports (F) from 1 x 2
pine, each measuring 8-7/8 inches long.
5. According to the spacing that your
desire, mark the placement of the shelf
supports (F) on the inside face of each
of the sides (A). Referring to Figure 1,
note that the shelf supports (F) are
installed 3/4 inch from the rear edge of
the sides (A) in order to accommodate
the back (B). There is a 7/8” space at the
front ends of the shelf supports (F) to
allow for the door.
6. Glue and screw the two shelf supports
(F) to inside face of each side (A) using
two 1-1/4-inch-long screws on each
shelf support (F). The two sides with the
shelf supports attached should be mirror
images of each other
Assembling the Cabinet
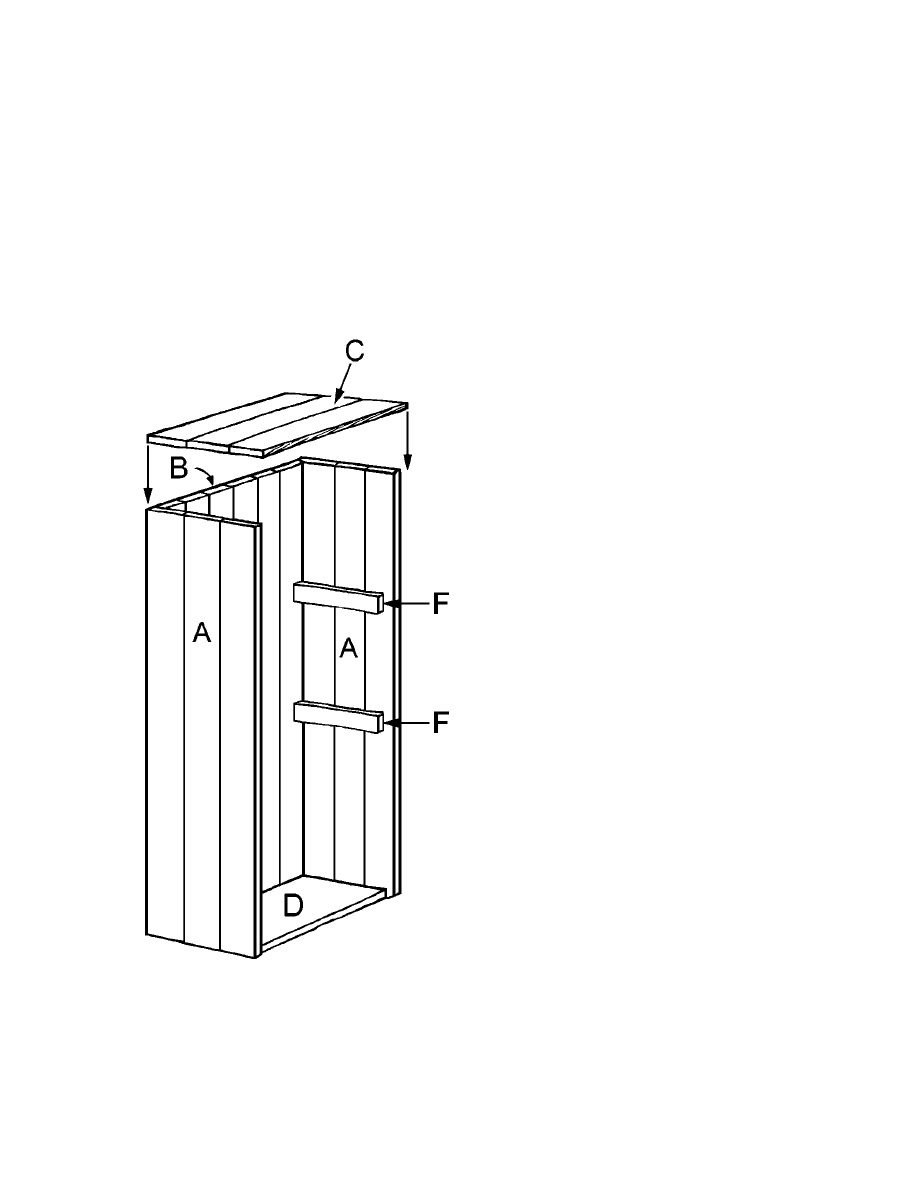
1. Figure 2 shows the assembly of the cabinet. Note that the cabinet top, back, and sides are
all flush at the rear, and that the top overhangs the sides and front by 1/2 inch. The bottom
Figure 2
5
fits inside the cabinet like a bottom shelf. Use glue and screws on all of the assembly steps,
and countersink the screws.
2. Place the back (B) between the two sides (A). Screw through the sides (A) into the edges
of the back (B) using 1-1/4-inch-long screws spaced about 5 inches apart.
3. Fit the bottom (D) between the two sides (D) so that it is flush with the lower edges of the
sides. Screw through the sides (A) into the edges of the bottom (D), using three 1-1/4-inch-
long screws on each side. Also use three 1-1/4-inch screws through the back (B) into the
edge of the bottom (D).
4. Fit the top (C) onto the cabinet. It should be flush with the cabinet assembly at the back,
and overhang the front and sides by ½”. Screw through the top (C) into the edges of the
sides (A) and into the edge of the back (B). Use 1-1/4-inch-long screws spaced about every
5 inches.
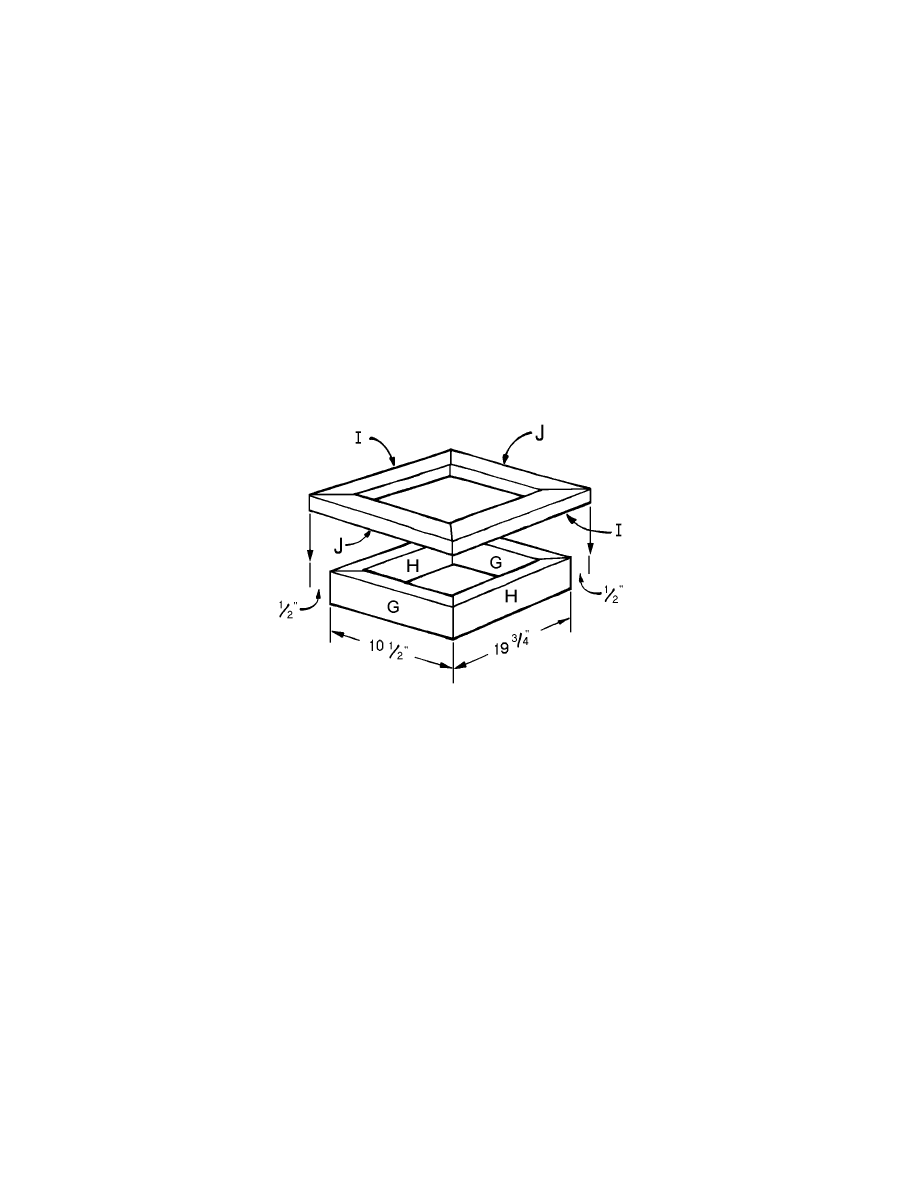
Building the Base
As shown in Figure 3, the base of the cabinet is an assembly of two mitered frames built from 2
x 4s. Note that the smaller frame on the bottom is made from the 2 x 4s standing on edge, and
that the larger, upper frame is assembled with the 3-1/2” width placed horizontally. The top of
the base extends 1 inch beyond the cabinet on the front and sides, and is flush with the cabinet in
the back.
1. Rip a total of 5-1/2 feet of 2 x 4 pine so that it measures 2 inches wide.
2. Cut two lower base side pieces (G) from the ripped 2 x 4, each measuring 10-1/2 inches
long.
3. With each lower base side piece (G) standing on edge, miter both ends at a 45-degree angle.
4. Cut two lower base front/back pieces (H) from the ripped 2 x 4, measuring 22-1/2 inches
long.
Figure 3
6
5. Again, stand the pieces on edge, and miter both ends of each of the lower base front and
back pieces (H) at a 45-degree angle.
6. Assemble the two lower base front/back pieces (H) and the two lower base side pieces (G),
matching the mitered corners, as shown in Figure 3. Glue and screw the corners together,
using two 2-1/2-inch-long screws in each corner.
7. Cut two upper base front/back pieces (I) from full-width 2 x 4 pine, each measuring 21-3/4
inches long.
8. Setting each upper base front/back piece (I) on its face, miter both ends at a 45-degree
angle, as shown in Figure 3.
9. Cut two upper base side pieces (J) from 2 x 4 pine, each measuring 11-1/2 inches long.
10. Again, with each piece on its face, miter both ends of each of the upper base side pieces (J)
at a 45-degree angle, as shown in Figure 3.
11. Assemble the two upper base front and back pieces (I) and the two upper base side pieces
(J), matching the mitered corners, as shown in Figure 3. Glue and screw the corners
together, using one 2-1/2-inch-long screw in each corner.
12. An optional step at this point is to rout a decorative design on the outer edges of the
assembled upper base. I routed the top outer edge, and then turned the base upside down
and routed the bottom outer edge with a matching cut.
13. Place the assembled upper base on top of the lower base. The two base assemblies are flush
at the back, and the upper base overhangs the lower base by 1 inch on both of the sides and
in the front. Glue and screw the two base frames together. Screw through the upper base
into the lower base using 2-1/2-inch-long screws spaced about every 4 inches. Countersink
the screws.
Attaching the Cabinet to the Base
1. Turn the cabinet assembly upside-down. Set the base assembly onto the bottom of the
cabinet so that the upper base fits next to the cabinet assembly. The upper base is flush
with the cabinet at the back and 1 inch larger on the sides and front.
Figure 4
7
2. Screw through the upper base boards (I and J) into the bottom of the cabinet using several
2-inch-long screws.
Constructing the Door
Although it looks very professional, the door is not difficult to make. Just take your time and
measure the pieces exactly. There are four raised panels, all fitted into an outer frame.
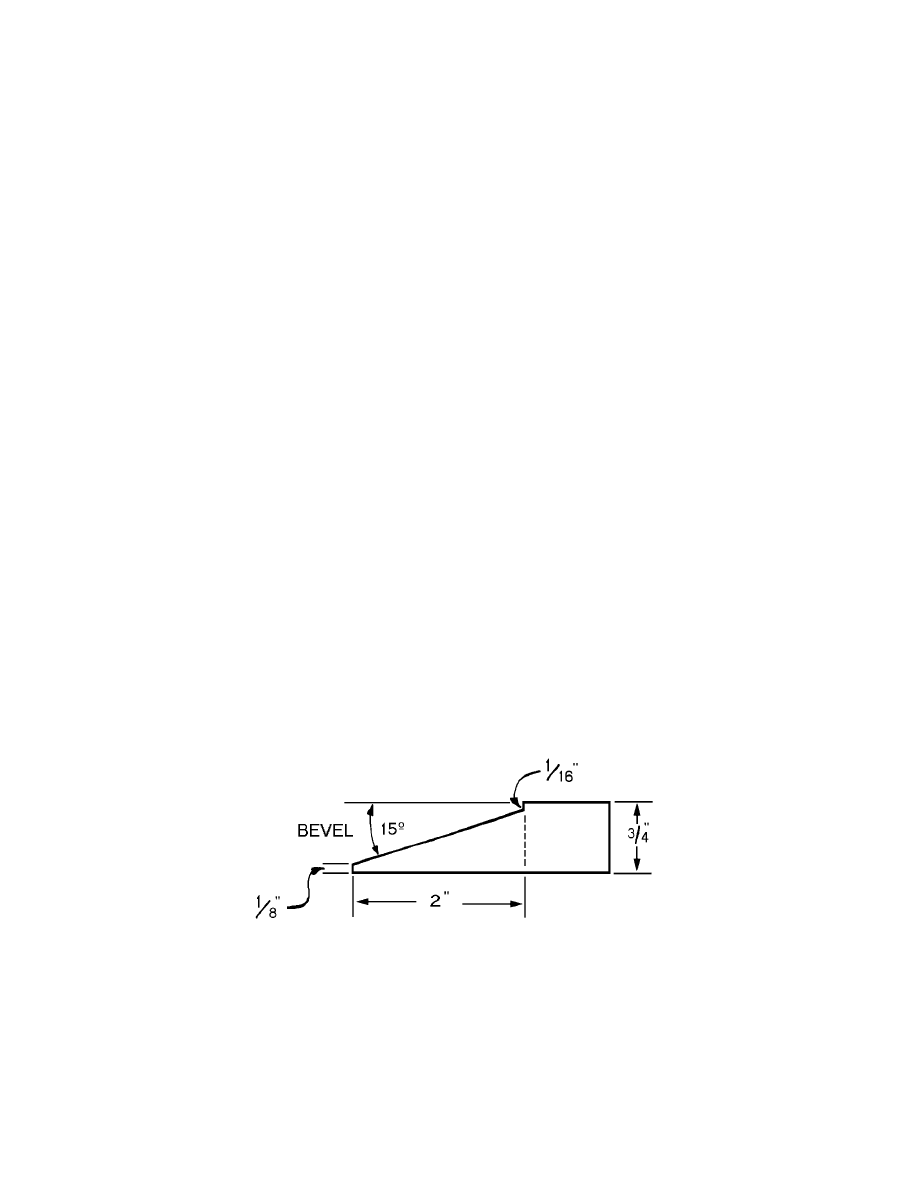
1. Start by cutting four panels (K) from 1 x 8 pine, each measuring 7 x 14-5/8 inches.
2. Set your saw blade to 15 degrees off vertical, and make a 2-inch-long bevel on all four
edges of each of the four panels (K). The remaining thickness of the cut side should be 1/8
inch. A diagram of the resulting cut is shown in Figure 4.
Figure 5

8
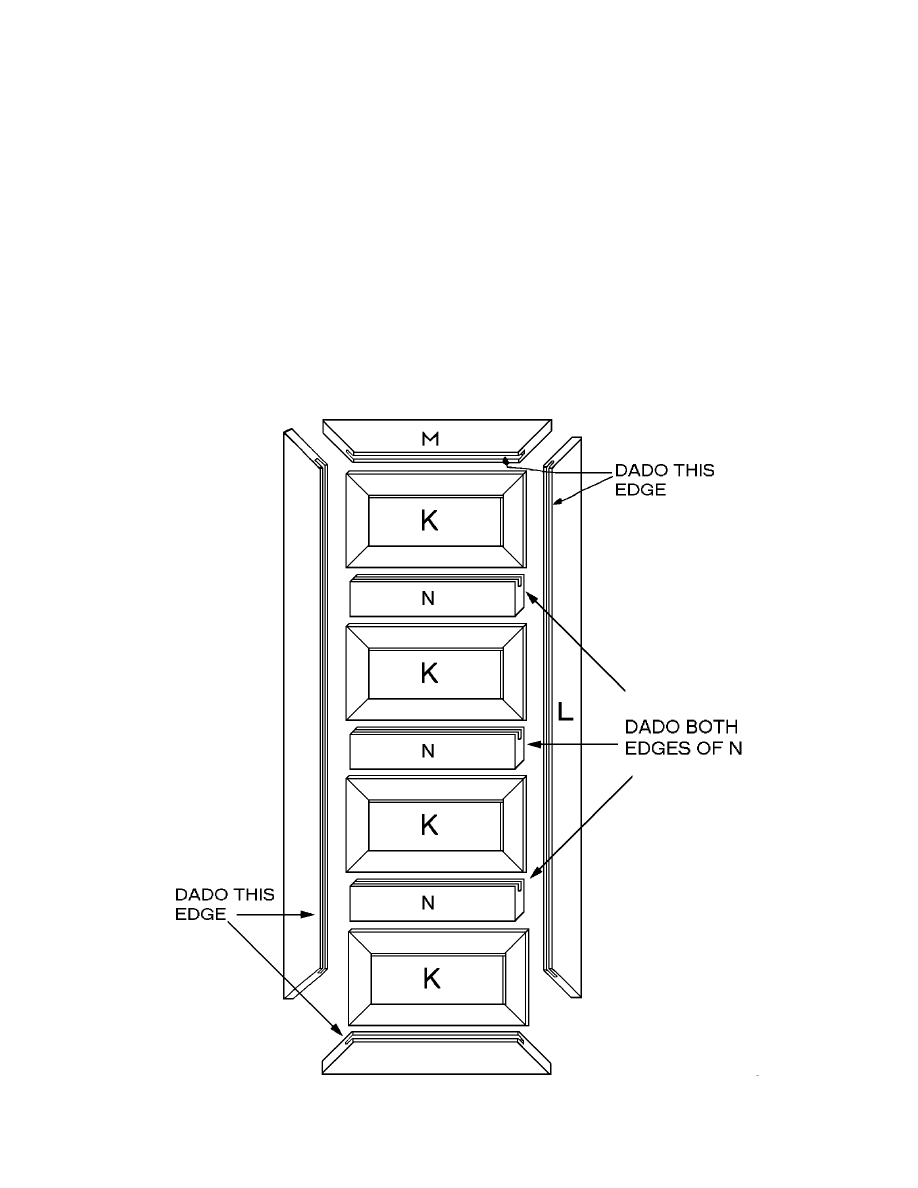
3. The assembly of the panels within the outer frame is show in Figure 5. To make the frame,
rip a total of 13 linear feet of 1 x 4 pine to a width of 2 inches.
4. Cut two side frame pieces (L) from the ripped 1 x 4 pine, each measuring 35-1/2 inches
long.
5. Setting each side frame piece (L) on its face, miter both ends at a 45-degree angle, as shown
in Figure 5.
6. Cut two inner top/bottom frame pieces (M) from the ripped 1 x 4 pine, each measuring 18
inches long.
7. Setting each top/bottom frame piece (M) on its face, miter both ends at a 45-degree angle as
shown in Figure 5.
8. Cut three inner frame pieces (N) from the ripped 1 x 4 pine, each 14 inches long.
9. The four panels (K) float in a dado that is cut into the frame pieces. Cut a dado 1/4-inch
wide and 3/8-inch deep into the shorter edge (which will face to the inside of the finished
door) of the top, bottom and side frame pieces (L and M). For some assistance in cutting
dadoes, refer to the “Tips and Techniques” on the home page of the website.
10. Cut a dado 1/4-inch wide and 3/8-inch deep into both of all three inner frame pieces (N).
11. To make certain that all pieces fit together perfectly, the door should first be assembled
without glue or nails. Lay all of the door parts on a level surface. Then, referring to Figure
5, place the top frame (M) between the two side frames (L), and match the miters. Set the
first panel (K) into the dadoes in the frame pieces (L and M), and fit one inner frame piece
(N) between the side frame pieces (L) below the panel. Next alternately add three more
panels (K) and two more inner frame pieces (N). Finally, add the bottom frame piece (M).
12. When you are satisfied that all of the pieces fit correctly, glue and clamp the assembly
together and let it sit for a few hours. Glue only the frame pieces together; the panels should
float freely in the dadoes. Reinforce the four corners and each of the inner frame pieces (N)
with 8-penny finishing nails.
Hanging the Door
It is easier to hang the door if you first lay the cabinet on its back. Then you will not be
supporting the weight of the door while you attempt to hang it.
1. Place the door inside the cabinet and check the fit. It should fit perfectly without binding
on the edges. Sand or plane the doors if necessary for a perfect fit.
2. Install two hinges on the inside of the cabinet following the manufacturer's directions.

9
3. Install a door pull on the cabinet door. I used a simple, white ceramic knob.
4. An optional step is to add a magnetic cabinet catch. This is inexpensive, easy to install, and
helps keep the door from creeping open.
Finishing
1. Fill any exposed screw holes with wood filler.
2. Sand the completed cabinet.
3. Stain or paint the finished cabinet in the color of your choice. I used a dark cherry stain.
Try other exciting designs for indoor and outdoor furniture at
www.wowimadeit.com
Wyszukiwarka
Podobne podstrony:
Corner Buffet Cabinet(1)
cabinetmakerupho00sher
Corner Cabinet 1
Plan and Install Kitchen Cabinets
bathroom cabinet szafka lazienkowa
Brydcliffe Cabinet
Display Cabinet 2
box taurus cabinets manual
Display Cabinet 3
Atlantic E New IP66 Cabinet id Nieznany
Mobile File Cabinet
I Ogólnopolski Kongres Naukowo Szkoleniowy CABINES Polska ~Dermatologia w kosmetyce i kosmetologii~
constitution of cabinet commitee on uidai 2009
Kitchen Base Cabinet
Corner Buffet Cabinet(1)
Cabinet Compact TV Cabinet
Cabinet Kitchen Island
cabinet bathroom 2
Cabinet Gun Cabinet
więcej podobnych podstron