
ITEM #
QTY
DESCRIPTION
1
1
1" x 6" x 5'-0" LONG CEDAR FENCE BOARD
2
35
1-1/2" LONG FINISH NAILS
3
1
OUTDOOR WOOD GLUE
4
4"
3/8" DIAMETER ROUND WOOD DOWEL
NOTE: All parts to be made from 1"x6" (3/4" thick by 5-1/2" wide) cedar fence board.
Therefore, all dimensions shown 5-1/2" will not require cutting. If a board other
than 5-1/2" wide will require additional cuts.
STEP #1
Make (2) side wall panels
as shown in Figure #1.
1
FIGURE #1
FIGURE #2
1-1/2" DIA.
HOLE
1
3/8" DIA.
HOLE
STEP #2
Make (1) front wall panel
as shown in Figure #2.
FIGURE #3
1
STEP #3
Make (1) back wall panel
as shown in Figure #3. Use
front panel as a template for
back panel to ensure both
panels are identical.
6"
5-1/2"
6"
5-1/2"
2"
4-1/2"
2-3/4"
2-3/4"
6"
5-1/2"
2-3/4"
2-3/4"
We are working on a customer "do-it-yourself" photo album web page which will feature photographs
of our customers projects. If you would like to participate, take a picture of your project and either
mail the photograph to us or scan it and e-mail it to us at:
mail to: L & R Designs, LLC
356 Holcomb Rd.
Kelso, WA 98626
e-mail to: doityourself@choosefreedom.com
L & R Designs, LLC is not responsible or liable for
the safety of any person building or using the items
based on our plans.
Copyright 2004 Martian Auctions
681
153
BIRDHOUSE
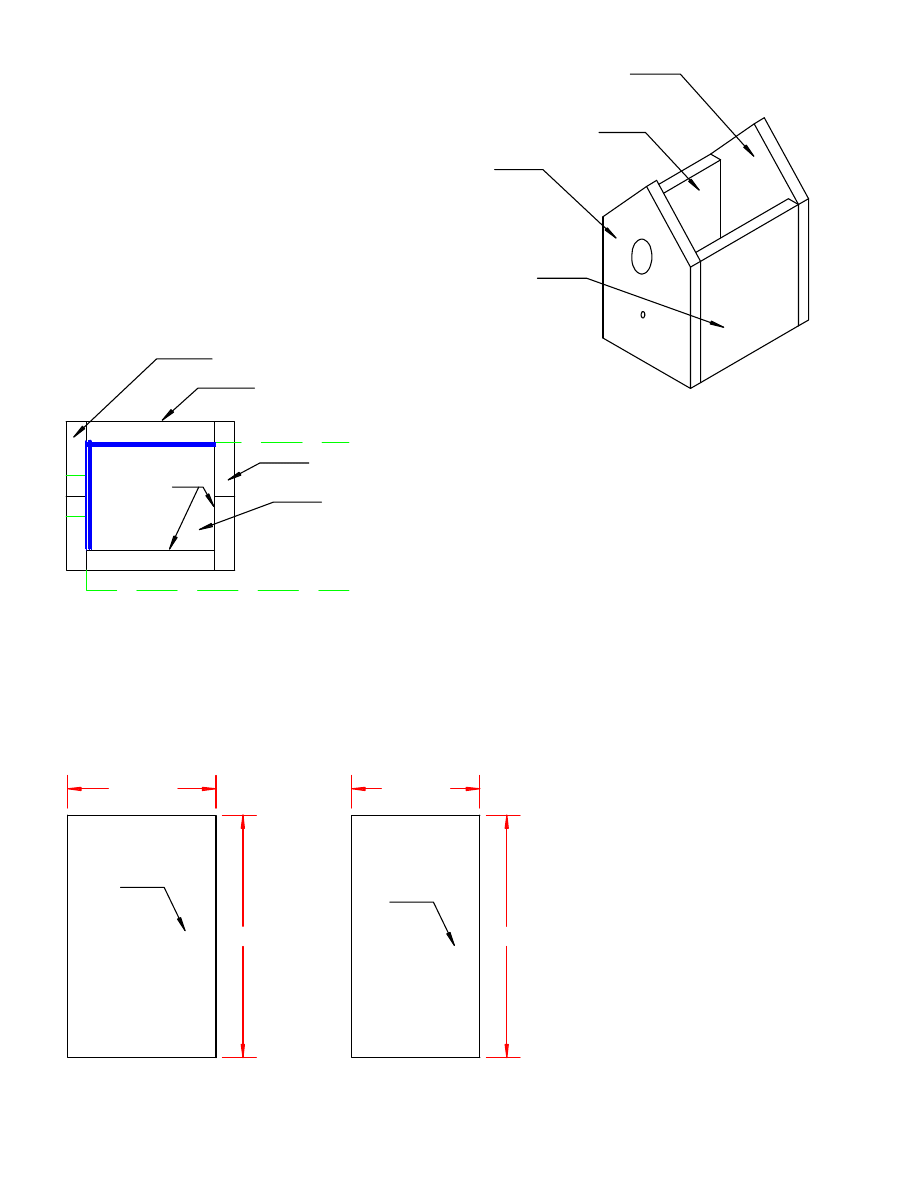
FIGURE #4
STEP #4
Assemble (2) sides, front, and back
panels as shown in Figure #4. Glue
and nail (3 nails per joint) each joint.
FIGURE #5
TOP VIEW
FRONT
PANEL
SIDE
PANEL
BACK
PANEL
SIDE
PANEL
UN-CUT
BOARD
MARK
& CUT
SIDE PANEL
FRONT PANEL
BACK PANEL
STEP #5
Make (1) bottom panel by placing assembled walls
on top of oversized, future bottom panel, board as
shown in Figure #5. Mark (2) edges to be cut from
inside of birdhouse as shown in Figure #5. Cut on
marked lines. Install bottom panel inside assembled
walls with glue and nails (2 nails per side).
1
1
1
FIGURE #6a
FIGURE #6b
STEP #6
Make (1) right roof panel and
(1) left roof panel as shown in
Figure #6a and Figure #6b.
RIGHT ROOF PANEL
LEFT ROOF PANEL
PAGE 2
5-1/2"
9"
4-3/4"
9"
Copyright 2004 Martian Auctions
682
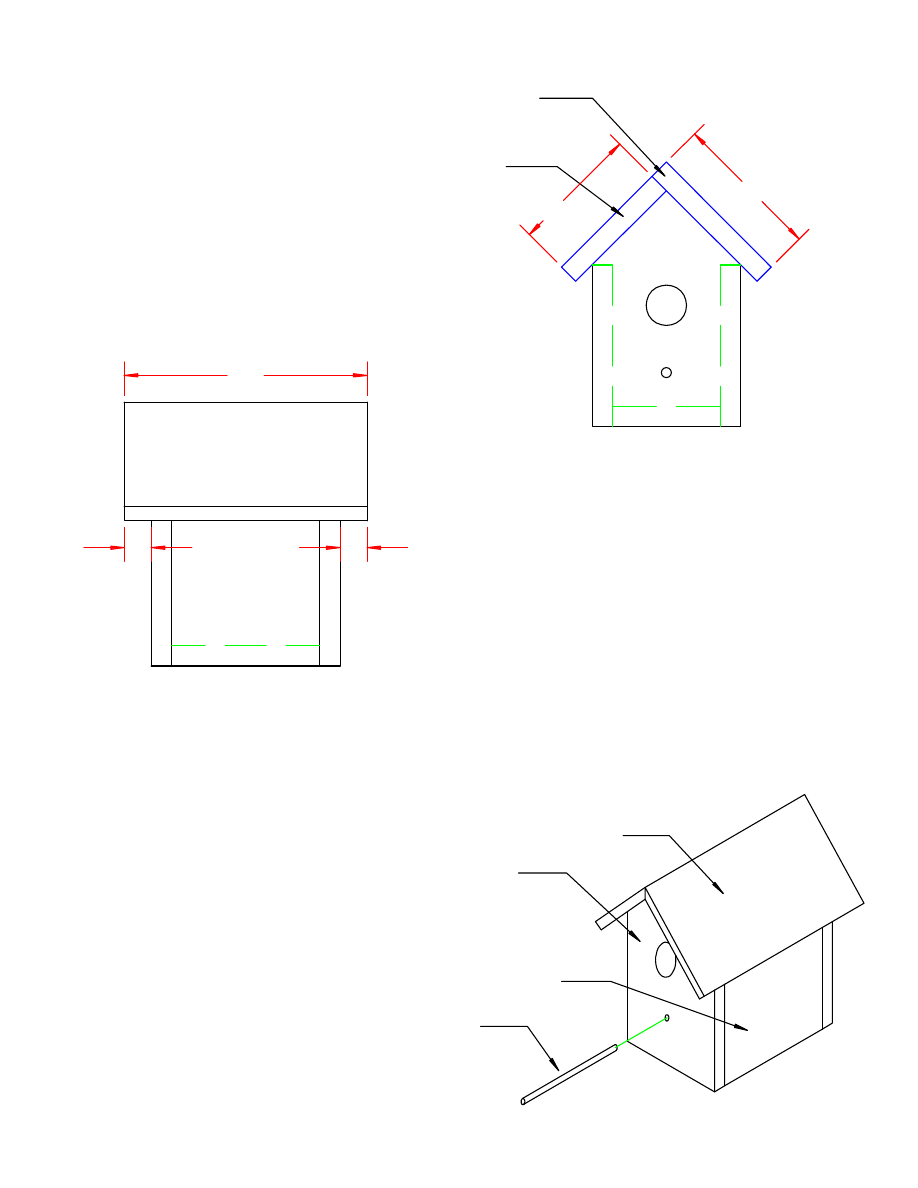
FIGURE #8
STEP #8
Cut a 4" long piece of 3/8" diameter
wood dowel. Glue and insert dowel
into 3/8" diameter hole previously cut
into front panel of bird house.
FRONT
PANEL
RIGHT ROOF
PANEL
RIGHT SIDE
PANEL
STEP #7
Install roof panels on house
walls as shown in Figure #7a
and Figure #7b. Glue and nail
(2 nails per end and 3 nails
along ridge) roof panels.
LEFT ROOF
PANEL
RIGHT ROOF
PANEL
FRONT
BACK
RIGHT ROOF PANEL
FIGURE #7a
FIGURE #7b
4" LONG
3/8" DOWEL
FRONT VIEW
SIDE VIEW
PAGE 3
5-1/2"
4-3/4"
9"
1"
1"
Copyright 2004 Martian Auctions
683
Wyszukiwarka
Podobne podstrony:
A building a bird house
A building a bird house
BIRD HOUSE various birds guidance
BIRD HOUSE various birds guidance
Bird house Cedar
Bird house traditional birdhouse
Bird house Hanging birdhouse
7 House of Korba (The Ghost Bird)
3E D&D Adventure 06 House of Harpies
Dolls house 2
16 Dom Wschodzącego Słońca [The House Of Rising Sun]
house list word impr, ANG
2 bedroom two storey house T shaped
czytanie koło II Man?out the House
Język angielski My house
więcej podobnych podstron