Introduction
— Article by Adam Troke
White Dwarf has been going now for more than thirty years (starting way back in June/July 1977) and over the years
it's featured some truly amazing battles. Just asking around the office, it seems that everyone has their own favourite
battlefields. What this article will do is delve into past issues of White Dwarf and showcase some of the most
impressive and inspiring battlefields. Every few months we'll update this article with some new battlefields, whether
those are from the latest issues of the magazine, or truly stunning examples of the scenery-builder's craft from years
gone by - and showcase them with great photography and comments and contributions from the scenery builders
themselves or the gamers who played upon them.
If you have a favourite battlefield from a previous issue of White Dwarf, that you would like to see featured in a future
update, why not drop us a line letting us know. Include which month and year it was shown in your letter, and we'll see
if we can feature your suggestions in this article in the future. Send any letters to:
White Dwarf Battlefields
Design Studio
Games Workshop
Lenton
Nottingham
NG7 2WS
UK
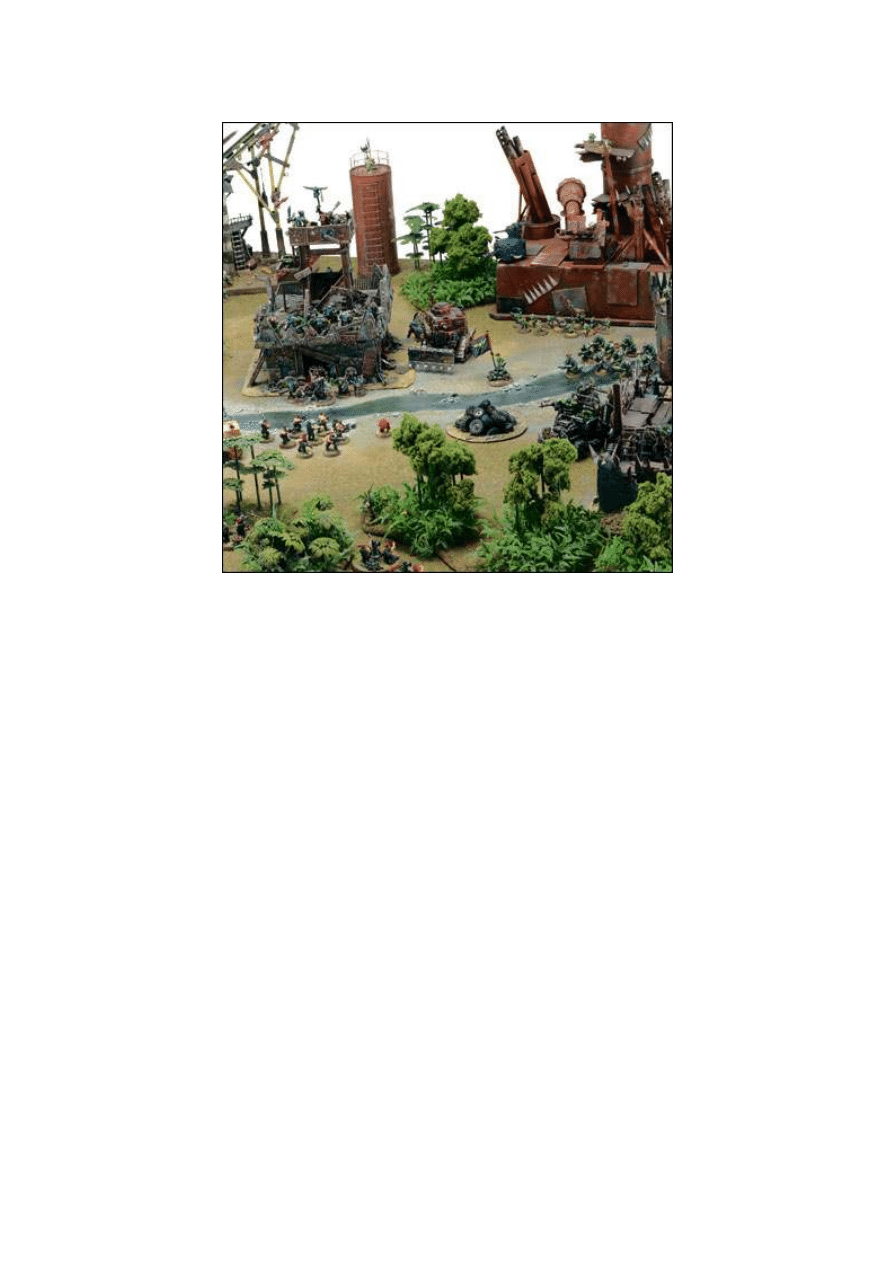
Dave & Jeremy's Jungle Installation
This cracking gaming board was featured back in the July 2009 issue of White Dwarf as part of Jeremy
Vetock and Dave Andrew's 'Old War Stories' series of articles, and goes to show what a couple of
enterprising wargamers can do when they get their hands on enough bits and bobs.
Most of the Orky items on this battlefield are scratch-built pieces by Jeremy (who has an eye for scrap that
would make any Death Skull Loota jealous), and they typically serve as a backdrop for his prodigious Ork
army. Determined to put together an inspiring battlefield, however, he intermingled them with the Studio
jungle scenery built by Studio modelling expert Mark Jones.
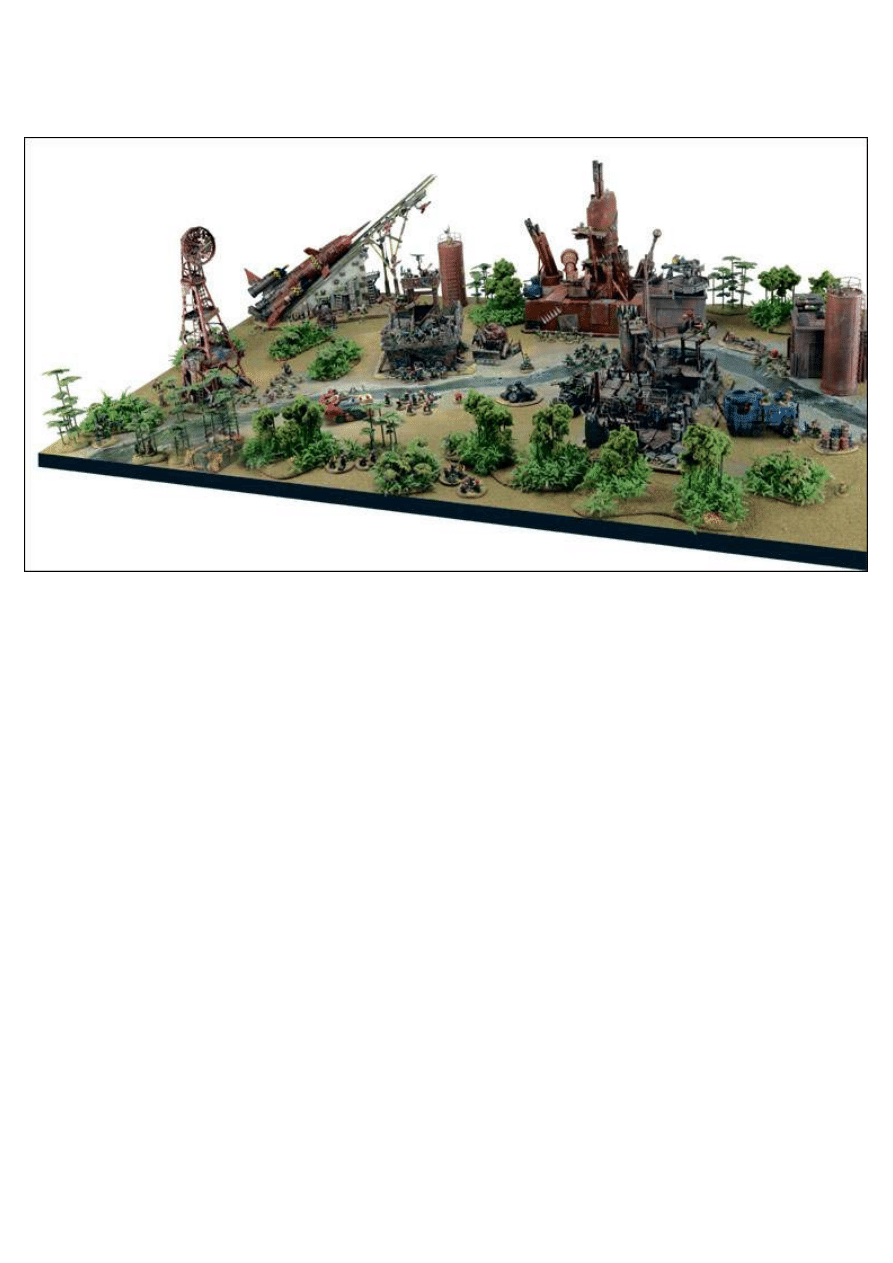
A board like this lends itself really well to a great narrative scenario, which is exactly what Dave and Jeremy
were going for in their game.
Dave: We had in mind a commando raid, and since Jeremy collects Orks, we knew we wanted to use them.
When you think of a typical Ork settlement, you tend to think of a desert shantytown, but we wanted to do
something slightly out of the ordinary - so we chose a jungle. Doing that brings to mind all sorts of great
military archetypes, especially when you throw the Catachans into the mix.
With the defenders decided and the board determined, I needed to cook up a daring commando team, so
Captain Black and his cutthroat unit of desperate Catachan Imperial Guardsmen were born.
The game itself was great fun, a real example of what you can do with a little forethought and ambition.
Using modified sentry rules and a crazy Ork reinforcement table added some real excitement to proceedings.
The end result was a blast, a memorable battle played on a great-looking battlefield.

Mark Jones made these pieces of jungle scatter terrain, using trees from the Warhammer 40,000 Jungle
Trees kit, along with some foliage taken from the Jungle Plants set - he attached these all to a hardboard
base, which he based and detailed with Modelling Sand and Static Grass.
These Jungle Trees were made by using wooden barbeque skewers to create long trunks, and foliage from
the Citadel Woods to create a realistic-looking jungle canopy. By mixing the types of plants and trees
included within his jungle terrain set, Mark managed to create a set that, while coherent in colour and overall
look, still had enough variety to look like a realistic jungle.
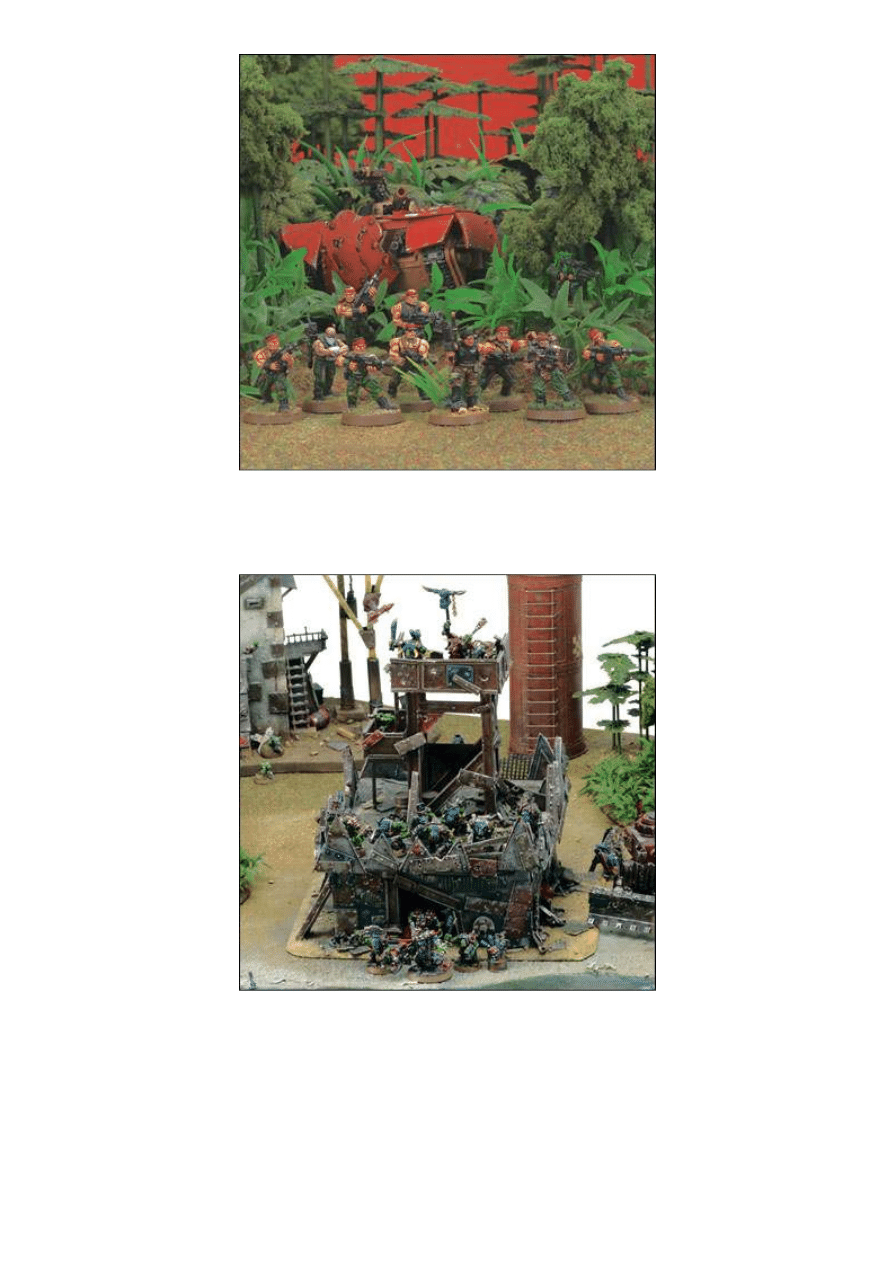
To accompany the great terrain setup they had planned, Dave created a band of misfit Catachans to launch
their daring raid. You'll note he even went to the trouble of converting up a Chimera, so that it looked like
his warriors had deliberately disguised it to look like a rusty Ork transport.
Jeremy is utterly mad about his Orks, and can often be found making crazy (and brilliant) pieces of scenery.
He plunders and purloins bits and pieces from more or less any source imaginable, creating a scenery set
that is undeniably Orky!
The Vale of Orthanc
This impressive board represents the Vale of Orthanc, and is the battlefield that hosts the titanic clash
between the enraged Ents of Fangorn and the remnants of Saruman's legions of Isengard. The scene where
Treebeard leads his army of furious treefolk into battle is stirring and inspiring, and it was always an
obvious contender for inclusion in a game featuring massed battles in Middle-earth such as War of The
Ring.
In August 2009's issue of White Dwarf, this board was used in a four player battle report, where Chris Peach
and Nick Bayton, controlling Saruman and the defenders of Isengard attempted to stave off Treebeard and
the ravening Ents.
The battlefield itself was built by Dave Andrews and Mark Jones, two of the seasoned scenery builders here
in the Studio. The pair took roughly a week to complete it from conception to completion - and the effort
certainly paid off.
We asked Chris Peach how he found playing on such an evocative board, here's what he had to say:
Chris: The great thing about War of The Ring is that you get to recreate a really iconic moment from the
books or films. That's pretty exciting, especially when it's a scene like this one. Who doesn't love the image
of the Ents emerging from the forest and smashing apart Saruman's diabolical mine workings?
One of the things I really like doing is getting down to the model's eye view and having a look to see what
it's like for the fighters on the ground. This board just looks amazing from that perspective. The mine
workings are a variety of heights to break up the skyline, and the dam at the far end makes, the perfect
backdrop. Of course, when you put all the Ents on it gets really exciting, as you see them bearing down of
the serried ranks of Orcs and Uruk-hai.
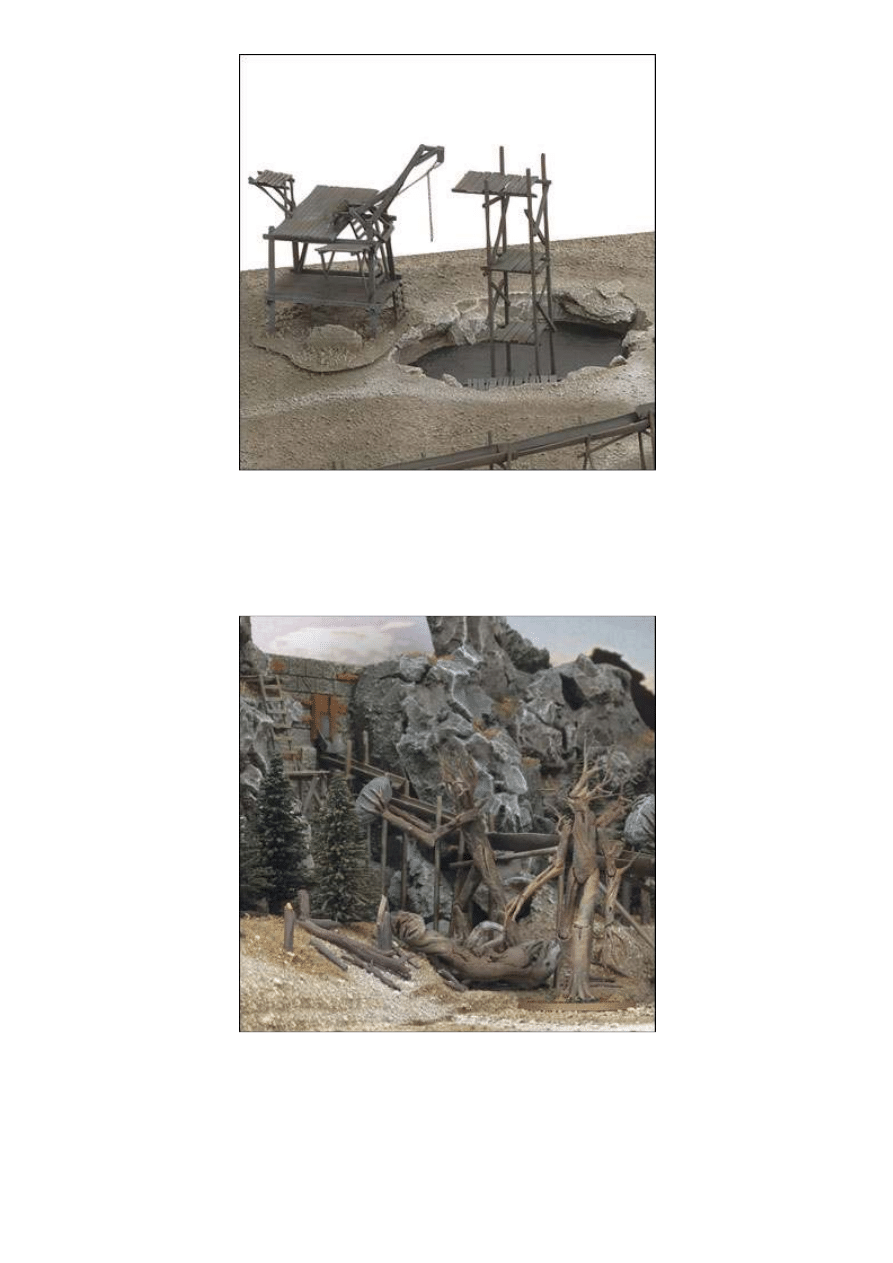
One of the defining features of the Orthanc board is the rickety mine workings that loom above the fissures
and rents in the ground. These were built using the guidelines given in the Two Towers Journey Book, and
further embellished with chains and other details. Not only do they provide height for the board, and
obstacles to fight across, but they also provide a memorable link to the scene as portrayed in the Two
Towers movie.
The dam is constructed from plasticard and cork that can be picked up at any specialist modelling shop.
Dave and Mark built it up to resemble the dam in the movie, adding details such as the wooden chutes that
funnel water down to the infernal mine workings below. Such an elaborate project as this calls for a real
diversity of skills, and an extensive selection of modelling tools and supplies to make it all happen.

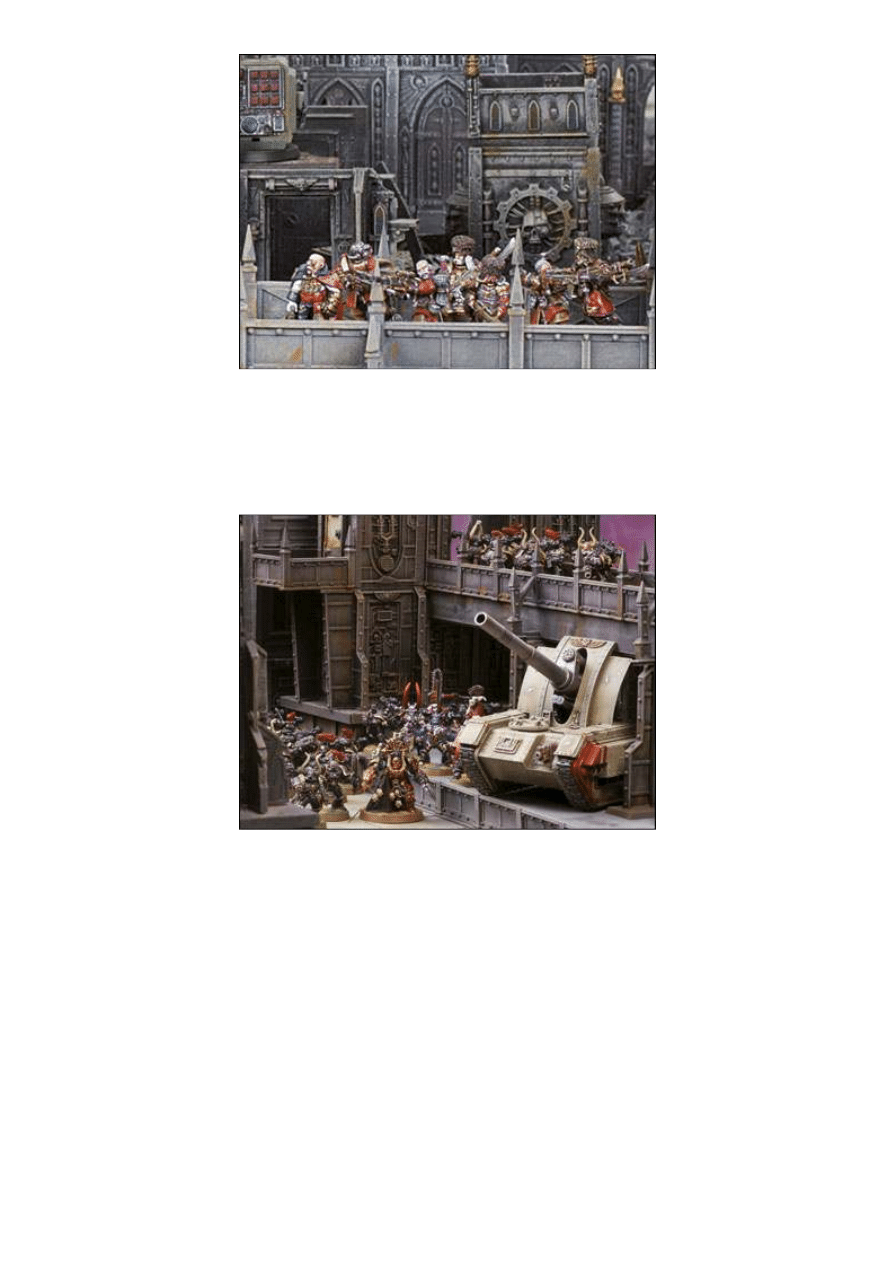
Inaugural Planetstrike Battle Report
What sets the battlefield in this Planetstrike battle report apart from the norm was the way that the scenery
changed from the start of the battle to the end. What started the game as an impressive array of robust
Imperial fortifications, ends up as a smashed and badly damaged position, littered with craters and battle
damage.
The first Planetstrike battle report was fought between Phil Kelly and Robin Cruddace, and became a bloody
affair as Phil's Eldar shattered most of Robin's Imperial Bastions and butchered his beleaguered Imperial
Guard defenders. As you can see from the two pictures shown below, the battlefield changed dramatically
from the start to the finish of the game.
We asked Robin Cruddace about how he got on in the game, and were delighted at how exciting he had
found the whole experience.
Robin: It's funny, because Phil didn't just beat me, he really beat me with 5 objectives to 0. That didn't leave
such an impression on me as did the fun of the game though - it was brilliant to watch a highly visual battle
play out. With every turn of the game the board changed as bastions exploded, lance strikes scored super-
heated scars into the battlefield and my 'impregnable' defences were pulverised. If you're the sort of gamer
that likes telling stories as you play, visualising great moments and watching them play out on the tabletop
in front of you, then a Planetstrike battlefield such as this is a dream come true!
•
This is the board as it started the game. Robin took great care to set up a bulwark area, packed with
Imperial defenders and several objectives, and then used two further Imperial Bastions to create a
killing zone - hopefully Phil would funnel his warriors into the kill zones and let Robin's big guns do
the talking.
•
The end of the game tells a very different story - Robin has been completely destroyed with all five
objectives falling into Eldar hands. In spite of the crushing defeat, however, everyone present agreed
that the game looked utterly brilliant. The battlefield is now a patchwork of craters, detritus and
debris.
•
The Imperial Bastion kit is clearly one of the stars of the show on this battlefield. The result of
teamwork between Dave Andrews, Chris Catton and Colin Grayson, the Imperial Bastion is a
fantastically versatile modular scenery piece. The advent of detailed multi-part plastic kits such as
this has transformed many a battlefield, and certainly enables Planetstrike gamers to create a truly
impressive compound to play their games upon.
•
Perhaps the other feature of this battlefield that we should talk about is that it is made up of a Realm
of Battle Gameboard. In years gone by hobbyists had few choices for beautiful gaming surfaces other
than spending countless hours with polystyrene, MDF sheets and all manner of other tools and
supplies. The Realm of Battle Gameboard, on the other hand, enables hobbyists to get their hands on
a marvellously detailed, modular gaming area that can be quickly and easily painted and made ready
for war.
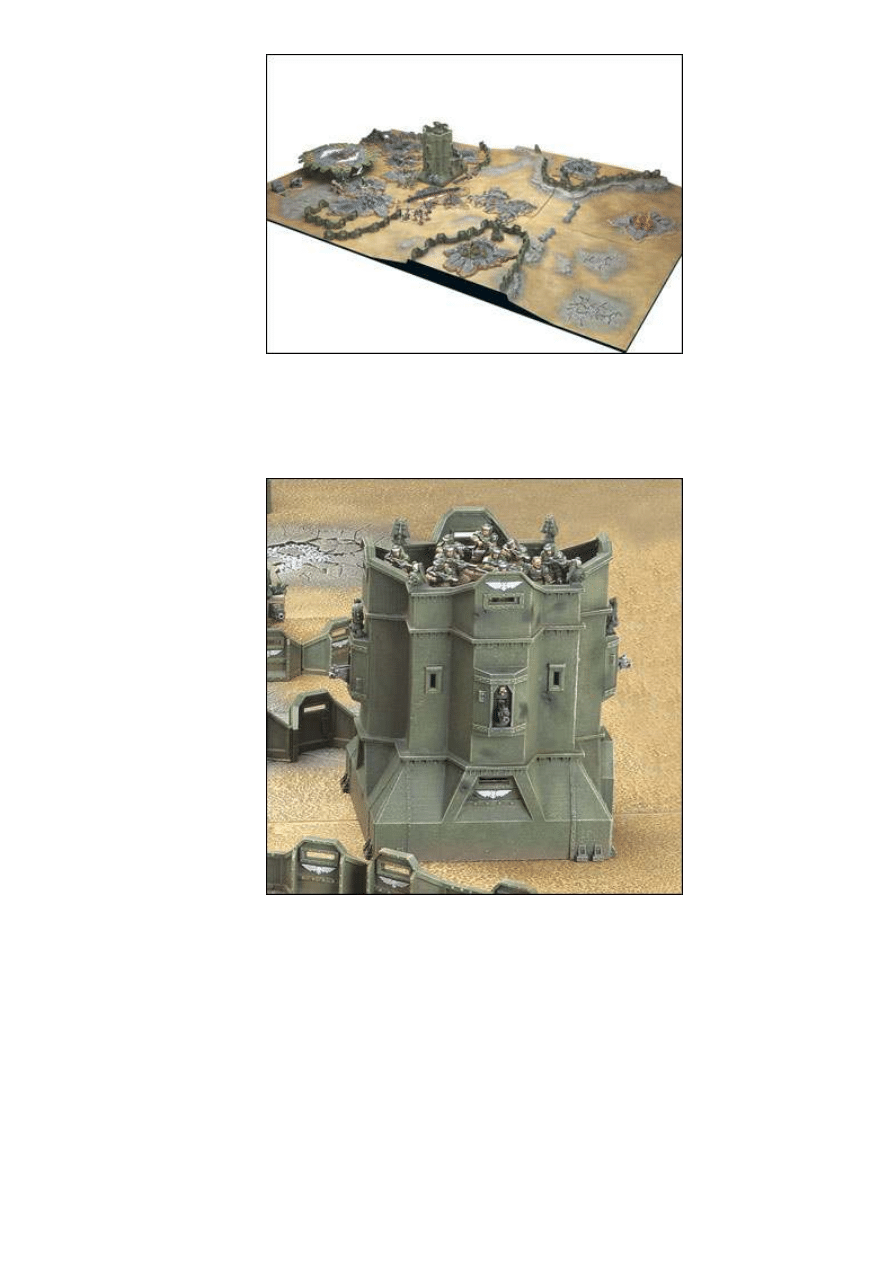
Assault on Outpost XIII
For this Salamanders versus Tyranids battle report Dave Andrews was assigned to create the titular Outpost
XIII. Unsurprisingly, Dave's finished project is a brilliant piece of kit building, using multiple Imperial
Bastion kits to get the finished look.
Dave: For this project I really wanted to highlight the unique modular nature of the Imperial Bastion kits.
Theyhave been designed in such a way that they can merge seamlessly with other bastions so I wanted to
really emphasise this with the structure I was building. I didn't just want to make a larger, more square
looking complex either, so I created multiple levels, added doors and integrated some extra automated
weapons such as the twin-linked autocannon. The footprint of the Outpost is very important,it needed to be
interesting with an irregular shape, so I changed this not just by adding the extra Imperial Bastionkits but
by cutting the structure into a Citadel Gaming Hill. I also put a hatch on top of the hill to suggest some kind
ofescape route or secret entrance.
The beauty of Dave's work is that it looks amazing, is practical from a gaming perspective and there is
always a faultless logic to the layout. For instance, no level is inaccessible; there is a door or some kind of
entry point onto every rampart.
The ground level door leads out of the rear of the complex onto the hill. Note the escape hatch, which no
doubt has a connecting tunnel into the building, emphasising Dave's logical approach to tabletop scenery
design.
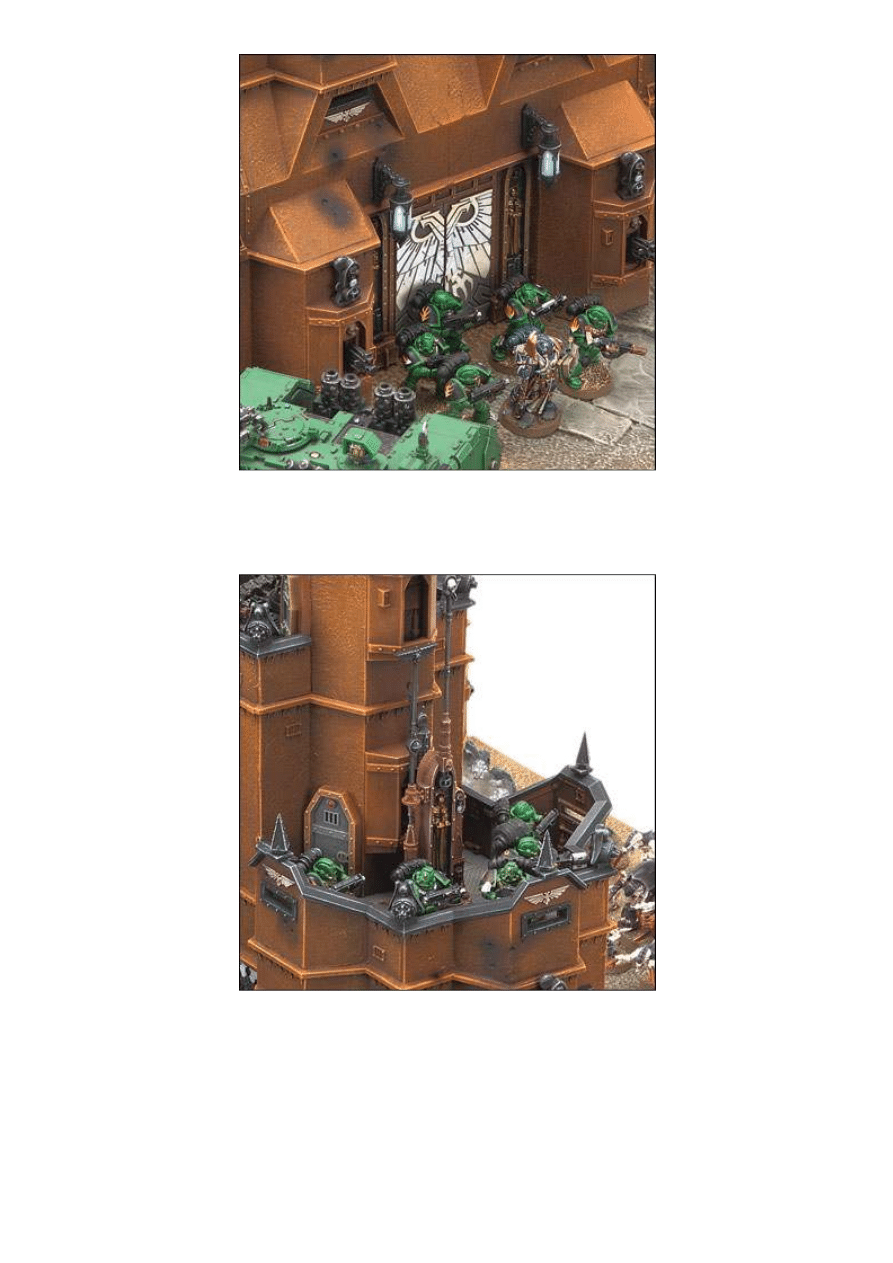
The main door into the complex is from the Cities of Death buildings frame. The bastion kits have been
designed so that the sections from the Cities of Death kits can be integrated into the structures with a
minimum of fuss, allowing you an even greater creative freedom.
The comms relay comes with every bastion kit. As Dave had used at least four bastions on the outpost it
would have been a shame not to integrate one of these components into the building. The large level where
the relay is placed allows you to deploy a squad of Space Marines on here, illustrating how Dave's scenery is
always practical as well.
An enemy force approaching the outpost from this side will suffer heavy causalities as three automated
heavy bolters scan the area. Nine Strength 5 AP4 shots are ready to scythe down any squad brave or foolish
enough to attack from this angle. Indeed, the Outpost is heavily armed on all sides, including a quad-
autocannon mount on the mid-level rampart.
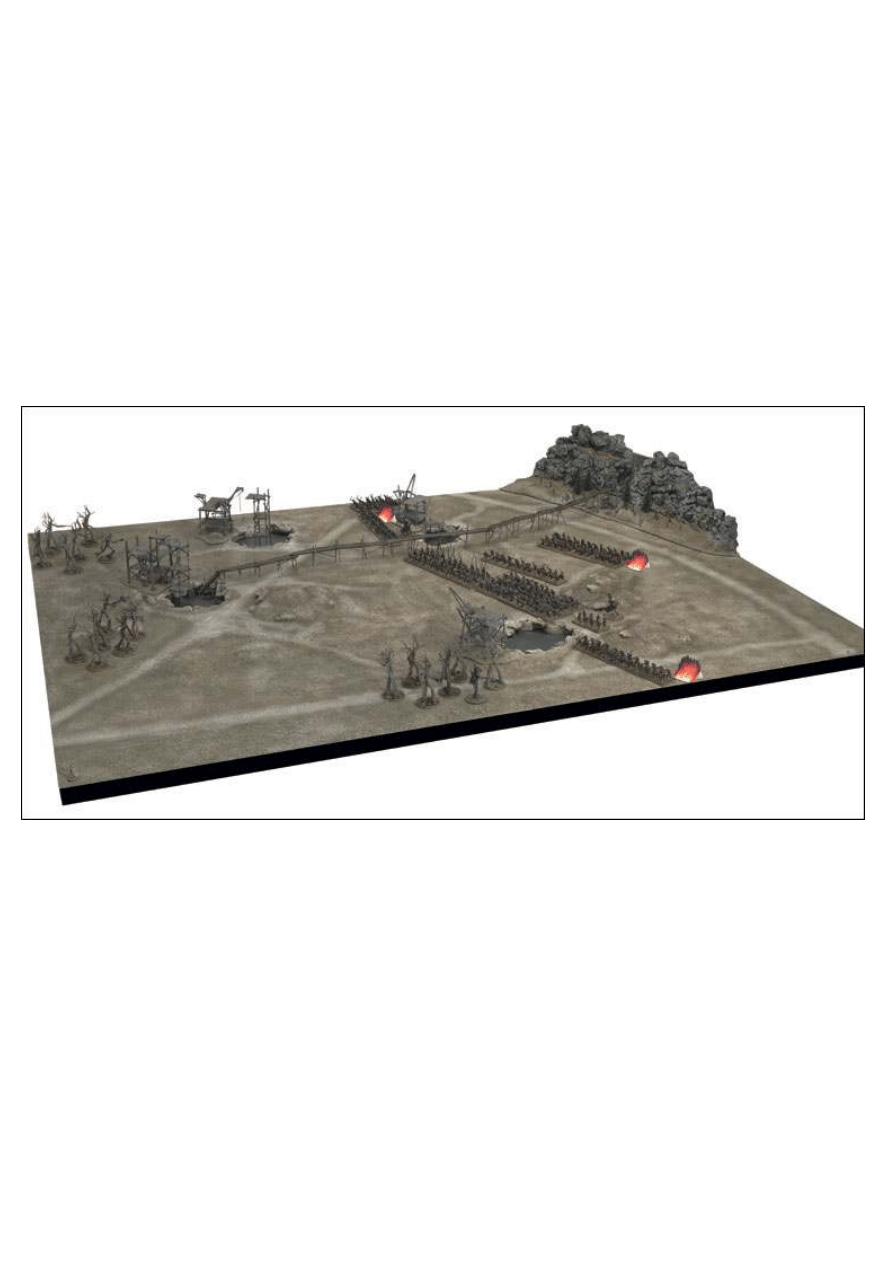
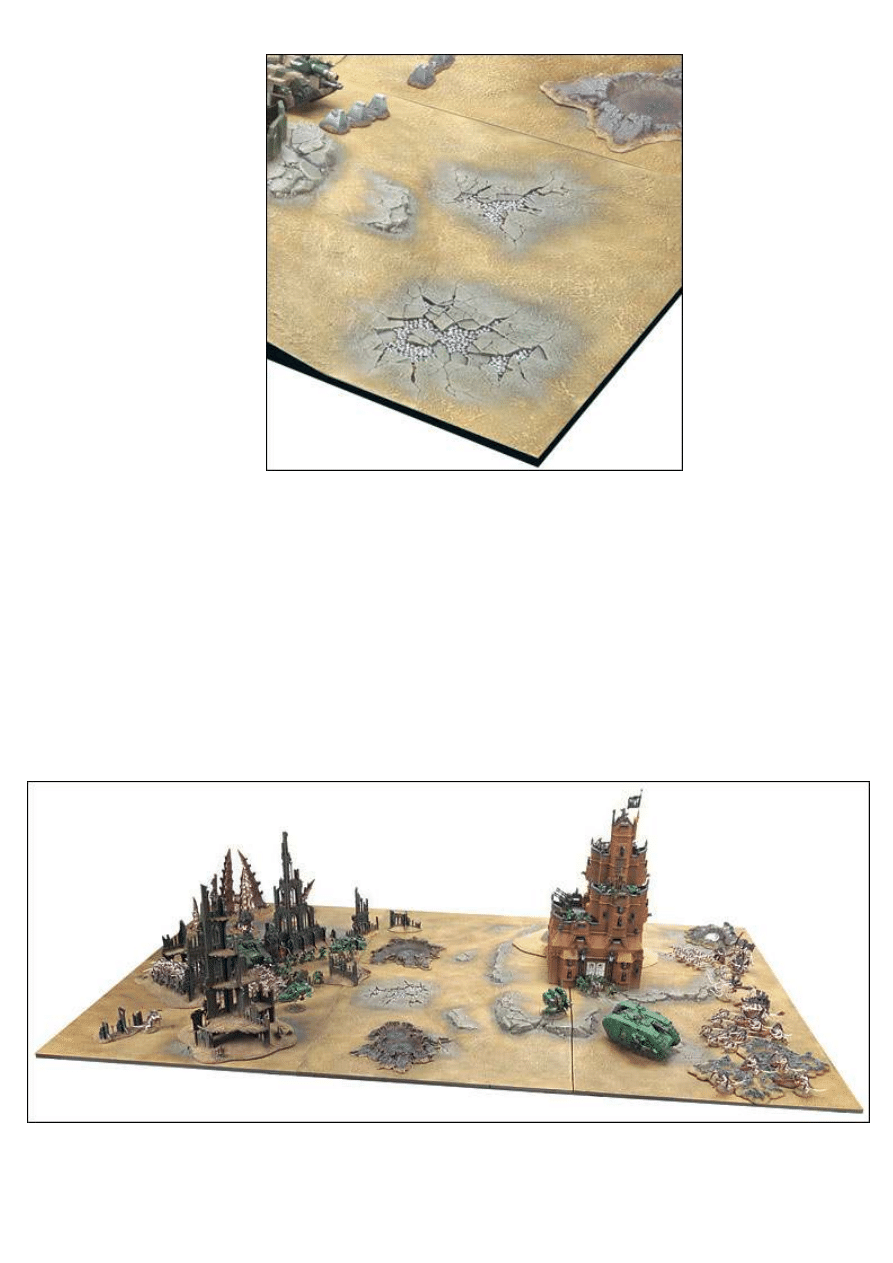
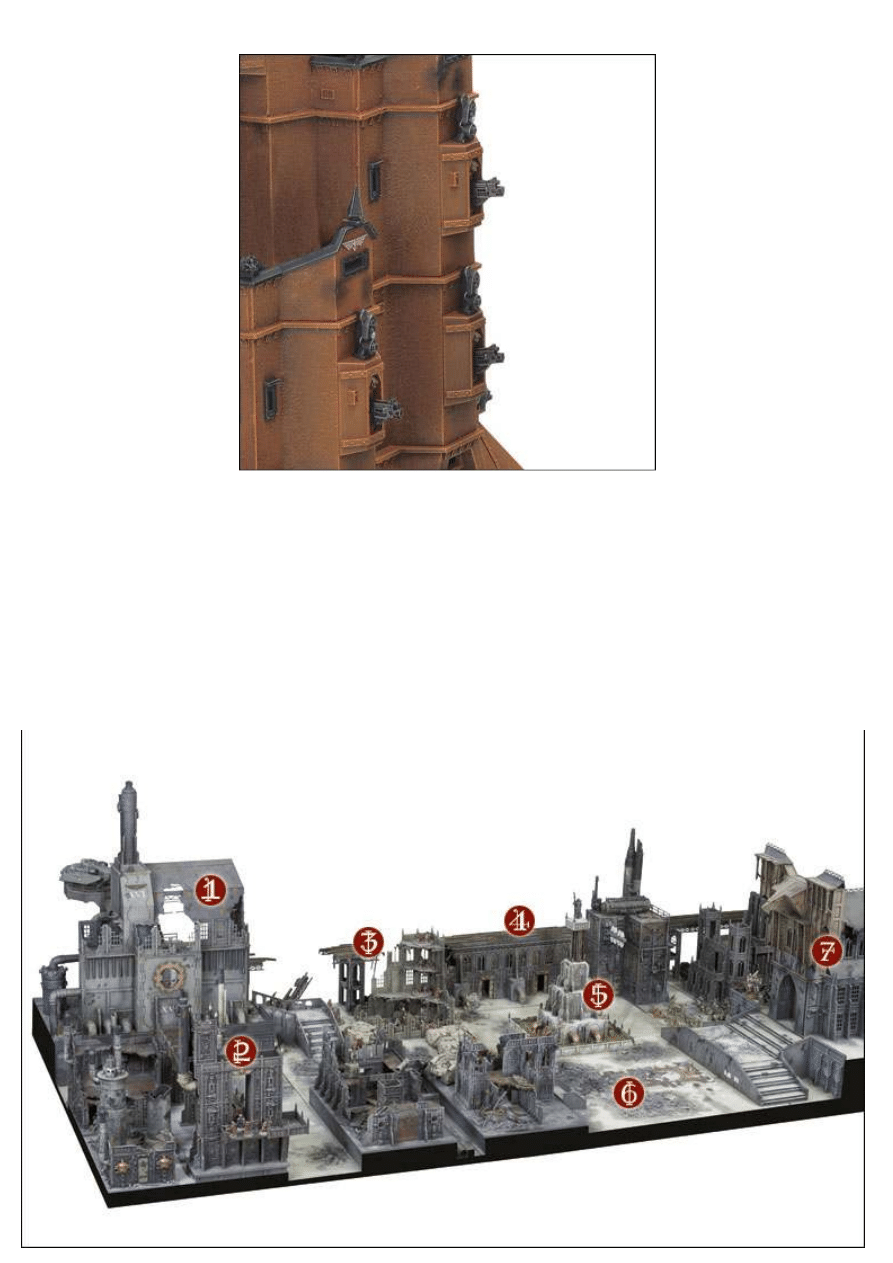
Escape from Euryales
In the summer of 2006 the fate of Medusa V was being decided across gaming tables around the world. This
culminated in the White Dwarf 319 July Battle Report - a special narrative scenario was cooked up by the

Games Development team.
Key
1. Adeptus Mechanicus Orbital Conveyance Relay
2. Grox Out-flow Plant
3. Office of Imperial Measures
4. Trans-Euryales Mag-line
5. Saint Maegera's Column
6. Proclamation Square
7. Galleries of the Emperor's Justice
Medusa V's Planetary Governor was a prime target for the Chaos Forces, who desired his capture for no
doubt nefarious reasons. Imperial command despatched a battalion of Vostroyans and a strike force of
Ultramarines, led by no less than Captain Sicarius himself, to protect the Governor and his meek advisors.
What followed was an exciting chase through the streets and buildings of Hive Euryales. To do the narrative
justice, a suitably impressive battlefield needed to be constructed. And so, with the help of scenery gurus
Mark Jones and Dave Andrews, a mighty cityscape was raised.
Not only was the battlefield impressive in the traditional sense, what made this stand out was the story that
was unfolding around it. As you can see from the key, the buildings were not just random groups of ruins
but named places; this immediately gave the location some weight. So, the Governor and his escort didn't
just have to dash across open ground - they had to run for their lives across Proclamation Square. That's why
this battle report has been regarded as a modern classic, because it had such a sense of place and time.
Let's have a look at some of the other memorable moments of the battle report.
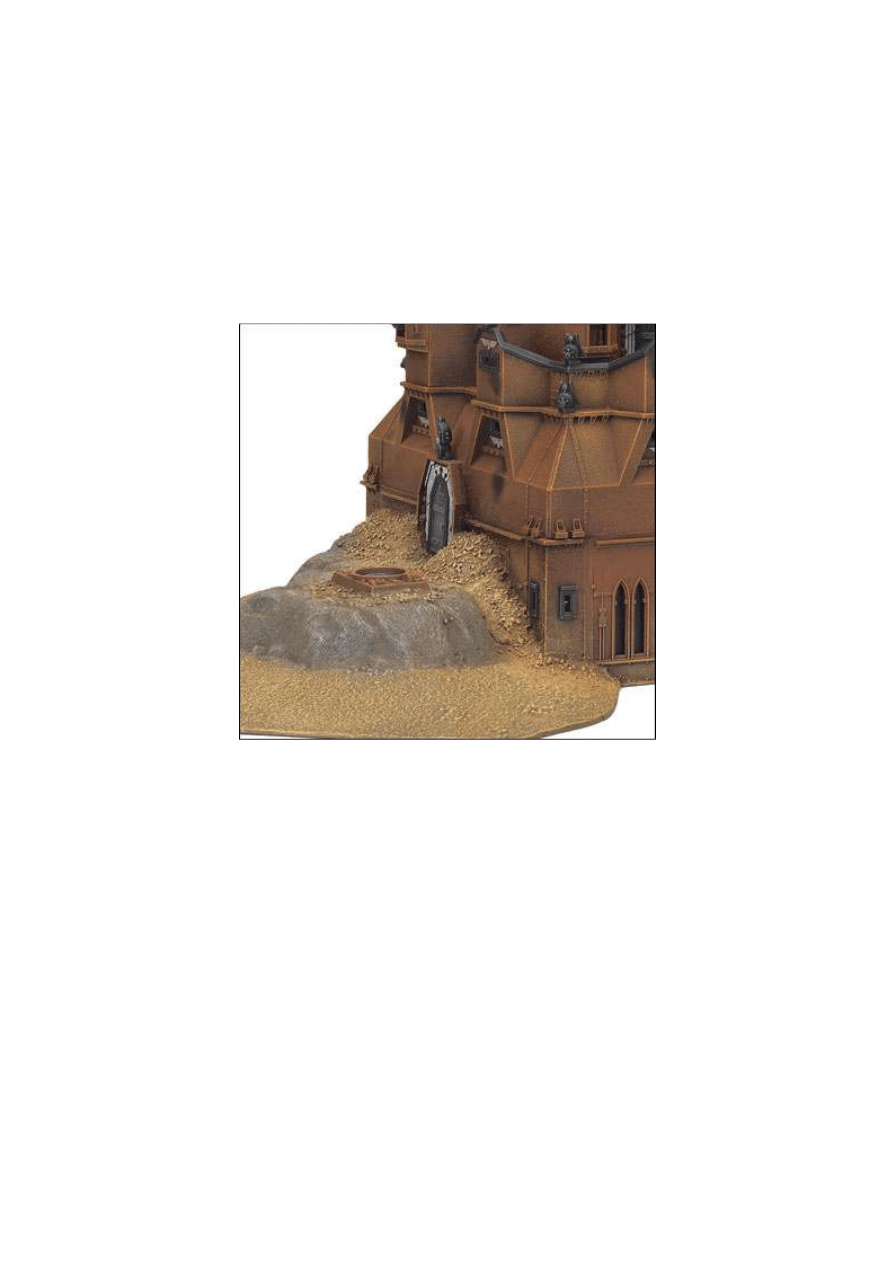
Soloman's Salvation
Governor Soloman's only hope was to reach the shuttle, which was warming its engines on the landing pad
of the Adeptus Mechanicus Orbital Conveyance Relay building. To get there he had to cross a great swathe
of treacherous urban cityscape, all the while being pursued by Plague Marines and the Black Legion.
"Come with us, sir"
Governor Soloman was to be escorted to safety by a Vostroyan Special Weapons team - a squad of gnarled,
cityfighting veterans equipped as snipers. Their plan was to get Soloman across the gantry before taking up a
covering position from which they could pour deadly accurate sniper rifle fire upon any enemy foolish
enough to venture within range.
The Black Legion Intervene
The Black Legion, led by the evil Chaos Sorcerer Ygethmor, entered the battle around the Grox Out-flow
building. Raptors, Screamers and Furies flew on ahead. The Sorcerer's hope was that these squads would
delay the Governor's escape while the remainder of the Chaos forces caught up, then his vile plans could see
fruition.

Enveloped by Ultramarines
The highlight of the battle came when Captain Sicarius and his accompanying squad of Ultramarines
conveyed Governor Soloman to the landing pad. It was a race up the gantry stairs for the waiting shuttle, as
a second wave of Chaos followers sought to intercept the Governor. At the last, the Raptors tried to prevent
Sicarius delivering Soloman to safety, wounding the captain, but ultimately failing in their endeavour. With
Soloman safely delivered to the shuttle, Sicarius led his squad back down the stairs - he had unfinished
business with Ygethmor...
Wyszukiwarka
Podobne podstrony:
White Dwarf 199 Space Hulk Bringer Of Sorrow Campaign
White Dwarf Magazine Classic Traveller White Dwarf Articles
White Dwarf 240 [parte] Mordheim Architecture
White Dwarf 238 Mordheim Architecture
White Dwarf 203 Space Hulk The Fate Of The Sword Of Halcyon Campaign
[RPG ABENTEUER]Philosophers Stone (AD&D, White Dwarf #66 1985) (Adv)[no Harry Potter!]
White Dwarf 027 Traveller Imperial Secret Service
White Dwarf December 2018 Bonus Material low
Close Quarers Battle Czarna Taktyka
AD Order Of Battle
No Longer White
FR Order of Battle
Classic Battletech Technical Readout Project Omega
Droga do Chrystusa E G White
pinkdolphin white
Dragonstar Starship Shadow Battle Crab
Magiczne przygody kubusia puchatka 26 I AM DREAMING OF A WHITE CHRISTMAS
Battletech Galaxy Map 3040
więcej podobnych podstron