Copyright
2001, Cisco Systems, Inc. Fundamentals of Web Design 1.1 – Course Project
1-1
Course Project Lab 3 - Creating a Logo (Illustrator)
In this lab you will learn to use Adobe Illustrator to create a vector-based design logo.
1. Start Illustrator. Open the lizard.ai file via the File>Open menu item. This file
contains two lizard images:
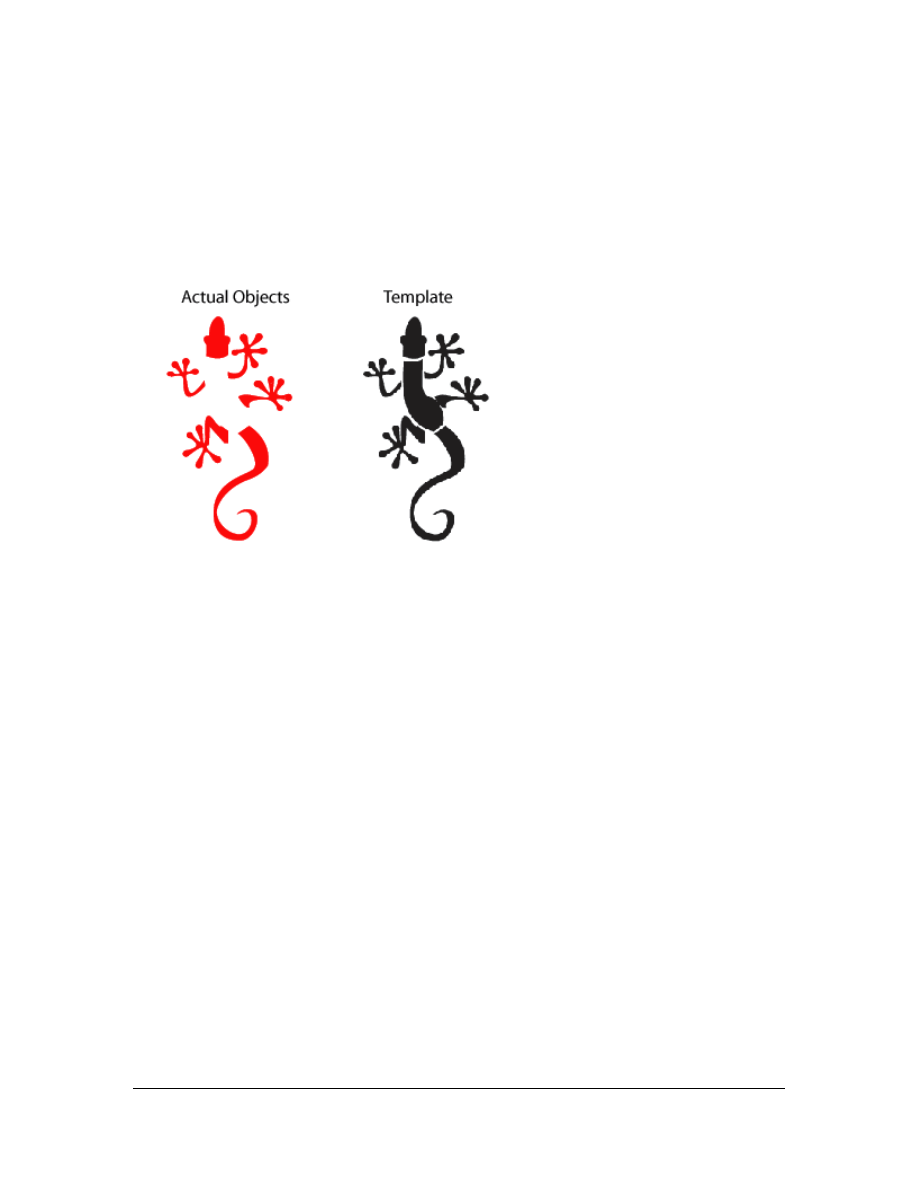
The red image consists of grouped vector objects that will make up the final logo,
once the missing object for the body has been created. The black image on the
right is a bitmap that has been placed into this Illustrator file to serve as template
and to help you create the body object.
In this lab, you will complete the lizard logo and export it to use in your
header.psd. If you wish, you can also create the complete lizard on your own,
using the template to help you.
2. To be able to retrace the body object of the lizard exactly, it is necessary to move
the template so that it is right beneath the red objects. To achieve this, you could
click on the template and drag it manually. This process however can be a little
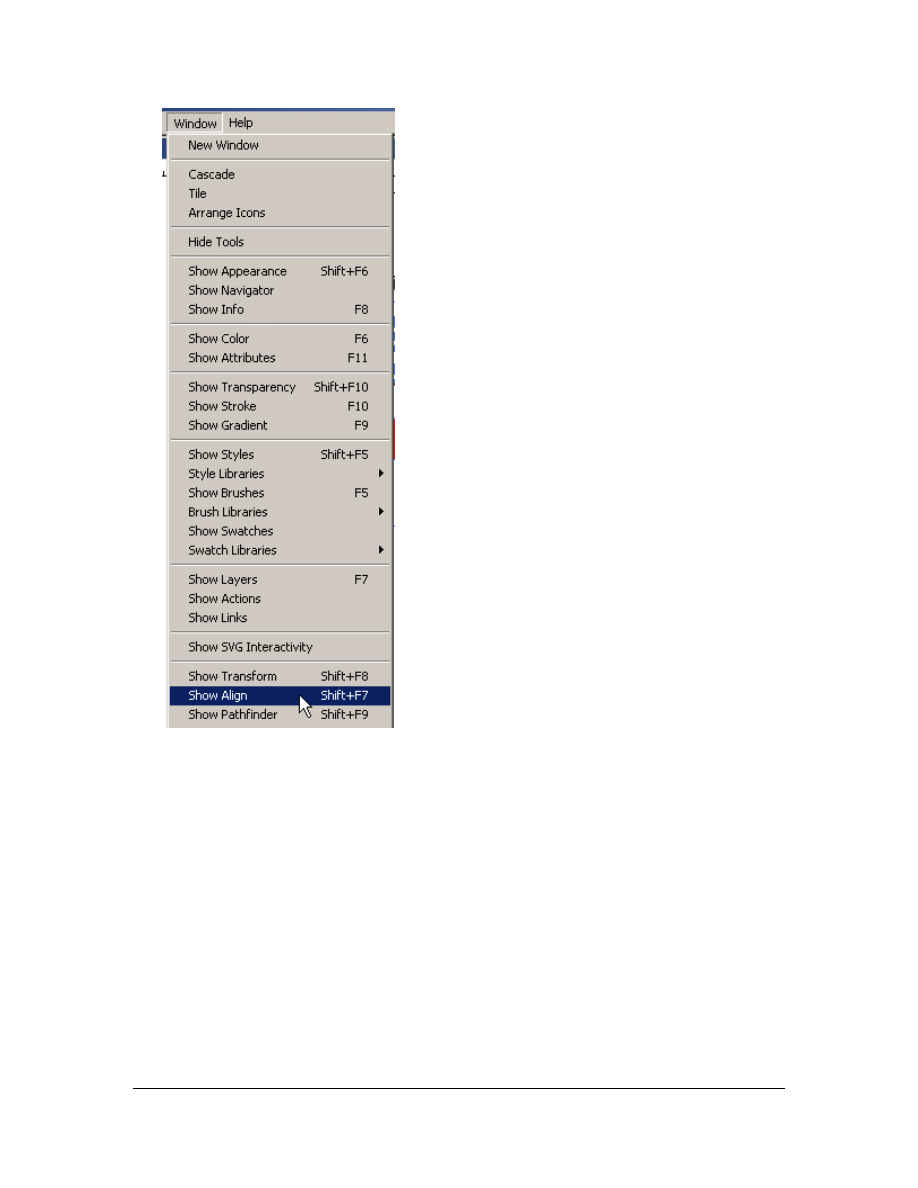
inaccurate. Thus it is a good idea, to take advantage of the Align Palette that
Illustrator offers. Open the Align Palette by clicking on Window > Show Align:
Copyright
2001, Cisco Systems, Inc. Fundamentals of Web Design 1.1 – Course Project
1-2
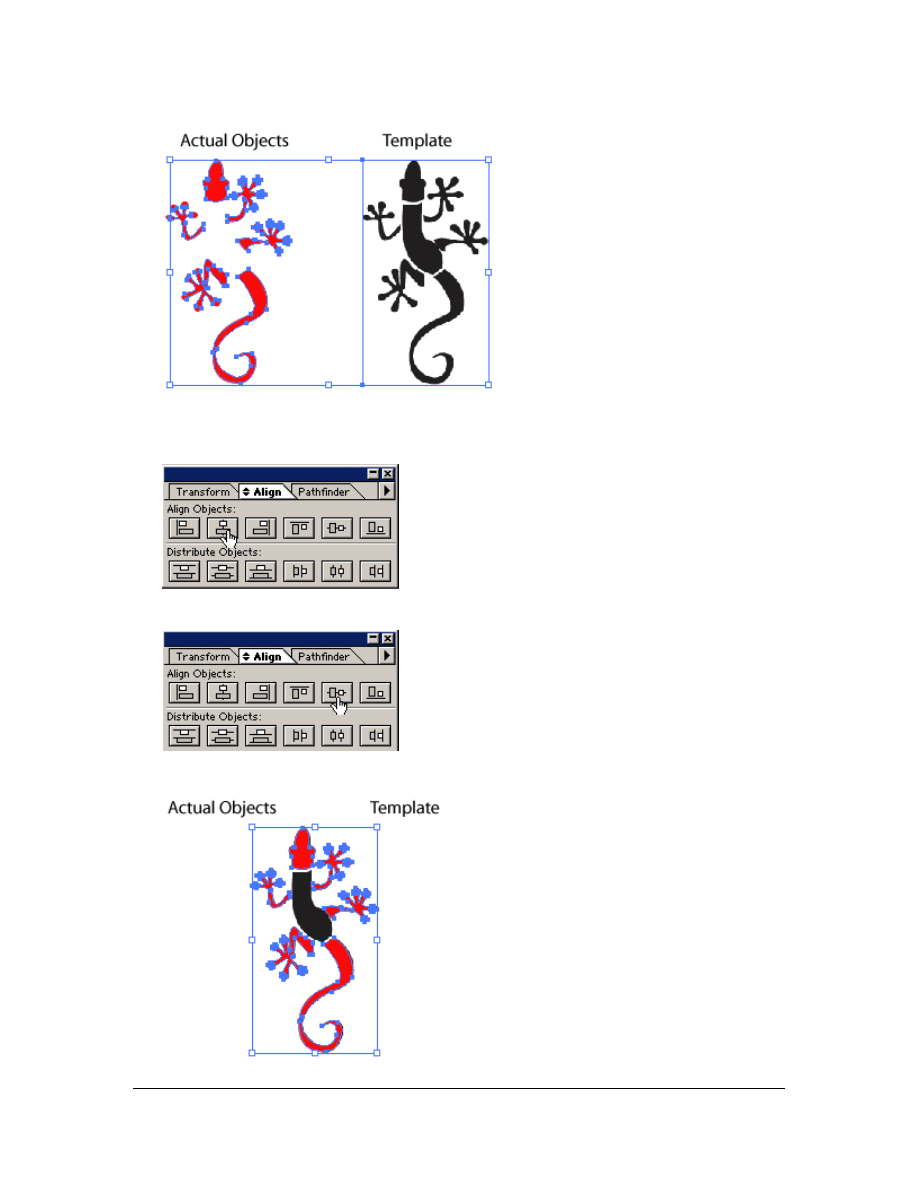
3. Now you select the template and the red group by clicking on the template while
holding down the SHIFT key and clicking on the red group. You should now have
both objects selected like this:
Copyright
2001, Cisco Systems, Inc. Fundamentals of Web Design 1.1 – Course Project
1-3
4. Then you can align them with the help of the Align Palette by first clicking on the
Horizontal Align Center button:
5. Then click on the Vertical Align Center button:
The result should look like this:
Copyright
2001, Cisco Systems, Inc. Fundamentals of Web Design 1.1 – Course Project
1-4
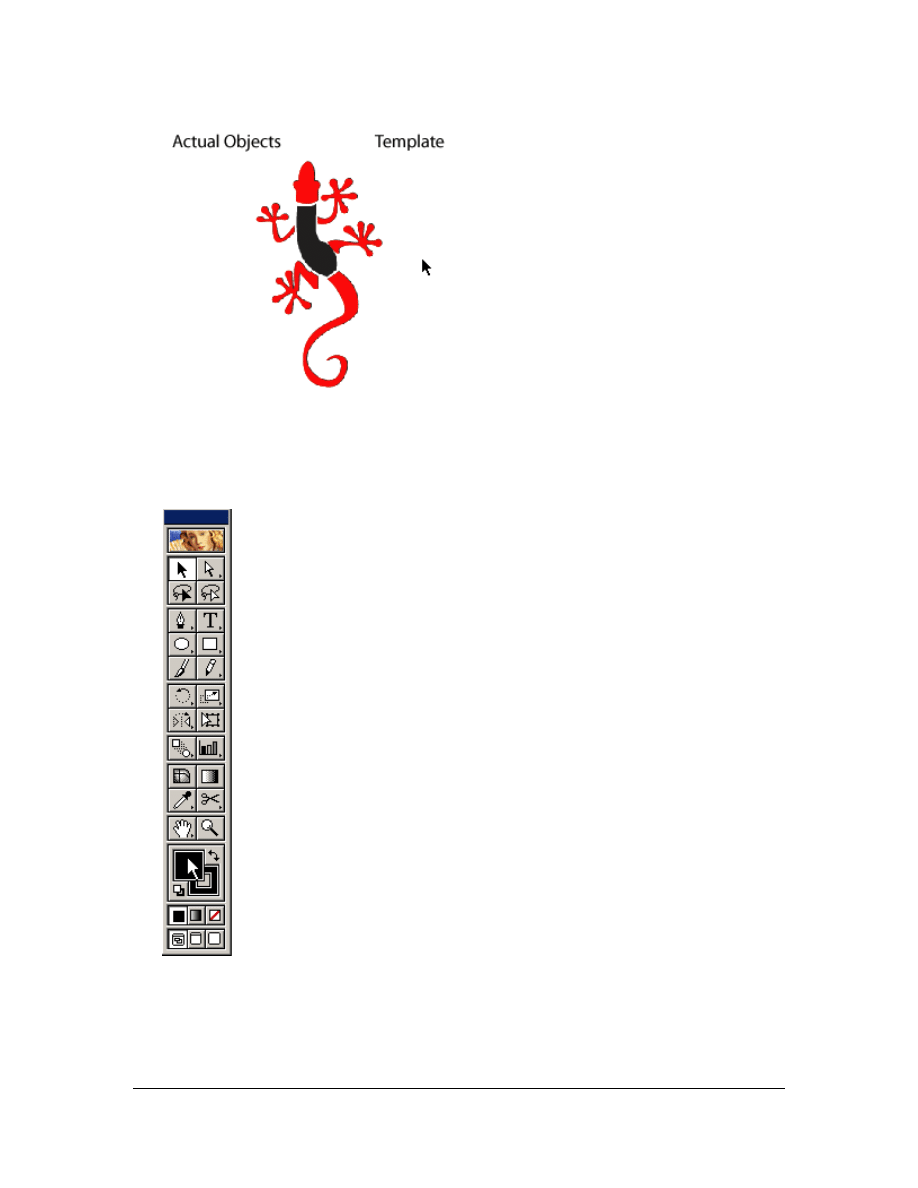
6. Now deselect the objects by clicking on the surrounding whitespace:
7. Save your file to your layout folder.
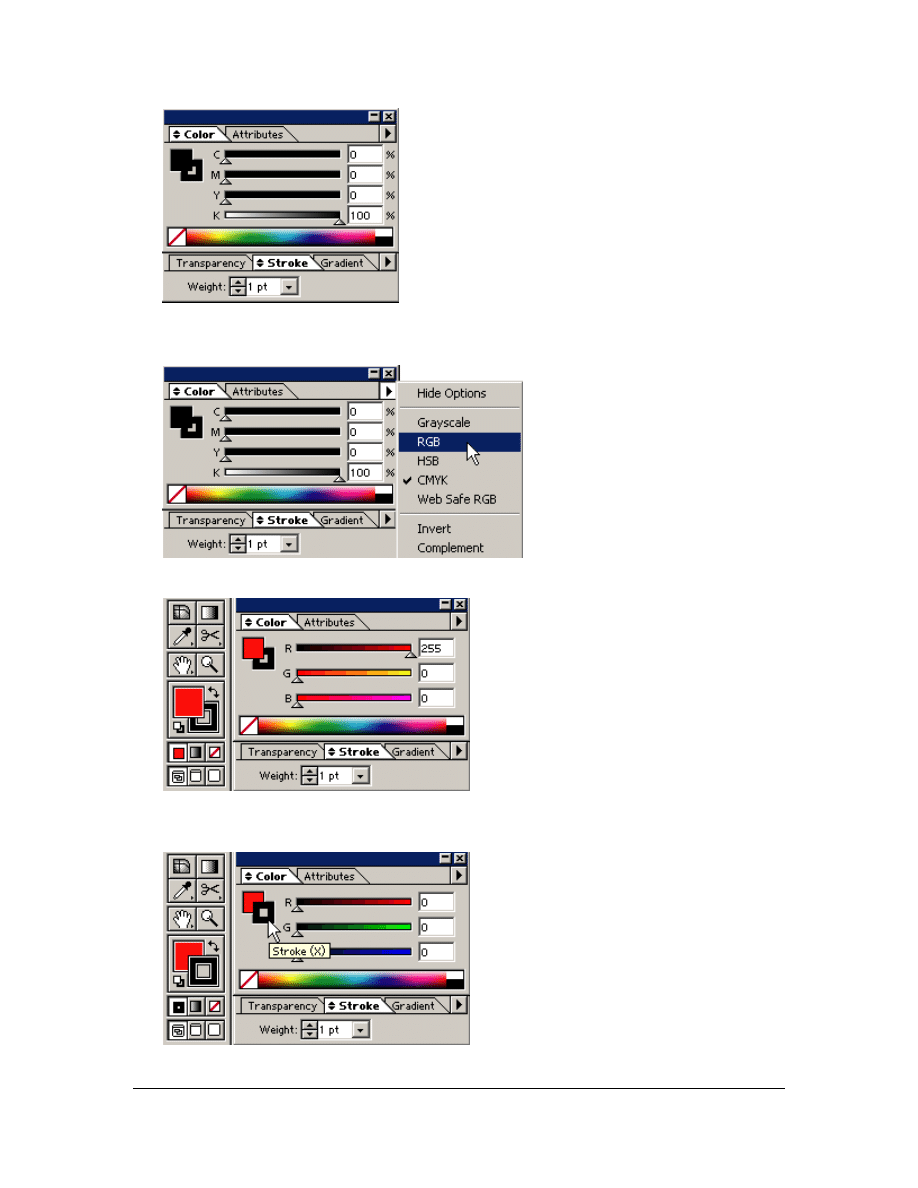
8. Before starting to draw the body, you need to set the stroke and fill color to red,
so you can see what you are drawing against the black template. On your toolbar,
click on the fill color area to open up the color palette:
The color palette will open up:
Copyright
2001, Cisco Systems, Inc. Fundamentals of Web Design 1.1 – Course Project
1-5
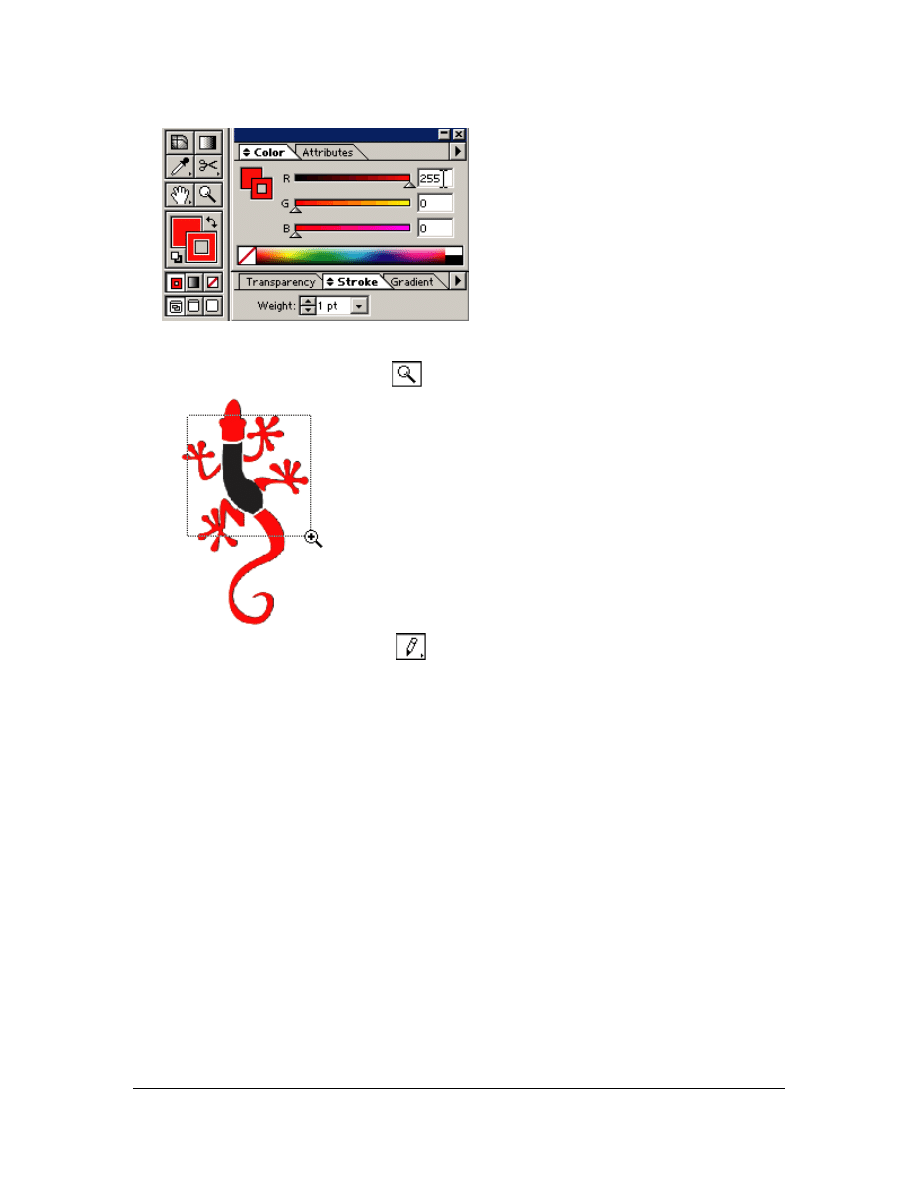
9. Set the color mode to RGB color, by clicking on the black arrow in the top right
corner of the Color Palette and selecting RGB:
10. In RGB mode, set the fill color to red (RGB: 255,0,0):
11. Now click on the Stroke Color area to set the stroke color, either on your Tool or
Color Palette:
Copyright
2001, Cisco Systems, Inc. Fundamentals of Web Design 1.1 – Course Project
1-6
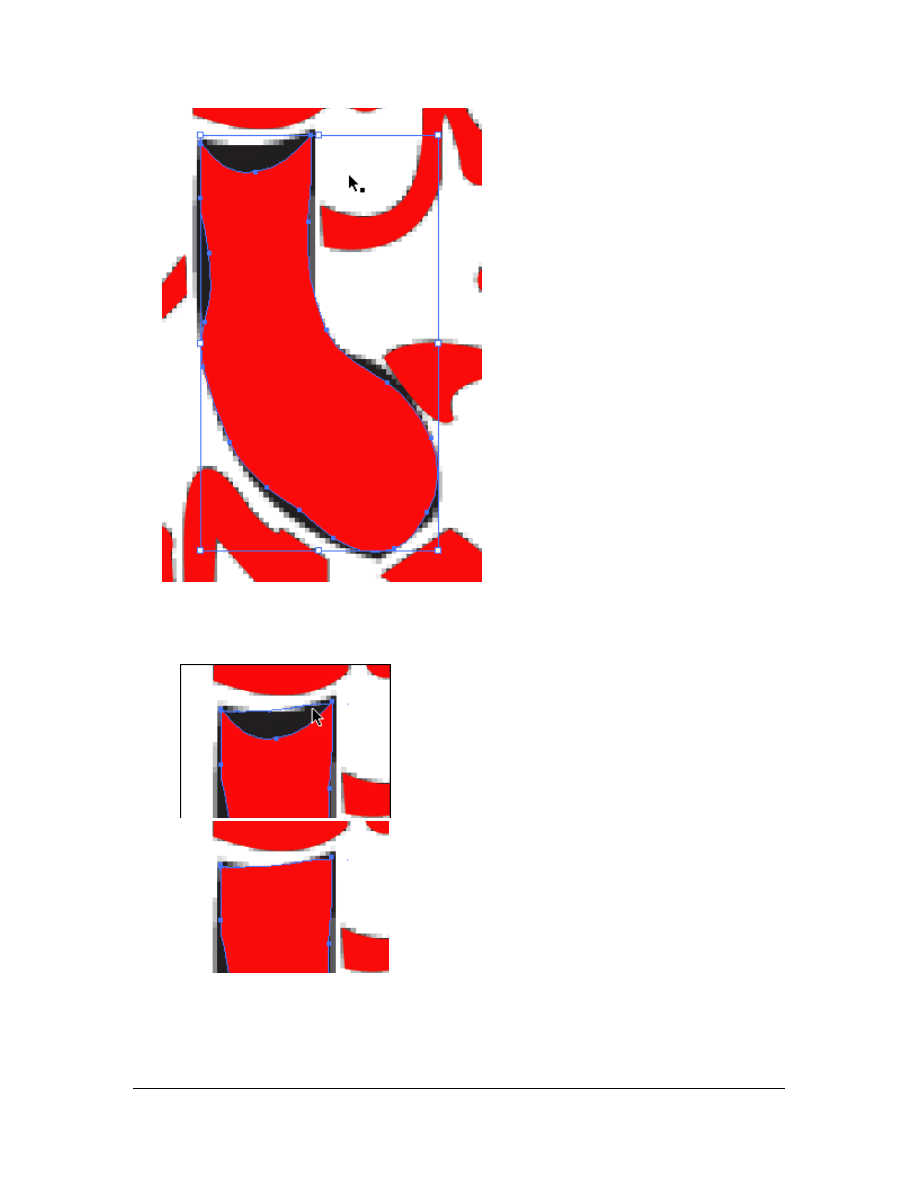
12. Enter the same RGB value as for the fill color:
13. Save your file.
14. Now select the Zoom Tool (
) and zoom in on the body area:
15. Then select the Pencil Tool (
), and trace the outline of the lizard‘s body in one
stroke until you reach the starting point (to close the path), then let go. A new red
body object appears:
Copyright
2001, Cisco Systems, Inc. Fundamentals of Web Design 1.1 – Course Project
1-7
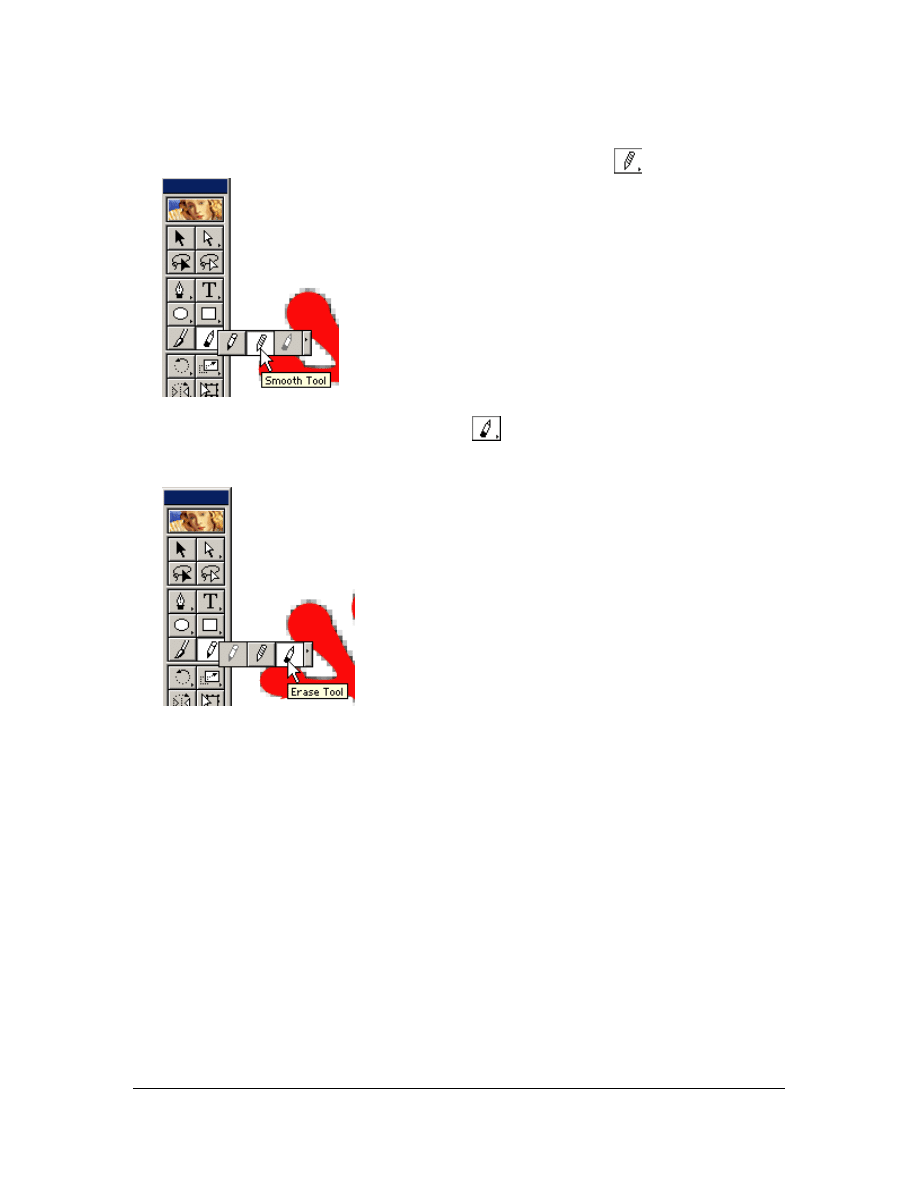
16. To add to the object, select it (so is shows the blue box around it). With the Pencil
Tool, draw the area you want to add starting and ending at the object’s border (a).
After letting go, the area will have been added to your object (b):
a)
b)
17. Continue with adding areas to your object until it covers the complete template’s
body.
Copyright
2001, Cisco Systems, Inc. Fundamentals of Web Design 1.1 – Course Project
1-8
18. In case you draw a line that does not work, use the keys CTRL+Z to undo this
step.
19. Now you can smooth out the edges with the Smooth Tool (
):
20. After that, you can use the Erase Tool (
) to erase over standing edges of your
object, if necessary. Be careful not to destroy the object, keep in mind to use the
Undo function (or keys):
21. Save your file.
22. Now that you have completed the lizard, you can zoom out. Using the pull down
menu in the lower left hand corner of the Illustrator window, select Fit on Screen:
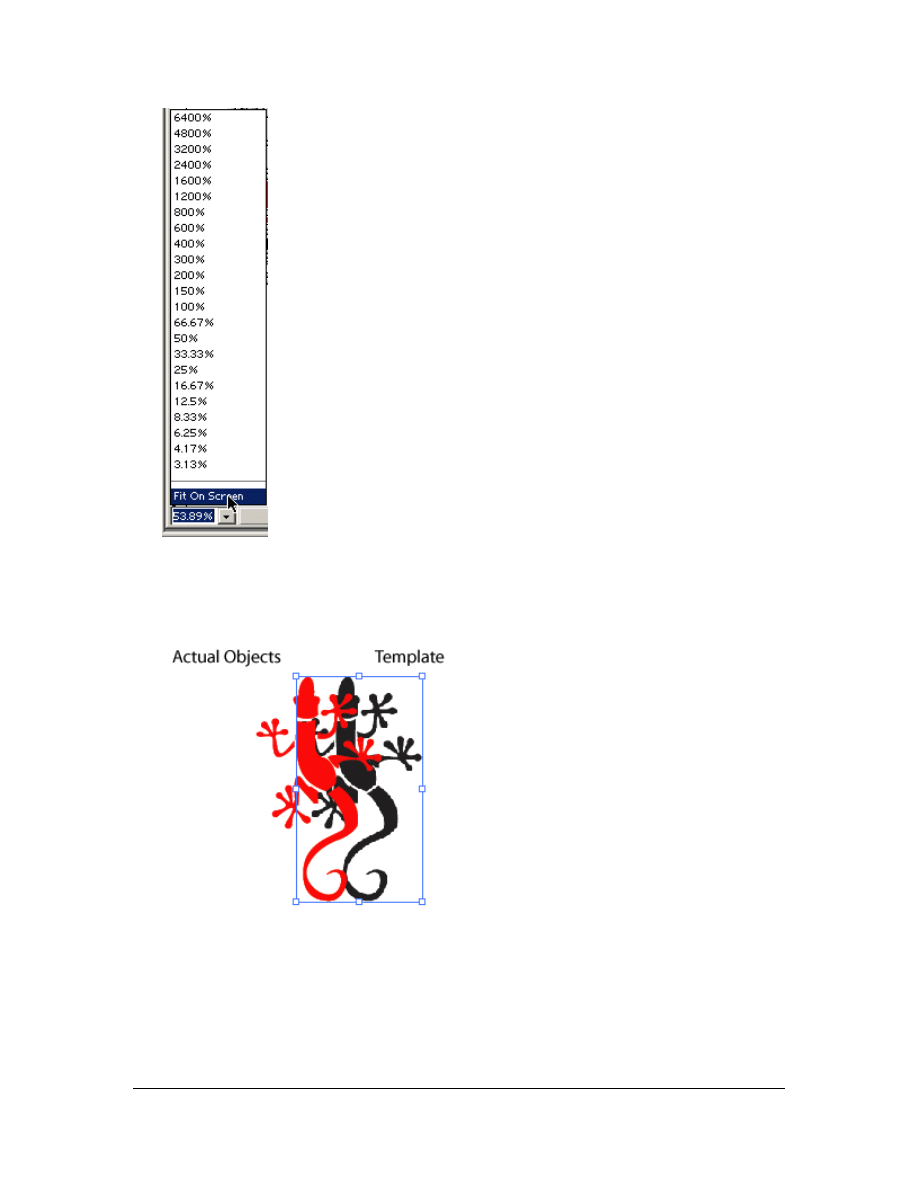
Copyright
2001, Cisco Systems, Inc. Fundamentals of Web Design 1.1 – Course Project
1-9
23. To prepare for exporting the vector lizard, you need to remove the template lizard.
To do this, click on the whitespace in the proximity of the lizard shapes until a
blue selection box shows. Then use the arrow keys to move the selected object to
the left. If you selected the template, it will look like this:
24. Move the template to the far right side of your page, so that you can easily select
the red objects and the lizard’s body object. Select them together by holding down
the SHIFT key:
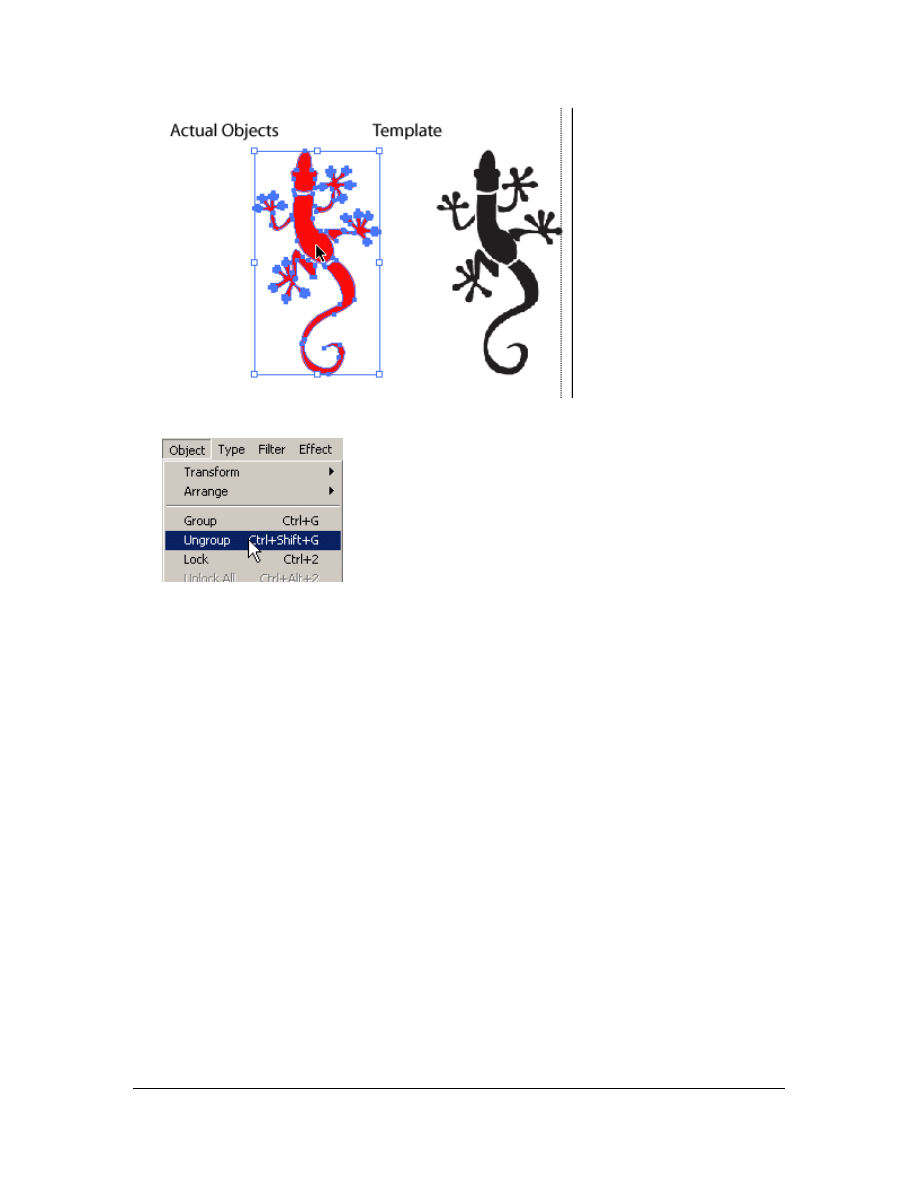
Copyright
2001, Cisco Systems, Inc. Fundamentals of Web Design 1.1 – Course Project
1-10
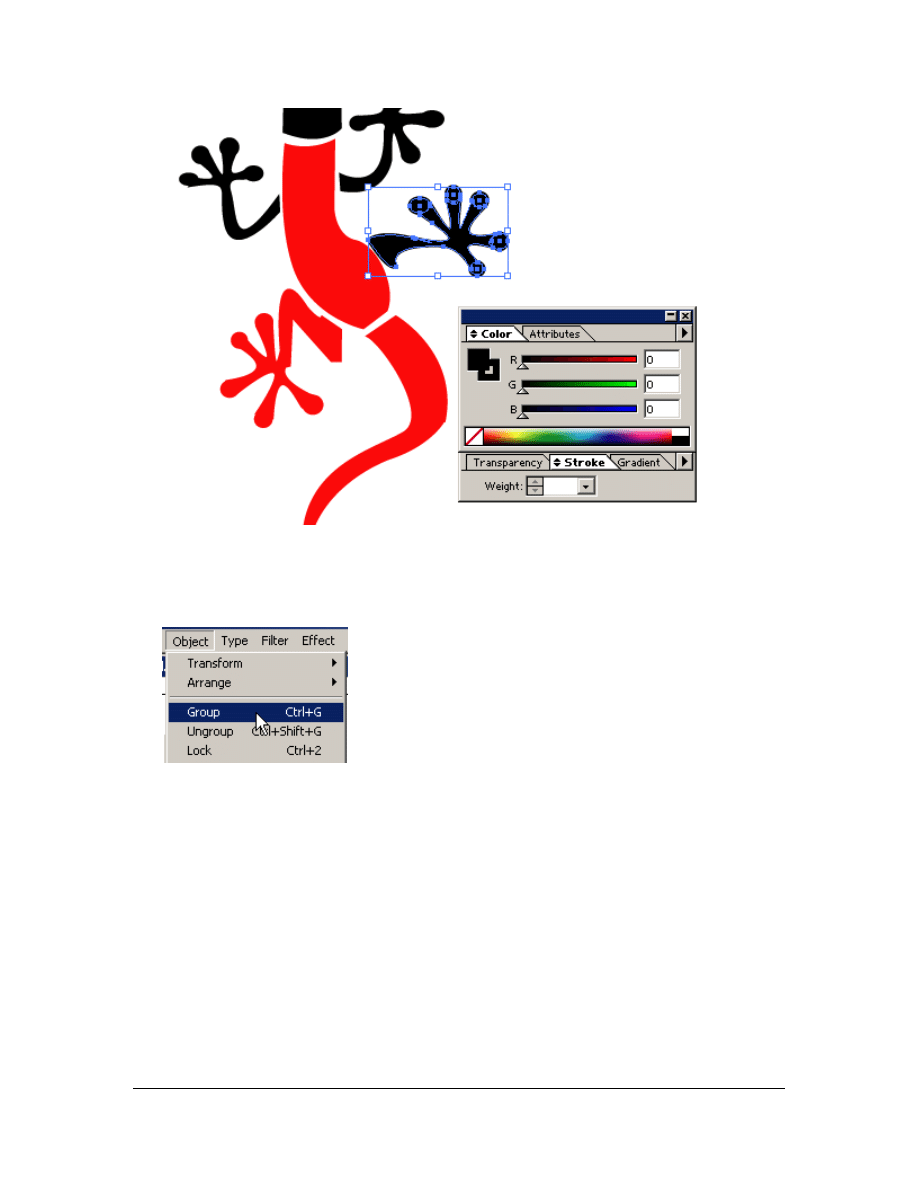
25. Now ungroup these objects by selecting the Object>Ungroup menu item:
26. Deselect the objects. Select one object after the other, and change the fill and
stroke color to black (RGB: 0,0,0) by using the Color Palette like you did before.
The lizard logo in the header is actually black; we made it red so it would stand
out better against the template. If necessary, use the Zoom Tool:
Copyright
2001, Cisco Systems, Inc. Fundamentals of Web Design 1.1 – Course Project
1-11
27. Now group the lizard objects together. By doing this, you can export them
without loosing the arrangement. First select all objects with the help of the
SHIFT key (make sure to get them all), and then select the Object>Group menu
item:
28. Save your file as lizard.ai.
29. Now export your file as lizard.psd to your layout folder via the File>Export menu
item:
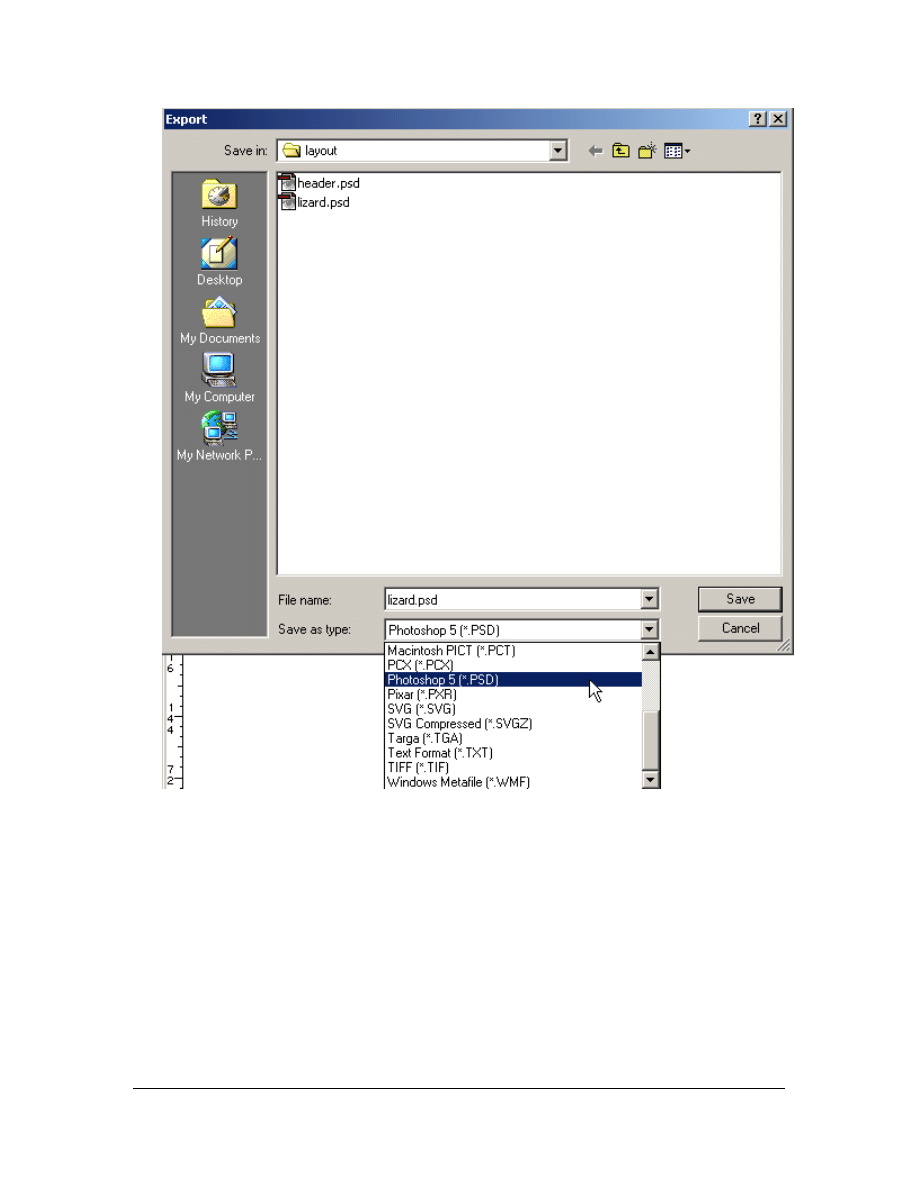
Copyright
2001, Cisco Systems, Inc. Fundamentals of Web Design 1.1 – Course Project
1-12
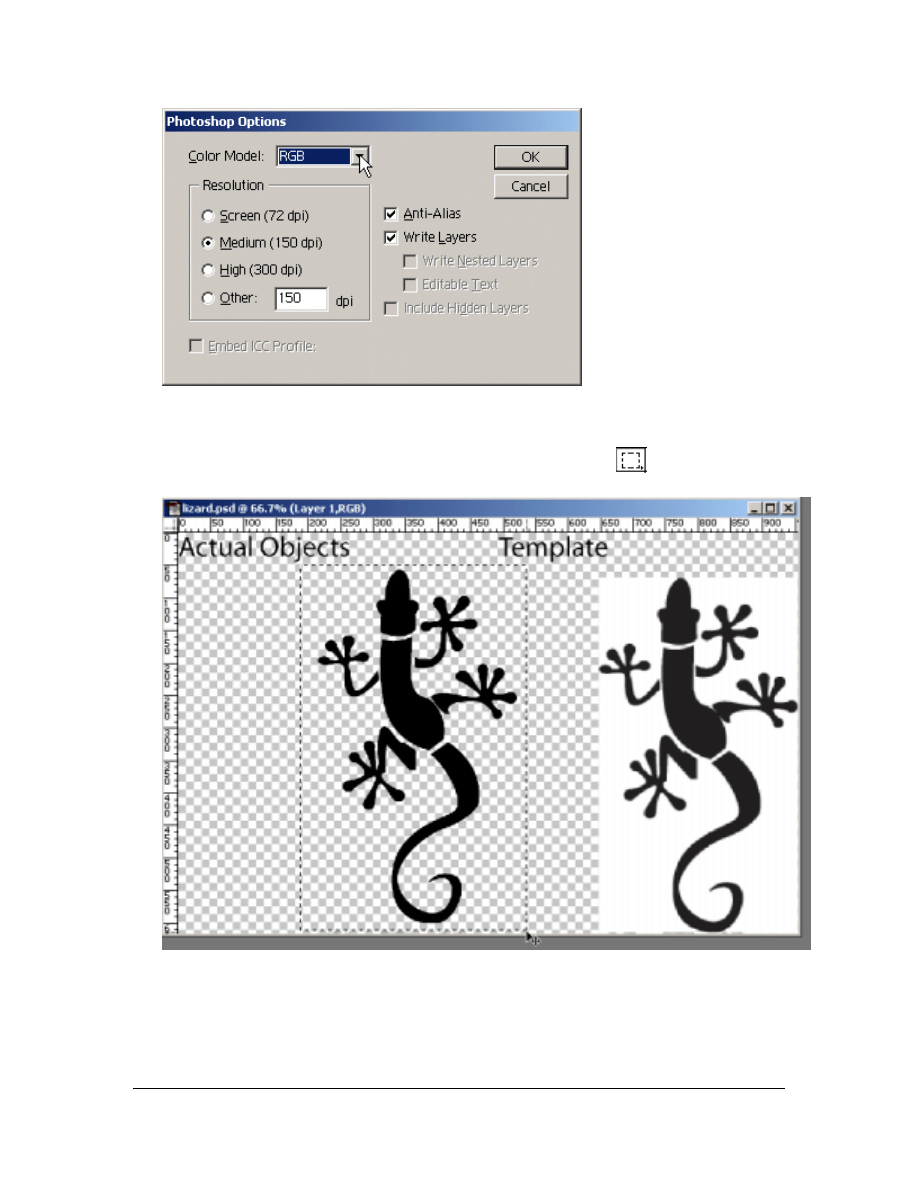
Make sure these options are switched on when the Photoshop Options window
appears:
Copyright
2001, Cisco Systems, Inc. Fundamentals of Web Design 1.1 – Course Project
1-13
30. Now start Photoshop, and open the lizard.psd.
31. Once open, select the image of the actual vector lizard on the left (not the
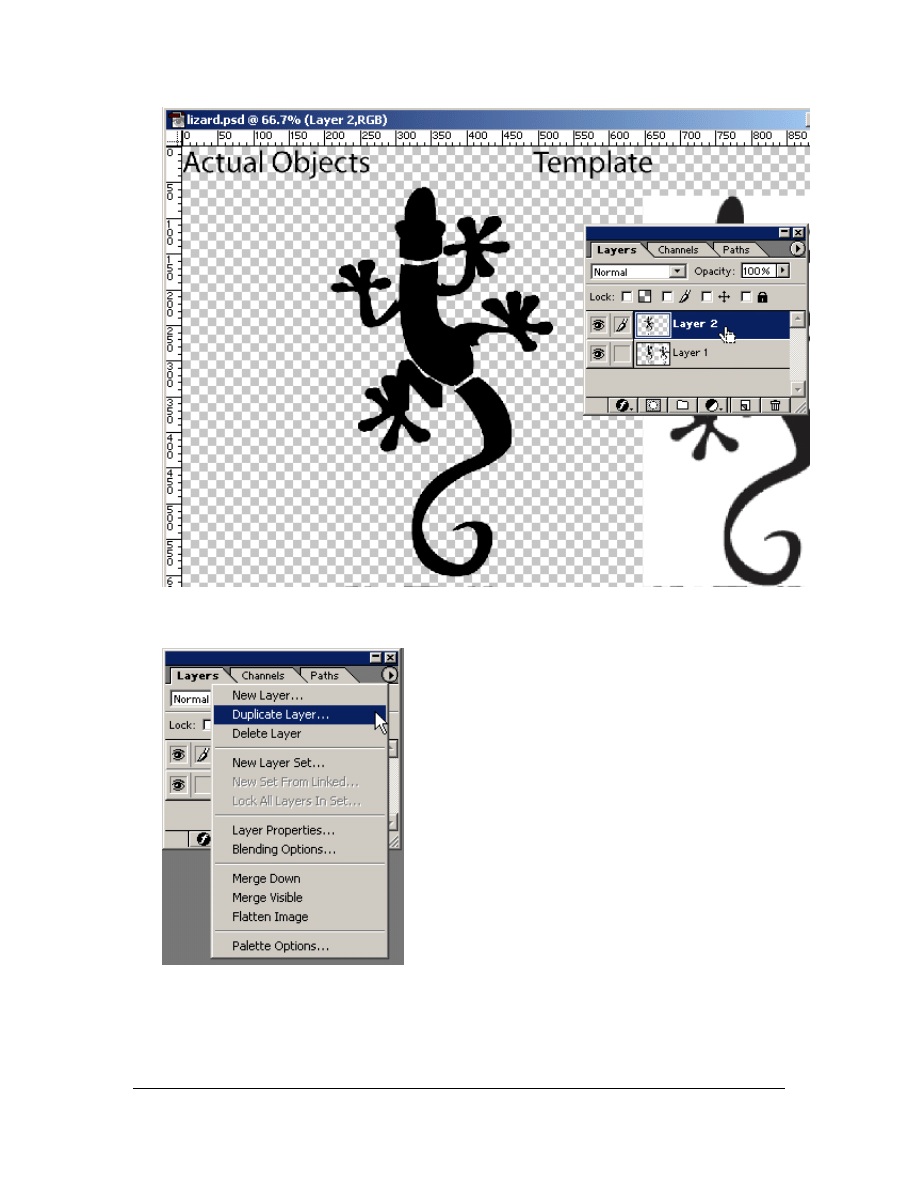
template on the right) with the Rectangular Marquee Tool (
) to create a mask
around the lizard:
32. Press the CTRL+C keys to copy the contents of the mask, and then press the
CTRL+V keys to paste the contents of the mask as a layer:
Copyright
2001, Cisco Systems, Inc. Fundamentals of Web Design 1.1 – Course Project
1-14
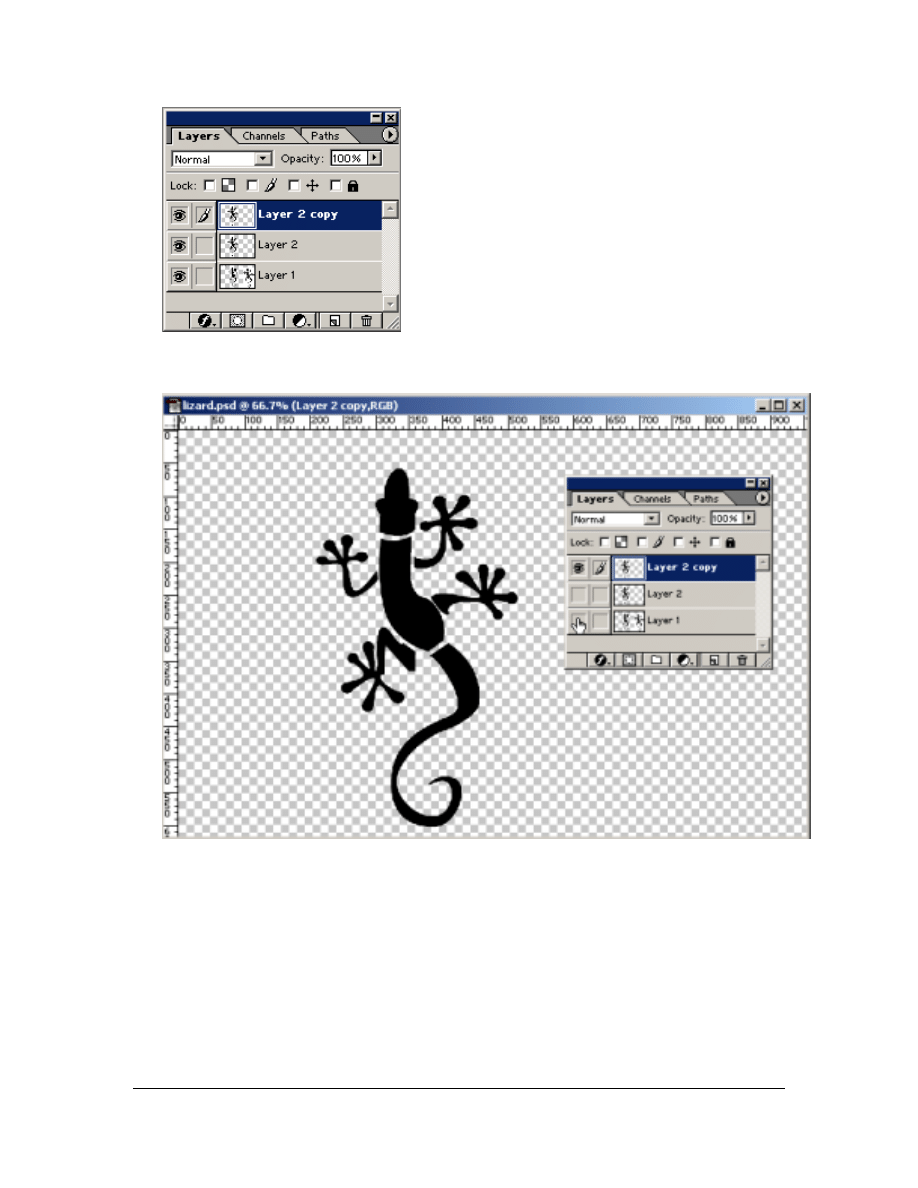
33. Now duplicate layer 2 by clicking on the black arrow on the top left corner of the
layers window and selecting Duplicate Layer:
You have now three layers in total in your layers window:
Copyright
2001, Cisco Systems, Inc. Fundamentals of Web Design 1.1 – Course Project
1-15
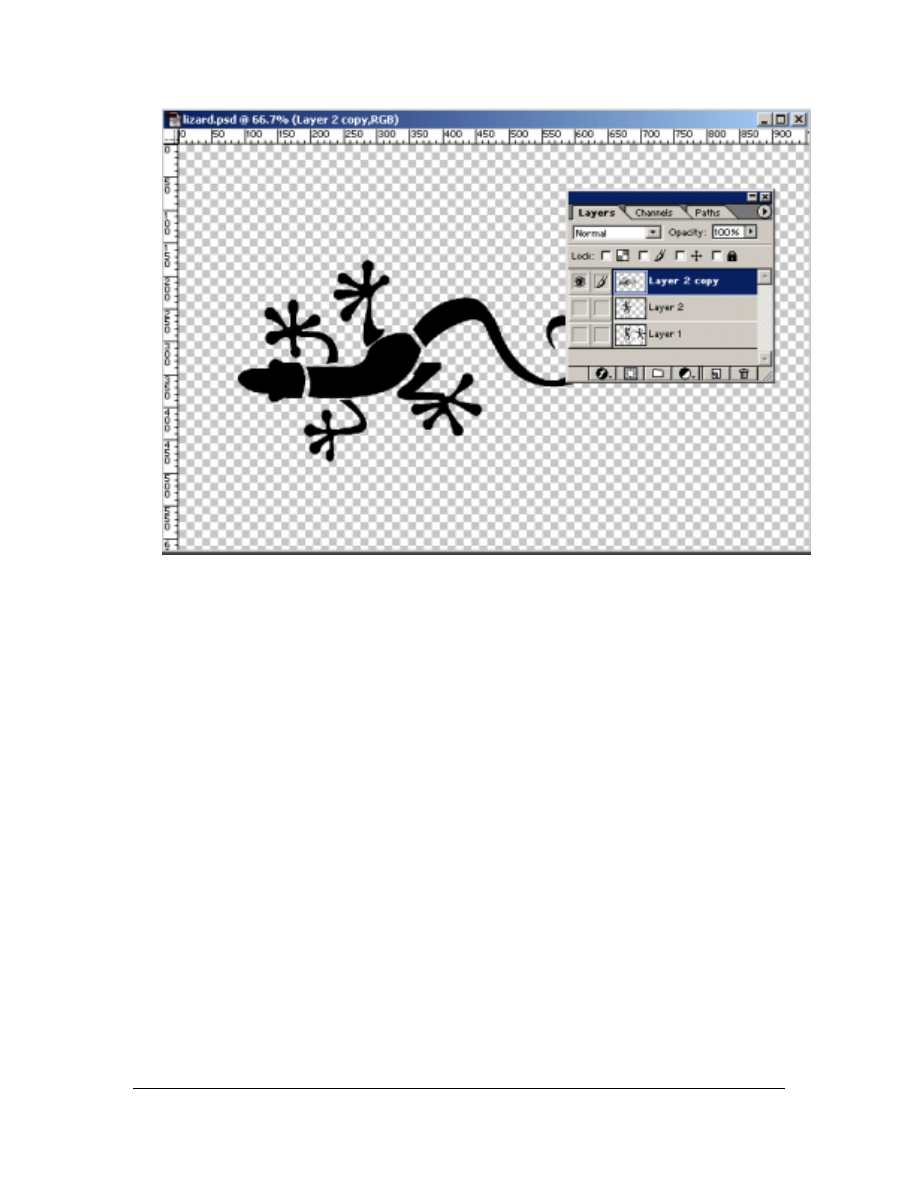
34. To make image editing easier, hide the two bottom layers by clicking on the eye
icons in the layers window:
35. Now rotate the visible top layer by selecting the Edit>Transform>90 CCW menu
item; this will rotate this layer by 90 degrees counter-clockwise:
Copyright
2001, Cisco Systems, Inc. Fundamentals of Web Design 1.1 – Course Project
1-16
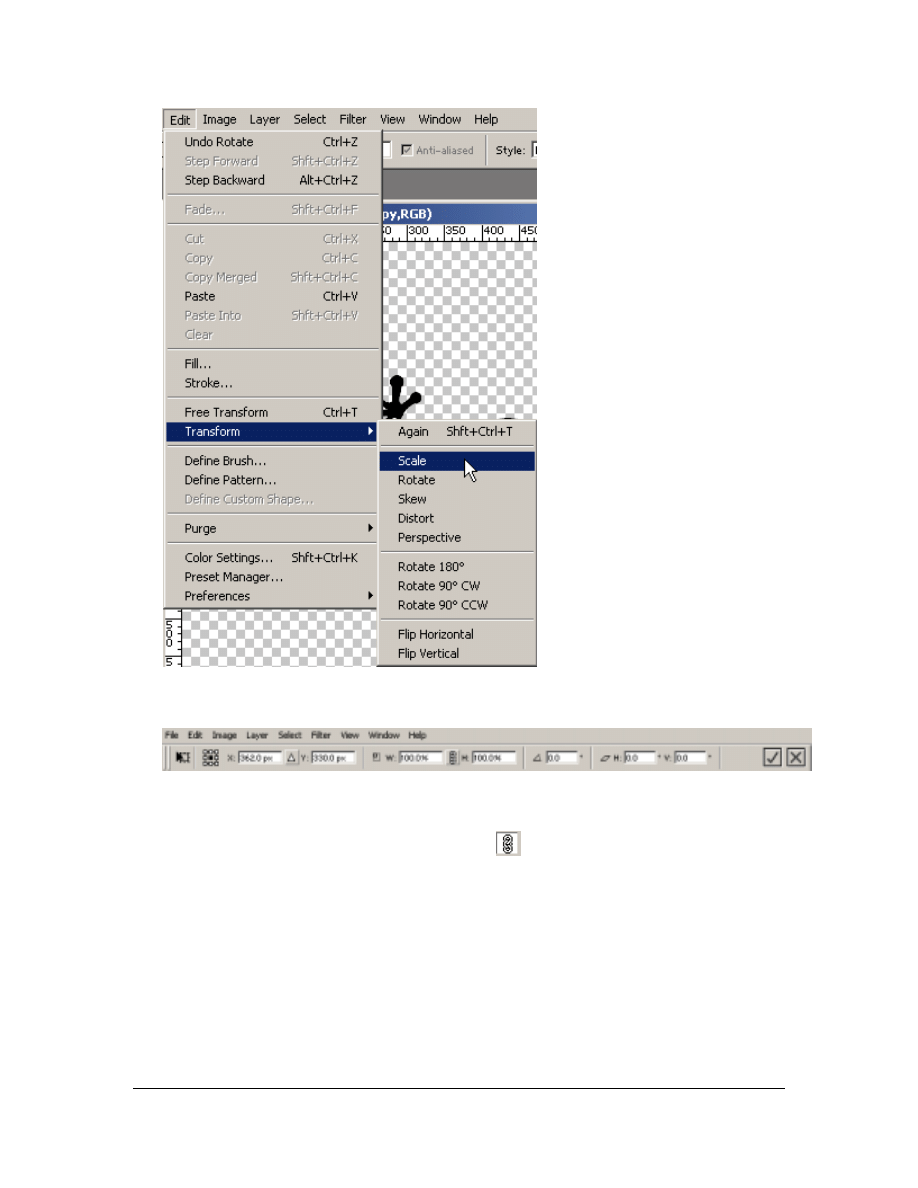
36. Then you will need to scale the layer by selecting the Edit>Transform>Scale
menu item:
Copyright
2001, Cisco Systems, Inc. Fundamentals of Web Design 1.1 – Course Project
1-17
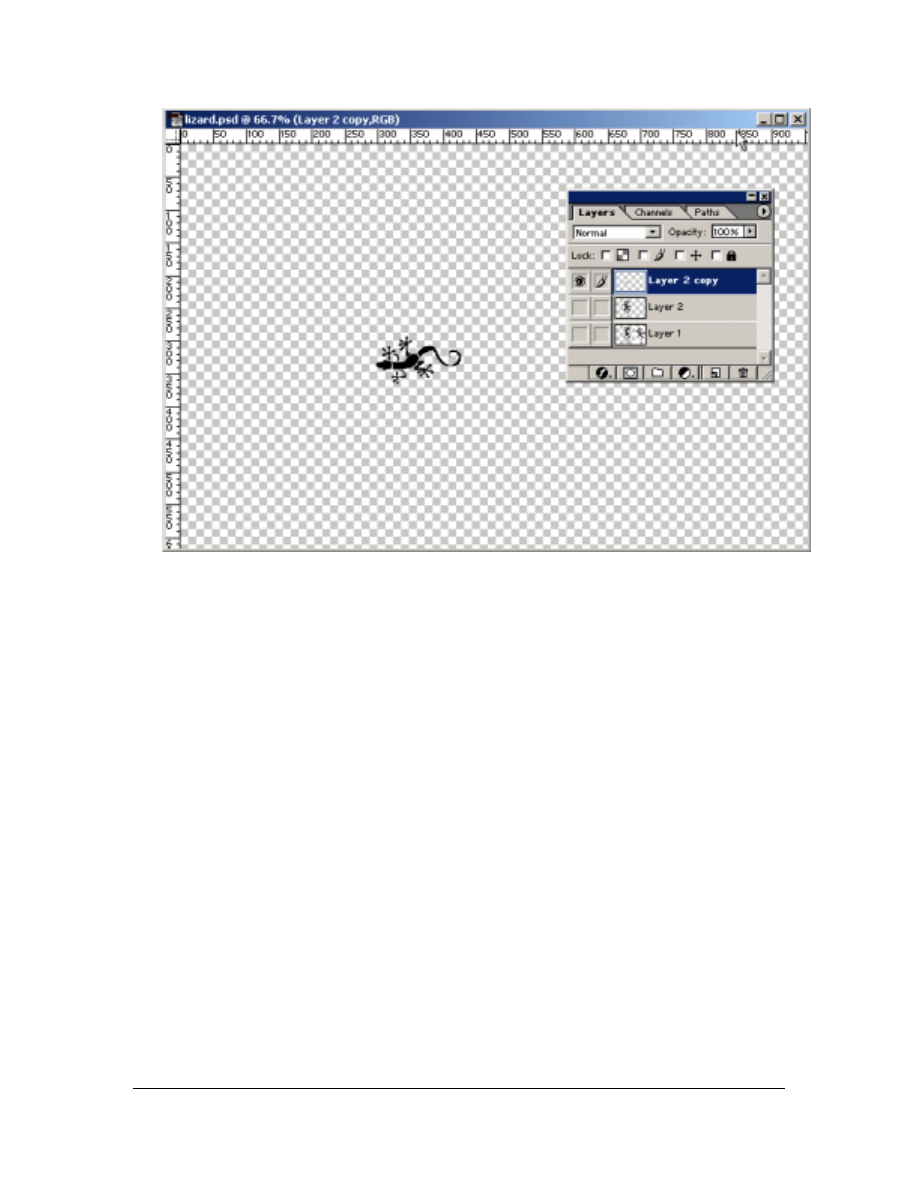
You will notice that a scale options bar appears beneath the menu items on the top of
the Photoshop window:
37. To change a layer size pixel wise, you need to enter the pixel number in the width
(W) or height (H) option boxes. To keep the proportions of the layer when
changing the size, click on the chain icon (
) between W and H in the width text
box (W), type in “130px,” and click the checkmark icon to commit the changes:
Copyright
2001, Cisco Systems, Inc. Fundamentals of Web Design 1.1 – Course Project
1-18
38. Save your file.
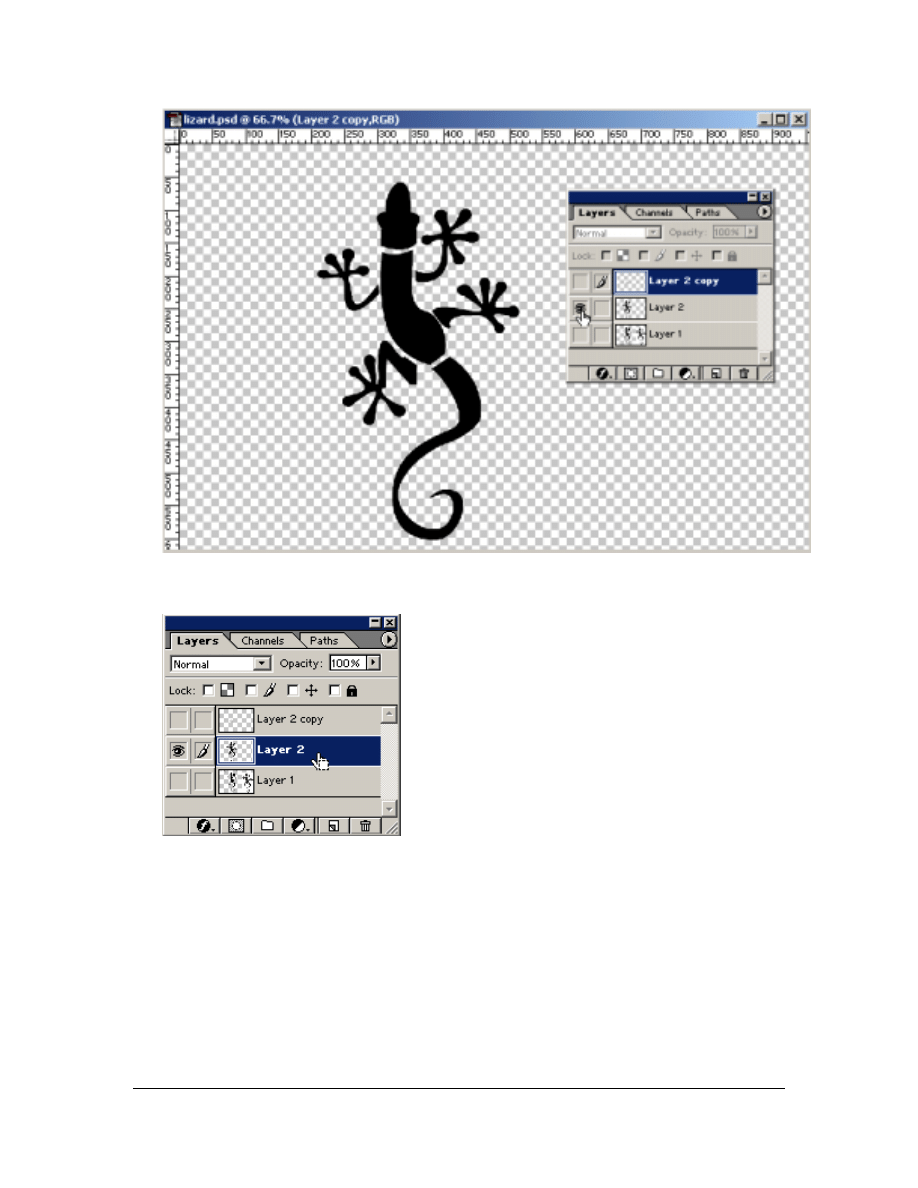
39. Hide the top layer and show the middle layer by clicking on the respective eye
icon:
Copyright
2001, Cisco Systems, Inc. Fundamentals of Web Design 1.1 – Course Project
1-19
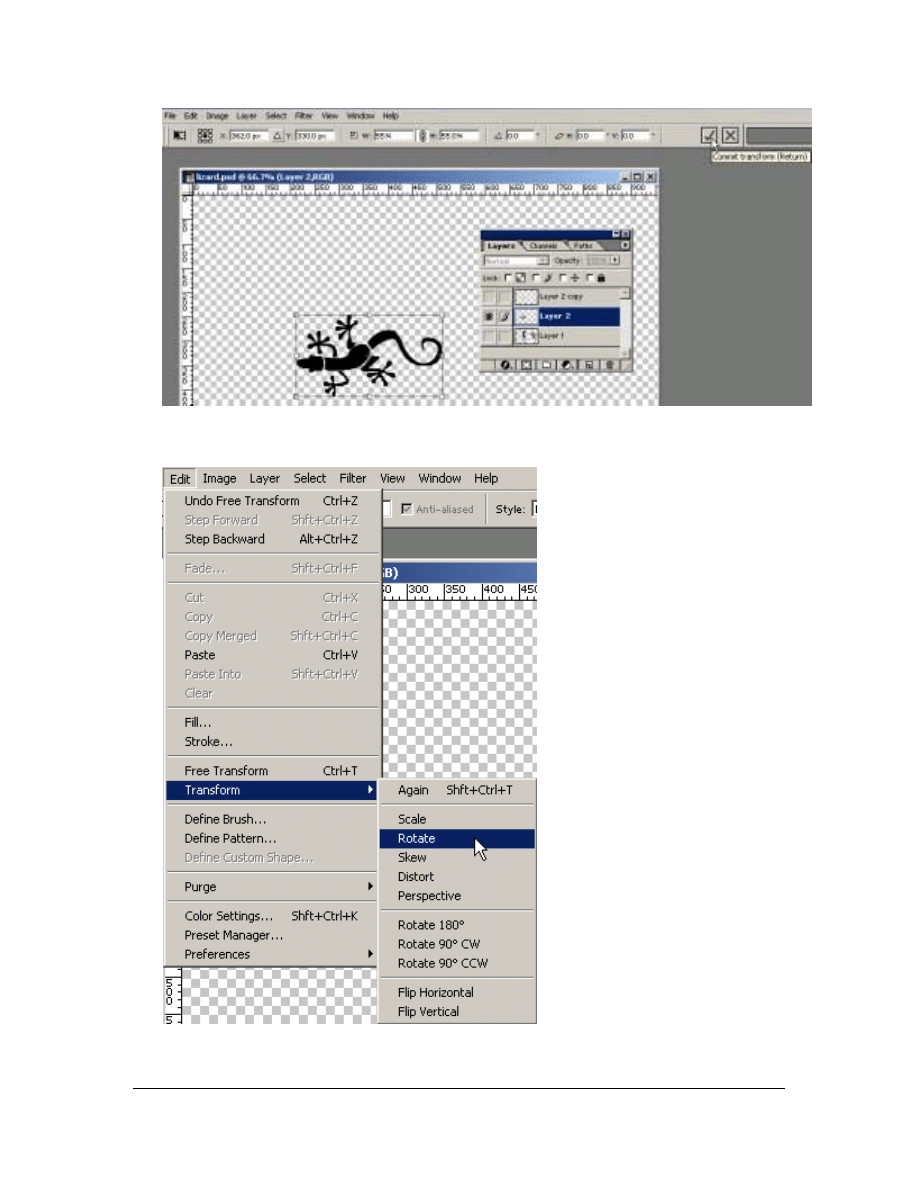
40. Select the middle layer to be able to edit it by clicking on Layer 2 in the Layers
Window:
41. Rotate this layer also 90 degrees counter-clockwise like you did before, then scale
this layer to 55% (remember to click on the chain icon), and commit the changes:
Copyright
2001, Cisco Systems, Inc. Fundamentals of Web Design 1.1 – Course Project
1-20
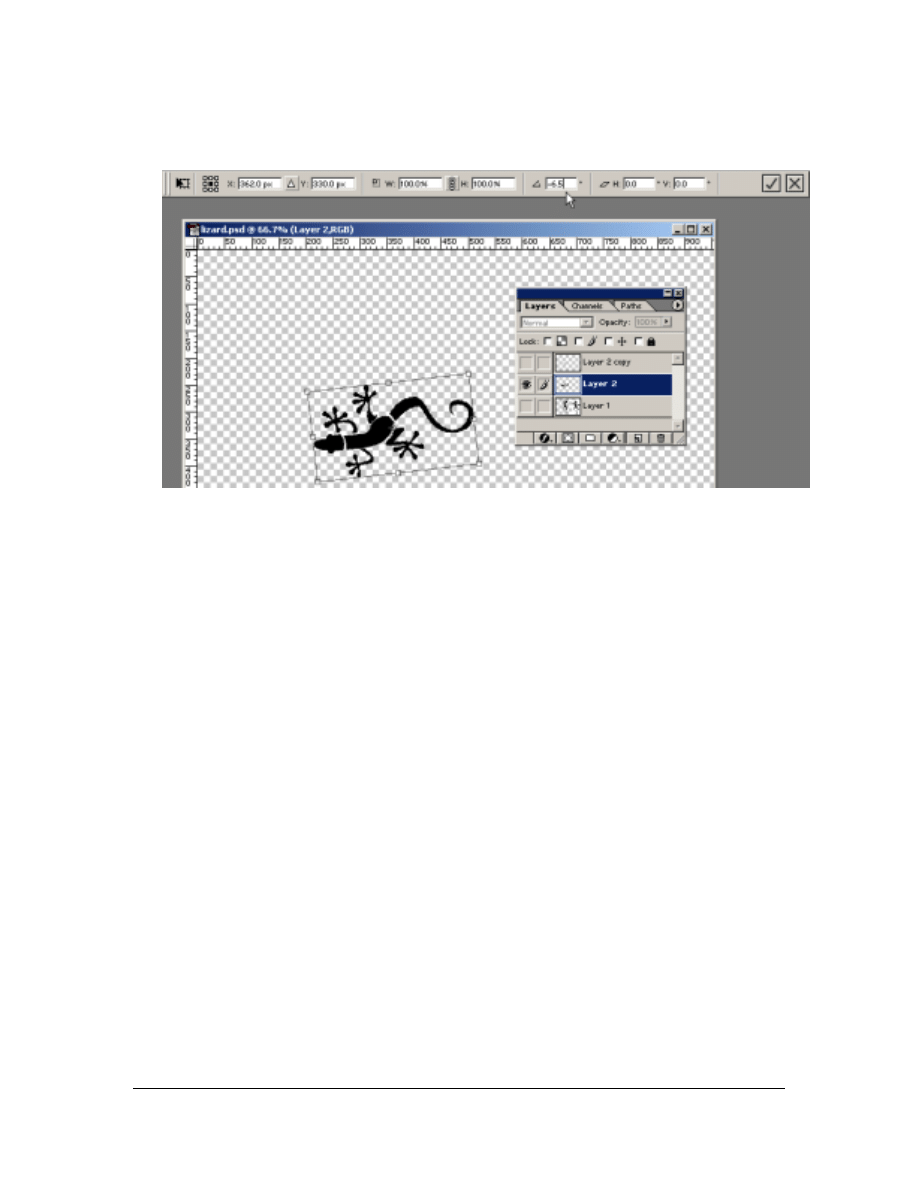
42. This layer needs to be rotated by a manual amount. Go to
Edit>Transform>Rotate:
Copyright
2001, Cisco Systems, Inc. Fundamentals of Web Design 1.1 – Course Project
1-21
43. Then in the Rotate Options Bar that appears beneath the menu, you will enter “-
6.5” in the Set rotation options box. After that, commit the changes by clicking on
the checkmark:
44. Now open the header.psd that is already in your layout folder.
45. Create new guides to be able to place the small lizard correctly in the header area:
vertical guide at the 456 marker and the horizontal guide at the 97 marker.
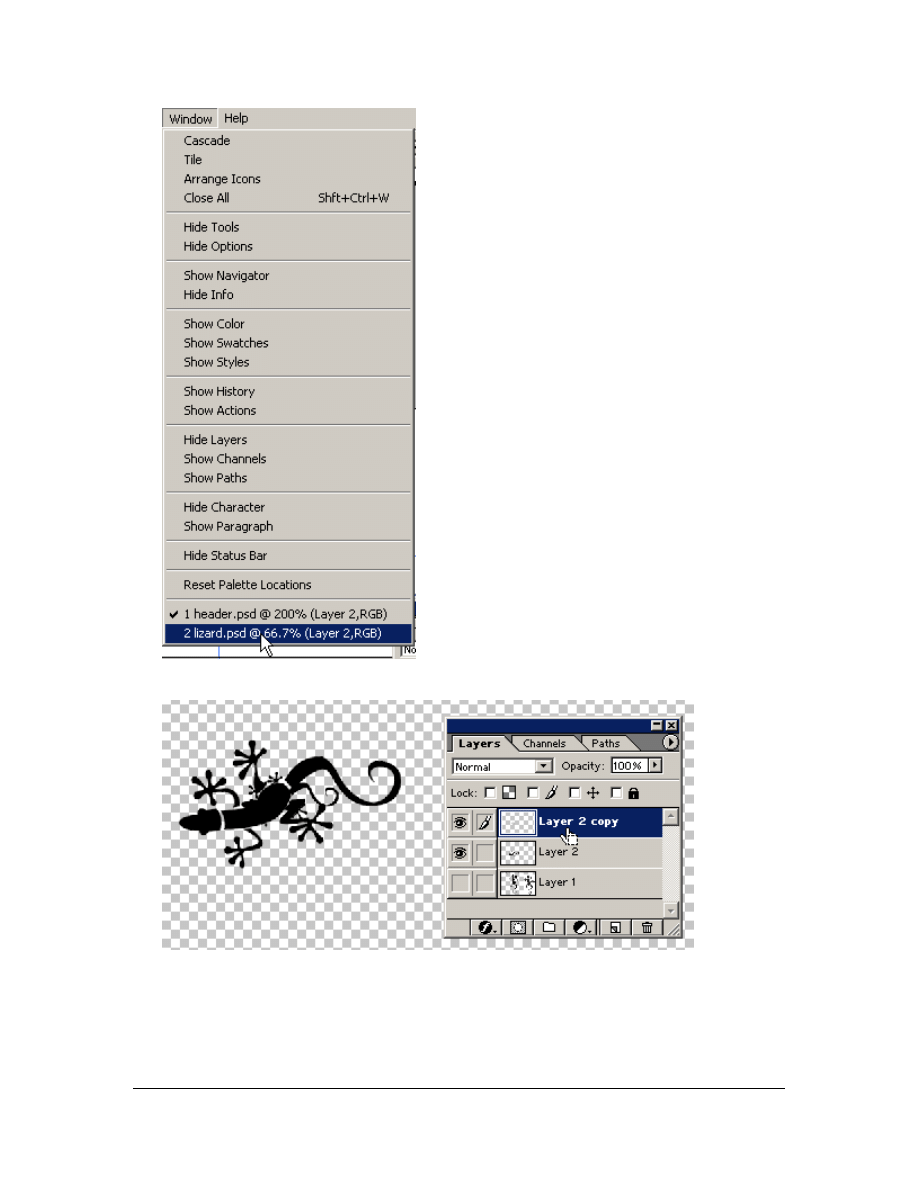
46. Switch back to the lizard.psd now by selecting the Window menu item and
choosing the lizard.psd option at the bottom:
Copyright
2001, Cisco Systems, Inc. Fundamentals of Web Design 1.1 – Course Project
1-22
47. In lizard.psd, activate the top layer by clicking on it in the Layers Window:
48. Press the keys CTRL+A to select all objects on the active layer, and press
CTRL+C to copy all selected objects to the cache.
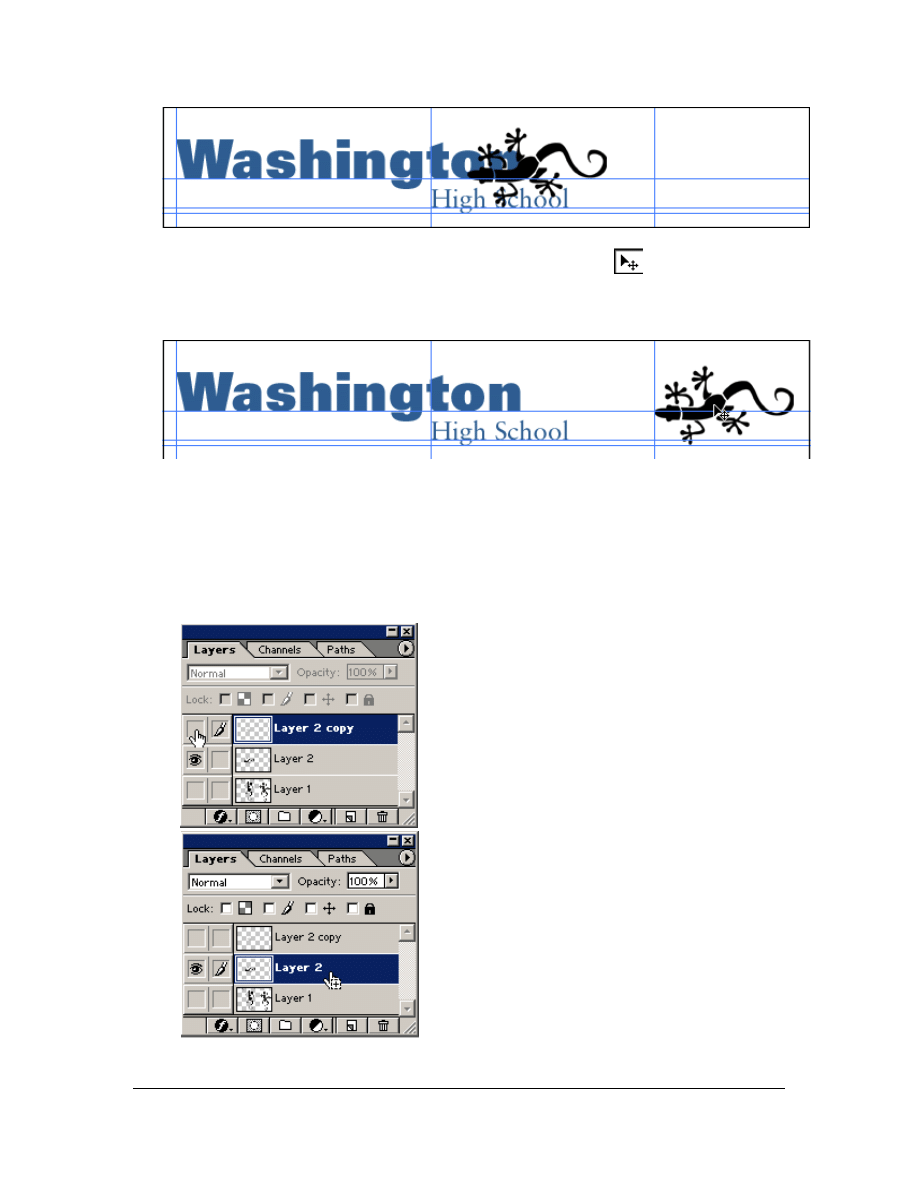
49. Go back to the header.psd (using the Window menu item like you did before), and
press CTRL+V to paste the small lizard that you just copied from the lizard.psd as
a layer to the header.psd:
Copyright
2001, Cisco Systems, Inc. Fundamentals of Web Design 1.1 – Course Project
1-23
50. Now you can move this layer by choosing the Move Tool (
) from the Tools
Palette and then dragging the small lizard so that the left and bottom borders of
the animal are aligned with the guides that you created before (pay attention not to
confuse the guides):
51. Create new guides to place the large lizard correctly in the header area: vertical
guide at the 382 marker and the horizontal guide at the 87 marker. Zoom in, if
necessary.
52. Save the header.psd by pressing CTRL+S.
53. Go back to lizard.psd.
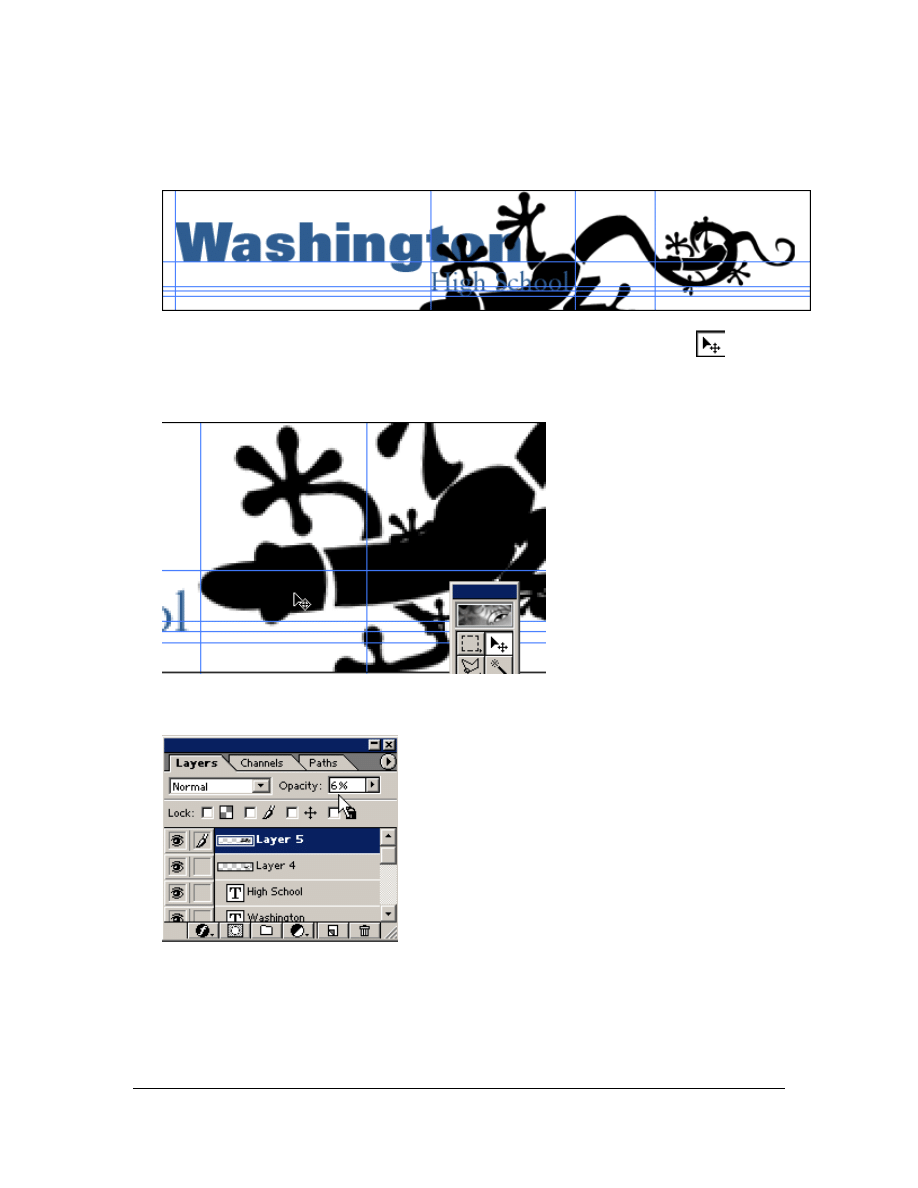
54. In lizard.psd, hide the top layer (a) showing the small lizard and activate the
middle layer showing the large lizard (b):
a)
b)
Copyright
2001, Cisco Systems, Inc. Fundamentals of Web Design 1.1 – Course Project
1-24
55. Use CTRL+A to select all objects on the active layer, and use CTRL+C to copy
all selected objects to the cache.
56. Go back to header.psd.
57. In header.psd, press CTRL+V to paste the large lizard as layer:
58. Now you can move the large lizard layer by choosing the Move Tool (
) from
the Tools Palette and then dragging it so that the left guide aligns with the lizard’s
nose and the bottom guide aligns with its bottom eye (pay attention not to confuse
the guides):
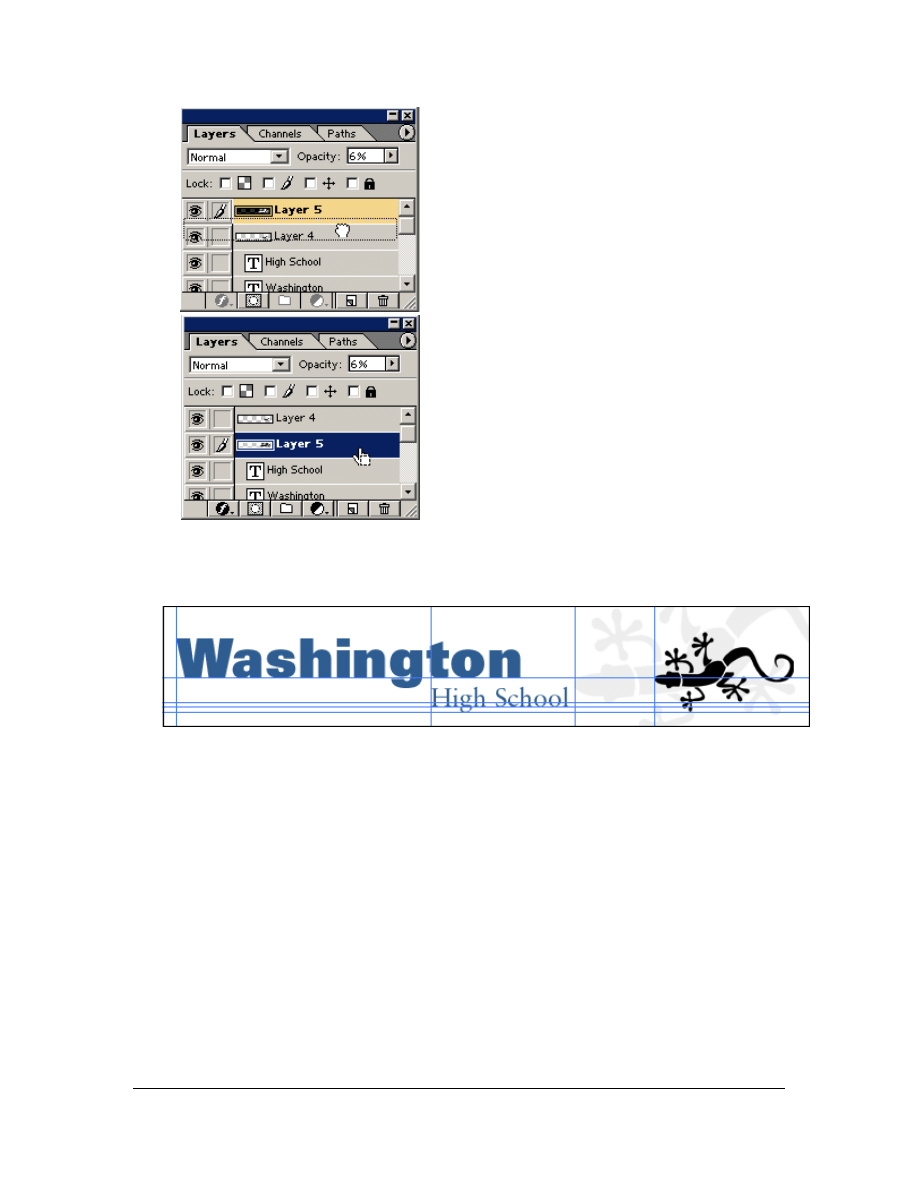
59. In your layers window, change the opacity of the large lizard (the active layer) to
6%:
60. In the Layers Window, drag the top layer (large lizard) down by one (a) so that it
is in the background of the small lizard (b):
Copyright
2001, Cisco Systems, Inc. Fundamentals of Web Design 1.1 – Course Project
1-25
a)
b)
61. You have now created the complete header consisting of the two text layers and
the two lizard layers. In addition, you have successfully positioned them so that
your file looks like this:
62. Save your header.psd and lizard.psd files.
Wyszukiwarka
Podobne podstrony:
Adobe Illustrator 10 Ćwiczenia
adobe illustrator cs2 cs2 pl o Nieznany
Adobe Illustrator 10 cwiczenia cwil10
Adobe Illustrator 10 cwiczenia
Adobe Illustrator CS CS PL Oficjalny podrecznik 2
Adobe Illustrator CS CS PL Oficjalny podrecznik ilcspo
DOKŁADNA INSTALACJA PROGRAMU ADOBE ILLUSTRATOR CS6 FULL
Adobe Illustrator 10 cwiczenia cwil10
Adobe Illustrator CS CS PL
adobe illustrator cs6 learn by video
Adobe Illustrator CS CS PL Oficjalny podrecznik ilcspo
Adobe Illustrator CS CS PL Oficjalny podrecznik
Adobe Illustrator CSCS PL Oficjalny podrecznik(1)
Adobe Illustrator CS3 CS3 PL cwiczenia praktyczne cwilc3
więcej podobnych podstron