HOW TO:
BUILD A SHOWER CUBICLE
INTRODUCTION
A second shower is almost a necessity in a busy household.
It is rare to find a home these days that does not boast at least one shower, but if you have a large family or
frequently entertain house guests, a second shower will take the pressure off the bathroom. You could build a
shower cubicle into the corner of a bedroom, in a downstairs toilet or utility room, or even under the stairs. And if
space is limited, there's no need to install a purpose-built cubicle - just screen off the bath and fit a shower unit
to the wall above.
SKILL LEVEL
Building a shower cubicle requires some experience in carpentry and tiling. You also need a degree of expertise
in wiring and plumbing in order to install a shower unit.
SAFETY FIRST
By all means construct the shower cubicle yourself, but it is safer to hire professionals if you are not competent
to install electrical wiring and plumbing.
TO COMPLETE THIS PROJECT
YOU WILL NEED...
• Claw hammer
• Copper Pipe
• Core Bit
• Craft Knife
• Electric Screwdriver
• Grout (suitable for the surface)
• Hacksaw
• Hole Saw
• Pipe Connectors
• Power drill (Cordless)
• Screws
• Shower Curtain/Screen
• Shower Tray
• Shower Unit
• Silicone Sealant
• Spanners
• Spirit Level
• Timber framing
• Tube Cutter
• Boss Fitting
• Plasterboard
• Plastic waste pipe and fittings
• Plywood - Exterior-grade
• Solvent Cement
• Trap
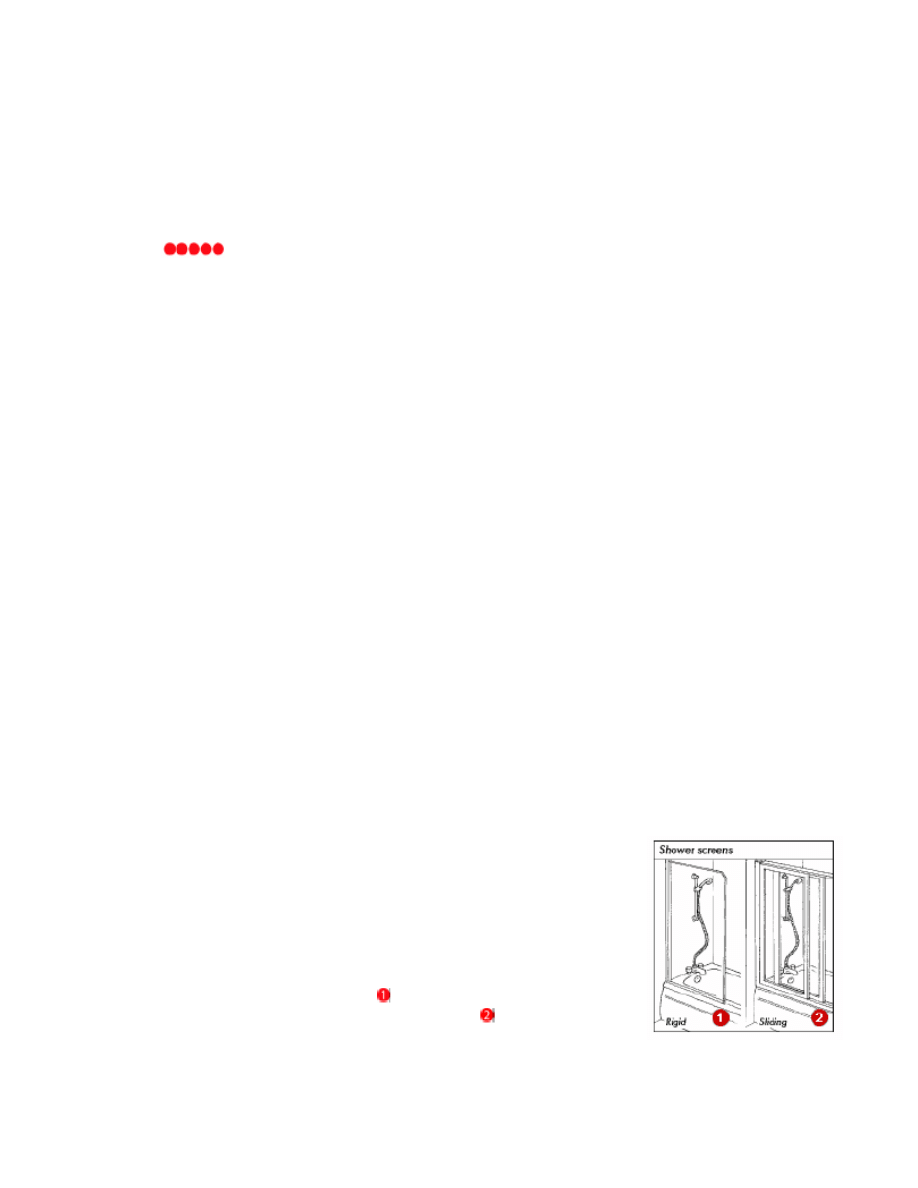
1 - FITTING A SHOWER SCREEN
The simplest way to screen off a bath shower is to hang a simple waterproof
curtain that is long enough to drape inside the bath rim. However, unless
you remember to tuck the curtain against the wall each time you take a
shower, you always seem to end up spraying the bathroom with water. A
rigid shower screen overcomes the problem.
There are various screen kits to choose from. Some are designed to shield
just the end of the bath where the shower is located
. Others enclose the entire bath.
To provide access, complete screens have hinged or sliding doors.
Hinged screens take up space when open and need good flexible seals.
To erect a fixed screen, fasten the channel to the wall with screws. Apply
sealant behind the channel before tightening up the screws, or run a bead of
sealant down the joint after fixing. Fit the glazed panel and seal between it
and the bath rim.
Fit a hinged or sliding screen following the manufacturer's instructions,
making sure you correctly install the seals provided with the screen.
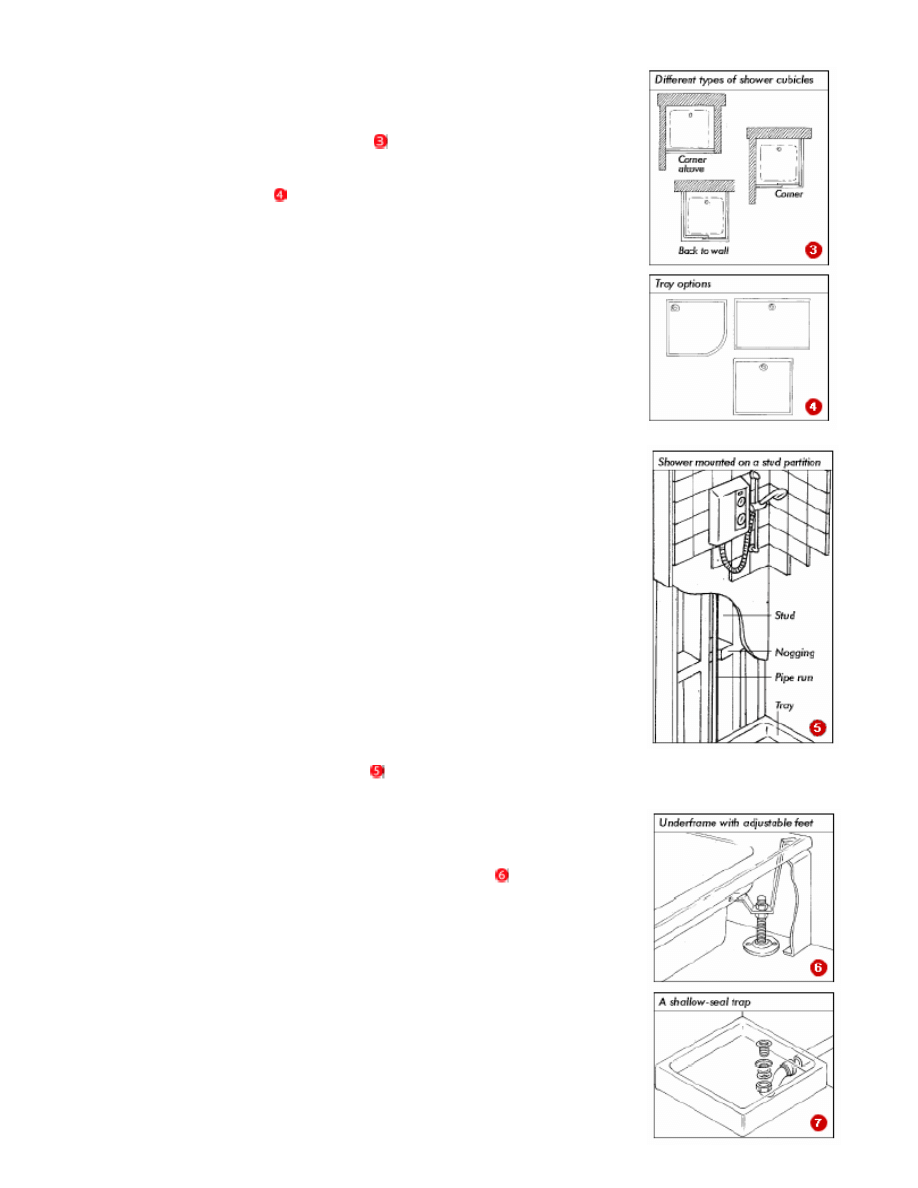
2 - SHOWER CUBICLES
Shower-cubicle components come in practically every combination
imaginable, from self-contained cabinets to screen panels for enclosing
alcoves, building into a corner or against a flat wall .
A range of sliding, hinged and bi-fold doors are available to fit all the various
shaped shower trays on the market .
A shower cubicle, fitted in a bedroom or some other part of the house,
must be at least 2.5m (8ft) from the nearest electrical socket - move the
socket if necessary.
Decide on the most convenient position for your shower, taking into
consideration the pipe runs for supply and waste. Check also on the
electrical-wiring requirements for instantaneous electric showers and
pumped power showers.
3 - BUILDING A STUD PARTITION
You can incorporate any existing wall into your shower cubicle, provided it is
sound enough to be lined with ceramic tiles.
It is easy to construct an alcove in the corner of your room by building a
stud partition to enclose the third side. Measure your shower tray carefully to
ensure you can make a good fit all round. It is usually best to remove the
skirtings and, if necessary, hack off some of the plaster from the existing
walls. This will enable you to set the rim of the tray into the walls to make a
waterproof seal after tiling.
A stud partition provides a convenient wall on which to mount the shower
unit, because all the services can be run within the frame.
Construct the partition from 100 x 50mm (4 x 2in) softwood treated with
preservative. Erect four uprights nailed to a similar-size piece of wood,
known as a sole plate, screwed to the floor. Nail them at the top to a head
plate screwed to the ceiling. Screw into the joists whenever possible. If need
be, fit timber bearers between the joists to provide fixing points.
Fix noggings between the uprights to stiffen the frame, but leave a clear
path for the plumbing (and wiring) down the centre.
4 - FITTING THE SHOWER TRAY
Shower trays are usually made from moulded plastic or are cast with a gel
coat. Most trays have an integral side skirt that is made to stand on the floor.
Others have a wooden or metal underframe fitted with adjustable feet.
A separate plinth panel is fitted to this type of shower tray to conceal the
underframe and provide access to the waste system.
The most important aspect when fitting a tray is to ensure that the tray is
level and that it is correctly bedded down. Manufacturers generally suggest
a sand/cement mix of 5:1. This is to ensure that the tray is fully supported
and also helps with levelling.
The next issue to address is whether or not the tray will need raising off the
floor. This will depend on whether installation is onto a timber or
solid/restricted access floor. If it is a timber floor, there should be sufficient
room to allow for the waste, trap and pipework. If the floor is solid or there is
restricted access, a plinth will need to be constructed which is capable of
accommodating the trap which is to be used.
The wastepipe must have sufficient fall (slope) for the water to drain
properly. Access must be provided in order to clean out the shower trap.
You can fit a shallow-seal trap
when draining into a two-pipe waste
system, but if you are connecting directly to a soil pipe you must use a
deep-seal trap.
If this gives you problems with clearance under the shower tray, fit a deepseal
running trap in the pipe run. Cut an access hatch in the floor.
Some traps have a twist-out grille that provides access to a detachable
chamber for removing blockages.
5 - THE WASTE SYSTEM
Attach a 40mm (1.5in) plastic wastepipe to the trap. The wastepipe can be
run through the wall and discharged into the hopper head of a two-pipe
waste system, or you can connect the pipe directly to the soil pipe of a
single-stack drainage system.
Try to run the wastepipe between the floor joists, providing sufficient fall -
6mm (1/4in) for every 300mm (1ft) run - otherwise you may have to build a
support frame to raise the shower tray to a higher level. If this results in the
rim of the shower tray being more than 225mm (9in) above the floor, you
should construct a step to provide safe access to the cubicle.
Having established the exit point for the wastepipe, use a power drill fitted
with a core bit to bore a hole through the wall of the house.
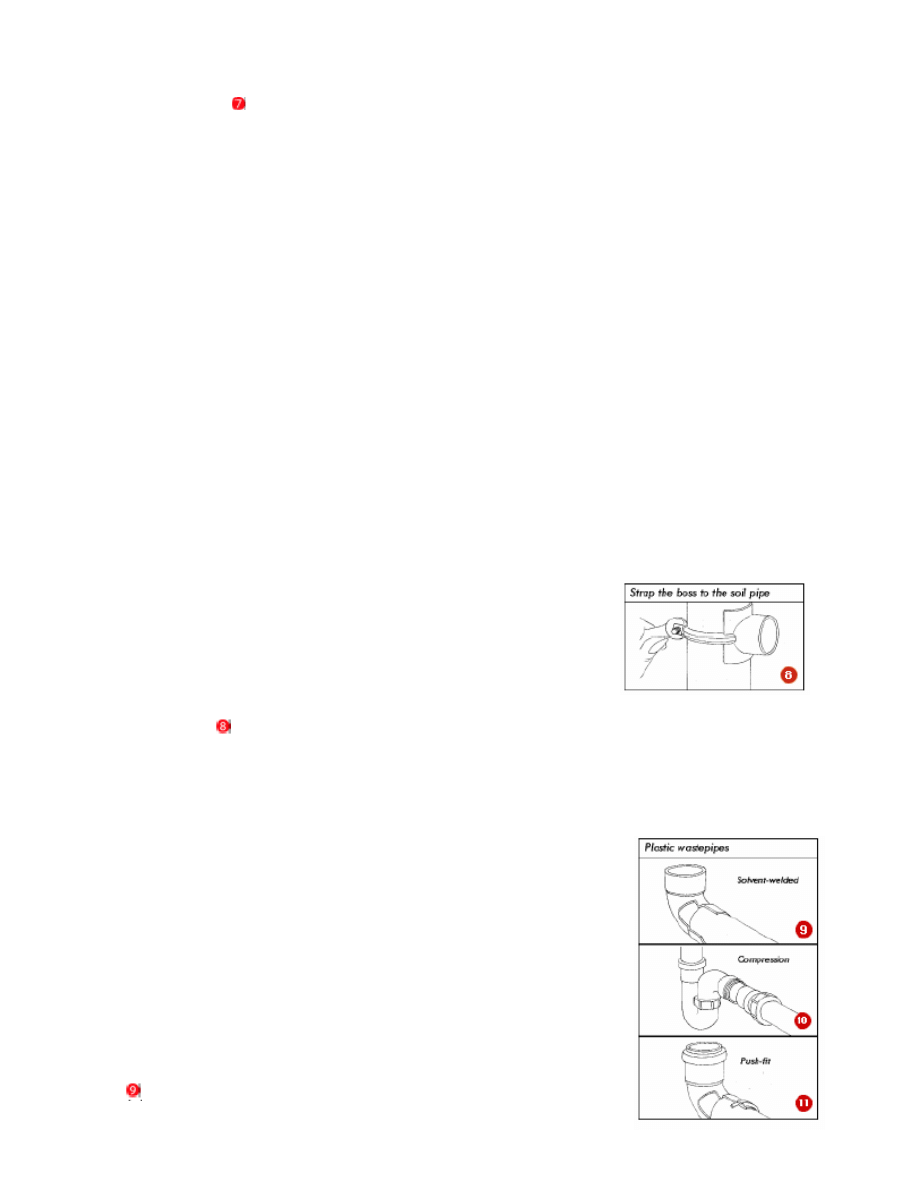
Connect an elbow to the end of the pipe to discharge water into a hopper.
Use a pipe boss to join the wastepipe to a plastic soil pipe. Mark where the
shower waste meets the soil pipe and cut a hole of the appropriate size,
using a hole saw. Smooth the edge of the hole with abrasive paper.
Following the manufacturer's instructions, apply solvent cement to the joint
and strap the boss in place.
When the cement has set, push the rubber seal into the boss and insert the
wastepipe.
6 - JOINING PLASTIC WASTEPIPES
Domestic wastepipe systems are lightweight and easy to assemble. The
pipes come in standard lengths and in three sizes - 32mm (1.25in) diameter
for washbasins, and 40mm (1.5in) for sink, bath and shower wastes. A
21mm (3/4in) pipe is also made for cistern overflows. The metric sizes refer
to outside diameters, the imperial sizes to inside.
When buying plastic pipes and fittings make sure they are compatible -
there may be slight variations in size between the ranges. For even the
simplest run of wastepipe, you will have to fit joints that enable the pipe to
change direction. A range of straight connectors, bends or elbows, T-joints
and adapters are available for joining straight lengths of wastepipe and for
connecting pipe to appliances.
JOINTS ARE CONNECTED TO THE PIPE USING VARIOUS METHODS:
A welded joint
is made by applying a solvent cement to the mating parts
just before the joint is assembled. The solvent softens the plastic, causing it
to fuse together and create a waterproof seal. Welded joints are best for
inaccessible pipe runs.

Compression joints
are often used to connect the wastepipe to the
shower trap. A large threaded cap compresses a rubber washer into the
neck of the joint, forming a seal. The joint can be dismantled by unscrewing
the cap. This type of joint can be used to join pipes of slightly different
diameters.
Push-fit joints
are quick and easy to assemble. When the wastepipe,
which must be cut square, is pushed into the joint, a rubber O-ring inside the
socket grips the end of the pipe, forming an instant watertight seal.
Smear petroleum jelly on the cut ends of the wastepipe to act as a lubricant
when assembling push-fit joints.
7 - THE FINAL STAGES
Having installed the tray and run the wastepipe, you can now line the inside
face of the partition with 9mm (3/8in) exterior-grade plywood. Seal all joints
with silicone sealant and prime the panels. Cut holes for the plumbing (and
electrical wiring if required), run the services and make the initial
connections. Panel the outside of the partition after you have tested the
plumbing for leaks. You can use plywood or plasterboard. Finish the edge of
the partition with softwood mouldings, or line it with a strip of plywood as a
base for tiling.
Tile the interior of the cubicle, using waterproof tile adhesive and grout. Refit
skirting boards on the outside. Make the final connections to the shower unit
and fit the sprayhead.
One last but important job is to seal the joints between the tiling and shower
tray. Grout is too inflexible, so use a silicone sealant to waterproof the joints.
Some shower trays are made with a raised lip to allow the tiles to overlap
the rim in order to improve the seal.
Clear sealant and a range of colours are available in tubes that fit into a
dispenser. Cut the tip off the pointed nozzle to a slight angle.
Clean the surfaces with methylated spirit, then run a bead of sealant along
each joint. Smooth the sealant with your fingertip dipped in a 50/50 solution
of washing-up liquid and water.
Having fitted the shower cubicle panels, following the manufacturer's
instructions, seal the joints between the framework, the walls and tray with
sealant .
Wyszukiwarka
Podobne podstrony:
HOW TO fit an electric shower
How to fit a gutter
How to fit bath & wash basins
How to fit a toilet & bidet
HOW TO STAY FIT
How to read the equine ECG id 2 Nieznany
CISCO how to configure VLAN
O'Reilly How To Build A FreeBSD STABLE Firewall With IPFILTER From The O'Reilly Anthology
How to prepare for IELTS Speaking
How To Read Body Language www mixtorrents blogspot com
How to summons the dead
How to draw Donkey from Shrek
How to Use Linked In
How to build a Raised Formal Pool
How to make
How to make an inexpensive exte Nieznany
how to write great essays id 20 Nieznany
how to use toyota lexus smart key programmer
więcej podobnych podstron