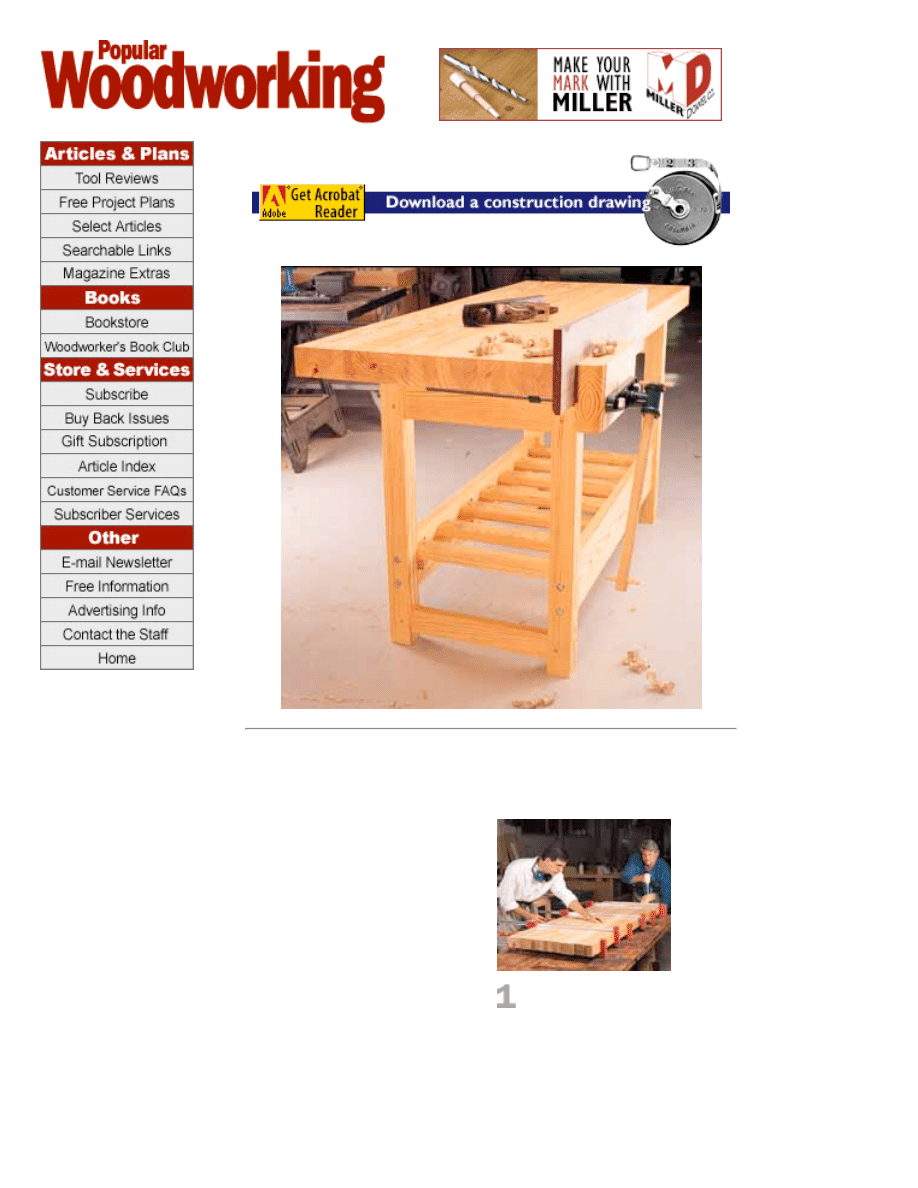
$175 Workbench
For $175 you can build a
bench that will retire after
you do.
I’ve hauled my grandfather’s
workbench across snow-covered
Appalachian mountains, down
narrow stairwells and into a dirt-
floored garage that should have
been torn down during the
Eisenhower administration. I’ve
built a lot of good stuff on that
bench, but now it’s time to retire
the old horse. For starters, the
bench is too low for the way I
work. And the top is pockmarked
When you glue up your top, you want
to make sure all the boards line up.
Lay down your glue and then clamp up one
end with the boards perfectly flush. Then
get a friend to clamp a handscrew on the
seam and twist until the boards are flush.
Continue clamping up towards your friend,
having your friend adjust the handscrews
as needed after each clamp is cinched
down.
with three different shapes and
sizes of dog holes. And during
the last few years I’ve become
fed up with the tool tray. The
only thing it seems designed to
hold is enough sawdust for a
family of gerbils. So I need a
new bench, but there’s no way
I’m going to spend $1,200 to
$1,400 for a high-quality bench
from Hoffman & Hammer or
Ulmia.
Enter Bob Key from Georgia. He
and his son have been building
benches using off-the-rack pine
for a few years and have even
built a website showing how
quick and easy this is to do (visit
them at
www.mindspring.com/~bobkey/
beginners.htm). I was impressed
with their idea. So I spent a
week reading every book on
benches I could find. I pored
over the woodworking catalogs.
And after a lot of figuring I came
up with a simple plan: Build a
bench for less than $175.
Believe it or not, I came in 92
cents under budget and ended
up with a bench that is tough,
sturdy and darn versatile. I made
a few compromises when
choosing the hardware to keep
the cost down, but I designed
the bench so that it can later be
upgraded with a nice tail vise.
However, I made no
compromises in the construction
of the top or base. You can
dance on this bench.
Let’s Go Shopping
OK friends, it’s time to make
your shopping list. First a word
about the wood. I priced my
lumber from a local Lowe’s. It
was tagged as Southern yellow
pine, appearance-grade. Unlike
a lot of dimensional stock, this
stuff is pretty dry and knot-free.
Even so, take your time and pick
through the store’s pile of 12-
foot-long 2 x 8s with care to get
the best ones possible. You can
hide a few tight knots in the top,
but with luck you won’t have to.
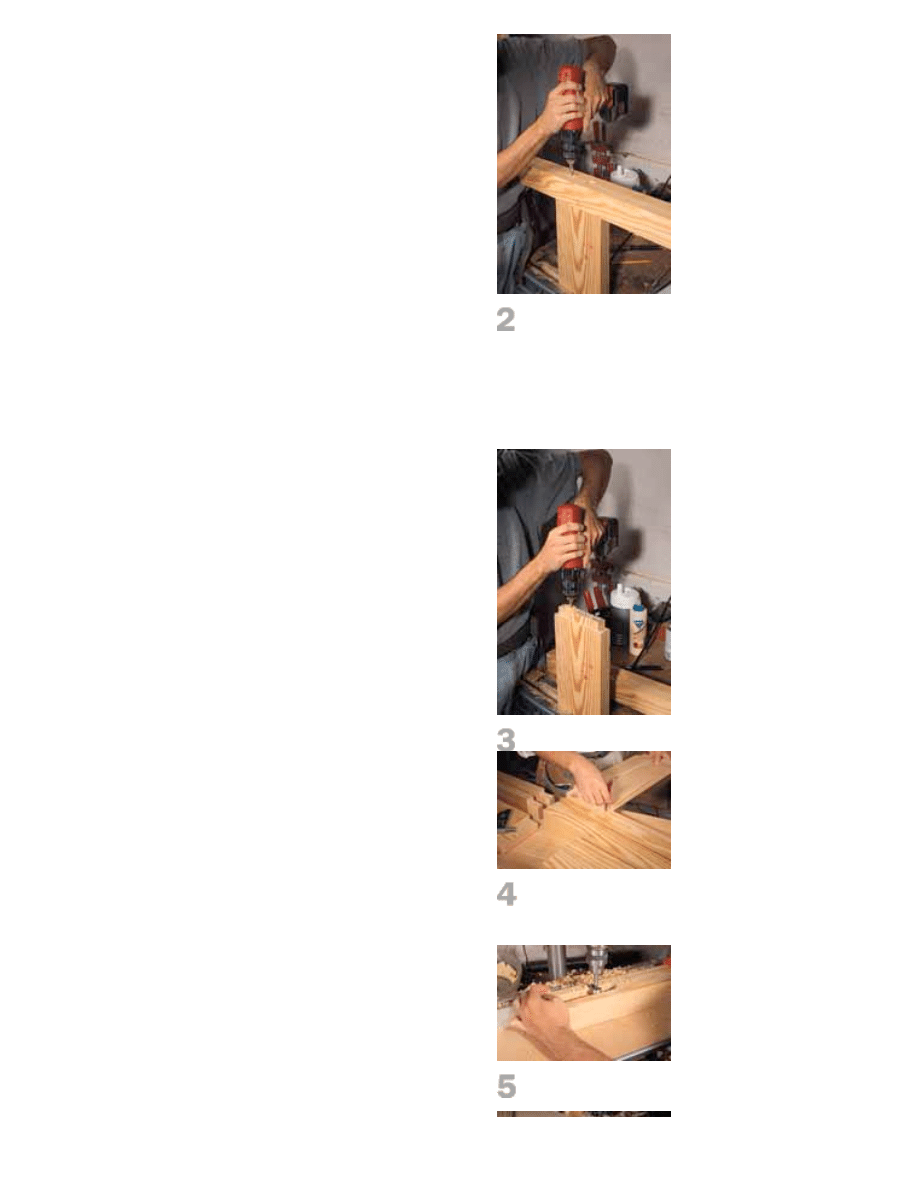
Drilling the 3/8" holes for the bolts is
easier if you do it in this order. First
drill the holes in the legs using your drill
press. Now assemble the leg and front rail.
Drill into the rail using the hole in the leg as
a guide. Remove the leg from the rail and
continue drilling the hole in the rail. The
hole you drilled before will once more act as
a guide. You still need to be careful and
guide your drill straight and true.
Another illustration of step 2.
After you cut your tenons, lay them
directly on your work and use the
edges like a ruler to mark where the
mortise should start and end (this picture).
Use a 1" Forstner bit in your drill press
to cut overlapping holes to make your
mortise (step 5).
Here’s the story on the
hardware. The bolts, nuts and
washers are used to connect the
front rails to the two ends of the
bench. Using this hardware,
we’ll borrow a technique used by
bed makers to build a joint that
is stronger than any mortise and
tenon. The Bench Dog and
Wonder Dog will keep you from
having to buy an expensive tail
vise. Using these two simple
pieces of hardware, you can
clamp almost anything to your
bench for planing, sanding and
chopping. The traditional face
vise goes on the front of your
bench and is useful for joinery
and opening cans of peanut
butter.
Preparing Your Lumber
Cut your lumber to length.
You’ve probably noticed that
your wood has rounded corners
and the faces are probably less
than glass-smooth. Your first
task is to use your jointer and
planer to remove those rounded
edges and get all your lumber
down to 1-3/8" thick.
Once your lumber is
thicknessed, start working on
the top. If this is your first
bench, you can make the top,
then throw it up on sawhorses to
build the base. The top is made
from 1-3/8" x 3-3/8" x 70"
boards turned on edge and
glued face-to-face. It will take
five of your 2 x 8s to make the
top. Build the top in stages to
make the task more
manageable. Glue up a few
boards, then run the assembly
through the jointer and planer to
get them flat. Make a few more
assemblies like this, then glue
all the assemblies together into
one big top.
When you finally glue up the
whole top, you want to make
sure you keep all the boards in
line. This will save you hours of
flattening the top later with a
hand plane. See the photo
above for a life-saving tip when
you get to this point. After the
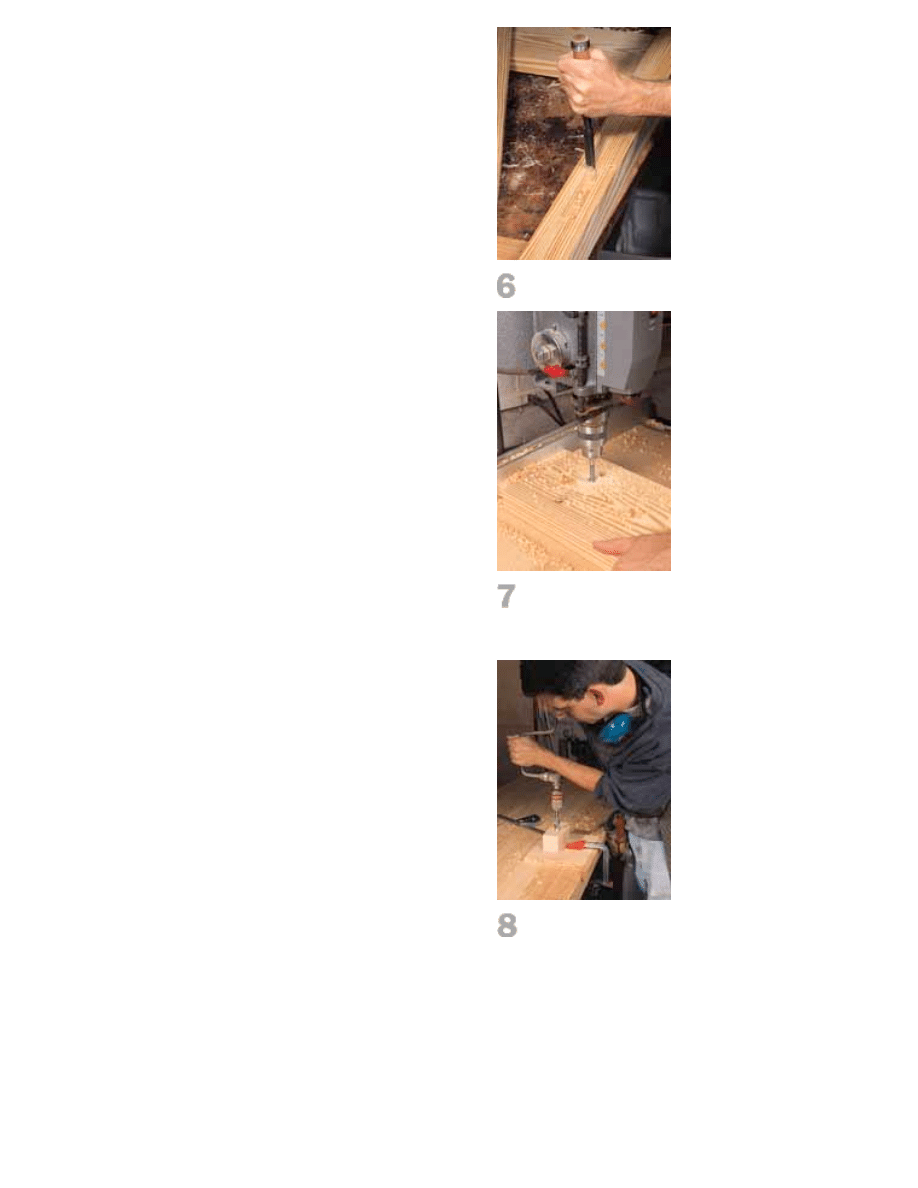
Now square up the edges of the
mortise using a mortise chisel and a
small mallet (step 6).
The mortises in the front rails are also
made on the drill press. Make them 1-
¼" deep to make sure you can get a
washer in there. If you can’t, try clipping an
edge off of the washer.
Drilling your dog holes may seem like
hard work using a brace and bit. It is.
However, you get an amazing amount of
torque this way — far more than you can
get with a cordless drill. Sadly, I had
cooked my corded drill, so this was my only
option.

glue is dry, square the ends of
your assembled top. If you don’t
have a huge sliding table on
your table saw, try cutting the
ends square using a circular saw
(the top is so thick you’ll have to
make a cut from both sides). Or
you can use a hand saw and a
piece of scrap wood clamped
across the end as a guide.
Build the Base
The base is constructed using
mortise-and-tenon joinery.
Essentially, the base has two
end assemblies that are joined
by two rails. The end assemblies
are built using big 1"-thick, 2"-
long tenons. The front rails are
attached to the ends using 1" x
1" mortise-and-tenon joints and
the 6"-long bolts. Begin working
on the base by cutting all your
pieces to size. The 2¾"-square
legs are made from two pieces
of pine laminated together. Glue
and clamp the legs and set them
aside. Now turn your attention
to cutting the tenons on the
rails. It’s a good idea to first
make a “test” mortise in a piece
of scrap so you can fit your
tenons as they are made. I like
to make my tenons on the table
saw using a dado stack. Place
your rails face down on your
table saw and use a miter gauge
to nibble away at the rails until
the tenons are the right size.
Because pine is soft, be sure to
make the shoulders on the
edges 1" wide on the upper side
rails. This precaution will prevent
your tenons from blowing out
the top of your legs.
Now use your tenons to lay out
the locations of your mortises.
See the photo at right for how
this works. Clamp a piece of
scrap to your drill press to act as
a fence and chain-drill the
mortises in the legs. Make your
mortises about 1/16" deeper
than your tenons are long. This
will give you a little space for
any excess glue.
Once you’ve got your mortises
drilled, use a mortise chisel to

square the round corners. Make
sure your tenons fit, then dry-fit
your base. Label each joint so
you can reassemble the bench
later.
Bed Bolts
There’s a bit of a trick to joining
the front rails to the legs.
Workbenches, you see, are
subject to a lot of racking back
and forth. A plain old mortise-
and-tenon joint just won’t hack
it. So we bolt it. First study the
diagram at left to see how these
joints work. Now here’s the best
way to make them.
First chuck a 1" Forstner bit in
your drill press to cut the
countersink in the legs for the
bolt head. Drill the countersinks,
then chuck a 3/8"-brad-point bit
in your drill press and drill in the
center of the counterbore
through the leg and into the
mortise.
Now fit the front rails into the leg
mortises. Chuck that 3/8" bit into
your hand drill and drill as
deeply as you can through the
leg and into the rail. The hole in
the leg will guide the bit as it
cuts into the rail. Then remove
the leg and drill the 3/8" hole
even deeper. You probably will
have to use an extra-long drill
bit for this.
OK, here’s the critical part. Now
you need to cut two small
mortises on each rail. These
mortises will hold a nut and a
washer and must intersect the
3/8" holes you just drilled. With
the leg and rail assembled,
carefully figure out where the
mortises need to go. Drill the
mortises in the rails as shown in
the photo. Now test your
assembly. Thread the joint with
the bolt, two washers and a nut.
Use a ratchet and wrench to pull
everything tight. If your bench
ever wobbles in your lifetime, it’s
probably going to be a simple
matter of tightening these bolts
to fix the problem. Remember to
tell this to your children.

Base Assembly
This bench has a good-sized
shelf between the front rails. Cut
the ledgers and slats from your
scrap. Also cut the two cleats
that attach the top to the base.
Now sand everything before
assembly — up to 150 grit
should be fine.
Begin assembly by gluing up the
two end assemblies. Put glue in
the mortises and clamp up the
ends until dry. Then, for extra
strength, peg the tenons using
3/8"-thick dowel. I had some
lying around. If you don’t, buy
the dowel at the hardware store
and add $1 to your bottom line.
Screw the ledgers to the front
rails. Make sure they don’t cover
the mortises for the bed bolts, or
you are going to be in trouble.
Now bolt the front rails to the
two ends (no glue necessary).
Rub a little Vaseline or grease
on the threads first because
after your bench is together you
want to seal up those mortises
with hot-melt glue. The Vaseline
will ensure your bolts will turn for
years to come.
Screw the cleats to the top of
the upper side rails. Then drill
oval-shaped holes in the cleats
that will allow you to screw the
top to the base. Now screw the
seven slats to the ledgers.
Finishing the Top
Before you attach your top, it’s
best to drill your dog holes and
attach the vise. Lay out the
location of the two rows of dog
holes using the diagram. I made
a simple jig to guide a ¾" auger
bit in a brace and bit. The jig is
shown in action in the photo
above.
Now position your vise on the
underside of the top and attach
it with the bolts provided by the
manufacturer. This Czech-made
vise is of surprising quality, with
a heavy-duty Acme-thread
screw. The only downside to the

vise is you are going to have to
make your own wooden face. I
must confess I didn’t have
enough wood left over from my
2 x 8s to make the face. So I
made it from a small piece of
scrap from another project.
You’ll need to drill three holes in
the wooden face so it fits over
the bars, but this is pretty self-
evident when you pull the vise
out of the box. All the European
benches I’ve seen have a bead
cut on the edges. I’m not one to
argue with tradition, so I used a
beading bit in a router table to
cut beads on mine, too.
Make the vise’s handle from a
length of 1"-diameter oak dowel.
My handle is 20" long, which is
just the right length to miss
whacking me in the head at
every turn. I’m a tall guy, so you
might want to make yours a bit
shorter.
You are now almost done. It’s
necessary to flatten the top. Use
“winding sticks” to determine if
your top is flat.
Winding sticks are simply
identical, straight lengths of
hardwood. Put one on one end
of the top and the other on the
far end. Now crouch down so
your eye is even with the sticks.
If your top is flat, the sticks will
line up perfectly. If not, you’ll
quickly see where you need
work. Use a jack plane to flatten
the high spots. Then sand your
top and rag on a couple coats of
an oil/varnish blend on the base
and top.
With the bench complete, I was
pleased with the price and the
time it took, which was about 30
hours. However, I’m now itching
to build a cabinet beneath the
bench and to add a leg jack for
planing the edges of long
boards. Maybe I’ll get to that
next issue, or maybe I’ll let a
future granddaughter take care
of those details.PW
Chris Schwarz is a Senior Editor for Popular
Woodworking.

Return to Free Projects Plans
© Popular Woodworking •
F+W Publications Inc.
Customer Service FAQs
Wyszukiwarka
Podobne podstrony:
Cwiczenie 6 WorkBench czwórniki pasywne
workbench
workbench
ANSYS Getting Started Tutorial Workbench
Do it Yourself Workbench id 137 Nieznany
Electronics Workbench 4 0 opis programu
WZÓR SPRAWOZDANIA ANSYS WORKBENCH=
Bauanleitung Instructions Workbee
(madera) Woodworking plans Workbench Popular Mechanics Hard Maple
(EBooks) DIY Woodwork Plans 10 Workbench Accessories
Space Saver Workbench
Do it Yourself Workbench
Shop Notes WorkBench Top with Hold down Tracks
Developing your STM32VLDISCOVERY application using the IAR Embedded Workbench
WorkBench Monterey Potting Center
Woodwork Plans Workbench
WorkBench Garage Workbench
Workbench1
więcej podobnych podstron