All-In-One Wireless Security System V2.0
Model #: MG-6160
X10 Operation User Guide
We hope this product performs to your complete satisfaction. Should you have any questions or comments, please visit
www.paradox.com and send us your comments.

1
Magellan - X10 Operation User Guide
Table of Contents
Introduction ......................................................................................................................................... 3
Accessing the X10 Setup Menu.......................................................................................................... 3
Enabling/Disabling the X10 Outputs ................................................................................................... 3
House and Unit Codes........................................................................................................................ 4
Programming Magellan’s House Code ....................................................................................................... 4
X10 Programming............................................................................................................................... 5
X10 Activation/Deactivation On Time ......................................................................................................... 5
X10 Activation/Deactivation on Zone Open ................................................................................................ 5
X10 Activation/Deactivation on Remote Button .......................................................................................... 6
X10 Activation/Deactivation on Exit Delay .................................................................................................. 7
X10 Activation/Deactivation when System Armed ...................................................................................... 7
X10 Activation/Deactivation on Entry Delay ............................................................................................... 7
X10 Activation/Deactivation on Alarm......................................................................................................... 7
Manually Activating/Deactivating X10 Outputs ................................................................................... 8
Using the Center Keypad............................................................................................................................ 8
Using the Action Keys................................................................................................................................. 8

Magellan - X10 Operation User Guide
2
Introduction
X10 is a communication protocol for remote control of electrical devices such as lamps and appliances. Communication is accomplished
through standard household electrical wiring using X10 transmitters and receivers. Magellan can be set as an X10 controller and when
used in conjunction with X10 transmitters, Magellan can be used to automate one’s home. Therefore, you can use Magellan to either
manually or automatically turn ON or OFF lamps, televisions, etc. The Magellan console can support a maximum of eight X10 receivers
or outputs.
Accessing the X10 Setup Menu
The X10 Setup menu is where you configure your X10 House Code and X10 receivers. To access the X10 Setup menu:
1. Press the right [
ACTION
] key (menu) to access the User menu.
2. Press the center [
ACTION
] key (next) seven times to scroll to the Utility Setup menu and then press
the left [
ACTION
] key (ok).
3. Press the center [
ACTION
] key (next) four times to scroll to the X10 Setup menu and then press the
left [
ACTION
] key (ok). Within this menu, you can perform any of the following options:
•
Press the left [
ACTION
] key (ok) to program the present X10 feature.
•
Press the center [
ACTION
] key (next) to scroll through all other X10 programming features.
•
Press the right [
ACTION
] key (exit) to exit the X10 Setup menu.
Enabling/Disabling the X10 Outputs
When programming Magellan’s X10 outputs from within the X10 Setup menu (see “Accessing the X10 Setup Menu” on page 2), you will
be instructing Magellan whether to activate or deactivate one or more X10 outputs. You have the choice of either activating or
deactivating ALL the outputs at once or individual outputs.
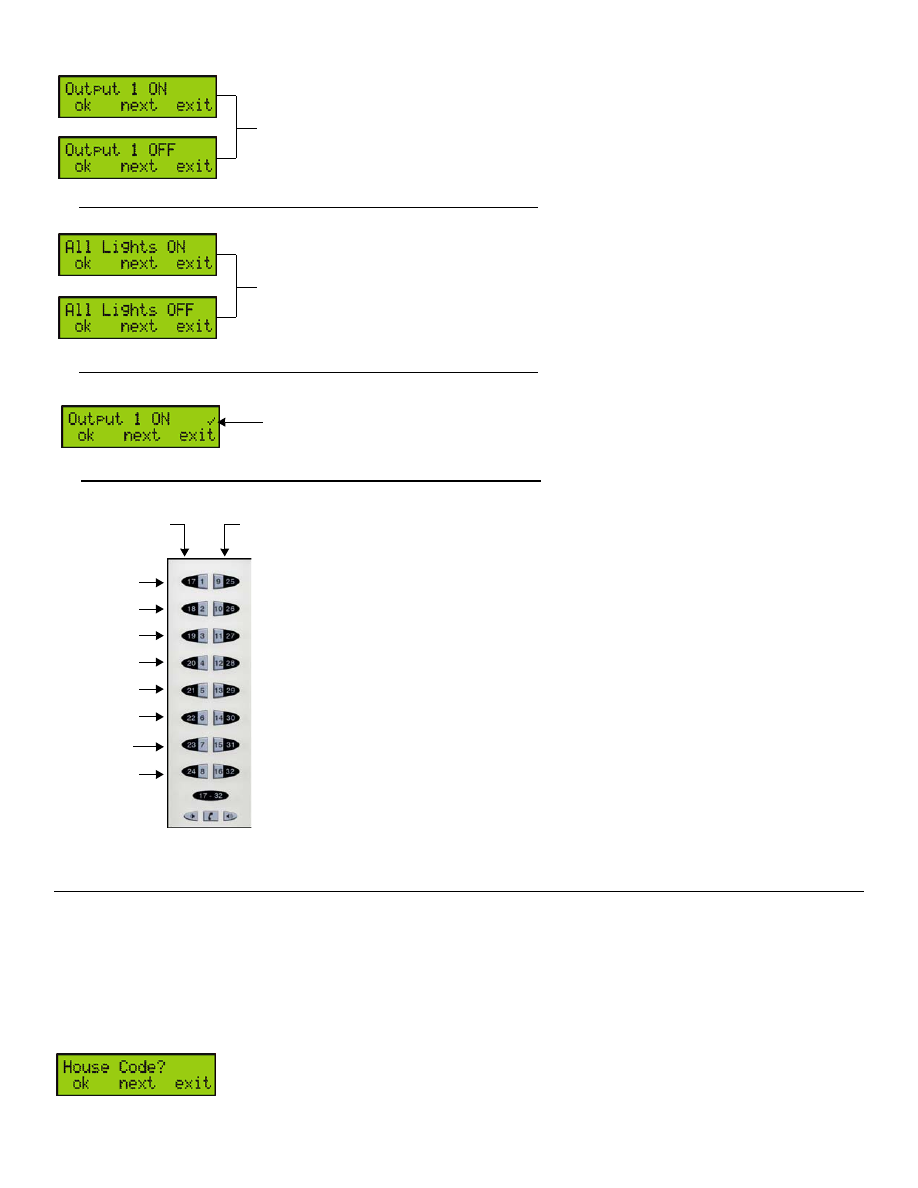
Every X10 output comes in two states, ON and OFF and is displayed in separate screens as shown in Figure 1 on page 3. The following
applies when enabling or disabling X10 outputs:
•
Press the left [
ACTION
] key (ok) or press the appropriate key from the Center keypad to enable or disable the displayed X10 state. A
checkmark will appear in the upper right corner of the screen and the appropriate key will be illuminated. See Figure 1 on page 3 for
more information.
•
Press the center [
ACTION
] key (next) to proceed to the next X10 output state.
•
Press the right [
ACTION
] key (exit) to save your programming and to exit.
3
Magellan - X10 Operation User Guide
Figure 1: Enabling/Disabling the X10 Outputs
House and Unit Codes
The Magellan console will be assigned a House Code from A to P while all assigned X10 receivers are assigned a specific address
consisting of the same House Code as the console as well as a unique Unit Code from 1 to 8. This is how Magellan will know which X10
receiver to activate and/or deactivate which will in turn activate and/or deactivate its corresponding device.
Programming Magellan’s House Code
1. Access the X10 Setup menu (see “Accessing the X10 Setup Menu” on page 2).
2. Press the center [
ACTION
] key (next) to scroll to the House Code menu. Press the left [
ACTION
] key
(ok) to program Magellan’s House Code.
Every X10 output is displayed in two screens. Each screen represents an X10 state: ON or OFF.
The checkmark indicates that this particular X10 output state is enabled.
The Center keypad can also be used to enable or disable X10 output states.
- Keys 1 to 8 represent the ON states of X10 outputs 1 to 8.
- Keys 9 to 16 represent the OFF states of X10 outputs 1 to 8.
- When a key is illuminated, it means that the output state of the X10 output associated with the illuminated key is enabled.
- If neither key is illuminated, that means that the X10 output will turn neither ON or OFF.
Example: The keypad on the left demonstrates that X10 outputs 1, 5 and 6 are configured to turn ON when the
programmed schedule, action or event occurs. X10 output 2 is configured to turn OFF when the programmed schedule,
action or event occurs. X10 outputs 3, 4, 7 and 8 are disabled and will neither turn ON or OFF.
X10 Output 2
X10 Output 3
X10 Output 4
X10 Output 5
X10 Output 6
X10 Output 7
X10 Output 8
Keys 1 to 8: ON state
for X10 outputs 1 to 8
Keys 9 to 16: OFF state
for X10 outputs 1 to 8
Use this feature to turn ON or OFF all programmed X10 outputs at the same time.
X10 Output 1
Magellan - X10 Operation User Guide
4
3. Select the desired House Code. Within this menu, you can perform any of the following options:
•
Press the left [
ACTION
] key (ok) to select and save the present House Code. Pressing this key will
also exit you from the House Code menu.
•
Press the center [
ACTION
] key (next) to scroll through the available House Codes (from A to P).
•
Press the right [
ACTION
] key (exit) to exit the screen and to return to the previous screen.
X10 Programming
Magellan offers a variety of programming choices for your X10 outputs (receivers). The X10 outputs can be programmed to follow a time
schedule or a specific event. You can select all X-10 outputs to be affected at the same time or select specific X10 outputs to be affected.
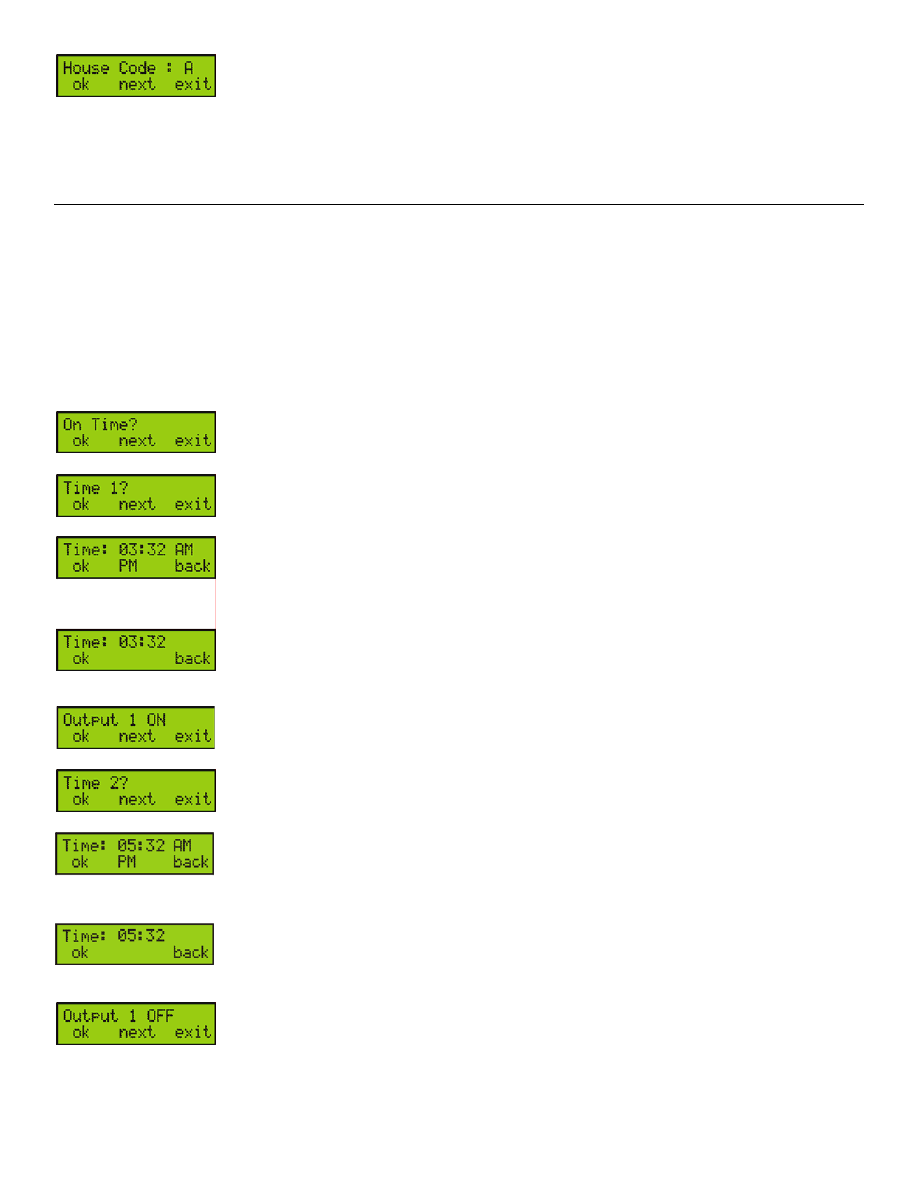
X10 Activation/Deactivation On Time
This programming option configures the X10 outputs to activate or deactivate by following a daily time
schedule. There are two time schedules that can be programmed. To configure the X10 outputs with this
feature:
1. Access the X10 Setup menu (see “Accessing the X10 Setup Menu” on page 2).
2. Press the left [
ACTION
] key (ok) to program Magellan’s X10 On Time feature.
3. Press the left [
ACTION
] key (ok) to program the first time schedule.
4. Depending on the time format being used within the system (see the Magellan Reference and
Installation Manual), enter the time you wish the first time schedule to take effect and then press the
left [
ACTION
] key (ok) to save and continue.
5. Configure the X10 outputs you wish to activate or deactivate with the schedule and then press the
right [
ACTION
] key (exit). See “Enabling/Disabling the X10 Outputs” on page 2 for more information.
6. Press the left [
ACTION
] key (ok) to program a second time schedule.
7. Depending on the time format being used within the system (see the Magellan Reference and
Installation Manual), enter the time you wish the second time schedule to take effect and then press
the left [
ACTION
] key (ok) to save and continue.
8. Configure the X10 outputs you wish to activate or deactivate with the schedule and then press the
right [
ACTION
] key (exit). See “Enabling/Disabling the X10 Outputs” on page 2 for more information.
12-hour clock format
24-hour clock format
12-hour clock format
24-hour clock format
5
Magellan - X10 Operation User Guide
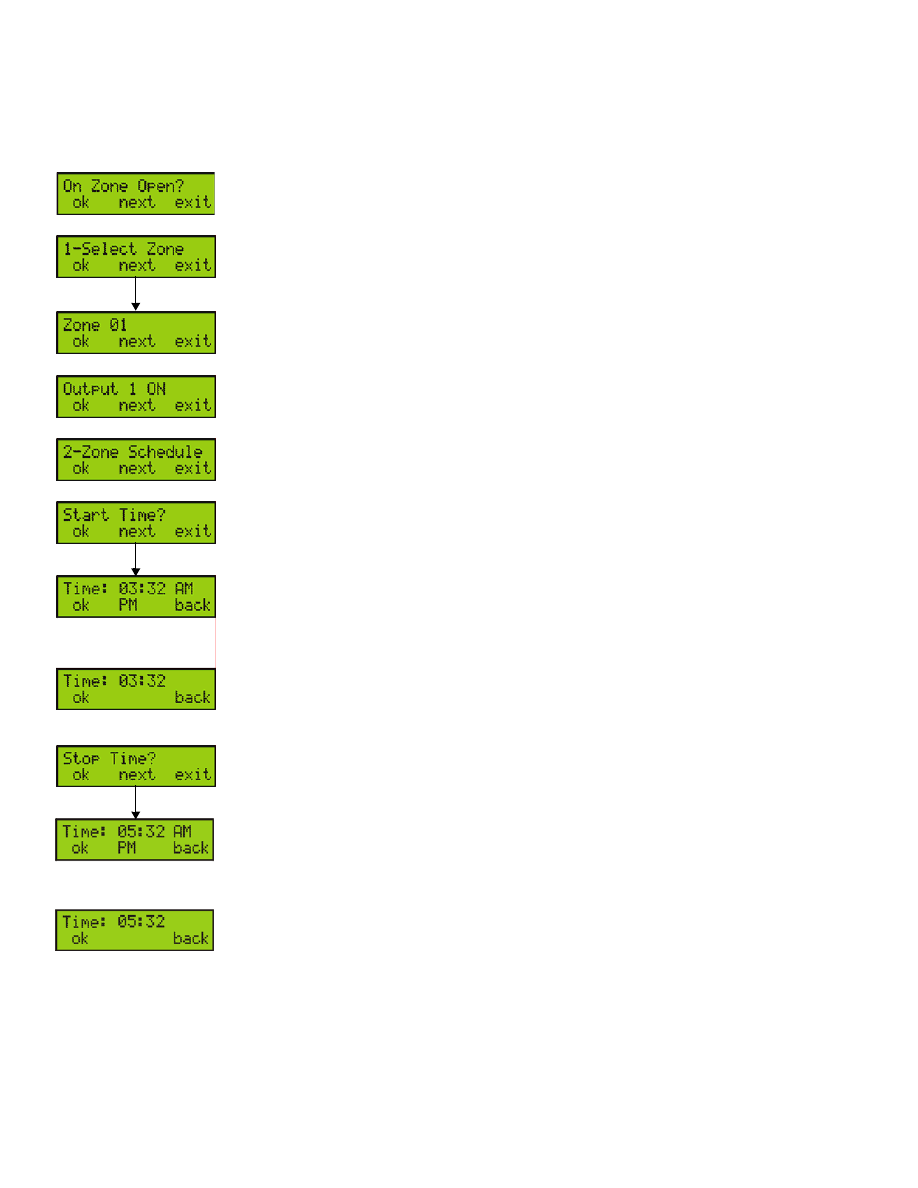
X10 Activation/Deactivation on Zone Open
Use this programming option to activate or deactivate your X10 outputs when a zone opens. The X10
outputs will remain activated/deactivated for 5 minutes. You can program a time period during which you
want this programming option to be enabled. To configure the X10 outputs with this feature:
1. Access the X10 Setup menu (see “Accessing the X10 Setup Menu” on page 2.
2. Press the center [
ACTION
] key (next) and then press the left [
ACTION
] key (ok) to program Magellan’s
X10 On Zone Open feature.
3. Press the left [
ACTION
] key (ok) to select the zone you wish to use to activate or deactivate one or
more X10 outputs. Within this menu, you can perform any of the following options:
•
Press the left [
ACTION
] key (ok) to configure the displayed zone.
•
Press the center [
ACTION
] key (next) to scroll through all other available zones.
•
Press the right [
ACTION
] key (exit) to exit the screen and to proceed.
4. Configure the X10 outputs you wish to activate or deactivate with the schedule and then press the
right [
ACTION
] key (exit). See “Enabling/Disabling the X10 Outputs” on page 2 for more information.
5. Press the left [
ACTION
] key (ok) to program the times you wish the programmed X10 outputs to
activate or deactivate.
6. Press the left [
ACTION
] key (ok) to program the Start Time of the schedule. Depending on the time
format being used within the system (see the Magellan Reference and Installation Manual), enter the
time you wish the second time schedule to take effect and then press the left [
ACTION
] key (ok) to
save and continue.
7. Press the left [
ACTION
] key (ok) to program the Stop Time of the schedule. Depending on the time
format being used within the system (see the Magellan Reference and Installation Manual), enter the
time you wish the second time schedule to take effect and then press the left [
ACTION
] key (ok) to
save and continue.
8. Return to step 3 to program another zone. If not, press the right [
ACTION
] key (exit) to exit the menu.
12-hour clock format
24-hour clock format
12-hour clock format
24-hour clock format
Magellan - X10 Operation User Guide
6
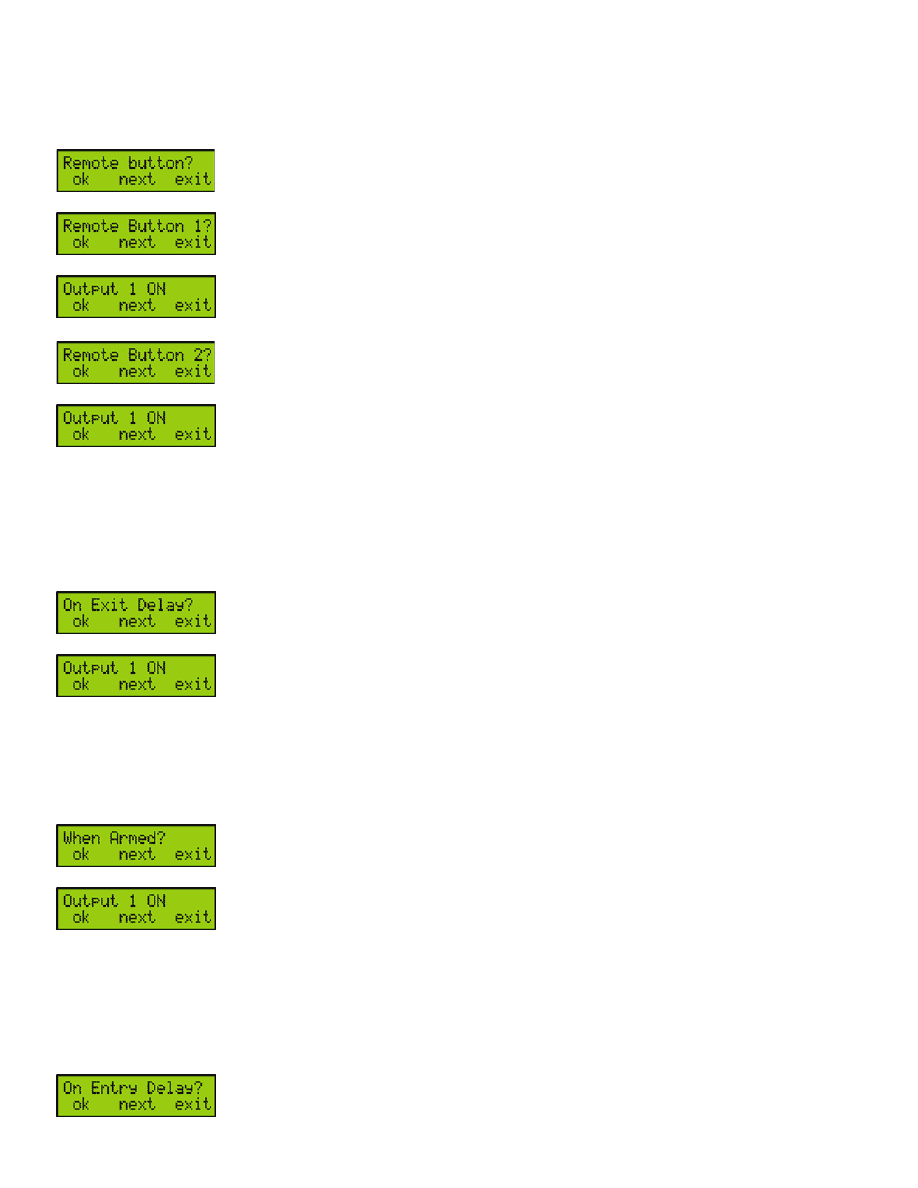
X10 Activation/Deactivation on Remote Button
Magellan’s X10 outputs can be programmed to activate or deactivate when a button on your remote
control is pressed. To configure the X10 outputs to do so:
1. Access the X10 Setup menu (see “Accessing the X10 Setup Menu” on page 2).
2. Press the center [
ACTION
] key (next) twice and then press the left [
ACTION
] key (ok) to program
Magellan’s X10 Remote Button feature.
3. Press the left [
ACTION
] key (ok) to program button 1 on your remote control to activate or deactivate
an X10 output.
4. Configure the X10 outputs you wish to activate or deactivate with the Remote Button option and then
press the right [
ACTION
] key (exit). See “Enabling/Disabling the X10 Outputs” on page 2 for more
information.
5. Press the left [
ACTION
] key (ok) to program button 2 on your remote control to activate or deactivate
an X10 output.
6. Configure the X10 outputs you wish to activate or deactivate with the Remote Button option and then
press the right [
ACTION
] key (exit). See “Enabling/Disabling the X10 Outputs” on page 2 for more
information.
X10 Activation/Deactivation on Exit Delay
You can program Magellan’s X10 outputs to activate or deactivate during the Exit Delay timer of your
system. To do so:
1. Access the X10 Setup menu (see “Accessing the X10 Setup Menu” on page 2).
2. Press the center [
ACTION
] key (next) three times and then press the left [
ACTION
] key (ok) to program
Magellan’s X10 On Exit Delay feature.
3. Configure the X10 outputs you wish to activate or deactivate whenever your Magellan system
initiates the Exit Delay timer and then press the right [
ACTION
] key (exit). See “Enabling/Disabling the
X10 Outputs” on page 2 for more information.
X10 Activation/Deactivation when System Armed
Use this option to activate or deactivate Magellan’s X10 outputs when your system is armed. To do so:
1. Access the X10 Setup menu (see “Accessing the X10 Setup Menu” on page 2).
2. Press the center [
ACTION
] key (next) four times and then press the left [
ACTION
] key (ok) to program
Magellan’s X10 When Armed feature.
3. Configure the X10 outputs you wish to activate or deactivate whenever your Magellan system is
armed and then press the right [
ACTION
] key (exit). See “Enabling/Disabling the X10 Outputs” on
page 2 for more information.
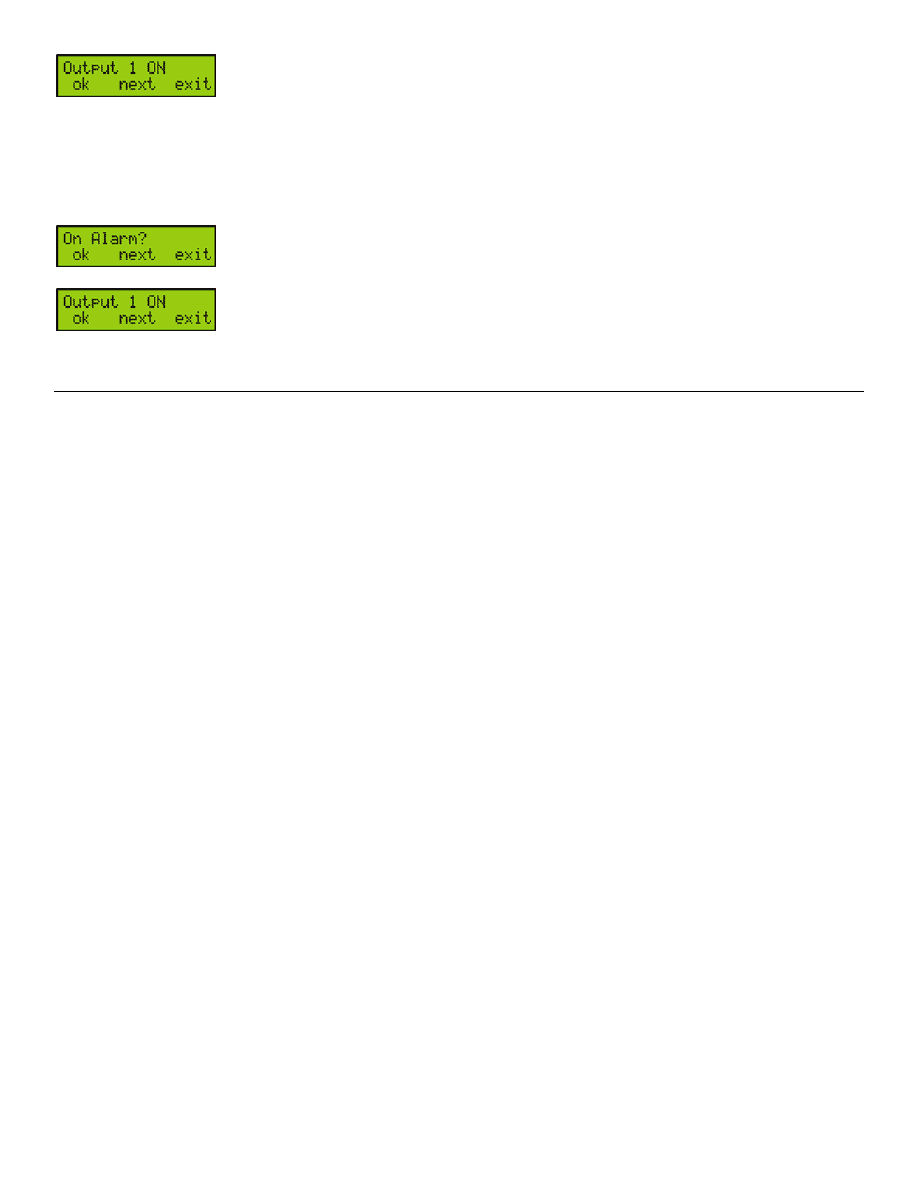
X10 Activation/Deactivation on Entry Delay
The X10 outputs can be programmed to activate or deactivate whenever either or both of Magellan’s
Entry Delay timers are initiated. To do so:
1. Access the X10 Setup menu (see “Accessing the X10 Setup Menu” on page 2).
2. Press the center [
ACTION
] key (next) five times and then press the left [
ACTION
] key (ok) to program
Magellan’s X10 On Entry Delay feature.
7
Magellan - X10 Operation User Guide
3. Configure the X10 outputs you wish to activate or deactivate whenever your Magellan system
initiates either or both of its Entry Delay timers and then press the right [
ACTION
] key (exit). See
“Enabling/Disabling the X10 Outputs” on page 2 for more information.
X10 Activation/Deactivation on Alarm
Program your X10 outputs to activate or deactivate during an alarm. To do so:
1. Access the X10 Setup menu (see “Accessing the X10 Setup Menu” on page 2).
2. Press the center [
ACTION
] key (next) six times and then press the left [
ACTION
] key (ok) to program
Magellan’s X10 On Alarm feature.
3. Configure the X10 outputs you wish to activate or deactivate whenever your Magellan system goes
into alarm and then press the right [
ACTION
] key (exit). See “Enabling/Disabling the X10 Outputs” on
page 2 for more information.
Manually Activating/Deactivating X10 Outputs
Magellan’s X10 outputs can be manually activated or deactivated through Magellan’s Center keypad or through the Action keys.
Using the Center Keypad
1. Press the [*] key.
2. Press keys [1] to [8] from the Center keypad to activate X10 outputs 1 to 8.
3. Press keys [9] to [16] from the Center keypad to deactivate X10 outputs 1 to 8.
4. Press the [*] key to exit.
Example: You wish to turn ON two lamps and to turn OFF another lamp. One is connected to X10 output 1, the second is connected to
X10 output 6 and the third lamp is connected to X10 output 8. You want the first two lamps to be turned ON. You press the [*] key and
then you press the [1] and [6] keys from the Center keypad.You want to last lamp to be turned OFF. You press the [16] key from the
Center keypad.
Using the Action Keys
1. Press the [*] key.
2. Press the left [
ACTION
] key (on) to activate the X10 output displayed on the screen. Press the center [
ACTION
] key (next) to scroll to
the desired X10 output. Press the right action key (off) to deactivate the X10 output displayed on the screen.
3. Press the [*] key to exit.
Example: You wish to turn ON a lamp connected to X10 output 4 and to turn OFF a lamp connected to X10 output 7. You press the [*]
key and then you press the center [
ACTION
] key (next) to scroll to output 4. You then press the left [
ACTION
] key (on) to activate output 4.
You press the center [
ACTION
] key (next) to scroll to output 7. You then press the right [
ACTION
] key (off) to deactivate output 7.

Limited Warranty
Paradox Security Systems Ltd. (“Seller”) warrants its products to be free from manufacturing defects in materials and workmanship for one-year following
the date of manufacture. Seller will, within this period, at its option, repair or replace any product failing to operate correctly without charge to the original
purchaser or user. This warranty will not apply to any equipment, or any parts thereof, which have been repaired by others, improperly installed, improperly
used, abused, altered, damaged, subjected to acts of God, or on which any serial numbers have been altered, defaced or removed. Seller will not be
responsible for any dismantling or reinstallation charges.
THERE ARE NO WARRANTIES, EXPRESS OR IMPLIED, BEYOND THE DESCRIPTION HEREIN. THERE IS NO EXPRESS OR IMPLIED WARRANTY OF
MERCHANTABILITY OR A WARRANTY OF FITNESS FOR A PARTICULAR PURPOSE. THIS WARRANTY IS IN LIEU OF ALL OTHER OBLIGATIONS OR LIABILITIES
ON THE PART OF SELLER, ITS SUPPLIERS AND/OR AFFILIATES.
Any action for breach of warranty, including but not limited to any implied warranty of merchantability, must be brought within three months following the
end of the warranty period. IN NO CASE WILL SELLER OR ITS AFFILIATES BE LIABLE TO ANYONE FOR ANY CONSEQUENTIAL OR INCIDENTAL DAMAGES
FOR BREACH OF THIS OR ANY OTHER WARRANTY, EXPRESS OR IMPLIED, EVEN IF THE LOSS OR DAMAGE IS CAUSED BY THE SELLER’S OWN NEGLIGENCE
OR FAULT.
In case of defect, contact the security professional who installed and maintains your security system. In order to exercise the warranty, the product must be
returned to the indicated RMA location by the security professional, shipping costs prepaid and insured. After repair or replacement, Seller assumes the cost
of returning products under warranty. Seller will have no obligation under this warranty, or otherwise, if the product has been repaired by others, improperly
installed, improperly used, abused, altered, damaged, subjected to accident, nuisance, flood, fire or acts of God, or on which any serial numbers have been
altered, defaced or removed. Seller will not be responsible for any dismantling, reassembly or reinstallation charges.
This warranty contains the entire warranty. Any prior agreements or representations, whether oral or written, are either merged herein or are expressly
cancelled. Seller neither assumes, nor authorizes any other person purporting to act on its behalf to modify, to change, or to assume for it, any other
warranty or liability concerning its products.
Notwithstanding anything herein, in no event shall Seller or its affiliates be liable for an amount in excess of Seller’s original selling price of the product, for
any loss or damage, whether direct, indirect, incidental, consequential or otherwise arising out of any failure of the product. Seller’s warranty, as
hereinabove set forth, shall not be enlarged, diminished or affected by and no obligation or liability shall arise from Seller offering to render or rendering
technical advice or services in connection with the purchase of goods hereunder.
SELLER STRONGLY RECOMMENDS THAT THE ENTIRE SYSTEM BE COMPLETELY TESTED MONTHLY.
Warning: Despite frequent testing, and due to, but not limited to, any or all of the following: criminal tampering, electrical or communication disruption, or
improper use, it is possible for the system to fail to perform as expected. Seller does not represent that the product/system may not be compromised or
circumvented or that the product or system will prevent any personal injury or property loss by burglary, robbery, fire or otherwise; nor that the product or
system will in all cases provide adequate warning or protection. A properly installed and maintained alarm may only reduce risk of burglary, robbery, fire or
otherwise but it is not insurance or a guarantee that these events will not occur. CONSEQUENTLY, SELLER SHALL HAVE NO LIABILITY FOR ANY PERSONAL
INJURY, PROPERTY DAMAGE, OR OTHER LOSS BASED ON A CLAIM THE PRODUCT FAILED TO GIVE WARNING. Therefore, the installer should in turn advise
the consumer to take any and all precautions for his or her safety including, but not limited to, fleeing the premises and calling 911, the police and/or fire
department, in order to mitigate the possibilities of harm and/or damage.
Seller is not an insurer of either the property or safety of the user’s family or employees, and limits its liability for any loss or damage including incidental or
consequential damages to Seller’s original selling price of the product in question, regardless of the cause of such loss and/or damage.
Some locations do not allow limitations on how long an implied warranty lasts or do not allow the exclusion or limitation of incidental or consequential
damages, or differentiate in their treatment of limitations of liabilities for ordinary or gross negligence, therefore the above limitations may be reduced and/
or not apply to you. This warranty gives you specific legal rights and you may also have additional rights depending on the location.
Limitations of Alarm Systems
It must be understood that while your Paradox alarm system is highly advanced and secure, it does not offer any guaranteed protection against burglary, fire
or other emergency (fire and emergency options are only available on certain Paradox models). This is due to a number of reasons, including by not limited
to inadequate or improper installation/positioning, sensor limitations, battery performance, wireless signal interruption, inadequate maintenance or the
potential for the system or telephone lines to be compromised or circumvented. As a result, Paradox does not represent that the alarm system will prevent
personal injury or property damage, or in all cases provide adequate warning or protection.
Your security system should therefore be considered as one of many tools available to reduce risk and/or damage of burglary, fire or other emergencies,
such other tools include but are not limited to insurance coverage, fire prevention and extinguish devices, and sprinkler systems.
We also strongly recommend that you regularly maintain your security systems and stay aware of new and improved Paradox products and developments.
Warning for Connections to Non-Traditional Telephony (eg. VoIP)
Paradox alarm equipment was designed to work effectively around traditional telephone systems. For those customers who are using a Paradox alarm panel
connected to a non-traditional telephone system, such as "Voice Over Internet Protocol" (VoIP) that converts the voice signal from your telephone to a digital
signal traveling over the Internet, you should be aware that your alarm system may not function as effectively as with traditional telephone systems.
For example, if your VoIP equipment has no battery back-up, during a power failure your system's ability to transmit signals to the central station may be
compromised. Or, if your VoIP connection becomes disabled, your telephone line monitoring feature may also be compromised. Other concerns would
include, without limitation, Internet connection failures which may be more frequent than regular telephone line outages.
We therefore strongly recommend that you discuss these and other limitations involved with operating an alarm system on a VoIP or other non-traditional
telephone system with your installation company. They should be able to offer or recommend measures to reduce the risks involved and give you a better
understanding.
www.paradox.com
Printed in Canada - 12/2006
MAGELLANX10-EU01
Document Outline
- Introduction
- Accessing the X10 Setup Menu
- Enabling/Disabling the X10 Outputs
- House and Unit Codes
- Programming Magellan’s House Code
- X10 Programming
- X10 Activation/Deactivation On Time
- X10 Activation/Deactivation on Zone Open
- X10 Activation/Deactivation on Remote Button
- X10 Activation/Deactivation on Exit Delay
- X10 Activation/Deactivation when System Armed
- X10 Activation/Deactivation on Entry Delay
- X10 Activation/Deactivation on Alarm
- Manually Activating/Deactivating X10 Outputs
- Limited Warranty
Wyszukiwarka
Podobne podstrony:
Ferdinand Magellan
magellan magellan
ODLEGŁOŚĆ DO WIELKIEGO OBŁOKU MAGELLANA
Dane Magellan
Wyprawa flotyli Magellana, ZHP - Zachomikowane, Plany kolonii 14-21 dni
Instr obslugi Datalogic Magellan 1000i v04 20100309
The Grift of the Magellanae Robin Scott Wilson
ferdynand magellan
Instr obslugi PSC Magellan 2200VS v05 20080131
Ferdynand Magellan
Instr obslugi Datalogic Magellan 2200VS Enhanced v02 20100309
Instr obslugi PSC Magellan 2300HS v06 20080131
Instr obslugi Datalogic Magellan 1100i v02 20100309
Instr obslugi Datalogic Magellan 2300HS Enhanced v02 20100309
MAGELLAN EU06
więcej podobnych podstron