ISTRUZIONI PER L’INSTALLAZIONE
INSTALLATION INSTRUCTIONS
INSTALLATIONSANLEITUNG
INSTRUCTIONS POUR L’INSTALLATION
INSTRUCCIONES PARA LA INSTALLACIÓN
- MONTAGGIO COCLEA CARICAMENTO CONCIME
- ASSEMBLY OF THE LOADING SCREW
- ANBAU DER LADESCHNECKE
- MONTAGE DE LA COCHLÉE DE CHARGE
- MONTAJE CÓCLEA DE CARGA
IT
ES
FR
DE
GB
Cod.
19500801
03 . 1997
g
g
g
g
g
g
g
g
g
g

ITALIANO
ENGLISH
DEUTSCH
FRANÇAIS
ESPAÑOL
INDICE
INDEX
INHALT
TABLES DE MATIERES
INDICE
1.0 Montaggio supporti coclea di
caricamento su seminatrice
ST300 .....................................3
2.0 Montaggio coclea di
caricamento concime su
seminatrice ST300...................5
3.0 Montaggio valvola .............6
4.0 Funzionamento..................7
5.0 Manutenzione e Pulizia......8
1.0 Assembling the loading
screw supports on the ST300
seeder.......................................3
2.0 Assembling the loading
screw on the ST300 seeder......5
3.0 Assembling the valve.........6
4.0 Operation...........................7
5.0 Maintenance and
Cleaning...................................8
1.0 Anbau der Halterungen
Ladeschnecke auf Sämaschine
ST300.......................................3
2.0 Anbau der Ladeschnecke
auf Sämaschine ST300............5
3.0 Vetileinbau ........................6
4.0 Betrieb ..............................7
5.0 Wartung und Reinigung......8
1.0 Montage des supports de la
cochlée de charge de la
semeuse ST300 ......................3
2.0 Montage de la cochlée de
charge de l’engrais sur la
semeuse ST300.......................5
3.0 Montage de la valve...........6
4.0 Functionnement ................7
5.0 Manutention et Nettoyage..8
1.0 Montaje soportes de cóclea
de carga en sembradora
ST300......................................3
2.0 Montaje de cóclea de carga
abono en sembradora ST300 ..5
3.0 Montaje de Válvula ...........6
4.0 Funcionamiento ................7
5.0 Mantenimiento y
Limpieza...................................8

ITALIANO
ENGLISH
DEUTSCH
FRANÇAIS
ESPAÑOL
3
g
g
g
g
g
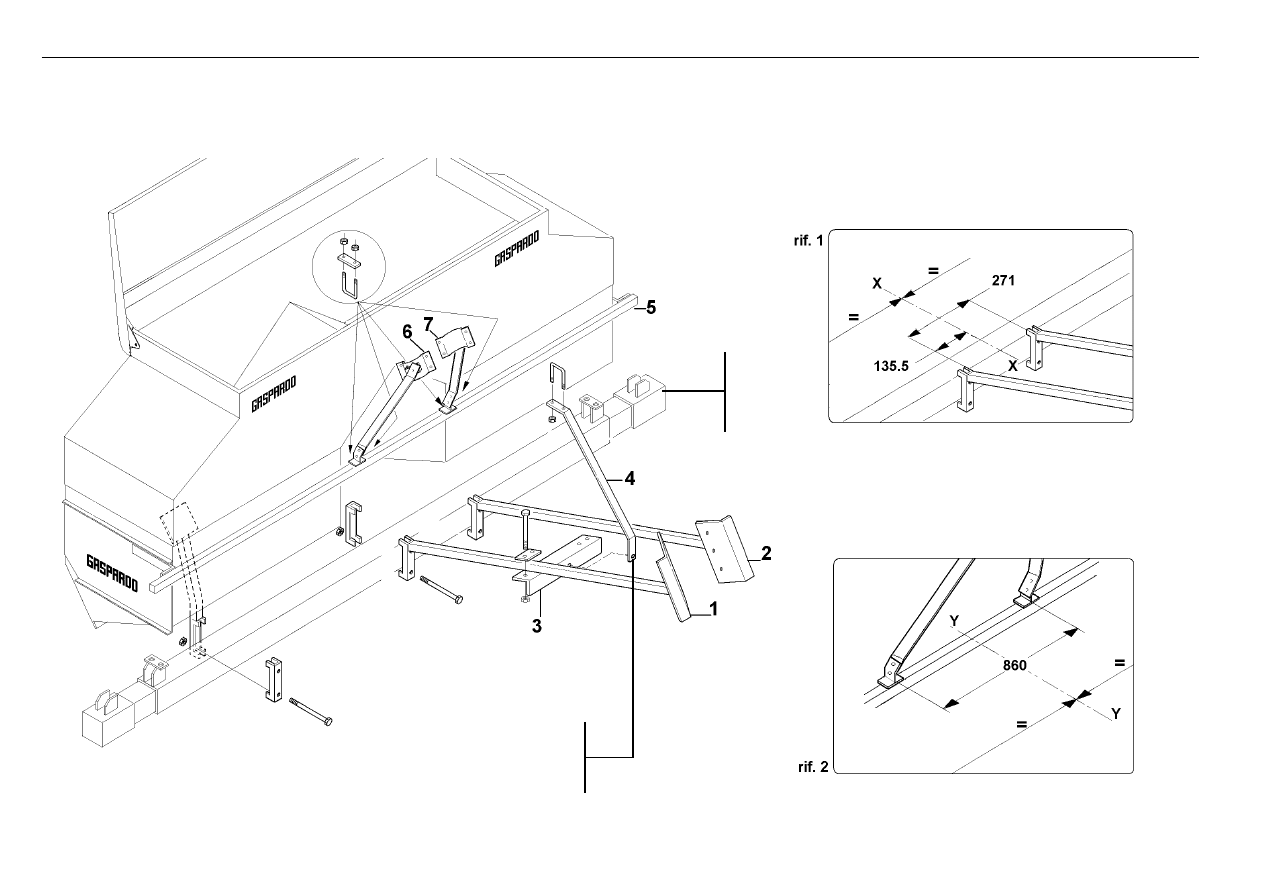
1.0 MONTAGGIO
SUPPORTI COCLEA DI
CARICAMENTO SU
SEMINATRICE ST300
Durante la fase di montaggio
non serrare la bulloneria.
Questo si esegue a montaggio
ultimato.
a) Fissare i supporti 1 e 2 al tela
io: questi devono essere
montati ad una distanza di 271
mm tra loro, al centro del telaio
corrispondente all’asse x-x (
asse mezzeria telaio), come da
rif. 1.
b) Fissare il tirante 4 al tubo
telaio 5 con l’apposito cavallotto.
c) Adattare il distanziale 3
fissandolo ai supporti 1 e 2 nella
posizione corrispondente al
tirante 4.
d) Posizionare i supporti 6 e 7
sull’asta supporto serbatoi 5:
questi devono essere montati ad
una distanza di 860 mm tra loro,
come da rif. 2.
Per il montaggio usufruire della
bulloneria d’assemblaggio in
dotazione alla fornitura.
1.0 ASSEMBLING THE
LOADING SCREW
SUPPORTS ON THE
ST300 SEEDER
During assembly do not
tighten the nuts and bolts.
This is
done only at the end of
assembly.
a)Fasten the brackets 1 and 2 to
the frame: they must be
mounted 271 mm away from
each other, at the center of the
frame corresponding to
the x-x axis (frame center line),
as in ref. 1.
b)Fit the stay rod 4 to the frame
tube 5 with its U bolt.
c)Fit the spacer 3 by securing it
to the supports 1 and 2 in the
position
corresponding to the stay rod 4.
d)Position the upper supporting
brackets 6 and 7 on the tank
supporting tube 5: these must
be mounted 860 mm apart, as
can be
seen from ref. 2.
For assembly, make use of the
assembly nuts and bolts
supplied with.
1.0 ANBAU DER
HALTERUNGEN
LADESCHNECKE AUF
SÄMASCHINE ST300
Beim Anbau die Schrauben
nicht anziehen. Dies erfolgt
bei beendigtem Anbau.
a) Halterungen 1 und 2 an den
Rahmen befestigen: diese sollen
mit einem Abstand von 271 mm
in der Mitte des Rahmens
angebaut werden, die der Achse
x-x (Mittelachse des Rahmens)
entspricht. (siehe Hinweis1)
b) Die Spannstange 4 an das
Rahmenrohr 5 mit dem
entsprechenden Bügelbolzen
befestigen.
c) Das Distanzstück 3 anpassen,
indem es an die Halterungen 1
und 2 in der Stellung
entsprechend der Spannstange 4
befestigt wird.
d) Die oberen Halterungen 6 und
7 an die Behältertragstange 5
anordnen: der Abstand dieser
Halterungen soll 860 mm
betragen (siehe Hinweis 2).
Benutzen Sie für den Anbau die
für den Zusammenbau
mitgelieferten Schrauben.
1.0 MONTAGE DES
SUPPORTS DE LA
COCHLÉE DE CHARGE
DE LA SEMEUSE ST300
Ne serrez pas la boulonnerie
pendant la phase du montage
mais à la fin du montage.
a) Fixer les supports 1 et 2 au
châssis: ceux-ci doivent être
montés à une distance de 271
mm l’un de l’autre, au centre du
châssis au niveau de l’axe x-x
(axe à la moitié du châssis),
comme à la réf. 1.
b) Fixer le tirant 4 au tube du
châssis 5 avec son propre
chevalet
c) Adapter la barre à distancier 3
en le fixant aux supports 1 et 2 à
la position qui correspond à celle
du tirant 4.
d) Positionner les supports
supérieurs 6 et 7 sur la barre de
support des réservoirs 5: ceux-ci
doivent être montés à une
distance de 860 mm l’un de
l’autre, comme à la réf. 2.
Pour le montage se munir de la
boulonnerie d’assemblage en
dotation avec la fourniture.
1.0 MONTAJE
SOPORTES DE CÓCLEA
DE CARGA EN
SEMBRADORA ST300
Durante la fase de montaje no
apretar el conjunto de pernos.
Esto se hará una vez
finalizado el montaje.
a) Fijar los soportes 1 y 2 al
bastidor: estos deberán
montarse a una distancia de 271
mm entre ellos, en el centro del
bastidor que corresponde al eje
x-x (eje linea de centro), como
ref.1.
b) Fijar el tirante 4 al tubo
bastidor 5 con el especial perno
de U.
c) Adaptar el distanciador 3
fijandolo a los soportes 1 y 2 en
la posición que corresponde al
tirante 4.
d) Posicionar los soportes
superiores 6 y 7 en la varilla
soporte tanque 5: estos deberán
montarse a una distancia de
860mm. entre ellos, como ref. 2.
Para el montaje emplear el
conjunto de pernos de
ensemblado incluidos en la
entrega.
ITALIANO
ENGLISH
DEUTSCH
FRANÇAIS
ESPAÑOL
4
g
g
g
g
g
Telaio
Frame
Rahemen
Châssis
Bastidor
Vite M10x35 ; Dado M10
M10x35 screw bolt ; M10 Nut
Schraube M10x35 ; Mutter M10
Vis M10x35 ; Écrous M10
Tornillo M10x35 ; Tuerca M10
ITALIANO
ENGLISH
DEUTSCH
FRANÇAIS
ESPAÑOL
5
g
g
g
g
g
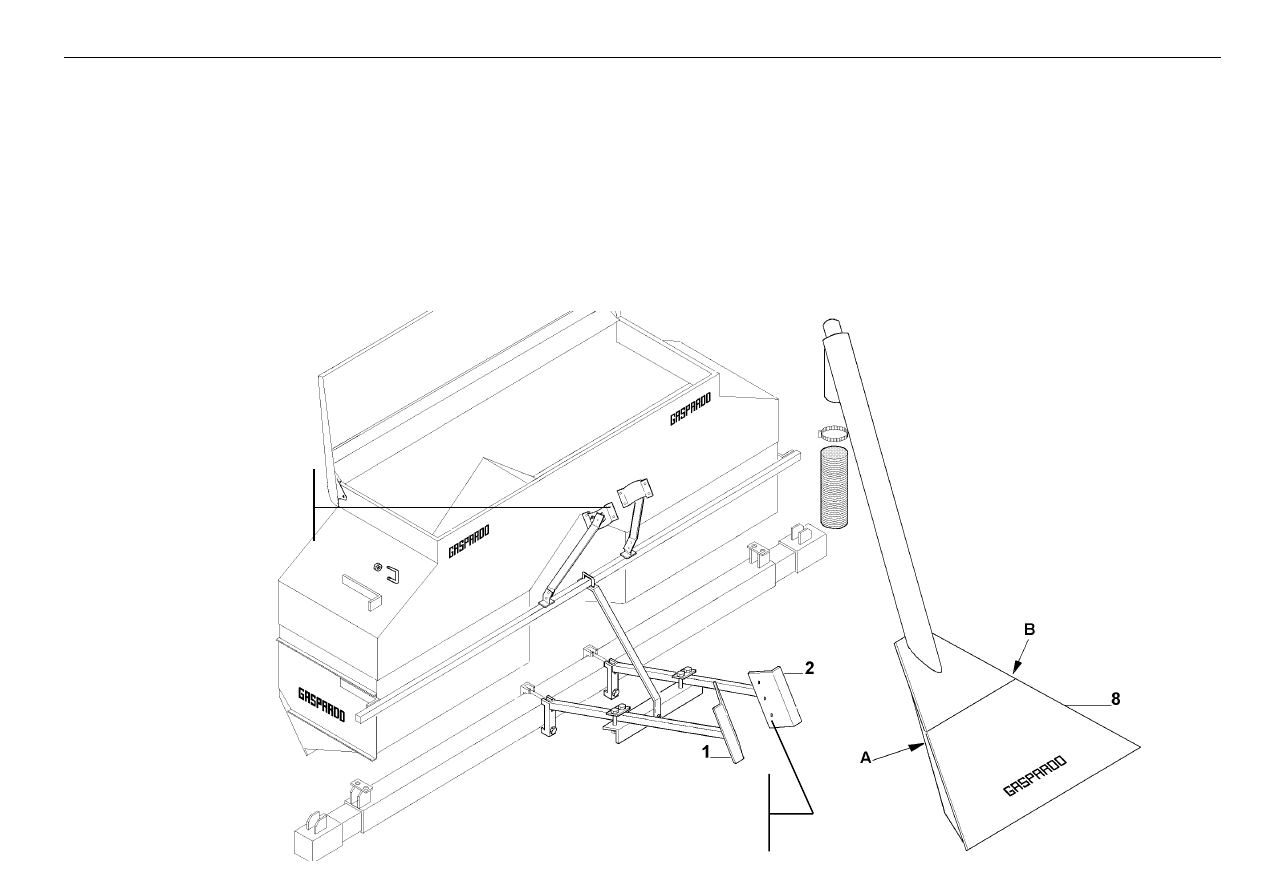
2.0 MONTAGGIO
COCLEA DI
CARICAMENTO
CONCIME SU
SEMINATRICE ST300
Per il montaggio della coclea 8,
togliere i fissaggi in A e B ,
collegarla in 1 e 2 fissando il
tutto nei due lati con le viti in
dotazione.
A questo punto si può serrare
saldamente tutte le parti di
fissaggio.
2.0 ASSEMBLING THE
LOADING SCREW ON
THE ST300 SEEDER
To assemble the screw 8,
remove the fasteners at A and
B, fit it to 1
and 2 by fastening everything
on
the two sides with the screws
supplied.
At this point all the fastening
parts can be tightened.
2.0 ANBAU DER
LADESCHNECKE AUF
SÄMASCHINE ST300
Für den Anbau der Schnecke 8
sind die Befestigungen in A und
B zu entfernen, die Schnecke
mit 1 und 2 verbinden, wobei
alles beidseitig mit den
beigestellten Schrauben
befestigt wird.
Jetzt kann man alle
Befestigungsteile gut festziehen.
2.0 MONTAGE DE LA
COCHLÉE DE CHARGE
DE L’ENGRAIS SUR LA
SEMEUSE ST300
Pour le montage de la cochlée
8, vous enlevez les fixages A et
B et vous la connectez en 1 et 2
en fixant le tout dans les deux
côtés avec les vis en dotation.
Maintenant vous pouvez serrer
bien fort toutes les parties à
fixer.
2.0 MONTAJE DE
CÓCLEA DE CARGA
ABONO EN
SEMBRADORA ST300
Para el montaje de la cóclea 8,
quitar las fijaciones en A y B,
conectaria en 1 y 2 fijando todo
en los 2 lados con los tornillos
incluidos.
A este punto se pueden apretar
firmemente todas las partes de
fijación.
Montare n°6 Viti M6x25, Dadi M6
Mount six M6x25 screw bolts and M6 nuts
6 Schrauben M6x25 und Muttern M6 anbringen
Monter n°6 Vis M6x25 et Ecrous M6
Montar n°6 Tornillos M6x25 y Tuercas M6
Montare n°4 Viti M10x35 e Dadi M10
Mount four M10x35 screw bolts and M10 nuts
4 Schrauben M10x35 und Muttern M10 anbringen
Monter n°4 Vis M10x35 et Ecrous M10
Montar n°4 Tornillos M10x35 y Tuercas M10
ITALIANO
ENGLISH
DEUTSCH
FRANÇAIS
ESPAÑOL
6
g
g
g
g
g
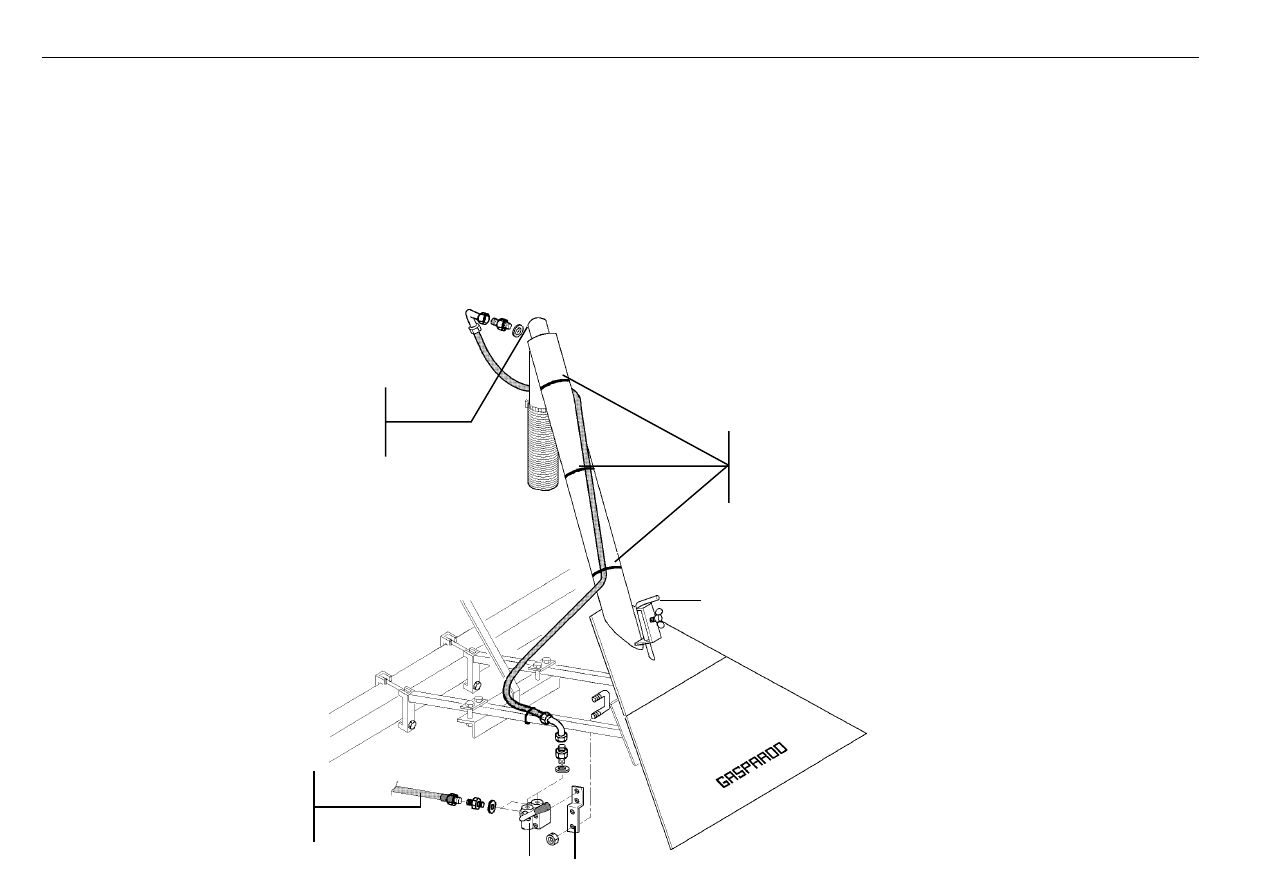
3.0 MONTAGGIO
VALVOLA
Fissare il supporto 9 con il
cavallotto in dotazione e fissare
su di esso il rubinetto 10.
In fine collegare i tubi al trattore
ed al motore idraulico della
coclea, ed alla stessa fissarli
con le fascette in dotazione
(fig.1).
3.0 ASSEMBLING THE
VALVE
Secure the bracket 9 with the U
bolt supplied and fit the cock 10
onto it.
Finally, connect the hoses to the
tractor and to the hydraulic
motor of the screw, to which
they will be fitted with the straps
supplied (fig.1).
3.0 VETILEINBAU
Die Halterung 9 mit dem
beigestellten Bügelbolzen
befestigen und auf diese den
Hahn 10 festmachen.
Abschließend die Rohre mit
dem Traktor und dem
Hydromotor der Schnecke
verbinden und sie an die
Schnecke selbst mit den
beigestellten Schellen
befestigen (Abb. 1).
3.0 MONTAGE DE LA
VALVE
Fixer le support 9 avec le
chevalet en dotation et fixer sur
lui-même le robinet 10.
Enfin connecter les tuyaux au
racteur et au moteur
hydraulique de la cochlée et les
fixer à elle-meme avec les
bandes en dotation (fig. 1).
3.0 MONTAJE DE
VÁLVULA
Fijar el soporto 9 con el perno
incluido y fijar en este el grifo
10.
En fin conectar los tubos al
tractor y al motor hidráulico de
la cóclea, y a la misma fijarlos
con las abrazaderas incluidas
(fig. 1).
Motore idraulico
Hydraulic motor
Hydromotor
Moteur hydraulique
Motor hidráulico
Fascette
Straps
Schellen
Bandes
Abrazadera
fig. 1
Tubi collegamento trattore
Tractor connection hoses
TRaktor-Verbindungsrohre
Tuyaux de connection au tracteur
Tubos de conexión tractor
10
9
a
ITALIANO
ENGLISH
DEUTSCH
FRANÇAIS
ESPAÑOL
7
g
g
g
g
g
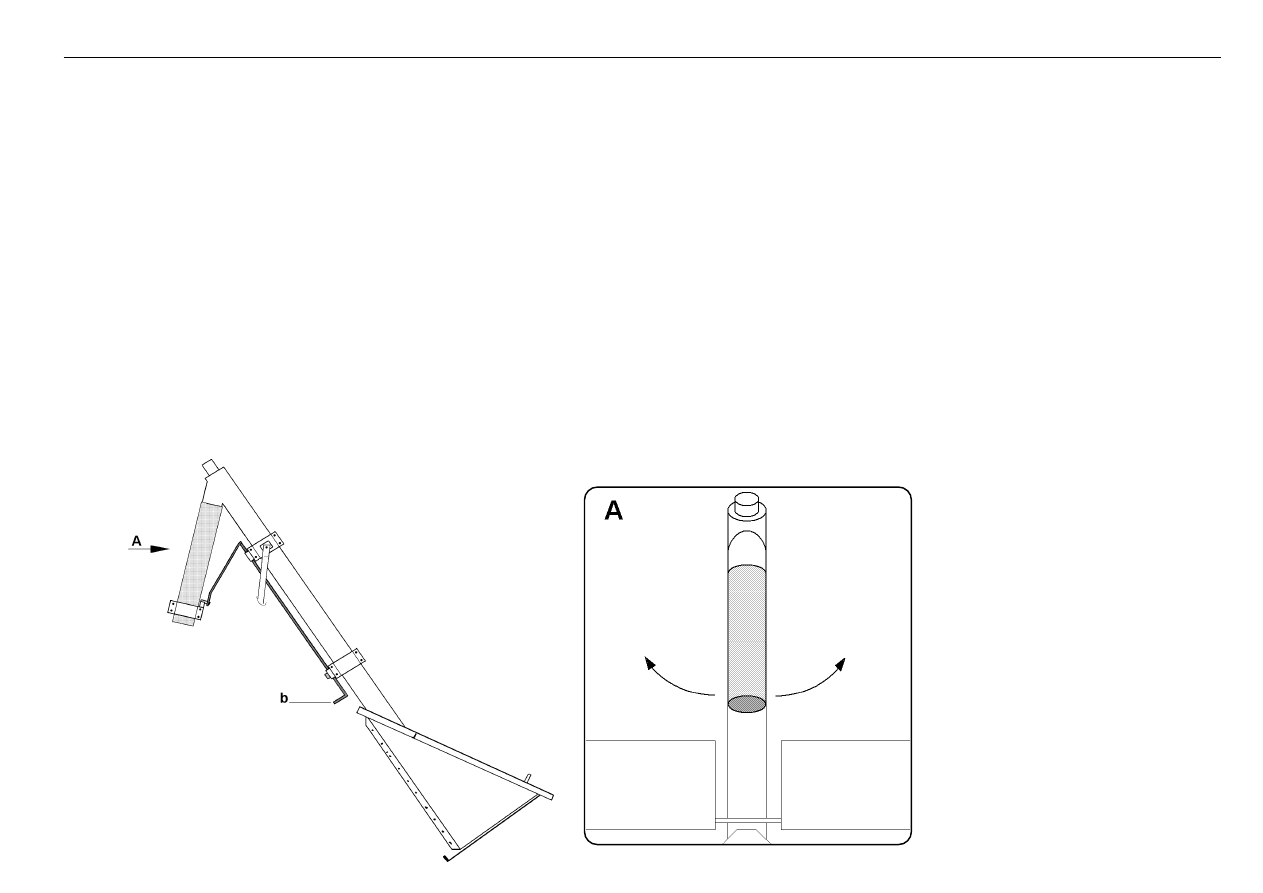
4.0 FUNZIONAMENTO
Il movimento di rotazione della
coclea è dato da motore idrauli-
co situato nella parte superiore
della coclea, il quale è alimenta-
to da un circuito idraulico. Il
movimento di avvio e di arresto
del caricamento è dato dal
rubinetto (10).
Per regolare il flusso di carico,
agire sull’asta a per regolare
l’apertura della camera della
coclea (fig.1).
Nel caso la seminatrice sia
sprovvista della maggirazione
dei serbatoi, nella fig. 2 viene
evidenziata la leva b che serve
per spostare la bocca di caduta
della coclea nei serbatoi conci-
me dx e sx.
4.0 OPERATION
The rotary movement of the
screw is supplied by a hydraulic
motor, fed by a hydraulic circuit,
and situated in the upper part of
the screw.
Starting and stopping of loading
is controlled by the cock (10).
The rod a adjusts the load flow
by adjusting the opening of the
screw chamber (fig. 1).
If the seeder is without the
increased tanks, fig. 2 illustrates
lever b that is used to move the
delivery outlet to the right and
left fertilizer tanks.
4.0 BETRIEB
Die Drehbewegung der
Schnecke wird von einem
Hydromotor erzeugt, der sich im
oberen Schneckenteil befindet
und von einem Hydrokreislauf
gespeist wird. Die Anlauf- und
Anhaltebewegung der Beladung
geht vom Hahn 10 aus.
Zur Einstellung des
Ladedurchflusses ist die Stange
a zu betätigen um die Öffnung
der Schneckenkammer zu
regeln.
Falls die Säemaschine mit dem
Behälterübermaß ausgestattet
ist, wird in der Abb. 2 die Stange
b abgebildet, die dazu dient um
die Fallöffung in den rechten
und linken Düngerbehälter zu
lenken.
4.0 FONCTIONNEMENT
Le mouvement de rotation de la
cochlée est dû à un moteur
hydraulique qui se trouve sur la
partie supérieure de la cochlée
et qui est alimenté par un circuit
hydraulique. La mise en marche
et l’arrêt du chargement se fait
grâce au robinet (10).
Pour régler le flux du
hargement, il faut régler l’ouver-
ture de la chambre de la ochlée
en agissant sur la barre a (fig.1).
Si la semeuse n’a pas de
réservoirs qui peuvent être
majorés, à la fig. 2 on montre le
levier b qui sert à déplacer la
bouche de chute de la cochlée
vers les réservoirs d’engrais de
droite et de gauche.
4.0 FUNCIONAMENTO
El movimiento de rotación de la
cóclea es dado por el motor
hidráulico situado en la parte
superior de la cóclea, y está
alimentado por un circuito
hidráulico El movimiento de
arranque y de parada de la
carga es dado por el grifo (10).
Para regular el flujo de carga,
mover el asta a para regular la
apertura de la cámara de la
cóclea (fig.1).
En el caso que la sembradora
no tenga el aumento de los
depósitos, en la figura 2 se
evidencia la leva b que sirve
para desplazar la boca de caida
de la cóclea en el depósito
abono derecho e izquierdo.
fig.2
serbatoio concime destro
fertilizer tanks right
Düngerbehälter rechten
réservoir engrais droite
depósito abono derecho
serbatoio concime sinistro
fertilizer tanks left
Düngerbehälter linken
réservoir engrais gauche
depósito abono izquierdo

ITALIANO
ENGLISH
DEUTSCH
FRANÇAIS
ESPAÑOL
8
g
g
g
g
g
5.0 MUNUTENZIONE E
PULIZIA
La Ditta Costruttrice consiglia,
per un corretto funzionamento,
di svuotare giornalmente la
coclea di caricamento ed i
serbatoi dal concime, lavare
l’attrezzatura abbondantemente
con acqua e quindi asciugarla. A
fine stagione proteggerla con un
telo a sistemarla in un luogo
asciutto e fuori dalla portata dei
non addetti.
5.0 MAINTENANCE AND
CLEANING
For proper operation, the
manufacturer recommends that
the fertilizer be removed daily
from the loading screw and
tanks, all the equipment be
washed horoughly with water
and dried. At the end of the
season, cover to protect and
store in a dry place, out of reach
of unauthorized persons.
5.0 WARTUNG UND
REINIGUNG
Die Herstellerfirma empfiehlt für
einen richtigen Betrieb die
Ladeschnecke und die Behälter
vom Dünger täglich zu
entleeren, die Ausrüstung
gründlich mit Wasser zu
reinigen und sie dann
abzutrocknen. Zu Saisonschluß
ist die Ausrüstung mit einem
Schutztuch abzudecken und an
einem trockenen Ort außerhalb
der Reichweite von unbefugten
Personen unterzubringen.
5.0 MANUTENTION ET
NETTOYAGE
Pour un bon fonctionnement de
l’équipement, la Maison
Constructrice conseille de vider
chaque jour la cochlée de
charge et les réservoirs de
l’engrais, de laver l’équipement
avec beaucoup d’eau et enfin
de l’essuyer.
A la fin de la saison, protégez
l’équipement avec une toile et
mettez-le en un lieu sec et en
dehors de la portée du
personnel non qualifié.
5.0 MANTENIMIENTO Y
LIMPIEZA
La Firma Constructora
aconseja, para un
funcionamiento correcto, de
vaciar diariamente la cóclea de
carga y el depósito del abono,
lavar el equipo con abundante
agua y secarlo. Al finalizar de la
temporada protegerlo con un
toldo y colocarlo en un lugar
seco y fuera del alcance de
quien no sea encargado.

ITALIANO
ENGLISH
DEUTSCH
FRANÇAIS
ESPAÑOL
9
g
g
g
g
g

USATE SEMPRE RICAMBI ORIGINALI
ALWAYS USE ORIGINAL SPARE PARTS
IMMER DIE ORIGINAL-ERSATZTEILE VERWENDEN
EMPLOYEZ TOUJOURS LES PIECES DE RECHANGE ORIGINALES
UTILIZAR SIEMPRE REPUESTOS ORIGINALES
g
g
g
g
g
U
fficio T
ecnico GASP
ARDO Seminatrici S.p.A.
GASPARDO Seminatrici SpA
Via Mussons, 7
I - 33075 Morsano al Tagliamento (PN) Italy
Tel.
+39 0434 695410
Fax
+39 0434 695425
gaspardo@interbusiness.it
GASPARDO Seminatrici SpA
MASCHIO DEUTSCHLAND GMBH
Äußere Nürmberger Straße 5
D - 91177 Thalmässing
Tel.
+49 (0)9173 79000
Fax
+49 (0)9173 790079
GASPARDO Seminatrici SpA
MASCHIO FRANCE Sarl
1, rue de Merignan ZA
F - 45240 La Ferte St. Aubin
Tel.
+33 (0)2 38641212
Fax
+33 (0)2 38646679
19500801
*19500801*
G
DEALER:
Wyszukiwarka
Podobne podstrony:
KL Montage Transformationen V01
Montagu
Libretto
La Traviata (ITA) libretto
La Traviata (GER) libretto
MOZART Czarodziejski Flet libretto
H P Lovecraft Le Montagne?lla Follia
H P Lovecraft Le Montagne?lla Follia
La Traviata (ENG) libretto
Gandhi, M K Antiche come le montagne
Libretto
Libretto
Montageplatte Interpact
Libreto Disco
Libretto110CT
Libretto
KL Montage Transformationen V01
Montagu
więcej podobnych podstron