Page 1
Article Subject:
Replacing Air Conditioner cluch on “Fixed
Displacement” C171 Mopar Compressor
Author:
Alan R. Helfinstine
Reference:
“Air conditioner troubleshooting” by Bohdan L.
Bodnar (also on this Web site).
Disclaimer:
The author believes all statements are true, but
is not responsible for anything that may be
incorrect or anything that may happen to you or your vehicle.
Introduction:
This article describes how to replace the air conditioner clutch found in late 80s and early 90s
Chrysler mini-vans. If you don’t particularly want to replace your A/C clutch, you should read
and follow the directions in the reference mentioned above. I believe low voltage at the clutch is
what prompted our Voyager air conditioner’s demise. We were on a family vacation heading out
west with 1988 Plymouth Voyager V6 when I noticed it was getting awfully hot in the car. The
air conditioning was on, but wasn’t putting out any cool air. I left the air conditioner on for an
hour or so (big mistake) even though it was not doing any cooling. When we stopped at a rest
area on the Interstate, I looked under the hood. Everything looked OK, but the Air Conditioner
clutch was burning hot. It later started making a loud clacking sound and it was evident the
pulley bearings were fried. I had to remove the A/C belt which, fortunately, can be done easily.
When I looked at the damage later, I found that the front plate (the metal plate on the front of
the compressor that engages with the pulley to turn the compressor) had a broken metal band, and
was off-center. The pulley bearings were no good, as it wobbled extensively. I followed the steps
outlined in the reference above, and found that there was a very large voltage drop across one of
the relays on the right side of the engine compartment. When I wiggled the connector at the
bottom of one of the relays, the voltage at the compressor clutch varied by 2 or 3 volts. I believer
what happened was that the clutch wasn’t getting sufficient voltage and started slipping. It
overheated and started a chain reaction of failures including cooking the bearings in the pulley.
Voltage and Current requirements at Clutch:
I cleaned the connector, and all the other relay connectors, and verified that the voltage and
current to the clutch were OK. This meant that the clutch magnetic coil was OK. The Chrysler
service manual specifies that:
•
The A/C clutch coil is acceptable if the current draw is 2.0 to 3.7 amperes at 11.5 -12.5 volts
at the clutch coil.
•
If the current is more than 4 amps, the coil is shorted and should be replaced.
C171 Mopar
A/C Compressor

Page 2
•
The voltage drop from the battery to the clutch coil should be less than 2 volts. If the drop is
more than 2 volts, test the clutch coil feed circuits for excessive voltage drop.
In my case, I merely needed to clean the connector at the relay, and the voltage and current were
back to normal. The clutch pulley and front plate, however, still needed to be replaced.
Finding replacement Clutch Parts:
There were several auto parts dealers that sold the “Clutch plus coil” assembly for around $130
(6/98). I found the best value, however, to be a genuing Mopar remanufactured clutch and coil
from a Plymouth dealer for around $95. Interestingly enough, there are two Plymouth dealers
within 10 miles of my home. One dealer said he could only order a new clutch (just front plate
and pulley, no coil) for around $140 and get it in 5 days, but did not have access to any
remanufactured parts. The other said he could get the remanufactured clutch and coil for $95 in
one day. The choice was obvious, but it left me wondering how two dealers just 10 miles from
each other could have access to such different parts.
I actually tried to have the part replaced by a guy who “specializes” in Chrysler products, (not a
Chrysler dealer) but he refused because he wasn’t licensed to handle freon. The Chrysler service
manual says that evacuating freon and removing A/C hoses is NOT required to replace the clutch.
I told him that, but he still wouldn’t do it. I sort of understand, since if he replaced the clutch and
the A/C still didn’t work, I probably wouldn’t be a happy customer. So I decided to try it myself.
The following is the writeup of how I went about it. It took about 2 hours, and that’s because I’m
not real speedy. It is actually a pretty simple procedure. I borrowed a snap ring pliers from a
friend, and borrowed a Chrysler service manual from another friend. You don’t need the Chrysler
service manual if you follow these instructions, but if you like pictures, you may want to get hold
of one.
Tools needed:
1. Socket set & wrenches
2. Snap ring pliers for External Snap rings. Must have 45 degree or 90 degree bend on the front.
3. A/C Front plate puller Chrysler part number __ . If you don’t have acces to one, you can
make one for about $2 with galvanized pipe fittings. (Described below).
4. Feeler gauges (the “tune-up” variety will work fine)
5. Large pliers or spanner wrench or vice-grips
Page 3
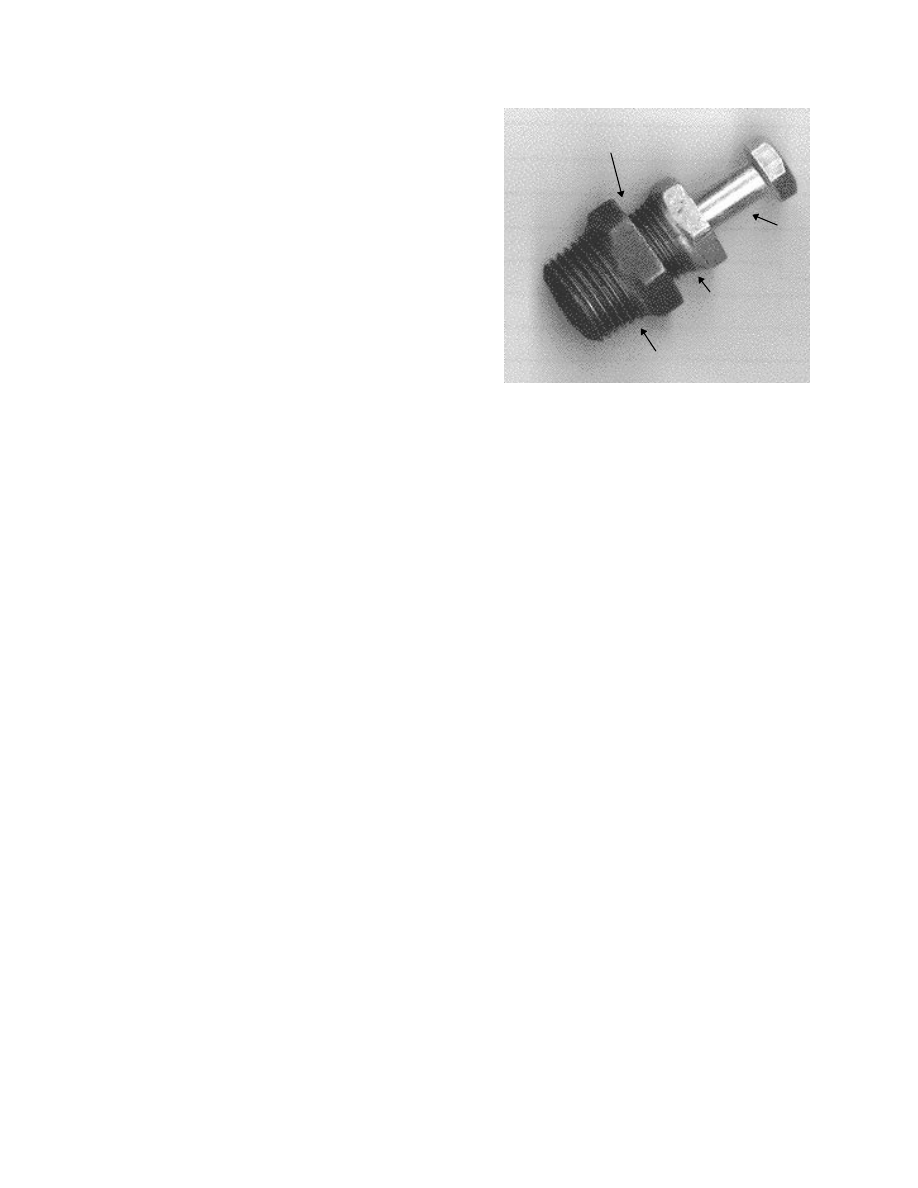
To make the front plate puller:
1. Go to a hardware and purchase these galvanized
pipe or black pipe fittings:
q 1/2” to 3/8” Reducer. It has male 1/2” pipe
threads, and accepts a threaded 3/8” pipe.
q 3/8” to 1/4” Reducer. Has 3/8” male threads
and accepts a threaded 1/4” pipe.
q Also purchase a 5/16” nut and 2” long bolt
(also 5/16”)
2. If you got the right parts, the 3/8-1/4 reducer
should screw into the 1/2 - 3/8 reducer
3. Drop the 5/16” nut into the back of the 1/2-3/8
reducer. It should fall in half way. If it falls
through, or doesn’t fit in at all, you need to find a different nut. Center the nut in the 1/2-3/8
reducer.
4. Screw the 3/8-1/4 reducer into the 1/2-3/8 reducer down on top of the nut. Put the assembly
in a vice, and tighten it down with a wrench so the nut is securely clamped between the two
reducers. (You don’t want the nut to be able to rotate).
5. Screw the 5/16 x 2” bolt into the assembly. If it’s put together right, should engage with the
nut trapped in the middle, and go all the way through both reducers without binding. The
whole thing will kind of look like a spark plug when you’re done. When you’re satisfied the
bolt fits, back it out most of the way. That’s all there is to it.
Procedure:
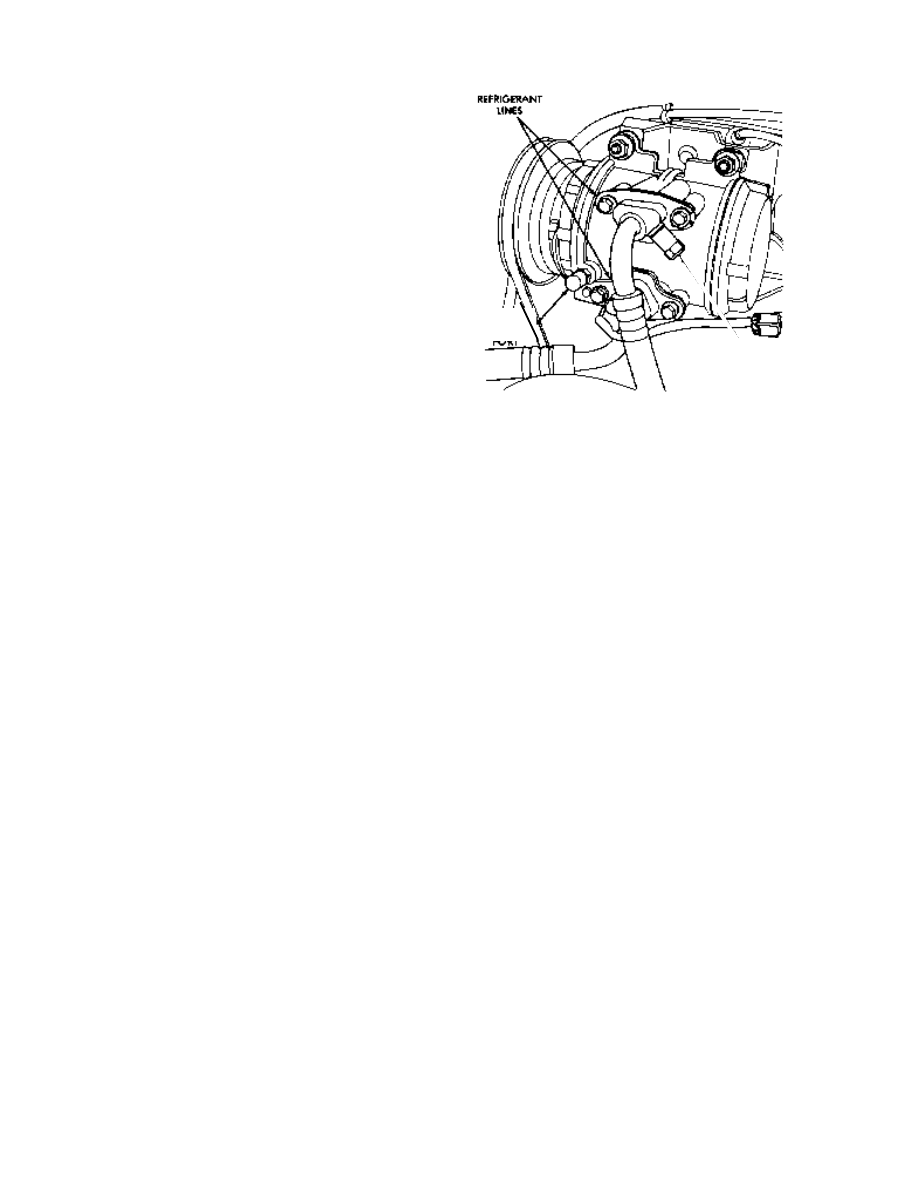
The procedure I describe is specifically for the “Fixed Displacement” C171 compressor found in late
80s and early 90s Chrysler products. It can be identified by the front plate (the armature) which has
slots that look like they were designed to guillotine finger-tips off of unwary mechanics. You can also
identify it by the freon lines which connect to the side of the compressor as shown in the Figure on
Page 1.
1. Make sure the voltage and current going to the coil are correct. The voltage and current
requirements are described a few paragraphs back. If they are not right, the coil also may need to
be replaced. This article does not describe coil replacement. (See the article referenced at the top
of this article for instructions on how to correct a low-voltage condition at the clutch if you haven’t
already read it.)
2. Remove the belt from the air conditioner compressor.
3. Take a 13 mm socket and remove the nut and lock washer from the front of the compressor. To
keep the compressor from rotating, use a spanner wrench (I don’t have one of those), or a very
large pliers to hold the front plate.
4. Take the front plate puller and screw the 1/2” pipe threads into the center of the front plate. Make
sure the 5/16 x 2” bolt is backed almost all the way out of the puller.
5. Take a wrench and drive the 5/16 x 2” bolt into the front plate puller until the front plate can be
removed.
6. Remove the front plate from the compressor.
7. Remove the shims (varying thickness washers) from the compressor shaft.
1/2” to 3/8” reducer
3/8” to 1/4” reducer
5/16” x 2” bolt
5/16” Nut is pinched
between the two reducers

Page 4
8. Take the snap ring pliers and put on the 90 degree (or 45 degree) attachments. Set the pliers for
External snap rings (so when you squeeze the pliers, the ring expands).
9. You may not actually be able to see the snap ring, but you can easily feel for the holes at the ends.
You might find it easier to rotate the snap ring to get it into a good position. Remove the snap ring.
I found that the 90 degree attachment didn’t open quite as wide as the 45 degree attachment. I had
trouble getting the snap ring open wide enough to slide off.
10. Slide off the pulley assembly.
11. At this point, if you were replacing the coil, you would need to get a snap-ring pliers back into the
center of the coil, but since you can’t see what you’re doing, you really need to unbolt the
compressor and swing it down a bit to do it. The Chrysler manual says not to let the compressor
hang by the high pressure hoses, so I would suggest tying it up with a rope if you are going to try
this. It is possible to replace the coil yourself, but I didn’t do it because I didn’t need to.
12. Slide the new pulley assembly back on the same way the old one came off. Make sure the side that
mates with the front plate is facing out.
13. Look at the snap ring. One side is beveled. That side must face outward. Install the snap ring.
Make sure the snap ring is fully seated in the groove.
14. Re-install the shims on the compressor shaft.
15. Slide the new front plate onto the shaft. It may be a tight fit - you may want to wipe a bit of oil on
the shaft, but make sure you don’t get any oil on the front plate or pulley face!
16. Reinstall the lock washer and nut and tighten down moderately. Make sure to tighten enough so
that the front plate is fully seated on the shaft.
17. Take the feeler gauge and put together a stack that equals 0.5 mm or slightly greater. Verify no
portion of the front plate is closer than 0.5 mm to the pulley.
18. Put together a stack that equals 0.9 mm or slightly less. Verify no portion of the front plate is
farther than 0.9 mm from the pulley (the gauge shouldn’t slide into the gap between the pulley and
the front plate anywhere).
19. If necessary, remove the front plate (remove the nut and use the front plate puller as before) and
add or remove shims so the clearance is between 0.5mm and 0.9mm. Note: Some shims are
supplied with the Mopar clutch assembly. A full set of shims may be purchased from Chrysler for
about $3. I bought them but didn’t use them. Note: If you thought shims were wedge shaped
pieces of wood, you are in good company.
20. Re-install the front plate, lock washer, and nut and repeat the steps above until the clearance is
between 0.5mm and 0.9mm. Tighten the nut to 17.5 +/- 2 Nm (155 +/- 20 in-lbs) and re-check
the clearance in at least 4 places. Spin the pulley as a final check, and verify it spins freely.
21. Install the belt and tighten properly.
22. Start the engine and verify the clutch engages and the A/C is functioning.
23. If desired, re-check the voltage and current to the coil to verify it is still within spec.
24. The following step is called “burnishing” and is designed to provide a higher clutch torque
capability. The following procedure is right from the Chrysler service manual. With the engine at
1500 - 2000 rpm and the blower on high, repeatedly engage and disengage the air-conditioning a
total of 20 times (5 seconds on, 5 seconds off). As a reference point, idle speed with the A/C on is
900 rpm, so you need to double the engine speed during this process. If you have a frequency
measuring voltmeter, 1800 rpm corresponds to 30 Hz as measured on a pickup around a single
spark plug wire.
25.
Done.
Wyszukiwarka
Podobne podstrony:
SR 8 Adaptive Air Conditioning ULA[1]
chrysler voyager uszkodzony tempomat
6 4 1%20Ventilation%20in%20Air conditioned%20Premises
0502 Refrigerant circuit Model 126 with air conditioning system
CHRYSLER VOYAGER 2001 2004
HEATER & AIR CONDITIONER
Audel Hvac Fundamentals, Air Conditioning, Heat Pumps And Distribution Systems (Malestrom)
Manual Air Conditioning
Air Conditioning
Automatic Air Conditioning
Chrysler Voyager
Design Of Air Conditioning Ducts
43 SC DS300 R CHRYSLER VOYAGER A 05 XX
Air conditioning sometimes does not work
[0] Chrysler Voyager
chrysler voyager przewod wysokiego cisnienia
19 air conditioning
sprawdzenie cewki chrysler, wszystko do chrysler voyager
SR 8 Adaptive Air Conditioning ULA[1]
więcej podobnych podstron