
Performance Chip Upgrade Installation Instructions
Applies to:
Audi TT / VW GTI / VW Jetta / VW Golf
This handout is provided to guide you through the steps necessary to upgrade your
vehicle with one of our performance chips. Also be aware that APR is only a phone call away
should you every have any questions or concerns pertaining to any APR products. Toll-Free:
1-800-680-7921
When you talk to the people at APR you speak to the source, not a middleman for
European-sourced components!
Vehicle needs to be in proper working order before any performance modifications are done!
Approximate Installation Time: 15 minutes
Tools Required:
Medium-sized flat-head screwdriver
13mm Socket & Ratchet

Step 1: Park Car.
Insure car is off and key is out of ignition. Engage the parking brake.
(Optional): Remove Battery Cable.
Caution! Before disconnecting the battery, determine the correct coding for the anti-theft radio.
Step 2: Remove Windshield Wipers.
Step 3: Remove Factory Weather-Stripping.
Remove Windshield Wipers to ease removal and
installation of ECM.
Use a flat head screwdriver to remove the plastic
cover from the wiper arm.
Remove the wiper arms by unbolting the 13mm nut
securing the wiper arms. After the nut is removed the
wiper arm must be wiggled in order to remove the arm
from the mount. Be sure to note the location of the
wiper arm for re-instillation.
Repeat this procedure for both sides.

Step 4: Raise Plastic Lid Over Pollen Filter.
Step 5: Remove Plastic Bracket, noting location of tabs
Step 6: Pull tab on wiring harness to the left, and remove left wiring harness.

Step 7: Pry metal tab holding ECU in place with screwdriver.
Step 8: Carefully pull ECU away from under plastic cover and rotate.
Step 9: Carefully rotate ECU and pull right wiring harness tab.
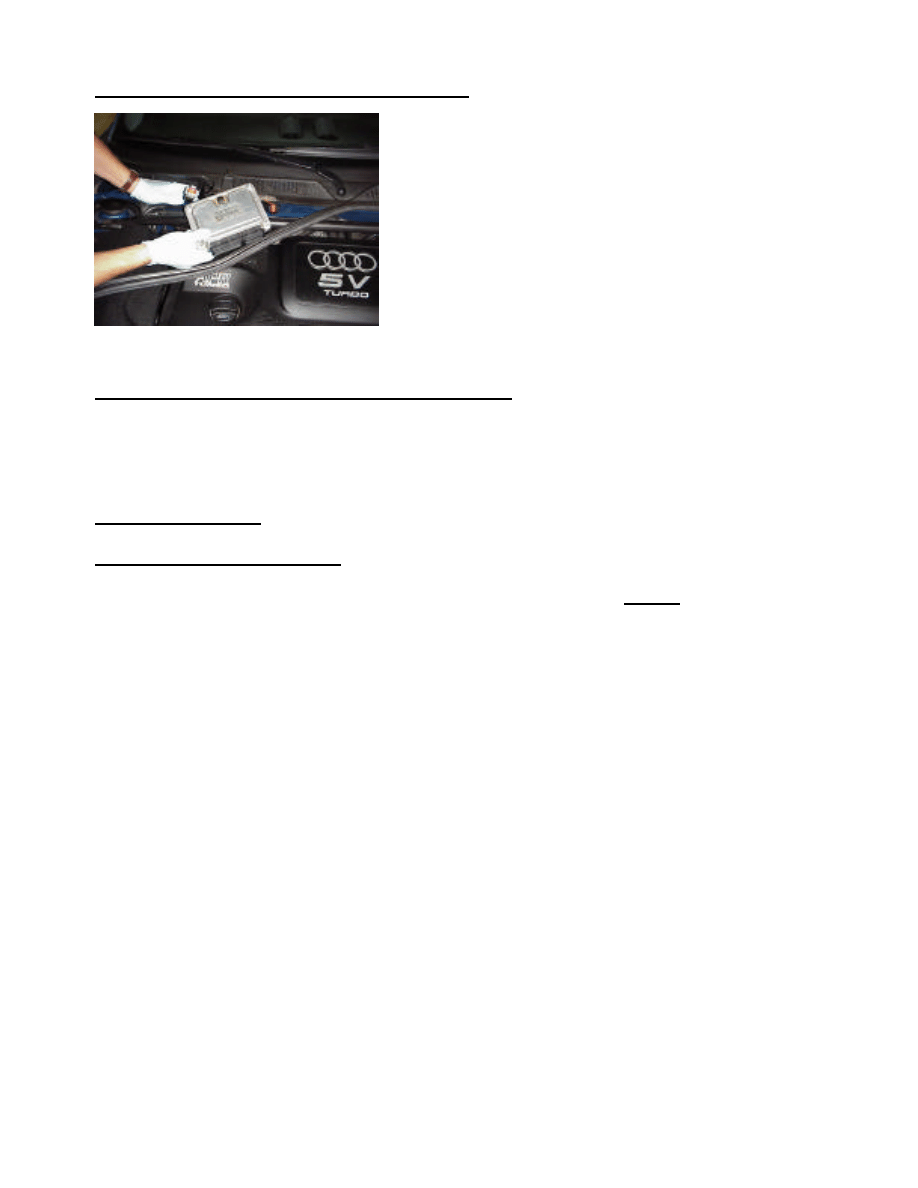
Step 10: Installion of New APR Tuned ECM.
Step 11: Reinstall all Parts in Reverse of Removal.
Important
Step 12: Throttle Adaptation.
•
Turn the ignition key to the ignition ON position but do not start the car.
•
Leave the key in this position for three minutes.
•
This will allow the ECU to relearn the relative throttle positions and
prevent possible error codes.
That’s it!
You are now ready to enjoy improved power and
performance from your vehicle.
Attach electrical plugs to the ECM ensuring that the
plugs are fully seated and release mechanisms are
pushed all the way in.
Wyszukiwarka
Podobne podstrony:
ECU berton seat,audi,vw,skoda,citroen,peugeot,opel,reanult,fiat,lancia,bmw,ford,alfa romero,rover,me
AudiZine com Audi A4 B7 ECU Removal DIY
PassatWorld com Audi VW Pinch Bolt Removal DIY
audi vw chlodziwo g12 plus odbarwienie
kodymigowe Audi VW
AUDI VW Turbo PartNumbers
Audi VW zly plyn chlodzacy
Przekaźnik świec żarowych w Audi i VW, auta, elektryka, przekaźniki w autach
KODY WYPOSAŻENIA [AUDI VW] [PL]
audi vw tdi zla paraca silnika
audi vw chlodziwo g12 plus odbarwienie
lokalizacja złącza diagnostycznego OBD [audi vw]
AUDI VW Turbo PartNumbers
Service Audi VW
kasowanie inspekcji serwisowych AUDI VW
mb audi vw centralny zamek
więcej podobnych podstron