Document Number: 231-02871 Revision: A.0 09/2006
1
Blue Coat SG8100 Quick Start
This Blue Coat Quick Start Guide describes how to rack-mount the Blue Coat SG8100 and explains the initial
configuration methods.
The Blue Coat SG8100 is shipped with the following components:
For initial configuration, you must know the following. Use the back page of this document to record
this information.
• Blue Coat SG8100 appliance
• Disk drives and carriers
• Power cords
• Null-modem serial cable
• Packet: Safety/Conformity
• Packet: Software license sticker card/software license agreement
• IP address, subnet mask, gateway
and DNS to be assigned.
• Administration access names and passwords to be
assigned to this SG8100.
• Physical location on the network.
• (Optional, 5.x and later) Application Delivery
Network (ADN) goals and traffic intercept choices.
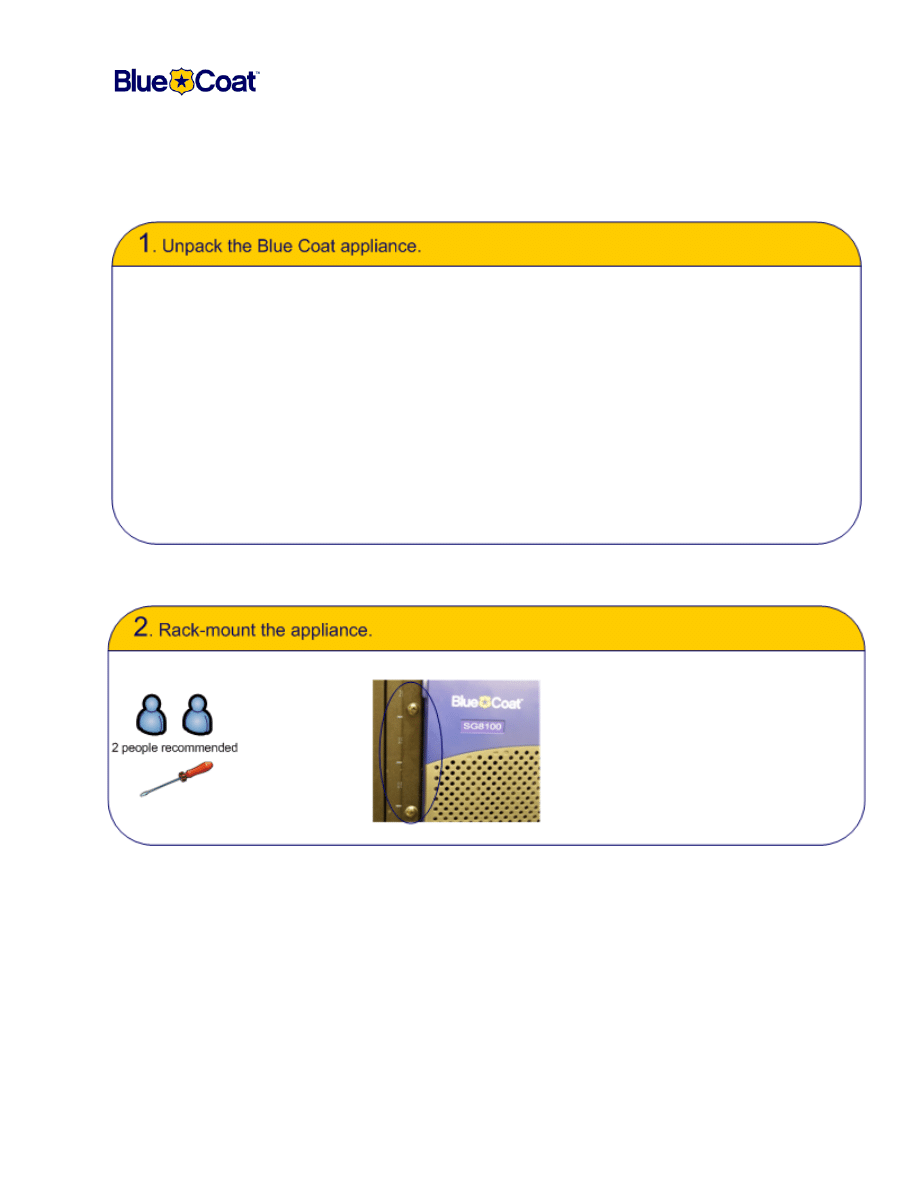
The Blue Coat SG8100 ships with the mounting brackets already attached to the appliance. Slide the
appliance into the rack and secure each bracket ear to the front rack posts (two screws each side, not
supplied).
Note:The mounting brackets are attached in the front position when shipped. If you wish to mount
your appliance using the middle mounting points, you must relocate the brackets yourself.
Document Number: 231-02871 Revision: A.0 09/2006
2
Blue Coat SG8100 Quick Start
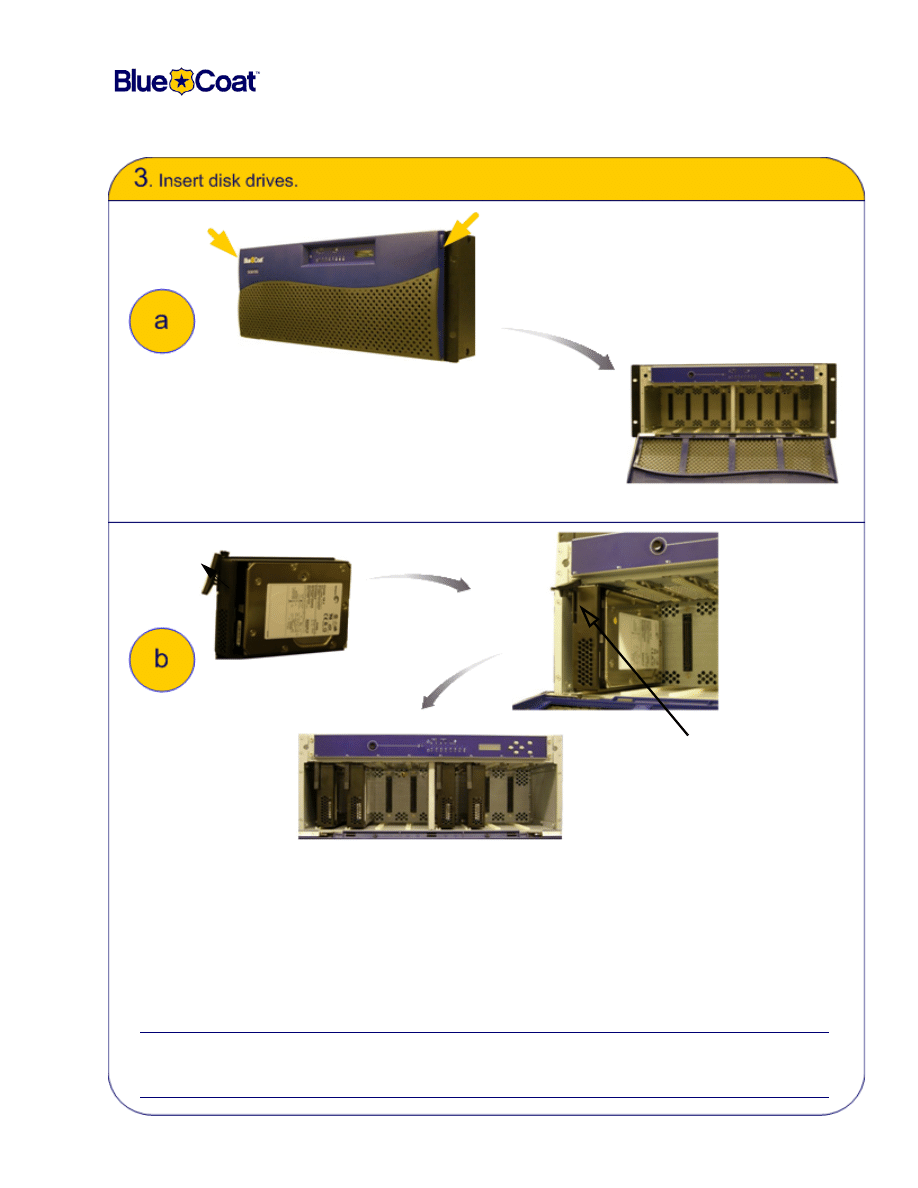
Disk drives are shipped inside disk drive carriers. The SG8100 ships with the number of drives
ordered. Install the disk drives left to right, alternating between each channel and beginning with Slot
1.
When properly positioned for insertion, the disk drive lever is on the top.
Important:
Before you move or transport an 8100 chassis, you must remove all the disk drives from the
system, package them separately in ESD protective materials, and place the drives back in
the accessory kit or equivalent packaging to prevent damage.
Push drive in all the way. Then, lock
the lever to secure the disk drive
Push in
tabs on
each side
Ensure drive lever is on
the top before installing
Swing down the front panel to
expose the empty disk drive slots
Channel A
Channel B
Note:For optimal performance,
ensure that there are equal number
of drives in each channel.
Document Number: 231-02871 Revision: A.0 09/2006
3
Blue Coat SG8100 Quick Start
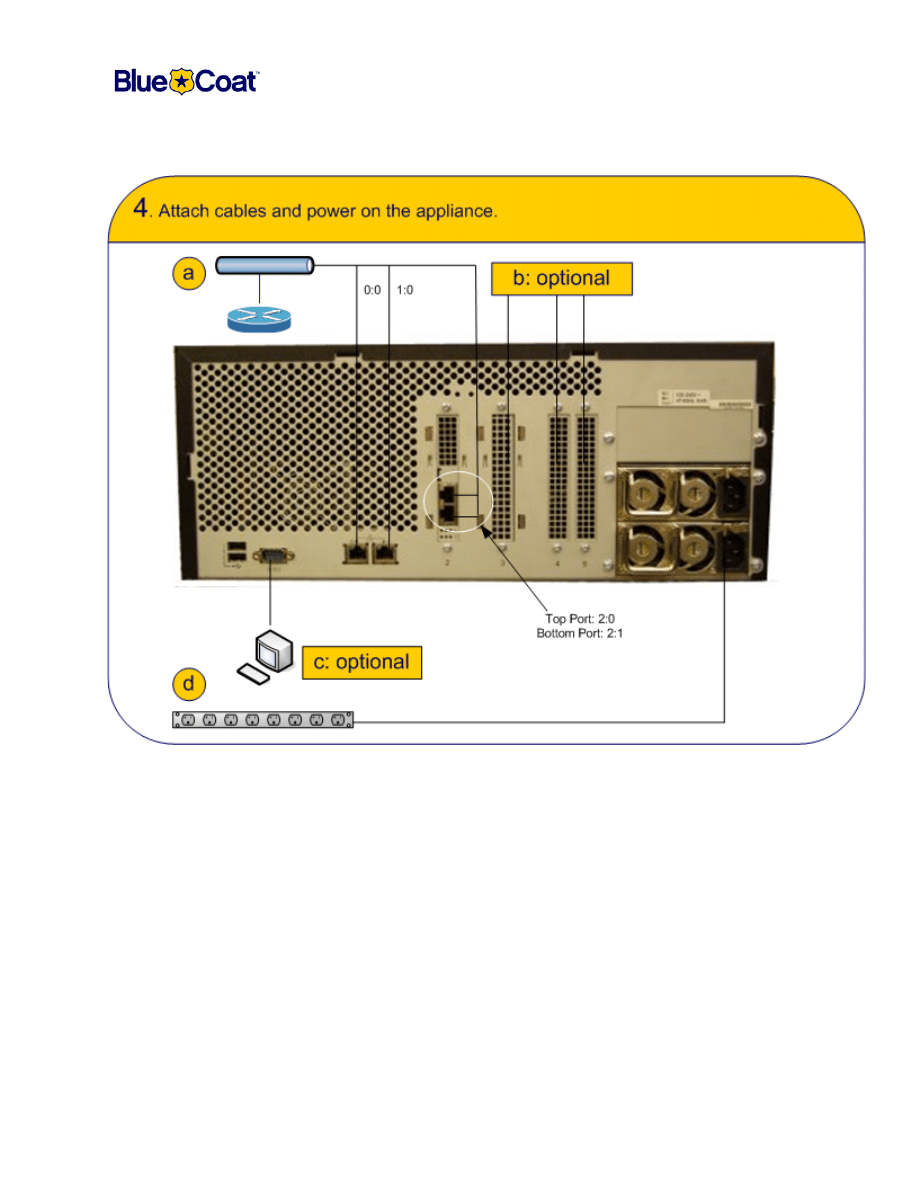
Attach cords:
a. The two full-duplex, auto-sensing Ethernet network adapters supporting 10/100/1000 Base-
T connections are labeled 00 and 01.
b.
(Optional) If you ordered an option card (NIC or SSL Accelerator), it arrived in a separate
shipment. Follow the installation instructions enclosed with the card.
c.
(Optional) Attach a serial cable to connect the system to a PC, serial terminal, or stand-alone
Serial Console box.
d. Plug the enclosed power cords into the power cord receptacles and into power sources. This
powers on the Blue Coat SG8100. If it does not power on, use the button on the front panel.
Document Number: 231-02871 Revision: A.0 09/2006
4
Blue Coat SG8100 Quick Start
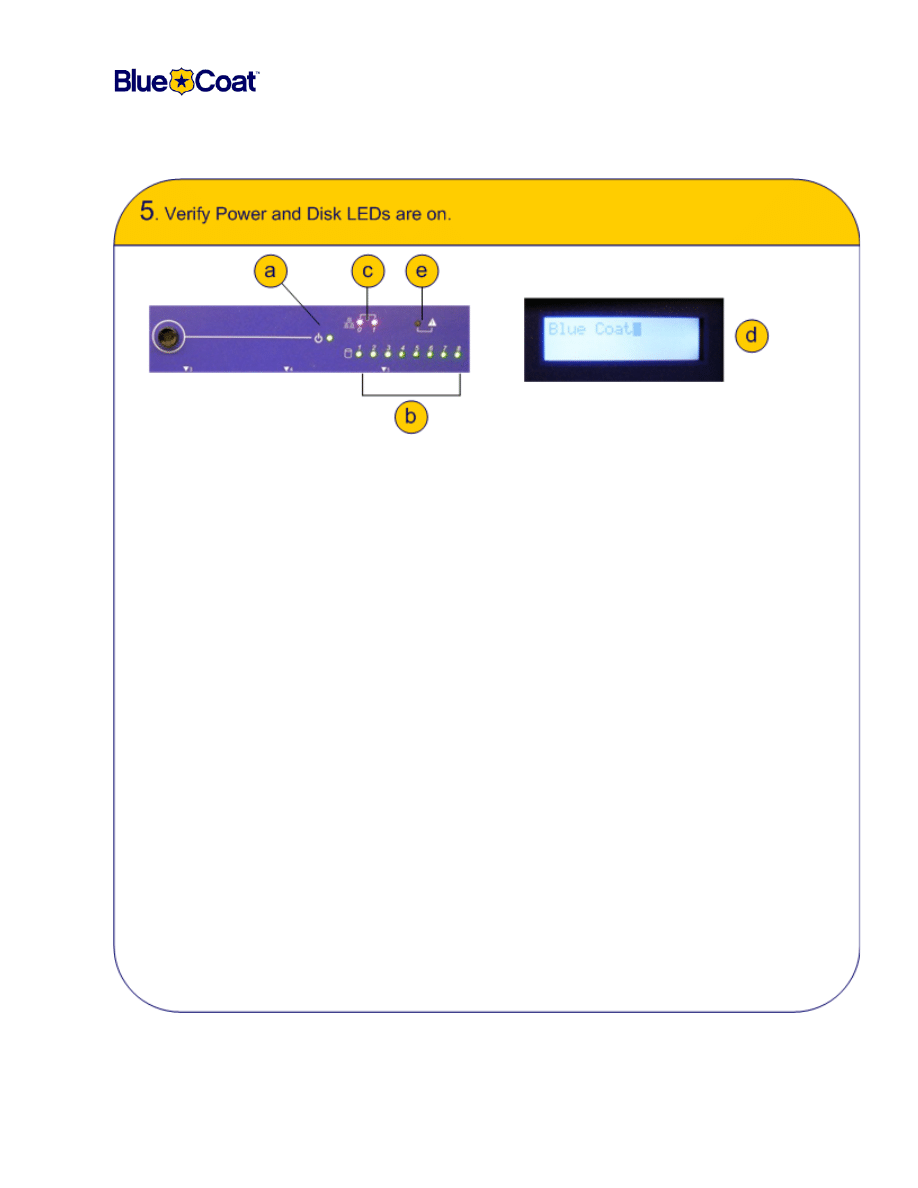
Verify that the Blue Coat SG8100 has powered on successfully:
a. The Power LED lights up amber while the appliance is booting up. Once booted up, the
LED will blink from green to amber while the appliance is not configured. When the
appliance is configured, the LED will turn solid green.
b.
The Disk Drive LEDs indicate the following:
•
If the LED is off, no disk is installed.
•
If the LED is solid green, a disk is installed.
•
If the LED randomly blinks from green to amber, there is disk activity.
•
If the LED blinks steadily from green to amber, the disk is bad or ready to be removed.
c.
The LAN LEDs indicate the following:
•
Orange: If solid, there is a 10 BaseT connection. If blinking, there is 10 BaseT activity.
•
Blue: If solid, there is a 100 BaseT connection. If blinking, there is 100 BaseT activity.
•
Pink: If solid, there is a 1000 BaseT connection. If blinking, there is 1000 BaseT activity.
d. The LCD displays
Blue Coat
when the appliance is powered on. Once booted up, the
LCD reads
IP Address not configured
or, if configured, it will scroll through the health
statistics of the appliance.
e. The System Management LED alerts the user to any problems the appliance may be
experiencing.
•
If the LED if off, there is no status on the health of the appliance.
•
If the LED is solid green, the system is ok.
•
If the LED is solid amber, there is a minor system problem.
•
If the LED is blinking red, there is a major system problem.
Note:
See the Troubleshooting section on page 10 if lights are not the correct colors.
Document Number: 231-02871 Revision: A.0 09/2006
5
Blue Coat SG8100 Quick Start
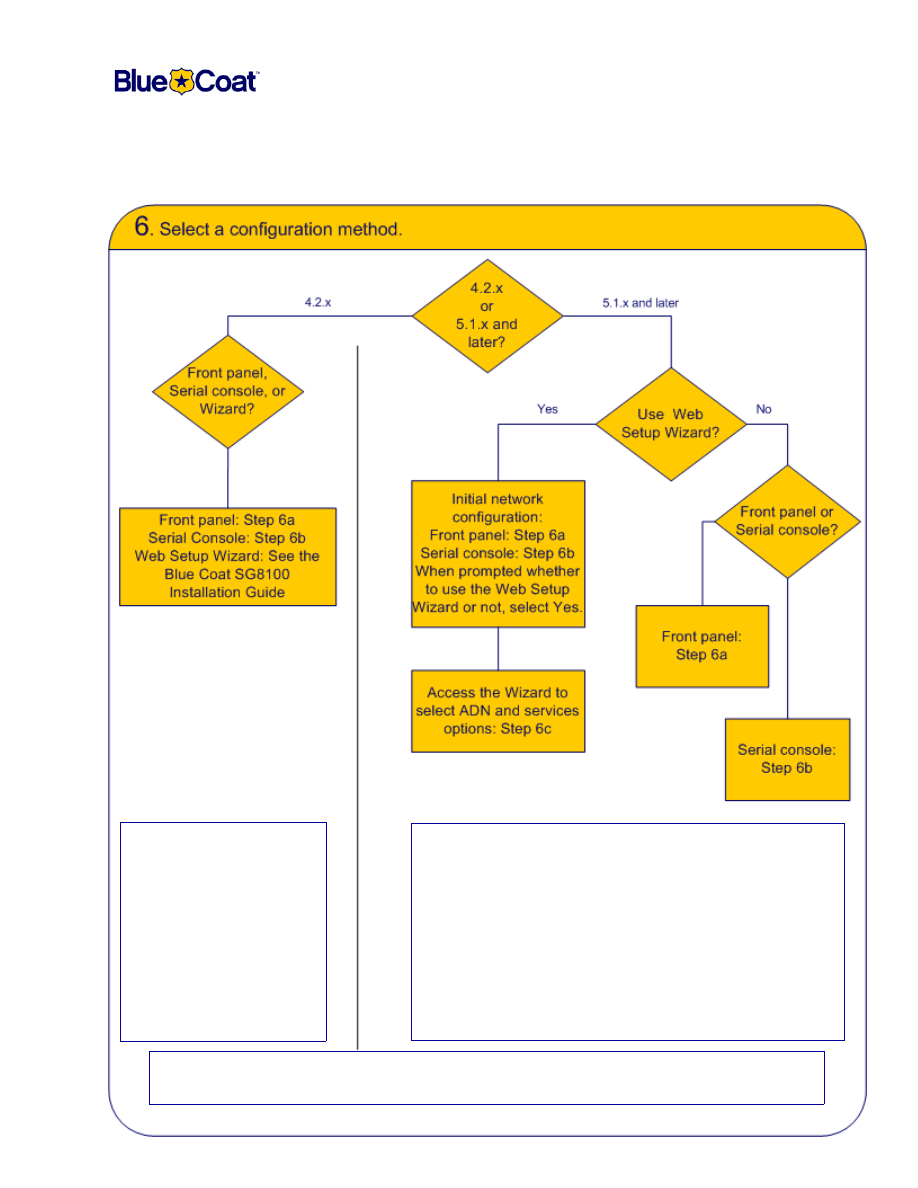
If this SG8100 shipped with
SGOS 4.2.x installed, you
can use the front panel or a
serial console to configure
the initial network settings.
You can also access a
Web-based wizard from a
PC residing on the same
subnet.
If this SG8100 shipped with SGOS 5.1.x (or later) installed,
you have two choices:
•
Use the front panel or serial console to assign the
appliance IP, DNS, and gateway addresses, then access
a Web-based wizard to set access credentials, configure
Application Delivery Network (ADN) options, and select
what traffic type(s) to intercept.
•
Continue with the front panel or serial console connection
to set access credentials.
Note: Determine your software version by examining the software serial number labels shipped
with the system.
Document Number: 231-02871 Revision: A.0 09/2006
6
Blue Coat SG8100 Quick Start
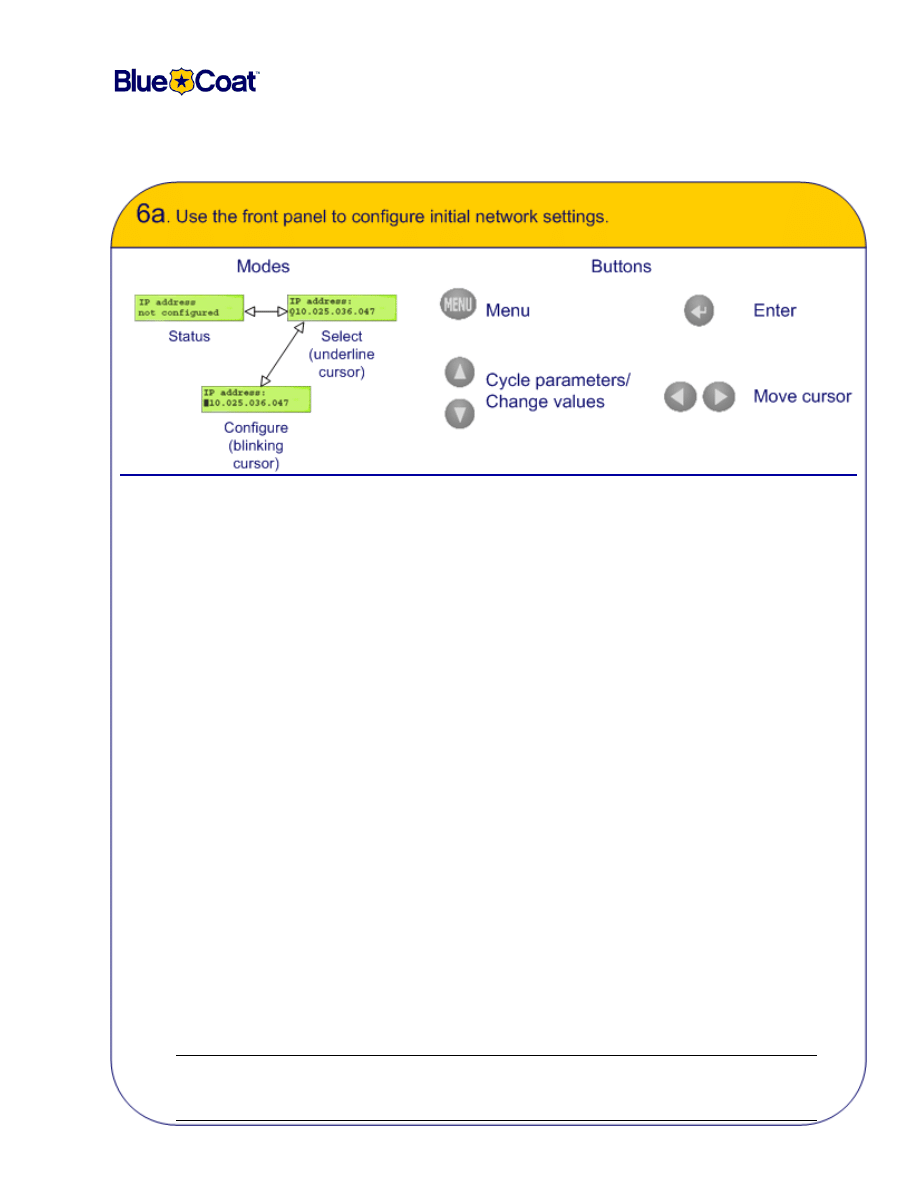
1
When the LCD displays
IP address not configured
, press the
Enter
button to enter Select mode.
The IP address parameter appears in the LCD, and the cursor appears as an underscore.
2
Press the
Enter
button again to enter Configure mode.
The cursor changes to a blinking box.
3
Press the Left or Right arrow buttons to position the cursor over the characters you want to change; press
the
Up
or
Down
arrow buttons to change them.
4
When you have the characters of the parameter entered correctly, press the Enter button to save the
changes and return to Select mode.
5
Press the Down arrow button to move to the next parameter; press the Enter button to enter Configure
mode.
6
Repeat Steps 3 through 5 for the Subnet mask, Gateway address, DNS address parameters, console
password, enable password.
(SGOS 4.2.x only) During initial configuration, the Blue Coat SG8100 generates and displays a complex
admin password, which is not displayed again. Record this password. It can be changed after initial
configuration is complete.
(SGOS 5.1.x and later only) After the DNS address parameter, you are asked if you want to continue
using the Web Setup Wizard.
•
Select
No
to continue to configure using the front panel.
•
Select
Yes
to finish using the wizard, which allows you to configure ADN and service options.
Proceed to Step
6c
.
7
Optional: Secure the serial port. If you secure the serial port and lose the password, you must restore the
appliance to its original factory defaults to access the CLI or Management Console.
8
Initial configuration is now complete. Proceed to Installation Step
7
, “Log on to the Blue Coat SG8100” on
page 9.
For detailed, front-panel configuration instructions, refer to the
Blue Coat SG8100 Series Installation Guide.
Note:
By default, the LCD automatically dims after 30 seconds without activity. Press any
control button once to relight the LCD. This behavior is configurable—for information,
refer to the
Blue Coat SG8100 Series Installation Guide.
Document Number: 231-02871 Revision: A.0 09/2006
7
Blue Coat SG8100 Quick Start
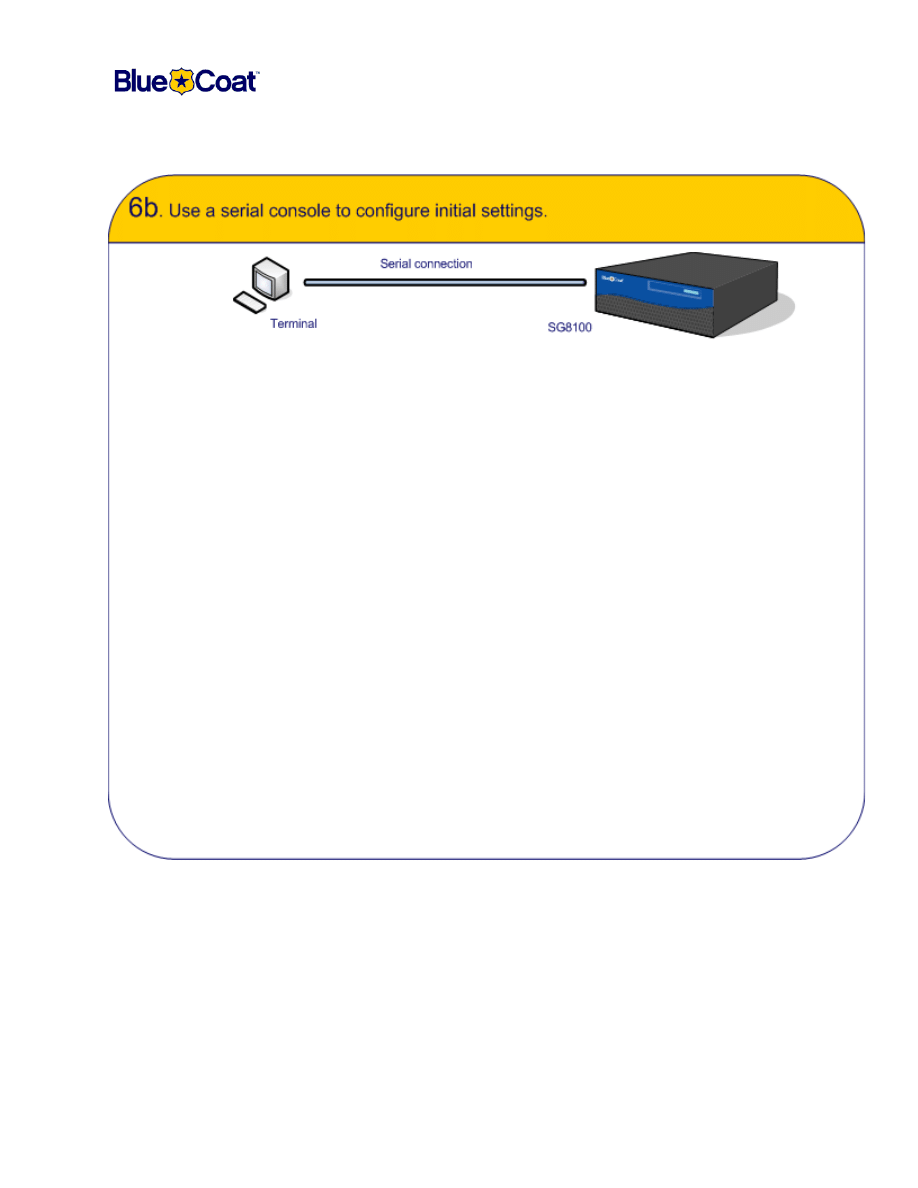
To access the serial console:
1.
Configure the terminal or PC terminal emulation software as follows:
2.
If your console was already configured before powering on the SG8100, you should
see the configuration alert. If not, power down the SG8100 and power back up after
configuring the terminal. The system prompts you with the following:
********** SYSTEM STARTUP TEMPORARILY SUSPENDED **********
Press "enter" three times to activate the serial console
3.
Press <Enter> three times to begin the initial configuration procedure. Enter basic
network information as prompted.
4.
(SGOS 5.1.x and later only) After the DNS address parameter, you are asked if you
want to continue using the Web-based wizard.
a. Press
N
to continue to configure using the serial console. When you complete the
procedure, proceed to Step
7
.
b.
Press
Y
to finish using the wizard, which allows you to configure ADN and service
options. Proceed to Step
6c
.
• Baud rate:
9600 bps
• Data bits:
8
• Parity:
none
• Stop bits:
1
• Flow control:
none
• Smooth-scroll:
disabled
Document Number: 231-02871 Revision: A.0 09/2006
8
Blue Coat SG8100 Quick Start
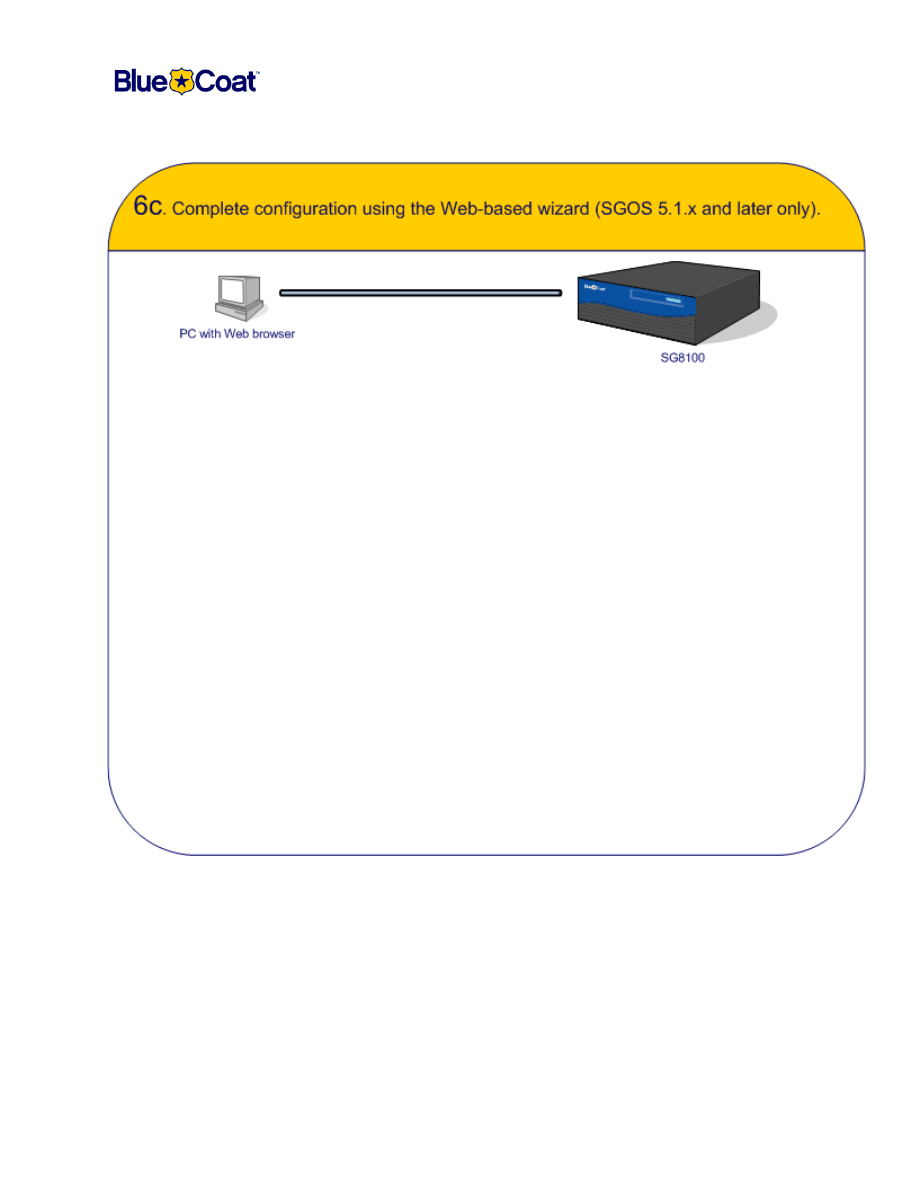
Open a Web browser and enter the following URL:
https://IP_address:8083
IP_address
is the one you specified during the initial configuration in
6a
or
6b
.
When the SG8100 connects, the setup wizard appears. Each page is described and includes
mouse-over help. Enter information on each screen, as prompted (the network settings you
entered from the front panel or serial console are already filled in):
Note:
The Web-based wizard is only available the first time the appliance is configured (or
following a reset to factory defaults). Once
Configure
is clicked during the final step, the
wizard is no longer available.
When you complete the wizard, proceed to Step
7
.
• Console username and password
• CLI (enable mode) password
• Serial port password
• Front panel PIN
• ADN Manager addresses
• Decision: Intercept traffic types
• Default policy: allow/deny
Document Number: 231-02871 Revision: A.0 09/2006
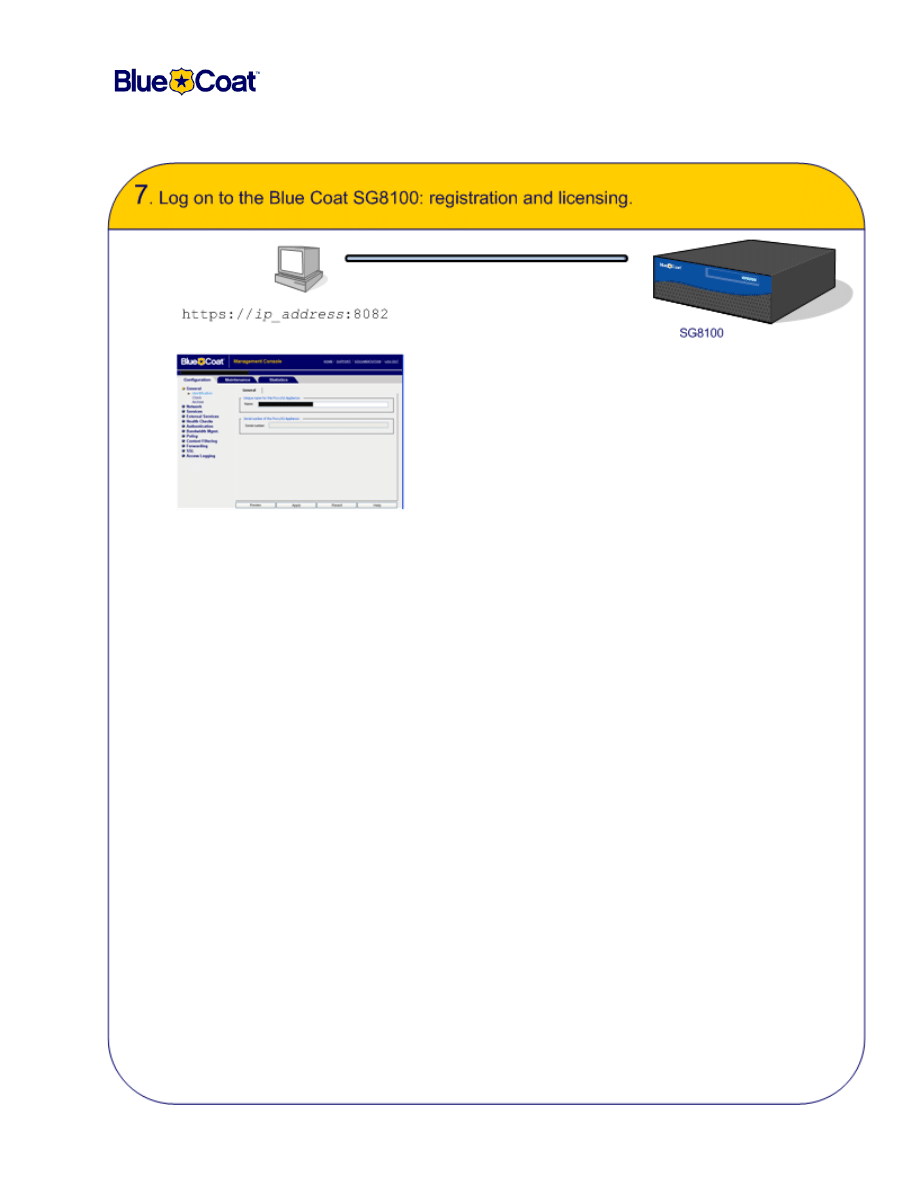
9
Blue Coat SG8100 Quick Start
Important: To activate the SG8100 license, you must register your hardware and install the license. To do
this, you must have a Blue Coat WebPower account. If you do not yet have an account, go to:
http://www.bluecoat.com/support/services/webpower_form.html
To activate the SG8100 license:
1. Open a Web browser. Ensure that the pop-up blocker is disabled.
2. Enter the IP address you assigned this appliance during initial setup:
https://ip_address:8082
3. Enter the access credentials, as specified during initial setup.
4. Click
Management Console
. The license warning/registration screen appears. Enter your WebPower
credentials and click
Register Now
; this automatically registers the hardware and displays the
Configuration page.
5. Enter your WebPower credentials in the Licensing and Configuration Management page.
6. Select the correct serial number.
7. Enter the software serial number in the Add tab and click
Apply
.
8. From the Management Console, navigate to the License page to begin the retrieval process:
Maintenance>Licensing>Install
.
9. Click
Retrieve
. The Request License Key dialog displays. Enter your WebPower credentials and click
Send Request
.
10.To verify license installation, click the
View
tab and click
Refresh
Data.
If you require detailed procedures regarding registration, license retrieval, and installation, refer to the
Licensing chapter in the
Blue Coat ProxySG CMG Volume 2: Getting Started document, or click the Help
button to view the contents of this chapter in HTML format.
Blue Coat recommends attaching one of the software license stickers to the chassis and saving the other
one for future reference. You can attach it to this document and file it, or attach it to another document as
required in your enterprise.

Document Number: 231-02871 Revision: A.0 09/2006
10
Blue Coat SG8100 Quick Start
Problem:
One or more of my Disk Drive LEDs are not on, but drives are installed.
Solution:
The disk might not be set in securely. Open the front panel, lift the latch to release the problem drive, pull
drive out a bit, re-insert and secure the latch closed. Check the front panel to see if the Disk Drive light is
now on. If it is not, the drive may need to be replaced.
Problem:
The Power and Disk Drive LEDs are green, but there is no network connection.
Solution:
Check the network connections to verify they are not loose. Otherwise, the problem might be a bad network
cable or possibly a problem with your router/switch. Refer to page 4 for a description of what each LED
means.
Problem:
I cannot access the Web Setup Wizard from my browser.
Solution:
Attempt one or more of the following, as required:
❐
Attempt to access an external site, such as www.bluecoat.com, to verify Internet connectivity.
❐
Ensure that the IP address you entered begins with
https
and is on port 8083.
❐
Verify all SG8100 network connections.
❐
Once the appliance is configured, the Web Setup Wizard is not available. If you suspect this
SG8100 has already been configured, but you require the configurations to change, you can reset
the appliance to its factory defaults from the serial console. Refer to the
Blue Coat SG8100 Series
Installation Guide.

Document Number: 231-02871 Revision: A.0 09/2006
11
Blue Coat SG8100 Quick Start
❐
How to Contact Support
—When contacting Blue Coat Systems for technical phone support or to setup an RMA,
be prepared to provide Blue Coat your serial number to verify entitlement.
If you have purchased a Support Contract but have not received a Support Contract Certificate, send an e-mail to
support.services@bluecoat.com
, and provide your product model, serial number(s) and contact information.
For the current list of regional customer support phone numbers, see:
http://www.bluecoat.com/support/contact.html
❐
WebPower
—Customers who have an active Blue Coat Support Contract will be provided access to WebPower, Blue
Coat's online Case Management Tool. WebPower allows you to create new technical support cases, review open
cases, and add comments to existing cases online at any time. Web Power also provides you with access to exclusive
Blue Coat support materials, installation notes, and OS updates. To obtain a Web Power Login, navigate to:
http://www.bluecoat.com/support/services/webpower_form.html
, and provide your name, company name, e-
mail address, telephone number, product model and serial number.
❐
How to Purchase Support
—When acquiring a Blue Coat product, the company recommends that you purchase a
Blue Coat Support Contract which are available from any Blue Coat Reseller. Information about Blue Coat Support
Services can be found at:
http://www.bluecoat.com/support/services/index.html
.
For more information about purchasing a Support Contract, contact Blue Coat Sales:
E-mail:
sales@bluecoat.com
.
Telephone: Toll Free in North America at 1-866-982-2628 (1-866-38-BCOAT), or North America Direct at
1- 408-220-2299.

Document Number: 231-02871 Revision: A.0 09/2006
12
Blue Coat SG8100 Quick Start
Contact Information
Blue Coat Systems Inc.
420 North Mary Ave
Sunnyvale, CA 94085-4121
http://www.bluecoat.com/support/index.html
bcs.info@bluecoat.com
http://www.bluecoat.com
For concerns or feedback about the documentation:
documentation@bluecoat.com
Copyright© 1999-2006 Blue Coat Systems, Inc. All rights reserved worldwide. No part of this document may be reproduced by any means
nor modified, decompiled, disassembled, published or distributed, in whole or in part, or translated to any electronic medium or other
means without the written consent of Blue Coat Systems, Inc. All right, title and interest in and to the Software and documentation are
and shall remain the exclusive property of Blue Coat Systems, Inc. and its licensors. ProxySG™, ProxyAV™, CacheOS™, SGOS™,
Spyware Interceptor™, Scope™, RA Connector™, RA Manager™, Remote Access™ are trademarks of Blue Coat Systems, Inc. and
CacheFlow®, Blue Coat®, Accelerating The Internet®, WinProxy®, AccessNow®, Ositis®, Powering Internet Management®, The
Ultimate Internet Sharing Solution®, Permeo®, Permeo Technologies, Inc.®, and the Permeo logo are registered trademarks of Blue Coat
Systems, Inc. All other trademarks contained in this document and in the Software are the property of their respective owners.
BLUE COAT SYSTEMS, INC. DISCLAIMS ALL WARRANTIES, CONDITIONS OR OTHER TERMS, EXPRESS OR IMPLIED,
STATUTORY OR OTHERWISE, ON SOFTWARE AND DOCUMENTATION FURNISHED HEREUNDER INCLUDING WITHOUT

Document Number: 231-02871 Revision: A.0 09/2006
13
Blue Coat SG8100 Quick Start
Installation Checklist
You can photocopy this page and use it as you install Blue Coat appliances.
Conventions:
❐
Bold—Required.
❐
Regular font—Recommended/optional.
Task
Reference
❏
Unpack appliance package and check for all
included parts.
❏
Connect the SG8100 to your network (Interface 0).
❏
(Optional) Interface 1 is for connecting to another proxy
or network device.
CMG:
Volume 2: Getting Started
❏
(Optional) Connect a serial console or PC with terminal
emulation software.
❏
Power on the appliance.
❏
Perform initial configuration:
(4.2.x) Front panel, serial console, or Web-based
wizard.
(5.1.x >) Front panel or serial console for initial IP
information; complete with the wizard.
The Blue Coat SG8100 Installation Guide
.
❏
License the appliance.
CMG:
Volume 2: Getting Started
.
❏
Upgrade the OS to the latest version.
CMG:
Volume 10: Managing the ProxySG
.
❏
Verify that the system time is accurate.
CMG:
Volume 2: Getting Started
.
❏
Employ a filter list to restrict access to the SG8100.

Document Number: 231-02871 Revision: A.0 09/2006
14
Blue Coat SG8100 Quick Start
Notes

Document Number: 231-02871 Revision: A.0 09/2006
15
Blue Coat SG8100 Quick Start
Notes

Document Number: 231-02871 Revision: A.0 09/2006
16
Blue Coat SG8100 Quick Start
Settings For This Appliance
Use this table to record the network settings for this SG8100. If you are unaware of what these settings are to
be, contact your network manager. Use caution if you record passwords here. Store in a secure location.
Parameter
Setting
Parameter
Setting
IP address
Subnet mask
Gateway address
DNS server
Console username
Console password
Enable (CLI) password
Serial port password
Front panel pin
The following parameters are only configurable through the Web-based Wizard
Primary ADN
Manager IP address
Backup ADN Manager
IP address
Server subnet 1
(IP/Mask)
Server subnet 2
(IP/Mask)
Server subnet 3
(IP/Mask)
Server subnet 4
(IP/Mask)
Intercept traffic? (5.1.x
or later only)
Circle: Yes / No
Traffic to intercept (5.1.x
or later only)
Circle: CIFS / FTP / HTTP /
IM / Exchange-Outlook /
Streaming /
Optimize other TCP traffic
Initial policy
Circle: Allow / Deny
Wyszukiwarka
Podobne podstrony:
Polityka Pieniężna BC
alfabet 2 bc id 56842 Nieznany (2)
Pomysły na prezenty dla?bci i dziadka
egzamin nadzor korporacyjny 214
MAKIJAŻ 214 GRANAT I SREBRO
Montaż BC
214
alfabet 2 bc
8100
rock and roll dla?bcii dziadka
alfabet 5 bc id 56848 Nieznany (2)
mat bc mat bc
plik (214)
alfabet 6 bc
Zaproszenie dla?bci i dziadka
zaproszenie dla?bci
więcej podobnych podstron