Copyright Interweave Press LLC. Not to be reprinted. All rights reserved.
page 1
project
library
R R R R R R R R R R R R R R R R R R R R R R R
publishers of Step by Step Wire Jewelry…join the online beading community at
BeadingDaily.com
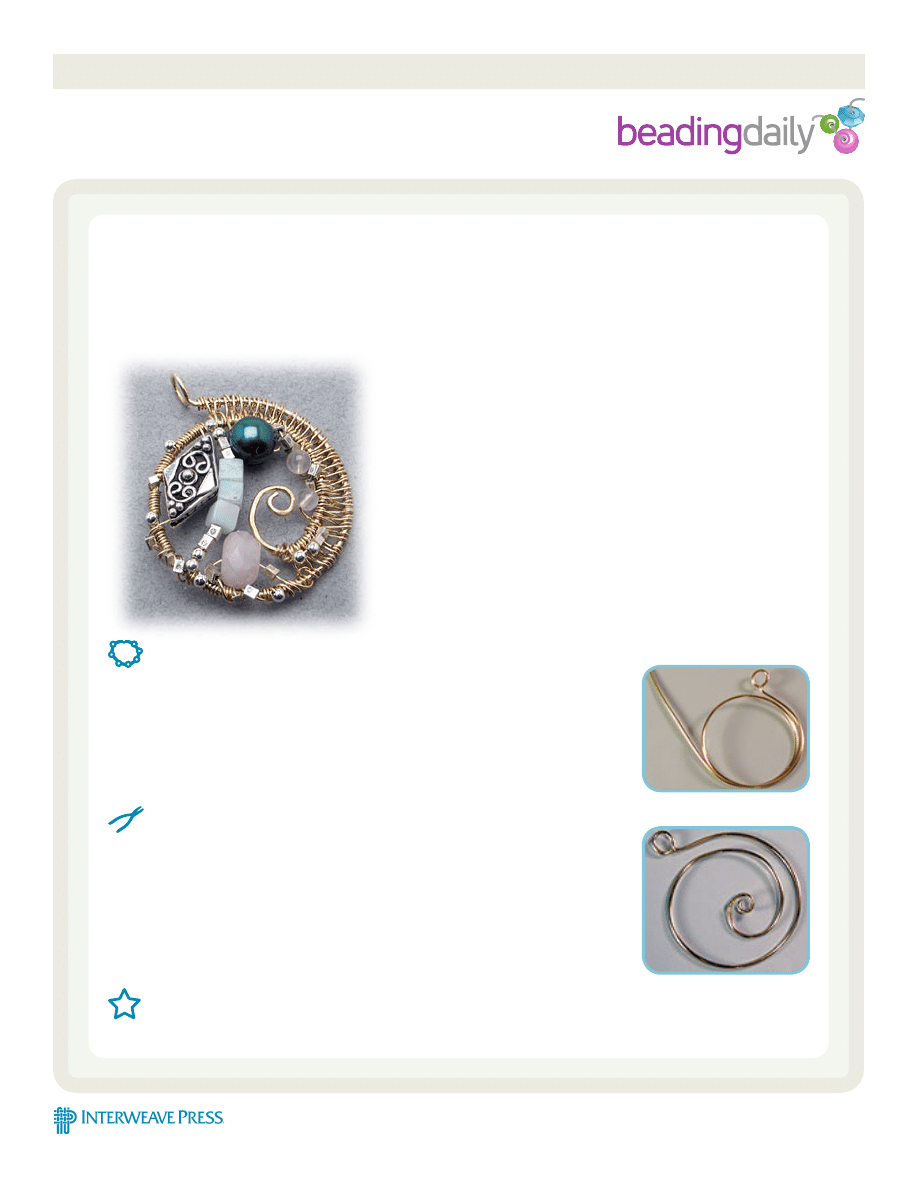
Free Wheeling Pendant
by Linda “Sorcie” Smith
Jewelry artisans have begun to explore many other
craft fields to find techniques that can be adapted to
wire, such as crochet, knitting, and weaving. Adding
these dimensions to jewelry enables wire artisans
to produce works that are rich in texture and eye
appeal.
This pendant employs a wire frame over which a
weaving technique is used, as well as coiling. Beads
are added later by “sewing” them onto the woven
frame.
One-of-a-kind wire weave and beads.
materiaLS:
18-gauge half-hard round wire
24-gauge dead soft round wire
16 x 8mm Bali style flat bead
4-5mm square beads, 3
7.5mm pearl
3.5mm beads, 2
7 x 10mm rondelle
2.5 and 3mm square and round metal beads
tOOLS:
Round nose pliers
Flat nose pliers
Chain nose pliers
Mandrels of different sizes
Flush cutters
Planishing or ball peen hammer
Bench block or anvil
Plastic coated clamp
Ring mandrel
techniqueS
Wirework
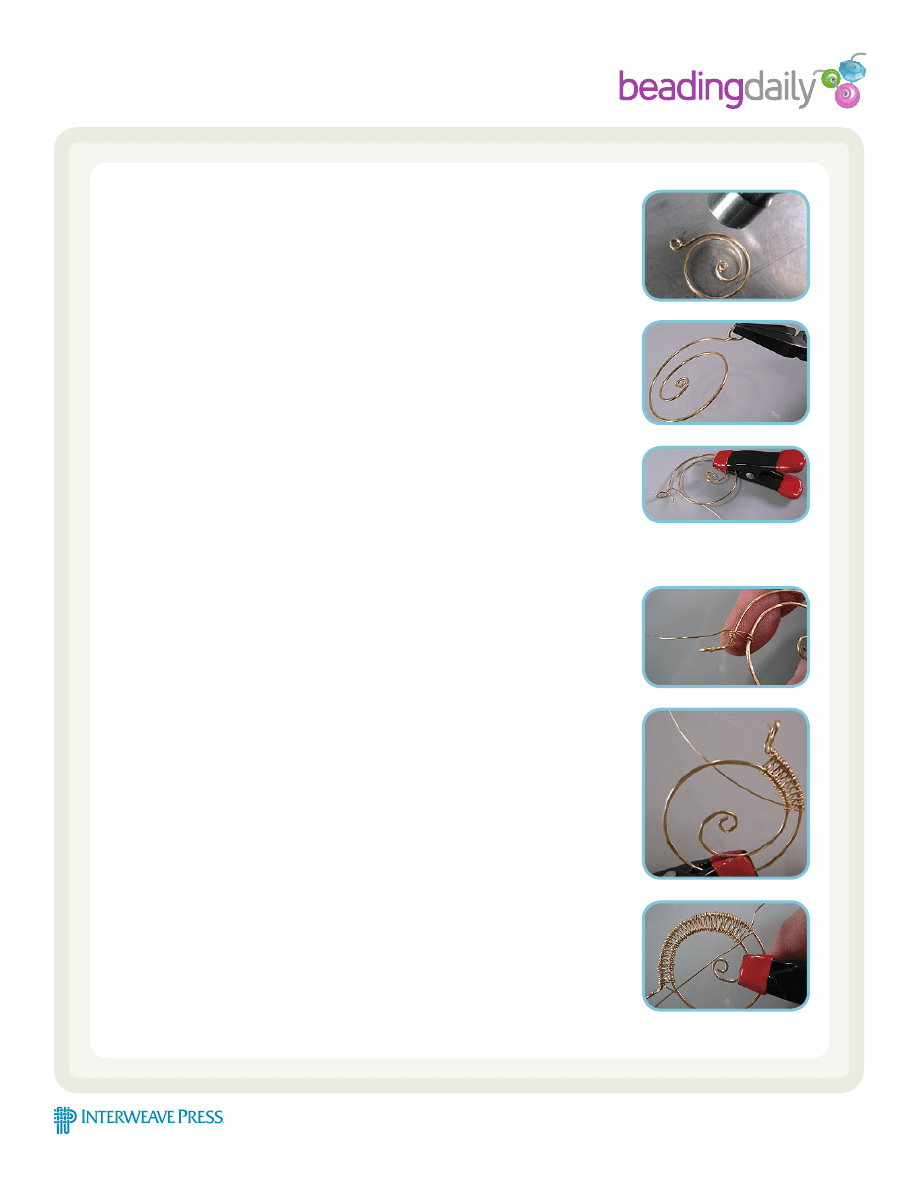
Step 1
To make the frame, cut
an 8” piece of the 18-gauge
wire. Make a loop using the
widest part of your round nose
pliers, and then form the wire
1-1/2 times around the largest
size on your ring mandrel.
Step 2
Use your round nose
pliers to form another loop on
the end of the wire and then
form a loose spiral around the
loop. Pull gently on the wire so
that the wire loops fit inside
each other.
Copyright Interweave Press LLC. Not to be reprinted. All rights reserved.
page 2
BangLe BraceLet
publishers of Step by Step Wire Jewelry…join the online beading community at
BeadingDaily.com
Step 3
Step 4
Step 5
Step 6
Lay the wire on your anvil and use your hammer to slightly flatten and harden
your wire frame.
Turn the top loop into a bail by using your flat nose pliers to rotate it 90° and
perpendicular to the frame.
Clamp the wire loops into position with the plastic coated clamp so that the
two widest curved sides have 1/4”-5/16” space between them to accommodate the
weave. Cut a 2’ piece of the 24-gauge wire and use your flat nose pliers to bend a
V on the wire end. Position the V beneath the bail and wind several coils of wire
beneath the bail to anchor the weave. Coil the wire from the inside of the frame
to the outside with your dominant hand while you hold the frame with your other
hand.
Come up behind the outside frame wire, and wind around it. To begin the
weave, take the wire down through the space between the wires and bring it up
on the inside of the inner wire. Coil this wire once around and then bring the wire
back down through the space between the frame wires and up on the outside of the
outer wire.
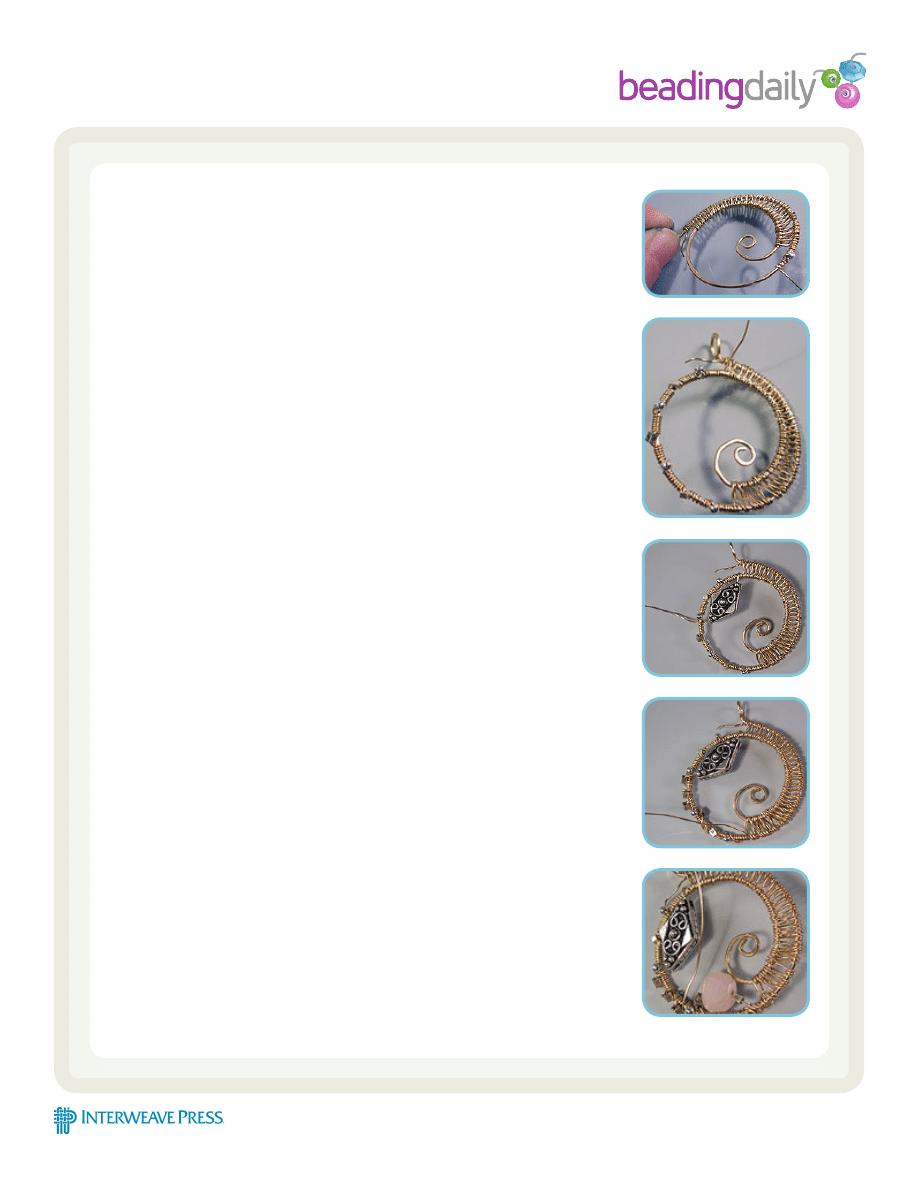
Step 7
Step 8
Make sure to keep the wire coiled tightly on the frame, but be careful not to
pull too tight as it will distort your coil. When the original 2’ of wire comes to an
end, coil the wire around the inner wire and trim the front. Close the coil with the
flush cutters.
Begin a second wire by making a V with the flat nose pliers, forming a binding
coil on the outer wire. Pick up the weave again, making the transition as seamless
as possible. Continue to weave until the two wires move apart when the curl goes
to the inside.
Copyright Interweave Press LLC. Not to be reprinted. All rights reserved.
page 3
BangLe BraceLet
publishers of Step by Step Wire Jewelry…join the online beading community at
BeadingDaily.com
Step 9
Step 10
Step 11
After the weave ends, begin to coil the wire around the single outer frame wire.
Periodically, alternately adding a 2mm round, then a square bead to the outside of
the outer wire for decoration.
Coil around the wire all the way back to the bail.
With the long coiling wire end near the bail, thread on the 16mm Bali bead.
Coil the wire around the frame to secure the bead at the 11 o’clock position on the
frame.
Step 12
Step 13
Intermittently coil the wire back down toward the curl and the weave, adding
3mm rectangular beads to the wire frame. Complete the last coil by coming up over
the outside, so that the next wrap will go down through the inside of the frame. If
necessary, to get the wire into position, come up through the last weave stitch.
Thread a 3mm accent bead, the rondelle, and another 3mm accent bead onto
the wire and secure it by going under the frame wire and coiling around it twice.

Copyright Interweave Press LLC. Not to be reprinted. All rights reserved.
page 4
BangLe BraceLet
publishers of Step by Step Wire Jewelry…join the online beading community at
BeadingDaily.com
Step 14
Step 15
Step 16
Coming up from the outside of the frame wire, thread on 2 round accent
beads, 2 rectangular beads, the 3 cube beads, 2 more rectangles, and 2 more rounds.
Secure the beads by coiling down over the outside of the frame 2 coils.
To add the pearl, bring the wire up from the back of the pendant through the
second weave stitch, and coil once. Add the pearl, and push it down into the top
open space of the pendant. Insert the wire back through the weave. Bring the wire
back up on the inside of the pendant, between the pearl and over the last stitch of
the wire, locking the pearl in place.
To finish the pendant decoration, add two 2.5mm rectangular silver beads and
“sew” a stitch into the weave. Repeat with a 3.5mm bead, then 2 more rectangles,
then the remaining 3.5mm bead, and lastly 2 rectangles and two 2.5mm round metal
beads, bringing them to the base of the spiral. End the wire by coiling it tightly
around the armature of the spiral and flush cut the wire on the front of the piece.
Press it tight with your chain nose. Trim all wire ends close to the coil, with the end
on the front of the pendant for wearing comfort.
LINDA “SORCIE” SMITH is a graphics shop owner and jewelry
designer from Beaver Falls, PA. Co-moderator of the Creative
Wire Jewelry forum, she loves to combine compelling colors with
imaginative balance in her designs. She teaches lessons locally
and has written tutorials for online Web sites; Linda can be
contacted via her Web site, www.FacetsOfLight.com.
Wyszukiwarka
Podobne podstrony:
beading free netting patterns
beading pendant necklace
OBE Gods of the Shroud Free Preview
Free Energy Projects 2
free sap tutorial on goods reciept
500 GB Free Transferu
BLOOG, ● Wiersze moje ♥♥♥ for Free, ☆☆☆Filozofia, refleksja, etc
Pokaż mi swój obraz, ● Wiersze moje ♥♥♥ for Free, ☆☆☆Filozofia, refleksja, etc
Pochód nocnych myśli, ● Wiersze moje ♥♥♥ for Free, ☆☆☆Filozofia, refleksja, etc
Free Energy & Technological Survival Homemade Wireless Antenna
Autokracja i liberalna demokracja, socjologia - free
W Labiryncie czasu, ● Wiersze moje ♥♥♥ for Free, ☆☆☆Filozofia, refleksja, etc
Wyżyna Krakowsko częstochowska, Dokumenty Free
(Reflek)-Gdy z drzewa spadał liść - jak więcej widzieći, ● Wiersze moje ♥♥♥ for Free, ☆☆☆Religijne ☆
Ananasek cytrynowy, PRZEPISY CIASTA DANIA FREE
butterfly wire pendant a
Geomorfologia i geologia ojcowski park narodowy, Dokumenty Free
NIEWIDZIALNI FURIACI - poltergeisty, Free
Strażnik zapomnianej wiedzy, Free
więcej podobnych podstron