1
Bob's Card Models
www.bobscardmodels.com
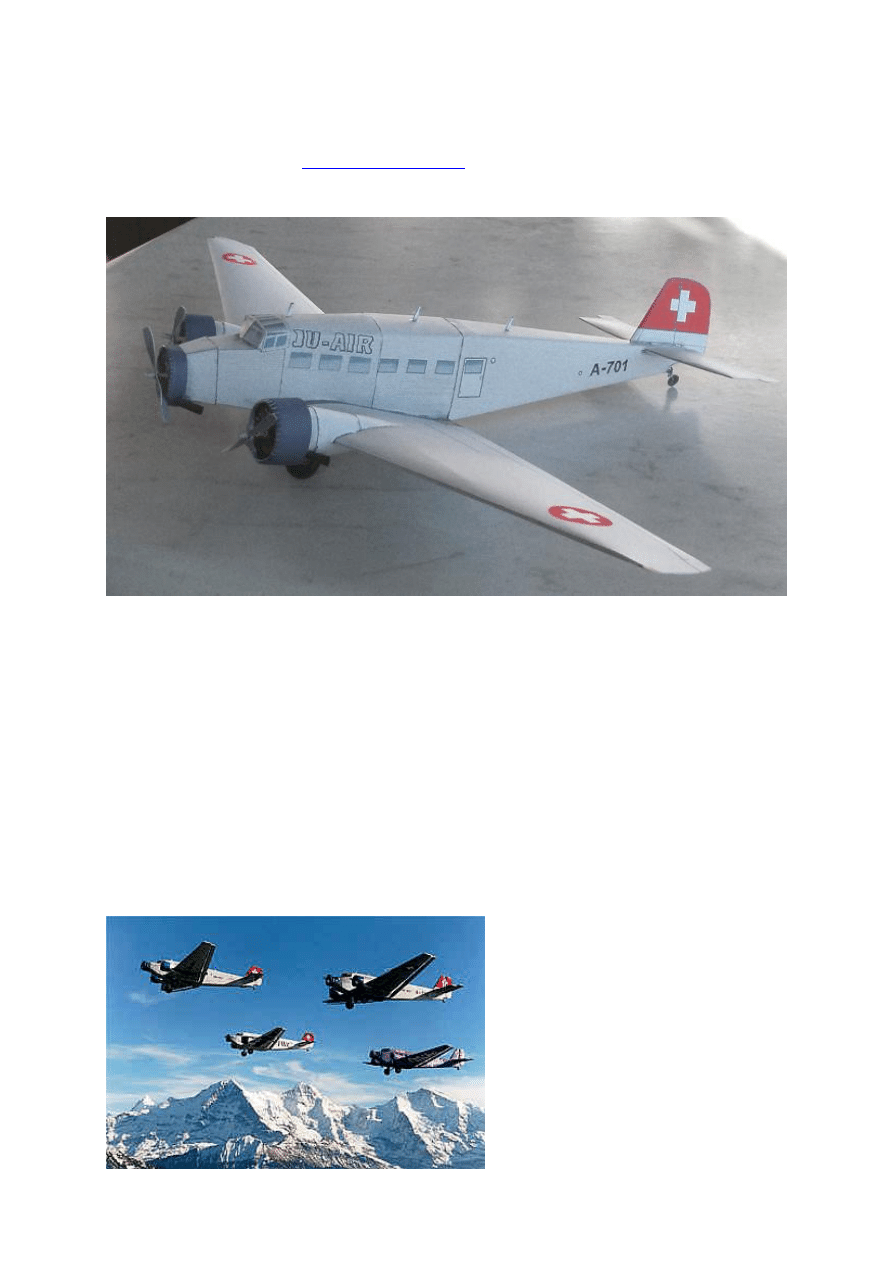
Junkers Ju 52 ("Tante Ju" - "Iron Annie") 1:72
The Junkers Ju 52 (nicknamed "Tante Ju" - "Auntie Ju" - and "Iron Annie") was a transport aircraft and bomber
manufactured 1932 – 1945 by Junkers. It saw both civilian and military service during the 1930s and 1940s. In a
civilian role, it flew with well over a dozen air carriers including Swissair and Lufthansa as an airliner and
freight hauler. In a military role, it flew with the Luftwaffe as a troop and cargo transport, with a secondary role
as a medium bomber. The Swiss Air Force also flew the Ju 52, with three machines remaining in operation until
the early 1980s.
I have chosen the non-military version decals, as the aircraft's miltary history (i.a. bombing of civilain Guernica,
Crete, Holland) is not a very noble one (actually it's not the plane's fault).
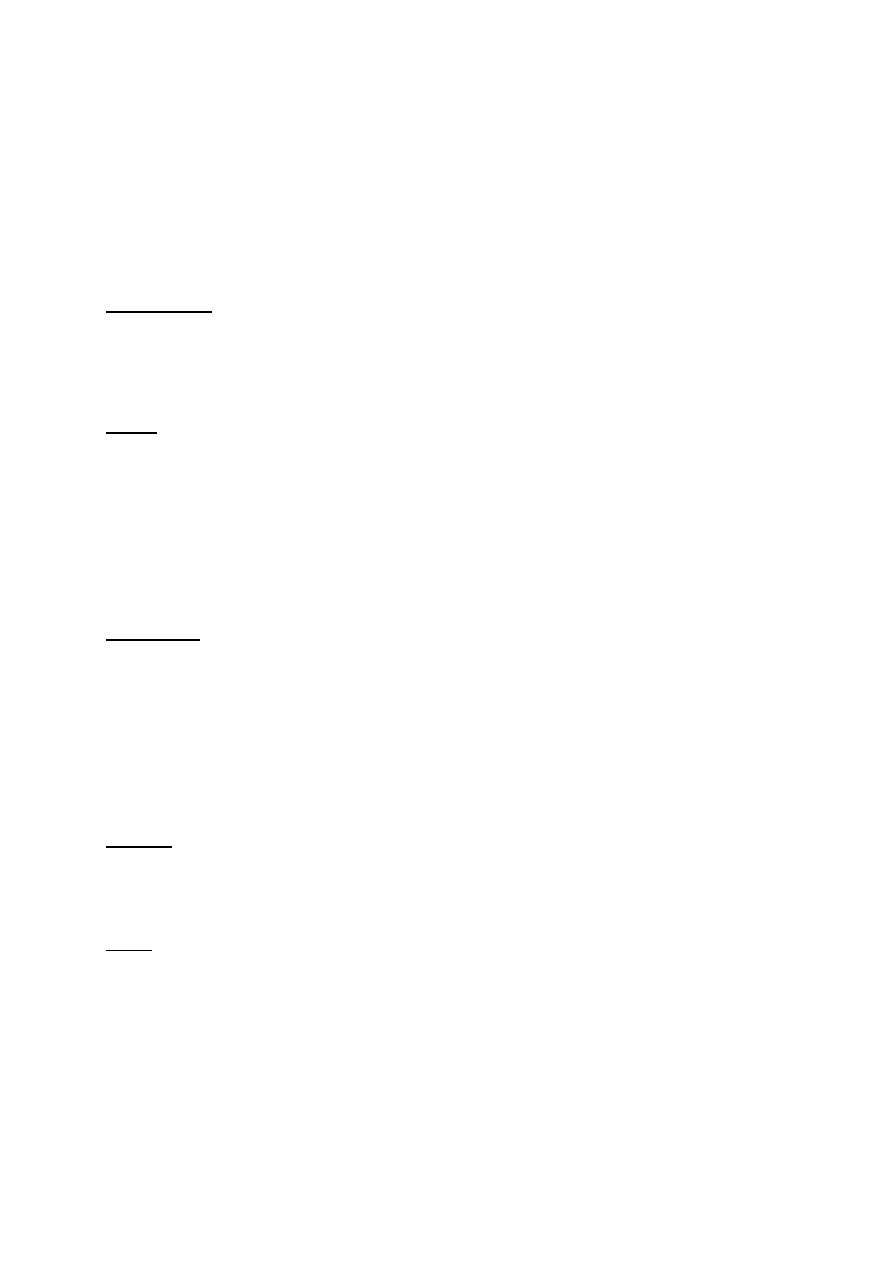
The version shown is still flown today, and enjoys taking passengers to view the magnificent Swiss Alps. You
will see that I have remained true to the corrugated sheeting of the fuselage and wings.

2
Length: 18.90 m (62 ft 0 in)
Wingspan: 29.25 m (95 ft 10 in)
-----------------------------------
Building Instructions
Print all sheets on between 160 and 230g card, except Instructions and Sheet 6 which should be printed on 80 -
90g Paper.
When gluing card parts at right-angles to another piece (eg bulkheads to the outer skin), holding together with
fingers until dry usually results in the 'skeleton' image of the bulkheads - not nice! Hold together with 2 flat
pieces of wood or plastic.
NOTE: Insert the bulkheads using a cocktail stick or tooth-pick (or even better, I use a long screw) pushed into a
tight hole in the centre of each bulkhead. The fit of the bulkhead must be flush, not tight, otherwise ugly
"ribbing" will be visible on the fuselage. NEVER force the bulkheads into position, rather snip a bit of card off
the outline.
Green areas must be cut out, BUT usually after gluing any folds. The Instructions will tell you when!
Although the model is relatively small, bulkheads have been used to keep the correct cross-sectional form of the
fuselage.
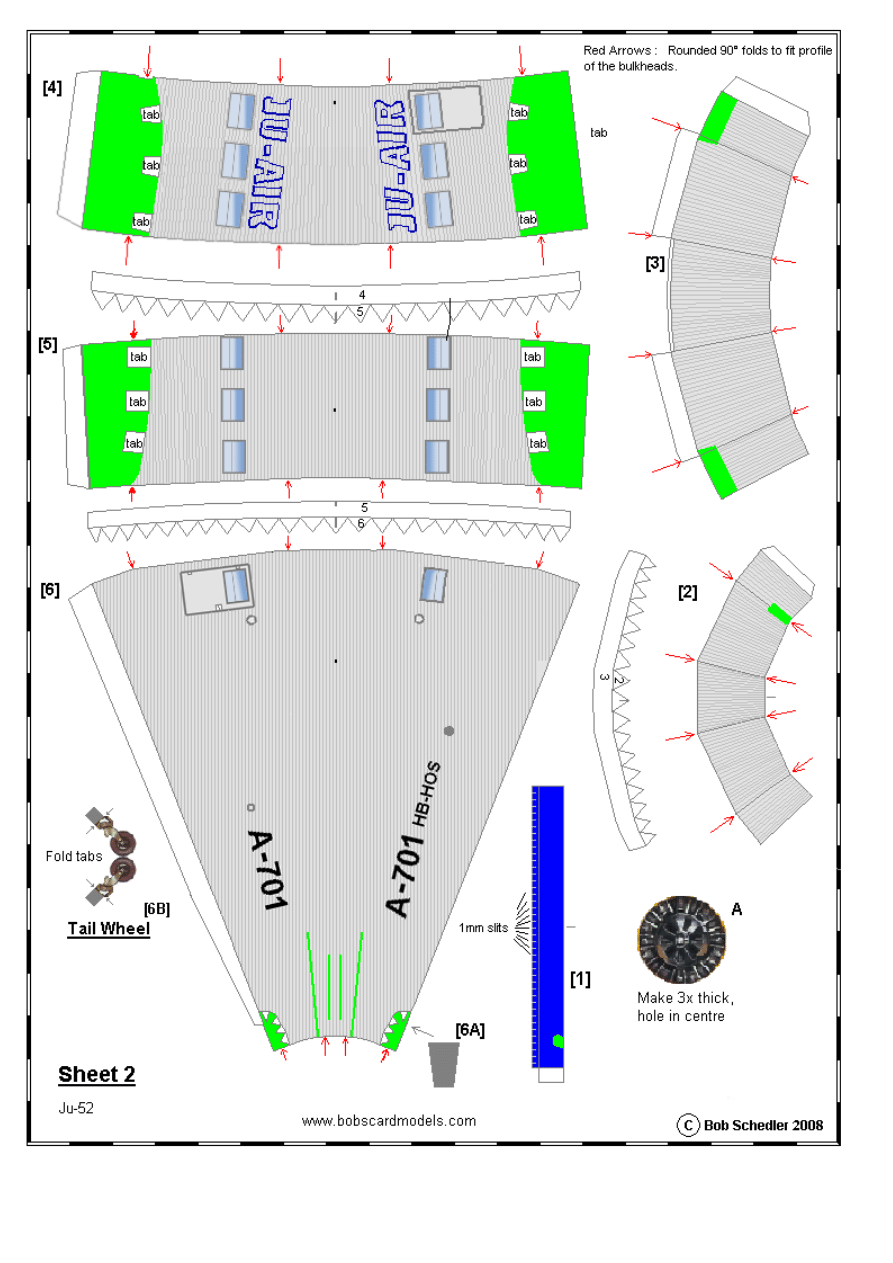
Fuselage
1.
Cut out bulkheads A to F, pierce their centres, make 3x thick by gluing on waste card.
2.
Cut out parts [2] to [6], making them oversize where the fold marks are. On each part, make a rounded
90° fold in the 4 positions marked, to fit the outlines of the bulkheads. Cut down the oversize.
3.
Close/glue forms [3] to [6] and glue on serrated tabs where applicable.
4.
Insert/glue bulkheads according to sketch ..... firstly F in [6], followed by E.
5.
Glue [5] to [6], then insert/glue b'head D in [5].
6.
Glue [4] to [5], then insert/glue b'head C in [4].
7.
Close/glue form [2]. Glue [2] to [3], insert/glue b'head B after piercing its centre to accommodate the
tooth-pick of the propeller shaft, and then glue the whole assembly to [4].
8.
On [2], cut out green area marked for exhaust pipe.
9.
Cut out/glue tab of central engine rim, [1]. Make 1mm long slits the front of [1] and round the front with
the aid of glue.
10.
Insert/glue front 'bulkhead' A.
11.
Cut out green area on [1] (for exhaust).
12.
With fingers, round the front of [2] as much as possible, ready to accept assembly [1].
13.
Glue assembly [1] on [2].
14.
Cut out, fold cockpit [8] and tabs, glue, glue in position.
15.
Roll/glue exhaust [7], insert/glue in place.
16.
Cut out the green area at the tip of the tail, bend back the tabs, glue on the oversized [6A]. When dry,
snip to size.
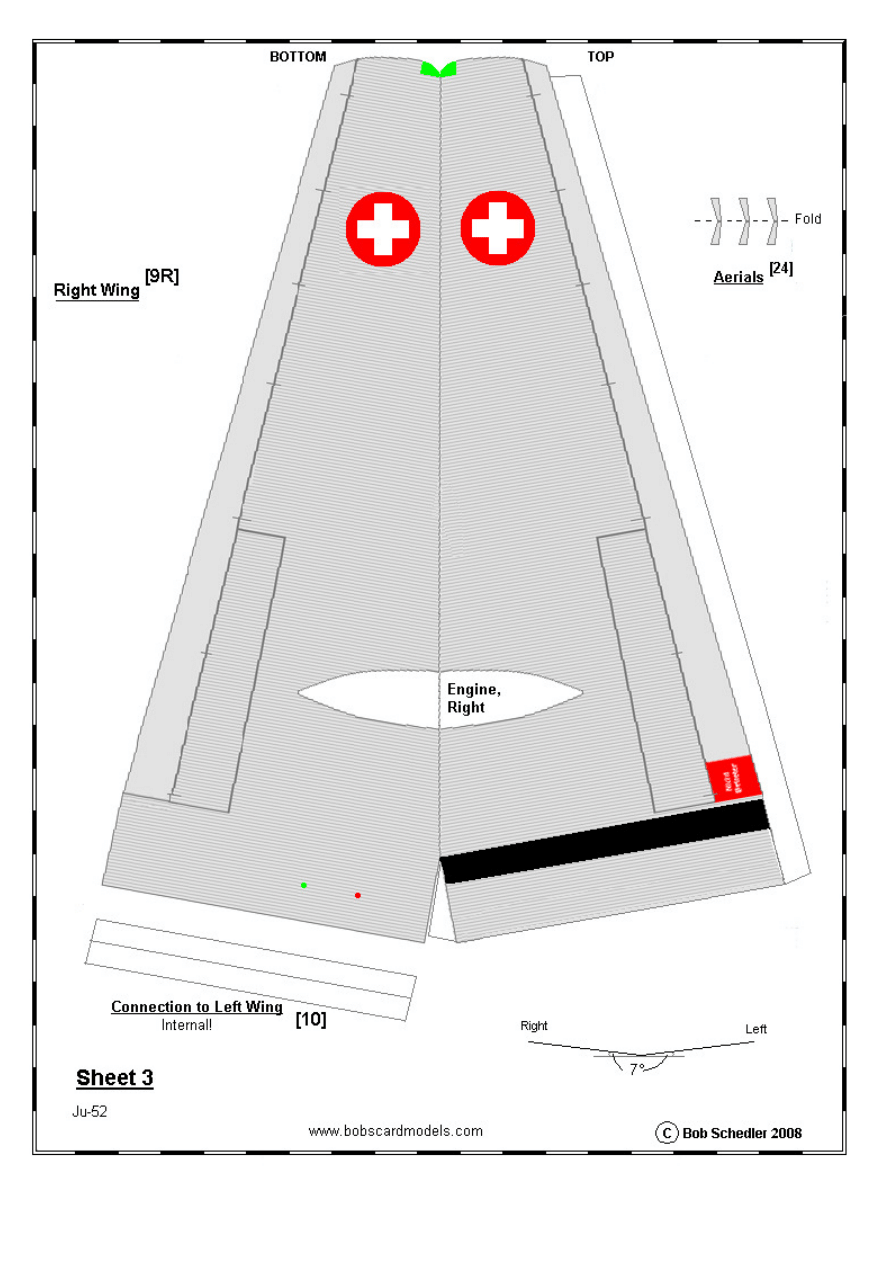
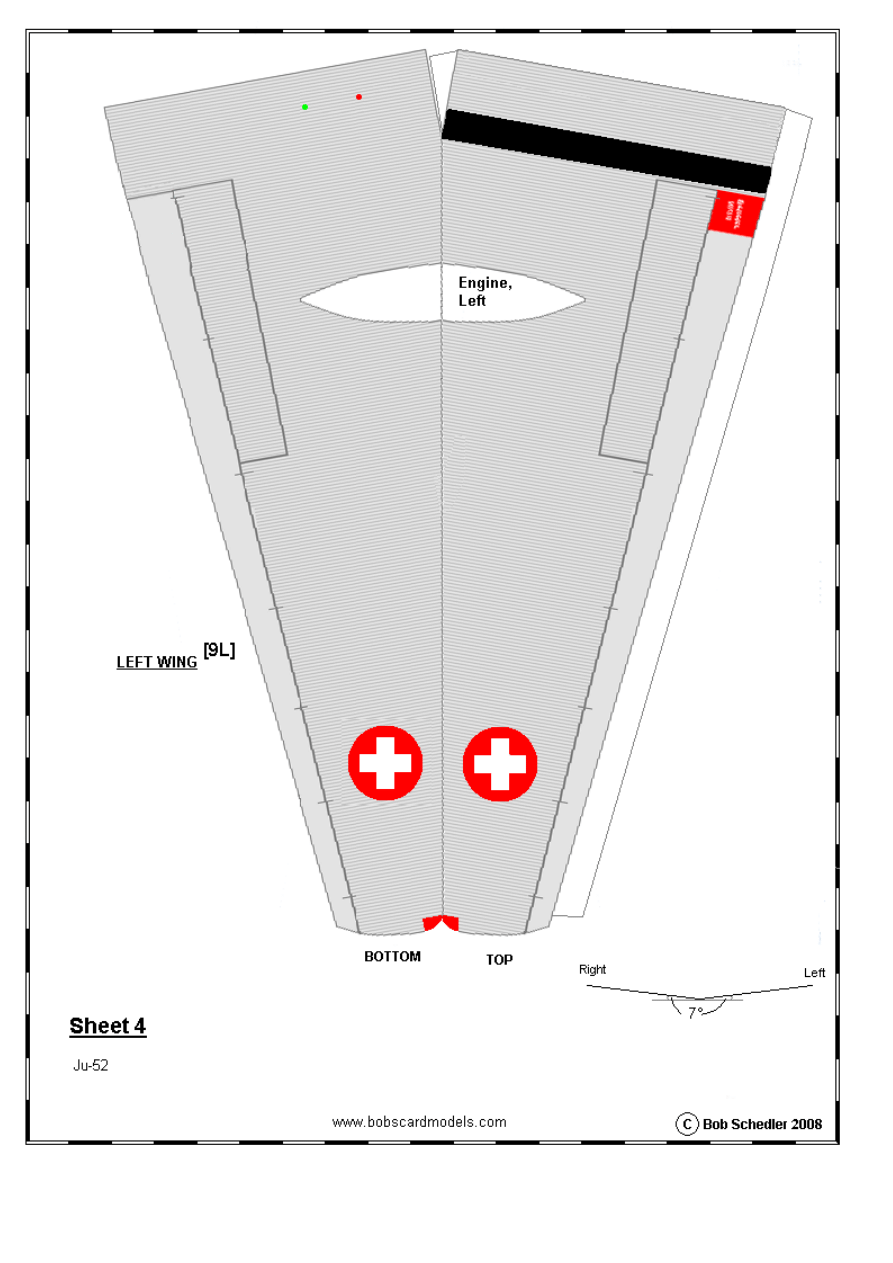
Main Wings
17.
Cut out the left and right Wings [9], and their connecting strip [10]. Fold the wings and tabs - do not
glue yet.
3
18.
Join the LOWER portion of each wing together with connector [10].
19.
Glue the long tab of the left-hand wing (upper part), to the lower part. NOTE: the width of the lower
part of each wing is 98% of that of the upper part, to give the correct profile.
20.
Insert the Dihedral [11] (glued on bottom, but only the top left portion) into the left portion of the wing
about 1/3 from the leading edge . To achieve this, bend the dihedral a bit, so that the 1/3 distance is
constant. Use minimal glue and finger pressure, otherwise ugly ribbing on the wing will become
visible. When dry, glue the top right portion of [11] and fold down the right wing gluing its tab.
21.
Mount the wings under the fuselage, first cutting out the green area under [3] to [5], bending back the
4 tabs, and gluing the wings in place. If necessary, snip away the fuselage until the wing fits snugly.
Tail/Rear Wings
22.
Cut the green markings at rear on top of the fuselage (anchorage for the fin), and on the side of the
fuselage (slit for the rear Wing).
23.
Cut out, fold and glue the rims (not the whole surface) of the rear Wings [12].
24.
From the rear, insert the wings and glue in place.
24.
Cut out, fold glue rear Fin [13]. Fit in slits on top of rear fuselage, glue in position.
Engines
14.
Cut out, round/close form and glue parts [14R] to [17R]. Glue together parts [15R] to [17R].
15.
Insert/glue bulkhead [19R].
16.
Glue part [18R] centrally on top of [15R].
17.
Insert/glue in [14R].
18.
Snip 1mm long slits around the perimeter of[14R] and round the front with the aid of glue.
19.
Cut out green areas marked, for the exhaust pipe as previously.
20.
Cut out the lateral green areas, for fitting the engine on the wing.
21.
Fit/glue in place on wing. If necessary, snip over the green area so that the engine is a good fit on the
wing.
22.
Repeat for left engine.
Undercarriage
23.
Cut out, roll/glue tyres [20], bend the tip of a tooth-pick 90° (initially wetting if necessary), glue well.
Cut to a total length of 55mm. Push on a 1cm length of rolled axle sleeve [21], Glue end & push in the
red hole under the wing, (near the fuselage) all the way, at an angle about 5° off vertical (backwards).
See Sketch on Sheet 5.
24.
The diagonal tooth-pick is likewise inserted through the green hole, cut to the appropriate length so that
the diagonal is approximately 45° to the vertical axle shaft. Measure length necessary in advance before
gluing., and cover again with a piece of axle sleeve [21]. Lean against the vertical shaft and glue well.
(See Sketch on Sheet 5).
25.
Add the Rear Wheel [6B]. (NOTE: to strengthen, after cutting out and folding the Rear Wheel, insert a
piece of card glued on both sides between the 2 sides of the wheel).
Propellers
26.
Cut out, fold/glue the Props [22] and the Prop Nose Cones [23]. Stick each prop on a tooth-pick and
glue. Add the Nose Cones.
27.
Insert the Prop assembly into the central hole of the engine assembly (shorten the tooth-pick as
required). Glue in position if desired.
Aerials
28.
Cut out, fold/glue and bring in position the 3 aerials [24] on the top of the fuselage in the positions
marked.
---oooOooo---

Wyszukiwarka
Podobne podstrony:
1 72 Short 330 200 Bobs Card Models 2007
Rozwiązanie zadania z fizyki 2 52 Mroszczyk Salach dla szkół ponadgimnazjalnych cz1 ZamKor 2008
1 72 F 89 Scorpion Bob s Card Models 2007
1 72 A 1H Skyraider Bob s Card Models 2007
Rozwiązanie zadania z fizyki 1 52 Mroszczyk Salach dla szkół ponadgimnazjalnych cz1 ZamKor 2008
Junkers Ju 52 3m(1974 11)
Junkers JU 52
Junkers Ju 52
Giełda ju 11
pan wołodyjowski, 15, Nazajutrz dzie˙ by˙a ju˙ Krzysia spokojniejsza, albowiem w˙r˙d popl˙tanych ˙ci
opracowania, Mikro JU cw 1, WIRUSY
opracowania, Mikro JU cw 5, • Flora fizjologiczna człowieka ze szczególnym uwzględnieniem
ju spis
ju II 92
opracowania, Mikro JU cw 2, GRZYBY (Zaremba 313-325 + 340 + 335-336 )
ju II 8
José Albán Juárez
policyjne ju jitsu
ju III 6
więcej podobnych podstron