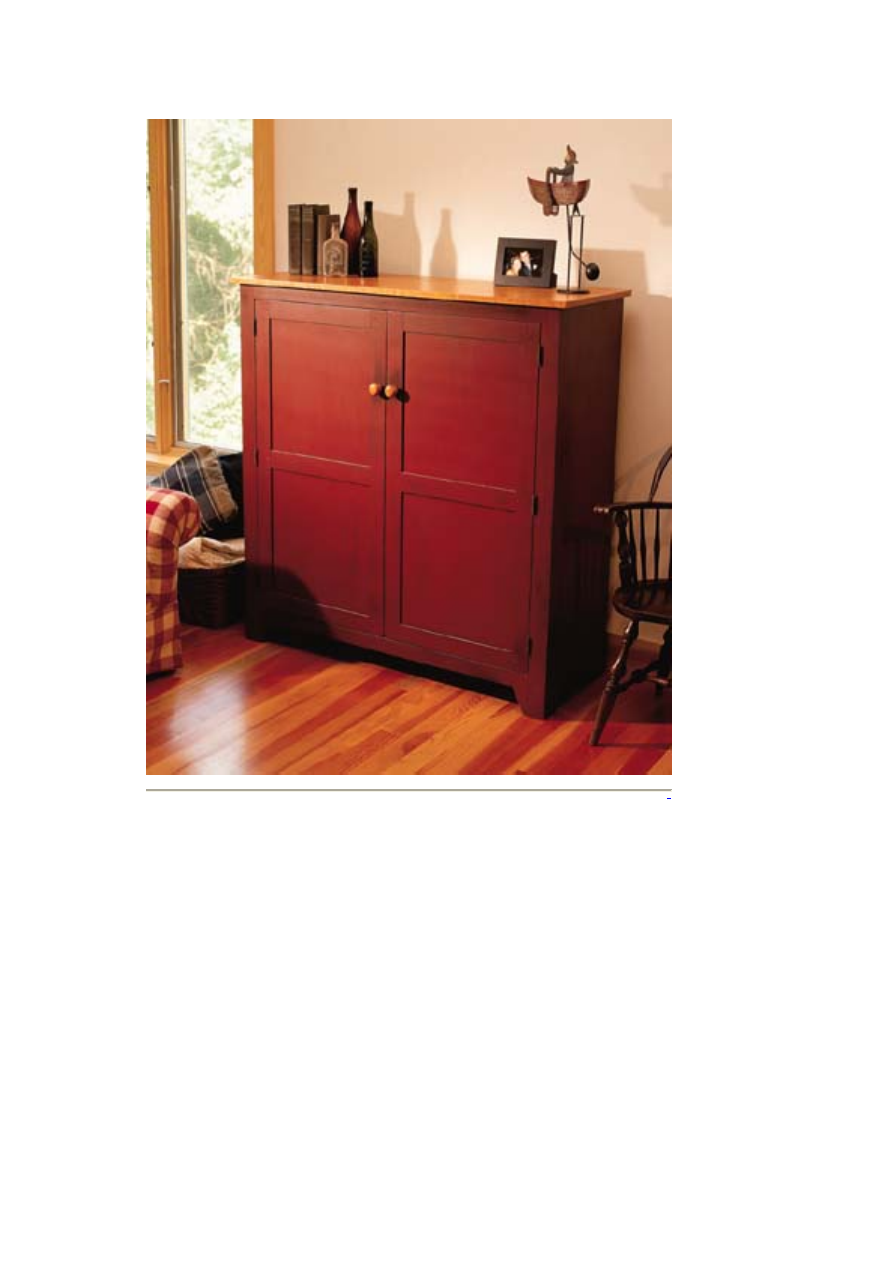

Maximize storage space in any cabinet
with a couple of simple tricks.
The Shakers always had a knack for
packing a lot of storage into a small space
and making it look good. The three-sided
built-in in the Center family residence at
Pleasant Hill, Ky., is a prime example.
You’ve probably seen a photo of it. It’s the
impressive cherry unit that’s in an attic with
a skylight that illuminates all 45 drawers.
It is in that spirit that I designed this two-
door cabinet for a client in Ohio. The family
needed to store an enormous number of
board games and toys in a small space.
The doors had to hide everything.
How to Pack Lots of Stuff Into
Small Spaces
Organizing clutter is an interesting problem
that you also might face as you design
storage in your home or case pieces.
Here’s what I did: Behind the left door I put
a series of five ¾"-thick adjustable solid-
wood shelves. These would handle the
heavier games and books. Behind the right
door is a series of ¼"-thick tempered
Masonite shelves. These 10 shelves slide
in and out of 1/4" x ¼" dados.
The Masonite won’t hold a lot of weight, but
it’s just right for storing lightweight objects.
Think home office, and you’ll know what I
mean. Masonite (sometimes called
“hardboard”) shelves are perfect for storing
letterhead, envelopes, CDs and any other
paper goods in an office. The other
challenge in this piece was getting the
shelves, doors and face frame positioned
so they didn’t interfere with one another. As
you’ll see in the drawings, it took a few
pieces of “blocking” to get everything to
work in this cabinet.
Face Frame First
This seems backwards, I know, but begin
construction by building the face frame. The
size of the case and doors are determined
by your face frame, so it’s clearly the place
to begin.
When ripping out the material for the face
frame stiles, cut them each about 1/16"
wider than the dimension called for in the
cutting list. This will make your face frame
Behind the left door are five 3/4"-thick
adjustable solid-wood shelves, perfect for
heavier games and books. Behind the right
door are 10 1/4"-tempered Masonite
shelves, perfect for storing letterhead,
envelopes, CDs and other home-office
related items.
I’m not perfect, and neither are you. If your
face frame is exactly the width of your
case, it’s going to be difficult to fasten it
square. Make life easier by ripping your
stiles 1/16" oversize in width. After you nail
and glue the face frame to the case, use a
flush-trimming bit in your router to trim the
face frame flush with the side of the
cabinet’s case.
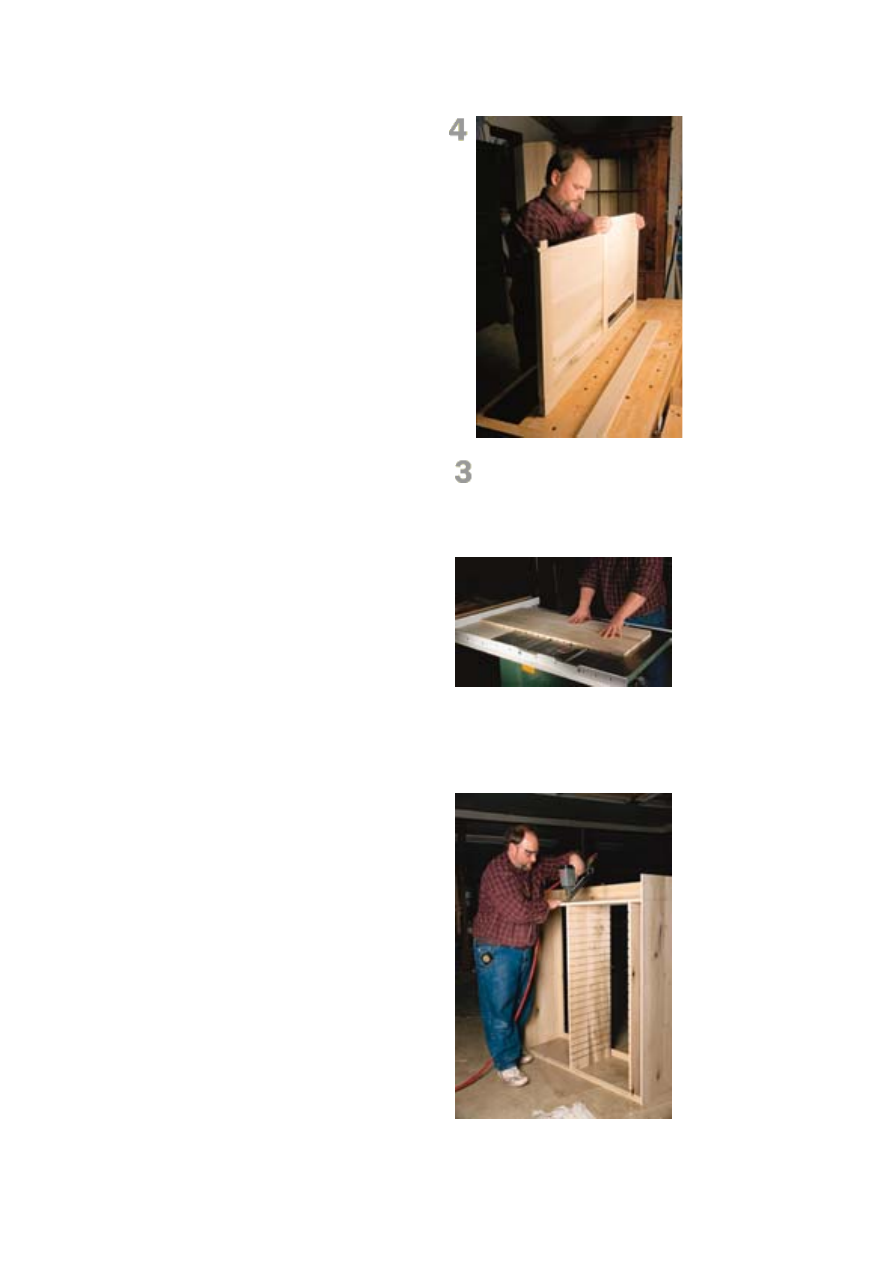
hang over the edge of the case sides. Once
the face frame is attached, you can trim it
flush for a perfect fit.
I use mortise-and-tenon joinery to build
both the face frames and doors. The tenons
are 3/8" thick and 1" long, and I usually cut
a 3/8" to ½" shoulder on the edges. Be sure
to cut your mortises 1-1/16" deep so your
tenons don’t bottom out. When everything
fits, put glue in the mortises, clamp the
frame and allow the glue to cure.
Doors are Second
Next, build the doors. It’s much easier to fit
the doors into your face frame before it’s
attached to the case. Build the doors much
like you did your face frame by using
mortise-and-tenon joints. The only
difference is that you need to cut a 3/8" x
3/8" groove in the rails and stiles to hold the
door panels.
I cut my grooves along the entire length of
the stiles; as a result, I cut my tenons with a
“haunch” to fill in that extra space on the
ends of the stiles. The panels are flat on the
front, and beveled on the backside so they
fit in the grooves in the rails and stiles. I cut
that bevel by setting my table saw blade to
7° and slicing off a little of the backside of
each door until the panels fit snug and
without rattling.
Sand the panels up to your final grit (120
will be fine for a painted piece) and
assemble the doors. Sand the assembled
doors and face frame and then peg the
tenons if you like. I used square pegs that I
pounded into round holes.
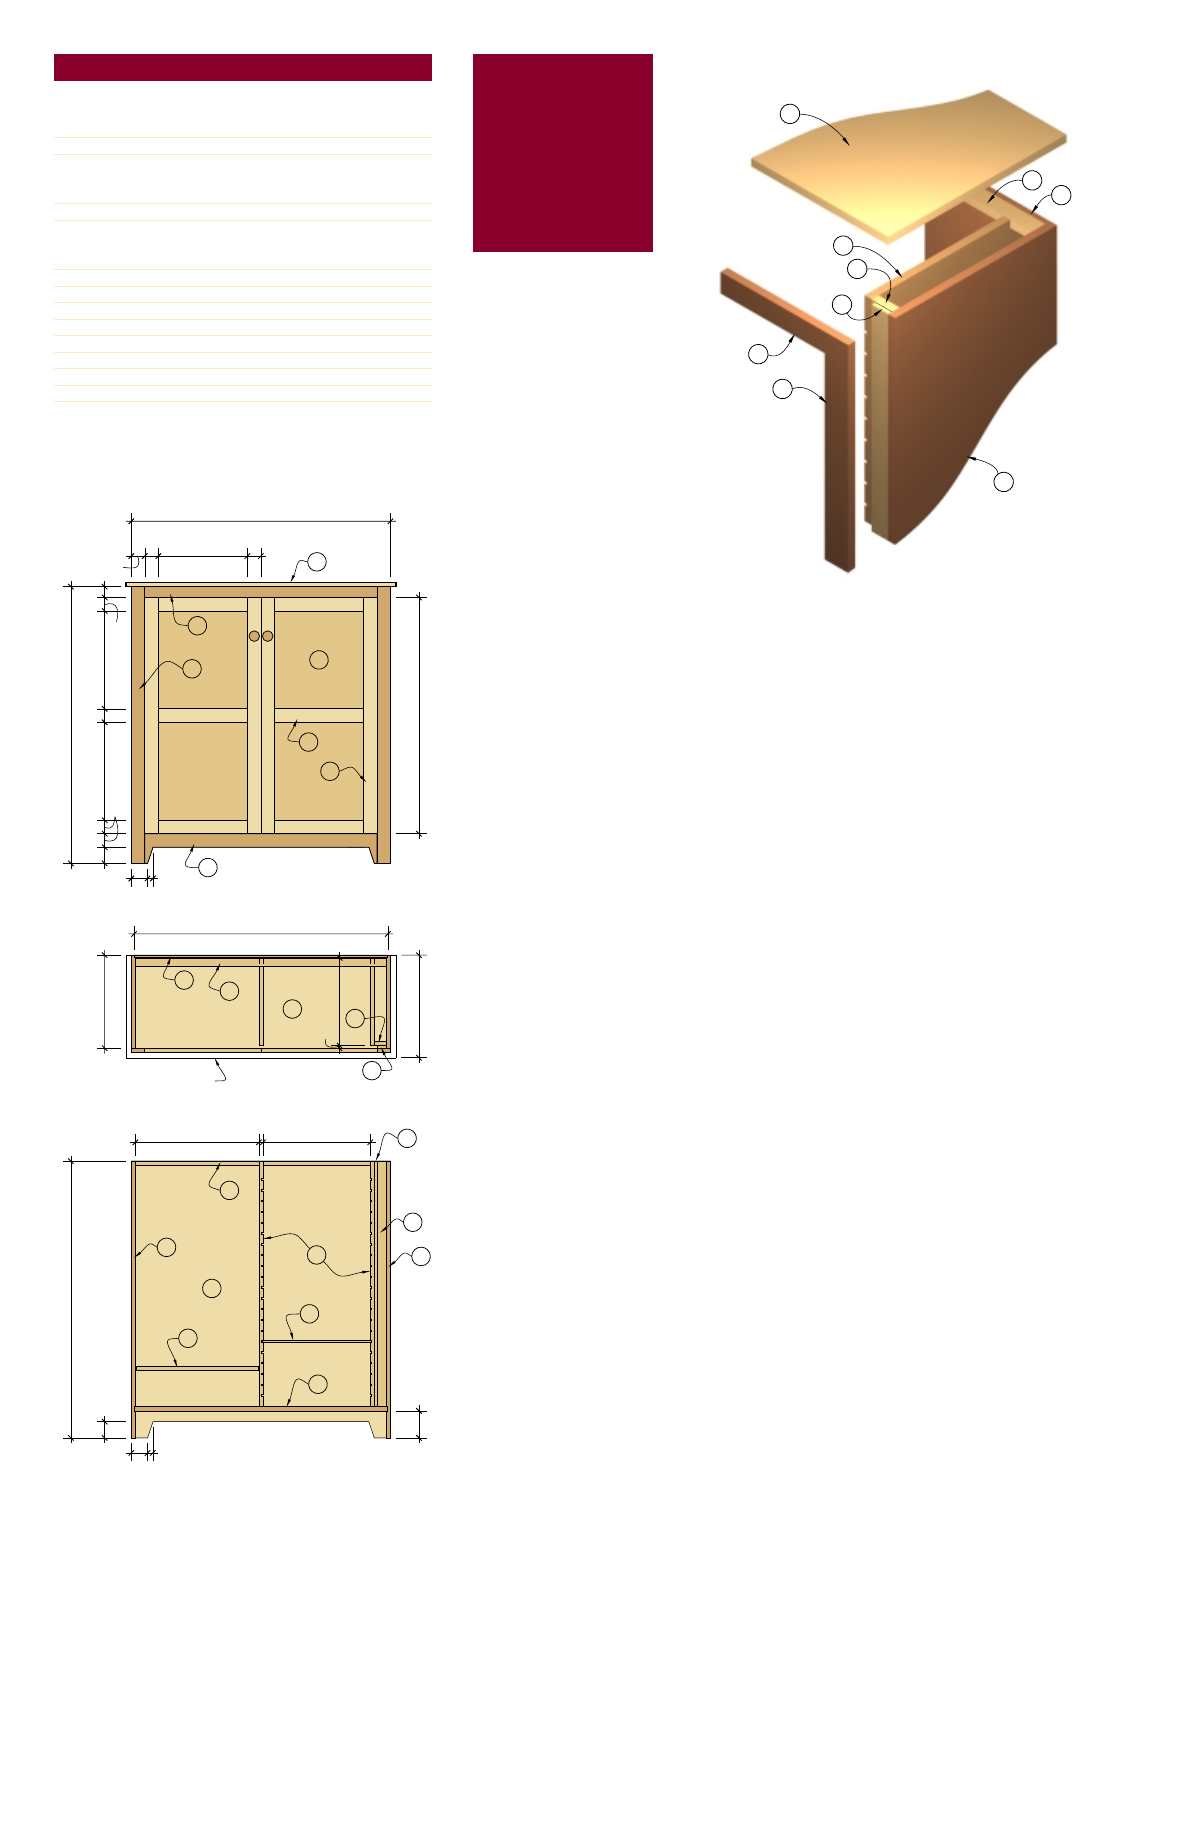
Finally, the Case
The case goes together quickly thanks to
my nail gun. Begin construction by cutting a
¾"-wide by ¼"-deep dado in the side pieces
for the bottom of the cabinet. I like to use a
dado stack in my table saw for this
operation. Now cut a ½" x ½" rabbet on the
back edges of the sides to hold the plywood
back in place. Sand the inside of the case
and get ready for the first bit of assembly.
Put the case together on its back. First put
glue in the dados in the sides and fit the
bottom in there. Nail the bottom in place
from the outside of the case. I use a finish
nailer for this task.
You can see the haunch on the tenons
on the rail closest to the camera.
When it comes to fitting your panels,
remember to work tight in summer and
loose in winter. Panels of this size will
shrink and contract noticeably.
You could use a router and a straight bit to
make this cut as long as you had a reliable
way of guiding the router (such as an edge
guide). I find a table saw is much faster for
this operation.

Now put the nailing strip in place at the top
of the case. The diagrams show you where
this needs to be, but essentially it’s flush
with both the rabbets in the sides and top of
the case. Nail it home. Glue and nail the
face frame to the case using brads. Trim
the face frame flush to the case.
All the Insides
There’s nothing complicated about the
insides once you have a plan. Begin by
cutting the ¼" x ¼" dados in the dividers.
These are spaced 2" apart, and there are
21 of them. I used a dado stack in my table
saw and simply moved the fence 1-¾" after
each pass.
Now it’s time to add the dividers to the
case. Turn the case on its head. Cut a
notch in each divider so it will fit around the
nailing strip. Get the divider right where it
needs to be and nail it in place through the
bottom and the nailing strip. Now nail the
two blocking pieces shown on the diagram
in place. The blocking does a couple things.
First, it allows the Masonite shelves to be
slid in and out without having to swing the
doors wide open. Second, the thinner piece
of blocking fills in the gap between the
divider and face frame and leaves room for
the hinges.
Now drill the holes in the left side of the
case and the center divider for the
adjustable solid-wood shelves. I’m partial to
5 mm holes spaced 1-3/8" on center.
Mark the base cutouts on the sides, front
and plywood back of the case using the
diagrams as a guide. Use a jigsaw to make
these cuts and clean up your work with
sandpaper.
Cut your top to size. I used a piece of
bird’s-eye maple. You have a couple
options for attaching the top. You could use
pocket holes, figure-8 fasteners or wooden
cleats. No matter which way you go,
prepare the case for the top but don’t attach
it. I like to glue the top to the front edge of
the case after finishing.
Finishing
On the knobs, top and all the inside pieces
(except the Masonite), I wiped on a light
honey-colored stain. Then I painted the
case a dark red and added a topcoat of
lacquer to protect the paint. Hang the
Once you nail the dividers in place
through the bottom piece, turn the case
ove
g
r on its feet and nail through the nailin
strip into the dividers.
In addition to cutting this detail on the sides
and front, I also cut it on the bottom of the
plywood back, which gives it a finished
look when the cabinet is viewed from down
low or from a distance.

doors, nail in the back and add the knobs.
The hinges I used to hang the doors are
available at Woodworker's Supply. The
maple knobs I used are available at Horton
Brasses.
I have no idea how the Shakers would feel
about seeing one of their cabinets filled with
“Parcheesi,” “Connect Four” and “Uncle
Wiggly” games. But I’m sure at least they
would approve of the efficient use of space.
PW
Troy Sexton is a contributing editor for Popular Woodworking.
N
I
O
H
P
K
J
K
P
I
L
M
D
C
A
B
E
F
G
48"
16
1
/
2"
2
1
/
2"
2
1
/
2"
2
1
/
2"
2
1
/
2
"
2
1
/
2
"
2"
18
1
/
8
"
2
1
/
2
"
51
1
/
4
"
18
1
/
8
"
3"
3" 1"
43
3
/
4
"
22
7
/
8"
19
7
/
8"
51
1
/
4
"
5"
3" 1"
3"
47"
17
1
/
4
"
19"
16
1
/
4
"
1
/
2
"
M
H
L
Outline of top
L
M
J
B
A
G
K
P
H
N O .
L E T.
I T E M
D I M E N S I O N S ( I N C H E S )
M AT E R I A L
T W
L
Face Frame
❏
2
A
Stiles
3
⁄
4
2
1
⁄
2
51
1
⁄
4
Poplar
❏
1
B
Top rail*
3
⁄
4
2
45
Poplar
❏
1
C
Bottom rail*
3
⁄
4
5
1
⁄
2
45
Poplar
Doors
❏
4
D
Stiles
3
⁄
4
2
1
⁄
2
43
3
⁄
4
Poplar
❏
6
E
Rails*
3
⁄
4
2
1
⁄
2
18
1
⁄
2
Poplar
❏
4
F
Panels
5
⁄
8
17
18
5
⁄
8
Poplar
Carcase
❏
1
G
Top
3
⁄
4
19
50
Maple
❏
2
H
Sides
3
⁄
4
17
1
⁄
4
51
1
⁄
4
Poplar
❏
1
I
Bottom
3
⁄
4
16
3
⁄
4
47
Poplar
❏
2
J
Dividers
3
⁄
4
16
1
⁄
4
45
1
⁄
2
Poplar
❏
1
K
Nailing strip
3
⁄
4
1
1
⁄
2
46
1
⁄
2
Poplar
❏
1
L
Blocking 1
3
⁄
4
2
1
⁄
4
45
1
⁄
2
Poplar
❏
1
M
Blocking 2
1
⁄
2
1
3
⁄
4
45
1
⁄
2
Poplar
❏
5
N
Adj. shelves
3
⁄
4
16
1
⁄
4
22
5
⁄
8
Poplar
❏ 10
O
Masonite shelves
1
⁄
4
16
1
⁄
4
20
1
⁄
4
Masonite
❏
1
P
Back
1
⁄
2
47
51
1
⁄
4
Ply
*= 1" tenon on both ends
SHAKER STORAGE CABINET
SUPPLIES
Woodworker’s Supply
800-645-9292
Amerock non-mortising hinges,
#891-749, $2.95 each
Horton Brasses
800-754-9127
Maple knobs, #WK-3, 1
1
⁄
2
" diame-
ter, call for pricing
Wyszukiwarka
Podobne podstrony:
Cabinet storage tower
Cabinet maple storage cabinet and easel
Cabinet Shaker entertainment center
Cabinet Shaker Style Vanity
Cabinet storage bins
Cabinet Storage Cabinet
Corner Buffet Cabinet(1)
cabinetmakerupho00sher
Corner Cabinet 1
Plan and Install Kitchen Cabinets
bathroom cabinet szafka lazienkowa
Brydcliffe Cabinet
Display Cabinet 2
box taurus cabinets manual
Display Cabinet 3
Atlantic E New IP66 Cabinet id Nieznany
Mobile File Cabinet
I Ogólnopolski Kongres Naukowo Szkoleniowy CABINES Polska ~Dermatologia w kosmetyce i kosmetologii~
constitution of cabinet commitee on uidai 2009
więcej podobnych podstron