
Building a Workbench
Your workbench is the heart of your shop. It should match your space and the type of work you do.
The bench should be at a comfortable height for you and your work piece. If you haven't been able to
find a bench that's right for you, try custom building your own. Lowe's is happy to provide this
information as a
service
to you.
Determining Size and Dimensions
Most workbenches range from 28" to 36" deep, 48" to 96" wide and 28" to 38" tall. The amount of
space you have usually dictates a bench's depth and width. Size your bench so you can move material
and equipment past it freely. Find a good working height— you'll probably spend a good deal of time
at the bench so it's important to be comfortable there. Everyone's measurements will vary; for clarity
we used 30" for depth, 60" for width and 34" for height. You can use our measurements or click
here
for formulas to customize your bench.
Tools
• Circular saw
• Drill/driver with bits
• Belt sander or hand plane
• Wood clamps
• Measuring tape
• Dust mask
• Safety goggles
Materials
• 2x4 lumber
• 2x8 lumber
• 1 sheet 1/2" plywood
• 16- 3/8"x4" carriage bolts with
washers and nuts
• Wood glue
• 3" wood screws
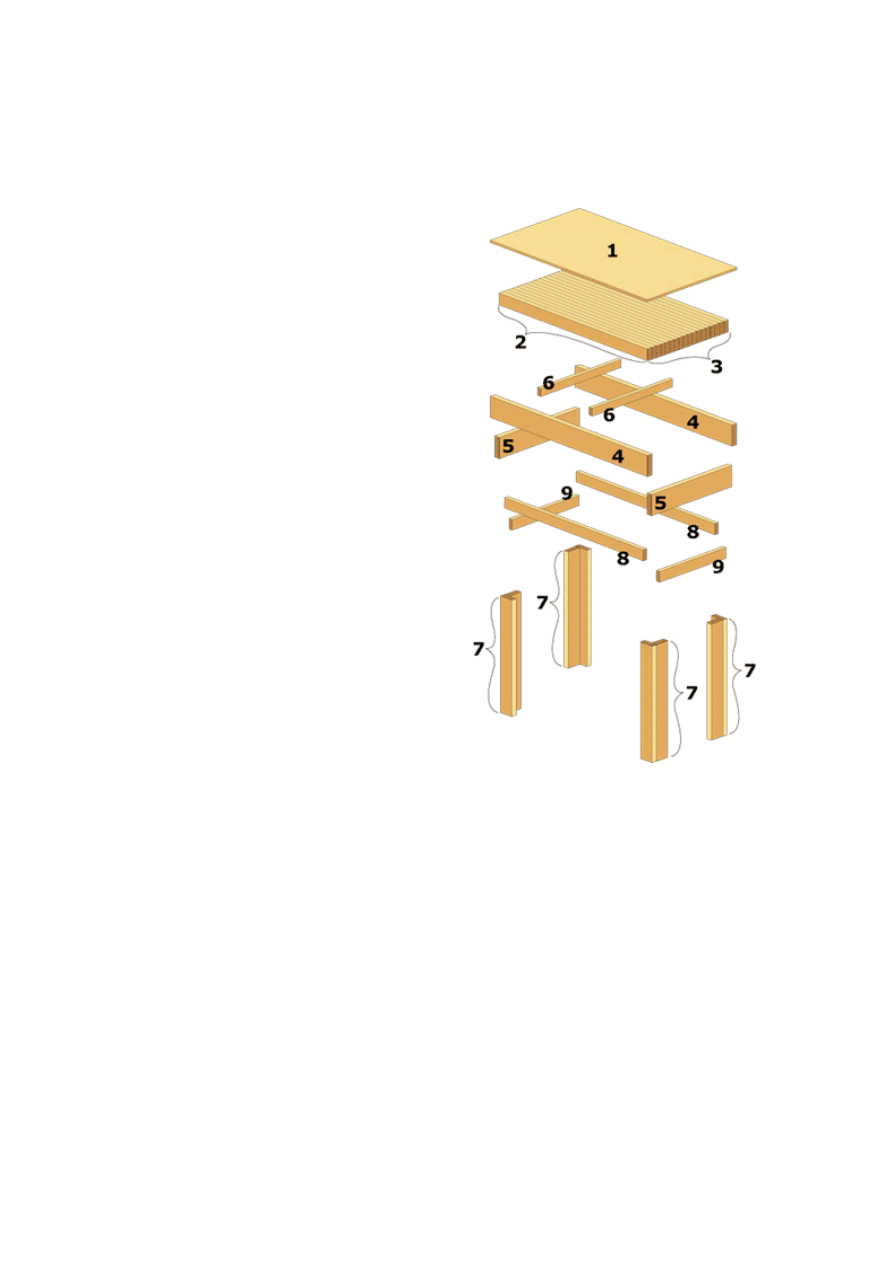
Cut list
Cut the pieces, using the measurements below or your own
custom measurements.
• 1- 1/2" plywood cover — 60" by 30"
• 18- 2x4's for the top substrate — 57"
• 2- Long 2x8 top rails — 60"
• 2- Short 2x8 top rails — 27"
• 2- 2x4 rail stretchers — 27"
• 8- 2x4 leg pieces — 30"
• 2- Long 2x4 bottom rails — 54"
• 2- Short 2x4 bottom rails — 21"
Assembling the Bench
1.
2.
Face-glue and clamp the 2x4's for the
top substrate so they give the
appearance of a butcher-block top. The
substrate gives the bench strength and
stability
.
3.
Use a belt sander or hand plane to
flatten the top of the substrate.
4.
Lay the substrate out, top side down. Align the short 2x8 top rails flush with the short sides of
the substrate and use 3" wood screws to secure the rails to the substrate.
5.
Align the long 2x8 top rails with the long sides of the substrate. The ends of the long top rails
should be flush with the outside face of each short top rail. Secure the long top rails to the
substrate with 3" wood screws.
6.
Insert the rail stretchers between the long rails, positioned 1/3 of the way in from each end of
the bench. Drive 3" wood screws through the
long rails into the ends of the rail stretchers.
7.
8.
Construct four leg assemblies. Butt the edge of
one 2x4 leg piece to the face of another and
line the ends up flush. Screw the leg pieces
together with 3" wood screws.
9.
Set the legs inside the corners where the long
and short top rails meet. The joints between
the leg assemblies should be visible from the
short sides of the bench. Bore 3/8" holes
through the top rails and legs
.
Insert 3/8" x 4" carriage bolts from the outside face of the top
rails through the leg pieces. Install a washer and nut on the backside of each carriage bolt and
tighten.
10.
Measure 12" from the bottom of each leg and mark. Align the tops of the long 2x4 bottom
rails flush with the marks and use 3" wood
screws to secure the rails to the legs.
11.
12.
Insert the short 2x4 bottom rails between the
long 2x4 bottom rails. The outside face of the
bottom rail should butt to the inside face of the
leg. Secure the short rails to the legs with 3"
wood screws.
13.
Stand the workbench right side up. The bench
will be heavy, so have someone help you.
Align the edges of the 1/2" plywood top flush
with the edges of the bench. Secure the top to
the substrate with 1" flathead screws. If the
plywood top is damaged later, it's a simple task to remove and replace it.
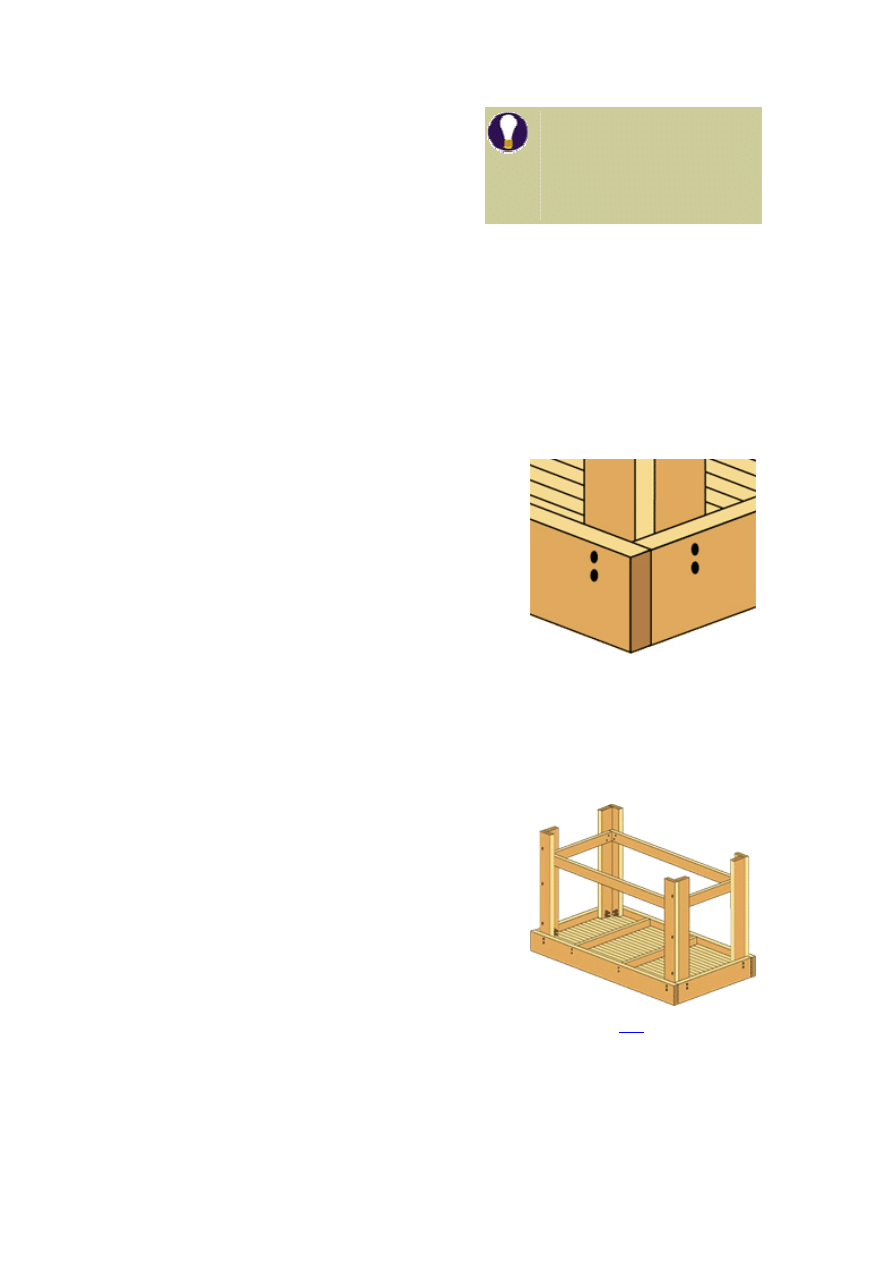
Good idea:
Glue the 2
in sets of five. After all
the sets have cured, glue
them together to create
the full top substrate
assembly.
x4's
Detail of carriage bolt installation.
The bench after steps 1 through 9 are
complete. Click
here
for a larger version
of this image.
Position the bench in your workspace and use it for all your projects.
Formulas for Sizing Workbench Parts
Below are the formulas we used to determine the size of our workbench parts. Use them to customize
the bench to your own needs. We've included our
dimensions as examples.
1.
Plywood cover for the top.
The dimensions of the plywood cover for the
top are equal to the overall width by the
overall depth.
Example:
60" by 30" 1/2"
2.
Length of 2x4's for the top substrate.
Overall width - 3
Example:
60-3 = 57"
3.
Number of 2x4's for the top substrate
.
(Overall depth - 3) ÷ 1.5
Example:
(30-3) ÷ 1.5 = Number of 2x4's for the top
27 ÷ 1.5 =18
4.
Length of Long 2x8 top rails.
Overall width
Example:
60 = 60"
Regardless of other dimensions the bench will
require two long 2x8 top rails.
5.
Length of short 2x8 top rails.
Overall depth -3
Example:
30-3=27"
Regardless of other dimensions the bench will require two short 2x8 top rails.
No matter the size of the bench you are building,
you'll need all 20 of these pieces (top substrate
counted as 1 piece) to complete this project.
6.
Length of 2x4 rail stretchers.
Overall depth - 3
Example:
30-3= 27"
The bench should have at least two rail stretchers, positioned 1/3 of the way in from each edge
of the bench.
7.
Length of 2x4 legs.
Overall height - 4
Example:
34-4=30"
Regardless of other dimensions the bench will require eight 2x4 leg pieces.

8.
Length of long 2x4 bottom rails.
Overall width - 6
Example:
60-6=54"
Regardless of other dimensions the bench will require two long 2x4 bottom rails.
9.
Length of short 2x4 bottom rail.
Overall depth - 9
Example:
30-9= 21"
Regardless of other dimensions the bench will require two short 2x4 bottom rails.
Wyszukiwarka
Podobne podstrony:
Garden Work Bench
Build a Work Bench
Catia Sketcher Work Bench (lesson 1)
Work Bench 1
Work Bench 2
M 5190 Long dress with a contrast finishing work
policy work dev
120222160803 english at work episode 2
121024104303 bbc english at work episode 37
23 299 318 Optimizing Microstructure for High Toughness Cold Work Steels
46 643 656 Vacuum HT of Hot Work Steel
130107151016 bbc english at work episode 48 final
Hollandus J I A Work of Saturn
potting bench
Knockdown Work Support
Arbor Bench id 67571 Nieznany
więcej podobnych podstron