
OPTIMIZING MICROSTRUCTURE FOR HIGH
TOUGHNESS COLD-WORK TOOL STEELS
D. Viale, J. Béguinot, F. Chenou and G. Baron
USINOR INDUSTEEL
Abstract
Increasing toughness and machinability at given high level of wear resistance
are consistently growing requirements for cold-work tool steels. Improv-
ing microstructure characteristics, especially coarse carbides distribution and
their chemical composition, reveals an appropriate way to meet such require-
ments. Referring to the archetypal cold work tool steel AISI D2, an improve-
ment of coarse carbides hardness by higher alloying with strong carbides
formers allows a moderate reduction of their volume fraction, resulting in
increased toughness and machinability performances. Also, the increase of
ultimate resistance of surrounding matrix by improved secondary hardening
preventing premature pulling off of carbides in service contributes to longer
service life, while reasonably increased silicon content leads to still better
machinability. A further step towards increased toughness and machinability
may result from slightly refining the coarse carbides sizes through moderate
addition of fine titanium nitrides acting as precipitation promoters for M
7
C
3
type carbides.
INTRODUCTION
Cold-work tool steels have been developed and used for more than a
century and have been designed, mainly on an empirical basis [1] in order
to cope with a large variety of often contradictory properties, among which
:
high strength level to resist against permanent deformations resulting
from high levels of applied stress
wear resistance during use, including abrasive wear, adhesive wear,
surface fatigue
299

300
6TH INTERNATIONAL TOOLING CONFERENCE
toughness (fracture resistance and also fatigue resistance)
dimensional stability during application (thermal treatment and sub-
sequent use)
uniformity and isotropy of microstructure
acceptable machinability, at least in the annealed state
acceptable corrosion resistance, especially against pitting corrosion in
some demanding applications
acceptably limited susceptibility to excessive hardening and associ-
ated crack sensitivity in thermal affected zones, related to EDM and
weld deposits.
Conventional cold-work tool steel such as 12 % chromium, 1,5 % carbon
(AISI D2 type) have long proved to be a satisfying solution especially re-
garding an equilibrated answer between deformation, wear and corrosion
resistances and dimensional sensibility. On the other hand, the high vol-
ume fraction (∼ 10 to 15 %) of coarse (∼ 20 µm) eutectic M
7
C
3
carbides
in these steels is largely responsible for low levels of toughness since these
carbides are intrinsically prone to easy cracking and contribute thus to ex-
cessive sensitivity of steel to fracture initiation and propagation. Times
going on, with steadily increasing deformation stresses applied to working
material, it appeared that insufficient toughness becomes far more a cause
of failure of tools with AISI D2 type steels than was an insufficient wear
resistance. Accordingly, increasing demands from tool manufacturers and
end users became in favour of improved fracture resistant cold work tool
steels. In this respect, and considering the major detrimental role of coarse
eutectic M
7
C
3
chromium- molybdenum carbides on the generation cracks
during use, it seems quite logical to try to modify the steel composition of
D2 type steel in order to decrease the volume fraction of these eutectic car-
bides, and in this scope, to reduce significantly the carbon and chromium
contents which govern, in major part, this volume fraction. On the other
hand, as these carbides contribute strongly to the wear resistance, it seems
necessary to compensate their lower volume fraction by a still higher intrin-
sic hardness. This is likely to be obtained by a significant enrichment of
strong carbides-forming elements like molybdenum and even, if necessary,

Optimizing Microstructure for High Toughness Cold-Work Tool Steels
301
by a complementary contribution of very strong MC carbides forming ele-
ments such as vanadium or niobium, which are in moderate content in D2
type steels. In addition, the higher bulk content of strong carbides-forming
elements may also contribute to improve wear resistance of the steel through
their residual contents in the matrix. The stronger secondary precipitation
of Mo, V, Nb-enriched fine carbides should make the matrix itself more
resistant to wear solicitations and thus reinforce the ability of the matrix
to resist to the pulling off of the coarse carbides during service, in severe
conditions. Also, to limit in an other way the detrimental effect of coarse
carbides on steel toughness, it seems as possibly useful to retain a mini-
mum quantity of austenite (even after moderate tempering) embedding the
coarse carbides. Ductile austenite acts as a mean to reduce stresses concen-
trations around these carbides during use and, by the way, the solicitations
for premature cracking. At this point of view, sufficient silicon addition,
which increases carbon solubility in austenite and thus acts indirectly as an
austenite stabilisating factor, may be considered (silicon is also interesting
for its generally recognised beneficial role on machinability answer). Even-
tually, the alloys equilibrium for such a newly designed tool steel, especially
regarding chromium and carbon contents, should be preferably optimised
regarding dimensional stability of the steel and also referring to corrosion
resistance. Here, it is not the bulk alloys contents but the contents in the
matrix, as depleted in carbon and carbides formers by the previous precip-
itation of eutectic carbides, which has to be considered. As D2 type steels
may be considered as fairly well optimised regarding dimensional stability,
the trend should be that the matrix composition of the new steels lay close
to that of D2 matrix. As concern corrosion resistance, the parallel decrease
of the bulk contents of chromium and carbon may lead to a substantially
unchanged level of passivating soluble chromium in the matrix. In addi-
tion, the significant increase of both bulk and solute molybdenum content
is intended to promote a higher pitting corrosion resistance [2]. As regard
other properties, lowering carbon content looks positive as a way to reduce
excessive hardening and crack sensitivity of thermal affected zones, along
EDM cuts or welding deposits. Considering machinability, things are a lot
complex since reduced volume fraction of carbides looks favourable and, on
the other hand, higher enrichment of carbides with molybdenum and vana-
dium/niobium looks unfavourable. At least for the specific steel conception
presented hereafter, the balance reveals positive with significant improve-

302
6TH INTERNATIONAL TOOLING CONFERENCE
ment of machinability observed in practice, both in annealed and end-treated
conditions. Incidentally this positive balance between contradictory effects
of reducing volume fraction and increasing intrinsic hardness of carbides is
in agreement with similar observations on quite different types of steels [3].
These metallurgical trends had substantiated considerable work, especially
among Japanese researchers, for example MATSUDA and SUDOH, and
were at the origin of the so called "8 % Cr. – 1 % C" new generation of cold
work tool steels. The "core composition" of this new concept is: 1 % carbon,
8 % chromium, 2.5 % molybdenum, 0.2% to 0.6% V + Nb/2, 1 % silicon, to
be compared to the typical composition of AISI D2 type steel: 1.5 % carbon,
12 % chromium, 0.8 % molybdenum, 0.25 % vanadium, 0.3 % silicon. This
evolution of alloy composition puts in a concrete form the application of
the metallurgical trends described above. Several tool steels manufacturers
subsequently derived a lot of variants, around this central concept.
TOWARDS A STILL FINER AND REGULAR
DISTRIBUTION OF COARSE EUTECTIC CARBIDES
MICROSTRUCTURE
Undoubtedly, the reduction of coarse eutectic carbides volume fraction
acts decisively for improvement of the cold work tool steels toughness, ac-
cording to the new concept [4]. But the accompanying decrease of coarse
carbides average sizes (reduced to ∼ 5 – 10 µm as compared to ∼ 15 –
20 µm for D2 type steels) is likely to play also a significant role in this re-
spect [5]. Indeed, refining the microstructure and especially coarse carbides
sizes proves very efficient, for example when comparing results obtained by
powder metallurgy and by conventional processes, applied to the same steel
composition with similar hot rolling ratios. Unfortunately, specific steel
making routes, such as powder metallurgy, remain quite expensive. How-
ever, from laboratory and industrial experiments, it was recently observed
than it is possible to improve the microstructure and toughness through spe-
cific micro-additions. Namely, the addition, in small contents, of elements
of the titanium family, in the melt prior to casting, under severely controlled
conditions, proves to be efficient in this respect. This refining effect is ten-
tatively attributed to an indirect consequence of the fine precipitation of
small titanium nitrides directly in the melt, according to the very high ther-
mal stability of these compounds. These fine nitrides particles in spite of

Optimizing Microstructure for High Toughness Cold-Work Tool Steels
303
Table 1.
Chemical analysis
C
Mn
Cr
Mo
V
Others
X160Cr Mo V12 / D2
1.55
0.35
11.75
0.75
0.95
—
TENASTEEL
1.0
0.35
7.5
2.6
0.3
Ti
their buoyancy in the melt, may act as promoters for carbides precipitation,
accordingly making carbides more numerous and consequently finer. In
fact this hypothetical mechanism would, logically, more readily address the
precipitation of primary carbides stricto-sensu rather than the more delayed
precipitation of eutectic carbides considered here. However, whatever be the
actual mechanism involved, the average size observed for eutectic carbides
was 3.3 µm to be compared to 6–7 µm without titanium addition. Tough-
ness was correspondingly improved from 20 % to near 40 % depending on
thermal treatments applied.
METALLURGICAL CONCEPT FOR THE
DEVELOPMENT OF THE NEW COLD WORK TOOL
STEEL OF USINOR INDUSTEEL : TENASTEEL
According to the previous considerations, the TENASTEEL differs from
standard grade X160 Cr Mo V12 / D2, Table 1, by 3 main points :
decreasing in the carbon and chromium contents ⇒ increasing of the
toughness
increasing of the molybdenum content to keep quenchability, hardness
and wear resistance
addition of titanium to refine the structure through fine precipitation
of titanium nitrides.
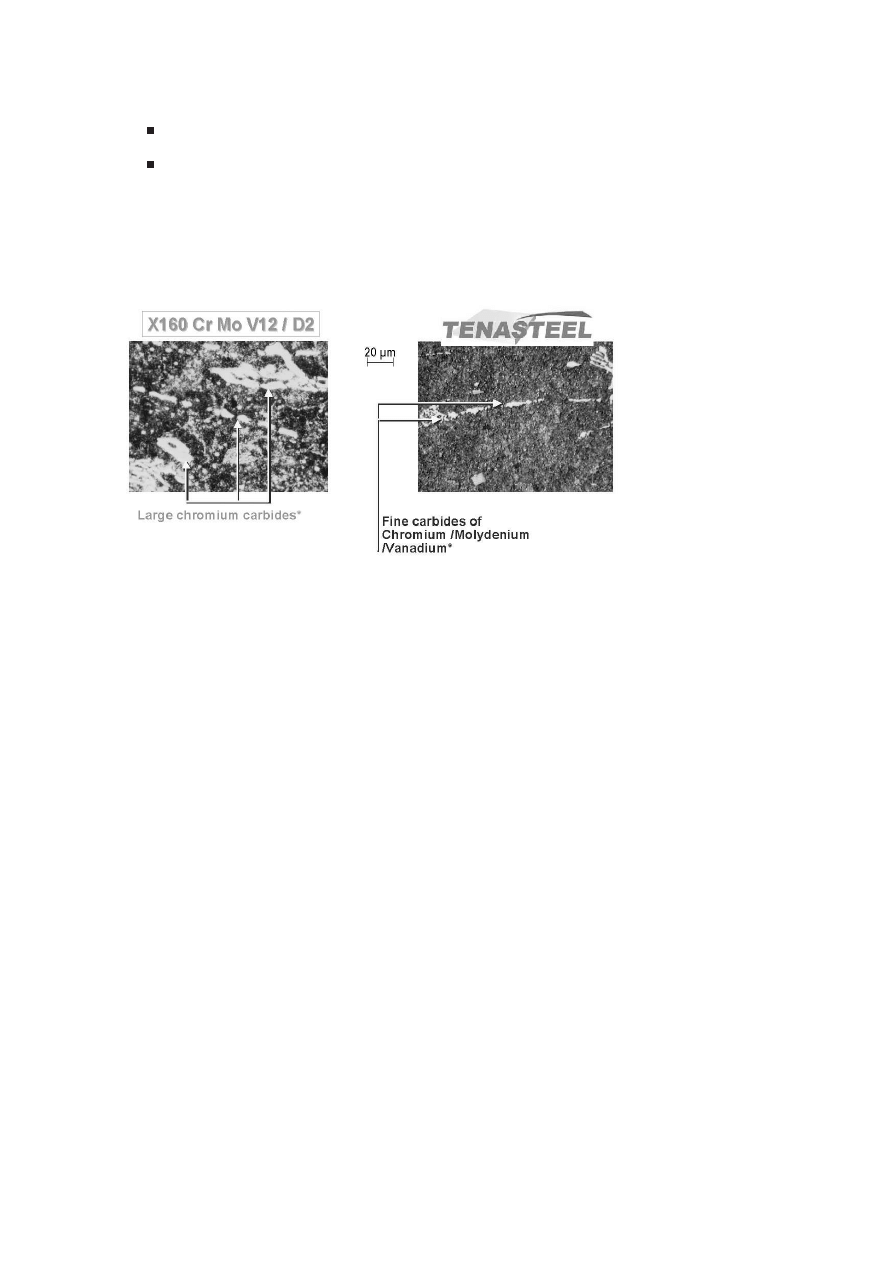
High chromium and carbon contents always induce formation of coarse
eutectic chromium carbides (Fig. 1) effective in term of wear resistance,
but principal causes of brittleness of steel X160 Cr Mo V12 / D2 type.
The concentration of these large carbides will be even more intense at mid
thickness of the products (segregated lines). Conversely, a low carbon and
chromium content guarantees:
304
6TH INTERNATIONAL TOOLING CONFERENCE
a much more finer carbide distribution (Fig. 1)
a better homogeneity in the thickness.
These are very good things to improve the toughness, the machinability or
the polishability of steel.
Figure 1.
Structures of D2 and TENASTEEL
Moreover, a characterisation of the precipitates in the D2 and TENAS-
TEEL grades was carried out by electron microprobe analysis. In the D2
grade steel, there is only one carbide type with the M
7
C
3
stoechiometrie.
Of course, the Table 2 shows that it is chromium carbide with a little bit of
vanadium, molybdenum and iron.
In the TENASTEEL, we can find this chromium carbide so, but moreover
there are molybdenum carbides (M
23
C
6
type) and titanium carbo-nitrides
(M
4
(C,N
3
)) type). The substitution of chromium carbides by molybdenum

Optimizing Microstructure for High Toughness Cold-Work Tool Steels
305
Table 2.
Chemical composition of the carbides precipitates in D2 and TENASTEEL grade
Atomic %
C
Si
Mn
Cr
V
Mo
Ti
Fe
D2 M
7
C
3
31,33
0,01
0,32
34,64
5,26
0,85
/
27,55
TENASTEEL M
7
C
3
31,91
0,03
0,36
31,01
3,14
3,82
0,09
29,64
TENASTEEL M
23
C
6
20,73
4,55
0,17
7,22
1,45
30,21
0,25
35,39
TENASTEEL M
4
(C, N
3
)
0,33
0,03
0,55
4,09
1,35
39,5
1,98
carbides gives a good wear resistance to the TENASTEEL because of their
hardness (Mo carbides: 1800 HV, Cr carbides: 1500 HV).
HEAT TREATMENTS AND MECHANICAL
PROPERTIES OF TENASTEEL
To obtain the mechanical characteristics on a given steel, with a good
compromise between strength and toughness, it is essential to optimize its
metallurgical structure as well as the size, the distribution, the density, the
homogeneity of the carbides which it contains. This double aim can be
achieved by an adapted composition, as it is the case for TENASTEEL, but
that is not enough. The mechanical characteristics of a steel with a given
composition can be widely improved by the heat treatments which it will
undergo. While influencing its structure, they will be able to increase or
decrease the strength of metal and decrease its brittleness. A heat treatment
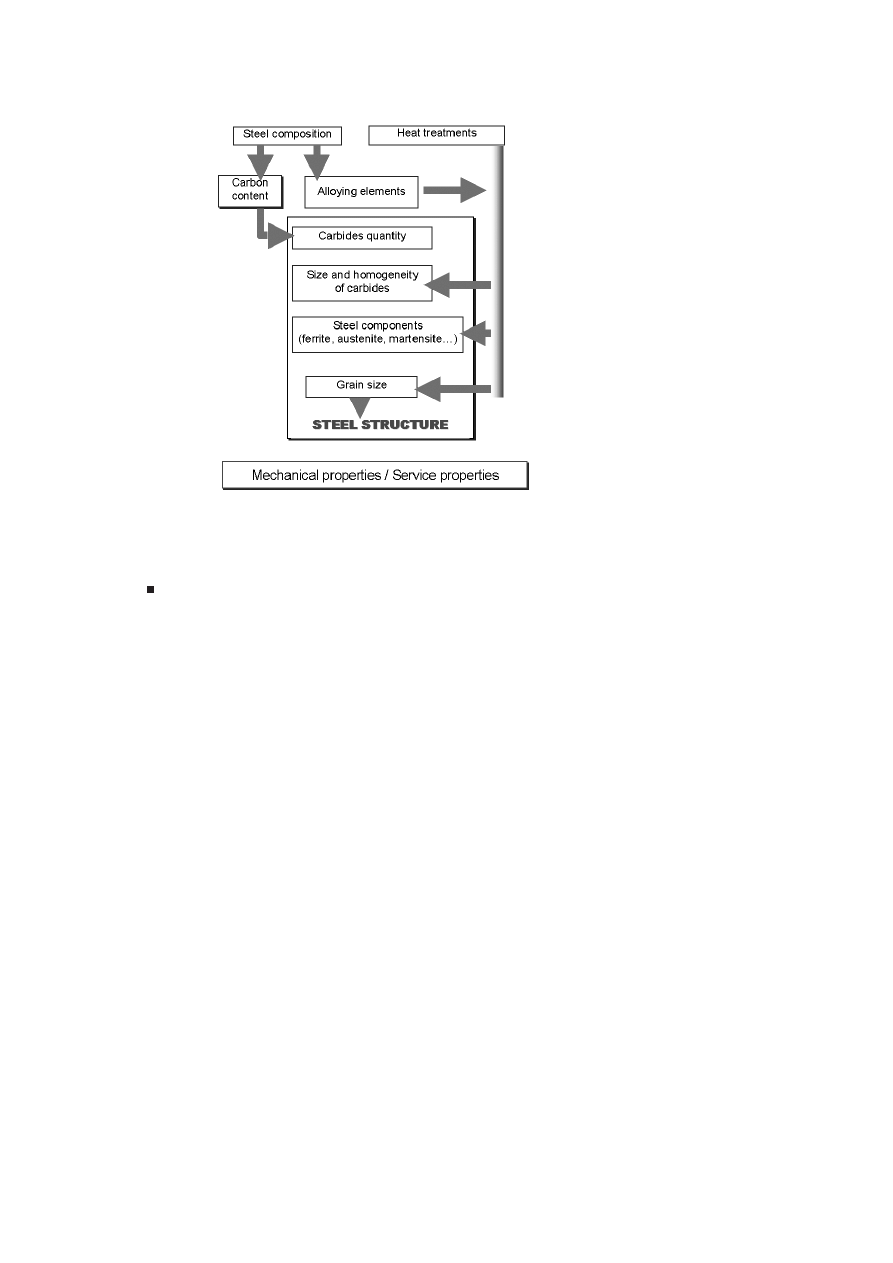
does not change the chemical composition of metal, but it modify (Fig. 2) :
its structure by controlling of carbide precipitation (size, distribu-
tion…) as well as the control of the nature and the proportion of the
components (ferrite, austenite, martensite…) ;
the mechanical equilibrium in the metal (internal stress, expansion…).
Technically, a heat treatment is defined by a variation in temperature
according to time. A thermal cycle practised on steel can be divided into
three distinct stages :
a reheating to the desired temperature ;
a stage at the temperature defined according to the practiced heat treat-
ment, and depending on its final purpose (homogenization, hardening,
softening, increase in ductility, internal stress relaxation…)
306
6TH INTERNATIONAL TOOLING CONFERENCE
Figure 2.
Incidence of the structure on the steel properties.
a cooling speed will fix the structure of metal in terms of components
and precipitation where the several speeds of cooling can follow one
another before reaching the temperature of end of processing.
The implementation of the heat treatments thus requires the comprehension
of the principal phenomena involved i.e. especially for tool steels, precipita-
tion and dissolution of carbides, as well as the evolution of structures, their
transformations and conditions under which they occur. In order to facilitate
its machining, TENASTEEL is delivered in annealed condition to give a low
hardness structure. Softened steel can be formed, but a heat treatment will
be then necessary to give the final mechanical characteristics to the pieces.
It is a quenching to harden the metal followed by temperings to eliminate
its brittleness and to increase its toughness. The processing of hardening
consists in:

Optimizing Microstructure for High Toughness Cold-Work Tool Steels
307
slow heating, to limit deformation and to avoid cracking (due to
stresses) up to a temperature just below AC1, then holding (time de-
pending on thickness) to homogenize the temperature through the
whole thickness. Then, re-heating up to austenitization temperature
(>AC3) ;
holding at austenitization temperature to get an homogeneous temper-
ature in the whole piece, to transform the steel into austenite and to
dissolve a maximum of carbides previously formed ;
cooling in an adapted cooling medium to get a martensitic structure.
In order to get a martensitic transformation, it is necessary to have a
cooling speed higher than critical quenching rate of the steel (minimum
speed allowing cooling without transformation into ferrite-pearlite).
The lower the critical quenching rate is, the more steel will be able to harden
deeply. The hardenability of a steel depends primarily on its chemical com-
position. All the alloy elements, except cobalt, tend to increase hardenability.
The TENASTEEL exhibits a critical quenching rate relatively low. Its hard-
enability is comparable with that of steel D2. After hardening, the structure
of steel is not completely martensitic, there remains a part of austenite called
retained austenite, and carbides. The more the steel is alloyed and the larger
the temperature and time of reaustenitization are, the more there is retained
austenite. This complex structure shelters internal stresses which increase
the brittleness of the steel. To decrease the harmful effects of hardening, a
new heat treatment will be perform on the pieces : the tempering which con-
sists in carrying them at a temperature lower than AC1, to avoid modifying
the crystalline iron (α) structure, then to cool them quickly. The reheating
of martensite tends to bring back it in a state of balance because the carbon
is rejected out of the structure and precipitates to give iron ε carbide (Fe
2
C)
and cementite (Fe
3
C). This precipitation is accompanied by a contraction of
metal and by a reduction in hardness (internal stress relaxation).
This softening due to the transformation of martensite, is attenuated by a
hardening caused by the transformation of retained austenite in secondary
martensite or bainite during cooling ; this reaction is accompanied by an
expansion of metal. A second tempering is generally practiced to transform
this new martensite. Lastly, during temperings carried out at high tempera-
ture (starting from 500
◦
C ), a secondary hardening is also produced by the
special carbides precipitation : vanadium and molybdenum carbides in the

308
6TH INTERNATIONAL TOOLING CONFERENCE
case of TENASTEEL. This new hardening is also accompanied by an ex-
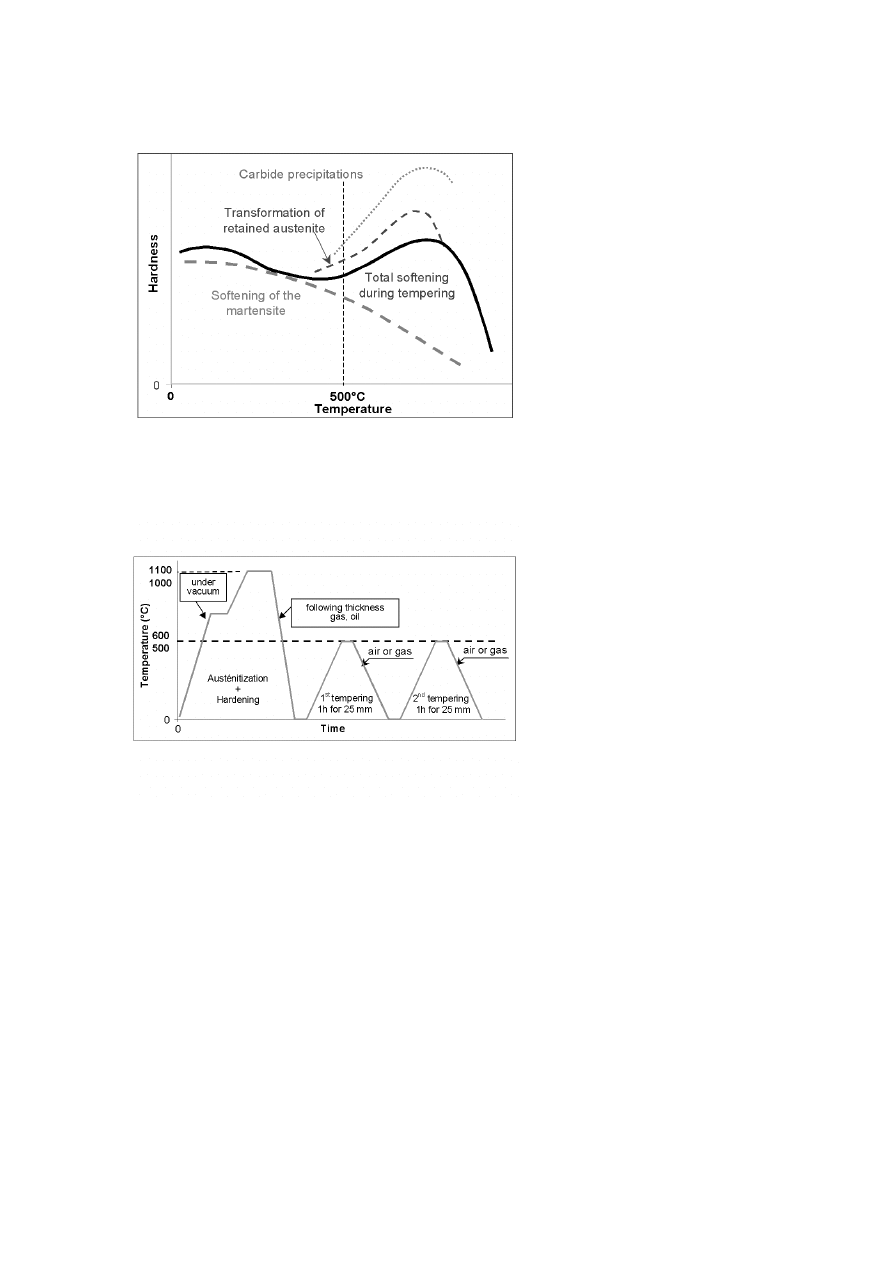
pansion of metal. In summary, softening with tempering results from several
simultaneous phenomena (Fig. 3):
the softening of martensite (primary then secondary)
the transformation of residual austenite
the special carbide precipitation if the tempering is carried out at high
temperature.
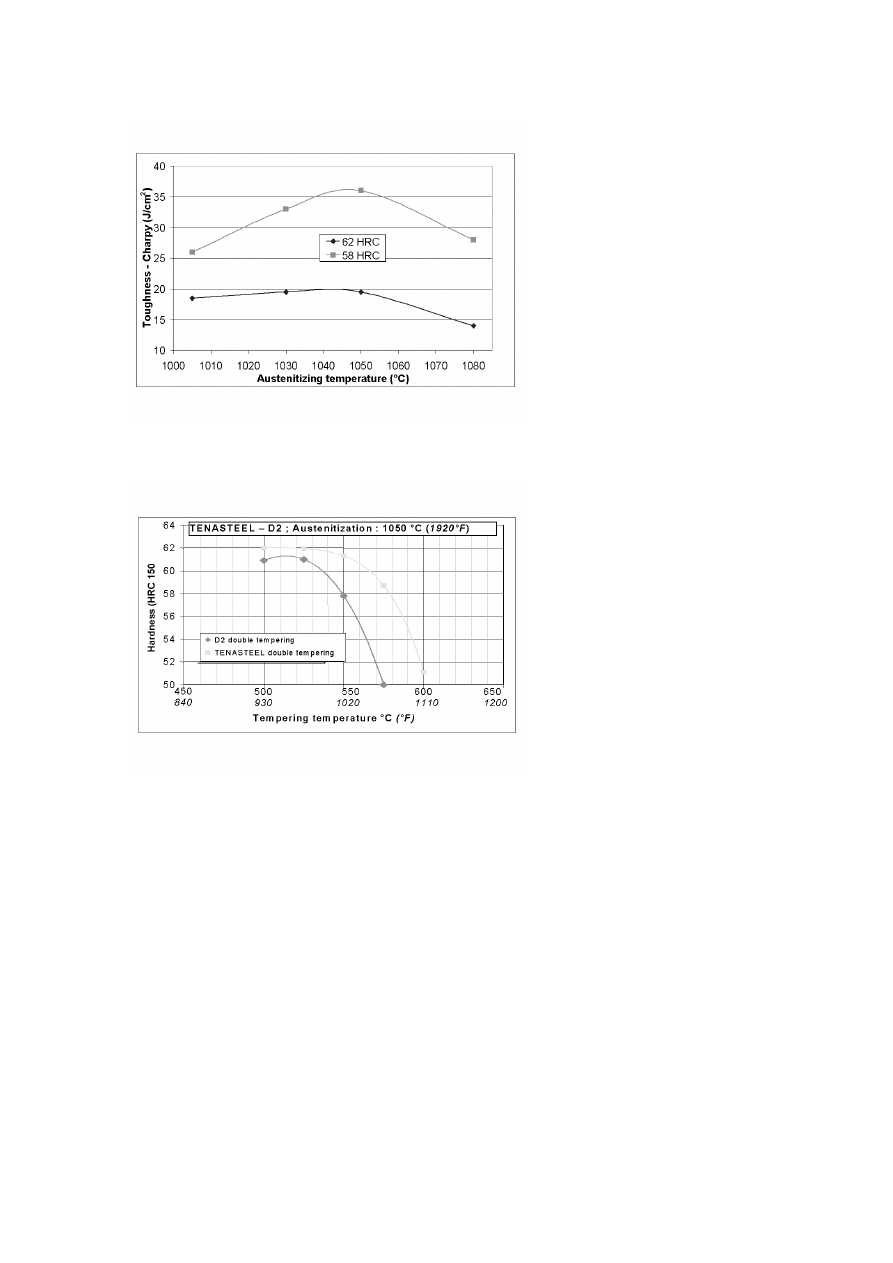
The thermal cycle of hardening - tempering to TENASTEEL takes into
account of these metallurgical considerations as schematised Fig. 4. The
reheating of austenitization will be practiced under vacuum, or at least in a
controlled atmosphere to prevent the risks of decarburization of steel. The
temperature of reaustenitization can be selected between 1000 and 1100
◦
C .
The hardness evolution of TENASTEEL after complete heat treatment is
shown on Fig. 5 according to austenitizing and tempering temperatures. It
should be noted that this very great interval of austenitizing temperatures
makes it possible to be compatible with the temperatures usually used for
many other steels (D2 in particular). This allows an optimization of furnace
productivity, and thus a reduction of the costs of heat treatment, as well as a
reduction of the risks of errors related to the non-observance of austenitizing
temperatures.
Whatever the austenitizing temperature, a hardness range between 58
and 62 HRC (standard of use for this type of steel) can be obtained if the
TENASTEEL undergone two temperings between 500/550
◦
C (930/1020°F)
to 575
◦
C (1065°F). While an austenitization between 1000 and 1100
◦
C (1830/2010°F)
leads to a good hardness of our steel, the best properties will be obtained
after reheating around 1030 - 1050
◦
C (1885- 1920°F). Indeed, Fig. 6 shows
that the toughness of metal is maximum in this range of temperature.
Indeed, if the austenitizing temperature is too low, a large part of fine
chromium molybdenum carbides will not be dissolved. They will remain
coarse and will not increase hardness and wear resistance of steel. In ad-
dition, for the highest reheating temperatures, the hardening obtained by
the refinement of subsequent secondary precipitation of carbides is counter-
balanced by softening due to the increasing in retained austenite rate after
hardening. A third tempering should be then necessary to completely desta-
bilise this retained austenite. Number and temperature of temperings used
Optimizing Microstructure for High Toughness Cold-Work Tool Steels
309
Figure 3.
Various metallurgical phenomena leading to a softening with the tempering.
Figure 4.
Thermal cycles of hardening and tempering practices on TENASTEEL.

310
6TH INTERNATIONAL TOOLING CONFERENCE
Figure 5.
Evolution of hardness of TENASTEEL with austenitizing and tempering tem-
peratures.
to soften martensitic structure after quenching will allow TENASTEEL to
obtain final mechanical characteristics and final using properties. The soft-
ening curves of the TENASTEEL are compared with those of the D2 Fig. 7
for an austenitizing temperature of 1050
◦
C (1920°F).
These softening curves of TENASTEEL make it possible to draw some
interesting conclusions :
TENASTEEL and D2 grades are treated in the same ranges of tem-
peratures,
for an identical temperature of tempering, the TENASTEEL is harder
than D2,
lastly, TENASTEEL makes it possible to obtain high hardnesses (> 60 HRC)
after tempering at high temperature (500 – 550
◦
C ).
This last possibility is a very good advantage regarding the aptitude for
the surface coating which requires for nitriding (gas, bath of salts, ionic...)
or PVD, for example, relatively long holding time at high temperatures.
These curves of soften show that for processing performed between 550 and
Optimizing Microstructure for High Toughness Cold-Work Tool Steels
311
Figure 6.
Effect of austenitizing temperature on the toughness of TENASTEEL
Figure 7.
Softening curve of TENASTEEL compared with that of the D2.
312
6TH INTERNATIONAL TOOLING CONFERENCE
575
◦
C , the TENASTEEL is able to keep a hardness of the matrix higher
than 60 HRC, whereas the Z160CDV12 sees its hardness breaking down (50
– 58 HRC) in this temperature range.
The evolution of mechanical characteristics obtained after heat treatment
is shown on Fig. 8.
Figure 8.
Evolution of mechanical characteristics of TENASTEEL following hardness
obtained after heat treatment.
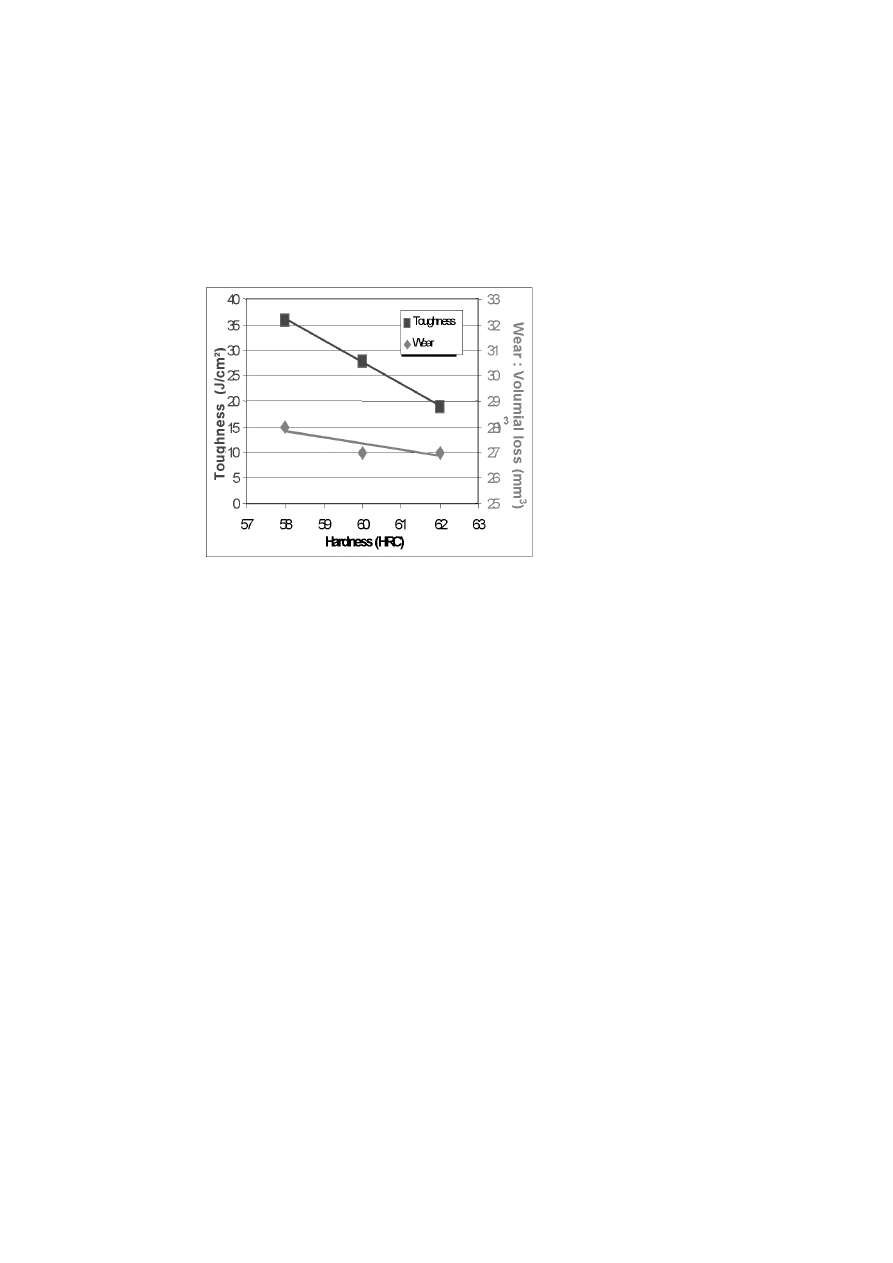
The toughness of TENASTEEL strongly grows up with the reduction in
the hardness of steel, whereas its abrasive wear resistance increases slightly
with hardness. The best compromise, for a standard application is obtained
after a double tempering between 525 and 575
◦
C . Moreover, the Fig. 9
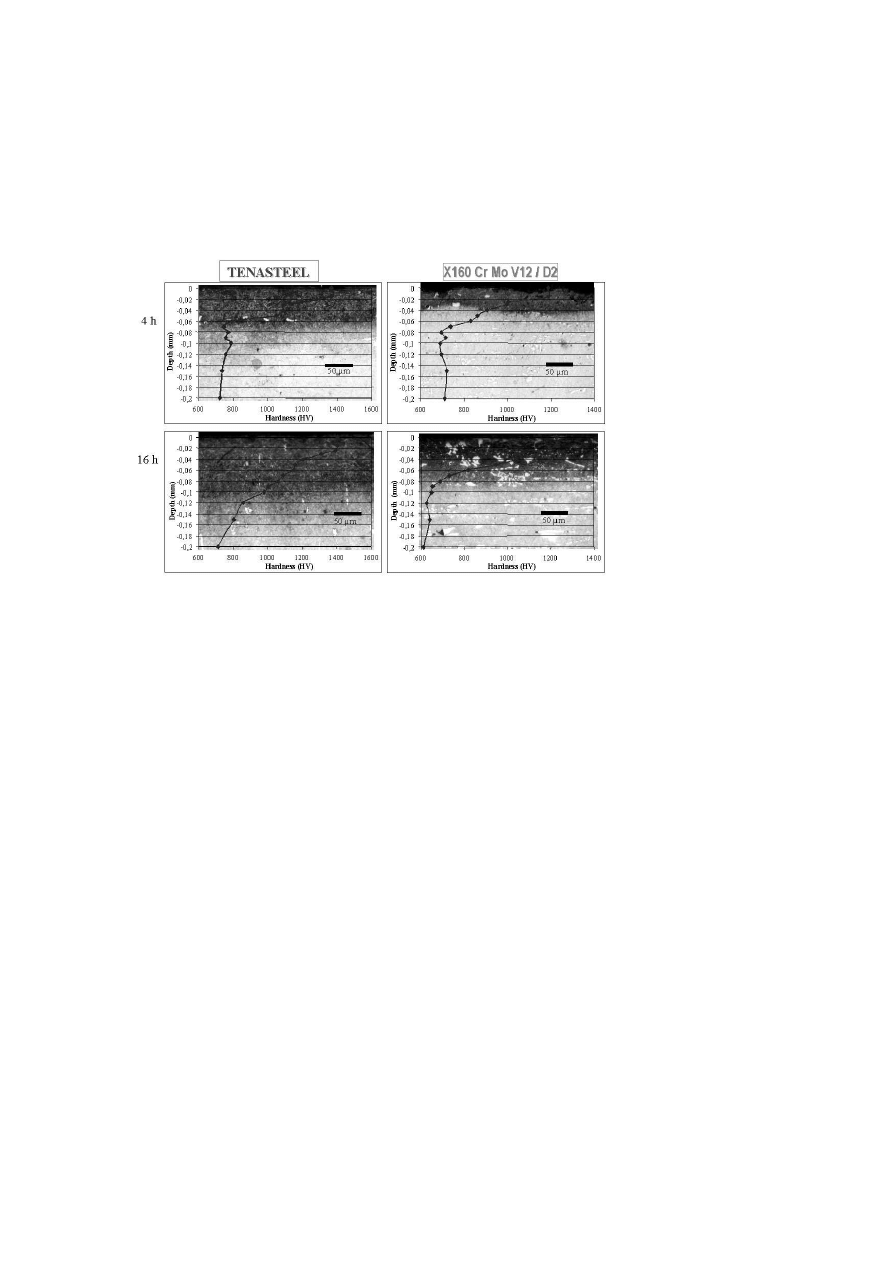
shows than the toughness of TENASTEEL is twice better than of D2 steel.
And this is always true in the range of the hardness used for these cold
work tool steels : 58 – 62 HRC. In the other hand, the abrasive wear resis-
tance of the two steels is comparable, then, TENASTEEL exhibits the best
compromise between wear resistance and toughness.

Optimizing Microstructure for High Toughness Cold-Work Tool Steels
313
Figure 9.
The toughness of TENASTEEL grade is almost twice better than of D2.
SURFACE TREATMENT
In order to increase their resistance to seizing up and to minimize the
friction in service, tool steels are more and more frequently surface treated
by nitriding or coated by metal deposits. This surface treatment also makes it
possible to increase the surface hardness of pieces and to increase the tool life
subjected to abrasive and/or adhesive wear. Nitriding is a thermochemical
process of hard facing by atomic nitrogen diffusion on the surface of the
pieces previously treated by hardening and tempering. The insertion of
nitrogen atoms and the nitride formation with steel alloying elements, induce
a hardening of surface (750 to 1400 HV) bringing the required properties :
improvement of resistance to wear and seizing up of materials ;
increasing of the stress limit of material because of the compressive
stresses created by the processing ;
maintain of metallurgical structures of the material and thus of its
internal mechanical characteristics if the tempering has been carried
out at a temperature higher than that of the surface treatment.
314
6TH INTERNATIONAL TOOLING CONFERENCE
Comparative gaseous nitriding tests were performed at 525
◦
C on TENAS-
TEEL and X160 Cr Mo V12 / D2, both heat-treated to 60 HRC. Nitrided
TENASTEEL layer appears homogeneous in depth and morphology, while
that of D2 reveals a lot of carbides and exhibit an irregular depth (Fig. 10).
For TENASTEEL, depth of nitrided layers measured by micro-hardness
Figure 10.
After gaseous nitriding at 525
◦
C, TENASTEEL exhibits layers thicker and
more homogeneous in depth and morphology than X160CrMoV12 / D2.
readings or shown on micrographs are coherent, and the values obtained are
respectively 60, 80 and 120 µm after treatment times of 4, 8 and 16 hours.
For X160 Cr Mo V12 / D2, maximum depth reach only 50, 70 and 80 µm
for same treatment times. But the Fig. 10 shows that in some places the
nitrided layer can drop down to 20 µm after 4h of treatment. Moreover, due
to the quantity of coarse carbides in the nitrided layer of X160 Cr Mo V12
/ D2 and its interface with the substrate, a poor adhesion can be expected
with possible shipping of the nitrided layer. The second very important
Optimizing Microstructure for High Toughness Cold-Work Tool Steels
315
Figure 11.
Comparative hardness of TENASTEEL matrix and X160 Cr Mo V12/D2 matrix
after gaseous nitriding at 525
◦
C.
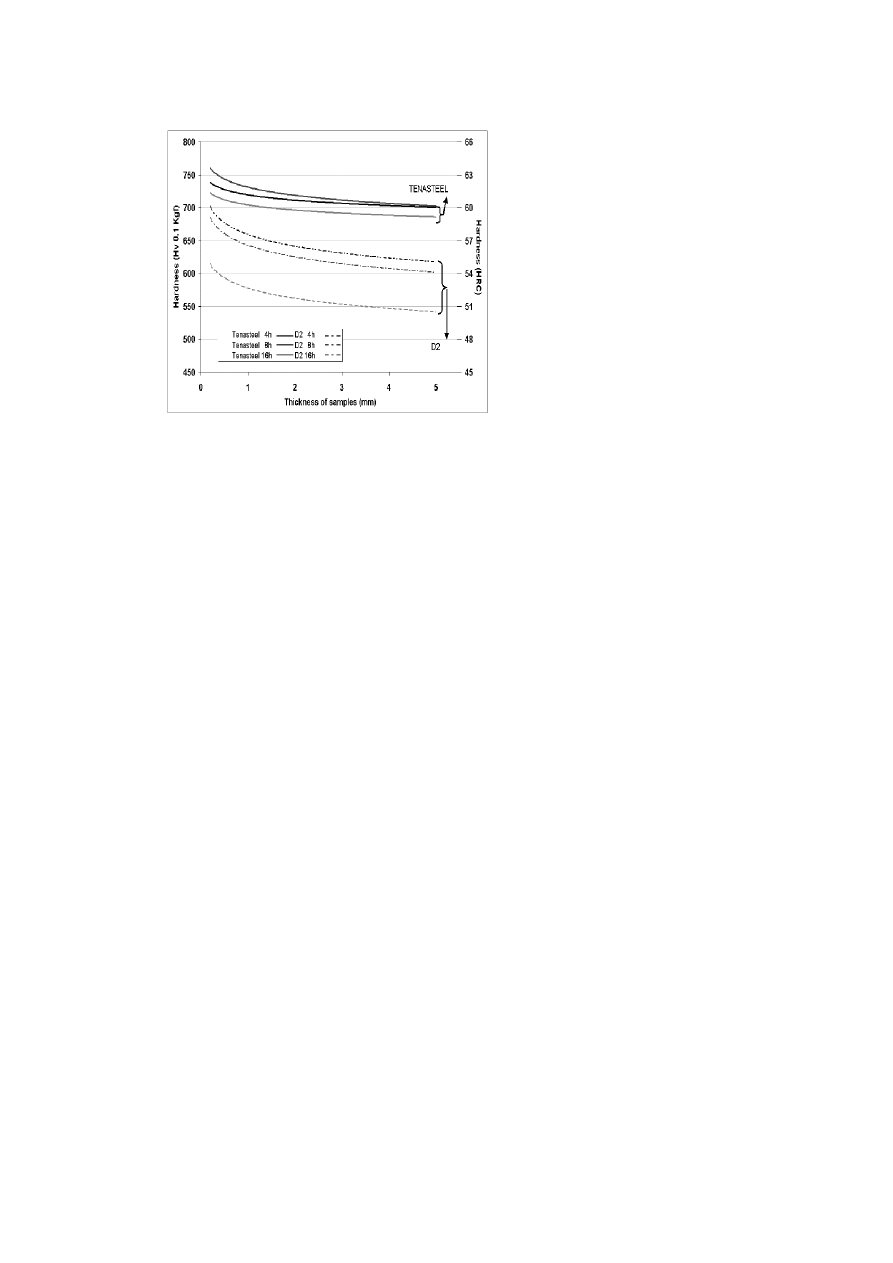
point to note is the influence of the hardness of the core of the piece during
nitriding. The Fig. 11 shows hardness records measured on the matrix of
TENASTEEL and X160 Cr Mo V12 / D2 after 4, 8 16 hours of nitriding
at 525
◦
C (975°F). Both steels were heat-treated to 60 HRC before nitriding.
TENASTEEL keeps its initial hardness after gaseous nitriding, a treatment
time of 16 H induce only a drop of 1 HRC. Conversely, the hardness of X160
Cr Mo V12 / D2 is strongly affected as it drops down from 60 to respectively
56, 55, and 50 HRC after 4, 8 and 16 hours of nitriding. This softening is
not surprising, looking at Fig. 7 showing the evolution of hardness versus
the holding time at 525
◦
C . Some other tests were carried out with ionic
nitriding process at 500
◦
C (930°F). Like after gaseous nitriding, the layer at
TENASTEEL surface seems to be homogeneous as well in thickness as in
morphology. Moreover, as already mentioned, layers on X160 Cr Mo V12/
D2 include much carbides and present a very irregular thickness.
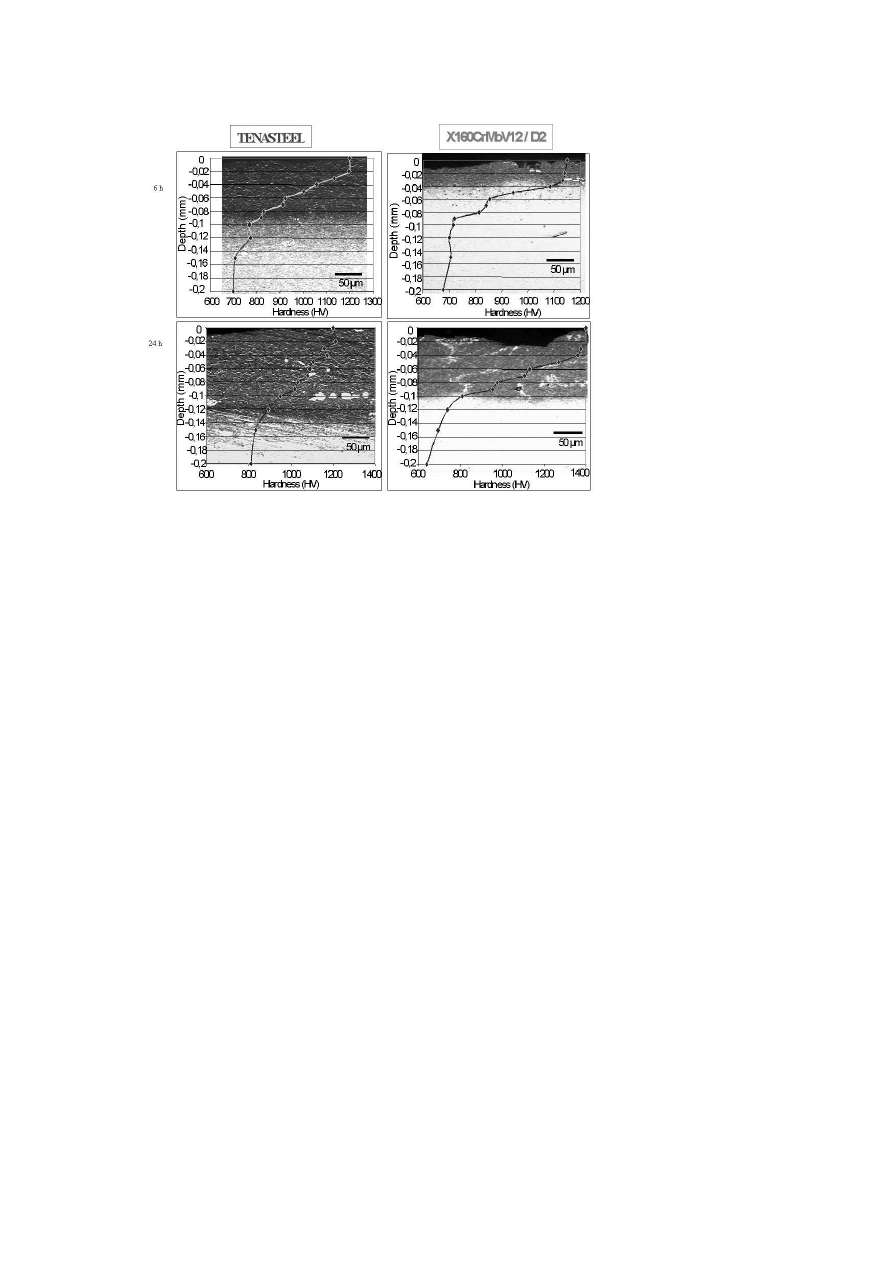
For TENASTEEL, measurement of nitrided layers thickness obtained on
micrographs of the Fig. 12 or by micro-hardness measurements, are coher-
ent and gives values of about 100 and 140 µm for 6 and 24 hours treatment
time respectively. For X160 Cr Mo V12 / D2, thickness have a maximum
316
6TH INTERNATIONAL TOOLING CONFERENCE
Figure 12.
After ionic nitriding at 500
◦
C, TENASTEEL exhibits layers thicker and more
homogeneous in depth and morphology than X160CrMoV12 / D2 do.
size of 50 and 100 µm for a same treatment duration. TENASTEEL allows
to minimise nitriding time (6h to obtain 100 µm on TENASTEEL and 24
h to the same thickness on D2) and to obtain a same thickness layer all
over the surface of the sheet. It has to be mentioned that the presence of
coarse carbides in the nitrided zone and at the interface with substrate will
reduce adhesion and lead to chipping of this layer in the case of X160 Cr Mo
V12 / D2. Steels are heated at only 500
◦
C (930°F) for this treatment, then
TENASTEEL as well as X160 Cr Mo V12 / D2 save their matrix hardness.
The cutting, forming tools, as well as molds elements for aluminum and
plastic injection are frequently covered by titanium nitride which reduces
to a significant degree the coefficient of friction, and very largely improves
the abrasive and adhesive wear resistance. These coatings, obtained by va-
por condensation on the surface of the substrate make it possible to form

Optimizing Microstructure for High Toughness Cold-Work Tool Steels
317
a metal deposit, which will grapple to the heat-treated surfaces. For this
type of coating, the preparation of the surface of the substrate is an essential
step. It will make it possible to solve possible problems of adherence by a
cleaning and an activation of surface. For these PVD (Physical vapor depo-
sition) and CVD (Chemical Vapor Deposition) coatings the main advantage
of the TENASTEEL compared to the X160 Cr Mo V12 / D2 is due to the
smoothness and the distribution of carbides. Indeed, the presence of large
chromium carbides to the interface between the substrate and the coating
decreases the adhesion of this one.
CONCLUSION
The aim of the new cold work tool steel grade with improved toughness,
TENASTEEL, is to take the place of X160CrMoV12 / D2, currently most
widespread on the market in spite of big problems of rupture, of damage
by chipping or adhesion due to its too low toughness. Its chemical com-
position was adapted in order to decrease the volume fraction of large pri-
mary chromium carbides and improve the toughness of steel. An increase in
molybdenum content compensates this decrease of the carbon and chromium
content to preserve a good wear resistance because of finer and dispersed
secondary carbides contribution. Moreover, an addition of titanium refines
the structure. After austenitization at 1030 or 1050
◦
C , temperatures com-
patible with the current practices for the processing of the other grades, the
TENASTEEL will be tempered twice between 525 and 575
◦
C to obtain a
standard hardness ranging between 58 and 62 HRC. For particular applica-
tions requiring a still increased toughness, tempering at higher temperature
could be practised in order to decrease the hardness of steel. At equal level
of hardness, the toughness of TENASTEEL is twice better than of D2 for a
wear resistance comparable. Moreover, the higher tempering temperatures
and the thinner carbides and structure confer to TENASTEEL a very good
aptitude for the surface coating :
to obtain homogeneous layers in thickness and in morphology ;
to reduce heating time ;
to improve coating adherence ;
to save the matrix hardness.

318
6TH INTERNATIONAL TOOLING CONFERENCE
Lastly, weldability, polishability and machinability of the TENASTEEL are
also higher than that of the D2. For example, compared with grades X160
Cr Mo V12 / D2, TENASTEEL allows an increasing of the tool life during
machining :
>
30% in softened condition
>
75% in hardened condition
The size and the dispersion of the carbides can explain these good prop-
erties.
REFERENCES
[1] R. EBNER, H. LEITNER, F. JEGLITSCH, D. CALISKANOGLU "Tool Steels in the
next century" 5th International Conference on Tooling – Loeben 1999.
[2] H. BERNS "New Materials Processes Experiences for Tooling" International European
Conference on Tooling Materials Interlaken 1992.
[3] S. CORRE, C. LE CALVEZ, P. MABELLY, F. CHENOU, J. BEGUINOT "Tool Steels
in the next century" 5th Interntional Conference on Tooling – Loeben 1999.
[4] H. JESPERSON "Tool Steels in the next century" 5th Interntional Conference on Tooling
– Loeben 1999.
[5] D. YOKOI, N. TSUJII European Patent Application EP 0930 374 A1.
Wyszukiwarka
Podobne podstrony:
Confocal optics microscopy for biochemical and cellular high throughput screening by Lenka Zemanová,
Zied H A A modular IGBT converter system for high frequency induction heating applications
Core Wall Survey Control System for High Rise Buildings
Home And Recreational Uses For High Explosives
15 185 196 A ew High Tensile Steel with High Toughness
4 39 48 New Hot Work Steel for High Temp and High Stress Service Conditions
Data and memory optimization techniques for embedded systems
A Composite Pwm Method Of Three Phase Voltage Source Inverter For High Power Applications
Transformation induced plasticity for high strength formable steels
Configuring MicroSCADA for DNP V3 00 Slave Protocol
Configuring MicroSCADA for Modbus Master Protocol
Configuring MicroSCADA for OPC DA Client
Auto Sign an automatic signature generator for high speed malware filtering devices
Configuring MicroSCADA for IEC 60870 5 103 Master Protocol
więcej podobnych podstron