
MAKING A SOLID-CORE DOOR
Building your own custom door is easier than you think
The Oxford dictionary describes a door as “a hinged barrier, for closing
or opening an entrance to a building or room.” To interior designers,
architects and DIYers, interior doors are much more than simply
“hinged barriers.” In fact, the design-savvy know that doors are one of
the most prominent elements of a home’s overall interior design theme.
The upgrade from run-of-the-mill builder’s doors to solid-core Colonial-
style doors in this project made a dramatic improvement in the look of
a house.
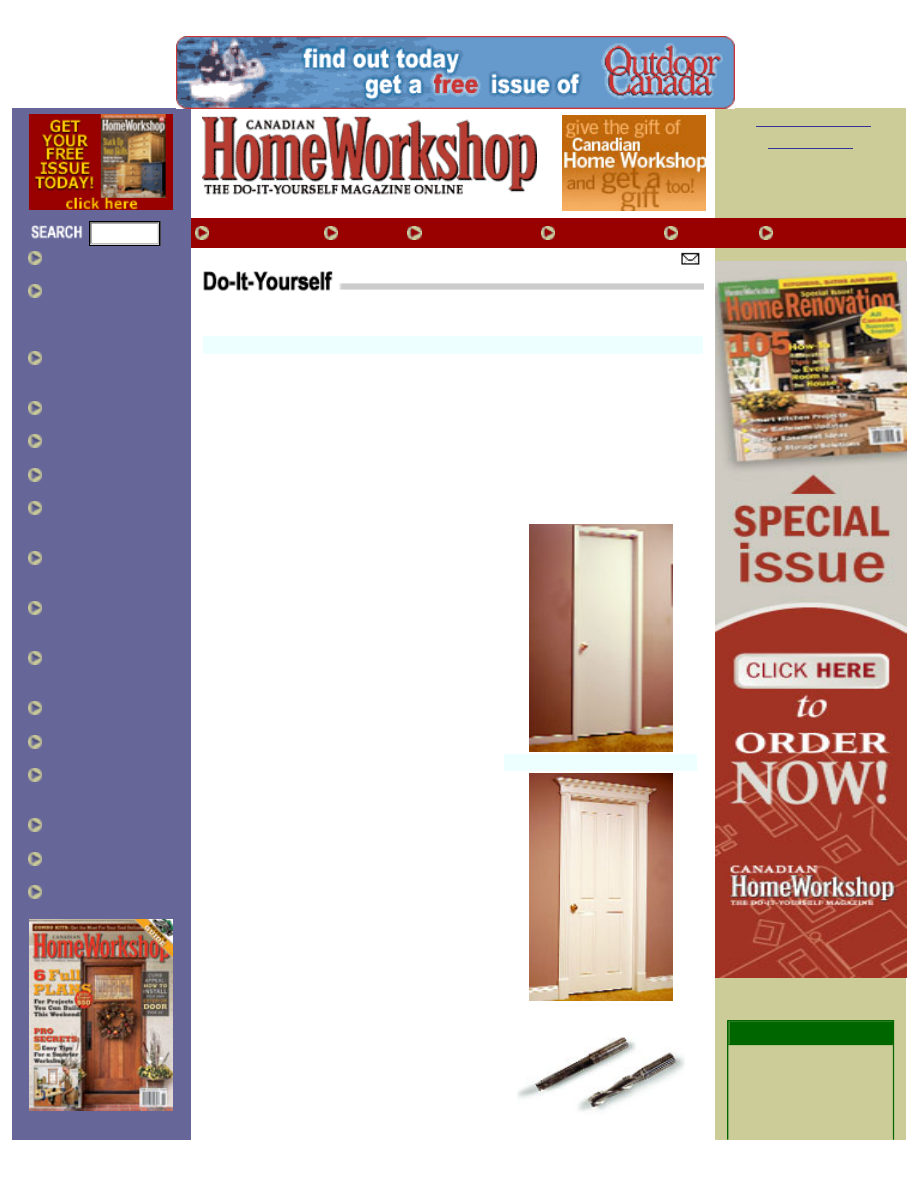
Before (ABOVE) and after
A 1/2" x 4" solid carbide spiral
router bit (right) is specifically
designed to plunge into stock
without predrilling. The carbide
bit produces a fast and clean
mortise with very little effort
compared with a straight-
cutting bit (left)

Door-making is not as difficult to master
as you might think, and this project will give
you all you need to know to build a simple
interior door.
For Openers
Making your own doors is not as difficult as
you might imagine, and the design
possibilities are almost unlimited. I make a
number of doors each year in different styles
for clients whose homes range in age from
brand-new to more than 80 years old.
Material Matters
I chose knotty pine for this painted door project. Knotty pine is
inexpensive, easy to work with and the knots can be sealed to prevent
them from bleeding through the painted topcoat easily by applying two
coats of shellac-based primer.
I cannot emphasize enough the importance of using dry, straight-
grained lumber for a project such as this. When I began this project,
the moisture content of this material was approximately seven per
cent, which is just about the perfect level for making doors and means
future dimensional changes of the frame should be minimal.
The materials list shows the material required to make one 30" x
80" door, a common size, but it can easily be adapted to suit doors of
other dimensions.
Finishing Up
Before the gluing and clamping operations are complete, check the
door for square by measuring across its diagonal lengths, ensuring
they are equal. Leave the door in the clamps for 24 hours to ensure a
solid glue bond.
Once the glue has dried, remove the door from the clamps, sand
thoroughly and fit into its opening. For fitting techniques, see the
September 2002 issue of Canadian Home Workshop, “Hanging the
Door,” page 28.
Trim it Out
Hang the door in the opening and trim it with new casing, plinth blocks
and baseboard as desired. Be sure to prime the door with two coats of
shellac-based primer to prevent the pine knots from bleeding through
the paint. Finish with two coats of oil-based semi-gloss paint.
CLICK ABOVE TO ENLARGE
You Will Need
Part
Size
Qty.
Stiles
1 3/8" x 5" x 80"
2
Upper rail
1 3/8" x 5" x 25 1/2"
1
Middle rail
1 3/8" x 5" x 25 1/2"
1
Lower rail
1 3/8" x 7" x 25 1/2"
1
Upper centre stile
1 3/8" x 5" x 36 1/2"
1
Lower centre stile
1 3/8" x 5" x 26 1/2"
1
Upper raised panels
1 3/8" x 8 1/2" x 37 1/2"
2
Lower raised panels
1 3/8" x 8 1/2" x 27 1/2"
2

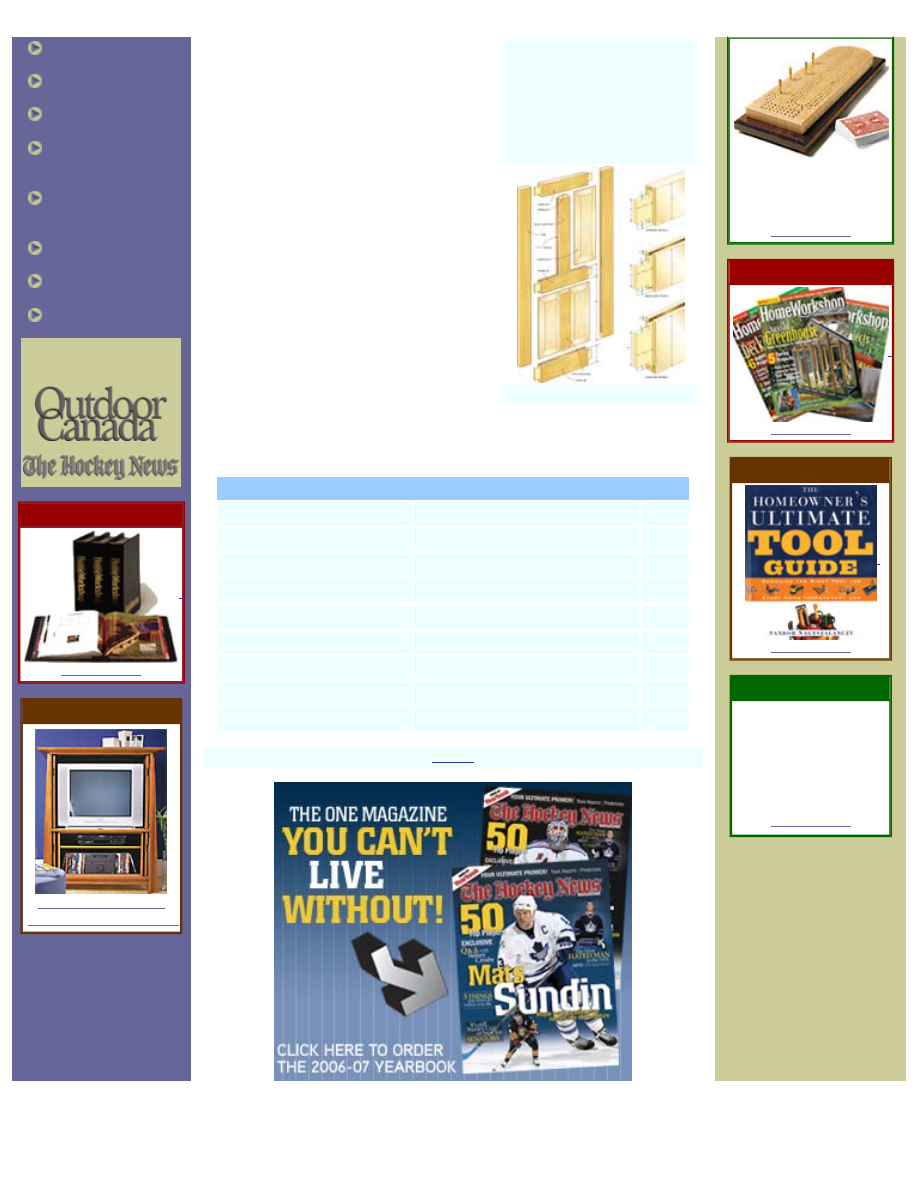
1.
Once the material is cut to rough length and width (
), the next step is to cut a
1/2" x 1/2" groove in the centre of all the stiles and rails. I used a 3/8"-wide stacked dado
blade on the tablesaw and raised the dado blade to 1/2" above the tablesaw surface. Centre
the dado blade in the stock and cut a groove into one of the stiles. Turning the stock end for
end and running the stile through again results in a 1/2"-wide groove that’s 1/2" deep and
centred in the stile. Test the cut on scrap material before committing to the actual door
material. Clamp a featherboard to the tablesaw’s surface to keep the stock tight against the
fence during this operation. As you assemble the frame, insert four #20 biscuits at the
intersection where the centre stiles meet the rails to help align the stiles with the rails.
2.
Mortise the stiles with the aid of a simple platform for the router to sit on while plunging.
Clamp this shopmade jig to the stile to support the router during the mortising operation, so
the mortise is parallel to the face of the stock. Cut the mortises by plunging the router bit into
the material and working to the layout lines and the prescribed depth of 2 1/4".
3.
Forming tenons on the top, middle and lower rails of the door is the next step. There are
many methods to choose from when it comes to making tenons, but this is one process that I
have found to be both fast and accurate. Cut the tenons using a dado blade, stacked to a
width of 3/4" and raised to remove just enough material to make for a snug fit of the tenon
into the mortises. Set the fence of the tablesaw to act as a stop to prevent the tenon length
from becoming longer than the depth of the mortise. Use a scrap piece of material of the
same thickness as the rails as a test piece. The tenon should be sized so that it can be
pressed into the mortise without having to force it into place with a hammer.
4.
Refine the tenons by rounding off the square corners left by the tablesaw cutting
operation so they fit snugly into the rounded corners of the mortise. Work a piece of cloth-
backed sandpaper across the square edges of the tenon (similar to polishing shoes with a
cloth) until the tenon has an evenly rounded profile that matches the mortise in the stile. The
strength of this joint is due in part to the fit between the mortise and the tenon, and close
attention to detail is a key contributor to a strong joint.
5.
Measure between the stiles to set the dimensions of the interior panels. If the door will be
painted, use medium-density fibreboard (MDF) for the interior panels. MDF is extremely
stable, and using it will eliminate any concern about the interior panels expanding or

contracting with the changing humidity. Once the panels are cut to dimensions, shape them
on the router table to give them their raised profile. They are now ready to dry-fit into the door
frame.
6.
Once the mortise-and-tenons are fitting snugly, the door frame can be dry-fit and then
clamped together to check that it’s square. Measure the door diagonally from both corners: if
the measurements are equal, the door is square; if they’re not, adjust the parts as required.
Make any necessary adjustments to the frame at this point, before gluing. Also, test to
ensure the door will lie flat under the pressure of the clamps as it’s glued.
CHW Online - Do-It-Yourself - Solid-Core Door
visit our online customer
service department, where
you can manage your
subscription.
by Gord Graff
photos by Christopher Campbell
MAKING A SOLID-CORE DOOR
Building your own custom door is easier than you think
The Oxford dictionary describes a door as “a hinged barrier, for closing
or opening an entrance to a building or room.” To interior designers,
architects and DIYers, interior doors are much more than simply “hinged
barriers.” In fact, the design-savvy know that doors are one of the most
prominent elements of a home’s overall interior design theme. The
upgrade from run-of-the-mill builder’s doors to solid-core Colonial-style
doors in this project made a dramatic improvement in the look of a
house.
Before (ABOVE) and after
Door-making is not as difficult to
master as you might think, and this
project will give you all you need to know
to build a simple interior door.
For Openers
Making your own doors is not as difficult
as you might imagine, and the design
possibilities are almost unlimited. I make
a number of doors each year in different
styles for clients whose homes range in
age from brand-new to more than 80
years old.
Material Matters
I chose knotty pine for this painted door
project. Knotty pine is inexpensive, easy
to work with and the knots can be sealed
to prevent them from bleeding through the
painted topcoat easily by applying two
coats of shellac-based primer.
I cannot emphasize enough the
importance of using dry, straight-grained
lumber for a project such as this. When I
began this project, the moisture content of
this material was approximately seven per
cent, which is just about the perfect level
for making doors and means future
dimensional changes of the frame should
be minimal.
The materials list shows the material
required to make one 30" x 80" door, a
common size, but it can easily be adapted
http://www.canadianhomeworkshop.com/diy/solid_door.shtml (1 of 3)05/11/2007 09:59:47 p.m.
CHW Online - Do-It-Yourself - Solid-Core Door
VISIT OUR
SITES:
A 1/2" x 4" solid carbide spiral
router bit (right) is specifically
designed to plunge into stock
without predrilling. The carbide
bit produces a fast and clean
mortise with very little effort
compared with a straight-cutting
bit (left)
CLICK ABOVE TO ENLARGE
to suit doors of other dimensions.
Finishing Up
Before the gluing and clamping
operations are complete, check the door
for square by measuring across its
diagonal lengths, ensuring they are equal.
Leave the door in the clamps for 24 hours
to ensure a solid glue bond.
Once the glue has dried, remove the
door from the clamps, sand thoroughly
and fit into its opening. For fitting
techniques, see the September 2002
issue of Canadian Home Workshop,
“Hanging the Door,” page 28.
Trim it Out
Hang the door in the opening and trim it
with new casing, plinth blocks and
baseboard as desired. Be sure to prime
the door with two coats of shellac-based
primer to prevent the pine knots from bleeding through the paint. Finish
with two coats of oil-based semi-gloss paint.
You Will Need
Part
Size
Qty.
Stiles
1 3/8" x 5" x 80"
2
Upper rail
1 3/8" x 5" x 25 1/2"
1
Middle rail
1 3/8" x 5" x 25 1/2"
1
Lower rail
1 3/8" x 7" x 25 1/2"
1
Upper centre stile
1 3/8" x 5" x 36 1/2"
1
Lower centre stile
1 3/8" x 5" x 26 1/2"
1
Upper raised panels
1 3/8" x 8 1/2" x 37 1/2"
2
Lower raised panels
1 3/8" x 8 1/2" x 27 1/2"
2
DOWNLOAD PLAN
TEMPLATES FOR THIS
CRIBBAGE BOARD
PROJECT.
Subscribe to our
newsletter. Every few
weeks, you'll get a behind-
the-scenes peek at the
magazine, the web site
and the folks who put it all
together.
http://www.canadianhomeworkshop.com/diy/solid_door.shtml (2 of 3)05/11/2007 09:59:47 p.m.

CHW Online - Do-It-Yourself - Solid-Core Door
|
All rights reserved: © 2007
Updating of website content: Canadian Home
Workshop
Optimized for Internet Explorer 5, 800x600
http://www.canadianhomeworkshop.com/diy/solid_door.shtml (3 of 3)05/11/2007 09:59:47 p.m.
Document Outline
- canadianhomeworkshop.com
Wyszukiwarka
Podobne podstrony:
(Ebooks) Diy Woodwork How To About Router Bits
(Ebooks) DIY Woodwork How To Exterior Finish Advice Red Wood Assn
(Ebooks) Diy Woodwork How To Understand Your Water System
DIY Guide How to research companies
(EBooks) DIY Woodwork Plans 10 Workbench Accessories
(Ebooks) Diy Woodwork Woodworking Basics Router Bit Storage
(Ebooks) DIY Woodwork Plans Drill Press Table
(Ebooks) Diy Woodwork Plans Kitchen Cabinets
(Ebooks) Diy Woodwork Plans Shed 24 Utility Shed
(Ebooks) Diy Woodwork Plans Longer Plank Top Workbench
(Ebooks) Diy Woodwork Hole Saw Sander
(Ebooks) Diy Woodwork Plans Shed 10 x10 Gambrel Roof With Loft Plans
(Ebooks) Diy Woodwork Plans Timber Garden Shed Part Ii
Door MAKING A SOLID wood door
(Ebooks) Diy Woodwork Plans Bending Wood
Diy How To Paint Woodwork
eBook DIY Woodworking Plans Guide To Wood Finishing
więcej podobnych podstron