29.09.2004
0:14:13
Автомобиль
VW (VOLKSWAGEN) / Passat 2.0 16V / 08/1988 - 09/1993 /
легковой
автомобиль с кузовом седан, автомобиль с кузовом универсал
Страна
происхождения
D
Литраж/Мощность 2.0 / 100 kW
Характеристика
двигателя
9A
Ключ RB
VWW 749
1
Timing Belt
Replacement Interval Guide
Every 30.000 km - check & adjust, replace if necessary.
No manufacturer's recommended replacement interval.
Engine Damage
Repair Times - hrs
The previous use and service history of the vehicle must always be taken into
account.
CAUTION: Although in the event of a timing belt failure engine damage will
NORMALLY occur, a compression check of all cylinders should be performed before
removing the cylinder head.
Golf/Jetta
→1992:
Check & adjust
0,50
Remove & install 1,10
Golf/Vento 1992
→:
Check & adjust
0,90
Remove & install 1,60
Passat:
Check & adjust
0,70
Remove & install 1,30
Scirocco:
Check & adjust
0,50
Remove & install 1,10

Special Tools
l
Tension gauge - VAG No.210.
l
Two-pin wrench - Matra V.159.
Special Precautions
l
Disconnect battery earth lead.
l
DO NOT turn crankshaft or camshaft when timing belt removed.
l
Remove spark plugs to ease turning engine.
l
Turn engine in normal direction of rotation (unless otherwise stated).
l
DO NOT turn engine via camshaft or other sprockets.
l
Observe all tightening torques.
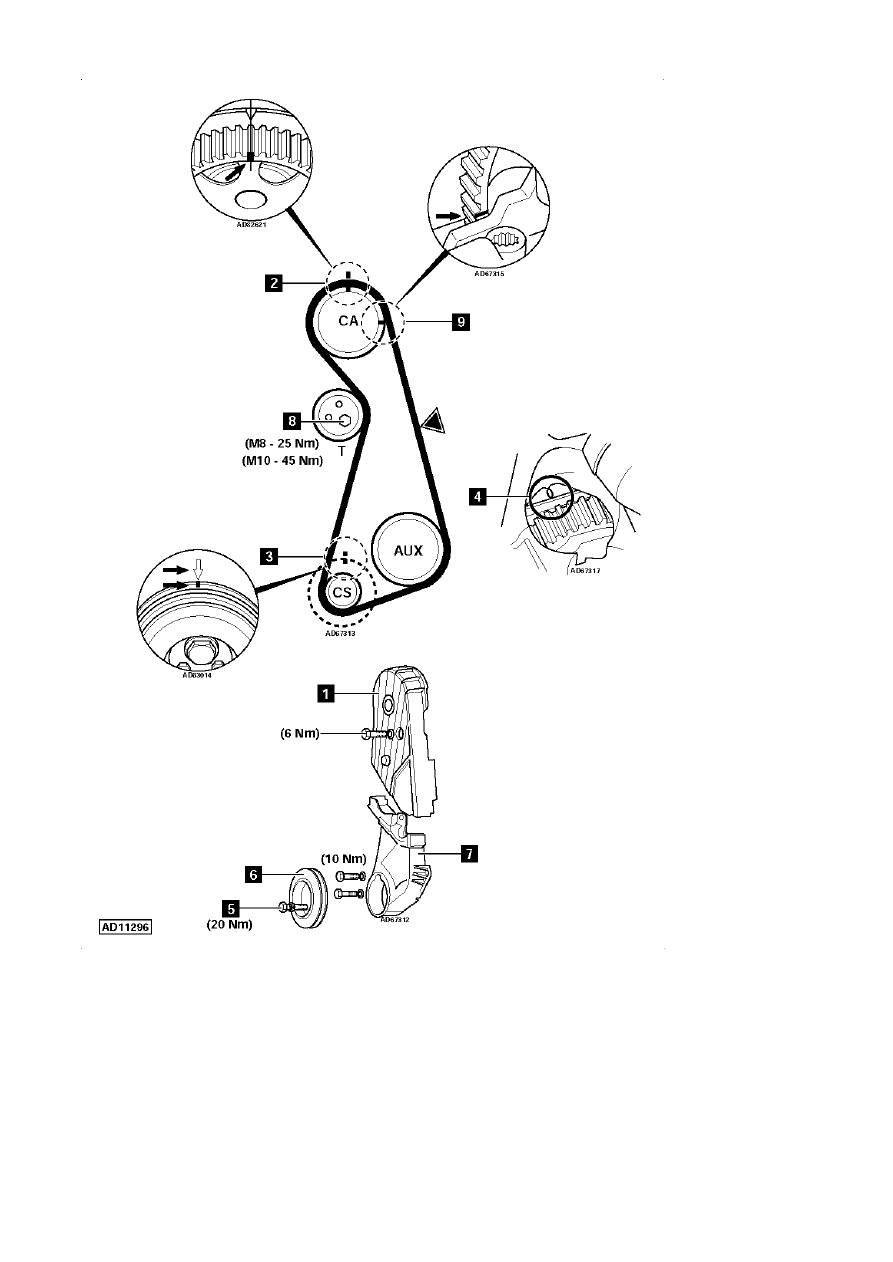
Removal
1. Remove:
¡
Auxiliary drive belt(s).
¡
Auxiliary drive belt tensioner pulley (if fitted).
¡
Timing belt upper cover [1].
2. Turn crankshaft to TDC on No.1 cylinder. Ensure timing marks aligned [2],
[3] & [4].
3. If cylinder head cover removed: Use camshaft sprocket rear timing mark [9].
NOTE: Align notch with upper cylinder head face.
4. Remove:
¡
Crankshaft pulley bolts [5].
¡
Crankshaft pulley [6].
¡
Water pump pulley (if required).
¡
Timing belt lower cover [7].
5. Slacken tensioner bolt [8]. Turn tensioner anti-clockwise to release tension
on belt. Lightly tighten bolt.
6. Remove timing belt.
Installation
1. Ensure timing marks aligned [2] & [4].
2. If cylinder head cover removed: Ensure camshaft sprocket rear timing mark
aligned [9].
NOTE: Notch aligned with upper cylinder head face.
3. Fit timing belt in anti-clockwise direction, starting at crankshaft
sprocket.
4. Attach tension gauge to belt at
. Tool No.210.
5. Turn tensioner clockwise. Use wrench Matra V.159. Tension gauge should
indicate 13-14 units.
6. Tighten tensioner bolt [8]. M8: 25 Nm. M10: 45 Nm.
7. Remove tension gauge.
8. Turn crankshaft two turns clockwise.
9. Ensure timing marks aligned [2] & [4].
10. Recheck belt tension.
11. Install components in reverse order of removal.
12. Tighten crankshaft pulley bolts [5]. Tightening torque: 20 Nm.
NOTE: Crankshaft pulley bolt holes are offset.
Corrado:
Check & adjust
0,40
Remove & install 1,60
2
3
Wyszukiwarka
Podobne podstrony:
Bosch com AEB VW B5 Passat Timing Belt Procedure
Tripod com VW 2000 Passat V6 2 8L Timing Belt Replacement
VW Passat B3 bezpieczniki i przekaźniki
VW Passat B3
VW Passat B3
passat B3 93wd
G 2 0 DOHC Timing Belt disassembly doc
vw golf passat halas ze skrzynki bezpiecznikow
passat B3 94(1)
passat B3 92
VAG VDO pulpity przez K line OBDII VW T5, Passat B5, Skoda Superb, Roomster, VW
VW Golf 5 Passat B7 Touran 1551 Can Service
vw golf 3 passat B5 immobilizer
timing belt 2 0 replacement
VW Passat 1988 1996 B3 B4 Sam Naprawiam PL(1)
EN SC DS400 C VW PASSAT A 05 XX
Aktualizacja oprogramowania nawigacji MFD2 w VW Passat?
136 SC DS300 R VW PASSAT A 01 XX
więcej podobnych podstron