Project Center
Planter Boxes
>
Decorating a garden is much like decorating a room in your
home-it's nice to have pieces that are adaptable enough that
you can move them around occasionally and create a
completely new look. After all, most of us can't buy new
furniture every time we get tired of the way our living rooms
look. And we can't build or buy new garden furnishings every
time we want to rearrange the garden.
That's one of the reasons this trio of planter boxes works so
well. in addition to being handsome especially when flowers are
bursting out of them they're incredibly adaptable. You can
follow these plans to build a terrific trio of planter boxes that
will go well with each other and will complement most gardens,
patios, and decks. Or you can tailor the plans to suit your
needs. For instance, you may want three boxes that are exactly
the same size. Or you might want to build several more and use
them as a border that encloses a patio or frames a terraced
area.
Whatever the dimensions of the boxes, the basic construction
steps are the same. If you decide to alter the designs, take a
little time to figure out the new dimensions and sketch plans.
Then devise a new cutting list and do some planning so you can
make efficient use of your wood. To save cutting time, clamp
together parts that are the same size and shape, and cut them
as a group (called gang cutting). When your planter boxes have
worn out their welcome in one spot, you can easily move them
to another, perhaps with a fresh coat of stain and new
plantings. You can even use the taller boxes to showcase
outdoor relief sculptures-a kind of alfresco sculpture gallery.
http://www.blackanddecker.com/ProjectCenter/printview.aspx?DOC_ID=p_2_87_22153_22225.html (1 of 2)17/03/2005 21:28:16

Project Center
Other related projects in this chapter include:
Tips--Simplify Planting & Maintenance
http://www.blackanddecker.com/ProjectCenter/printview.aspx?DOC_ID=p_2_87_22153_22225.html (2 of 2)17/03/2005 21:28:16
Project Center
Box Planter
>
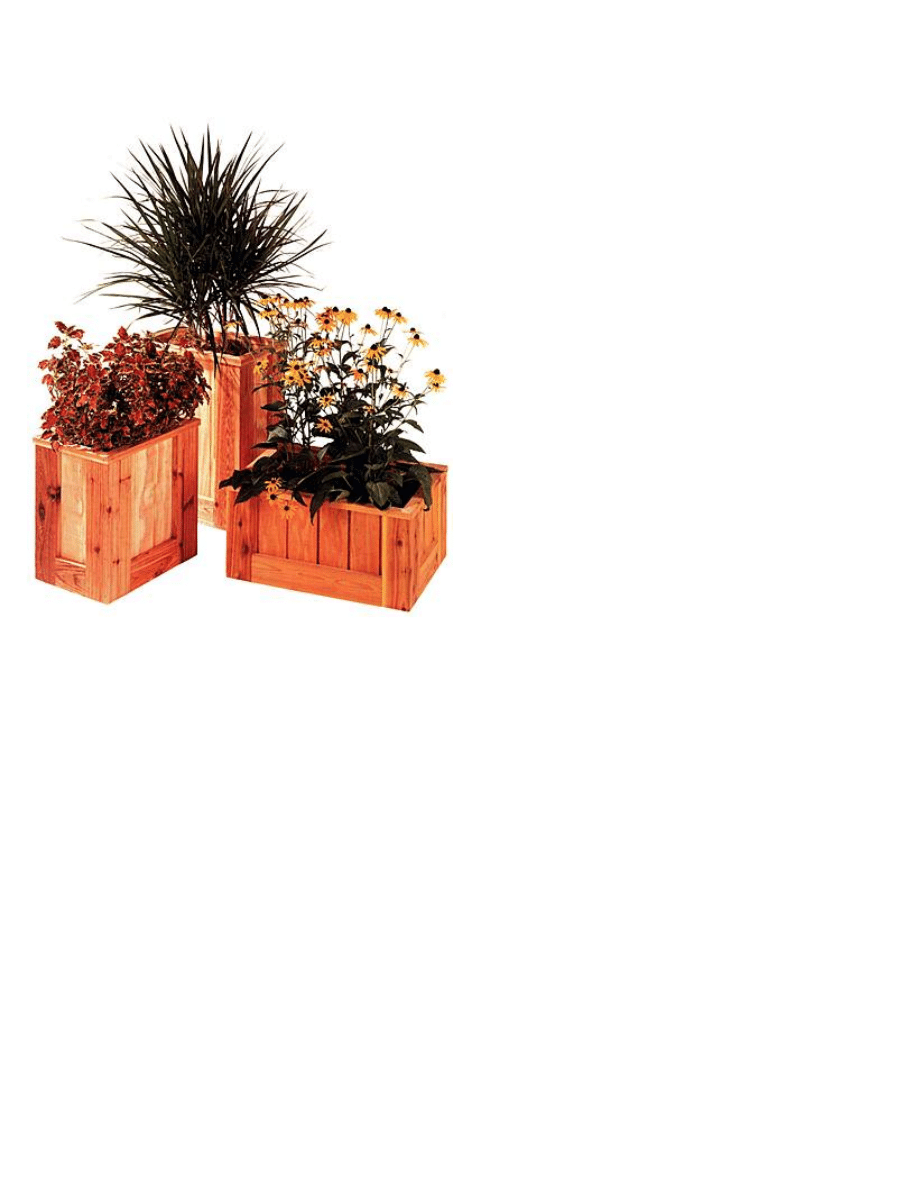
This planter is large enough to hold a potted shrub, mixed
flowers or even a miniature herb garden. The "tiered"
construction process makes it both easy to build and sturdy
enough for years of use.
Everything You Need:
Materials:
2 1/2" gold-colored deck screws (120)
10d casing nails (10)
Directions: Box Planter
CONSTRUCTION MATERIALS
Quantity
Lumber
8
2 × 4" × 6'
cedar
3
2 × 2" × 6' cedar
http://www.blackanddecker.com/ProjectCenter/printview.aspx?DOC_ID=p_2_85_22074_22089.html (1 of 3)17/03/2005 21:21:00
Project Center
Cutting List
Key
Part
Dimension
Pcs. Material
A
Side
1 1/2 × 3 1/2 ×
16 1/2"
24
Cedar
B
Stringer
1 1/2 × 1 1/2 ×
21 1/2"
4
Cedar
C
Bottom
cleat
1 1/2 × 1 1/2 ×
12"
4
Cedar
D
Bottom
1 1/2 × 3 1/2 ×
14 3/4"
3
Cedar
E
Frame
1 1/2 × 3 1/2 ×
18 3/4"
4
Cedar
F
Top cleat
1 1/2 × 1 1/2 ×
13 1/4"
4
Cedar
Note: Measurements reflect the actual thickness of
dimensional lumber.
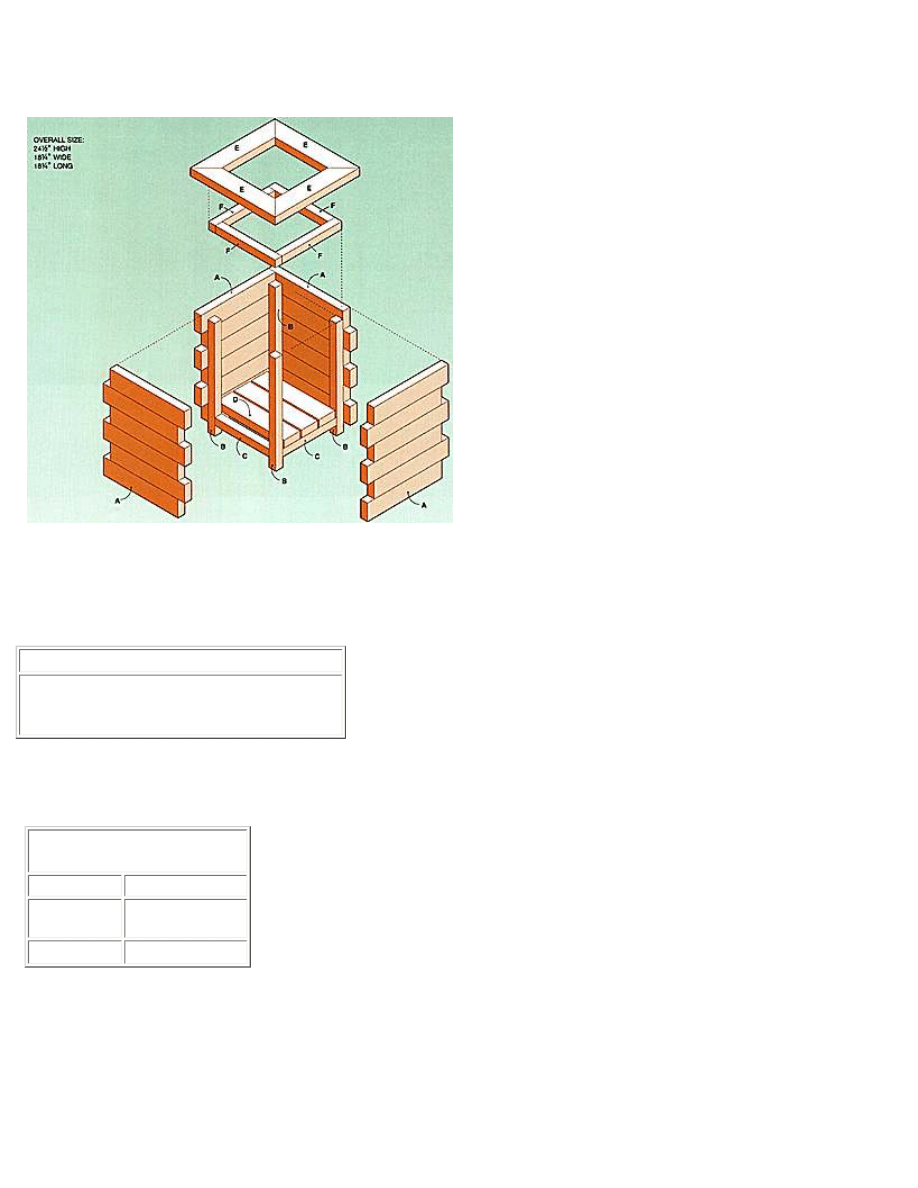
This planter is assembled upside down. The rows of side pieces, or
tiers, are constructed independently, then stacked on top of each
other and fastened together from the inside through the stringers.
1. Measure, mark and cut the side pieces (A) to length from 2 × 4"
cedar stock.
2. Drill a pair of 1/8" pilot holes through each side piece, about 3/4"
from one end.
3. Form each of the six tiers by screwing four side pieces together
with deck screws driven through the pilot holes.
4. Measure, mark and cut the stringers (B) to length.
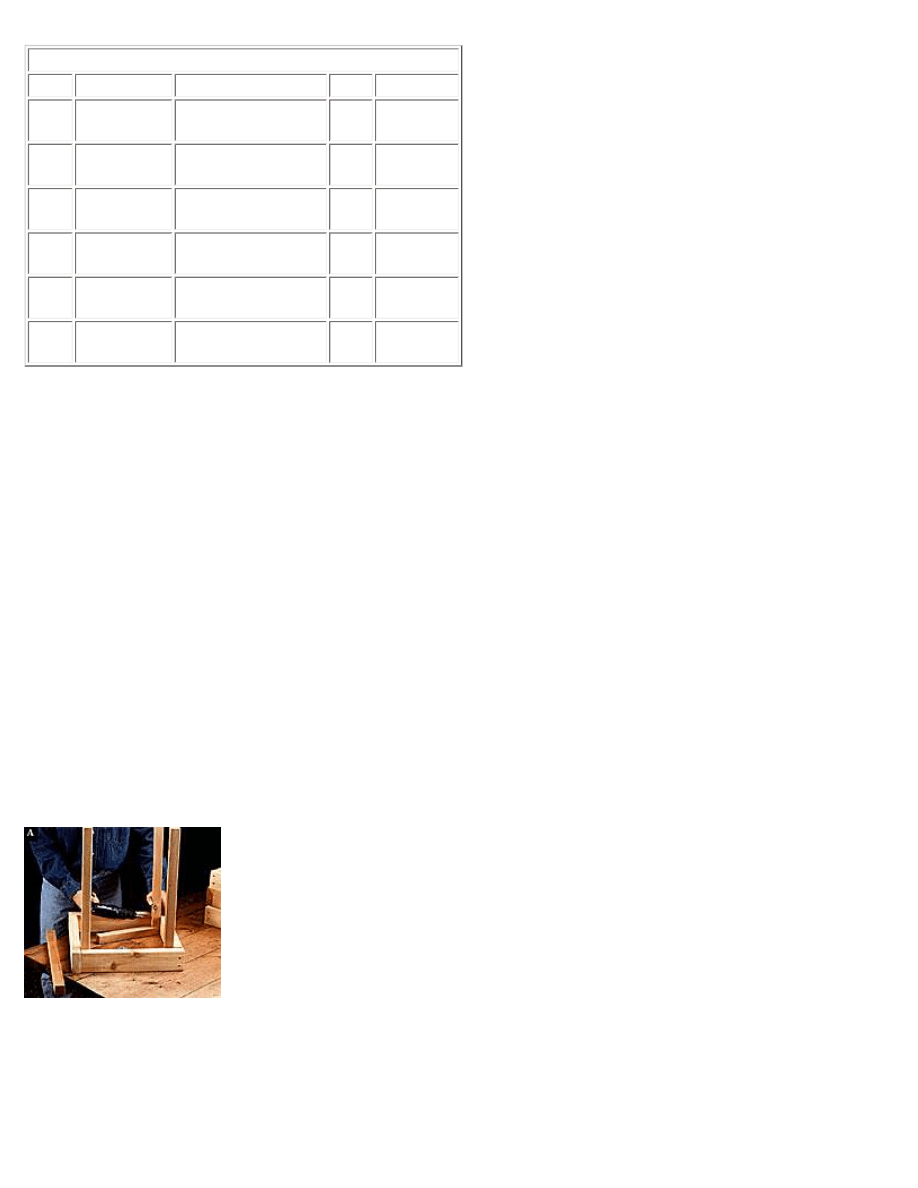
5. Lay the first tier on a flat work surface, then position a stringer
upright in one corner using a scrap of 2 × 2" lumber as a spacer to
raise the stringer off the work surface.
6. Drill 1/8" pilot
holes and attach the
stringer to the tier
with 2 1/2" deck
screws. Attach the
other three stringers
in the same fashion
(photo A).
http://www.blackanddecker.com/ProjectCenter/printview.aspx?DOC_ID=p_2_85_22074_22089.html (2 of 3)17/03/2005 21:21:00

Project Center
7. Add the remaining tiers one at a time, positioning each tier so the
butt joints do not line up with those of the previous tier. Drill 1/8"
pilot holes and attach each tier to the stringers with deck screws as
you go.
8. Measure, mark and cut the bottom cleats (C) to length from 2 × 2
" cedar stock.
9. With the planter box still upside down, position a bottom cleat
between two stringers, so the edge of the cleat is flush with the edge
of the side.
10. Drill angled 1/8"
pilot holes, and attach
the bottom cleat to
the side using deck
screws. Attach the
remaining bottom
cleats in the same
fashion (photo B).
11. Measure, mark and cut bottom pieces (D) to length from 2
× 4" cedar stock.
12. Turn the box assembly right-side-up, and set the bottom
pieces into the planter so they rest on the cleats and are
evenly spaced.
13. Attach the bottom pieces by drilling pilot holes and driving
deck screws through the bottom pieces into the cleats.
14. Measure, mark and cut the frame pieces (E) from 2 × 4"
cedar stock, mitering the ends at 45°.
15. Dry-fit the frame pieces together, with the miter joints
tight. Join the frame pieces with casing nails.
16. Cut top cleats (F) to size from 2 × 2" cedar stock. Position
the cleats on the assembled frame so the edges are flush with
the inside edge of the framing pieces. Drill pilot holes through
the cleats and attach by driving deck screws through the cleats
into the frame.
17. Position the frame on the planter so the cleats fit tightly
inside box. Attach the frame by drilling pilot holes and driving
deck screws through the inside face of the top cleats.
18. Soften the corners and edges of the box planter with a
rasp, then apply a finish of your choice; our planter is
protected with a coat of clear sealant-preservative.
http://www.blackanddecker.com/ProjectCenter/printview.aspx?DOC_ID=p_2_85_22074_22089.html (3 of 3)17/03/2005 21:21:00
Project Center
How to Build Planter Boxes
>
Everything You Need:
Tools: Tape measure,
Circular saw, Straightedge,
Drill, Finishing sander, Miter
box and backsaw, 8 ft. cedar
1 × 2s (3), 8 ft. cedar 1 × 4s
(6), 4 × 8 ft. sheet of 5/8" fir
siding, 2 × 4 ft. piece 3/4"
CDX plywood, 1 1/4"
galvanized deck screws, 1
1/2" galvanized deck screws,
6d galvanized finish nails,
Exterior wood stain,
Paintbrush.
CUTTING LIST
Key Part
Front Bin
Dimension
Pcs.
Middle Bin
Dimension
Pcs.
Back Bin
Dimension
Pcs.
Material
A
End
panel
5/8 × 15 × 11
1/8'
2
5/8 × 15 × 17
1/8'
2
5/8 × 15 × 23
1/8'
2
Siding
B
Side
panel
5/8 × 22 1/4
x 11 1/8'
2
5/8 × 10 1/4
x 17 1/8'
2
'5/8 × 10 1/4
× 23 1/8'
2
Siding
C
Corner
trim
'7/8 × 3 1/2 x
11 1/8'
8
7/8 × 3 1/2 x
17 1/8
8
7/8 × 3 1/2 x
23 1/8
8
Cedar
D
Bottom
trim
7/8 × 3 1/2 x
9 1/4'
2
7/8 × 3 1/2 x
9 1/4'
2
7/8 × 3 1/2 x
9 1/4'
2
Cedar
E
Bottom
trim
7/8 × 3 1/2 x
17'
2
'7/8 × 3 1/2x
5'
2
7/8 × 3 1/2 x
5'
2
Cedar
I
Top cap
7/8 × 1 1/2 x
18'
2
7/8 × 1 1/2 x
18'
2
7/8 × 1 1 1/2
× 18'
2
Cedar
G Top cap
7/8 × 1 1/2 x
24'
2
7/8 × 1 1/2 x
12'
2
7/8 × 1 1/2 x
12'
2
Cedar
H
Bottom
panel
3/4 × 14 1/2
x 19 1/2'
1
3/4 × 14 1/2
x 8 1/2'
1
3/4 × 14 1/2
x 8 1/2'
1
Plywood
I
Cleat
'7/8 × 1 1/2 x
12'
2
'7/8 × 1 1/2 x
12'
2
'7/8 × 1 1/2 x
12'
2
Cedar
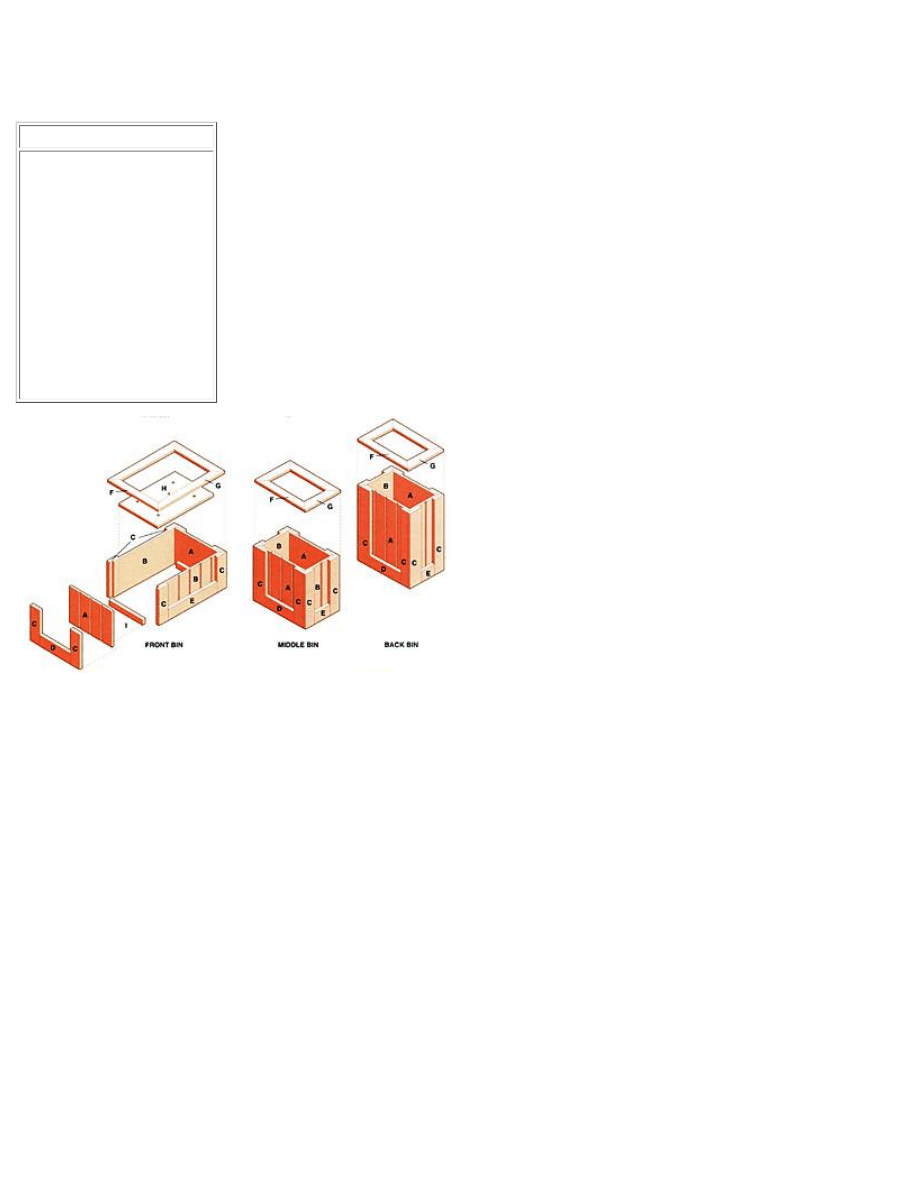
DIMENSIONS
Front Bin Overall
Size
Back Bin Overall Size
http://www.blackanddecker.com/ProjectCenter/printview.aspx?DOC_ID=p_2_87_22153_22225_22306.html (1 of 3)17/03/2005 21:29:41
Project Center
12' High
24' High
18' Wide
18' Wide
24' Long
12' Long
Middle Bin overall
Size
18' High
18' Wide
12' Long
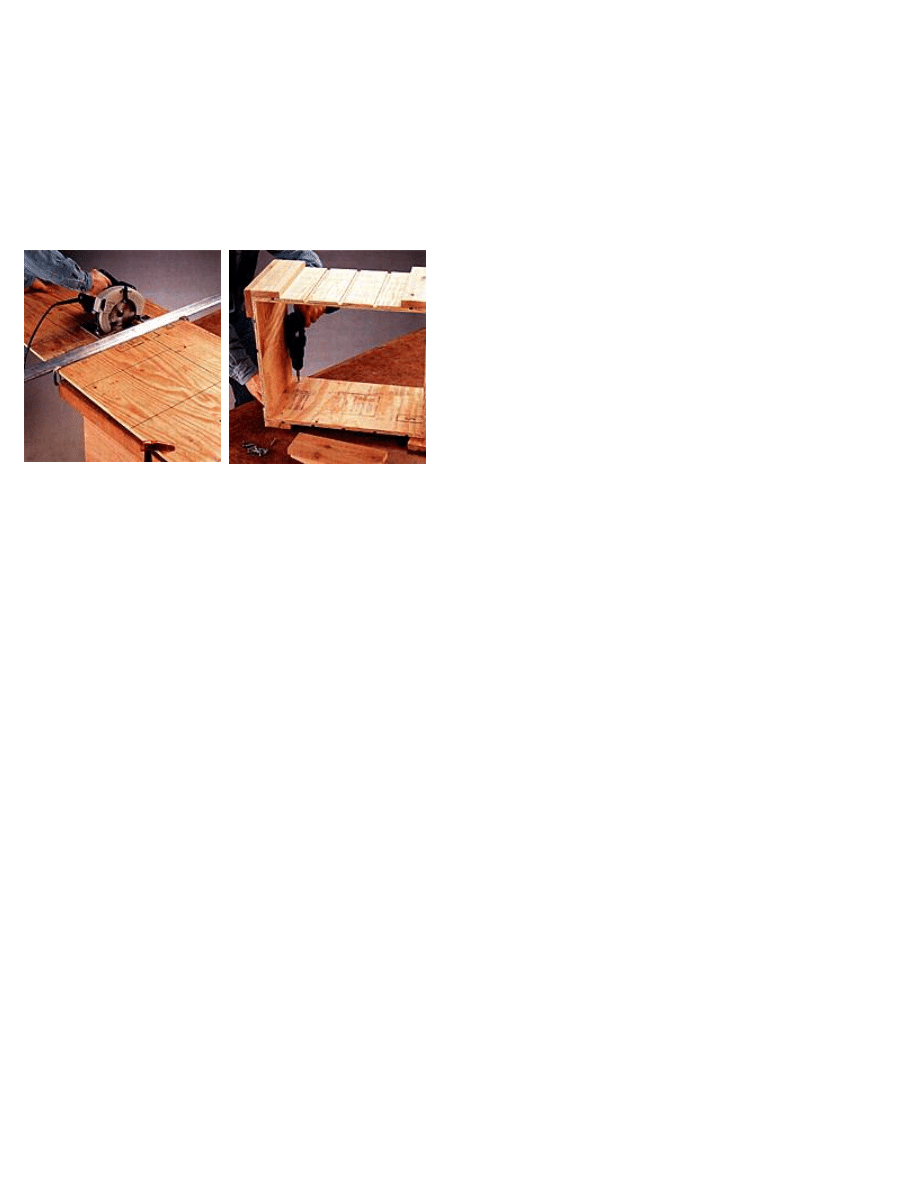
Step A: Make &
Assemble the Box Panels
1. Following the cutting list,
cut the end panels (A) and
side panels (B), using a
circular saw and a
straightedge cutting guide.
2. Put one end panel face-
down on your work surface,
butting it up against the
side panel, face-sideout.
Mark positions and drill
several counterbored 3/32"
pilot holes in the side panel.
3. Fasten the side panel to
the end panel with 1 1/2"
deck screws. Repeat this
process to fasten a second
side panel to the end panel.
4. Put the remaining end
panel face-down on the
work surface. Take the
assembled pieces and place
the open end over the
second end panel, side
panels flush with the end-
panel edges. Drill
counterbored pilot holes in
the side panels, and attach
the side panels to the end
panel, using deck screws.
Step B: Attach the Trim
1. Cut the corner trim (C) to
length. Overlap the edges of the
corner trim pieces at the corner,
forming a square butt joint.
Fasten the corner trim pieces to
the panels by driving 1 1/4"
deck screws through the inside
faces of the panels and into the
corner pieces.
2. To provide extra support,
drive screws or galvanized finish
nails through the overlapping
corner trim pieces and into the
edges of the adjacent trim piece.
3. Cut the bottom trim pieces
(D, E) to length. Fasten them to
the end and side panels,
between the corner trim pieces.
Drive 1 1/4" deck screws
through the side and end panels
and into the bottom trim pieces.
4. Cut the top caps (F, G) to
length. Cut 45° miters at both
ends of one cap piece, using a
miter box and back saw.
5. Tack the mitered cap piece to
the top edge of the planter, with
the outside edges flush with the
outer edges of the corner trim
pieces. For a proper fit, use this
cap piece to guide the marking
and cutting of the miters on the
other cap pieces.
http://www.blackanddecker.com/ProjectCenter/printview.aspx?DOC_ID=p_2_87_22153_22225_22306.html (2 of 3)17/03/2005 21:29:41

Project Center
6. Miter both ends of each piece.
Tack it to the box so it makes a
square corner with the
previously installed piece. If the
corners don't fit just right,
loosen the pieces, and adjust
them until everything is square.
7. Permanently attach all the
cap pieces to the box, using 6d
galvanized finish nails.
Step C: Install the Box
Bottom & Finish the Planter
1. Cut the cleats (I) to length,
and screw them to the end
panels with 1 1/2" deck screws.
On taller planters, it's best to
mount the cleats higher on the
panels so you won't need as
much soil to fill the box-a
savings in cost and weight. in
that case, add cleats on the side
panels for extra support.
2. Cut the bottom panel (H) to
size from 3/4"-thick CDX
plywood. Drill several 1"-
diameter weep holes in this
panel. Set the panel onto the
cleats-it does not need to be
fastened in place.
3. Using a finishing sander,
remove rough spots and
splinters from all edges and
surfaces. Apply two or three
coats of exterior wood stain to
all surfaces, and let the planter
dry.
Other related projects in this chapter include:
How to Build Planter Boxes
Tips--Simplify Planting & Maintenance
http://www.blackanddecker.com/ProjectCenter/printview.aspx?DOC_ID=p_2_87_22153_22225_22306.html (3 of 3)17/03/2005 21:29:41

Project Center
Tips--Simplify Planting & Maintenance
>
To help keep planter boxes from becoming discolored, line
them with landscape fabric before adding soil. Simply cut a
piece of fabric large enough to wrap the box as if you were
gift-wrapping it, and then fold it to fit inside the box. Staple
the fabric at the top of the box and trim off the excess. Add a
2" layer of gravel, and then add potting soil and plants.
If your yard or garden is partially shaded, you may want to
add wheels or casters to your planter boxes so you can move
them to follow the sun; casters also make it easier to bring
the planters indoors during cold weather. Be sure to use
locking wheels or casters with brass or plastic housings.
If you're not experienced at arranging color combinations,
start with a simple approach. Stay within the basic hot (red,
yellow, and orange) or cool (blue, purple, and green) color
families to create visual harmony. You can plant a collection of
flowers and foliage in your favorite color or try combining a
variety of hues of the same color. If you want to add contrast,
add some plants in neutral tones.
Proportion, or the size and scale of plants in relationship to
one another and the container, is another important
component of successful plantings. In general, plant tall plants
in large containers and low-lying plants in smaller ones. To
achieve balance, use a dominant plant to establish a focal
point, and then fill in around it with a combination of colors,
textures, and shapes.
Before purchasing plants for any container, consider their
preferred growing conditions. Grouping plants with similar soil,
watering, and fertilization requirements simplifies your work
during the growing season.
Other related projects in this chapter include:
Tips--Simplify Planting & Maintenance
http://www.blackanddecker.com/ProjectCenter/printview.aspx?DOC_ID=p_2_87_22153_22225_22307.html17/03/2005 21:30:30
Document Outline
- Square Planter Box.pdf
- blackanddecker.com
- box planter.pdf
- blackanddecker.com
- planter box 3.pdf
- blackanddecker.com
- planter box 4.pdf
- blackanddecker.com
Wyszukiwarka
Podobne podstrony:
planter box 2
planter box
planter box with trellis
Planter Box
planter box with trellis
Planter Box
Picket Fence Planter Box
Garden Planter Square from UK
Planters The Basic Box
Window Box Planter
box shaped planter
Planter Salt box planter
więcej podobnych podstron