
Language Bindings
This chapter would not quite fit into the printed SharpDevelop book so it has been decided that it will
be released online.
One of the aims in the development of SharpDevelop was to provide support for as wide a spectrum of
programming languages and compilers as possible, be they .NET or not. This is accomplished by
implementing compiler and language support as add-ins.
This chapter deals with the issues involved in implementing a language binding.
Topics for this chapter include:
❑
The C# language binding
❑
Switching compilers for C#
❑
Binding a different language
The C# Language Binding
We will discuss the C# language binding first, as this binding is the most frequently used by the
SharpDevelop team. After all, SharpDevelop is written exclusively in C#. This binding is therefore the
most elaborate of those considered to date, especially due to the options available with the C# compiler.
Chapter 18
2
The Big Picture
A language binding is more than it might at first appear to be: a call to a compiler so that we can
produce executable code without leaving the IDE. What about running the code? In .NET, we need a
runtime for that. We therefore also have to specify this and as we will see in the next section on
switching compilers, there can be more than one runtime available.
And there is even more to be considered – the behavior of the IDE also depends on which language is
being used for development. The appearance of the text in the editor depends on the language as this
governs the highlighting and formatting of the text.
The 'natural' approach for implementing a language binding is to use the add-in tree of SharpDevelop
for this purpose. We want to be able to modify, insert, or delete a binding without disrupting the
functionality of SharpDevelop. We will now look at the way this can be done
We will start with the formatting strategy as the lowest level of detail and work our way up to the big
picture where all things come together.
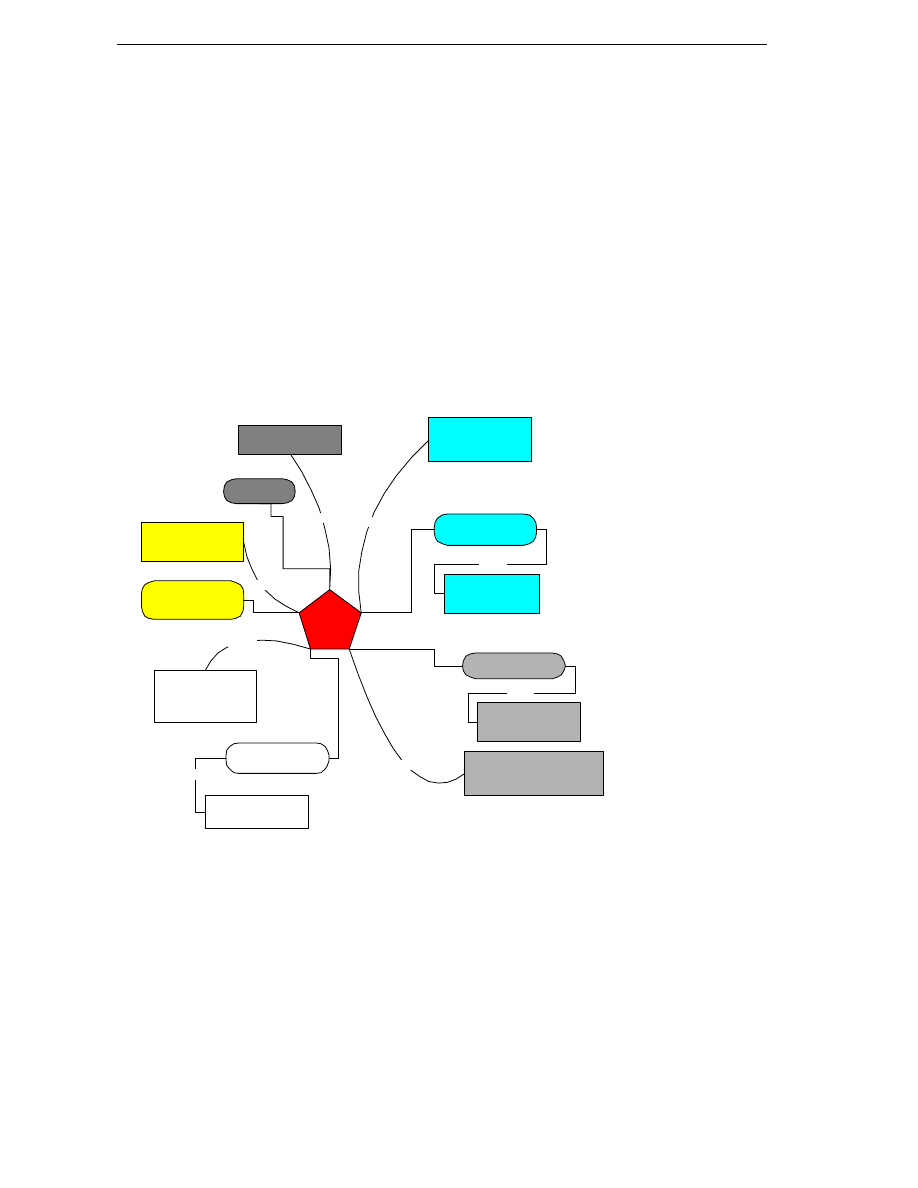
The following diagram illustrates the C# binding to show how the various elements of a language
binding relate to the add-in tree and how they are used in SharpDevelop:
LanguageBindingCodon
AddInTre e
CSharpLanguageBinding
(Compilation/Execution)
Creates
LanguageBindingService
GetsAllBindings
ClassCodon
CSharpFormattingStrategy
(Formatting/Indenting)
Creates
SharpDevelopTextAreaControl
GetsFormattingForLanguage
DialogPanelCodon
DialogPanel
*
Creates
Display s
ProjectOptionsDialog
FileFilterCodon
IconCodon
File Dialogs
Display s
Loads
FileUtilityService
Take heart: things are not as complex as they may seem. Each color-coded 'leg' of the 'spider'
corresponds to one of the items we will discuss below Lets examine the various legs in the C# binding.

Language Bindings
3
Formatting Strategy
Besides the issue of syntax highlighting (which was discussed in Chapter 8, Syntax Highlighting), we need
something else for our IDE to be useful from an editing point of view - formatting. We use this term to
refer to placement of code in the editor as opposed to coloring of the text according to the highlighting
rules. In formatting our code, we deal with indentation, which ideally should reflect logical levels of
nesting code structures. There are two modes of indentation to consider:
❑
Autoindenting
❑
Smart indenting
Autoindenting is simple to explain – we have some block of text in which we stay at a given level of
indentation If we indent a line with the tab key, the next line also should be indented to this same level.
This is fine for straight text but what about code following some style guidelines? Say we have a switch
statement and type in something like:
switch(foo){
case "1":
bar();
break;
case "2":
baz();
break;
default:
fnord();
}
This code without indentation is not nice to read and hard to understand. Understanding longer
stretches of code without indentation according to the inner logic of the code is tiring and error-prone.
Now, let us look at a formatted version of the above snippet:
switch(foo){
case "1":
bar();
break;
case "2":
baz();
break;
default:
fnord();
}
Much nicer to look at and easier to understand, isn't it? This is the whole point of smart indenting. You
type in your code and the formatting strategy does the rest, indenting and unindenting as required by
the construct. Obviously, different languages are going to need different rules for indentation, so it
makes sense for this kind of formatting to be included in the language binding.
We will look at a part of the code contained in the file
src\BackendBindings\CSharpLanguageModule\FormattingStrategy\CSharpFormattingSt
rategy.cs

Chapter 18
4
namespace CSharpBinding.FormattingStrategy {
public class CSharpFormattingStrategy : DefaultFormattingStrategy
{
public CSharpFormattingStrategy()
{
}
/// <summary>
/// Define CSharp specific smart indenting for a line :)
/// </summary>
protected override int SmartIndentLine(int lineNr)
{
if (lineNr > 0) {
LineSegment lineAbove = document.GetLineSegment(lineNr - 1);
string lineAboveText =
document.GetText(lineAbove.Offset, lineAbove.Length).Trim();
LineSegment curLine = document.GetLineSegment(lineNr);
string curLineText =
document.GetText(curLine.Offset, curLine.Length).Trim();
if (lineAboveText.EndsWith(")") && curLineText.StartsWith("{")) {
string indentation = GetIndentation(lineNr - 1);
document.Replace
(curLine.Offset, curLine.Length, indentation + curLineText);
return indentation.Length;
}
In the code segment above, you see a use of the
LineSegment
functions we first encountered in
chapter 8, Document Management. We do not always deal with entire lines of text, so we handle such
cases separately. One of these cases is indenting lines when they contain certain characters at end or
start, such as beginning curly brackets or closing parentheses. In such cases, we adjust the indentation
level. The indentation and the rest of the line can then be considered as line segments.
Next, we handle the closing of brackets:
if (curLineText.StartsWith("}")) { // indent closing bracket.
int closingBracketOffset =
TextUtilities.SearchBracketBackward(document, curLine.Offset +
document.GetText(curLine.Offset, curLine.Length).
IndexOf('}') - 1, '{', '}');
if (closingBracketOffset == -1) {
// no closing bracket found -> autoindent
return AutoIndentLine(lineNr);
}
string indentation =
GetIndentation(document.GetLineNumberForOffset(closingBracketOffset));
document.Replace
(curLine.Offset, curLine.Length, indentation + curLineText);
return indentation.Length;
}

Language Bindings
5
We have to check whether the closing bracket that was just typed matches an existing opening bracket.
Of course, we also have to keep up a certain indentation level when we changed it, so that all the code
in between paired brackets is indented at the same level:
if (lineAboveText.EndsWith(";")) {
// expression ended, reset to valid indent.
int closingBracketOffset =
TextUtilities.SearchBracketBackward
(document, curLine.Offset +
document.GetText
(curLine.Offset, curLine.Length).IndexOf('}') - 1, '{', '}');
if (closingBracketOffset == -1) {
// no closing bracket found -> autoindent
return AutoIndentLine(lineNr);
}
int closingBracketLineNr =
document.GetLineNumberForOffset(closingBracketOffset);
LineSegment closingBracketLine =
document.GetLineSegment(closingBracketLineNr);
string closingBracketLineText =
document.GetText
(closingBracketLine.Offset, closingBracketLine.Length).Trim();
string indentation = GetIndentation(closingBracketLineNr);
We always consider an expression complete when we encounter ';'. Then we go and set the indentation
to the currently valid value. As soon as we close a bracket, the level is reset to the level of that bracket.
Do you recall the coding style guidelines we discussed in chapter 2? There we presented our way to
format a
switch
statement. Of course, we implement a routine for automatically formatting these
statements:
// special handling for switch statement formatting.
if (closingBracketLineText.StartsWith("switch")) {
if (lineAboveText.StartsWith("break;") ||
lineAboveText.StartsWith("goto") ||
lineAboveText.StartsWith("return")) {
} else {
indentation += "\t";
}
}
indentation += "\t";
document.Replace
(curLine.Offset, curLine.Length, indentation + curLineText);
return indentation.Length;
}

Chapter 18
6
In the above code, we handle the lines containing the switch keywords such as
case
etc. separately and
give a default handling for all other code in the switch. This is what is called smart indenting; it depends
on a specific construct with a given formatting style. Next we go on to handle other cases that need
special indentation, involve line wrapping or nested parentheses. This is called autoindenting:
if (lineAboveText.EndsWith("{") || // indent opening bracket.
lineAboveText.EndsWith(":") || // indent case xyz:
(lineAboveText.EndsWith(")") && // indent single line if, for ... etc
(lineAboveText.StartsWith("if") ||
lineAboveText.StartsWith("while") ||
lineAboveText.StartsWith("for"))) ||
lineAboveText.EndsWith("else")) {
string indentation = GetIndentation(lineNr - 1) + "\t";
document.Replace
(curLine.Offset, curLine.Length, indentation + curLineText);
return indentation.Length;
} else {
// try to indent linewrap
ArrayList bracketPos = new ArrayList();
for (int i = 0; i < lineAboveText.Length; ++i) {
// search for a ( bracket that isn't closed
switch (lineAboveText[i]) {
case '(':
bracketPos.Add(i);
break;
case ')':
if (bracketPos.Count > 0) {
bracketPos.RemoveAt(bracketPos.Count - 1);
}
break;
}
}
This code is performing automatic indenting. The important thing here is to keep track of indenting
levels as they can reach arbitrary depths in contrast to the indenting scenarios we looked at until now.
We handle the levels in an array list. The code below performs the actual indenting by adding spaces
according to the nesting depth:
if (bracketPos.Count > 0) {
int bracketIndex = (int)bracketPos[bracketPos.Count - 1];
string indentation = GetIndentation(lineNr - 1);
for (int i = 0; i <= bracketIndex; ++i) {
// insert enough spaces to match
indentation += " ";
// brace start in the next line
}
document.Replace
(curLine.Offset, curLine.Length, indentation + curLineText);
return indentation.Length;
}
Language Bindings
7
}
}
return AutoIndentLine(lineNr);
}
As we have to check for language specific keywords to achieve smart indenting behavior, an individual
formatting strategy has to be defined for each language supported by SharpDevelop.
GUI Issues
The language we are programming in has no effect on most of the SharpDevelop GUI. The option
dialogs, however, are affected. Option dialogs control the project options for compiler settings, the
runtime environment used, and output options, amongst other things. As the options available vary with
the language, we also have to provide dialog panels appropriate for each language. Another subtle
interaction with the GUI is that we have to modify the file I/O dialogs depending on the project's
programming language, as we have to insert the appropriate file extension filters into the dropdown
box. The file filters will be discussed in the section Putting it all together, as the add-in XML file handles
them. Also, icons corresponding to various project types may be supplied
SharpDevelop uses three option dialogs to configure the project and compiler options:
❑
Output options
❑
Code generation options
❑
Compiler/Runtime options
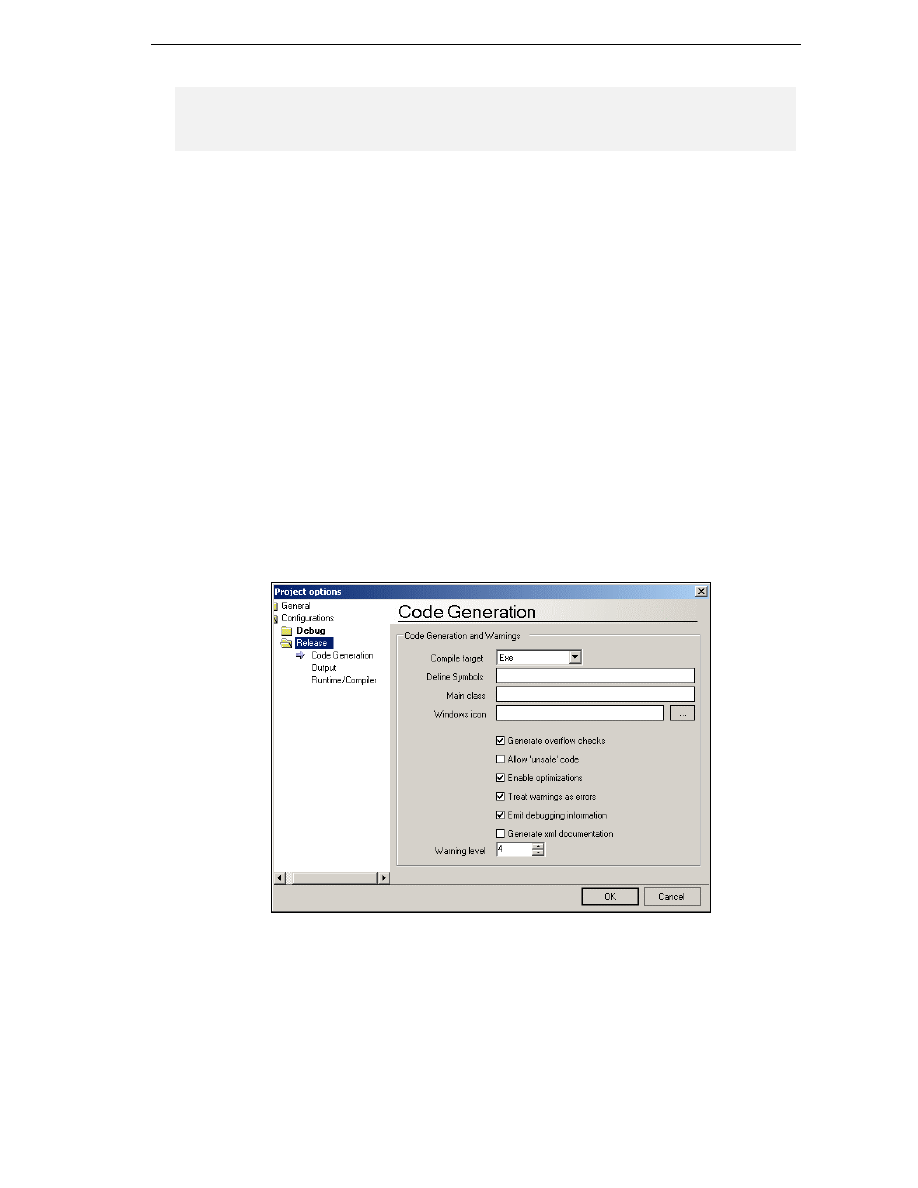
Here, we will deal with the implementation of these panels. For this purpose, we will look at the code
generation options dialog. The other dialogs' implementation follows the same route, so we can omit
them here. The panel is shown in the following screenshot:

Chapter 18
8
It should be noted that there are two different panels for debug and release compilation respectively.
The debug panel activates the debug options of the compiler, whereas the release panel disables them.
The source code for this panel is located in
src\BackendBindings\CSharpLanguageModule\Gui\CodeGenerationPanel.cs
and is as follows:
using ICSharpCode.SharpDevelop.Internal.Project;
using ICSharpCode.SharpDevelop.Internal.ExternalTool;
using ICSharpCode.SharpDevelop.Gui.Dialogs;
using ICSharpCode.Core.Services;
using ICSharpCode.Core.Properties;
using ICSharpCode.Core.AddIns.Codons;
namespace CSharpBinding {
public class CodeGenerationPanel : AbstractOptionPanel
{
CSharpCompilerParameters compilerParameters = null;
ResourceService resourceService =
(ResourceService)ServiceManager.Services.GetService(typeof(ResourceService));
Above, we have initialized our dialog panel using the SharpDevelop resource service. We discussed this
service in chapter 5, Providing Functionality with Workspace Services. We also reference the SharpDevelop
namespace responsible for handling GUI dialog. Next we move on to handle an item to be used in
creating the project – the icon for the compiled program. This icon is obtained from a method that we
will see further down, here we just handle what we received:
public override bool ReceiveDialogMessage(DialogMessage message)
{
if (message == DialogMessage.OK) {
if (compilerParameters == null) {
return true;
}
FileUtilityService fileUtilityService = (FileUtilityService)
ServiceManager.Services.GetService(typeof(FileUtilityService));
if (ControlDictionary["win32IconTextBox"].Text.Length > 0) {
if (!fileUtilityService.IsValidFileName
(ControlDictionary["win32IconTextBox"].Text)) {
MessageBox.Show("Invalid Win32Icon specified", "Error",
MessageBoxButtons.OK, MessageBoxIcon.Hand,
MessageBoxDefaultButton.Button1);
return false;
}
if (!File.Exists(ControlDictionary["win32IconTextBox"].Text)) {
MessageBox.Show("Win32Icon doesn't exist", "Error",
MessageBoxButtons.OK, MessageBoxIcon.Hand,
MessageBoxDefaultButton.Button1);
return false;
}
}

Language Bindings
9
Having successfully obtained our icons from the SharpDevelop file utility service, we can move on to
defining the form items we need for setting project options – textboxes and checkboxes:
compilerParameters.CompileTarget = (CompileTarget)
((ComboBox)ControlDictionary["compileTargetComboBox"]).SelectedIndex;
compilerParameters.DefineSymbols =
ControlDictionary["symbolsTextBox"].Text;
compilerParameters.MainClass =
ControlDictionary["mainClassTextBox"].Text;
compilerParameters.Win32Icon =
ControlDictionary["win32IconTextBox"].Text;
compilerParameters.Debugmode = ((CheckBox)
ControlDictionary["generateDebugInformationCheckBox"]).Checked;
compilerParameters.GenerateXmlDocumentation = ((CheckBox)
ControlDictionary["generateXmlOutputCheckBox"]).Checked;
compilerParameters.Optimize = ((CheckBox)
ControlDictionary["enableOptimizationCheckBox"]).Checked;
compilerParameters.UnsafeCode = ((CheckBox)
ControlDictionary["allowUnsafeCodeCheckBox"]).Checked;
compilerParameters.GenerateOverflowChecks = ((CheckBox)
ControlDictionary["generateOverflowChecksCheckBox"]).Checked;
compilerParameters.RunWithWarnings = !((CheckBox)
ControlDictionary["warningsAsErrorsCheckBox"]).Checked;
compilerParameters.WarningLevel =
(int)((NumericUpDown)ControlDictionary["warningLevelNumericUpDown"]).Value;
}
return true;
}
Now we need to give meaningful default values – or if the options already have been set in a previous
SharpDevelop session – we need to restore the saved values:
void SetValues(object sender, EventArgs e)
{
this.compilerParameters = (CSharpCompilerParameters)
((IProperties)CustomizationObject).GetProperty("Config");
((ComboBox)ControlDictionary["compileTargetComboBox"]).SelectedIndex =
(int)compilerParameters.CompileTarget;
ControlDictionary["symbolsTextBox"].Text =
compilerParameters.DefineSymbols;
ControlDictionary["mainClassTextBox"].Text = compilerParameters.MainClass;
ControlDictionary["win32IconTextBox"].Text = compilerParameters.Win32Icon;
Not terribly exciting, code, as you will certainly agree, but it does show the use of .NET dictionaries.
Now, on with it:
((CheckBox)ControlDictionary["generateDebugInformationCheckBox"]).Checked =
compilerParameters.Debugmode;
((CheckBox)ControlDictionary["generateXmlOutputCheckBox"]).Checked =
compilerParameters.GenerateXmlDocumentation;
((CheckBox)ControlDictionary["enableOptimizationCheckBox"]).Checked =

Chapter 18
10
compilerParameters.Optimize;
((CheckBox)ControlDictionary["allowUnsafeCodeCheckBox"]).Checked =
compilerParameters.UnsafeCode;
((CheckBox)ControlDictionary["generateOverflowChecksCheckBox"]).Checked =
compilerParameters.GenerateOverflowChecks;
((CheckBox)ControlDictionary["warningsAsErrorsCheckBox"]).Checked =
!compilerParameters.RunWithWarnings;
((NumericUpDown)ControlDictionary["warningLevelNumericUpDown"]).Value =
compilerParameters.WarningLevel;
}
Now that we have filled in the compiler options, we need to get the compilation target type and the
program's icon set. This is done by handling events from the compile target combo box and the icon
browse button:
public CodeGenerationPanel() : base(Application.StartupPath +
@"\..\data\resources\panels\ProjectOptions\CodeGenerationPanel.xfrm")
{
CustomizationObjectChanged += new EventHandler(SetValues);
((ComboBox)ControlDictionary["compileTargetComboBox"]).Items.Add
(resourceService.GetString
("Dialog.Options.PrjOptions.Configuration.CompileTarget.Exe"));
((ComboBox)ControlDictionary["compileTargetComboBox"]).
Items.Add(resourceService.GetString
("Dialog.Options.PrjOptions.Configuration.CompileTarget.WinExe"));
((ComboBox)ControlDictionary["compileTargetComboBox"]).
Items.Add(resourceService.GetString
("Dialog.Options.PrjOptions.Configuration.CompileTarget.Library"));
ControlDictionary["browseWin32IconButton"].Click +=
new EventHandler(SelectWin32Icon);
}
The code below selects the icon to be associated with the compiled program from an icon file. This uses
the standard open file dialog box. The result is handled by the routine why saw a while ago:
void SelectWin32Icon(object sender, EventArgs e)
{
using (OpenFileDialog fdiag = new OpenFileDialog()) {
fdiag.AddExtension = true;
fdiag.Filter = "Icon|*.ico|All files (*.*)|*.*";
fdiag.Multiselect = false;
fdiag.CheckFileExists = true;
if (fdiag.ShowDialog() == DialogResult.OK) {
ControlDictionary["win32IconTextBox"].Text = fdiag.FileName;
}
}
}
}
}

Language Bindings
11
This code defines the panel, yet does not look like windows forms code. This is due to the fact that we
are using XML forms here. The actual layout is defined in an XML file.
After having looked at the 'skin' of a language binding, we are ready to go to the heart – compiler and
execution environment for our language.
The Compiler
We now go on to specifying the compiler to be used. In this case, we use the
csc.exe
compiler
supplied with the .NET framework SDK This compiler has numerous options for controlling the code
generated – how overflows should be handled, what source and target files to use, and so on. The full
list of available options is given below, following the order they are given in the .NET Framework SDK
documentation:
Option
Purpose
@
Specifies a response file.
/?
List the compiler options to standard output.
/addmodule
Specifies one or more modules that are to be part of this assembly.
/baseaddress
Specifies a preferred base address at which to load a DLL.
/bugreport
Creates a file containing information that makes it easy to report a bug.
/checked
Specifies whether integer arithmetic overflows beyond the bounds of the data
type will cause an exception at run time.
/codepage
Specifies a code page to be used for all source code files in the compilation.
/debug
Emits debugging information.
/define
Defines preprocessor symbols.
/doc
Processes documentation comments to an XML file.
/filealign
Specifies the size of sections in the output file.
/fullpaths
Specifies the absolute path to the file in compiler output.
/help
Lists compiler options to standard output.
/incremental
Enables incremental compilation of the source code files.
/lib
Specifies the location of assemblies referenced by /reference.
/linkresource
Creates a link to a managed resource.
/main
Specifies the location of the Main method.
/nologo
Suppresses the compiler banner information.
/nostdlib
Do not import the standard library (mscorlib.dll).
/noconfig
Do not compile with either the global or local versions of csc.rsp.

Chapter 18
12
/nowarn
Suppresses the compiler's ability to generate specified warnings.
/optimize
Enables/disables code optimizations.
/out
Specifies the output file.
/recurse
Searches subdirectories for source files to compile.
/reference
Imports metadata from a file that contains an assembly.
/resource
Embeds a .NET Framework resource into the output file.
/target
Specifies the format of the output file using one of four options:
/target:exe
/target:library
/target:module
/target:winexe
/unsafe
Compiles code using the unsafe keyword.
/utf8output
Displays compiler output using the UTF-8 encoding.
/warn
Sets the warning level.
/warnaserror
Promotes warnings to errors.
/win32icon
Inserts an .ico icon file into the output file.
/win32res
Inserts a Win32 resource into the output file.
Of course, a compiler options dialog offering all of these options using individual check boxes would be
difficult to use. We therefore decided to skip a number of the options available The option dialog for
setting the options available was shown in the above section "GUI Issues" where we also looked at the
code for generating these
We will now look at some code from
src\BackendBindings\CSharpLanguageModule\Project\CSharpCompilerParameters.cs
,
which sets the compiler options for the C# compiler:
using System;
using System.Xml;
using System.Diagnostics;
using ICSharpCode.SharpDevelop.Internal.Project;
namespace CSharpBinding {
public enum CompileTarget {
Exe,
WinExe,
Library
};
public enum CsharpCompiler {
Csc,
Mcs

Language Bindings
13
};
public enum NetRuntime {
Mono,
MonoInterpreter,
MsNet
};
/// <summary>
/// This class handles project specific compiler parameters
/// </summary>
public class CSharpCompilerParameters : AbstractProjectConfiguration
{
[XmlNodeName("CodeGeneration")]
class CodeGeneration
{
[XmlAttribute("runtime")]
public NetRuntime netRuntime = NetRuntime.MsNet;
[XmlAttribute("compiler")]
public CsharpCompiler csharpCompiler = CsharpCompiler.Csc;
[XmlAttribute("warninglevel")]
public int warninglevel = 4;
[XmlAttribute("includedebuginformation")]
public bool debugmode = true;
[XmlAttribute("optimize")]
public bool optimize = true;
[XmlAttribute("unsafecodeallowed")]
public bool unsafecode = false;
[XmlAttribute("generateoverflowchecks")]
public bool generateOverflowChecks = true;
[XmlAttribute("mainclass")]
public string mainclass = null;
[XmlAttribute("target")]
public CompileTarget compiletarget = CompileTarget.Exe;
[XmlAttribute("definesymbols")]
public string definesymbols = String.Empty;
[XmlAttribute("generatexmldocumentation")]
public bool generateXmlDocumentation = false;
[ConvertToRelativePathAttribute()]
[XmlAttribute("win32Icon")]
public string win32Icon = String.Empty;
}
[XmlNodeName("Execution")]
class Execution

Chapter 18
14
{
[XmlAttribute("commandlineparameters")]
public string commandLineParameters = String.Empty;
[XmlAttribute("consolepause")]
public bool pauseconsoleoutput = true;
}
CodeGeneration codeGeneration = new CodeGeneration();
Execution execution = new Execution();
public CsharpCompiler CsharpCompiler {
get {
return codeGeneration.csharpCompiler;
}
set {
codeGeneration.csharpCompiler = value;
}
}
public NetRuntime NetRuntime {
get {
return codeGeneration.netRuntime;
}
set {
codeGeneration.netRuntime = value;
}
}
public bool GenerateXmlDocumentation {
get {
return codeGeneration.generateXmlDocumentation;
}
set {
codeGeneration.generateXmlDocumentation = value;
}
}
public string Win32Icon {
get {
return codeGeneration.win32Icon;
}
set {
codeGeneration.win32Icon = value;
}
}
public string DefineSymbols {
get {
return codeGeneration.definesymbols;
}
set {
codeGeneration.definesymbols = value;
}
}

Language Bindings
15
public string CommandLineParameters {
get {
return execution.commandLineParameters;
}
set {
execution.commandLineParameters = value;
}
}
public int WarningLevel {
get {
return codeGeneration.warninglevel;
}
set {
codeGeneration.warninglevel = value;
}
}
public bool PauseConsoleOutput {
get {
return execution.pauseconsoleoutput;
}
set {
execution.pauseconsoleoutput = value;
}
}
public bool Debugmode {
get {
return codeGeneration.debugmode;
}
set {
codeGeneration.debugmode = value;
}
}
public bool Optimize {
get {
return codeGeneration.optimize;
}
set {
codeGeneration.optimize = value;
}
}
public bool UnsafeCode {
get {
return codeGeneration.unsafecode;
}
set {
codeGeneration.unsafecode = value;
}
}
public bool GenerateOverflowChecks {
get {

Chapter 18
16
return codeGeneration.generateOverflowChecks;
}
set {
codeGeneration.generateOverflowChecks = value;
}
}
public string MainClass {
get {
return codeGeneration.mainclass;
}
set {
codeGeneration.mainclass = value;
}
}
public CompileTarget CompileTarget {
get {
return codeGeneration.compiletarget;
}
set {
codeGeneration.compiletarget = value;
}
}
public CSharpCompilerParameters()
{
}
public CSharpCompilerParameters(string name)
{
this.name = name;
}
}
}
As you can see, we only use a subset of the options available for the C# compiler. Also note that the
runtime for executing our programs and the compiler to use are set in this code. However, as we will
see further down in the section Switching the Compiler, these settings can be overridden.
But how do we know where the compiler and runtime can be found? We did not set any path here. To
answer this question, let us look at the following piece of code from the file
src\BackendBindings\CSharpLanguageModule\CSharpBindingCompilerManager.cs
string GetCompilerName()
{
return
fileUtilityService.GetDirectoryNameWithSeparator(System.Runtime.InteropServices.Ru
ntimeEnvironment.GetRuntimeDirectory()) +
"csc.exe";
}

Language Bindings
17
Simple, isn't it? We know that the C# compiler
csc.exe
is located in the path of the .NET runtime, so
we merely have to use the above call to obtain this path and concatenate
csc.exe
onto it Now we only
need to pass the options to the compiler and we are all set to compile This again happens in the above
source file.
public ICompilerResult CompileProject(IProject project)
{
CSharpProject p = (CSharpProject)project;
CSharpCompilerParameters compilerparameters =
(CSharpCompilerParameters)p.ActiveConfiguration;
string exe = fileUtilityService.GetDirectoryNameWithSeparator
(compilerparameters.OutputDirectory) + compilerparameters.OutputAssembly +
(compilerparameters.CompileTarget ==
CompileTarget.Library ? ".dll" : ".exe");
string responseFileName = Path.GetTempFileName();
StreamWriter writer = new StreamWriter(responseFileName);
string optionString = compilerparameters.CsharpCompiler ==
CsharpCompiler.Csc ? "/" : "-";
if (compilerparameters.CsharpCompiler == CsharpCompiler.Csc) {
writer.WriteLine("\"/out:" + exe + '"');
IP
rojectService projectService = (IProjectService)
ICSharpCode.Core.Services.ServiceManager.Services.GetService
(typeof(IProjectService));
ArrayList allProjects =
Combine.GetAllProjects(projectService.CurrentOpenCombine);
In this, we also open a response file as we need to capture the compilers option list, which can get quite
lengthy. This way we avoid potential problems with options being dropped due to line length
restrictions. The statement
if (compilerparameters.CsharpCompiler == CsharpCompiler.Csc) {
generates options for the .NET C# compiler. More on compiler specific issues further down when we
look at generating options for the mono C# compiler.
Now we need to get the references set and add a few more compiler switches, some depending on
whether debug compile mode for the project is set:
foreach (ProjectReference lib in p.ProjectReferences) {
writer.WriteLine("\"/r:" + lib.GetReferencedFileName(p) + "\"");
}
writer.WriteLine("/nologo");
writer.WriteLine("/utf8output");
writer.WriteLine("/w:" + compilerparameters.WarningLevel);;
if (compilerparameters.Debugmode) {

Chapter 18
18
writer.WriteLine("/debug:+");
writer.WriteLine("/debug:full");
writer.WriteLine("/d:DEBUG");
}
if (compilerparameters.Optimize) {
writer.WriteLine("/o");
}
All these options are generated using
writer.writeline()
, generating the response file we will feed
into the compiler. Next we set the icon and continue with code generation options:
if (compilerparameters.Win32Icon != null &&
compilerparameters.Win32Icon.Length > 0 &&
File.Exists(compilerparameters.Win32Icon)) {
writer.WriteLine("\"/win32icon:" + compilerparameters.Win32Icon + "\"");
}
if (compilerparameters.UnsafeCode) {
writer.WriteLine("/unsafe");
}
if (compilerparameters.DefineSymbols.Length > 0) {
writer.WriteLine("/define:" + compilerparameters.DefineSymbols);
}
if (compilerparameters.MainClass != null &&
compilerparameters.MainClass.Length > 0) {
writer.WriteLine("/main:" + compilerparameters.MainClass);
}
Selecting the compile target is done using a switch statement:
switch (compilerparameters.CompileTarget) {
case CompileTarget.Exe:
writer.WriteLine("/t:exe");
break;
case CompileTarget.WinExe:
writer.WriteLine("/t:winexe");
break;
case CompileTarget.Library:
writer.WriteLine("/t:library");
break;
}
Next, we handle nested projects and the documentation switch. This is all we need for the .NET
compiler, but after the
else
statement we take care of generating options for a different C# compiler,
namely the MCS compiler of the mono project. This compiler has a different format for options (minus
instead of slash to indicate an option), as it comes from the Linux platform:

Language Bindings
19
foreach (ProjectFile finfo in p.ProjectFiles) {
if (finfo.Subtype != Subtype.Directory) {
switch (finfo.BuildAction) {
case BuildAction.Compile:
writer.WriteLine('"' + finfo.Name + '"');
break;
case BuildAction.EmbedAsResource:
writer.WriteLine("\"/res:" + finfo.Name + "\"");
break;
}
}
}
if (compilerparameters.GenerateXmlDocumentation) {
writer.WriteLine("\"/doc:" + Path.ChangeExtension(exe, ".xml") + '"');
}
}
else {
writer.WriteLine("-o " + exe);
if (compilerparameters.UnsafeCode) {
writer.WriteLine("--unsafe");
}
writer.WriteLine("--wlevel " + compilerparameters.WarningLevel);
IProjectService projectService = (IProjectService)
ICSharpCode.Core.Services.ServiceManager.Services.GetService
(typeof(IProjectService));
ArrayList allProjects =
Combine.GetAllProjects(projectService.CurrentOpenCombine);
foreach (ProjectReference lib in p.ProjectReferences) {
writer.WriteLine("-r " + lib.GetReferencedFileName(p));
}
Again we use a switch statement to select the target type. Note that instead of by a slash, each option is
preceded by two minus signs:
switch (compilerparameters.CompileTarget) {
case CompileTarget.Exe:
writer.WriteLine("--target exe");
break;
case CompileTarget.WinExe:
writer.WriteLine("--target winexe");
break;
case CompileTarget.Library:
writer.WriteLine("--target library");
break;
}
Nearly done, now rinse and repeat for nested projects:

Chapter 18
20
foreach (ProjectFile finfo in p.ProjectFiles) {
if (finfo.Subtype != Subtype.Directory) {
switch (finfo.BuildAction) {
case BuildAction.Compile:
writer.WriteLine('"' + finfo.Name + '"');
break;
case BuildAction.EmbedAsResource:
writer.WriteLine("--linkres " + finfo.Name);
break;
}
}
}
}
We use project settings that are saved to disk from session to session to set the options. Now that we
have seen how to set up everything, we can compile our code. Now what about the compiler's output? It
will emit status messages and (hopefully no) errors. How do we capture these for display? Yet again, the
answer can be found in
src\BackendBindings\CSharpLanguageModule\CSharpBindingCompilerManager.cs
immediately below the code we have already seen:
writer.Close();
string output = String.Empty;
string error = String.Empty;
string compilerName =
compilerparameters.CsharpCompiler == CsharpCompiler.Csc ?
GetCompilerName() : System.Environment.GetEnvironmentVariable
("ComSpec") + " /c mcs";
string outstr = compilerName + " @" + responseFileName;
TempFileCollection tf = new TempFileCollection();
Executor.ExecWaitWithCapture(outstr, tf, ref output, ref error);
ICompilerResult result = ParseOutput(tf, output);
File.Delete(responseFileName);
File.Delete(output);
File.Delete(error);
return result;
}
We create a few temporary files for storing the output and errors generated, then run the compiler using
this line:
Executor.ExecWaitWithCapture(outstr, tf, ref output, ref error);

Language Bindings
21
Then it is parsed for display in the task list. Now that we know how to set up and run a compiler, let us
move on to running our program. This is handled by the execution manager. This manager resides in
the file
src\BackendBindings\CSharpLanguageModule\CSharpBindingExecutionManager.cs
,
which contains the following source code:
namespace CSharpBinding {
public class CSharpBindingExecutionManager
{
public void Execute(string filename)
{
string exe = Path.ChangeExtension(filename, ".exe");
ProcessStartInfo psi =
new ProcessStartInfo(Environment.GetEnvironmentVariable
("ComSpec"), "/c " + "\"" + exe + "\"" + " & pause");
psi.WorkingDirectory = Path.GetDirectoryName(exe);
psi.UseShellExecute = false;
try {
Process p = new Process();
p.StartInfo = psi;
p.Start();
} catch (Exception) {
throw new ApplicationException
("Can't execute " + "\"" + exe +
"\"\n(.NET bug? Try restarting SD or manual start)");
}
}
Above, we obtain the path to the shell and the working directory. Then, we kick off a new process for
execution. This is the simple part – now we go on to overload this so that we can properly handle the
different runtimes:
public void Execute(IProject project)
{
CSharpCompilerParameters parameters =
(CSharpCompilerParameters)project.ActiveConfiguration;
FileUtilityService fileUtilityService = (FileUtilityService)
ServiceManager.Services.GetService(typeof(FileUtilityService));
string directory = fileUtilityService.GetDirectoryNameWithSeparator
(((CSharpCompilerParameters)project.ActiveConfiguration).OutputDirectory);
string exe = ((CSharpCompilerParameters)
project.ActiveConfiguration).OutputAssembly + ".exe";
string args = ((CSharpCompilerParameters)
project.ActiveConfiguration).CommandLineParameters;
ProcessStartInfo psi;
string runtimeStarter = String.Empty;

Chapter 18
22
switch (parameters.NetRuntime) {
case NetRuntime.Mono:
runtimeStarter = "mono ";
break;
case NetRuntime.MonoInterpreter:
runtimeStarter = "mint ";
break;
}
if (parameters.CompileTarget !=
CompileTarget.WinExe && parameters.PauseConsoleOutput) {
psi = new ProcessStartInfo(Environment.GetEnvironmentVariable
("ComSpec"), "/c " + runtimeStarter + "\"" + directory +
exe + "\" " + args + " & pause");
} else {
psi = new ProcessStartInfo(runtimeStarter +
"\"" + directory + exe + "\"");
psi.Arguments = args;
}
try {
psi.WorkingDirectory = Path.GetDirectoryName(directory);
psi.UseShellExecute = false;
Process p = new Process();
p.StartInfo = psi;
p.Start();
} catch (Exception) {
throw new ApplicationException("Can't execute " + "\""
+ directory + exe + "\"\n(.NET bug? Try restaring SD or manual start)");
}
}
}
}
We start up a shell and run the program using the appropriate runtime environment, directory
information, and arguments that may be passed to the program. If the switch statement dealing with
mono and mint confuse you, rest assured, we will explain these further down when discuss switching
between different compilers.
Now that we know how to compile and run our C# programs, we need to look at how this language
binding is integrated into SharpDevelop.
Putting Things Together
What we have done above is all fine stuff, but as of now, it still is independent of SharpDevelop. The
IDE is not aware of a language binding for C#. This is precisely what we will deal with now.
As you know, SharpDevelop is based on an add-in structure. This means that we will also integrate our
language binding as an add-in. For this, we need to define where to add language bindings. This is done
in an XML file It is located in the file
AddIns\bindings\BackendBindings.addin

Language Bindings
23
The format of our XML definition for add-ins is discussed in chapter 4.
Please note that this directory resides immediately below the top-level directory of SharpDevelop. Do
not confuse it with the directory in the
src
branch! In this file, you will find the language bindings for
all programming languages supported by SharpDevelop:
<AddIn name = "SharpDevelop Bindings"
author = "Mike Krueger"
copyright = "GPL"
url = "http://www.icsharpcode.net"
description = "SharpDevelop core module"
version = "1.0.0">
First we have a standard header containing general information, then we move on to defining the file
extension filters for the file dialog boxes as each language has its own file extensions. We also specify
the insertion point in the list of file filters:
<Extension path = "/SharpDevelop/Workbench/FileFilter">
<FileFilter id = "CSharp"
insertbefore="AllFiles"
name = "C# Files (*.cs)"
extensions = "*.cs"/>
<FileFilter id = "VBNET"
insertbefore="AllFiles"
name = "VB Files (*.vb)"
extensions = "*.vb"/>
<FileFilter id = "Assemblies"
insertbefore="AllFiles"
name = "Assemblies Files (*.exe, *.dll)"
extensions = "*.exe,*.dll"/>
<FileFilter id = "Html"
insertbefore="AllFiles"
name = "Html Files (*.htm, *.html)"
extensions = "*.htm,*.html"/>
<FileFilter id = "Xml"
insertbefore="AllFiles"
name = "Xml Files (*.xml)"
extensions = "*.xml"/>
<FileFilter id = "Resources"
insertbefore="AllFiles"
name = "Resource Files (*.resources, *.resx)"
extensions = "*.resources,*.resx"/>
<FileFilter id = "XmlForms"
insertbefore="AllFiles"
name = "Xml Forms (*.xfrm)"
extensions = "*.xfrm"/>
<FileFilter id = "Text files"
insertbefore="AllFiles"
insertafter="CSharp,Java"
name = "Text files (*.txt)"

Chapter 18
24
extensions = "*.txt"/>
<FileFilter id = "SharpDevelop templates"
insertbefore="AllFiles"
name = "Templates (*.xft; *.xpt)"
extensions = "*.xft,*.xpt"/>
</Extension>
We also need some assemblies for running our add-in which are not loaded by default, so we specify
them next:
<Runtime>
<Import assembly="CSharpLanguageModule.dll"/>
<Import assembly="ObjectBrowser.dll"/>
<Import assembly="ResourceEditor.dll"/>
<Import assembly="VBNetLanguageModule.dll"/>
</Runtime>
This done, we must specify where the GUI dialogs can be found:
<Extension path =
"/SharpDevelop/Workbench/ProjectOptions/ConfigurationProperties">
<Conditional activeproject="C#">
<DialogPanel id = "CSharpCodeGenerationPanel"
label =
"${res:Dialog.Options.PrjOptions.CodeGenerationPanel.PanelName}"
class = "CSharpBinding.CodeGenerationPanel"/>
<DialogPanel id = "CSharpOutputOptionsPanel"
label =
"${res:Dialog.Options.PrjOptions.OutputOptionsPanel.PanelName}"
class = "CSharpBinding.OutputOptionsPanel"/>
<DialogPanel id = "CSharpRuntimeCompilerPanel"
label = "Runtime/Compiler"
class = "CSharpBinding.ChooseRuntimePanel"/>
</Conditional>
<Conditional activeproject="VBNET">
<DialogPanel id = "VBCodeGenerationPanel"
label =
"${res:Dialog.Options.PrjOptions.CodeGenerationPanel.PanelName}"
class = "VBBinding.CodeGenerationPanel"/>
<DialogPanel id = "VBOutputOptionsPanel"
label =
"${res:Dialog.Options.PrjOptions.OutputOptionsPanel.PanelName}"
class = "VBBinding.OutputOptionsPanel"/>
</Conditional>
</Extension>
Formatting the text in the editor also needs to be defined:
<Extension path = "/AddIns/DefaultTextEditor/Formater">
<Conditional textcontent = "C#">

Language Bindings
25
<Class id ="CSharpFormatter" insertbefore="DefaultFormatter" class =
"CSharpBinding.FormattingStrategy.CSharpFormattingStrategy"/>
</Conditional>
<Conditional textcontent = "VBNET">
<Class id ="VBNetFormatter" insertbefore="DefaultFormatter" class
="VBBinding.FormattingStrategy.VBFormattingStrategy"/>
</Conditional>
</Extension>
We need appropriate icons for all project types we want to offer in the 'new' dialog:
<Extension path = "/Workspace/Icons">
<!-- C# -->
<Icon id = "C#Prj" language = "C#" location="icons\CSharpProject.png"/>
<Icon id = "C#File" extensions = ".cs" location="icons\CSharpFileIcon.png"/>
<Icon id = "C#.File.CSFileIcon" location="icons\CSharpFile.png" />
<Icon id = "C#.Project.EmptyCSProjectIcon"
location="icons\EmptyCSharpProject.png" />
<Icon id = "C#.Project.CSProjectIcon" location="icons\FullCSharpProject.png"/>
<Icon id = "C#.Project.CSWebProjectIcon"
location="icons\EmptyCSharpApplication.png"/>
<Icon id = "C#.Project.CSWebServiceIcon" location="icons\CSharpWebService.png"
/>
<Icon id = "C#.Project.ConsoleCSharpProject"
location="icons\ConsoleCSharpProject.png"/>
<Icon id = "C#.Project.CSharpClassLibrary"
location="icons\CSharpClassLibrary.png" />
<Icon id = "C#.Project.CSharpServiceFileIcon"
location="icons\CSharpCubeFileIcon.png" />
<Icon id = "C#.Project.FullCSharpProject"
location="icons\FullCSharpProject.png"/>
<Icon id = "C#.Project.ServiceCSharpProject"
location="icons\ServiceCSharpProject.png"/>
Now that we handled C# projects, we move on to VB.NET to give you a flavor of how this looks for
another language. We omitted the sections for Java and Jscript for brevity's sake:
<!-- VB.NET -->
<Icon id = "VBPrj" language = "VBNET" location = "icons\VBProject.png"/>
<Icon id = "VBFile" extensions=".vb" location = "icons\VBFileIcon.png"/>
<Icon location = "icons\ConsoleVBProject.png" id =
"VB.Project.ConsoleVBProject"/>
<Icon location = "icons\EmptyVBProject.png" id =
"VB.Project.EmptyVBProject"/>
<Icon location = "icons\EmptyVBWebApplication.png" id =
"VB.Project.VBWebProjectIcon"/>
<Icon location = "icons\FullVBProject.png" id =
"VB.Project.FullVBProject"/>

Chapter 18
26
<Icon location = "icons\ServiceVBProject.png" id =
"VB.Project.ServiceVBProject"/>
<Icon location = "icons\VBClassLibrary.png" id =
"VB.Project.VBClassLibrary"/>
<Icon location = "icons\VBCubeFileIcon.png" id =
"VB.Project.VBServiceFileIcon"/>
<Icon location = "icons\VBFile.png" id = "VB.File.VBFile"/>
<Icon location = "icons\VBWebDocument.png" id = "VB.Project.VBWebDocument"/>
<Icon location = "icons\VBWebService.png" id =
"VB.Project.VBWebService"/>
Next we load various icons that we will need in a number of places throughout SharpDevelop:
<!-- Resources -->
<Icon id = "Icons.16x16.ResourceFileIcon" location =
"icons\Icons.16x16.ResourceFileIcon.png" extensions=".resources,.resx"/>
<!-- XML -->
<Icon id = "XmlFileIcon" location = "icons\XmlFileIcon.png"
extensions=".xml"/>
<!-- #Unit testconfig -->
<Icon id = "TestConfig" location = "icons\TestConfigIcon.png"
extensions=".testconfig"/>
<!-- TextFiles -->
<Icon id = "Icons.16x16.TextFileIcon" extensions=".txt,.doc"/>
</Extension>
<Extension path = "/SharpDevelop/Workbench/DisplayBindings">
<DisplayBinding id = "ObjectBrowser"
insertbefore = "Text"
class = "ObjectBrowser.DisplayInformation" />
<DisplayBinding id = "ResourceEditor"
insertbefore = "Text"
class = "ResourceEditor.ResourceEditorDisplayBinding"
/>
</Extension>
Finally, we specify where the bindings for the supported languages can be found and which file name
extension is supported:
<Extension path = "/SharpDevelop/Workbench/LanguageBindings">
<LanguageBinding id = "CSharp"

Language Bindings
27
supportedextensions = ".cs"
class = "CSharpBinding.CSharpLanguageBinding" />
<LanguageBinding id = "VBNET"
supportedextensions = ".vb"
class = "VBBinding.VBLanguageBinding" />
</Extension>
</AddIn>
The full file contains the XML necessary for all language bindings. For our purposes, we only listed the
parts relevant for the C# and VB.NET bindings. The Jscript and Java bindings were omitted.
The binding for C# is made up of the components we discussed above plus the execution manager
(which is similar to the compiler manager). These are finally joined up in the file
src\BackendBindings\CSharpLanguageModule\CSharpLanguageBinding.cs
Let's have a look at what it contains:
using ICSharpCode.SharpDevelop.Internal.Project;
using ICSharpCode.SharpDevelop.Gui;
namespace CSharpBinding {
public class CSharpLanguageBinding : ILanguageBinding
{
public const string LanguageName = "C#";
CSharpBindingCompilerManager compilerManager =
new CSharpBindingCompilerManager();
CSharpBindingExecutionManager executionManager =
new CSharpBindingExecutionManager();
public string Language {
get {
return LanguageName;
}
}
public void Execute(string filename)
{
Debug.Assert(executionManager != null);
executionManager.Execute(filename);
}
public void Execute(IProject project)
{
Debug.Assert(executionManager != null);
executionManager.Execute(project);
}

Chapter 18
28
public string GetCompiledOutputName(string fileName)
{
Debug.Assert(compilerManager != null);
return compilerManager.GetCompiledOutputName(fileName);
}
public string GetCompiledOutputName(IProject project)
{
Debug.Assert(compilerManager != null);
return compilerManager.GetCompiledOutputName(project);
}
public bool CanCompile(string fileName)
{
Debug.Assert(compilerManager != null);
return compilerManager.CanCompile(fileName);
}
public ICompilerResult CompileFile(string fileName)
{
Debug.Assert(compilerManager != null);
return compilerManager.CompileFile(fileName);
}
public ICompilerResult CompileProject(IProject project)
{
Debug.Assert(compilerManager != null);
return compilerManager.CompileProject(project);
}
public ICompilerResult RecompileProject(IProject project)
{
return CompileProject(project);
}
public IProject CreateProject(ProjectCreateInformation info)
{
return new CSharpProject(info);
}
}
}
The whole binding represents exactly the structure shown in the diagram at the beginning of this
chapter.
Now let us move on to using a different compiler for the same language.
Language Bindings
29
Switching the Compiler
Besides Microsoft's .NET framework, other implementations of the .NET standard as specified by
ECMA (http://www.ecma.ch/ecma1/MEMENTO/tc39.htm) are available. Namely, we have Rotor, an
open source implementation for FreeBSD developed by Microsoft, and dotGNU and mono -
independent implementations running on Linux. Of these, the mono implementation is available for the
Windows platforms as well. This implementation can be found at:
http://www.go-mono.com
As of the time of this writing, mono is not yet feature complete. However, its Windows implementation
can at least be used to produce console applications. Implementation of Windows Forms is planned for
future mono releases. For further information on the status of the mono project check the URL above.
We decided to provide support for the mono C# compiler as well as for the runtime needed to execute
the programs generated. The aim was to prove the versatility of our design approach, as well as perhaps
contribute something to furthering the popularity of .NET by supporting third party efforts to
implement this powerful technology.
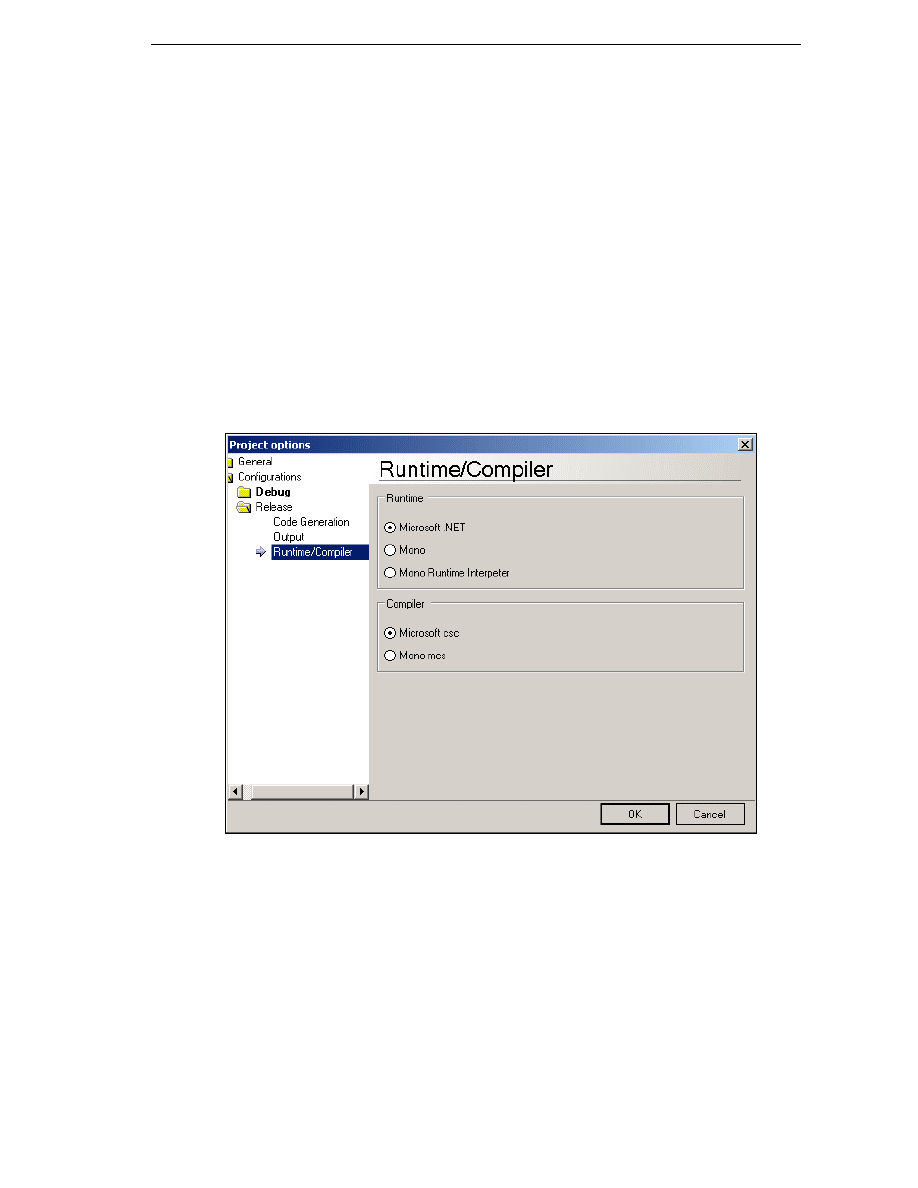
The selection of the compiler and the runtime to use is done in the option panel pictured below:
This option panel can also be accessed via the context menu of the project scout.

Chapter 18
30
As we can see, mono provides us with two different runtimes The difference between the two is that the
first,
mono
, is a Just in Time compiler (JIT) and the second, called
mint
, is an interpreter. The JIT may
not yet be quite stable, so the slower interpreter also is available. Of course, .NET portable executables
built using the Mono MCS compiler may also be run under the Microsoft .NET runtime and vice versa.
Also, the compiler is named differently, namely
mcs.exe,
and will be found in a different path/folder
outside the .NET framework.
The compiler and runtime are set using the following code from
src\BackendBindings\CSharpLanguageModule\Gui\ChooseRuntimePanel.cs
:
void SetValues(object sender, EventArgs e)
{
this.config = (CSharpCompilerParameters)
((IProperties)CustomizationObject).GetProperty("Config");
((RadioButton)ControlDictionary["msnetRadioButton"]).Checked =
config.NetRuntime == NetRuntime.MsNet;
((RadioButton)ControlDictionary["monoRadioButton"]).Checked =
config.NetRuntime == NetRuntime.Mono;
((RadioButton)ControlDictionary["mintRadioButton"]).Checked =
config.NetRuntime == NetRuntime.MonoInterpreter;
((RadioButton)ControlDictionary["cscRadioButton"]).Checked =
config.CsharpCompiler == CsharpCompiler.Csc;
((RadioButton)ControlDictionary["mcsRadioButton"]).Checked =
config.CsharpCompiler == CsharpCompiler.Mcs;
}
Fortunately for us, the mono compiler not only supports its original UNIX style for the command line
options, but can also handle Windows style options (slashes) as used by the .NET compiler. This makes
for one headache less in switching the compiler as do not need to produce different command strings.
But being nice, we produce those different options as well, as we saw above. However, we still are
confronted with one problem: how do we find out where mcs.exe resides? Obviously, we cannot use our
previous ploy for finding csc.exe, as mono most definitely does not reside in the path of the .NET
framework but in some other arbitrary location you specified when installing. This problem is solved by
a piece of code found in
src\BackendBindings\CSharpLanguageModule\CSharpBindingCompilerManager.cs
It is as follows:
string compilerName = compilerparameters.CsharpCompiler ==
CsharpCompiler.Csc ? GetCompilerName() : "mcs";
string outstr = compilerName + " @" +responseFileName;
Executor.ExecWaitWithCapture(outstr, tf, ref output, ref error);
ICompilerResult result = ParseOutput(tf, output);
We are simply assuming that the Mono
mcs.exe
compiler is in the system's path, so we can leave the
task of locating the executable to the system. This is not a very sophisticated, but it works! Also note
that the actual call to the compiler is the same as for the .NET
csc.exe
compiler, with the options
again being provided in a response file. Behavior is the same as far as we are concerned.

Language Bindings
31
Now let us look at the handling of the different runtimes available. This is done by the code in the file
src\BackendBindings\CSharpLanguageModule\CSharpBindingExecutionManager.cs
A switch statement handles switching runtimes:
switch (parameters.NetRuntime) {
case NetRuntime.Mono:
runtimeStarter = "mono ";
break;
case NetRuntime.MonoInterpreter:
runtimeStarter = "mint ";
break;
}
The Microsoft .NET runtime is assumed to be the default. In case we have selected one of the Mono
runtimes, we just switch over to that.
As you can see, switching compilers and runtime for a language already bound is not hard to do. Now
let us bind another language. This will also prove to be a manageable task.
Binding a Different Language – VB.NET
Up to now, we looked at the issues involved in building a language binding for C#, the language used to
develop SharpDevelop itself. Now, we will go on to look at some of the requirements for implementing
a binding for another language, in this case the popular Microsoft offering, Visual Basic.NET.
First of all, the SharpDevelop core team wants to thank Markus Palme who contributed significantly to
making the VB.NET language binding what it is now. We were just too busy to do it properly ourselves.
As for C#, when writing a binding for VB.NET we need to resolve the same three central issues:
❑
Formatting Strategy
❑
Compiler Options
❑
A Runtime
A different formatting strategy is obviously necessary – after all, we are now dealing with a different
programming language, having its own distinct formatting guidelines. The runtime is no problem, as we
again need the .NET runtime. For other languages, a different runtime may be necessary, as is the case
for Java, which we also have written a binding for as part of SharpDevelop. Yet other
language/compiler bindings may not need a runtime at all, as they produce 'machine native code'. This
is the case for the GCC C compiler binding supplied in the samples directory.
In the case of VB.NET, we need to specify a different compiler which of course has a different set of
options as can be seen from the following list which again follows the .NET Framework SDK reference:

Chapter 18
32
Option
Purpose
@ (Specify Response File)
Specifies a response file.
/?
Displays the compiler options. This command is the same as
specifying the /help option. No compilation will be performed.
/addmodule
Causes the compiler to make available all type information from
the specified file(s) to the project you are currently compiling.
/baseaddress
Specifies the base address of a DLL.
/bugreport
Creates a file that contains information making it easy to report
a bug.
/debug
Produces debugging information.
/define
Defines symbols for conditional compilation.
/delaysign
Specifies whether the assembly will be fully or partially signed.
/help
Displays the compiler options. This command is the same as
specifying the /? option. No compilation will be done.
/imports
Imports a namespace from a specified assembly.
/keycontainer
Specifies a key container name for a key pair for strong assembly
naming.
/keyfile
Specifies a file containing a key or key for a strong assembly name.
/libpath
Specifies the location of assemblies referenced using the
/reference
option.
/linkresource
Creates a link to a managed resource.
/main
Specifies the class that contains the Sub Main procedure to use at
startup.
/nologo
Suppresses display of compiler banner information.
/nowarn
Suppresses the compiler's ability to generate warnings.
/optimize
Enables/disables optimization of code.
/optioncompare
Determines whether string comparisons should be performed
binary or using locale-specific text semantics.
/optionexplicit
Requires the explicit declaration of variables.
/optionstrict
Enforces strict language semantics.
/out
Specifies an output file.
/quiet
Suppresses displaying code for syntax-related errors and warnings
by the compiler.
Language Bindings
33
/recurse
Searches through subdirectories for source files to compile.
/reference
Imports metadata from an assembly.
/removeintchecks
Disables integer data type overflow checking.
/resource
Embeds a managed resource in an assembly.
/rootnamespace
Specifies a namespace for all type declarations.
/target
Specifies the format of the output file using one of four options:
/target:exe, /target:library, /target:module, or /target:winexe.
/utf8output
Displays the compiler's output using UTF-8 encoding.
/verbose
Outputs extra information during the compilation run.
/warnaserror
Treats warnings to errors.
/win32icon
Inserts an .ico icon file into the output file.
/win32resource
Inserts a Win32 resource into the output file.
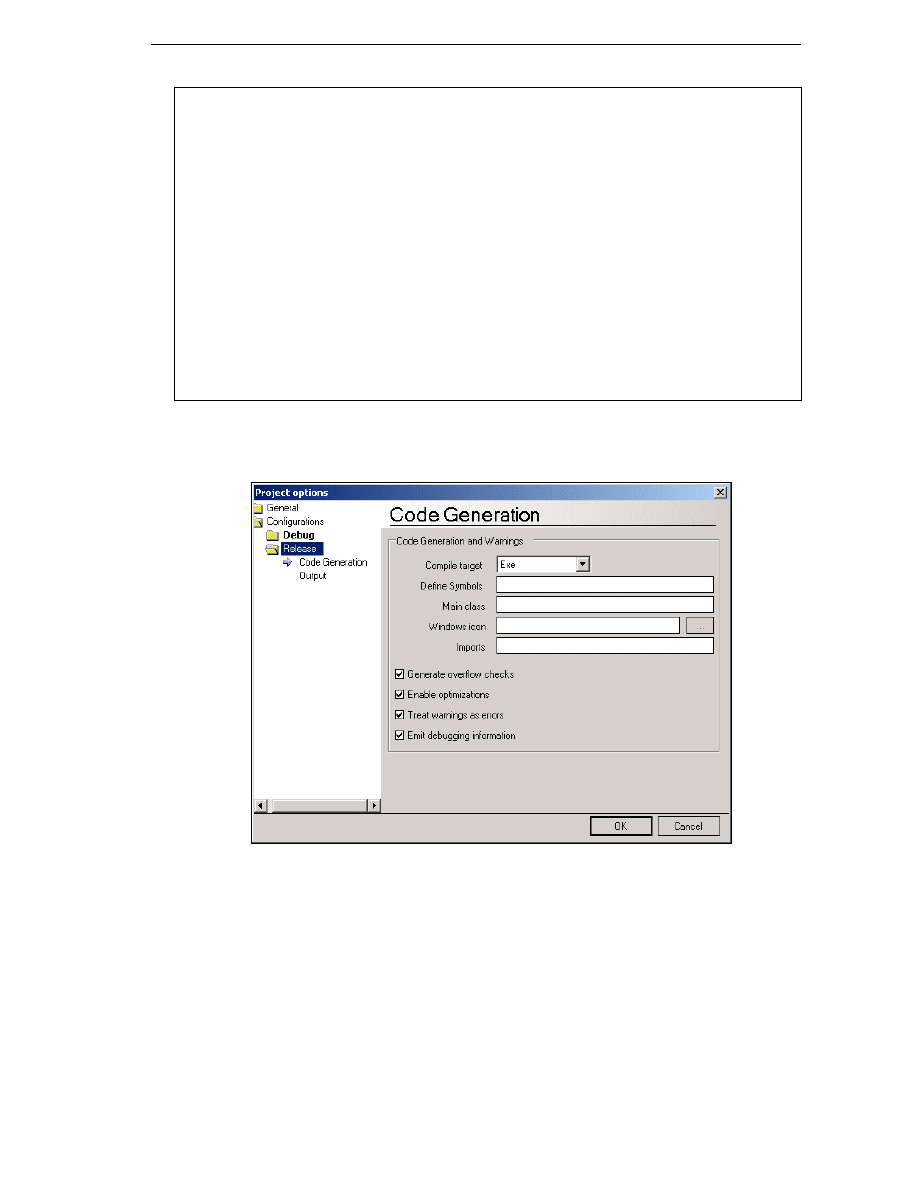
As having all these listed in the options dialog box would be cumbersome for user as per the C#
compiler options, they have similarly been reduced down to the options that can be toggled in the
dialog, as the figure below demonstrates:
As we can see, there are less checkboxes present This means that we have to change the code used for
generating the dialog This is done with the following code from the file
src\BackendBindings\VBNetLanguageModule\Gui\CodeGenerationPanel.cs

Chapter 18
34
We will not reproduce the code from this file in full, as it is quite similar to what we saw regarding C#:
public override bool ReceiveDialogMessage(DialogMessage message)
{
if (message == DialogMessage.OK) {
if (compilerParameters == null) {
return true;
}
FileUtilityService fileUtilityService =
(FileUtilityService)ServiceManager.Services.GetService(typeof(FileUtilityService))
;
if (ControlDictionary["win32IconTextBox"].Text.Length > 0) {
Console.WriteLine(ControlDictionary["win32IconTextBox"].Text);
if
(!fileUtilityService.IsValidFileName(ControlDictionary["win32IconTextBox"].Text))
{
MessageBox.Show("Invalid Win32Icon specified", "Error",
MessageBoxButtons.OK, MessageBoxIcon.Hand, MessageBoxDefaultButton.Button1);
return false;
}
if (!File.Exists(ControlDictionary["win32IconTextBox"].Text)) {
MessageBox.Show("Win32Icon doesn't exists", "Error",
MessageBoxButtons.OK, MessageBoxIcon.Hand, MessageBoxDefaultButton.Button1);
return false;
}
}
compilerParameters.CompileTarget =
(CompileTarget)((ComboBox)ControlDictionary["compileTargetComboBox"]).SelectedInde
x;
compilerParameters.DefineSymbols =
ControlDictionary["symbolsTextBox"].Text;
compilerParameters.MainClass =
ControlDictionary["mainClassTextBox"].Text;
compilerParameters.Win32Icon =
ControlDictionary["win32IconTextBox"].Text;
compilerParameters.Imports =
ControlDictionary["importsTextBox"].Text;
compilerParameters.Debugmode =
((CheckBox)ControlDictionary["generateDebugInformationCheckBox"]).Checked;
compilerParameters.Optimize =
((CheckBox)ControlDictionary["enableOptimizationCheckBox"]).Checked;
compilerParameters.GenerateOverflowChecks =
((CheckBox)ControlDictionary["generateOverflowChecksCheckBox"]).Checked;
compilerParameters.RunWithWarnings =
!((CheckBox)ControlDictionary["warningsAsErrorsCheckBox"]).Checked;
}
return true;
}

Language Bindings
35
Assigning values to the options is analogous to the C# dialog discussed above. Now let us skip back to
the formatting strategy. We need a different formatting strategy here to handle the indentation of code
as code blocks are delimited differently when compared to C# – in VB.NET we do not group
statements using curly brackets for example.
In this case Markus decided to use
enum
s, proving that there are several ways to achieve the same goal.
We have not yet performed benchmark tests to see which approach is faster, but we hope to do so in the
future. For now we are happy that both approaches work. The formatting strategy for VB.NET can be
found in
src\BackendBindings\VBNetLanguageModule\FormattingStrategy\VBFormattingStrateg
y.cs
This makes the initial part of the file look quite different:
namespace VBBinding.FormattingStrategy {
/// <summary>
/// This class handles the auto and smart indenting in the textbuffer while
/// you type.
/// </summary>
public class VBFormattingStrategy : DefaultFormattingStrategy
{
enum VBSubroutineTypes
{
sub,
function,
property,
any,
none
}
enum VBStatementTypes
{
module,
class
_
,
if
_
,
selectcase,
while
_
,
any,
none
}
public VBFormattingStrategy()
{
}
Here, we base the smart indenting decisions on whether a statement has been identified using the
enum
s
above. Compare to the
if
blocks of the C# formatting strategy discussed above:
protected override int SmartIndentLine(int lineNr)
{
if (lineNr > 0) {

Chapter 18
36
LineSegment lineAbove = document.GetLineSegment(lineNr - 1);
string lineAboveText =
document.GetText(lineAbove.Offset, lineAbove.Length).Trim();
LineSegment curLine = document.GetLineSegment(lineNr);
string curLineText =
document.GetText(curLine.Offset, curLine.Length).Trim();
if (IsStatement(lineAboveText, VBStatementTypes.any) !=
VBStatementTypes.none ||
IsSubroutine(lineAboveText, VBSubroutineTypes.any) !=
VBSubroutineTypes.none) {
string indentation = GetIndentation(lineNr - 1);
indentation += "\t";
document.Replace
(curLine.Offset, curLine.Length, indentation + curLineText);
return indentation.Length;
}
}
return AutoIndentLine(lineNr);
}
The code below does the formatting of individual lines that could not be identified as statements. This is
the case for example with comments:
public override int FormatLine(int lineNr, int cursorOffset, char ch)
// used for comment tag formatter/inserter
{
if (lineNr <= 0) {
return 0;
}
LineSegment lineAbove = document.GetLineSegment(lineNr - 1);
string lineAboveText =
document.GetText(lineAbove.Offset, lineAbove.Length).Trim();
string indentation = GetIndentation(lineNr - 1);
LineSegment curLine = document.GetLineSegment(lineNr);
string curLineText =
document.GetText(curLine.Offset, curLine.Length).Trim();
The formatting of VB.NET subroutines is handled by a switch statement:
switch (ch) {
case '\n':
if (document.Properties.GetProperty("AutoInsertCurlyBracket", true)) {
System.Text.StringBuilder indentstring =
new System.Text.StringBuilder();
indentstring.Append('\t', indentation.Length);

Language Bindings
37
VBSubroutineTypes sub =
IsSubroutine(lineAboveText, VBSubroutineTypes.any);
VBStatementTypes statement =
IsStatement(lineAboveText, VBStatementTypes.any);
if (IsEndStatementNeeded(statement, document, lineNr)) {
document.Insert(document.Caret.Offset, "\n" + indentstring +
"End " + fstToUpper(StatementType2String(statement)));
}
if (IsEndSubroutineNeeded(sub, document, lineNr)) {
document.Insert(document.Caret.Offset, "\n" + indentstring +
"End " + fstToUpper(SubroutineType2String(sub)));
}
}
return IndentLine(lineNr);
default:
Above we 'abused' the
AutoInsertCurlyBracket
property to insert a tab character instead of the
curly bracket of C#. Then we completed the subroutines or code blocks that need end statements with
the properly formatted line containing an appropriate statement.
Now, we need to handle the default, which comes into play when
AutoInsertCurlyBracket
is not
set, i.e the user wants to type in everything on his own:
VBStatementTypes stype =
IsEndStatement(curLineText, VBStatementTypes.any);
VBSubroutineTypes ftype =
IsEndSubroutine(curLineText, VBSubroutineTypes.any);
if(ftype != VBSubroutineTypes.none) {
string indentation
_
new =
GetIndentationOfSubroutine(lineNr, ftype, document);
if(indentation
_
new != "") {
document.Replace
(curLine.Offset, curLine.Length, indentation
_
new + curLineText);
return indentation
_
new.Length;
} else {
return 0;
}
}
if(stype != VBStatementTypes.none) {
string indentation
_
new =
GetIndentationOfStatement(lineNr, stype, document);
if(indentation
_
new != "") {
document.Replace
(curLine.Offset, curLine.Length, indentation
_
new + curLineText);
return indentation
_
new.Length;
} else {
return 0;
}

Chapter 18
38
} else {
return 0;
}
}
}
Now let us move on to calling the compiler. This is achieved in the following file:
src\BackendBindings\VBNetLanguageModule\VBBindingCompilerServices.cs
The following code snippet highlights the compiler services for VB.NET:
public ICompilerResult CompileProject(IProject project)
{
VBProject p = (VBProject)project;
VBCompilerParameters compilerparameters =
(VBCompilerParameters)p.ActiveConfiguration;
string exe = fileUtilityService.GetDirectoryNameWithSeparator
(compilerparameters.OutputDirectory) + compilerparameters.OutputAssembly +
(compilerparameters.CompileTarget ==
CompileTarget.Library ? ".dll" : ".exe");
string responseFileName = Path.GetTempFileName();
StreamWriter writer = new StreamWriter(responseFileName);
As we already saw in the section on calling the C# compiler, we again generate a response file using a
stream writer. We then gather up all projects in the current combine:
writer.WriteLine("\"/out:" + exe + '"');
IProjectService projectService =
(IProjectService)ICSharpCode.Core.Services.ServiceManager.
Services.GetService(typeof(IProjectService));
ArrayList allProjects =
Combine.GetAllProjects(projectService.CurrentOpenCombine);
Of course, we also have to iterate over all references in the combine (so they will be added to the option
string) and then add options according to the state of the panel settings:
foreach (ProjectReference lib in p.ProjectReferences) {
writer.WriteLine("\"/r:" + lib.GetReferencedFileName(p) + "\"");
}
writer.WriteLine("/nologo");
writer.WriteLine("/utf8output");
if (compilerparameters.Debugmode) {
writer.WriteLine("/debug+");
writer.WriteLine("/debug:full");
}
if (compilerparameters.Optimize) {
writer.WriteLine("/optimize");
}

Language Bindings
39
if (compilerparameters.Win32Icon != null &&
compilerparameters.Win32Icon.Length > 0 &&
File.Exists(compilerparameters.Win32Icon)) {
writer.WriteLine("/win32icon:" + '"' + compilerparameters.Win32Icon +
'"');
}
if (compilerparameters.DefineSymbols.Length > 0) {
writer.WriteLine("/define:" + compilerparameters.DefineSymbols);
}
if (compilerparameters.MainClass != null &&
compilerparameters.MainClass.Length > 0) {
writer.WriteLine("/main:" + compilerparameters.MainClass);
}
if(compilerparameters.Imports.Length > 0) {
writer.WriteLine("/imports:" + compilerparameters.Imports);
}
switch (compilerparameters.CompileTarget) {
case CompileTarget.Exe:
writer.WriteLine("/t:exe");
break;
case CompileTarget.WinExe:
writer.WriteLine("/t:winexe");
break;
case CompileTarget.Library:
writer.WriteLine("/t:library");
break;
}
foreach (ProjectFile finfo in p.ProjectFiles) {
if (finfo.Subtype != Subtype.Directory) {
switch (finfo.BuildAction) {
case BuildAction.Compile:
writer.WriteLine('"' + finfo.Name + '"');
break;
case BuildAction.EmbedAsResource:
writer.WriteLine("\"/res:" + finfo.Name + "\"");
break;
}
}
}

Chapter 18
40
Now we set up the temporary files to capture the compiler output and error messages, start the compiler
run and then clean up after having parsed the compiler output:
TempFileCollection tf = new TempFileCollection ();
writer.Close();
string output = "";
string error = "";
string outstr = GetCompilerName() + " @" +responseFileName;
Executor.ExecWaitWithCapture(outstr, tf, ref output, ref error);
ICompilerResult result = ParseOutput(tf, output);
File.Delete(responseFileName);
File.Delete(output);
File.Delete(error);
return result;
}
This is quite similar to what we saw before when we looked at the Microsoft .NET C# compiler call.
Therefore, all the other code needed to implement a backend binding is quite similar to what we saw
before.
Summary
In this chapter, we looked at the issues involved in providing language bindings to the IDE. We learned
about the structure of a language binding, which involves the formatting strategy, appearance of the
IDE and compiler options. We saw how these components are integrated into the SharpDevelop add-in
tree as a codon.
Next, we dealt with switching the compiler and runtime used for execution of the compiled code and
learned about the issues involved in calling a compiler outside the .NET framework path. We
investigated how to realize this compiler switch using the Mono compiler and runtime.
Then we went on to look at the requirements involved in creating bindings for other languages. For this
purpose, we looked at the VB.NET language binding and considered the requirements for binding
languages that are independent of the .NET framework.
Wyszukiwarka
Podobne podstrony:
8171
8171
bb5 chap18
8171
8171
FTFS Chap18 P069
FTFS Chap18 P088
FTFS Chap18 P001
FTFS Chap18 P047
więcej podobnych podstron