
U.S. Department of Justice
Office of Justice Programs
National Institute of Justice
National Institute of Justice
Development of NIST Standard Bullets
and Casings Status Report
NIJ Report 603–00
Law Enforcement and Corrections Standards and Testing Program
WWW.SURVIVALEBOOKS.COM

ABOUT THE LAW ENFORCEMENT AND CORRECTIONS
STANDARDS AND TESTING PROGRAM
The Law Enforcement and Corrections Standards and Testing Program is sponsored by the Office of Science and
Technology of the National Institute of Justice (NIJ), U.S. Department of Justice. The program responds to the
mandate of the Justice System Improvement Act of 1979, which directed NIJ to encourage research and development
to improve the criminal justice system and to disseminate the results to Federal, State, and local agencies.
The Law Enforcement and Corrections Standards and Testing Program is an applied research effort that
determines the technological needs of justice system agencies, sets minimum performance standards for specific
devices, tests commercially available equipment against those standards, and disseminates the standards and the test
results to criminal justice agencies nationally and internationally.
The program operates through:
The Law Enforcement and Corrections Technology Advisory Council (LECTAC), consisting of nationally
recognized criminal justice practitioners from Federal, State, and local agencies, which assesses technological needs
and sets priorities for research programs and items to be evaluated and tested.
The Office of Law Enforcement Standards (OLES) at the National Institute of Standards and Technology, which
develops voluntary national performance standards for compliance testing to ensure that individual items of equipment
are suitable for use by criminal justice agencies. The standards are based upon laboratory testing and evaluation of
representative samples of each item of equipment to determine the key attributes, develop test methods, and establish
minimum performance requirements for each essential attribute. In addition to the highly technical standards, OLES
also produces technical reports and user guidelines that explain in nontechnical terms the capabilities of available
equipment.
The National Law Enforcement and Corrections Technology Center (NLECTC), operated by a grantee, which
supervises a national compliance testing program conducted by independent laboratories. The standards developed by
OLES serve as performance benchmarks against which commercial equipment is measured. The facilities, personnel,
and testing capabilities of the independent laboratories are evaluated by OLES prior to testing each item of equipment,
and OLES helps the NLECTC staff review and analyze data. Test results are published in Equipment Performance
Reports designed to help justice system procurement officials make informed purchasing decisions.
Publications are available at no charge through the National Law Enforcement and Corrections Technology
Center. Some documents are also available online through the Internet/World Wide Web. To request a document or
additional information, call 800–248–2742 or 301–519–5060, or write:
National Law Enforcement and Corrections Technology Center
P.O. Box 1160
Rockville, MD 20849–1160
E-Mail: asknlectc@nlectc.org
World Wide Web address: http://www.nlectc.org
The National Institute of Justice is a component of the Office
of Justice Programs, which also includes the Bureau of Justice
Assistance, the Bureau of Justice Statistics, the Office of
Juvenile Justice and Delinquency Prevention, and the Office for
Victims of Crime.
WWW.SURVIVALEBOOKS.COM

U.S. Department of Justice
Office of Justice Programs
National Institute of Justice
Development of NIST Standard Bullets and Casings
Status Report
NIJ Report 603–00
J. Song, and T.V. Vorburger
Manufacturing Engineering Laboratory
National Institute of Standards and Technology
Gaithersburg, MD 20899–8212
Coordination by:
Office of Law Enforcement Standards
National Institute of Standards and Technology
Gaithersburg, MD 20899–8102
Prepared for:
National Institute of Justice
Office of Science and Technology
Washington, DC 20531
November 2000
NCJ 184434
WWW.SURVIVALEBOOKS.COM

National Institute of Justice
Julie E. Samuels
Acting Director
The technical effort to develop this report was conducted
under Interagency Agreement 94–IJ–R–004,
Project No. 96–019IA/CTT.
This report was prepared by the Office of Law Enforcement
Standards (OLES) of the National Institute of Standards
and Technology (NIST) under the direction of
Alim A. Fatah, Program Manager
for Chemical Systems and Materials, and
Kathleen M. Higgins, Director of OLES.
The work resulting from this report was sponsored by the
National Institute of Justice (NIJ), Dr. David G. Boyd, Director,
Office of Science and Technology.
WWW.SURVIVALEBOOKS.COM

FOREWORD
The Office of Law Enforcement Standards (OLES) of the National Institute of Standards and
Technology (NIST) furnishes technical support to the National Institute of Justice (NIJ) program to
strengthen law enforcement and criminal justice in the United States. OLES’s function is to
conduct research that will assist law enforcement and criminal justice agencies in the selection and
procurement of quality equipment.
OLES is: (1) Subjecting existing equipment to laboratory testing and evaluation, and (2) conducting
research leading to the development of several series of documents, including national standards,
user guides, and technical reports.
This document covers research conducted by OLES under the sponsorship of the National Institute
of Justice. Additional reports as well as other documents are being issued under the OLES program
in the areas of protective clothing and equipment, communications systems, emergency equipment,
investigative aids, security systems, vehicles, weapons, and analytical techniques and standard
reference materials used by the forensic community.
Technical comments and suggestions concerning this report are invited from all interested parties.
They may be addressed to the Office of Law Enforcement Standards, National Institute of Standards
and Technology, 100 Bureau Drive, Stop 8102, Gaithersburg, MD 20899–8102.
Dr. David G. Boyd, Director
Office of Science and Technology
National Institute of Justice
iii
WWW.SURVIVALEBOOKS.COM

CONTENTS
FOREWORD ...............................................................................................................................iii
COMMONLY USED SYMBOLS AND ABBREVIATIONS....................................................vi
1. PROJECT OVERVIEW...........................................................................................................3
2. WORK ACCOMPLISHED......................................................................................................5
2.1 Design of the Prototype NIST Standard Bullets ...............................................................5
2.2 Manufacturing...................................................................................................................6
2.3 Testing and Results ...........................................................................................................7
2.4 Prototype NIST Standard Casings...................................................................................11
3. PLANNED ACCOMPLISHMENTS FOR YEAR 2000 .......................................................13
3.1 Second Version of NIST Standard Bullet Prototypes .....................................................13
3.2 NIST Standard Casing Prototypes...................................................................................13
4. PLANS FOR FUTURE WORK.............................................................................................15
5. SUMMARY...........................................................................................................................17
6. SUGGESTED READINGS ...................................................................................................19
FIGURES
Figure 1. Design for the NIST prototype standard bullets ..........................................................6
Figure 2. ATF master bullet No. 1 obtained by a standardized shooting procedure (left)
and NIST prototype standard bullets No. 1 and 2 made by NC diamond
turning process (middle and right)...............................................................................7
Figure 3. Bullet signature comparison between the master bullet No. 1, land 1 (fig. 3a)
and the standard bullet No. 2, land 3 (fig. 3b)..............................................................8
Figure 4. Bullet signature comparison on the same standard bullet No. 2, between
land 4 and land 3, both in the top section (fig. 4a and 4b), and land 3, bottom
section (fig. 4c).............................................................................................................8
Figure 5. Bullet signature comparison between the standard bullet No. 1 and No. 2,
both on the central section of land 4 ............................................................................9
Figure 6. Bullet signature comparison between land 1 and land 2 of the standard
bullet No. 2. The same bullet signature was machined in the counter-clockwise
direction at land 1 and 2 ...............................................................................................9
Figure 7. Measurement repeatability tests of standard bullet No. 2, land 6 using the IBIS
System at FTI, Canada. The maximum IBIS score is 472 (fig. 7a), the minimum
IBIS score is 384 (fig. 7b) ...........................................................................................10
Figure 8. Measurement comparison between lands 3 and 4 of standard bullet No. 2. Where
bullet signatures have the same pattern, there is a high IBIS score of 452 (fig. 8a).
Figure 8b shows a comparison between lands 1 and 6, where the same bullet
signature was manufactured in different directions, yielding a low IBIS score
of 54.............................................................................................................................11
v
WWW.SURVIVALEBOOKS.COM

COMMONLY USED SYMBOLS AND ABBREVIATIONS
A
ampere
H
henry
nm
nanometer
ac
alternating current
h
hour
No.
number
AM
amplitude modulation
hf
high frequency
o.d.
outside diameter
cd
candela
Hz
hertz
Ω
ohm
cm
centimeter
i.d.
inside diameter
p.
page
CP
chemically pure
in
inch
Pa
pascal
c/s
cycle per second
IR
infrared
pe
probable error
d
day
J
joule
pp.
pages
dB
decibel
L
lambert
ppm
parts per million
dc
direct current
L
liter
qt
quart
°
C
degree Celsius
lb
pound
rad
radian
°
F
degree Fahrenheit
lbf
pound-force
rf
radio frequency
dia
diameter
lbf
⋅
in
pound-force inch
rh
relative humidity
emf
electromotive force
lm
lumen
s
second
eq
equation
ln
logarithm (base e)
SD
standard deviation
F
farad
log
logarithm (base 10)
sec.
section
fc
footcandle
M
molar
SWR
standing wave ratio
fig.
figure
m
meter
uhf
ultrahigh frequency
FM
frequency modulation
min
minute
UV
ultraviolet
ft
foot
mm
millimeter
V
volt
ft/s
foot per second
mph
miles per hour
vhf
very high frequency
g
acceleration
m/s
meter per second
W
watt
g
gram
N
newton
λ
wavelength
gr
grain
N
⋅
m
newton meter
wt
weight
area=unit
2
(e.g., ft
2
, in
2
, etc.); volume=unit
3
(e.g., ft
3
, m
3
, etc.)
PREFIXES
d
deci (10
-1
)
da
deka (10)
c
centi (10
-2
)
h
hecto (10
2
)
m
milli (10
-3
)
k
kilo (10
3
)
µ
micro (10
-6
)
M
mega (10
6
)
n
nano (10
-9
)
G
giga (10
9
)
p
pico (10
-12
)
T
tera (
1012
)
COMMON CONVERSIONS
(See ASTM E380)
0.30480 m =1ft
4.448222 N = 1 lbf
2.54 cm = 1 in
1.355818 J =1 ft lbf
0.4535924 kg = 1 lb
0.1129848 N m = 1 lbf in
0.06479891g = 1gr
14.59390 N/m =1 lbf/ft
0.9463529 L = 1 qt
6894.757 Pa = 1 lbf/in
2
3600000 J = 1 kW
⋅
hr
1.609344 km/h = 1 mph
Temperature: Tq
C
= (Tq
F
-32)×5/9
Temperature: Tq
F
= (Tq
C
×9/5)+32
vi
WWW.SURVIVALEBOOKS.COM

1
NIJ Report 603–00
Development of NIST Standard Bullets
and Casings Status Report
J.F. Song and T.V. Vorburger, National Institute of Standards and Technology, Precision Engineering Division,
Manufacturing Engineering Laboratory (MEL), Gaithersburg, MD 20899.
In April 1998, two prototype standard bullets were developed at the National Institute of
Standards and Technology (NIST). In October 1999, prototype standard casings were also
developed at NIST. The standard bullets and casings are intended for use in Federal, State, local,
and international crime laboratories as reference standards. The implementation of standard
bullets and casings will help verify that the computerized optical-imaging equipment used in
those laboratories is operating properly. These standard bullets and casings are being developed
to enable nationwide and worldwide ballistics measurement traceability and unification. Test
results at NIST indicate that the prototype standard bullets have essentially identical signature
marks and minimal geometrical nonuniformity. Additional testing performed at the Bureau of
Alcohol, Tobacco and Firearms (ATF) National Laboratory Center and at Forensic Technology
Inc. (FTI, Canada) has also shown that these prototype bullets have unique properties,
specifically repeatable and reproducible signature marks. The digitized bullet signature is stored
in a computer and can be used for reproducing the same bullet signature anytime. This project
report addresses the prototype design, manufacturing technique, testing results, potential
enforcement impact and continued development of the standard bullet.
The Authors gratefully acknowledge R. Clary, M. McGlauflin, E. Whitenton,
C. Evans, and T.B. Renegar of NIST for their contributions in the manu-
facturing and measurement of the NIST prototype standard bullets; and to
M. Ols of the ATF and R. Belanger and M. McLean of the FTI for their
measurements with the IBIS system and many enlightening discussions. We
are also grateful to Prof. R. Baldur, University of Waterloo of Ontario, Canada,
and Dr. A. Fatah of the Office of Law Enforcement Standards (OLES) for key
consultations.
WWW.SURVIVALEBOOKS.COM

2
WWW.SURVIVALEBOOKS.COM

3
1. PROJECT OVERVIEW
The National Institute of Standards and Technology (NIST) standard bullets and casings are
being developed as reference standards for crime laboratories. The standard bullets and casings
will help verify that the computerized optical-imaging equipment in those laboratories is
operating properly; i.e., for ballistics measurement quality control. They will also provide a
foundation for establishment of nationwide ballistics measurement traceability and unification.
As with fingerprints, each firearm has unique mechanical characteristics that leave unique
signatures on the bullets and casings fired by it. By analyzing these ballistics signatures,
examiners can connect a firearm to criminal acts. In the early 1990’s, the Federal Bureau of
Investigation (FBI) established the DRUGFIRE
1
program, and the Bureau of Alcohol, Tobacco
and Firearms (ATF) established the CEASEFIRE
2
program. Both agencies established these
programs to develop a national integrated ballistics information network [1,2].
3
Both systems
are based on optical image capture, image analyses and electronic database techniques. In the
DRUGFIRE program, the image capture system itself is also called DRUGFIRE. In the
CEASEFIRE program, the image capture system is the Integrated Ballistics Identification
System (IBIS
4
). Unfortunately, these systems are incompatible. The measurements are made
with different instrumentation under different testing conditions. The respective data files have
different digital formats. In 1997, the ATF and the FBI signed a concept paper to establish the
National Integrated Ballistics Information Network (NIBIN) [1,2]. The foundation of NIBIN
consists of establishment of ballistics measurement traceability, unification of ballistics
measurements, and information sharing between these two types of systems.
In December 1995, an ATF Firearms Examiner wrote to the Director of the Office of Law
Enforcement Standards at NIST. In the letter, the Firearms Examiner outlined the concept of
mass-producing “quality assurance standard bullets and casings.” The proposed standard bullets
and casings would bear reproducible and recognizable patterns of striae, which could be entered
at different IBIS locations and produce signatures that would be essentially identical.
To fulfill this request, the NIST Precision Engineering Division (PED) began in 1997 a new
project––NIST Standard Bullets and Casings. Four designs and manufacturing techniques were
proposed for producing the standard bullet prototypes. After comparing these designs and
manufacturing plans, the numerical control (NC) diamond turning process was selected for
manufacturing the prototype NIST standard bullets. The NC diamond turning process had been
previously used at NIST [3,4] and elsewhere [5] for producing prototype roughness standards.
On April 15, 1998, five master bullets and casings were fired into a water tank and recovered at
the ATF National Laboratory Center in Rockville, MD. One digitized bullet signature was used
1
Certain commercial equipment, instruments, or materials are identified in this paper to specify adequately the experimental procedure. Such
identification does not imply recommendation or endorsement by the National Institute of Standards and Technology, nor does it imply that the
materials or equipment identified are necessarily the best available for the purpose.
2
Ibid.
3
Numbers in brackets refer to Suggested Readings in section 6.
4
See footnote 1.
WWW.SURVIVALEBOOKS.COM

4
for producing two bullet prototypes by means of the NC diamond turning process of the
Precision Manufacturing and Research Facility (PMRF) at NIST. Test results at NIST, ATF and
Forensic Technology Inc. (FTI, Canada) confirmed that these two prototype bullets have unique
properties, specifically their identical, repeatable and reproducible signature marks. The
digitized bullet signature is stored in a computer and can be used anytime for reproducing
standard bullets with the same bullet signature by means of the NC diamond turning technique.
These unique properties make the prototype standard bullets potentially powerful tools for
measurement quality control and nationwide measurement unification in ballistics
measurements. In October 1999, several of the prototype casings were also delivered.
Fiscal year (FY) 1998 and FY 1999 accomplishments are reported in the following sections.
Topics include discussions of the design, manufacturing procedure and test results of the
prototype NIST standard bullets, and the status of the prototype NIST standard casings. We also
discussed our working plan for FY 2000 and beyond.
WWW.SURVIVALEBOOKS.COM

5
2. WORK ACCOMPLISHED
2.1 Design of the Prototype NIST Standard Bullets
2.1.1 Technical Requirements
Based on discussions with ATF and FBI bullet examiners, and the instrument manufacturers for
both the IBIS and DRUGFIRE systems, basic requirements for the NIST standard bullets were
defined:
•
Size, shape, color and material: The size, shape, color and material of the NIST standard
bullets should be as close as possible to conventional bullets. A hard coating can be used on
the bullet surface for protection from rust and long life. However, this coating should not
change the geometry of the bullet signatures.
•
Bullet signature: Bullet signature patterns on the standard bullets must come from
conventional bullets. However, these bullet signatures must be identical in different axial
sections of the same standard bullet. Furthermore, identical bullet signatures must also be
found in a group of standard bullets. Geometric nonuniformity, including pits and damage
on the surfaces of the standard bullets, should be minimized.
•
Repeatability and reproducibility: Bullet signatures on the standard bullets should show
high repeatability and reproducibility. Repeatability here means that the bullet signatures are
highly repeatable at different axial sections on the same standard bullets. Reproducibility
means that the bullet signatures on different standard bullets are essentially identical. For
these reasons it is highly desirable to use information technology for production of the NIST
standard bullets. That means the standardized bullet signatures are stored in a computer and
can be produced and reproduced essentially anytime anywhere.
2.1.2 Technical Design
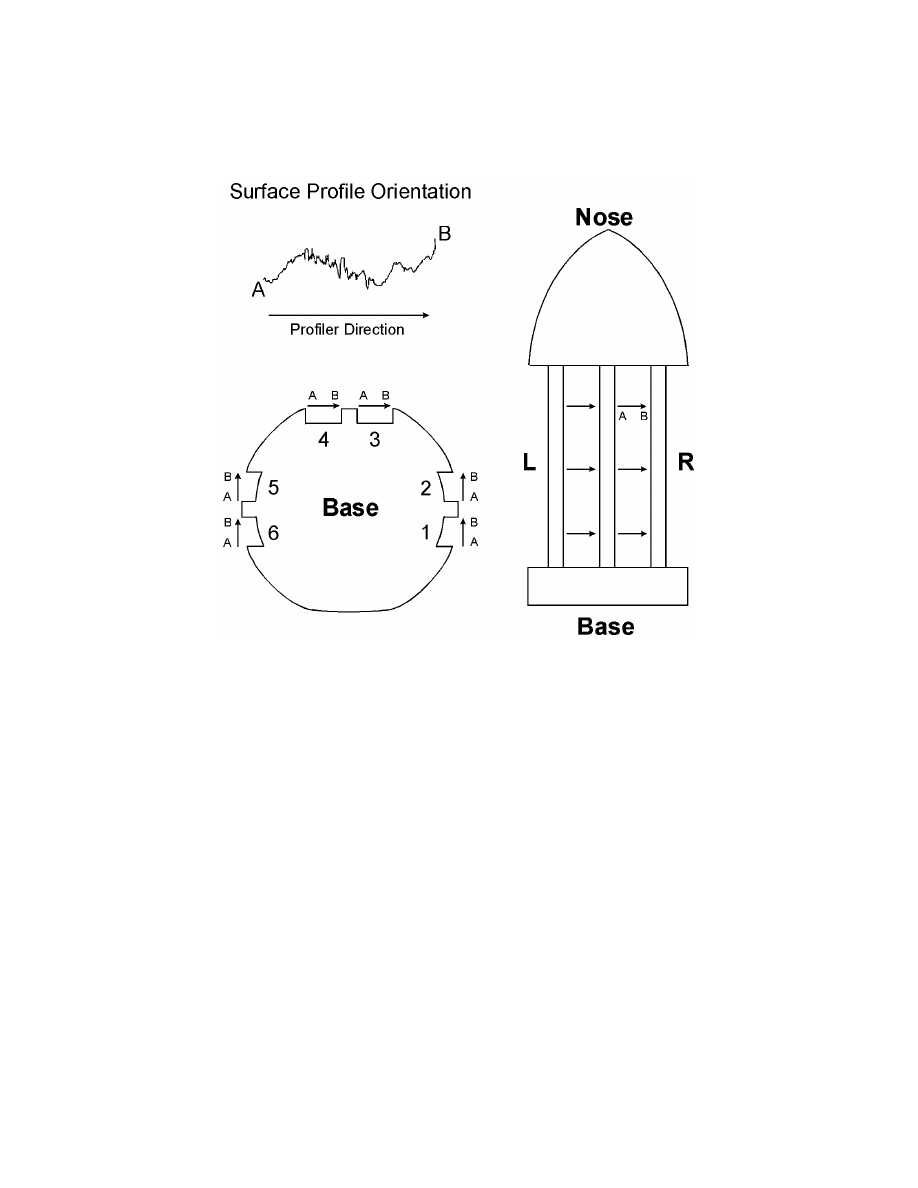
The prototype NIST standard bullet was designed as shown in figure 1. The bullet signature AB
was measured from one of five master bullets fired at the ATF National Laboratory Center in
Rockville, MD, in April 1998. The digitized bullet signature was stored in a computer and
reproduced on a NC diamond turning machine generating six lands numbered from 1 to 6, as
shown in figure 1. The purpose of making two prototype bullets with six lands, all having the
same bullet signature, is to test the repeatability and reproducibility of the manufacturing
technique. In the future production of NIST standard bullets, all six lands will have different
signatures.
For the prototype bullet shown in figure 1, the signature was machined on a radius of
approximately 4.5 mm for lands 1, 2, 5, and 6, and was machined flat for lands 3 and 4. In
addition, the bullet signatures on lands 3, 4, 5, and 6 were machined in the clockwise direction,
while the bullet signatures on lands 1 and 2 were machined in the counter-clockwise direction
(fig. 1). The purpose of designing the bullet signatures of the prototype standard bullets in this
way was to test the repeatability and reproducibility of the NC manufacturing process and to test
the capability of different bullet-measuring instruments for measuring and quantifying the same
bullet signature pattern but with different directions.
WWW.SURVIVALEBOOKS.COM
6
Figure 1. Design for the NIST prototype standard bullets
2.2 Manufacturing
The five master bullets and casings were generated using a standardized shooting procedure at
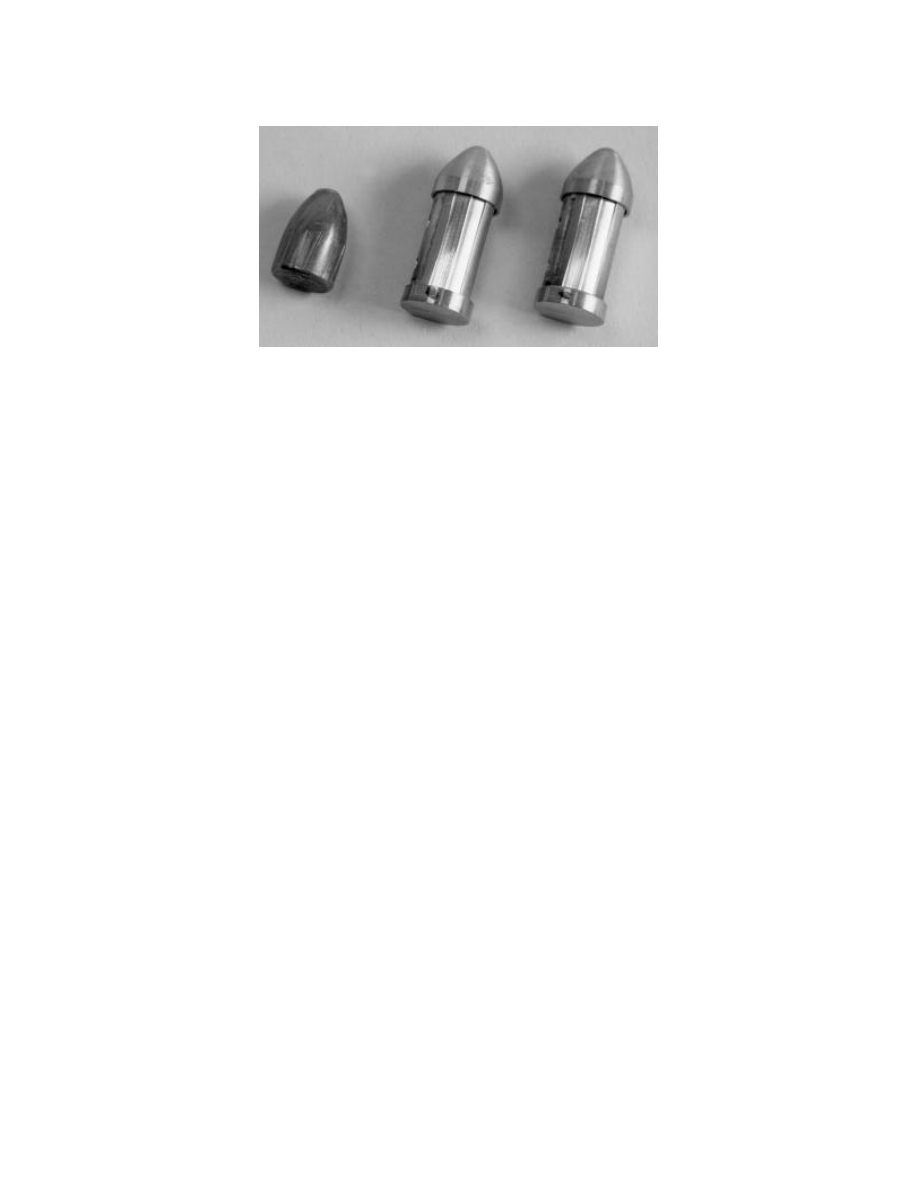
the ATF National Laboratory Center. Master bullet No. 1 is shown in figure 2, on the left. The
mechanical signature of figure 1 was measured on land No. 1 using a stylus instrument at NIST.
On April 23, 1998, two prototype NIST standard bullets were made at the PMRF at NIST using a
NC diamond turning machine. The prototype standard bullets, numbered No. 1 and 2, are also
shown in figure 2, in the middle and on the right. A separate detailed manufacturing process
report was published as NIJ Report 0601-00 [4].
WWW.SURVIVALEBOOKS.COM
7
Figure 2. ATF master bullet No.1 obtained by a standardized shooting procedure (left) and
NIST prototype standard bullets No.1 and 2 made by NC diamond
turning process (middle and right)
2.3 Testing and Results
2.3.1 Geometrical Measurement Results
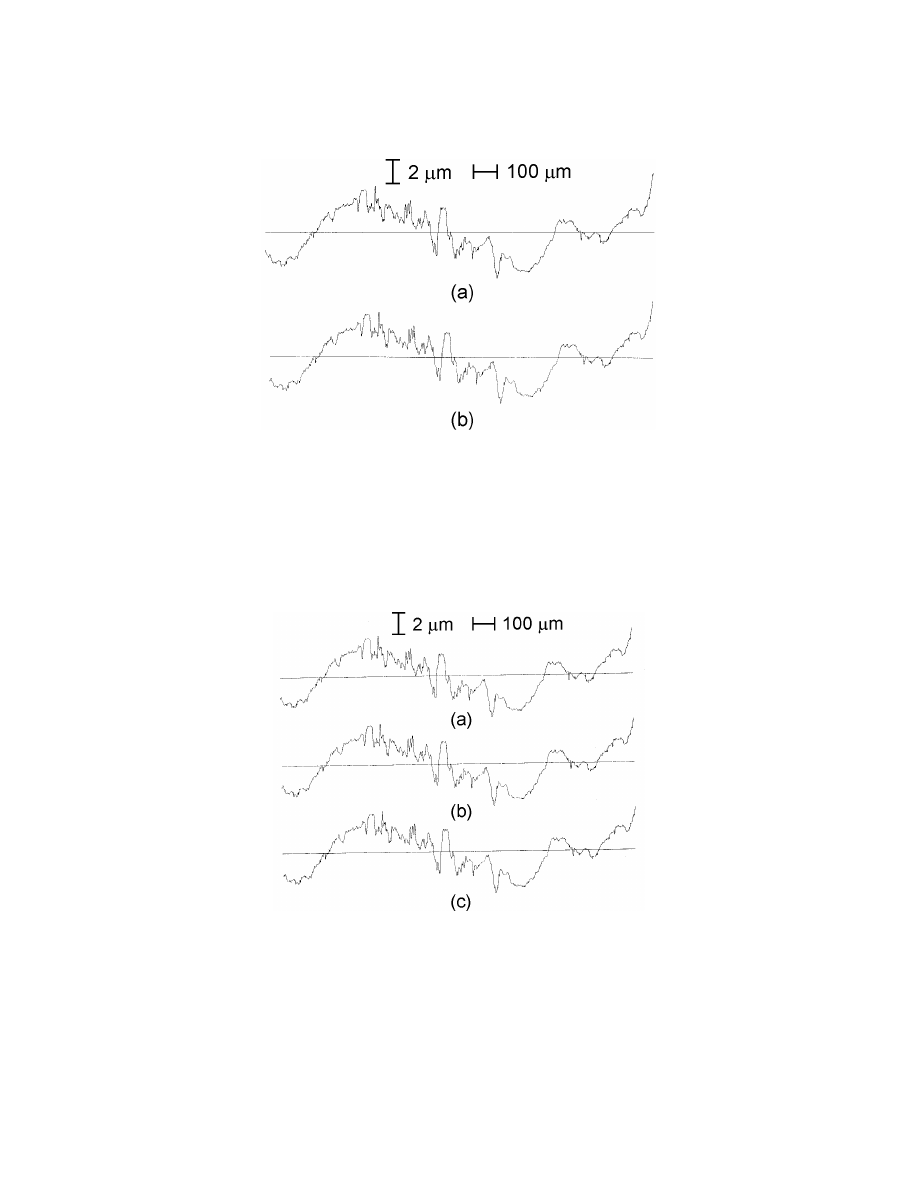
Figure 3 shows profiling signature comparisons between the master bullet and one of the
prototype standard bullets. These profiling signatures were measured using a stylus instrument
at NIST. In the vertical direction, the digital resolution is 10 nm, and the expanded measurement
uncertainty is about 1 % (k = 2). In the horizontal direction, the digital resolution is 0.25
µ
m,
and the expanded measurement uncertainty is about 1 % (k = 2). Figure 3a shows the profiling
signature from land 1 of master bullet No. 1. This profiling signature was used to produce the
standard bullets. Figure 3b shows a profiling signature from land 3 of the standard bullet No. 2.
Figure 3 illustrates that the profiling signature on the standard bullet has high fidelity with
respect to the master bullet.
The profiling signatures of the standard bullet No. 2 were also tested in different lands and
different axial sections. For example, figures 4a and 4b show profiling signatures of land 4 and
3, respectively, both measured at the top section. Figure 4c shows a profiling signature from the
bottom section of land 3. From figure 4, the profiling signature tests indicate that the NC
diamond turning process can produce the bullet signature with precision and repeatability on the
same standard bullet.
WWW.SURVIVALEBOOKS.COM
8
Figure 3. Bullet signature comparison between the master bullet No. 1, land 1 (fig. 3a)
and the standard bullet No. 2, land 3 (fig. 3b)
Figure 4. Bullet signature comparison on the same standard bullet No. 2, between land 4
and land 3, both in the top section (fig. 4a and 4b), and land 3, bottom section (fig. 4c)
WWW.SURVIVALEBOOKS.COM
9
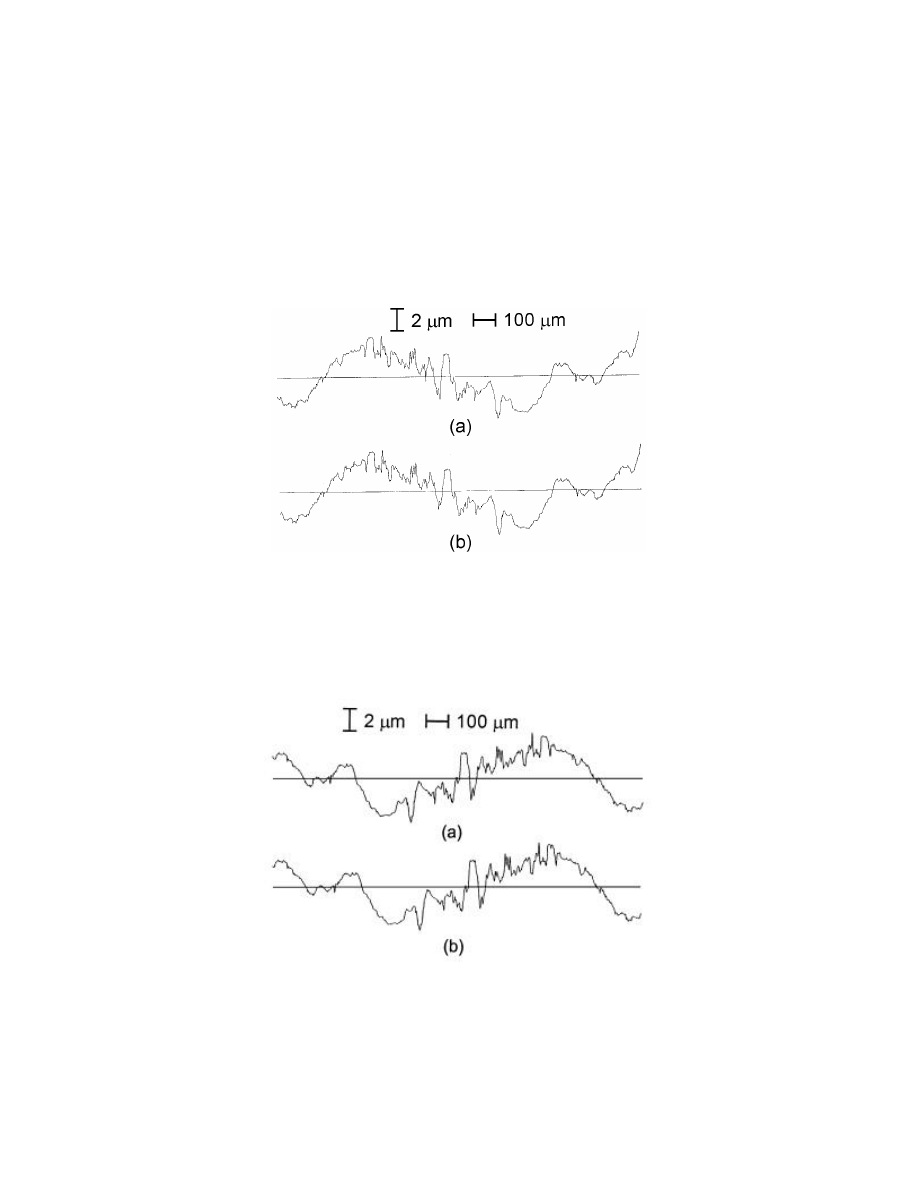
Figure 5 shows a profiling signature comparison between the standard bullets No. 1 and No. 2,
both measured at the No. 4 land, central section. It can be seen that the standard bullets can be
manufactured with high reproducibility.
Figure 6 shows a profiling signature comparison between land 1 and land 2 of the standard bullet
No. 2. The same bullet signature was machined in the counter-clockwise direction at land 1 and
land 2 (see fig. 1).
Figure 5. Bullet signature comparison between the standard bullet No. 1 and
No. 2, both on the central section of land 4
Figure 6. Bullet signature comparison between land 1 and land 2 of the standard bullet No. 2.
The same bullet signature was machined in the counter-clockwise direction at land 1 and 2
WWW.SURVIVALEBOOKS.COM
10
2.3.2 IBIS Testing Results
The two prototype NIST standard bullets were tested with the IBIS system at FTI in Canada.
First, the measurement repeatability of the IBIS was tested by repeatedly measuring land 6 on
standard bullet No. 2 and matching these images with each other. The 36 measurement results
showed uniformly high IBIS scores with a variation range of 384–472. The score is a
proprietary estimator of the degree of matching between pairs of optical images. The score may
be calculated between a single pair of land images or between two sets of images containing, say,
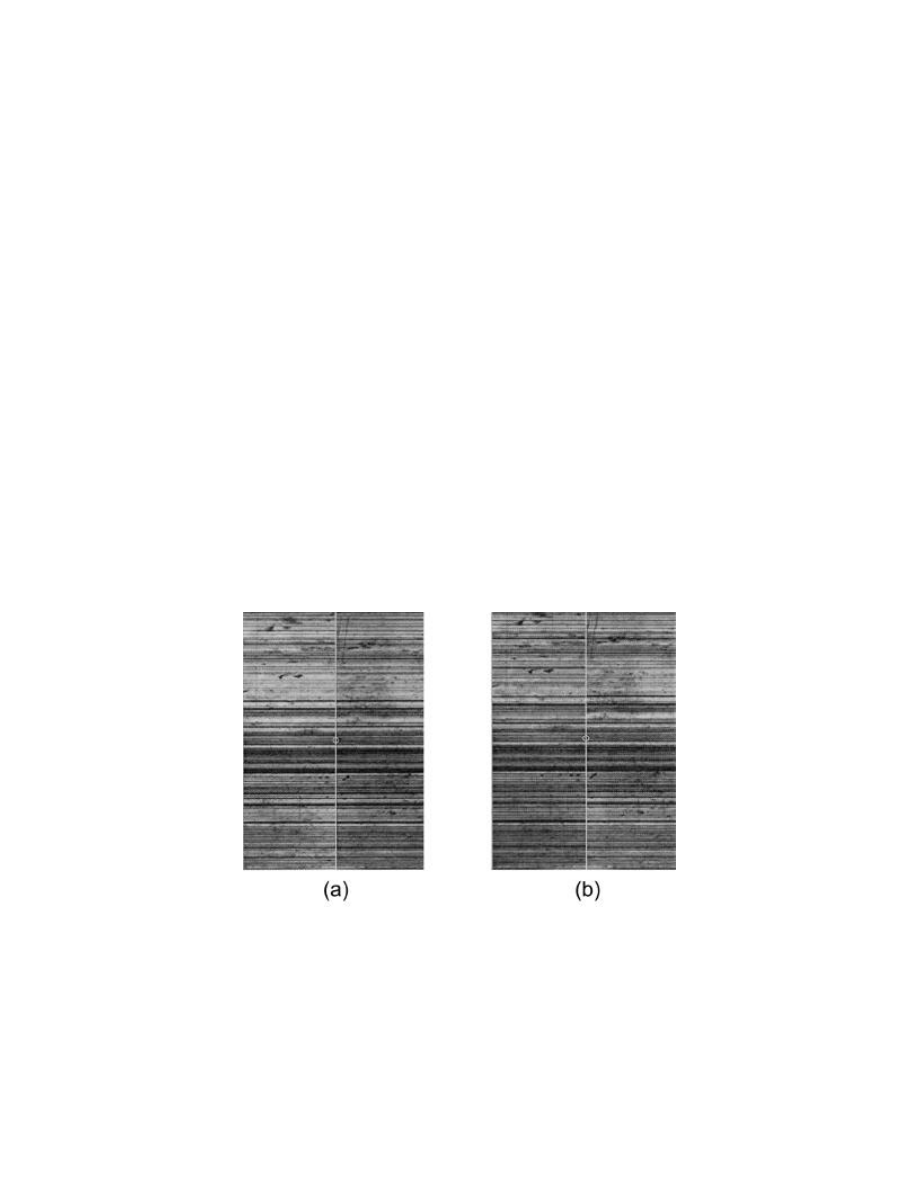
six lands each. Figure 7 shows two matching images from these tests. The image that yields the
maximum IBIS score of 472 is shown in figure 7a; that yielding the minimum IBIS score of 384
is shown in figure 7b.
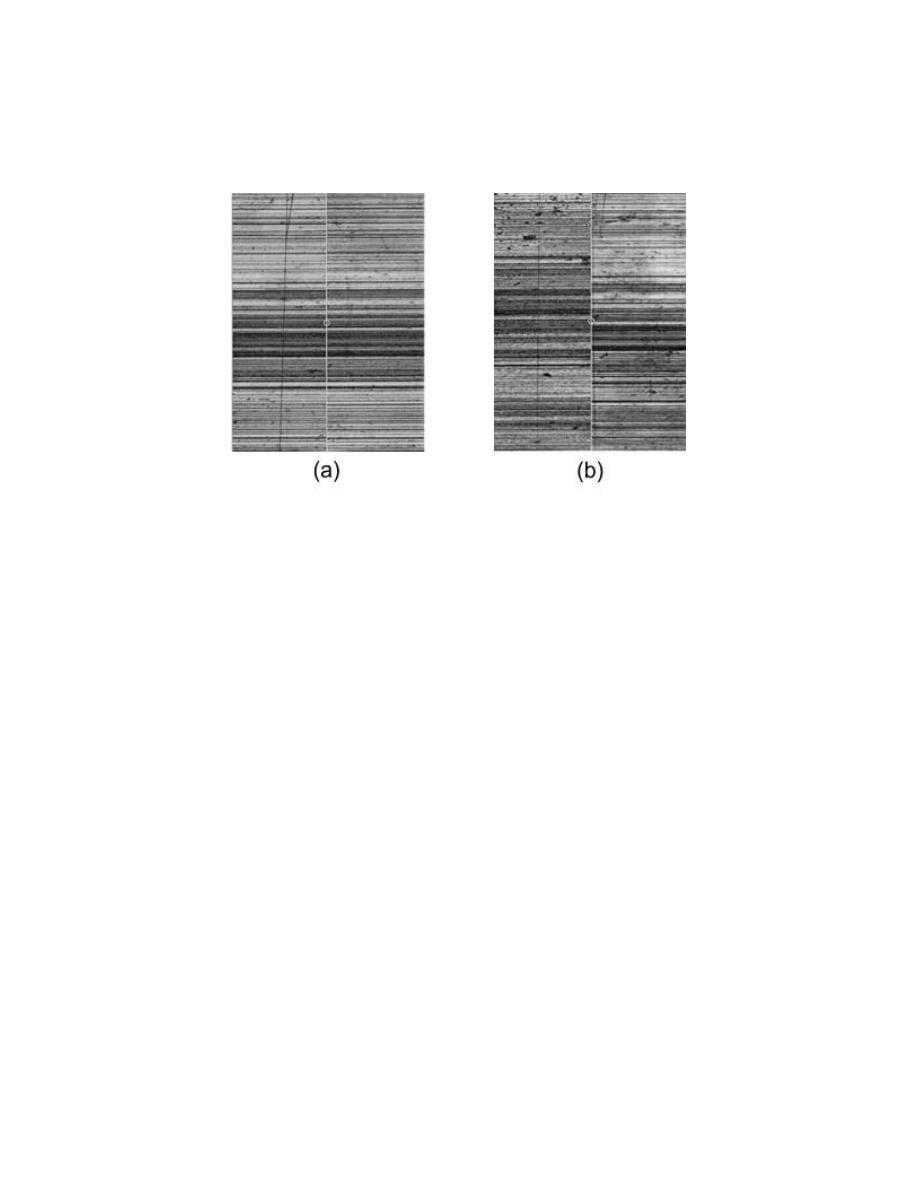
The second comparison was made between different lands of the standard bullet. The
comparison results showed that, when the IBIS optical signatures have the same pattern, there is
a very high IBIS score. For example, figure 8a shows a comparison between lands 3 and 4 on
the No. 2 standard bullet. The IBIS score is 452. These high IBIS scores are also found in the
36 measurement repeatability tests mentioned above, with the maximum and the minimum
scores shown in figure 7. Figure 8b shows a comparison between lands 1 and 6 on the No. 2
standard bullet. There is a low IBIS score of 54 because the same bullet signature was
manufactured in opposite directions (see fig. 1 and fig. 6).
Figure 7. Measurement repeatability tests of standard bullet No. 2, land 6 using the IBIS
system at FTI, Canada. The maximum IBIS score is 472 (fig. 7a), the
minimum IBIS score is 384 (fig. 7b)
WWW.SURVIVALEBOOKS.COM
11
Figure 8. Measurement comparison between lands 3 and 4 of standard bullet No. 2. Where
bullet signatures have the same pattern, there is a high IBIS score of 452 (fig. 8a).
Figure 8b shows a comparison between lands 1 and 6, where the same bullet signature
was manufactured in different directions, yielding a low IBIS score of 54
2.4 Prototype NIST Standard Casings
On April 5, 1998, five master casings QA1 – QA5 were also received with the five master bullets
obtained from the standardized shooting procedure at the ATF National Laboratory Center in
Rockville, MD. The electroforming technique is being used to fabricate the NIST prototype
standard casings. Two companies, GAR Electroforming Division in the United States and
Rubert Ltd., in the United Kingdom, were contracted for this work. The master casings were
first measured at ATF and FTI using their IBIS system. The digitized casing images were stored
so they can be compared with those to be taken from the replica casings.
On July 27 and August 2, 1999, the master casings, QA1 and QA2 were sent to GAR and Rubert,
respectively, for manufacture of the replica casings. The set from Rubert was completed in
October 1999. Delivery from GAR is expected soon. Following delivery of the replica casings,
NIST will test these standard casings by comparing their IBIS images with those of the master
casings stored at ATF and FTI.
WWW.SURVIVALEBOOKS.COM

12
WWW.SURVIVALEBOOKS.COM

13
3. PLANNED ACCOMPLISHMENTS FOR YEAR 2000
3.1 Second Version of NIST Standard Bullet Prototypes
Based on the testing results, as well as discussions with bullet examiners and instrument
manufacturers, we are improving the design for the second version of NIST standard bullet
prototypes, which are planned to be delivered in 2000. The major improvements for the second
version of standard bullets are:
•
Reduce the length from 25 mm to (15 – 18) mm.
•
Make all six bullet signatures different on the six lands.
•
Make all six bullet signatures on the bullet radius, no flat bullet signatures.
•
Make all six bullet signatures on the same center of the curvature.
•
Increase the cutting diameter to improve the straightness of the bullet signatures.
•
Increase the minimum spacing between the bullet signatures and make all the spacings equal.
•
Make the prototypes of standard bullets the same shape as the master bullets.
•
Possibly provide nose cones or pieces to fit different instruments.
3.2 NIST Standard Casing Prototypes
Ten prototype casings are to be delivered to NIST. The first seven were delivered in October
1999. The prototype standard casings will be tested by using the IBIS systems at ATF and FTI.
WWW.SURVIVALEBOOKS.COM

14
WWW.SURVIVALEBOOKS.COM

15
4. PLANS FOR FUTURE WORK
Plans for future development include the following:
•
Develop 10 second-version NIST standard bullets in 2000, distribute them for testing at both
ATF and FBI laboratories, collect comments for the production of NIST Standard Reference
Materials (SRM) 2081 Standard Bullets.
•
Develop 10 NIST prototype standard casings in 1999 and finish evaluation testing in 2000,
distribute them for testing at ATF and FBI laboratories, collect comments for the production
of NIST SRM standard casings.
•
Produce NIST SRM standard bullets and casings.
•
Develop parameters and algorithms for 2D and 3D bullet signature comparisons.
WWW.SURVIVALEBOOKS.COM

16
WWW.SURVIVALEBOOKS.COM

17
5. SUMMARY
The standard bullets and casings development process has achieved the following results:
•
The NC diamond turning process can produce standard bullets and meet essentially all
technical requirements.
•
Geometric measurements show highly uniform and reproducible profiling signatures.
•
IBIS tests also show repeatable matching scores consistent with the profiling signatures.
•
NIST standard bullets can be used as a powerful tool for the quality control and unification of
ballistics measurements.
WWW.SURVIVALEBOOKS.COM

18
WWW.SURVIVALEBOOKS.COM

19
6. SUGGESTED READINGS
[1] Office of Firearms, Explosives and Arson, ATF: ATF’s NIBIN Program, 98 AFTE
(Association of Firearm and Tool Mark Examiners), July 12–17, 1998, Tampa, FL.
[2] Casey, W. (Deputy Superintendent, BPD), J. Wooten (Assistant Director, ATF), and
R. Murch (Deputy Assistant Director, FBI), National Integrated Ballistics Information
Network, 98 AFTE, July 12–17, 1998, Tampa, FL.
[3] Song, J., C. Evans, M. McGlauflin, E. Whitenton, T. Vorburger, and Y. Yuan, "NIST
Virtual/Physical Random Profile Roughness Calibration Standards," Proc. SPIE, Vol. 3426,
1998, p. 213.
[4] NIJ Report 601–00, NIST Random Profile Roughness Specimens and Standard Bullets, U.S.
Department of Justice, National Institute of Justice, July 2000, NCJ 183256.
[5] Kruger, R. and M. Krystek, "Diamond-Turned Surface-Roughness Standards for the
Calibration of Interference Microscopes,” Proc. 7
th
Int. Conf. on Metrology and Properties of
Engineering Surfaces, edited by B.G. Rosen and R.J. Crafoord (Chalmers University of
Technology, Göteborg, Sweden, 1997).
WWW.SURVIVALEBOOKS.COM

20
WWW.SURVIVALEBOOKS.COM
Wyszukiwarka
Podobne podstrony:
US Department Of Justice Development of NIST Standard Casings and Status Reports NIJ Report 603 00
1999 US Department Of Justice Death Scene Investigation 72p
The power and aims of international Jewery (Siła i cele międzynarodowego Żydostwa) US Department of
Mullins Eustace, Warning The Department Of Justice Is Dangerous To Americans (1989)
Functions of the Department of Defense
Fricke Visual assessments of the surface diusion properties of concert halls
DEPARTMENT OF HEALTH AND HUMAN SERVICES PROTECTION OF HUMAN SUBJECTS
2000 The Art of the Ridiculous Sublime
Sobczyński, Marek Achievements of the Department of Political Geography and Regional Studies, Unive
Bearden US Office of Naval Research Report on the Priore Machine
Model kartonowy Digital Card Model 2000 Spad VII of SPA 48 (1 32)
New York City Of Aspiration Middle Class Report
2000 Dept of Justice A Guide For Explosion & Bombing Scene Investigation 65p
Development of Carbon Nanotubes and Polymer Composites Therefrom
więcej podobnych podstron