Super
Mario Bros. X World/Level Editor Help
Version
1.3
Index
1.
About The Program
1.a Folders
2.
Basics of the Editor
2.a Menus
2.b Layers
2.c Events
3.
World Edit Mode
3.a Features
3.b Tiles
3.c Scenery
3.d Levels
3.e Paths
3.f Music
3.g Settings
4.
Level Edit Mode
4.a Features
4.b Blocks and Tiles
4.c Backgrounds
4.d NPCs
4.e Level Settings
4.f Warps and Doors
4.g Water
5.
NPC Customization
5.a Step By Step
5.b List of NPC Flags
6.
Tutorials
6.a Using Custom Graphics
6.b Moving Layers
6.c Warps and Doors
7.
Troubleshooting
7.a Errors
1. About The Program
Program
created by Andrew Spinks 'Redigit'
Email
= redigit@tehgamez.com
SMBX Editor allows you to create your own Mario Bros. games and levels utilizing items, enemies and graphics from many of your favorite Mario games including, SMB, SMB2, SMB3 and SMW, and even music from SM64.
Please visit the Forums on www.SuperMarioBrothers.org if you have any questions, comments, suggestions or to seek further help with the editor.
1.A Folders - The following folders are included with SMBx, these are descriptions of what they are used for.
Battle
- Contains
all folders that relate to the Battle Mode of SMBx. You can find all
levels for battle mode in here, as well as the custom graphics for
those levels.
Graphics
- Contains all the Graphics used by default by the game and editor.
Inside it is seperated by type of graphic. (When
creating custom graphics, they do not need to be seperated in the
same way when placed in your level folder.) Each
graphic has its own type and number, and these must be referenced
when using custom graphics as the name of the custom graphic file
must match exactly the name of the file to be over-ridden in the
level.
Music
- Contains
all the Music used by default by the game and editor. (SMBX uses mp3
file formats.)
Sound
- Contains
all the Sounds used by the game and editor.
Worlds
-
This is where you would place any created, or downloaded
episodes.
Episode
Folder -
Each episode has its own folder, and contains the following.
.lvl
File These
are your levels. To use custom graphics in your level and
overwrite the default graphics used by SMBx you will create a new
folder inside the episode folder with the SAME EXACT name as the
.lvl file that the graphics are being used in (minus the .lvl
extension) and then place the graphics inside that folder. They
do not need to be seperated by type in the fashion that they are
in the default graphics folder.
.sav
File When
you save, these are created, To delete a save file, you must
delete this file from the folder.
.wld
File
This is the World Map file. Every Episode MUST have this file to
be playable even if there is no world map since it uses the world
maps SETTINGS information to set certain things about the game.
2.
Basics of the Editor
2.A
Menus
-
You will see the following menus listed at the top of the editor
window.
"File"
Menu -
Contains New, Save and Open Functions. These are self Explanatory.
"Mode" Menu - Choose either to edit the World Map or Levels. When switching between these two modes, you will be prompted to save our current map. Each mode has its own set of functions, please see each modes respective help sections in this Help File for further details.
"Test
Level" Menu
- Will only appear when editing levels. Contains the following
options.
"Test
Level 1up"
- (F5) Play the currently opened level to test its playability and
proper function as a single player. The player will start where you
have placed the Player
1 Start location.
"Test Level 2up" - (F6) Same as "Test Level 1up" but both players will be present, each using their own start locations. If the players separate the screen will seamlessly split and become a dual screen so both may continue to explore.
"Test Level Battle Game" - (F7) Same as "Test Level 2up" but both players will be able to harm eachother with every type of attack. The point of this mode is to cause the other player to lose all of thier lives by whatever means you can.
"Test Settings" - Here you set the options that will be used while testing the level.
Grab
All -
Allows Mario and Luigi to grab, carry and toss any enemy regardless
of whether or not it would normally be allowed.
God
mode -
Makes Mario and Luigi immortal.
Show
FPS
- Shows the Frames Per Second. Something around 60-70 is where you
will want it to run, if its higher, you may want to remove a few NPCs
from that area of the level as having too many on the screen at
once can reduce gameplay speeds.
Max
FPS
- Runs the game at the highest speed possible.
Fullscreen
- Will run the test in Full-screen Mode.
Player 1 and Player 2 - Set what character and what power-ups each will start the test with. You may also set the Yoshi they will be riding at test start.
"Reset Game" - Removes any previous test run information from the next play through. This includes Midway Points having been reached.
THINGS
TO REMEMBER WHEN TESTING
*
You may still edit the map while you are in test mode, however any
changes you make to the map while testing will not be saved when
the test ends. *The player controls used while testing the level
will be taken from the options you have chosen in smbx.exe the
last time you played it. So if you want to use a joystick while
testing, simply change the player controls in smbx and then load
up the editor again.
*
Entering any warp that sends you to another level or another will
end the test. Hitting Escape will also end the Test.
"View" Menu - (Level Editor Only) This contains two very important functions. Layers, and Events. It also contains the debugger which will show you the levels current and maximum uses of Tiles and NPCs, The X/Y location of the mouse, the current FPS (frames per second), and how many of certain NPCs you have placed so far.
2.B Layers
- (Level Editor Only) Layers
are used to create moving platforms, hidden blocks, and other
interesting effects. When you select a layer, the next Tile,
Background, NPC, Warp and even Water effect will be placed on that
Layer, and will be effected by any, SHOW, HIDE, or MOVE effect done
on that layer. Clicking the Check box off next to a layer will make
it begin the level Hidden. When naming a layer, you must hit ENTER
after typing in the new name for it to save that name.
Default
Layer -
This is the basic layer.
Destroyed
Blocks -
Only useful during a test, If you wish to re-show all the blocks
that have been broken and destroyed. Clicking the check box will
recreate them.
Spawned
NPCs -
This is the layer that will contain any NPC's that emerge from NPC
Generators. Only useful during a test to remove all spawned NPCs
that have emerged so far.
ADD
LAYER -
When you create a new layer it will be added to the list and need a
new name or remain as New Layer X.
DELETE LAYER - When attempting to Delete a layer, a prompt will show asking you if you if you are sure. CAUTION When deleting a layer all objects created while that layer was selected will also be deleted.
2.C Events
- (Level Editor Only) Events
can be used to make many different things happen in a level, ranging
from a message being shown to causing a layer to SHOW, HIDE, or
MOVE. Events are called by a few different means.
BUILT
IN
(May
not be removed)
Level
Start - This event is called when the level begins.
P
Switch Start - This event starts when a player jumps on a P
Switch.
P
Switch End - This event starts when the P Switch effect reaches its
end.
SET
BY USER
New
Event
-
Click ADD to create a new event. These events can start
automatically or be set to start only when they are called by a
NPC or Block/Tile Event or another Event having finished. When
naming a new event, hit ENTER after you are done typing to have
that new name saved.
DUPE
-
Copies the currently selected event and all its settings and creates
a clone of itself in the list.
Event Features - Layers This is where you will select what layers will be hidden, shown or toggled.
No Smoke - When a Layer is hidden it makes a poof of smoke on each hidden tile or NPC, checking NO SMOKE will make this poof effect not happen when this event is called.
TOGGLE, HIDE, SHOW LAYERS - To add a layer to one of these lists, click on it in whatever list it is currently in, and then click the ADD button under the desired list. Clicking remove while selected on a Layer while it is Hidden, toggled or shown will add it back into the list of all unaffected layers.
Layer Movement This is where you set a Layers movement to create moving platforms/blocks. If you plan on putting an NPC on a moving platform it must be added to the same layer as that platform or it may not collide correctly with that platform and fall through it. Certain enemy projectiles (Shy Guys) will hit the moving platform as soon as they fire, while the platform is moving up, please make note of this when designing your levels as it will effect difficulty.
First Select a Layer from the drop down box. This is the layer that will be moving.
(Please note, Creating a moving layer horizontally can cause strange things to happen when interacting with Mario, Luigi since you can not place them in a specific layer. These strange things include Mario and Luigi sliding ever so slightly as the platform is moving.)
Layer Direction and Speed.
To set a layers direction and speed you will use the horizontal and vertical speed fields. It is suggested that you only use numbers ranging from 0 to 5, as anything faster is impossible to see or interact with correctly. Decimals may also be used.
Horizontal = A positive number will move the layer RIGHT, a negative number will move the layer LEFT
Vertical = A positive number will move the layer UP, a negative number will move the layer DOWN
Diagonal = Putting a number in both fields at the same time will cause the layer to move at an angle.
(If an event attempts to move a layer already being moved by another event, the newest events movement will override the old movement.)
Auto-Scroll
To create a level which scrolls on its own and makes a player have to move with the screen without going ahead or back, you would use this function. This is used in conjuction with the POSITION section setting.
After creating the entire level set the boundary to the size of the playable screen and select POSTION "Use Current". This will set the area that the players must remain inside. Now you may resize the boundary again back to the edges of the level itself.
Select which section will use this auto scroll feature to turn it on. The speeds are set just like Layer movement speeds. Other events may be used to change the direction or speed of the screen as its moving.
Message - When the event is called, this message will pop up onto the screen. Play will pause until the message is cleared with a button press by the player.
Section Settings - When calling the event you can change the music that is playing and also change the background image to another if you would like. You would simply change the playing music in the editor to the desired new music and click "use current" this will lock that song into the editor. Then you may change the song back to what should play originally in the level when it begins. Setting another event to have Default afterwards will change the song or background back to the sections original settings. This is good for a temporary change, for example, while a P Switch is in effect.
Position - Also listed under Section settings is the option to set Position. This option will allow you to set the level boundaries to a specific area and not allow the player to pass beyond that set boundary until another event unlocks it with the DEFAULT setting. To do this first select the "Level Settings" button to have that window open. In that window, select "Level Boundary" and shrink or expand the level to the area you wish the player to be able to navigate in until you let them to explore more or less. (Don't worry, if you shrink the level beyond what you've already created, the tiles you have placed will remain and not be deleted. And you can expand it back to normal once you have clicked SET in the EVENT windows Position option.) Click Set to capture the size of the level boundry you have just set. You may now re- expand your boundary back to where it would normally be. And there you have it a growing or shrinking level when the event is called. Remember its always best to make sure the player is within the new boundary before the event is called otherwise they will be automatically moved to the very edge of the new boundary, even if that edge is now inside a wall. If the player happens to appear inside a wall, he will move automatically to the nearest open space (horizontally) from where he is now located. If there are no open spaces, he will become unable to move and the level will become impossible to complete.
Play Sound - This sound will play when the event is called.
End Game - The game will end in victory for the players when this is set to Bowser Defeat.
Trigger Event - When another event is to follow the current action, for example to reverse the effects of the trigger you are making, you can set that trigger to be called after the current triggers delay has completed. See Delay below.
Delay - Set this delay to have the event being called by the current event to wait a certain amount of time before activating. This delay only effects how long until the event chosen in "Trigger Event" starts, and not how long the current event lasts.
Player Controls - By selecting one of the controls listed, you are setting the control to be pressed automatically by the computer for both players when this event is called. So if you want both players to jump when an enemy appears, you would use this. This effects both players at the same time.
3.
World Editor Mode
3.A Features - The World Editor is what you use to create your overworld, if you want your Mario game to have an overworld map that is. However, for your game to work the folder for you game must contain a map file, even if its completely empty, as the map file contains important information. Which level is the first level of your game for example.
Size
- An
important thing to remember about World Editor Mode, is that you only
have one overworld map to work with, but it is very massive in size.
The exact size of the max map size is so large it is currently
unknown, it is concievable, but not likely, that a map designer
could make a map 10000 tiles wide by 10000 tiles high.
If
you wish to create multiple "areas" in your game, like
Super Mario Bros. 3 had Worlds 1-8, simply spread them apart on the
map so they are far enough apart you will never be able to see one
from the other.
Getting Around - The following controls can be used to navigate and edit the map.
Arrow
Keys
- While the mouse is over the map window, you can scroll the map
with the arrow keys.
Shift
Keys
- While Scrolling, holding shift scrolls the map much faster.
Types of Mouse Actions - At the bottom of the screen you will see Selection and Eraser listed. These are two 'brushes' you will use often.
Selection
- While you are using the Selection Brush the following controls are
in effect.
Left
Click
- Grabs an already placed tile and attaches it to the mouse to be
placed elsewhere. The window for that type of tile will appear
allowing you to change its options before you place it again if
you would like.
Left Click (While A Tile is Attached) - Places the attached tile in the clicked location. Once the item is placed, a clone of that tile will still remain attached to the mouse so you can place another if you want. This can save a designer time when creating multiple of the same tile. Dragging while placing Tiles will create a constant flow of tile placement. This is only suggested if AUTO-ALIGN is checked, otherwise too many tiles may be placed in a small area.
Right Click (While A tile Is Attached) - Deletes the attached Tile From the Mouse so you can grab another. Don't Worry, the information of the last selected level will remain in the Level window, so you don't have to worry about accidentally losing all your work if you pick up a level and right click by mistake. Just make sure you place that level back as soon as you can.
Eraser
- This
is what you use to clear tiles from the map. The follow controls
are in effect while the Eraser is selected.
Left
Click -
Erases the topmost tile. Tiles are layered in the following way from
topmost to bottom most, so when deleting a tile make sure another
tile isnt above it in the list.
Top
- Music
Middle
- Levels Or Paths
Lower
Middle - Scenery
Very
Bottom - Tiles
For
example, if in one Square, you have Music, A Level and a Tile and
wanted to delete the tile, you would either have to move or delete
the Music and the Level to then be able to delete the Tile. So take
this into consideration before trying erase something.
Right
Click
- Deselects the Eraser and puts you into the Selection Brush.
Other
Brushes -
The following are the remaining brushes.
Tiles
- Allows
placement of the ground tiles, such as Grass, Water, Desert and
Snow.
Scenery
- Places
sprites that are used to make the map have more ambience and
appeal. These include Trees, Signs, Hills. The player does not
interact with these in any way. These may not be placed on
Levels.
Levels
- These
are placed as placeholders for Level entrances. These may not be
placed on Scenery or Paths.
Paths
- These
dictate where the player may move. Paths appear depending on if
the level connecting to them has been completed. Paths may not be
placed on Levels, but they may be placed over scenery, the
scenery will be pushed underneath.
Music
-
When a player passes over this Tile, the overworld music will
change to the selected Music. These may be placed anywhere except
onto other music
3.B Tiles
- The
Tiles Brush is quite straightforward. Currently there are four Tile
sets to choose from.
Super
Mario World A (Grass/Dirt/Bridge)
Super
Mario World B (Cave/Lava)
Super
Mario World C (Star Road/Snow/Clouds)
Super
Mario Bros. 3
3.C Scenery - The Scenery Brush has no special settings, but most scenery can be placed closer together than most other "auto-aligned" tiles allowing for more decorative design. Some scenery is animated, and you will see this animation once the scenery is attached to the mouse and is hovered over the map.
3.D Levels
- Levels
are the powerhouse of World Edit Mode. This is what you use to make
your map come alive and have a purpose. When selecting the Level
Brush, the Levels window will open. Below is an overview of the
Levels Windows functions.
Level
Graphic -
Choose what the level will look like on the map. Some levels are
animated, hover them over the map to preview the animation before
placement.
Level
File Name -
Type in the File name of the Level you wish the player to enter
when hitting the select key on this Level. Do not include the
Extension ".lvl" when entering the file name. (Example,
for "1-1.lvl" I would type "1-1".
Level's
Name - During
playthrough, when the player moves onto this Level marker on the
overworld map, this Name will show at the top of the screen near
the players Lives and Coins. Choose a name for the level that is
appropriate. (Example : If the level is full of pipes, call it
Pipeworks, so the player has an idea what to expect.)
Level
Exits - This
is called when the Level is completed by the players. Any paths
connected to the completed level in the direction chosen will
appear if the selected completion NPC is touched. These are the
different kinds of level completions that can be placed in a
level.
-
SMB3
Standard Exit,
When the level is completed by touching the Star/Flower/Mushroom
Exit NPC.
-
SMB3
Boss Exit,
When the level is completed by touching the ? Ball Exit NPC.
-
Walked
Off Screen,
If the "Off-screen Exit" option in a level is selected
and the player walks off the screen, the level will be
considered completed.
-
Secret
Exit,
When the Player brings the SMW Key Exit NPC to the Background
Keyhole, the level will be considered completed in this
manner.
-
SMB2
Boss Exit,
When the player touches the Glass Orb Exit NPC the map will end
with this completion.
-
Warp
Exit,
When a Pipe, Door or Instant Warp has the option MAP EXIT set,
the level will be considered completed.
-
Star
Exit,
When the player touches the SMB3 Star Exit NPC, the level will be
considered completed in this manner.
-
SMW
Exit,
When the player cuts the tape on the SMW goal line, the level
will be considered completed in this manner.
Location
- This
simply displays the current X,Y mouse pointer location on the map
for reference when placing Warp Exits.
Options
- The
following options may be set for the level.
-
Big
Background,
This gives the path background that is displayed under the level
graphic a much larger size.
-
Path
Background,
This will hide or show the path background under the level
sprite.
-
Always
Visible,
This makes the level show up on the map even if the level before
it has not been completed yet.
-
Game
Start,
This is where the player will begin the game on the map when the
game is begun. it is best you only put this option on one
level.
Map
Warp Location - When
the player "Enters" this Level, instead of a level being
loaded, the player will warp to the set location on the map. If a
level is set as well, after the level is completed or dies, the
player will warp to the set location when the world map screen
re-shows.
Entrance
- This
is where you set where the player will begin the level. If the
player is to start where you placed the Mario and Luigi Start
locations, choose Normal. If they player is to exit a warp pipe or
door and start the level that way, once the Warp EXIT is placed in
the level, the player will start the level there if that warp is
chosen on the slide bar.
3.E Paths - Paths are how you guide the player from one level to another, and also limit the movement of the player. The player is only able to cross over the path and Level tiles on the world map. Path tiles will appear when the level preceding the path is completed, otherwise they will not be seen. When placing path tiles, be sure to take note that any adjacent path tile will allow the player to cross that area, even it the paths sprite image isnt a "connecting" image. The following image shows an example of this. The two paths may not appear to connect, but the player could walk from the left tile to the right tile if he so chose.
![]()
![]()
3.F Music - This brush will allow you to place Music change tiles onto the map. When the player touches these tiles, the music will change to the selected music file. To set this, first select the music you want to change to and then click where you want it on the map.
3.G Settings-
This
is where you set some of the games basic settings.
World
Name -
This is simply the name of the world. It has no purpose besides
allowing you to name the file for your save/load reference.
Auto
Start Level -
To have the game begin in a level instead of having the player
start on the map, set a level here. Type in the levels name, without
the ".lvl" extension.
No
World Map
- Fancy a game like SMB1 or SMB2 where the play is continuous from
one level to another. Choose this option to make that possible and
the world map will never be used. It must still be saved and
placed in the same folder as the levels you create however for the
game to recognize the levels as a collection.
Restart
last level on Death
- If you are using the no world map feature, this setting will
cause the player to be sent back to the beginning
of
the level when they die.
Number
of Stars,
This is the total number of stars in the game. This number is
simply used to calculate the percent of the game completed by the
player when displaying the save game to load.
Block
Characters,
This will prevent a certain character from being selected to enter
this level.
Credits
- List those who worked on this World and Level set here.
4. Level Edit Mode
4.A Features - Level Edit Mode is where you create the levels the player will have to complete to proceed in the game. It has many more features than World Edit Mode, including the ability to set triggered events that change the level dynamically as its played. Below are the basic features in Level Edit Mode.
Getting Around - The following controls can be used to navigate and edit the level.
Arrow
Keys
- While the mouse is over the level window, you can scroll the
level with the arrow keys.
Shift
Keys
- While Scrolling, holding shift scrolls the level much faster.
Types of Mouse Actions - At the bottom of the screen you will see Selection and Eraser listed. These are two 'brushes' you will use often in the level editor.
Selection
- While you are using the Selection Brush the following controls are
in effect.
Left
Click
- Grabs an already placed tile, background, NPC, warp or water tile
and attaches it to the mouse to be placed elsewhere. The window
for that type of tile will appear allowing you to change its
options before you place it again if you would like.
Left
Click (While A Tile is Attached) -
Places the attached tile, background, NPC warp or water tile in
the clicked location. Once the item is placed, a clone of that tile
will still remain attached to the mouse so you can place another if
you want. This can save a designer time when creating multiple of
the same tile. Dragging while placing Tiles will create a constant
flow of tile placement.
Right
Click (While A tile Is Attached) -
Deletes the attached Tile From the Mouse so you can grab another.
Don't
Worry, the information of the last selected tile will remain in
that tile types window, so you don't have to worry about
accidentally losing all your work if you pick up a npc with settings
and right click by mistake. Just make sure you place that tile/npc
back as soon as you can.
Eraser
- This
is what you use to clear tiles and objects from the level. The
follow controls are in effect while the Eraser is selected.
Left
Click -
Erases the topmost tile or object. Tiles are layered in the following
way from topmost to bottom most, so when deleting a tile make sure
another tile isn't above it in the list.
Top
- NPC or Tiles
Middle
- Music
Lower
Middle - Background
Very
Bottom - Water
For
example, if in one Square, you have Music, An NPC and a Water and
wanted to delete the water, you would either have to move or
delete the Music and the NPC to then be able to delete the water.
So take this into consideration before trying erase
something.
Right
Click
- Deselects the Eraser and puts you into the Selection Brush.
Other
Brushes -
The following are the remaining brushes.
Blocks
and
Tiles
- Allows
placement of the solid tiles for the player to walk on, hit from
below and be blocked by.
Backgrounds
- Places
images that are used to make the level have more ambience and
appeal and 90% of the time are not interactable. Yet, some
background tiles have actual effects built into them, Such as the
SMW Keyhole. Backgrounds also include plants, the water image
(not the effect), doors, clouds, and other overlays that either
display behind or in front of the player.
NPCs
- These are Enemies, Items and even Allies that you can speak to.
Also includes Exits for levels and certain moving
platforms.
Warps
and Doors
- This brush allows you to set Pipes, and doors to move the
player from one location to another. Without this, the pipes and
doors would not do anything.
Water
- Allows
you to designate areas where a water effect should be in effect
allowing the player to swim and water enemies float correctly.
4.B
Blocks and Tiles - Every
level needs a ground so the player can walk without dying. And you
can always add a ? blocks to give a player an item. This is what you
would use to do just these things. Blocks and Tiles have many more
features than World Edit Tiles do, and allow you to set events when
certain things occur with that block or tile. Below are the advanced
features of the Tiles and Blocks brush.
Game
Selection -
This lets you choose the game the enemies and items will be listed
for. Currently SMB1, SMB2, SMB3 and SMW are available, as well as
some random enemies and items from other Nintendo games.
Block
Contents -
Using the slider or quick buttons, you may set what emerges from a
block or tile when it is hit from below. Scrolling to the left allows
you to set a number of coins in the block from 1-99. Scrolling
right will list all other NPCs available to you.
Invisible
- This
will cause the tile or block to not appear or be interactable with
until a HIT action is found, either hitting the block from below, or
hitting it from the side with a shell.
Slippery
- Sets
a tile to be slippery as if it is made/covered in ice.
Events
-
This button will open a small window that contains three options that
will call the event selected when those actions are taken against
the tile or block. These are as follows.
Death
- If
the tile is a breakable block, and it is destroyed, the event
selected will be called.
Hit
- If this block is hit from below the selected event will be
called.
No
More Objects in Layer -
If the block or tile is set to a layer besides default and no
other block or npc remains in that layer, this event will
call.
Tile
Set - Depending
on what game you chose, you will see a different selection of game
tiles you can place separated
in
category buttons. Here are brief descriptions of what certain
special tile categories are used for.
Hurts
- Any
of these tiles will hurt or sometimes even kill the player when
they are touched.
SMW
Switch -
Placing the ? block version in a level, and then hitting it will
cause the dotted line version to appear as ! point versions of that
same color.
Sizable
-
These blocks use the Block Size arrow buttons. The right and down
arrows will grow the block, and the left and up will shrink the
block.
Special
- This
contains all of the item and interactive blocks.
Misc
- This
contains some special use blocks and other unclassified blocks.
The SMB3 block that is all grey is used for making a completely
invisible
block
that you can walk on.
Player
Blocks
- For levels that allow more than just Mario and Luigi, these
blocks are placed to allow the player to hit the block and become
the designated character. The blocks with the ! are only
passable by the character who is designated by that color.
Red
= Mario
Green
= Luigi
Pink
= Peach
Blue
= Toad
Yellow
= Link
FILL
-
On the far right you will see a fill button. When this is activated,
can paste a tile to fill any open area quickly.
4.C Backgrounds
- These
are general tiles used to appear behind the player or in front of
the player for ambience and flare. However some Background objects
have a use. Some important Backgrounds with actual functions are
listed below.
SMW
Keyhole Exit
SMW
Check Point and Goal Exit
Doors
SMW
Platform
SMW
Fences
4.D NPCs
- These
are your enemies, allies and items. Each has its own way of
interacting with the world and with the player. NPCs have many
special settings you may set for them. Each is explained
below.
Direction
-
Choose which way the NPC or Item will originally
be
facing and/or moving or exiting a pipe (pirana
plants).
For certain NPC's the Direction Selector will be replaced with a
"Active On/Off" Option to set if the initial state of
that NPC is on or off.
Game
Selection -
This will show you the enemies and Items from a specific mario
(or misc) game when you choose that games button.
Message
- Set
a message that will appear if the NPC is set to "Friend"
and
the player presses the up key while standing in front of it. Clicking
TEST will show the message in the editor window so you can see
what it will look like during the game.
Advanced
-
This opens a small window with specific settings for two types of
enemies. Koopa Para-Troopers, which can have their flight type
changed. And the cheep-cheep setting which can change their swim
type. The last option listed is "Legacy Boss" This is to be
set on the games final boss for use in an event to call the end
of the game.
Warp
To Section - Used
with the Red Potion/Red Door NPC to set its destination when
used. This is to be used in conjunction with the CLONE section
command, so the warped to section is exactly the same as the warp
from section, so the player does not get stuck as the player will
warp to the new section at the SAME EXACT X,Y coords as
where
they entered in the first section.
Firebar
Position - Used
when placing firebars. position 0 is the center of the fire bar,
and 1 is the spot below it, and 2 is below that. Always create
firebars from the middle down, for if you place any above the
middle it will spin awkwardly.
Generator
-
This is used to create spawn points for NPCs. These spawn points
will generate a new npc every so often depending on the settings
you choose. There are two types of generators. Warp and
Projectile. The warp generator, will give the impression of the
npc exiting a warp pipe. Once the NPC has exited the warp it will
move in a random direction based on the type of npc being spawned
and the direction it was spawned. Projectile Generators will
spawn the NPC at a high speed and it wont stop moving until it
hits a solid object. A Bullet Bill launcher sound will play on
each projectile launch.
Direction
- Set
which direction the NPC will spawn towards. If you choose left,
the NPC will appear as if emerging from the right and move left
as it exits.
Delay
- How
long between spawns until the generator spawns another NPC of the
same type. Can be 0.1 second to 60 seconds.
Events
-
This button will show a small window containing four options to
call an event when a specific action is done to the NPC.
Death
- When
this enemy dies, call the event. All collectable items are
considered dead when they are collected by the player.
Talk
- When
the player presses up on this "Friend" the event will
be called.
Activate
- If
the NPC can be activated, and is, the event will be called. P
Switches are an example.
No
more Objects in Layer - When
every single object in a layer including the object this event is
listed on is destroyed, this event will be called.
Attach
To Layer - This
will make a layer follow an NPCs movement. It is suggested that
you only attach one NPC to a Layer in this way, attaching more
will automatically detect the first you attached in such a way and
that NPC will be the only one to effect the layer.
Egg
- This
will place the Item or Npc inside an egg, once the egg is tossed
by the player, the object inside will emerge.
Don't
Move -
This makes the NPC not move from the location it was placed.
Enemies will still jump up and down and face the player to
shoot/throw weapons.
Buried
- The
placed item will be hidden in the ground with a Leafy sprout
above it for the player to press Run/Grab and press up on it to
pull it out of the ground.
Friendly
-
This will make the NPC not harm-able, and not harm mario or luigi
on touch. If a message is set on the Friendly NPC an ! will
appear over its head indicating it may be spoken with by the
player by them pressing up while standing in front of them.
Setting an item to Friend and not setting a message will simply
make the item not collectable. This is a good way to make trick
items.
Bubble
- This
will make the selected NPC (that must be a small npc) or Item,
start by floating in a bubble that will pop when the player
colides with it, or if the bubble colides with a solid block. If
the bubble is popped the contained item will fall to the
ground.
Lakitu
- This
will create a SMW type Cloud Riding Lakitu that will toss the
selected NPC/Item down at the players continuously.
4.E Level
Settings - This
window allows you to do many interesting things with your level. It
is where you choose the music, background, and even size of the level
you are currently working on. Below are the different options and
features offered in the level settings window.
Game
Selection - These
buttons will change what Music and Backgrounds are available for
choosing.
Level
Boundary
-
A
very important feature to learn how to use. These four buttons
will allow you to grab and drag the boundary
in
question to increase or decrease the explore-able size of the
level. If you shrink a boundary
over
already created tiles, those tiles will remain undeleted, even if
you save and close the level and open it again. Suffice to say,
the boundary
is
only a setting that controls the ability fo the player to explore
that area, it does not actually limit the size of the level
itself.
Use
- To
use this feature, click Right, scroll the displayed level with
your arrow keys to right until you see a grey border. With
"Right" still selected, click and drag the grey boarder
to the right increasing the size of your level. This can be done
with all four directions. Holding Shift while dragging and
hitting an arrow key will let you drag the boundary
much
faster.
Start
Locations -
These Mario and Luigi placement holders are what you place to set
a levels "Normal Entrance" which is called in World
Edit Mode by Level tiles. The players will begin at the locations
set for them. Only one start location per player, per level may be
set. trying to place another will simply move the placement to
that new location and remove the old one.
Section
- Each
level may have up to 21 different sections. These sections are
all considered the same level and will not "end a level" if
you warp between them like it would if you warped from one level
to another. To work on each setting simply click the numbered
button for each. It will change the Level shown in the Edit
screen to the new section. Its just as easy to swap back to the
other section. Each section may have its own music, background and
even settings.
Level
Wrap - Setting
this will allow the player, NPCs and even projectiles to move
off one side of the screen and appear on the other side as if the
sides were connected. This wrap does not effect layers, which
will not wrap. Also, an NPC will wrap when its center tile (on
multi tile npcs like the tank treads) hits the wrap location. If
another tile is riding on the tank treads when it wraps and is
not placed directly on the center tile of that tread when it
does, it will not travel correctly with it. This can take some
trial and error.
Off-screen
Exit -
This will cause the level to end if the player walks off the right
or left ends of the screen. This will call the World Edit Mode
Level exit path event "Off-screen Exit" to be called
and that path will appear.
No
Turn Back - This
will create a SMB1 map effect, where once the screen moves to the
right due to the player moving, it will no longer move left even
if the player moves left.
Underwater
- This
makes the player and npcs able to swim throughout the entire
section without having to place multiple water tiles.
Backgrounds
- Set
the background image for this section.
Music
- Set
the desired music for this section.
Advanced
- Contains
the options for cloning a section so if you want to have a level
that have RED POTION warps, you can. Simply select the Section you
want to clone in the Source Box, and select what section you want
to create with Target Box. You now may allow the player to warp to
this hidden parallell world that mimics the first. This is
neccesary as the RED POTION WARPS will teleport the player to the
same X,Y coordinates as the entering door, just on the new
section.
4.F Warps
and Doors - This
is how you create transitions the player may use to travel from one
spot in a section to another area in the same section, or from one
section to another inside a level. There are three kidns of Warps you
can use. Pipe, Door, and Instant.
Warps
- The
most important thing to know about placing a warp is that when
you place it, you are either placing an entrance or an exit
denoted with a small number on either the top left of the warp
tile or the bottom right. A number on the top left is an entrance,
and a number on the bottom right is an exit. As you place warps
this number will increase automatically. Each warp will have a
exit and an entrance so it is impossible to skip a number.
Warp
Placement - Use
these buttons to select which part of the warp you will be
placing. The Exit and Entrance option will remain the same for each
warp number set.
Entrance
Direction - What
direction must the player be moving for the warp to become active.
(This is not an option for doors.) For pipes, it will detect what
direction the player is pushing up against the desired pipe or
wall where the warp will be located. Doors will always be entered by
the player pressing up while standing in front of the door.
Exit
Direction - What
direction will the player exit the "Target" warp in.
Even if the exit is on another section, this option must be set on
the Entrance Tile when it is placed.
Warp
Effect - Choose
between, Pipe, Door and Instant Effects.
Level
Exit -
If you want a warp entrance to end the level as "completed".
Select the "level Exit Check Box and put the X , Y
coordinates you wish the player to emerge from. If no X , Y is set
the player will emerge at the same location it entered the level
from the map.
Warp
To Level - If
you have no world map, or want the player to be able to exit a
different world map level than they entered, set the desired level
here. Warping to another level is different than warping to
another section in a few ways. A player entering another level,
will pull the other player with them no matter where in the level
they were located. Also, leaving a level in this manner leaves the
other level "incomplete" and the level paths will not
update on the map. Check the "Level Entrance" check box
to only place an exit for a warp which will be used by a Level
Tile in World Edit mode to be entered from the world map, or
another level. This exit will not have a matching entrance on this
level.
No
Yoshi - Yoshi
will not be able to be ridden and still enter this warp.
Allow
NPC -
This will allow Mario to be carrying an object with him through
the warp. (Shell, P Switch)
Locked
- This
will place a lock on Door Warps, and will require the player be
carrying a SMW Key and press up on the door to unlock it and pass
through.
Stars
Needed - This
will require the players to have gathered a certain number of
stars to enter the warp.
4.G Water
- Placing
water background tiles in your level is all well and good. But these
would do no good if the water 'effect' was not present and the player
and enemies could not swim in said water tiles. So using the WATER
brush you may place the water effect wherever you would like.
Use
-
To successfully
place
water, simply use the arrows to expand the size of the water bounds
box which is green. When you have the desired size click to place the
water effect over the water tiles. The player will now be able to
swim in the water. Be careful when placing the water effect, as the
player will be able to "swim" in the air if the water
effect is placed on a location the player can walk without any water
graphics being placed first.
Quicksand - Makes the placed water area utilize a quicksand effect that pulls the player downwards. The player must jump continuously to fight the pull.
5. Customizing NPCs
5.a Step By Step
While
the feature is implimented in SMBx. It is not part of the actual
programs user interface. All custom NPCs are set just like custom
graphics and are done manualy by the user creating a file in the
game folders. In the folder for the level you wish to use a custom
NPC in you will create a file with notepad (a program that comes with
your computer) that is named the same exact as the graphic file of
the NPC you wish to alter. For example. If you wish to make a goomba
not able to be stomped, you would do the following.
Create
a new .txt file in the desired levels folder.
Name
the .txt file npc-1
Open
that file and then place the following text in
it.
playerblock=1
jumphurt=0
and
then save the file.
Now
in the level in question, the goomba will no longer be able to be
stomped.
5.b List of NPC Flags
The
following flags can be placed in the .txt file to effect the npc.
If
you want to set a flag to yes, put =1 and for no =0
NPC
Player/World Interactions Flags
grabtop=
Can Mario pick it up and carry it?
grabside=
Can Mario grab this from the side and carry
it?
jumphurt=
Will Mario get bounce if he jumps on the top of this
NPC?
playerblock=
Will the player treat this NPC like a block?
playerblocktop=
Can the player stand on this NPC?
npcblock=
Will other NPCs treat this NPC as a block?
npcblocktop=
Will other NPCs walk on this NPC's head?
noblockcollision=
Passes through blocks.
cliffturn=
Will it turn around when it comes to an edge, rather
than falling off?
nohurt=
Will
not hurt the player if set to 1.
noyoshi=
If yoshi can't eat it, set this to 1.
nofireball=
Setting
to 1 prevents fire from harming this NPC.
noiceball=
Setting
to 1 prevents ice from freezing this NPC.
nogravity=
Is
uneffected by gravity if set to 1.
speed=
How fast it moves. (Percentage) 0=0% 1=100%
2=200%
score=
How many points the NPC should give you upon its
death/collection. Score can be set to any number from
0-13. Each gives a different amount of points listed
below.
0
give 0 points
1
gives 10 points
2
gives 100 points
3
gives 200 points
4
gives 400 points
5
gives 800 points
6
gives 1000 points
7
gives 2000 points
8
gives 4000 points
9
gives 8000 points
10
gives a 1up
11
gives a 2up
12
gives a 3up
13
gives a 5up (anything higher than 13 will produce a 5up as
well.)
NPC
Appearance Flags
foreground=
This
will be drawn in front of other sprites if set to 1.
frames=
How many frames the sprites animation uses for a
single direction.
framespeed=
How fast the frames of the sprites animation change. 8 is
Normal.
framestyle=
0=No
Directional Sprites, 1=Left and Right movement,
2=Left and Right movement and inverted (upsidedown) if
Held.
gfxoffsetx=
Moves the graphic in a specific direction (X) -1 is up, 1
is down.
gfxoffsety=
Moves the graphic in a specific direction (Y) -1 is left, 1
is right.
width=
The NPCs hitbox width (in pixels)
height=
The NPCs hitbox height (in pixels)
gfxheight=
Only set if sprite height is different than Hit box
height.
gfxwidth=
Only set if sprite width is different than Hit box
width.
6. Tutorials
6.a Using Custom Graphics - Tutorial
While smbx comes with many of the tiles from our favorite Mario games, some tiles are still in the process of being added in future updates, or may not be added at all. But with the programs ability to use custom graphic files PER LEVEL, you can simulate many of the blocks you will need to make your Mario episode unique and colorful on your own.
The process is quite simple, but for those of you who don't know how, here is an in depth look at using custom graphics.
For this first example, We want to add the star block from Super Mario World. First we need to find the graphic we would like to use or create it ourselves.
![]()
Now that we have our graphic, we should look through smbx's available blocks for a good block to replace with this new graphic. We need to find a block that we WONT be using in the level itself, since that block will no longer be shown when editing the level. When choosing a block to replace, keep in mind these following factors.
*Is
the Block an Animated Sprite? (and is the Block we are replacing
animated)
*The
size and shape of the block. (Does it match the size and shape of the
block we are replacing? Will we have to change the mask as
well?)
*Is
it a Sizable block? (If we replace a Sizable block, will it tile
correctly?)
*What
effect the block will have. (The new graphic will only overwrite what
the block looks like, not what it does. For example, When hitting it
for an item, do we want a SMB3 USED Block to appear or a SMW USED
Block to appear. See Below
SMB3
![]() ->
->
![]() or SMW
or SMW
![]() ->
->
![]()
So if I wanted to have the SMW USED block appear, I would have to replace the
![]() with the
with the
![]()
As you can see, the new graphic and the replaced blocks themselves are the same size, and have the same effect of being able to hit the block from below. So this means we will have the desired effect, and we wont have to add a custom mask as ell.
BUT you may have noticed that we are trying to replace a graphic that in our graphics folder looks like this.
![]()
with one that looks like this.
![]()
As you can see, this will not do. If we try to replace it this way, the block will not display correctly in the game itself. So we have to alter the new graphic to match, or find another block the replace that isnt animated.
If you want to still replace the animated block simply create the following graphic.
![]() Making the new graphic like this will solve the issue. You could
also animate the star block in whatever way you want as well.
Making the new graphic like this will solve the issue. You could
also animate the star block in whatever way you want as well.
So
now that we have our new graphic, and have chosen which graphic to
replace in our level, what do we do with it?
The
next step is to create a Graphics folder in our 'worlds' folder. So
open that folder.
Now
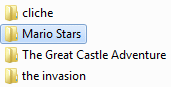
that we are in the worlds folder, open your episode folder. My
Episode is called Mario Stars, so I would open that.
Now that Im in that folder, I should see all of my levels and world file. Like Below.
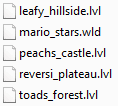
I
would like to add the new graphic to my level "leafy_hillside"
Right
click anywhere in the folder, and select NEW FOLDER and then name it
the SAME EXACT name as the level I will be adding the graphic to.
Like this;
![]()
Now
we will place our graphic in this new folder and RENAME it to she
same name that the original block we are replacing is named in the
smbx graphics folder.
So
for example we would rename our block to "block-169" (This
is the SMW grey ? Block). And now when we load our level in the map
editor, and then select the block we replaced in the tile selector,
when we try and place it, it should place the new graphic!
When placing ANY custom sprite in our levels new graphic folder we would put them all in the same folder, there is no need to separate them (background, tile, etc) as long as they are named correctly matching the block they will be replacing.
6.b Moving Layers - Tutorial
So you feel your level is too bland, and you want to add some motion to it, perhaps add an airship that floats up and then down again? This tutorial is for you, even if you dont want an airship, if you follow the steps, you will see how it is done!
Firstly,
create your level up to the location of where you would like the
airship to appear.
Now,
select LAYERS from the top of the screen.
Create
a new layer, and name it AIRSHIP (or whatever you want it to
be)
Once
you have completed that, select the AIRSHIP layer, and place all the
tiles for the airship and all of the other objects that should be
moving along with the airship itself, (This includes all NPCS who
will be riding the airship, Doors, and even WARP events. If you dont
add them to the same layer, the npcs will fall through the airship
and the doors and warps will not line up correctly.) To do this,
simply make sure you are selected on the proper layer the entire
time you are placing all of these objects and tiles. You will know
youa re doing this correctly when you see the word AIRSHIP clinging
to your mouse while placing the tiles.
Now
that you have your airship. Its time to make it move.
Open
your events window.
Create
TWO new events, one called "Airship Up", and one called
"Airship Down"
In
the "Airship Down" event, set the Layer Movement dropdown
on the far right of the window to AIRSHIP. And set the vertical
speed to 1. This will make the layer move down at a basic
speed.
Under
Trigger event dropdown, select "Airship Up" and set the
delay to be 2 seconds.
Now
In the "Airship Up" event, set the Layer Movement dropdown
on the far right of the window to AIRSHIP as well. And set the
vertical speed to -1. This will make the layer move up at a basic
speed. (Make sure it is the same speed number as the down event,
just make it negative, or you will have to do a lot of testing to see
what delay to use so your airship doesnt fly higher and higher each
time it cycles.)
Under
Trigger event dropdown, select "Airship Down" and set the
delay to be 2 seconds.
Now select the "Level - Start" event and under Trigger event select "Airship Down" with an INSTANT delay. This will cause the airship to start moving. This is very important or nothing will happen.
Now your aiship should float upwards for 2 seconds, then reverse direction and return to where it was, then repeat.
Play around with the vertical speeds and Trigger event delays to have faster moving or further moving platforms. But this should give you an idea how to create platforms that move.
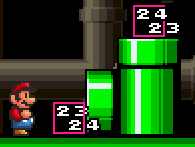
6.c Creating a Warp Pipe - Tutorial
For
this example, look at the below situation. We want to make Mario be
able to enter the side pipe and emerge from the top one.

First
Select Warp and Doors, then Click these options,
Entrance
Direction = Right
Exit
Direction = Up
Warp
Placement = Entrance
Warp
Effect = Pipe
Leave
"Stars Needed", "Level Exit", "Warp to
Level" alone for now.
Now click and place the entrance to the left of the pipe itself. you always want to place a warp in this manner. Not on the pipe itself but where the player will be standing when he initiates the warp.
Follow
this example of placement.
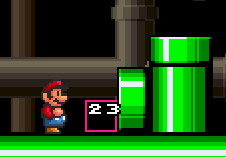
This
map already has 22 other warps being used so warp ENTRANCE 23 has
been placed. Now to place the exit.
Click
Warp and Doors again unless the window is already open, which it
still should be.
Leave all the options the same as before except change Warp
Placement from "Entrance" to "Exit".
Now place the Exit at the top of the pipe like so.
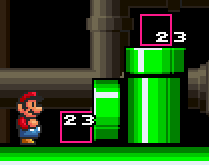
Now that the entrance and exit has been placed, you may test the level, and Mario should be able to enter the pipe and be warped up to the top.
but now, how would you make the pipe returnable?
Click Warps and Doors again, then make a new warp with the following settings.
Entrance
Direction = Down
Exit
Direction = Left
Warp
Placement = Entrance
Warp
Effect = Pipe
Leave
"Stars Needed", "Level Exit", "Warp to
Level" alone for now.
Place
that Entrance right on top of Exit 23. It will add an entrance number
to it.
Now
change the "Warp Placement" to "Exit" and place
the Exit on the same location as Entrance 23. You finished product
should look like this.
Now mario may travel both ways in this pipe.
All rights to Nintendo Characters and themes are held by Nintendo, please show you support of Nintendo by purchasing Nintendo Games and Game systems.
Help
File Written and updated for each version
by
www.supermariobrothers.org
member "Blue" (Jeremy Guerrette)
Wyszukiwarka
Podobne podstrony:
help
Help & Info Filosofia OT
CSS3 Help Sheet1
2008 01 We Help You To Choose the Best Anti spyware [Consumer test]
Darmowa wyszukiwarka - HELP DESK, Ulepszanie Chomika, Wyszukiwarki
RozwiÄ…zywanie problemĂłw z uruchamianiem systemu Windows za pomocÄ… konsoli odzyskiwania, windows XP i
Help & Info Tribute WIN
HELP
Jak tworzyć szybko pliki PDF, windows XP i vista help
Ukrywanie zasobĂłw komputera, windows XP i vista help
To what extend?n?ucation help protect the environment
Wirusy sÄ… tylko na niebezpiecznych stronach, windows XP i vista help
Ograniczanie zuĹĽycia prÄ…du przez komputer, windows XP i vista help
Can we help
0042 ?n't Help?lling in Love UB@
making long lghting ?li with help siatky dyfrakcyney
I CAN HELP IT, Michael Jackson, Teksty z tłumaczeniami
Wskazniki, Informatyka HELP
help i workshop do AI, dziennikarstwo i komunikacja społeczna, technologie informacyjne