A2 1 4 (75 koni)� 02


Replacement lnteival Guide
Check For Engine Doimige
Rep.iii Times - his
Special Tools
Speciol Precmitions
Removal - Timing Belt
Instalhition - Timing Belt
Remov<il - Exhmist Camshaft Drive Belt
Installation - Exhaust Camshaft Drive Belt
Installation
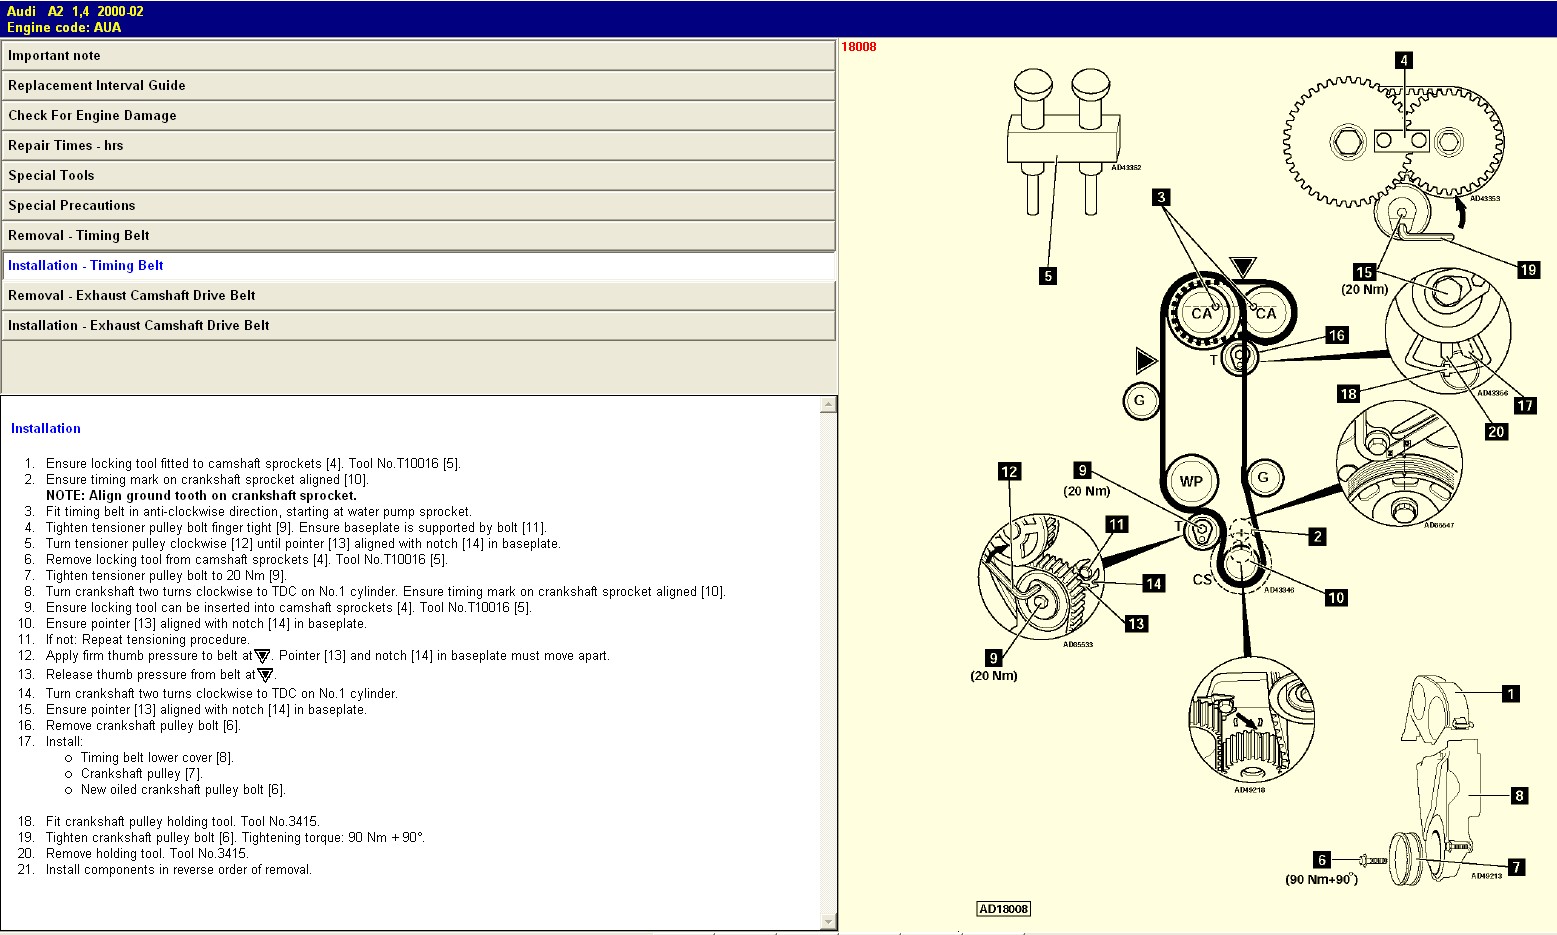
1. Ensure locking tool fitted to camshaft sprockets [4]. Tool No.T10016 [5].
2. Ensure timing mark on crankshaft sprocket aligned [10].
NOTĘ: Align ground tooth on crankshaft sprocket.
3. Fit timing belt in anti-clockwise direction, starting at water pump sprocket.
4. Tighten tensioner pulley bolt fingertight [9]. Ensure baseplate is supported by bolt [11],
5. Tum tensioner pulley clockwise [12] until pointer [13] aligned with notch [14] in baseplate.
6. Remove locking tool from camshaft sprockets [4]. Tool No.T10016 [5].
7. Tighten tensioner pulley bolt to 20 Nm [9].
8. Tum crankshaft two turns clockwise to TDC on No.1 cylinder. Ensure timing mark on crankshaft sprocket aligned [10].
9. Ensure locking tool can be inserted into camshaft sprockets [4]. Tool No.T10016 [5].
10. Ensure pointer [13] aligned with notch [14] in baseplate.
11. If not: Repeat tensioning procedurę.
12. Apply firm thumb pressure to belt at^. Pointer [13] and notch [14] in baseplate must move apart.
13. Release thumb pressure from belt at^.
14. Tum crankshaft two turns clockwise to TDC on No.1 cylinder.
15. Ensure pointer [13] aligned with notch [14] in baseplate.
16. Remove crankshaft pulley bolt [6].
17. Install:
o Timing belt lower cover [8]. o Crankshaft pulley [7], o New oiled crankshaft pulley bolt [6].
18. Fit crankshaft pulley holding tool. Tool No.3415.
19. Tighten crankshaft pulley bolt [6]. Tightening torque: 90 Nm +90°
20. Remove holding tool. Tool No.3415.
21. Install components in reverse order of removal.
AD18008
Wyszukiwarka
Podobne podstrony:
A8 2 8 (174 koni) Audi A8 (94-02) 2,8 19944)0 Engine codę: AAH Impoitant notę Replacement lnteival G
A8 3 7 (230 koni) Audi A8 (94-02) 3,7 19954)1 Engine codę: AEW Impoitant notę Replacement lnteival G
S6 2 2 (230 koni) Audi SG 2,2 1994-96 Engine codę: AAN Impoitant notę Replacement lnteival Guide Che
S6 4 2 (326 koni)? 97 Audi SG 4,2 1996-97 Engine codę: AHK Impoitant notę Replacement lnteival Guide
S8 4 2 (340 koni) ? 00 Audi S8 4,2 1996-00 Engine codę: AHC Impoitant notę Replacement lnteival Guid
A3 1 6 (100 KONI) Audi A3 (974)3) 1,6 1996-03 Engine codę: AEH Impoitant notę Replacement lnteival G
A6 2 0 (101 koni) Audi A6 (94-97) 2,0 1994-97 Engine codę: AAE Impoitant notę Replacement lnteival G
A6 2 6 (150 koni) Audi A6 (94-97) 2,6 1994-97 Engine codę: ABC Impoitant notę Replacement lnteival
A6 2 8 (174 koni) Audi A6 (94-97) 2,8 1994-97 Engine codę: AAH Impoitant notę Replacement lnteival
A6 2 8 (193 koni) ALG Audi A6 (974)5) 2,8 19974)2 Engine codę: ALG Impoitont notę Replacement lnte
Audi? 2 0 (90 koni) Audi 80 (91-96) 2,0 1991-95 Engine codę: ABT Impoitant notę Replacement lnteival
więcej podobnych podstron