Part 1 of 2
ZOOM
SIZED FOR PRINT
Page 1 of 22
2000 Toyota Celica GT -S L4-1762cc 1.8L DOHC MFI - Part 1 of 2
12/13/2001
http://www.alldatadiy.com/alldata/AFI~V1046639~C34697~R0~OD~N/0/77993956/788...
ZOOM
SIZED FOR PRINT
Page 2 of 22
2000 Toyota Celica GT -S L4-1762cc 1.8L DOHC MFI - Part 1 of 2
12/13/2001
http://www.alldatadiy.com/alldata/AFI~V1046639~C34697~R0~OD~N/0/77993956/788...
ZOOM
SIZED FOR PRINT
Page 3 of 22
2000 Toyota Celica GT -S L4-1762cc 1.8L DOHC MFI - Part 1 of 2
12/13/2001
http://www.alldatadiy.com/alldata/AFI~V1046639~C34697~R0~OD~N/0/77993956/788...
ZOOM
SIZED FOR PRINT
Page 4 of 22
2000 Toyota Celica GT -S L4-1762cc 1.8L DOHC MFI - Part 1 of 2
12/13/2001
http://www.alldatadiy.com/alldata/AFI~V1046639~C34697~R0~OD~N/0/77993956/788...
ZOOM
SIZED FOR PRINT
Page 5 of 22
2000 Toyota Celica GT -S L4-1762cc 1.8L DOHC MFI - Part 1 of 2
12/13/2001
http://www.alldatadiy.com/alldata/AFI~V1046639~C34697~R0~OD~N/0/77993956/788...
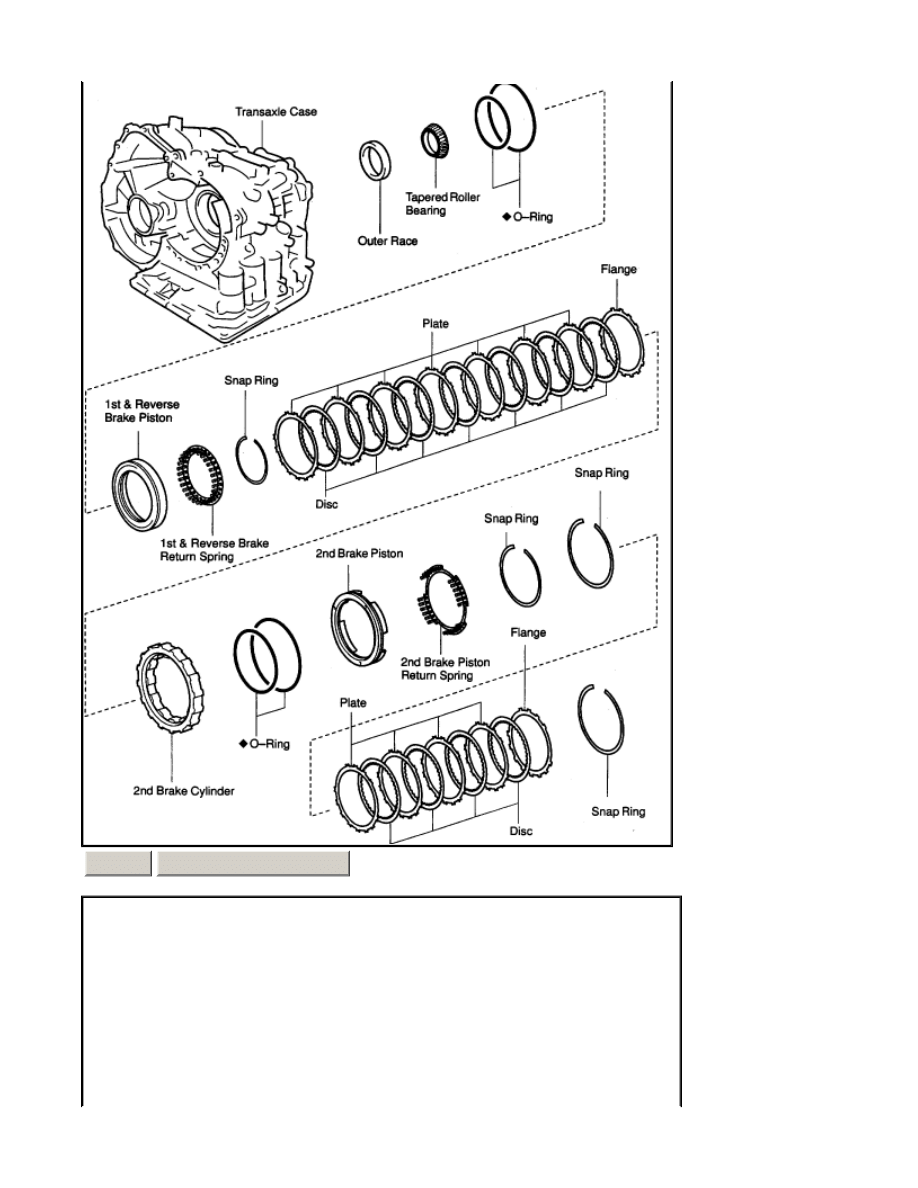
DISASSEMBLY
1.
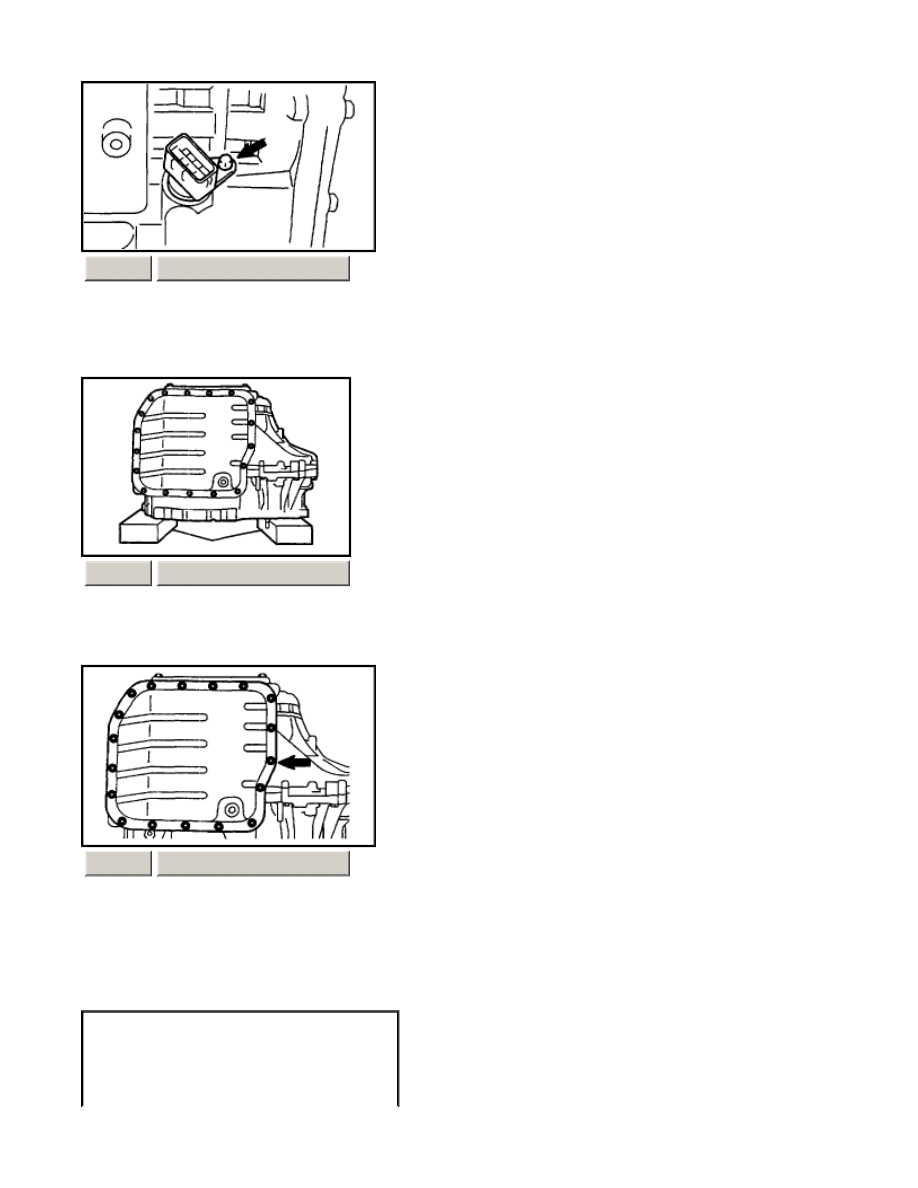
REMOVE
PARK/NEUTRAL POSITION SWITCH
ZOOM
SIZED FOR PRINT
Page 6 of 22
2000 Toyota Celica GT -S L4-1762cc 1.8L DOHC MFI - Part 1 of 2
12/13/2001
http://www.alldatadiy.com/alldata/AFI~V1046639~C34697~R0~OD~N/0/77993956/788...
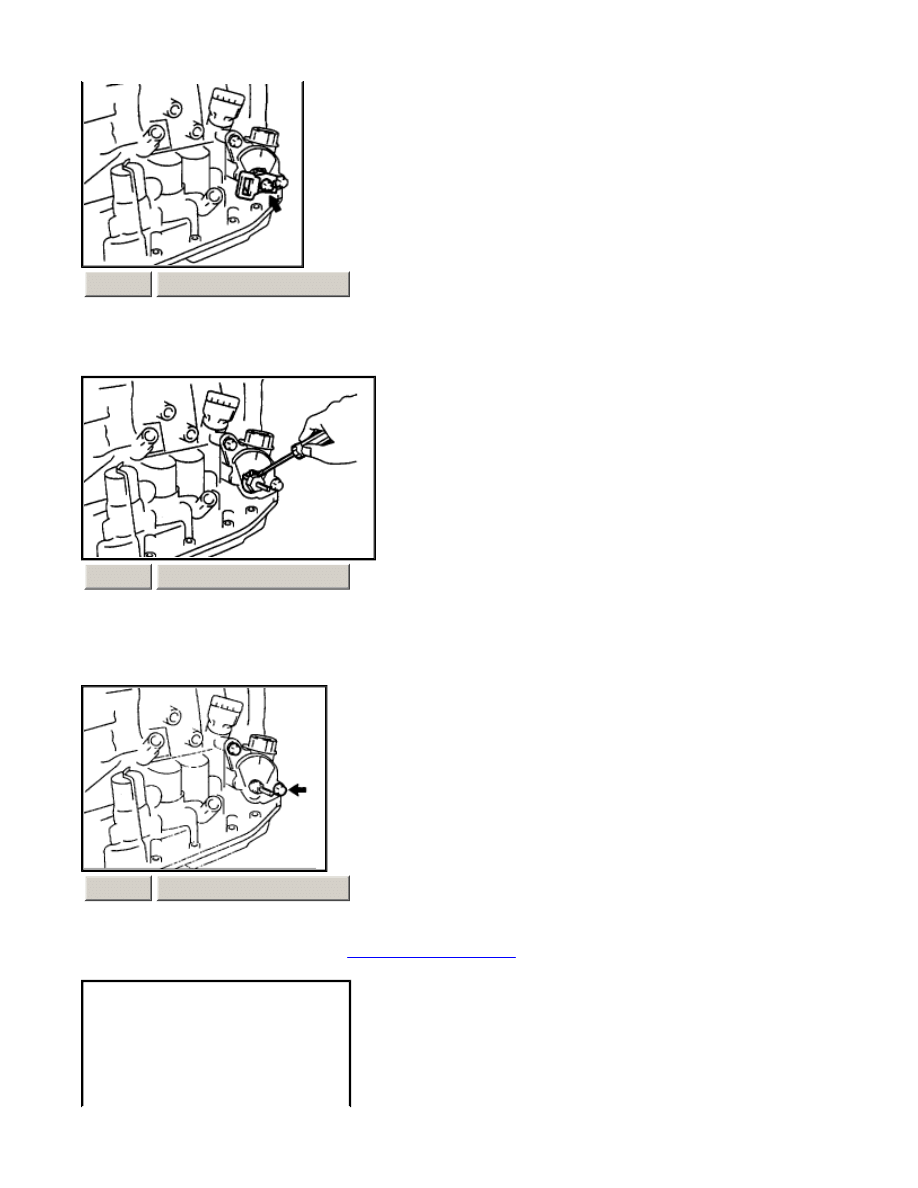
a.
Remove the nut, washer and control shaft lever.
b.
Using a screwdriver, unstake the lock washer.
c.
Remove the nut.
d.
Remove the 2 bolts, and pull out the
park/neutral position switch
.
ZOOM
SIZED FOR PRINT
ZOOM
SIZED FOR PRINT
ZOOM
SIZED FOR PRINT
Page 7 of 22
2000 Toyota Celica GT -S L4-1762cc 1.8L DOHC MFI - Part 1 of 2
12/13/2001
http://www.alldatadiy.com/alldata/AFI~V1046639~C34697~R0~OD~N/0/77993956/788...
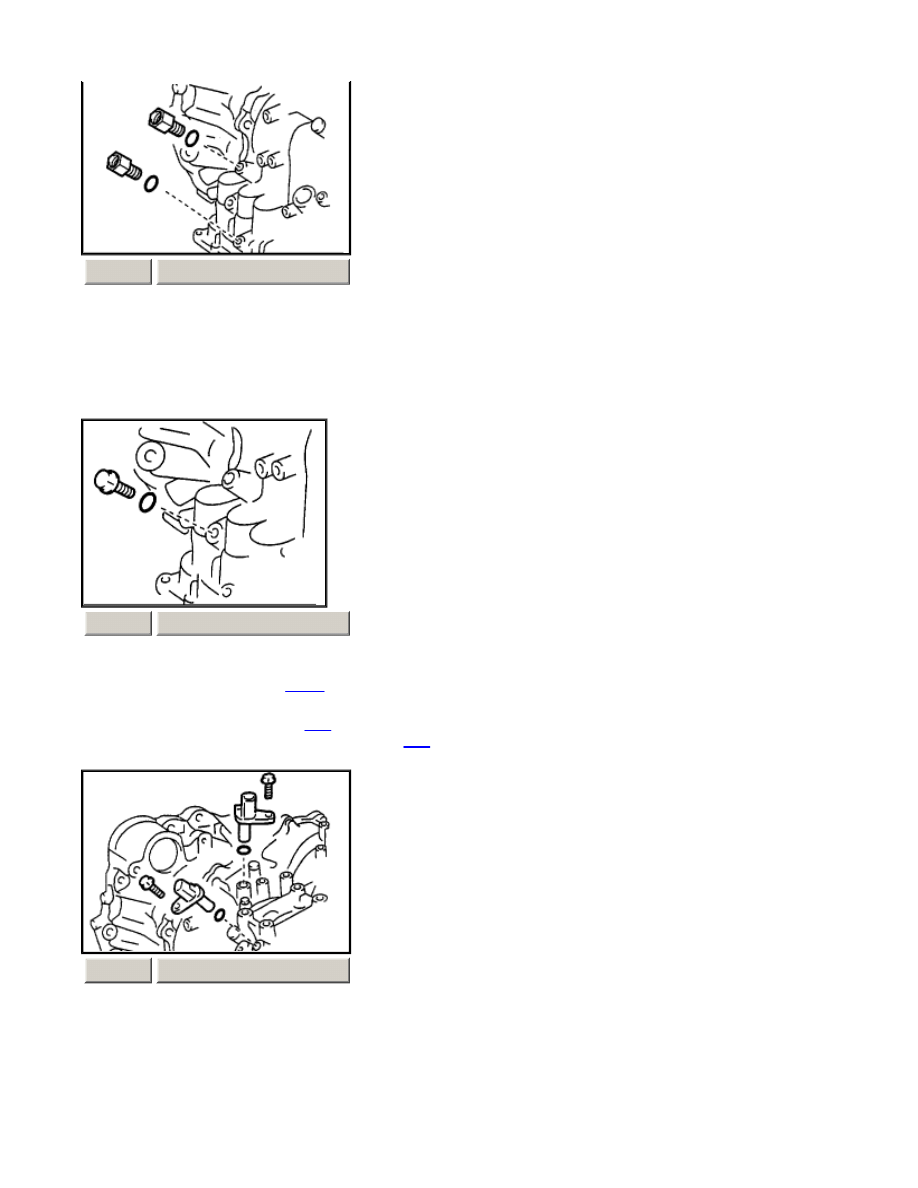
2.
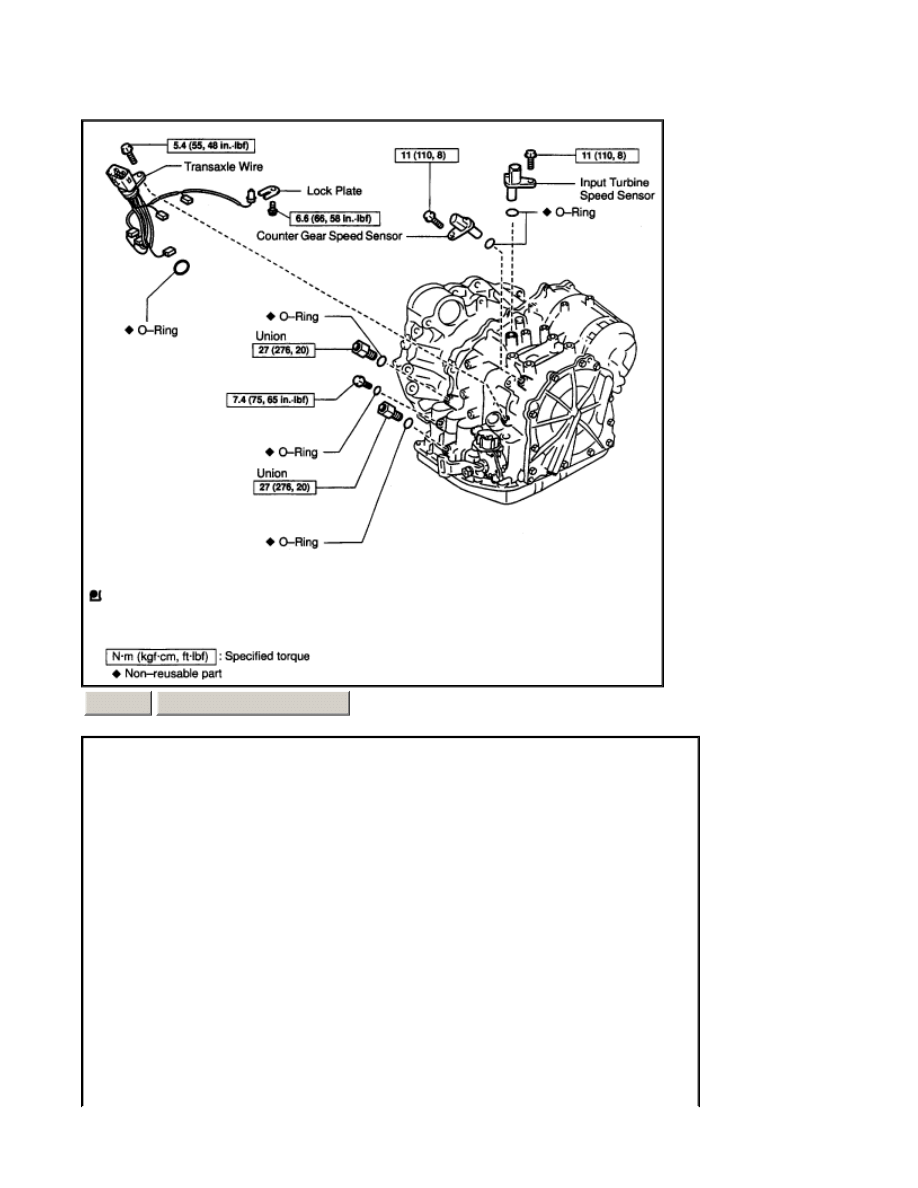
REMOVE UNION
a.
Remove the 2 unions.
b.
Remove the 2 O -rings from the 2 union.
3.
REMOVE TRANSAXLE
CASE
PLUG NO. 1
a.
Remove the transaxle
case
plug No. 1 from the transaxle case.
b.
Remove the O-ring from the transaxle
case
plug No. 1.
4.
REMOVE SPEED SENSOR
a.
Remove the 2 bolts and 2 speed sensors from the transaxle.
b.
Remove the 2 O -rings from the sensors.
ZOOM
SIZED FOR PRINT
ZOOM
SIZED FOR PRINT
ZOOM
SIZED FOR PRINT
Page 8 of 22
2000 Toyota Celica GT -S L4-1762cc 1.8L DOHC MFI - Part 1 of 2
12/13/2001
http://www.alldatadiy.com/alldata/AFI~V1046639~C34697~R0~OD~N/0/77993956/788...
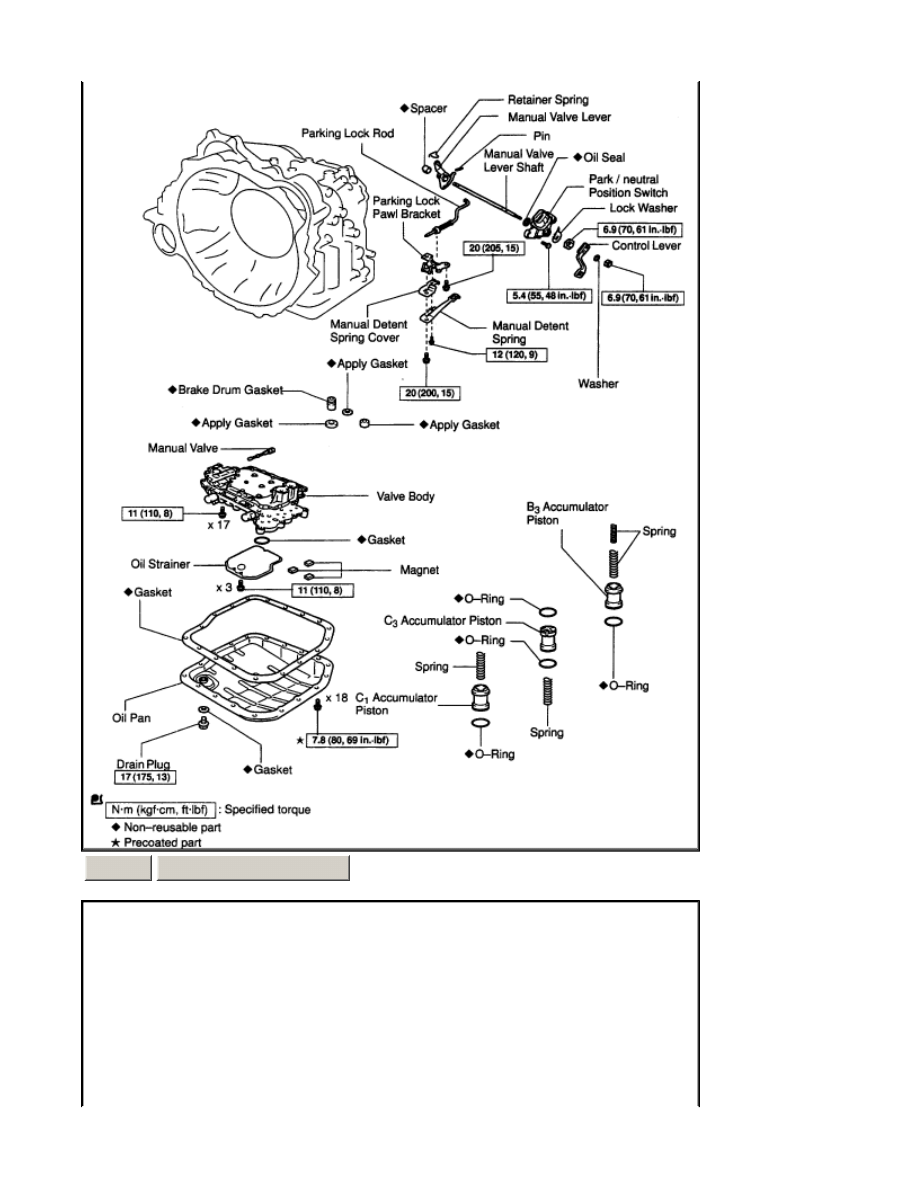
5.
REMOVE SOLENOID WIRE RETAINING BOLT NOTICE: Remove the bolt only and do not remove the solenoid
wire.
6.
PLACE TRANSAXLE ON WOODEN BLOCKS NOTICE: Be careful not to damage the oil seal.
7.
REMOVE OIL PAN AND GASKET
a.
Remove the 18 bolts.
b.
Remove the oil pan and gasket.
ZOOM
SIZED FOR PRINT
ZOOM
SIZED FOR PRINT
ZOOM
SIZED FOR PRINT
Page 9 of 22
2000 Toyota Celica GT -S L4-1762cc 1.8L DOHC MFI - Part 1 of 2
12/13/2001
http://www.alldatadiy.com/alldata/AFI~V1046639~C34697~R0~OD~N/0/77993956/788...
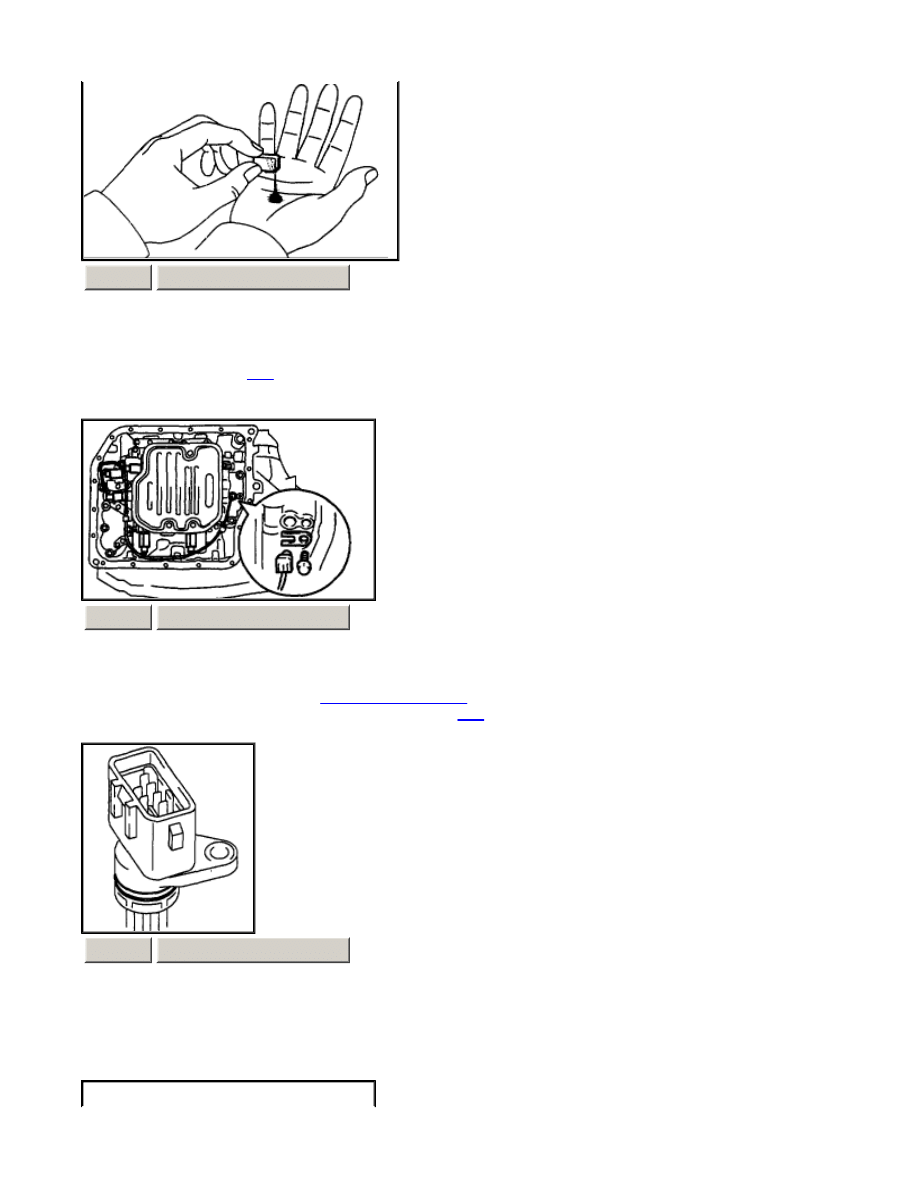
8.
EXAMINE PARTICLES IN PAN Remove the magnets and use them to collect any steel chips. Examine the chips
and particles in the pan and on the magnet to determine what type of wear has occurred in the transaxle: Steel
(magnetic) bearing,
gear
and plate wear Brass (non-magnetic) bushing wear
9.
REMOVE TRANSAXLE SOLENOID WIRE
a.
Remove the 5 connectors from shift solenoid valves.
b.
Remove the bolt, lock plate and
ATF temperature sensor
.
c.
Remove the transaxle solenoid wire from the transaxle
case
.
d.
Remove the O-ring from the transaxle solenoid wire.
10.
REMOVE OIL STRAINER
ZOOM
SIZED FOR PRINT
ZOOM
SIZED FOR PRINT
ZOOM
SIZED FOR PRINT
Page 10 of 22
2000 Toyota Celica GT -S L4-1762cc 1.8L DOHC MFI - Part 1 of 2
12/13/2001
http://www.alldatadiy.com/alldata/AFI~V1046639~C34697~R0~OD~N/0/77993956/788...
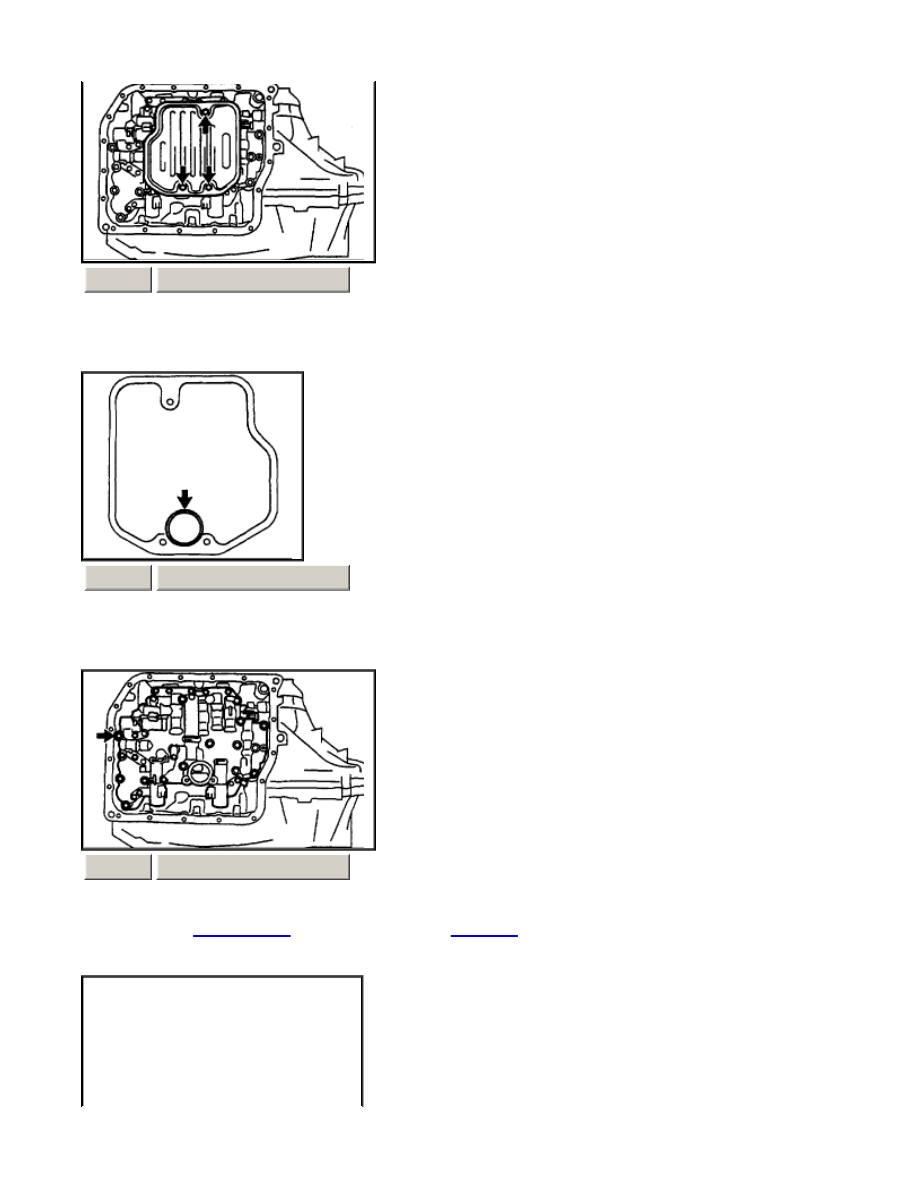
a.
Remove the 3 bolts and oil strainer.
b.
Remove the gasket from the oil strainer.
11.
REMOVE
VALVE BODY
ASSEMBLY Support the
valve body
assembly and remove the 17 bolts and the valve
body assembly.
ZOOM
SIZED FOR PRINT
ZOOM
SIZED FOR PRINT
ZOOM
SIZED FOR PRINT
Page 11 of 22
2000 Toyota Celica GT -S L4-1762cc 1.8L DOHC MFI - Part 1 of 2
12/13/2001
http://www.alldatadiy.com/alldata/AFI~V1046639~C34697~R0~OD~N/0/77993956/788...
12.
REMOVE 4 APPLY GASKETS
13.
REMOVE CHECK BALL BODY Remove the check ball body and spring.
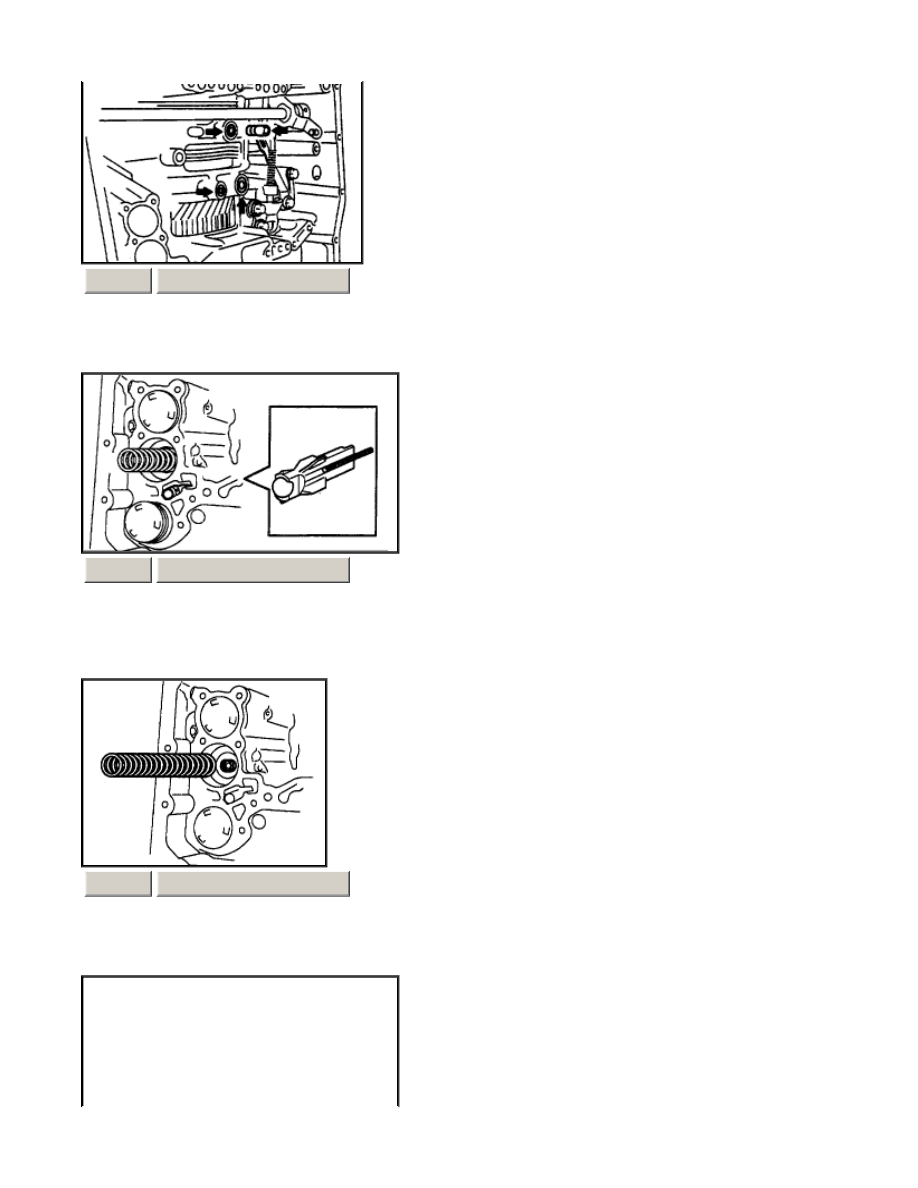
14.
REMOVE ACCUMULATOR SPRING AND PISTON
a.
Remove the spring from the C3 accumulator piston.
ZOOM
SIZED FOR PRINT
ZOOM
SIZED FOR PRINT
ZOOM
SIZED FOR PRINT
Page 12 of 22
2000 Toyota Celica GT -S L4-1762cc 1.8L DOHC MFI - Part 1 of 2
12/13/2001
http://www.alldatadiy.com/alldata/AFI~V1046639~C34697~R0~OD~N/0/77993956/788...

b.
Apply compressed air (392 kPa, 4.0 kgf/cm2, 57 psi) to the oil hole and remove the C3 accumulator piston.
NOTICE:
¡
Blowing of air may cause the piston to jump-out. When removing the piston, hold it with your hand using a
waste cloth.
¡
Take care not to splash
ATF
when air-blowing.
c.
Remove the O-ring from the piston.
d.
Apply compressed air (392 kPa, 4.0 kgf/cm2, 57 psi) to the oil hole and remove the C1 accumulator piston and
spring. NOTICE:
¡
Blowing off the air may cause the piston's jump-out. When removing the piston, hold It with your hand using
a waste cloth.
ZOOM
SIZED FOR PRINT
ZOOM
SIZED FOR PRINT
ZOOM
SIZED FOR PRINT
Page 13 of 22
2000 Toyota Celica GT -S L4-1762cc 1.8L DOHC MFI - Part 1 of 2
12/13/2001
http://www.alldatadiy.com/alldata/AFI~V1046639~C34697~R0~OD~N/0/77993956/788...

¡
Take care not to splash
ATF
when air-blowing.
e.
Remove the 2 O -rings from the piston.
f.
Apply compressed air (392 kPa, 4.0 kgf/cm2, 57 psi) to the oil hole and remove the B3 accumulator piston and 2
springs. NOTICE:
¡
Blowing off the air may cause the piston's jump-out. When removing the piston, hold It with your hand using
a waste cloth.
¡
Take care not to splash
ATF
when air-blowing.
g.
Remove the O-ring from the piston.
ZOOM
SIZED FOR PRINT
ZOOM
SIZED FOR PRINT
ZOOM
SIZED FOR PRINT
Page 14 of 22
2000 Toyota Celica GT -S L4-1762cc 1.8L DOHC MFI - Part 1 of 2
12/13/2001
http://www.alldatadiy.com/alldata/AFI~V1046639~C34697~R0~OD~N/0/77993956/788...
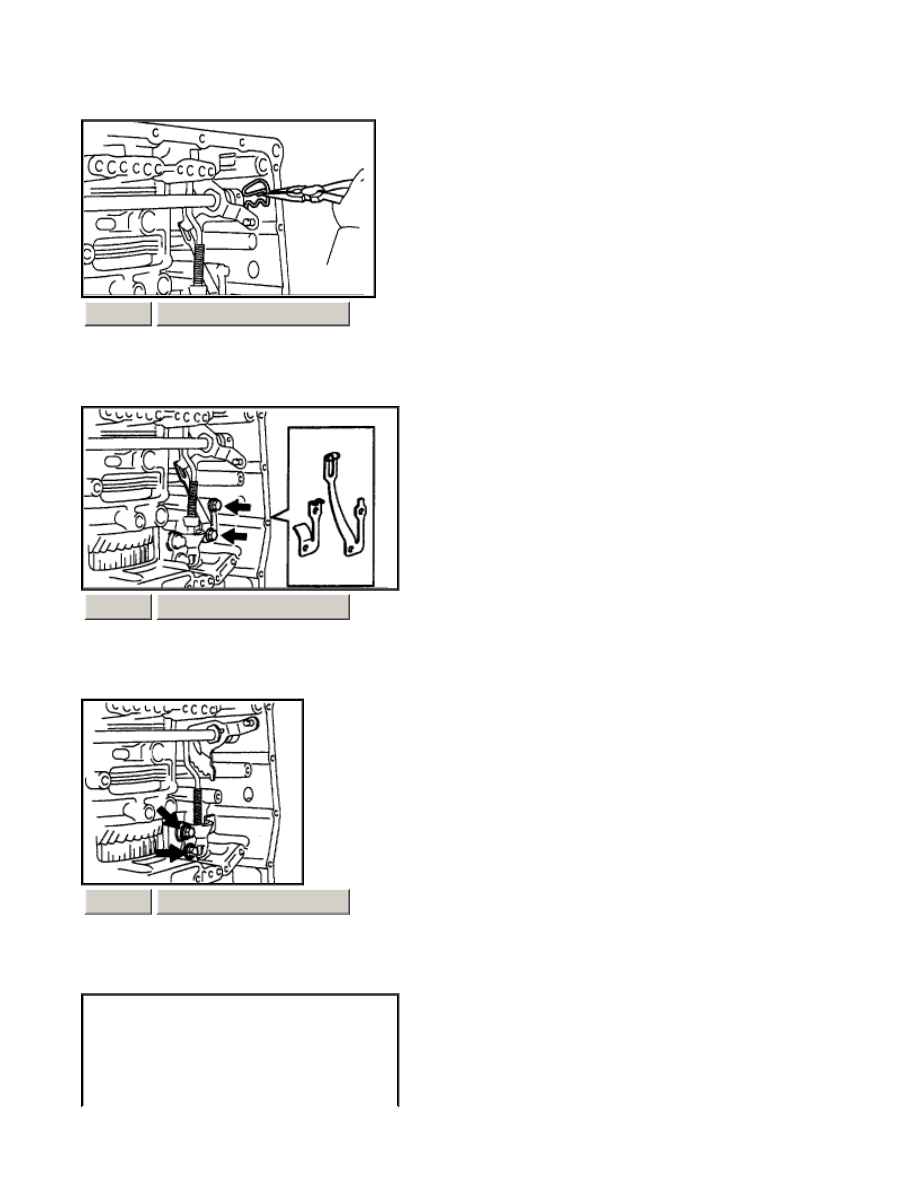
15.
REMOVE MANUAL VALVE LEVER SHAFT
a.
Using needle-nose pliers, remove the retainer spring.
b.
Remove the 2 bolts, the manual detent spring and cover.
c.
Remove the 2 bolts and the parking lock pawl bracket.
ZOOM
SIZED FOR PRINT
ZOOM
SIZED FOR PRINT
ZOOM
SIZED FOR PRINT
Page 15 of 22
2000 Toyota Celica GT -S L4-1762cc 1.8L DOHC MFI - Part 1 of 2
12/13/2001
http://www.alldatadiy.com/alldata/AFI~V1046639~C34697~R0~OD~N/0/77993956/788...

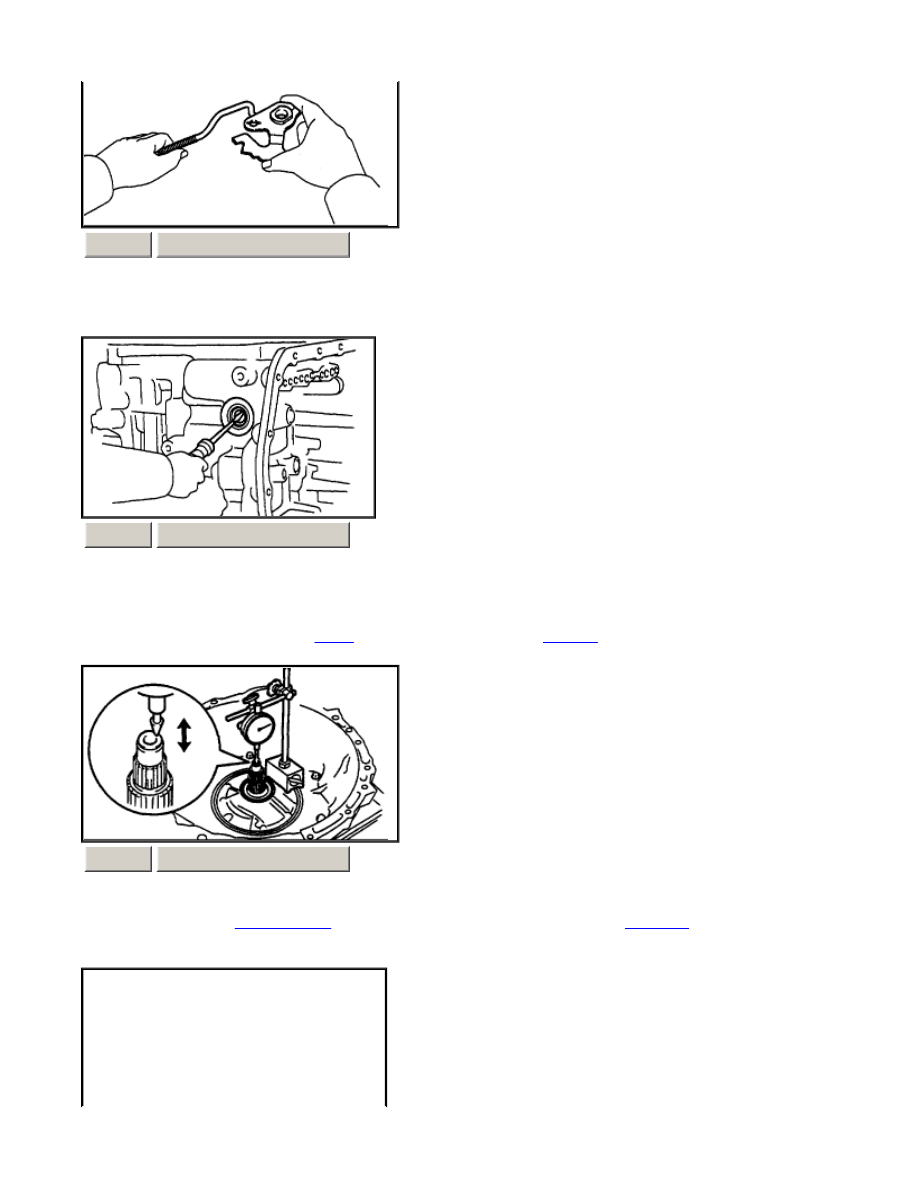
d.
Using a chisel and a hammer, unstake and remove the spacer.
e.
Using a pin punch and a hammer, drive out the pin. HINT: Slowly drive out the pin so that it will not fall into the
transaxle
case
.
f.
Remove the manual valve lever shaft and the manual valve lever.
ZOOM
SIZED FOR PRINT
ZOOM
SIZED FOR PRINT
ZOOM
SIZED FOR PRINT
Page 16 of 22
2000 Toyota Celica GT -S L4-1762cc 1.8L DOHC MFI - Part 1 of 2
12/13/2001
http://www.alldatadiy.com/alldata/AFI~V1046639~C34697~R0~OD~N/0/77993956/788...
g.
Remove the parking lock rod from the manual valve lever shaft.
h.
Using a screwdriver, remove the oil seal.
16.
PLACE TRANSAXLE
CASE
Fix the transaxle case with the
oil pump
side facing up.
17.
INSPECT
INPUT SHAFT
END PLAY Using a dial indicator, measure the
input shaft
end play. End play:
0.27 - 1.24 mm (0.0106 - 0.0488 inch)
ZOOM
SIZED FOR PRINT
ZOOM
SIZED FOR PRINT
ZOOM
SIZED FOR PRINT
Page 17 of 22
2000 Toyota Celica GT -S L4-1762cc 1.8L DOHC MFI - Part 1 of 2
12/13/2001
http://www.alldatadiy.com/alldata/AFI~V1046639~C34697~R0~OD~N/0/77993956/788...
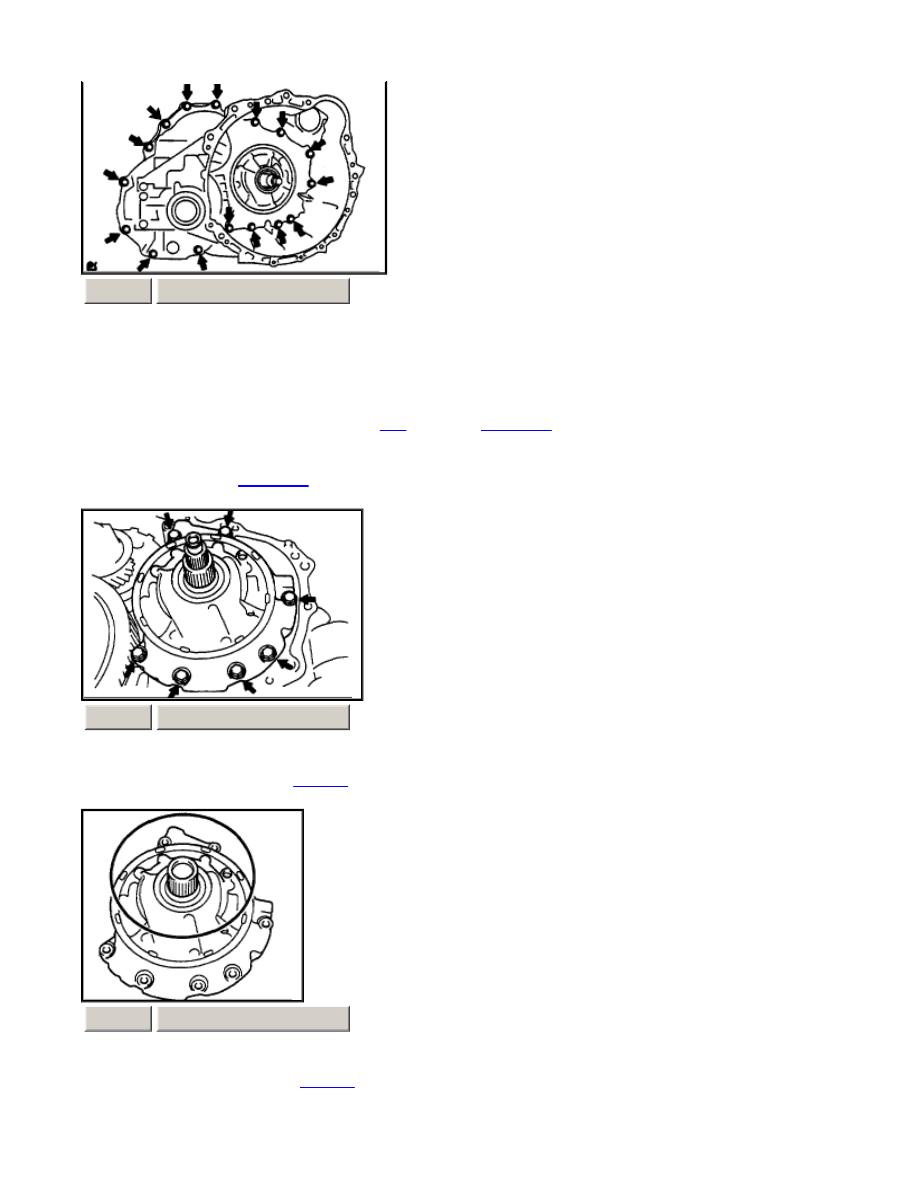
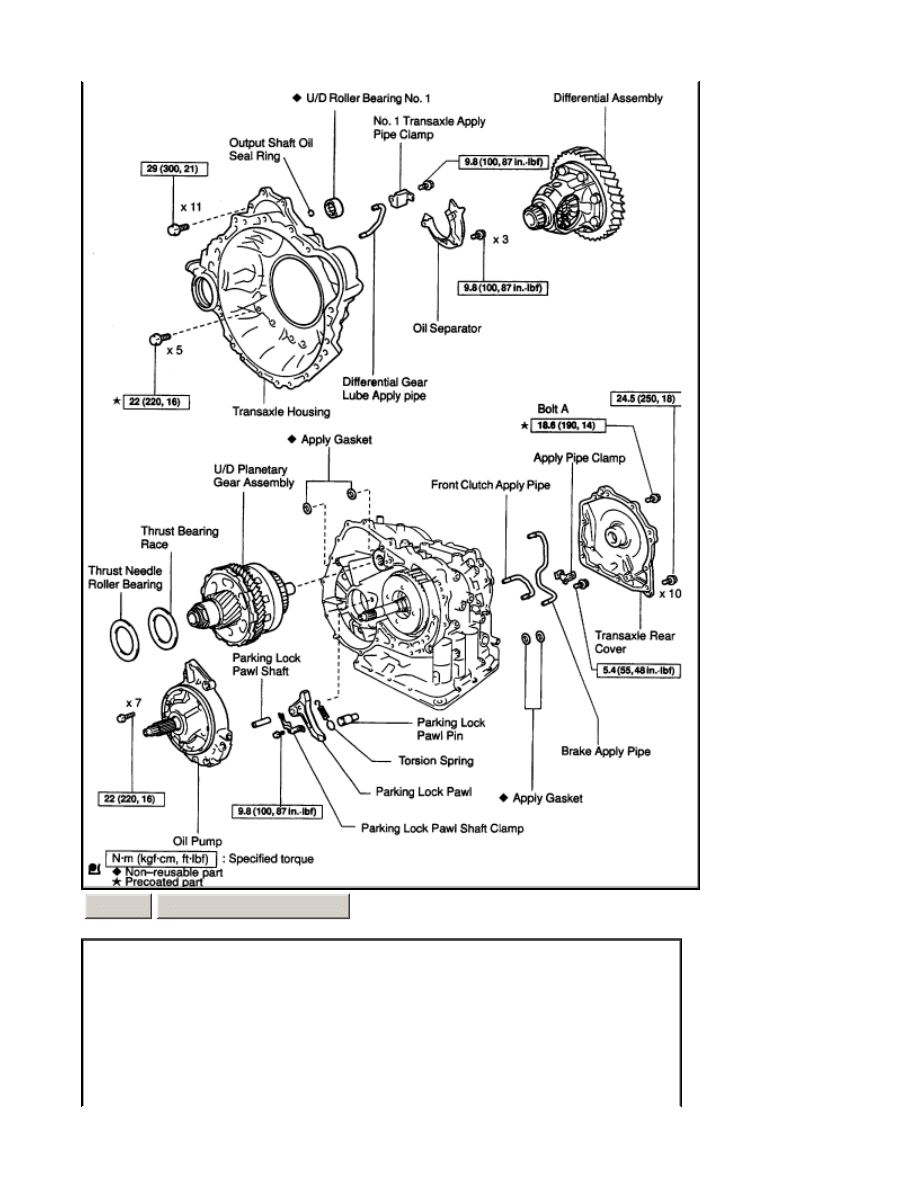
18.
REMOVE TRANSAXLE HOUSING
a.
Remove the 16 bolts.
b.
Tap on the circumference of the transaxle housing with a plastic hammer to remove the transaxle
housing from the transaxle
case
. NOTICE:
Differential
may be accidentally removed when the
transaxle housing Is removed.
19.
REMOVE
OIL PUMP
a.
Remove the 7 bolts and the
oil pump
.
b.
Remove the O-ring from the
oil pump
.
ZOOM
SIZED FOR PRINT
ZOOM
SIZED FOR PRINT
ZOOM
SIZED FOR PRINT
Page 18 of 22
2000 Toyota Celica GT -S L4-1762cc 1.8L DOHC MFI - Part 1 of 2
12/13/2001
http://www.alldatadiy.com/alldata/AFI~V1046639~C34697~R0~OD~N/0/77993956/788...
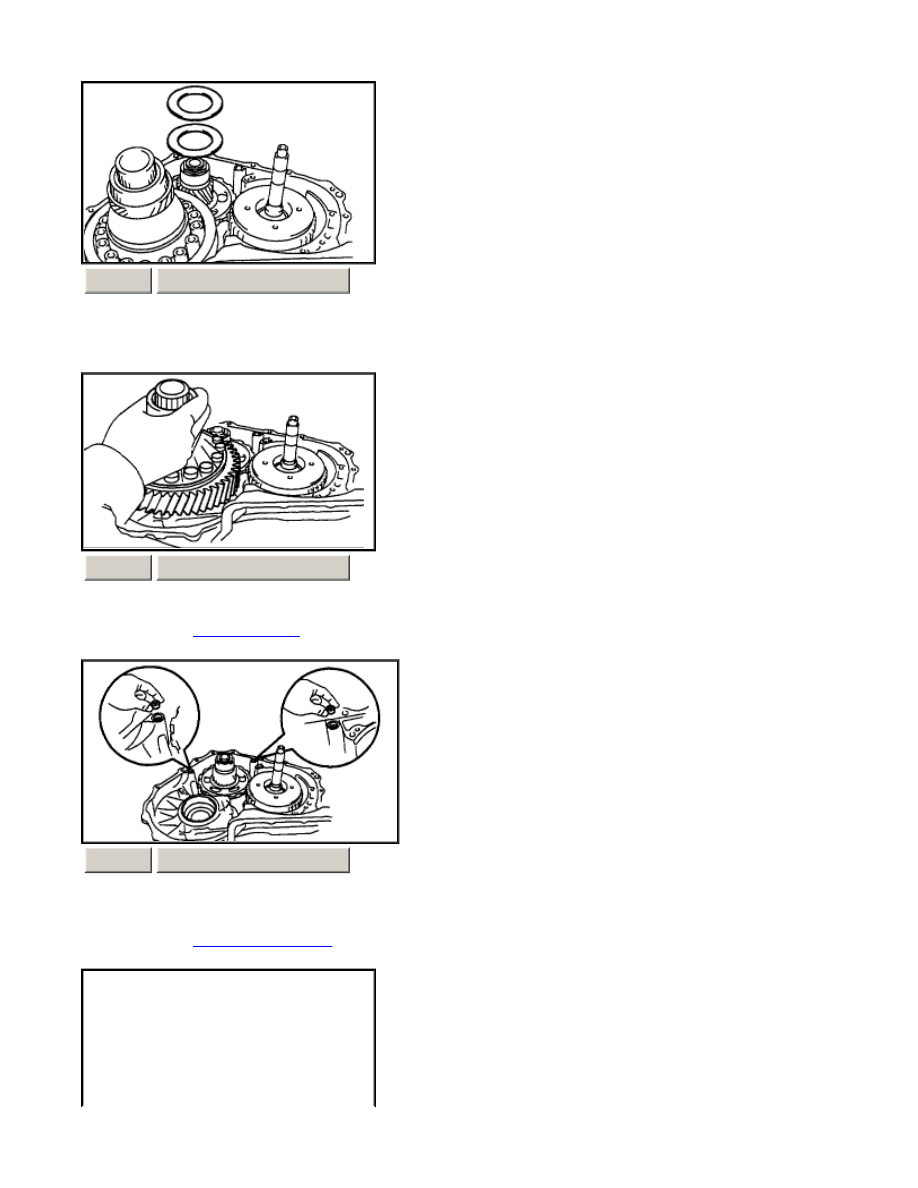
20.
REMOVE THRUST BEARING AND BEARING RACE
21.
REMOVE
DIFFERENTIAL
ASSEMBLY
22.
REMOVE 2 APPLY GASKETS
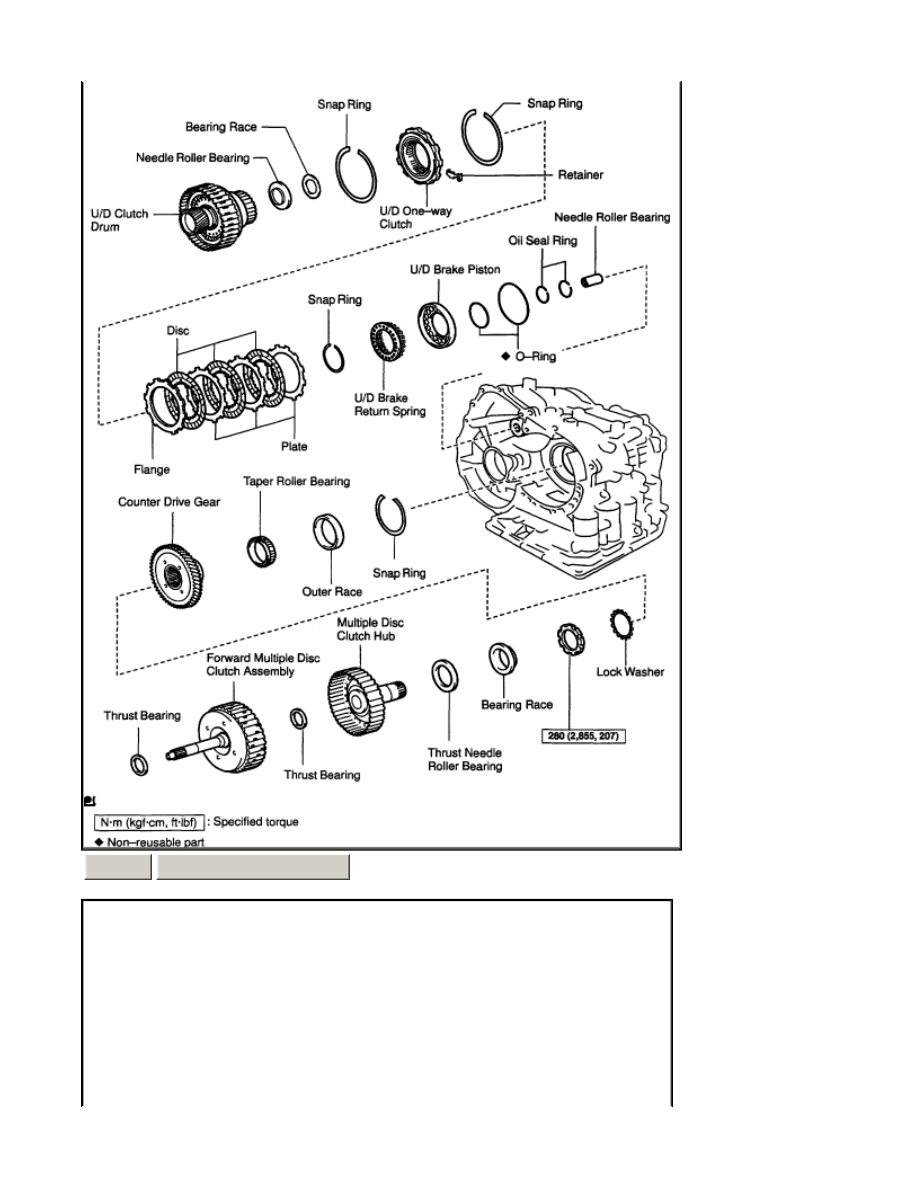
23.
REMOVE
FORWARD CLUTCH
ZOOM
SIZED FOR PRINT
ZOOM
SIZED FOR PRINT
ZOOM
SIZED FOR PRINT
Page 19 of 22
2000 Toyota Celica GT -S L4-1762cc 1.8L DOHC MFI - Part 1 of 2
12/13/2001
http://www.alldatadiy.com/alldata/AFI~V1046639~C34697~R0~OD~N/0/77993956/788...
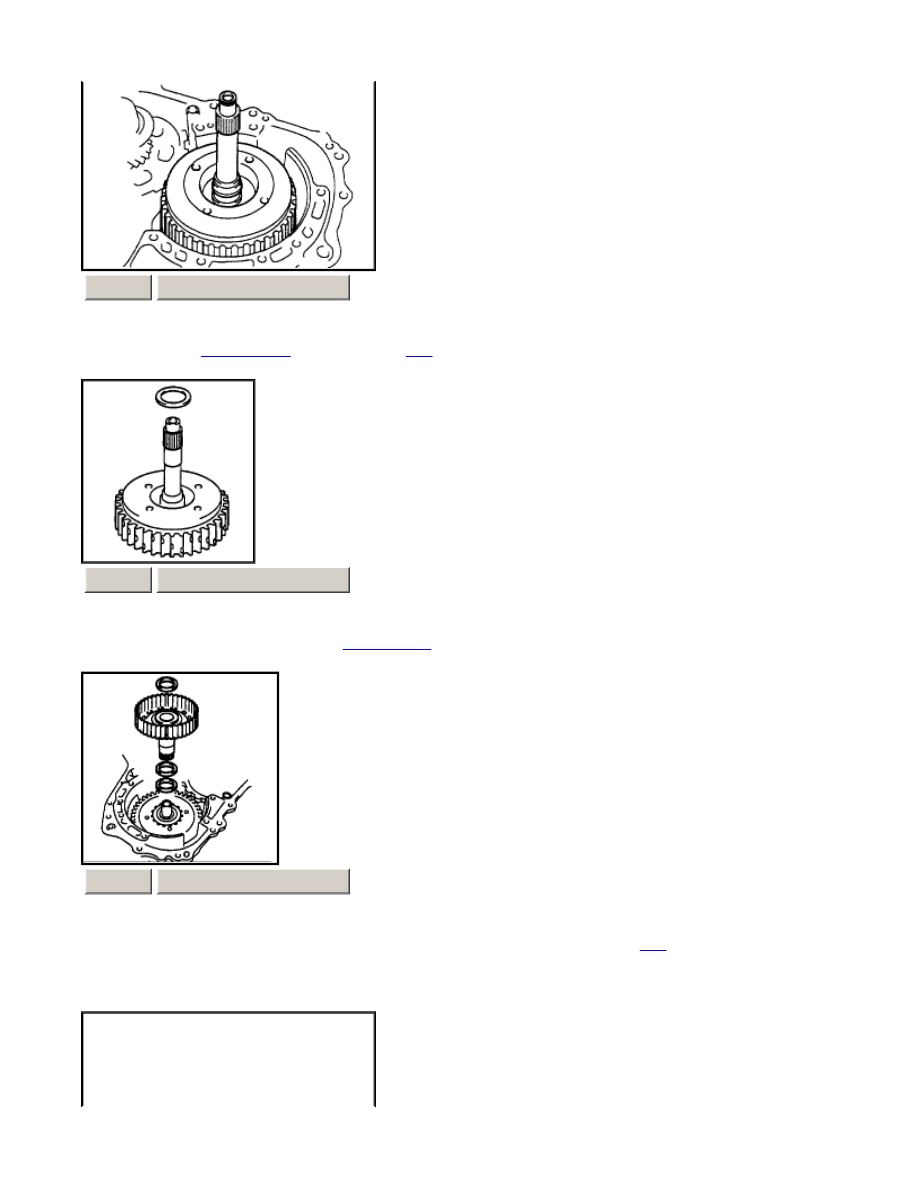
a.
Remove the
forward clutch
from the transaxle
case
.
b.
Remove the thrust bearing from the
forward clutch
.
c.
Remove the multiple clutch hub, 2 thrust bearing and bearing race from the transaxle
case
.
24.
REMOVE U/D PLANETARY GEAR ASSEMBLY
ZOOM
SIZED FOR PRINT
ZOOM
SIZED FOR PRINT
ZOOM
SIZED FOR PRINT
Page 20 of 22
2000 Toyota Celica GT -S L4-1762cc 1.8L DOHC MFI - Part 1 of 2
12/13/2001
http://www.alldatadiy.com/alldata/AFI~V1046639~C34697~R0~OD~N/0/77993956/788...
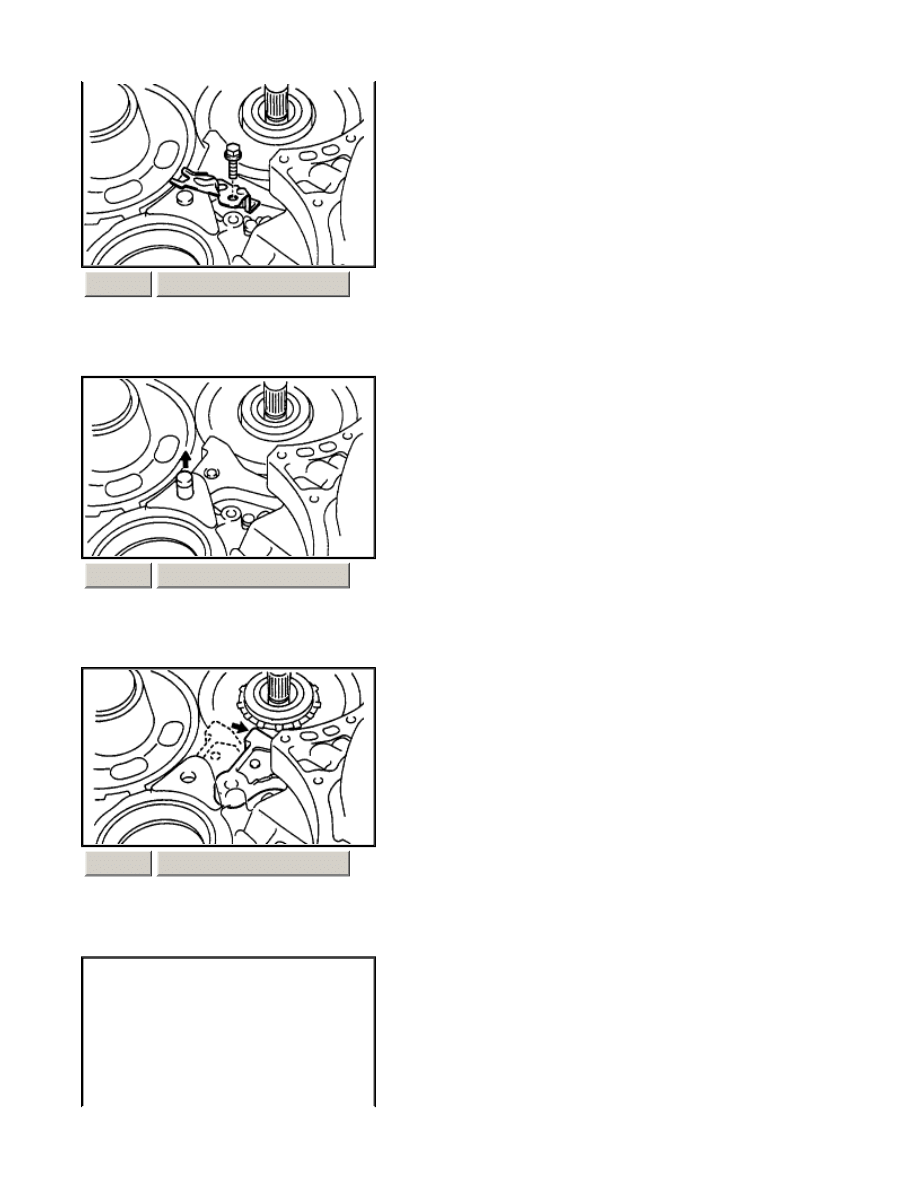
a.
Remove a bolt and the pawl shaft clamp.
b.
Remove the parking lock pawl shaft.
c.
Push the parking lock pawl. HINT: Failure to do so will cause interference when the U/D planetary gear is removed.
ZOOM
SIZED FOR PRINT
ZOOM
SIZED FOR PRINT
ZOOM
SIZED FOR PRINT
Page 21 of 22
2000 Toyota Celica GT -S L4-1762cc 1.8L DOHC MFI - Part 1 of 2
12/13/2001
http://www.alldatadiy.com/alldata/AFI~V1046639~C34697~R0~OD~N/0/77993956/788...
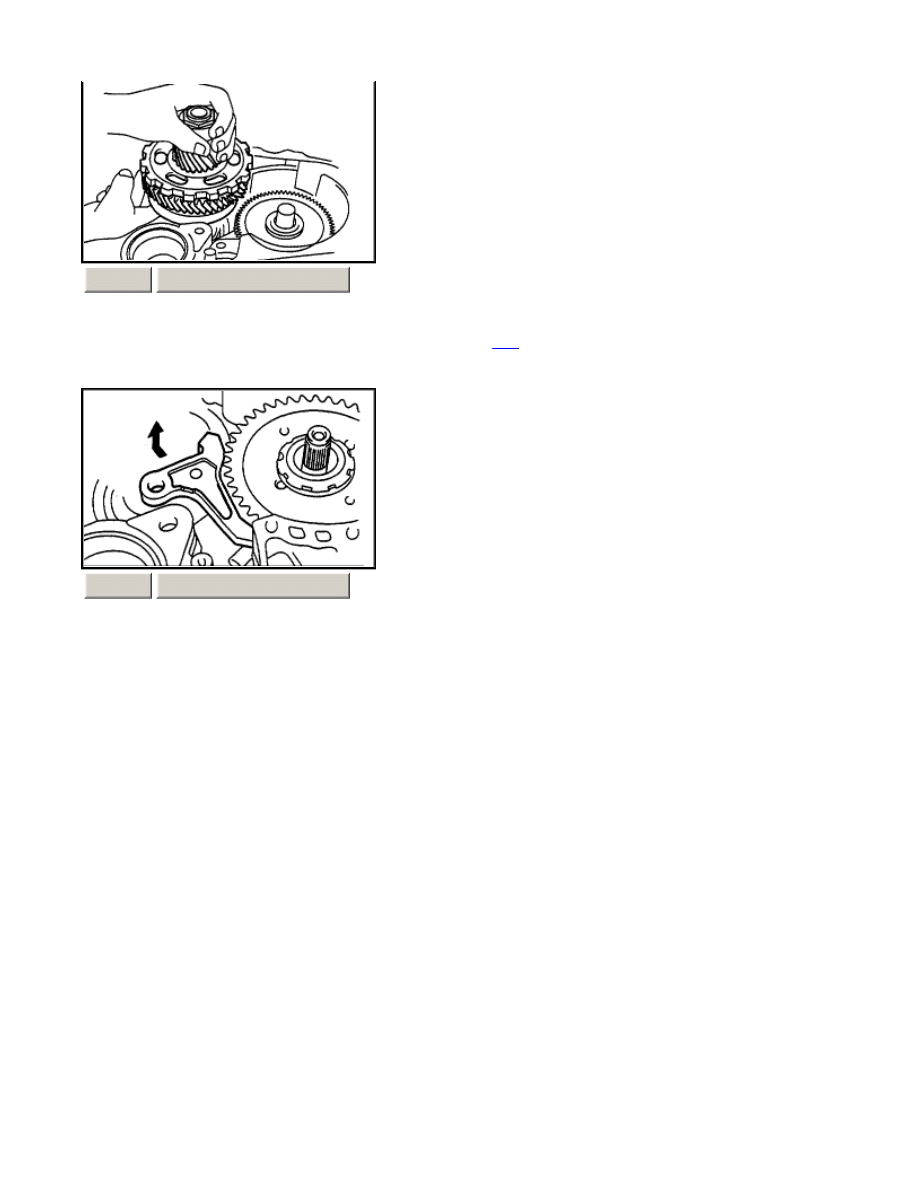
d.
Remove the U/D planetary gear assembly from the transaxle
case
. NOTICE: Be careful that the U/D planetary gear
assembly do not fall out.
e.
Remove the spring, the pawl pin and the parking lock pawl.
ZOOM
SIZED FOR PRINT
ZOOM
SIZED FOR PRINT
Page 22 of 22
2000 Toyota Celica GT -S L4-1762cc 1.8L DOHC MFI - Part 1 of 2
12/13/2001
http://www.alldatadiy.com/alldata/AFI~V1046639~C34697~R0~OD~N/0/77993956/788...
Wyszukiwarka
Podobne podstrony:
ARTICLE TRANNY AUTO REASSEMBLE PART1
ARTICLE TRANNY AUTO DISASSEMBLE PART2
ARTICLE TRANNY AUTO REMOVE INSTALL
ARTICLE TRANNY AUTO REASSEMBLE PART2
ARTICLE TRANNY AUTO REASSEMBLE PART3
ARTICLE MANUAL TRANSAXLE DISASSMEBLY
ARTICLE ELECTRICAL ALTERNATOR DISASSEMBLY
ARTICLE SUSPENSION STRUT FRONT DISASSEMBLE REASSEMBLE
ARTICLE SUSPENSION STRUT REAR DISASSEMBLE REASSEMBLE
The Definite or Zero Article Exercise at Auto
więcej podobnych podstron