Part 2 of 2
ZOOM
SIZED FOR PRINT
Page 1 of 26
2000 Toyota Celica GT -S L4-1762cc 1.8L DOHC MFI - Part 2 of 2
12/13/2001
http://www.alldatadiy.com/alldata/AFI~V1046639~C34697~R0~OD~N/0/77993956/788...
ZOOM
SIZED FOR PRINT
Page 2 of 26
2000 Toyota Celica GT -S L4-1762cc 1.8L DOHC MFI - Part 2 of 2
12/13/2001
http://www.alldatadiy.com/alldata/AFI~V1046639~C34697~R0~OD~N/0/77993956/788...
ZOOM
SIZED FOR PRINT
Page 3 of 26
2000 Toyota Celica GT -S L4-1762cc 1.8L DOHC MFI - Part 2 of 2
12/13/2001
http://www.alldatadiy.com/alldata/AFI~V1046639~C34697~R0~OD~N/0/77993956/788...
ZOOM
SIZED FOR PRINT
Page 4 of 26
2000 Toyota Celica GT -S L4-1762cc 1.8L DOHC MFI - Part 2 of 2
12/13/2001
http://www.alldatadiy.com/alldata/AFI~V1046639~C34697~R0~OD~N/0/77993956/788...
ZOOM
SIZED FOR PRINT
Page 5 of 26
2000 Toyota Celica GT -S L4-1762cc 1.8L DOHC MFI - Part 2 of 2
12/13/2001
http://www.alldatadiy.com/alldata/AFI~V1046639~C34697~R0~OD~N/0/77993956/788...
DISASSEMBLY
ZOOM
SIZED FOR PRINT
Page 6 of 26
2000 Toyota Celica GT -S L4-1762cc 1.8L DOHC MFI - Part 2 of 2
12/13/2001
http://www.alldatadiy.com/alldata/AFI~V1046639~C34697~R0~OD~N/0/77993956/788...
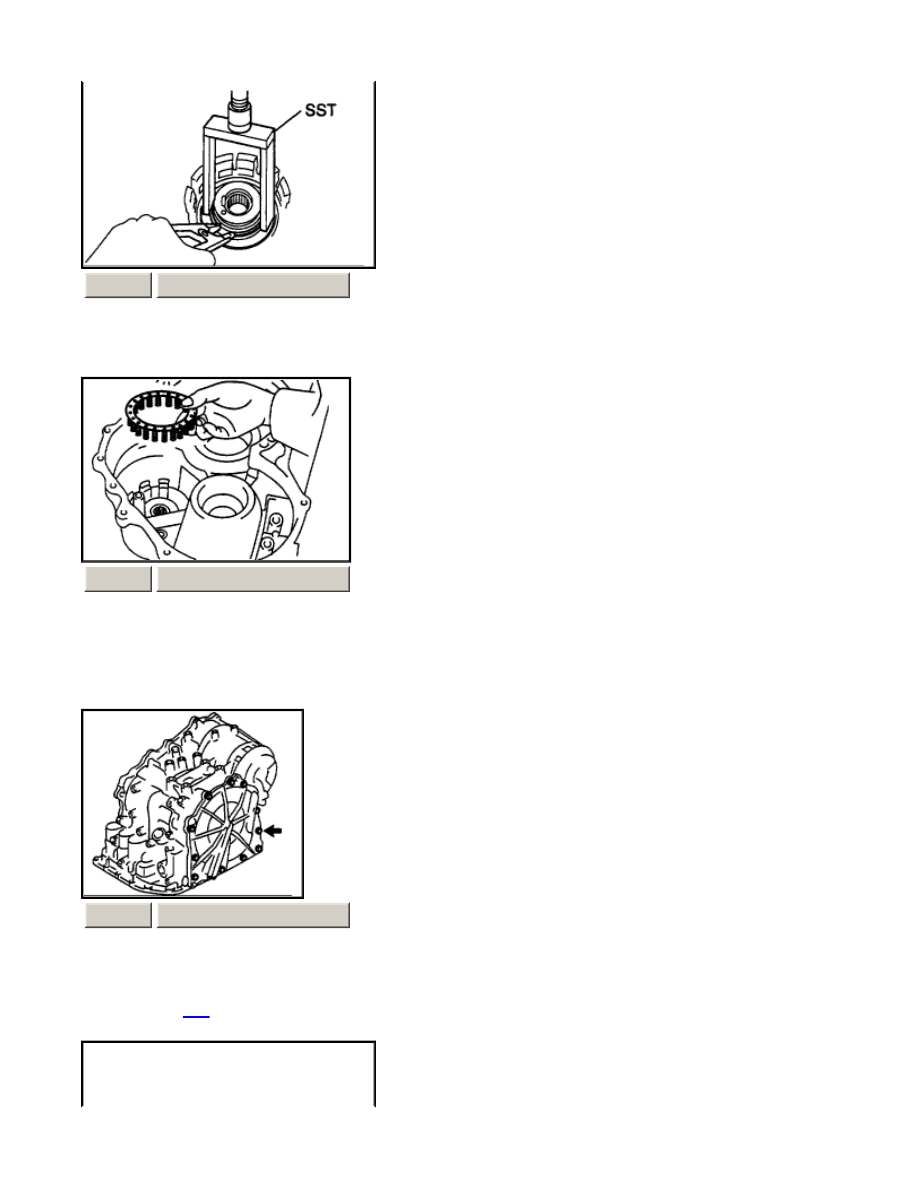
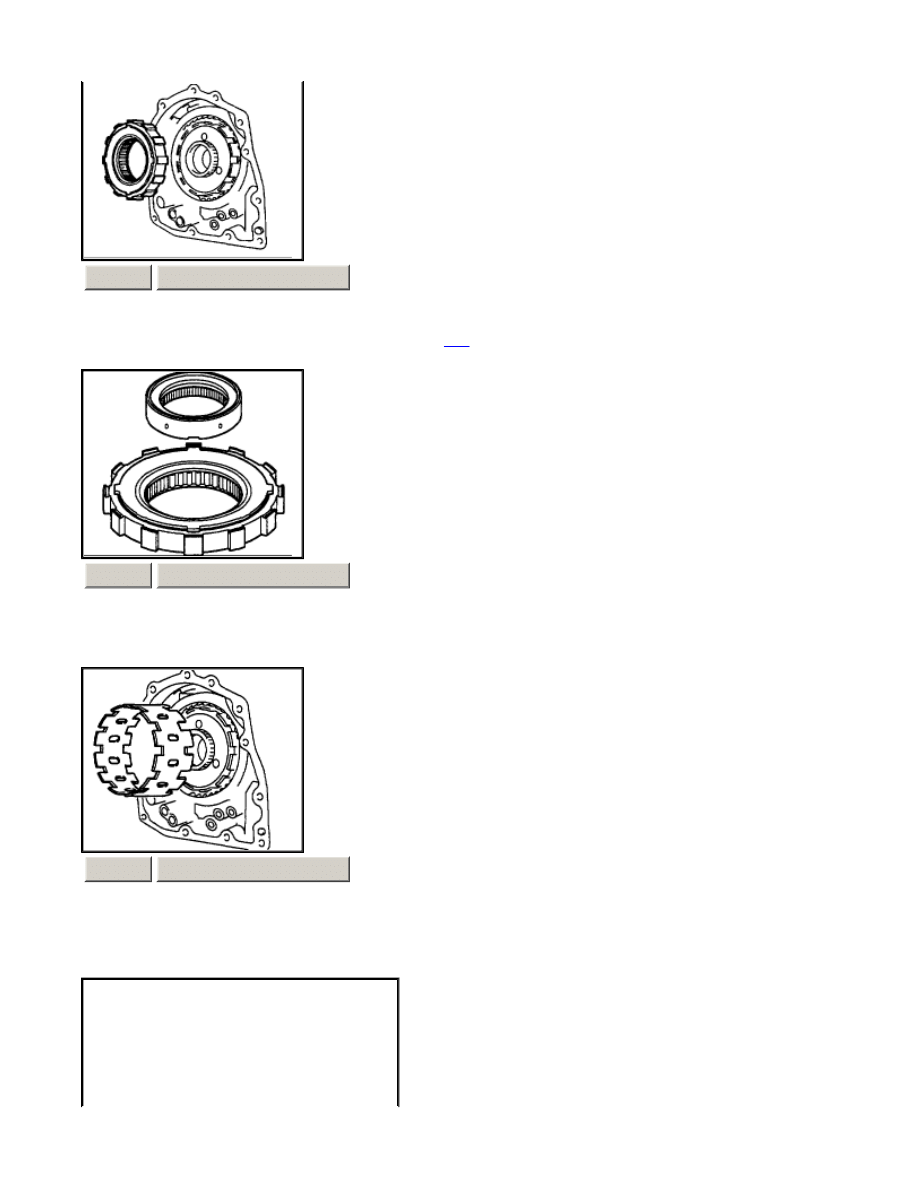
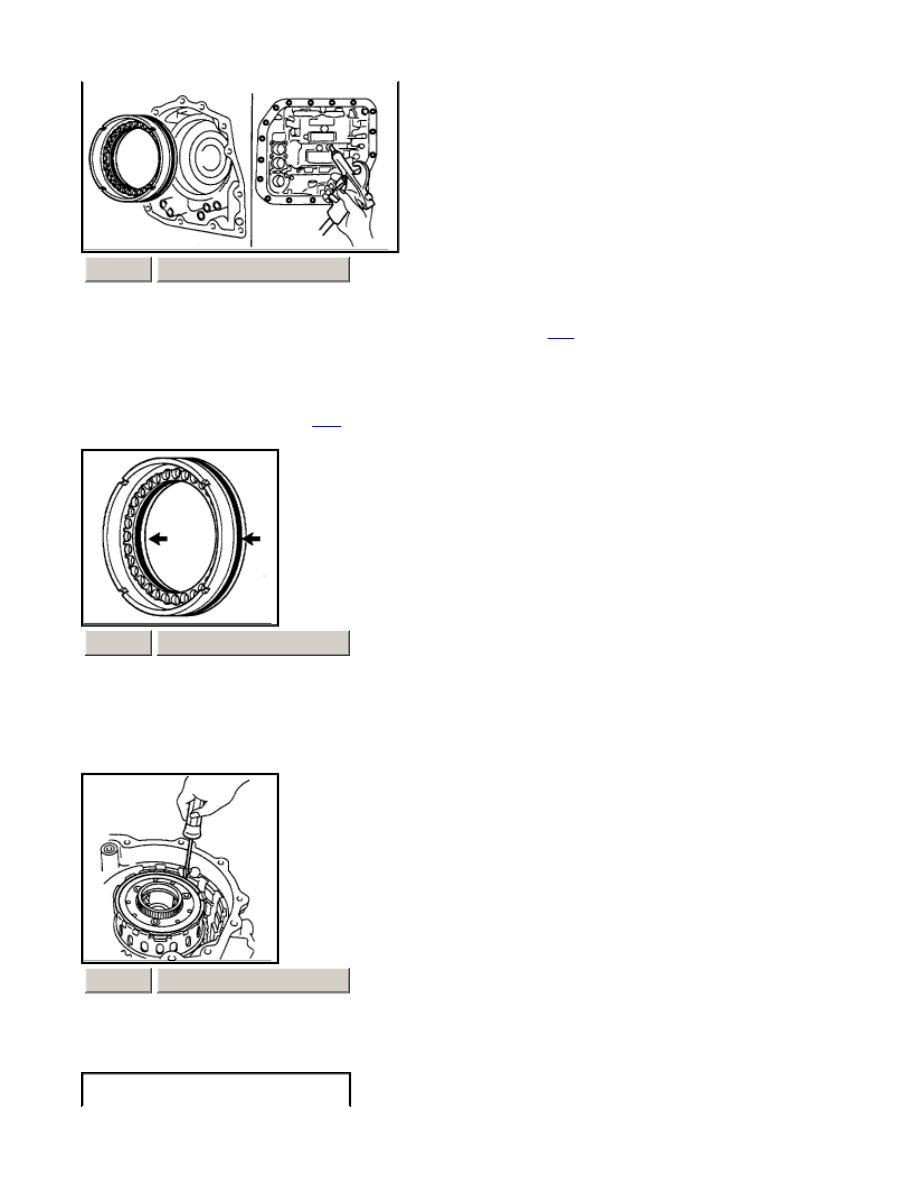
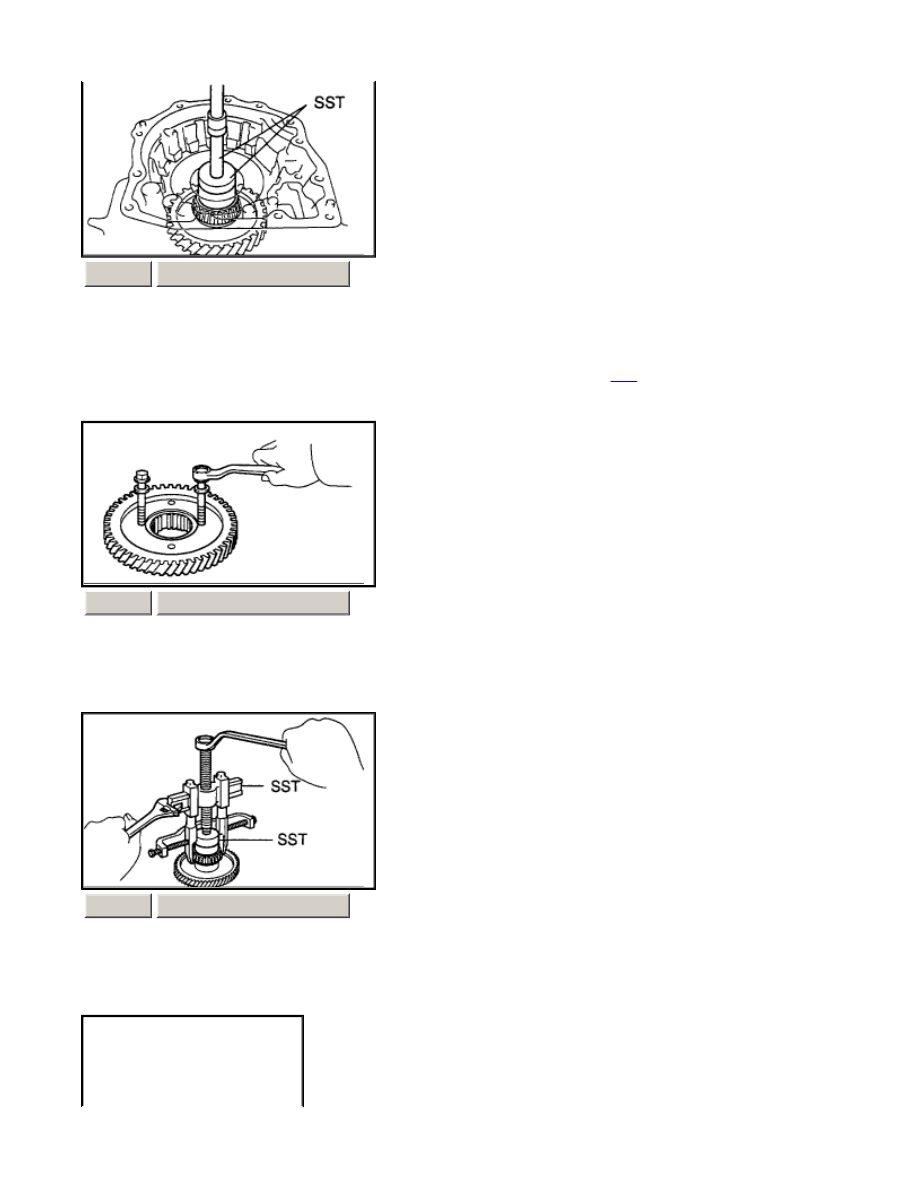
25.
REMOVE U/D
CLUTCH
ASSEMBLY Remove the U/D
clutch
assembly, the thrust bearing and the bearing race
from the transaxle
case
.
26.
REMOVE ONE-WAY CLUTCH NO. 2
a.
Using a screwdriver, remove the snap ring.
b.
Remove the one -way clutch No. 2 from the transaxle
case
.
ZOOM
SIZED FOR PRINT
ZOOM
SIZED FOR PRINT
ZOOM
SIZED FOR PRINT
Page 7 of 26
2000 Toyota Celica GT -S L4-1762cc 1.8L DOHC MFI - Part 2 of 2
12/13/2001
http://www.alldatadiy.com/alldata/AFI~V1046639~C34697~R0~OD~N/0/77993956/788...
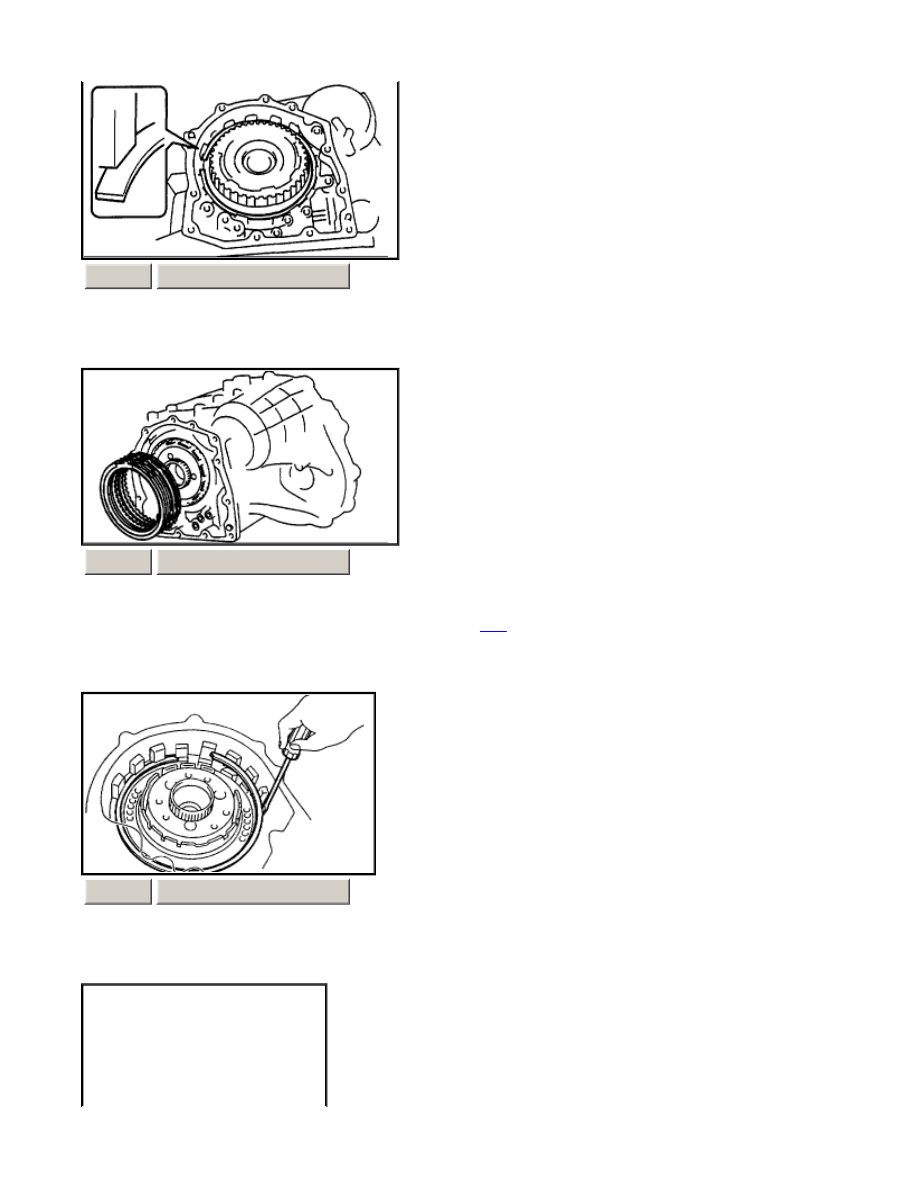
c.
Remove the outer race retainer from the one -way clutch No. 2.
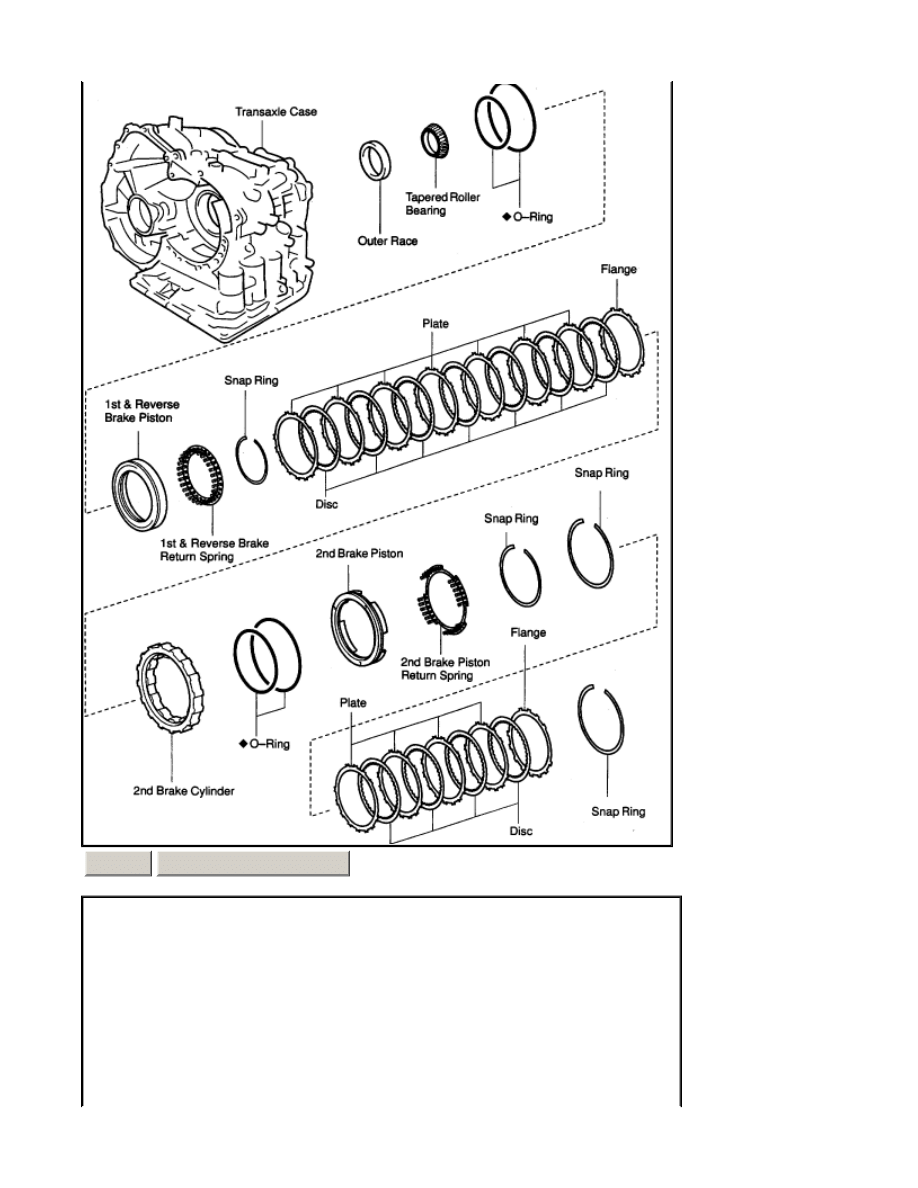
27.
REMOVE U/D BRAKE
a.
Using a screwdriver, remove the snap ring.
b.
Remove the flange, 4 discs and 4 plates from the transaxle
case
.
ZOOM
SIZED FOR PRINT
ZOOM
SIZED FOR PRINT
ZOOM
SIZED FOR PRINT
Page 8 of 26
2000 Toyota Celica GT -S L4-1762cc 1.8L DOHC MFI - Part 2 of 2
12/13/2001
http://www.alldatadiy.com/alldata/AFI~V1046639~C34697~R0~OD~N/0/77993956/788...
c.
Using SST, a snap ring expander and a press, remove the snap ring. SST 09387-00020
d.
Remove the piston return spring.
28.
REMOVE TRANSAXLE REAR COVER
a.
Remove the 11 bolts.
b.
Tap on the circumference of the rear cover with a plastic hammer to remove the transaxle rear cover from the
transaxle
case
.
ZOOM
SIZED FOR PRINT
ZOOM
SIZED FOR PRINT
ZOOM
SIZED FOR PRINT
Page 9 of 26
2000 Toyota Celica GT -S L4-1762cc 1.8L DOHC MFI - Part 2 of 2
12/13/2001
http://www.alldatadiy.com/alldata/AFI~V1046639~C34697~R0~OD~N/0/77993956/788...
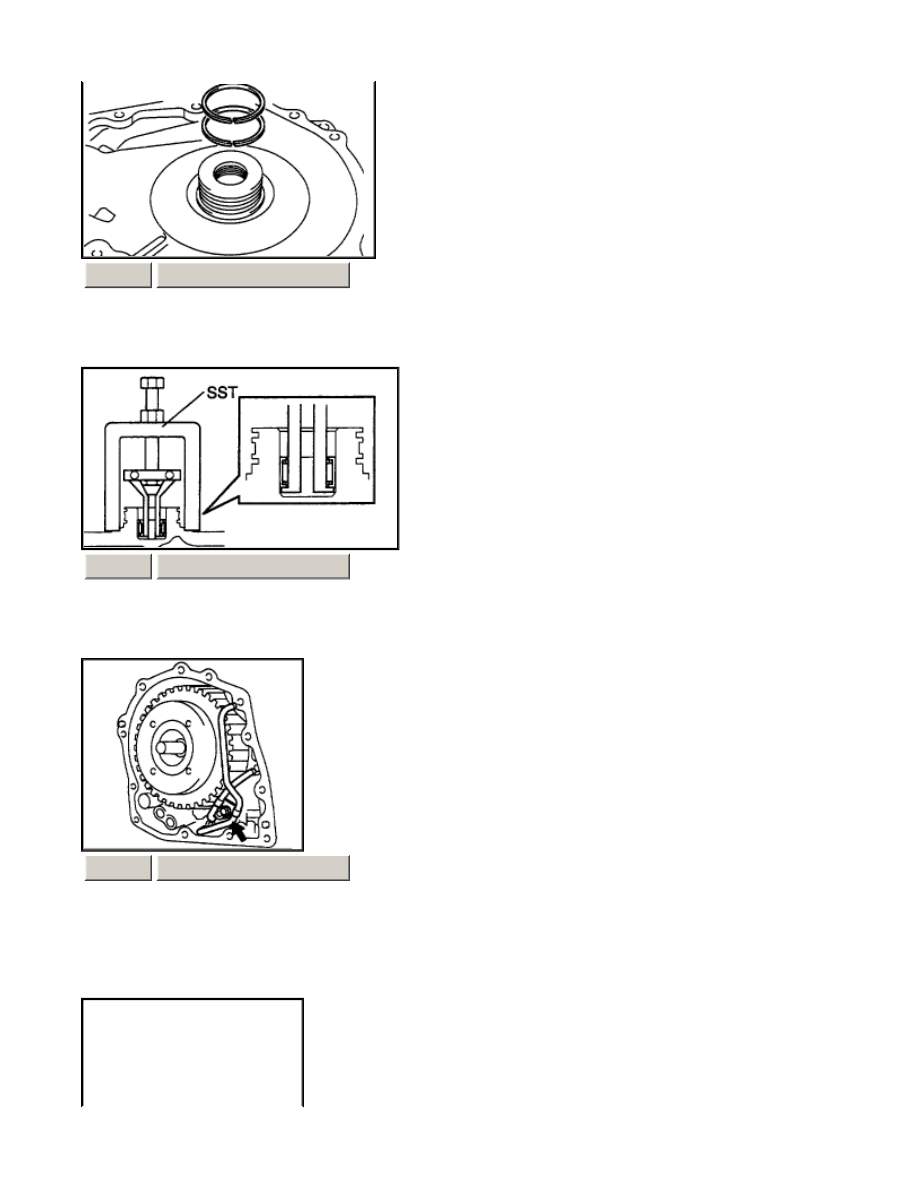
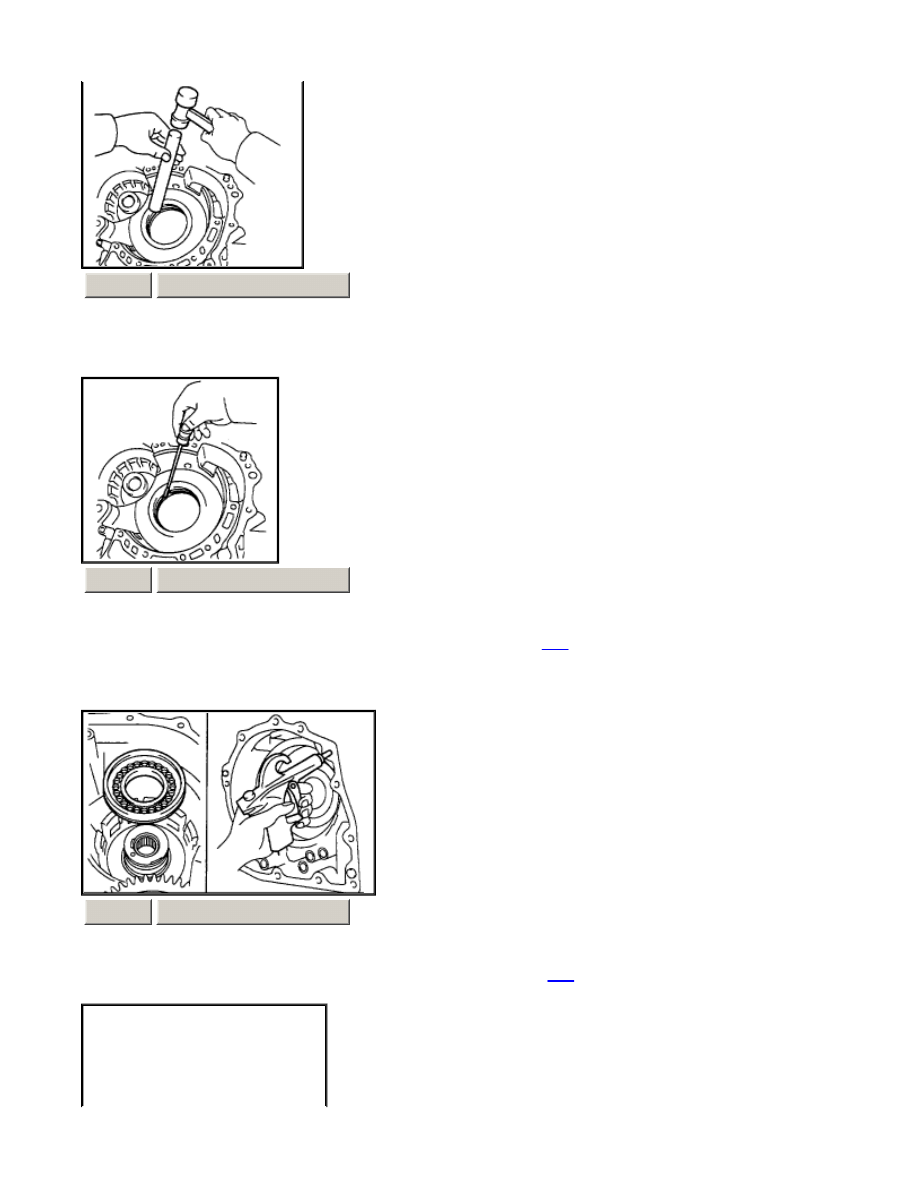
c.
Remove the 2 oil seal rings from the transaxle rear cover.
d.
Using SST, remove the needle-roller bearing. SST 09387 -00040 (09387-01010, 09387-01030, 09387-01040)
29.
REMOVE BRAKE APPLY PIPE
a.
Remove a bolt, clamp and 2 brake apply pipes.
ZOOM
SIZED FOR PRINT
ZOOM
SIZED FOR PRINT
ZOOM
SIZED FOR PRINT
Page 10 of 26
2000 Toyota Celica GT -S L4-1762cc 1.8L DOHC MFI - Part 2 of 2
12/13/2001
http://www.alldatadiy.com/alldata/AFI~V1046639~C34697~R0~OD~N/0/77993956/788...
30.
REMOVE TRANSAXLE
CASE
APPLY GASKET Using a screwdriver, remove the 2 apply gaskets.
31.
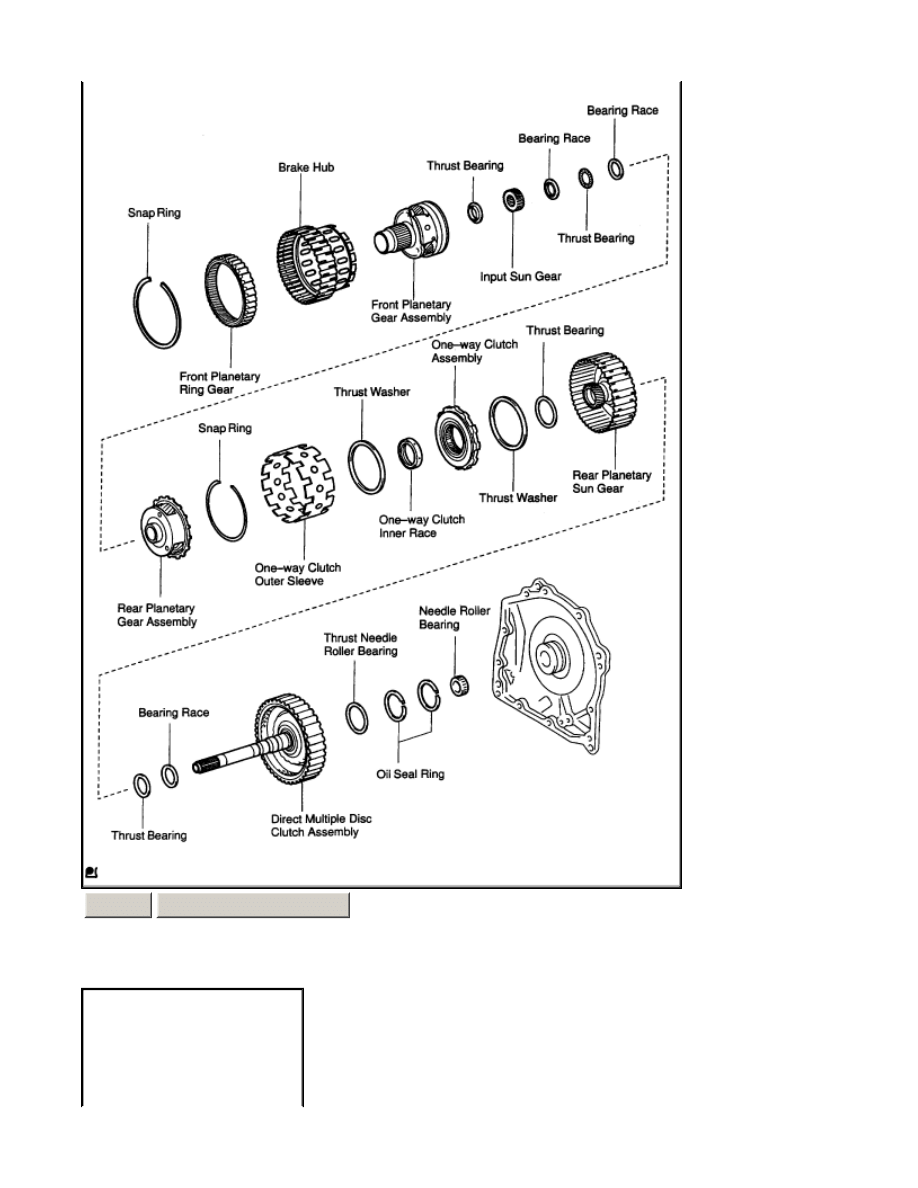
REMOVE
DIRECT CLUTCH
ASSEMBLY
a.
Remove the thrust bearing and the
direct clutch
from the transaxle
case
.
b.
Remove the bearing race from the
direct clutch
.
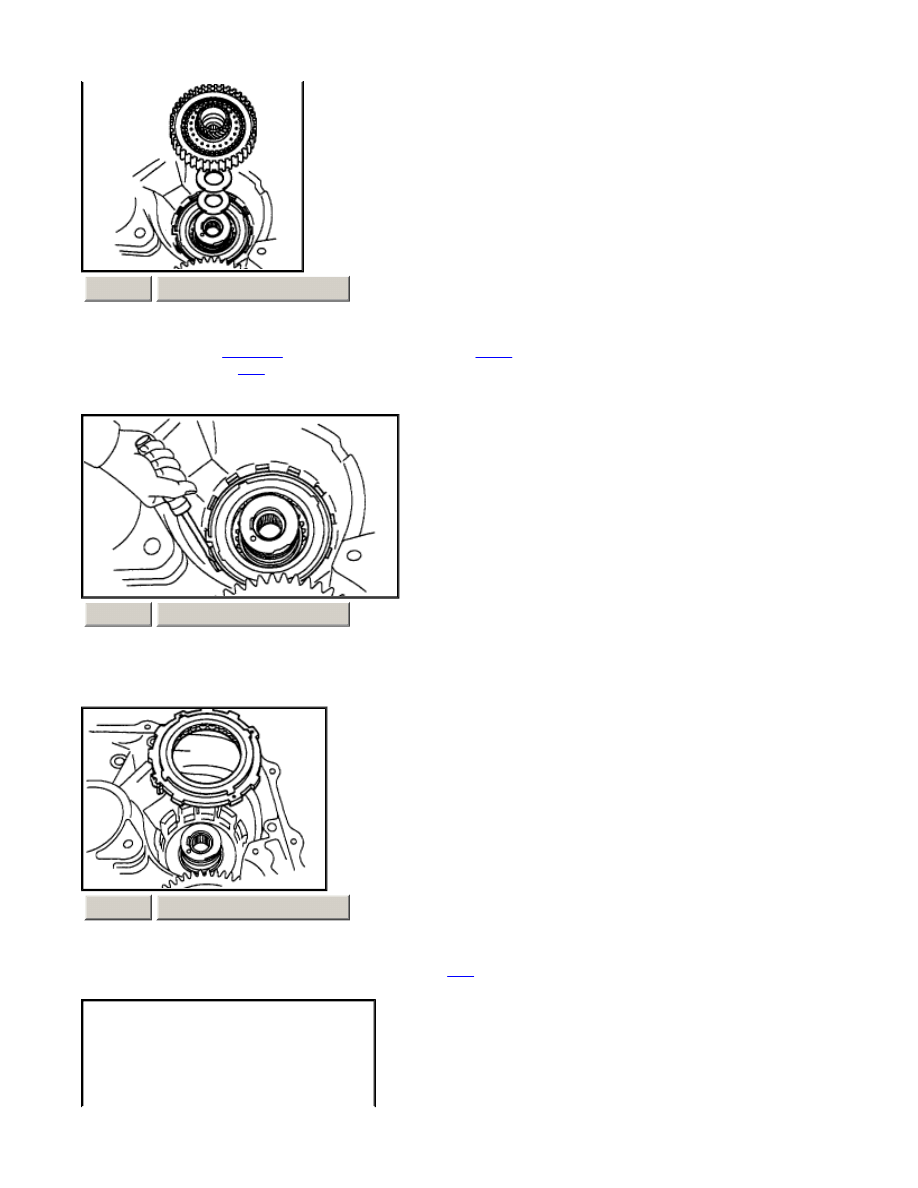
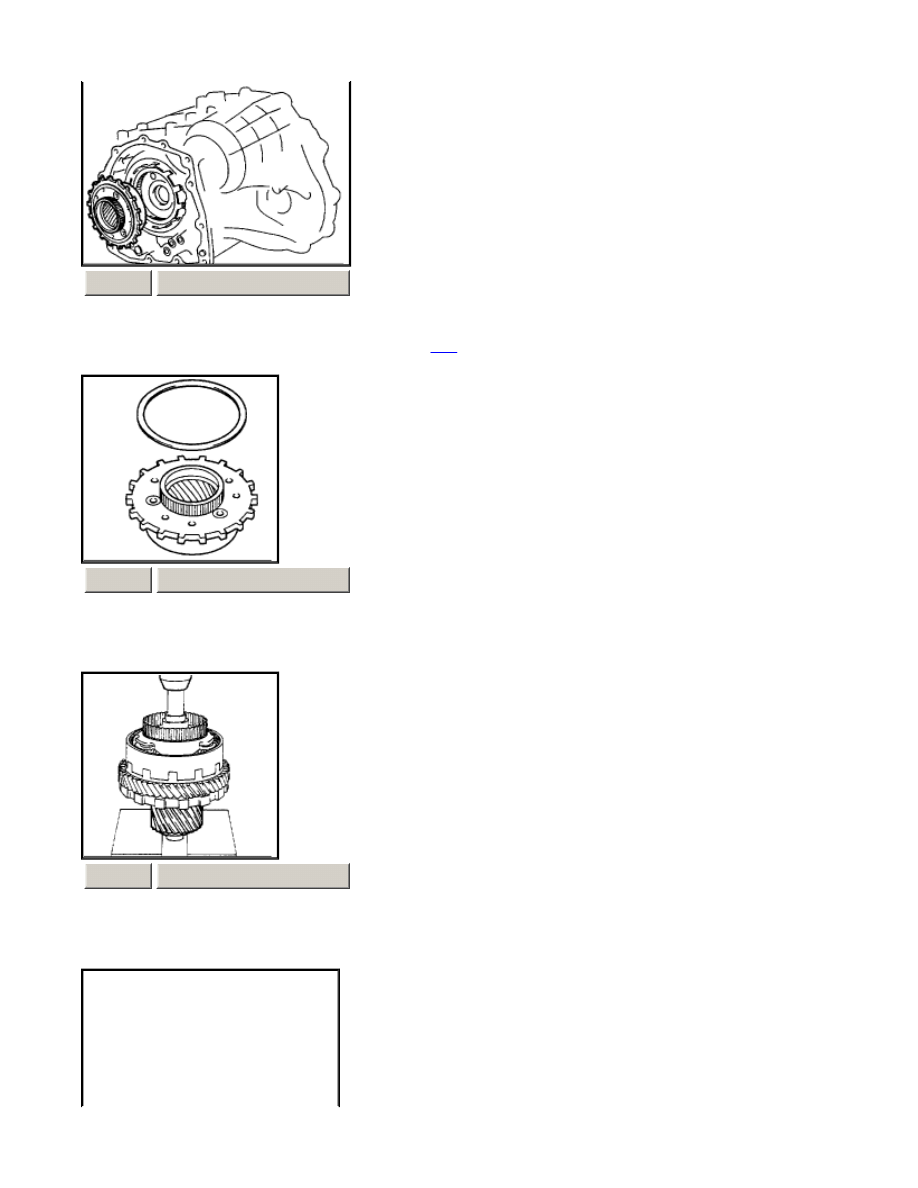
32.
REMOVE REAR PLANETARY SUN GEAR ASSEMBLY
ZOOM
SIZED FOR PRINT
ZOOM
SIZED FOR PRINT
ZOOM
SIZED FOR PRINT
Page 11 of 26
2000 Toyota Celica GT -S L4-1762cc 1.8L DOHC MFI - Part 2 of 2
12/13/2001
http://www.alldatadiy.com/alldata/AFI~V1046639~C34697~R0~OD~N/0/77993956/788...
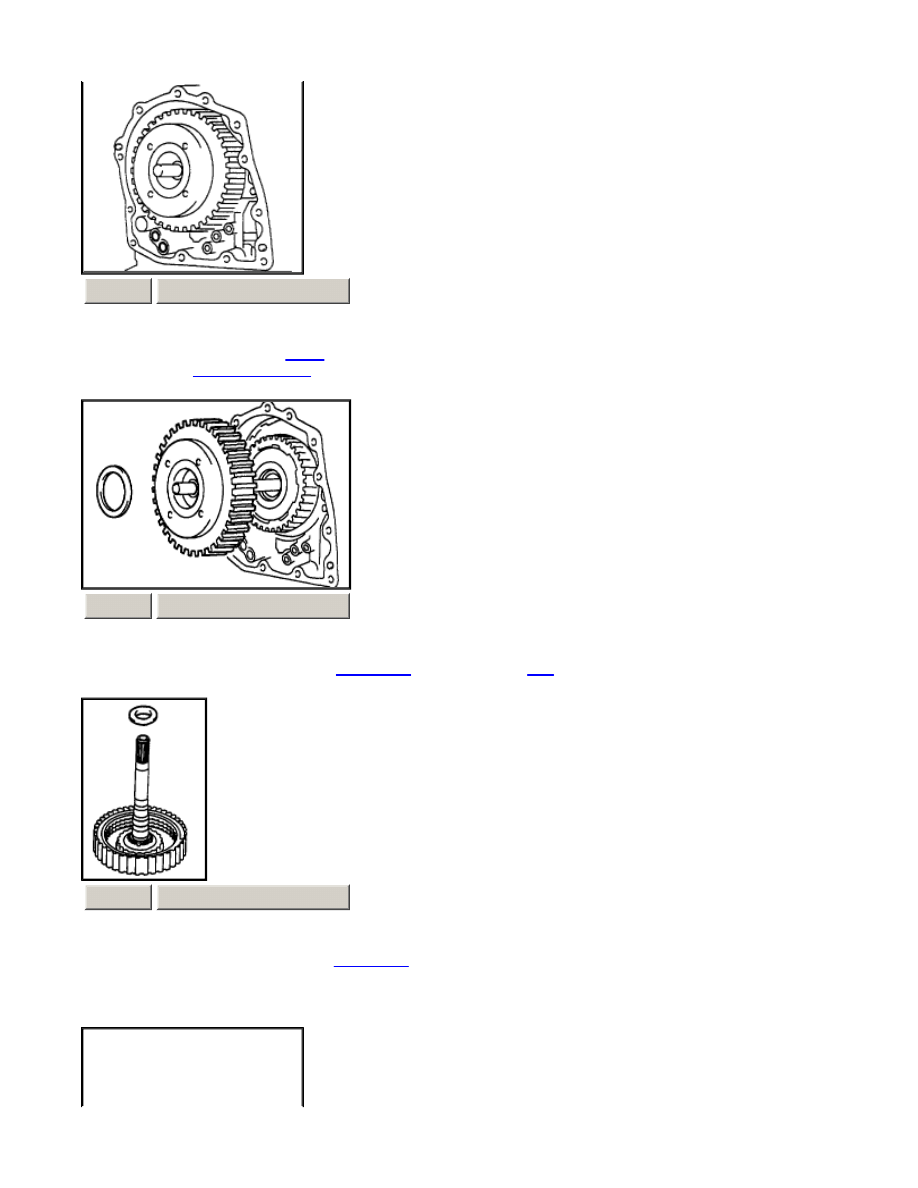
a.
Remove the rear planetary sun gear assembly from the transaxle
case
.
b.
Remove the thrust bearing from the rear planetary sun gear.
c.
Remove the thrust washer No. 1 and thrust bearing from the rear planetary sun gear.
33.
REMOVE ONE-WAY CLUTCH NO.1
ZOOM
SIZED FOR PRINT
ZOOM
SIZED FOR PRINT
ZOOM
SIZED FOR PRINT
Page 12 of 26
2000 Toyota Celica GT -S L4-1762cc 1.8L DOHC MFI - Part 2 of 2
12/13/2001
http://www.alldatadiy.com/alldata/AFI~V1046639~C34697~R0~OD~N/0/77993956/788...
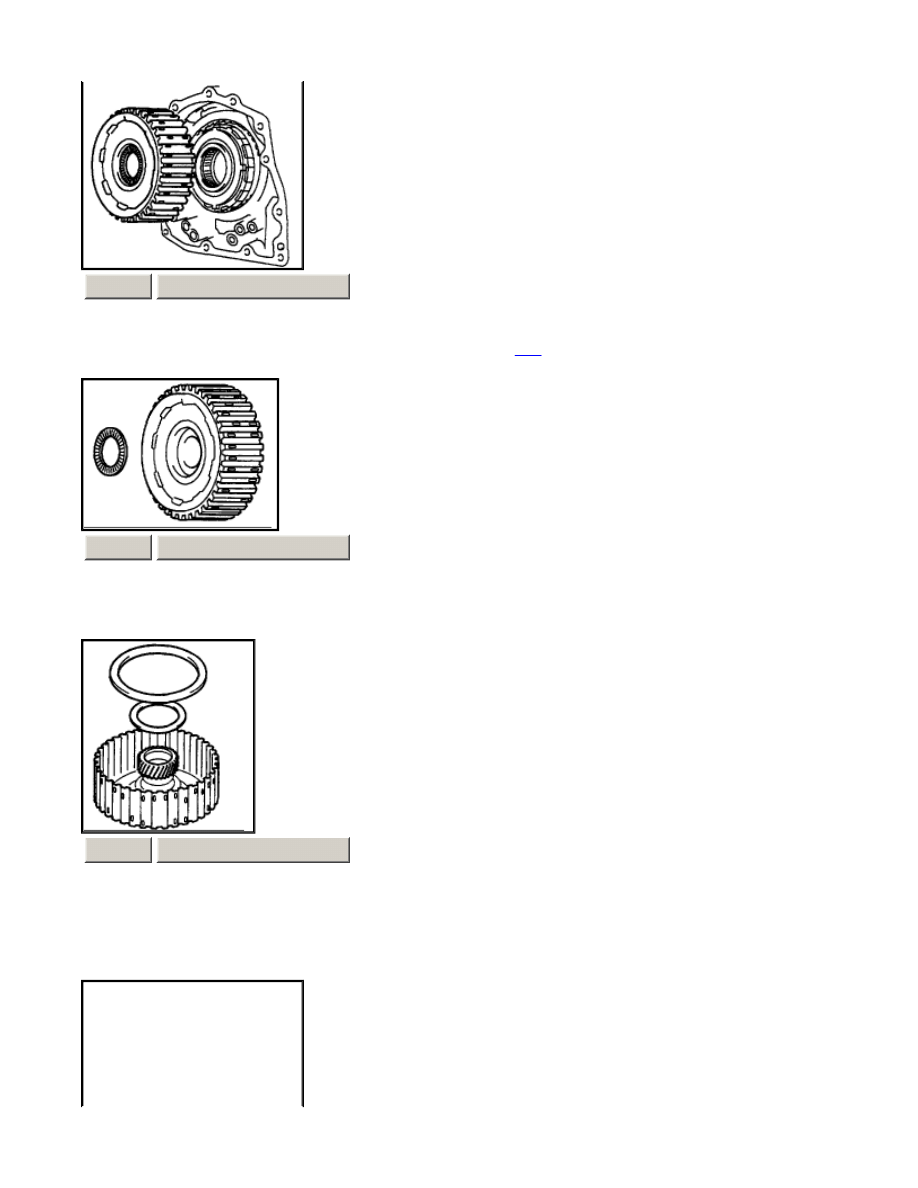
a.
Remove the one -way clutch No.1 from the transaxle
case
.
b.
Remove the inner race from the one -way clutch No. 1.
34.
REMOVE ONE-WAY CLUTCH OUTER SLEEVE
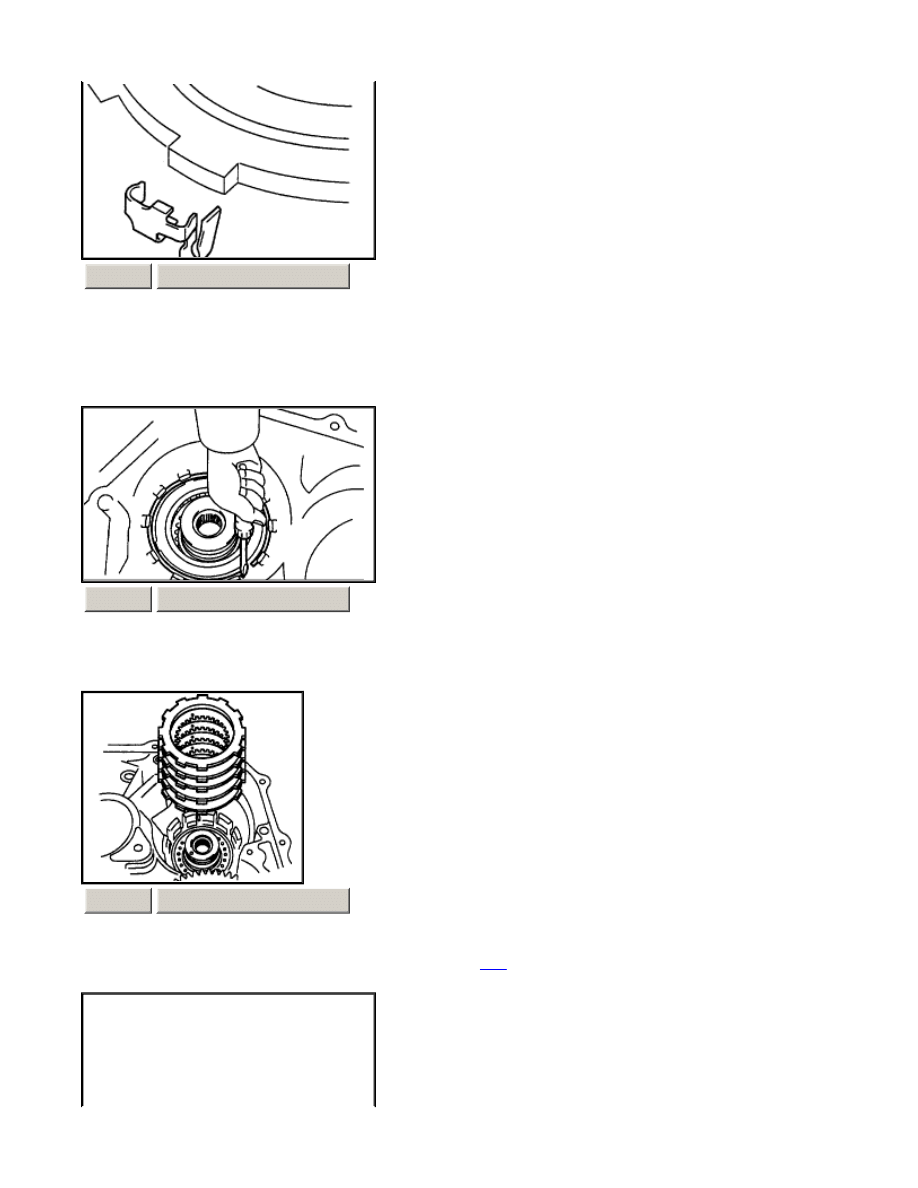
35.
REMOVE 2ND BRAKE
ZOOM
SIZED FOR PRINT
ZOOM
SIZED FOR PRINT
ZOOM
SIZED FOR PRINT
Page 13 of 26
2000 Toyota Celica GT -S L4-1762cc 1.8L DOHC MFI - Part 2 of 2
12/13/2001
http://www.alldatadiy.com/alldata/AFI~V1046639~C34697~R0~OD~N/0/77993956/788...
a.
Using a screwdriver, remove the snap ring.
b.
Remove the flange, 4 discs and 4 plates from the transaxle
case
.
36.
REMOVE 2ND BRAKE CYLINDER
a.
Using a screwdriver, remove the snap ring.
ZOOM
SIZED FOR PRINT
ZOOM
SIZED FOR PRINT
ZOOM
SIZED FOR PRINT
Page 14 of 26
2000 Toyota Celica GT -S L4-1762cc 1.8L DOHC MFI - Part 2 of 2
12/13/2001
http://www.alldatadiy.com/alldata/AFI~V1046639~C34697~R0~OD~N/0/77993956/788...
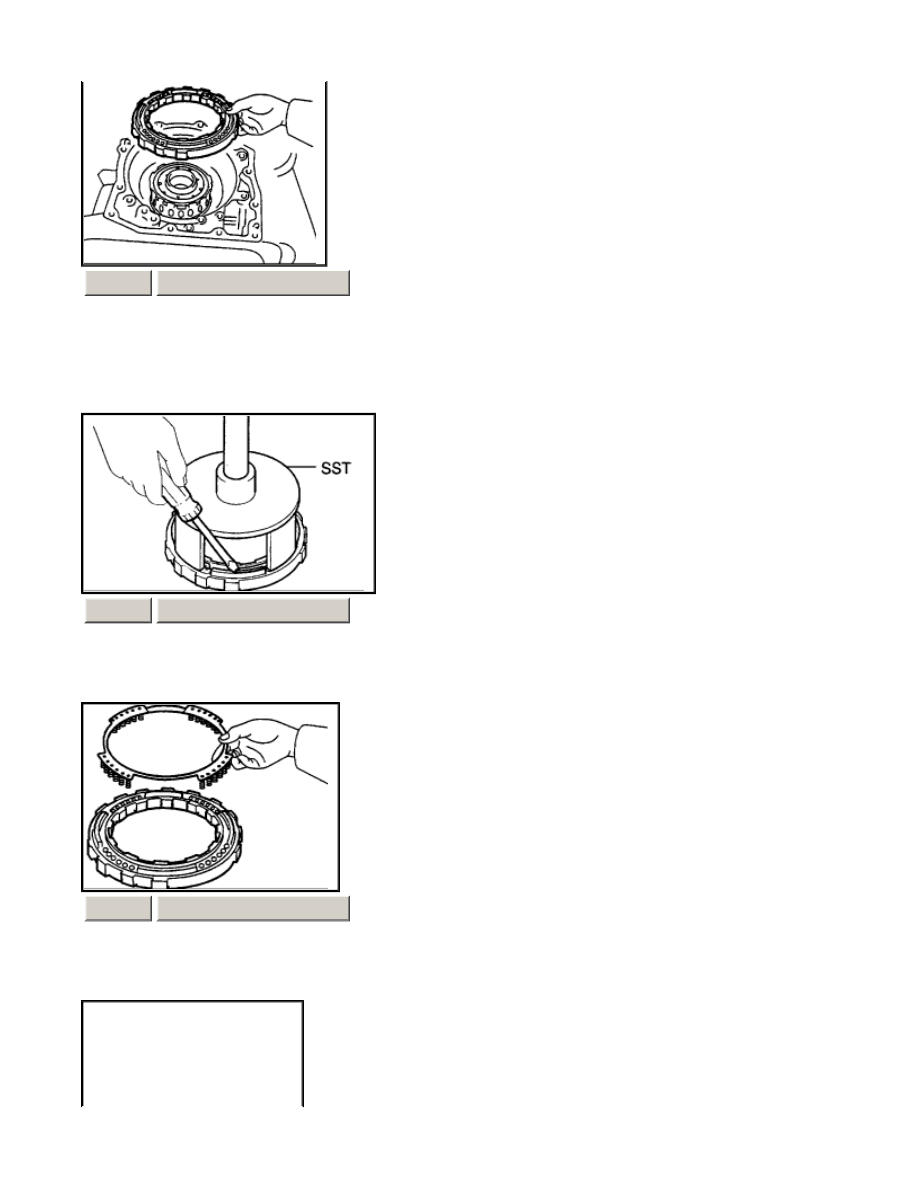
b.
Remove the 2nd brake cylinder from the transaxle.
37.
REMOVE 2ND BRAKE PISTON
a.
Using SST, a press and a screwdriver, remove the snap ring. SST 09387-00060
b.
Remove the return spring.
ZOOM
SIZED FOR PRINT
ZOOM
SIZED FOR PRINT
ZOOM
SIZED FOR PRINT
Page 15 of 26
2000 Toyota Celica GT -S L4-1762cc 1.8L DOHC MFI - Part 2 of 2
12/13/2001
http://www.alldatadiy.com/alldata/AFI~V1046639~C34697~R0~OD~N/0/77993956/788...

c.
Apply compressed air (392 kPa, 4.0 kgf/cm2, 57 psi) to the 2nd brake cylinder to remove 2nd brake piston.
NOTICE:
¡
Blowing of air may cause the piston to jump-out. When removing the piston, hold it with your hand using a
waste cloth.
¡
Take care not to splash
ATF
when air-blowing.
d.
Remove the 2 O -rings from the 2nd brake piston.
38.
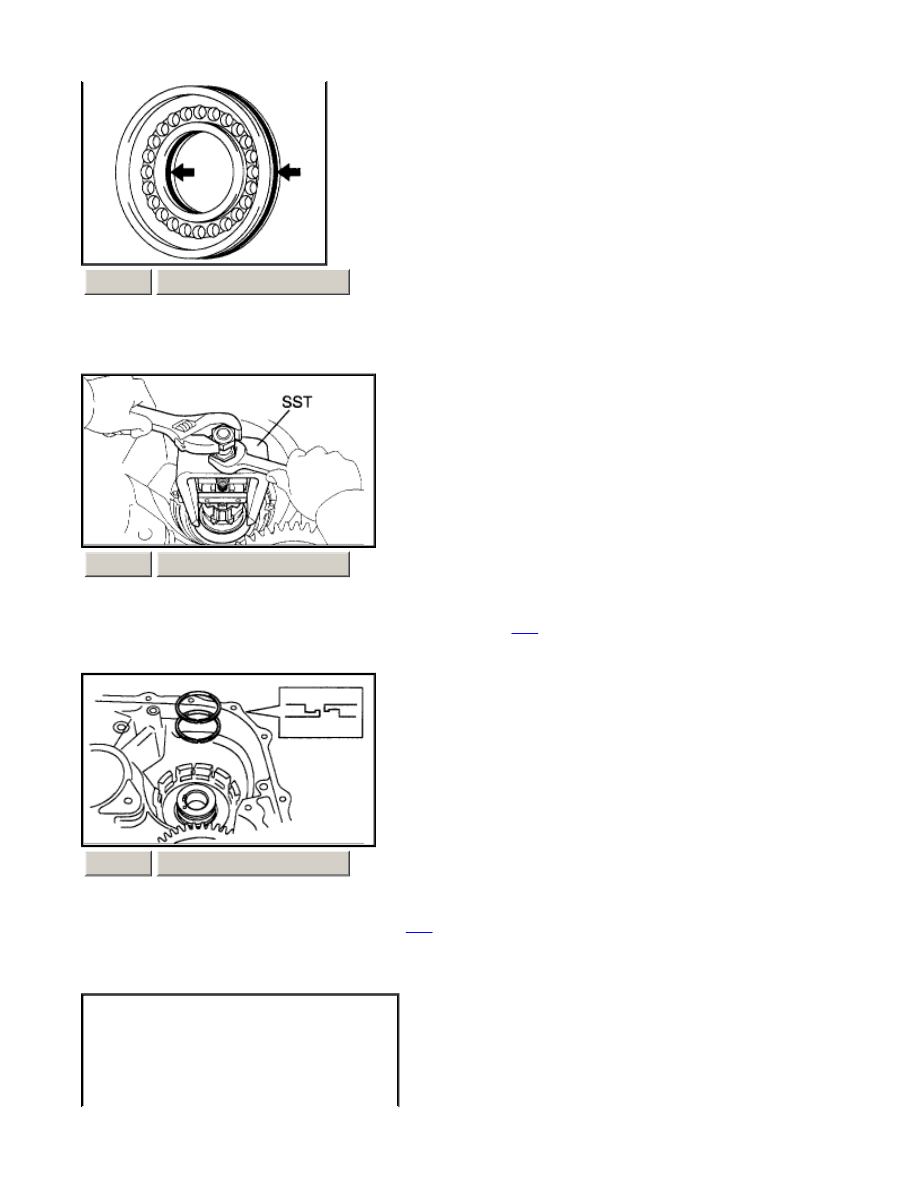
CHECK 2ND BRAKE PISTON RETURN SPRING Using vernier calipers, measure the free length of the spring
together with the spring seat. Standard free length: 16.61 mm (0.6539 inch)
39.
REMOVE 1ST & REVERSE BRAKE
ZOOM
SIZED FOR PRINT
ZOOM
SIZED FOR PRINT
ZOOM
SIZED FOR PRINT
Page 16 of 26
2000 Toyota Celica GT -S L4-1762cc 1.8L DOHC MFI - Part 2 of 2
12/13/2001
http://www.alldatadiy.com/alldata/AFI~V1046639~C34697~R0~OD~N/0/77993956/788...
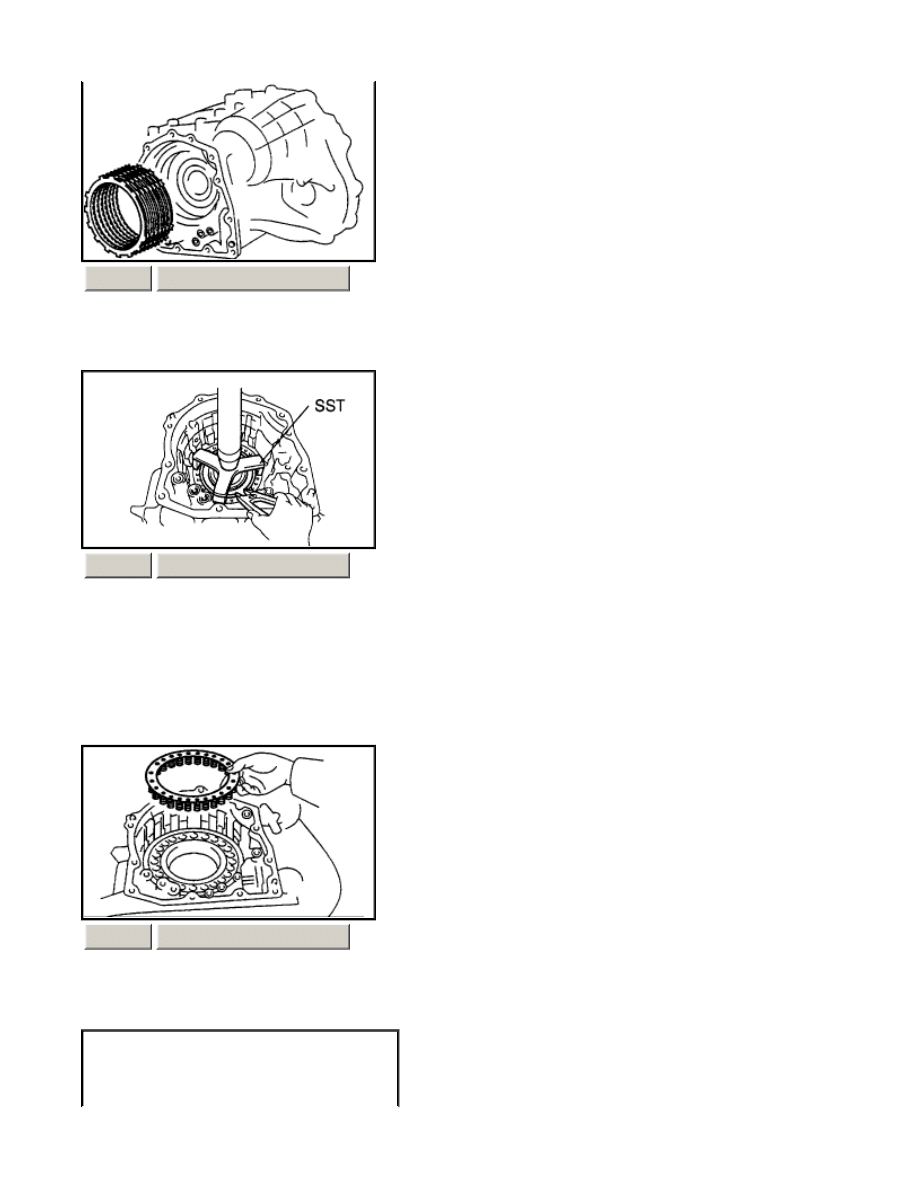
a.
Remove the flange, 5 discs and 5 plates.
b.
Using SST, a press and a snap ring expander, remove the snap ring and the piston return spring. SST 09387-00070
NOTICE:
¡
Stop the press when the spring sheet is lowered 1 - 2 mm (0.039 - 0.078 inch) from the snap ring groove,
preventing the spring sheet from deforming.
¡
Do not expand the snap ring excessively.
c.
Remove the return spring.
ZOOM
SIZED FOR PRINT
ZOOM
SIZED FOR PRINT
ZOOM
SIZED FOR PRINT
Page 17 of 26
2000 Toyota Celica GT -S L4-1762cc 1.8L DOHC MFI - Part 2 of 2
12/13/2001
http://www.alldatadiy.com/alldata/AFI~V1046639~C34697~R0~OD~N/0/77993956/788...
d.
Apply compressed air (392 kPa, 4.0 kgf/cm2, 57 psi) to the transaxle
case
to remove 1st & reverse brake piston.
NOTICE:
¡
Blowing of the air may cause the piston to jump -out. When removing the piston, hold it with your hand using
a waste cloth.
¡
Take care not to splash
ATF
when air blowing.
e.
Remove 2 O-rings from the 1st & reverse brake piston.
40.
REMOVE REAR PLANETARY GEAR
a.
Using a screwdriver, remove the snap ring.
ZOOM
SIZED FOR PRINT
ZOOM
SIZED FOR PRINT
ZOOM
SIZED FOR PRINT
Page 18 of 26
2000 Toyota Celica GT -S L4-1762cc 1.8L DOHC MFI - Part 2 of 2
12/13/2001
http://www.alldatadiy.com/alldata/AFI~V1046639~C34697~R0~OD~N/0/77993956/788...
b.
Remove the rear planetary gear from the transaxle
case
.
c.
Remove the thrust washer No. 2 from the rear planetary gear.
d.
Remove the bearing race from the rear planetary gear.
ZOOM
SIZED FOR PRINT
ZOOM
SIZED FOR PRINT
ZOOM
SIZED FOR PRINT
Page 19 of 26
2000 Toyota Celica GT -S L4-1762cc 1.8L DOHC MFI - Part 2 of 2
12/13/2001
http://www.alldatadiy.com/alldata/AFI~V1046639~C34697~R0~OD~N/0/77993956/788...
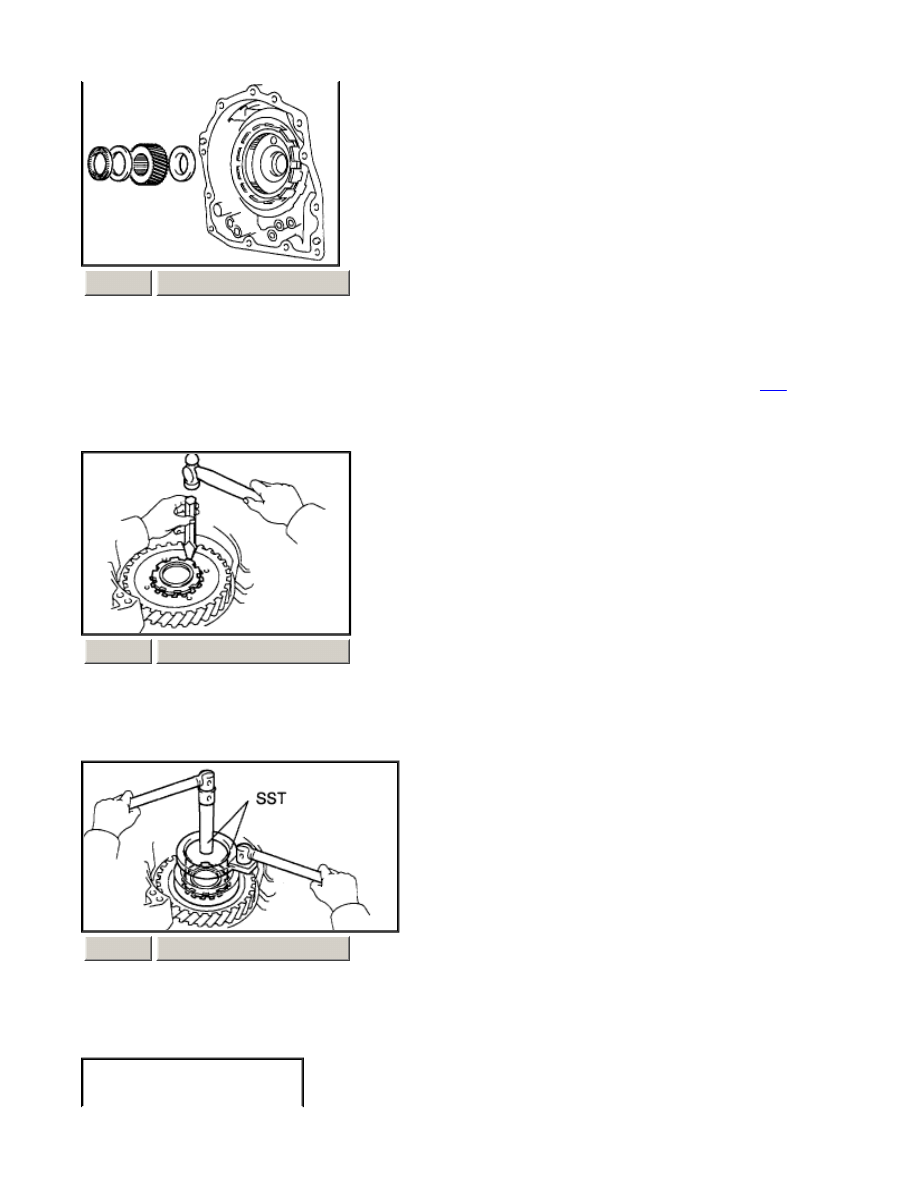
41.
REMOVE FRONT PLANETARY SUN GEAR
a.
Remove the 2 thrust bearings, the bearing race and the front planetary sun gear from the transaxle
case
.
42.
REMOVE FRONT PLANETARY GEAR ASSEMBLY AND BRAKE HUB
a.
Using a chisel and a hammer, unstake the lock washer. NOTICE: Push down all claws of the washer. Otherwise SST
can not be fully pressed again the nut and can not loosen the nut.
b.
Using SST, remove the nut. SST 09387-00030, 09387-00080
c.
Remove the lock washer.
ZOOM
SIZED FOR PRINT
ZOOM
SIZED FOR PRINT
ZOOM
SIZED FOR PRINT
Page 20 of 26
2000 Toyota Celica GT -S L4-1762cc 1.8L DOHC MFI - Part 2 of 2
12/13/2001
http://www.alldatadiy.com/alldata/AFI~V1046639~C34697~R0~OD~N/0/77993956/788...
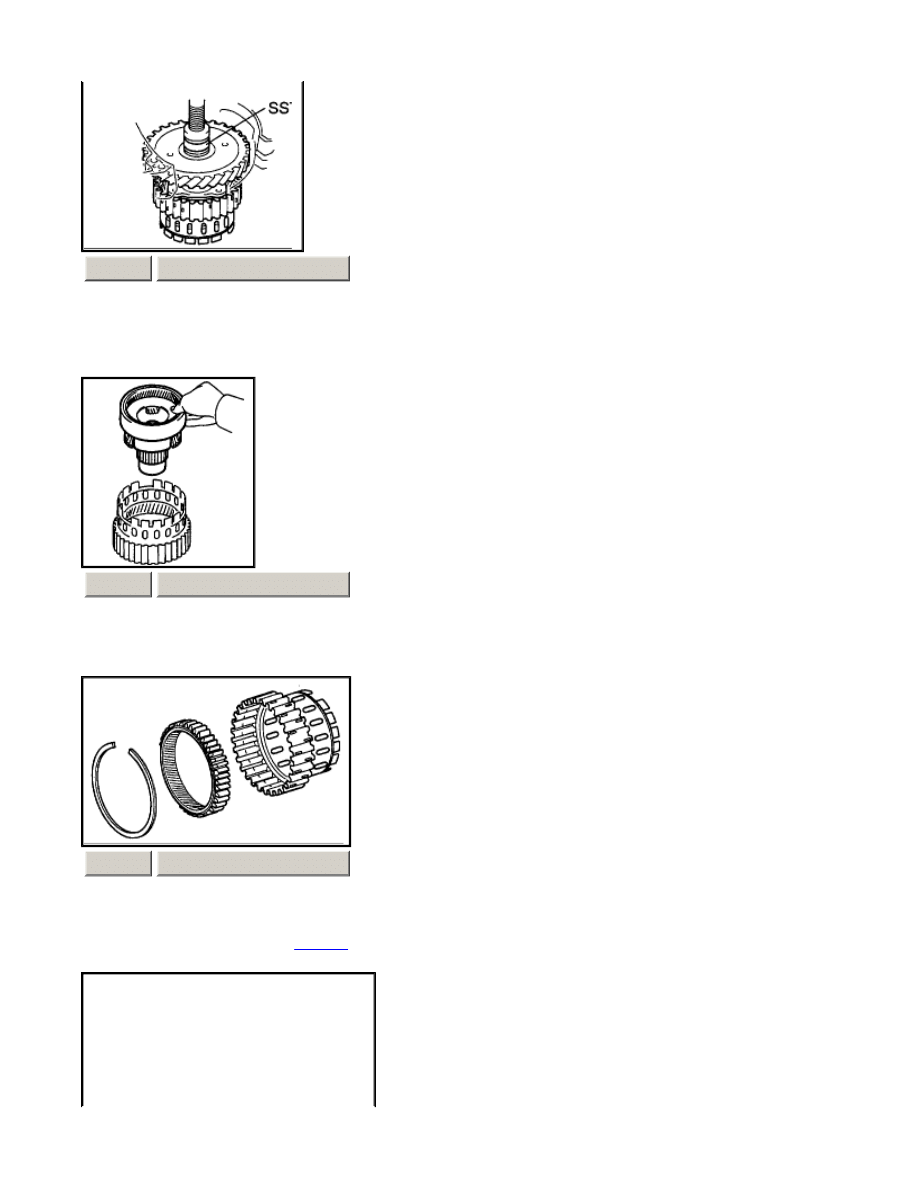
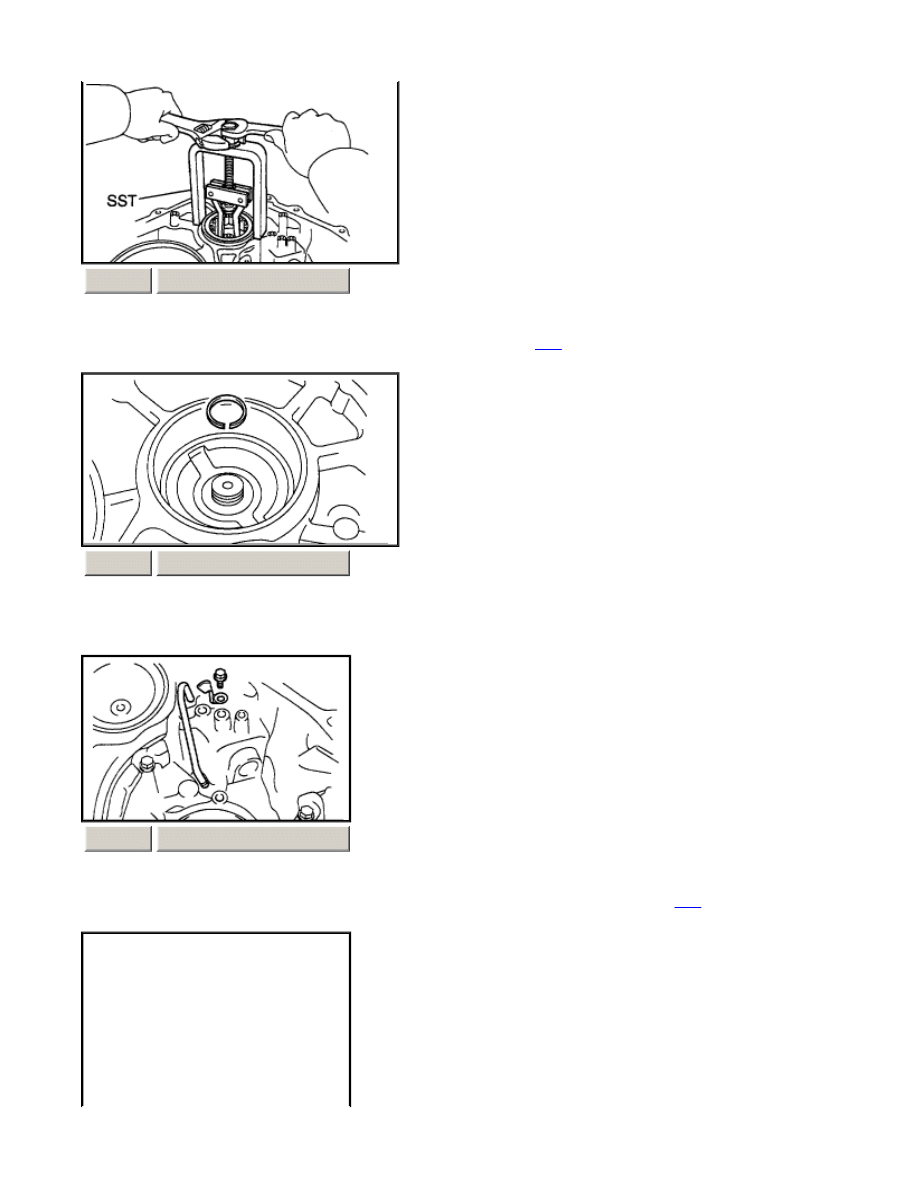
d.
Using SST and a press, remove the front planetary gear assembly from the counter drive gear. SST 09950-60010
(09951-00450)
e.
Remove the front planetary gear.
f.
Using a screwdriver, remove the snap ring.
g.
Remove the front planetary
ring gear
from the brake hub.
ZOOM
SIZED FOR PRINT
ZOOM
SIZED FOR PRINT
ZOOM
SIZED FOR PRINT
Page 21 of 26
2000 Toyota Celica GT -S L4-1762cc 1.8L DOHC MFI - Part 2 of 2
12/13/2001
http://www.alldatadiy.com/alldata/AFI~V1046639~C34697~R0~OD~N/0/77993956/788...
43.
REMOVE COUNTER DRIVE GEAR
a.
Using SST and a press, remove the counter drive gear from the transaxle
case
. SST 09950-60010 (09951-
00600), 09950-70010 (09951 -07100)
b.
As shown in the illustration, tighten 2 bolts evenly and make clearance of approximately 20.0 mm (0.797
inch) between the counter drive gear and the inner race.
c.
Using SST, remove the tapered roller bearing RH. SST 09950-40011 (09951 -04010, 09952-04010, 09953-
04020, 09954-04010, 09955-04011, 09958-04011), 09950-60010 (09951-00600)
ZOOM
SIZED FOR PRINT
ZOOM
SIZED FOR PRINT
ZOOM
SIZED FOR PRINT
Page 22 of 26
2000 Toyota Celica GT -S L4-1762cc 1.8L DOHC MFI - Part 2 of 2
12/13/2001
http://www.alldatadiy.com/alldata/AFI~V1046639~C34697~R0~OD~N/0/77993956/788...
d.
Using a brass bar and a hammer, remove the 2 bearing outer races.
e.
Using a screwdriver, remove the snap ring from the transaxle
case
.
44.
REMOVE U/D BRAKE PISTON
a.
Apply compressed air (392 kPa, 4.0 kgf/cm2, 57 psi) to the transaxle
case
to remove the U/D brake piston.
ZOOM
SIZED FOR PRINT
ZOOM
SIZED FOR PRINT
ZOOM
SIZED FOR PRINT
Page 23 of 26
2000 Toyota Celica GT -S L4-1762cc 1.8L DOHC MFI - Part 2 of 2
12/13/2001
http://www.alldatadiy.com/alldata/AFI~V1046639~C34697~R0~OD~N/0/77993956/788...
b.
Remove the 2 O -rings from the U/D brake piston.
c.
Using SST, remove the needle-roller bearing from the transaxle
case
. SST 09387-00040, (09387-01020, 09387-
01030, 09387-01040)
d.
Remove the 2 oil seal rings from the transaxle
case
.
45.
REMOVE U/D CYLINDRICAL ROLLER BEARING
ZOOM
SIZED FOR PRINT
ZOOM
SIZED FOR PRINT
ZOOM
SIZED FOR PRINT
Page 24 of 26
2000 Toyota Celica GT -S L4-1762cc 1.8L DOHC MFI - Part 2 of 2
12/13/2001
http://www.alldatadiy.com/alldata/AFI~V1046639~C34697~R0~OD~N/0/77993956/788...
a.
Using SST, remove the cylindrical roller bearing from the transaxle
case
. SST 09514-35011
b.
Remove the oil seal ring from the transaxle housing.
46.
REMOVE APPLY PIPE Remove the bolt, the clamp and the apply pipe from the transaxle
case
.
ZOOM
SIZED FOR PRINT
ZOOM
SIZED FOR PRINT
ZOOM
SIZED FOR PRINT
Page 25 of 26
2000 Toyota Celica GT -S L4-1762cc 1.8L DOHC MFI - Part 2 of 2
12/13/2001
http://www.alldatadiy.com/alldata/AFI~V1046639~C34697~R0~OD~N/0/77993956/788...

47.
REMOVE OIL SEPARATOR
a.
Remove the 3 bolts and oil separator from the transaxle
case
.
ZOOM
SIZED FOR PRINT
Page 26 of 26
2000 Toyota Celica GT -S L4-1762cc 1.8L DOHC MFI - Part 2 of 2
12/13/2001
http://www.alldatadiy.com/alldata/AFI~V1046639~C34697~R0~OD~N/0/77993956/788...
Wyszukiwarka
Podobne podstrony:
ARTICLE TRANNY AUTO REASSEMBLE PART2
ARTICLE TRANNY AUTO DISASSEMBLE PART1
ARTICLE TRANNY AUTO REASSEMBLE PART1
ARTICLE TRANNY AUTO REMOVE INSTALL
ARTICLE TRANNY AUTO REASSEMBLE PART3
ARTICLE MANUAL TRANSAXLE DISASSMEBLY
ARTICLE ELECTRICAL ALTERNATOR DISASSEMBLY
ARTICLE SUSPENSION STRUT FRONT DISASSEMBLE REASSEMBLE
ARTICLE SUSPENSION STRUT REAR DISASSEMBLE REASSEMBLE
The Definite or Zero Article Exercise at Auto
więcej podobnych podstron