
Operation and maintenance manual
22
Version 1.00
2
We congratulate You on purchasing a new
alamarin-jet
water jet propulsion unit and
alamarin-jet
alamarin-jet
hope that you can enjoy it.
Alamarin-Jet Oy has developed and manufactured water jet propulsion units since 1976.
The propulsion units are used e.g. in pleasure and work boats, as well as in fast rescue
boats with a number of different engines. Thousands of users around the world rely on
the
alamarin-jet
water jet propulsion unit.
alamarin-jet
alamarin-jet
The aim of this instruction is to give important information on the operation, use and
maintenance of the unit. We recommend reading this manual carefully before the
implementation of the unit and before You set out to test Your new jet boat for the fi rst
time. This is how You get the most pleasure and benefi t out of it.
With best regards,
Alamarin-Jet Oy
Tuomisentie 16
62300 Härmä
Finland
tel. +358-10-7745 260
fax. +358-10-7745 269
www.alamarinjet.com
3
Operation and maintenance manual
Version 1.00
alamarin-jet
water jet propulsion unit
OPERATION AND MAINTENANCE MANUAL
Alamarin-Jet Oy has published this manual in order to guide the owners and users of
boats equipped with
alamarin-jet
water jet propulsion unit.
alamarin-jet
alamarin-jet
Alamarin-Jet Oy has published other manuals separately for technical designers,
mechanics and repair men.
From here on in this manual the
alamarin-jet
water jet propulsion unit will be refer-
alamarin-jet
alamarin-jet
red to as ”jet”. This term refers exlusively to a propulsion unit manufactured by Alama-
rin-Jet Oy.
The instruction covers the following jet propulsion models:
Jet-160 Jet-180 Jet-185 Jet-230 Jet-235
If the given information is type specifi c, this will be expressed in the text.
In this manual, clarifying fi gures will be used.
NOTE - the text includes a warning of a slight danger or a possibility of minor damage to
equipment
HINT - the text includes useful additional information or a hint which facilitates the work
performance or procedure
STOP!
SERIOUS DANGER - the text includes a warning of danger to life
WARNING - the text includes a warning of a danger that can lead to personal injury, breaking
down of equipment or serious malfunction of equipment
WARRANTY
GUARANTEE MATTER - the text includes a guarantee clause
The symbols used in the manual:
ARROW DESCRIBING MOTION
INDICATOR ARROW
X
PART MARKING
Operation and maintenance manual
44
Version 1.00
4
Index.... ................................................................................................................4
List of Appendixes ...............................................................................................5
Declaration of Conformity .................................................................................... 6
1. The Jet Propulsion Unit ................................................................................... 7
2. Operation .........................................................................................................8
2.1. Using for the First Time ............................................................................ 8
2.2. Steering and Controlling ........................................................................... 9
... 2.2.1. Steering ........................................................................................... 10
... 2.2.2. Controlling ....................................................................................... 10
2.3. Operating in Shallow Water ....................................................................
2.3. Operating in Shallow Water
2.3. Operating in Shallow Water
12
2.4. Operating in Reedy Water ......................................................................
2.4. Operating in Reedy Water
2.4. Operating in Reedy Water
13
2.5 Cavitation and Ventilation ....................................................................... 14
... 2.5.1. Cavitation ........................................................................................ 14
... 2.5.2. Ventilation ....................................................................................... 15
3. Functions .......................................................................................................16
3.1. Transmission .......................................................................................... 16
3.2. Bearing ................................................................................................... 17
3.3. Control System ....................................................................................... 17
... 3.3.1. Electronic Reversing Defl ector Control System .............................. 17
... 3.3.2. Hydraulic Reversing Defl ector Control System ............................... 18
3.4. Raw Water Cooling ................................................................................ 20
3.5. Corrosion Protection .............................................................................. 20
... 3.5.1. Cathodic Protection ......................................................................... 20
... 3.5.2. Painting ........................................................................................... 21
4. Maintenance ..................................................................................................21
4.1. Tools ....................................................................................................... 21
4.2. Periodical Maintenance .......................................................................... 22
... 4.2.1. Washing the Jet .............................................................................. 22
... 4.2.2 Lubricating the Bearings .................................................................. 22
... 4.2.3. Lubricating the Control System ....................................................... 23
... 4.2.4 Changing the Zinc Anodes ............................................................... 23
... 4.2.5. Adjusting the Impeller ......................................................................
4.2.5. Adjusting the Impeller
4.2.5. Adjusting the Impeller
24
... 4.2.6. Checking the Seals ......................................................................... 24
... 4.2.7. Maintenance of the Hydraulic System ............................................ 24
4.3. The Impeller ...........................................................................................
4.3. The Impeller
4.3. The Impeller
26
... 4.3.1. Removing the Impeller ....................................................................
4.3.1. Removing the Impeller
4.3.1. Removing the Impeller
28
... 4.3.2. Fitting the Impeller ..........................................................................
4.3.2. Fitting the Impeller
4.3.2. Fitting the Impeller
30

5
Operation and maintenance manual
Version 1.00
APPENDIXES
Appendix 1. Maintenance Manual ......................................................................... 32
Appendix 2. SE-01 ................................................................................................ 33
Appendix 3. SE-02 ................................................................................................ 34
Appendix 4. Exploded Views ................................................................................. 35

Operation and maintenance manual
66
Version 1.00
6
DECLARATION OF CONFORMITY
Directive 98/37/EY
Manufacturer : Alamarin-Jet Oy
Address: 62300 Härmä, Finland
Tel.: +358 10 7745260
Fax.: +358 10 7745269
Email: info@alamarin-jet.com
Guarantees that the devices:
Model:
Serial number:
are intented as a structural part or to be connected to the unit, so that they
together constitute a device intented in directive 98/37/EY and the amendments
pertaining to it.
The following harmonised standards must be observed in connection with them:
EN 12100-1 , EN 12100-2 , EN 294
In addition, we declare that the unit must not be introduced to use before the
unit for which it is intented has been brought into accordance with directive
98/37/EY and validating national regulations. This applies to the whole unit,
including the unit mentioned in this declaration.
Place: Alahärmä, Finland
Date: …………………………………………..………
Signature: …………………………………………………………………………
7
Operation and maintenance manual
Version 1.00
1. The Jet Propulsion Unit
Alamarin-jet water jet propulsion unit is a single stage axial fl ow pump, which produces
a high volume fl ow rate and thrust with high effi ciency.
The operation of the unit is based on increasing the water fl ow rate in the nozzle. The
change in the fl ow rate creates a reacting force in the direction of the fl ow, which thrusts
the boat forward. By changing the direction of the jet, it is possible to steer the boat in
the desired direction.
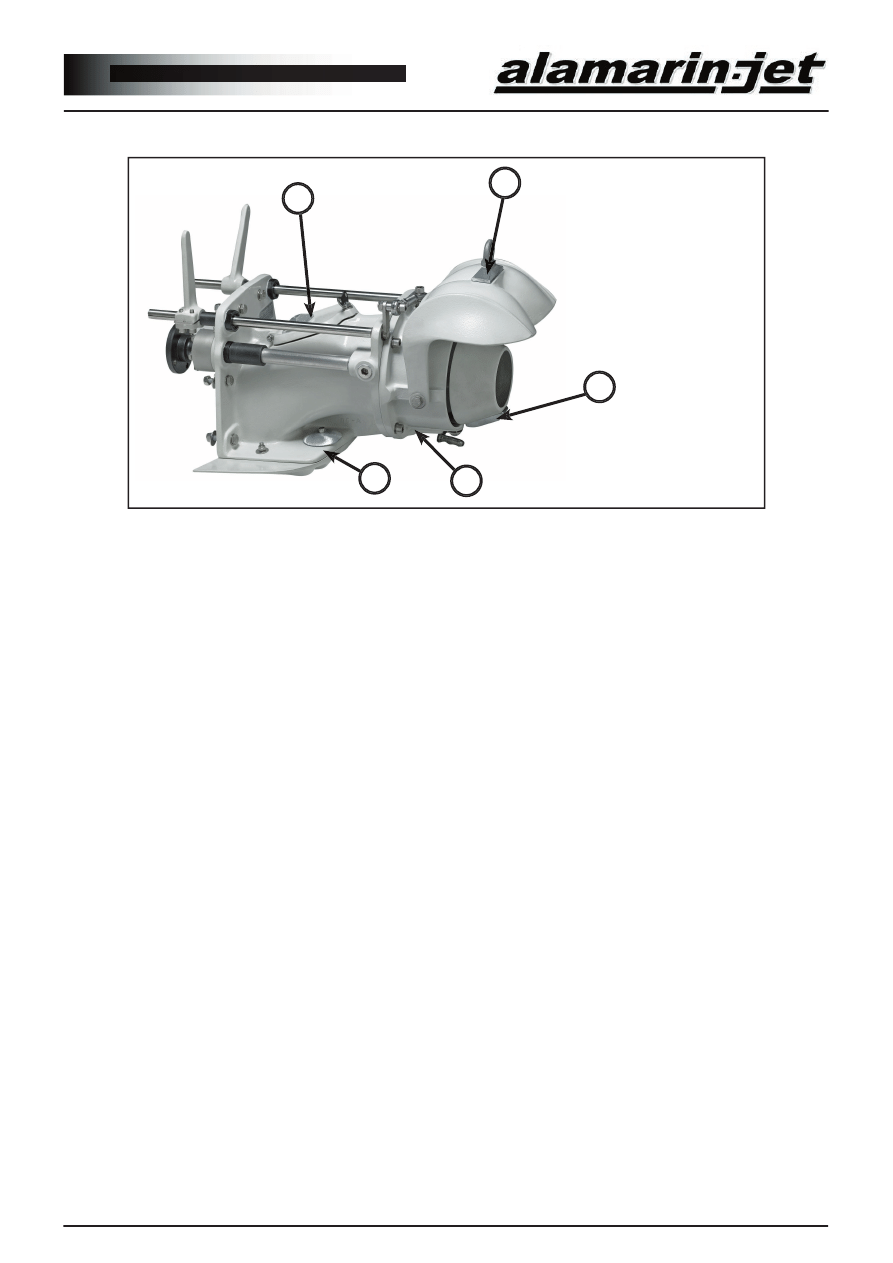
Main Parts (fi gure 1-1):
The intake duct (A), whose
function is to lead the water from
outside the boat to the intake
side of the impeller with as little
loss as possible and an even
distribution of velocity.
The impeller (B), which is
rotated by the driving motor
through direct drive, increases
the water’s fl ow rate.
The nozzle converts the pressure
energy produced by the impeller
to motion energy.
The steering device (C) is used
to change the direction of the jet
fl ow coming out of the nozzle,
which creates the force needed
for turning.
The controlling device (D)
Lowering the reversing defl ector
causes the boat to reverse. The
direction of the jet fl ow changes
obliquely forward under the
boat, which is when the thrust
is directed forward and down.
The reversing defl ector is also
used for stopping the boat. See
section: Steering and Controlling,
page 10
Figure 1-1
B
D
C

Operation and maintenance manual
88
Version 1.00
8
Before you set the boat afl oat for the fi rst time, make sure that the jet
has been installed according to the Installation Instruction.
This prevents the emergence of unexpected fault situations which can
lead to damages.
2. Operation
2.1. Using for the First Time
Starting:
In starting an engine equipped with the jet, the following things should be observed:
- The reversing defl ector control lever must be in centre position.
- The possible gear must be in ”neutral” position.
- In a system without a gear the accelerator must be in ”idle” position.
See the effect of the position of the reversing defl ector control lever on the position of
the reversing defl ector on page 11.
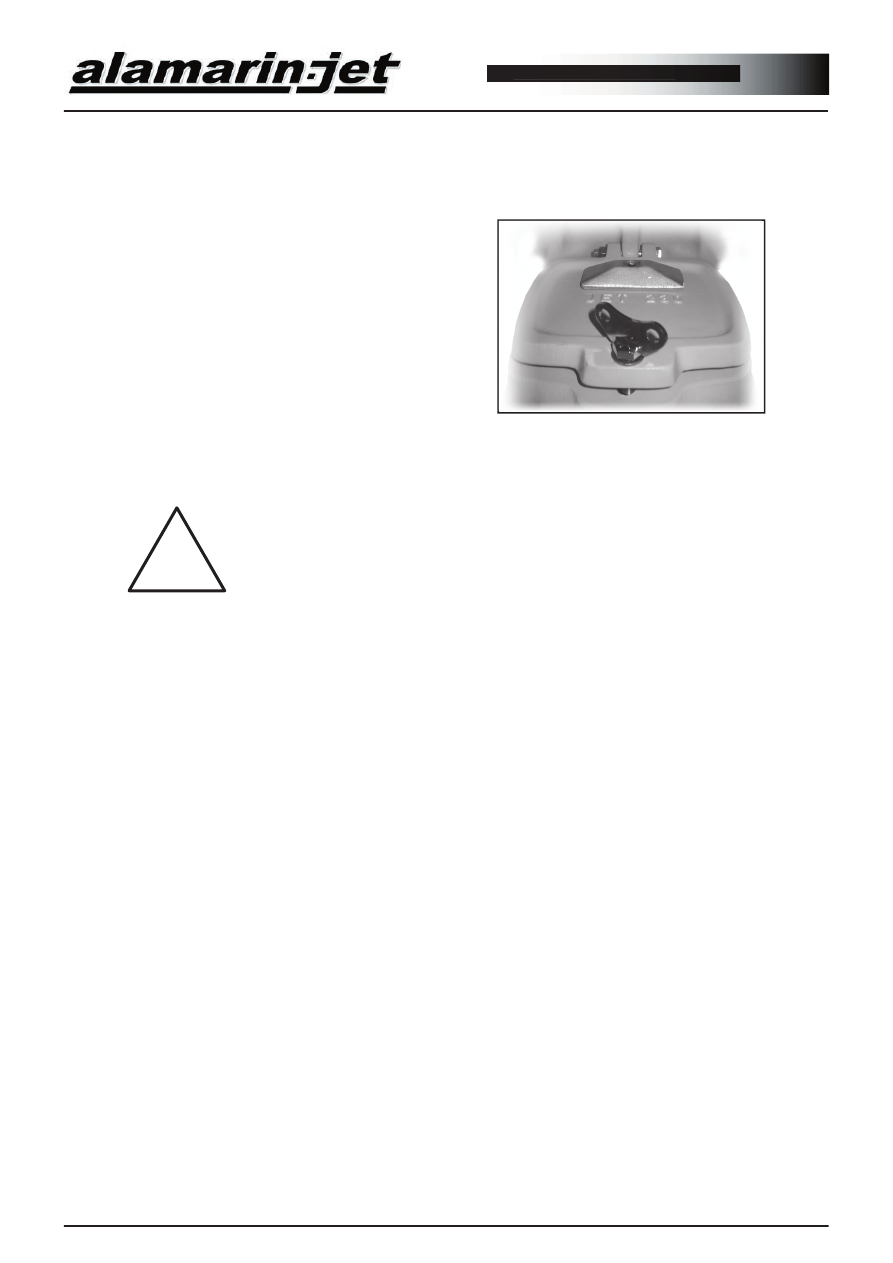
Every propulsion unit has its own
serial number. The serial number has
been marked on the type label and in
addition it has been stamped both on
the frame of the propulsion unit and on
the inspection hatch cover.
The places in which the serial number
can be found have been designated in
fi gures 1-2 and 1-3. The serial number
has also been recorded on page 6 of the
Instructions for Use and Maintenance.
Figure 1-2
Figure 1-3
9
Operation and maintenance manual
Version 1.00
When you start the engine for the fi rst time:
- It may be possible that ”clinking” is heard from the jet during the fi rst minutes. This
should usually disappear, however, when the impeller gap becomes fi t.
- The reversing defl ector’s hydraulic control system needs more oil because the hoses
and cooler are empty. The oil pump noise may be loud at fi rst, but as the system fi lls up
with oil the noise disappears. Observe the oil level in the beginning because leakages
cause environmental pollution.
- Ensure the functioning of the system carefully, at low speeds.
- Observe the engine manufacturer’s instructions on running in. The jet does not
require special running in.
WHEN THE ENGINE IS STARTED UP, THE INTERMEDIATE
SHAFT AND THE MAIN SHAFT START TO ROTATE. AT THIS
STAGE, IT IS NOT ALLOWED TO GO NEAR THE ROTATING
PARTS!
THE INSPECTION HATCH MUST BE KEPT CLOSED WHILE
THE ENGINE IS RUNNING!
2.2. Steering and Controlling
IN THIS SECTION, CONTROLLING THE jet boat IS DESCRIBED
IN A WAY THAT IT IS DONE THROUGH A SYSTEM THAT HAS
BEEN INSTALLED AS INTENTED BY THE MANUFACTURER.
Alamarin-Jet Oy IS NOT LIABLE FOR DAMAGES WHICH
DERIVE FROM INCORRECT INSTALLATION OF THE SYSTEM.
WARRANTY
Steering denotes exclusively moving the steering nozzle. Steering means changing the
boat’s bow angle.
Controlling denotes exclusively moving the reversing defl ector. Controlling means
changing the boat’s driving direction (forward - astern).
Operation and maintenance manual
1010
Version 1.00
10
Figure 2.2.1-1
2.2.1. Steering
The boat is steered by turning the steering wheel. The connection from the wheel to the
steering lever can be either mechanical or hydraulic (fi gure 2.2.1-1). The lever moves
the nozzle through the shaft and the joint.
- Steering is possible when the power of the jet fl ow is suffi cient. This is why the
engine must run on suffi ciently high revs when steering. 1200-1800 rpm is a suitable
number of revolutions, depending on the engine.
- In sharp curves, turning the nozzle causes the boat to slow down. This is normal and
increases safety.
- The turning of the nozzle from one extreme position to the other takes ~2 turns of the
wheel.
2.2.2. Controlling
Driving direction is controlled with the reversing defl ector. The reversing defl ector
is moved with the lever which is usually next to the throttle lever. With this lever, it
is possible to control the hydraulic system mechanically or the mechanical system
electrically.
In models Jet-160 and Jet-180/185 a fully mechanical system can be used, as long as it
is sturdy enough.
11
Operation and maintenance manual
Version 1.00
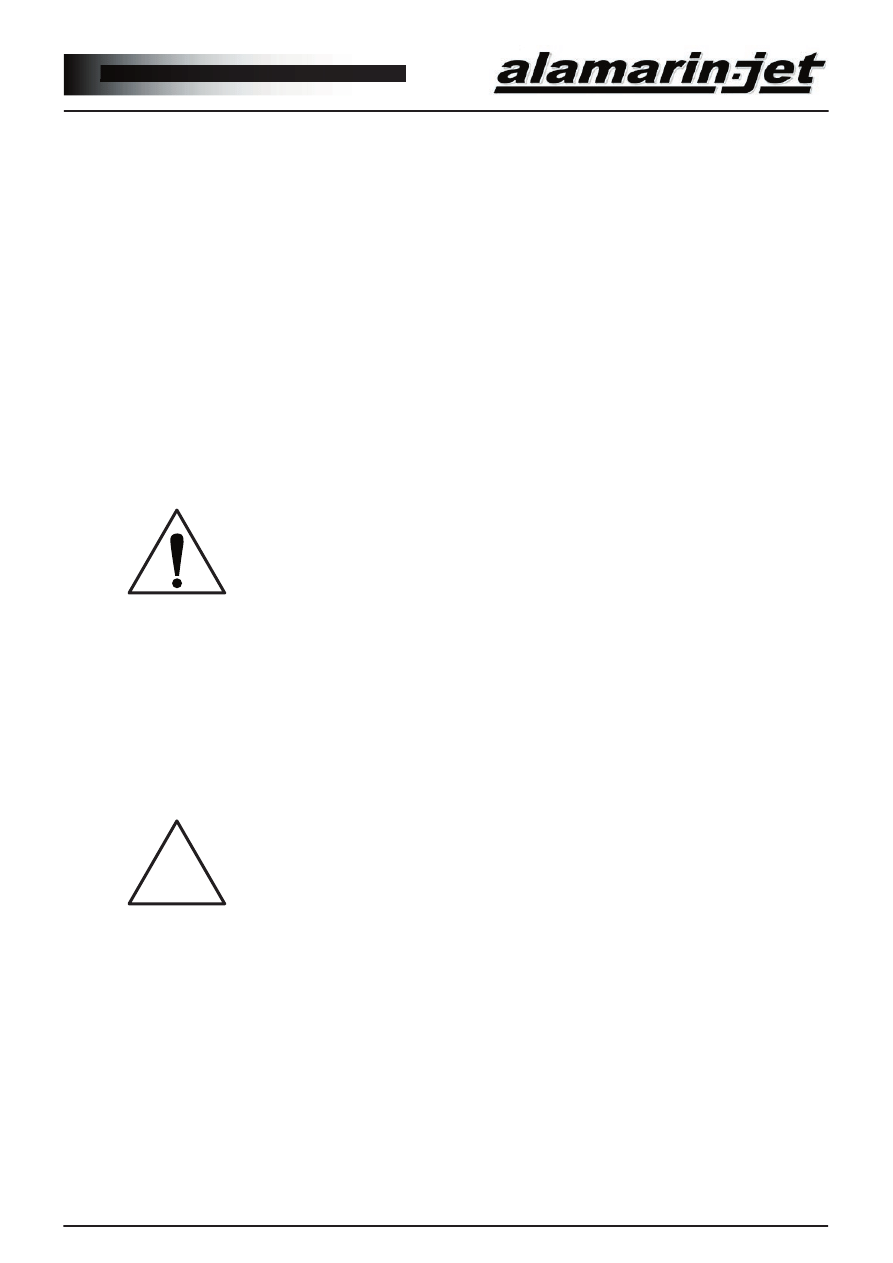
The reversing defl ector can be
lowered in front of the jet fl ow,
changing its direction forward
and down. There are two
different types of defl ectors.
The round type reversing
defl ector (fi gure 2.2.2-1) fi ts in
assemblies in which width is
critical. By using the tube type
reversing defl ector (fi gure 2.2.2-
2), a higher reversing power
is attained, but the defl ector is
wider.
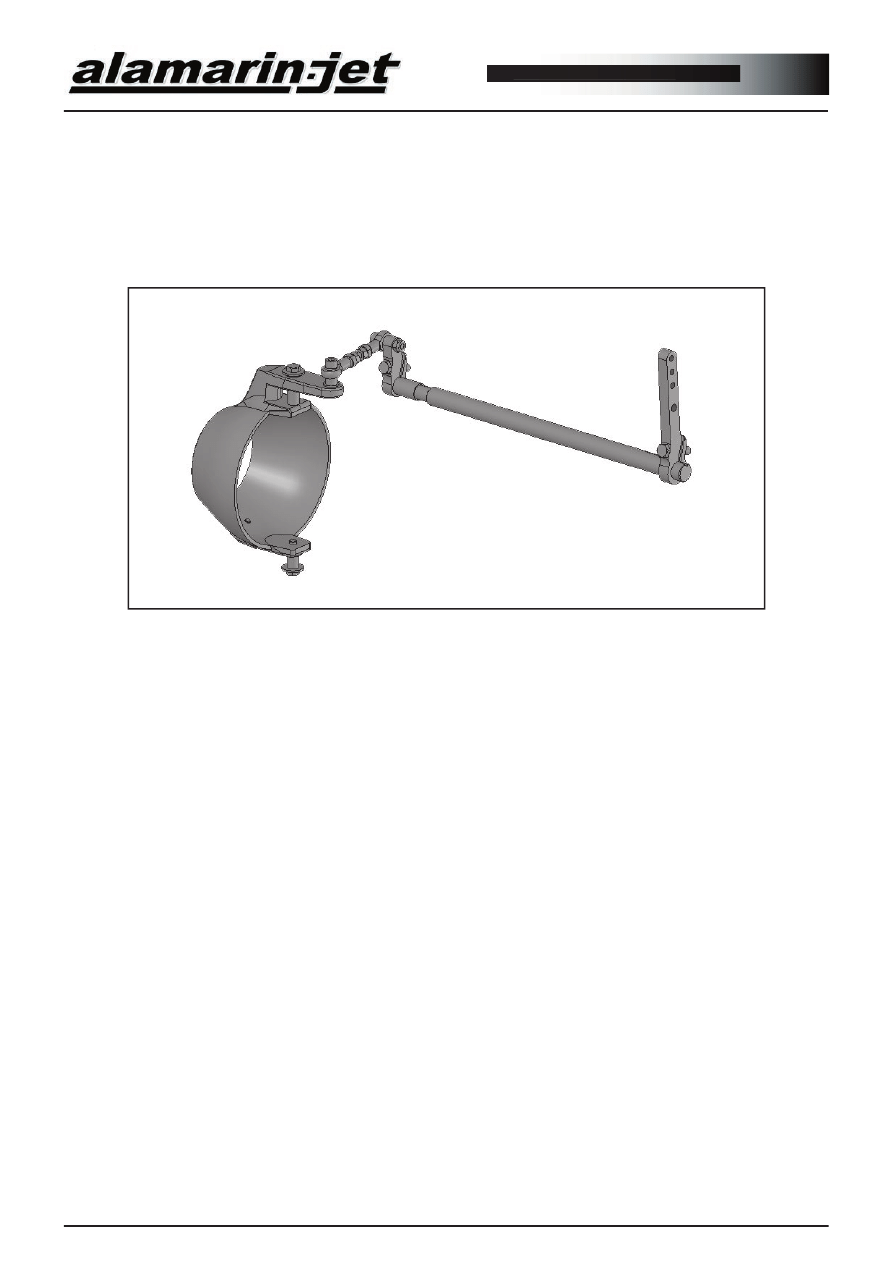
In fi gure 2.2.2-2 is shown the
Jet-230 hydraulic defl ector
control system.
For models Jet-160 and Jet-
180/185, only the round type
reversing defl ector is available.
Figure 2.2.1-1
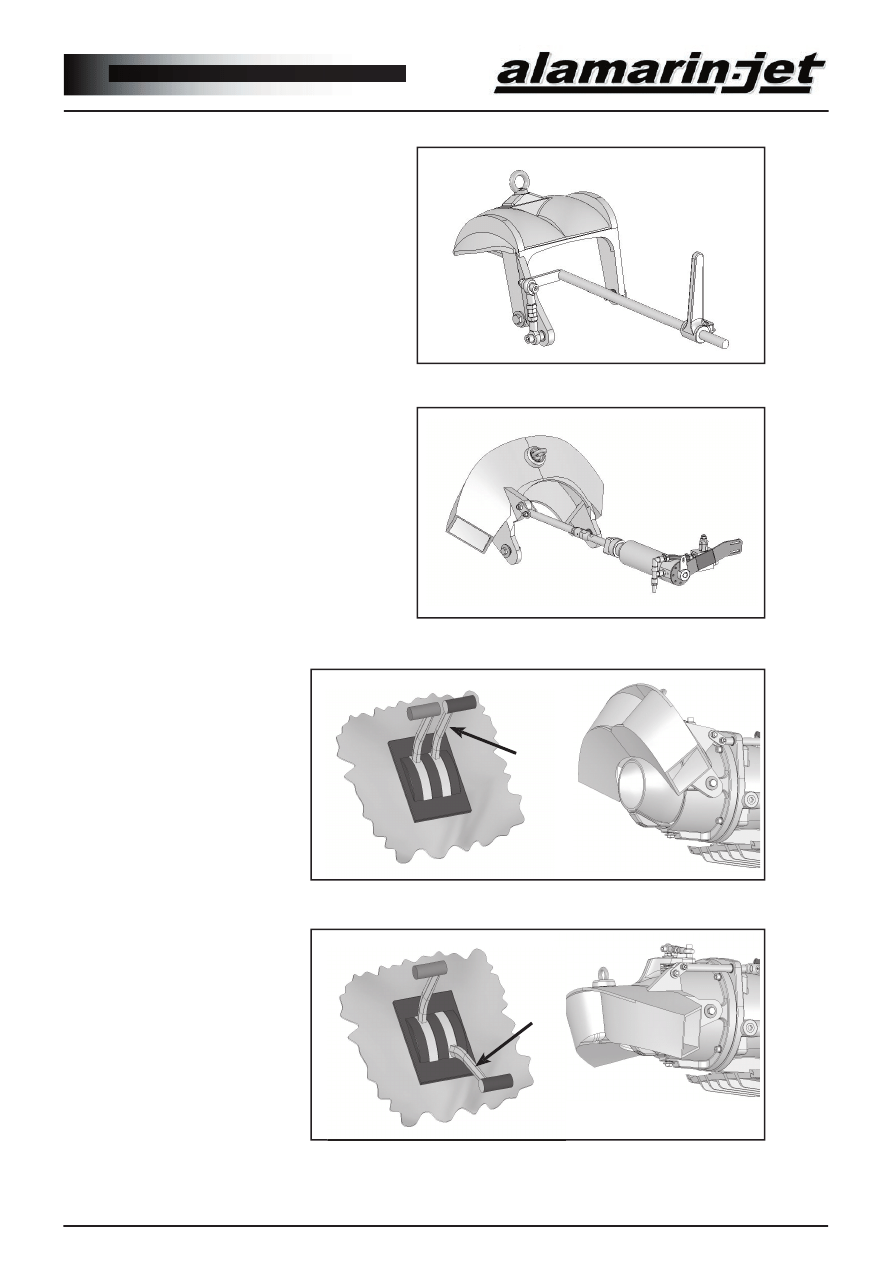
When the reversing
defl ector control lever
is in forward position,
the defl ector is not
blocking the jet fl ow
and the boat moves
forward (fi gure 2.2.2-
3).
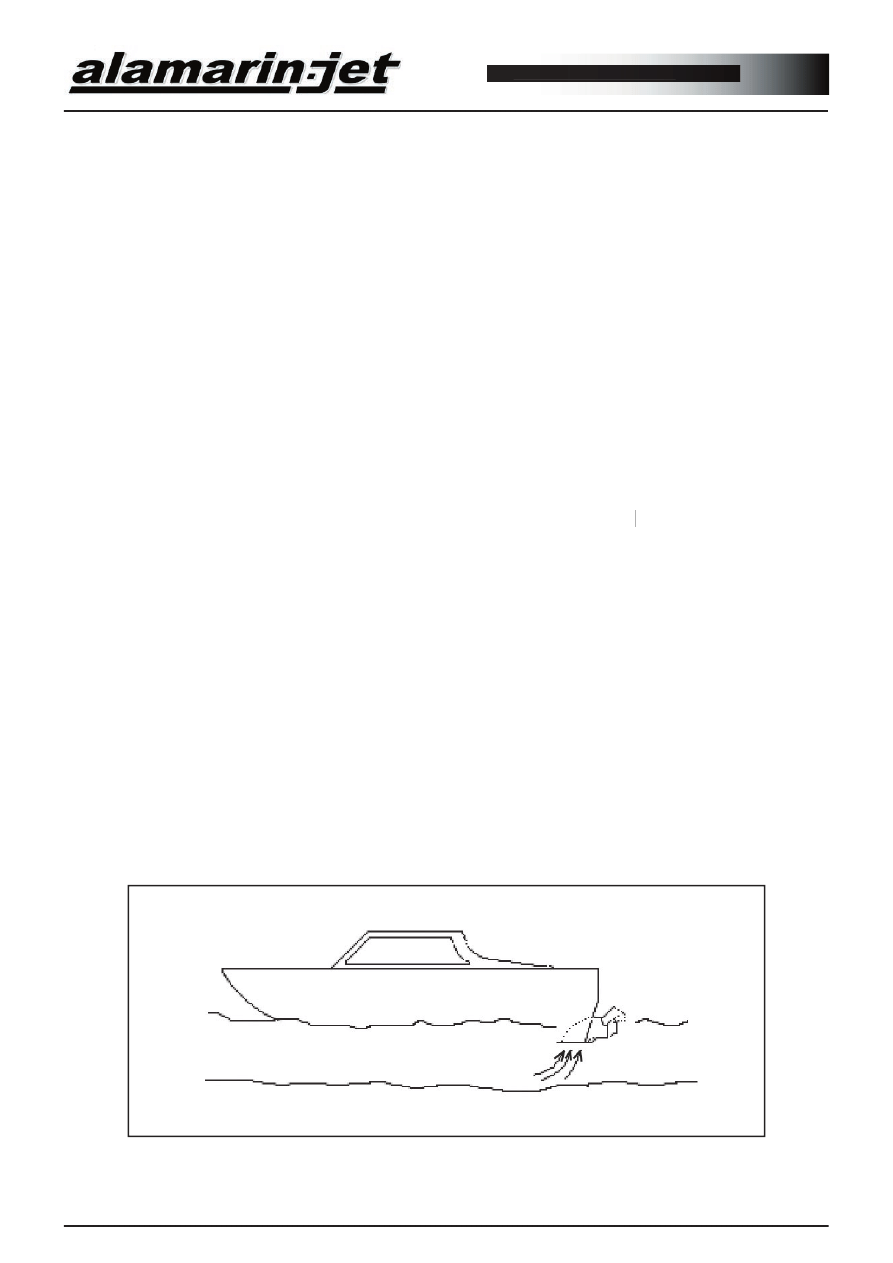
When the lever is
in the rear position
(fi gure 2.2.2-4), the
defl ector is in front of
the jet fl ow and the
boat moves astern.
Figure 2.2.2-2
Figure 2.2.2-3
Figure 2.2.2-4
Operation and maintenance manual
1212
Version 1.00
12
The centre position of the reversing defl ector corresponds to gear’s ”idle” position; even
though the drive is on, the boat stays still. The centre position is not absolute, it depends
on the power of the jet fl ow. Finding the centre position is done by testing during the
fi rst driving hours.
When moving at low speeds, the reversing defl ector is used to control the boat’s speed.
at low speeds, the reversing defl ector is used to control the boat’s speed
at low speeds, the reversing defl ector is used to control the boat’s speed
Because the engine is being run at 1200-1800 rpm to enhance steering, the boat may
travel faster than desired. In this case the defl ector is lowered in front of the jet fl ow
to reduce the thrust directed towards the driving direction. Steerability remains good
however.
At high speeds, the defl ector is not used to reduce speed. Instead, speed is controlled
with engine revolution.
It is possible to turn the boat in place when the defl ector is in centre position. When the
nozzle is turned to the desired direction, the boat rotates about its central axis.
When reversing, steering is inversed in comparison to driving forward. If you want to
When reversing, steering is inversed in comparison to driving forward
When reversing, steering is inversed in comparison to driving forward
turn the boat to the left, the wheel must be turned to the right. A good mnemonic is that
the boat’s bow always turns in the same direction as the wheel.
When fast turns are needed, the engine revolutions are not reduced, but instead the turn
is done through combined motion of the nozzle and the defl ector.
Figure 2.3-1
2.3. Operating in Shallow Water
The jet boat can be used in very shallow water, but it must be taken into account that
especially on high revolutions the suction power of the intake is high (cf. fi gure 2.3-1).
Loose objects may get sucked into the intake screen and small objects wash through the
jet. Stones may cause damage. In sandy conditions wearing inevitably takes place. The
maintenance procedures required by a worn impeller are described in the maintenance
section of this manual. See Adjusting and Fitting the Impeller, page 24.
13
Operation and maintenance manual
Version 1.00
At planing speeds, a jet boat usually crosses reed fi elds without diffi culty. In diffi cult
conditions however, clogging may be possible. In boats equipped with a gear box,
cleaning the intake duct is easy because at reverse gear, a back fl ow is created in the
duct.
2.4. Operating in Reedy Water
THE JET HAS BEEN DESIGNED TO RUN ON REVERSE GEAR
ONLY MOMENTARILY AND ON LOW REVOLUTIONS. A TOO
HEAVY LOAD ON REVERSE GEAR CAN LEAD TO JAMMING
OF THE IMPELLER OR BREAKING DOWN OF HYDRAULICS!
Figure 2.4-1
If clogging occurs on a boat that does not have a gear box, the following procedures are
recommended:
1.
Stop the engine. This causes the extraneous objects in the grass rake simply to
drop off.
2.
Let the engine run on high revolutions for a few times. This often sucks the
extraneous objects through the jet and cleans it.
3.
If the boat is moving forward, raise the boat speed as much as possible and then
shut down the engine. The speed of the boat often sweeps the grass rake clean.
4.
Drive the boat on reverse as fast as possible. As the boat moves astern, shut
down the engine and move the defl ector control lever to forward position.
This causes water to fl ow backwards through the jet and usually opens any
blockage whatsoever.
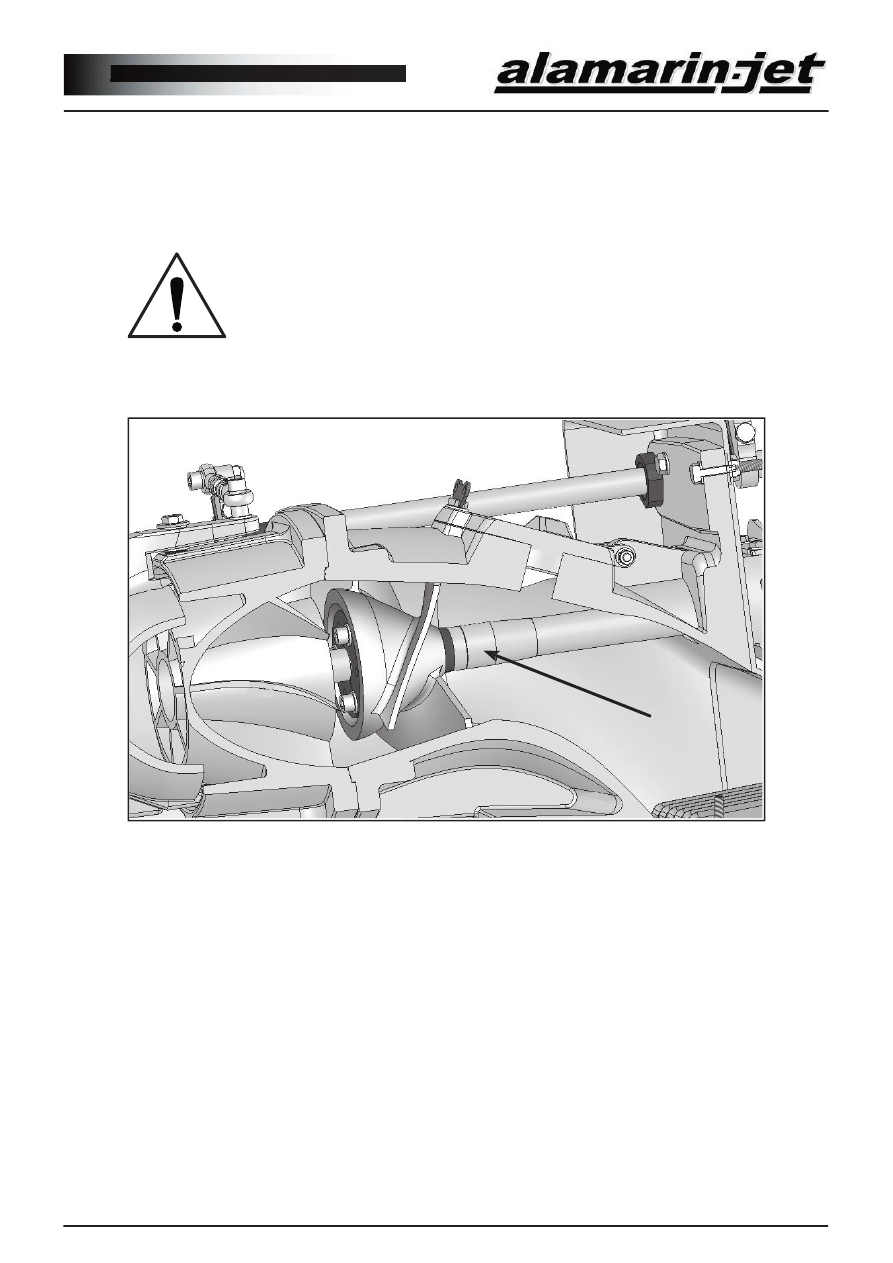
The sleeve shown in fi gure 2.4-1 on the axle has a left-handed threading. If the engine is
run at too high revolutions on reverse gear, the sleeve may loosen and the impeller may
get stuck against the duct walls.
Operation and maintenance manual
1414
Version 1.00
14
Figure 2.4-2
The most common malfunction in water jet propulsion units manifests as cavitation.
Engine overdrive and stopping of thrust are signs of this.
Cavitation is a phenomenon in which the water pressure decreases locally in such an
extent that water vaporizes on the surface of the impeller blade, creating steam bubbles.
The bubbles move on the surface of the blade and when they reach a higher pressure
area they collapse. Cavitation incurs considerable reduction in capacity and damages the
impeller.
Usually the cause is the reduction of pressure in the whole intake duct, which is induced
by a blockage.
Cavitation can often be heard as a rumbling sound.
Any factor that hinders the fl ow of water in the jet increases the chance of cavitation.
With these simple instructions it is
possible practically without exception
to clean the jet even after the boat has
stopped completely in reedy water.
Unlike with other propulsions, in boats
equipped with the jet the engine stops
very rarely as a result of a reed blockage.
If the measures mentioned above are
not of help, the propulsion is equipped
with an inspection hatch (fi gure 2.4-2),
through which the blockage can be seen
and removed.
Remember to close the hatch! The wing screw is tightened by hand!
2.5. Cavitation and Ventilation
2.5.1. Cavitation
15
Operation and maintenance manual
Version 1.00
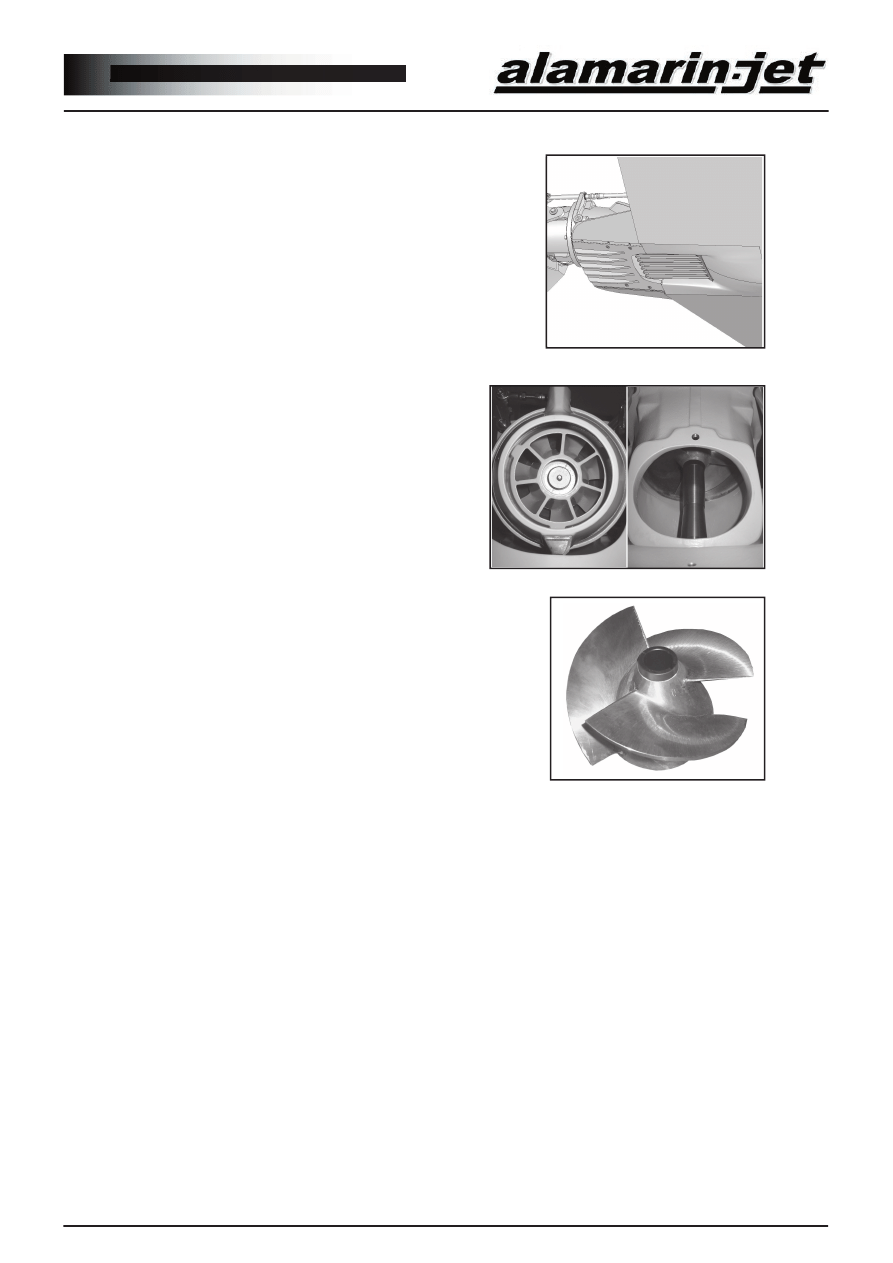
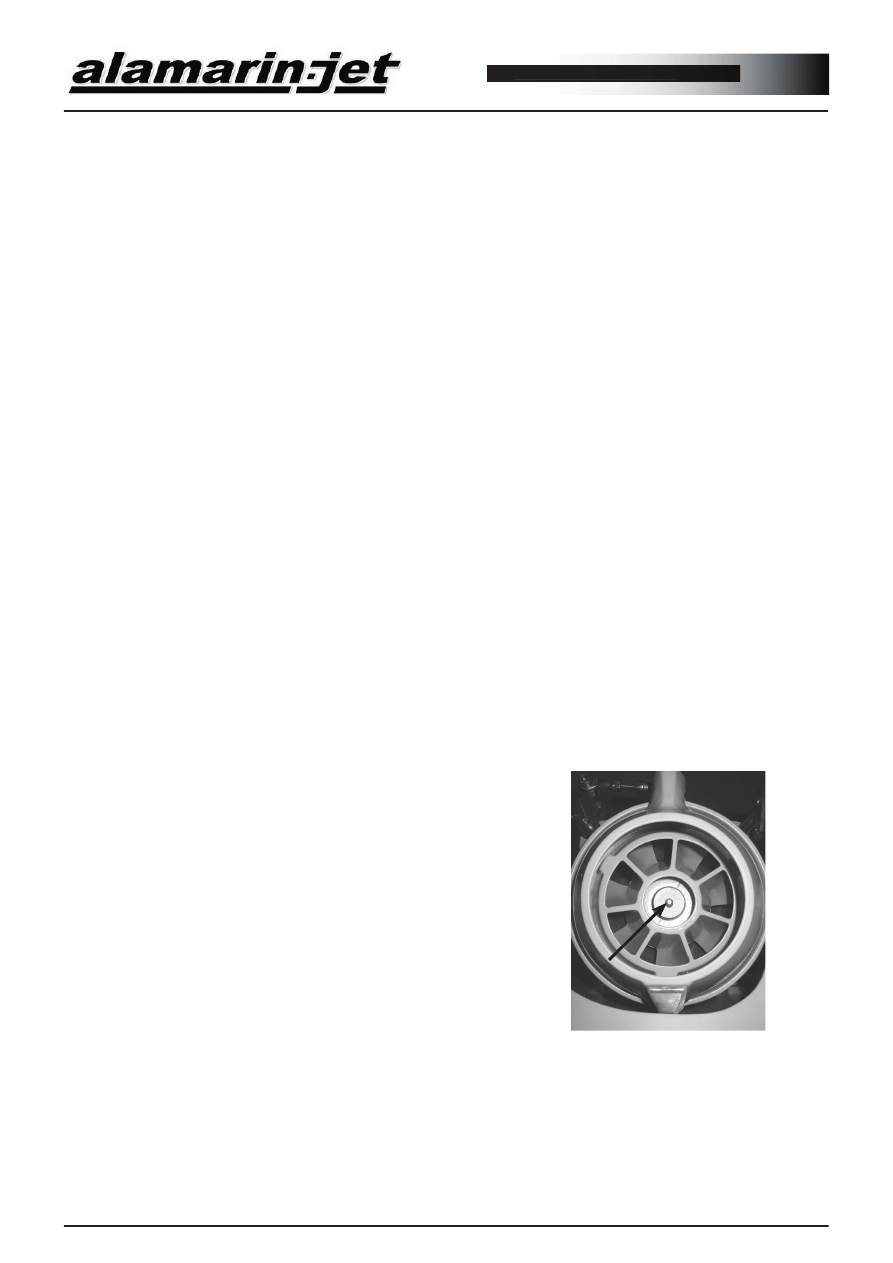
If cavitation is apparent, the following things
should be checked.
Check through the inspection hatch that:
1. The grass rake (fi gure 2.5.1-1) is not
clogged (by grass, reed, plastic, stones etc.).
2. There are no extraneous objects in the stator
or nozzle unit or the impeller (fi gure 2.5.1-2)
(rope, reed entagled in the drive shaft, stones
in the outlet port)
3. The impeller (fi gure 2.5.1-3) is not
damaged. It should be smooth and it should
not have any sharp cuts.
If the boat runs slowly even though the engine
runs on high revolutions, fi nd out the cause.
Ventilation produces similar symptoms as cavitation but is caused by different reasons.
Ventilation is created when air gets to drift into the intake duct. The air causes the
impeller to lose grip and the thrust weakens. Ventilation can be heard as a similar sound
as cavitation.
Ventilation can be caused e.g. by the following things:
- The inspection hatch cover is open or a seal is damaged.
- The installation height of the jet is wrong, air is allowed to pass along the surface of
the cavitation plate into the intake duct.
- During installation, places accordant with the instructions have not been sealed.
Figure 2.5.1-1
Figure 2.5.1-2
Figure 2.5.1-3
2.5.2. Ventilation
Operation and maintenance manual
1616
Version 1.00
16
3. Functions
3.1. Transmission
The jet takes its propulsion power from a petrol or a diesel engine. The most common
way to transmit the power is through a 1:1 gear box, but direct drive is also possible
and functional. The greatest benefi ts of a gear box are a real neutral gear and an intake
duct backfl ush.
In the direct drive or so-called bobtail installation it is commendable to use a fl ywheel
adapter provided by the engine manufacturer. It protects the fl ywheel from mechanical
damages and e.g. corrosion.
The auxiliary shaft which is connected between the jet and the engine usually depends
auxiliary shaft
auxiliary shaft
on the boat manufacturer. If necessary, the jet manufacturer supplies the auxiliary shaft
with the propulsion unit. It is also possible to get instructions and recommendations
from the manufacturer on which auxiliary shaft to use. In the end, the shaft
manufacturer gives instructions on the installation and maintenance of the shaft. Below
is a list of example shafts which have been used with the jet.
1. Constant speed shaft
- Joint structure based on balls rolling on a spherical surface.
2. Cardan shaft
- Joint structure based on pivoted grids.
3. Silent block shaft
- Joint structure based on an elastic rubber element
THE AUXILIARY SHAFT MUST ABSOLUTELY BE OF
HIGH ENOUGH QUALITY AND PROPERLY BALANCED. A
POOR SHAFT CAN CAUSE EXCESSIVE DAMAGE TO THE
PROPULSION UNIT.
THE ALIGNMENT OF THE AUXILIARY SHAFT MUST BE KEPT
ACCURATE. IT MUST BE CHECKED AT LEAST ONCE EVERY
DRIVING SEASON (YEAR).
17
Operation and maintenance manual
Version 1.00
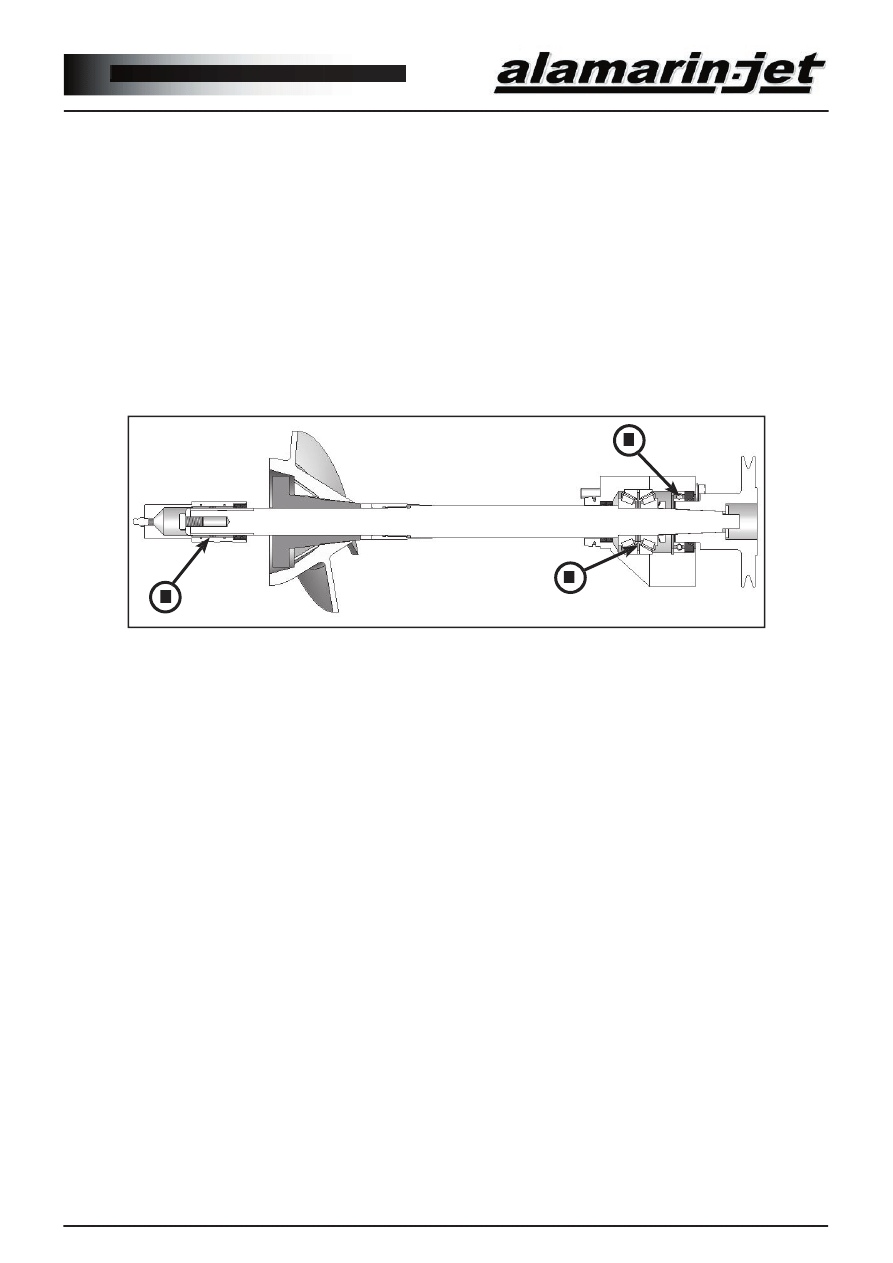
The jet’s bearing is very simple (fi gure 3.2-1). There are bearings at both ends of the
direct shaft. The structure of the front bearing (A) is receptive to axial pressure. In
addition, at the front end there is the supporting bearing (B) of the coupling fl ange and
the auxiliary shaft.
Rolling type bearing is used at the front end and slide bearings are used at the rear (C).
Both bearings are stock grease lubricated. It is possible to install a water lubricated
bearing at the rear end.
Figure 3.2-1
3.3. Control System
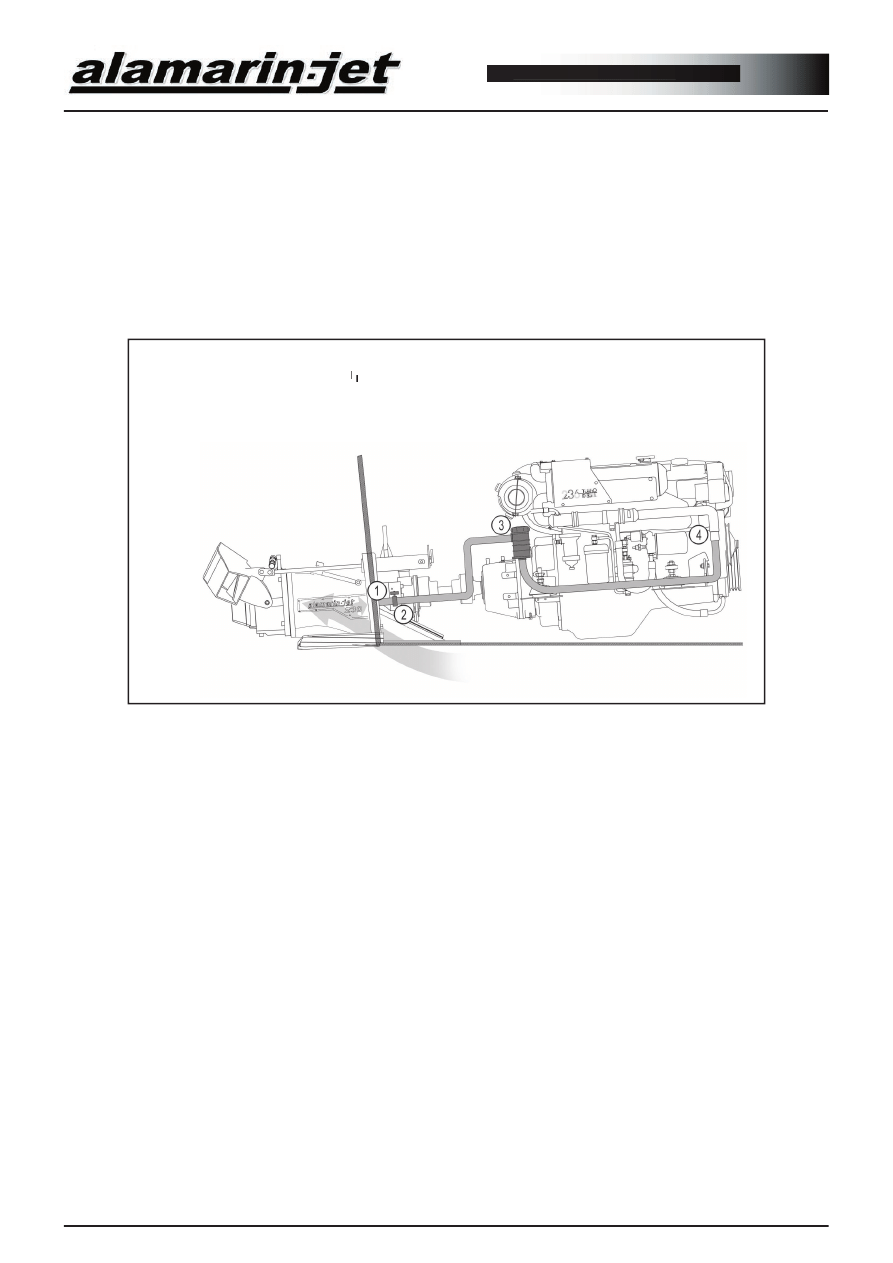
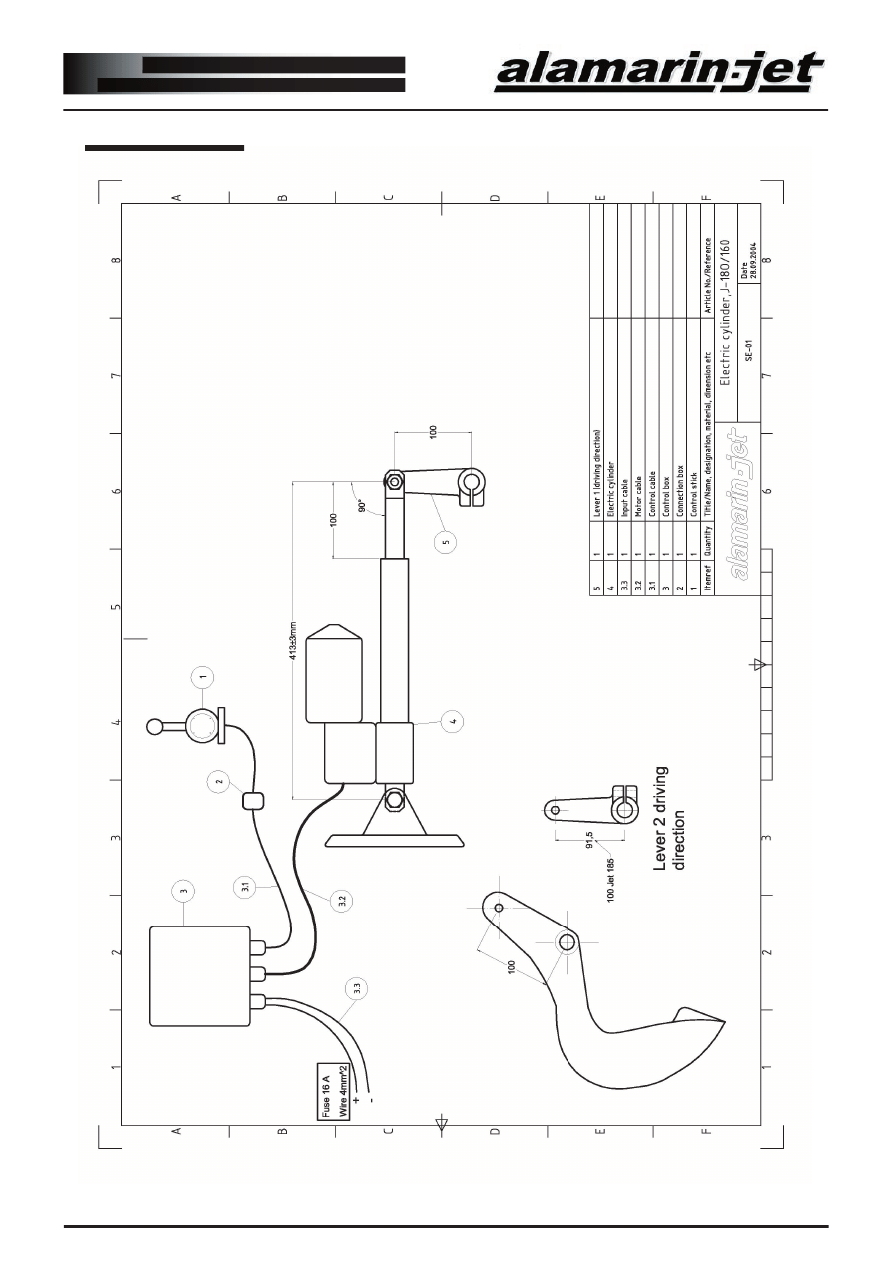
The system is available for models Jet-160, Jet-180 and Jet-185.
The main components that the system consists of are #1 a control lever (potentiometer),
#3 an electronics unit and #4 a spindle motor. See fi gure SE-01 in Appendixes.
The electronics unit changes the position of the lever into a signal to to the spindle
motor.
The repair and adjustment instructions for the system can be found in Repair Manual 1.
3.3.1. Electronic Reversing Defl ector Control System
3.2. Bearing
Operation and maintenance manual
1818
Version 1.00
18
Figure 3.3.2-1
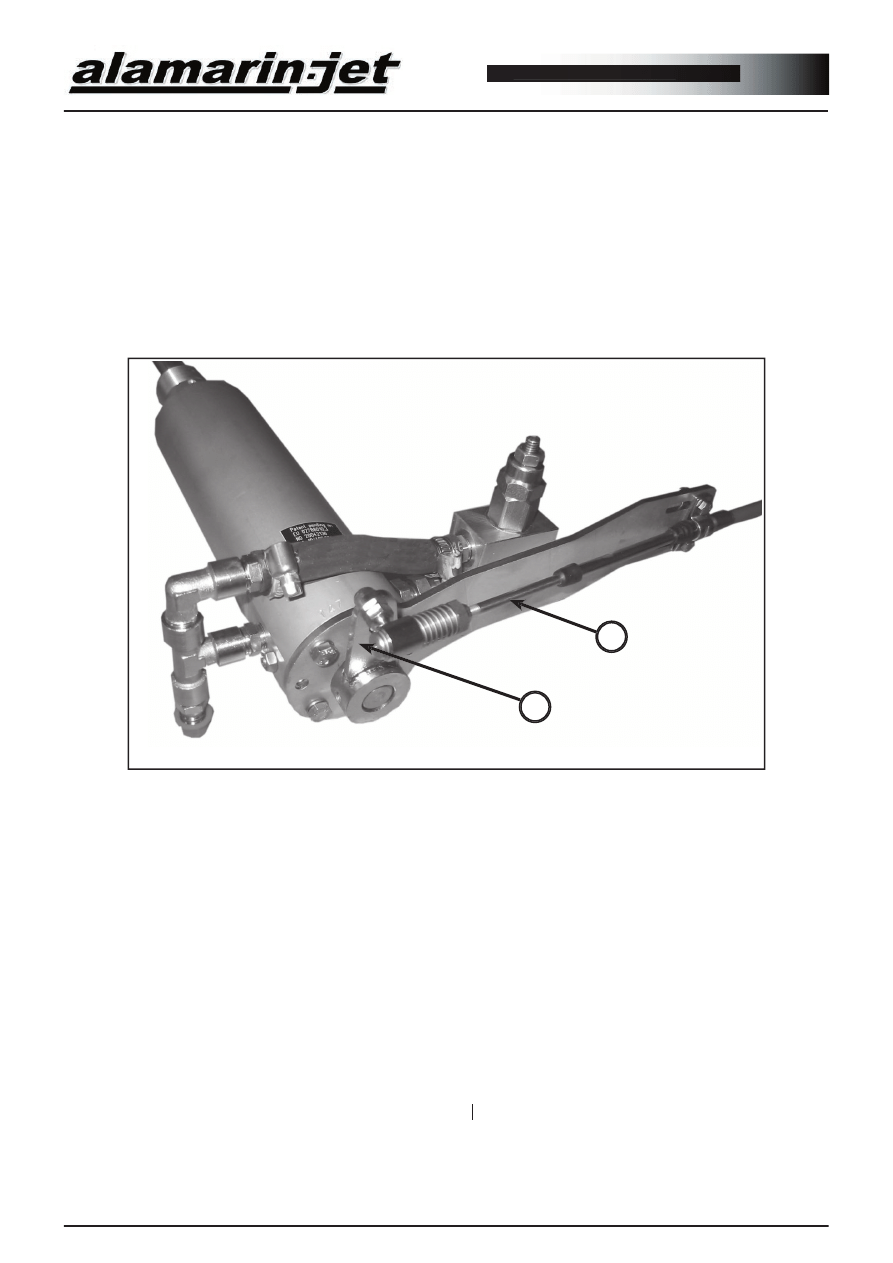
3.3.2. Hydraulic Reversing Defl ector Control System
The system is available for models Jet-230 and Jet-235. It includes a patented rotary
valve which simplifi es the system considerably.
The reversing defl ector is controlled (cf. fi gure 3.3.2-1) mechanically with a cable (A)
which operates the valve regulator (B).
A
B
The cylinder gets its power from the oil pump which has been integrated in the
propulsion unit.
In a stock delivery, the system does not include a control lever or a cable, so their type
varies depending on the boat manufacturer. However, the different types of systems
have the following things in common:
- The operation of the defl ector must be separate from the throttle and the gear.
- The stroke length of the cylinder is always the same.
- The incoming direction of the cable can be chosen freely.
The oil circulating in the system must be cooled in order to prevent excessive heating.
oil circulating in the system must be cooled
oil circulating in the system must be cooled
This is done with a separate heat exchanger or a possible cooler in the engine.
.
19
Operation and maintenance manual
Version 1.00
IF THE OIL IN THE SYSTEM IS NOT COOLED, THE
MANUFACTURER IS NOT RESPONSIBLE FOR POSSIBLE
DAMAGES WHICH DERIVE DIRECTLY OR INDIRECTLY FROM
THE OIL OVERHEATING!
An extra cooler must be installed in the following cases:
An extra cooler
An extra cooler
1. If there is no cooler in the engine.
2. If the cooler in the engine is reserved, e.g. for cooling the transmission oil.
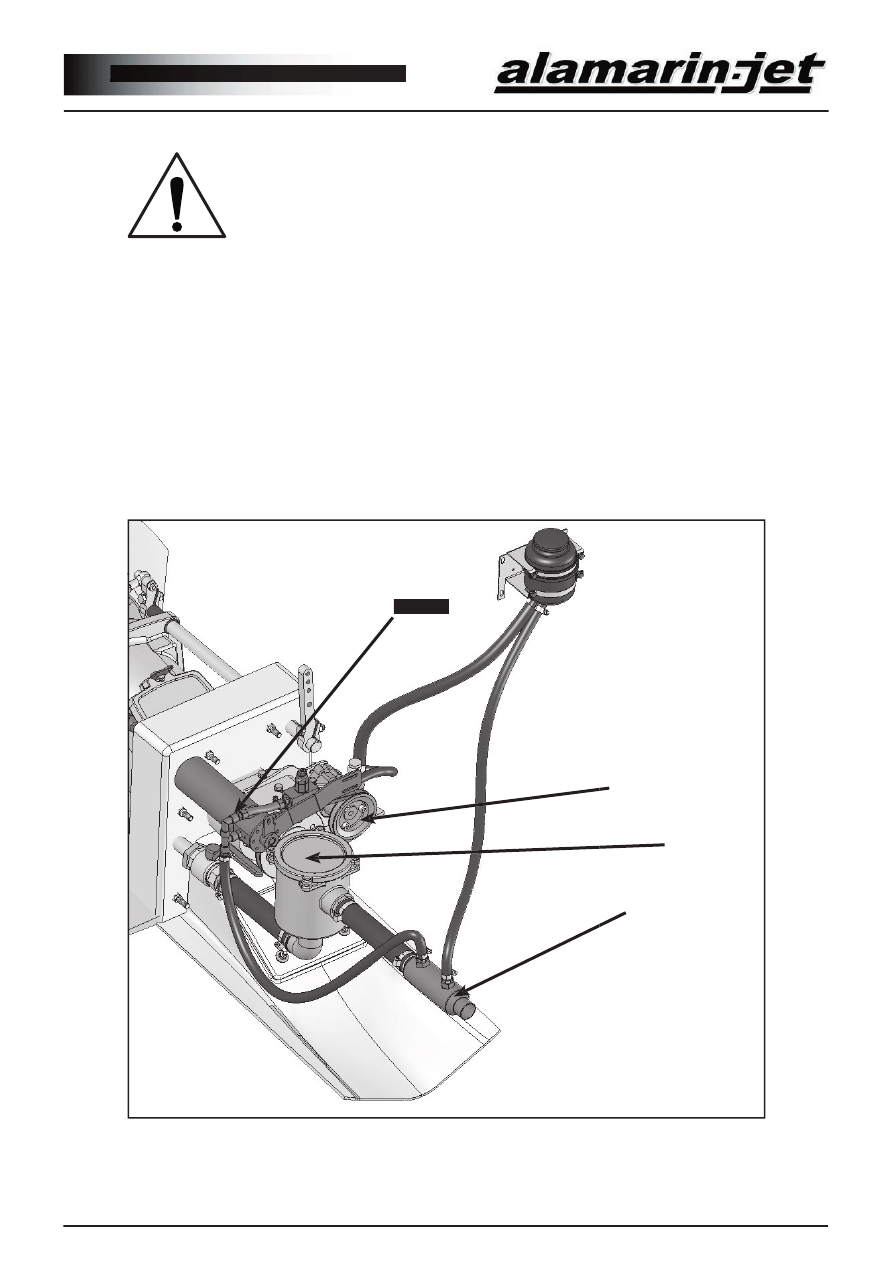
In the fi gure below 3.3.2-2 is a system in which the cooling water comes from the jet
(see next chapter). The system can consist of different looking components depending
on the boat manufacturer. What is essential is the correct order of the components.
Notice especially the cooler’s place after the fi lter. A system equipped with a separate
raw water intake pump has the same main components.
Figure 3.3.2-2
Pump
Filter
Cooler
Operation and maintenance manual
2020
Version 1.00
20
Figure 3.4-1
3.4. Raw Water Cooling
The jet comes complete with the possibility to connect the engine cooling water (cf.
Figure 3.4-1). The engine does not need a separate water pump. However, if the cooling
water is taken with a separate pump, the jet’s raw water line is stoppered.
At the beginning of the line, there must be a tap with which the line can be shut
temporarily for example during cleaning of the fi lter or other maintenance.
1. Raw water connector (G 3/
33 4//”)
2. Tap
3. Filter
4. Raw water intake
3.5. Corrosion Protection
The raw materials used for manufacturing the jet parts are mainly aluminum, acid-proof
steel, and plastic.
Materials that have different electrochemical properties can form a so-called galvanic
couple while they are in electrolytic fl uid (salt water). A galvanic couple forms an
electric circuit, because the materials have different inherent voltages. This in turn leads
to electron movement and corrosion of the weaker material. Cathodic protection is used
to try and prevent the propagation of galvanic corrosion. Cathodic protection means
introducing into the same circuit a third material, the electrochemical properties of
which are weaker.
3.5.1. Cathodic Protection
The jet is protected from galvanic corrosion with passive cathodic protection. Every
critical aluminum casting has its own zinc anode. In fi gure 3.5-1 are shown the places of
the anodes.
21
Operation and maintenance manual
Version 1.00
The aluminum castings have also been protected by painting. Painting effi ciently
prevents the propagation of various forms of corrosion e.g. pit corrosion.
Bare aluminum is liable to corrosion in diffi cult conditions. This is why it is important
to carry out touch-up painting if paint comes loose and aluminum is exposed. Touch-
up painting can be done in various ways. What is important is that the paints used are
suitable for aluminum and that the paint manufacturer’s instructions are followed during
painting.
1. Inspection hatch cover
2. Reversing defl ector
3. Steering nozzle
4. Stator
5. Frame (2 pcs)
1
2
3
4
5
3.5.2. Painting
Figure 3.5-1
4. Maintenance
4.1. Tools
- Wrench
10 mm
- Wrench
13 mm
- Wrench
17 mm
- Allen wrench
5 mm
- Allen wrench
6 mm
- Allen wrench
8 mm
- Knife
- Universal pliers
The following items are included in the tool kit delivered with the propulsion unit if or-
dered separately:
Most of the maintenance and repair procedures can be carried out with these tools.
Operation and maintenance manual
2222
Version 1.00
22
4.2.1. Washing the Jet
4.2. Periodical Maintenance
The jet is designed and manufactured to be as simple as possible. This is why the need
for maintenance is low and maintenance can be carried out on shore.
Every time the boat is lifted out of the water, it is advisable to wash it with fresh
water. This clears possible salt accruals and impurities, which leads to the reduction of
corrosive effect due to conditions.
4.2.2 Lubricating the Bearings
4.2.2.1. Lubricating the Front Bearing
The lubrication of the front bearing is carried out from the engine compartment side.
To facilitate greasing, there is a hose with a grease nipple at one end connected to the
bearing housing. The end of the hose can be attached in the loose space so that using the
grease gun is easy.
Excess grease exits the bearing housing automatically. When lubricating, only add 4-5
injections of grease with the grease gun.
4.2.2.2. Lubricating the Rear Bearing
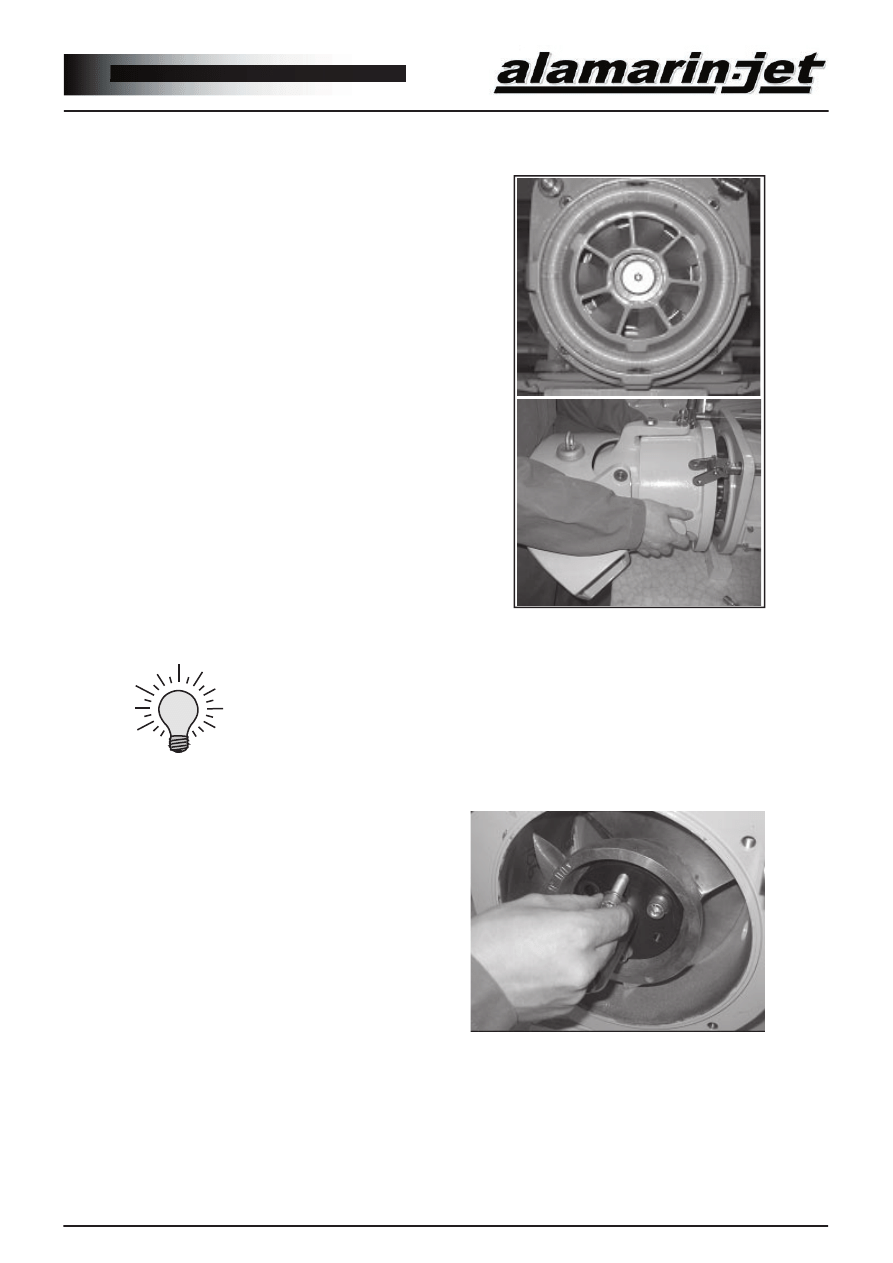
It is easiest to carry out the lubrication of the rear
bearing when the boat is out of the water, but it
can also be done while the boat is in the water. The
lubrication is carried out through the steering nozzle
from the nipple in the middle of the stator (fi gure
4.2.2.2-1).
Excess grease exits the bearing housing
automatically. When lubricating, only add 2-3
injections of grease with the grease gun.
The rear end bearing supports the shaft and centers it
in respect of the duct. This is why excessive wearing
of the bearing affects the behaviour of the impeller.
When the bearing has been worn enough, excess
vibration builds up in the unit and “clinking” can
be heard from the impeller. In this case the impeller
wears also and its effi ciency is reduced.
A worn bearing should be replaced with a new one
when the aforementioned symptoms appear.
Figure 4.2.2.2-1
23
Operation and maintenance manual
Version 1.00
4.2.3. Lubricating the Control System
Technical specifi cations for the
lubricant greases:
- lithium soap and a thickener with EP
additives
- mineral oil as a base oil
- NLGI class 2
- operating temperature range –
25…130˚C
- continuous operating temp. min. 75˚C
Example greases:
- Würth Multi-Purpose Grease
III
- FAG Multi2
- FAG Load 220
- Mobil XHP 222
- Neste Allrex EP2
- Shell Retinax Grease EP2
- Würth Multi-Purpose Grease
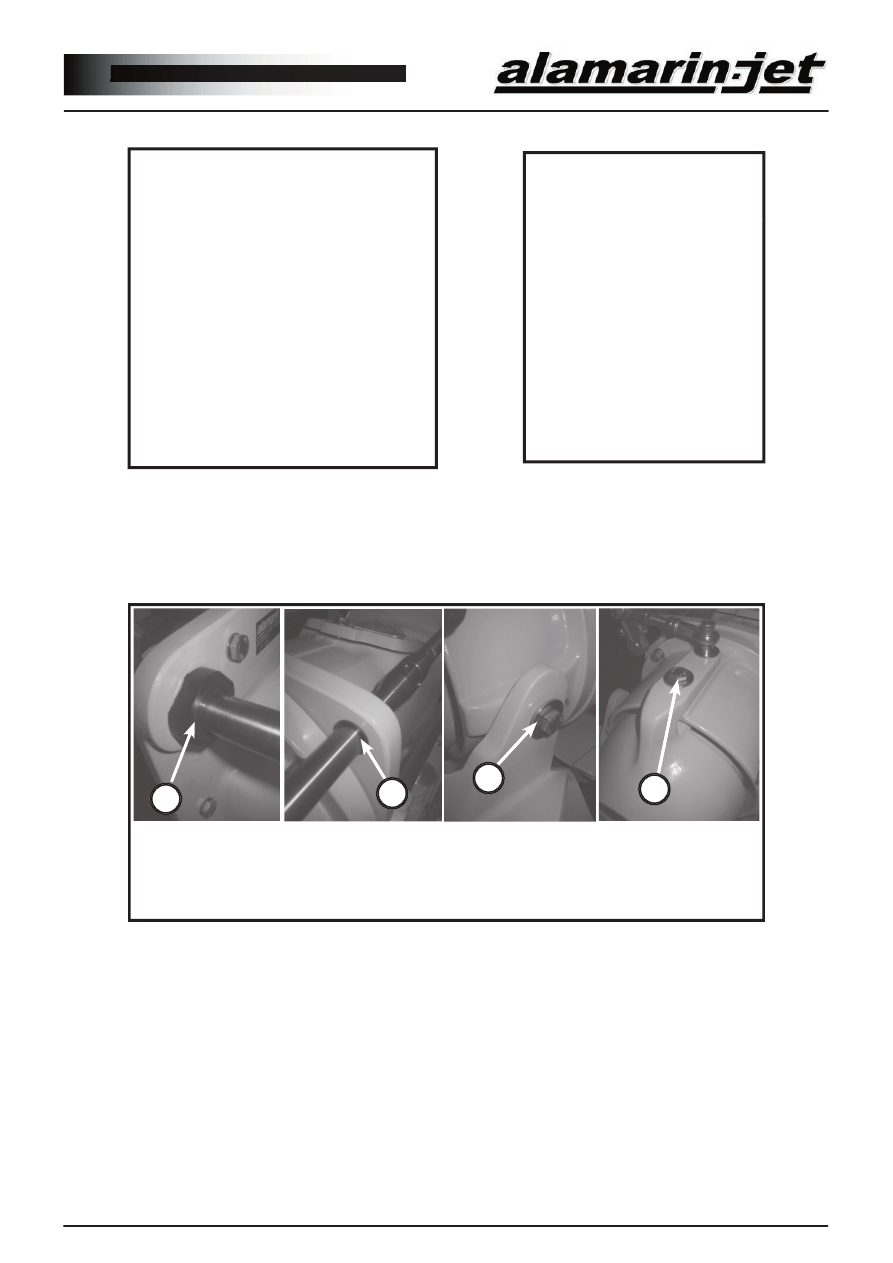
The joints and shaft bushings that belong to the control systems are essentially
maintenance-free, but lubrication prolongs their operating life. Below (fi gure 4.2.3-1) is
a list of objects, in which water-proof vaseline is added in connection with maintenance.
When the plastic bearings of the joints wear and gaps are created, they must be replaced.
1. Shaft bushing in the stern
3. Pivoting of the reversing defl ector
on both sides of the stator
2. Shaft bushings in the rear fl ange
4. Pivoting of the nozzle on both
sides of the stator
1
2
3
4
4.2.4 Changing the Zinc Anodes
Figure 4.2.3-1
The jet is protected with passive cathodic protection. The functioning of the zinc anodes
is crucial from the point of view of corrosion. The zinc anodes must be changed when
they have worn down to half of their original size. Every aluminum component has been
protected separately with a zinc anode. The places of the anodes are described in chapter
3.5.1.
Operation and maintenance manual
2424
Version 1.00
24
4.2.5. Adjusting the Impeller
Depending on driving conditions, the impeller wears, and a gap develops between
the duct wall and the tip of the blade. When it expands enough, the jet’s performance
decreases. By adjusting the impeller, the operating life can be prolonged considerably
The adjustment of the impeller should be done whenever it is necessary, but checking
must be done at least once a year.
Adjusting the impeller is done by removing the impeller and reinstalling it. See next
chapter.
Figure 4.2.6-1
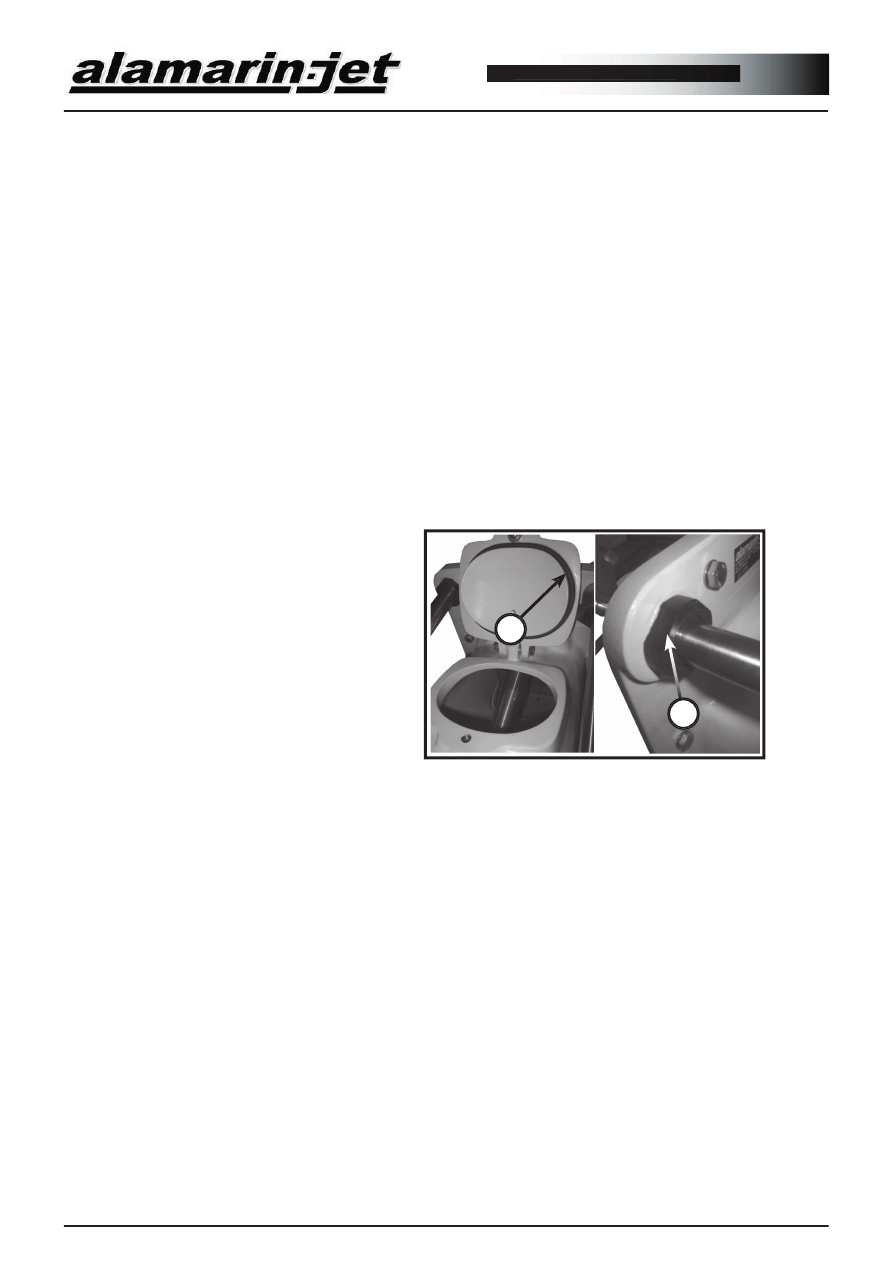
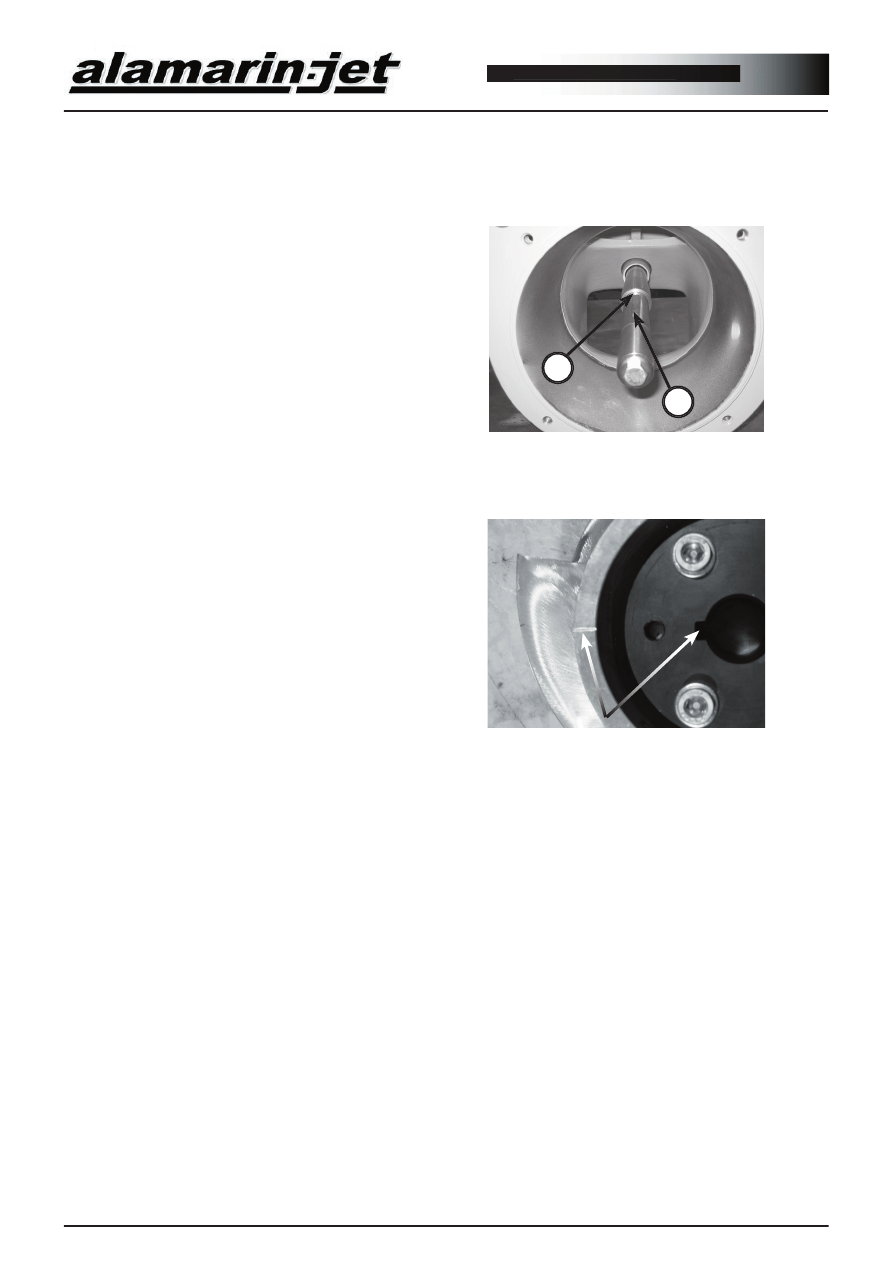
4.2.6. Checking the Seals
The seals to be checked are
e.g. the O-ring seal of the
inspection hatch (A) and the
sealings of the steering shaft
bushings (B) (fi gures on the
side). When the inspection
hatch seal leaks, it causes
ventilation and the sealings
of the steering shaft bushings
cause water to leak in the bilge.
If water gathers in the bilge,
the cause for this must be
determined immediately and
the possible leak must be
repaired. Water can damage
e.g. the starter motor.
A
B
4.2.7. Maintenance of the Hydraulic System
The reversing defl ector hydraulic control system requires maintenance as follows:
- checking the oil level
- checking the condition of the V-belt and replacing it if necessary
- checking the condition of the hoses and replacing them if necessary
25
Operation and maintenance manual
Version 1.00
The Maintenance and Repair Table gives detailed instructions for checking different
targets.
Service and Maintenance Chart
daily
weekly
montly
every 6 months yearly
Hydraulic reverse bucket operating system
hydraulic oil amount
X
possible leaks (hoses, couplings)
X
cable fastening
X
test run and accuracy of reverse bucket
movement
X
tightness of v-belt
X
condition of spare v-belt
X
general technical condition
X
Engine raw water cooling system
if cooling water from jet
possible leaks (hoses, couplings)
X
function of valve (if mounted)
X
possible blocks in system
X
Reverse bucket
zinc anode (1 pcs)
X
tightness of bolts
X
paint
X
general technical condition
X
Frame of the jet
zinc anodes (2 pcs)
X
tightness of bolts
X
paint
X
general technical condition
X
cavitation plate’s technical condition and paint
X
Stator
zinc anode (1 pcs)
X
tightness of bolts
X
paint
X
no blocks in stator intakes
X
condition of intakes
X
general technical condition
X
Steering nozzle and steering system
zinc anode (1 pcs)
X
function of steering nozzle and steering system
X
tightness of bolts
X
technical condition of control shaft and levers
X
steering nozzle paint
X
general technical condition
X
Operation and maintenance manual
2626
Version 1.00
26
All maintenance that has been done to the propulsion unit can be entered in the
Maintenance Manual. The Maintenance Manual is Appendix 1.
4.3. The Impeller
The impeller usually wears on the outer edge of the blades. It operates in a cone-shaped
space and its position can be adjusted in the direction of the shaft in accordance with the
blade wear.
The gap between the outer edge of the blades and the cone should be as small as
possible to achieve best effi ciency. (Factory installation gap 0.2 mm).
The longitudinal position of the impeller in the duct reveals its power demand. The
deeper the impeller sits, the less power it takes from the engine, because the diameter
of the impeller is smaller. The pitch and the length and number of blades naturally also
affect the power demand.
daily
weekly
montly
every 6 months yearly
Jet inlet duct
cleaness of inlet surfaces
x
(no marine growth etc.)
Front bearing
Lubrication
x
x
tightness of bolts
x
general technical condition of bearing
x
End bearing
Lubrication
x
x
general technical condition of bearing
x
Impeller
allowance of impeller
x
technial condition of impeller blades
x
tightness of adjuster sleeve
x
tightness of bolts
x
technical condition of impeller mounting cone
x
technical condition of impeller housing
x
Main shaft
general technical condition
x
condition of shaft sleeve (part no 23028)
x
technical condition of jet fl ange
x
tightness of intermediate shaft fastening bolts
x
x
27
Operation and maintenance manual
Version 1.00
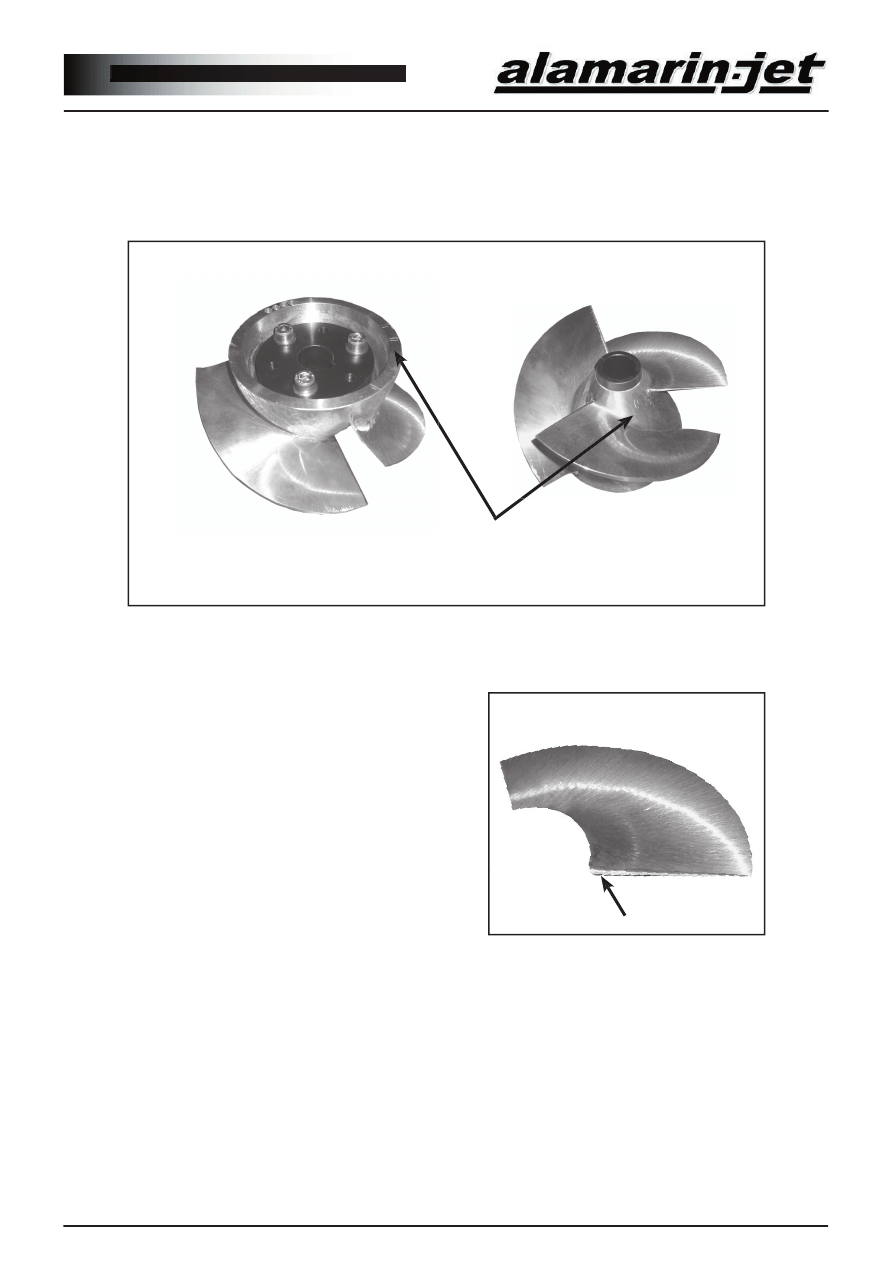
Figure 4.3-1
The size marking of the impeller can be found both at the front and rear end (fi gure 4.3-
1). It can be seen through the inspection hatch and by removing the stator.
Marking showing the
size of the impeller
The condition of the front edge of the
impeller blades is important. A damaged
front edge causes cavitation.
The front edge can be repaired by
carefully hammering the marks caused
by bigger stones and grinding them
smooth. The front edge must not be
sharpened, it must be left about 2mm
thick and rounded
r = 2 mm.
Figure 4.3-2
You can also return the impeller to the factory for checking and repairing.
If you suspect that there is a malfunction in the impeller, do as follows:
1. Shut down the engine and open the inspection hatch.
2. Check that nothing is blocking the intake duct.
3. Check the impeller visually. Notice especially the gap between the outer
edge of the blade and the duct wall.
r
Operation and maintenance manual
2828
Version 1.00
28
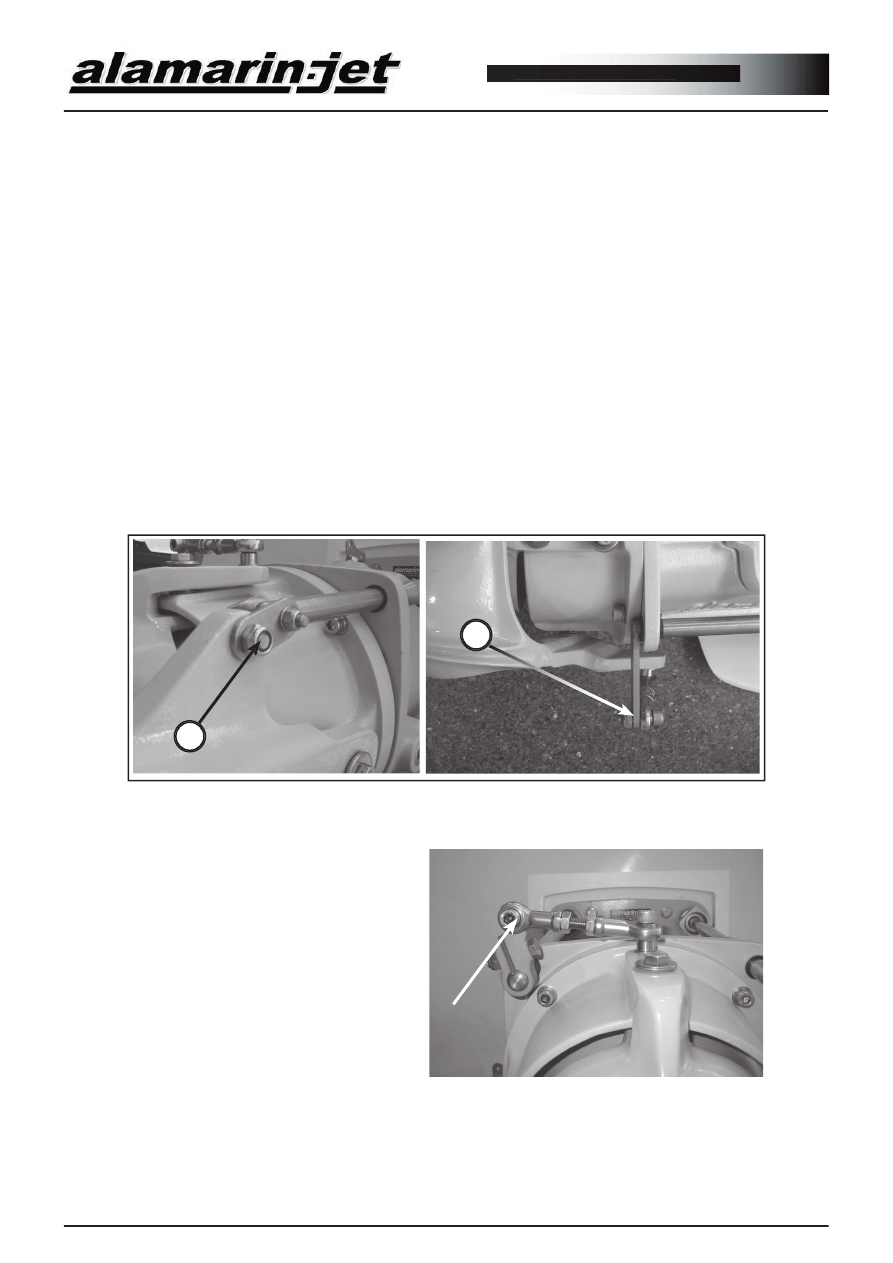
1. Remove the joint between the reversing defl ector and the hydraulic cylinder by
opening the bolt marked by the arrow (A) (Jet-230). In models that do not have a
hydraulic reversing defl ector control, the loop joint (B) which connects the reversing
defl ector and the steering shaft, is removed.
4. If there is no apparent fault, the boat must be lifted out of the water for closer
inspection.
5. Remove the impeller. See section Removing the Impeller below.
6. Check the impeller more closely. You can always ask the importer or manufacturer
for instructions.
4.3.1. Removing the Impeller
Figure 4.3.1-1
A
B
2. Remove the joint between
the steering nozzle and the
steering shaft (fi gure 4.3.1-2).
Figure 4.3.1-2
29
Operation and maintenance manual
Version 1.00
3. Open the fastening bolts (4 pcs) of the
stator. After this, the stator, the defl ector
and the nozzle come off as a whole. (In
fi gure 4.3.1-3 the reversing defl ector has
been removed for clarity).
The fi tting of the stator and the hull of the propulsion unit with
each other is tight. You can help the detachment by cranking with a
screwdriver.
Figure 4.3.1-4
4. Loosen the impeller’s fastening bolts
(fi gure 4.3.1-4) and completely remove
one of them. Screw it in the adjacent
threaded hole in line with the wedge
groove and tighten carefully. The plastic
fastening cone is released and the
impeller can be pulled off the shaft.
If the fi tting is very tight, multiple bolts
are used as help.
Figure 4.3.1-3
Operation and maintenance manual
3030
Version 1.00
30
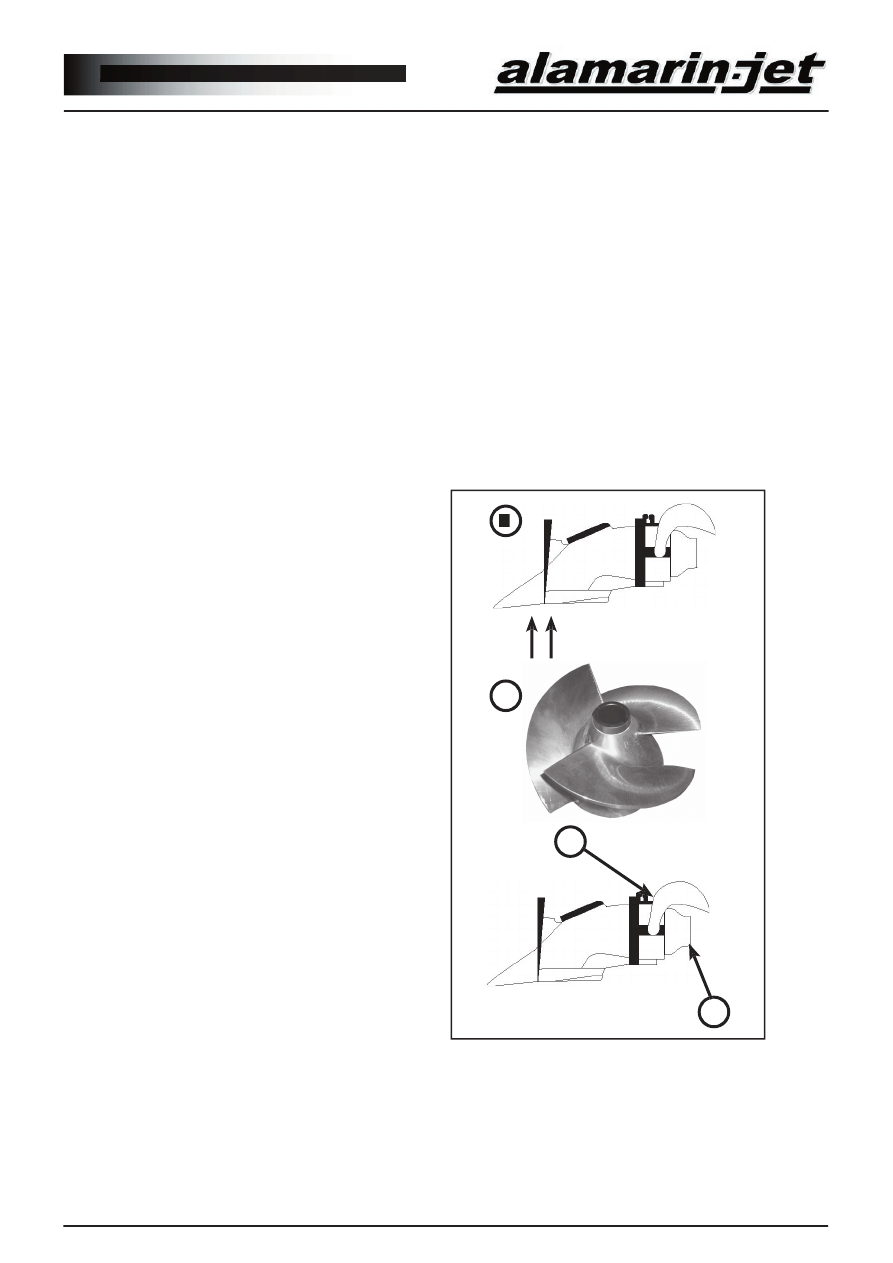
4.3.2. Fitting the Impeller
1. Screw the adjuster sleeve (A) and the
possible additional ring on the shaft.
The sleeve has a left-handed threading.
Set the wedge (B) in the groove
reserved for it.
A
B
2. The place of the fastening cone
wedge groove is marked on the impeller
with a line. Set the cone so that the
wedge groove is aligned with the line as
in fi gure 4.3.2-2.
Figure 4.3.2-1
Figure 4.3.2-2
31
Operation and maintenance manual
Version 1.00
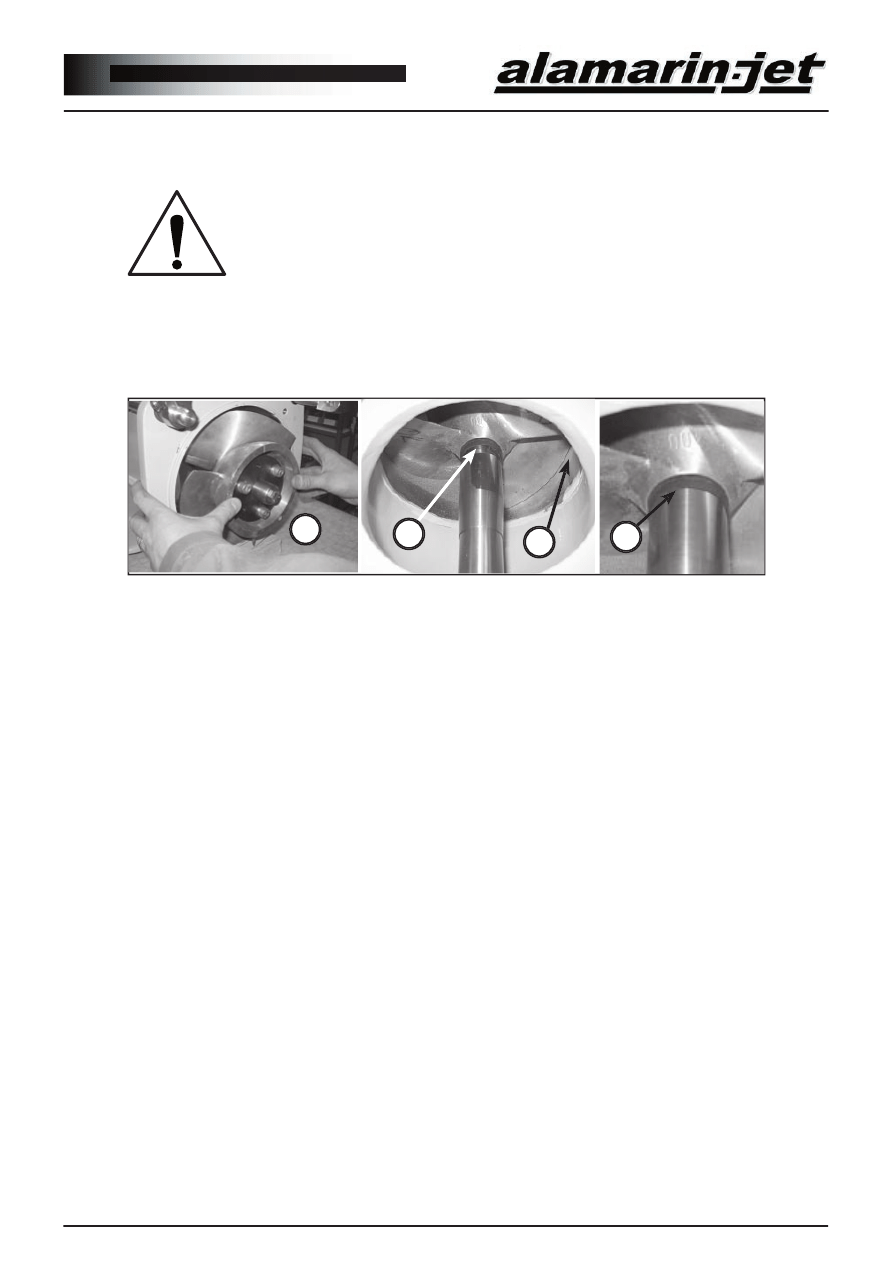
3. Place the impeller on the shaft along with the cone. Tighten the screws fi nger tight.
4. Push the impeller as far in the intake duct as it goes (B).
BE CAREFUL NOT TO LEAVE YOUR FINGERS BETWEEN
THE IMPELLER AND THE CONE! Use the working position (A)
shown in fi gure 4.3.2-1!
Tighten the screws to a torque of 20 Nm.
Screw the adjuster sleeve through the inspection hatch so that it sits tightly against the
impeller’s plastic cone. If the adjusting sleeve is left loose (B), the impeller gets stuck in
the duct cone. Reference C shows a correctly tightened sleeve.
There can be a gap of 0.2 mm between the impeller blade and the cone (D). During
installation, the lower edge lies on the cone and there can be a slightly bigger gap at
the upper part of the impeller due to the weight of the impeller and the axle. This gap
disappears when the stator fi nally centers the shaft.
Too wide a gap between the cone and the impeller blade leads to loss of power.
If the impeller does not rotate properly after the installation, open the impeller screws,
pull it slightly outwards, and tighten the screws.
5. Close the inspection hatch.
6. Install the reversing defl ector, the steering nozzle and the stator in place as a whole in
a reverse order than when removing. The tightening torque for M10 bolts is 50Nm and
80Nm for M12 bolts.
B
C
A
Figure 4.3.2-1
D
APPENDIXES - Operation and
32
maintenance manual
Version 1.00
32
Appendix 1: MAINTENANCE MANUAL
MAINTENANCE LOG
Commissioning
Made by:
Date:
Service
Commissioning
Made by:
Date:
Service
Commissioning
Made by:
Date:
Service
Commissioning
Made by:
Date:
Service
Commissioning
Made by:
Date:
Service
Commissioning
Made by:
Date:
Service
32
32
Version 1.00
33
APPENDIXES - Operation and
maintenance manual
Appendix 2: SE-01
APPENDIXES - Operation and
34
maintenance manual
Version 1.00
34
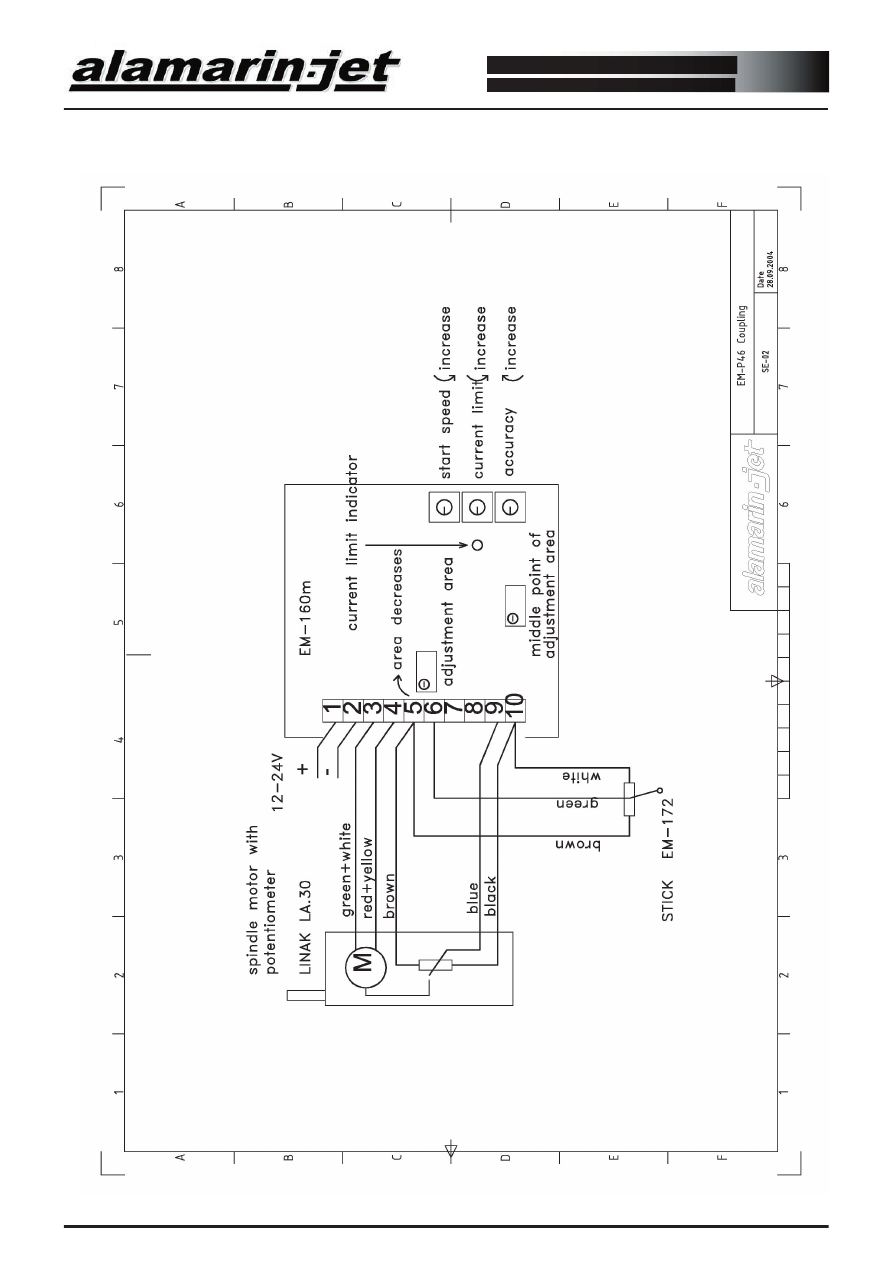
Appendix 3: SE-02
34
34
Version 1.00
35
APPENDIXES - Operation and
maintenance manual
Appendix 4: Exploded Views
When delivering this manual in paper form, the manufacturer has added to the following
pages the exploded views of the propulsion unit model with which the manual is
delivered. In the electronic version the exploded views as a separate fi le.
Document Outline
- Operation and maintenance manual.pdf
- Operation and maintenance manual_Ver_1.pdf
Wyszukiwarka
Podobne podstrony:
5 Operation and maintenance manual Alamarin jet Ver 1
4 Steyr Operation and Maintenance Manual 8th edition Feb 08
4 Steyr Operation and Maintenance Manual 8th edition Feb 08
7 K4 FM operation maintenance manual
COMBAT AND OPERATIONAL STRESS CONTROL MANUAL FOR LEADERS AND SOLDIERS
Glow Worm installation and service manual Hideaway 70CF UIS
Glow Worm installation and service manual Ultimate 50CF UIS
Glow Worm installation and service manual Ultimate 60CF UIS
Glow Worm installation and service manual Glow micron 60
Optibelt Instalation and maintenance
Model Loading and stability manual
Glow Worm installation and service manual Glow micron 40
Glow Worm installation and service manual Hideaway 80BF UIS
Glow Worm installation and service manual Hideaway 50CF
Glow Worm installation and service manual Energy Saver 60 UI
Operation And Function Light Anti Armor Weapons M72 And M136 (2)
Glow Worm installation and service manual Hideaway 120BF UIS
więcej podobnych podstron