publishers of Step by Step Wire Jewelry magazine . . . join the online beading community at www.BeadingDaily.com
In Step by Step Wire Jewelry’s Spring 2008
issue, you learned how to make the Ring-a-
ding swirly ring. In part two, learn how to
make the basic plain ring. It’s a stunning ring
on its own, without the extra embellishments.
This project assumes some prior knowledge of
basic wire wrapping techniques.
by Martha Umberger
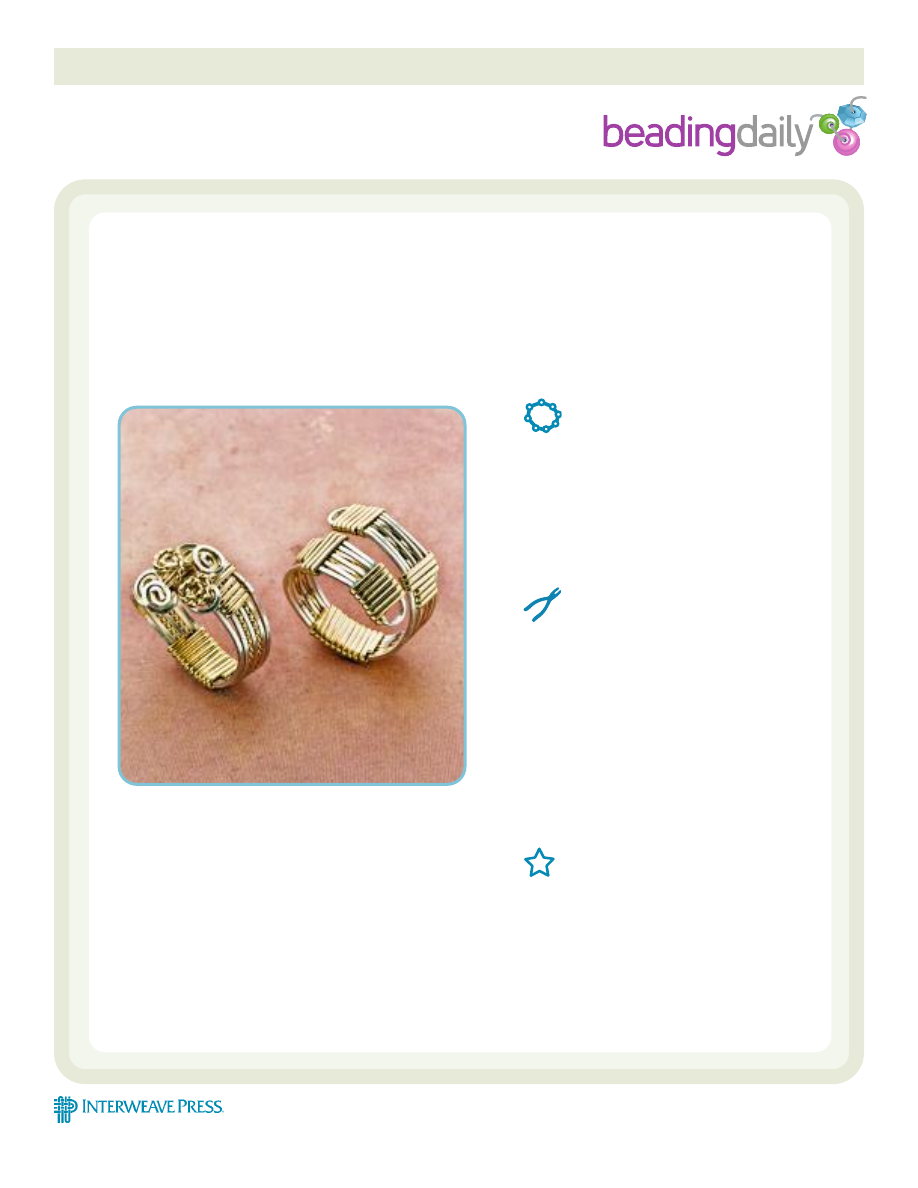
Part two: Learn to make the plain ring.
Ring-a-Ding Rings
MATERIALS:
20-gauge square half hard wire, (color of
your choice), 24”
8” square half hard wire for outside wires
18-gauge half round half hard wire (color of
your choice), 18”
TOOLS:
Round nose pliers – marked in the middle
Chain nose pliers
Pin vise or wire twisting machine
Ring mandrel
Quilter’s tape or blue painter’s tape
Ruler
Extra-fine point marker
File
Polishing cloth
Flush cutters
TECHNIQUES:
Wire wrapping, wirework.
RRRRRRRRRRRRRRRRRRRRRRRRRRR
project
library
Copyright Interweave Not to be reprinted. All rights reserved.
page 1
P
h
o
to
of
fi
n
is
h
ed
p
ie
ce
b
y
Ji
m
La
w
so
n
;
al
l
o
th
er
p
h
o
to
s
co
u
rt
es
y
of
th
e
au
th
o
r.
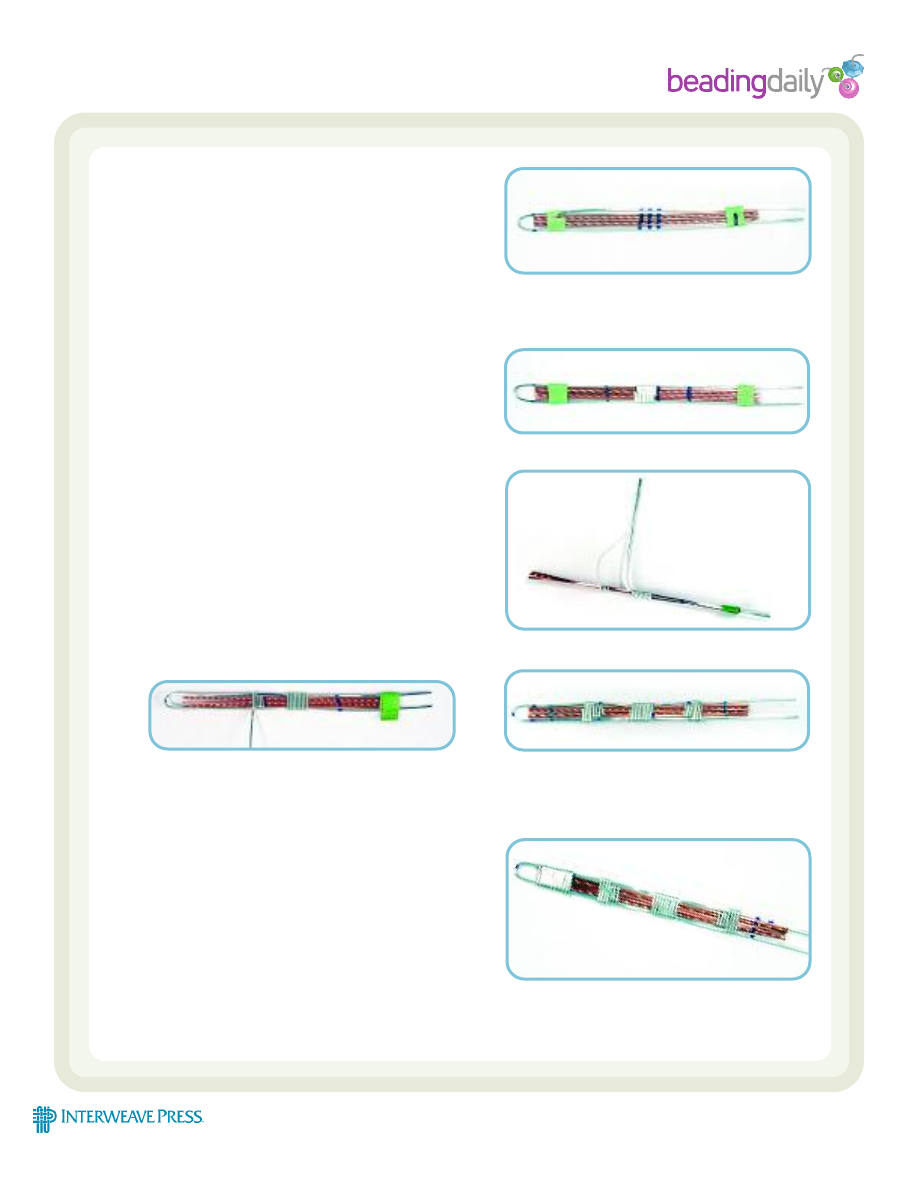
Step 1: Clean and straighten the wire. Cut five 3”
sections of 20g for middle bundle – you may
twist two sections if you’d like. Arrange the
wire as follows making sure both ends are
evenly blunt cut: Flat square wire, twisted wire,
flat wire, twisted wire, and flat wire. Place the
8” square half hard wire (in this example,
shown in silver) on the outside of this bundle,
and tape each end together. Mark the center of
the wires. Place a mark 2/16” on each side of
the center mark.
Step 2: With 5” of square wire, make 6–10 wraps
between the three marks. One side will have
two straight wires, and the other side will have
the twisted wire. Make sure all ends of the five
center wires are blunt cut across both sides.
Step 3: Mark 1/2” on each end of the wraps toward the
end of wire. Untape the ends, and hold your
thumb on the top side of bindings. Bring one
side of the outside wires straight up to a 90°
angle.
At the 1/2” mark, make three bindings ending
on bottom with 7” of wire. DO NOT CUT THE
WIRE.
Bring the outside wires down so they are even
with the other five wires, bind four more times
ending on bottom, and cut the wire. Repeat on
the other side. One side of the outside wire is
round, and the other has open ended wires.
Step 4: Mark 2/16” from the last bindings on each side.
Starting with the rounded side, and with 10” of
wire, wrap from the mark toward the loop.
When you get to the end of the inner bundle,
wrap the wire around one side of the loop, and
bind off. Cut off the leftover wire.
Ring-a-Ding Rings
Copyright Interweave. Not to be reprinted. All rights reserved.
page 2
publishers of Step by Step Wire Jewelry magazine . . . join the online beading community at www.BeadingDaily.com
Step 1
Step 2
Step 3: Marking the wraps and bending up.
Step 4: Marking the bindings
Step 3: Bringing and bringing the wires down.
Step 3: One side of the wire is round and one is
open-ended
publishers of Step by Step Wire Jewelry magazine . . . join the online beading community at www.BeadingDaily.com
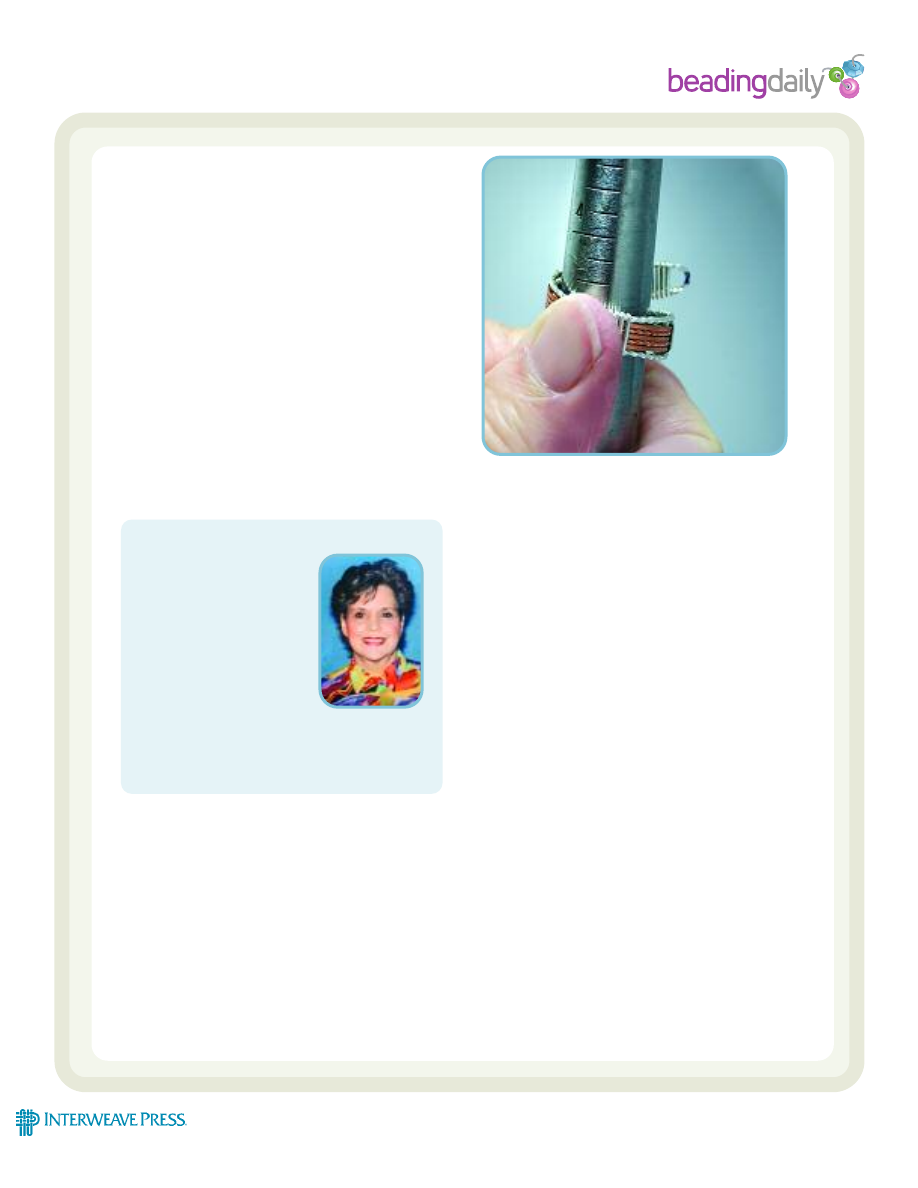
On the open ended side, using the center mark
of your round nose pliers, shape either side of
the straight wire toward the center, and make a
loop by bending across to the outside of the
other wire. Mark and cut the straight wire
1/16” from the center bundle mark. These two
cuts will butt up against each other like one
solid wire. Wrap the bundle as you did on the
other end, and bind off.
Place the center wire around the mandrel on
one size smaller than your finished ring size.
Equally bring up the sides straight up. Slightly
pull the unfinished side of the ring to the side,
so the ends of the ring lie side by side. Gently
and slowly work the unfinished side of the ring
around the mandrel to complete your ring size.
MARTHA UMBERGER
is a mixed media artist and
designer living in Dunwoody,
Ga. Martha and her husband
Gary are the owners of Beading
Frenzie in Norcross, Ga. After
trips to the William Holland
Lapidary School, she keeps
expanding her horizons using
glass art, wire wrapping, and
chain maille. To contact Martha, e-mail
beadingfrenzie@yahoo.com or visit
beadingfrenzie.com.
Ring-a-Ding Rings
Copyright Interweave. Not to be reprinted. All rights reserved.
page 3
Step 4: Measuring against the ring mandrel to finish
Wyszukiwarka
Podobne podstrony:
Bizuteria kurs Jewellery handmade jewelery jevelery kolczyki bransoletki naszyjniki koraliki(CRAFTS)
Bizuteria kurs Jewellery handmade jewelery jevelery kolczyki bransoletki naszyjniki koraliki(CRAFTS)
Bizuteria kurs Jewellery handmade jewelery jevelery kolczyki bransoletki naszyjniki koraliki(CRAFTS)
Bizuteria kurs Jewellery handmade jewelery jevelery kolczyki bransoletki naszyjniki koraliki(CRAFTS)
Bizuteria kurs Jewellery handmade jewelery jevelery kolczyki bransoletki naszyjniki koraliki(CRAFTS)
Bizuteria kurs Jewellery handmade jewelery jevelery kolczyki bransoletki naszyjniki koraliki(CRAFTS)
Bizuteria kurs Jewellery handmade jewelery jevelery kolczyki bransoletki naszyjniki koraliki(CRAFTS)
Bizuteria kurs Jewellery handmade jewelery jevelery kolczyki bransoletki naszyjniki koraliki(CRAFTS)
landrynkowe bransoletki, Inne ంం, koraliki bizuteria
jak zrobić kolczyki, Inne ంం, koraliki bizuteria
Kolczyki pędzelki, Biżuteria - WZORY
01 Biżuteria z drobnych koralików kolczyki
więcej podobnych podstron