–1–
WOODWORKS: ADVANCED PROJECT 2001-2002
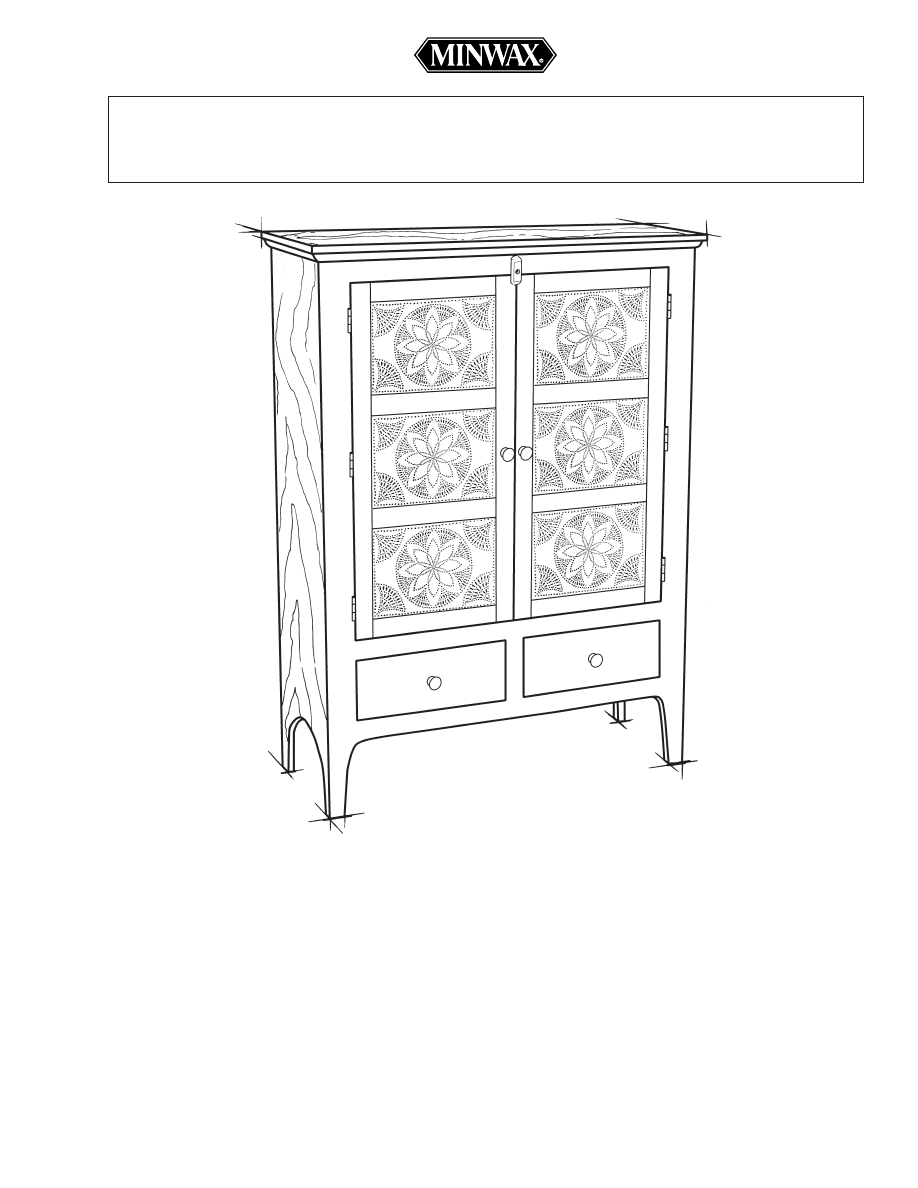
OAK PIE SAFE
Build a brand-new antique! This versatile classic goes together fast with biscuit joinery.
• Built of solid oak in a simple, modified-Shaker style, this pie safe blends easily into most any décor. Adjustable shelves and a pair of
drawers make it a versatile storage cabinet for more than just cooling off fresh-baked pies. The pierced-tin panels can also provide
ventilation for a modern sound system. Or, you can use this cabinet to store clothing and take some of the pressure off an overstuffed
closet or bureau.
• Biscuits make the joinery on this project as easy as pie. If you’ve never made a project of this scale before, or are new to biscuit
joinery, this is the perfect place to start. You’ll need to know how to make stopped rabbets for the back and dadoes for the drawers,
but hanging the flush-fit doors is a breeze with no-mortise hinges.
This pie safe gives advanced woodworking students the opportunity to employ a number of their skills, including biscuit joinery for
edges and corners, making templates, measuring, cutting, marking, gluing, clamping and mitering. And after you build the pie safe,
you’ll learn how to apply stains and finishes to protect the wood and keep it looking beautiful.
–2–
Hand tools
– Hold-down clamps
– Pipe or bar clamps at least 4’ long
– Combination square
– Carpenter’s square
– Hole punch
– Lampmaker’s chisel
SHOPPING LIST
TOOLS REQUIRED
Power Tools
– Biscuit joiner
– Table saw
– Router with a 3/8” rabbeting bit
– Jigsaw
Miscellaneous
– Pencil
– Carpenter’s glue
– Safety glasses
Item
Quantity
4/4 oak
100 board feet
1/4” oak plywood
1 4’x 8’ sheet
1/4” diameter brass shelf supports
16
1-1/4” diameter wood knobs
4
Tin for pierced panels
4 pcs., 10”x14”
#20 biscuits
150
Brads, 3/4”, 1”, 1-1/4” long
1 box each size
#10 x 1-1/4” pan head screw w/ flat washer 8
#4 x 5/8” flat head screw
50
#10 x 1-1/4” flat head screw
10
No-mortise hinges
6
WOOD FINISHING PRODUCTS
(Choose the recommended stain/finish or create
your own combination)
CONTINUED - WOODWORKS: ADVANCED PROJECT 2001-2002 OAK PIE SAFE
CUTTING LIST
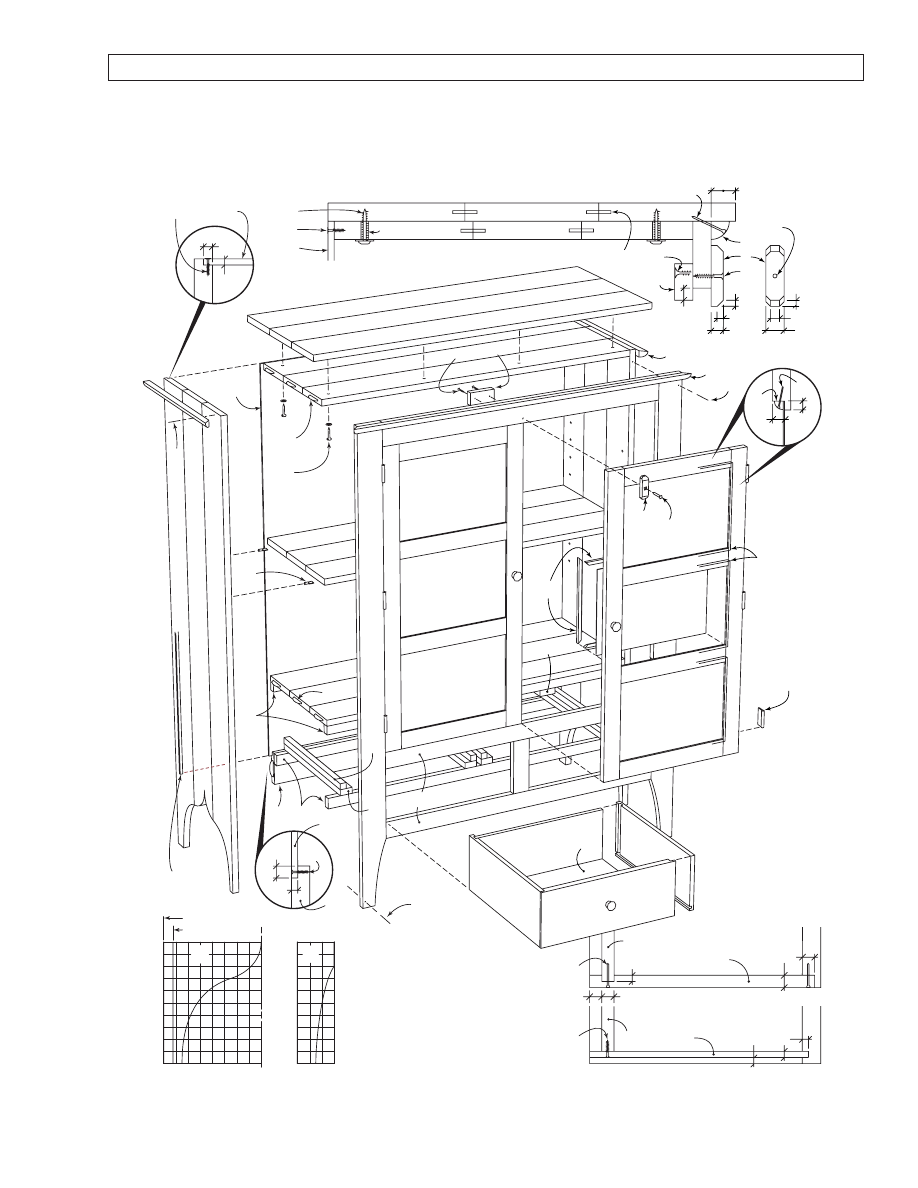
OAK PIE SAFE 57-3/4” H x 42-1/2” W x 16” D
Part Name
Qty. Dimensions
CARCASS Oak hardwood
A
top
1
3/4 x 17 x 42-1/2
B
sides
2
3/4 x 15-1/4 x 57
C
shelves
5
3/4 x 15 x 39
D
back rail
1
3/4 x 4 x 39
E
drawer kickers
2
3/4 x 2 x 15
F
drawer runners
4
3/4 x 1-1/2 x 15
G
doorstop
1
3/4 x 1-1/2 x 3
H
drawer runner cleats
2
3/4 x 1-5/16 x 39
J
drawer kicker cleats
2
3/4 x 1-1/16 x 39
K
molding
1
3/4 x 3/4 x 42
L
molding
2
3/4 x 3/4 x 16-3/4
M
drawer runners
4
3/4 x 3/4 x 15
N
door latch
1
1/2 x 7/8 x 2-1/2
FACE FRAME Oak hardwood
P
face stiles
2
3/4 x 3 x 57
Q
top rail
1
3/4 x 2-3/4 x 34-1/2
R
lower rails
2
3/4 x 2 x 34-1/2
S
drawer divider mullion
1
3/4 x 2 x 6-1/2
DOORS Oak hardwood
T
door stiles
4
3/4 x 2 x 35-3/4
U
door rails
8
3/4 x 2 x 13-1/4
V
tin panel stops
24 3/8 x 3/8 x 15
DRAWERS Oak hardwood
W
drawer fronts
2
3/4 x 6-3/8 x 16-1/8
X
drawer sides
4
1/2 x 6-3/8 x 15-1/2
Y
drawer backs
2
1/2 x 5-7/8 x 15-5/8
OAK PLYWOOD
Z
back
1
1/4 x 39-3/4 x 48-3/16
AA
drawer bottoms
2
1/4 x 14-3/4 x 15-5/8
Recommended finish
Stain: Minwax
®
Wood Finish
TM
Cherry (or any color
you prefer)
Finish: Minwax
®
Fast-Drying Polyurethane Satin
Alternate Finishes
Stain: Minwax
®
Gel Stain in Cherrywood (or any
color you prefer)
Finish: Minwax
®
Fast-Drying Polyurethane Satin
Miscellaneous
Sandpaper
Gloves for finishing
Clean, lint-free rags for wiping
Mineral spirits
Minwax
®
Wood Putty
Minwax
®
Finishing Brushes
Water-filled metal container with tight-fitting lid

BEFORE YOU BEGIN
Good craftsmanship begins and ends with good work habits, so make
the following steps part of your routine workshop practice. If you have
any doubts or questions about how to proceed with a project, always
discuss them with your shop instructor.
• Carefully and fully review plans and instructions before putting a tool
to the project lumber.
• Work sensibly and safely. Wear safety goggles when doing work that
creates flying chips and sawdust; wear the appropriate mask or
respirator whenever making sawdust or working with thinners or
other solvents.
• At the end of every work session, clean up your shop area and put
away all portable tools.
CUTTING AND ASSEMBLY
PROCEDURE
Refer to the project illustrations shown on pages 7, 8 and 9.
Woodworker’s Tip:
Sort your wood for grain and color. Select
flat, straight-grained wood for the doors and face frame. This is
one place you can’t afford any warping. Cut the drawer fronts
(W) from a single board so the grain flows from one drawer to the
next. Choose boards with compatible figure and color for the sides
(B) and top (A). Use the less desirable pieces for shelving.
Woodworker’s Tips:
There are three common sizes of biscuits:
#20, #10 and #0. Number 20 biscuits offer the greatest gluing sur-
face and are, therefore, the strongest. Use these whenever possible
even if it results in the biscuit “breaking out” of the joint. In this
project, breakouts occur on the face frame and door frames where
narrow rails join the stile. But they won’t be a problem if you off-
set the center mark for the biscuits so the breakout won’t be seen.
We did this on the face frame so the biscuits break out where the
drawers and top cover them (see Fig. D). Breakouts on the door
frames are covered by the stops for the tin panels. The top-rail
biscuits on the door frames are also offset to keep the top edge of
the door clean (Fig. B). Use the following tips to get better results
with your biscuit joinery.
• Take the time to dry-fit each assembly using all the biscuits and
clamps you’ll need for the real thing. You’ll be able to rehearse your
glue-up and red-flag any misaligned biscuits.
• Assembly with biscuits needs to go smoothly because the biscuits
swell quickly once glue is applied. For a more-relaxed assembly, use
an extended-open-time glue.
• Getting glue in the biscuit slots can be a bit messy. Just squirt a bead
into the groove and spread it along both side walls of the slot with a
small glue brush.
• If you accidentally cut a biscuit slot where none belonged, and it’s
on an exposed edge, you can make a nearly invisible repair. Use a
compass to mark a 4”-diameter circle in some oak that’s 5/32”
thick. Cut it out on the bandsaw and then glue the circle into the
bad slot, cleaning up any excess glue. After the glue dries, flush-cut
the repair and sand the edge smooth.
THE CARCASS
1. Lay out and cut the biscuit slots for the top (A), sides (B) and
shelves (C).
Woodworker’s Tip:
Cut the biscuit slots about 6” apart for edge
joining. The biscuits align the surface of the boards and produce
flush joints that will require little sanding. You don’t want to
expose a biscuit joint when making your final cuts, so keep your
biscuits at least 3”away from the ends of the top (A) and the leg
cutout area on the sides (B).
2. Dry-fit then glue-up and clamp the top (A), sides (B) and
shelves (C); after the glue has dried, cut these pieces to length.
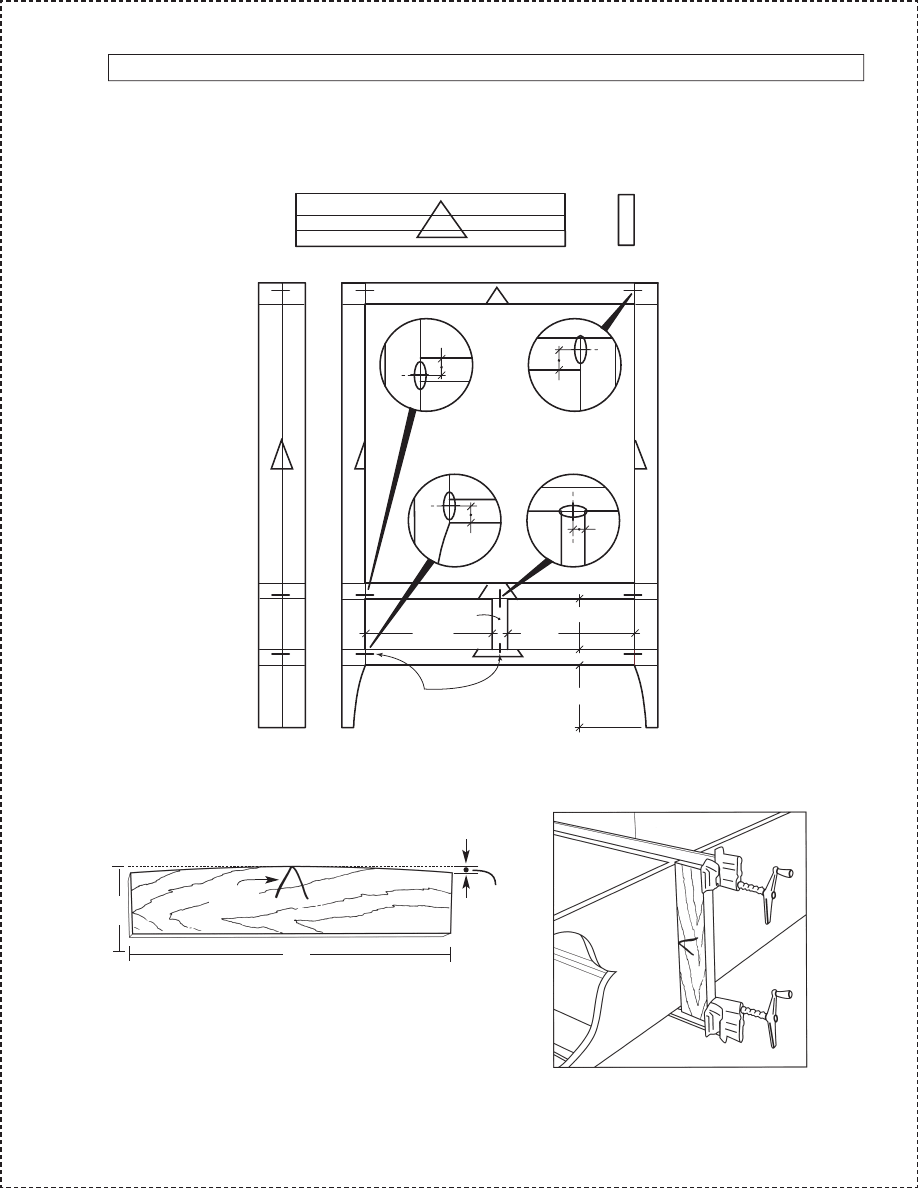
3. Use the leg patterns (shown in Fig. A) to lay out the shapes on the
bottoms of the sides (B). Cut them out with a jigsaw.
4. Use a table saw to cut the rabbet on the back rail (D) for the
back (Z). Use a router with a 3/8”rabbeting bit to cut the stop rabbet
on the sides for the back.
5. Lay out the fixed shelf locations on the cabinet sides, then cut the
biscuit slots for the shelves and the back rail.
Woodworker’s Tip:
Cut the slots in the end of a shelf (C) with
the base of the plate joiner on the cabinet side (B). Clamp the
shelf on the side so the top edge of the shelf lines up with the top
edge of the layout mark on the side. Mark for biscuits in the mid-
dle of the shelf and 3 inches in from each end. Cut the slots in the
side (B) with the plate joiner held vertical, using the markings on
the shelf.
6. Drill holes for adjustable shelf pins.
Woodworker’s Tip:
An accurate way to drill for adjustable shelf
pins is to use a perf-board template. Mark the bottom and back
edge to correctly register the template on the other side of the
cabinet. Mark the holes to be drilled (every other hole gives a 2”
spacing) and use a sharp brad-point bit. Fasten a metal depth-
stop ring to the bit or use your own depth stop made from 3/4”
x 3/4” stock that’s drilled down the center and cut to length.
7. Finish-sand all the pieces starting with 120-grit paper and working
your way to 220-grit.
8. Dry-fit and glue the carcass. Use four clamps and some cauls for the
shelves and a fifth clamp for the back rail. Be sure the carcass is glued-
up square.
Woodworker’s Tip:
When doing the above assembly, make a few
clamping cauls to ensure that the sides and top will be flat (see
Fig. E). A caul is used to distribute clamping pressure across a wide
joint. Make your cauls from 2x4s cut to the width of the cabinet.
The wood should be well dried and square on all four sides. Choose
one of the edges and plane or sand a 1/16” crown into it, marking
the crown with an arrow.
9. Glue the drawer kicker cleats (J) to the bottom of the lower shelf.
If you have a pneumatic brad nailer, tack the cleat in place first so it
won’t slide around when you apply the clamps.
–3–
CONTINUED - WOODWORKS: ADVANCED PROJECT 2001-2002 OAK PIE SAFE

THE FACE FRAME
10. Lay out the face frame, as shown in Fig. D.
Woodworker’s Tip:
Labeling your project parts with letters and
numbers works fine when you’re dealing with a few pieces. But if
your pile of parts gets mixed up, it can take a while to sort things
out again. The cabinetmaker’s triangle allows you to instantly
identify the location and orientation of each individual piece.
Here’s how it works: Group your frame members face-side up in
the same orientation they will have when assembled (stiles are
vertical, rails are horizontal, etc.). Mark each group with a trian-
gle that points up toward the top of the cabinet. (With parts like
the top and shelves, the triangle will point to the back of the cabi-
net.) The triangle leaves two lines on each piece, making identifi-
cation a snap (See Figs. B and D). If two or more assemblies are
identical, like our pair of doors, add an extra line along the
triangle’s side for the rails and along the bottom for the stiles.
Woodworker’s Tip:
Group the face-frame stiles and rails
together and orient them as they will be on the cabinet. Use the
combination square to mark the precise position of each rail on
the stiles. Make these lines light and long to distinguish them from
your biscuit marks. Now, decide where an offset is needed to dis-
guise any biscuit breakout. To figure out how much to offset the
bottom rail, for example, subtract the width of the rail (2”) from
the width of the slot made by the joiner (2-3/4”). If you centered
the biscuit on the rail, the slot would break out 3/8”on each side.
To keep the biscuit inside the drawer opening, you’ll need to off-
set the cut 3/8” toward the opening. Add 1/8” for insurance and
you have an offset of 1/2”.
11. Cut the biscuit slots and dry-fit the face frame.
Woodworker’s Tip:
Cut slots in the ends of narrow parts, like
this face frame rail, using a simple jig to steady the work and
provide a wider surface for the plate joiner fence. We used a
12” x 30” piece of melamine with a 3” x 18” piece of hardwood
centered along the edge. Add a couple of hold-down clamps.
Note in Fig. D how the cabinetmaker’s triangle identifies the
piece being cut as the top rail.
12. If you are mortising in your hinges, now’s the time to lay out and
cut the hinge mortises on the inside edges of the face stiles.
13. Lay out and cut the leg profiles on the bottom of each stile (see
Fig. A).
14. Begin the glue-up with the drawer divider mullion (S) and the
lower rails (R). Then glue the rest of the face frame together.
15. Trim any protruding biscuits and finish sand.
FINAL ASSEMBLY
16. Glue the face frame assembly to the carcass. Tack the face frame in
position with brads before applying clamps. Trim the face frame over-
hang with a flush-trim bit in a router.
17. Center the drawer kickers (E) in the drawer openings and attach
them to the kicker cleats with a #6 x 1-1/2” screw.
18. Attach the drawer runner cleats (H, see Fig. C) with a brad, glue
and clamp.
19. Assemble the drawer runners (F and M) and position them on the
cleats so they set 1/16” into the drawer openings (see Fig. C). Attach
the runners to the front cleat only (see Fig. C). You’ll attach the back of
the runners later.
20. Attach the top (see Fig. A).
21. Make the oak quarter-round molding (K and L) from a 3”- wide
piece of oak. Round over the two long edges with a router and a 3/4”
round-over bit. Rip the moldings off the piece and cut to fit. Glue and
nail the front molding in place. Nail the side moldings in place but only
glue the miter joint and the first couple of inches at the front of the
case. This will keep the miter joint tight but still allow the carcass to
move with the seasons.
THE DOORS
22. Use a table saw to cut the rabbets on the back edges of the door
rails (U).
23. Cut biscuit slots, dry-fit, glue and clamp the door frames.
Woodworker’s Tip:
Assemble your door frames on a perfectly flat
surface using identical clamps. This helps ensure a flat door and
saves all kinds of headaches later. Spacer sticks hold the frame up
off the clamps (so it won’t get stained by the metal) and in line
with the clamp screw pressure (so it won’t get twisted).
24. Finish the rabbets on the doors with a router fitted with a 3/8” rab-
beting bit; this will also trim the protruding biscuits. Square the corners
with a sharp chisel.
25. Fit the doors into the face-frame opening.
26. Make the door latch (N) and the door stop(G); mount only the
door stop at this time (see Fig. A).
27. Make the tin panel stops (V) and miter them so they fit in place,
but don’t attach them yet.
THE DRAWERS
28. Cut the dadoes and rabbets in the drawer fronts (W) and sides (X).
29. Finish-sand the insides of the drawer pieces, then glue and nail the
drawers together making sure they are square.
30. Finish-sand the outside of the drawers.
31. Attach the drawer runners to the drawer runner cleat.
Woodworker’s Tip:
Mark the position of the drawer runners on
the lower back support cleat. Have the drawer in place with even
margins around the opening and enough room between the slides
and drawer sides for smooth operation. Remove the drawer and
fasten the runners with screws.
32. Drill holes for the door and drawer knobs.
33. Attach the back with screws. Screws allow you to easily remove the
back for finishing and you won’t be accidentally driving nails through
the side of the cabinet.
–4–
CONTINUED - WOODWORKS: ADVANCED PROJECT 2001-2002 OAK PIE SAFE

THE TIN PANELS
The pattern used in this project is a Lacework stencil, which is available
from Country Accents (pattern #1004P, phone: 570 478-4127), or visit
www.piercedtin.com. Country Accents can also supply the 10” x 14”
tin blanks and the hole punch and lampmaker’s chisel. If you’d rather
develop your own pattern, look through books about American quilts,
where you’ll find ideas for all sorts of geometric and floral designs.
As was done with the Lacework pattern, the hole punch makes round
holes, which should be spaced at roughly 1/4” intervals, and the lamp-
maker’s chisel makes the elongated perforations.
Expect to spend 30 to 40 minutes punching each panel. Don’t try
to do all six in a row or you’ll feel like punching more than tin. Take it
easy and spread the job over a few sessions. Wear gloves when han-
dling the tin to keep from etching in your fingerprints. The stencil kit
comes with complete directions, but you basically just secure the tin to
a piece of particleboard, tape the pattern to the tin with masking tape
and have at it with the punch and chisel.
STAINING AND FINISHING
Woodworker’s Tip:
Though you may be tempted to cut short
your sanding and wiping time, don’t do it. Both of these tasks
are very important steps in obtaining a high-quality finish.
Remember, it is the finish, just as much as the fit and smoothness
of the parts, that will have great bearing on how people judge your
craftsmanship. To ensure an excellent result, follow the steps
listed below and also the instructions the finish manufacturer
puts on its products.
FINISHING TIPS
• Use scraps of wood to test the stains and finishes you are planning to
use. On the back of the scrap, mark the stain/finish combination and
the type of wood. Allow all samples to dry thoroughly before making
your final finish selection. Save your samples for quick reference
on future projects.
• All stains and finishes must be allowed to dry thoroughly between
coats. Remember that drying times can vary due to humidity and
other climate conditions.
• If you have some leftover stain or finish, wipe the can rim so that
stain or finish in the rim won’t dry out and prevent the lid from
forming a tight seal.
• Brushes used for oil-based finishes must be cleaned with mineral
spirits; for water-based products such as Minwax
®
Polycrylic
®
Protective Finish, clean brushes with warm water and soap.
34. Finish-sand the outside surfaces and ease all the edges. Vacuum
the inside and wipe the entire piece down with a cloth dampened with
mineral spirits.
NOTE: Whichever stain you choose, do the staining in two steps, start-
ing on the interior surfaces and then moving to the exterior surfaces.
Apply the Minwax
®
Wood Finish or Gel Stain you’ve chosen to the inte-
rior surfaces using a clean, lint-free rag. Allow the stain to set for about
10 to15 minutes then wipe off any excess. Repeat for the exterior
surfaces. Allow the stain to dry for 24 hours before applying the finish.
Woodworker’s Tip:
When wiping off stain, make certain that
your last wipe with the cloth goes with the grain of the wood. This
way, any stain you might miss during wipe-off will be visually
minimized by the wood grain.
35. Apply Minwax
®
Fast-Drying Polyurethane following the directions
on the can. Use a brush intended for use with Polyurethane. Allow the
first coat to dry overnight.
36. The next day, sand all surfaces lightly with 220-grit paper using
with-the-grain strokes. Dust off and wipe all surfaces with a cloth
dampened with mineral spirits. Apply a second coat of Polyurethane
and set the piece aside to cure overnight.
37. The next day, sand all surfaces lightly with 220-grit paper. Dust off
and wipe the piece with a cloth dampened with mineral spirits and
apply the third and final coat of Polyurethane.
38. Follow these same steps for finishing the knobs, the door latch
(N) and the back (Z) separately, after first removing the back from the
cabinet. Allow the cabinet and these pieces to cure for several days
before doing the next steps.
39. Mount the tin panels in the doors, hang the doors and attach
the knobs and the latch.
40. Attach the back and stand back to admire your work. Just think,
food safes like this used to hold biscuits; now they’re held together
by them!
CONTINUED - WOODWORKS: ADVANCED PROJECT 2001-2002 OAK PIE SAFE
–5–

PRODUCT SAFETY
For your safety and the safety of those you work with, always read the
safety warnings, which manufacturers print on their labels, and follow
them to the letter. Typical safety advice and instructions will contain
information such as the following:
DANGER! MINERAL-BASED PRODUCTS ARE HARMFUL OR FATAL
IF SWALLOWED. SKIN IRRITANT. COMBUSTIBLE. KEEP OUT OF
REACH OF CHILDREN. DANGER: Contains mineral spirits. Harmful
or fatal if swallowed. Do not take internally. Skin irritant. Avoid contact
with skin and eyes. Wear rubber gloves and safety glasses when han-
dling. Combustible. Do not use or store near heat, sparks, flame or
other source of ignition. Close container after each use. Avoid inhala-
tion and use only with adequate ventilation. If using indoors, open all
windows and doors to make sure there is fresh air movement. If you
experience light-headedness, dizziness or headaches, increase fresh air
movement or leave the area. Reports have associated repeated and pro-
longed occupational overexposure to solvents with permanent brain
and nervous system damage. Intentional misuse by deliberately concen-
trating and inhaling the contents may be harmful or fatal.
FIRST AID: If swallowed: Do not induce vomiting. Call physician
immediately.
FOR SKIN CONTACT: Wash thoroughly with soap and water. If irrita-
tion persists, get medical attention.
FOR EYE CONTACT: IMMEDIATELY flush eyes thoroughly with water,
then remove any contact lenses. Continue to flush eyes with water for
at least 15 minutes. If irritation persists, get medical attention.
IF AFFECTED BY INHALATION: Immediately remove to fresh air.
If symptoms persist, call physician.
DELAYED EFFECTS FROM LONG-TERM OCCUPATIONAL
OVEREXPOSURE.
Contains solvents that can cause permanent brain and nervous system
damage. Intentional misuse by deliberately concentrating and inhaling
the contents may be harmful or fatal.
SAFE DISPOSAL OF RAGS AND WASTE.
Please be mindful of the safe way to dispose of rags and other waste.
Rags, steel wool and other waste products soaked with oil finishes or
solvents may spontaneously catch fire if improperly discarded. Place
rags, steel wool and other waste immediately after use in a water-filled
metal container. Tightly seal and dispose of the waste materials in
accordance with local trash removal regulations. Be sure to keep the
waste out of reach of children.
This project adapted with permission from American
Woodworker
magazine, 2915 Commers Drive, Suite 700,
Eagan, MN 55121.
©Copyright 2000. All Rights Reserved.
For subscriptions call toll-free: 800 666-3111.
–6–
CONTINUED - WOODWORKS: ADVANCED PROJECT 2001-2002 OAK PIE SAFE
–7–
CONTINUED - WOODWORKS: ADVANCED PROJECT 2001-2002 OAK PIE SAFE
REAR EDGE
FRONT EDGE
EACH SQ.=1"
1/4"
1/4"
TOP VIEW AT SIDE
SIDE SECTION VIEW AT BOTTOM
1/4"
1" (TYP.)
7/8"
3/16"
3/8"
OVERSIZE
CLEARANCE
HOLE
3/8"
3/8"
3/8"
1/4"
1/4"
1/4"
1/2"
1/2"
1/2"
1/2"
STOPPED
RABBET
5/16" DIA. HOLE
STOPPED
RABBET
IN STILES
1/2"
1/2"
1/2"
CL
LEG PATTERNS
B
B
6
5
C
C
P
3
DOOR LATCH
SECTION AT TOP
DRAWER DETAILS
C
C
Q
Q
K
G
N
N
5
5
6
8
8
A
A
4
4
Z
Z
Z
Z
B
D
D
4
P
W
W
HARDWARE
1. 3/4" BRAD
2. 1" BRAD
3. 1-1/4" BRAD
4. NO. 4 x 5/8" FH SCREW
5. NO. 10 x 1-1/4" FH SCREW
6. NO. 10 x 1-1/4" PAN HEAD
SCREW AND FLAT WASHER
7. 1/4" DIA. BRASS SHELF PIN
8. NO. 20 BISCUIT
9. NO-MORTISE HINGE
10. PUNCHED TIN INSERT
W
T
R
E
U
S
F
G
H
J
K
3
L
M
X
X
X
Y
Y
2
4
Y
V
1
AA
AA
5
3
7
3
8
V
10
9
FIG A. OAK PIE SAFE ASSEMBLY
CONTINUED - WOODWORKS: ADVANCED PROJECT 2001-2002 OAK PIE SAFE

1-1/2" OFFSET
PENCIL
MARKS
9-1/4"
9-1/4"
1"
9-1/4"
DRY FIT DOORS
AND MARK FOR
BISCUITS
C
L
U
U
T
T
–8–
1/16"
FACE FRAME
18-1/4"
9-5/16"
2-5/16"
16-1/8"
16-1/4"
6-1/2"
5-5/16"
8"
Z
SIDE SECTION
FRONT VIEW
J
C
M
F
H
R
E
D
J
C
5
E
S
B
H
M
F
5
D
R
R
P
FIG B. DOOR FRAME LAYOUT
FIG C. INTERIOR CONSTRUCTION
CONTINUED - WOODWORKS: ADVANCED PROJECT 2001-2002 OAK PIE SAFE
1-1/2"
BISCUIT
MARKS
6-1/2"
16-1/4"
16-1/4"
8"
1-1/2"
DRY FIT FRAME AND
MARK FOR BISCUITS
1-1/2"
1"
C
L
Q
Q
R
P
P
P
S
S
P
R
R
R
–9–
FIG D. FACE FRAME LAYOUT
FIG E. CAUL DESIGN AND USAGE
16
”
3
”
ARROW
MARKS THE
CROWN
1/16
” CROWN
(EXAGGERATED
FOR CLARITY)
CONTINUED - WOODWORKS: ADVANCED PROJECT 2001-2002 OAK PIE SAFE
Wyszukiwarka
Podobne podstrony:
Woodworking Oak Pie Safe
oak dining table
Pio XII Le vicaire de hochhuth et le vrai Pie XII
fotokomorka automatow bramowych safe kj2005
Key lime pie ciasto cytrynowe
Pumpkin Pie
firstword pie
SAFE HOUSE thesewarmstars
Polityka pieniężna, STUDIA, studia II stopień, studia II st Finanse i Rachunkowość 1 semestr, 01s po
2004 Code of Safe Practice for Solid Bulk?rgoesid 171
pie 9c f1+o+obronie+trembowli DGGN4E5SGNDSRA7ZMNASZT6AOQMDKLF4QXOALDA
OAK Rozwiązanie testu nr 2 z ubera
24(3), PIE˙˙ NAD PIE˙NIAMI SALOMONA
OAK W2 Ewolucja procesorów
Amerykańska szarlotka Apple Pie
oak(1) 25 02 2008
Pie c5 9b c5 84+nad+pie c5 9bniami
więcej podobnych podstron