
DAEWOO M-150 BL2
SECTION 9L
GLASS AND MIRRORS
CAUTION: Disconnect the negative battery cable before removing or installing any electrical unit or when a
tool or equipment could easily come in contact with exposed electrical terminals. Disconnecting this cable
will help prevent personal injury and damage to the vehicle. The ignition must also be in B unless otherwise
noted.
TABLE OF CONTENTS
Description and System Operation
9L-2
. . . . . . . . . .
Stationary Glass
9L-2
. . . . . . . . . . . . . . . . . . . . . . . . . .
Inside Rearview Mirror
9L-2
. . . . . . . . . . . . . . . . . . . . .
Outside Rearview Mirrors
9L-2
. . . . . . . . . . . . . . . . . . .
Components Locator
9L-3
. . . . . . . . . . . . . . . . . . . . . . .
Glass and Mirror
9L-3
. . . . . . . . . . . . . . . . . . . . . . . . . .
Diagnostic Information and Procedures
9L-4
. . . . .
Testing Rear Window Defogger Grid Line
9L-4
. . . . .
Repair Instructions
9L-5
. . . . . . . . . . . . . . . . . . . . . . . . .
On-Vehicle Service
9L-5
. . . . . . . . . . . . . . . . . . . . . . . . . .
Windshield
9L-5
. . . . . . . . . . . . . . . . . . . . . . . . . . . . . . .
Rear Window Glass
9L-7
. . . . . . . . . . . . . . . . . . . . . . .
Rear Window Defogger Grid Line Repair
9L-9
. . . . .
Rear Window Defogger Braided Lead
Wire Repair
9L-10
. . . . . . . . . . . . . . . . . . . . . . . . . . . . . .
Front Door Glass
9L-10
. . . . . . . . . . . . . . . . . . . . . . . . .
Front Door Quarter Glass
9L-12
. . . . . . . . . . . . . . . . .
Rear Door Glass
9L-13
. . . . . . . . . . . . . . . . . . . . . . . . .
Inside Rearview Mirror
9L-13
. . . . . . . . . . . . . . . . . . . .
Outside Rearview Mirror (Manual)
9L-14
. . . . . . . . . .
Outside Rearview Mirror (Cable)
9L-15
. . . . . . . . . . . .
Outside Rearview Mirror (Electric)
9L-16
. . . . . . . . . .
Special Tools and Equipment
9L-17
. . . . . . . . . . . . . .
Special Tools Table
9L-17
. . . . . . . . . . . . . . . . . . . . . . .
Schematic and Routing Diagrams
9L-18
. . . . . . . . . .
Rear Window Defogger
9L-18
. . . . . . . . . . . . . . . . . . .

9L – 2 GLASS AND MIRRORS
DAEWOO M-150 BL2
DESCRIPTION AND OPERATION
STATIONARY GLASS
Stationary glass consists of all the glass on the vehicle
which is immovable within its frame, such as the wind-
shield glass, the back glass, and the inside rearview
mirror.
INSIDE REARVIEW MIRROR
The inside rearview mirror can be manually adjusted up/
down, fore/aft, and left/right. The rearview mirror pivots
in two places: the ball-and-socket mirror pivot and the
up/down hinge lever at the mirror support.
OUTSIDE REARVIEW MIRRORS
Three types of outside rearview mirrors are available.
The outside rearview mirrors are adjusted by hand
which is standard. The remote control and the electric
outside rearview mirrors are optional. The outside rear-
view mirrors are installed on the front doors.
GLASS AND MIRRORS 9L – 3
DAEWOO M-150 BL2
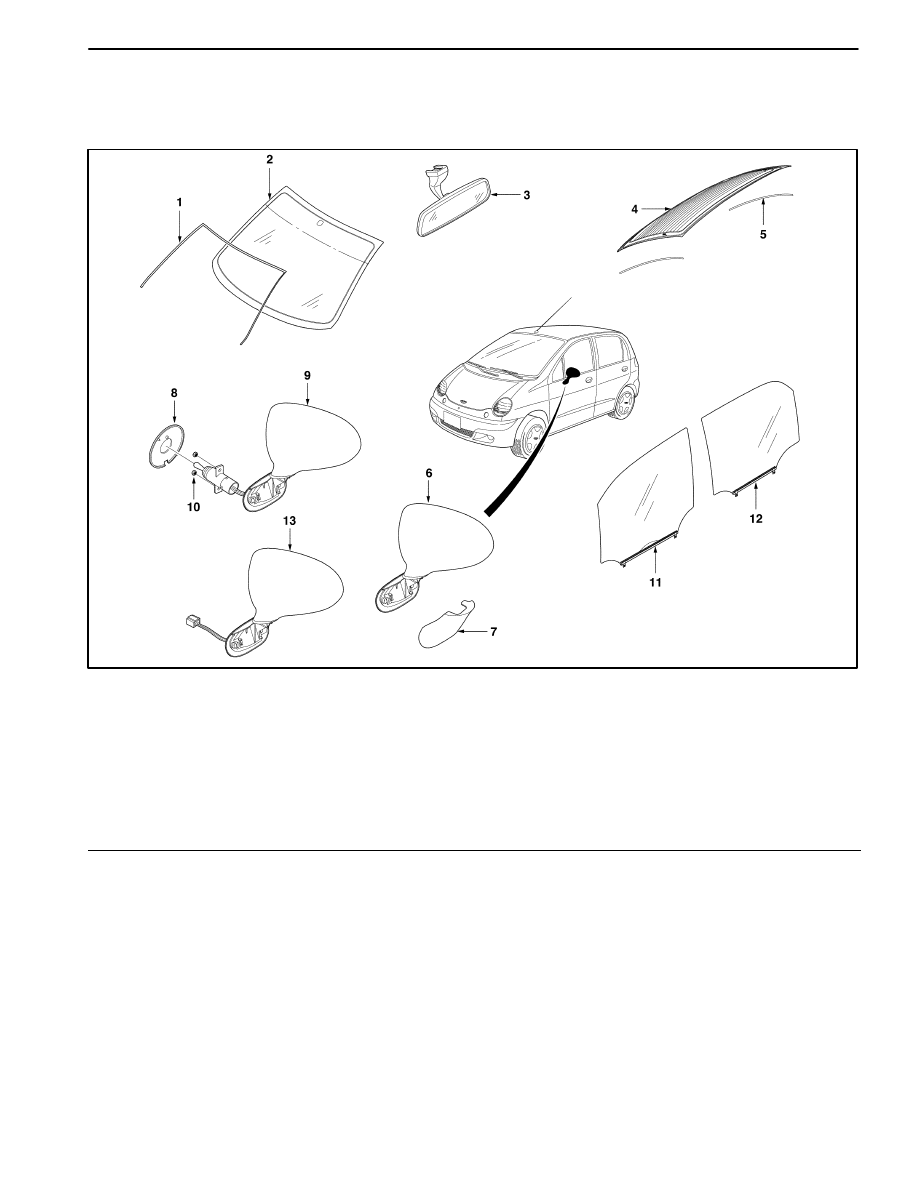
COMPONENTS LOCATOR
GLASS AND MIRROR
D19E401B
1. Windshield Molding
2. Windshield
3. Inside Rearview Mirror
4. Rear Window Glass
5. Rear Window Glass Damping
6. Outside Rearview Mirror (Manual)
7. Outside Rearview Mirror Cover
8. Outside Rearview Mirror Trim Cover
9. Outside Rearview Mirror (Cable)
10. Nuts
11. Front Door Glass
12. Rear Door Glass
13. Outside Rearview Mirror (Electric)
9L – 4 GLASS AND MIRRORS
DAEWOO M-150 BL2
DIAGNOSTIC INFORMATION AND PROCEDURES
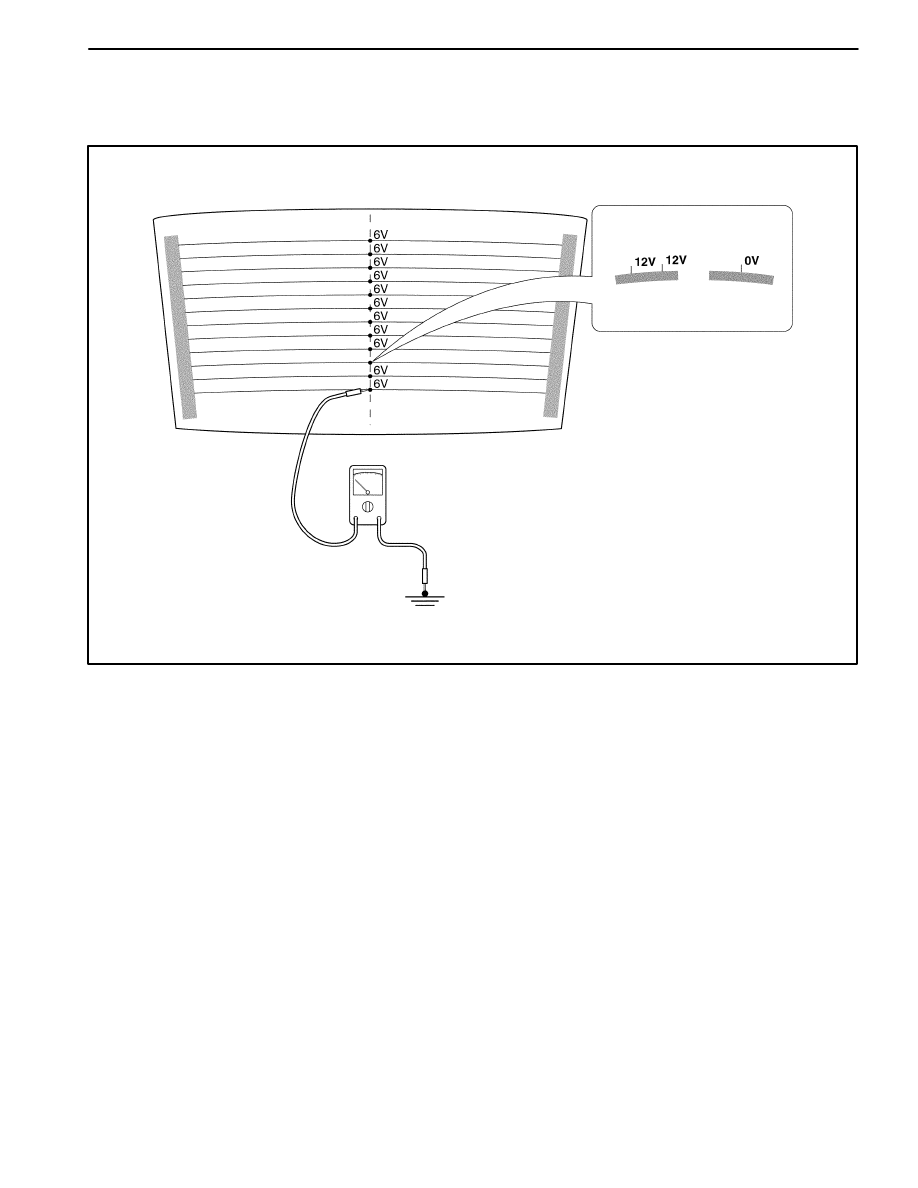
TESTING REAR WINDOW DEFOGGER GRID LINE
D109E301
If it has been observed during use that a grid line is inop-
erative, the following procedure can be used to find the
break. If none of the grid lines is operating, a full system
diagnosis should be completed before attempting to re-
pair the grid lines.
1. Turn the ignition ON.
2. Turn on the rear window defogger.
Notice: Use care when touching the voltmeter terminals
to a grid line. If the terminals are roughly applied, the grid
line may be scratched, resulting in an open circuit.
3. From the inside of the vehicle, connect a voltmeter to
each end of a grid line. The voltmeter will indicate bat-
tery voltage if the grid line is open.
4. If a grid line is found to be open, move a voltmeter ter-
minal from one side of the grid line and retest at a
point nearer to the other side of the window. Continue
to retest, each time bringing one of the voltmeter ter-
minals closer to the opposite side of the window from
where it was originally connected. The break in the
grid line is at the point where the voltmeter begins
reading 0 volts instead of battery voltage.
5. Use a marking crayon to lightly mark the break point
on the rear window. Mark the glass instead of mark-
ing directly on the grid line, and make the mark far
enough from the grid line so that the mark can easily
be removed without disturbing the repair.
6. Use a grid line repair kit to fix the break in the grid line.
Refer to “Rear Window Defogger Grid Line Repair” in
this section.
GLASS AND MIRRORS 9L – 5
DAEWOO M-150 BL2
REPAIR INSTRUCTIONS
ON–VEHICLE SERVICE
D19E501
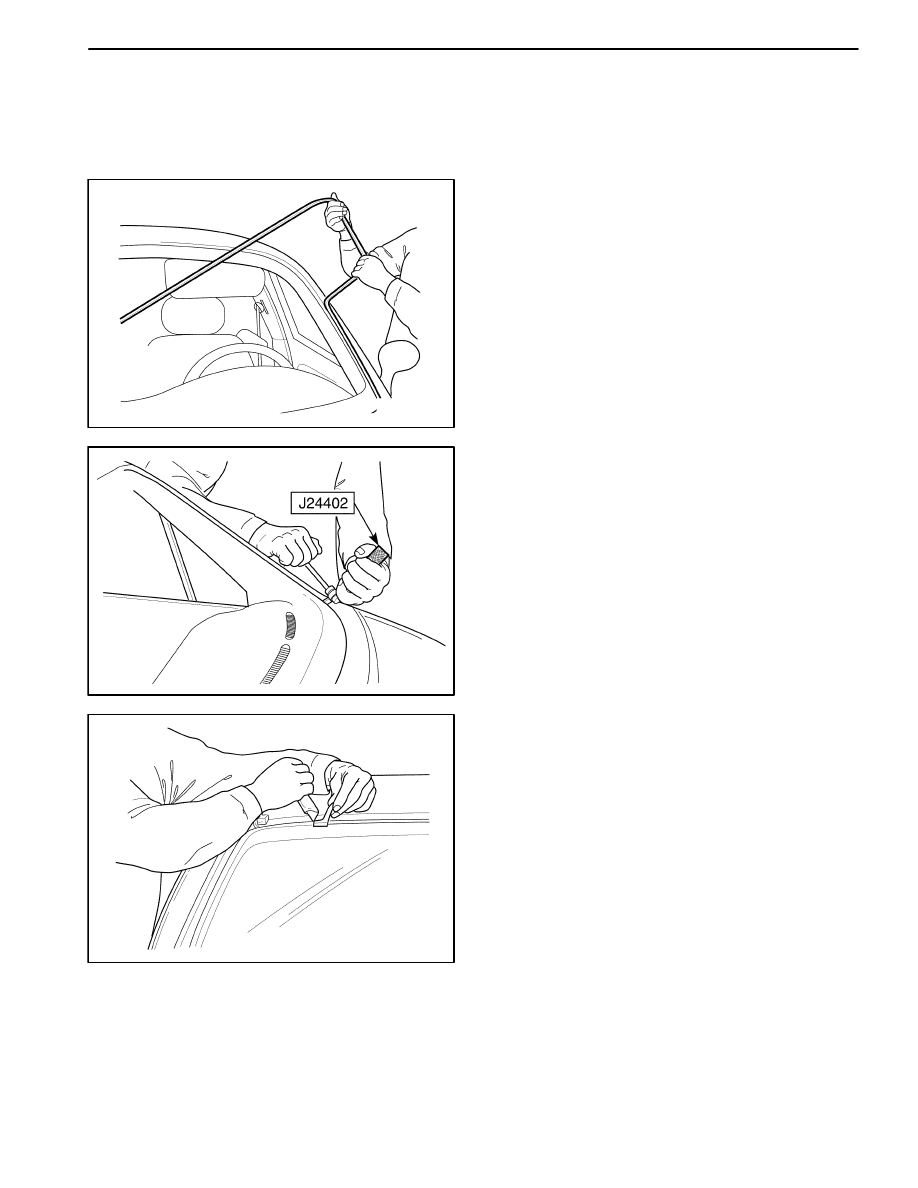
WINDSHIELD
Tool Required
J–24402 Glass Sealant Remover
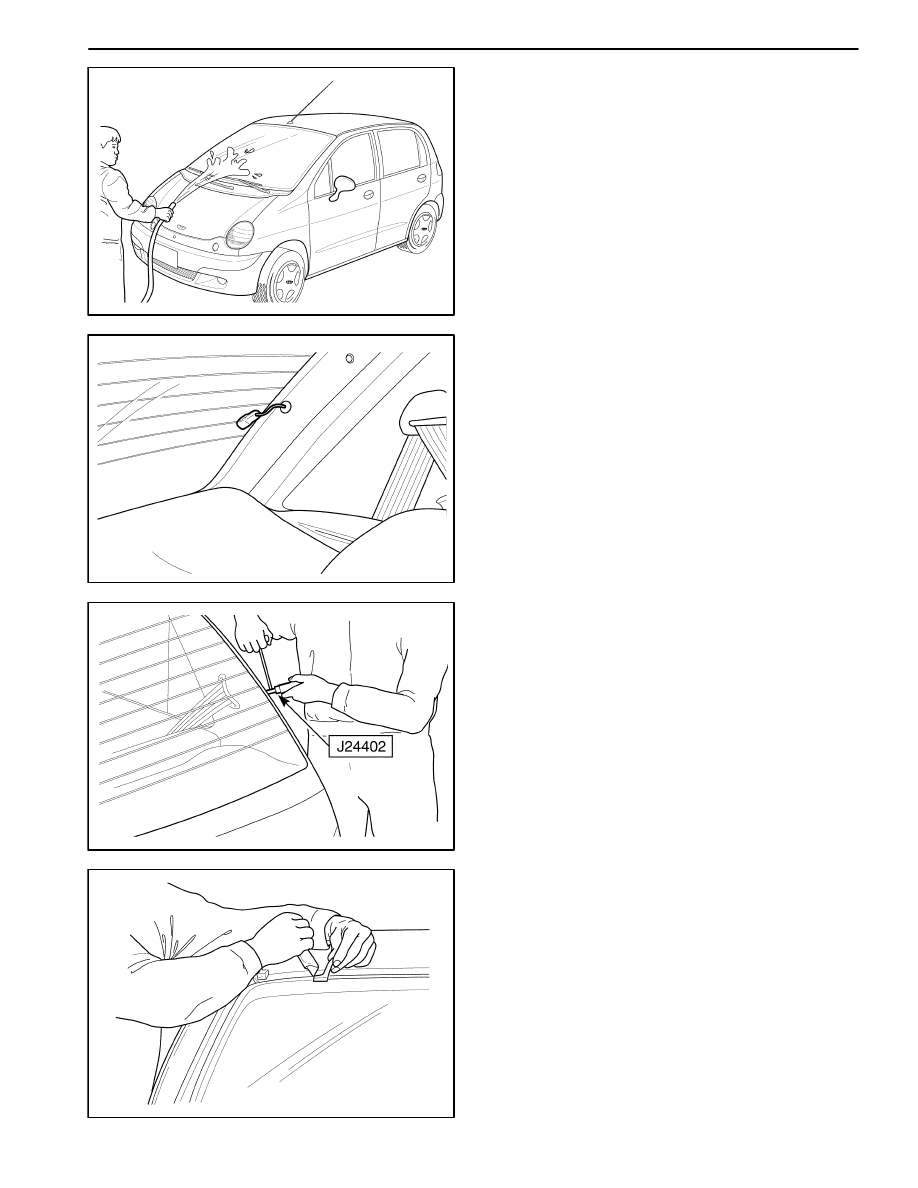
Removal Procedure
1. Remove the cowl vent grille. Refer to Section 9R,
Body Front End.
2. Remove the inside rearview mirror. Refer to “Inside
Rearview Mirror” in this section.
3. Remove the weatherstrip around the windshield.
D19E502
4. Using the glass sealant remover J–24402, cut the
adhesive around the windshield.
D19E503
5. Remove the windshield from the vehicle.
6. Using a knife, remove the adhesive from the wind-
shield.
9L – 6 GLASS AND MIRRORS
DAEWOO M-150 BL2
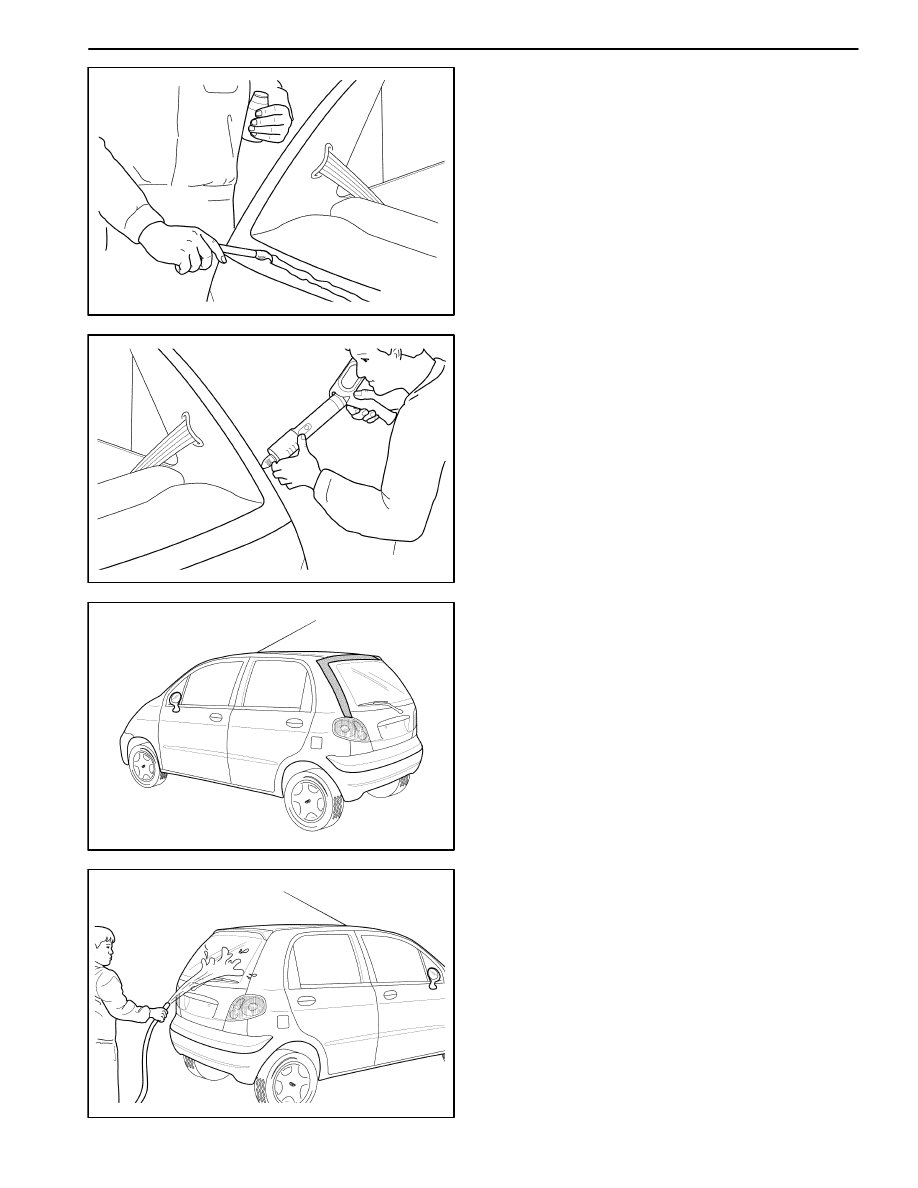
D19E504
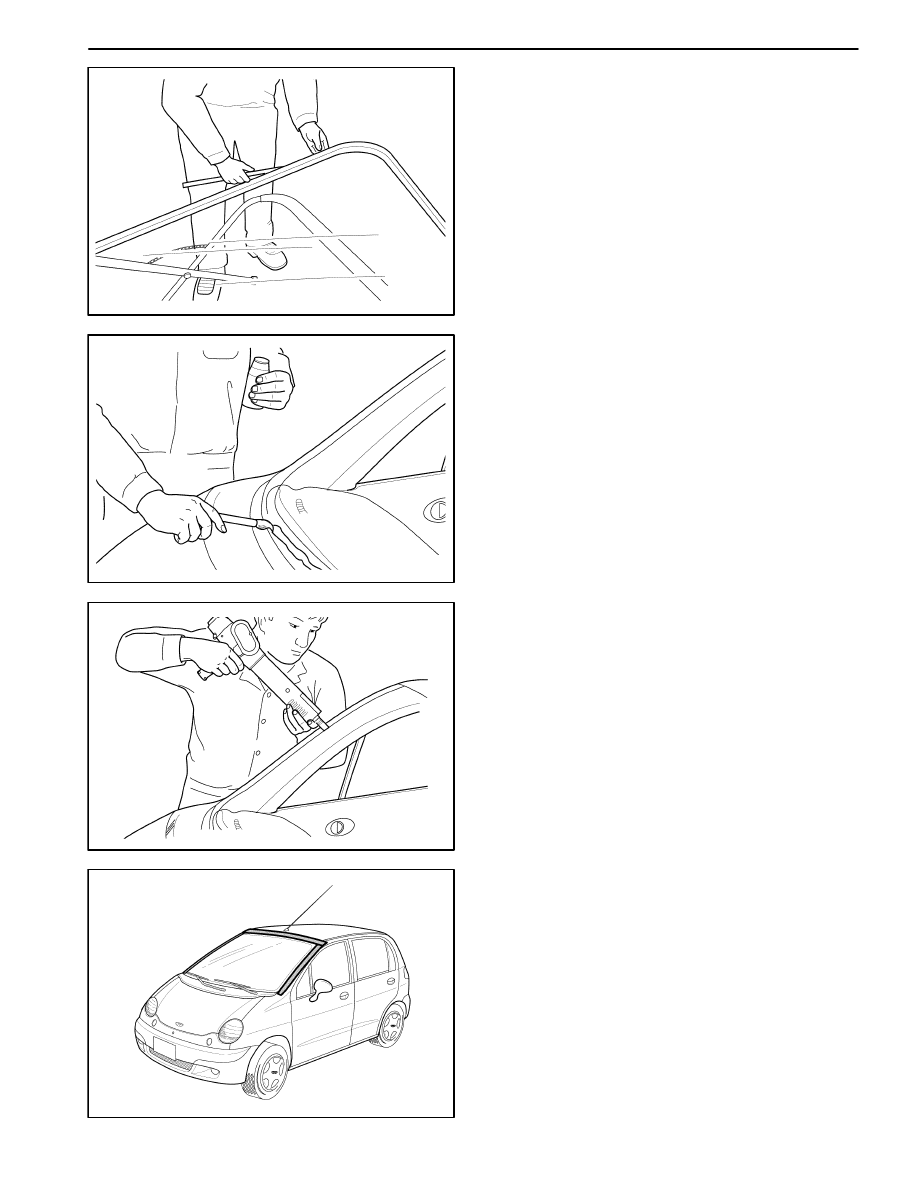
Installation Procedure
1. Install the new weatherstrip to the windshield.
D19E505
2.
Apply tape to the new weatherstrip and the wind-
shield to hold the weatherstrip in place.
3.
Apply adhesive primer to the windshield frame and
the perimeter of the windshield.
D19E506
4.
Apply glass adhesive to the windshield frame.
D19E507A
5.
Install the windshield into the windshield frame.
6.
Reposition the tape over the weatherstrip, the wind-
shield and the windshield frame to hold the wind-
shield in place.
7.
Let the adhesive dry for 24 hours.
8.
Remove the tape.
GLASS AND MIRRORS 9L – 7
DAEWOO M-150 BL2
D19E508A
9.
Check for waterleaks by pouring water on the wind-
shield. If a leak is found, dry the windshield and fill
the area that leaks with adhesive. If the leak per-
sists, remove the windshield and repeat the entire
procedure.
10. Install the inside rearview mirror. Refer to “Inside
Rearview Mirror” in this section.
11. Install the cowl vent grille. Refer to Section 9R, Body
Front End.
D19E509
REAR WINDOW GLASS
Removal Procedure
1. Disconnect the negative battery cable.
2. Disconnect the rear window defogger electrical con-
nectors.
D19E510
3. Using the glass sealant remover J–24402, cut the
adhesive around the rear window glass.
D19E503
4. Remove the rear window glass from the vehicle.
5. Using a knife, remove the adhesive from the rear win-
dow glass.
6. Using a knife, remove the adhesive from the rear win-
dow frame.
9L – 8 GLASS AND MIRRORS
DAEWOO M-150 BL2
D109E511
Installation Procedure
1. Apply tape to the new weatherstrip and the rear win-
dow to hold the weatherstrip in place.
2. Apply adhesive primer to the rear window frame and
the perimeter of the rear window.
D109E512
3.
Apply glass adhesive to the rear window frame.
D19E513A
4.
Install the rear window into the rear window frame.
5.
Reposition the tape over the weatherstrip, the rear
window and the rear window frame to hold the rear
window in place.
6.
Let the adhesive dry for 24 hours.
7.
Remove the tape.
D19E514A
8.
Check for waterleaks by pouring water on the rear
window. If a leak is found, dry the window and fill the
area that leaks with adhesive. If the leak persists,
remove the rear window and repeat the entire pro-
cedure.
9.
Connect the rear window defogger electrical con-
nector.
10. Connect the negative battery cable.
GLASS AND MIRRORS 9L – 9
DAEWOO M-150 BL2
D19E509
REAR WINDOW DEFOGGER GRID
LINE REPAIR
1.
Disconnect the negative battery cable.
2.
Disconnect the rear window defogger electrical con-
nector.
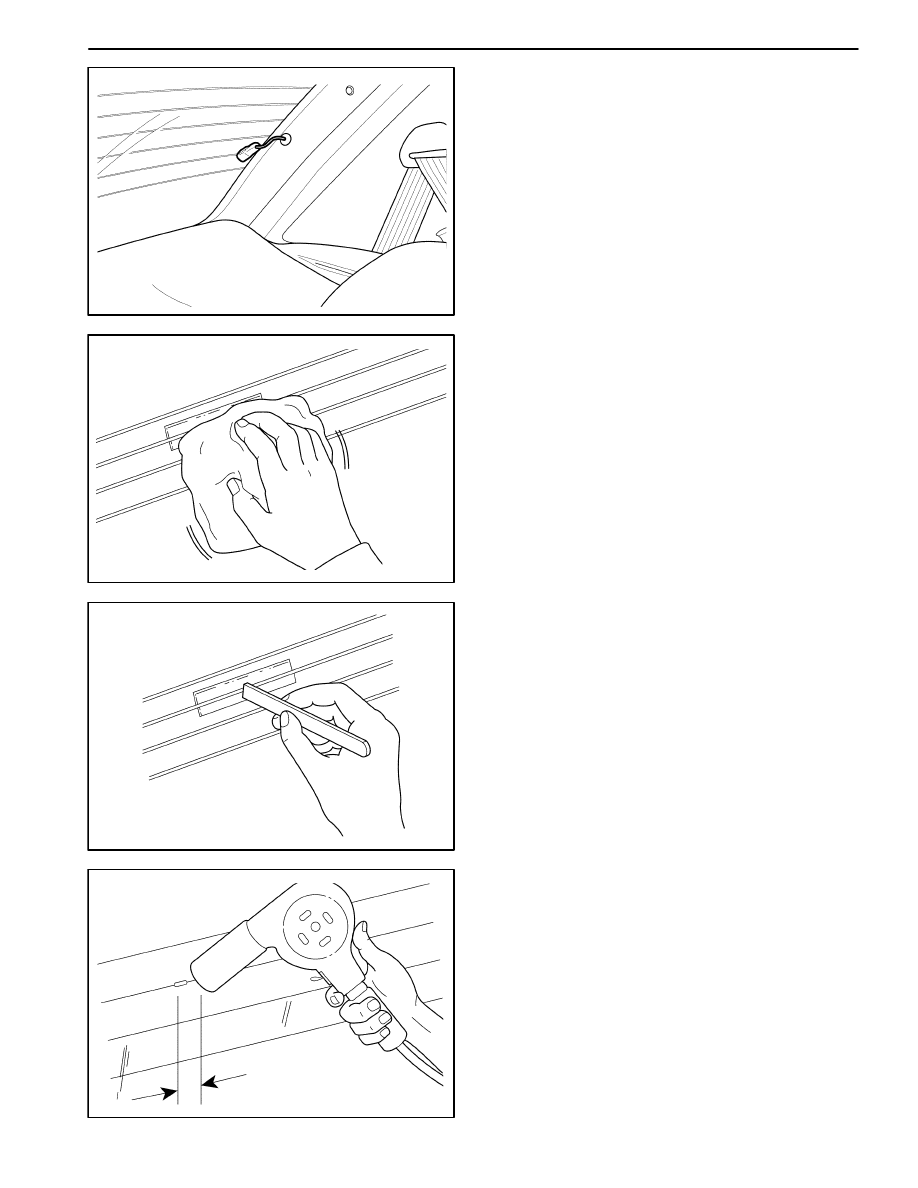
D19E515
3.
Inspect the rear window defogger grid lines.
4.
Use steel wool to buff the grid lines that are to be
repaired. Wipe the lines clean using a cloth damp-
ened with alcohol. Buff and clean about 6 mm (0.25
inch) beyond each side of the break in the grid line.
D19E516
5.
Attach a grid line repair decal or two strips of tape
above and below the repair areas.
D
A repair decal or tape must be used in order to
control the width of the repair areas.
D
If a decal is used, the die–cut metered slot must
be the same width as the grid line.
6.
Apply the grid repair material to the repair area using
a small wooden stick or a spatula. The grid repair
material should be at room temperature.
7.
Carefully remove the decal or the tape.
D19E517
Notice: The grid line repair material must be cured with
heat. In order to avoid heat damage to the interior trim,
protect the trim near the repair area where heat will be
applied.
8.
Heat the repair area for 1 to 2 minutes.
9.
Hold the heat gun nozzle 25 mm (1 inch) from the
surface. A minimum temperature of 149
_
C (300
_
F)
is required.
9L – 10 GLASS AND MIRRORS
DAEWOO M-150 BL2
D109E518
10. Inspect the grid line repair area. If the repair appears
discolored, apply a coating of tincture of iodine to
the area using a pipe cleaner or a line brush. Allow
the iodine to dry for about 30 seconds. Carefully
wipe off the excess iodine with a lint-free cloth.
11. Test the operation of the rear window defogger in or-
der to verify that the repair was successful.
Important: At least 24 hours is required for complete
curing of the repair materials. The repair area should not
be physically disturbed until after that time.
D109E519
REAR WINDOW DEFOGGER
BRAIDED LEAD WIRE REPAIR
The rear window defogger bus lead wire or the terminal
can be reattached by resoldering. Use a solder contain-
ing 3 percent silver and a rosin flux paste.
1. Disconnect the negative battery cable.
2. The repair area should be buffed with fine steel wool
before soldering the bus lead wire.
3. Apply the paste–type rosin flux in small quantities to
the wire lead and the bus lead wire repair area using a
brush.
D109E520
4. Coat the soldering iron tip with solder use only
enough solder to ensure a complete repair.
5. Use only enough heat to melt the solder. Do not over-
heat the wire when resoldering to the bus lead wire.
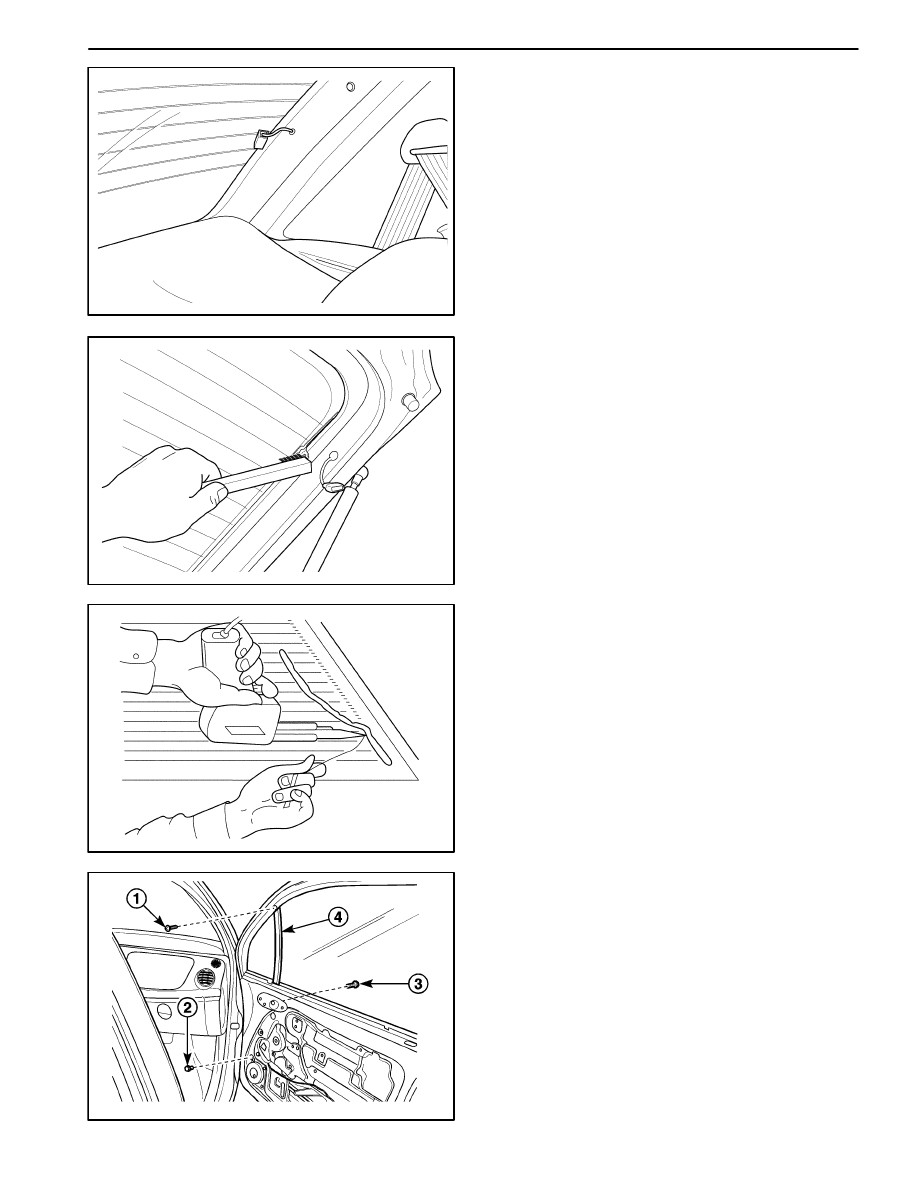
D109E521
FRONT DOOR GLASS
Removal Procedure
1. Remove the front door seal trim. Refer to Section 9P,
Doors.
2. Remove the outside rearview mirror from the front
door. Refer to “Glass and Mirrors” in this section.
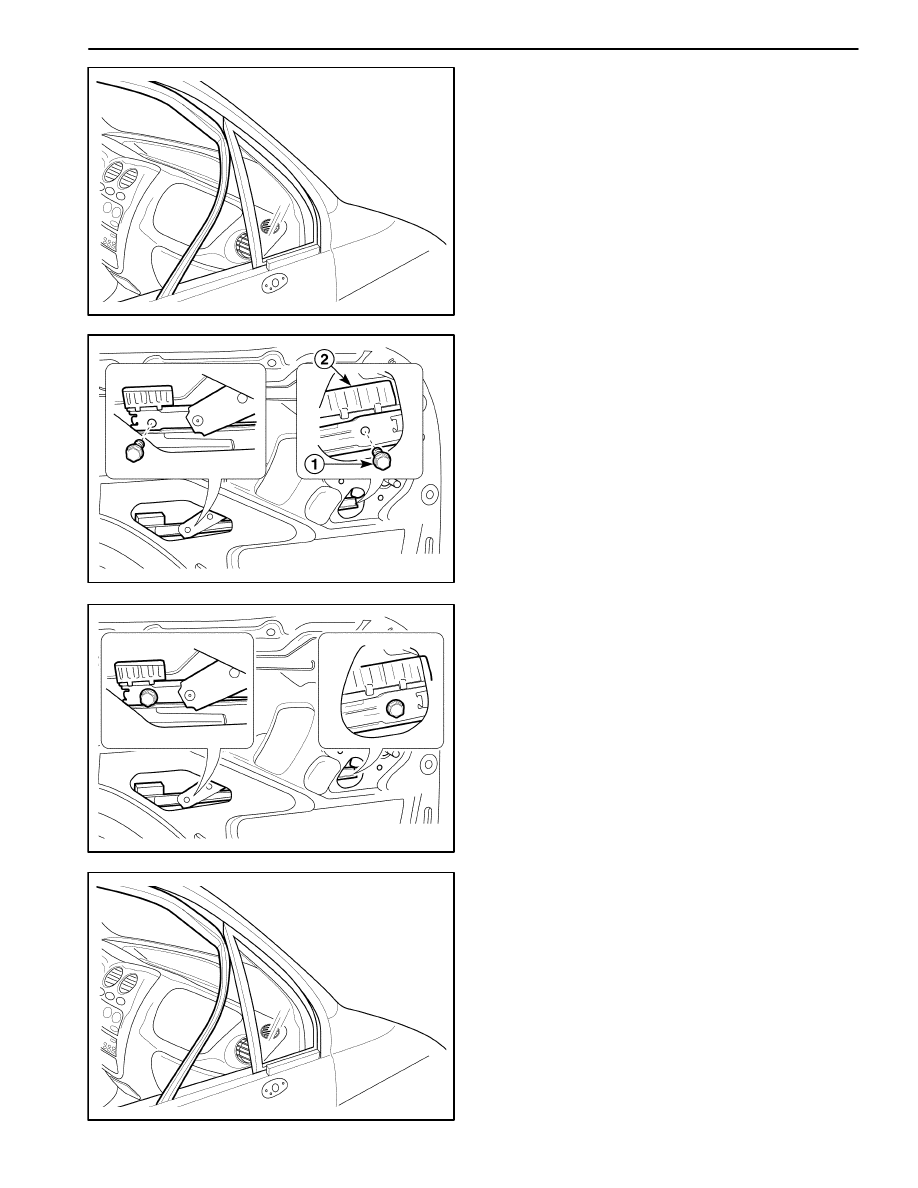
3. Remove the division bar.
D
Remove the screw (1).
D
Remove the inside bolt (2).
D
Remove the outside bolt (3).
D
Remove the division bar (4).
GLASS AND MIRRORS 9L – 11
DAEWOO M-150 BL2
D19E522
4. Remove the glass run from the front door.
D19E523
5. Remove the glass from the front door.
D
Remove the glass retaining bolts (1).
D
Remove the glass (2).
Notice: Make sure not to contact the glass with the body
to prevent the paint damage.
D19E524
Installation Procedure
1. Install the front door glass with the bolts.
D19E522
2. Install the front door glass run.
9L – 12 GLASS AND MIRRORS
DAEWOO M-150 BL2
D19E521A
3. Install the division bar with the guide rail inside bolt,
the guide rail outside bolt and the guide rail screw.
4. Install the outside rearview mirror. Refer to “Glass
and Mirrors” in this section.
5. Install the front door seal trim. Refer to Section 9P,
Doors.
D109E521
FRONT DOOR QUARTER GLASS
Removal Procedure
1. Remove the front door seal trim. Refer to Section 9P,
Doors.
2. Remove the outside rearview mirror. Refer to “Out-
side Rearview Mirror” in this section.
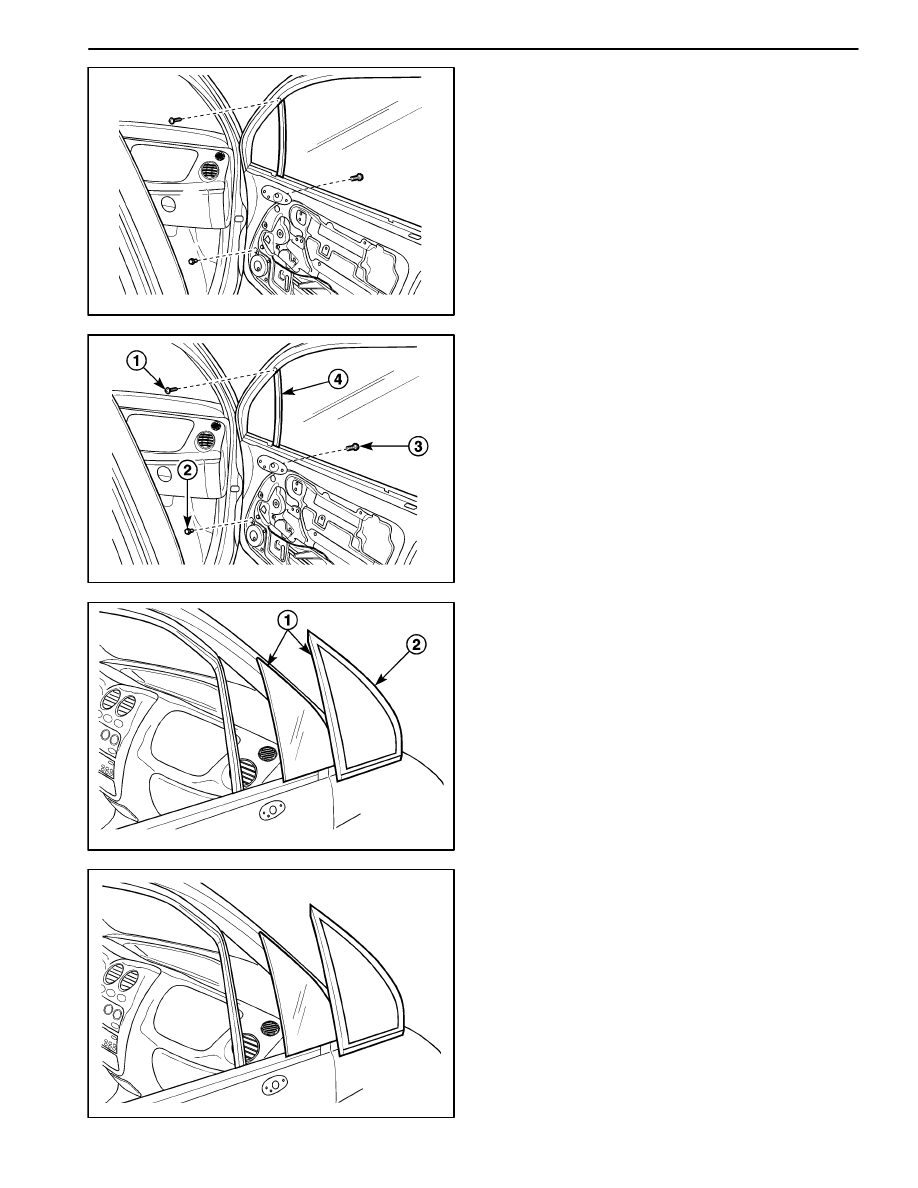
3. Remove the guide rail.
D
Remove the screw (1).
D
Remove the inside bolt (2).
D
Remove the outside bolt (3).
D
Remove the division bar (4).
D109E525
4. Remove the quarter glass from the front door.
D
Remove the quarter glass assembly (1).
D
Remove the quarter glass run (2).
D19E525A
Installation Procedure
1. Install the quarter glass with the quarter glass run.
GLASS AND MIRRORS 9L – 13
DAEWOO M-150 BL2
D109E526
2. Install the division bar with the guide rail inside bolt,
the guide rail outside bolt and the guide rail screw.
3. Inside the outside rearview mirror. Refer to “Outside
Rearview Mirror” in this section.
4. Install the front door seal trim. Refer to Section 9P,
Doors.
D19E523
REAR DOOR GLASS
Removal Procedure
1. Remove the glass run. Refer to Section 9P, Doors.
2. Remove the glass.
D
Remove the bolts (1).
D
Remove the glass (2).
Notice: Make sure not to contact the glass with the body
to prevent the paint damage.
D19E524
Installation Procedure
1. Install the glass with the bolts.
2. Install the glass run. Refer to Section 9P, Doors.
D19E527
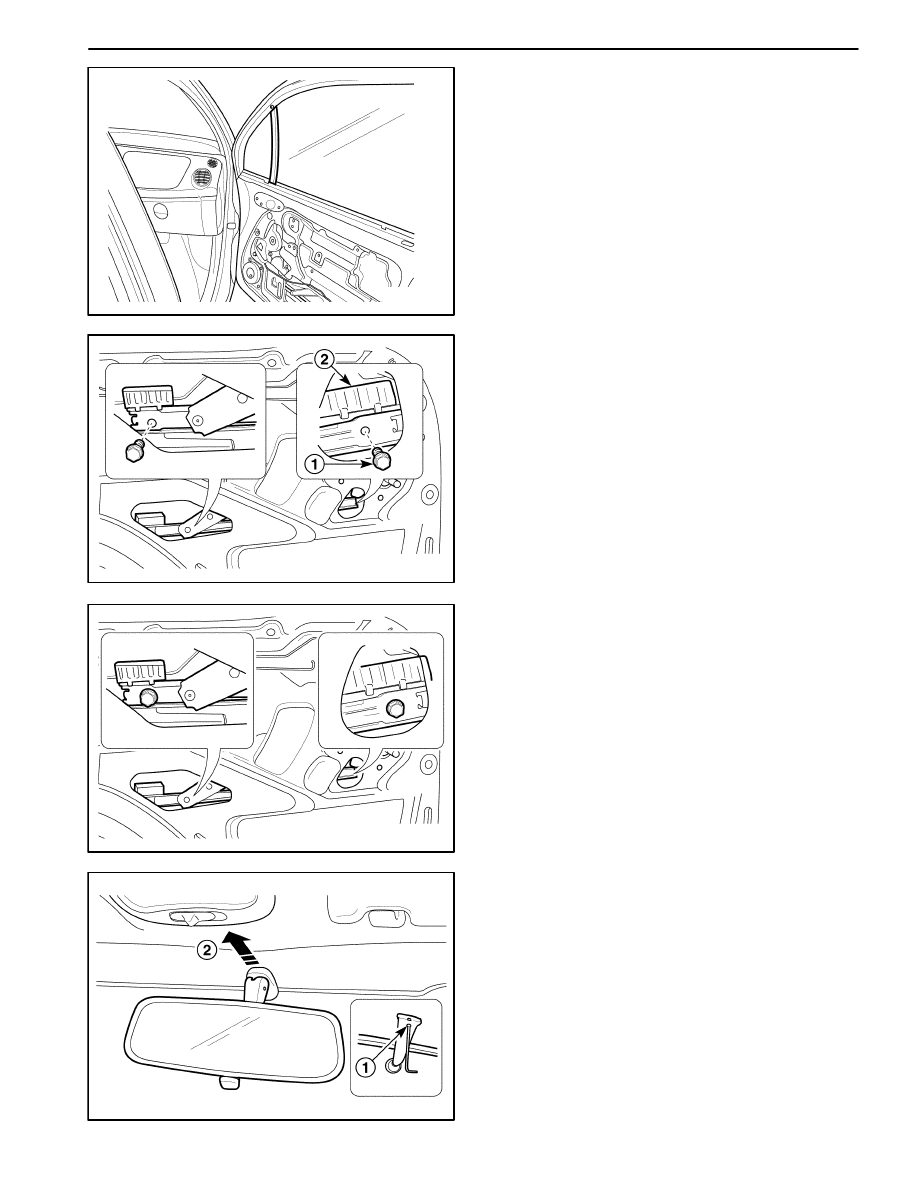
INSIDE REARVIEW MIRROR
Removal Procedure
1. Remove the inside rearview mirror.
D
Remove the screw (1).
D
Remove the inside rearview mirror (2).
9L – 14 GLASS AND MIRRORS
DAEWOO M-150 BL2
D19E528
Installation Procedure
1. Install the inside rearview mirror with the screw.
D19E529
OUTSIDE REARVIEW MIRROR
(MANUAL)
Removal Procedure
1. Remove the outside rearview mirror cover from the
outside rearview mirror.
D19E530
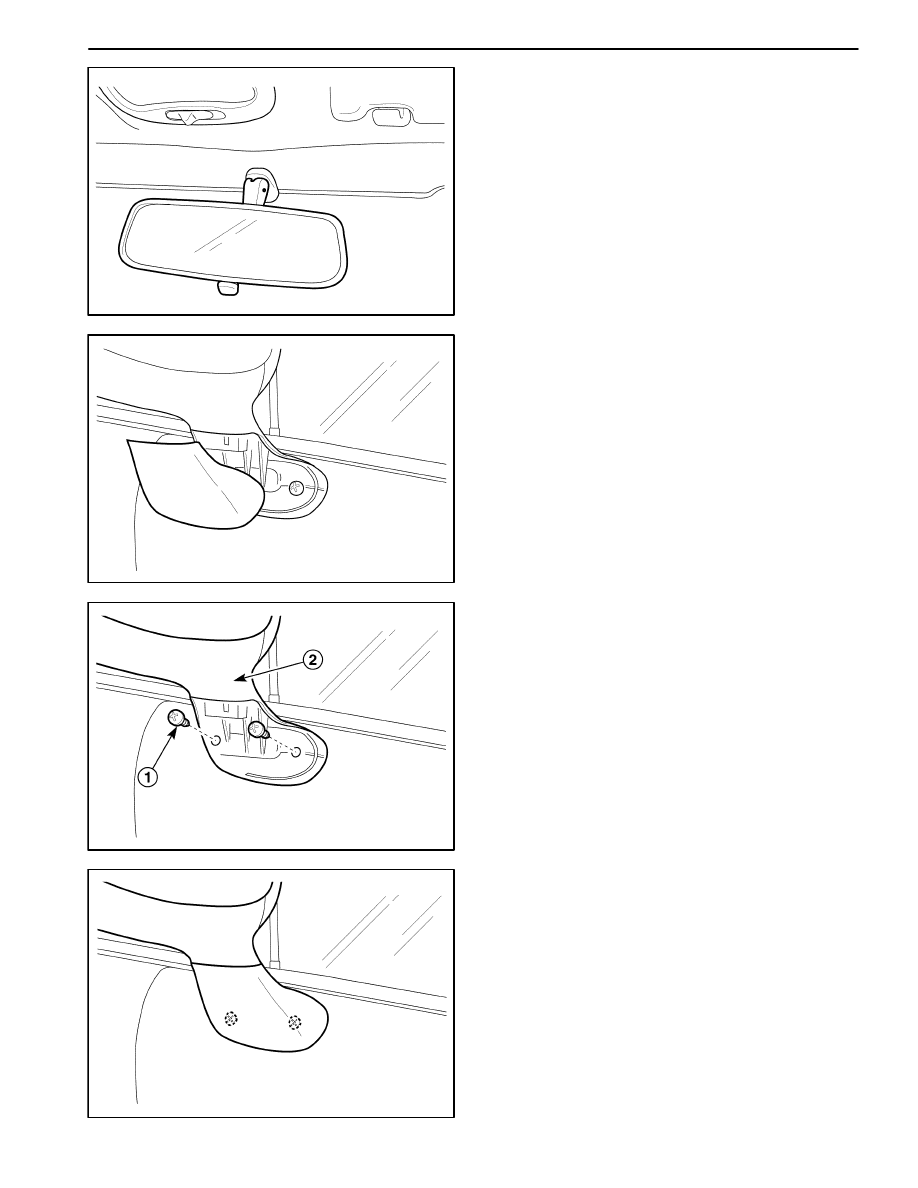
2. Remove the outside rearview mirror.
D
Remove the screws (1).
D
Remove the outside rearview mirror (2).
D19E531
Installation Procedure
1. Install the outside rearview mirror with the screws.
2. Install the outside rearview mirror cover.
GLASS AND MIRRORS 9L – 15
DAEWOO M-150 BL2
D29L001
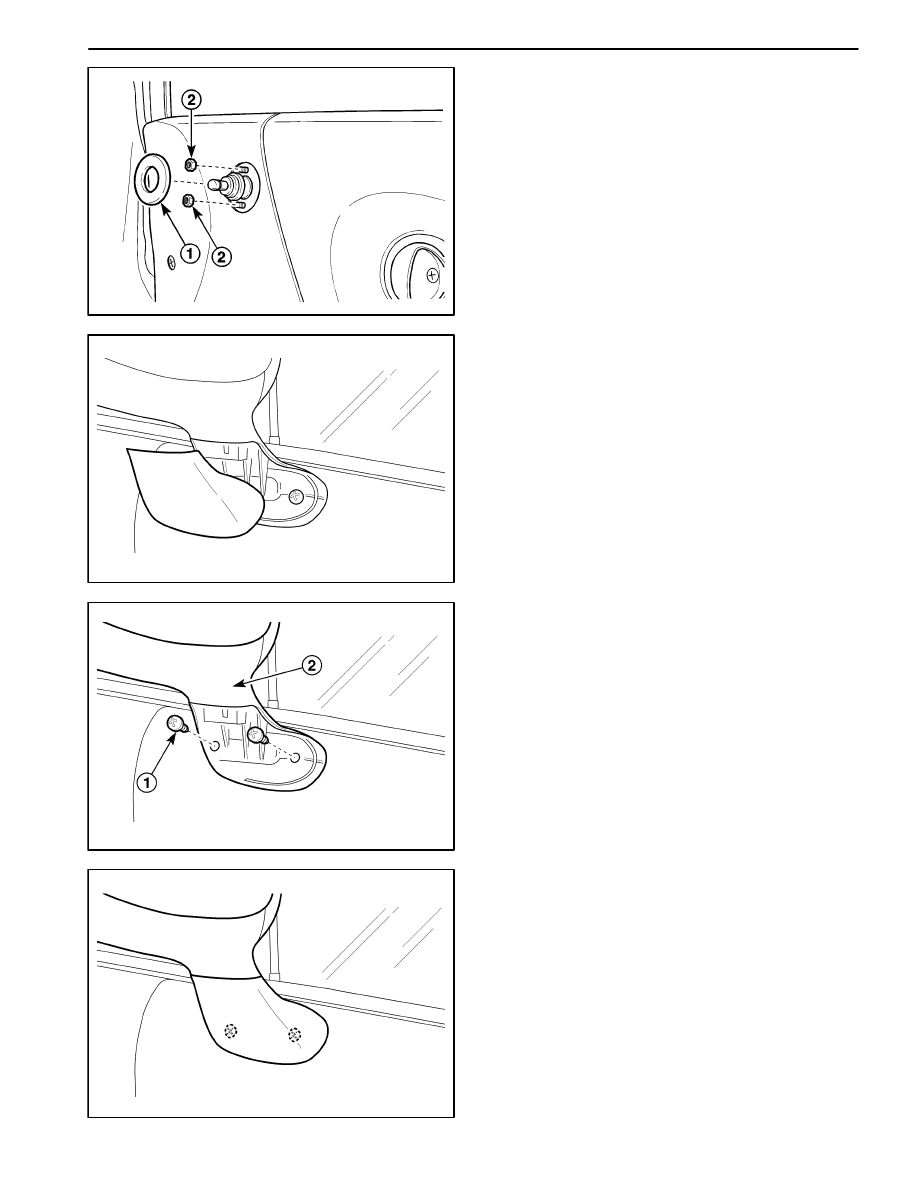
OUTSIDE REARVIEW MIRROR
(CABLE)
Removal Procedure
1. Pry off the outside rearview mirror inside trim cover
(1).
2. Remove the mirror adjusting lever mounting nuts (2).
D109E529
3. Remove the outside rearview mirror cover from the
outside rearview mirror.
D109E530
4. Remove the outside rearview mirror.
D
Remove the screws (1).
D
Remove the outside rearview mirror (2).
D109E531
Installation Procedure
1. Install the outside rearview mirror with the screws.
2. Install the outside rearview mirror cover.
3. Install the mirror adjusting lever with the nuts.
4. Install the outside rearview inside trim cover.

9L – 16 GLASS AND MIRRORS
DAEWOO M-150 BL2
D109E529
OUTSIDE REARVIEW MIRROR
(ELECTRIC)
Removal Procedure
1. Disconnect the negative battery cable.
2. Remove the outside rearview mirror cover from the
outside rearview mirror.
D209B108
3. Remove the outside rearview mirror.
D
Remove the screws (1).
D
Disconnect the electrical connector (2).
D
Remove the outside rearview mirror (3).
D109E531
Installation Procedure
1. Connect the outside rearview mirror.
2. Install the outside rearview mirror with the screws.
3. Install the outside rearview mirror cover.
4. Connect the negative battery cable.
GLASS AND MIRRORS 9L – 17
DAEWOO M-150 BL2
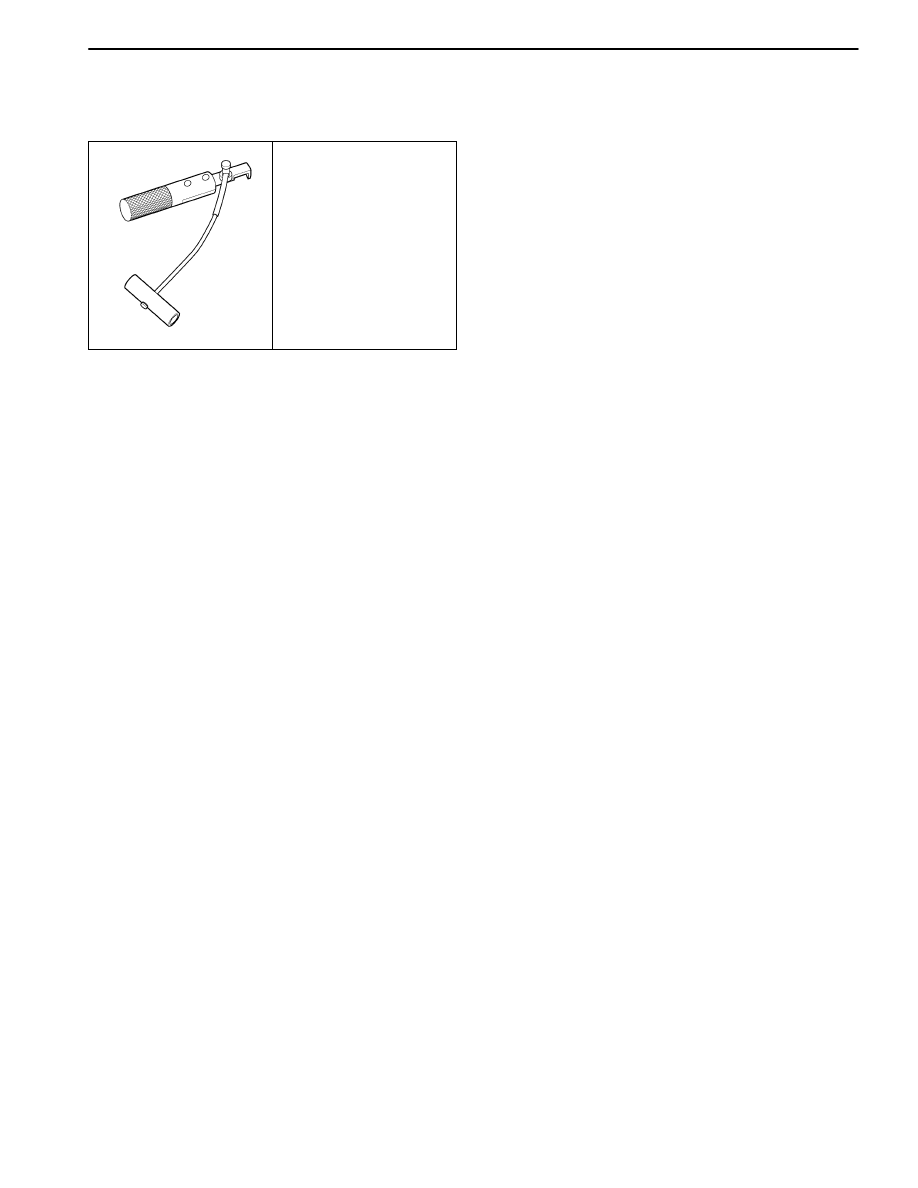
SPECIAL TOOLS AND EQUIPMENT
SPECIAL TOOLS TABLE
D109E102
J-24402
Glass Sealant Remover
9L – 18 GLASS AND MIRRORS
DAEWOO M-150 BL2
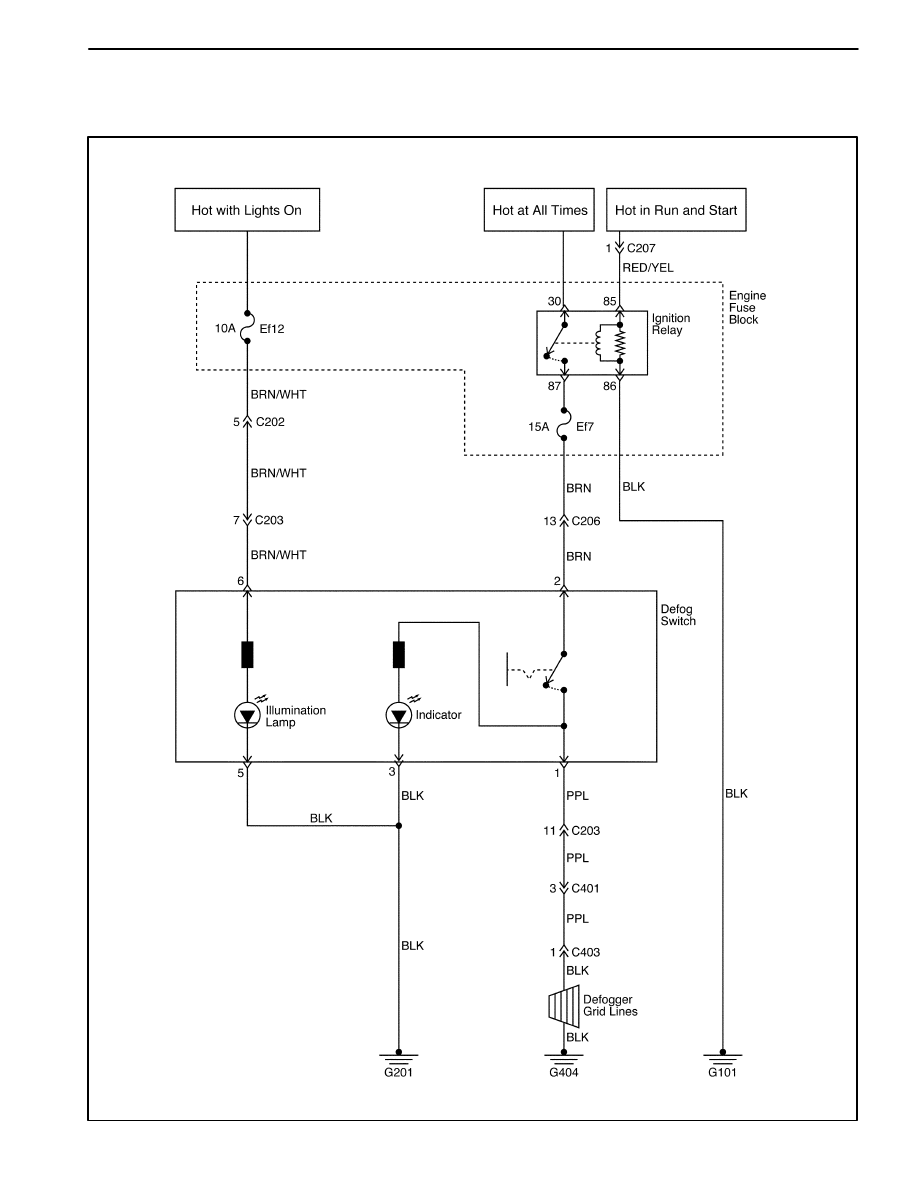
SCHEMATIC AND ROUTING DIAGRAMS
REAR WINDOW DEFOGGER
D19E201B
Wyszukiwarka
Podobne podstrony:
70 Windows and Mirrors
Warren Murphy Destroyer 078 Blue Smoke and Mirrors
Pec 12 frequent questions Sensor Cleaning for DSLR and Mirrorless Cameras
v ray rendering glass and liquid part 2 of 5
The Wolf Among Us Smoke and Mirrors poradnik do gry
dahl charlie 2 charlie and the great glass elevator
Imitation, Mirror Neurons And Autism Review
(autyzm) Hadjakhani Et Al , 2005 Anatomical Differences In The Mirror Neuron System And Social Cogn
Between Lips and Glass
Borovik Mirrors And Reflections The Geometry Of Finite Reflection Groups (2000) [sharethefiles com
John Maddox Roberts Cingulum 03 The Sword, The Jewel and the Mirror
Laser surface modification of hydroxyapatite and glass
26 Audi A6 Automatic Dimmer Inside and Outside Mirror
Robert Asprin and George Takei Mirror Friend Mirror Foe
Postmodernity and Postmodernism ppt May 2014(3)
Scoliosis and Kyphosis
L 3 Complex functions and Polynomials
więcej podobnych podstron