267
Small Tool Instruments and
Data Management
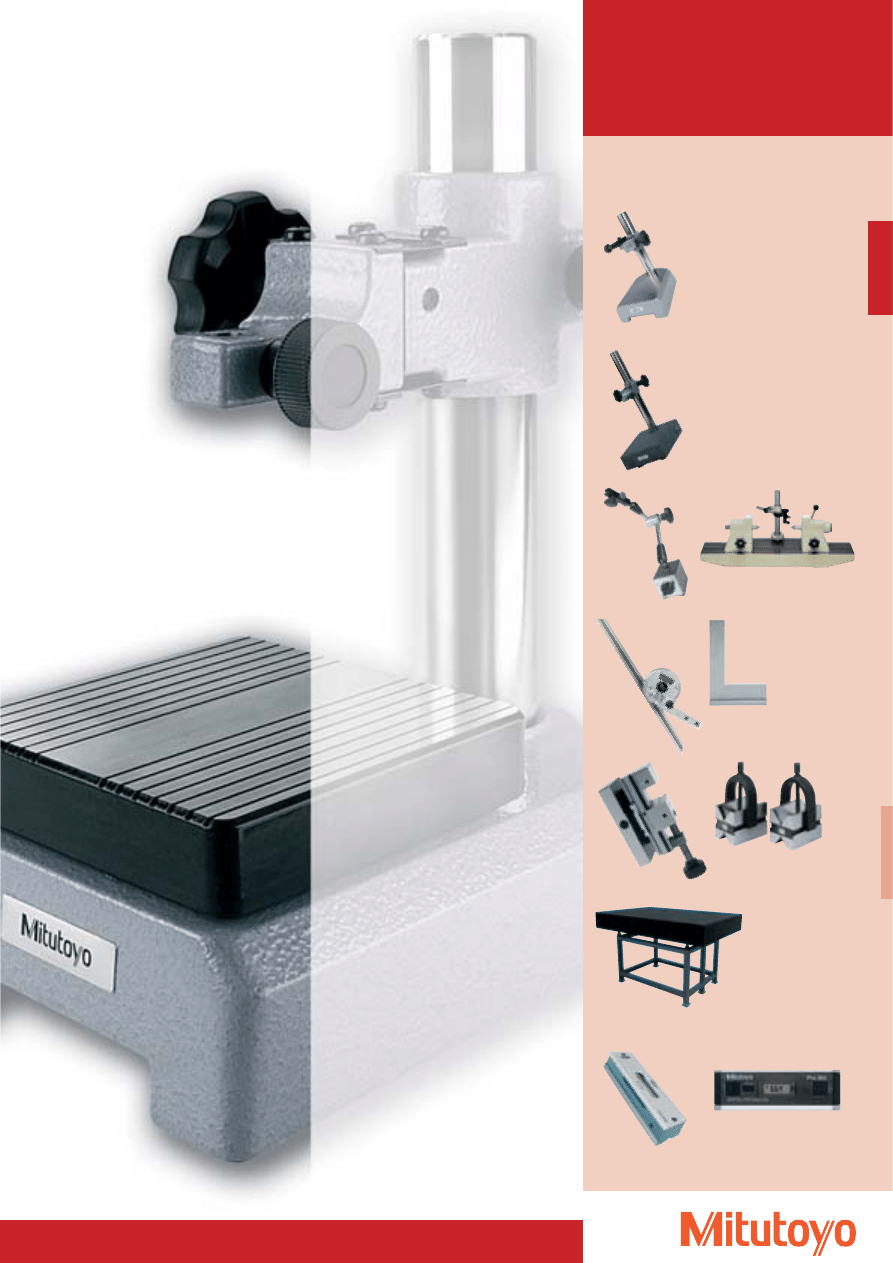
Dial Gauge Stands
Pages 273–274
Comparator Stands
Pages 275–280
Joint Magnetic Stands
Concentricity testers
Angulometers, steel squares
Precision vices
and other measuring aids
Granite Plates
Page 299
Levels
Digital levels
Pages 268–272
Pages 297–298
Pages 286–296
Pages 281–286
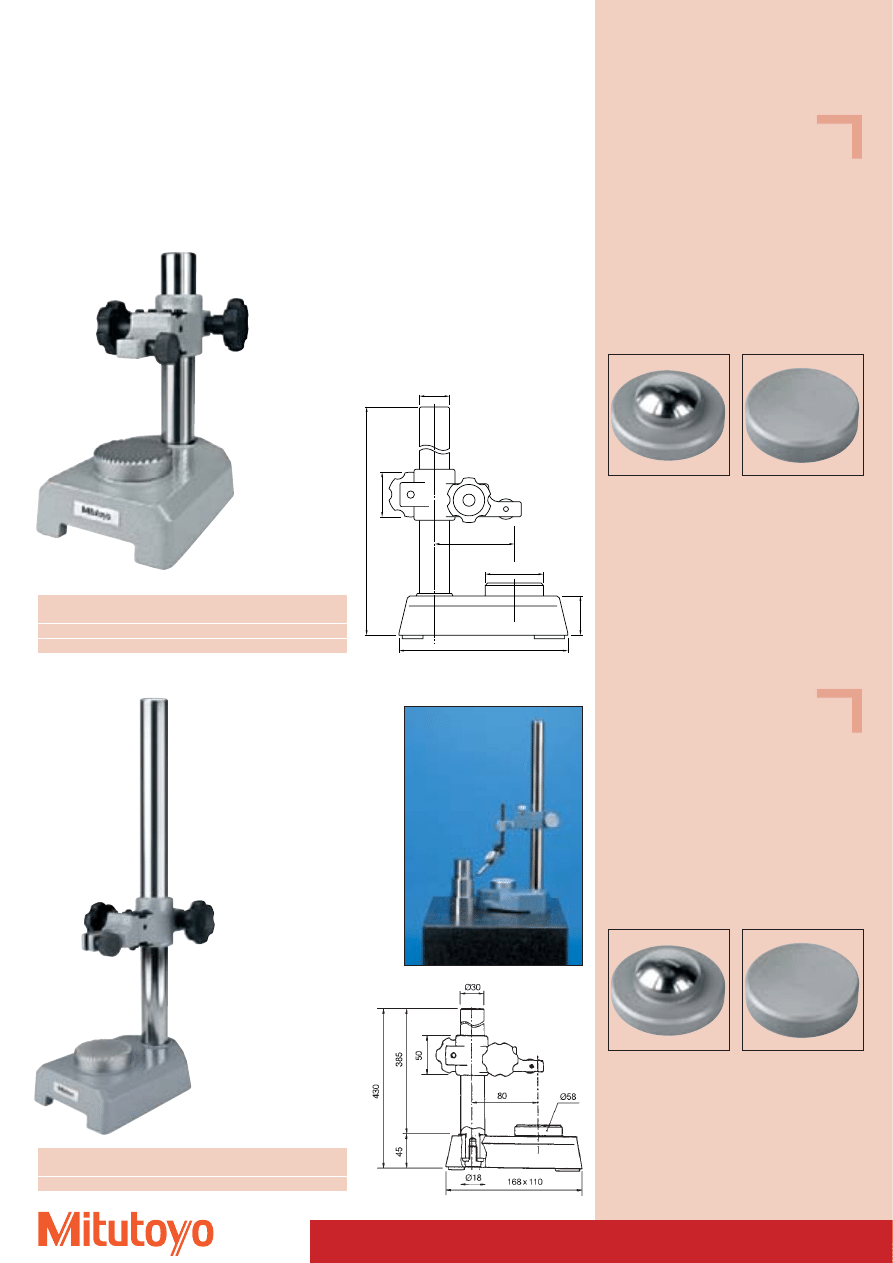
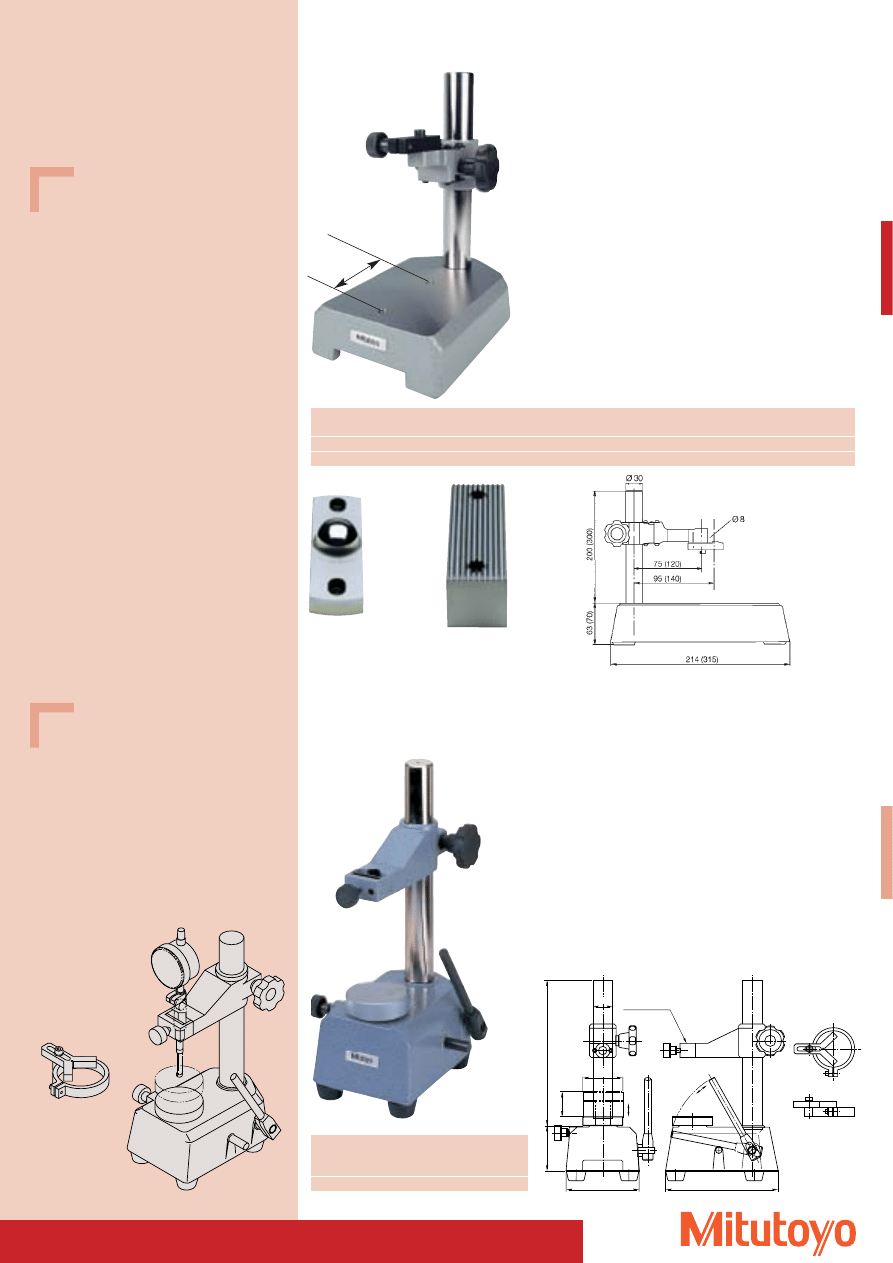
Series 7
Standard version
• Stainless chrom plated steel column.
• Three interchangeable measuring tables, flat, convex and with corrugated toothing.
Ø30
80
168 x 110
Ø58
45
205
50
No.
Max. Measuring height
Measuring table (No..)
Mass
mm
(Standard accessory)
kg
7001 M
100
Corrugated toothing (101462)
5,2
7002 M
100
flat (101461)
5,2
Dial Gauge Stand
Specifications
Column:
Ø 30 mm
Table dimensions:
Ø 58 mm
Base size:
168 x 110 mm
Throat:
65 mm
Bore for dial indicator stem: Ø 8 mm
Fine adjustment:
1 mm with locking
Optional accessory
No. 101463
Measuring table, convex
No. 101461
Measuring table, flat
No. 101462
Measuring table, corrugated toothing
Series 519
No.
Max. Measuring height
Measuring table (No.)
Mass
mm
(Standard accessory)
kg
519–109 MM
300
Corrugated toothing (101462)
6,5
519–109 MM
268
101463
101461
101463
101461
7001 M
269
Specifications
Column:
Ø 30 mm
Table dimensions:
90 x 90 mm
Base size:
168 x 110 mm
Throat:
65 mm
Bore for dial indicator stem: Ø 8 mm
Fine adjustment:
1 mm
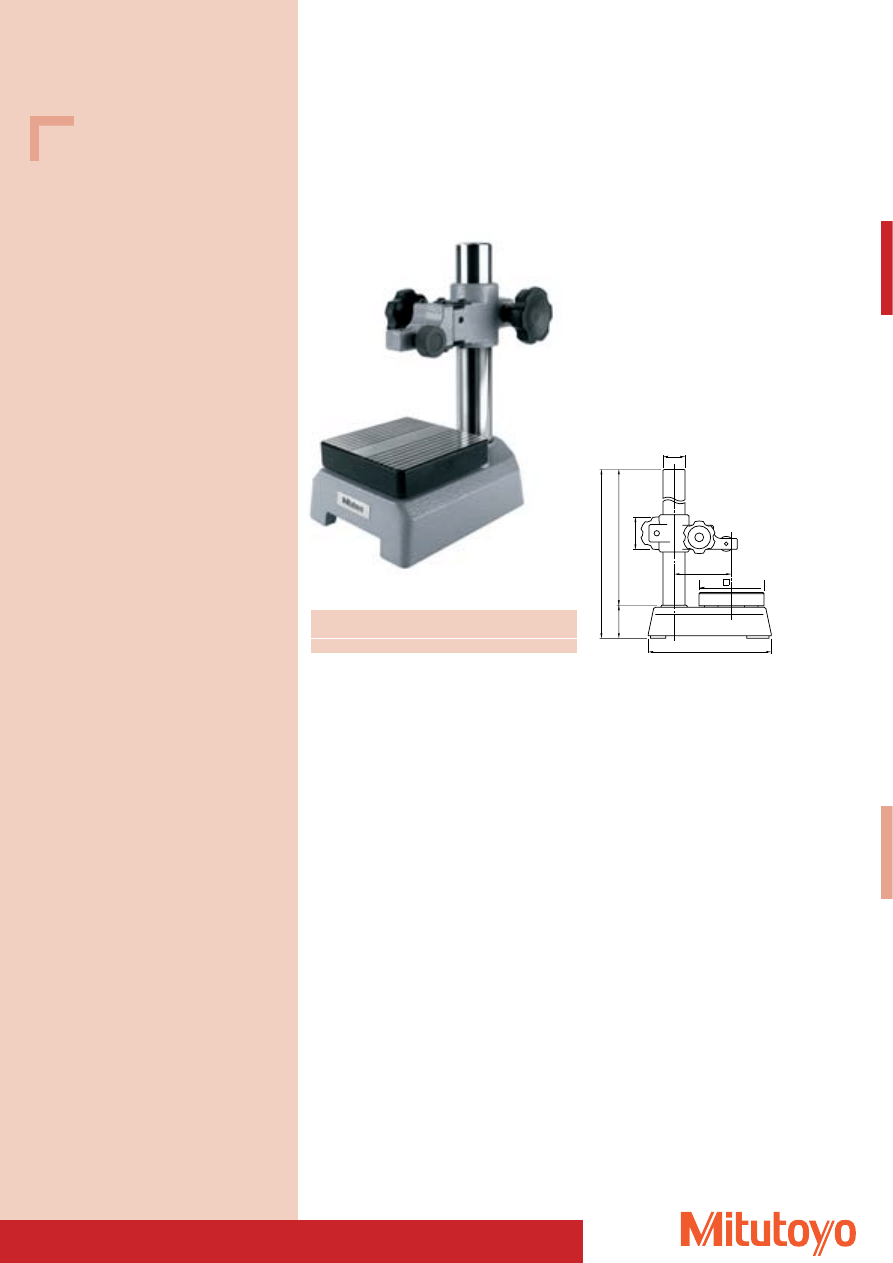
Dial Gauge Stand
Series 7
Standard version with large table
• Cast base; measuring table made of hardened steel with lapped surface.
Ø30
80
168 x 110
45
160
205
50
90
No.
Max. Measuring height
Mass
mm
kg
7007 M
90
5,6
7007 M
270
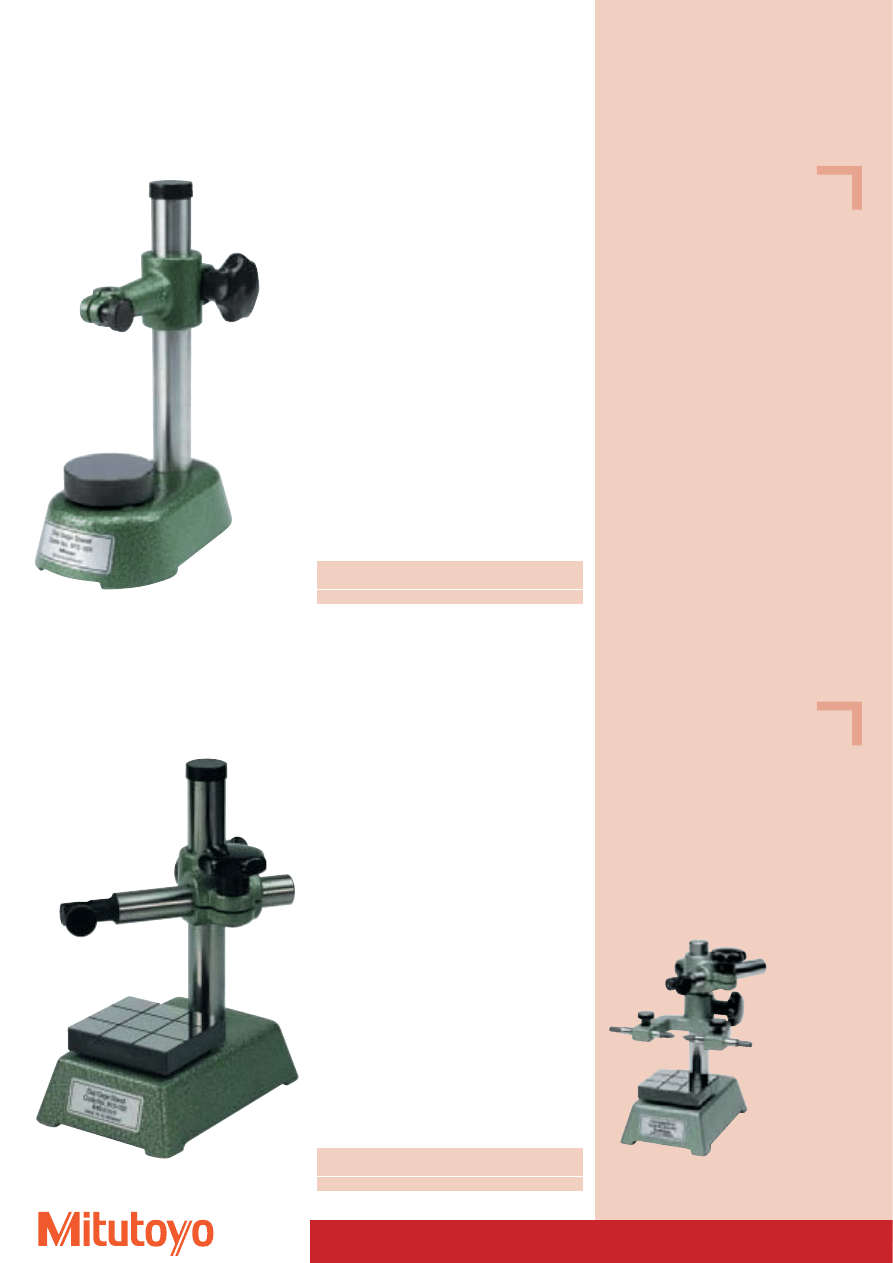
Series 913
No.
Max. Measuring height
Measuring table
Throat
mm
mm
mm
913–102
100
60 x 70
100
Specifications
Column:
Ø 22 mm
Table dimensions:
60 x 70 mm
Throat:
100 mm
Bore for dial indicator stem: Ø 8 mm
Optional accessory
No. 913–201
Horizontal measuring bow
for comprehensive measuring
applications
Center distance: max. 45 mm
913–102
913–102 with 913–201
Specifications
Column:
Ø 22 mm
Table dimensions:
Ø 50 mm
Throat:
50 mm
Bore for dial indicator stem: Ø 8 mm
Optional accessory
No. 913–201
Horizontal measuring bow
for comprehensive measuring
applications
Center distance: max. 45 mm
(see below)
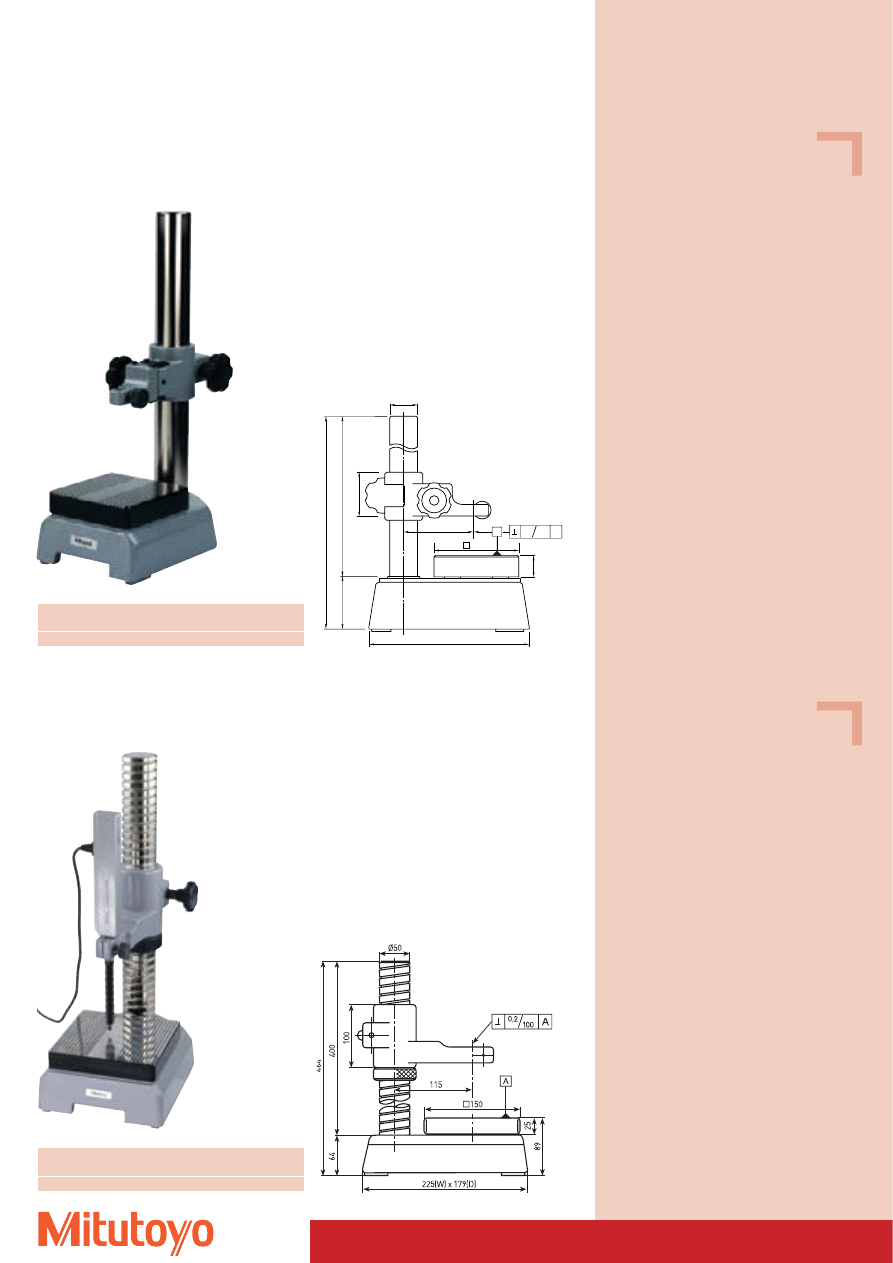
Comparator Stands
• Simple standard version.
• Ground and lapped table surface.
• Hardened and ground column.
Series 913
No.
Max. Measuring height
Measuring table Throat
mm
mm
mm
913–101
100
Ø 50
50
913–101
271
Specifications
Column:
Ø 30 mm
Throat:
80 mm (215–631)
125 mm (215–641)
Bore for dial indicator stem: Ø 8 mm
Optional accessory
No. 990029
Measuring table with corrugated
toothing 38,1x101,6 x 38,1 mm
No. 990031
Measuring table with convex
steel ball Ø 30 mm
No.
Max. Measuring height
Mass
consisting of:
mm
kg
215–631
100
8,5
Column 200 mm, Ø 30 mm
215–641
200
13,5
Column 300 mm, Ø 30 mm
Comparator Stands
215–631
Series 215
990031
990029
76,2 mm
The details in brackets refer to No. 215–641
Specifications
Measuring stroke: max. 38 mm
Optional accessory
No. 902798
Detachable angle stop for safe and
quick workpiece positioning under
the measuring instrument,
for Ø 8–16 mm
Quick Stand
• Quick stand for precision bore gauges, for serial inside measuring of small parts.
902798
Ø 30
Ø 60
220
68
38
110
170
Ø 8 - Ø 14
902798
No.
Max. Measuring Measuring
Mass
height
table
mm
Ø mm
kg
215–120 M
110
60
6,5
Series 215
215–120 M
272
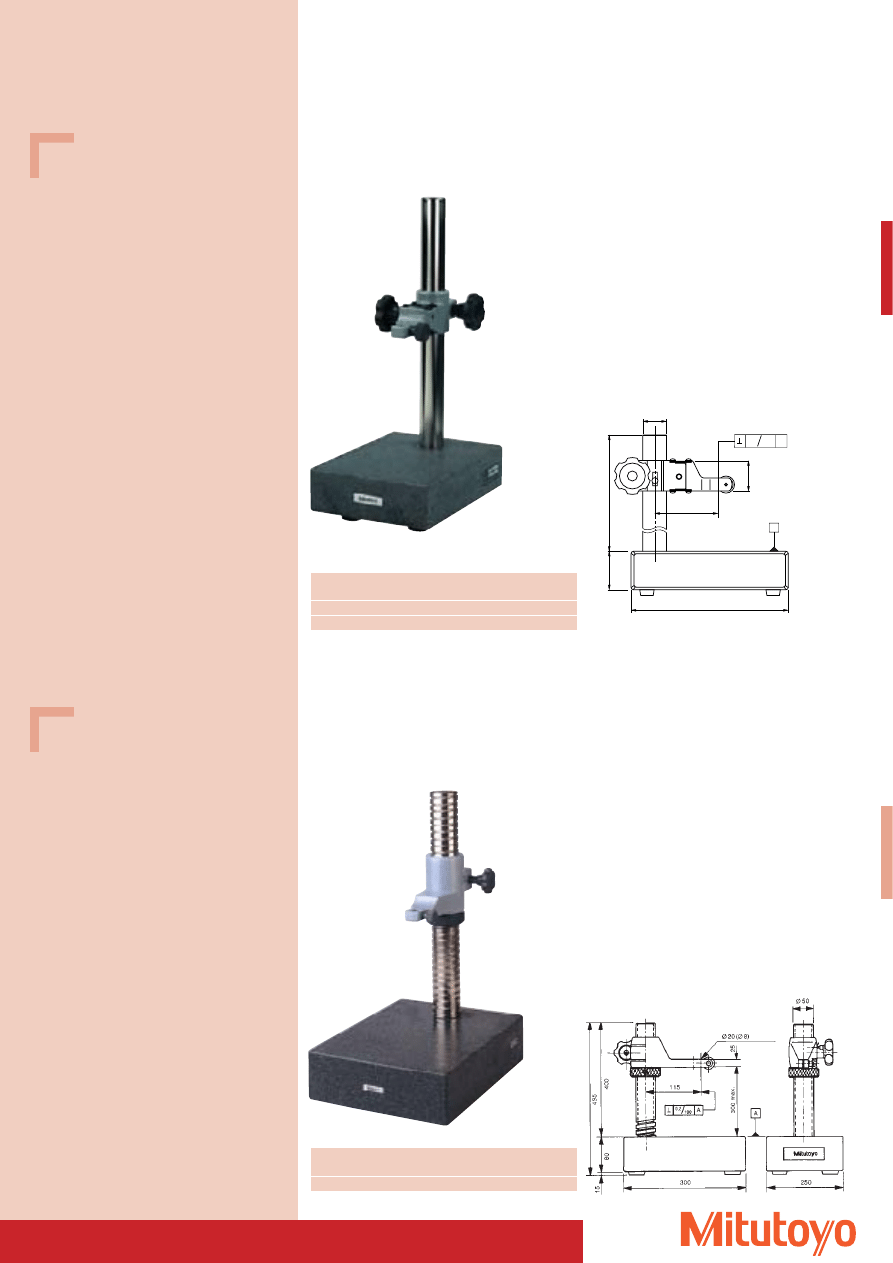
Comparator Stand
No.
Max. Measuring height
Measuring table
Mass
mm
mm
kg
215–505
260
150 x 150
23
Series 215
Version with large table and high threaded column
215–505
Specifications
Column:
Ø 50 mm
Table dimensions:
150 x 150 mm
Base size:
255 x 179 mm
Throat:
90 mm
Bore for dial indicator stem: Ø 20 mm
(Ø 8 / Ø 15 mm over
bushing)
Standard accessory
No. 58AAA151
Bushing Ø 8 mm
Optional accessory
No. 58AAA276
Bushing Ø 15 mm
No.
Max. Measuring height
Measuring table
Mass
mm
mm
kg
215–405
200
110 x110
12,5
Series 215
Standard version with large table and high column
Table surface ground and lapped, column hardened and precision ground
215–405
Specifications
Column:
Ø 40 mm
Table dimensions:
110 x 110 mm
Base size:
214 x 142 mm
Throat:
75 mm
Bore for dial indicator stem: Ø 8 mm
Fine adjustment:
1 mm
Ø40
95
214 x 142
69
320
389
60
25
110
A
0,2
100
A
273
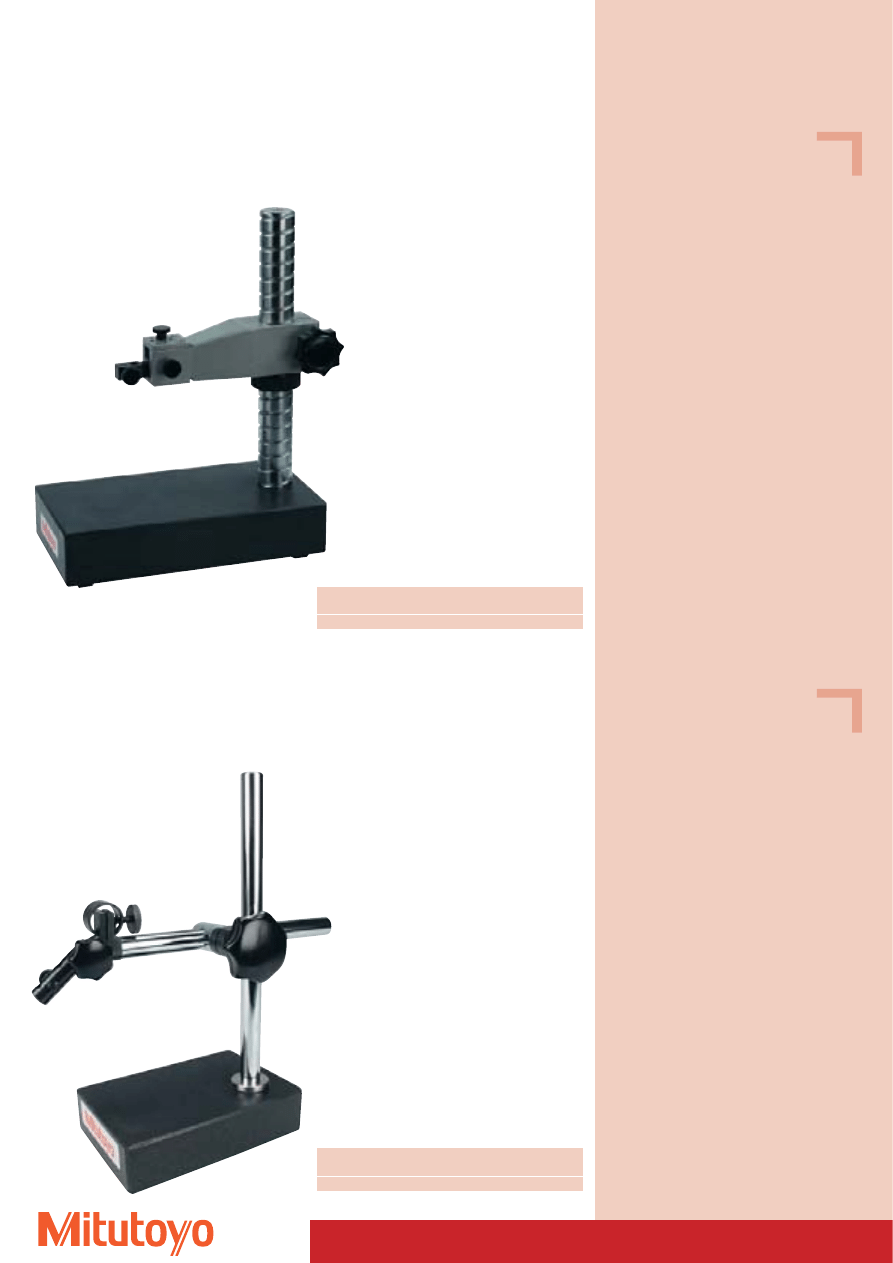
Series 215
With wear-resistant hard rock table
215–151 M
The details in brackets relate to
No. 215–150 M
Specifications
Column:
Ø 30 mm
Base size:
120 x 180 mm
(215–150 M)
150 x 200 mm
(215–151 M)
Throat:
65 mm
Bore for dial indicator stem: Ø 8 mm
Fine adjustment:
1 mm
Table flatness:
3 mm
No.
Max. Measuring height
Measuring table
Mass
mm
mm
kg
215–150 M
120
120 x 180
5,7
215–151 M
260
150 x 200
8,0
Fine Gauge Stand
No.
Max. Measuring height
Measuring table
Mass
mm
mm
kg
215–156
300
300 x 250
29,5
Series 215
Wear-resistant hard rock table
With threaded column, without fine adjustment.
Specifications
Threaded column:
Ø 50 mm
Table dimensions:
300 x 150 mm
Base size:
250 x 300 mm
Throat:
90 mm
Bore for dial indicator stem: Ø 20 mm
(Ø 8 / Ø 15 mm over
bushing)
Table flatness:
6 mm
Standard accessory
No. 58AAA151
Bushing Ø 8 mm
Optional accessory
No. 58AAA276
Bushing Ø 15 mm
300
(1
60)
(180 x 120)
80
Ø30
50
40
200 x 150
A
0,2
100
A
215–156
274
Series 912
Hard rock base
With cross arm and fine adjustment
912–101
Fine Gauge Stand
Series 912
Hard rock, fine diamond-lapped measuring table
Arm with 120 mm projection
912–105
Specifications
Column:
Ø 16 mm
Cross arm:
Ø 16 mm
Usable measuring surface:
100 x 100 mm
Base size:
150 x 100 x 40 mm
Throat:
150 mm (adjustable)
Bore for dial indicator stem: Ø 8 mm
Table flatness:
2 mm
Specifications
Column:
Ø 35 mm
Usable measuring surface:
200 x 140 mm
Base size:
260 x 140 x 50 mm
Throat:
120 mm
Bore for dial indicator stem: Ø 8 mm
Fine adjustment:
8 mm
Table flatness:
2 mm
No.
Max. Measuring height
Mass
mm
kg
912–101
180
2,8
No.
Max. Measuring height
Mass
mm
kg
912–105
200
9,5
275
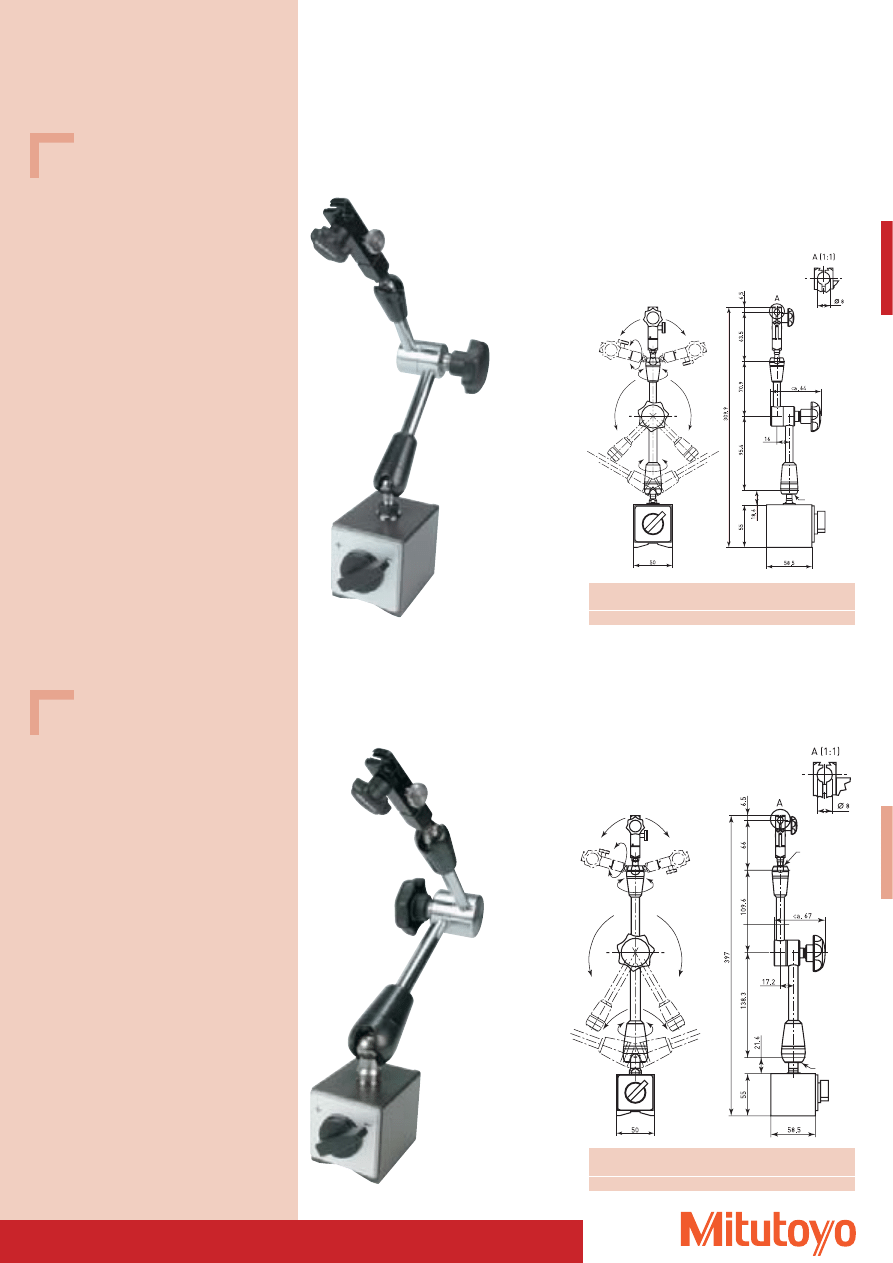
Joint magnetic stand
No.
Working radius
Total height
Mass
mm
mm
kg
011358
200
310
1,55
Series 7
The dial indicator can be fixed in any position using the clamping
011358
Specifications
Magnetic force:
750 N vertical
retractile force
Base size:
60 x 50 x 55 mm
Bore for dial indicator stem: Ø 8 mm
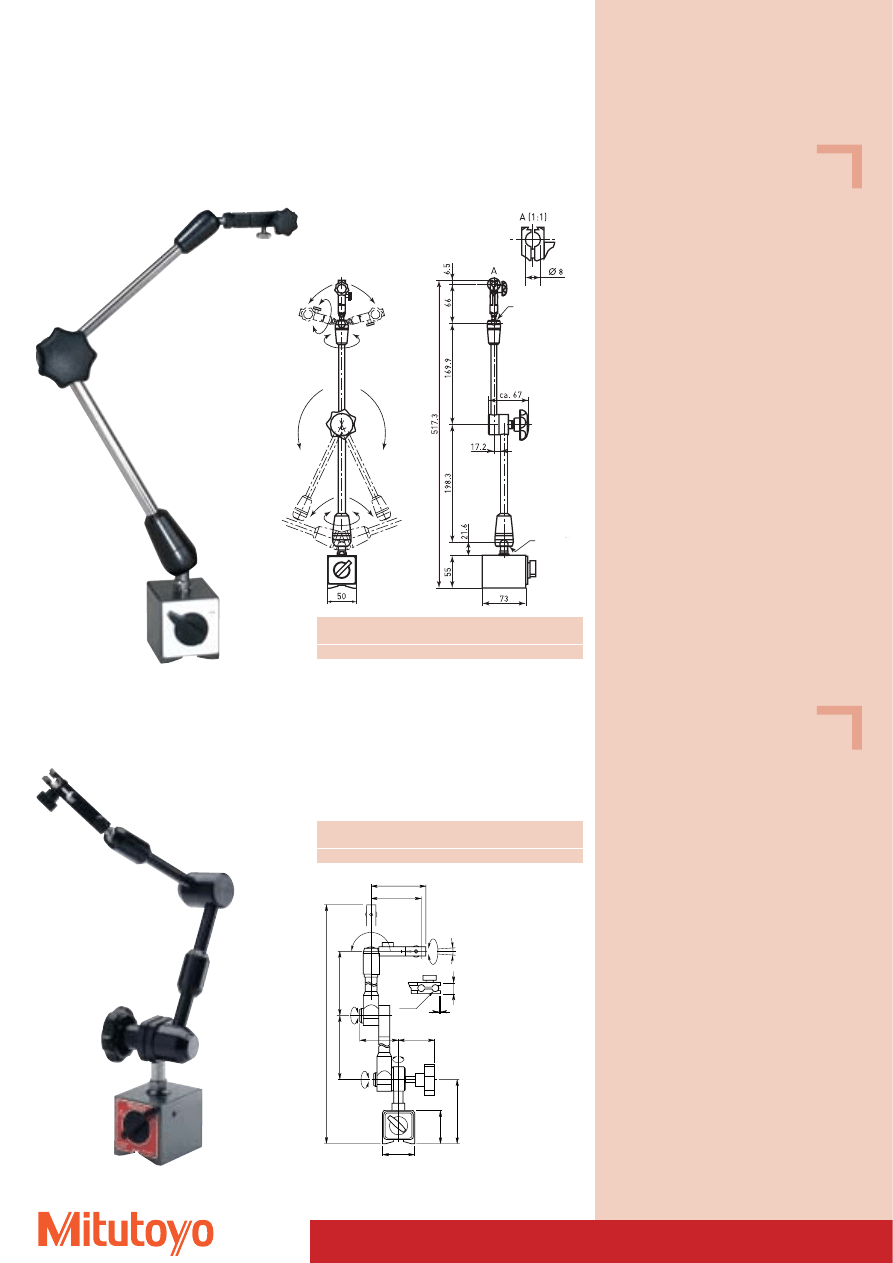
No.
Working radius
Total height
Mass
mm
mm
kg
011359
280
390
1,85
Series 7
The dial indicator can be fixed in any position using the clamping
Specifications
Magnetic force:
750 N vertical
retractile force
Base size:
60 x 50 x 55 mm
Bore for dial indicator stem: Ø 8 mm
011359
Ball Ø 13
Ball Ø 13
Ball Ø 18
276
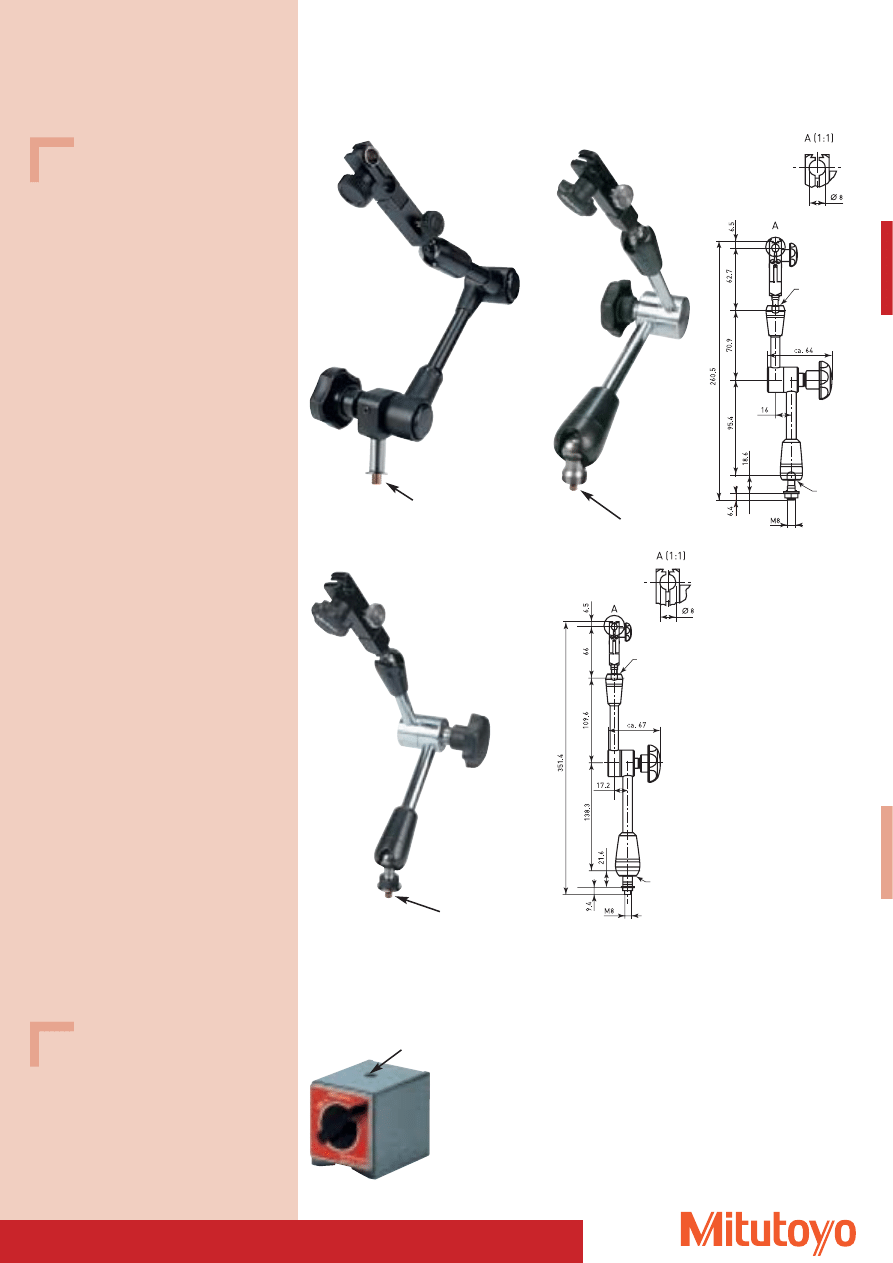
Joint magnetic stand
Series 7
The dial indicator can be fixed in any position using the clamping
011360
No.
Working radius
Total height
Mass
mm
mm
kg
011360
400
510
2,1
Specifications
Magnetic force:
900 N vertical
retractile force
Base size:
75 x 50 x 55 mm
Bore for dial indicator stem: Ø 8 mm
No.
Working radius
Total height
Fine
Mass
ca. mm
mm
Adjustment
kg
7019 B
320
420
±
± 5°
1,75
Series 7
The dial indicator can be fixed in any position by means of the hydraulic clamping
7019 B
97
55
50 x 60
MAX.56
135.5
425.5
350
290
360
180
5
12.7
360
53
112
81
74
1.4
Ø8
Specifications
Magnetic force:
600 N vertical
retractile force
Base size:
50 x 60 x 55 mm
Bore for dial indicator stem: Ø 8 mm
Ball Ø 13
Ball Ø 13
277
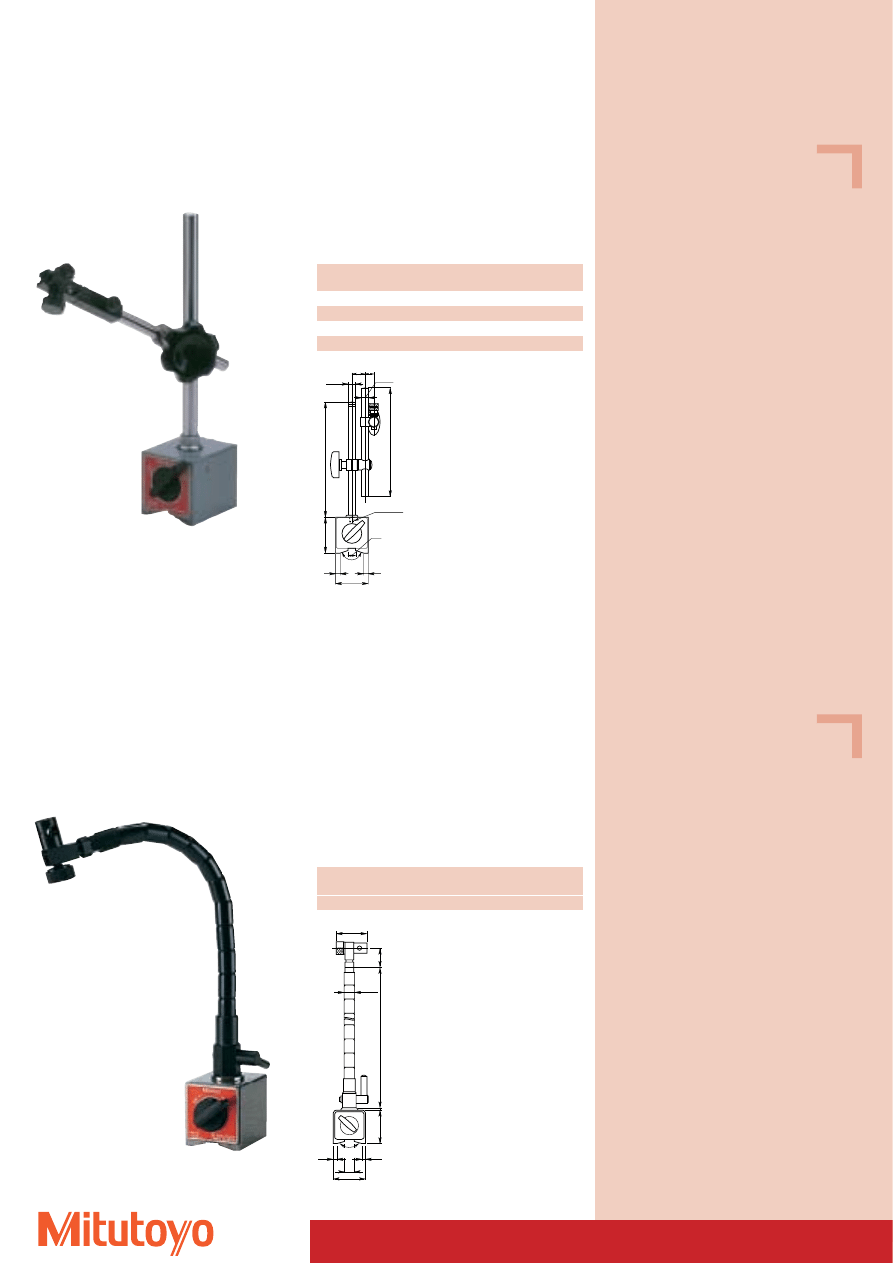
Series 7
7013 B
Magnetic Base
• With measuring V-block
Hydraulic clamping
076360
Flexible Jointarm
Thread M 8 x 1,25 mm
Thread M 8 x 1,25 mm
Mechanical clamping
011361
Thread M 8 x 1,25 mm
Mechanical clamping
011362
Thread M 8 x 1,25 mm
Specifications
No. 7013 B
Magnetic force: 600 N vertical retractile force
Base size:
50 x 60 x 55 mm
Threaded bore: M 8 (for flexible link stand)
Mass:
1 kg
Specifications
No. 076360
Working radius:
ca. 320 mm
Bore for dial indicator stem: Ø 8 mm
No. 011361
Working radius:
ca. 200 mm
Bore for dial indicator stem: Ø 8 mm
No. 011362
Working radius:
ca. 280 mm
Bore for dial indicator stem: Ø 8 mm
Ball Ø 10
Ball Ø 13
Ball Ø 13
Ball Ø 18
278
No.
Working radius
Total height
Mass
ca. mm
mm
kg
Without fine adjustment
7010 SN
150
235
1,25
With fine adjustment
7011 SN
160
235
1,45
Series 7
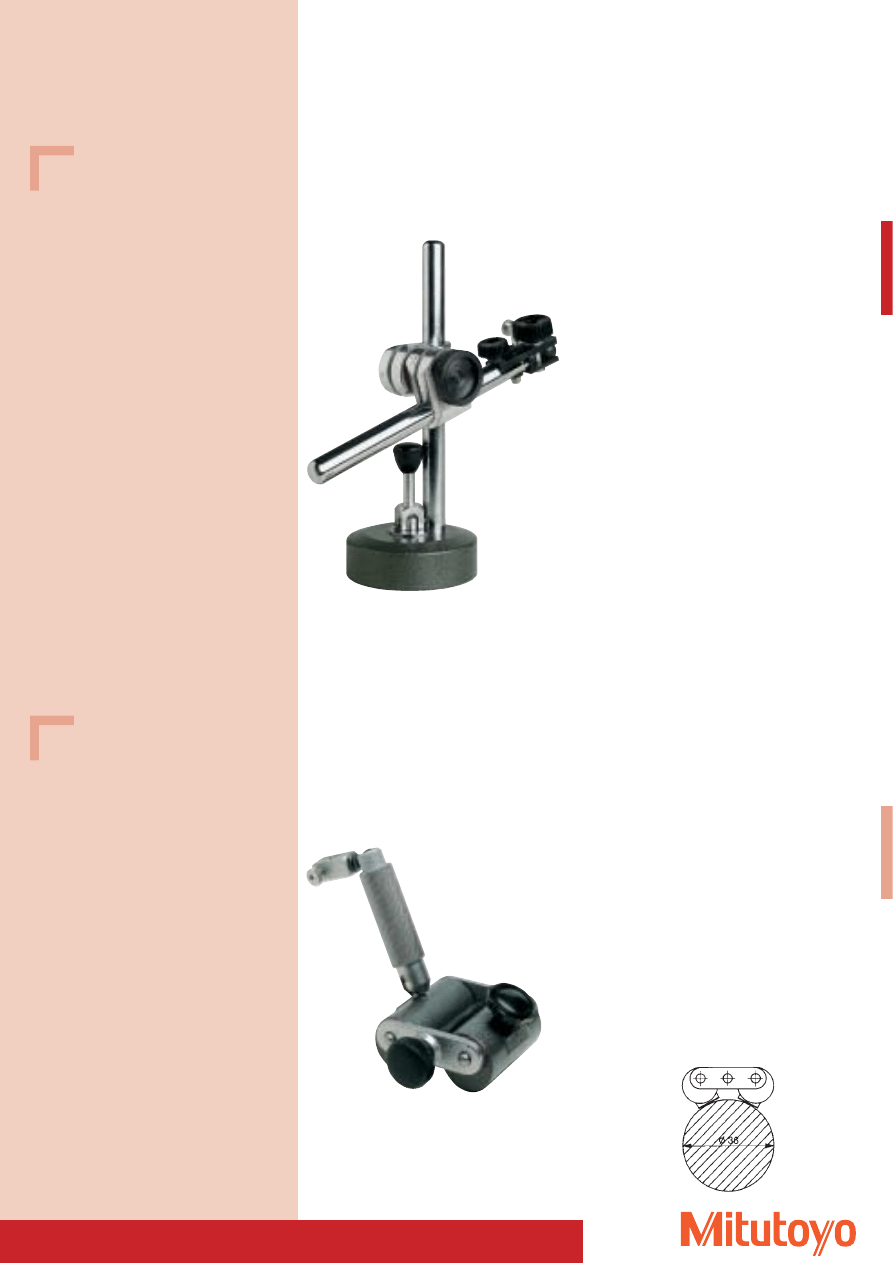
Universal dial indicator holder
• With measuring V-block
7011 SN
Magnetic Stands
20 13
165 (150)
176
55
Ø12
Ø10
12
5
5
150
M8x1.25
50 x 60
No.
Working radius
Total height
Mass
ca. mm
mm
kg
7012
250
393
1,5
Series 7
Universal dial indicator holder
• With measuring V-block and flexible column..
47.2
Ø16
30
305
55
3
5
50 x 60
12
5
150
7012
Specifications
Magnetic force:
600 N vertical
retractile force
Base size:
50 x 60 x 55 mm
Bore for dial indicator stem: Ø 9,5 mm
Standard accessory
No. 206983
Bushing for dial indicators
with shaft Ø 8 mm
Optional accessory
No. 206979
300 mm cross arm
(for No. 7010 SN only)
Specifications
Magnetic force:
750 N vertical retrac-
tile force
Base size:
50 x 60 x 55 mm
Bore for dial indicator stem: Ø 9,5 mm
Standard accessory
No. 206983
Bushing for dial indicators
with shaft Ø 8 mm
279
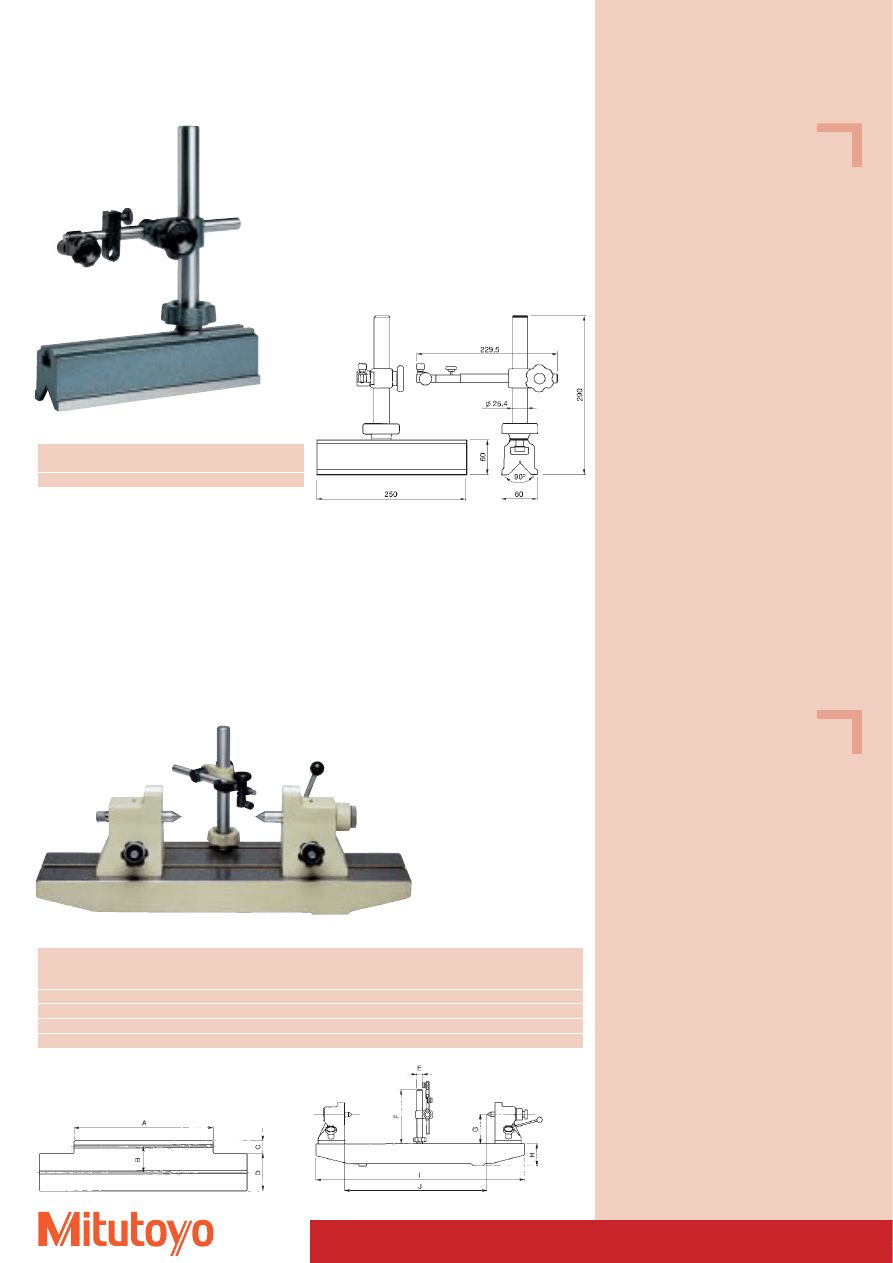
Series 913
Pneumatic stand
• Also adheres on all smooth surfaces such as Granite slabs etc.
Dial Gauge Stand
913–103
Series 913
Magnetic stand
• Specially suited for mounting on cylindrical parts.
• Magnetic base.
913–104
Specifications
No. 913–103
Base diameter:
90 mm
Total height:
245 mm
Vertical arm:
200 x Ø 16 mm
Cross arm:
200 x Ø 16 mm
Bore for dial indicator stem: Ø 8 mm
Mass: 2,3
kg
Specifications
No. 913–104
Bore for dial indicator stem:
Ø 8 mm
Minimum workpiece diameter: 36 mm
280
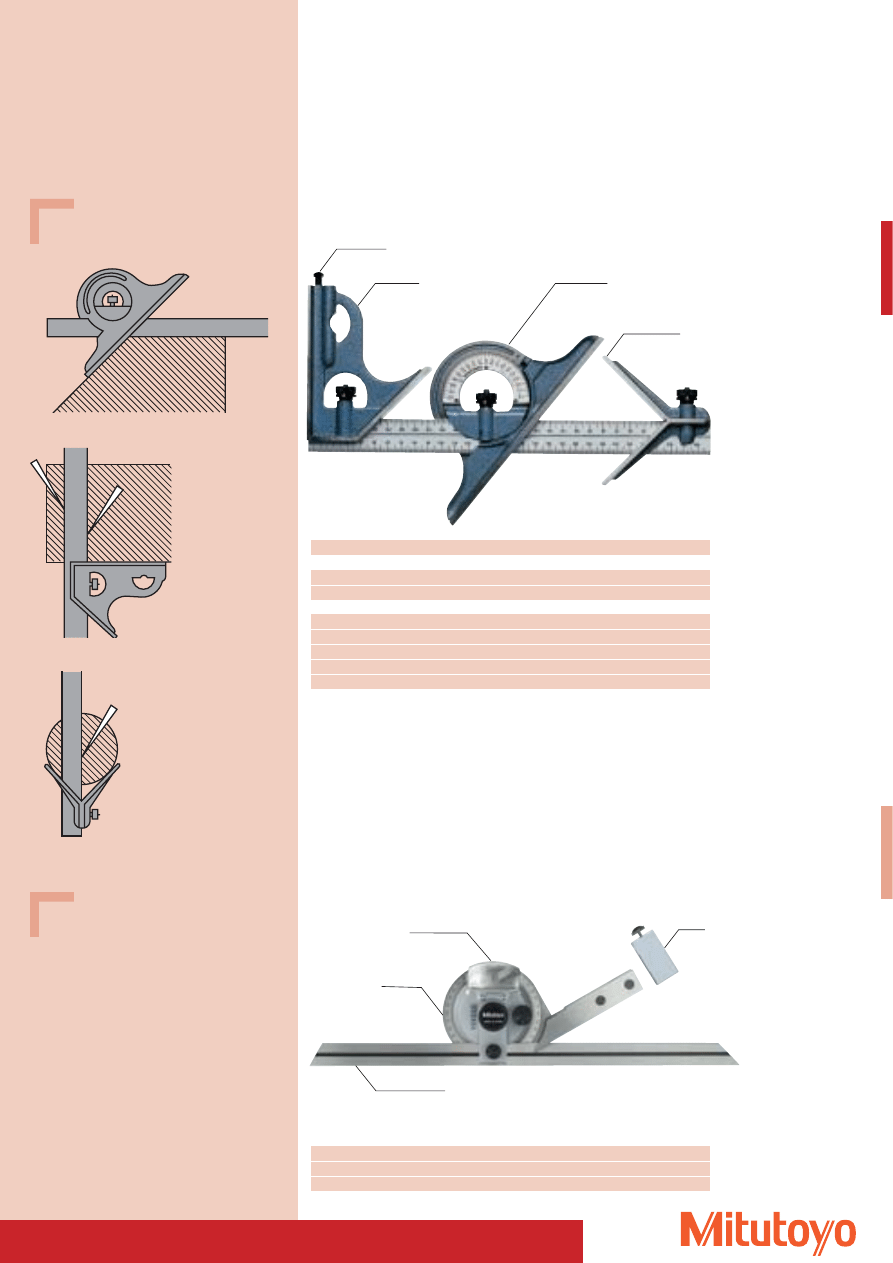
Series 914
Specifications
Bore for dial indicator stem: Ø 8 mm
No.
Base size
Cross arm length
mm
mm
914–101 M
250 x 60
150
Universal Dial Gauge Stand
• With prismatically ground base and adjustable column.
914–101
Series 967
Specifications
Bore for dial indicator stem: Ø 8 mm
No.
Stand Max. center Center
Dimensions
Mass
A
B
C
D
E
F
G
H
I
J
No.
distance
height
mm
mm
mm
kg
mm mm mm mm mm mm mm mm mm mm
967–203 M
068804
150
50
330 x 120 x 111
7
178
60
41
70
16 134,5 50
45 310 150
967–201 M
068802
300
75
500 x 240 x 115
13
370
60
36
80
16 194,5 75
45 500 300
967–101 EM 063303
350
90
674 x 209 x 185
40
400
90
50
140
25 230
90
60 650 350
967–202 M
063303
600
125
900 x 330 x 200
70
600 104
50
160
25 230 125 100 900 600
Precision Bench Centers
• Bench centers made of aged special cast.
• Quill and lathe centers made of hardened steel, precision ground and calibrated.
• Center bearing consisting of 1 tailstock with fixed quill and 1 tailstock
with axially movable quill, adjustable via manual lever.
967–101 EM
914–101 M
281
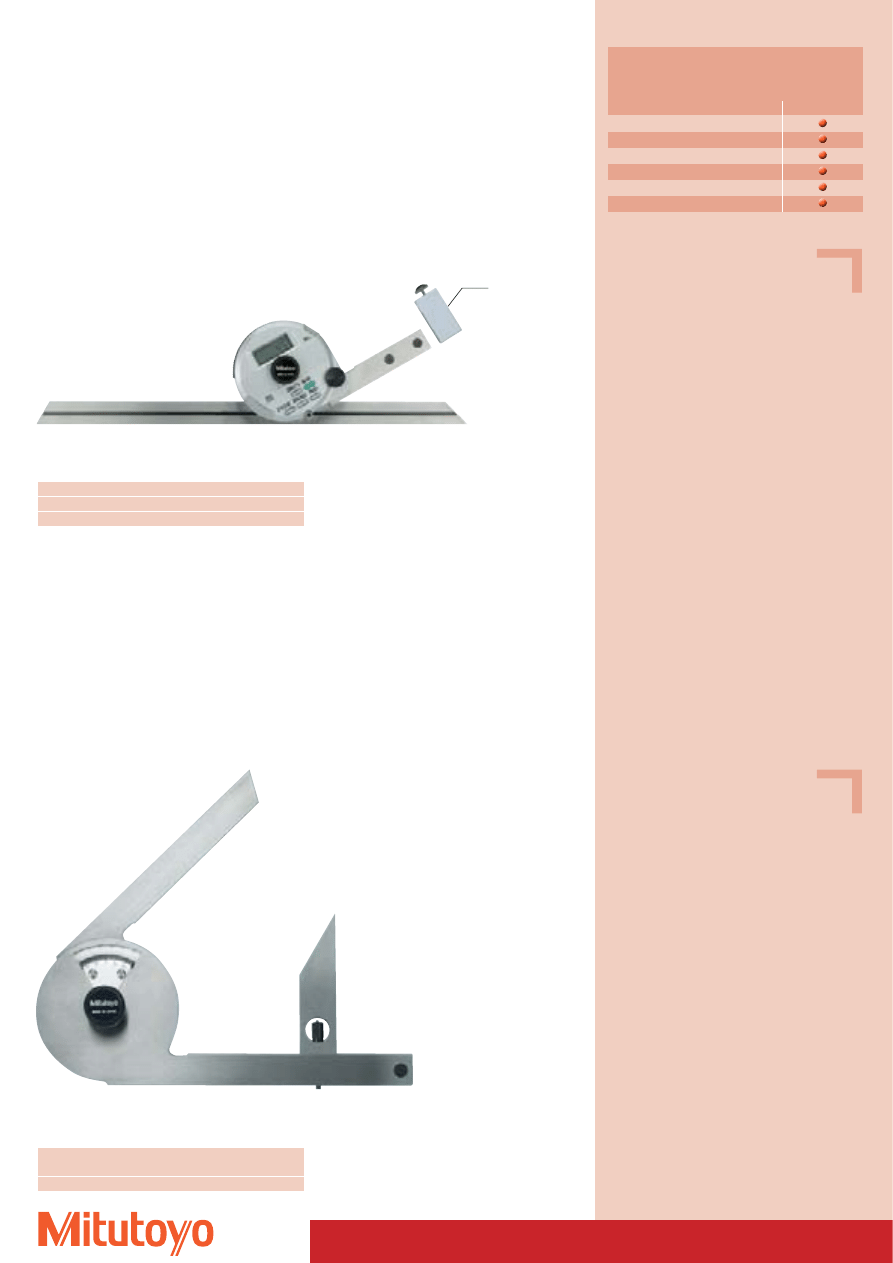
Combination Square Set
• Three accessory components on one rail, hardened, made of stainless steel with 4 graduations,
enable various uses.
• Protractor
Scale satin chrome finished, reversible (front and rear side can be applied).
• Hardened square head, with water level.
• Hardened center head
No.
Design
Sets
180–907 M
Set: 300 mm blade (No. 180–503), protractor, square head and center head
180–910 M
Set: 300 mm blade (No. 180–505), protractor, square head and center head
Individual parts
180–503
Blade: 300 mm length with 4 graduations of 1 mm,
1
/
2
mm,
1
/
32
” and
1
/
64
”
180–505
Blade: 300 mm length with 2 graduations of 1 mm and
1
/
2
mm
180–301 M
Protractor
180–102 M
Square head
180–202 M
Center head
Series 180
180–910 M
Scriber
Square head
Protractor
Center head
Universal Bevel Protractor
• With fine adjustment, reading free from parallax.
• Including magnifying glass.
• With connection facility for height gauges and tracers of series 192 via holder.
No.
Design
187–907
Universal protractor, blade 150 mm (187–106), magnifying glass, holder (950750)
187–908
Universal protractor, blade 300 mm (187–107), magnifying glass, holder (950750)
Series 187
187–908
Blade (300 mm)
Protractor
Magnifying glass
Holder
Specifications
Graduation:
5´
Circle division: 4 x 90°
Including softbox
Optional accessory
No. 187–105
Additional square
No. 187–106
Blade 150 mm
No. 187–107
Blade 300 mm
No. 950750
Holder for height gauges and
tracers
Accessories
No. 180–301 M
Protractor
No. 180–102 M
Square head
No. 180–202 M
Center head
282
No.
Design
Mass
187–501
Universal Bevel Protractor, blade 150 mm
624 g
187–502
Universal Bevel Protractor blade 300 mm
662 g
Specifications
Measuring range: – 360° to + 360°
Error limits:
2’ (0,03°)
Graduation:
1’ (0,01°)
Repeatability:
1’ (0,01°)
Battery life:
2000 hours
Delivery in box inkluding battery
Standard accessory
No. 950750
Holder for height gauges
and tracers
Optional accessory
No. 187–105
Additional angle
No. 187–106
Blade 150 mm
No. 187–107
Blade 300 mm
No. 905338
Signal cable 1 m
No. 905409
Signal cable 2 m
Consumable Spares
No. 05SAA217D
Battery CR-2032
“DIGIMATIC” Universal Bevel Protractor
• Digital Universal Bevel Protractor with easy-to-read digital display.
• Automatic turn-off after 10 minutes, fixed reference points for easy adjustment.
• The measuring blade can be slided and clamped over the entire length.
• Fine adjustment for precise adjustment of arbitrary angle dimensions.
• With connection facility for height gauge and tracers of series 192 via holder.
187–502
Functions
Series 187
PRESET
ZERO-setting
Switching of the counting direction
DATA / HOLD
Angle display decimal/sexadecimal
Data output
Holder
Series 187
with data output
No.
Blade length
Graduation
mm
187–201
135
5’
Specifications
Vernier reading: 5´
Circle division:
4 x 90°
Fixed blade:
135 mm
Adjustable blade: 150 mm
Including softbox
Optional accessory
No. 952624
for height measurement
and tracers series 192
187–201
Series 187
283
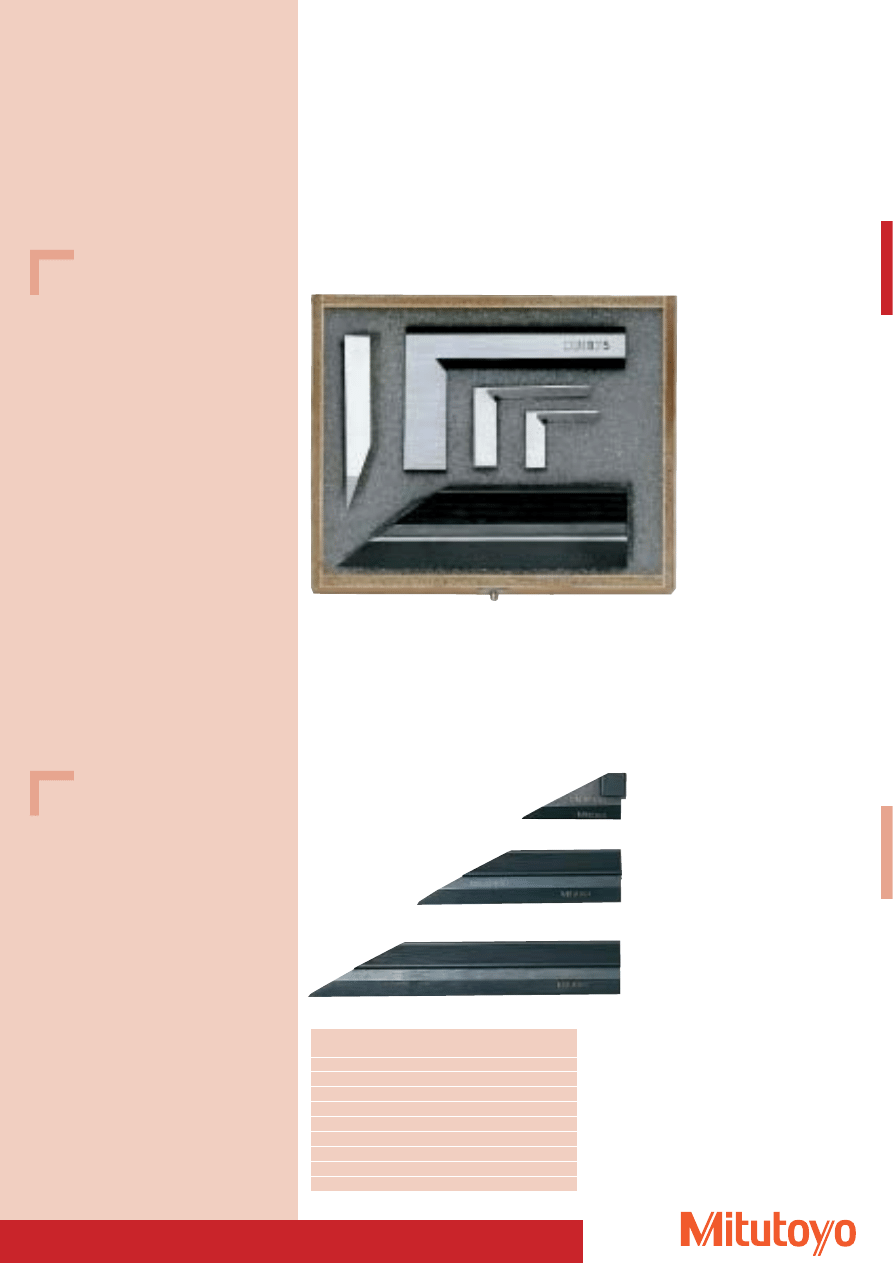
Set with straight edge and precision squares
Series 916
916–110
Straight Edges
• The straight edges are especially suited for testing the flatness of surfaces.
• Hardened, ground and micro lapped measuring edge.
• Made of special steel. With hand guard.
Series 528
528–103
528–102
528–101
No.
Length Note
mm
528–100
50
528–101
75
528–102
100
528–110
125
528–103
150
528–104
200
528–105
300
Supplied in a wooden case
528–106
400
Supplied in a wooden case
528–107
500
Supplied in a wooden case
Contents
Straight edge:
100 mm
Precision square: 75 x 50 mm
Cutting square: 40 x 28 mm
Cutting square: 25 x 20 mm
Scriber:
9 x 9 x 60 mm
Including softbox
Specifications
Wedge shape section: 60°
Accuracy:
according to DIN 874
284
* Including wooden case
916–302
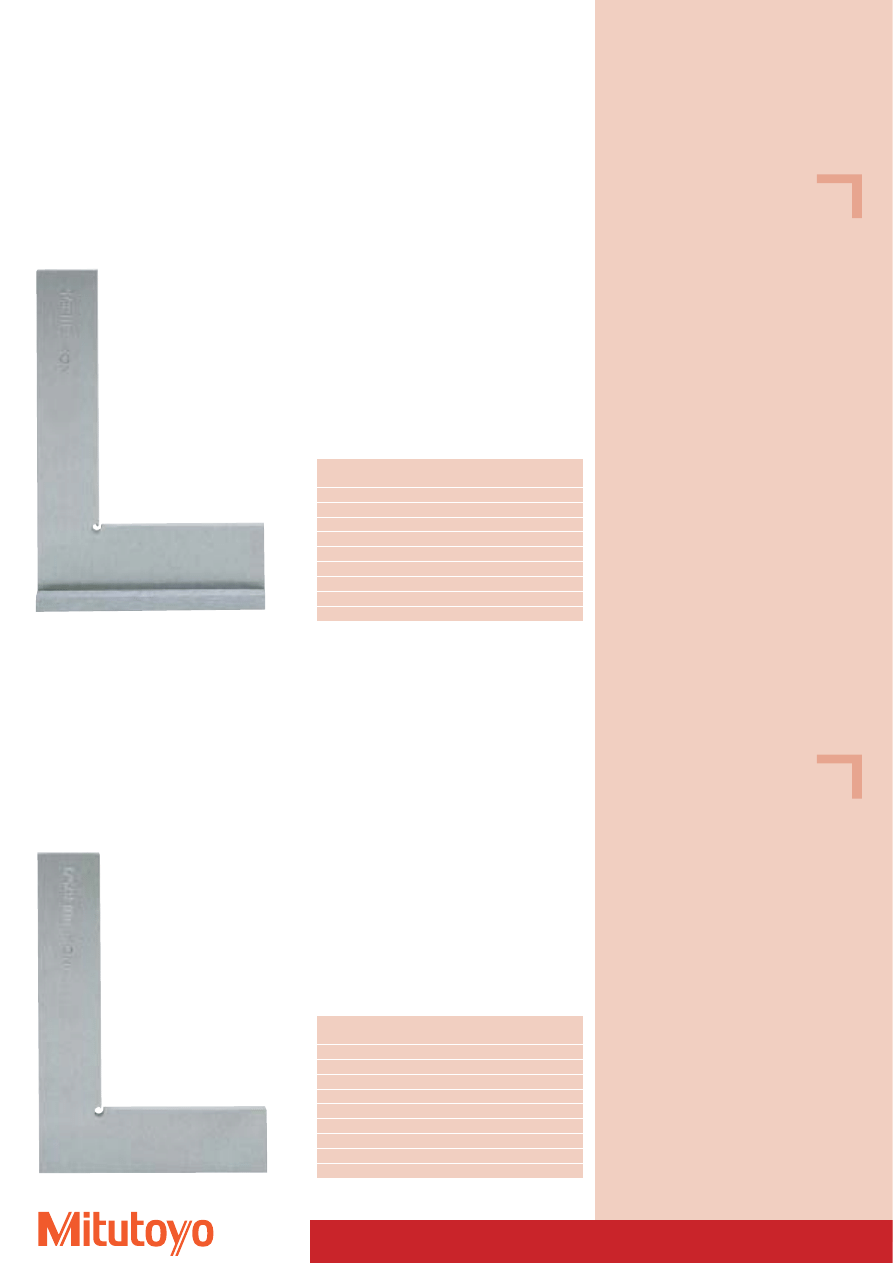
90° Steel square / Engineers Square
• Accuracy grade 0.
Series 916
Shifting square
Specifications
Accuracy:
according to DIN 875
Accuracy grade: 0
Standard steel
Stainless steel
Leg length
Cross section
No.
No.
mm
mm
916–300
916–310
50 x 40
15 x 4,0
916–301
916–311
75 x 50
15 x 4,0
916–302
916–312
100 x 70
20 x 4,0
916–303
916–313
150 x 100
25 x 5,5
916–304
916–314
200 x 130
30 x 5,5
916–305
916–315
250 x 165
35 x 8,0
916–306
916–316
300 x 200
40 x 8,0
916–307*
916–317*
400 x 250
45 x 10,0
916–308*
916–318*
500 x 330
50 x 10,0
* Including wooden case
916–202
Series 916
Flat square
Specifications
Accuracy:
according to DIN 875
Accuracy grade: 0
Standard steel
Stainless steel
Leg length
Cross section
No.
No.
mm
mm
916–211
916–201
50 x 40
15 x 4,0
916–212
916–202
75 x 50
15 x 4,0
916–213
916–203
100 x 70
20 x 4,0
916–214
916–204
150 x 100
25 x 5,5
916–215
916–205
200 x 130
30 x 5,5
916–216
916–206
250 x 165
35 x 8,0
916–217
916–207
300 x 200
40 x 8,0
916–218*
916–208*
400 x 250
45 x 10,0
916–219*
916–209*
500 x 330
50 x 10,0
285
* Including wooden case
916–322
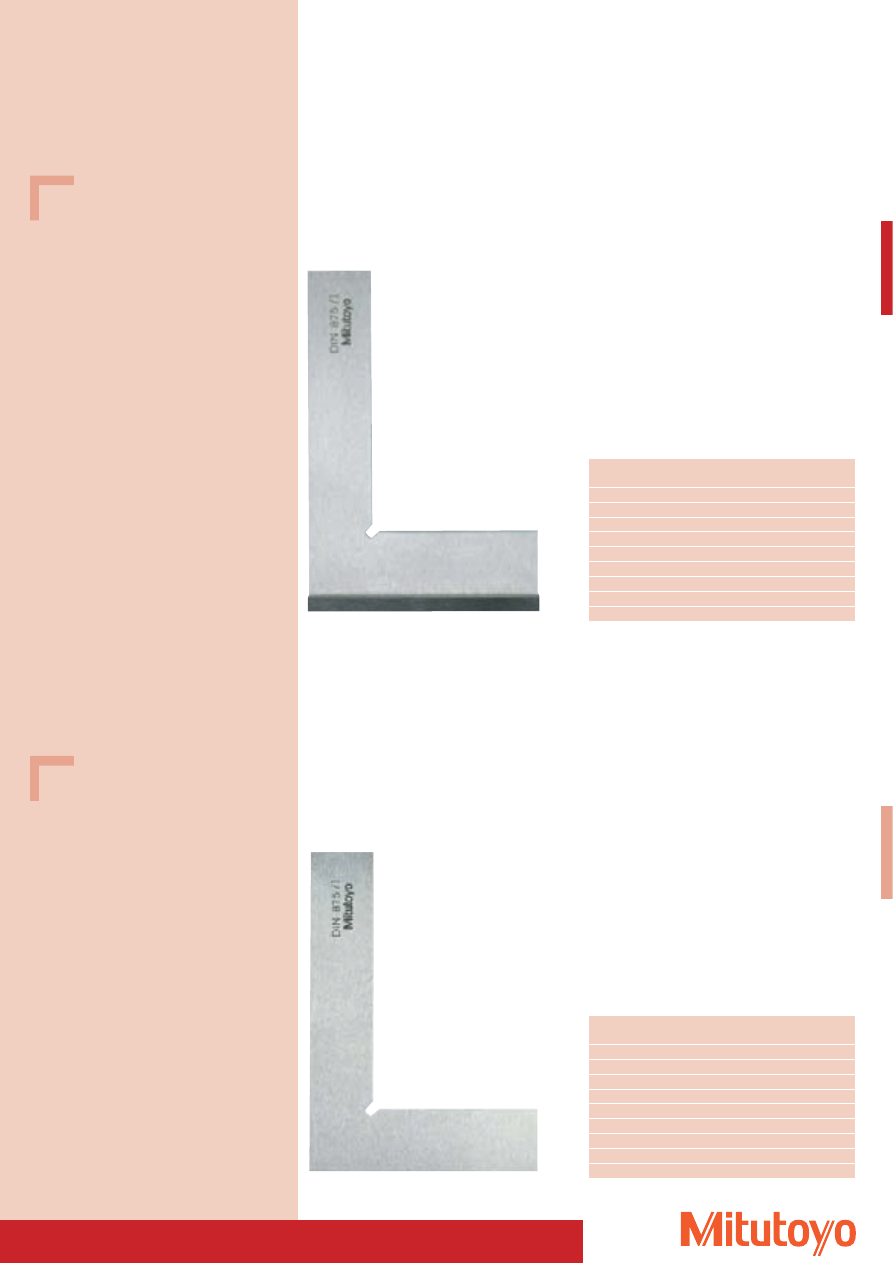
90° Steel square / Workshop Square
• Accuracy grade 1 / 2.
Series 916
Shifting square
DIN 875-1
DIN 875-2
Leg length
Cross section
No.
No.
mm
mm
916–320
916–330
50 x 40
15 x 5
916–321
916–331
75 x 50
15 x 5
916–322
916–332
100 x 70
20 x 5
916–323
916–333
150 x 100
25 x 5
916–324
916–334
200 x 130
30 x 6
916–325
916–335
250 x 165
35 x 7
916–326
916–336
300 x 200
40 x 8
916–327*
916–337*
400 x 200
45 x 10
916–328*
916–338*
500 x 250
50 x 10
* Including wooden case
916–223
Series 916
Flat square
DIN 875-1
DIN 875-2
Leg length
Cross section
No.
No.
mm
mm
916–221
916–231
50 x 40
15 x 5
916–222
916–232
75 x 50
15 x 5
916–223
916–233
100 x 70
20 x 5
916–224
916–234
150 x 100
25 x 5
916–225
916–235
200 x 130
30 x 6
916–226
916–236
250 x 165
35 x 7
916–227
916–237
300 x 200
40 x 8
916–228*
916–238
400 x 200
45 x 10
916–229*
916–239
500 x 250
50 x 10
Specifications
DIN 875:
Accuracy:
according to DIN 875
Accuracy grade: 1
Precision ground edges
DIN 875:
Accuracy:
according to DIN 875
Accuracy grade: 2
Specifications
DIN 875/1:
Accuracy:
according to DIN 875
Accuracy grade: 1
Precision ground edges
DIN 875/2:
Accuracy:
according to DIN 875
Accuracy grade: 2
286
916–102
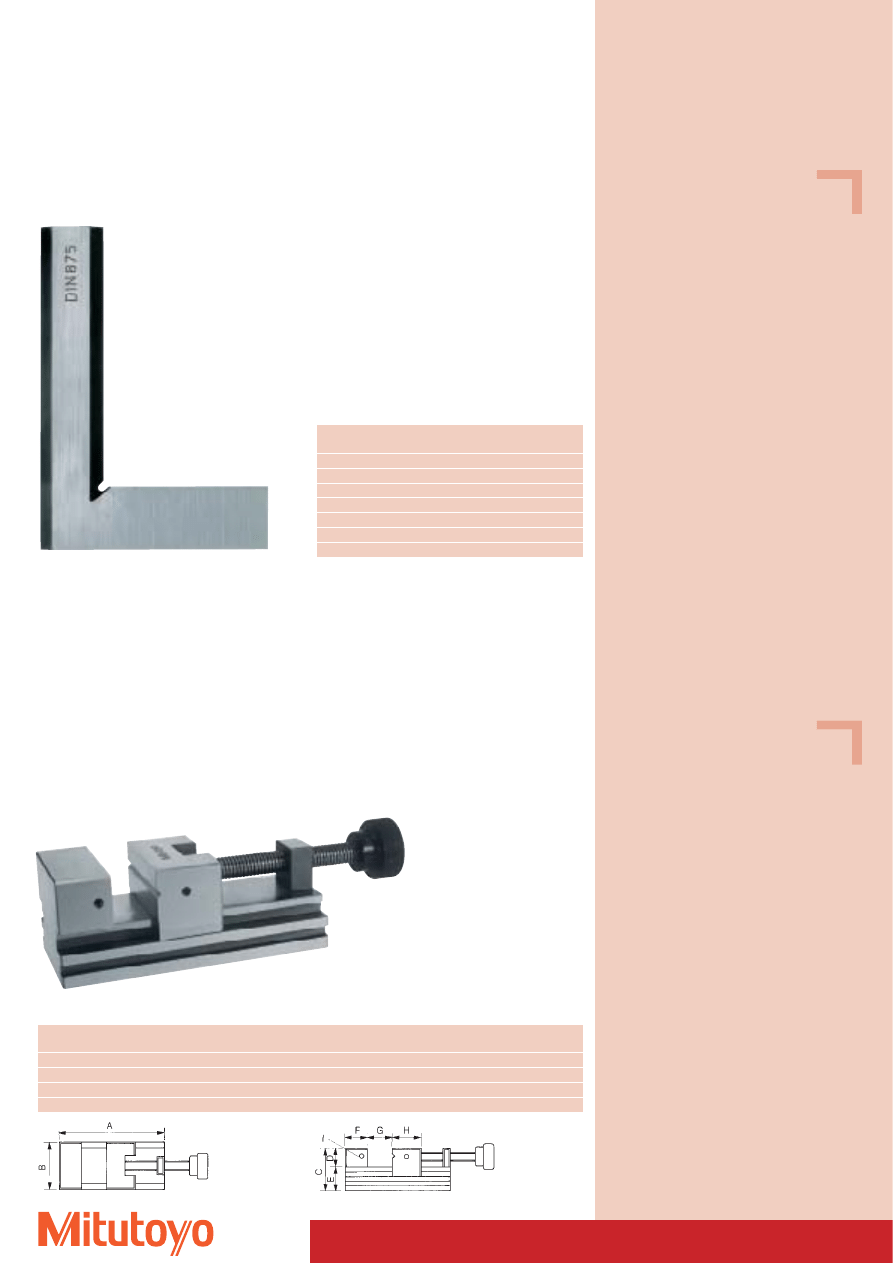
90° Steel square / Precision Square
• Accuracy grade 00.
• Edges and support faces ground and lapped, completely hardened and stress relieved.
Specifications
Accuracy:
according to DIN 875
Accuracy grade: 00
Specifications
Squareness: 0,005 mm/100 mm
Parallelism: 0,002 mm/100 mm
Standard steel
Stainless steel
Leg length
Cross section
No.
No.
mm
mm
916–008*
–
25 x 20
6 x 3,0
916–009*
–
40 x 28
8 x 3,0
916–100
916–105
50 x 40
15 x 6,0
916–101
916–106
75 x 50
15 x 6,0
916–102
916–107
100 x 70
20 x 6,0
916–103
916–108
150 x 100
25 x 7,5
916–104
916–109
200 x 130
30 x 9,0
* Cutting square (for inside measurement only)
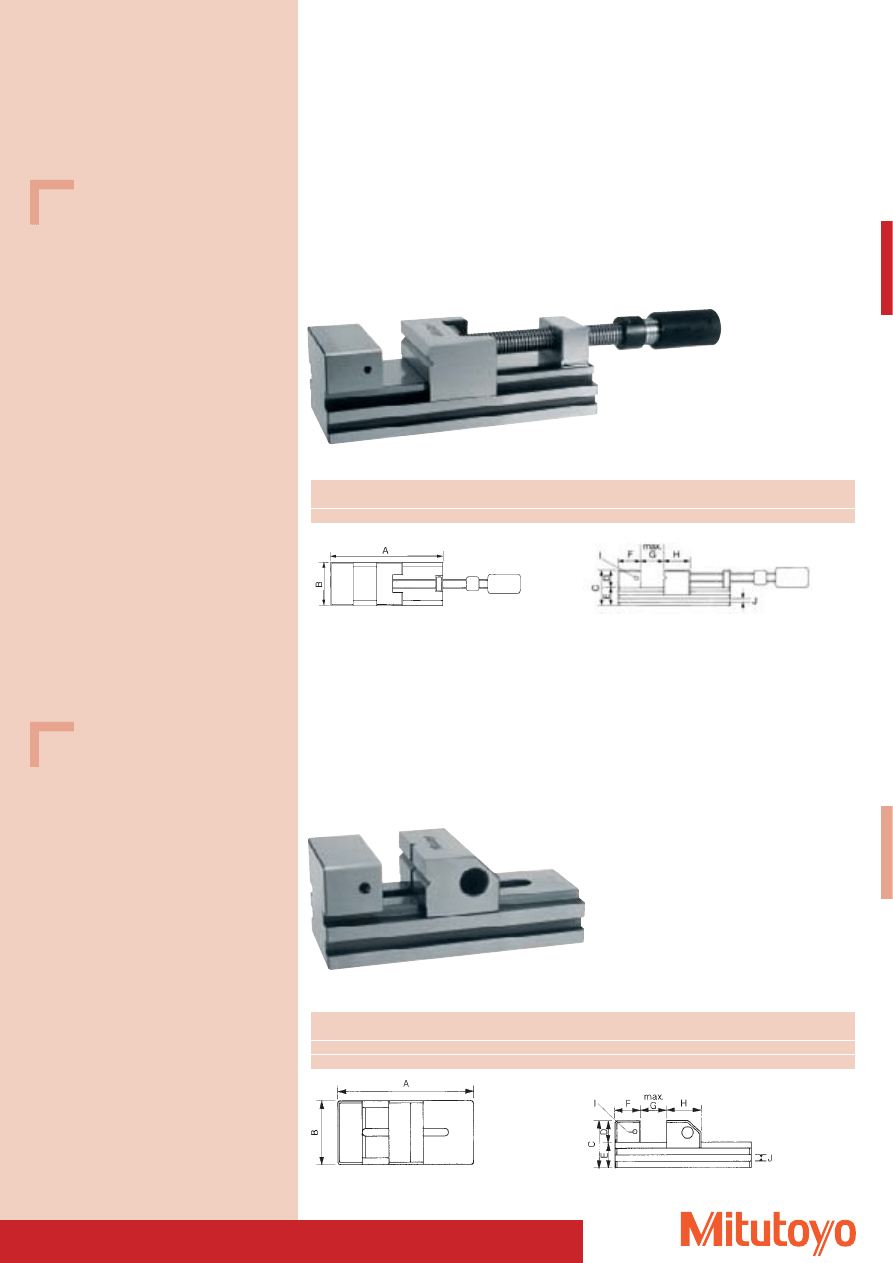
Precision Vices
Series 930
With threaded spindle
• Made of alloyed tool steel, hardened and precision ground.
• With horizontally ground prism in the movable jaws.
No.
A
B
C
D
E
F
G
H
I
Mass
mm
mm
mm
mm
mm
mm
mm
mm
kg
930–611
90
60
50
25
25
25
30
30
M 5
1,6
930–601
160
70
62
30
32
33
80
45
M 6
4,0
930–602
210
90
80
40
40
40
120
50
M 6
7,6
930–612
285
120
90
40
50
55
150
70
M 6
17,4
Series 916
Hairline square
930–602
287
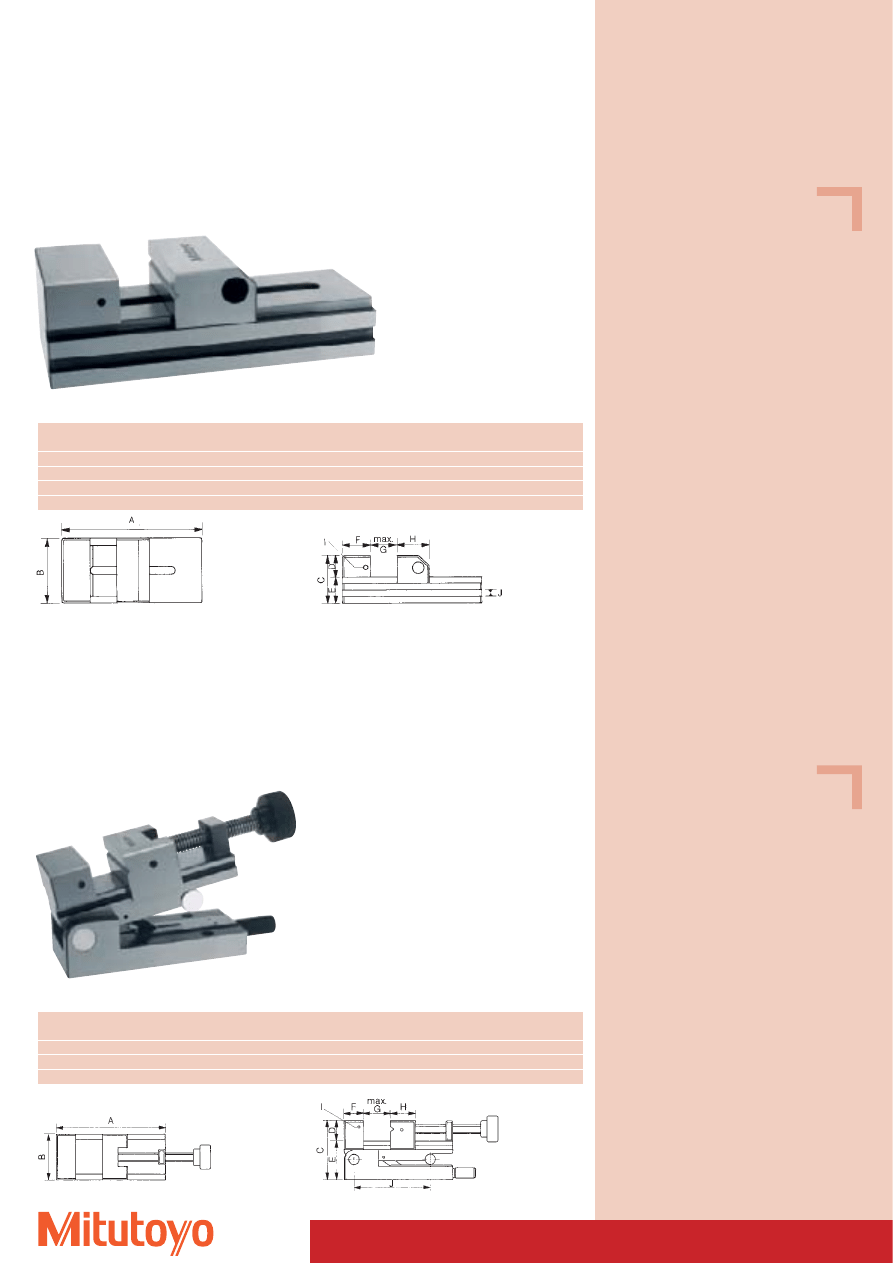
930–616
Precision Vices
Series 930
With threaded spindle
• For grinding large workpieces.
• Including one key bar with hydraulic amplification of the clamping force.
• With horizontally ground prism in the movable jaws.
Series 930
With pull-down systsem
• High accuracy for precision grounding, milling, measuring and eroding.
• With quick adjustment and vertically and horizontally ground-in prism in the movable jaws.
No.
A
B
C
D
E
F
G
H
I
J
Mass
mm
mm
mm
mm
mm
mm
max. mm
mm
height x depth mm
kg
930–606
160
70
62
30
32
33
80
45
M6
8 x 7
3,0
930–607
210
90
80
40
40
40
120
50
M6
10 x 7
5,8
No.
A
B
C
D
E
F
G
H
I
J
Mass
mm
mm
mm
mm
mm
mm
max. mm
mm
height x depth mm
kg
930–616
285
120
90
40
50
55
150
70
M6
10 x 7
17,7
Specifications
Squareness: 0,005 mm/100 mm
Parallelism: 0,002 mm/100 mm
Specifications
Squareness: 0,005 mm/100 mm
Parallelism: 0,002 mm/100 mm
930–607
288
Specifications
Squareness: 0,005 mm/100 mm
Parallelism: 0,002 mm/100 mm
Specifications
Angle deviation at 45°: ± 15”
Squareness:
0,005 mm/100 mm
Parallelism:
0,002 mm/100 mm
Precision Vices
• High accuracy for precision grounding, milling, measuring and eroding.
• With horizontally ground prism in the movable jaws.
930–632
Series 930
With pull-down systsem
No.
A
B
C
D
E
F
G
H
I
J
Mass
mm
mm
mm
mm
mm
mm
max. mm
mm
height x depth mm
kg
930–630
70
30
35
15
20
20
25
25
M4
–
0,35
930–631
110
45
45
20
25
25
50
35
M5
8 x 6
1,00
930–632
285
120
90
40
50
60
150
70
M6
12 x 7
13,50
930–633
370
175
95
45
50
60
200
110
M8
12 x 10
28,70
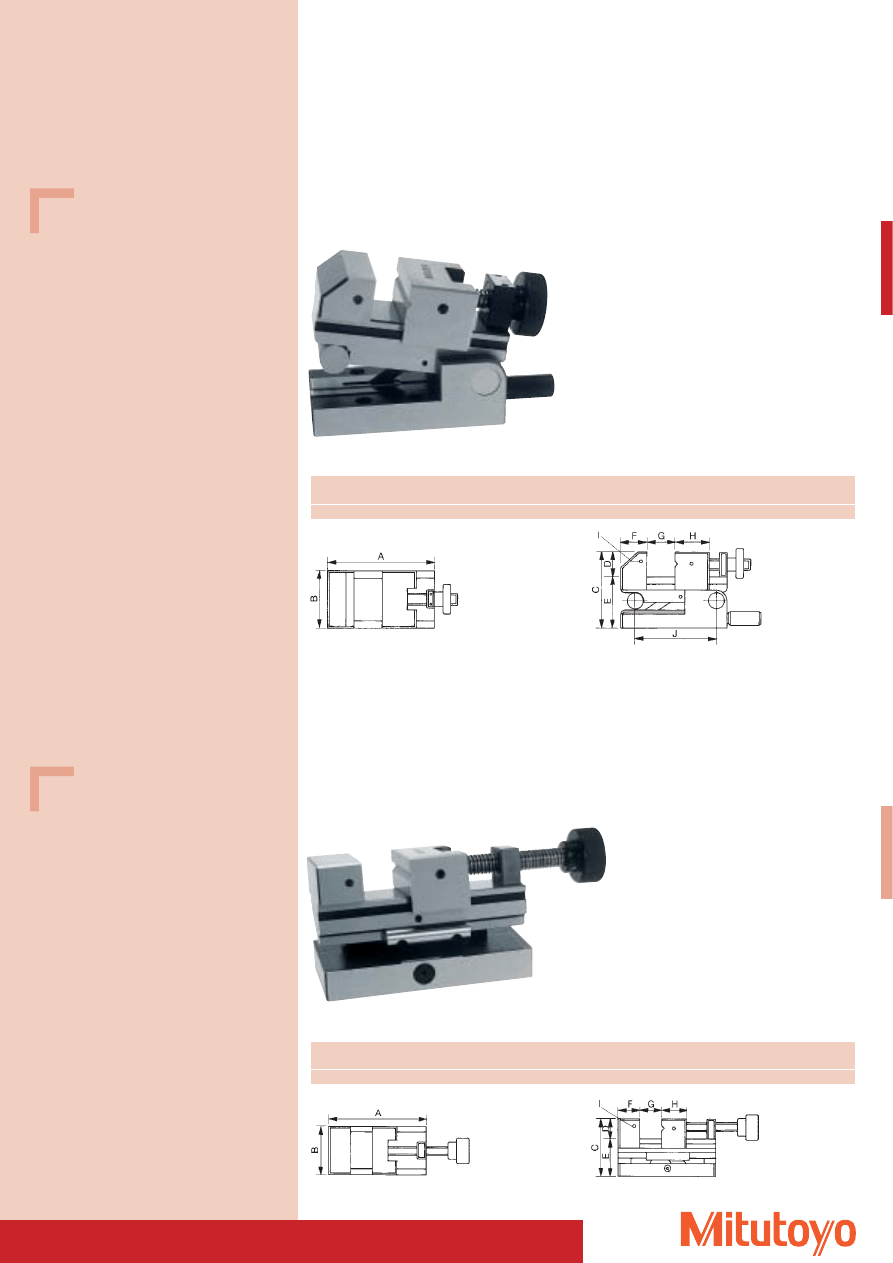
Precision Sine Vices
• Made of alloyed tool steel, hardened and precision ground.
• Bearing and holding bolt hardened and ground.
• The clamping device can be locked in any angular position.
• Accurate angle adjustment by gauge blocks, max. 46°.
Series 930
With swivelling front axis
No.
A
B
C
D
E
F
G
H
I
J
Mass
mm
mm
mm
mm
mm
mm
max. mm
mm
height x depth mm
kg
930–620
100
50
75
25
50
25
40
30
M5
50
2,7
930–621
160
70
93
30
63
33
80
45
M5
100
5,3
930–622
210
90
113
40
73
40
120
50
M5
150
11,0
930–621
289
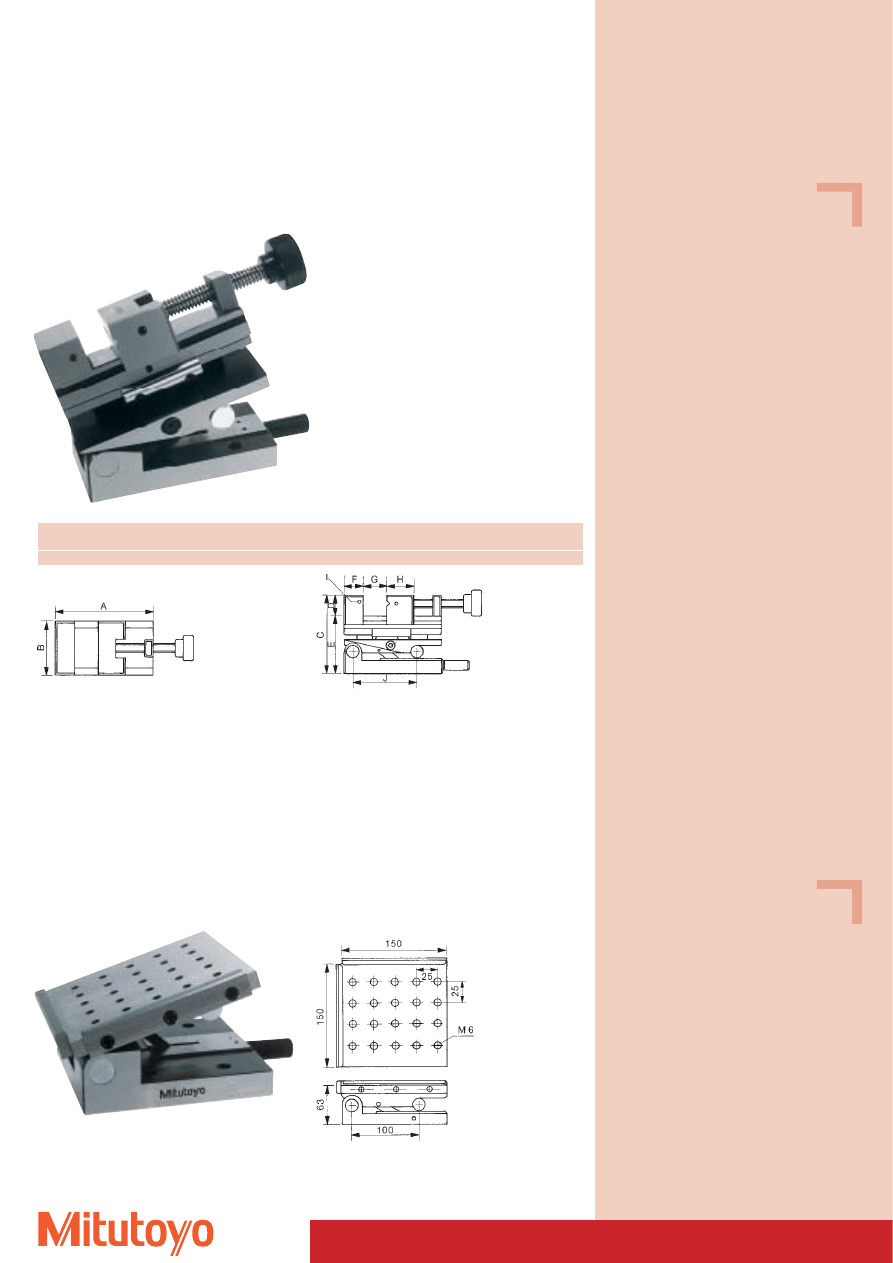
Precision Sine Vices
• Made of alloyed tool steel, hardened and precision ground.
• Bearing and holding bolt hardened and ground.
• The clamping device can be locked in any angular position.
• Accurate angle adjustment by gauge blocks, max. 46°.
Series 930
With swivelling rear axis
930–623
Series 930
With swivelling longitudinal axis
930–624
Specifications
Angle deviation at 45°: ± 15”
Squareness:
0,005 mm/100 mm
Parallelism:
0,002 mm/100 mm
Specifications
Angle deviation at 45°: ± 15”
Squareness:
0,005 mm/100 mm
Parallelism:
0,002 mm/100 mm
No.
A
B
C
D
E
F
G
H
I
Mass
mm
mm
mm
mm
mm
mm
max. mm
mm
kg
930–624
160
75
93
30
63
33
80
45
M5
5,9
No.
A
B
C
D
E
F
G
H
I
J
Mass
mm
mm
mm
mm
mm
mm
max. mm
mm
mm
kg
930–623
130
70
93
30
63
33
50
40
M5
100
4,5
290
Precision Sine Vices
• Made of alloyed tool steel, hardened and precision ground.
• Bearing and holding bolt hardened and ground.
• The clamping device can be locked in any angular position.
• Accurate angle adjustment by gauge blocks, max. 46°.
Specifications
Angle deviation at 45°: ± 15”
Squareness:
0,005 mm/100 mm
Parallelism:
0,002 mm/100 mm
Series 930
With swivelling longitudinal axis and swivelling front axis
930–625
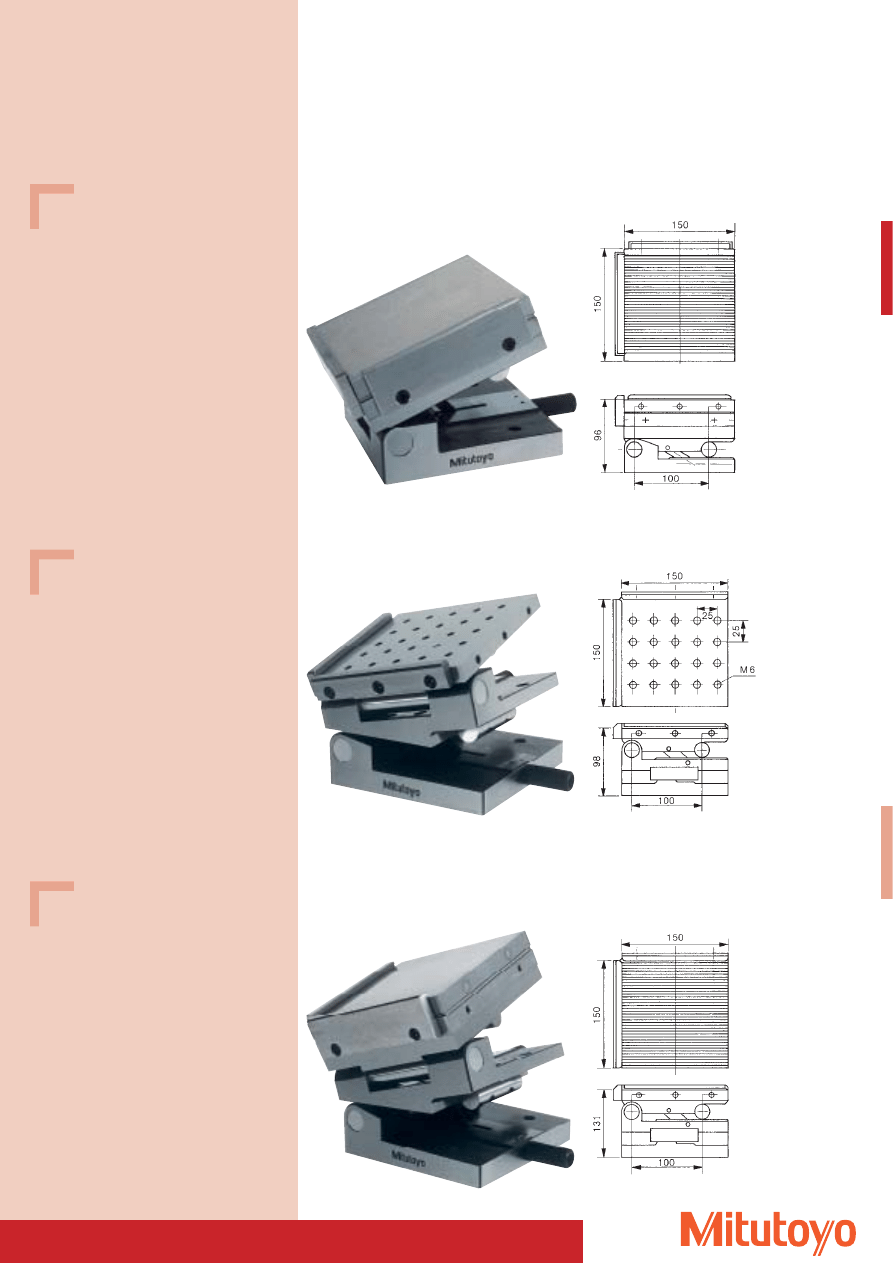
Precision Sine Plates
• Made of alloyed tool steel, hardened and precision ground.
• Bearing and holding bolt hardened and ground.
• The clamping device can be locked in any angular position.
• Accurate angle adjustment by gauge blocks.
Series 930
Specifications
Angle deviation at 45°: ± 15”
Squareness:
0,005 mm/100 mm
Parallelism:
0,002 mm/100 mm
Mass:
7,6 kg
930–626
No.
A
B
C
D
E
F
G
H
I
J
Mass
mm
mm
mm
mm
mm
mm
max. mm
mm
mm
kg
930–625
160
75
124
30
94
33
80
45
M5
100
7,4
291
Specifications
Angle deviation at 45°: ± 15”
Squareness:
0,005 mm/100 mm
Parallelism:
0,002 mm/100 mm
Mass:
11,3 kg
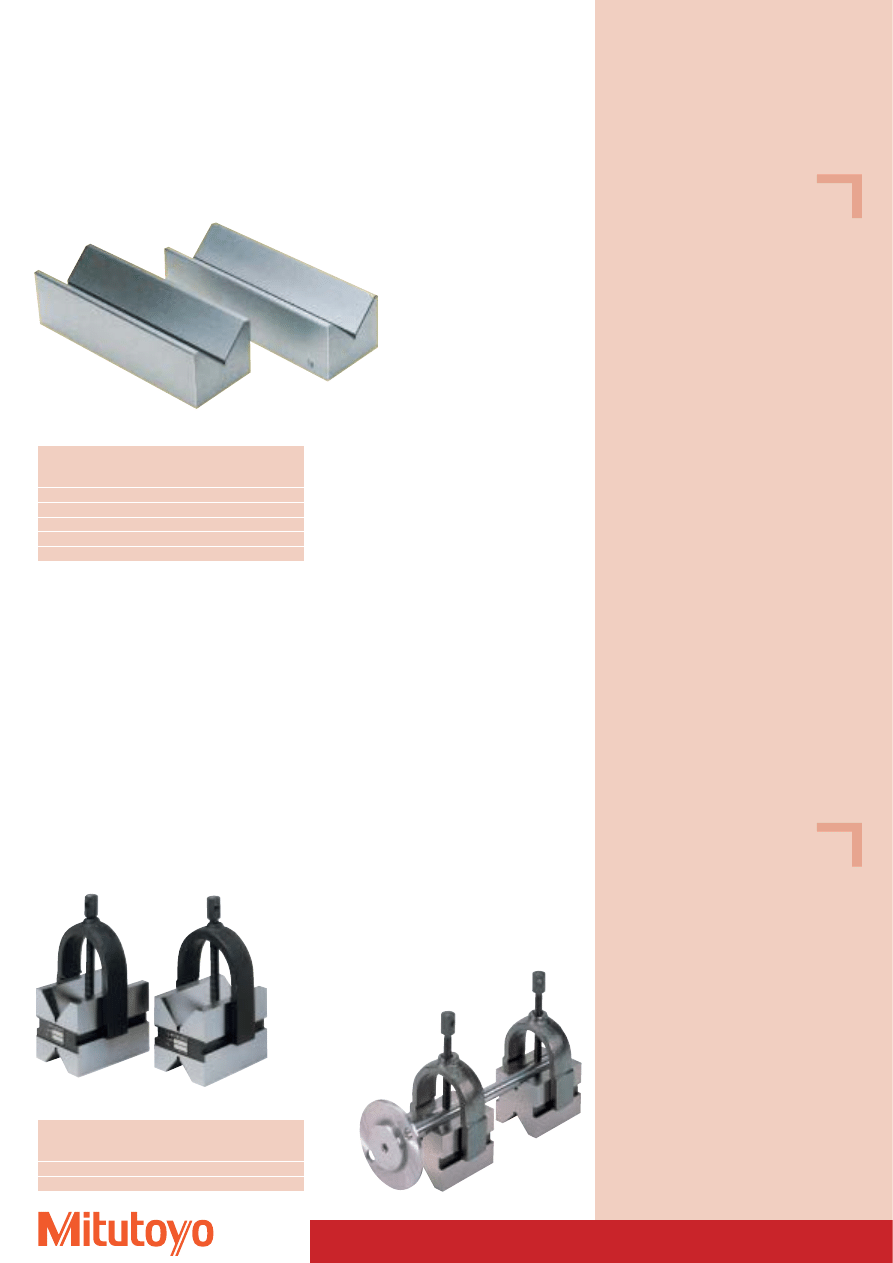
Precision Sine Plates
• Made of alloyed tool steel, hardened and precision ground.
• Bearing and holding bolt hardened and ground.
• The clamping device can be locked in any angular position.
• Accurate angle adjustment by gauge blocks.
Specifications
Angle deviation at 45°: ± 15”
Squareness:
0,005 mm/100 mm
Parallelism:
0,002 mm/100 mm
Mass:
16,1 kg
Specifications
Angle deviation at 45°: ± 15”
Squareness:
0,005 mm/100 mm
Parallelism:
0,002 mm/100 mm
Mass:
20,0 kg
Series 930
With adjustment in 2 axis
Series 930
With swivelling front axis
and magnetic chuck switched-on via a lever
Series 930
With adjustment in 2 axis and magnetic chuck switched-on via a lever
930–627
930–628
930–629
292
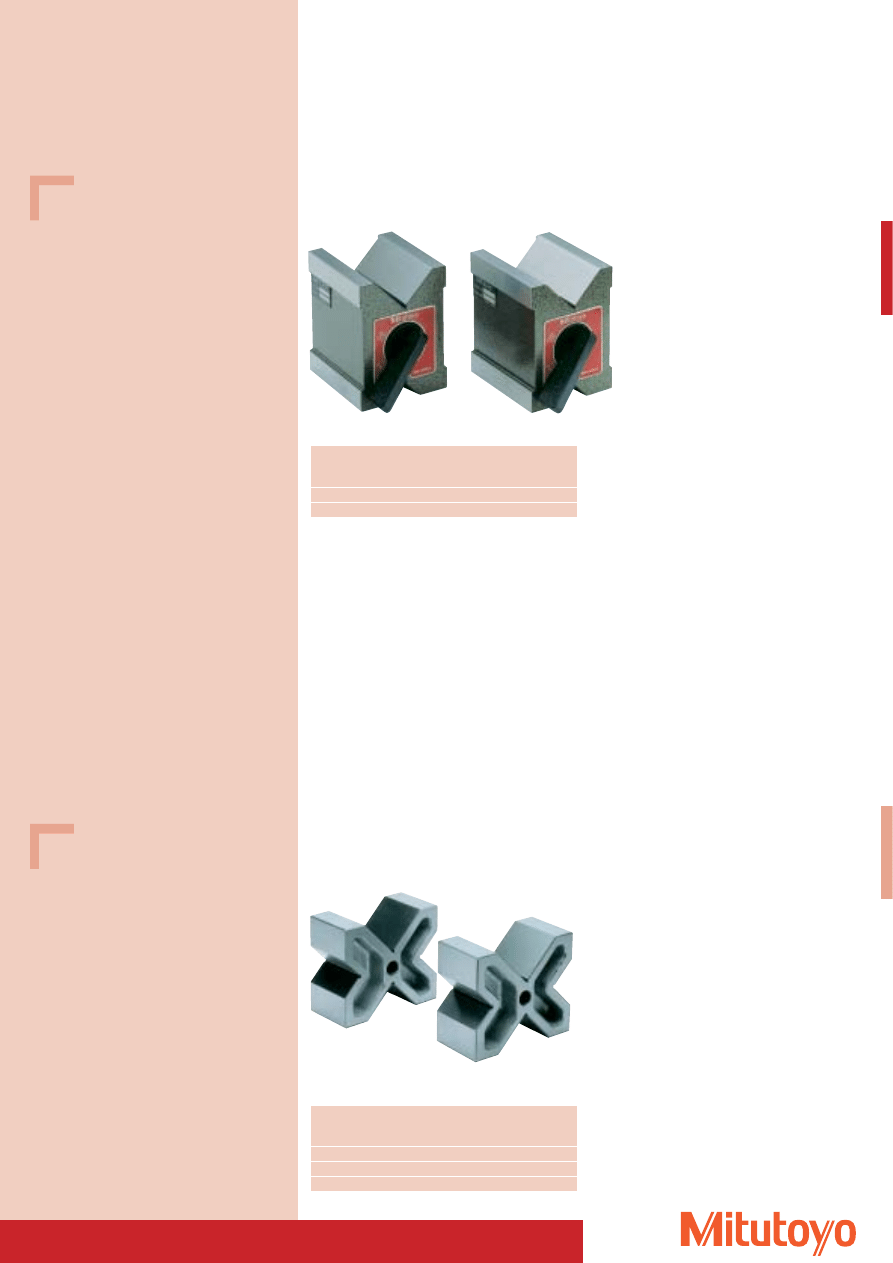
V-Blocks
• Made of dense special cast iron, highly wear resistant.
• The 90° V-block cutting angle is parallel to the base and isometric in pairs.
• For scribing, adjusting and testing cylindrical parts.
Series 910
Specifications
Quality class:
1
Parallelism:
0,016 mm
Hardness according to Brinell: 160–190
Supplied in pairs
910–112
No.
Length
Width
Height
Mass
Receiver for
per pair
workpiece Ø
mm
mm
mm
kg
mm
910–111
100
40
30
1,5
6– 40
910–112
150
50
40
3,5
8– 50
910–113
200
70
50
6,5
8– 70
910–114
250
85
60
10,0
12– 85
910–115
300
100
70
15,0
12–100
Hardened Double V-Blocks
• With 2 supporting surfaces and 2 recesses, angle 90°, as well as a clamping bracket.
• Recesses and supporting surfaces ground and lapped.
• Outer edges ground.
Series 181
With clamp bracket
Specifications
Hardness: HRC 58-62
Supplied in pairs
181–903 M
No.
Length Width Height Mass
Receiver
for
per pair workpiece Ø
mm
mm
mm
kg
mm
181–902 M
41
31,8
31,8
0,6
25
181–903 M
75
58,0
58,0
3,4
50
293
Magnetic Double V-Blocks
Series 181
181–946
No.
Length Width Height Mass
Max.
receiver
for
per pair
workpiece Ø
mm
mm
mm
kg
mm
181–946
79
58
64
3,5
50,8
181–947
95
70
95
7,3
50,8
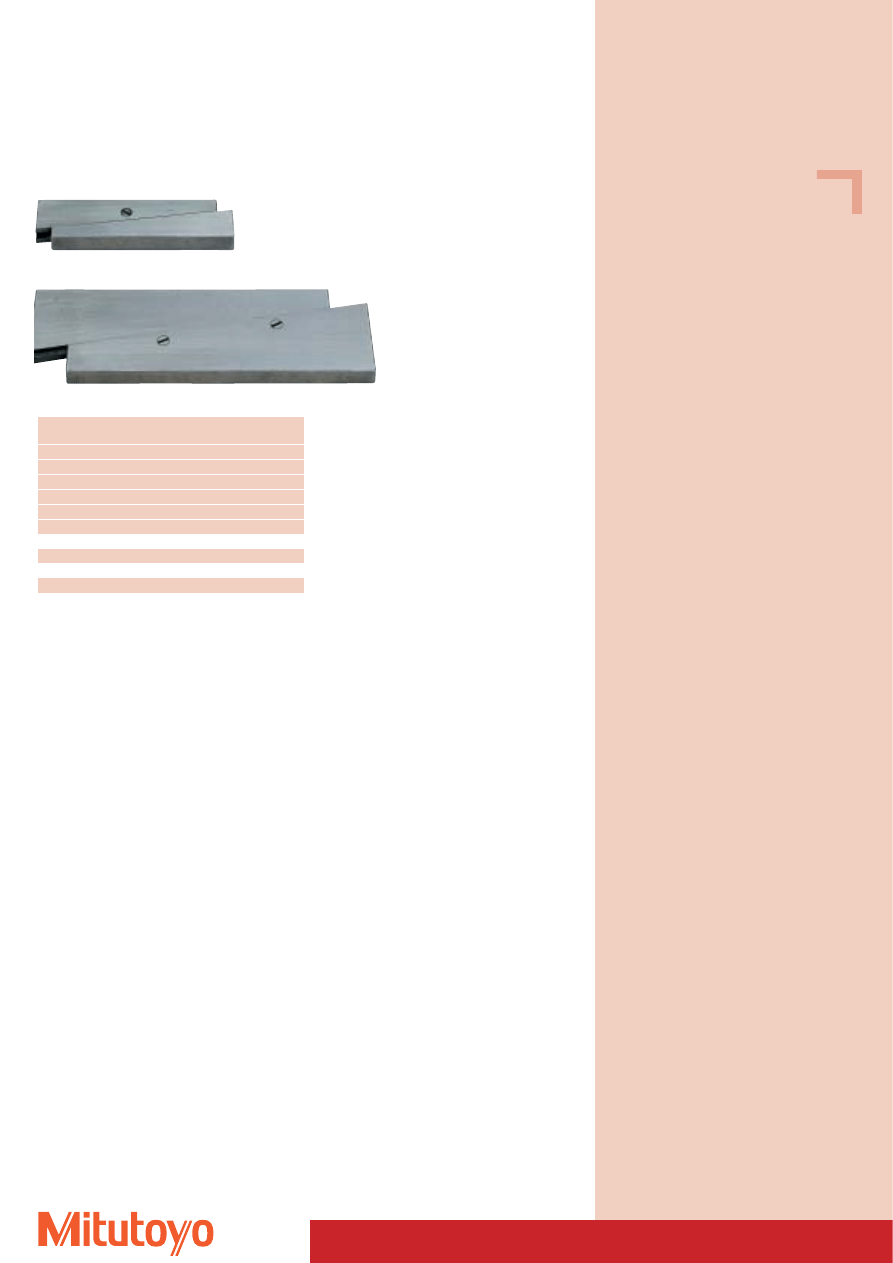
Series 911
911–111
No.
Length Width Height
Mass
Max. receiver for
per pair
workpiece Ø
mm
mm
mm
kg
mm
911–111
60
120
100
6,5
8– 90
911–112
75
150
130
13,5
8–110
911–113
90
200
170
23,0
8–150
Four-recess V-block pair
• Parallel pair.
• Made of dense special cast iron, highly wear resistant.
• With 4 recesses in different sizes, angle 90°, worked in pairs, made of special cast,
aged and stress relieved.
• The 90° V block angles notches are parallel to the standing surfaces and paired in identical dimensions.
• For scribing, adjusting and testing cylindrical parts.
Specifications
Quality class: 1
Parallelism:
0,016 mm
Supplied in pairs
Specifications
Supplied in pairs
294
Series 908
908–303
908–305
No.
Adjustable range
Length
mm
mm
908–301
9,6–12,7
45
908–302
12,7–17,4
54
908–303
17,4–23,8
65
908–304
23,8–33,3
89
908–305
33,3–44,4
110
908–306
44,4–57,0
130
Set with 4 pieces
908–310
9,6–33,3
–
Set with 6 pieces
908–312
9,6–57,0
–
Adjustable Parallel Supports
• The adjustable parallel supports are suited for various applications in tool making, general machine
construction and control.
• They are well suited as adjustable gauges for groove width and distances, as well as base for machine
vices and other devices.
Specifications
Individual version
Set with 4 pieces
Set with 6 pieces
295
Series 908
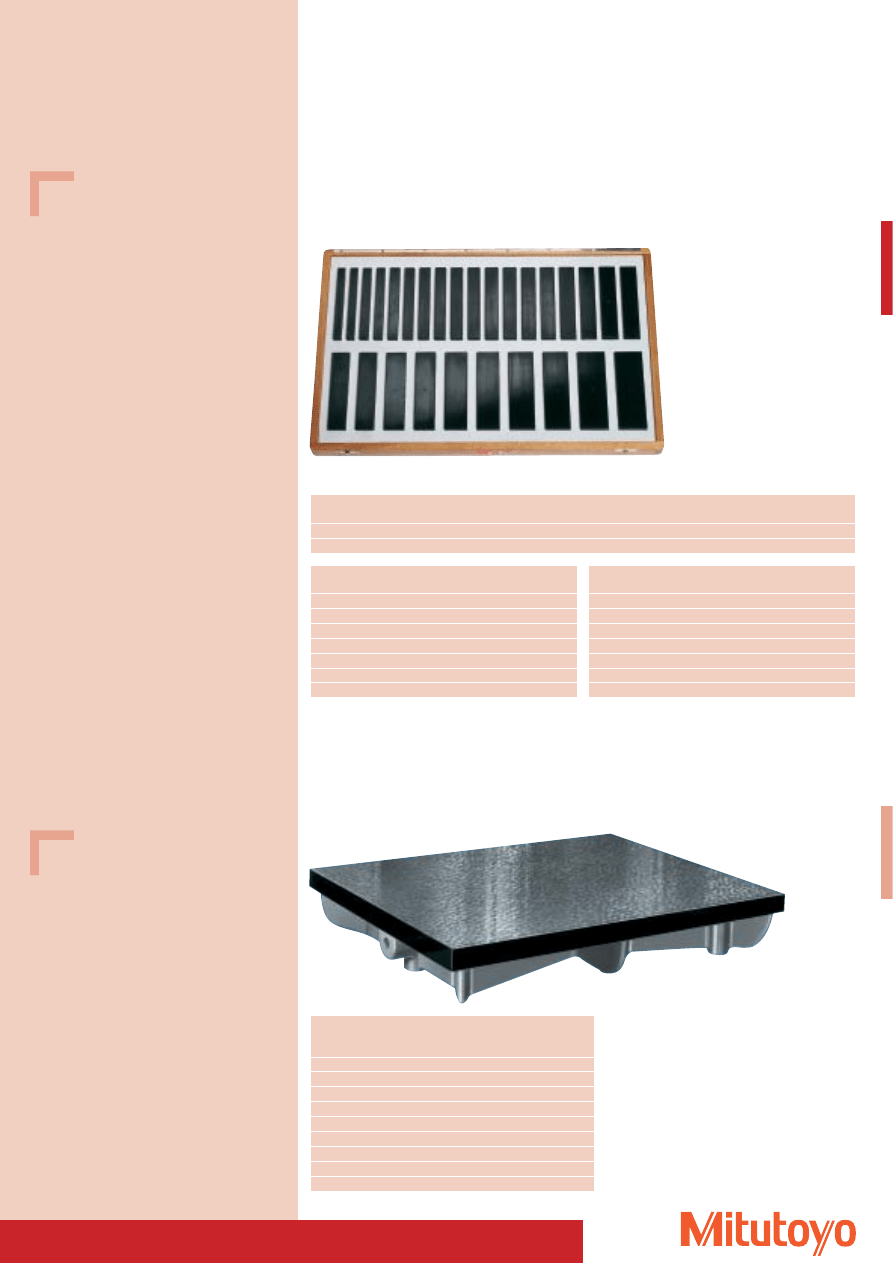
Complete set in wooden box
14 pairs
908–901
No.
Tolerance mm
Number
height parallelism
per pair
908–901
± 0,002
14
908–902
± 0,005
14
Size
Length
Width
Height
mm
mm
mm
1
150
10
14
2
150
10
16
3
150
10
18
4
150
10
20
5
150
10
22
6
150
10
24
7
150
10
26
Size
Length
Width
Height
mm
mm
mm
8
150
10
28
9
150
10
30
10
150
10
32
11
150
10
36
12
150
10
40
13
150
10
45
14
150
10
50
Hardened Parallel Supports
• For height equalisation when holding workpieces when drilling, grinding, milling, planing, tracing and
measuring.
• Particularly suitable for use in mechanical vices or marking plates.
Series 902
902–304
Size
Dimensions
Accuracy 1
Accuracy 3
Mass
DIN 876
DIN 876
(L x W mm)
No.
No.
kg
1
300 x 300
902–301
902–101
15
2
400 x 400
902–302
902–102
35
3
500 x 400
902–303
902–103
40
4
600 x 500
902–304
902–104
65
5
800 x 500
902–305
902–105
95
6
1000 x 750
902–306
902–106
210
7
1200 x 800
902–307
902–107
230
8
1500 x 1000
902–308
902–108
490
9
2000 x 1000
902–309
902–109
780
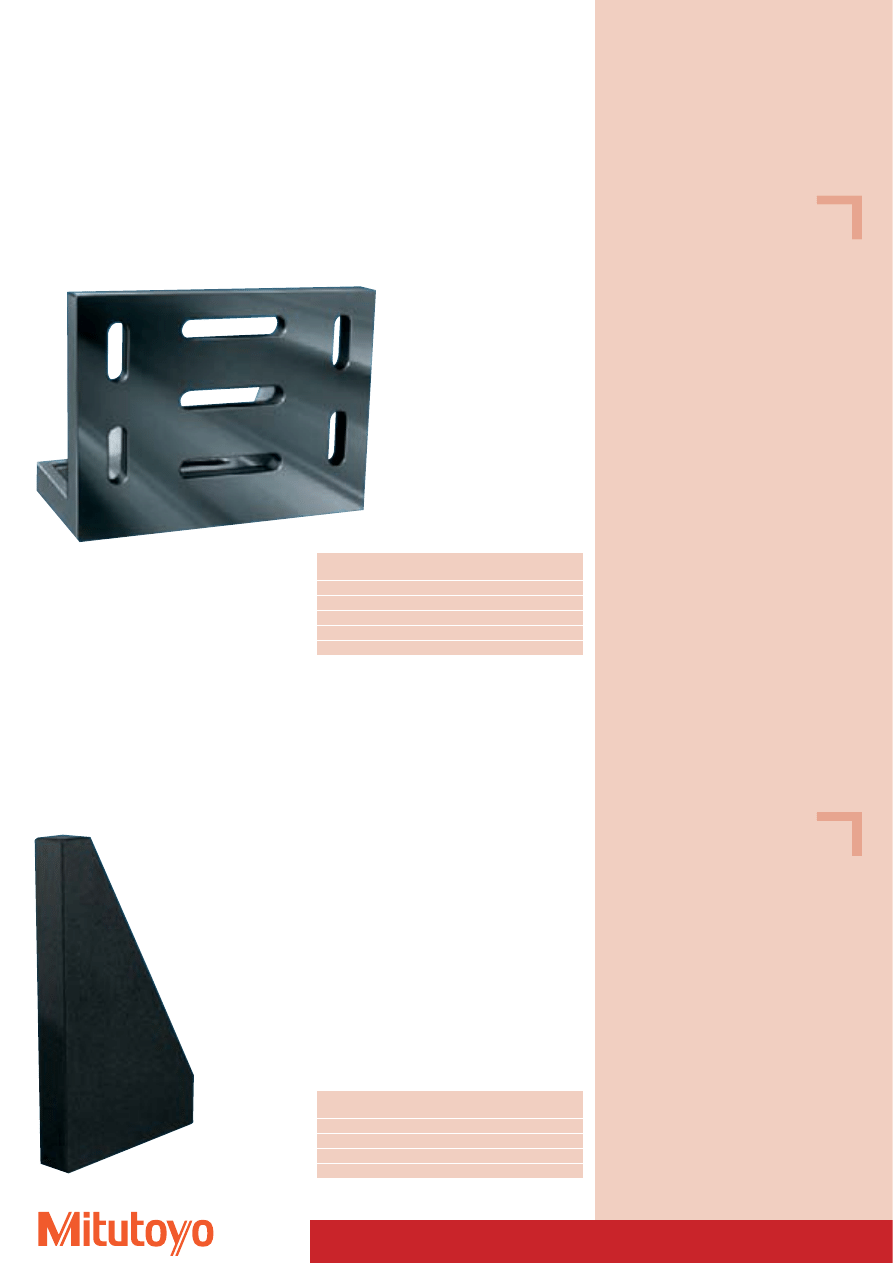
Scribing and Marking-Off Plates
• In ripped construction made of special cast, with high degree of wear resistance.
• Measuring surfaces finished to DIN 876. Outside edges milled clean.
Specifications
Accuracy: according to DIN 876
DIN 876: Accuracy grade 1
Fine scraped
DIN 876: Accuracy grade 3
Fine planed
Specifications
made of steel
Hardened and lapped surfaces
worked in pairs
Tolerance of length and width: ± 0,2 mm
296
Series 906
Angle 90°
• Made from special cast iron with high wear resistance.
No.
Length
Width
Height
Mass
mm
mm
mm
kg ca.
906–301
150
75
100
5
906–302
200
100
150
10
906–303
275
150
200
20
906–304
400
225
300
52
906–305
500
300
400
95
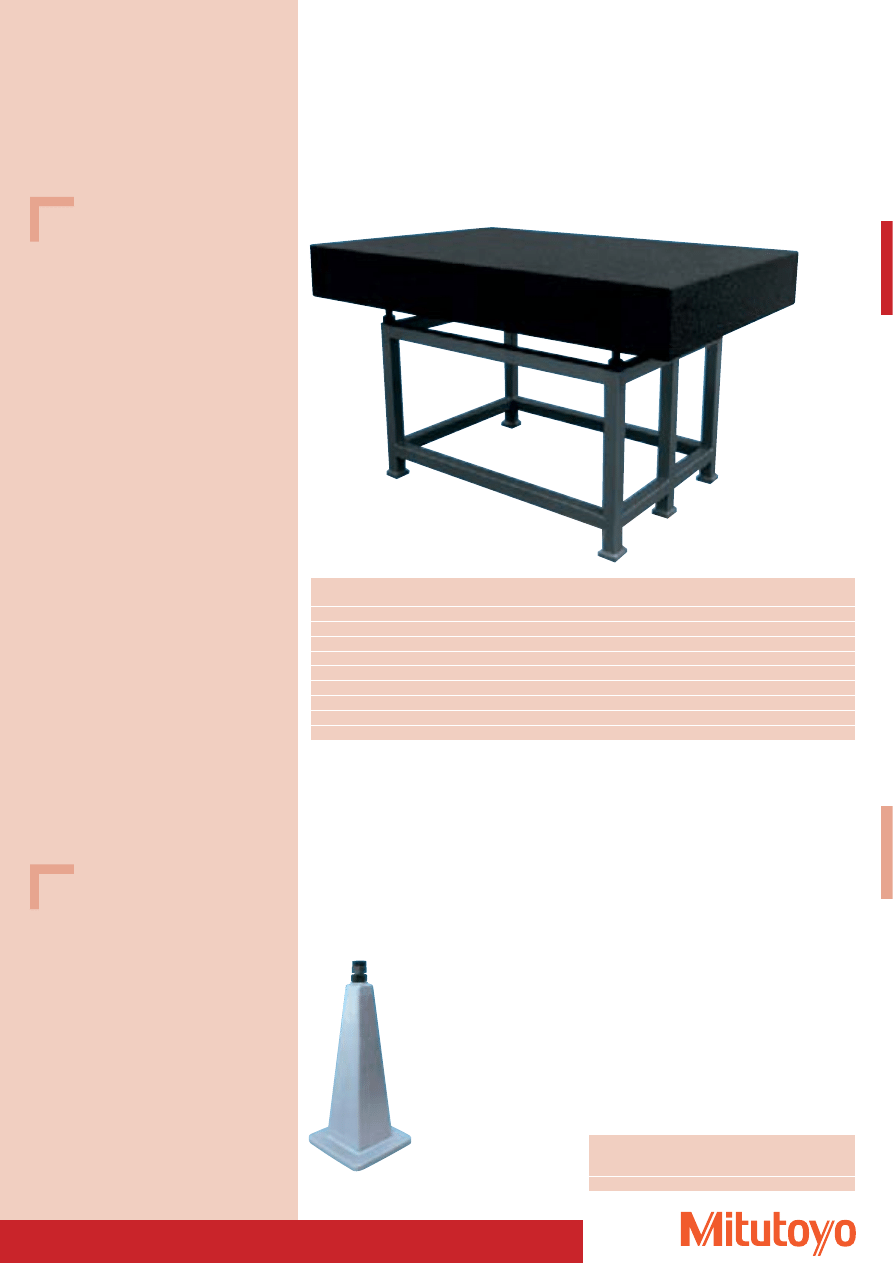
Angle Plate with Clamping Slots
972–108
No.
Leg length
Width
Perpendicularity
Mass
mm
mm
mm
kg
972–106
300 x 200
50
0,002
6,5
972–107
400 x 250
50
0,003
10,0
972–108
500 x 300
60
0,004
17,0
972–109
600 x 400
70
0,005
30,0
Measuring Angle 90°
• Measuring Angle made of black natural hard stone, two sides precision ground
• Hard and wear resistant
Specifications
Flatness:
DIN 876
Accuracy grade: 00
Perpendicularity tolerance: DIN 875
Specifications
Flatness:
DIN 876
Accuracy grade: 1
Perpendicularity tolerance: DIN 875
Accuracy grade: 1
906–303
Series 972
297
Granite plate and stand
Size
Dimensions
Accuracy 00
Accuracy 0
Accuracy 1
Accuracy 2
Mass
L x W x H mm
No.
No.
No.
No.
kg
1
400 x 250 x 50
901–131
901–121
901–111
901–101
15
2
400 x 400 x 50
901–132
901–122
901–112
901–102
25
3
630 x 400 x 70
901–133
901–123
901–113
901–103
53
4
630 x 630 x 70
901–134
901–124
901–114
901–104
83
5
1000 x 630 x 100
901–135
901–125
901–115
901–105
189
6
1000 x 1000 x 100
901–136
901–126
901–116
901–106
300
7
1200 x 800 x 160
901–137
901–127
901–117
901–107
460
8
1600 x 1000 x 160
901–138
901–128
901–118
901–108
768
9
2000 x 1000 x 220
901–139
901–129
901–119
901–109
1320
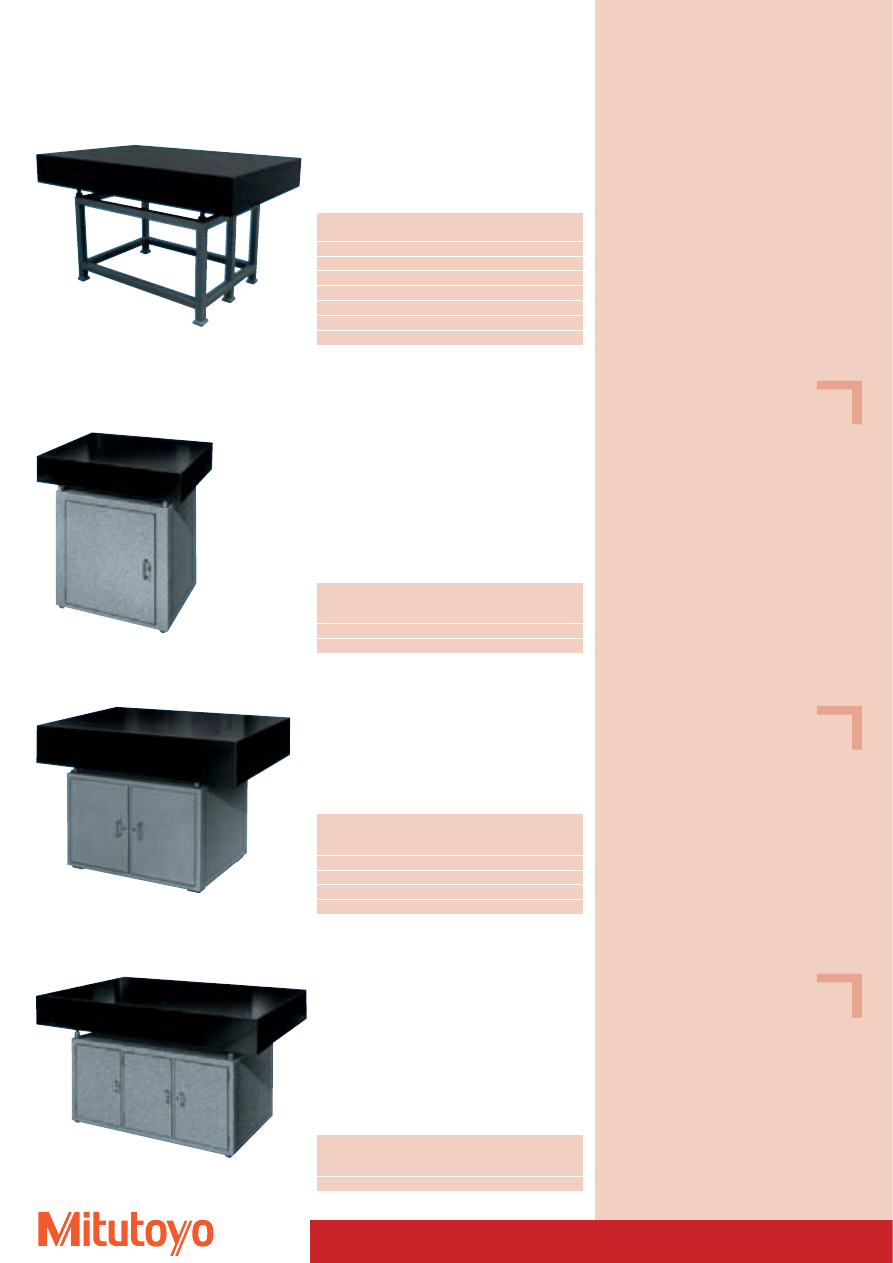
Granite Plates
• These granite plates are made of exquisite and fine grained granite.
• Stress relieved, naturally aged over milleniums.
• Harder than steel.
• Non magnetic and electrically non conducting.
• Stainless, therefore easy maintenance.
Size
No.
Mass
Support
kg
8 / 9
901–921
20
Series 901
Delivery without support but with steel ball inserts
Accessory for granite plates
Series 901
Individual supports mounting (4 pieces)
Appropriate for slab sizes 8 and 9
Specifications
Accuracy:
according to DIN 876
Vickers hardness:
HV 850–900
Flexural resistance: 13–22 N/mm
2
Pressure resistance: ca. 280 N/mm
2
Linear co-efficient
of expansion:
(5 to 7,5) x 10
–6
x K
–1
Supplied with factory certificate
Optional accessory
No. 517–660 P
Cleaning and care agents for
measuring instruments made from
natural stone (5 l canister)
Specifications
Surface size:
250 x 250 mm
Support height: 550–600 mm
901–921
Accessory for granite plates
Series 901
Profiled steel underframe
901–935 (illustrated with granite slab)
Size
Plate dimensions
No.
Mass
L x W x H mm
kg
3
630 x 400 x 70
901–931
22
4
630 x 630 x 70
901–932
25
5
1000 x 630 x 100
901–933
28
6
1000 x 1000 x 100
901–934
30
7
1200 x 800 x 160
901–935
30
8
1600 x 1000 x 160
901–936
35
9
2000 x 1000 x 220
901–937
40
Series 901
Tool cabinets
901–941 (illustrated with granite slab)
Size
Plate dimensions
No.
Number
Number
Mass
of doors of drawers
L x W x H mm
kg
3
630 x 400 x 70
901–941
1
1
50
4
630 x 630 x 70
901–942
1
1
55
Design
1 door
1 drawer
901–945 (illustrated with granite slab)
Size Plate dimensions
No.
Number
Number
Mass
of doors of drawers
L x W x H mm
kg
5
1000 x 630 x 100
901–943
2
1
75
6
1000 x 1000 x 100
901–944
2
1
82
7
1200 x 800 x 160
901–945
2
1
82
8
1600 x 1000 x 160
901–946
2
1
100
Design
2 doors
1 drawer
298
901–947 (illustrated with granite slab)
Size Plate dimensions
No.
Number
Number
Mass
of doors of drawers
L x W x H mm
kg
9
2000 x 1000 x 220
901–947
3
2
130
Design
3 doors
2 drawers
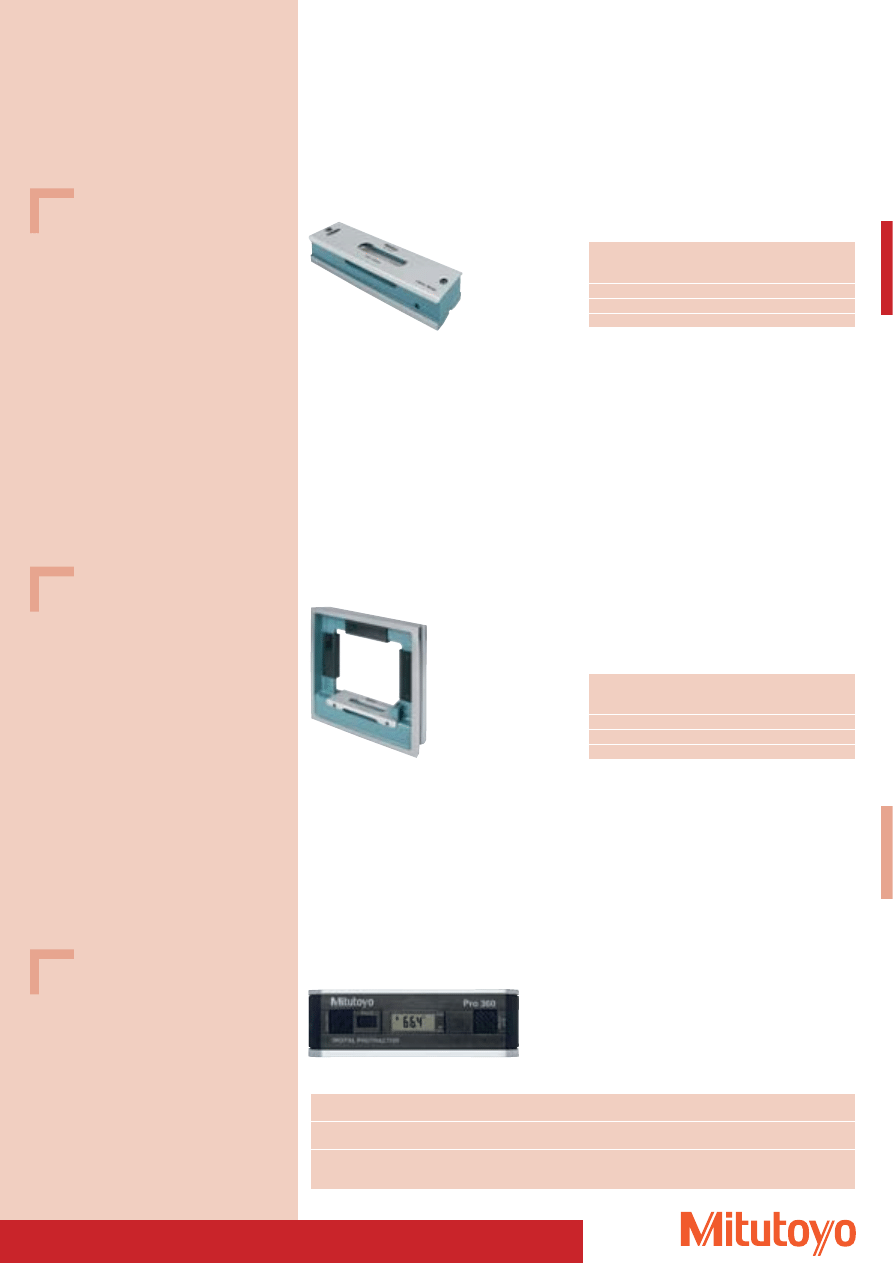
299
950–317
No.
Model
Measuring range
Resolution /
Error Limits
Repeatability
Sensitivity
950–317
Pro 360
360° (4 x 90°)
0,1°
horizontal 0,1°
± 0,1°
vertical 0,2°
950–318
Pro 3600
360° (4 x 90°)
0,01° (0° to 9,99°)
0,05° (0° to 10°)
± 0,05°
0,1° (10° to 90°)
0,1° (80° to 90°)
0,2° (10° to 80°)
Digital Protractor
• Newly developed instrument for measurement of flatness, squareness and angularity.
• Precision support surface in aluminium frame, high rigidity and low weight.
Series 960
960–604
No.
Graduation /
Mass
Error Limits
Sensivity
mm/m
kg
mm/m
960–604
0,10
1,45
0,050
960–605
0,05
1,45
0,025
960–606
0,02
1,45
0,010
Levels
• For adjusting and testing of flat and cylindrical surfaces on precision machines.
• Prismatic and flat supporting faces, precision ground.
• Longitudinal and transverse bubble level.
• With graduation adjustable.
Series 960
960–704
No.
Graduation /
Mass
Error Limits
Sensivity
mm/m
kg
mm/m
960–704
0,10
4,0
0,050
960–705
0,05
4,0
0,025
960–706
0,02
4,0
0,015
Frame Level
• For adjusting horizontal and vertical surfaces on precision machines.
• 2 prismatic and 2 flat supporting surfaces, precision ground.
• Divided longitudinal and transverse bubble level.
• With graduation adjustable.
Specifications
Accuracy:
Factory specification
Power supply:
Standard battery (9 V)
Operation temperature: – 5 °C to 50 °C
Dimensions:
153 x 49 x 31 mm
Mass:
300 g
Including box
Optional accessory
No. 64PPP794
Magnetic V block for securing to
magnetic workpieces
Specifications
Accuracy:
Factory specification
Support angle of prism: 140°
Dimensions:
200 x200 x 44 mm
Supplied in a wooden case
Specifications
Accuracy:
Factory specification
Support angle of prism: 140°
Length:
200 mm
Supplied in a wooden case
Series 950
Wyszukiwarka
Podobne podstrony:
czujniki Mitutoyo
Fizyczne Podstawy Czujników Opracowanie na ściągę (Mroczka)
Fizyczne Podstawy Czujników Opracowanie (Mroczka)
4 Podstawy Metrologii przetworniki i czujniki
Labolatorium podstaw techniki światłowodowej, Światłowodowy czujnik pomiaru ciśnienia, Politechnika
Podstawy metr wykl4Przetworniki i czujniki
20120206 Czujniki pojemnościowe podstawy
Badanie czujników ciśnienia, Informatyka, Podstawy miernictwa, Laboratorium
dr inż Piotr Dutkiewicz, Podstawy Robotyki, Budowanie lokalnej mapy otoczenia skaner z czujnikiem po
Podstawowe zasady udzielania pomocy przedlekarskiej rany i krwotoki
Farmakologia pokazy, Podstawy Farmakologii Ogólnej (W1)
Podstawy fizyczne
więcej podobnych podstron