A
Reference number
ISO 128-25:1999(E)
INTERNATIONAL
STANDARD
ISO
128-25
First edition
1999-11-15
Technical drawings — General principles
of presentation —
Part 25:
Lines on shipbuilding drawings
Dessins techniques — Principes généraux de représentation —
Partie 25: Traits utilisés pour les dessins de construction navale
SIS-2003-159
1999

ISO 128-25:1999(E)
© ISO 1999
All rights reserved. Unless otherwise specified, no part of this publication may be reproduced or utilized in any form or by any means, electronic
or mechanical, including photocopying and microfilm, without permission in writing from the publisher.
International Organization for Standardization
Case postale 56
•
CH-1211 Genève 20
•
Switzerland
Internet
iso@iso.ch
Printed in Switzerland
ii
Foreword
ISO (the International Organization for Standardization) is a worldwide federation of national standards bodies (ISO
member bodies). The work of preparing International Standards is normally carried out through ISO technical
committees. Each member body interested in a subject for which a technical committee has been established has
the right to be represented on that committee. International organizations, governmental and non-governmental, in
liaison with ISO, also take part in the work. ISO collaborates closely with the International Electrotechnical
Commission (IEC) on all matters of electrotechnical standardization.
International Standards are drafted in accordance with the rules given in the ISO/IEC Directives, Part 3.
Draft International Standards adopted by the technical committees are circulated to the member bodies for voting.
Publication as an International Standard requires approval by at least 75 % of the member bodies casting a vote.
International Standard ISO 128-25 was prepared by the Technical Committee ISO/TC 10,
Technical drawings,
product definition and related documentation
, Subcommittee SC 1,
Basic conventions
.
ISO 128 consists of the following parts, under the general title
Technical drawings — General principles of
presentation
:
Part 20: Basic conventions for lines
Part 21: Preparation of lines by CAD systems
Part 22: Basic conventions and applications for leader lines and reference lines
Part 23: Lines on construction drawings
Part 24: Lines on mechanical engineering drawings
Part 25: Lines on shipbuilding drawings
Part 30: Basic conventions for views
Part 40: Basic conventions for cuts and sections
Part 41: Cuts and sections for mechanical engineering drawings
Part 50: Basic conventions for representing areas on cuts and sections
Part 60: Additional conventions for views, cuts and sections
Annex A of this part of ISO 128 is for information only

INTERNATIONAL STANDARD
©
ISO
ISO 128-25:1999(E)
1
Technical drawings — General principles of presentation —
Part 25:
Lines on shipbuilding drawings
1 Scope
This part of ISO 128 specifies application rules and basic conventions for the types of lines on shipbuilding
drawings.
2 Normative references
The following normative documents contain provisions which, through reference in this text, constitute provisions of
this part of ISO 128. For dated references, subsequent amendments to, or revisions of, any of these publications do
not apply. However, parties to agreements based on this part of ISO 128 are encouraged to investigate the
possibility of applying the most recent editions of the normative documents indicated below. For undated
references, the latest edition of the normative document referred to applies. Members of ISO and IEC maintain
registers of currently valid International Standards.
ISO 128-20:1996,
Technical drawings — General principles of presentation — Part 20: Basic conventions for lines.
ISO 6428:1982,
Technical drawings — Requirements for microcopying.
3 General principles
The basic types of lines, their designations and dimensions as well as general rules for draughting of lines are
specified in ISO 128-20.
The requirements for microcopying are specified in ISO 6428.
4 Types of lines and their application
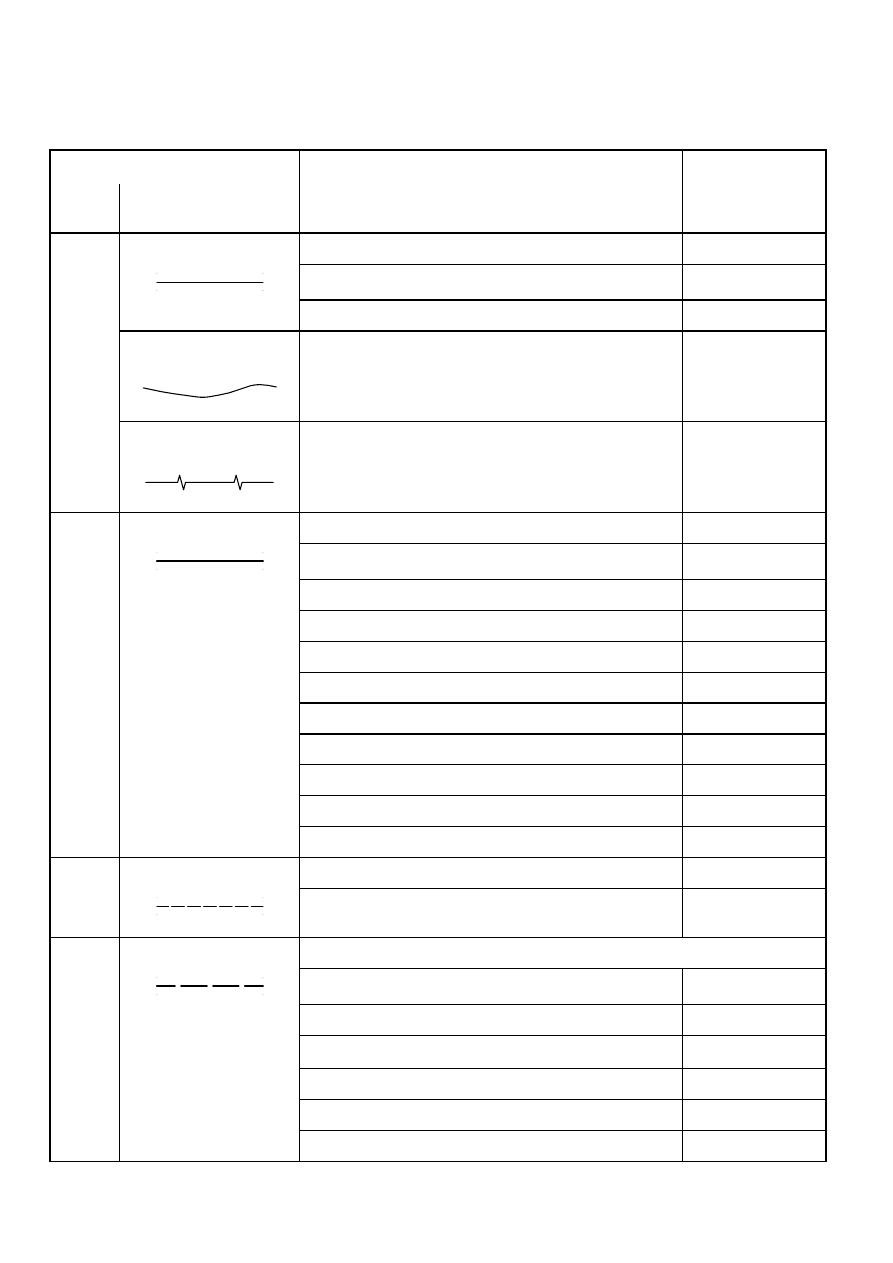
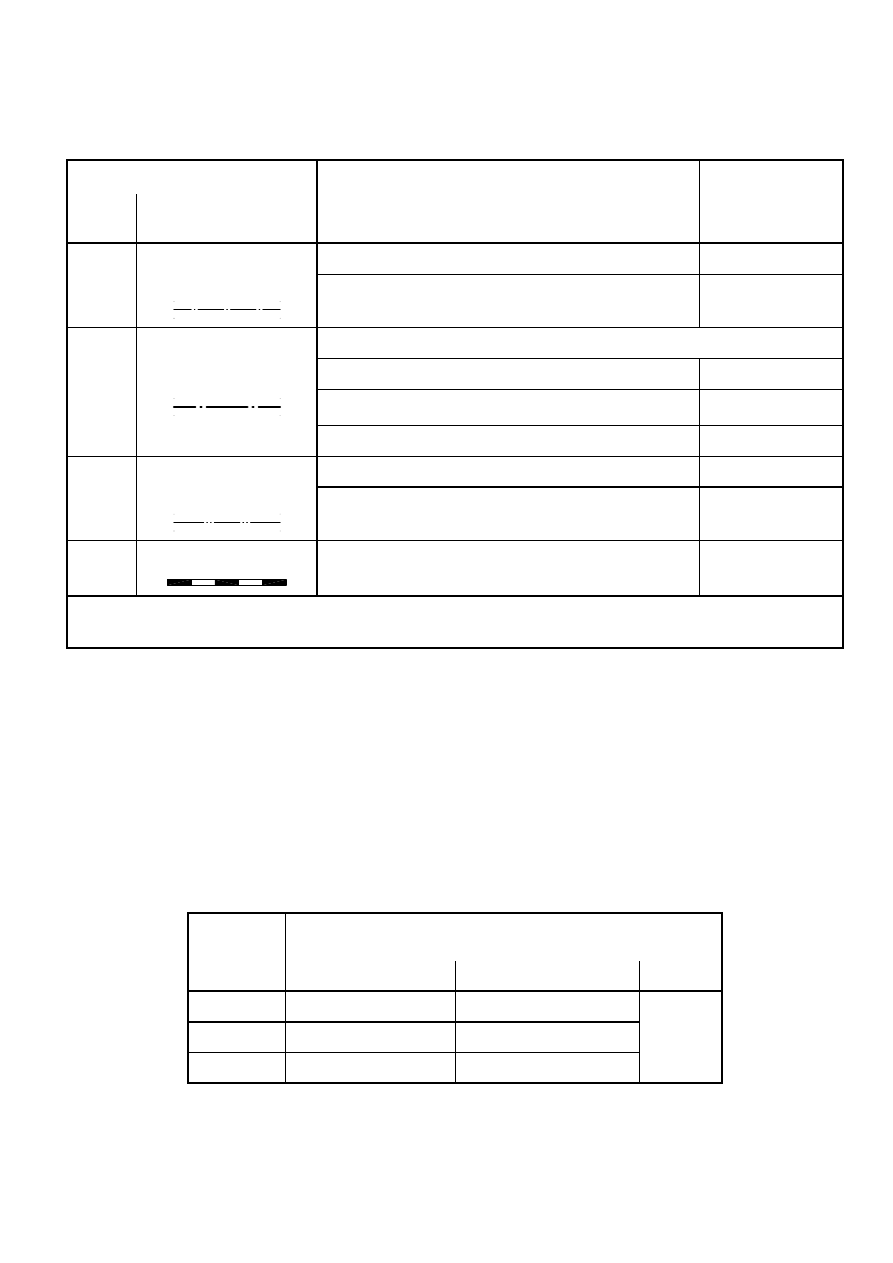
The different types of lines and their application are described in Table 1.
The first part of the line number in Table 1 corresponds to the basic type number, in accordance with ISO 128-20.
ISO 128-25:1999(E)
©
ISO
2
Table 1 — Types of lines and their application
Line
Application
Examples,
No.
Description and
representation
see figure
01.1
Continuous narrow line
.1
visible edges
A.2
.2
seams and butts
A.18, A.20
.3
visible profiles
A.1, A.6
Continuous narrow
undulating line
.4
preferably freehand
◊
drawn boundaries of partial
or interrupted views and sections, if the
boundary is not a line of symmetry or a
centreline
a
A.1
Continuous narrow line
with zigzags
.5
preferably computer
◊
drawn boundaries of partial
or interrupted views and sections, if the
boundary is not a line of symmetry or a
centreline
a
A.2
01.2
Continuous wide line
Sections of structural members, for example
.1
outer plating
A.2, A.19, A.20
.2
decks
A.6
.3
inner bottoms
A.19
.4
bulkheads and walls
A.20
.5
bottom girders and floors
A.19
.6
transverse girders, longitudinal girders
A.4
.7
stringers
—
.8
web frames
A.2
.9
brackets
A.6
.10
profiles
A.19
02.1
Dashed narrow line
.1
hidden edges
A.2
.2
hidden profiles
A.1, A.2, A.6, A.18,
A.20
02.2
Dashed wide line
Hidden plates, for example
.1
decks
A.18
.2
inner bottoms
A.18
.3
walls and bulkheads
b
A.18, A.20
.4
bottom girders
A.18
.5
floors
A.18
.6
brackets
A.6
©
ISO
ISO 128-25:1999(E)
3
Table 1
(continued)
Line
Application
Examples,
No.
Description and
representation
see figure
04.1
Long-dashed dotted
.1
veed-out openings
A.18, A.20
narrow line
.2
intersections, knuckles, centrelines
A.16, A.17
04.2
Long-dashed dotted wide Hidden plates, for example
line
.1
deck girders
A.20
.2
web frames
A.2, A.18
.3
transverse webs, stringers
A.20
05.1
Long-dashed double-
.1
outlines of adjacent parts
A.18
dotted narrow line
.2
parts situated in front of or behind the cutting
plane
—
01+03
Railway line
.1
hidden plates, e.g. tight walls or bulkheads
b
A.20
a
It is recommended to use only one type of line on one drawing.
b The decision to use the type of line 02.2.3 or 01+03 is left to the shipyard.
Examples of applications are given in annex A.
5 Line widths and line groups
Two line widths are normally used on shipbuilding drawings. The proportions between the line widths should be not
smaller than 1:2. A proportion of 1:3 is also allowed.
The line groups are specified in Table 2.
Table 2 — Line groups
Dimensions in millimetres
Line group
Line widths
for line No.
01.2 - 02.2 - 04.2
01.1 - 02.1 - 04.1 - 05.1
01+03
0,5
0,5
0,25
0,7
0,7
0,35
1,0
1,0
1,0
0,5
The widths and groups of lines should be chosen according to the type, size and scale of the drawing and according to
the requirements for microcopying and/or other methods of reproduction.
ISO 128-25:1999(E)
©
ISO
4
Annex A
(informative)
Application examples
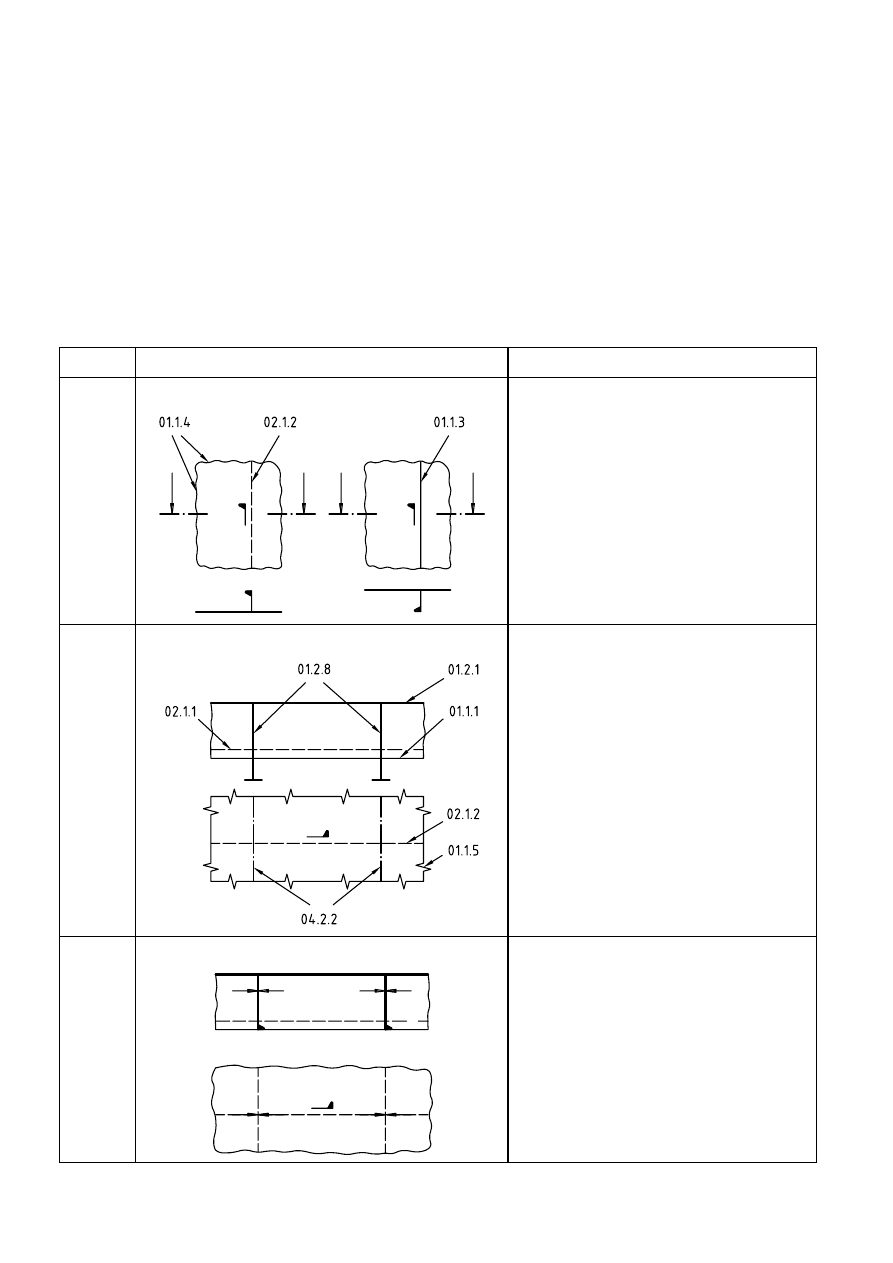
Table A.1 gives examples of the application of the different types of lines indicating the reference number given in
Table 1.
Table A.1 — Application examples
Figure
Representation
Explanation, remarks
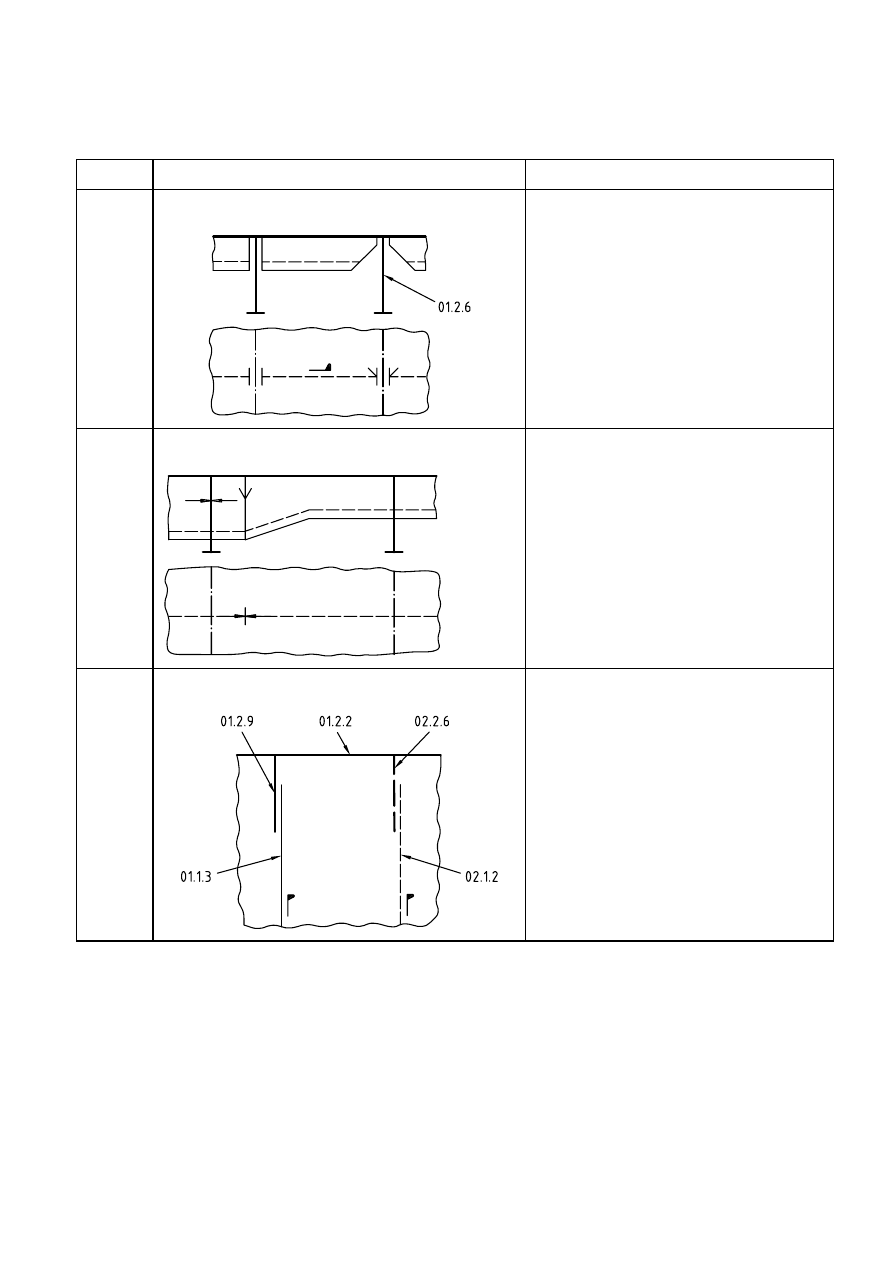
A.1
Profiles on panels, general
Representation in walls, decks, etc.
The actual shape of the profile section used
may also be represented.
Designation of profile sections shall be in
accordance with ISO 5261.
A.2
Continuous profile sections crossing with girders
A.3
Welded ends of profiles
Welded ends of profile sections shall be
marked by arrows.
When such profile ends are represented in
both top view and projection, arrows may be
dispensed within one view.
For identification of the lines, see Figure A.2.
©
ISO
ISO 128-25:1999(E)
5
Table A.1 (
continued
)
Figure
Representation
Explanation, remarks
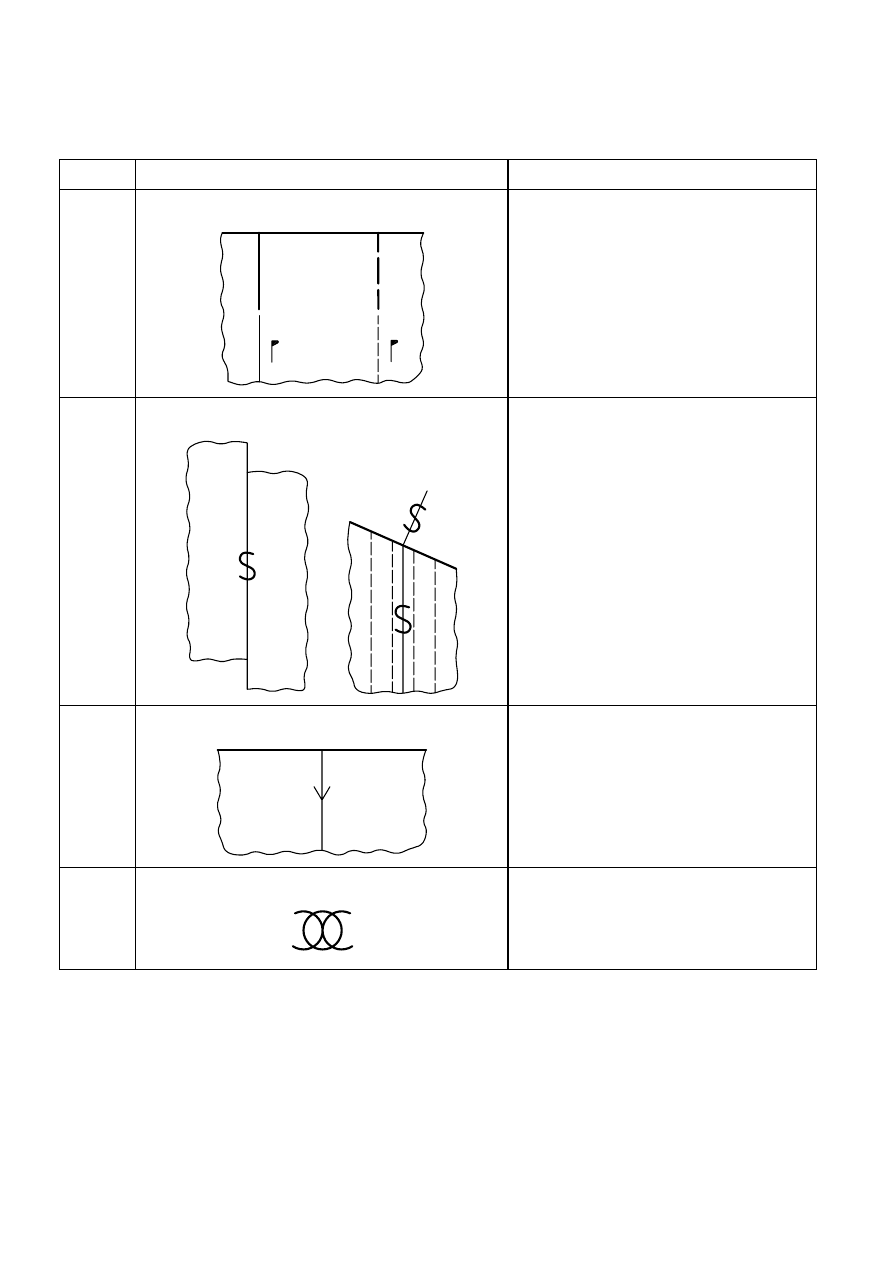
A.4
Sniped profile sections
A transverse line is used to show free ending
profile sections in top view/projection
drawings. An end cut under 30° or 45° is
marked by an additional sloped dash.
When such profile sections are represented
in both top view/projection and section, the
transverse lines may be dispensed with in
one of the drawings.
For identification of the lines, see Figure A.2.
A.5
Junction between profile sections of different sizes
In sectional representations of the junction
the arrows are omitted.
For identification of the lines, see Figure A.2.
A.6
Profile sections connected with overlapping brackets
ISO 128-25:1999(E)
©
ISO
6
Table A.1 (
continued
)
Figure
Representation
Explanation, remarks
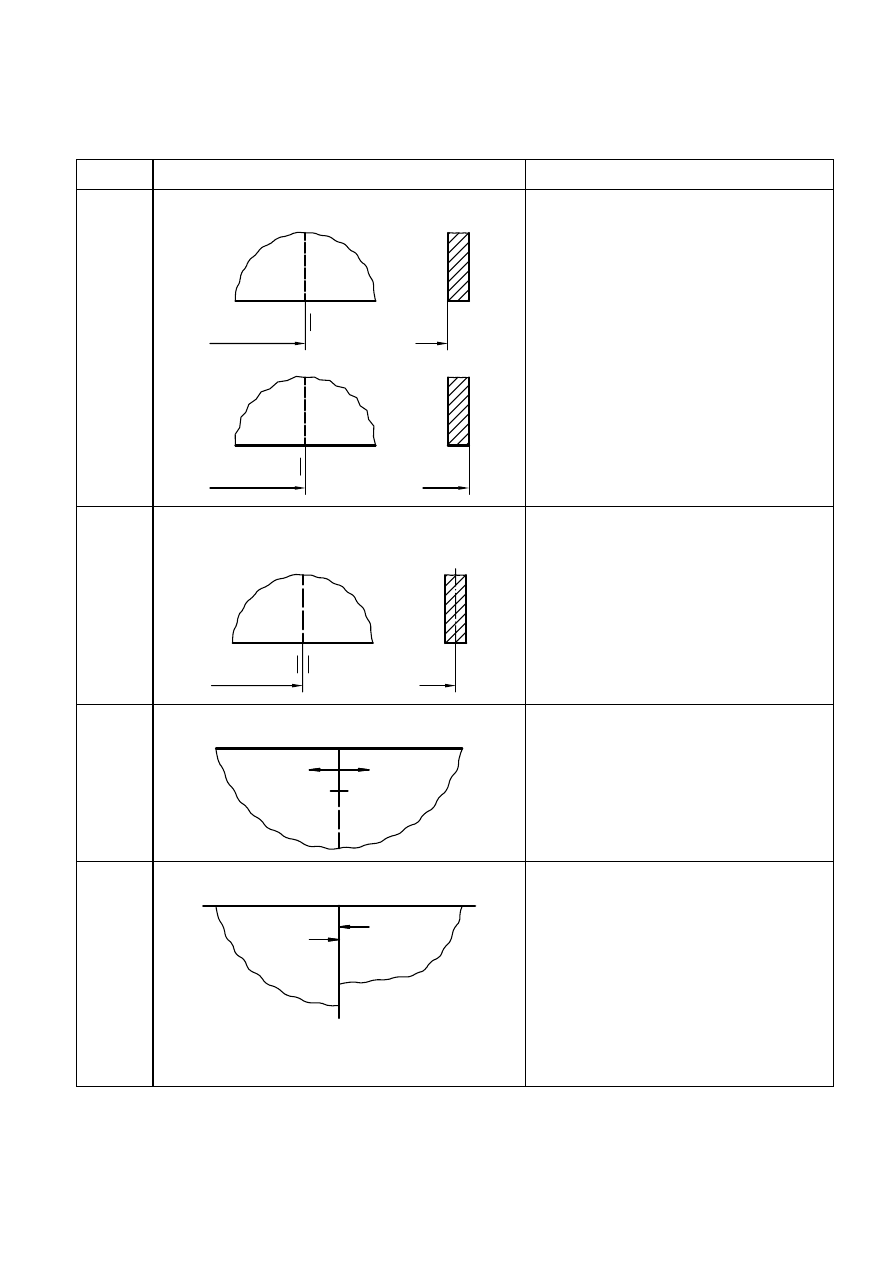
A.7
Profile sections connected with inserted brackets
For identification of the lines, see Figure A.6.
A.8
Section butt
The sign shown here shall be used on
drawings which do not provide welding
information as specified in ISO 2553.
The sign designates the butt of adjoining
sections. It is drawn in top views and
projections, while in sectional drawings it is
represented externally in conjunction with
line 01.1.
A.9
Butt joint of plates and/or profile sections
The sign shown shall be used on drawings
which do not provide welding information, as
specified in ISO 2553.
A.10
Change of frame direction
Representation using line 01.2
©
ISO
ISO 128-25:1999(E)
7
Table A.1 (
continued
)
Figure
Representation
Explanation, remarks
A.11
Indication of position of moulded edge of plates
To indicate the moulded edge of plates and
profile sections, it shall be designated by a
dash drawn adjacent to the ancillary
dimension line.
A.12
Indication of dimension referred to the centreline of
plates
Indication of dimension referred to the
centreline, e.g. of main girders or other thick
structural members
A.13
Continuous parts at junctions
The arrows indicate that the component in
fragmentary representation is continuous.
A.14
Non-continuous parts at junctions
The arrows indicate that the components in
fragmentary representation end at the
junction.
ISO 128-25:1999(E)
©
ISO
8
Table A.1 (
continued
)
Figure
Representation
Explanation, remarks
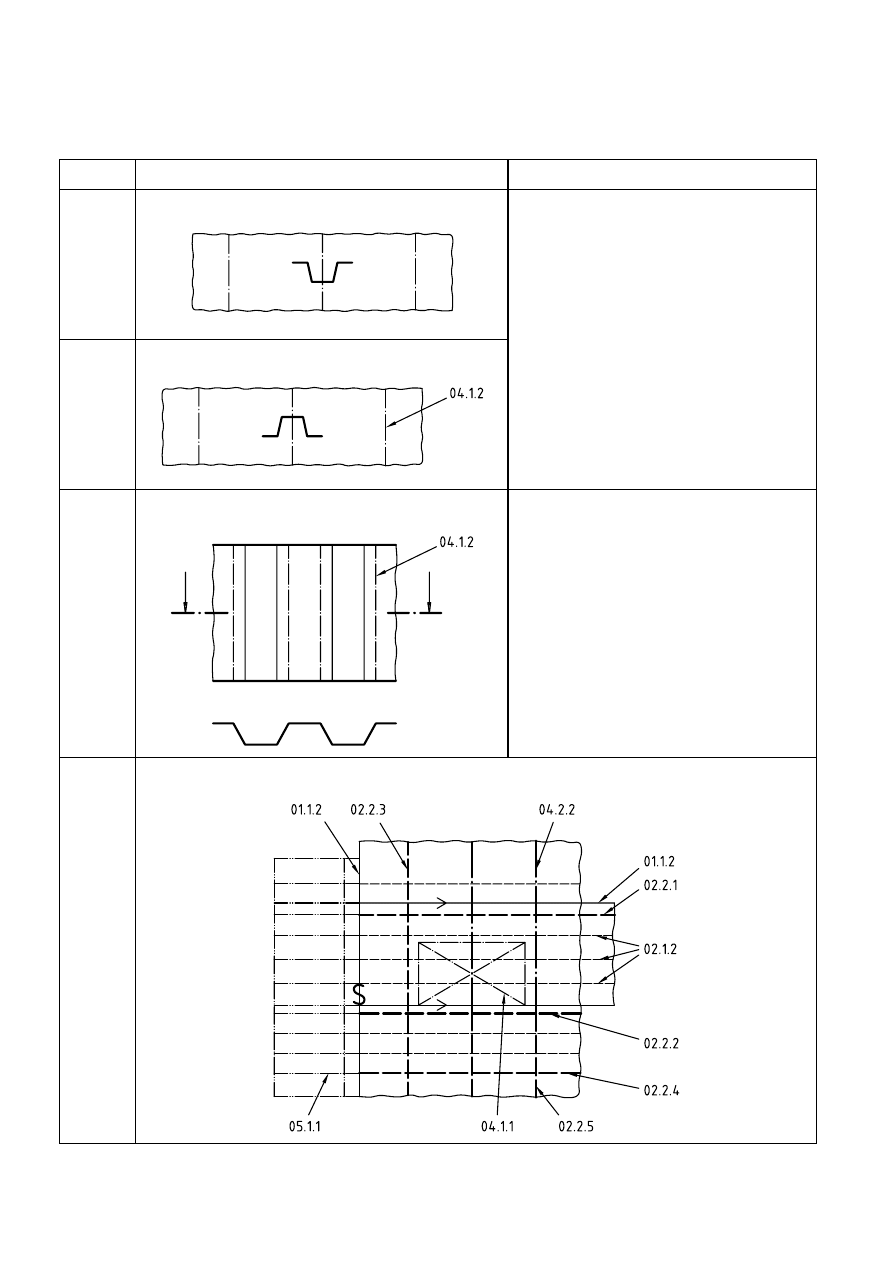
A.15
Swedge, facing forward
For a swedged wall one representation of
the swedge is sufficient.
The distance between swedges shall be
drawn to scale.
A.16
Swedge, facing down
A.17
Corrugated bulkheads
Nearby knuckles are represented by
continuous narrow lines; distant ones by
long-dashed dotted narrow lines.
A.18
Application of different lines exemplified in a view of a shell expansion
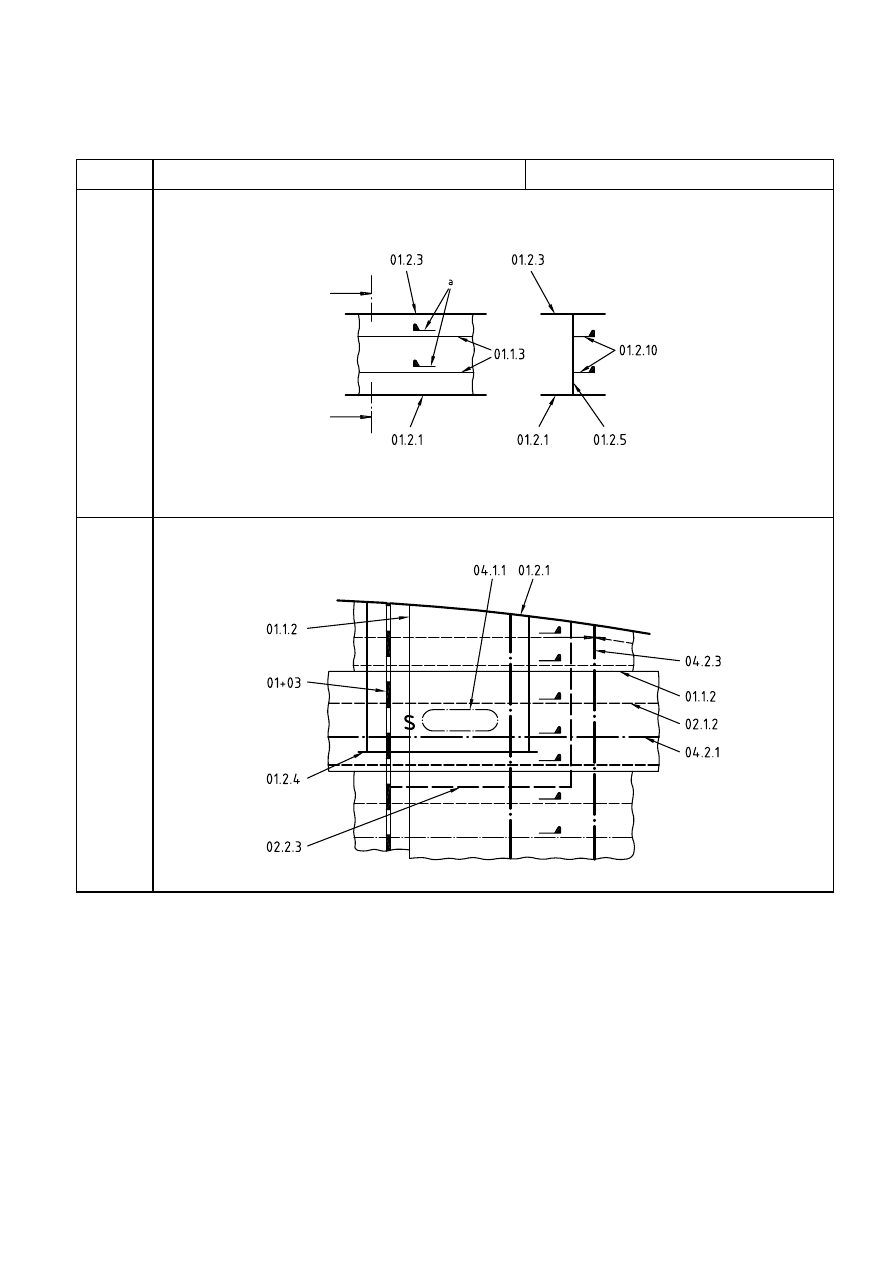
©
ISO
ISO 128-25:1999(E)
9
Table A.1 (
continued
)
Figure
Representation
Explanation, remarks
A.19
Application of continuous wide lines exemplified by a detail of a stiffened longitudinal girder of a bottom
structure
a
To be indicated only when no sectional drawing is supplied
A.20
Application of different lines and symbols exemplified by a deck detail

ISO 128-25:1999(E)
©
ISO
10
Bibliography
[1]
ISO 2553:1992
, Welded, brazed and soldered joints — Symbolic representation on drawings.
[2]
ISO 5261:1995,
Technical drawings — Simplified representation of bars and profile sections.


ISO 128-25:1999(E)
©
ISO
ICS 01.100.20; 47.020.01
Price based on 10 pages
Wyszukiwarka
Podobne podstrony:
ISO128 23 lines technical
ISO128 24 lines mechanical
ISO128 23 lines technical
ISO128 24 lines mechanical
ISO128 22 leader and reference lines
ISO128 22 leader and reference lines
Ustawa z dnia 25 06 1999 r o świadcz pien z ubezp społ w razie choroby i macierz
Cwiczenia 23 25 2007
Wykład 25
Wykład12 Sieć z protokołem X 25 i Frame Relay
zwierzaczki 25
25 Wyklad 1 Dlaczego zwiazki sa wazne
wyklad 2012 10 25 (Struktury systemów komputerowych)
więcej podobnych podstron