
A
Reference number
ISO 128-23:1999(E)
INTERNATIONAL
STANDARD
ISO
128-23
First edition
1999-06-15
Technical drawings — General principles of
presentation —
Part
23:
Lines on construction drawings
Dessins techniques — Principes généraux de représentation —
Partie 23: Traits utilisés dans la documentation de construction et de génie
civil
SIS-2002-571
1999

ISO 128-23:1999(E)
© ISO 1999
All rights reserved. Unless otherwise specified, no part of this publication may be reproduced or utilized in any form or by any means, electronic
or mechanical, including photocopying and microfilm, without permission in writing from the publisher.
International Organization for Standardization
Case postale 56
•
CH-1211 Genève 20
•
Switzerland
Internet
iso@iso.ch
Printed in Switzerland
ii
Contents
1 Scope ........................................................................................................................................................................ 1
2 Normative references .............................................................................................................................................. 1
3 General principles.................................................................................................................................................... 2
4 Types of lines and their applications..................................................................................................................... 2
5 Line widths ............................................................................................................................................................... 4
Annex A (informative) Examples of application ....................................................................................................... 6

©
ISO
ISO 128-23:1999(E)
iii
Foreword
ISO (the International Organization for Standardization) is a worldwide federation of national standards bodies (ISO
member bodies). The work of preparing International Standards is normally carried out through ISO technical
committees. Each member body interested in a subject for which a technical committee has been established has
the right to be represented on that committee. International organizations, governmental and non-governmental, in
liaison with ISO, also take part in the work. ISO collaborates closely with the International Electrotechnical
Commission (IEC) on all matters of electrotechnical standardization.
International Standards are drafted in accordance with the rules given in ISO/IEC Directives, Part 3.
Draft International Standards adopted by the technical committees are circulated to the member bodies for voting.
Publication as an International Standard requires approval by at least 75 % of the member bodies casting a vote.
International Standard ISO 128-23 was prepared by Technical Committee ISO/TC 10,
Technical drawings, product
definition and related documentation
, Subcommittee SC 8,
Construction documentation.
This first edition is based on ISO 128:1982, clause 3, and it replaces the rules specified in that clause.
ISO 128 consists of the following parts, under the general title
Technical drawings — General principles of
presentation:
Part 20: Basic conventions for lines
Part 21: Preparation of lines by CAD systems
Part 22: Basic conventions and applications for leader lines and reference lines
Part 23: Lines on construction drawings
Part 24: Lines on mechanical engineering drawings
Part 25: Lines on shipbuilding drawings
Part 30: Basic convention for views
Part 50: Basic conventions for representing areas on cuts and sections
NOTE
Further parts of ISO 128 are planned, covering other general principles of presentation including those for
application of lines within drawings of various technical fields.
Annex A of this part of ISO 128 is for information only.

ISO 128-23:1999(E)
©
ISO
iv
Introduction
The basic conventions and the application of lines in respect to other fields of drawing practice are presented in
other parts of ISO 128 since requirements in industry vary considerably. For further information, see ISO 128-20.

INTERNATIONAL STANDARD
©
ISO
ISO 128-23:1999(E)
1
Technical drawings — General principles of presentation —
Part 23:
Lines on construction drawings
1 Scope
This part of ISO 128 specifies types of lines and their application in construction documentation comprising
architectural drawings, structural engineering drawings, building service engineering drawings, civil engineering
drawings, landscape drawings and town planning drawings.
2 Normative references
The following normative documents contain provisions which, through reference in this text, constitute provisions of
this part of ISO 128. For dated references, subsequent amendments to, or revisions of, any of these publications do
not apply. However, parties to agreements based on this part of ISO 128 are encouraged to investigate the
possibility of applying the most recent editions of the normative documents indicated below. For undated
references, the latest edition of the normative document referred to applies. Members of ISO and IEC maintain
registers of currently valid International Standards.
ISO 128-20:1996,
Technical drawings — General principles of presentation — Part 20: Basic conventions for lines.
ISO 129:1985,
Technical drawings — Dimensioning — General principles, definitions, methods of execution and
special indications.
ISO 3766:1995,
Construction drawings — Simplified representation of concrete reinforcement.
ISO 4068:1978,
Building and civil engineering drawings — Reference lines.
ISO 4069:1977,
Building and civil engineering drawings — Representation of areas on sections and views
General principles.
ISO 4463-1:1989,
Measurement methods for building — Setting-out and measurement — Part 1: Planning and
organization, measuring procedures, acceptance criteria.
ISO 6428:1982,
Technical drawings — Requirements for microcopying.
ISO 7519:1991,
Technical drawings — Construction drawings — General principles of presentation for general
arrangement and assembly drawings.
ISO 8048:1984,
Technical drawings — Construction drawings — Representation of views, sections and cuts.
ISO 8560:1986,
Technical drawings — Construction drawings — Representation of modular sizes, lines and grids.
ISO 11091:1994,
Construction drawings — Landscape drawing practice.
ISO 128-23:1999(E)
©
ISO
2
3 General principles
The types of lines, their designations and their dimensions as well as general rules for draughting of lines are
specified in ISO 128-20.
The requirements for microcopying are specified in ISO 6428.
4 Types of lines and their applications
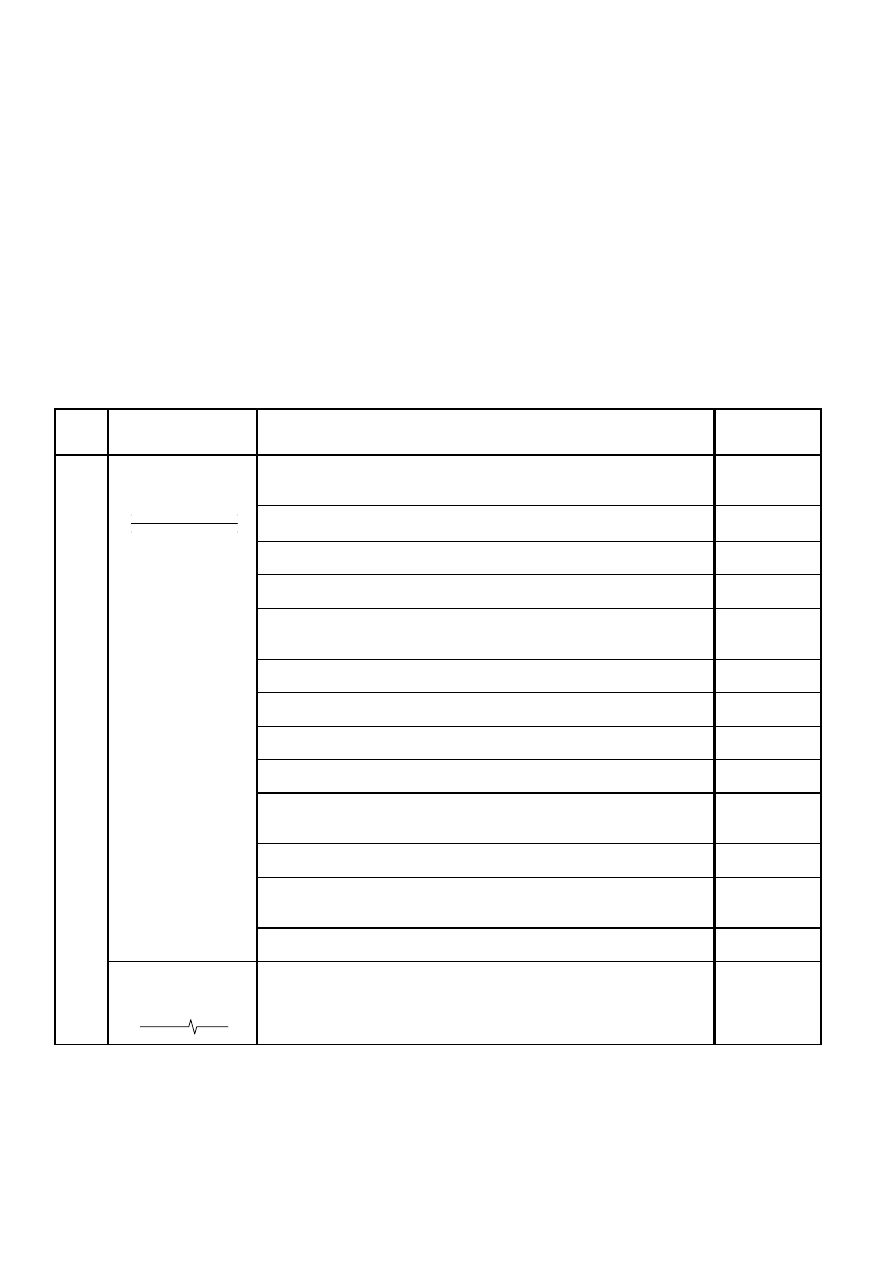
The first part of the number is the number of line type in ISO 128-20.
Examples of applications are shown in annex A.
Table 1 — Types of lines and their application
No.
Description and
representation
Application
Reference to
ISO
01.1
Continuous narrow
line
.1 boundaries of different materials in view, cut and section
(alternatively, see 01.2.2)
7519
.2 hatching
4069
.3 diagonals for indication of openings, holes and recesses
7519
.4 arrow lines in stairs, ramps and sloping areas
7519
.5 modular grid lines, first stage (if necessary, other colour than
outlines)
8560
.6 short centrelines
—
.7 extension lines
129
.8 dimension lines and their terminators
129
.9 leader lines
129
.10 existing contours on landscape drawings (alternatively, see
02.1.1)
11091
.11 visible outlines of parts in view (alternatively, see 01.2.3)
—
.12 simplified representation of doors, windows, stairs, fittings etc.
(alternatively, see 01.2.4)
7519
.13 framing of details
—
Continuous narrow
lines with zigzags
.14 limits of partial or interrupted views, cuts and sections, if the
limit is not a line 04.1 (alternatively, see 04.1.6)
—
©
ISO
ISO 128-23:1999(E)
3
Table 1
(continued)
No.
Description and
representation
Application
Reference to
ISO
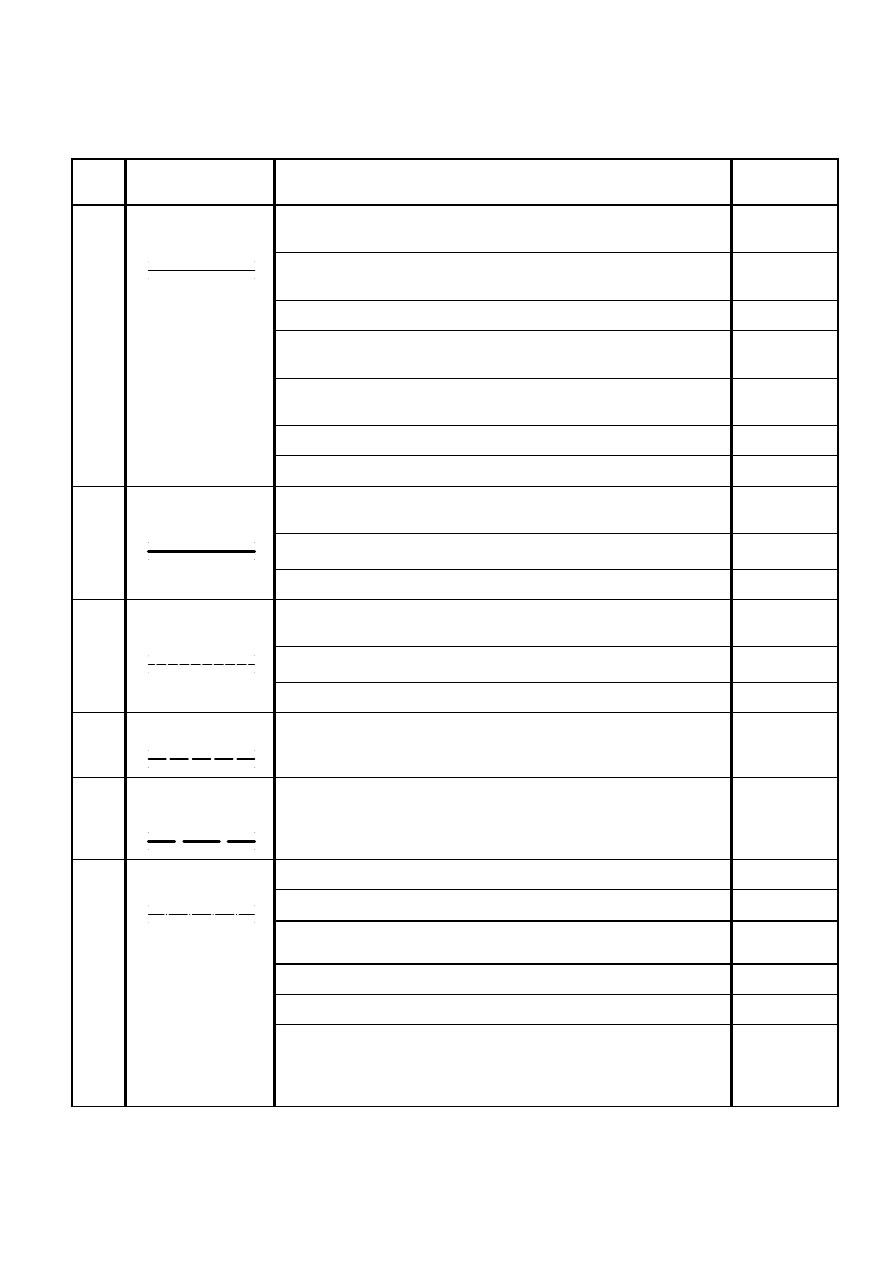
01.2
Continuous wide line
.1 visible outlines of parts in cut and section when hatching is
used
7519
.2 boundaries of different materials in view, cut and section
(alternatively, see 01.1.1)
—
.3 visible outlines of parts in view (alternatively, see 01.1.11)
7519
.4 simplified representation of doors, windows, stairs, fittings etc.
(alternatively, see 01.1.12)
7519
.5 modular grid lines, second stage (if necessary other colour
than outlines)
8560
.6 arrow lines for marking of views, cuts and sections
8048
.7 proposed contours on landscape drawings
11091
01.3
Continuous extra-
wide line
.1 visible outlines of parts in cut and section when hatching is not
used
7519
.2 reinforcing bars (see 02.3.1)
3766
.3 lines of special importance
—
02.1
Dashed narrow line
.1 existing contours on landscape drawings (alternatively, see
01.1.10)
11091
.2 subdivision of plant beds/grass
11091
.3 hidden outlines (alternatively, see 02.2.1)
—
02.2
Dashed wide line
.1 hidden outlines (alternatively, see 02.1.3)
—
02.3
Dashed extra-wide
line
.1 reinforcing bars in bottom layer on plan and far face layer in
elevation when bottom and top layers and near and far face
layers are shown on the same sketch
3766
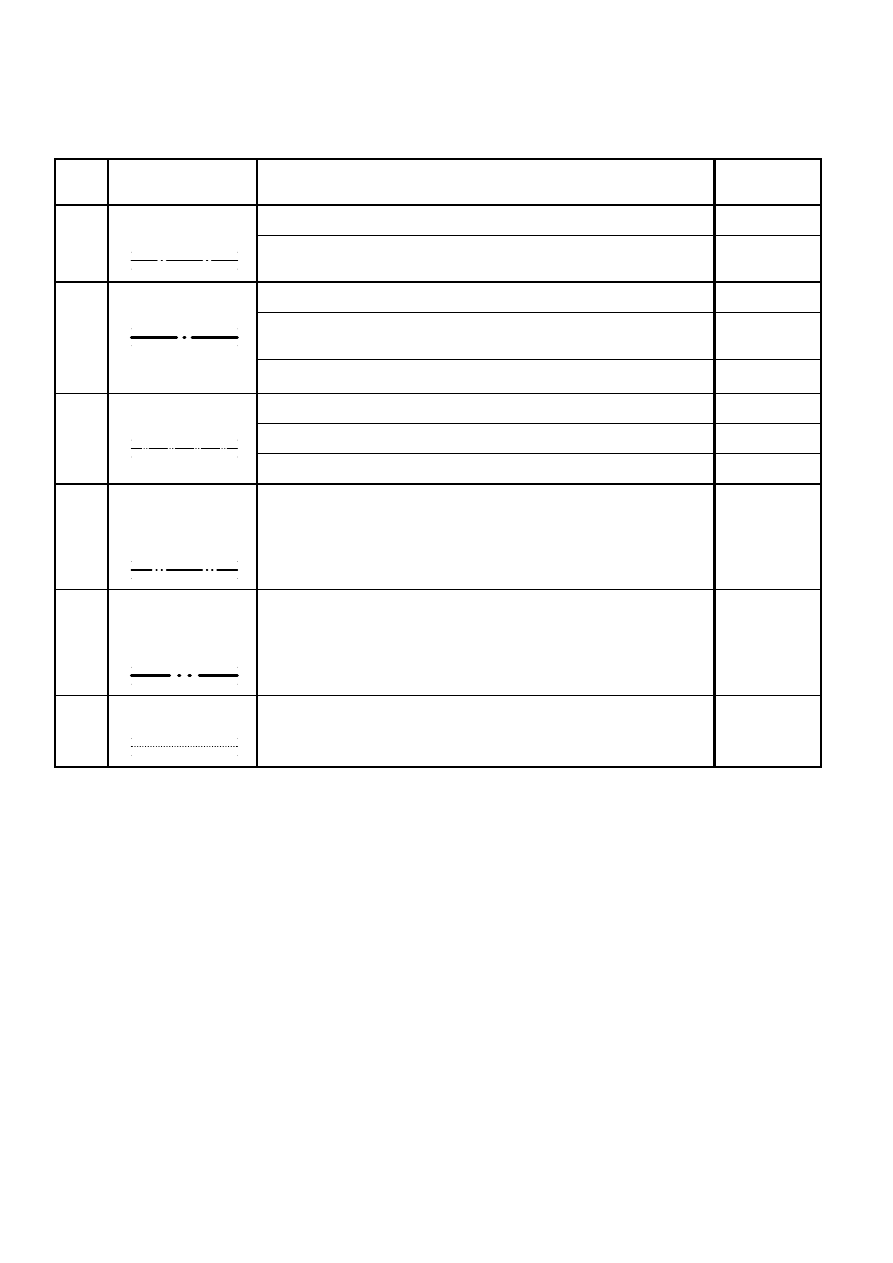
04.1
Long dashed dotted
narrow line
.1
.2
.3
cutting planes (line 04.2 at ends and changes of direction)
centrelines
lines of symmetry (identified at the ends by two narrow short
parallel lines drawn at right angle)
—
—
—
.4 framing of enlarged details
—
.5 reference lines
—
.6 limits of partial or interrupted views, cuts and sections
(especially for short lines and in narrow situations; see
examples 01.1.2, 01.2.1, 01.3.1, etc., in annex A; alternatively,
see 01.1.14)
—
ISO 128-23:1999(E)
©
ISO
4
Table 1
(continued)
No.
Description and
representation
Application
Reference to
ISO
04.2
Long dashed dotted
wide line
.1
.2
cutting planes (at ends and changes of direction; see 04.1.1)
outlines of visible parts situated in front of the cutting plane
—
—
04.3
Long dashed dotted
extra-wide line
.1
.2
secondary lines for setting out and arbitrary reference lines
indication of lines or surfaces to which a special requirement
applies
4463-1;4068
—
.3 boundary lines for contracts, stages, zones etc.
—
05.1
Long dashed double-
dotted narrow line
.1
.2
.3
alternative and extreme positions of movable parts
centroidal line
outlines of adjacent parts
—
—
—
05.2
Long dashed
double-dotted wide
line
.1 outlines of hidden parts situated in front of the cutting plane
—
05.3
Long dashed
double-dotted
extra-wide line
.1 reinforcing prestressed bars and cables
3766
07.1
Dotted narrow line
.1 outlines of parts not included in the project
—
5 Line widths
On a construction drawing three line widths, narrow, wide and extra-wide, are normally used (see Table 2).
The proportions between the line widths are 1:2:4.
A special line width is used for representation and lettering of graphical symbols. This line width is situated between
the width of the narrow and the wide line.

©
ISO
ISO 128-23:1999(E)
5
Table 2 — Line widths
Dimensions in millimetres
Line group
Narrow line
Wide line
Extra-wide line
Line widths for
graphical symbols
0,25
0,13
0,25
0,5
0,18
0,35
0,18
0,35
0,7
0,25
0,5
0,25
0,5
1
0,35
0,7
0,35
0,7
1,4
0,5
1
0,5
1
2
0,7
The line widths shall be chosen according to the type, size and scale of the drawing and the requirements at
microcopying and other methods of reproduction.
ISO 128-23:1999(E)
©
ISO
6
Annex A
(informative)
Examples of application
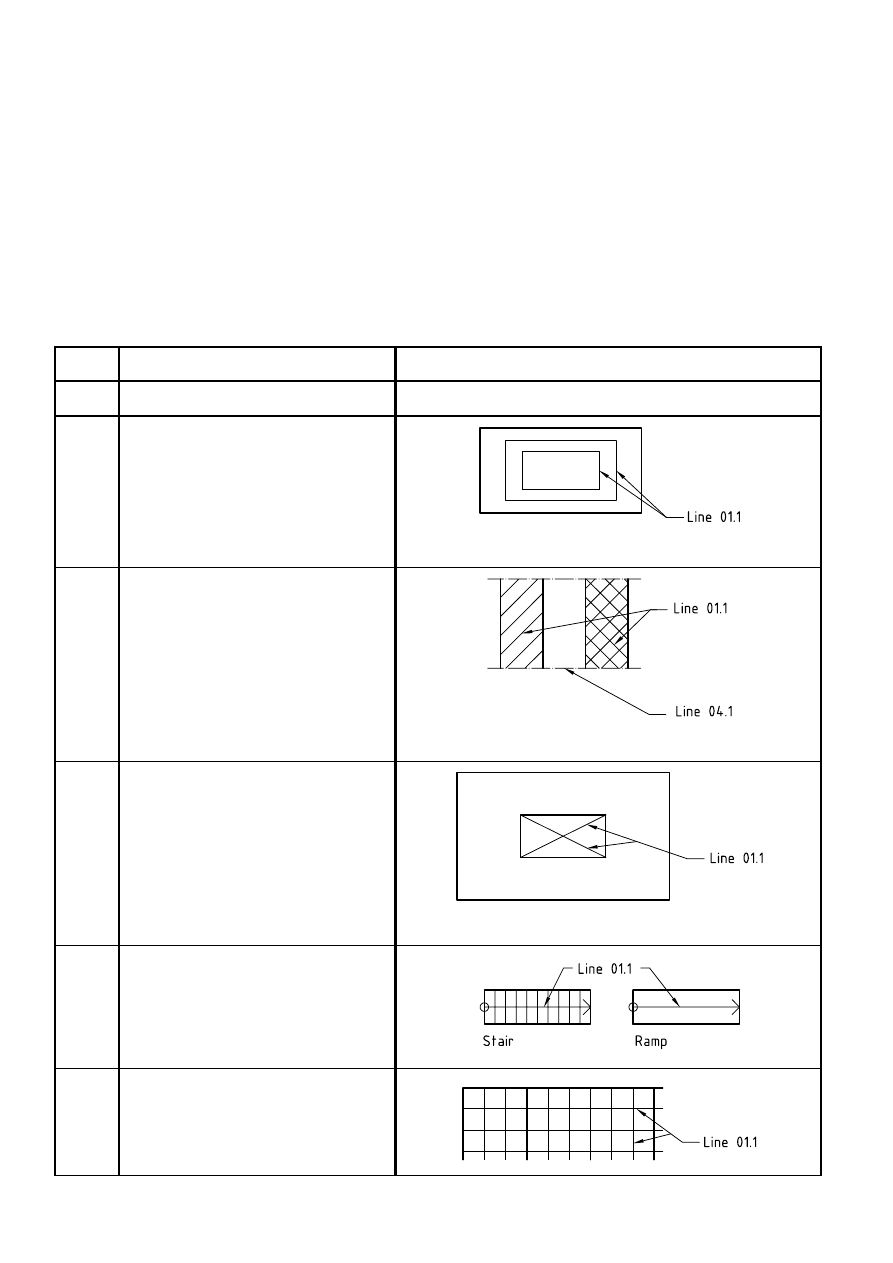
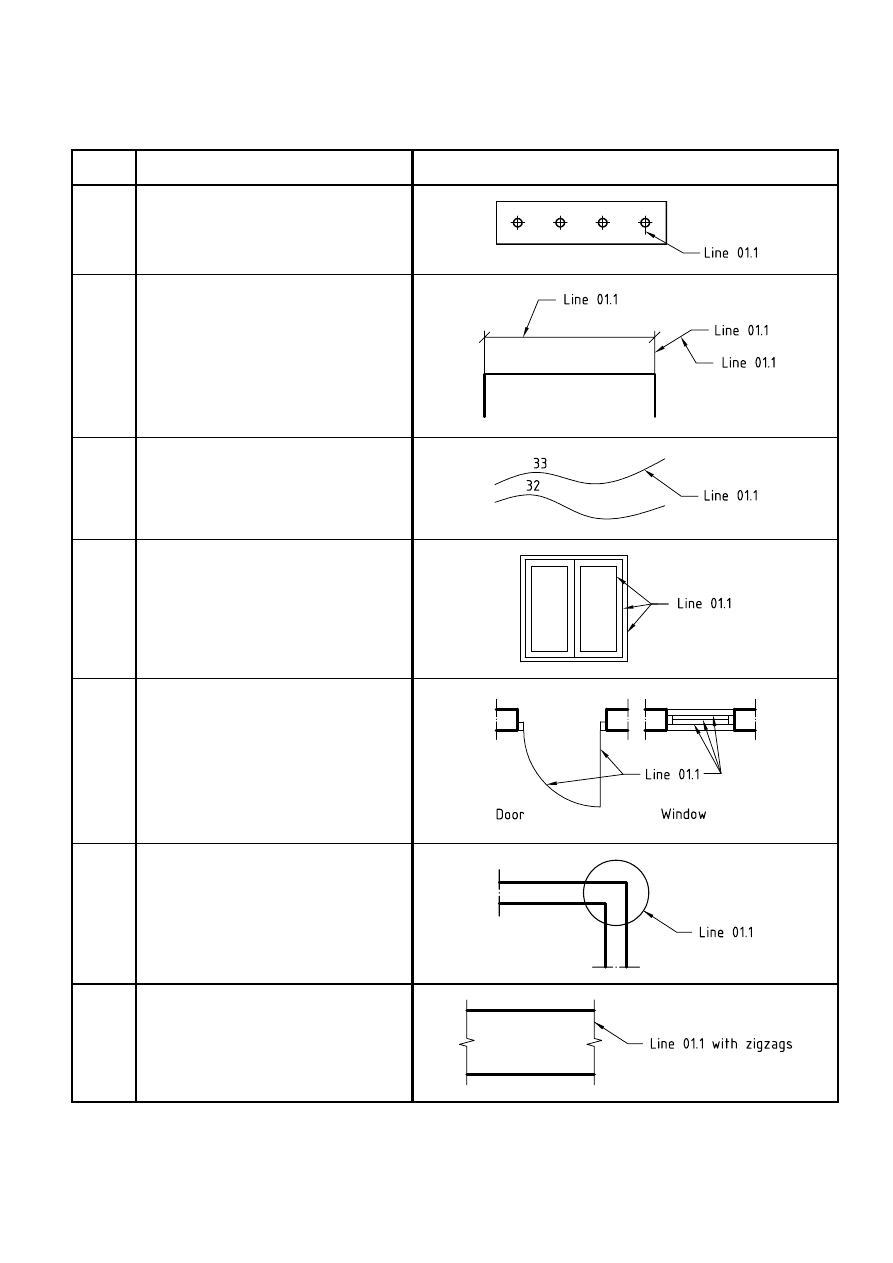
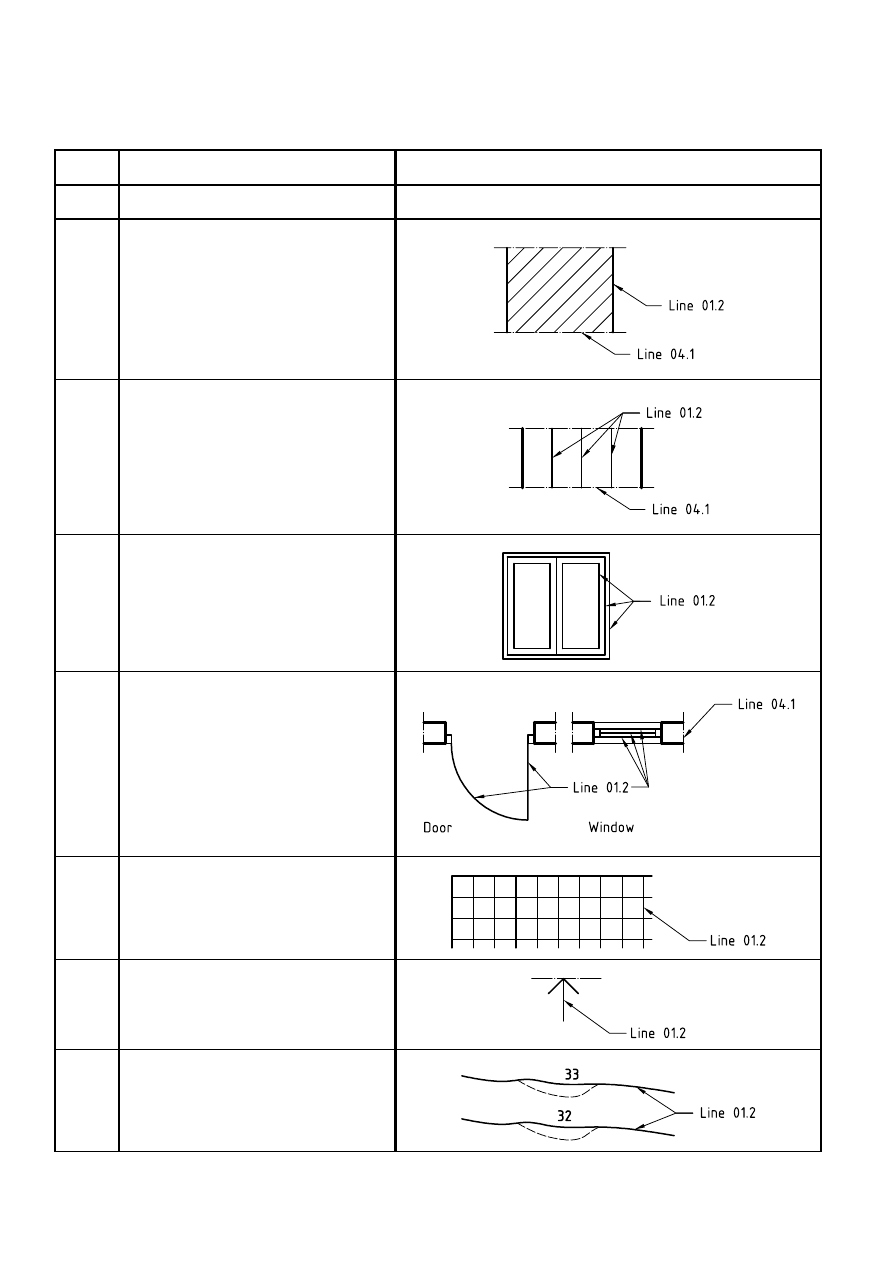
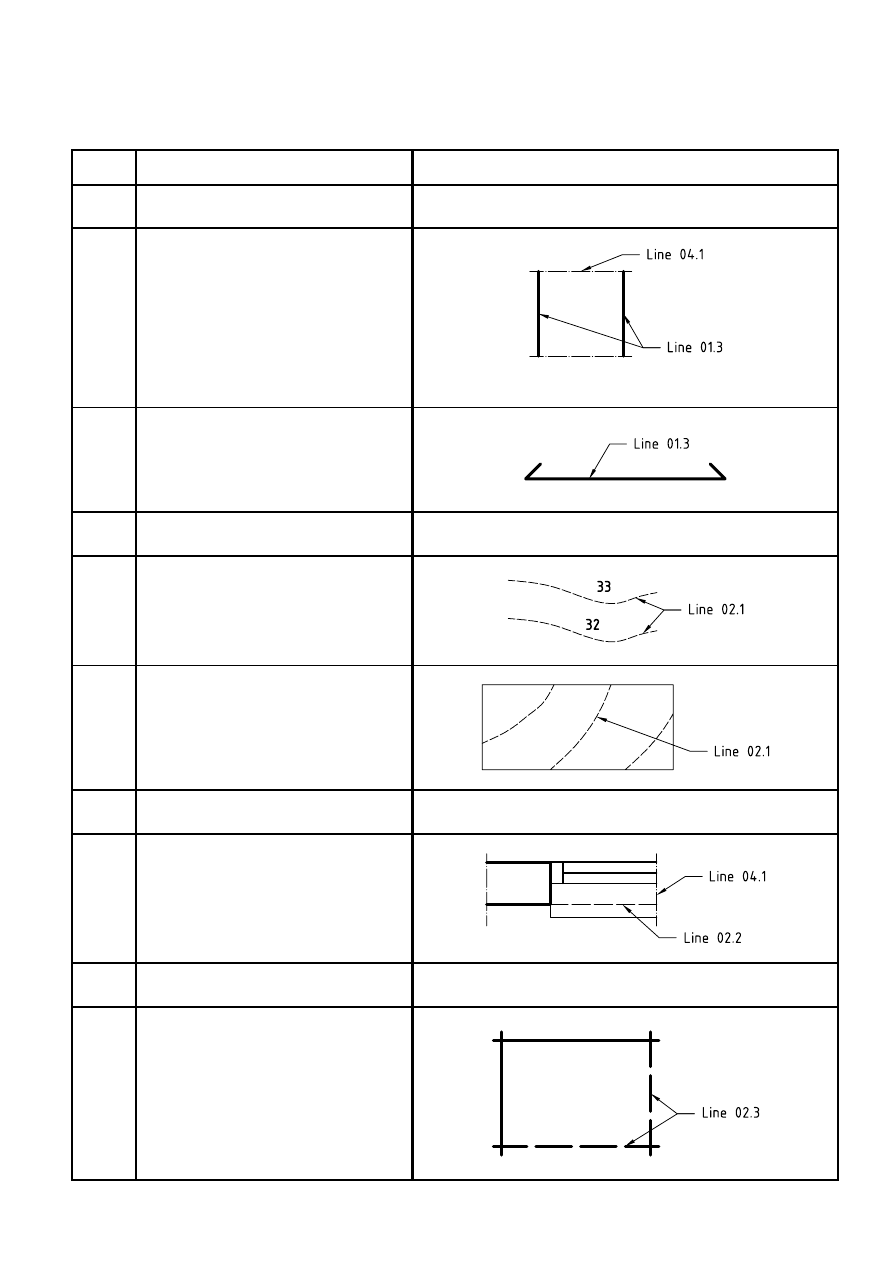
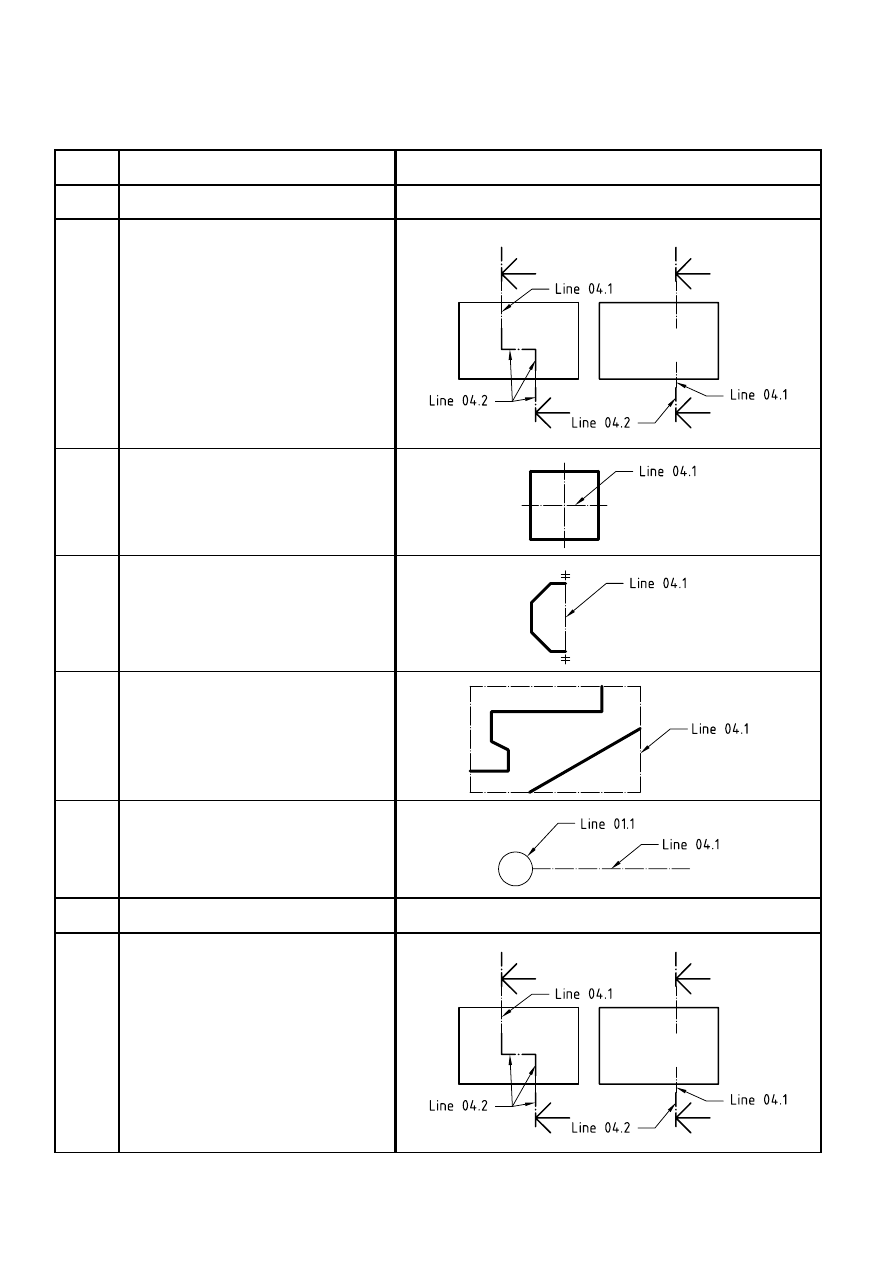
Examples of the application of the different types of lines, along with the corresponding reference numbers from
clause 4, are given in Table A.1.
Table A.1 — Examples of application
No.
Line type
Example of application
01.1
Continuous narrow line
01.1.1
Boundaries of different materials in
view, cut and section
View of a floor with different materials
01.1.2
Hatching
Vertical section of a wall
01.1.3
Diagonals for indication of openings,
holes and recesses
View of a wall with an opening
01.1.4
Arrow lines in stairs, ramps and sloping
areas
01.1.5
Modular grid lines, first stage
©
ISO
ISO 128-23:1999(E)
7
Table A.1
(continued)
No.
Line type
Example of application
01.1.6
Short centrelines
01.1.7
01.1.8
01.1.9
Extension lines
Dimension lines and their terminators
Leader lines
01.1.10
Existing contours on landscape
drawings
01.1.11
Visible outlines of parts in view
(alternatively, see 01.2.3)
01.1.12
Simplified representation of doors,
windows, stairs, fittings etc.
(alternatively, see 01.2.4)
01.1.13
Framing of details
01.1.14
Limits of partial or interrupted views,
cuts and sections, if the limit is not a
line 04.1
ISO 128-23:1999(E)
©
ISO
8
Table A.1
(continued)
No.
Line type
Example of application
01.2
Continuous wide line
01.2.1
Visible outlines of parts in cut and
section when hatching is used
01.2.2
Boundaries of different materials in
view, cut and section
01.2.3
Visible outlines of parts in view
(alternatively, see 01.1.11)
01.2.4
Simplified representation of doors,
windows, stairs, fittings etc.
(alternatively, see 01.1.12)
01.2.5
Modular grid lines, second stage
01.2.6
Arrow lines for marking of views, cuts
and sections
01.2.7
Proposed contours on landscape
drawings
©
ISO
ISO 128-23:1999(E)
9
Table A.1
(continued)
No.
Line type
Example of application
01.3
Continuous extra-wide line
01.3.1
Visible outlines of parts in cut and
section when hatching is not used
Vertical section of a wall
01.3.2
Reinforcing bars
02.1
Dashed narrow line
02.1.1
Existing contours on landscape
drawings (alternatively, see 01.1.10)
02.1.2
Subdivision of plant beds/grass
02.2
Dashed wide line
02.2.1
Hidden outlines
02.3
Dashed extra-wide line
02.3.1
Reinforcing bars in bottom layer on
plan and far face layer in elevation
when bottom and top layers are shown
on the same sketch
ISO 128-23:1999(E)
©
ISO
10
Table A.1
(continued)
No.
Line type
Example of application
04.1
Long dashed dotted narrow line
04.1.1
Cutting planes (drawn with line 04.2 at
ends and changes of direction)
04.1.2
Centrelines
04.1.3
Lines of symmetry
04.1.4
Framing of enlarged details
04.1.5
Reference lines
04.2
Long dashed dotted wide line
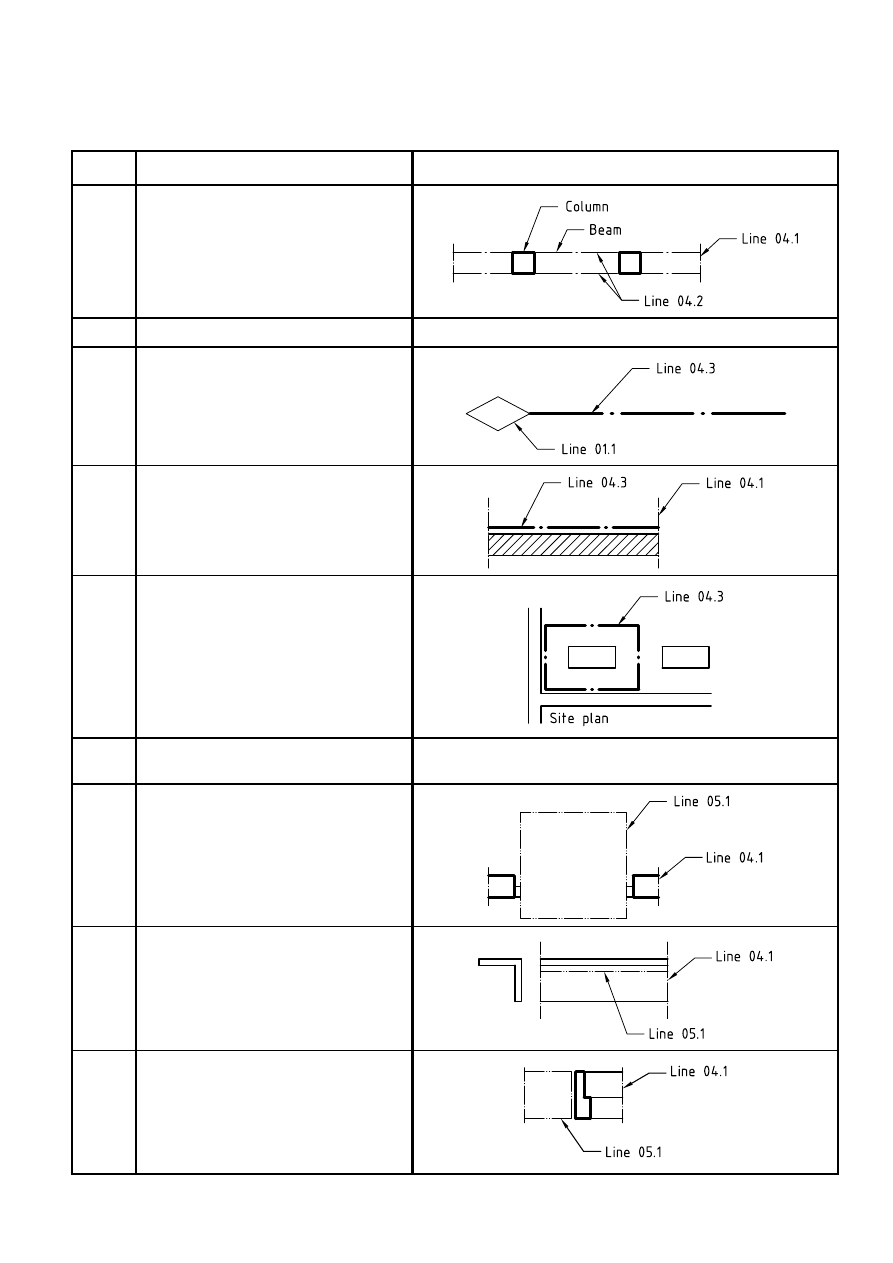
04.2.1
Cutting planes (drawn with line 04.2 at
ends and changes of direction; the rest
is drawn with line 04.1)
©
ISO
ISO 128-23:1999(E)
11
Table A.1
(continued)
No.
Line type
Example of application
04.2.2
Outlines of visible parts situated in
front of the cutting plane
04.3
Long dashed dotted extra-wide line
04.3.1
Secondary lines for setting out and
arbitrary reference lines
04.3.2
Indication of lines or surfaces to which
a special requirement applies
04.3.3
Boundary lines for contracts, stages,
zones, etc.
05.1
Long dashed double-dotted narrow
line
05.1.1
Alternative and extreme position of
movable parts
05.1.2
Centroidal lines
05.1.3
Outlines of adjacent parts
ISO 128-23:1999(E)
©
ISO
12
Table A.1
(continued)
No.
Line type
Example of application
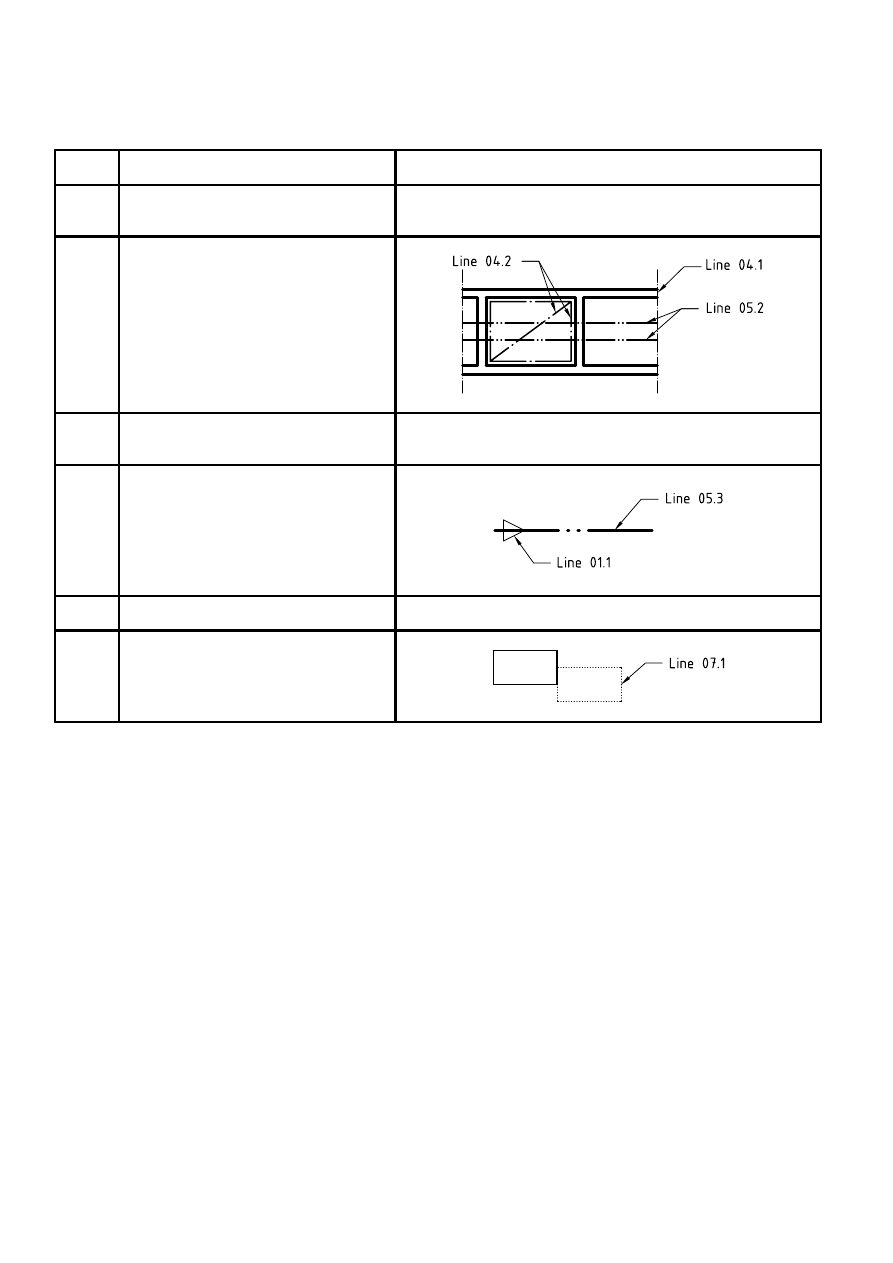
05.2
Long dashed double-dotted wide
line
05.2.1
Outlines of hidden parts situated in
front of the cutting plane
05.3
Long dashed double-dotted extra-
wide line
05.3.1
Reinforcing prestressed bars and
cables
07
Dotted narrow line
07.1
Outlines of parts not included in the
project


ISO 128-23:1999(E)
©
ISO
ICS 01.100.30
Price based on 12 pages
Wyszukiwarka
Podobne podstrony:
ISO128 24 lines mechanical
ISO128 25 lines shipbuilding
23 Organizowanie technicznej obsługi rolnictwa
Aronson - wersja 23 strony, Technik Administracji, SOCJOL I PSYCH SPOŁECZNA, Socjologia i Psychologi
2009 07 23 warunki techniczne jakim powinny odpowiadać budowle rolnicze i ich usytuowanie
23.technologia i technika wapnowania
ISO128 24 lines mechanical
ISO128 25 lines shipbuilding
ISO128 22 leader and reference lines
Ocenianie stanu technicznego urządzeń i systemów (23 54)
23 06 2012 Techniczne bezpieczeństwo pracy
Hydrodynamika środowiskowa z elementami mechani technicznej 23.11.2007, Inżynieria Ochrony Środowisk
Siatkówka- doskonalenie poznanych elementów technicznych 23, Konspekty, Siatkówka
więcej podobnych podstron