A
Reference number
ISO 128-24:1999(E)
INTERNATIONAL
STANDARD
ISO
128-24
First edition
1999-06-01
Technical drawings — General principles of
presentation —
Part 24:
Lines on mechanical engineering drawings
Dessins techniques — Principes généraux de représentation —
Partie 24: Traits utilisés pour les dessins industriels
SIS-2002-572
1999

ISO 128-24:1999(E)
© ISO 1999
All rights reserved. Unless otherwise specified, no part of this publication may be reproduced or utilized in any form or by any means, electronic
or mechanical, including photocopying and microfilm, without permission in writing from the publisher.
International Organization for Standardization
Case postale 56
•
CH-1211 Genève 20
•
Switzerland
Internet
iso@iso.ch
Printed in Switzerland
ii
Foreword
ISO (the International Organization for Standardization) is a worldwide federation of national standards bodies (ISO
member bodies). The work of preparing International Standards is normally carried out through ISO technical
committees. Each member body interested in a subject for which a technical committee has been established has
the right to be represented on that committee. International organziations, governmental and non-governmental, in
liaison with ISO, also take part in the work. ISO collaborates closely with the International Electrotechnical
Commission (IEC) in all matters of electrotechnical standardization.
International Standards are drafted in accordance with the rules given in the ISO/IEC Directives, Part 3.
Draft International Standards adopted by the technical committees are circulated to the member bodies for voting.
Publication as an International Standard requires approval by at least 75% of the member bodies casting a vote.
International Standard ISO 128-24 was prepared by Technical Committee ISO/TC 10,
Technical drawings, product
definition and related documentation
, Subcommittee SC 1,
Basic conventions
.
ISO 128 consists of the following parts, under the general title
Technical drawings — General principles of
presentation
:
Part 20: Basic conventions for lines
Part 21: Preparation of lines by CAD systems
Part 22: Basic conventions and applications for leader lines and reference lines
Part 23: Lines on construction drawings
Part 24: Lines on mechanical engineering drawings
Part 25: Lines on shipbuilding drawings
Part 30: Basic conventions for views
Part 31: Additional conventions for views
Part 40: Basic conventions for cuts and sections
Part 41: Cuts and sections for mechanical engineering drawings
Part 50: Basic conventions for representing areas on cuts and sections
Part 60: Additional conventions for cuts and sections
Annex A of this part of ISO 128 is for information only.

INTERNATIONAL STANDARD
©
ISO
ISO 128-24:1999(E)
1
Technical drawings — General principles of presentation —
Part 24:
Lines on mechanical engineering drawings
1 Scope
This part of ISO 128 specifies general rules and basic conventions for the types of lines on mechanical engineering
drawings.
2 Normative references
The following normative documents contain provisions which, through reference in this text, constitute provisions of
this part of ISO 128. For dated references, subsequent amendments to, or revisions of, these publications do not
apply. However, parties to agreements based on this part of ISO 128 are encouraged to investigate the possibility of
applying the most recent editions of the normative documents indicated below. For undated references, the latest
edition of the normative document referred to applies. Members of ISO and IEC maintain registers of currently valid
International Standards.
ISO 128-20:1996,
Technical drawings — General principles of presentation — Part 20: Basic conventions for lines.
ISO 128-22:1999,
Technical drawings — General principles of presentation — Part 22: Basic conventions and
applications for leader lines and reference lines.
ISO 128-30:—
1
)
,
Technical drawings — General principles of presentation — Part 30: Basic conventions for views.
ISO 128-40:—
1)
,
Technical drawings — General principles of presentation — Part 40: Basic conventions for cuts and
sections.
ISO 128-50:—
1)
,
Technical drawings — General principles of presentation — Part 50: Basic conventions for
representing areas on cuts and sections.
ISO 129:1985,
Technical drawings — Dimensioning — General principles, definitions, methods of execution and
special indications.
ISO 2203:1973,
Technical drawings — Conventional representation of gears.
ISO 3040:1990,
Technical drawings — Dimensioning and tolerancing — Cones.
ISO 5261:1995,
Technical drawings — Simplified representation of bars and profile sections.
ISO 6410-1:1993,
Technical drawings — Screw threads and threaded parts — Part 1: General conventions.
1
)
To be published.
ISO 128-24:1999(E)
©
ISO
2
ISO 6428:1982,
Technical drawings — Requirements for microcopying.
ISO 10135:1994,
Technical drawings — Simplified representation of moulded, cast and forged parts.
ISO 10578:1992,
Technical drawings — Tolerancing of orientation and location — Projected tolerance zone.
3 General principles
The basic types of lines, their designations and dimensions as well as general rules for draughting of lines are specified
in ISO 128-20.
Requirements for microcopying are specified in ISO 6428.
4 Types of lines and their application
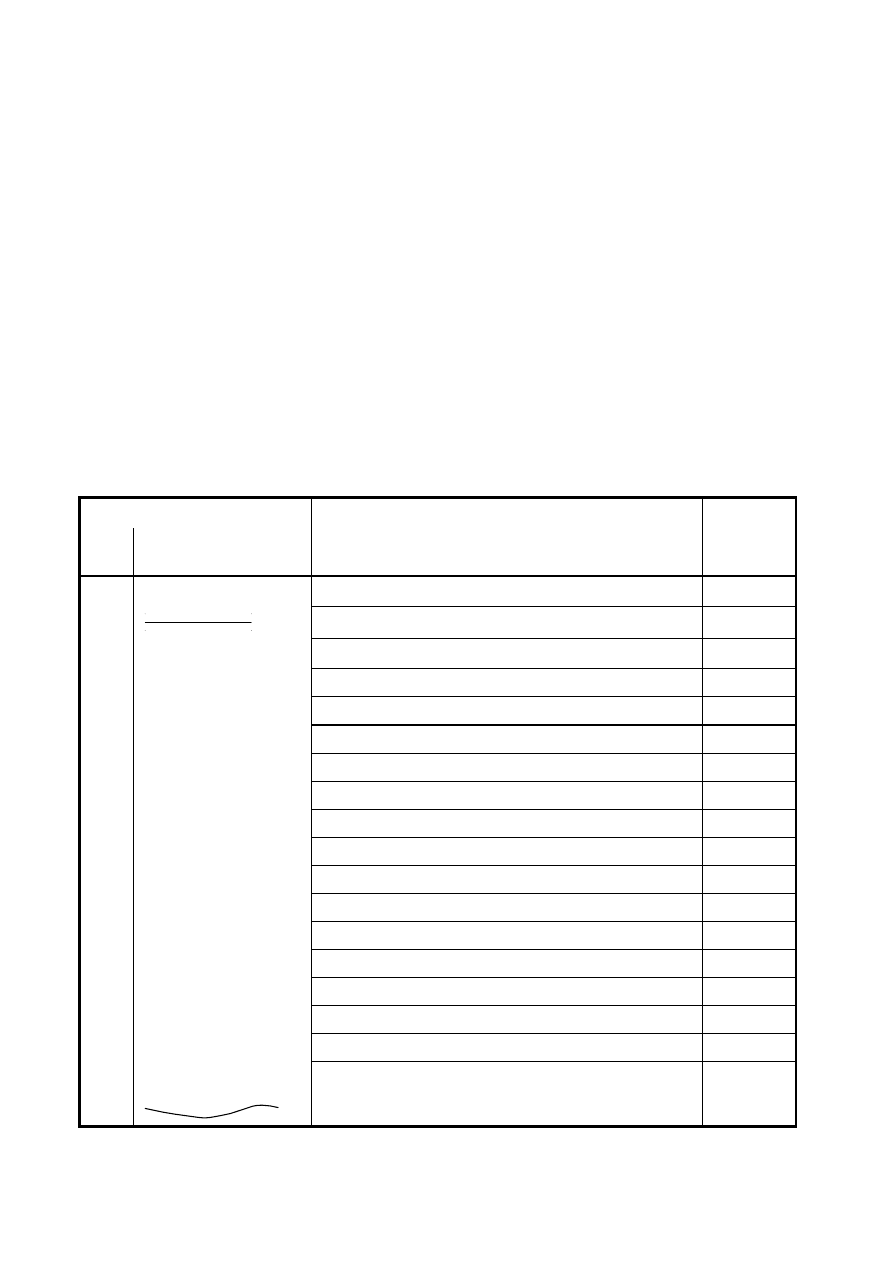
The first part of the line number in Table 1 is the number of the basic type in accordance with ISO 128-20.
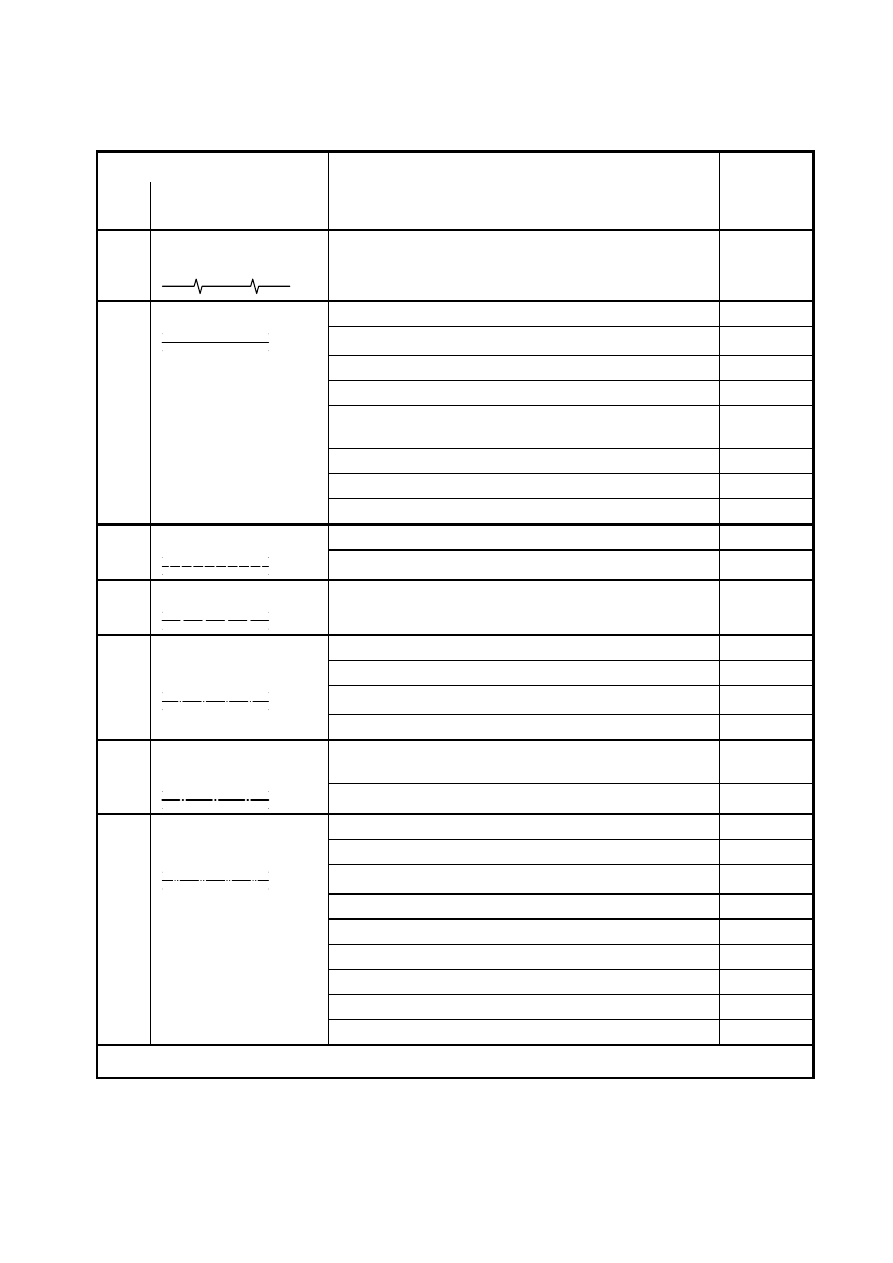
Table 1 — Types of lines and applications
Line
No.
Description and
representation
Application
Reference
to ISO
01.1
Continuous narrow line
.1
imaginary lines of intersection
—
.2
dimension lines
129
.3
extension lines
129
.4
leader lines and reference lines
128-22
.5
hatching
128-50
.6
outlines of revolved sections
128-40
.7
short centre lines
—
.8
root of screw threads
6410-1
.9
origin and terminations of dimension lines
129
.10
diagonals for the indication of flat surfaces
—
.11
bending lines on blanks and processed parts
—
.12
framing of details
—
.13
indication of repetitive details
—
.14
interpretation lines of tapered features
3040
.15
location of laminations
—
.16
projection lines
—
.17
grid lines
—
Continuous narrow
freehand line
.18
preferably manually represented termination of
partial or interrupted views, cuts and sections, if the
limit is not a line of symmetry or a centre line
a
—
©
ISO
ISO 128-24:1999(E)
3
Table 1
(continued)
Line
No.
Description and
representation
Application
Reference
to ISO
01.1
Continuous narrow line
with zigzags
.19
mechanically represented termination of partial or
interrupted views, cuts and sections, if the limit is
not a line of symmetry or a centre line
a
—
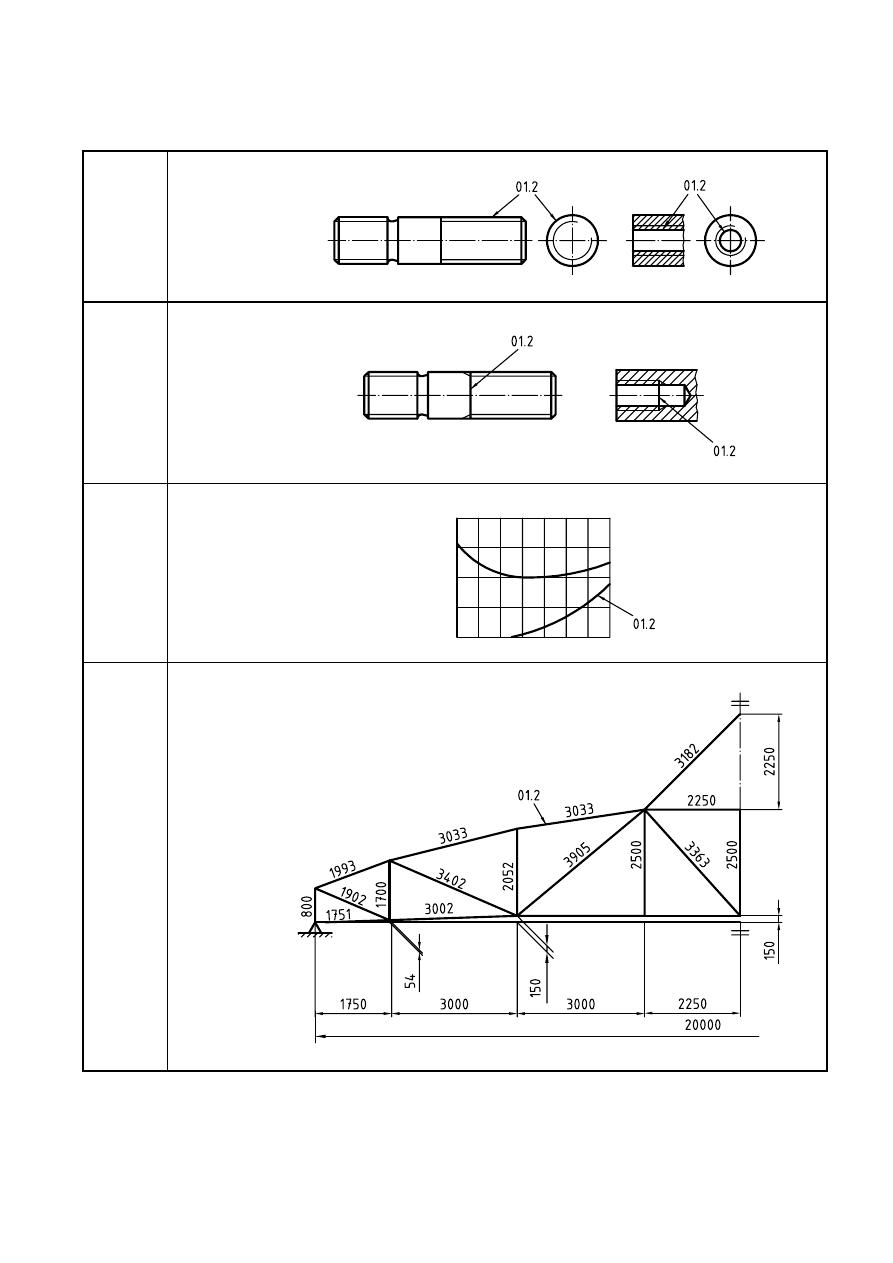
01.2
Continuous wide line
.1
visible edges
128-30
.2
visible outlines
128-30
.3
crests of screw threads
6410-1
.4
limit of length of full depth thread
6410-1
.5
main representations in diagrams, maps, flow
charts
—
.6
system lines (structural metal engineering)
5261
.7
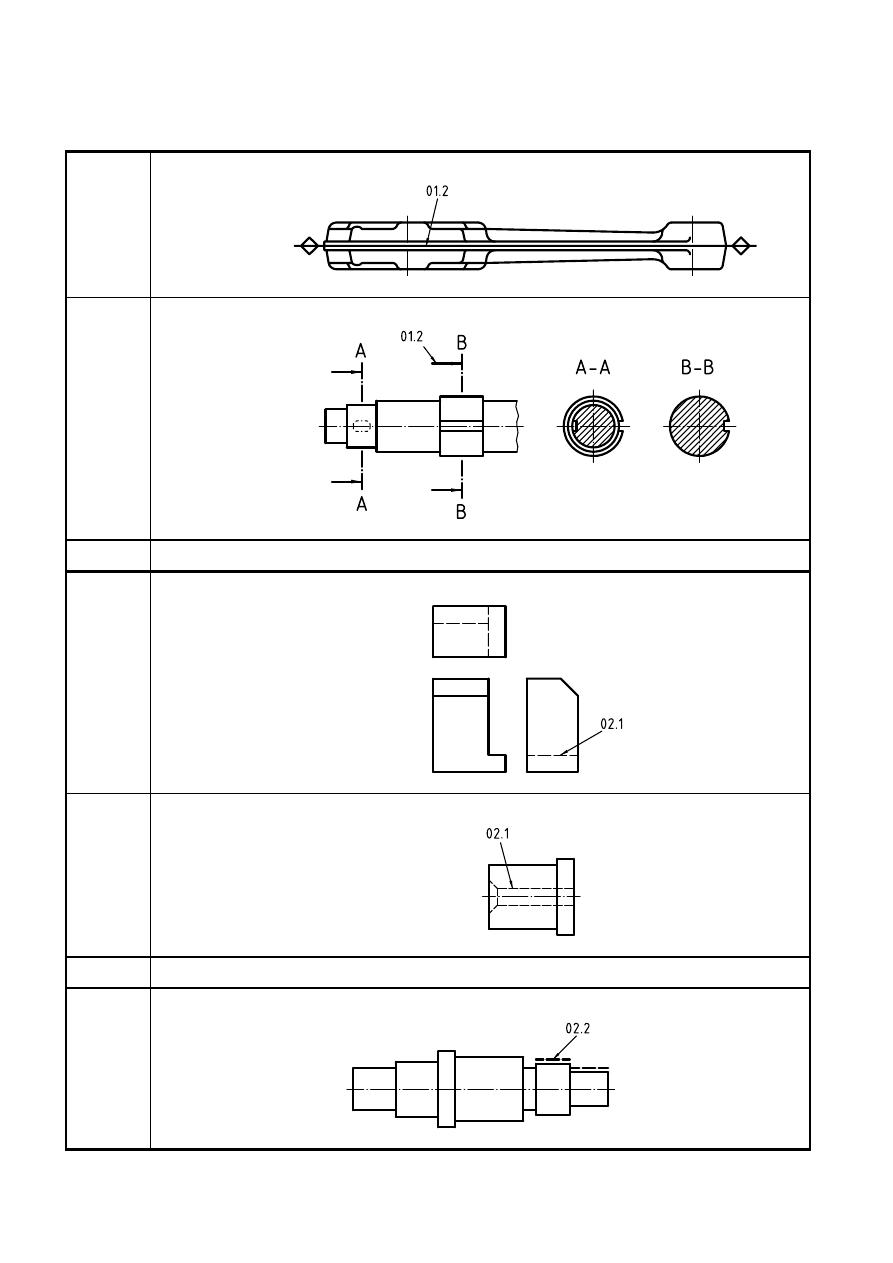
parting lines of moulds in views
10135
.8
lines of cuts and section arrows
128-40
02.1
Dashed narrow line
.1
hidden edges
128-30
.2
hidden outlines
128-30
02.2
Dashed wide line
.1
indication of permissible areas of surface
treatment, e.g. heat treatment
—
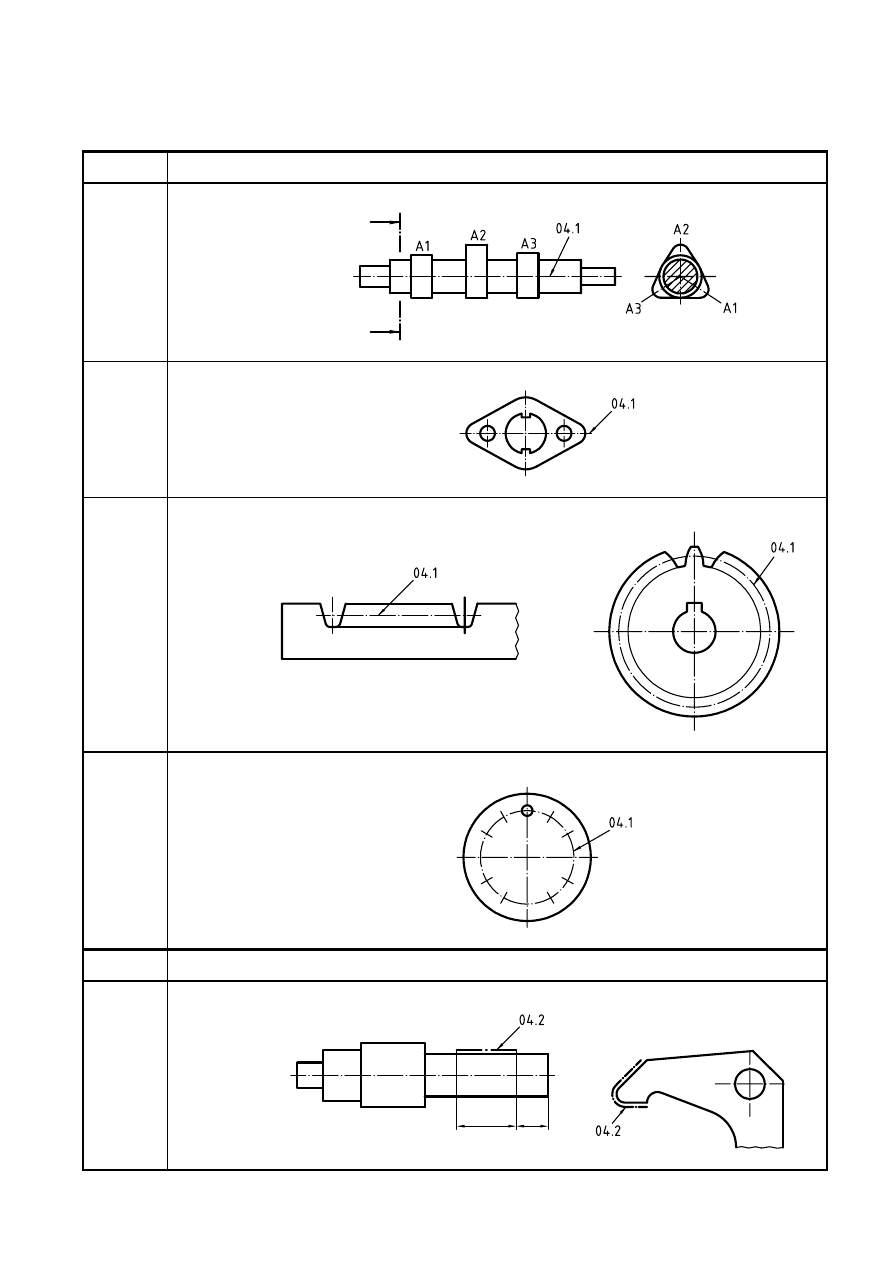
04.1
Long-dashed dotted
.1
centre lines
—
narrow line
.2
lines of symmetry
—
.3
pitch circle of gears
2203
.4
pitch circle of holes
—
04.2
Long-dashed dotted
wide line
.1
indication of (limited) required areas of surface
treatment, e.g. heat treatment
—
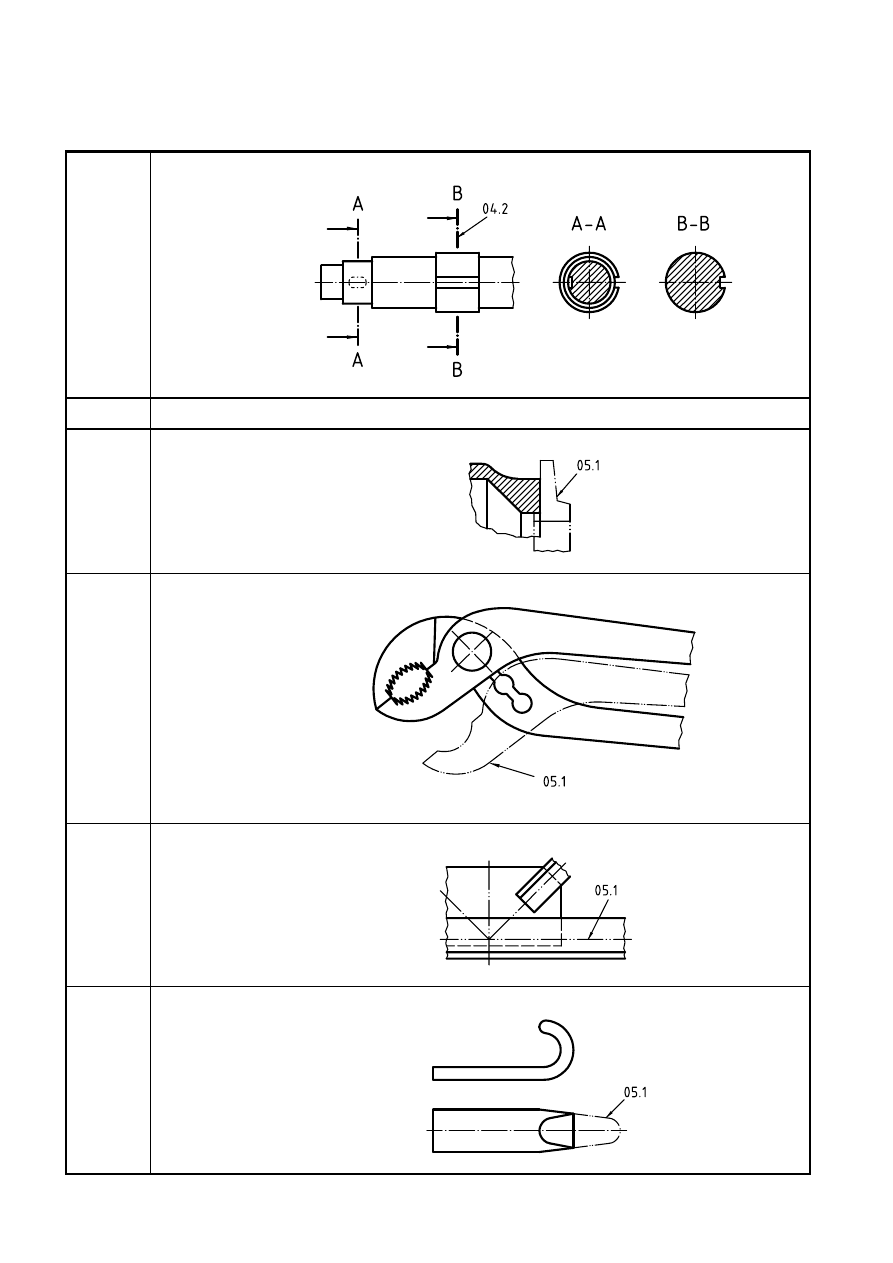
.2
position of cutting planes
128-40
05.1
Long-dashed double-
.1
outlines of adjacent parts
—
dotted narrow line
.2
extreme positions of movable parts
—
.3
centroidal lines
—
.4
initial outlines prior to forming
—
.5
parts situated in front of a cutting plane
—
.6
outlines of alternative executions
—
.7
outlines of the finished part within blanks
10135
.8
framing of particular fields/areas
—
.9
projected tolerance zone
10578
a
It is recommended to use only one type of line on one drawing.
Examples of applications are given in annex A.
ISO 128-24:1999(E)
©
ISO
4
5 Line widths and line groups
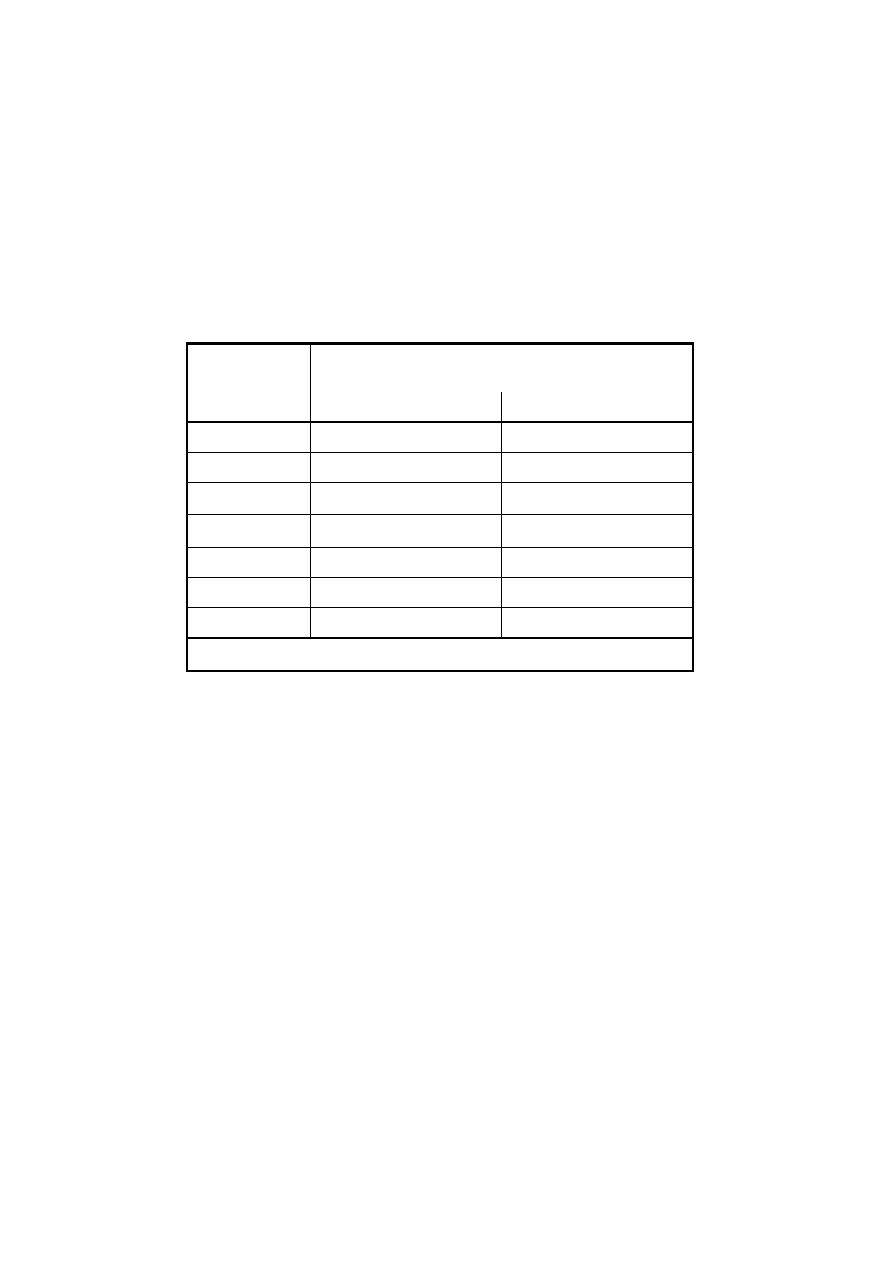
On mechanical engineering drawings two line widths are normally used. The proportions between the line widths
should be 1:2.
The line groups are specified as shown in Table 2.
Table 2 — Line groups
Dimensions in millimetres
Line group
Line widths
for line No.
01.2 - 02.2 - 04.2
01.1 - 02.1 - 04.1 - 05.1
0,25
0,25
0,13
0,35
0,35
0,18
0,5
a
0,5
0,25
0,7
a
0,7
0,35
1
1
0,5
1,4
1,4
0,7
2
2
1
a
Preferred line groups
The widths and groups of lines should be chosen according to the type, size and scale of the drawing and according to
the requirements for microcopying and/or other methods of reproduction.
©
ISO
ISO 128-24:1999(E)
5
Annex A
(informative)
Examples of application
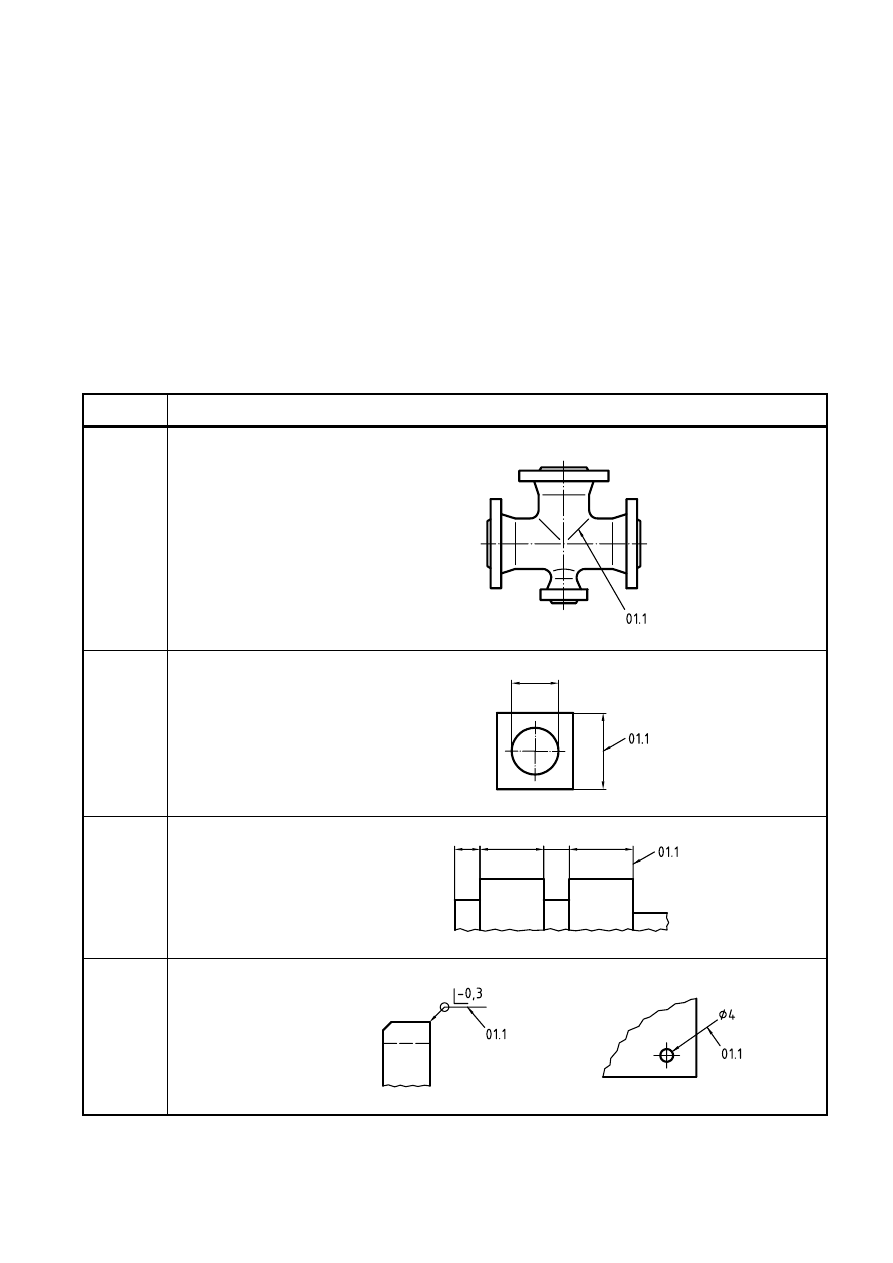
Table A.1 gives examples of the application of the different types of lines indicating the reference number given in
Table 1. The figures are shown in first angle projection. It is understood that third angle projection could be used as
well.
Table A.1 — Examples of application
01.1
Continuous narrow line
01.1.1
Imaginary lines of intersection
01.1.2
Dimension lines
01.1.3
Extension lines
01.1.4
Leader lines and reference lines
ISO 128-24:1999(E)
©
ISO
6
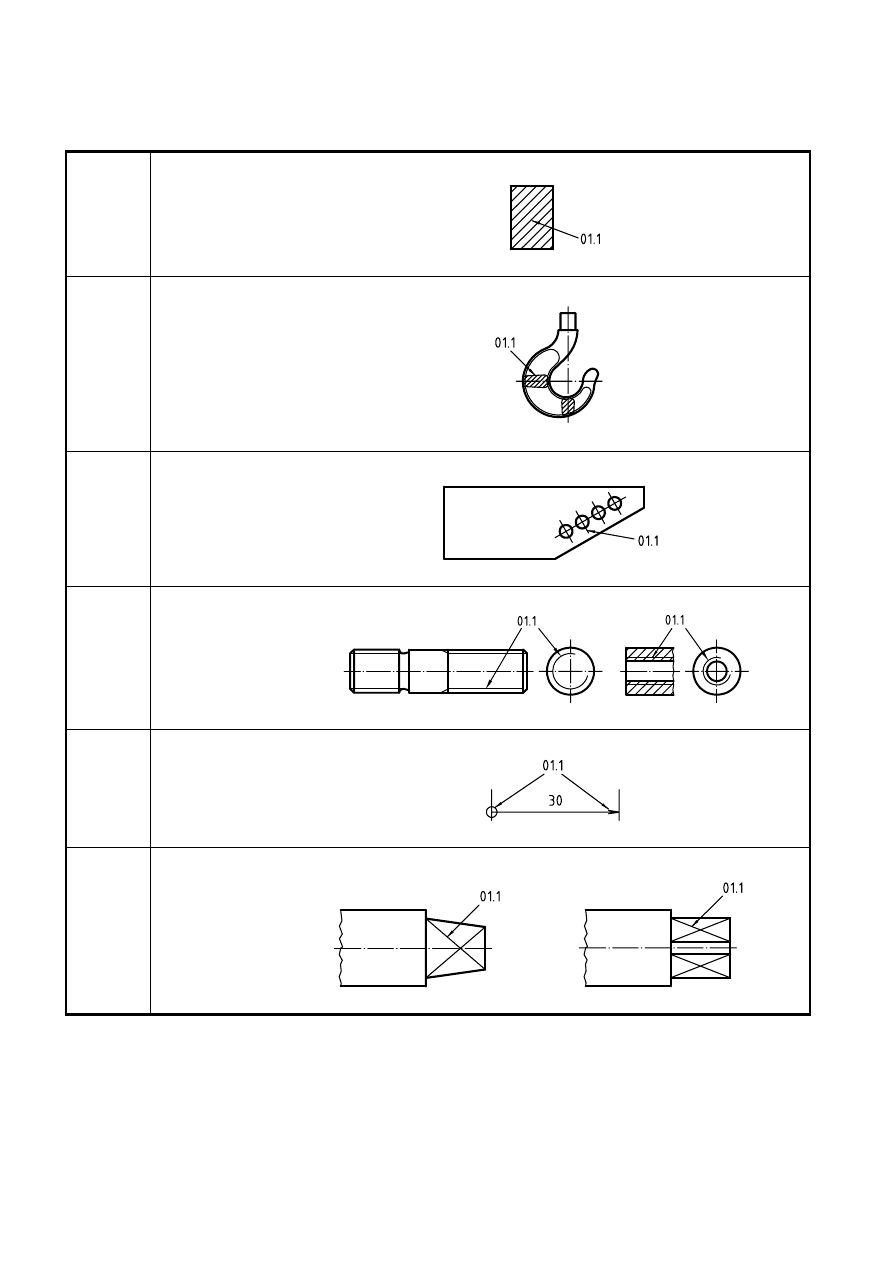
Table A.1
(continued)
01.1.5
Hatching
01.1.6
Outlines of revolved sections
01.1.7
Short centre lines
01.1.8
Root of screw threads
01.1.9
Origin and terminations of dimension lines
01.1.10
Diagonals for the indication of flat surfaces
©
ISO
ISO 128-24:1999(E)
7
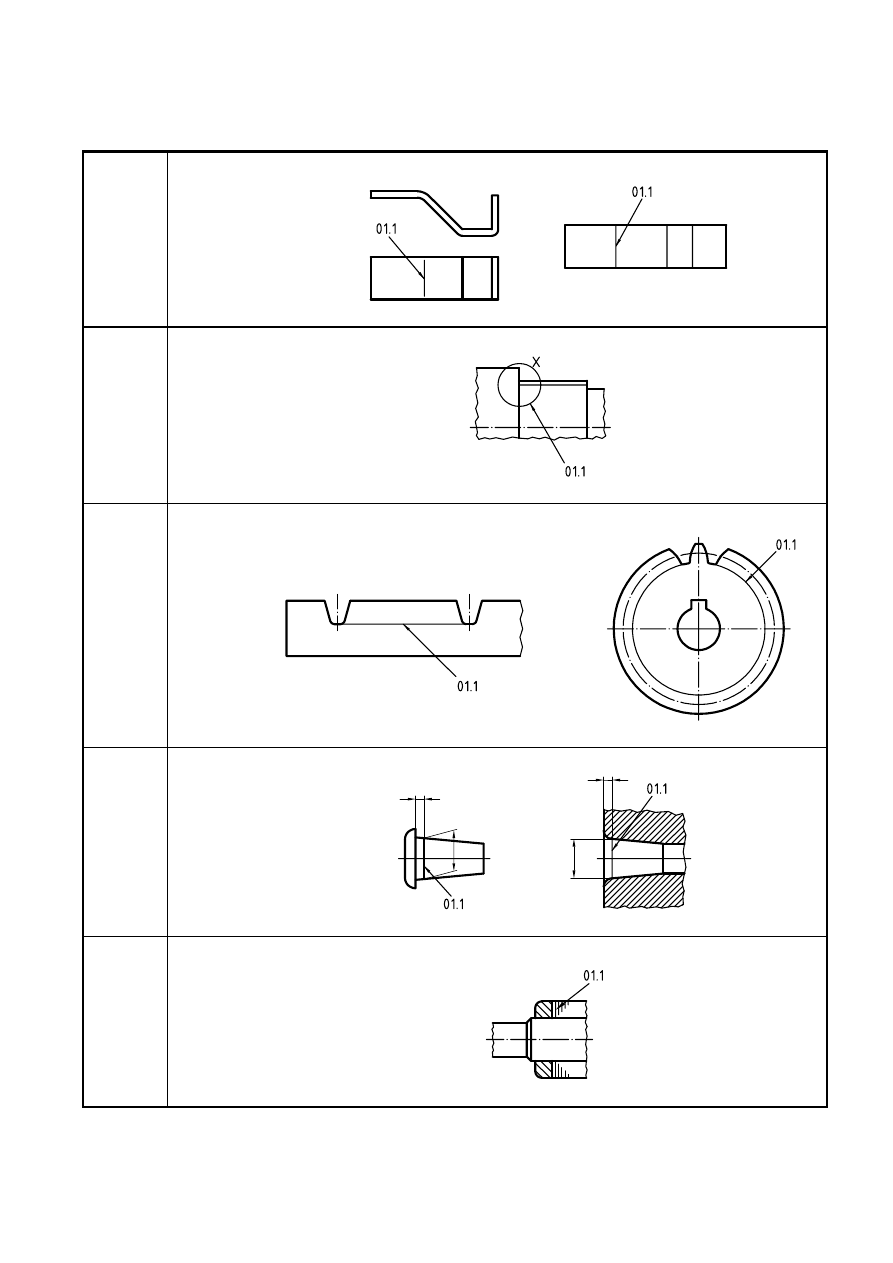
Table A.1
(continued)
01.1.11
Bending lines on blanks and processed parts
01.1.12
Framing of details
01.1.13
Indication of repetitive details, e.g. root diameters of gears
01.1.14
Interpretation lines of tapered features
01.1.15
Location of laminations, e.g. transformer plates
ISO 128-24:1999(E)
©
ISO
8
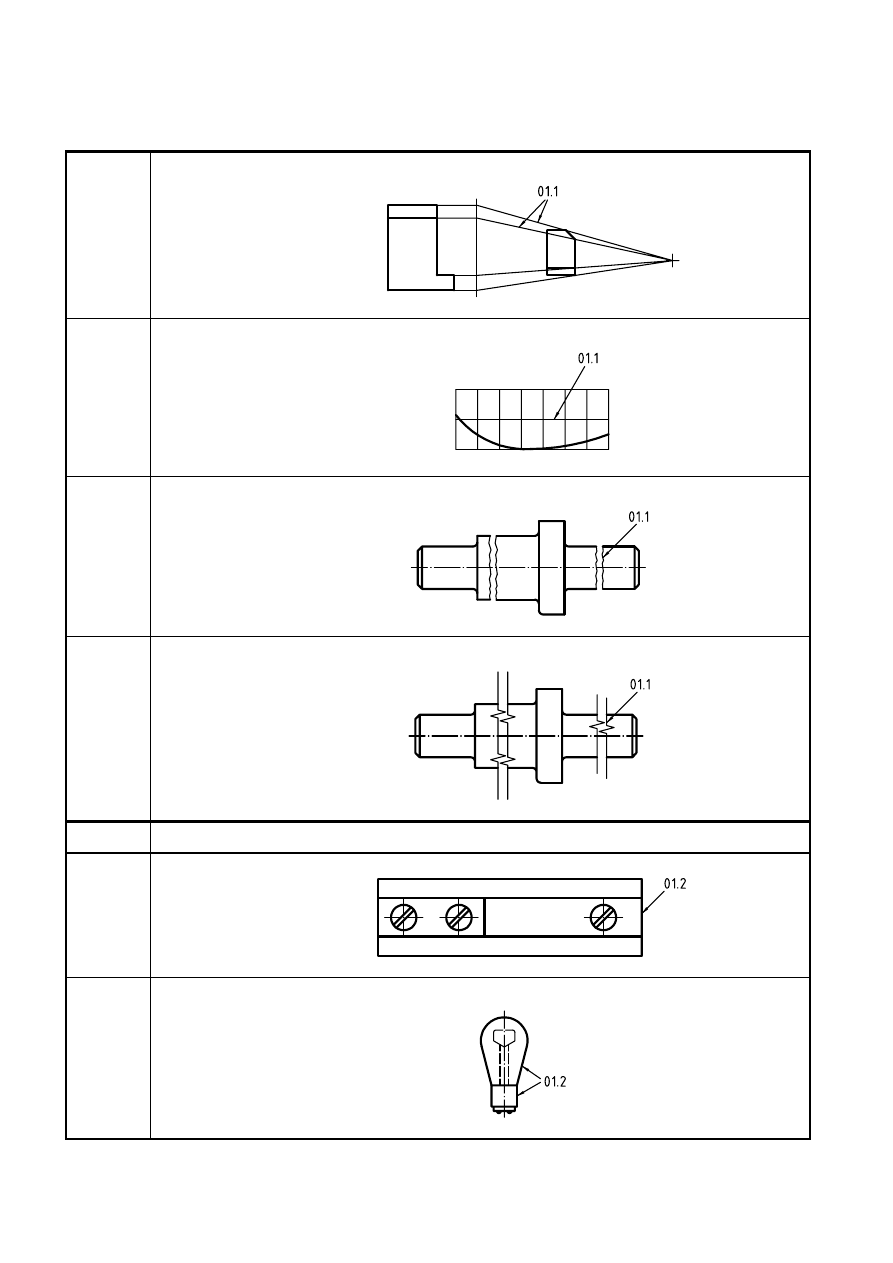
Table A.1
(continued)
01.1.16
Projection lines
01.1.17
Grid lines
01.1.18
Continuous narrow freehand lines
01.1.19
Continuous narrow lines with zigzags
01.2
Continuous wide line
01.2.1
Visible edges
01.2.2
Visible outlines
©
ISO
ISO 128-24:1999(E)
9
Table A.1
(continued)
01.2.3
Crests of screw threads
01.2.4
Limit of length of full-depth thread
01.2.5
Main representations in diagrams, maps, flow charts
01.2.6
System lines
ISO 128-24:1999(E)
©
ISO
10
Table A.1
(continued)
01.2.7
Parting lines of moulds in views
01.2.8
Lines of cuts and section arrows
02.1
Dashed narrow line
02.1.1
Hidden edges
02.1.2
Hidden outlines
02.2
Dashed wide line
02.2.1
Indication of permissible surface treatment, e.g. heat treatment
©
ISO
ISO 128-24:1999(E)
11
Table A.1
(continued)
04.1
Long-dashed dotted narrow line
04.1.1
Centre lines
04.1.2
Lines of symmetry
04.1.3
Pitch circles of gears
04.1.4
Pitch circles of holes
04.2
Long-dashed dotted wide line
04.2.1
Indication of limited areas (heat treatment, measuring area)
ISO 128-24:1999(E)
©
ISO
12
Table A.1
(continued)
04.2.2
Position of cutting planes
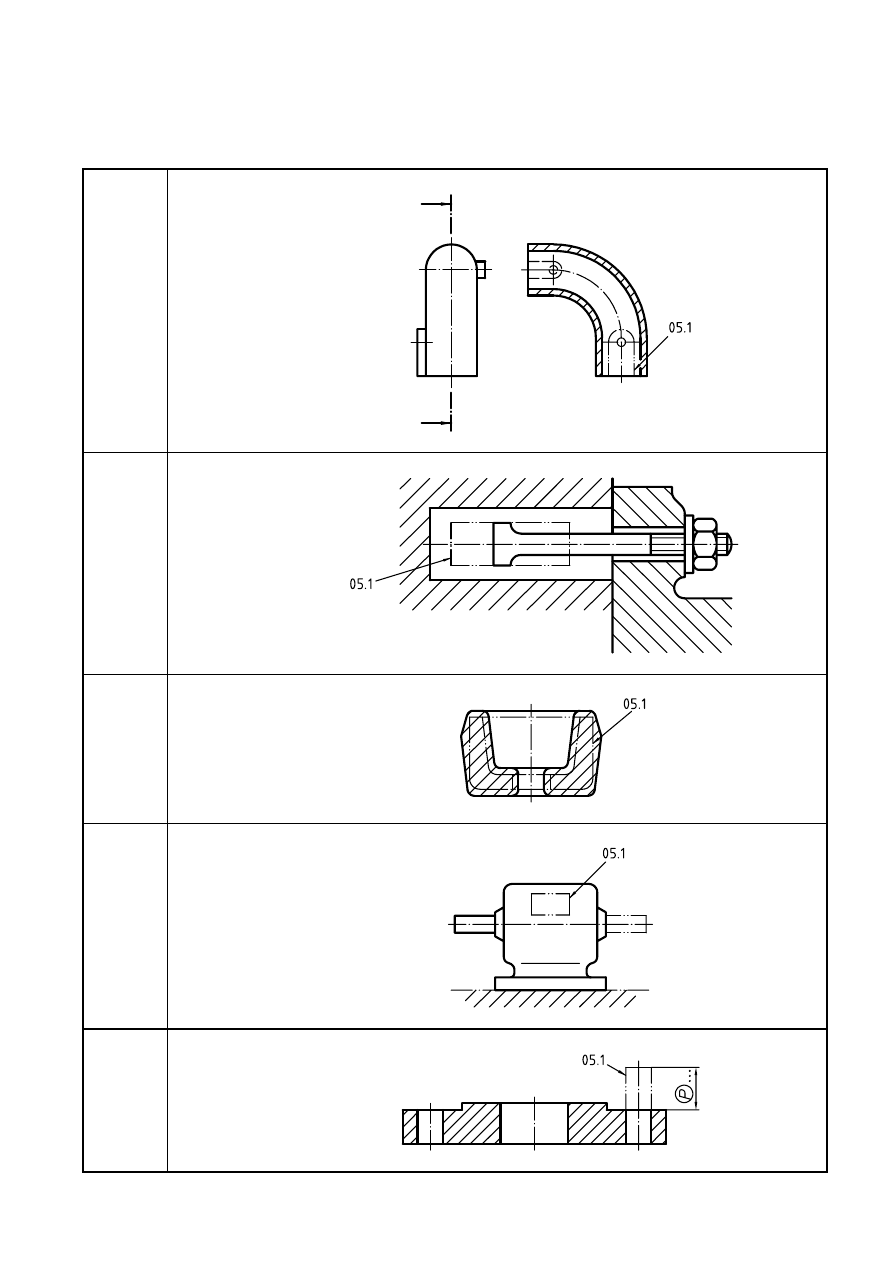
05.1
Long dashed double-dotted narrow line
05.1.1
Outlines of adjacent parts
05.1.2
Extreme positions of movable parts
05.1.3
Centroidal lines
05.1.4
Initial outlines prior to forming
©
ISO
ISO 128-24:1999(E)
13
Table A.1
(continued)
05.1.5
Parts situated in front of a cutting plane
05.1.6
Outlines of alternative executions
05.1.7
Outlines of the finished part within blanks
05.1.8
Framings of particular fields/areas
05.1.9
Projected tolerance zone

ISO 128-24:1999(E)
©
ISO
ICS 01.100.20
Price based on 13 pages
Wyszukiwarka
Podobne podstrony:
ISO128 23 lines technical
ISO128 25 lines shipbuilding
24 - oddane 21.04.2010, Studia, Pracownie, I pracownia, 24 Wyznaczenie mechanicznego równoważnika ci
ISO128 34 views mechanical
24 Wyznaczanie mechanicznego równoważnika ciepła
24 Wyznaczanie mechanicznego równoważnika ciepła
ISO128 44 sections mechanical
ISO128 23 lines technical
ISO128 25 lines shipbuilding
24 - oddane 21.04.2010, Studia, Pracownie, I pracownia, 24 Wyznaczenie mechanicznego równoważnika ci
24 Wyznaczanie mechanicznego równoważnika ciepła
ISO128 22 leader and reference lines
więcej podobnych podstron