Problem One: Linear Static Analysis
NE/Nastran Version 8.1
Tutorial 6
1. Problem One: Linear Static Analysis
1.1 Introduction
This example problem illustrates the use of NE/Nastran for a simple static analysis. You will
learn how to build the model using FEMAP, perform the analysis with NE/Nastran, and examine
the results with both the NE/Nastran Editor and FEMAP.
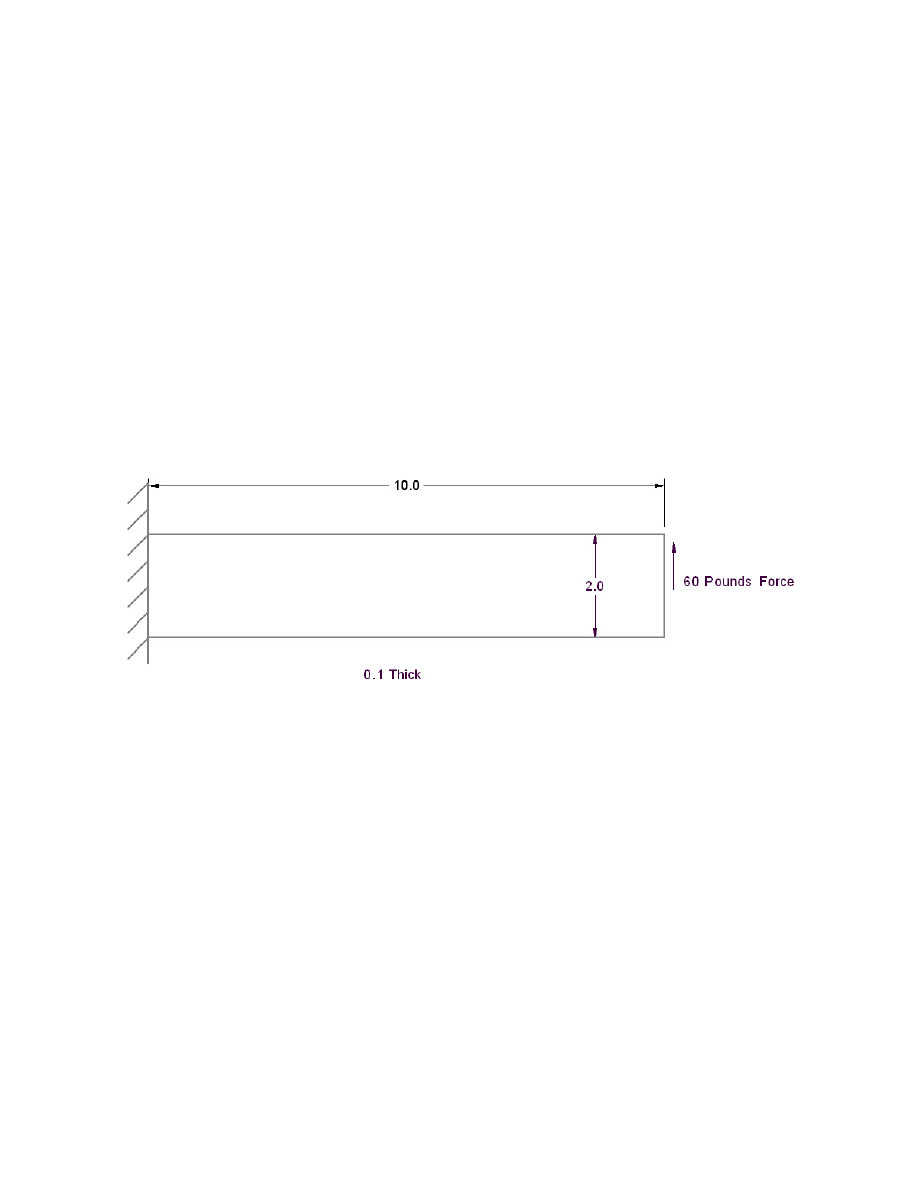
The model consists of a simple aluminum plate 10 inches long by 2 inches wide by 0.1 inch
thick. One end of the plate is firmly supported and the other end is loaded with a 60 pound
upward force. The goals of the analysis are to estimate the stresses in the plate and the
deflection when loaded.
The units used in this analysis are inches, pounds force, pounds force per square inch, and
pounds mass per cubic inch. The effects of gravity are not considered in this model.
1.2 Pre-Process the Model
You will first prepare the model geometry and then define the materials, define the properties of
the elements, mesh the geometry, and then apply the constraints and loads. These steps are
called pre-processing and will be done with the program FEMAP.
Because the plate has uniform thickness, the model is created as a two-dimensional surface.
The thickness is added later as a property of the elements into which the surface is divided.
1.2.1 Create the Geometry
In this step you will enter the coordinates of the two dimensional surface that characterizes the
shape of the aluminum plate.
Problem One: Linear Static Analysis
NE/Nastran Version 8.1
Tutorial 7
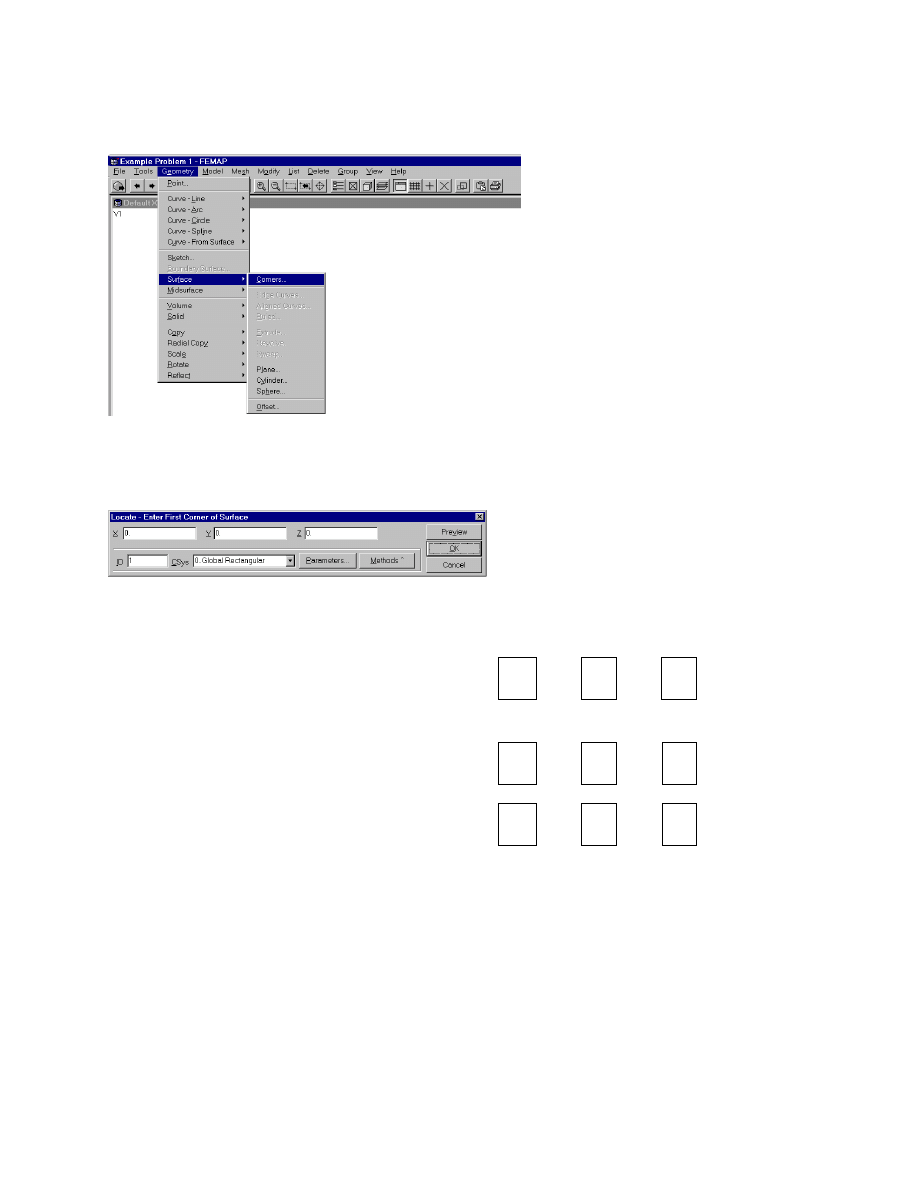
Open FEMAP. From the FEMAP Main Menu select Geometry. Next, choose Surface and
then Corners… from the menus.
In the Locate – Enter First Corner of Surface dialog box verify that the X, Y, and Z fields
contain zeros. Choose OK.
Another dialog box will appear requesting the second corner of the surface. Enter the following
coordinates for the second corner:
Locate – Enter Second Corner of Surface:
enter:
X = 10 Y = 0
Z =
0
Then, click
OK.
For the third and fourth corners:
Locate – Enter Third Corner of Surface:
enter:
X = 10 Y = 2
Z =
0
Then, click
OK.
Locate – Enter Fourth Corner of Surface:
enter:
X =
0
Y = 2
Z =
0
Then, click
OK.
The surface you have drawn will appear off to the right side of your workspace. Since you will
not draw any other surfaces, click Cancel in the Locate – Enter First Corner of Surface dialog
box.
To center the image of the surface in your workspace, select View on the FEMAP Main Menu,
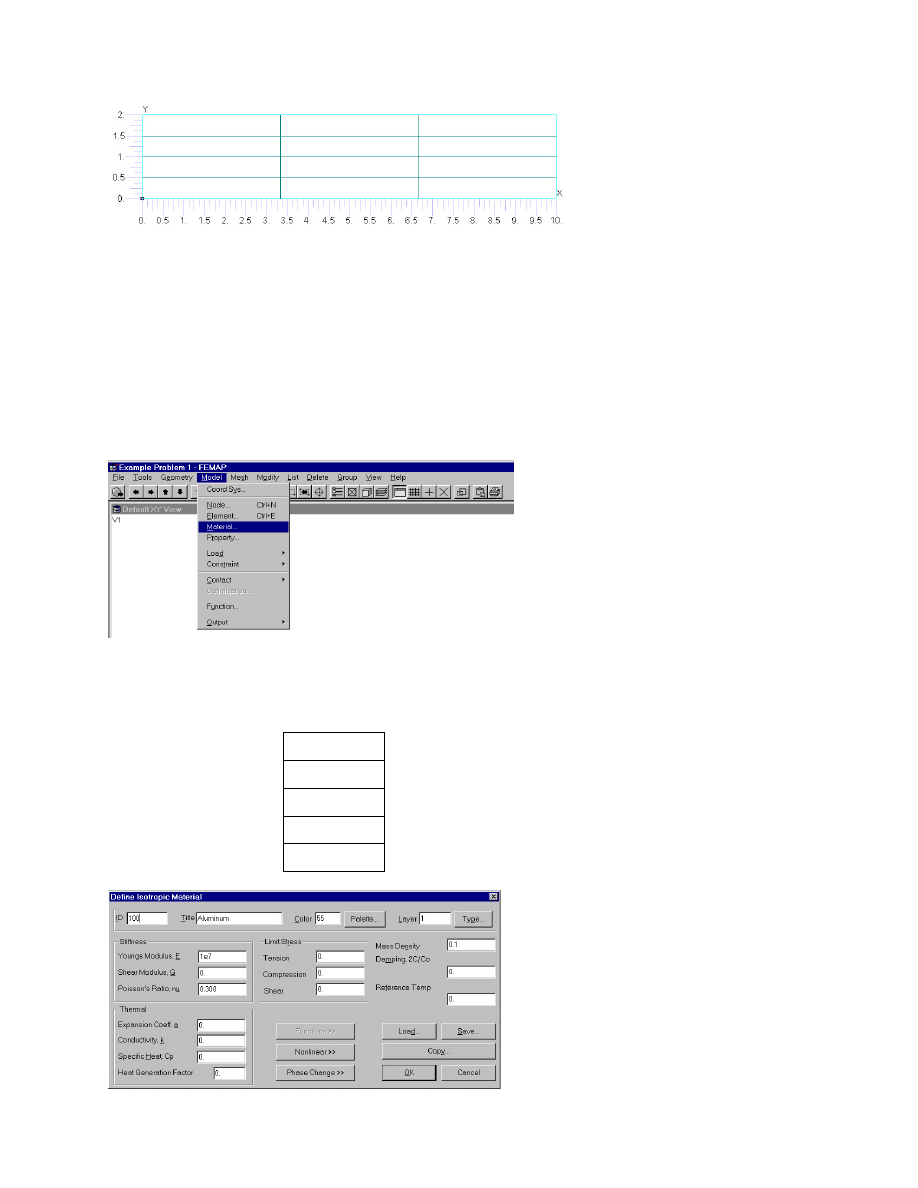
then from the menus, choose Autoscale and then Visible. You should have a surface in the
workspace that looks like this:
Problem One: Linear Static Analysis
NE/Nastran Version 8.1
Tutorial 8
The rectangles that appear in the surface are not the elements. The elements will be defined in
a later section.
1.2.2 Define the Material Properties
Here, you will define the physical properties of the material that composes the model.
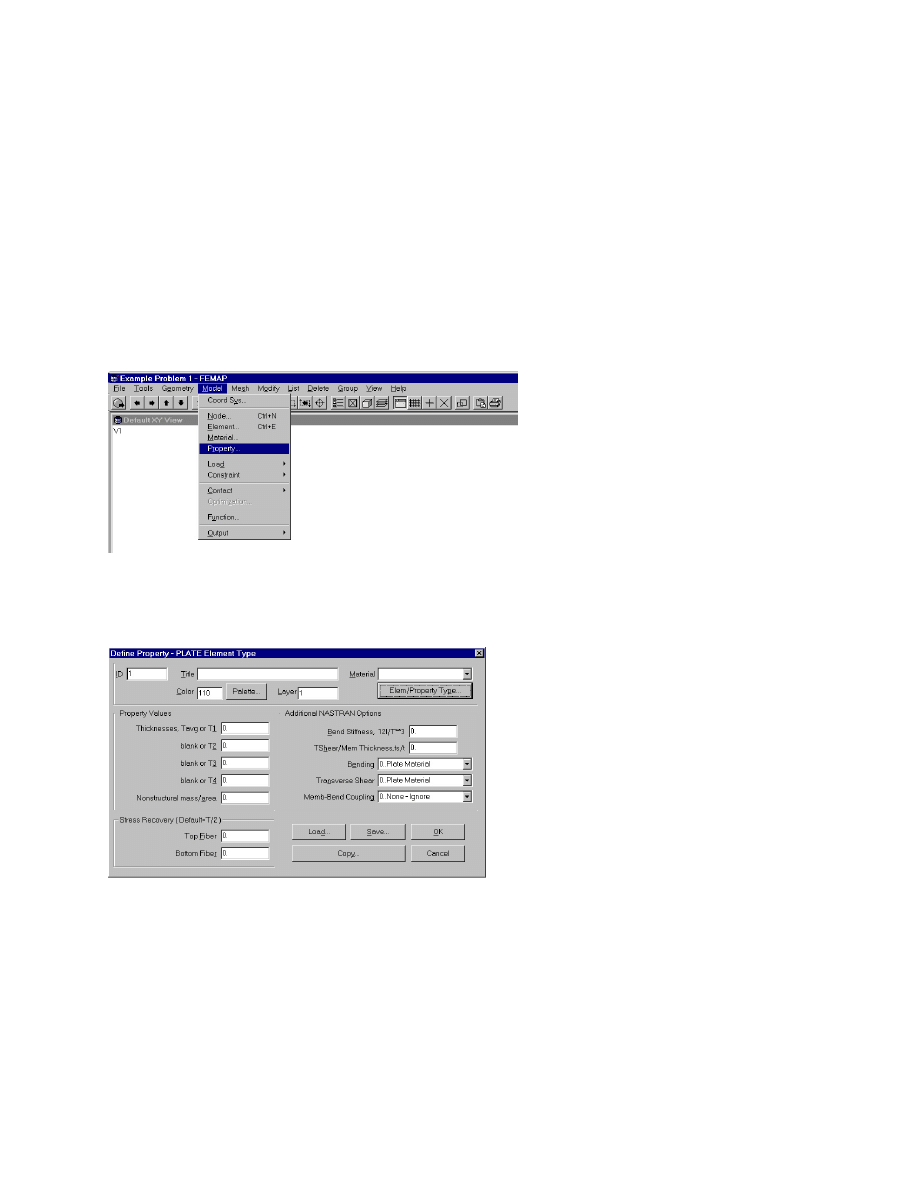
From the FEMAP Main Menu select Model then choose Material….
In the Define Isotropic Material dialog box enter the following values into their respective
fields:
ID 100
Title Aluminum
Youngs Modulus, E 1e7
Poisson’s Ratio nu 0.3
Mass Density 0.1
Problem One: Linear Static Analysis
NE/Nastran Version 8.1
Tutorial 9
Select OK. The Define Isotropic Material dialog box will appear again expecting you to enter
another material. Since there is only one material in this model, choose Cancel to exit the next
material definition.
1.2.3 Define the Properties of the Elements
In this step, you will define the properties of the shell elements that will be used in the next step
to mesh the model.
From the FEMAP Main Menu select Model then choose Property….
In the Define Property – PLATE Element Type dialog box click the Elem/Property Type…
button.
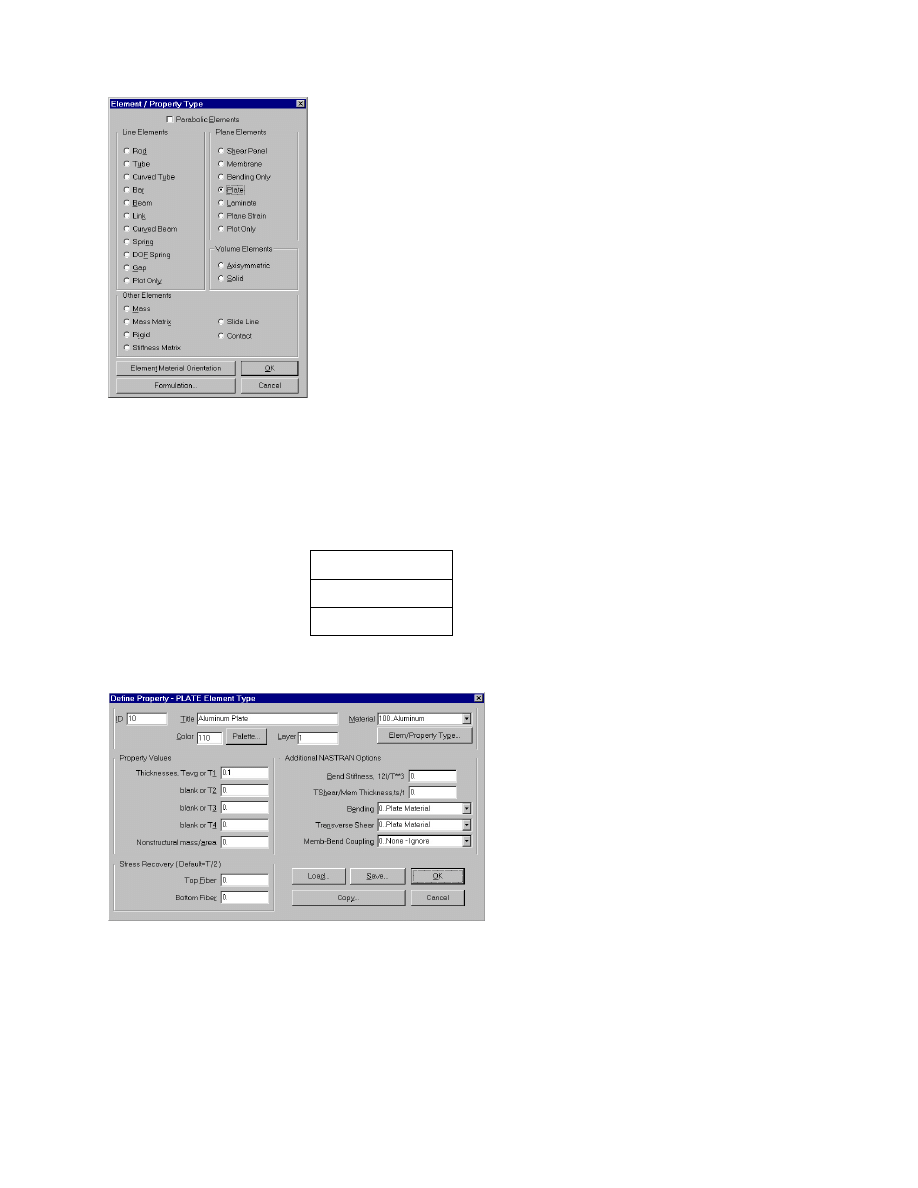
The Element / Property Type dialog box appears. Select Plate and verify that all other
settings are the same as illustrated.
Problem One: Linear Static Analysis
NE/Nastran Version 8.1
Tutorial 10
This last step will instruct NE/Nastran to use CQUAD4 quadrilateral plate or “shell” elements
with four nodes (grid points), one in each corner.
Select OK. In the Define Property – PLATE Element Type dialog box, fill the following values
into their respective fields:
ID 10
Title Aluminum
Plate
Thickness, Tavg or T1 0.1
Click the down arrow in the Material box and select 100..Aluminum.
Select OK. The Define Property – PLATE Element Type dialog box will re-appear. Click
Cancel because there are no further element types to define.
1.2.4 Mesh the Model
Problem One: Linear Static Analysis
NE/Nastran Version 8.1
Tutorial 11
In the first part of this step, you will divide the model into ten elements along its long axis and
four elements along its short axis. The thickness of the plate requires only one element when
using shell elements.
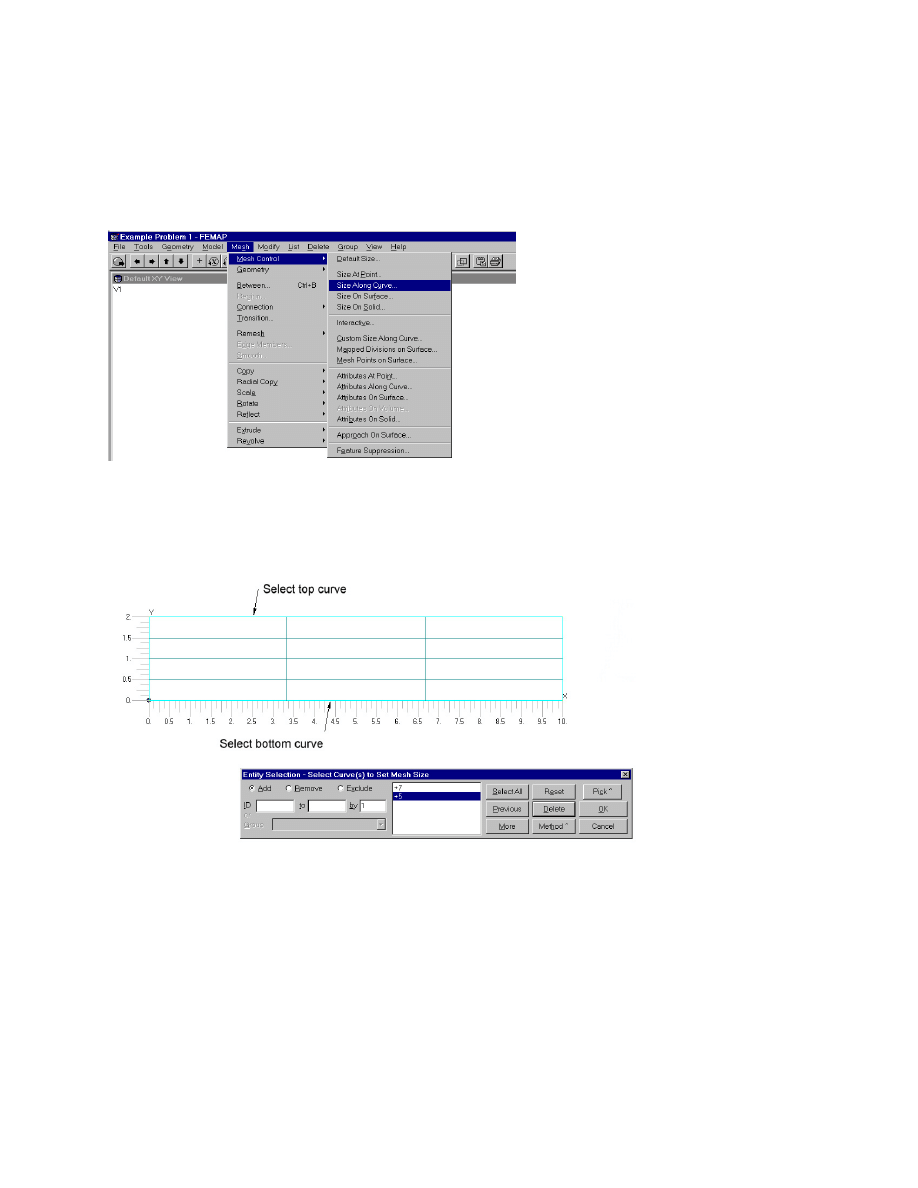
From the FEMAP Main Menu select Mesh then choose Mesh Control and Size Along
Curve….
The Entity Selection – Select Curve(s) to Set Mesh Size dialog box appears. With your
mouse, point to the top edge of the surface in the workspace and left click (see figure below).
Do the same with the bottom edge.
Select OK. The Mesh Size Along Curves dialog box appears. In the Mesh Size box enter 10
for the Number of Elements. The Mesh Size Along Curves dialog box should appear as
illustrated.
Problem One: Linear Static Analysis
NE/Nastran Version 8.1
Tutorial 12
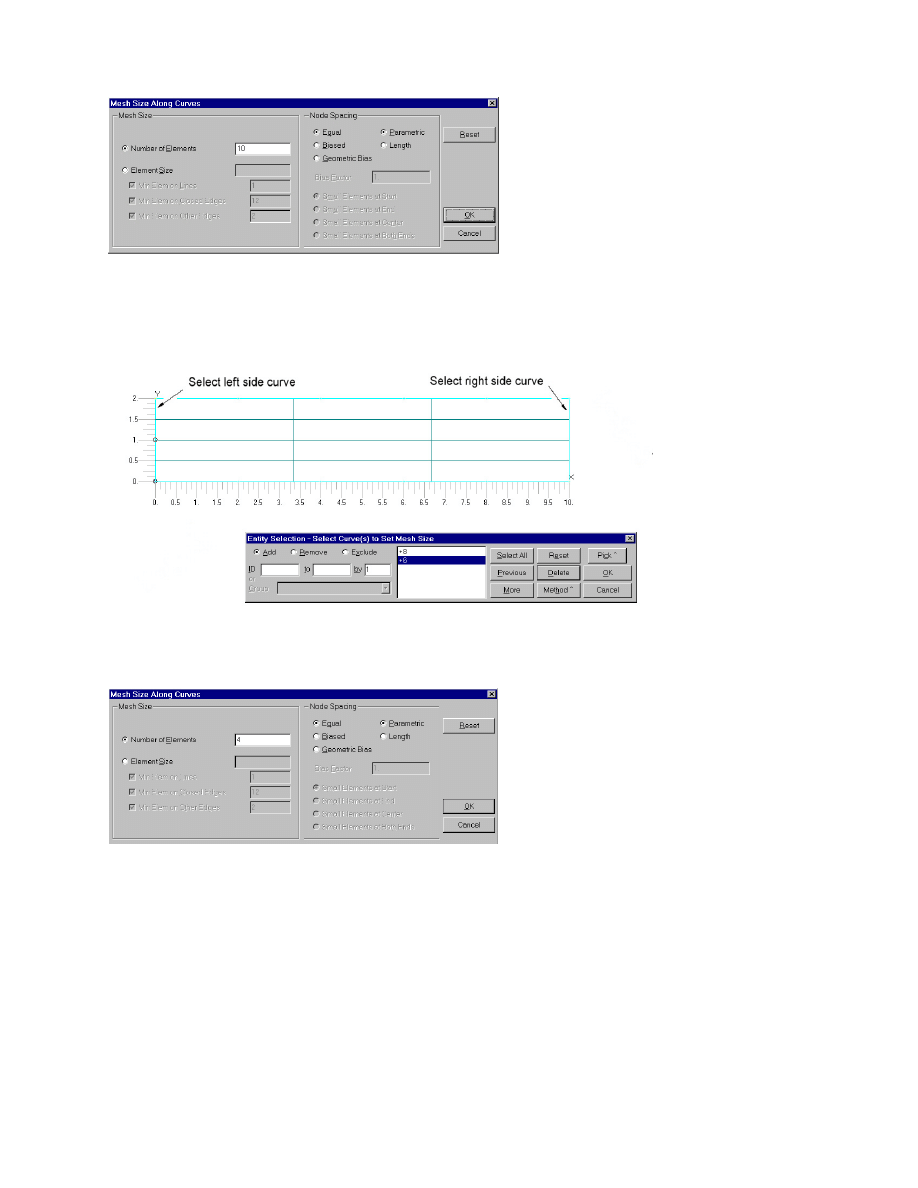
Select OK. The Entity Selection – Select Curve(s) to Set Mesh Size dialog box appears
again. Now, select the left edge and click (see figure below). Then, select the right edge and
click.
Click OK. In the Mesh Size Along Curves dialog box, enter 4 for the Number of Elements.
Select OK in the Mesh Size Along Curves dialog box. Select Cancel in the Entity Selection –
Select Curve(s) to Set Mesh Size dialog box.
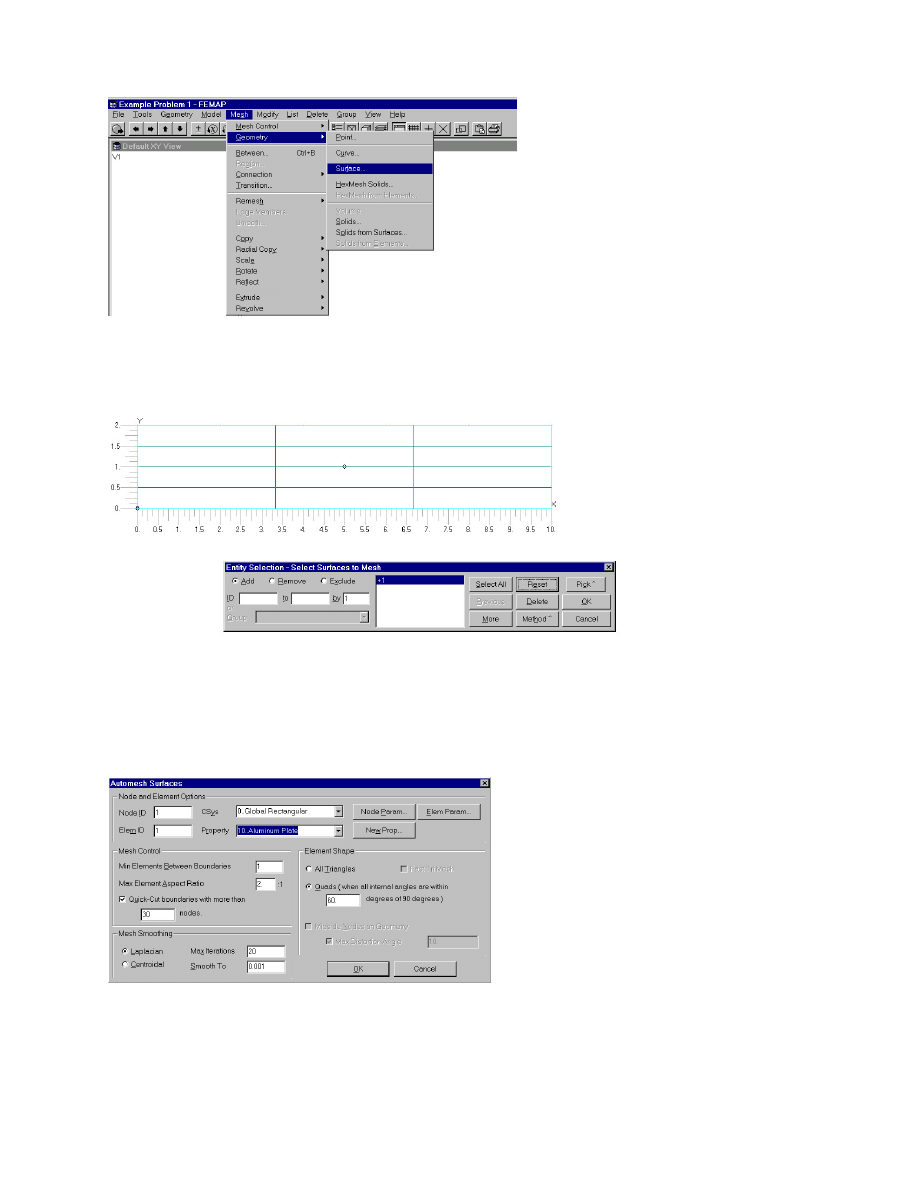
From the FEMAP Main Menu select Mesh then choose Geometry and Surface….
Problem One: Linear Static Analysis
NE/Nastran Version 8.1
Tutorial 13
The Entity Selection – Select Surfaces to Mesh dialog box appears. With your mouse, point
to and left click the surface of the model (point anywhere in the rectangle).
Select OK in the Entity Selection – Select Surfaces to Mesh dialog box.
The Automesh Surfaces dialog box appears. Click the down arrow in the Property box and
select 10..Aluminum Plate.
Select OK. Your model should now look like this:
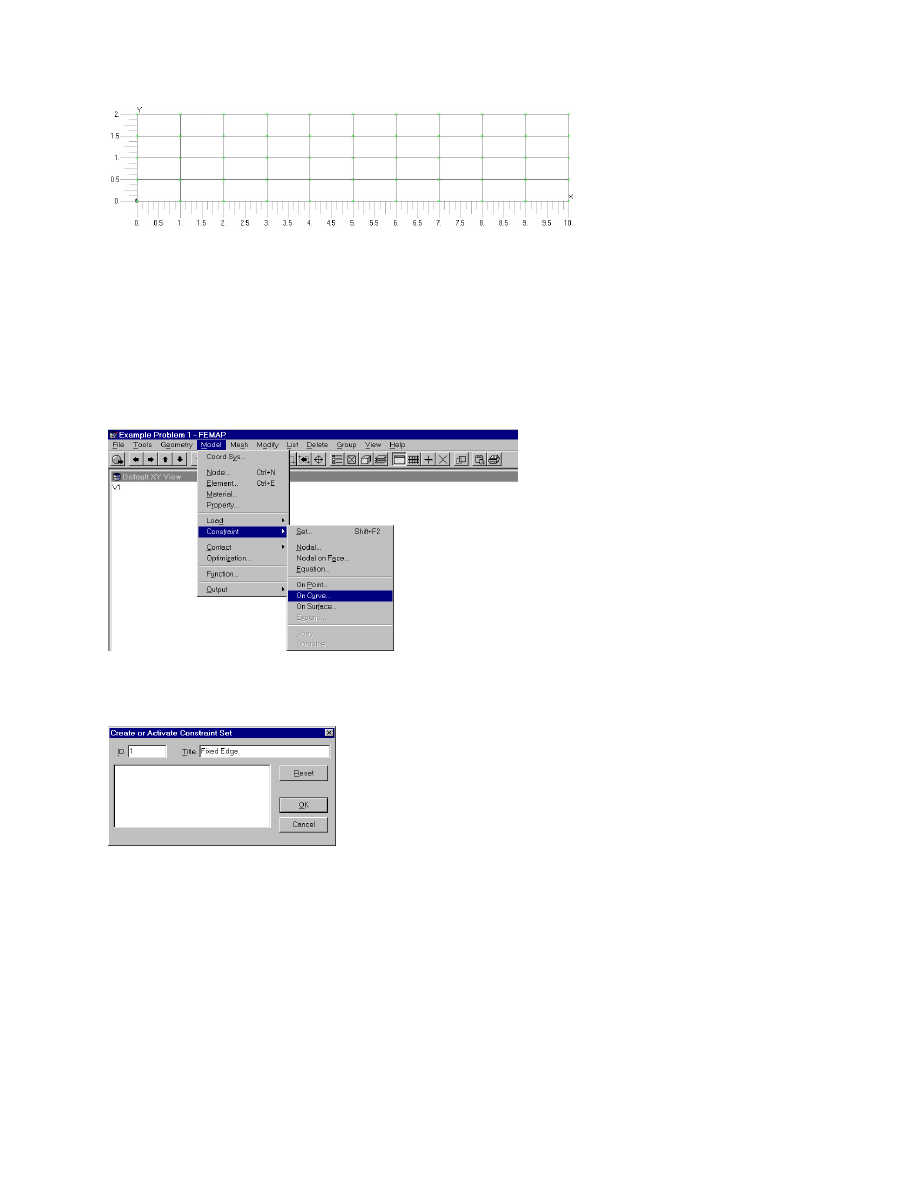
Problem One: Linear Static Analysis
NE/Nastran Version 8.1
Tutorial 14
1.2.5 Apply the Constraints
The left side of the aluminum plate is firmly supported. In this step, you will create that
constraint.
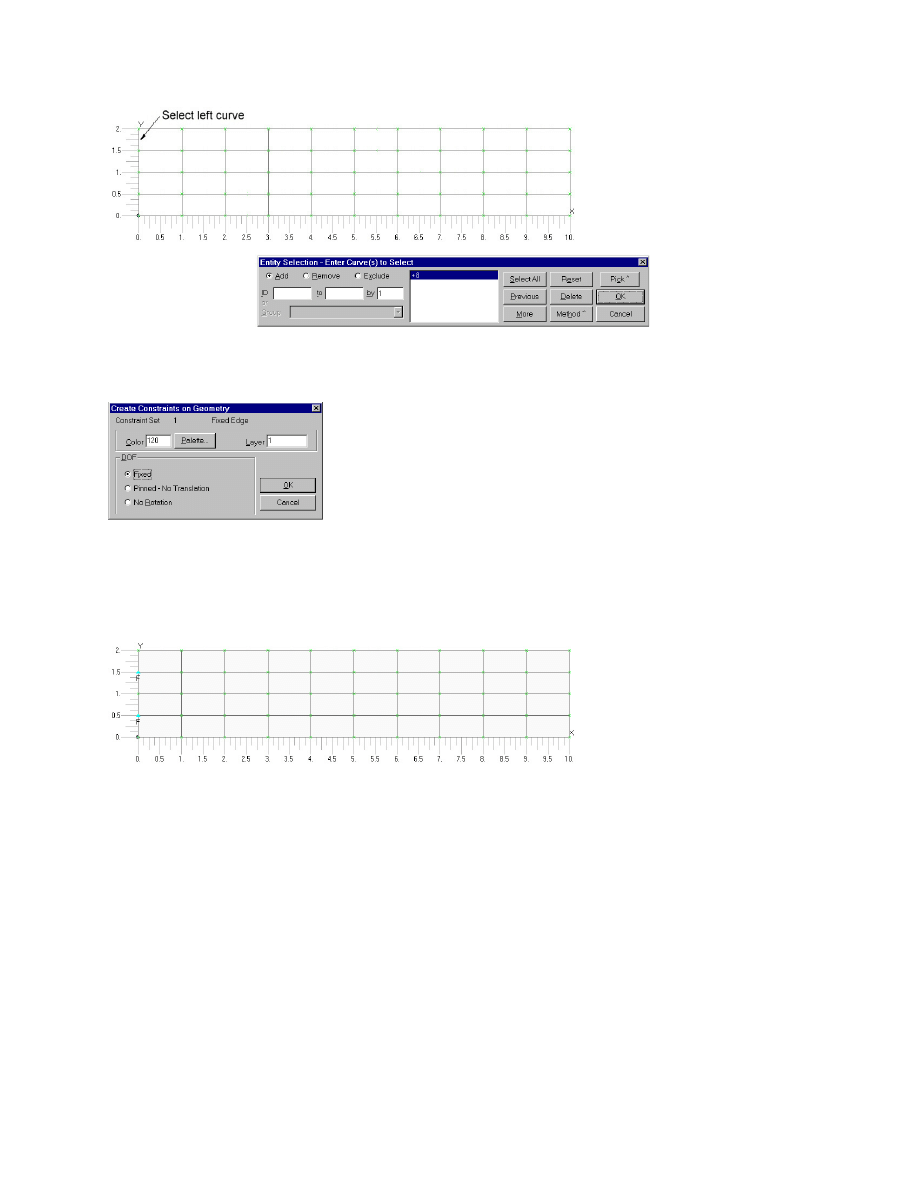
From the FEMAP Main Menu select Model, then choose Constraint and On Curve….
The Create or Activate Constraint Set dialog box appears. In the Title field type: Fixed Edge.
Select OK. The Entity Selection – Enter Curve(s) to Select dialog box appears. With your
mouse, point to and click the left side edge of the model.
Problem One: Linear Static Analysis
NE/Nastran Version 8.1
Tutorial 15
Select OK. The Create Constraints on Geometry dialog box opens.
If the entries are the same as in this illustration, select OK. When the Entity Selection – Enter
Curve(s) to Select dialog box opens, select Cancel. The constraint has now been applied.
Your model should now appear like this:
The small triangles with the letter “F” below them signify that the edge is fixed.
1.2.6 Apply the Load
The load is the 60 pound upward force applied to the right side of the aluminum plate. This step
shows you how to enter that load.
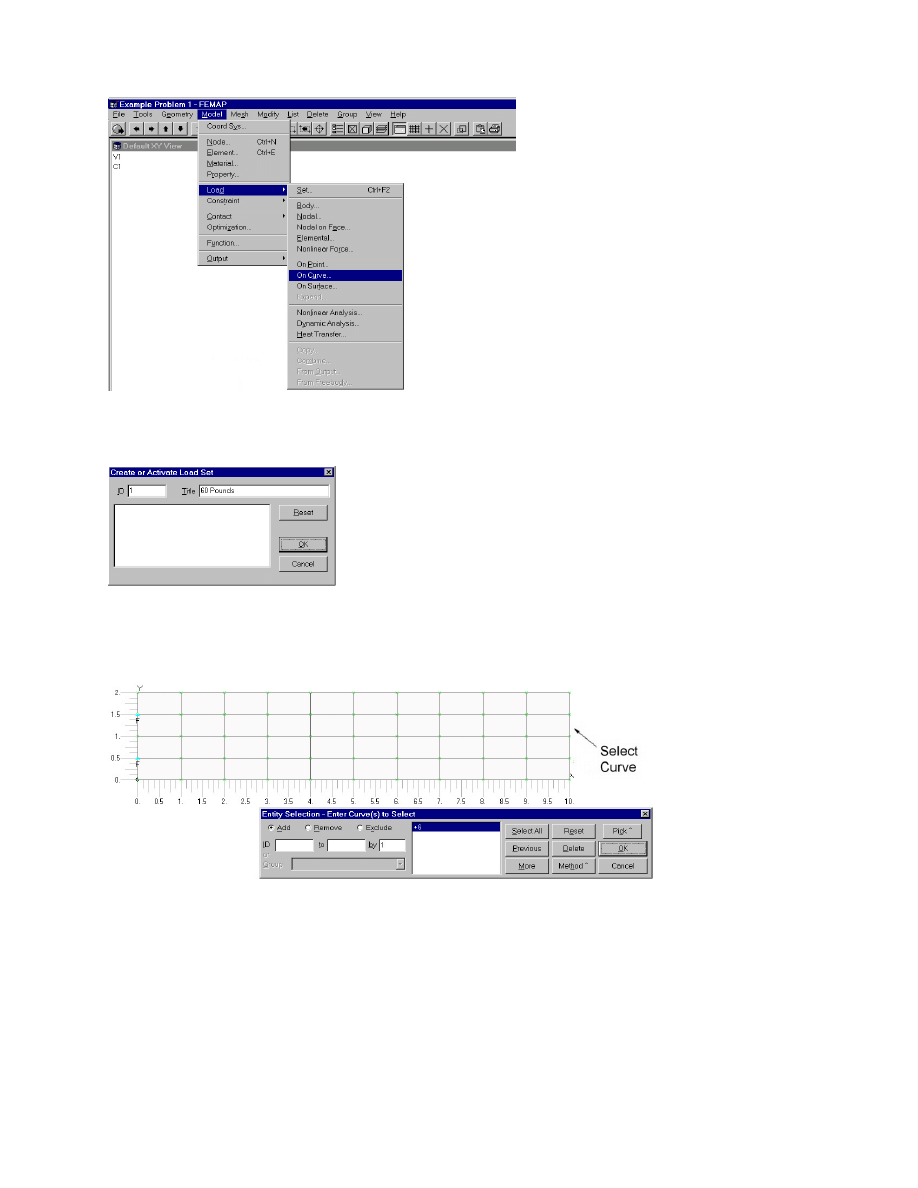
From the FEMAP Main Menu select Model then choose Load and On Curve….
Problem One: Linear Static Analysis
NE/Nastran Version 8.1
Tutorial 16
Enter 60 Pounds in the Title field of the Create or Activate Load Set dialog box.
Select OK. The Entity Selection – Enter Curve(s) to Select dialog box appears. With your
mouse point to and click on the right side edge of the model.
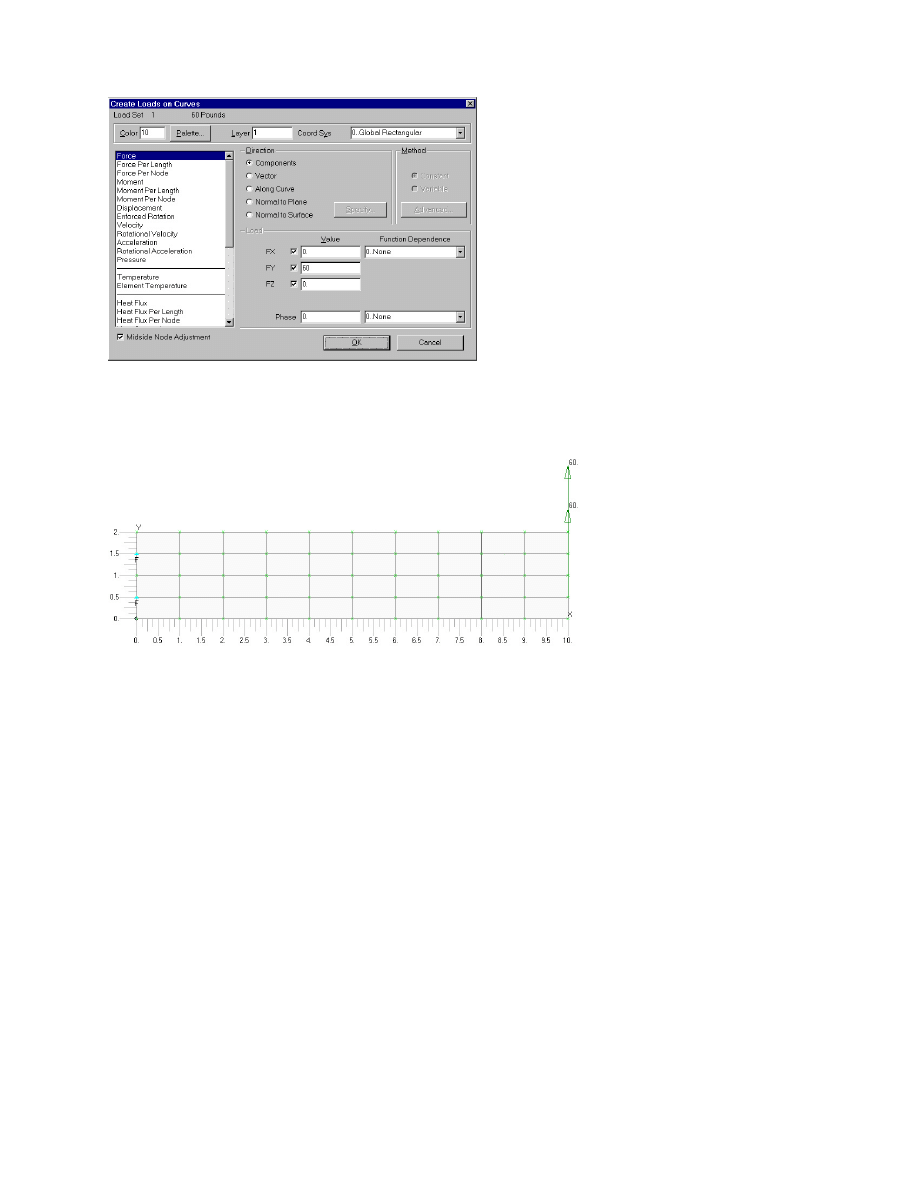
Select OK. When the Create Loads on Curves dialog box opens, select Force and enter the
value of 60 in the FY box. (Note that the force is positive since it is acting in the positive Y-
direction.)
Problem One: Linear Static Analysis
NE/Nastran Version 8.1
Tutorial 17
Select OK. The Entity Selection – Enter Curve(s) to Select dialog box appears again. Select
Cancel. The load is now applied. Your model should now appear like this:
Note the two load arrows on the right edge.
To save your file select File from the FEMAP Main Menu and then choose Save As…. Enter
the file name, Example Problem 1, navigate to your working directory, and click Save.
1.3 Run the Analysis
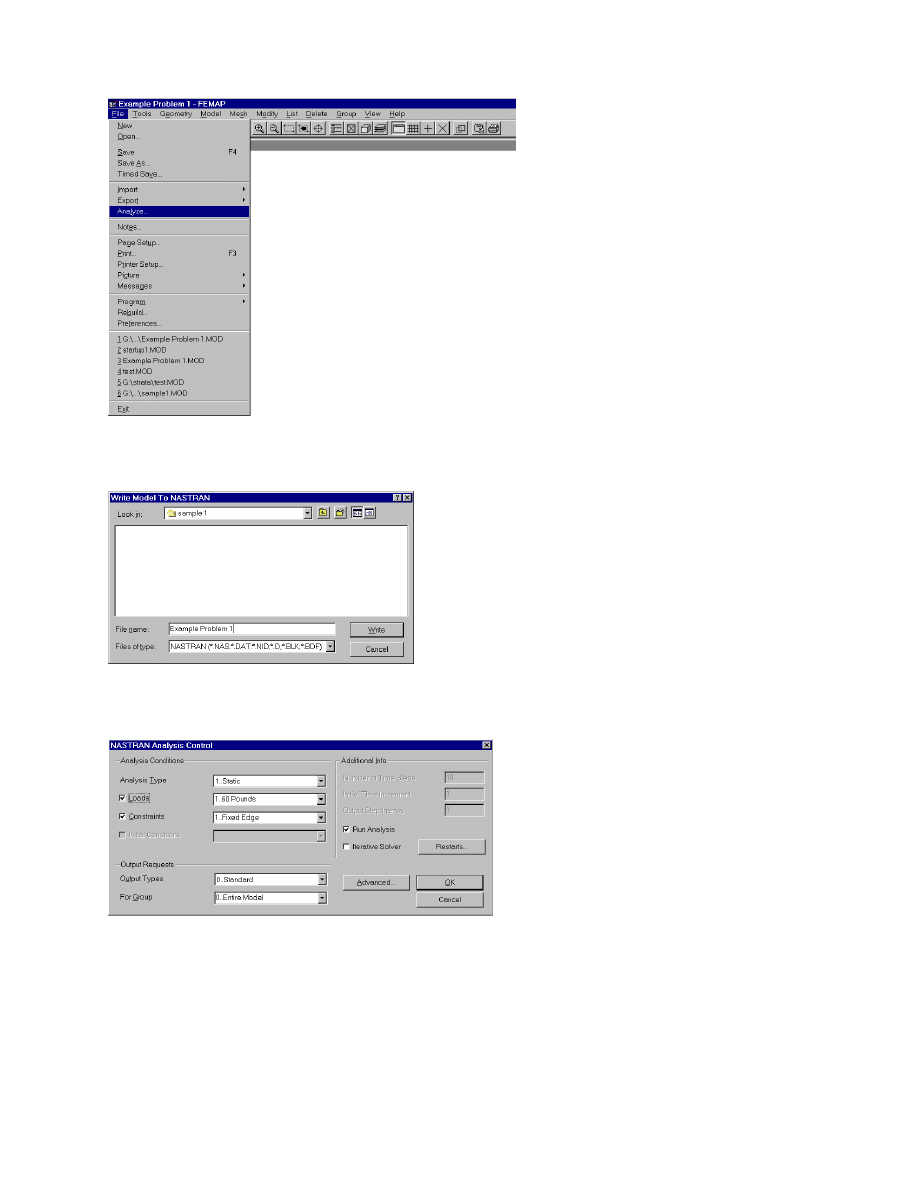
From the FEMAP Main Menu select File then choose Analyze….
Problem One: Linear Static Analysis
NE/Nastran Version 8.1
Tutorial 18
When the Write Model To Nastran dialog box opens, type the file name Example Problem 1.
Click Write. The NASTRAN Analysis Control dialog box appears.
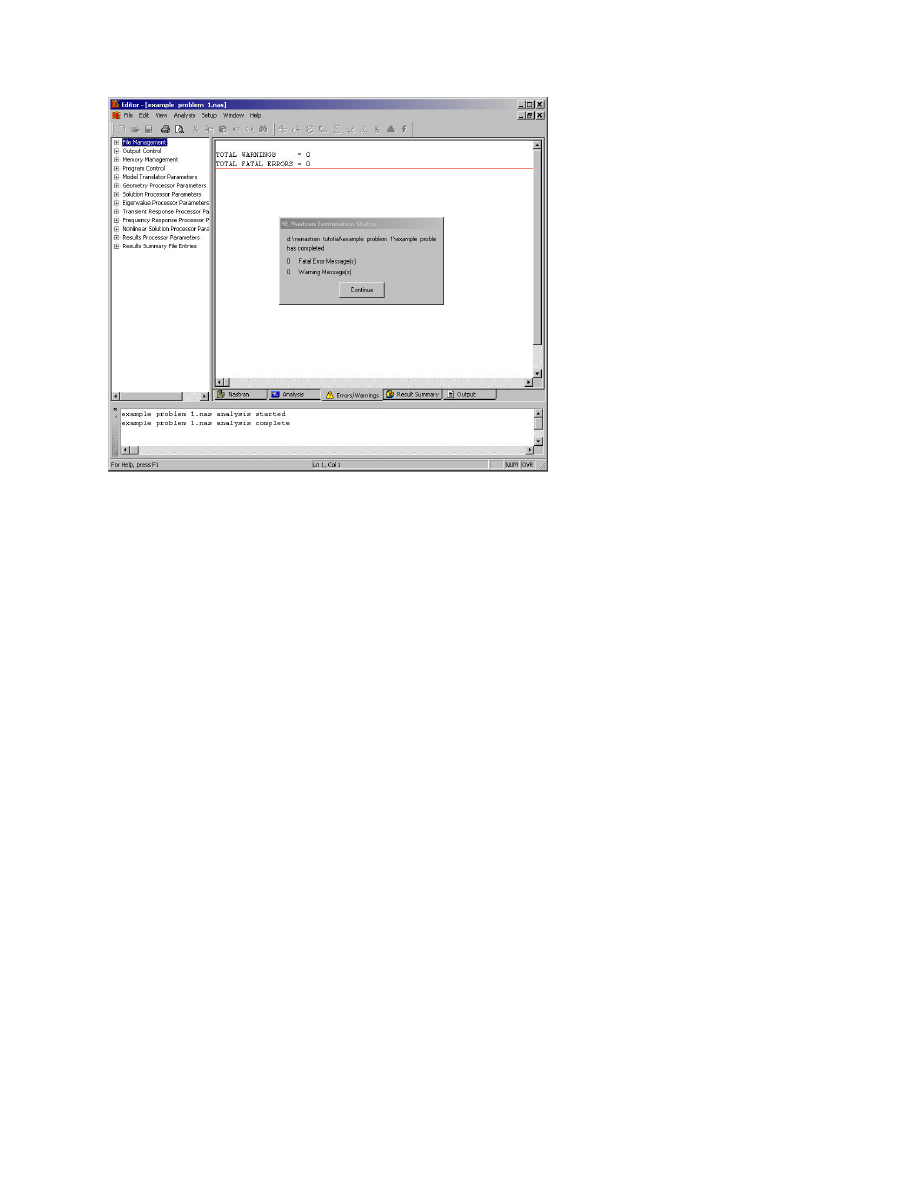
Select OK in the NASTRAN Analysis Control dialog box. The NE/Nastran Editor opens and
analysis data from its current operation scrolls in the Analysis view. When the analysis is
complete, the NE/Nastran Editor displays the Errors/Warnings view, and the NE/Nastran
Termination Status dialog box appears telling you that the analysis is complete with no errors
or warnings. (Do not click the Continue button yet.)
Problem One: Linear Static Analysis
NE/Nastran Version 8.1
Tutorial 19
Next, you will interrogate the results using the NE/Nastran Editor (in the next section), and then
you will post-process the results with FEMAP (in the section after next).
1.4 NE/Nastran Editor
The NE/Nastran Editor is a utility that allows you to manage your analysis files, monitor analysis
progress, queue multiple analysis jobs, change NE/Nastran settings and options, and access
the NE/Nastran help file. When you analyze a file from the FEMAP Main Menu, the NE/Nastran
Editor is opened. (Alternatively, you can open the Editor from your computer’s start menu.)
In the large Editor View of the NE/Nastran Editor you should see the Errors and Warnings
view. In this view you will see a listing of any errors and warnings generated during the
analysis. You can see more information by selecting from the several tabs at the bottom of the
Editor View.
Click the Nastran tab and you will see the Model Input File, Example Problem 1.NAS. This is
the file that FEMAP prepares when you choose Analyze, and the Write Model to Nastran
dialog box appears. It contains all of the pre-processed model data needed by the NE/Nastran
solver to perform the analysis.
The Analysis View shows the status information provided by the solver during the analysis.
Click the Result Summary tab and the Result Summary File, Example Problem 1.RSF,
appears in the view. The Results Summary File is a report of any runtime errors or warnings,
the model’s properties, the number of elements, number of degrees of freedom, maximum
aspect ratios of the elements, total mass, epsilon, strain energy, extreme values of various
stresses, and other data. The report’s contents can be interrogated or printed from the Editor.
See Listing 1 below.

Problem One: Linear Static Analysis
NE/Nastran Version 8.1
Tutorial 20
The Output View has the listing of the Example Problem 1.OUT file that is written by
NE/Nastran when the analysis is complete. This file contains all of the analysis results in an
ASCII format.
To the left of the Editor View is the Options View. Here the Model Initialization File settings can
be viewed or modified. These settings allow you to configure NE/Nastran.
The window on the bottom is the Messages Window. The messages displayed here come from
the NE/Nastran Editor and solver.
When you are finished exploring the NE/Nastran Editor, click Continue in the NE/Nastran
Termination Status dialog box. NE/Nastran will write the results to FEMAP, close the Editor,
and return control to FEMAP.
Listing 1. Results Summary File Report.
NE/NASTRAN VERSION 8.1 09:30 11/17/01
SERIAL NUMBER: NIW-I586-01810-XXXX
MODULE SEQUENCE FOR SOLUTION: LINEAR STATIC
MAXIMUM QUAD ELEMENT ASPECT RATIO = 2.00 ON ELEMENT 40
MAXIMUM QUAD ELEMENT SKEW ANGLE = 0.00 DEGREES ON ELEMENT 40
MAXIMUM QUAD ELEMENT TAPER RATIO = 0.00 ON ELEMENT 40
MAXIMUM QUAD ELEMENT WARPING ANGLE = 0.00 DEGREES ON ELEMENT 40
TOTAL MASS = 2.000000E-01
MAXIMUM STIFFNESS MATRIX DIAGONAL = 3.0568E+06 AT GRID 55 COMPONENT 2
MINIMUM STIFFNESS MATRIX DIAGONAL = 1.9231E+01 AT GRID 15 COMPONENT 6
NUMBER OF NEGATIVE TERMS ON FACTOR DIAGONAL = 0
MAXIMUM MATRIX FACTOR DIAGONAL RATIO = 6.047E+03 AT GRID 44 COMPONENT 3
FACTORED SPARSE MATRIX SIZE = 9356 WORDS 0.1 MEGABYTES
ADDITIONAL MEMORY ALLOCATED = 74002 WORDS 0.6 MEGABYTES
MAXIMUM APPLIED FORCE MAGNITUDE = 1.500000E+01 AT GRID 14
MAXIMUM APPLIED MOMENT MAGNITUDE = 0.000000E+00 AT GRID 55
MAXIMUM SINGLE POINT CONSTRAINT FORCE MAGNITUDE = 2.085721E+02 AT GRID 28
MAXIMUM SINGLE POINT CONSTRAINT MOMENT MAGNITUDE = 0.000000E+00 AT GRID 55
MAXIMUM DISPLACEMENT MAGNITUDE = 3.090763E-02 AT GRID 15
MAXIMUM ROTATION MAGNITUDE = 0.000000E+00 AT GRID 55
EPSILON = 9.488360E-13
STRAIN ENERGY = 9.171863E-01
MAXIMUM QUAD ELEMENT PRINCIPAL STRESS = 6.464570E+03 AT ELEMENT 1
MAXIMUM QUAD ELEMENT SHEAR STRESS = 2.955441E+03 AT ELEMENT 32
MAXIMUM QUAD ELEMENT VON MISES STRESS = 6.113108E+03 AT ELEMENT 31
MINIMUM QUAD ELEMENT PRINCIPAL STRESS = -6.464570E+03 AT ELEMENT 31
TOTAL MODEL ANALYSIS TIME = 5.9 SECONDS
Problem One: Linear Static Analysis
NE/Nastran Version 8.1
Tutorial 21
1.5 Post-Process the Model
In this section, you will use FEMAP to view the analysis results graphically. You will instruct
FEMAP to present the stresses in a color contour plot so that the peak stress and its location
can be identified. The colors in the contour plot show the stress level at each location in the
model. The deformation of the plate under the load is represented by the deformation of the
model in the plot.
To match the graphical settings of the plots in this tutorial manual you may want to make two
changes to the FEMAP view options. The first change is to the number of color contour levels
from FEMAP’s default of 16 to 64. The second change is to the actual colors of the levels.
Note that these changes are optional and that they apply only to the open file. If you choose to
use them in the future, you will need to repeat the steps below. These steps are not reproduced
in the next example problems.
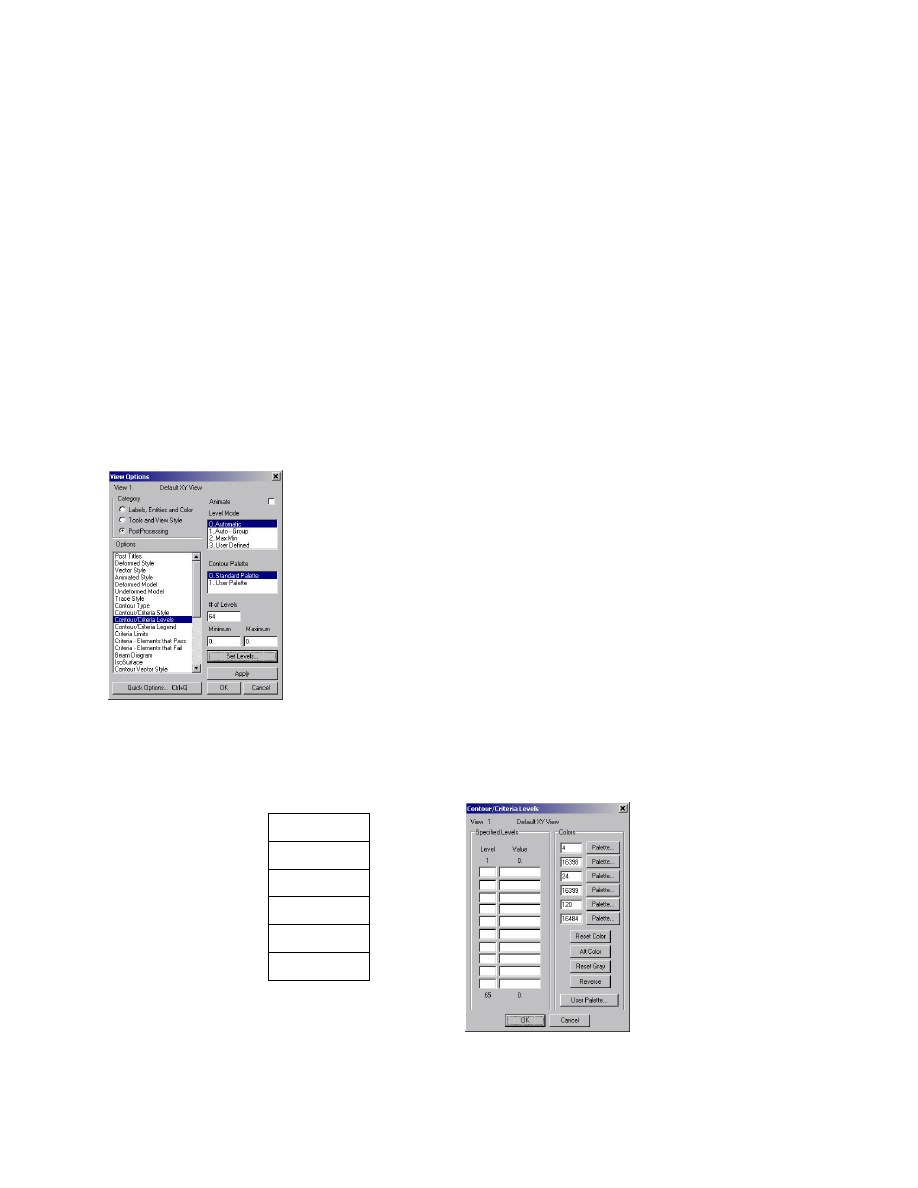
From the FEMAP Main Menu, select View then choose Options…. In the View Options dialog
box click the PostProcessing radio button. In the Options box click on the Contour/Criteria
Levels entry. In the # of Levels field enter 64.
Next click the Set Levels… button. In the Contour/Criteria Levels dialog box enter the
following six numbers in the six fields of the Colors box. Your dialog box should look like the
one below.
4
16398
24
16399
120
16484
Problem One: Linear Static Analysis
NE/Nastran Version 8.1
Tutorial 22
These numbers set the color levels to range from blue for low values of the contours to red for
high values. So the sequence of colors is then blue, green, yellow, orange, and red. Click OK
in the Contour/Criteria Levels dialog box and again in the View Options box.
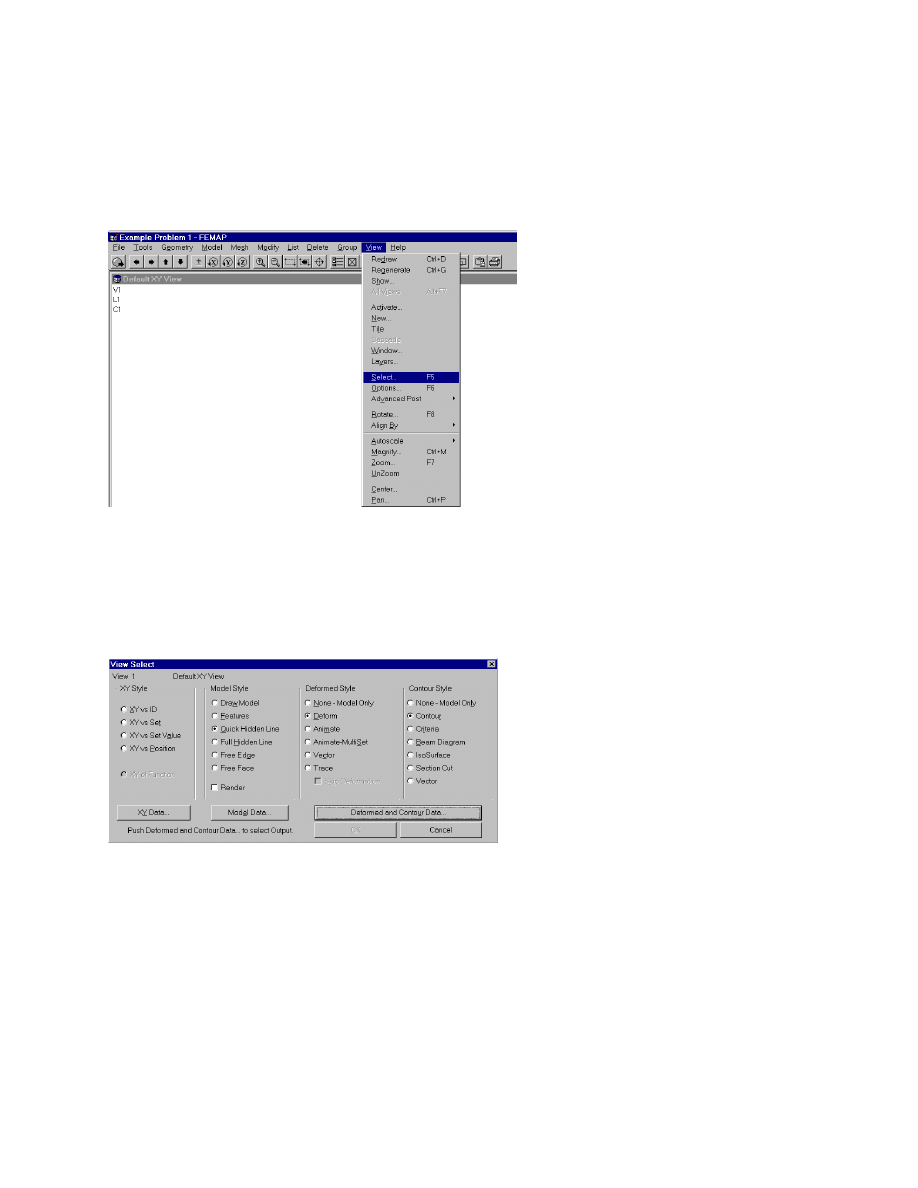
Next, you will prepare the contour plots of the plate. From the FEMAP Main Menu, select View
then choose Select….
The View Select dialog box appears. Click the Quick Hidden Line radio button in the Model
Style box. Click the Deform radio button in the Deformed Style box. This will show the
deformation of the model in the contour plot. Click the Contour radio button in the Contour
Style box. This will activate the color contour plot. Verify that all other selections are as
illustrated.
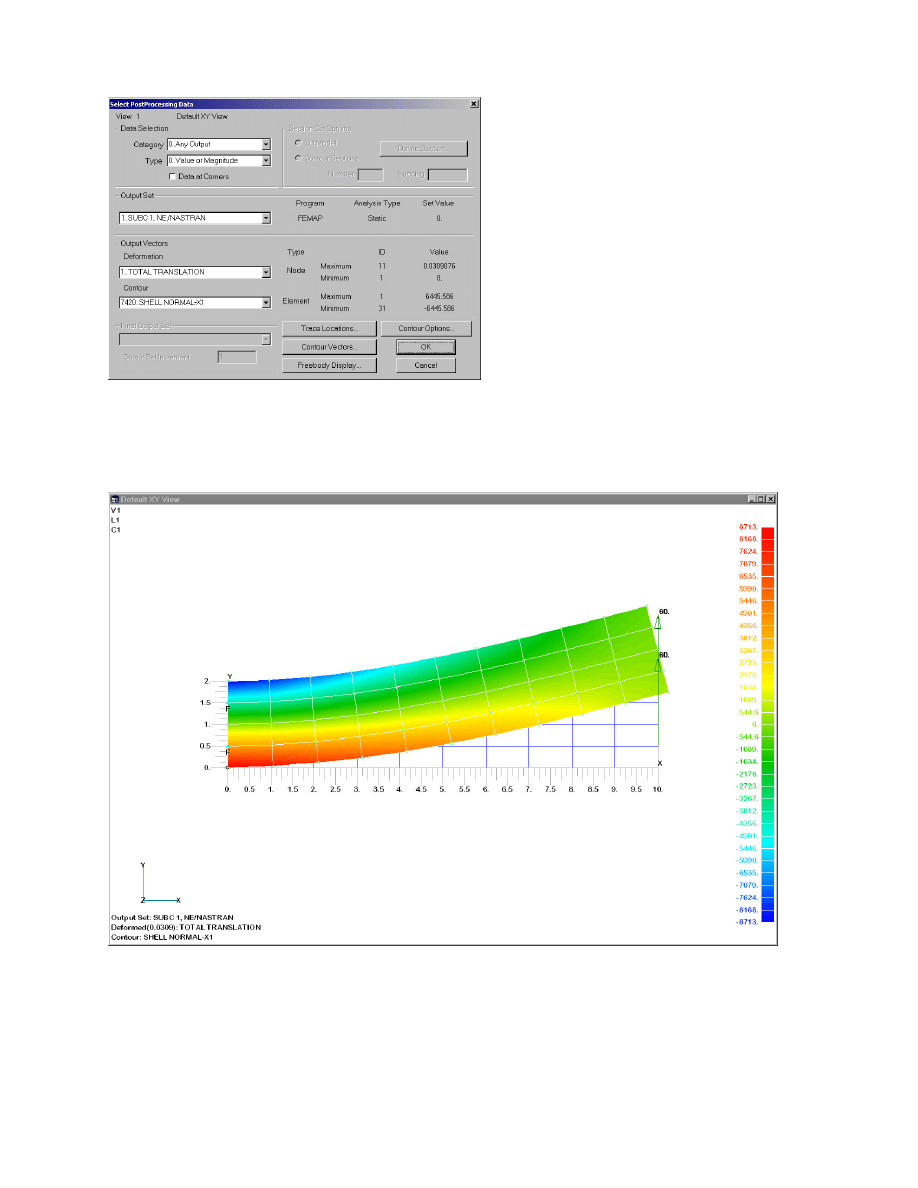
Click the Deformed and Contour Data… button. The Select PostProcessing Data dialog box
opens. The Deformation setting within the Output Vectors box should be 1..TOTAL
TRANSLATION. This will plot the deformation of the plate using the total translation calculated
in the analysis. For the Contour setting, select 7420..SHELL NORMAL-X1. This is the normal
stress in the x-direction. The last number “1” signifies that the stresses are computed on the
bottom (negative z axis) side of the shell elements. Because of the symmetry of the model, this
is the same as the center and topside of the plate. The maximum and minimum values listed
are for the element centroid. Element corner data is included by default and is used by FEMAP
to plot the stresses more accurately.
Problem One: Linear Static Analysis
NE/Nastran Version 8.1
Tutorial 23
Select OK. The View Select dialog box reappears. Select OK again.
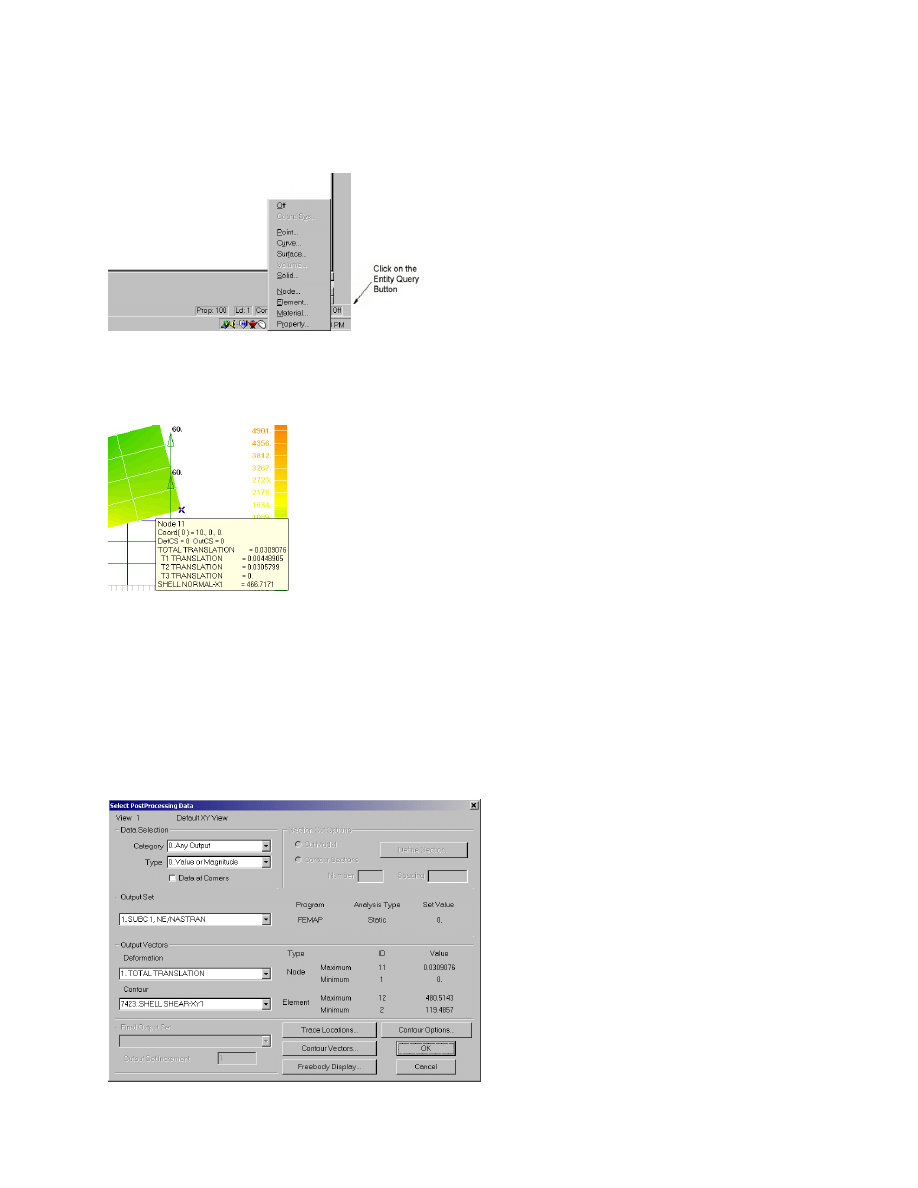
The colored contour plot should appear.
The color contours show a peak stress of 8713 psi in the bottom of the plate near the fixed
support. The plate’s total deformation is shown exaggerated.
Problem One: Linear Static Analysis
NE/Nastran Version 8.1
Tutorial 24
FEMAP allows you to interrogate the contour plot directly, by pointing with your mouse. To do
this, click on the Entity Query button in the FEMAP frame on the extreme bottom right of your
display.
From the menu, select Node…. Now position your mouse over the bottom right corner of the
model of the plate. After a brief pause, data for the highlighted node will appear.
Note that the deformation of the plate in the y-direction (“T2” for a Cartesian coordinate system)
is 0.0306 inch at this node.
To see a color contour plot of the shear stress, select View from the FEMAP Main Menu, then
choose Select…. As before, the View Select dialog box appears. Click the Deformed and
Contour Data… button. The Select PostProcessing Data dialog box appears again. Change
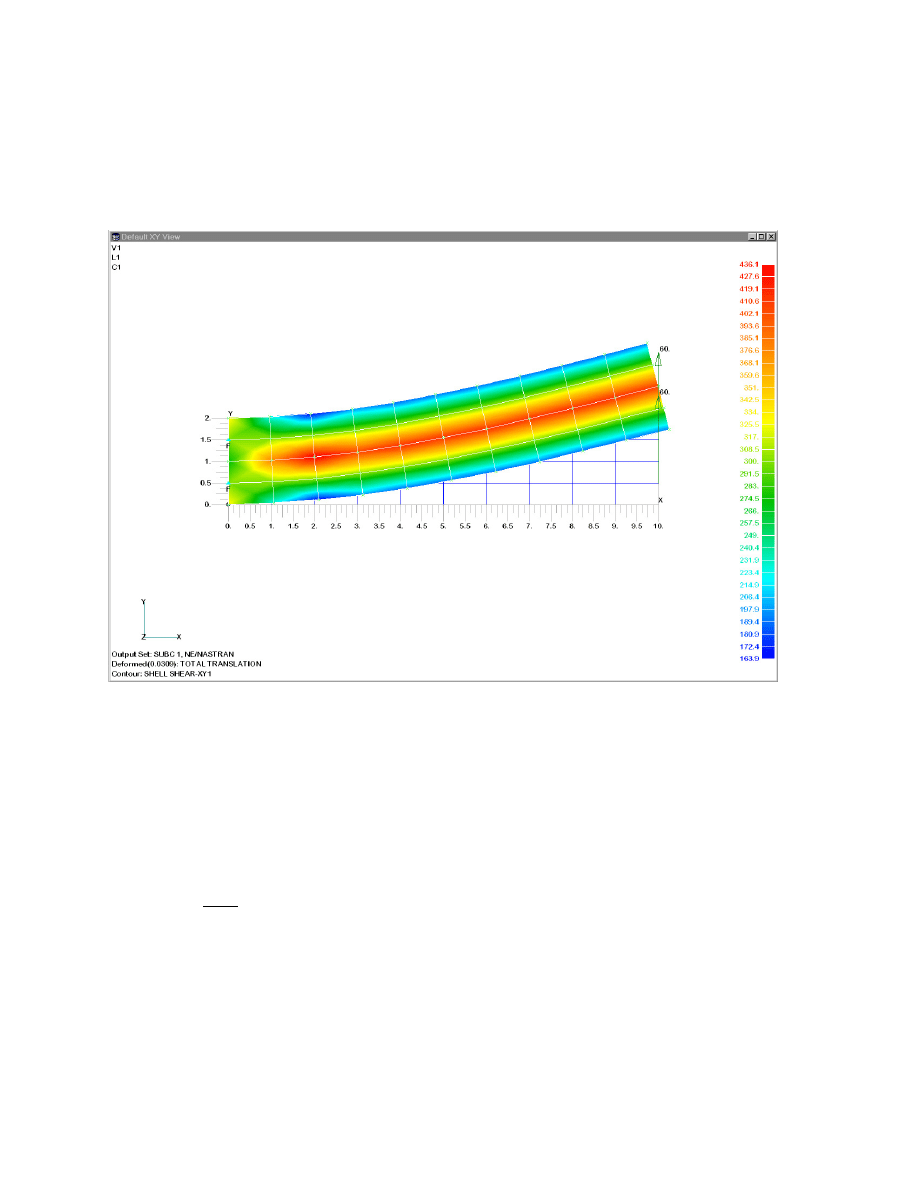
the Contour setting to 7423..SHELL SHEAR-XY1. This output vector contains the element
shear stresses for the bottom side.
Problem One: Linear Static Analysis
NE/Nastran Version 8.1
Tutorial 25
Select OK. The View Select dialog box reappears. Select OK again.
The colored contour plot should appear with shear stresses. The maximum value of the shear
stress (436 psi) occurs along the neutral axis, a short distance from the fixed support.
1.6 Comparison to Theoretical Beam Models
The stress in this plate can be estimated with a simple model of a cantilever beam assuming
linear-elastic behavior and isotropic, homogeneous materials.
At an arbitrary point (x,y,z) in the beam, the normal stress in the x-direction is:
I
c
M
x
x
=
σ
where,
M
x
is the bending moment at the y-z section containing the point (x,y,z) and is computed
by the product (60 lbf x 10 in) of the load with the distance, in the x-direction, from
the point (x,y,z) to the location of the load,
c
is the distance in the y-direction from the neutral axis to the point (x,y,z),

Problem One: Linear Static Analysis
NE/Nastran Version 8.1
Tutorial 26
I
is the second moment of the plane area about the neutral axis, and for a rectangular
cross section, is computed from,
12
3
db
I
=
where,
d
is the thickness of the plate (0.1 Inch)
b
is the height of the plate (2 inches).
For this beam, I = 0.06667 in
4
.
The normal stress in the x-direction at the point, (x,y,z) = (0,0,0) is:
psi
9000
in
06667
0
in)
1
in)(
10
lbf)(
60
(
4
=
=
.
x
σ
The result computed by NE/Nastran at this point is 8713 psi, or only 3.2% below the theoretical
result.
The deflection of the beam, in the y-direction, at the free end is estimated by:
EI
PL
y
3
3
=
∆
where,
P
is the load applied at the end of the beam (60 lbf),
L
is the distance from the fixed support to the point of the load (10 inches),
E
is Young’s modulus (the modulus of elasticity) for the aluminum in this model (1.0 x
10
7
psi).
The calculated deflection for this beam is
∆y = 0.0300 inch. NE/Nastran computed 0.0306 inch,
an error of only 2.0%.
The value of the shear stress along the neutral axis is estimated by,
A
V
2
3
=
τ
where,
V
is the vertical shear force (60 lbf),
A
is the cross sectional area of the beam (2.0 inches x 0.1 inch).
The computed shear stress on the neutral axis is 450 psi. NE/Nastran calculates 436 psi. The
error is only -3.1%.

Problem One: Linear Static Analysis
NE/Nastran Version 8.1
Tutorial 27
References:
1. W.C. Young,
Roark’s Formulas for Stress and Strain, McGraw-Hill, NY, 1989.
2. F.P. Beer and E.R. Johnston,
Mechanics of Materials, McGraw-Hill, NY, 1981.

2003 NE, Noran Engineering, Inc. NE, NE/, and NEi logo are Registered Trademarks of Noran Engineering, Inc.
NASTRAN is a registered trademark of the National Aeronautics and Space Administration. Windows is a registered
trademark of the Microsoft Corporation. All other trademarks and registered trademarks are the property of their
respective owners.
Noran Engineering, Inc
is aggressively
focused on commitment to the customer.
Detailed documentation, customized on-site
training, and comprehensive technical
support ensures that you will see immediate
return on your investment.
For more information about our company
or our products, please contact:
Headquarters:
Noran Engineering, Inc
5555 Garden Grove Blvd., Suite 300
Westminster, CA 92683-1886
USA
Phone: 1.714.899.1220
Fax:
1.714.899.1369
Email: info@noraneng.com
Website: www.NENastran.com
Europe:
Noran Engineering, GmbH
Theresien Str. 128
80333 Munich
GERMANY
Phone: +49.0.8153.990.447
Fax: +49.0.8153.990.448
E-mail: info.de@ noraneng.com
Website: www.NENastran.com
Asia/Pacific:
Tomoko Saruwatari Science Software
Sumisho Electronics Co., Ltd.
Sumitomoshoji-nishikicho-building, 3-11
Kanda-nishiki-cho, Chiyoda-ku
Tokyo 101-8453
JAPAN
Phone: +81.3.5217.5430
Fax: +81.3.5217.5771
E-mail: saruwata@sse.co.jp
NE/Nastran
for Windows
From Noran Engineering, Inc.
Wyszukiwarka
Podobne podstrony:
Simple Retrofitted Flat Plate Solar Water and Air Heaters
Simplex
pogoda i klimat (simple)
Podstawy Optymalizacji, simplex
Testing simple hypotheses
Anisakis simplex
Lekcja 5 Czas Past Simple, lekcje
past simple, korepetycje - materiały
Simple pr cont + test ps, tenses
Present Simple - zasady, dodatkowe materiały na zajęcia
Past Simple
Past Perfect Simple Użycie
metoda SIMPLEX
present i past simple i continuous
PRESENT SIMPLE
Future Simple Użycie
Phase Linear 200 II
LinearAlgebra 1(14s) Nieznany
więcej podobnych podstron