
6.4.8a
6.4.8a Creating Web
Graphics Using Slices
and Rollovers
(Photoshop,
ImageReady)

6.4.8a Creating Web Graphics Using
Slices and Rollovers (Photoshop,
ImageReady)
About slices
Slices are areas in an image that you define based on layers, guides, or precise
selections in the image, or by using the slice tool. When you define slices in an
image, Photoshop or ImageReady creates an HTML table or cascading style
sheet to contain and align the slices. If you want, you can generate an HTML file
that contains the sliced image along with the table or cascading style sheet.
You can optimize slices as individual Web images, add HTML and text to slices,
and link slices to URL addresses. In ImageReady, you can animate slices and
create rollovers with them.
In this lesson, you’ll explore different ways to slice an image in Photoshop and
ImageReady, optimize the slices, and create four rollover buttons for the banner.
To learn how to animate slices, see Lab 8.5.2, “Creating Animated GIFs”
Slicing the image in Photoshop
Adobe Photoshop lets you define slices using the slice tool or by converting
layers into slices. You’ll begin the lesson by slicing parts of a banner image for
buttons using the slice tool in Photoshop. You’ll name the slices and link them to
URL addresses, and then optimize the slices. Then you’ll continue slicing the
banner image in ImageReady and create rollovers for the button slices.
Using the slice tool to create slices
You use the slice tool to define rectangular areas in your image as slices. Slices
created by the slice tool are called user-slices. When you define a user-slice in an
image, Photoshop or ImageReady creates auto-slices for all the undefined areas
surrounding the user-slice. Using the slice tool, you’ll define four user-slices for
buttons in the banner.
1. Start Adobe Photoshop.
If a notice appears asking whether you want to customize your color settings,
click No.
2. Choose File > Open, and open the file start.psd from the 6_4_8/a/Start folder.
If a notice appears asking whether you want to update the text layers for vector
based output, click Update.
Horizontal and vertical guidelines were added to the lesson file to help you as
you define sliced areas in the banner.
3. If you don’t see the guidelines, choose View > Show > Guides.
You’ll slice text areas in the image to create four buttons.
4. Choose View > Show > Slices.
1-2
Fundamentals of Web Design 1.2—-Lab 6.4.8a
Copyright
2002, Adobe Systems, Inc.
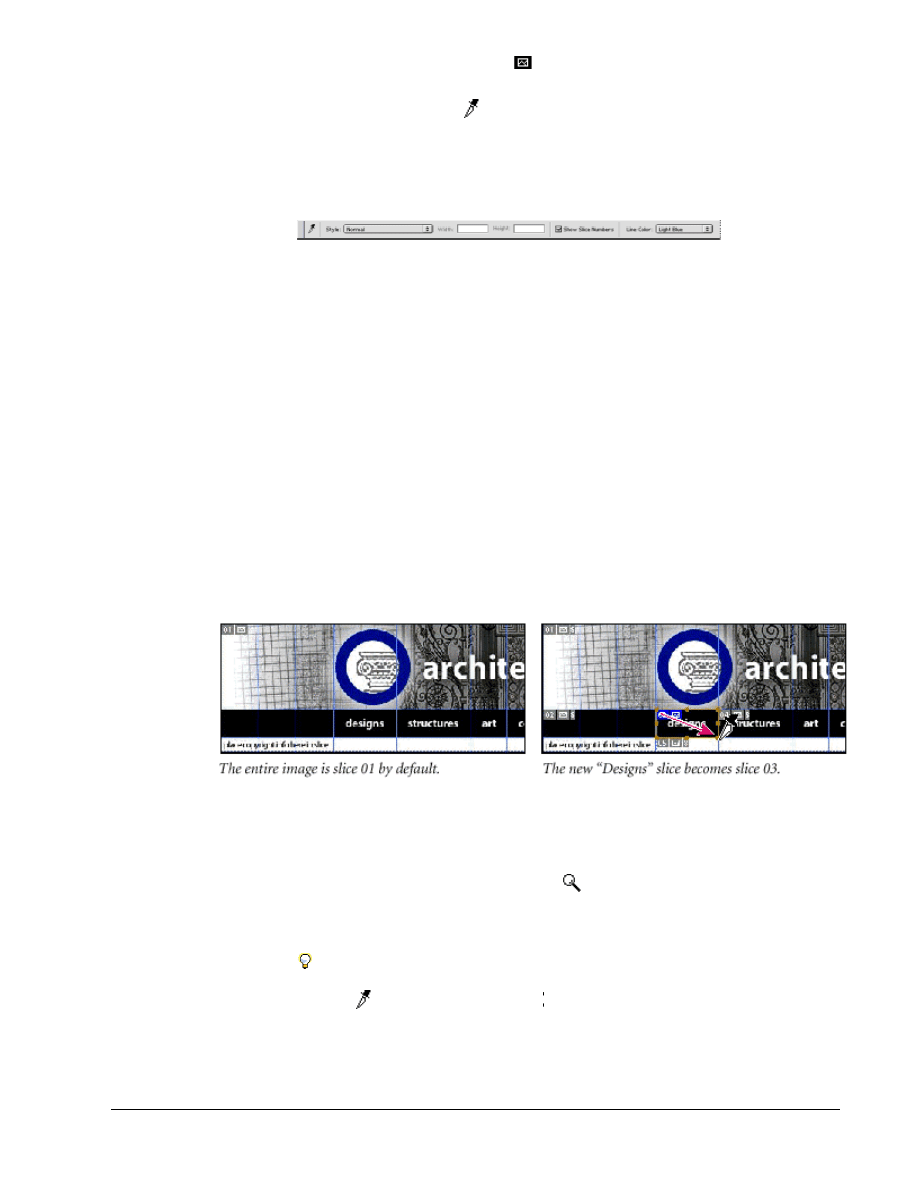
A number (01) and a slice icon (
) appear in the upper-left corner of the image
indicating that currently the entire image is a slice.
5. Select the slice tool ( ).
Notice that slice style, size, and line color options appear in the tool options bar
when you select the slice tool.
To help you as you draw marquees with the slice tool, you’ll use the Snap To
Guides and Snap To Slices commands.
6. If it’s not already selected, choose View > Snap To > Guides.
This will help you define a slice area by snapping to the guides as you draw.
7. If it’s not already selected, choose View > Snap To > Slices.
Snapping to slices that already exist will help ensure that a new sliced area
doesn’t overlap the other slices.
8. Using the slice tool, draw a marquee around the rectangular area containing
the “Designs” text so that it lines up with the guides. When you release the
mouse, Photoshop creates a slice and assigns a number to the upper-left
corner of the slice.
Areas to the left, right, and below the new slice become new auto-slices. Slices
01, 02, 04, and 05 are auto-slices; slice 03 is your new user-slice.
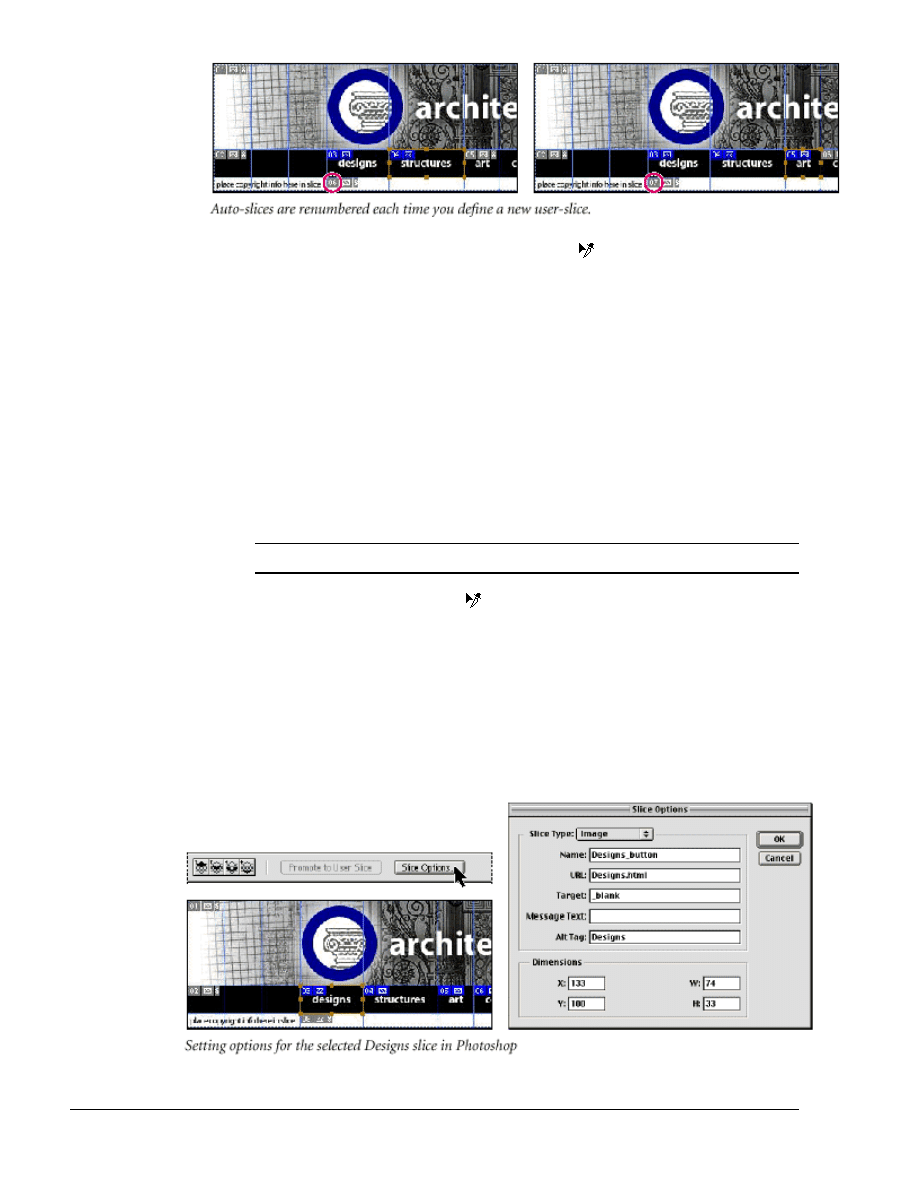
9. Using the slice tool and the guides, draw marquees around the text
“Structures,” “Art,” and “Contact” to create slices for three more buttons.
Make sure there are no gaps between the slices because gaps will become auto-
slices. (If necessary, use the zoom tool (
) to get a closer view, and then
double-click the zoom tool to return to 100%.)
Notice that the auto-slices are renumbered each time you create a new user-slice.
You can change the way the pointer appears on-screen for the slice tool by
changing your Photoshop preferences. To change the slice tool’s standard
pointer ( ) to the precise pointer (
), choose Edit > Preferences > Display &
Cursors, select Precise for Other Cursors, and click OK.
Copyright
2002, Adobe Systems, Inc.
Fundamentals of Web Design 1.2—Lab 6.4.8a
1-3
10. To resize a slice, select the slice select tool (
) hidden behind the slice tool,
select the slice, and drag the selection handles.
11. Choose File > Save to save your work.
Setting options for slices in Photoshop
Before optimizing slices as Web images, you can set options for them, such as
naming the slices or assigning URL links to them. The names you assign to the
slices will determine the filenames of the optimized images.
In this part of the lesson, you’ll name the four user-slices that you defined, link
them to Web pages, specify blank target frames so each linked page will appear
in a separate browser window, and specify alternative text to appear in place of
the images if they don’t appear in a browser.
Note Setting options for auto-slices automatically promotes them to user-slices.
1. Select the slice select tool ( ), and use it to select the Designs slice.
The tool options bar changes to display options for the slice select tool.
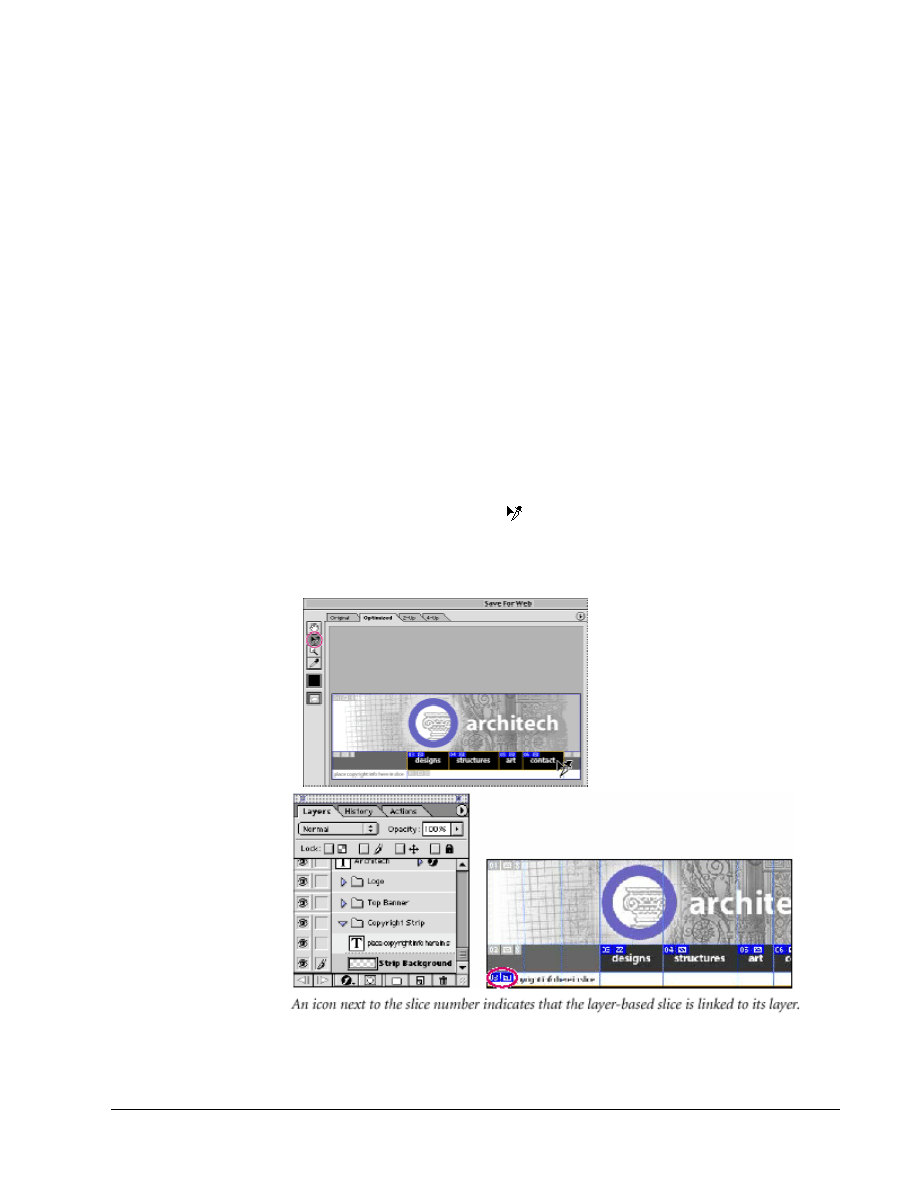
2. Click the Slice Options button in the tool options bar.
By default, Photoshop names each slice based on the filename and the slice
number.
3. In the Slice Options dialog box, enter Designs_button in the Name text box,
Designs.html in the URL text box, _blank in the Target text box, and
Designs in the Alt Tag text box. Then click OK.
1-4
Fundamentals of Web Design 1.2—-Lab 6.4.8a
Copyright
2002, Adobe Systems, Inc.
4. Repeat steps 1 through 3 to rename and link the other three slices you made.
Using the slice select tool, double-click a slice to open the Slice Options
dialog box. Enter Structures_button, Art_button, and Contact_button for
the names; Structures.html, Art.html, and Contacts.html for the URLs; and
Structures, Art, and Contact for the alternative text.
In the Slice Options dialog box, you can also specify message text to appear in
the browser’s status area, specify dimensions to move or resize a slice, and
change a slice to a No Image slice that contains HTML and text. Additional
output settings for changing the background color of a slice are available when
you open the Slice Options dialog box from the Save For Web dialog box or
Save Optimized dialog box.
5. Choose File > Save.
Optimizing slices in Photoshop
You optimize slices in Photoshop by selecting them in the Save For Web dialog
box, choosing optimization settings for each selection, and saving optimized files
for either the selected slices or all slices. Photoshop creates an Images folder to
contain the optimized files.
Here you’ll optimize the four user-slices you defined.
1. Choose File > Save for Web.
2. Select the slice select tool ( ) in the Save For Web dialog box.
3. Shift-click in the optimized version of the image to select the four slices you
created.
4. Choose GIF Web Palette from the Settings menu, and click OK.
Copyright
2002, Adobe Systems, Inc.
Fundamentals of Web Design 1.2—Lab 6.4.8a
1-5

5. In the Save Optimized As dialog box, choose Images Only from the Save As
Type menu, choose Selected Slices from the bottom pop-up menu, leave the
Name setting as it is, locate the 6_4_8/a/Start/Architech Pages folder, and
click Save.
Photoshop saves the optimized images in an Images folder within the Architech
Pages folder and uses the names you specified in the Slice Options dialog box for
the filenames.
If there are any gaps in the table, Photoshop creates a Spacer.gif file.
6. Choose File > Save.
Slicing the image in ImageReady
Similar to Adobe Photoshop, Adobe ImageReady lets you define slices using the
slice tool or by converting layers into slices. In addition, you can define all the
slices in an image by converting guides into slices and you can define the precise
shapes of slices by converting selections into slices. In this part of the lesson,
you’ll convert a layer into a slice, create a No Image slice, and create a precisely
shaped slice from a selection.
Creating slices from guides
In ImageReady, you can convert all the areas between guides into user-slices.
When you convert guides into slices, the entire image is sliced and you lose any
preexisting slices.
1. In Photoshop, click the Jump to ImageReady button.
The Start.psd file opens in ImageReady.
2. Choose View > Show > Slices.
3. Choose Window > Show Slice to display the Slice palette. Then choose
Show Options from the palette menu to expand the Slice palette if necessary.
Notice that the Slice palette is similar to the Slice Options dialog box in
Photoshop.
4. Select the slice select tool ( ), and select the Designs_button slice.
1-6
Fundamentals of Web Design 1.2—-Lab 6.4.8a
Copyright
2002, Adobe Systems, Inc.
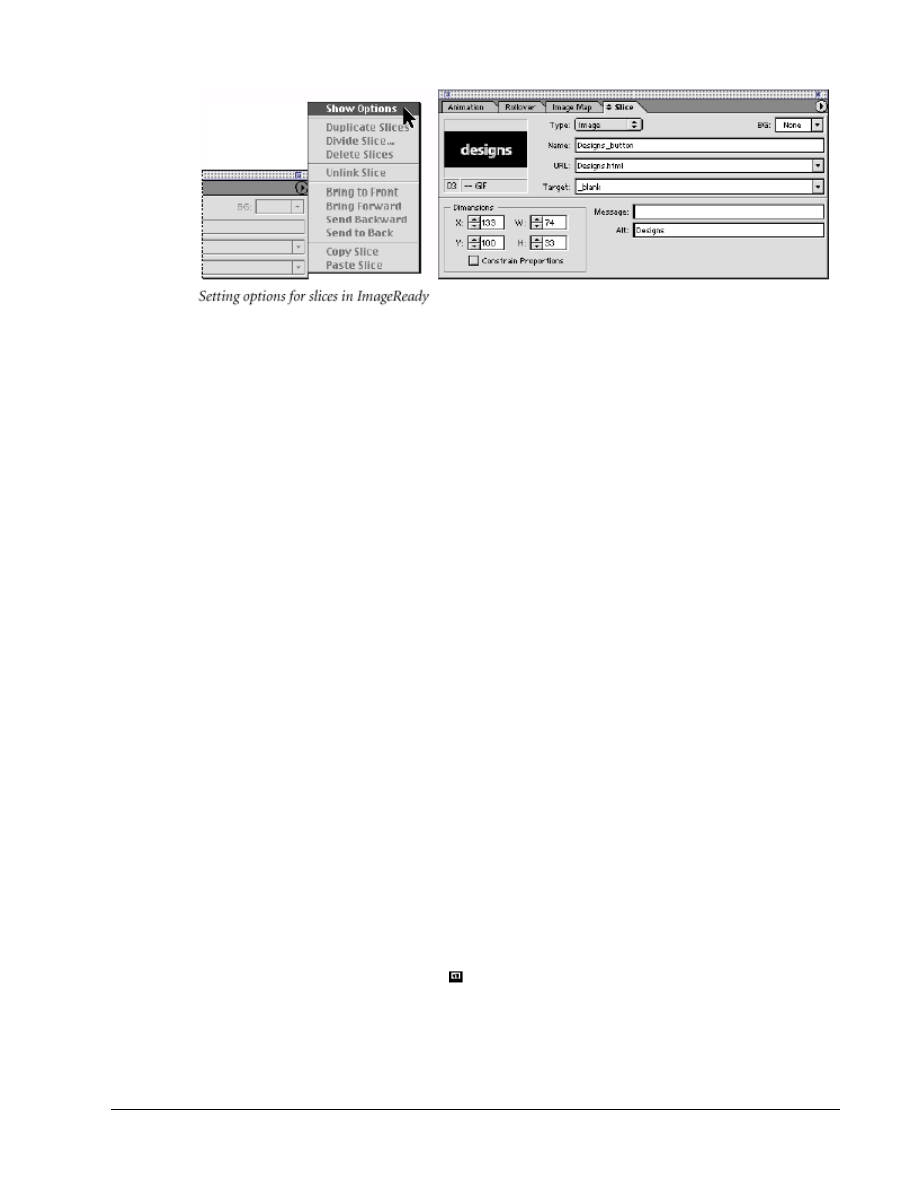
Notice that the slice’s name, URL, Target, and Alt text that you entered in
Photoshop appear in the Slice palette.
5. If the guides aren’t showing, choose View > Show > Guides.
6. Choose Slices > Create Slices from Guides.
This is a quick method for creating slices for every rectangular area between the
guides.
7. Use the slice select tool to select the Designs slice again.
Notice that the options in the Slice palette for the Designs slice have changed to a
default name based on the filename and slice number, and you’ve lost the options
you set in Photoshop.
8. Choose Edit > Undo Create Slices from Guides.
Creating slices from layers
Another method for defining slices in Photoshop and ImageReady is to convert
layers into slices. A layer-based slice includes all the pixel data in the layer.
When you edit the layer, move it, or apply a layer effect to it, the layer-based
slice adjusts to encompass the new pixels. To unlink a layer-based slice from its
layer, you can convert it to a user-slice.
You’ll create a slice based on the Copyright Strip layer, and then apply a layer
effect to it so you can see how the slice adjusts to the new effect.
1. In the Layers palette, expand the Copyright Strip layer set and select the
Strip Background layer.
The Strip Background layer contains the white strip that goes across the bottom
of the banner.
2. Choose Layer > New Layer Based Slice.
ImageReady replaces the auto-slices with one layer-based slice for the entire
layer. Notice the icon ( ) in the upper-left corner of the slice that indicates the
slice is based on a layer. Now you’ll apply a layer effect to see how the slice
resizes to accommodate it.
3. With the Strip Background layer selected, choose Layer > Layer Style >
Outer Glow.
Copyright
2002, Adobe Systems, Inc.
Fundamentals of Web Design 1.2—Lab 6.4.8a
1-7
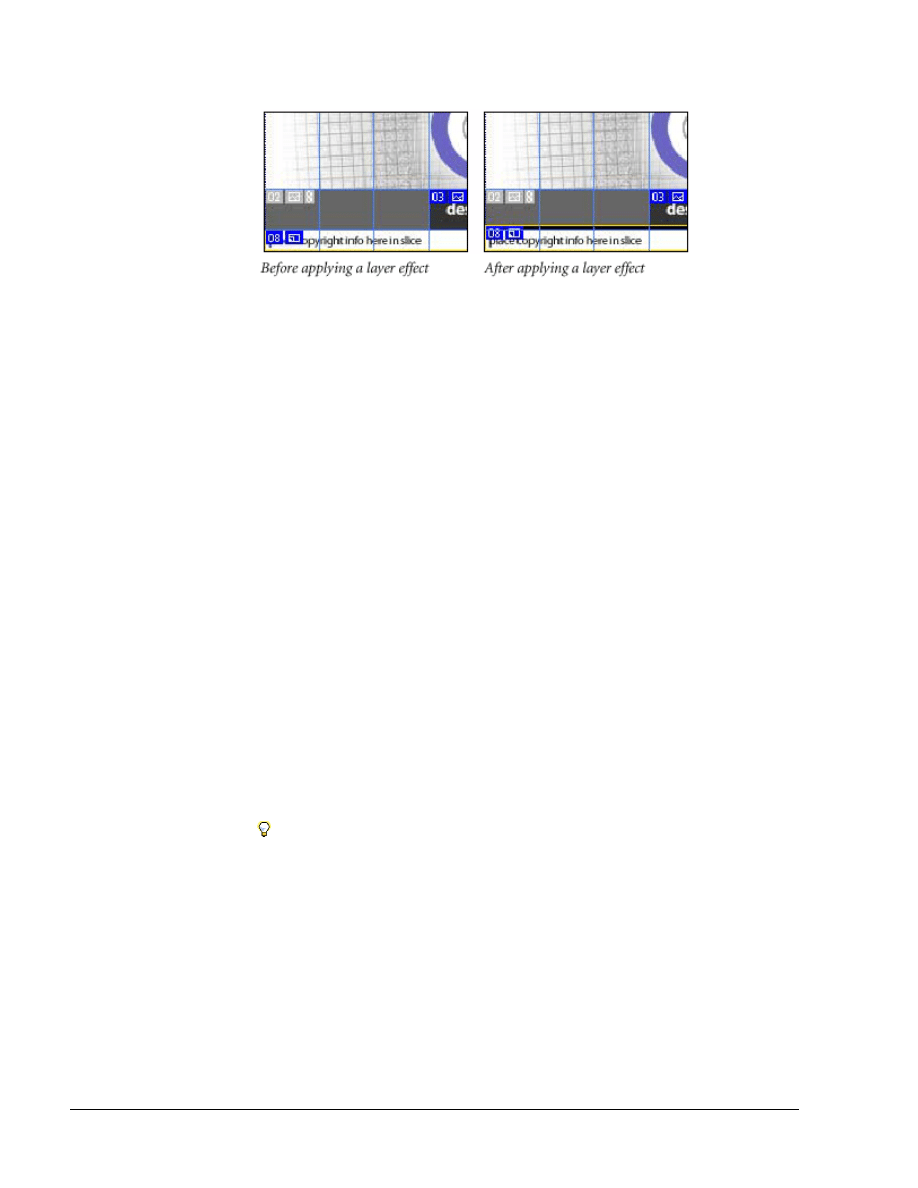
Notice that the selection line around the layer-based slice expands to include the
new layer effect.
4. Choose Edit > Undo Outer Glow to cancel the new layer effect.
5. Choose File > Save to save your work in ImageReady.
Creating No Image slices
In ImageReady and Photoshop, you can create No Image slices and add text or
HTML source code to them. No Image slices can have a background color and
are saved like any other table cell or DIV element as part of the HTML file.
The primary advantage of using No Image slices for text is that the text can be
edited in any HTML editor, saving you the trouble of having to go back to
Photoshop or ImageReady to edit it. The disadvantage is that if the text grows
too large for the slice, it will break the HTML table and introduce unwanted
gaps.
Now you’ll convert the Copyright Strip slice into a No Image slice and add text
to it.
1. Make sure the layer-based slice that you created for the copyright
information is selected.
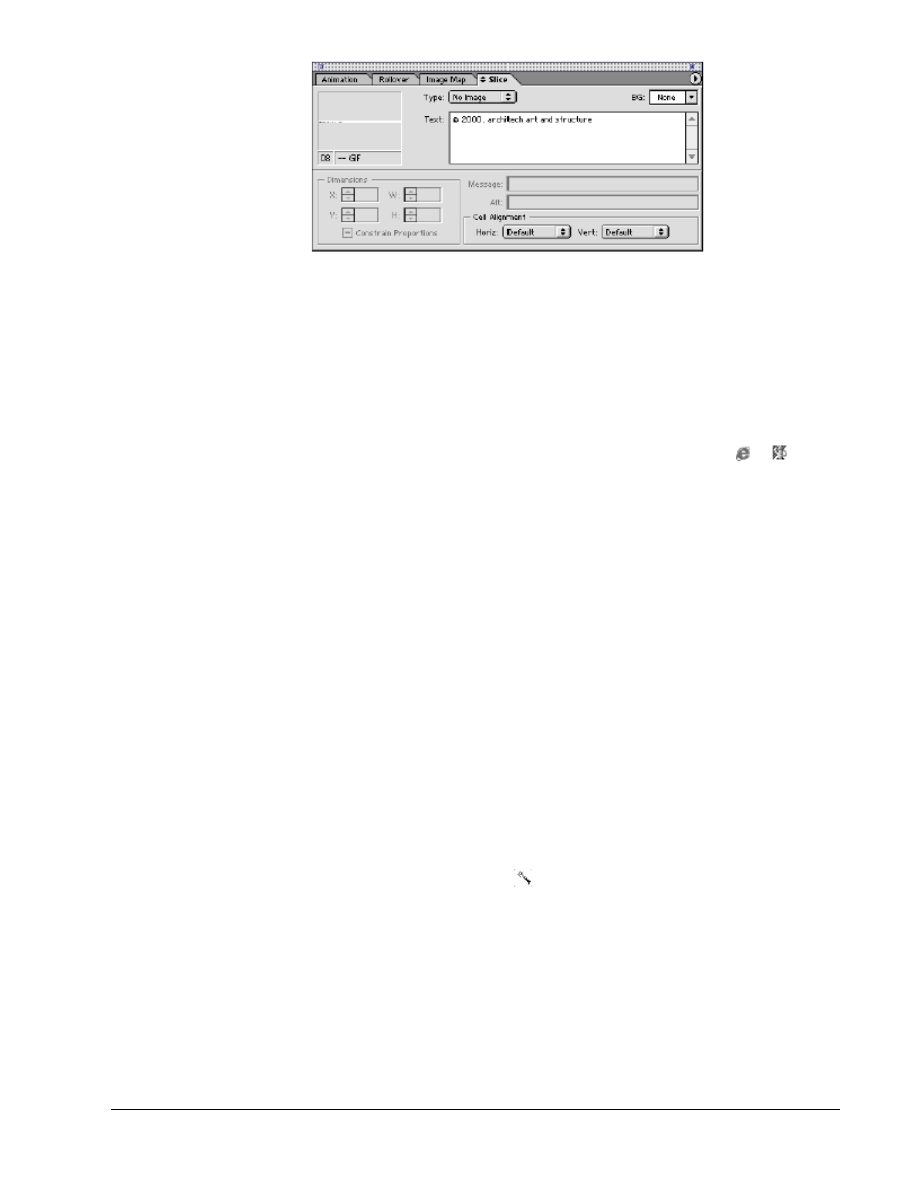
2. In the Slice palette, choose No Image from the Type menu.
3. Enter the copyright information for your banner in the Text box.
The text that you type here in the Slice palette will appear in the Web page;
however, it will not appear in your sliced image in ImageReady or Photoshop.
You can add a copyright symbol by pressing Alt+0169 on the numeric keypad
(Windows) or Option+G (Mac OS).
Because you chose No Image for the slice type, the layer of placeholder text
(“place copyright info here in slice”) that you do see in ImageReady will not
appear in the Web page.
1-8
Fundamentals of Web Design 1.2—-Lab 6.4.8a
Copyright
2002, Adobe Systems, Inc.
4. Choose File > Save.
Previewing in a Web browser
To make sure the text that you type will fit in the table cell, you’ll preview the
image in a Web browser.
1. In the toolbox, click the Preview in Default Browser button ( or ) ) or
choose a browser from the button’s pop-up menu.
The image appears in the browser window, and the HTML source for the preview
appears in a table below the image.
Note: To add your browser to the Preview in Default Browser button, drag its
shortcut (Windows) or alias (Mac OS) into the Preview In folder located inside
the Helpers folder in the Photoshop 6.0 folder.
2. When you’re done previewing the copyright text, quit the browser to return
to ImageReady.
Creating slices from selections
In ImageReady, the easiest way to create a slice for a small or unusually shaped
graphic element is to select the element with the magic wand tool and use the
selection as the basis for the slice. This is also a useful technique for slicing
objects that are crowded closely together.
You’ll use the magic wand tool to select the blue logo and convert it to a slice.
1. In the Layers palette, expand the Logo layer set and select the Big Circle
layer.
2. Select the magic wand tool ( ). ).
3. Click the blue area of the logo in the image to select the outer edge of the
circle.
Copyright
2002, Adobe Systems, Inc.
Fundamentals of Web Design 1.2—Lab 6.4.8a
1-9
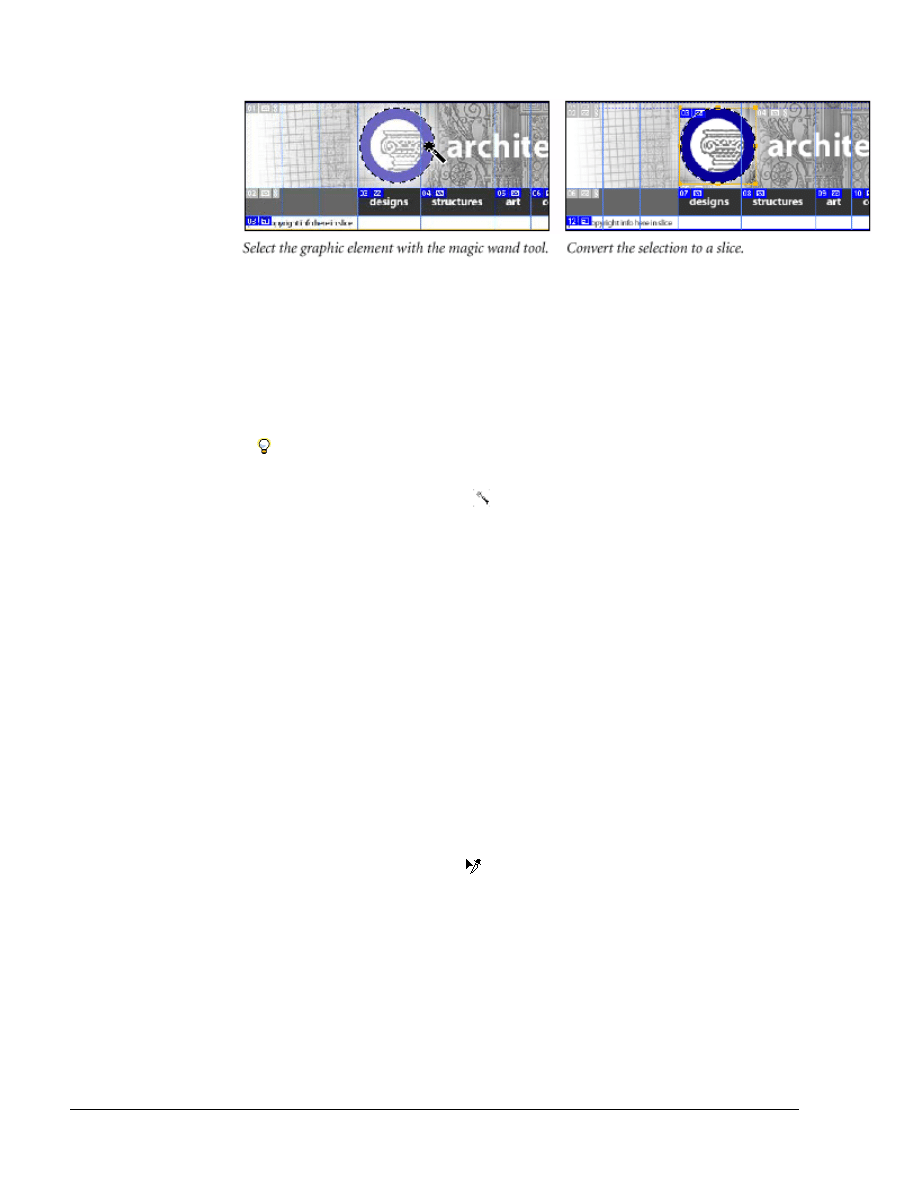
Slices are created based on the outer boundary of the selection. This means that
every pixel within the circle will be part of the slice.
4. Choose Slices > Create Slice from Selection.
Notice the additional auto-slices that are created around the logo to complete the
table.
5. In the Slice palette, enter Logo in the Name text box, Home.html in the URL
text box, and Home in the Alt text box. Enter _blank in the Target text box by
choosing it from the Target pop-up menu.
You can choose URLs that you’ve already entered previously from the URL
pop-up menu in the Slice palette.
6. With the magic wand tool ( ). ) selected, choose Select > Deselect to
remove the magic wand selection lines from the logo.
7. Choose File > Save.
Optimizing slices in ImageReady
ImageReady records separate optimization settings for every slice in the image.
You specify optimization settings for a slice by selecting it and entering values in
the Optimize palette. Then you can save an optimized image file for the selected
slice.
In this part of the lesson, you’ll explore how to set the optimization for slices in
ImageReady, and then you’ll link the slices together to share the optimization
settings.
Setting the optimization for selected slices
Slices use the optimization settings of the entire image until you select them and
specify new settings.
1. Select the slice select tool ( ).
2. Select the number 02 auto-slice in the image.
3. Click the 2-UP tab in the document window to display the original image
next to the optimized image.
4. Choose 200% from the Zoom Level menu in the lower-left corner of the
document window.
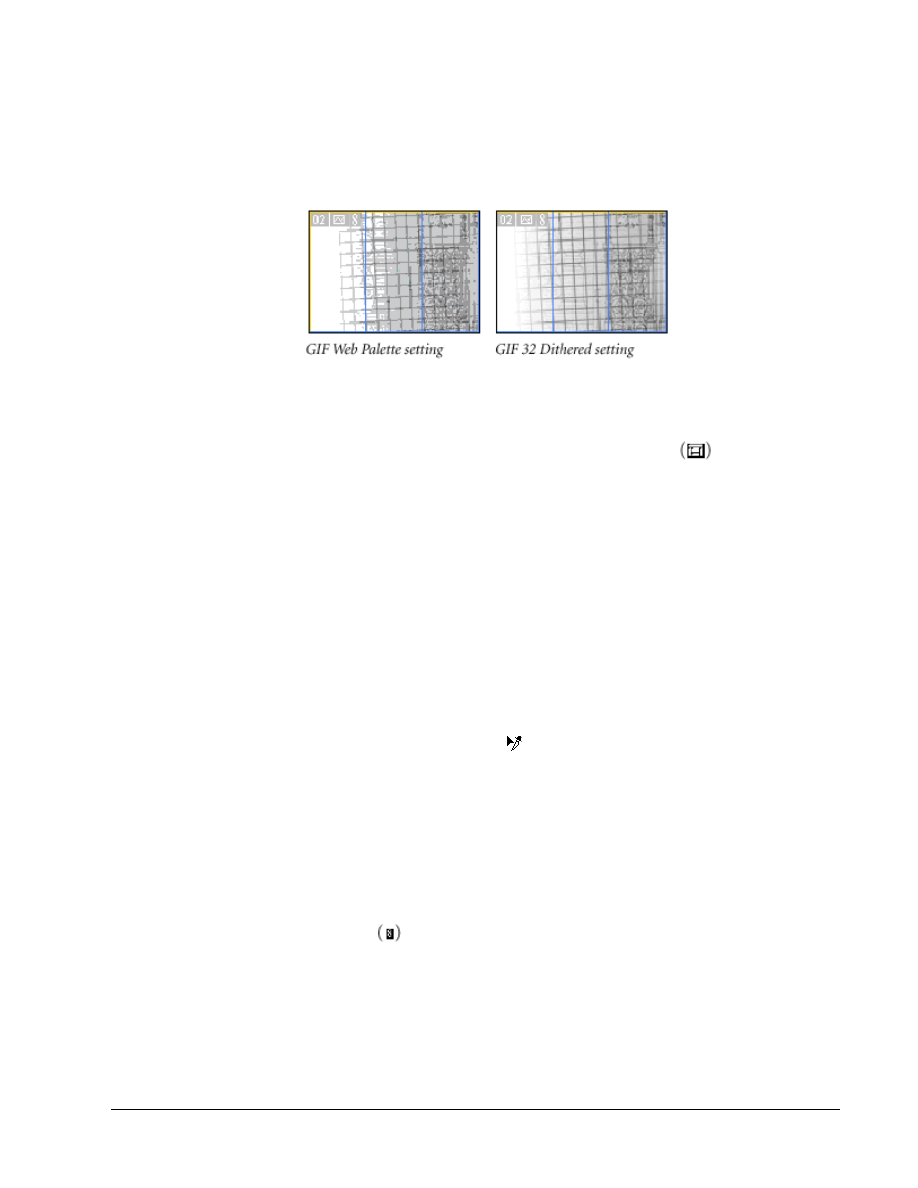
Notice that the quality of the optimized image at its default setting (GIF Web
Palette) is poor compared to the original image.
1-10
Fundamentals of Web Design 1.2—-Lab 6.4.8a
Copyright
2002, Adobe Systems, Inc.
5. If you don’t see the Optimize palette, choose Window > Show Optimize to
display it.
6. In the Optimize palette, choose GIF 32 Dithered from the Settings menu.
Notice that the quality of the selected slice is better than it was with the default
GIF Web Palette setting.
7. Choose 100% from the Zoom Level menu in the lower-left corner of the
document window.
8. If you want, click the Toggle Slices Visibility button in the toolbox to
hide the slice numbers while you’re viewing the optimized image.
9. In the image, select another auto-slice.
Notice in the Optimize palette that the selected slice has the same GIF 32
Dithered setting. This is because all auto-slices are linked together, and any
optimization setting that you choose for one auto-slice is automatically applied to
the others.
Linking slices together
In ImageReady, you can link slices together to share the same optimization
settings. Then, in ImageReady or Photoshop, you can change the settings for a
linked slice and the new settings are instantly applied to the entire set of linked
slices. Linked sets are color-coded to help identify slices in a set.
1. Using the slice select tool ( ), Shift-click in the optimized version of the
image to select the four button slices. Then Shift-click to select the auto-slice
to the right of the Contact button.
The order in which you select slices for linking makes a difference. If the first
slice you select is a user-slice, any auto-slices you link to that slice also become
user-slices. Similarly, if the first slice you select is an auto-slice, any user-slices
you select are linked to the auto-slice set.
2. Choose Slices > Link Slices.
A link icon appears in the upper-left corner of every linked slice and the slice
color changes to red. The next set of slices that you link will have a different
color.
Copyright
2002, Adobe Systems, Inc.
Fundamentals of Web Design 1.2—Lab 6.4.8a
1-11
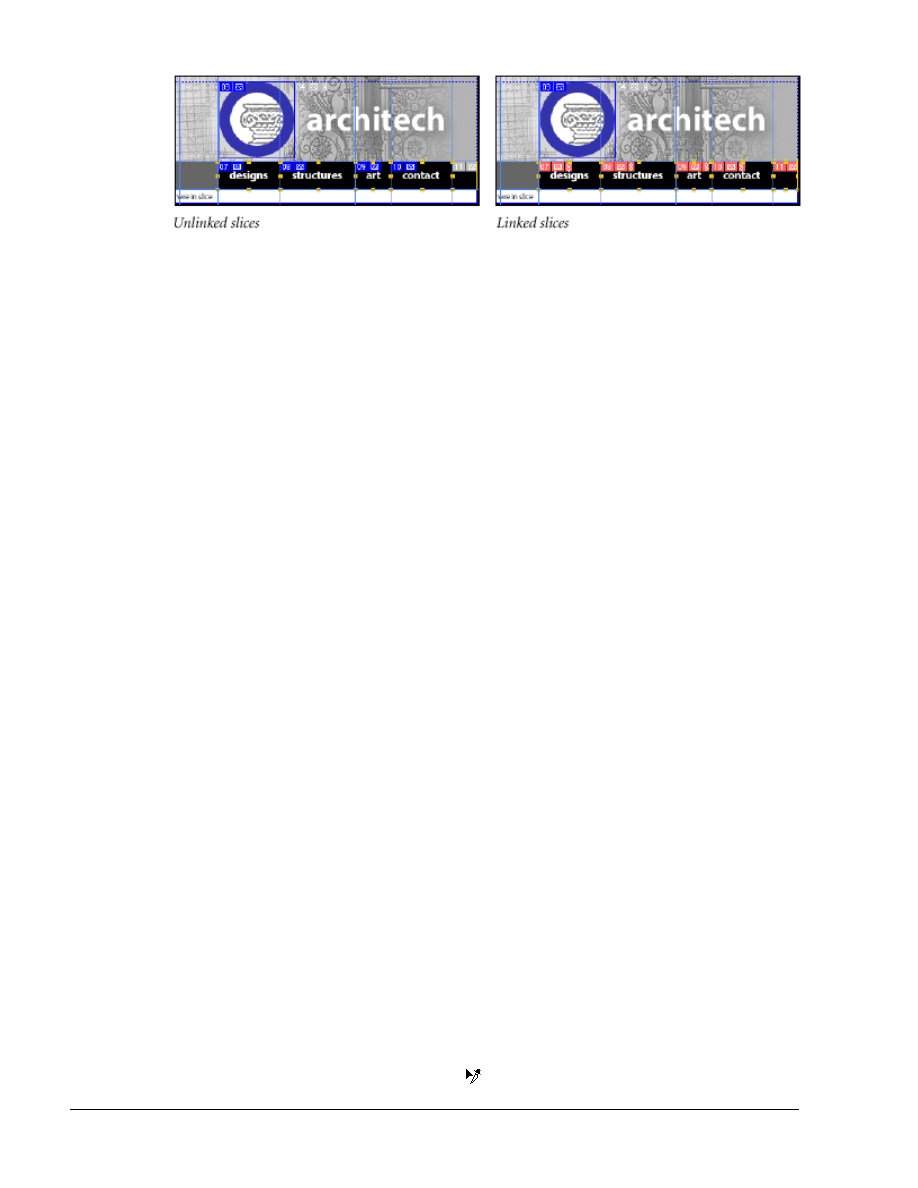
3. Click away from the selection and then select the slice to the right of the
Contact button.
Notice in the Optimize palette that the auto-slice setting of GIF 32 Dithered has
changed to the GIF Web Palette setting shared by the other linked slices.
4. Click the Original tab in the document window to return to a single view of
the image.
5. Choose File > Save.
You’ll save the optimized slices later, after you create some rollovers. For
information about the optimization settings and available Web formats for your
image slices, see Lesson 14, “Optimizing Images for the Web.”
Creating rollovers
ImageReady lets you create rollovers and secondary rollovers from slices or
image map areas. (To learn how to create an image map, see “Creating an image
map” on page 373.) Rollovers are multistate buttons that change their appearance
or behavior when you roll the mouse pointer over them or click them. Secondary
rollovers affect the appearance or behavior of other areas of the image when you
perform the mouse action on the rollover button.
You can create different effects when a rollover is in a Normal, Over, Down,
Click, Out, or Up state. If you know JavaScript, you can also create Custom
states. You can also preserve the current state of an image for later use as a
rollover state. (A rollover state designated as None will not be displayed on the
Web page.) You can animate user-slices in different rollover states in the same
way that you animate an image in its normal state. To promote an auto-slice to a
user-slice so you can animate it, select the slice, and choose Slices > Promote to
User-Slice. To learn how to animate the image, see Lesson 17, “Creating
Animated Images for the Web.”
In this part of the lesson, you’ll create secondary rollovers for the text buttons to
display different layers of the banner image when the mouse pointer rolls over or
is held down on the buttons. You’ll also display a special warped text effect for
one of the rollover states.
Displaying warped text in the Over state
You’ll create an effect that makes the word “Architech” appear warped when the
mouse pointer is rolled over the Contact button.
1. Choose Window > Show Rollover to display the Rollover palette.
2. Using the slice select tool ( ), select the Contact_button slice in the image.
1-12
Fundamentals of Web Design 1.2—-Lab 6.4.8a
Copyright
2002, Adobe Systems, Inc.
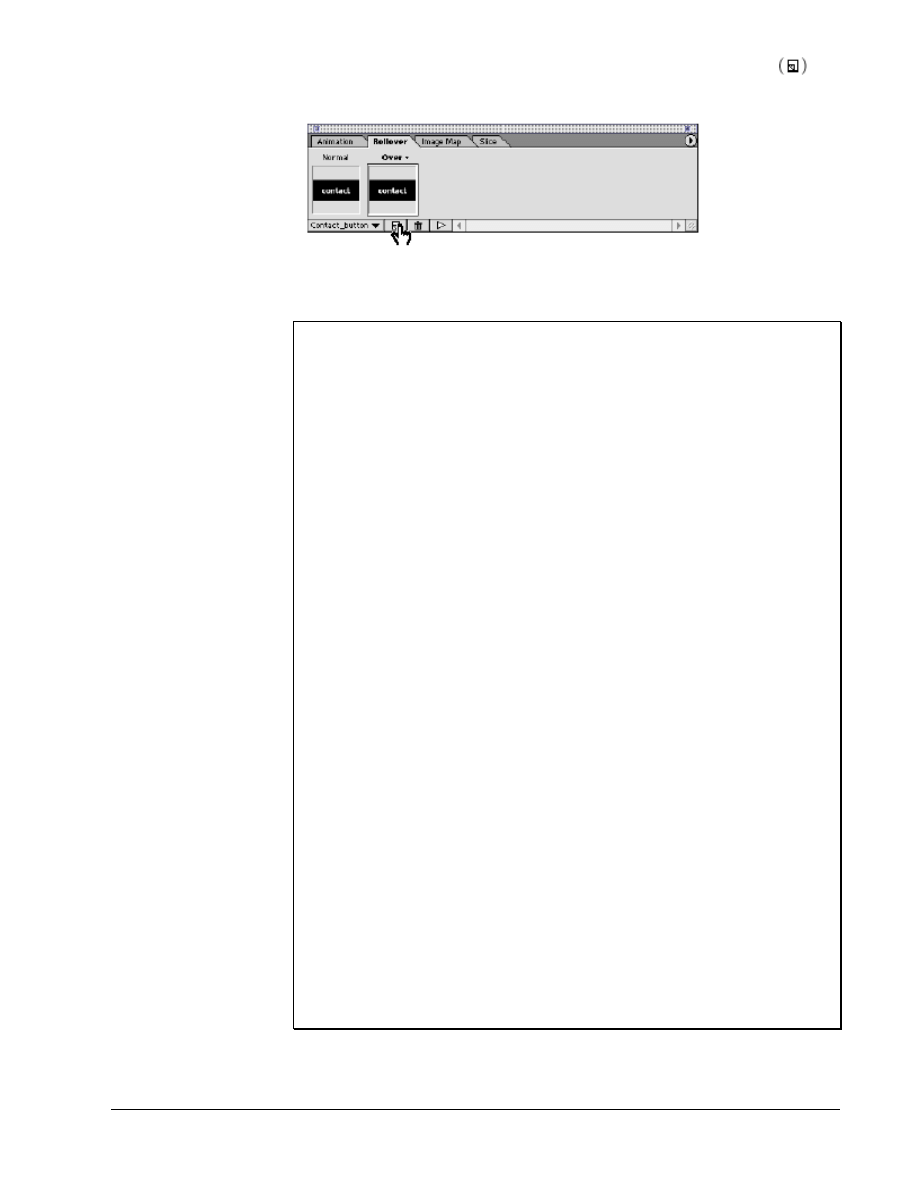
3. In the Rollover palette, click the Creates New Rollover State button to create
a new Over state for the selected slice.
You can create these types of rollover states in this order: Over, Down, Click,
Out, Up, Custom, and None.
Rollover states in ImageReady
Over—when the Web viewer rolls over the slice or image map area with the
mouse while the mouse button is not pressed. (Over is automatically selected for
the second rollover state.)
Down—when the Web viewer presses the mouse button on the slice or image map
area. (This state appears as long as the viewer keeps the mouse button pressed
down on the area.)
Click—when the Web viewer clicks the mouse on the slice or image map area.
(This state appears after the viewer clicks the mouse and remains until the viewer
activates another rollover state.)
Out—when the Web viewer rolls the mouse out of the slice or image map area.
(The Normal state usually serves this purpose.)
Up—when the Web viewer releases the mouse button over the slice or image map
area. (The Over state usually serves this purpose.)
Custom—a new rollover state. (You must create JavaScript code and add it to the
HTML file for the Web page in order for the Custom rollover option to function.
See a JavaScript manual for more information.)
None—current state of the image preserved for later use as a rollover state. (A
state designated as None will not be displayed on the Web page.)
Note: Different Web browsers, or different versions of a browser, may process
clicks and double-clicks differently.
For example, some browsers leave the slice in the Click state after a click, and in
the Up state after a double-click; other browsers use the Up state only as a
transition into the Click state, regardless of single- or double-clicking. To ensure
your Web page will function correctly, be sure to preview rollovers in various
Web browsers.
–From Adobe Photoshop 6.0 online Help
4. In the Layers palette, select the Architech type layer.
Copyright
2002, Adobe Systems, Inc.
Fundamentals of Web Design 1.2—Lab 6.4.8a
1-13
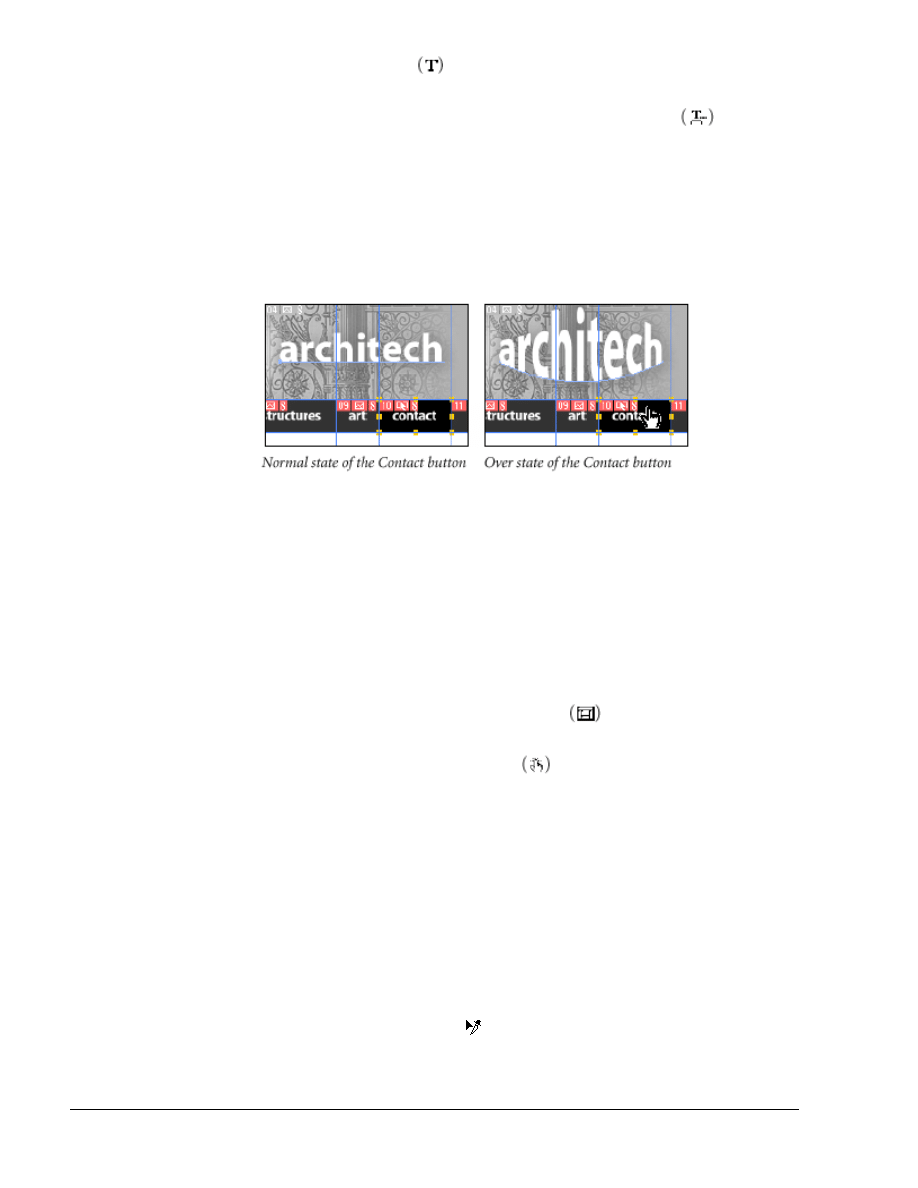
5. Select the type tool . .
Notice that the tool options bar now displays options that are specific for type.
6. In the tool options bar, click the Create Warped Text button
to apply an
effect to the selected Architech layer.
7. In the Warp Text dialog box, choose an option (such as Bulge) from the
Style menu. Select Preview and wait a moment to see the affect applied to the
type. (You may need to move the dialog box so you can see the type in the
image.) Try other styles and drag the sliders to achieve different effects.
When you’re satisfied with a style, click OK.
The Warped Text effect is applied only to the Over state of the button.
8. In the Rollover palette, click the Normal state.
9. Choose File > Save.
Previewing rollovers in ImageReady
ImageReady provides a quick way to preview rollovers in the document window
without the need to use a Web browser. This rollover preview mode in
ImageReady is consistent with Internet Explorer 5.0 for Windows.
1. Choose View > Show > Guides to deselect and hide the guides.
2. Select the Toggles Slices Visibility button in the toolbox to hide the
slices.
3. Select the Rollover Preview button in the toolbox.
4. Move the pointer over the Contact button in the image and notice how the
Architech text changes.
5. Click the Rollover Preview button again to deselect it.
6. Click the Toggles Slices Visibility button to show the slices.
Showing or hiding layers in a rollover state
You’ll create Down rollover states for the Designs, Structures, and Art buttons to
hide various letters in the Architech text when the mouse is held down on the
buttons. Then you’ll create Over rollover states that show a special image when
the mouse is rolled over each button.
1. Select the slice select tool ( ).
2. Select the Designs_button slice in the image.
1-14
Fundamentals of Web Design 1.2—-Lab 6.4.8a
Copyright
2002, Adobe Systems, Inc.
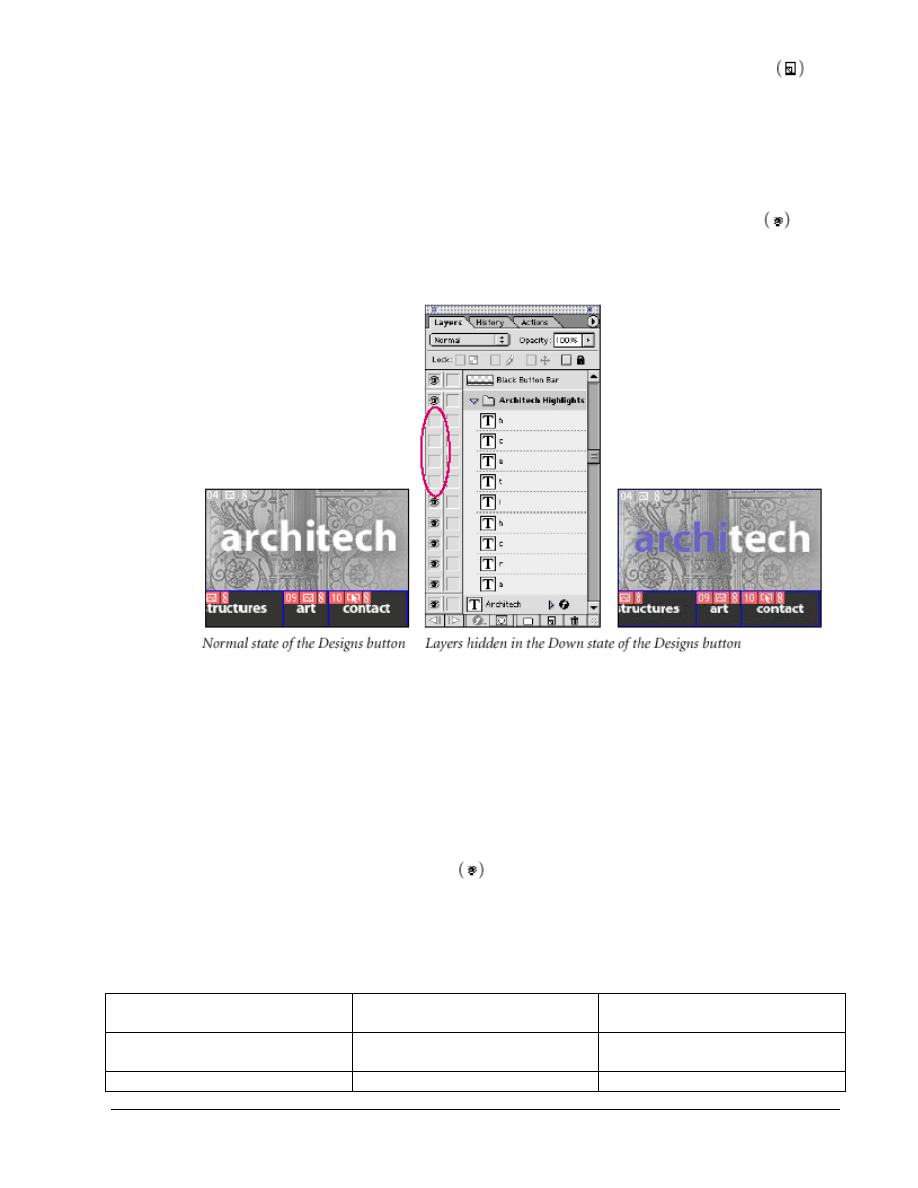
3. In the Rollover palette, click the Creates New Rollover State button twice
to create an Over state and a Down state for the slice.
4. Select the Down state.
5. In the Layers palette, select the Architech Highlights layer set.
Notice the blue text that appears over the word “Architech” in the image. You’ll
hide parts of the blue text to draw attention to other parts of the word.
6. Expand the Architech Highlights layer set and click the eye icons next to
the top four layers to hide the last four letters of the blue word, “t-e-c-h.”
The Down state of the Designs button now shows the letters “archi” in blue and
“tech” in white.
Now you’ll show a special image for the Designs button when it’s in the Over
state.
7. In the Rollover palette, select the Over state.
8. In the Layers palette, select and expand the Image Rollovers layer set.
9. Click the eye icons to hide two of the layers so that only the For
Designs layer is showing.
10. Repeat steps 2 through 9 for the Structures_button slice and the Art_button
slice, showing the layer set, and hiding and showing the appropriate layers as
described in this table.
For this slice
Hide these layers in the Down
state
Show these layers in the Over
state
Designs_button
Top four layers (h, c, e, t) in the
Architech Highlights folder
For Designs in the Image
Rollovers folder
Structures_button
Bottom four layers (h, c, r, a) in
For Structures in the Image
Copyright
2002, Adobe Systems, Inc.
Fundamentals of Web Design 1.2—Lab 6.4.8a
1-15

the Architech Highlights folder
Rollovers folder
Art_button
Three layers (t, r, a) in the
Architech Highlights folder
For Art in the Image Rollovers
folder
11. Choose File > Save.
Previewing the completed banner in a browser
Before you save the optimized image slices, you’ll preview the completed
rollovers for the banner in a Web browser. However, the URL links that you
assigned to the slices won’t work in Preview in Browser mode, so you’ll test
them later when you generate the final HTML file and open the file from the
browser.
1. In the toolbox, click the Preview in Default Browser button or
choose a browser from the button’s pop-up menu.
2. Move the pointer over each rollover button in the banner.
A different image appears for each of the first three buttons, and the warped text
effect appears for the last button.
3. Hold the mouse button down when the pointer is over each button.
When you hold down the mouse button, on the Designs button, the white letters
“tech” are visible; on the Structures button, the white letters “arch” are visible;
and on the Art button, the white letters “art” are visible.
4. When you’re finished previewing the rollovers, quit the browser and return
to ImageReady.
Saving the sliced images in ImageReady
Now that the banner is complete, you’ll save the optimized image slices and
generate an HTML file that contains an HTML table of the sliced image.
ImageReady also lets you save slices in a cascading style sheet rather than a
table. To set up the file for cascading style sheets, choose File > Output Settings
> HTML. For Slice Output, select Generate CSS, and click OK. You can also
change the output settings from the Save Optimized dialog box.
1. Choose File > Save Optimized.
2. In the Save Optimized dialog box, enter Banner.html and click Save.
1-16
Fundamentals of Web Design 1.2—-Lab 6.4.8a
Copyright
2002, Adobe Systems, Inc.

The Replace Files dialog box appears for the four button images you saved
earlier in Photoshop.
3. Click Replace to save the new versions of the images.
ImageReady saves the HTML table of the entire sliced image in an HTML file
and saves the optimized images for all of the auto-slices, user-slices, layer-based
slices, and rollover states inside the Images folder. The filenames of the images
are based on either the names you specified for the slices or the default names
and numbers for the slices.
4. To test the URL links that you assigned to the slices, start a Web browser and
use it to open the Banner.html file.
Now that you’ve learned how to create slices and rollovers, try animating them.
For example, you could animate an image to move across a section of the banner
when the pointer is over a rollover button.
Copyright
2002, Adobe Systems, Inc.
Fundamentals of Web Design 1.2—Lab 6.4.8a
1-17
Document Outline
- 6.4.8a Creating Web Graphics Using Slices and Rollovers (Photoshop, ImageReady)
- 6.4.8a Creating Web Graphics Using Slices and Rollovers (Photoshop, ImageReady)
-
- About slices
- Slicing the image in Photoshop
- Using the slice tool to create slices
- Setting options for slices in Photoshop
- Optimizing slices in Photoshop
- Slicing the image in ImageReady
- Creating slices from guides
- Creating slices from layers
- Creating No Image slices
- Previewing in a Web browser
- Creating slices from selections
- Optimizing slices in ImageReady
- Setting the optimization for selected slices
- Linking slices together
- Creating rollovers
- Displaying warped text in the Over state
- Previewing rollovers in ImageReady
- Showing or hiding layers in a rollover state
- Previewing the completed banner in a browser
- Saving the sliced images in ImageReady
-
- 6.4.8a Creating Web Graphics Using Slices and Rollovers (Photoshop, ImageReady)
Wyszukiwarka
Podobne podstrony:
8a Nadcisnienie leczenie
8a Syntezy prostych aminokwasów
8a
8a
Fizyka 8a
EZG 8A
exam skills test 7&8a
speaking test 7&8a
WYKLAD 8a, GOSPODARKA NIERUCHOMOŚCIAMI - SEM
Wybrane problemy współczesnej administracji i prawa administracyjnego, WYKLAD 8a, Wykład Z 7
deon, 1c 2b 3b 4d 5a 6c 7d 8a 9b 10d 11b 12a 13b 14d 15c 16 b 17b 18d 19c 20b 21d 22d 23a 24a 25a 26
8a
8a
8A Kurs operatora VHF
Mikro II W 8a Ł
8a-Czynniki strukturotwrcze i ESO [tryb zgodnoci]
więcej podobnych podstron