
IBM DB2
®
9.7
DB2 application
development
Hands-On Lab
I
Information Management Cloud Computing Center of Competence
IBM Canada Lab

2
Contents
CONTENTS ..........................................................................................................2
1.
INTRODUCTION ...........................................................................................3
2.
OBJECTIVES ................................................................................................3
3.
SUGGESTED READING...............................................................................3
4.
SETUP...........................................................................................................3
4.1
Environment Setup Requirements..........................................................3
4.2
Login to the Virtual Machine ...................................................................4
5.
DEVELOPING STORED PROCEDURES, UDFS AND TRIGGERS .............5
5.1
Procedure to create a SQL PL stored procedure....................................5
5.2
Procedure to create a UDF.....................................................................7
5.3
Procedure to create a trigger ..................................................................8
6.
WORKING WITH A CLIENT APPLICATION TO ACCESS A DB2
DATABASE ........................................................................................................12
6.1
Create and populate a table .................................................................12
6.2
Open the Application in IBM Data Studio..............................................13
6.3
Install JDBC Driver ...............................................................................15
7.
Connecting to DB2 ...................................................................................19
7.1
Closing the Connection.........................................................................20
8.
QUERYING DATA.......................................................................................20
8.1
Incorporating SELECT with the Application ..........................................22
8.2
Search the Database using the Application ..........................................23
9.
INSERTING DATA ......................................................................................26
9.1
Incorporating INSERT with the Application...........................................27
9.2
Insert into the Database using the Application......................................28

3
1.
Introduction
In this lab you will create a stored procedure, a user-defined function, and a
trigger. Later in the lab you will work with a JDBC application that accesses a
DB2 database.
2.
Objectives
After completion of this lab, you should be able to:
•
Develop stored procedures, UDFs and triggers
•
Install the JDBC driver in IBM Data Studio
•
Write Java code that can:
•
Create a connection to DB2
•
Properly close a connection to DB2
•
Query data using SELECT statements
•
Add new data to the database
3.
Suggested reading
Getting started with DB2 Application Development eBook (Chapter 1, 3, 4)
https://www.ibm.com/developerworks/wikis/display/db2oncampus/FREE+ebook+-
+Getting+started+with+DB2+application+development
A free eBook that can quickly get you up to speed with DB2 application development
4.
Setup
4.1
Environment Setup Requirements
To complete this lab you will need the following:
4
•
DB2 Academic Workshop VMware
®
image
•
VMware Player 2.x or VMware Workstation 5.x or later
For help on how to obtain these components please follow the instructions
specified in the VMware Basics and Introduction module.
4.2
Login to the Virtual Machine
1. Login to the VMware virtual machine using the following information:
User: db2inst1
Password: password
2. Type in the command “startx” to bring up the graphical environment.
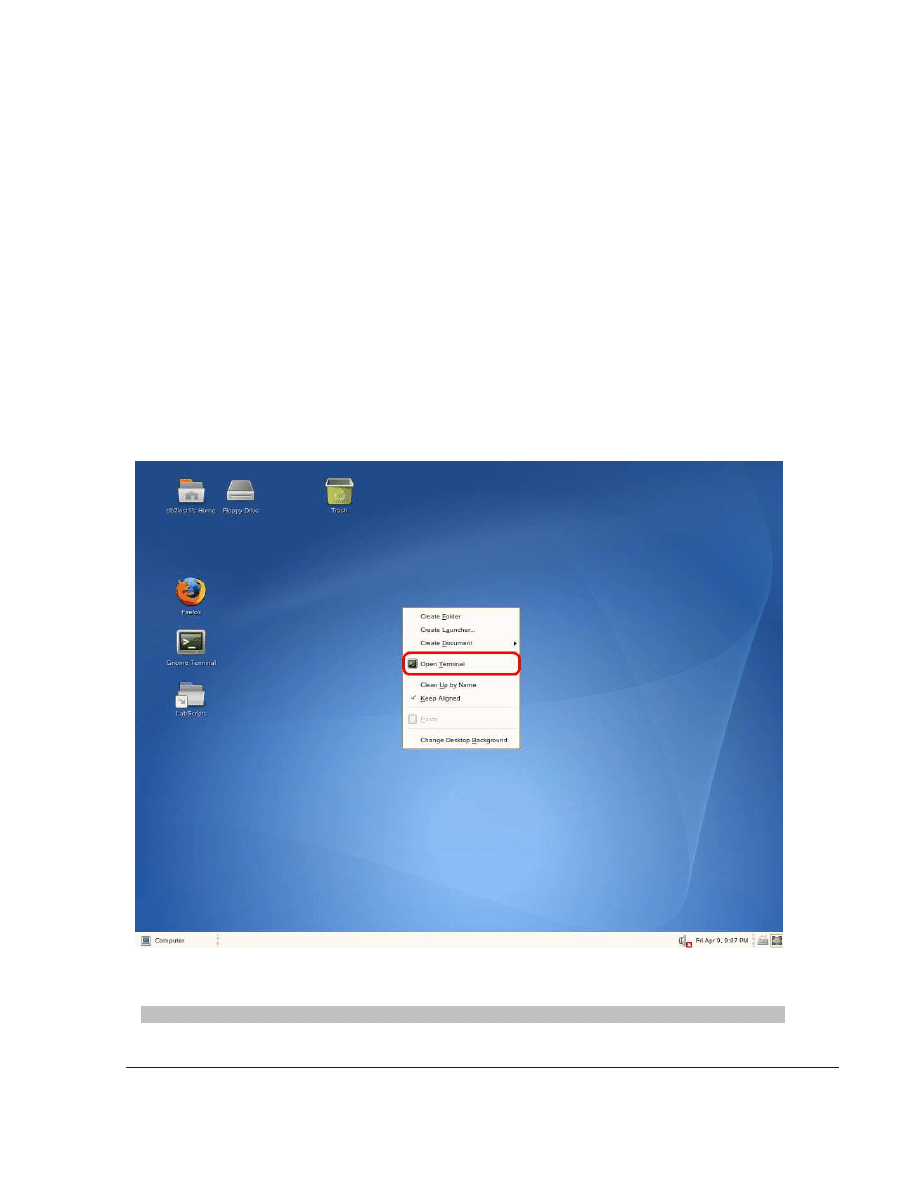
3. Open a terminal window as by right-clicking on the Desktop area and
choose the “Open Terminal” item.
4. Start up DB2 Server by typing “db2start” in the terminal window.
db2start

5
5. For executing this lab, you will need the DB2’s sample database
created in its original format. Execute the commands below to drop (if it
already exists) and recreate the SAMPLE database:
db2 force applications all
db2 drop db sample
db2sampl
5.
Developing stored procedures, UDFs
and Triggers
5.1 Procedure to create a SQL PL stored procedure
1. Let’s create a SQL PL Stored Procedure using IBM Data Studio. IBM
Data Studio is not required to develop stored procedures; however, we
recommend this tool as it makes development easier.
2. Open IBM Data Studio
3. Click on the Data Project Explorer window, then choose:
File
New
Project
Data Development Project
4. After clicking next, give the name MyProject to your project, and click
Next
5. Choose the database you want to associate this project with from the
list, then click Next, and Finish. If you get a dialog box indicating your
profile is not complete, click on Edit. Choose Driver properties and
ensure your User name and password fields are completed, and that
clicking on Test Connection works. If all is OK, then click OK and
Finish.
6. The database name should be SAMPLE. The rest of default values
should be correct. Provide your user ID/psw and click on Test
Connection. If the connection is successful, click on Next, and then on
Finish.
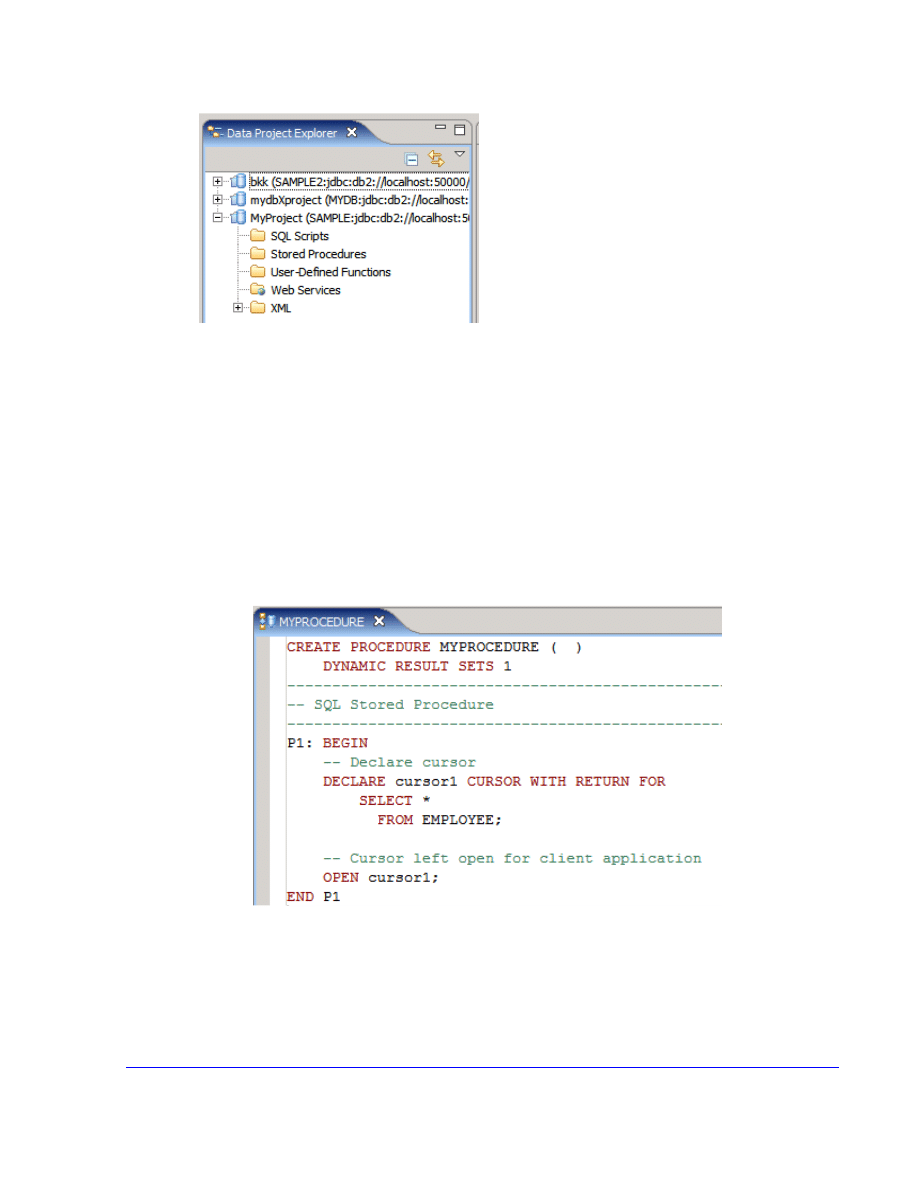
7. On the Data Project Explorer you should now be able to see your
project. Drill down your project tree as shown below to list folders for
SQL Scripts, Stored Procedures, etc.
6
8. Right-click the Stored Procedures folder, and choose New
Stored
Procedure
9. Provide a name for your stored procedure, for example use
myprocedure, then click Next.
10. In the SQL Statements window, IBM Data Studio provides you with a
sample statement SELECT PROCSCHEMA, PROCNAME FROM
SYSCAT.PROCEDURES. Replace this statement with: SELECT *
FROM EMPLOYEE, and click on Finish. You will then be presented
with a template code as shown below.
11. The code provided by IBM Data Studio can be used as a template for
you to write your own code. This code declares a cursor and then
opens it at the end, which would mean that the cursor is to be returned
to the caller. Without modification, let’s use this stored procedure for
illustration purposes.

7
12. In the Database Explorer panel, expand the tree to show your
connection, database, schema, and stored procedures. Note the
stored procedure myprocedure is not shown. The Database Explorer
shows the objects in the database. At this moment, the myprocedure
stored procedure is not in the database since it has not been deployed.
To deploy the procedure, right-click on it from the Data Project
Explorer window, and choose Deploy. On the Deploy options window,
let’s choose all default, and click on Finish.
13. If the deployment was not successful, review the error codes received
at deployment time, and fix them. If the deployment is successful, you
are ready to run the procedure. Right-click on the procedure from the
Data Project Explorer panel, and choose Run. At the bottom right-
corner you will see the results of the procedure.
14. Now that the procedure has been successfully coded, deployed and
run, you can test running it from the DB2 CLP:
db2 => connect to sample
db2 => call myprocedure()
5.2 Procedure to create a UDF
1. Creating user-defined functions (UDFs), is very similar to creating
Stored Procedures. You can create a UDF by issuing the CREATE
FUNCTION statement from the DB2 Command Window or Linux shell.
For ease of development, we recommend you to use IBM Data Studio.
2. To develop a UDF from IBM Data Studio, let’s use the same project we
used when working with Stored Procedures. Right-click the User-
Defined Functions folder, and click New
User-Defined Function
menu item.
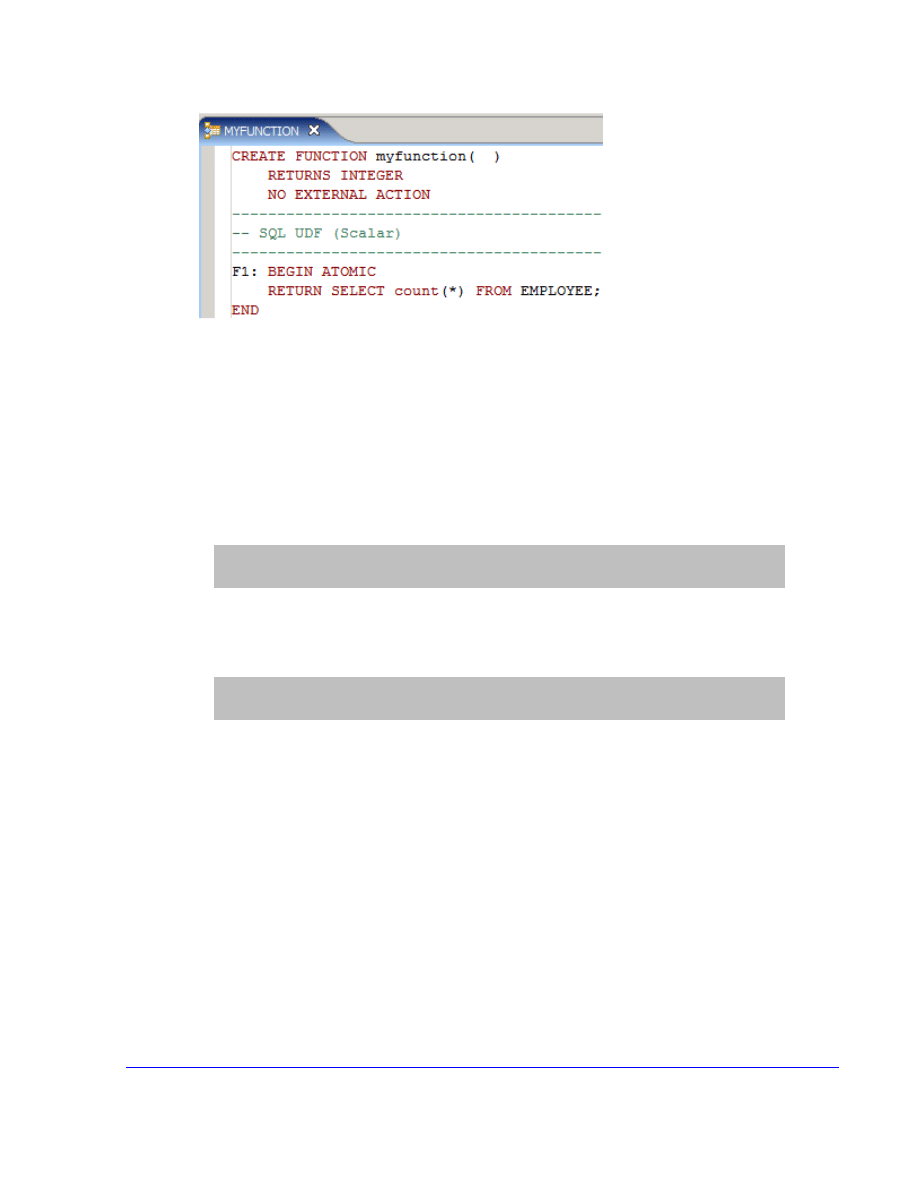
3. Give the name myfunction to your function, and click on Next.
4. In the SQL Statement or Expression window, IBM Data Studio will
provide an SQL statement as example. Change this statement to:
SELECT count(*) FROM EMPLOYEE
5. At this point click on finish. A template as shown in the figure below
should be displayed:
8
6. Let’s now deploy the function and run it. From the Data Project
Explorer panel, right-click on the function myfunction, and choose
Deploy. On the Deploy options window, leave all defaults as they are,
and click on Finish.
7. After a successful deployment, right-click again on the function, and
choose Run. At the bottom right corner you will see the result.
8. To run the function from the DB2 CLP issue the following:
db2 => connect to sample
db2 => values myfunction()
9. Instead of using the values clause, you can also issue a SELECT
statement as shown below:
db2 => connect to sample
db2 => select myfunction() from sysibm.sysdummy1
SYSIBM.SYSDUMMY1 is a table provided with DB2 that contains one
row and one column. It can be used for this purpose where you are
calling a function from a SELECT statement, but you don’t really need
to access any table. Because the SELECT statement requires a table
as part of its syntax, we need to provide a table. Of course, you can
create your own “dummy” table for this same purpose.
5.3 Procedure to create a trigger
1.
You can create a trigger by issuing the CREATE TRIGGER statement
from the DB2 CLP. If you would like to use IBM Data Studio, you have
to create the trigger as a script. There is no folder specific for
developing Triggers from Data Studio. The Control Center, which is

9
deprecated, can be used to create triggers. Start the Control Center
from the Command Window or Linux shell issuing the command:
db2cc
2. For this example with triggers, you will need to create an additional
table that will be used for logging as follows:
db2 => create table saleslog (userid varchar(128) not null,
daytime timestamp not null)
3. From the Control Center, expand the SAMPLE database folder. Right-
click on the Triggers folder and select the Create option. The Create
Trigger dialog window opens.
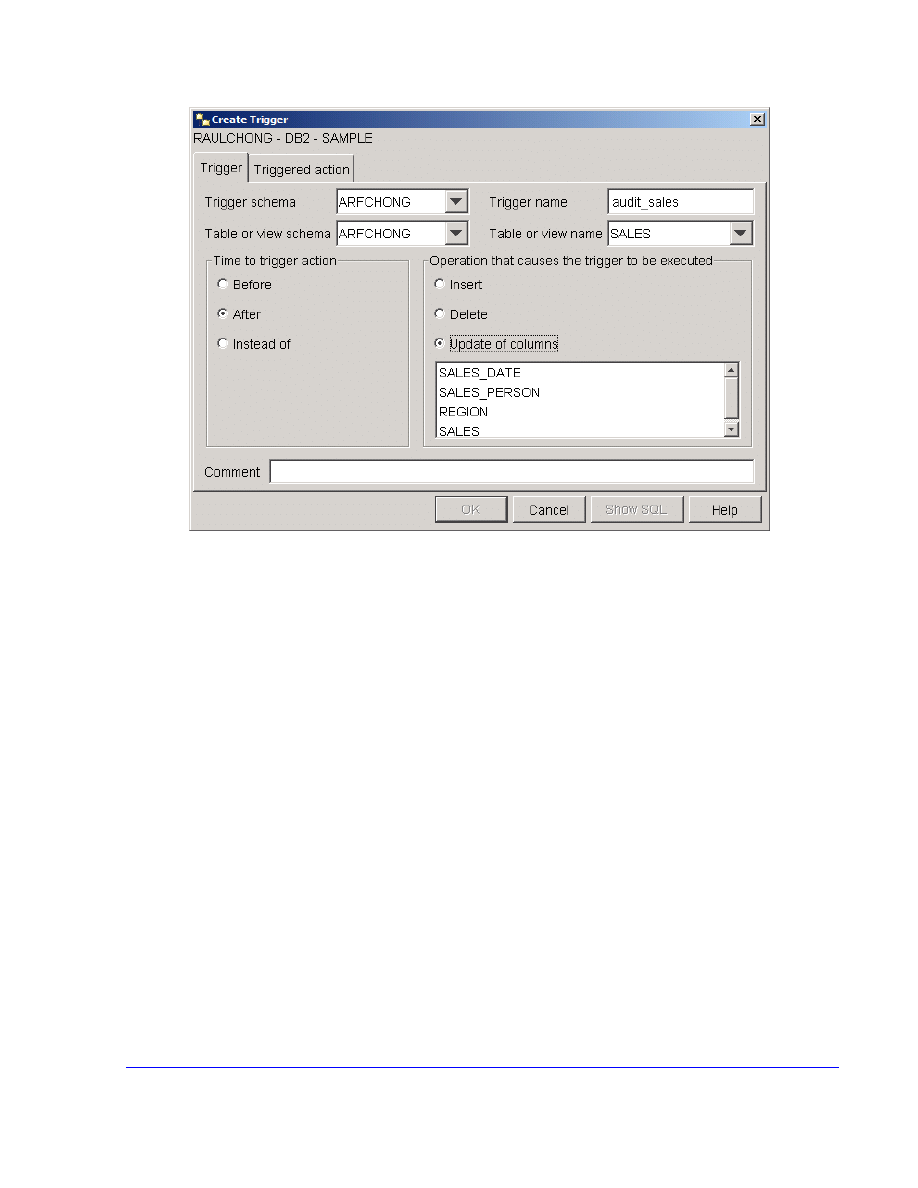
4. Fill in the following information in the dialog window:
Trigger property
Value
Trigger Schema
User ID of the user you are logged in as (should be the
default setting)
Trigger Name
audit_sales
Table/View Schema
User ID of the user you are logged in as (should be the
default setting)
Table/View Name
Sales
Time to trigger action
After
Operation that
causes the trigger to
be executed
Update of columns (do not specify any columns
because we want the trigger to fire when any of the
columns are updated).
Comment
Logs all update actions on Sales table.
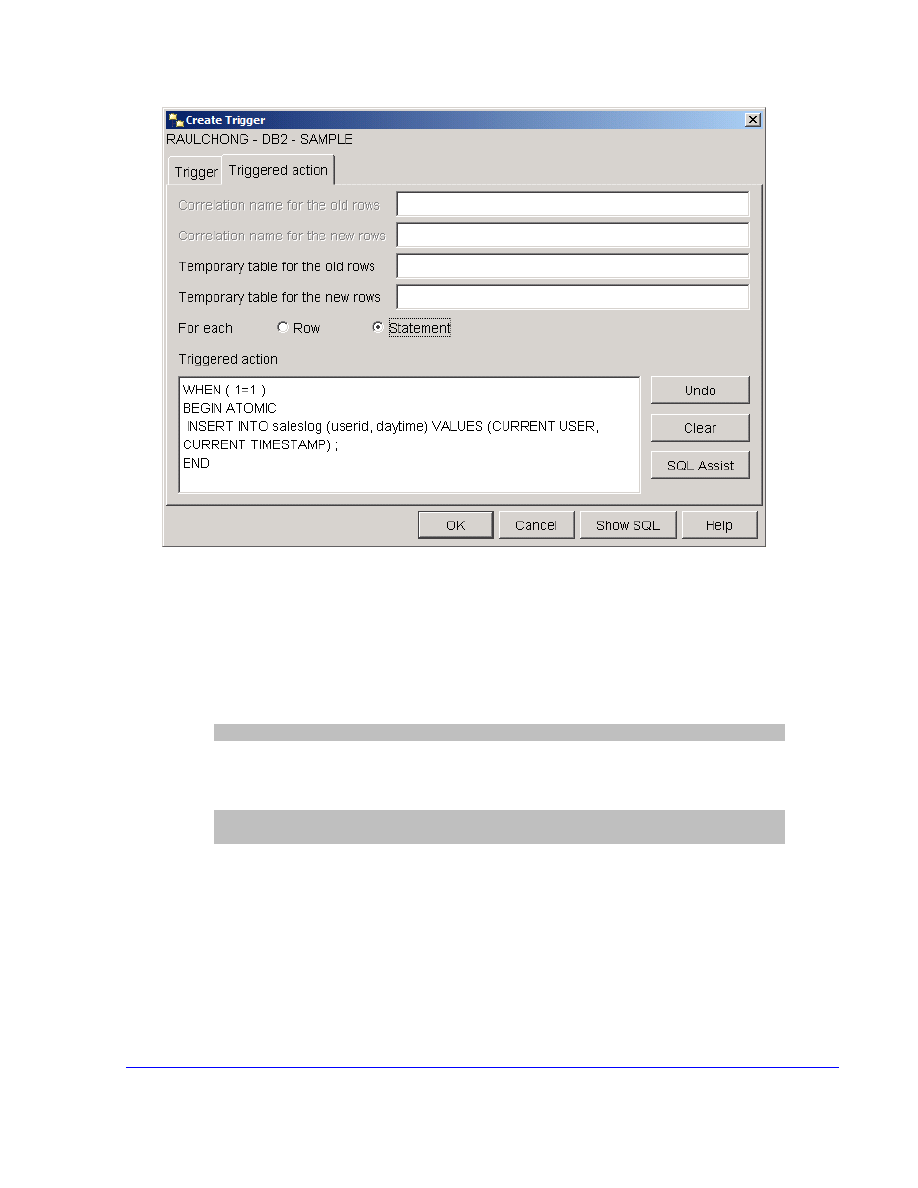
5. The following figure shows the corresponding values to set:
10
6. On the Triggered action tab, select the For Each STATEMENT option.
Use the following code for the triggered action:
WHEN ( 1=1 )
BEGIN ATOMIC
INSERT INTO saleslog (userid, daytime)
VALUES (CURRENT USER, CURRENT TIMESTAMP);
END
Note:
A statement trigger fires once after the statement activating the trigger
has completed. This is specified with the FOR EACH STATEMENT
option. A row trigger specifies that the triggered action will execute every
time the triggering SQL statement affects a row. This is specified with the
FOR EACH ROW statement.
11
Click the OK button to create the trigger.
7. You should now be able to view the trigger in the Triggers folder in
Control Center.
8. Query the saleslog table to ensure there is no data in it. Delete any
rows that may be in it using DELETE FROM saleslog
db2 => delete from saleslog
9. Update a record in the sales table to test the trigger:
db2 => update sales set sales_date = current date where year
(sales_date) = 1996
10. Check the contents of the saleslog table. How many rows are in it?

12
6.
Working with a client application to
access a DB2 database
In this part of the lab, you will work with a JDBC application that will access a
DB2 database. You first need to create and populate a table used for this
exercise, and configure the JDBC in Data Studio.
6.1
Create and populate a table
We will create a simple table that will be updated during this lab session. The
table named “ESQLEMPLOYEE” will be created and will be populated with 1 row
of data.
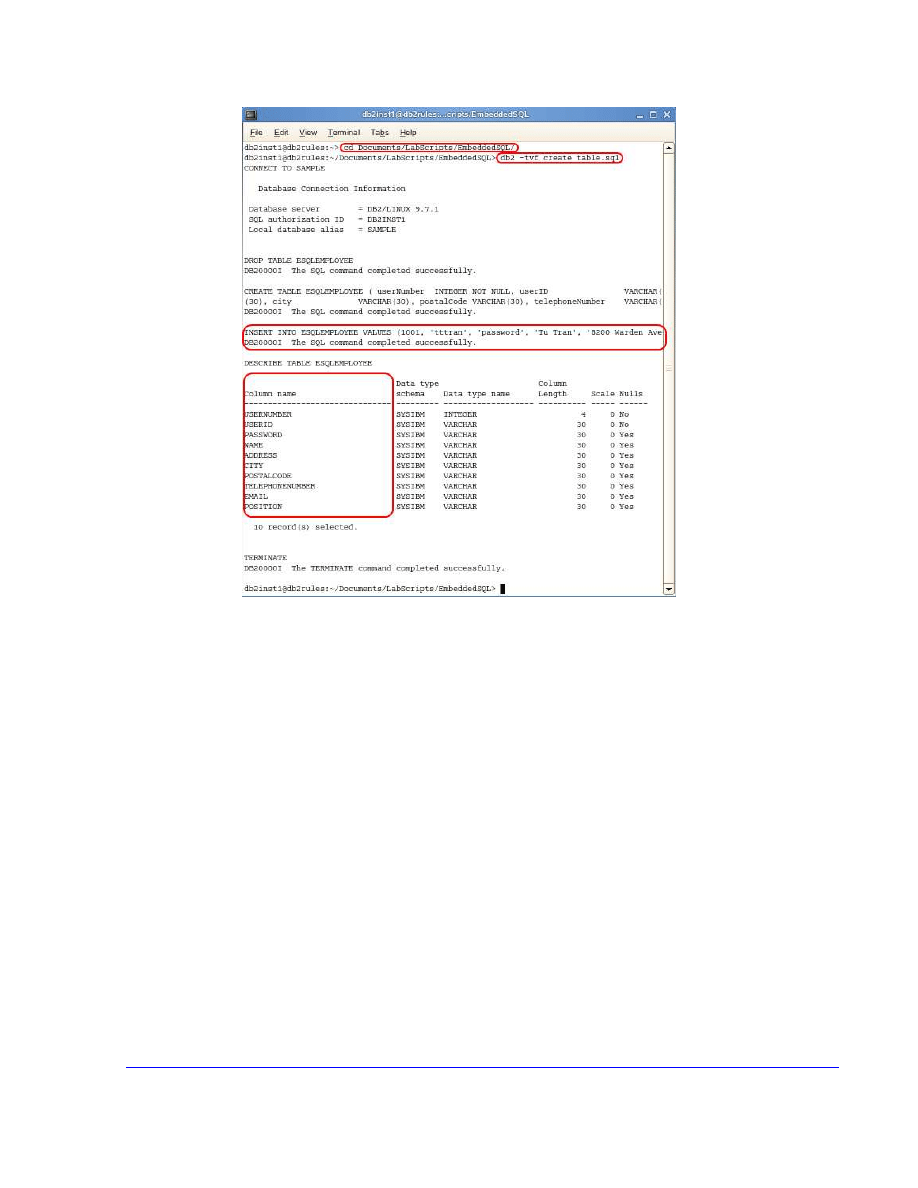
1. Change to the directory where the script files are.
cd /home/db2inst1/Documents/LabScripts/EmbeddedSQL
2. We will take a look at the simple query first by using the command
cat create_table.sql
3. To run the query, in the terminal window, type in
db2 –tvf create_table.sql
13
6.2
Open the Application in IBM Data Studio
Now that the database is ready and the ESQLEMPLOYEE table is created, we
need to open the application that we will be working with in IBM Data Studio.
Once opened, we can begin configuring the DB2 JDBC driver for the application.
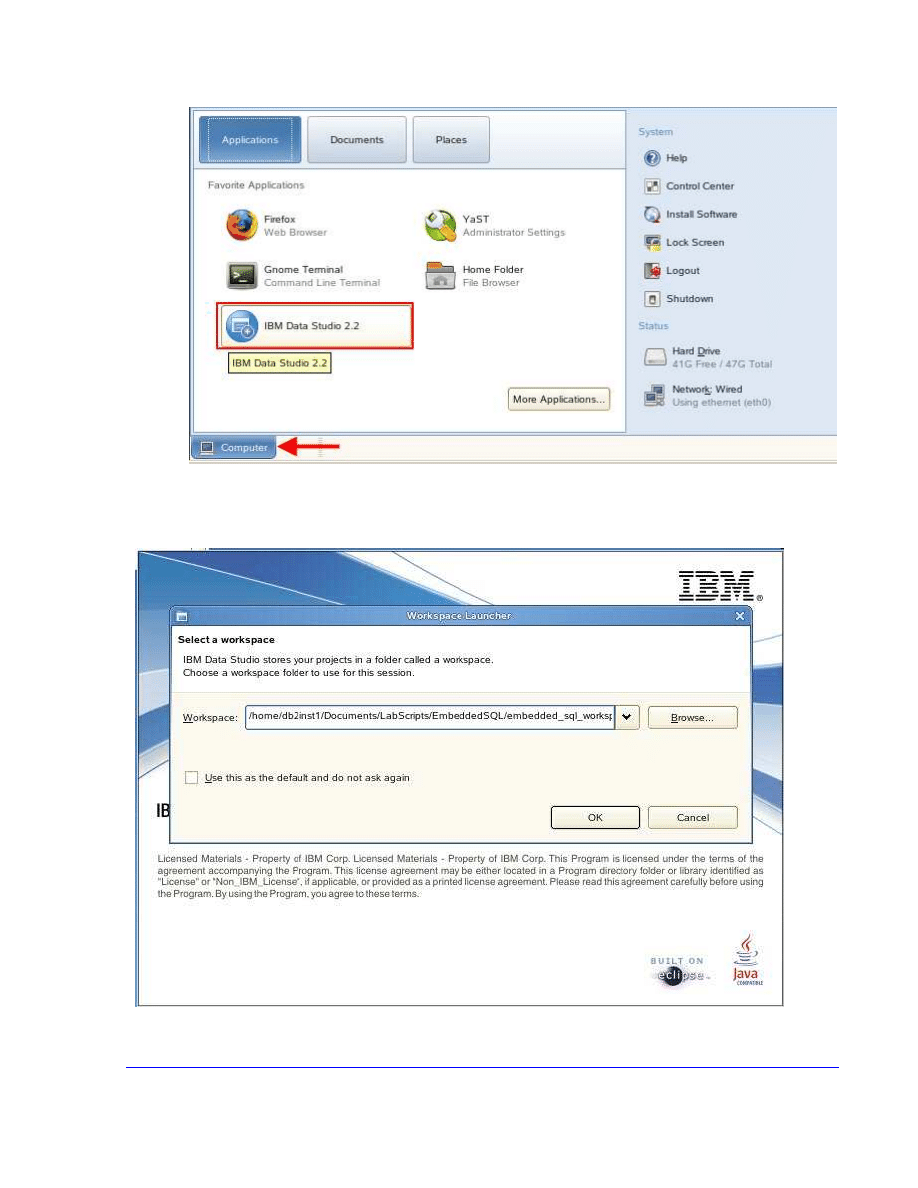
1. Open IBM Data Studio by clicking Computer and choosing IBM Data
Studio 2.2.
14
2. A prompt to select a workstation will appear. Enter
“/home/db2inst1/Documents/LabScripts/EmbeddedSQL/embedded_sql_
workspace
” as the workstation and select OK.
3. The following screen will be displayed.
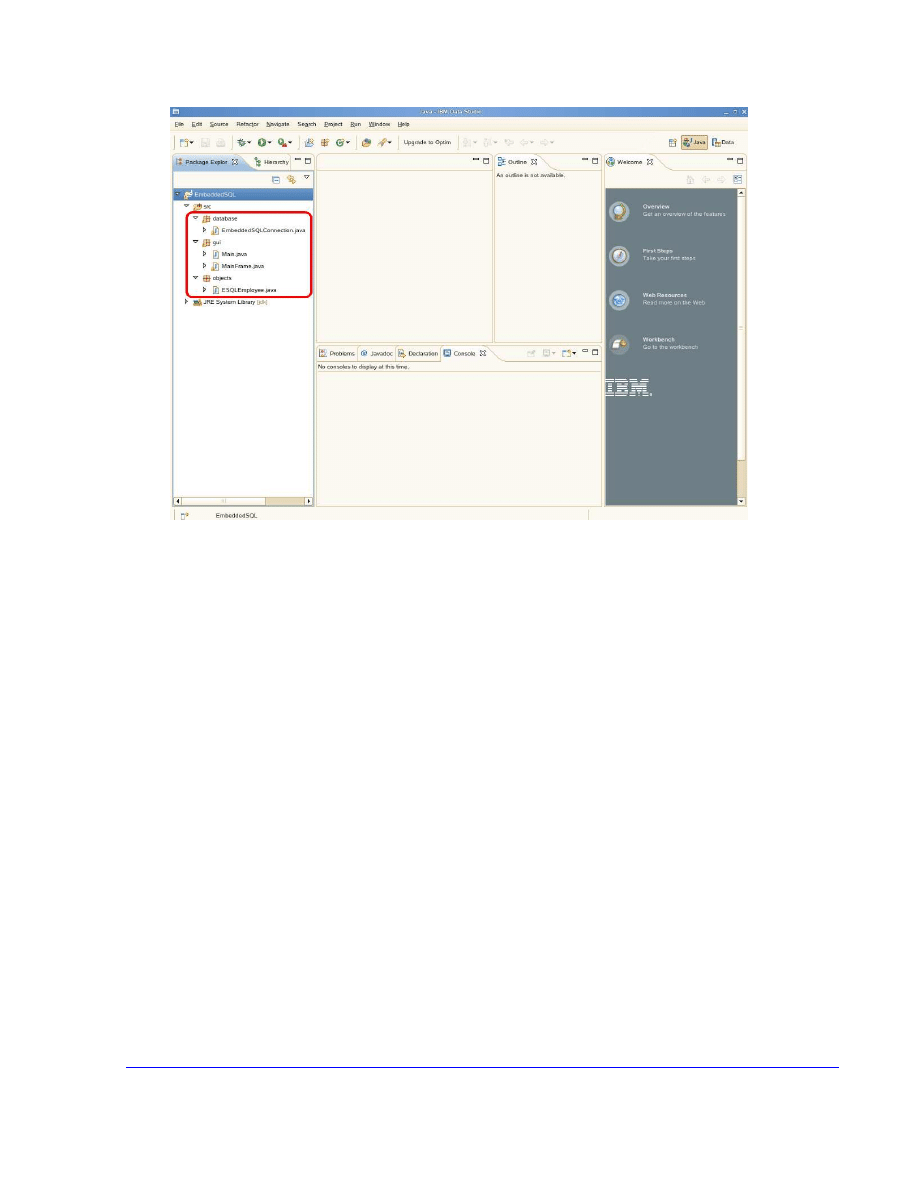
15
We have successfully opened our application in IBM Data Studio; however it is
not ready to connect to DB2 just yet. In order to connect to DB2 we must first
install the JDBC driver in our project.
6.3
Install JDBC Driver
The JDBC Driver allows Java applications to connect to SQL compliant
databases, send SQL statements, and process return messages and data.
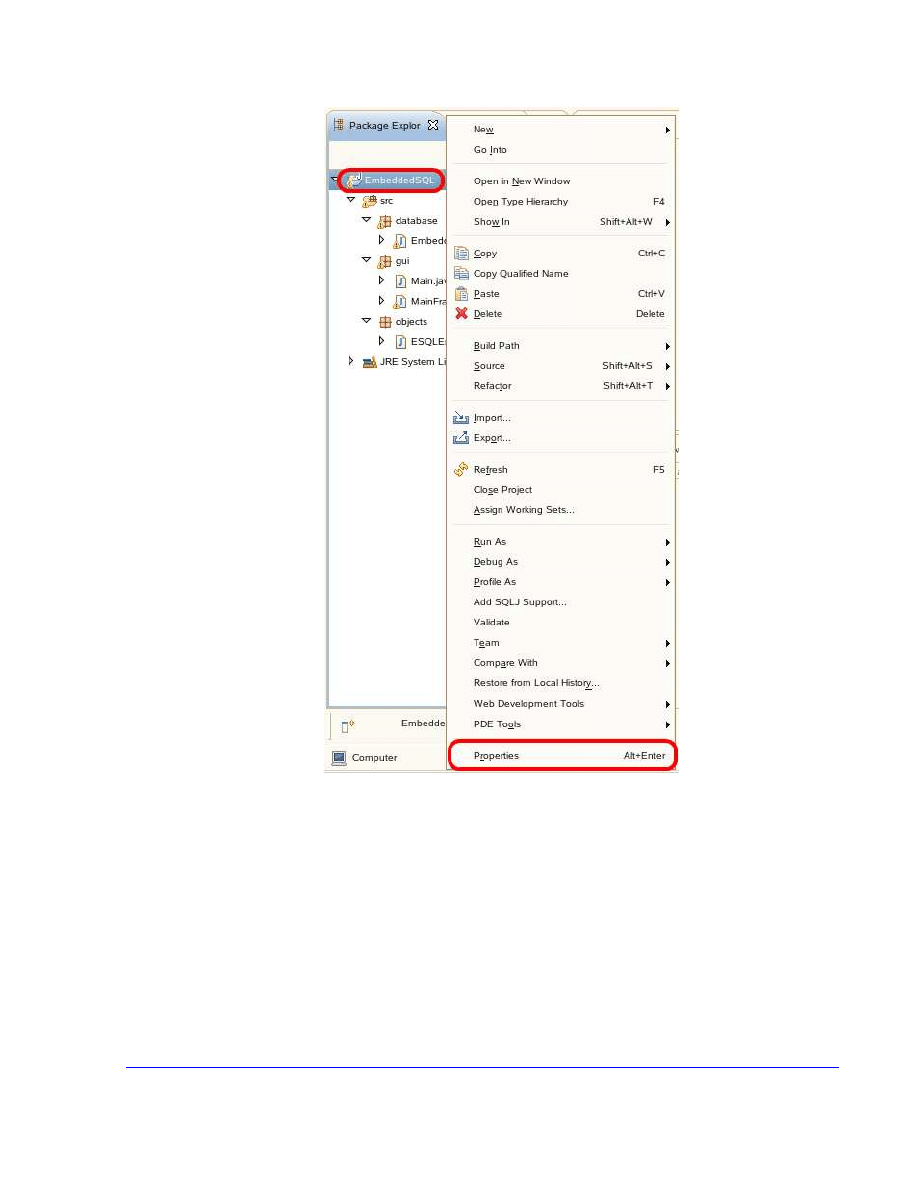
1. With IBM Data Studio opened, right click EmbeddedSQL and select
Properties.
16
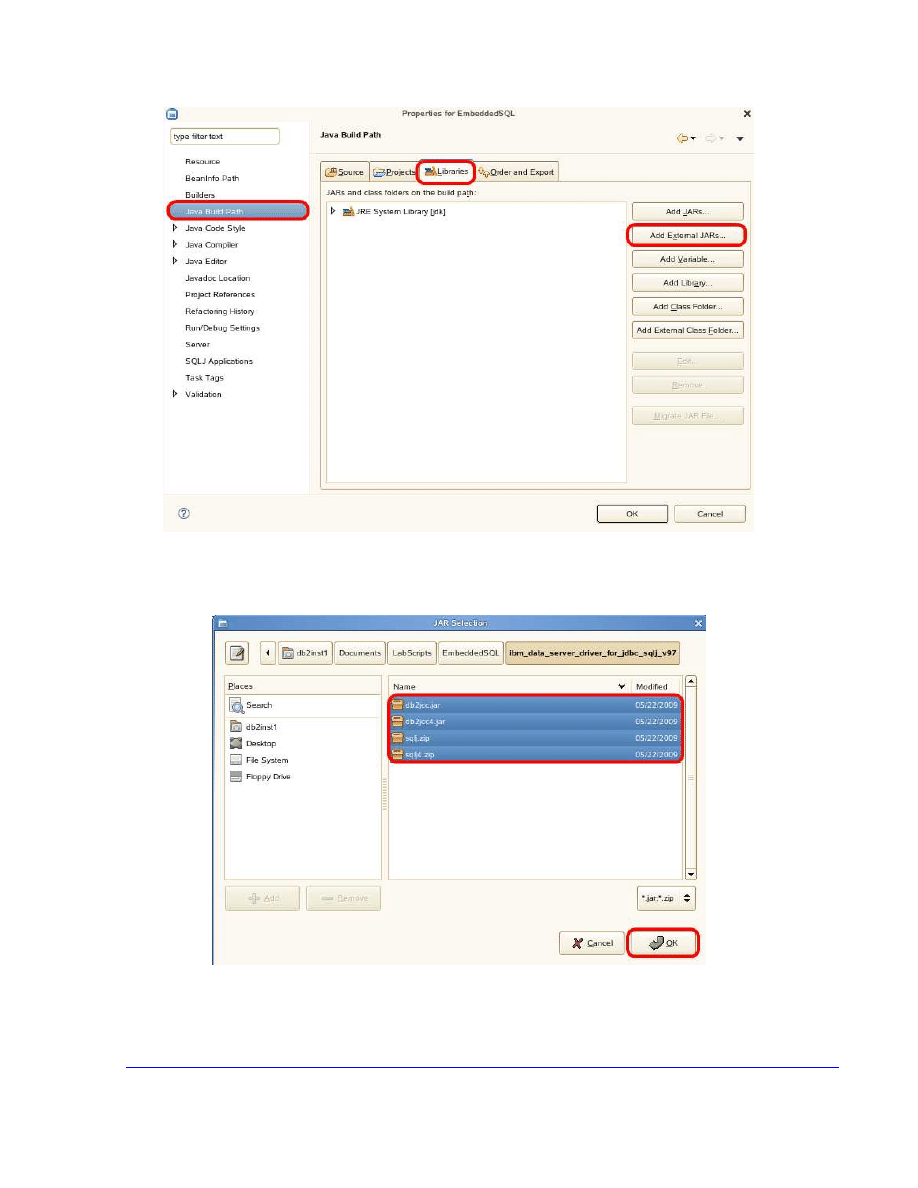
2. Select Java Build Path from the list. Then select the Libraries tab and
click the Add External JARs button.
17
3. Browse to
“/home/db2inst1/Documents/LabScripts/EmbeddedSQL/ibm_data_serv
er_driver_for_jdbc_sqlj_v97”
and select all the files in this folder.
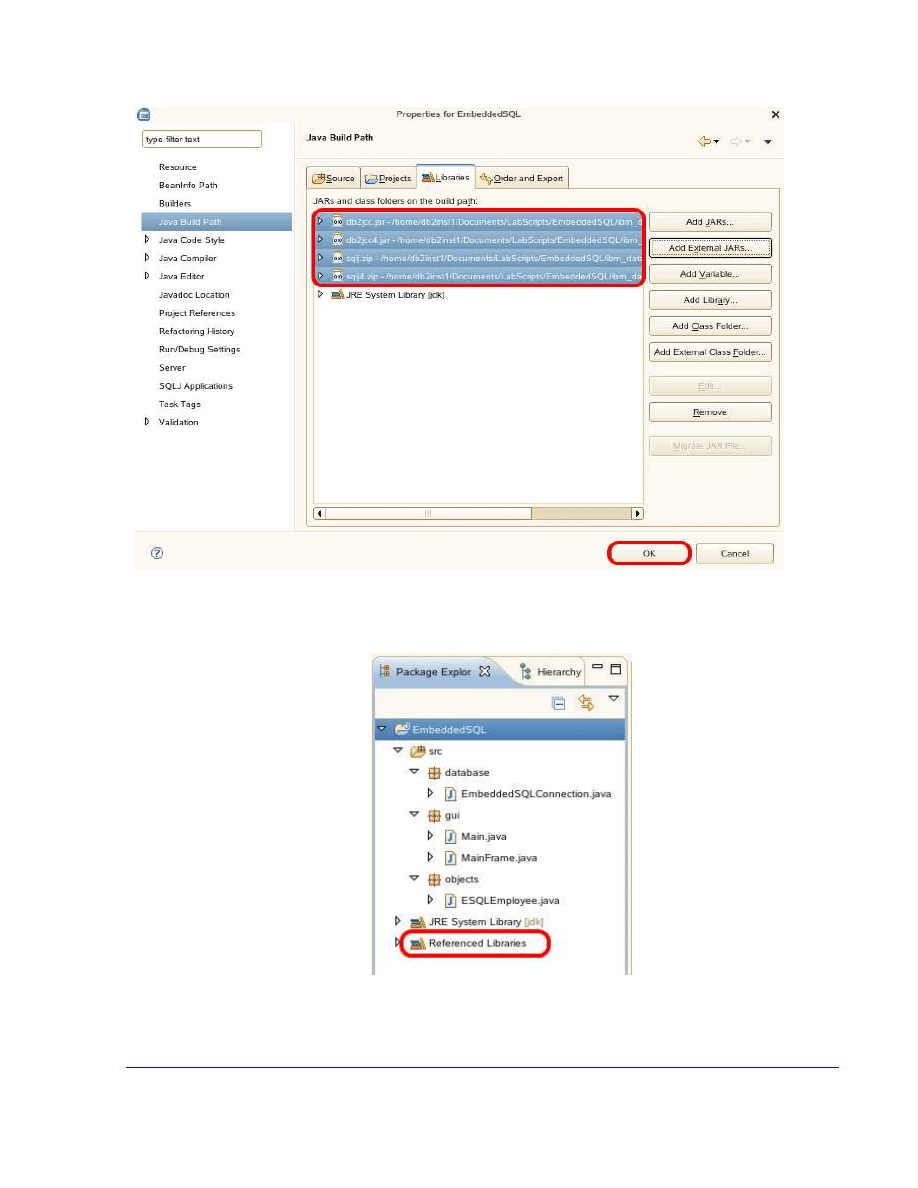
4. The selected files will now appear under the Libraries Tab. Select OK
to continue.
18
5. The JDBC Driver has been successfully installed. You can view the
libraries that were added by selecting Referenced Libraries in the
Package Explorer.
Now that the JDBC driver is properly set up in our development environment, we
can start adding code in our application to connect to DB2.
19
7.
Connecting to DB2
Whenever we wish to interact with a database, we must first establish a
connection to the database server.
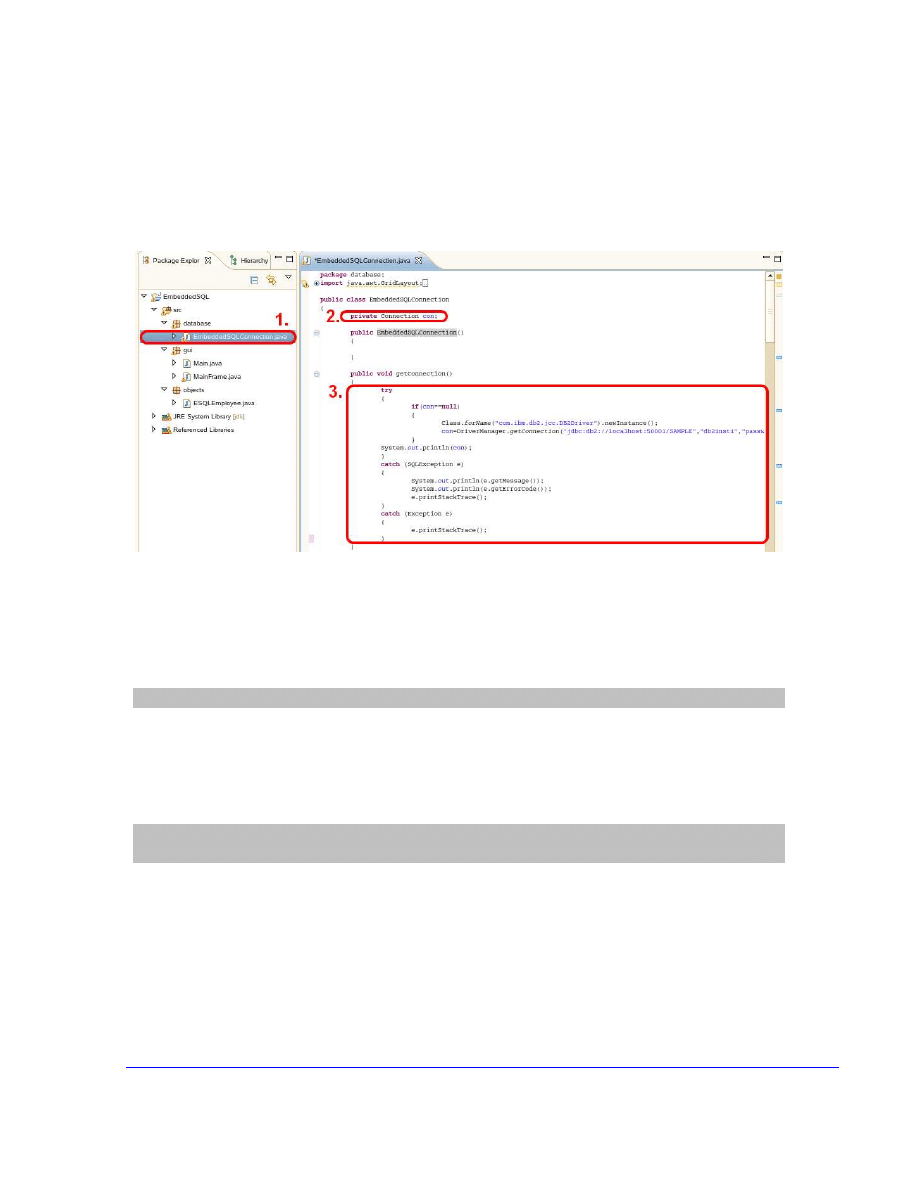
1. In the database package, open the EmbeddedSQLConnection class.
Select the EmbeddedSQL project and press F5 to open the class
The EmbeddedSQLConnection class will be the most important class in this
exercise. This class contains all the functions in the application related to data
access.
2. In order to create a connection, a variable of type Connection must first
be declared to hold the Connection object.
private
Connection
con
;
Now we can create the connection to the DB2 server using the DriverManager
object, and finally we store that connection in the “con” variable.
3. Complete the getConnection() function by uncommenting the code
provided within getConnection().
con
=DriverManager.getConnection
("jdbc:db2://localhost:50001/SAMPLE","db
2inst1","password"
);
The method getConnection() is attempting to establish a connection to the given
database URL. We are connecting to DB2’s SAMPLE database with the user
“db2inst1” using the password “password” through the JDBC API on port 50001.
20
7.1
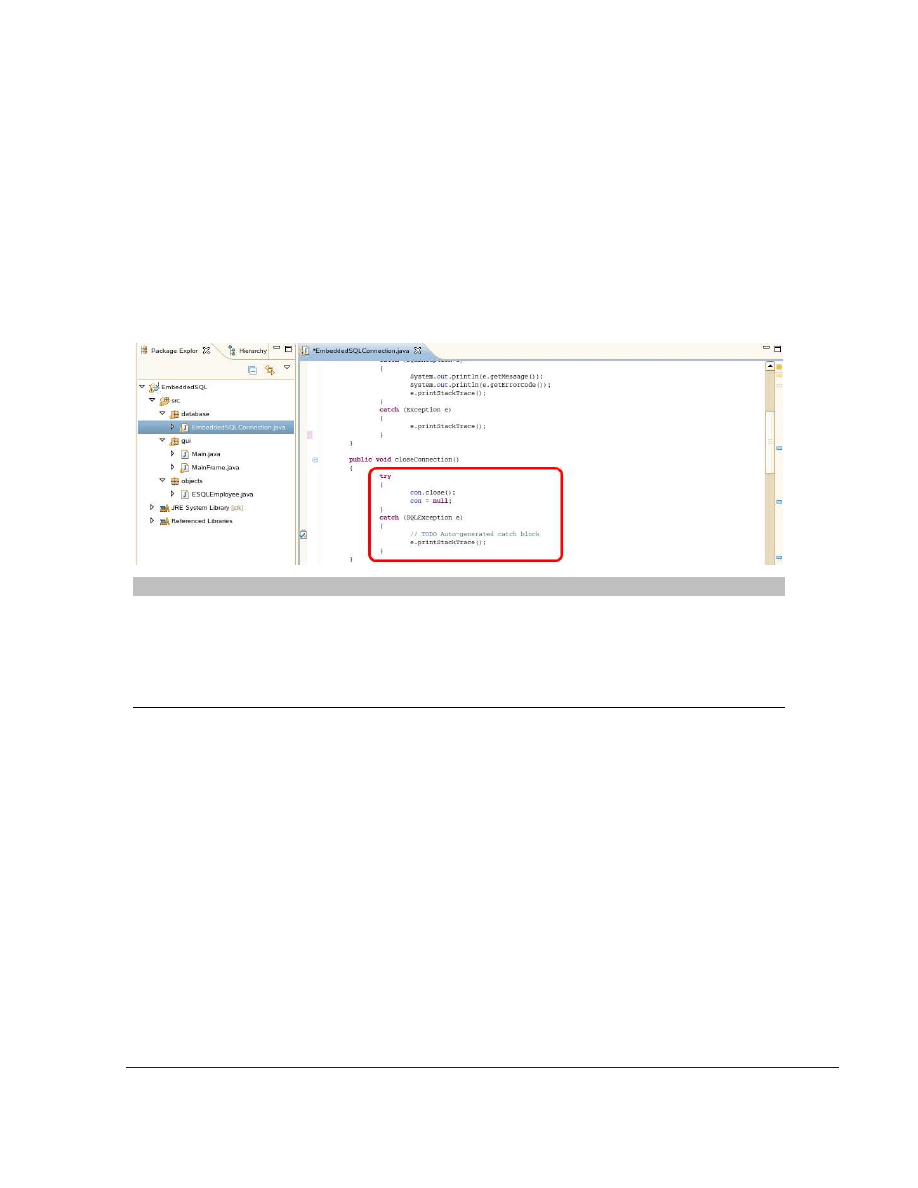
Closing the Connection
Now that we know how to establish a connection, we also need to know how to
properly close our connection to DB2 once it is not needed any more. This is an
important step as it will free up system’s resources for your application and the
database server.
1. In the EmbeddedSQLConnection class, complete the
closeConnection() function by uncommenting the code provided within
closeConnection().
con
.close()
The method close() is terminating the connection to the database specified
during the getConnection() method above. Once the connection is terminated
we can also set
con
=
null
.
8.
Querying Data
Now that we have created functions to create and close a connection to DB2, we
are ready to write a query to search through and display data.
1. In the EmbeddedSQLConnection class, complete the
getEmployeeInformation() function by uncommenting the code
provided within getEmployeeInformation ().
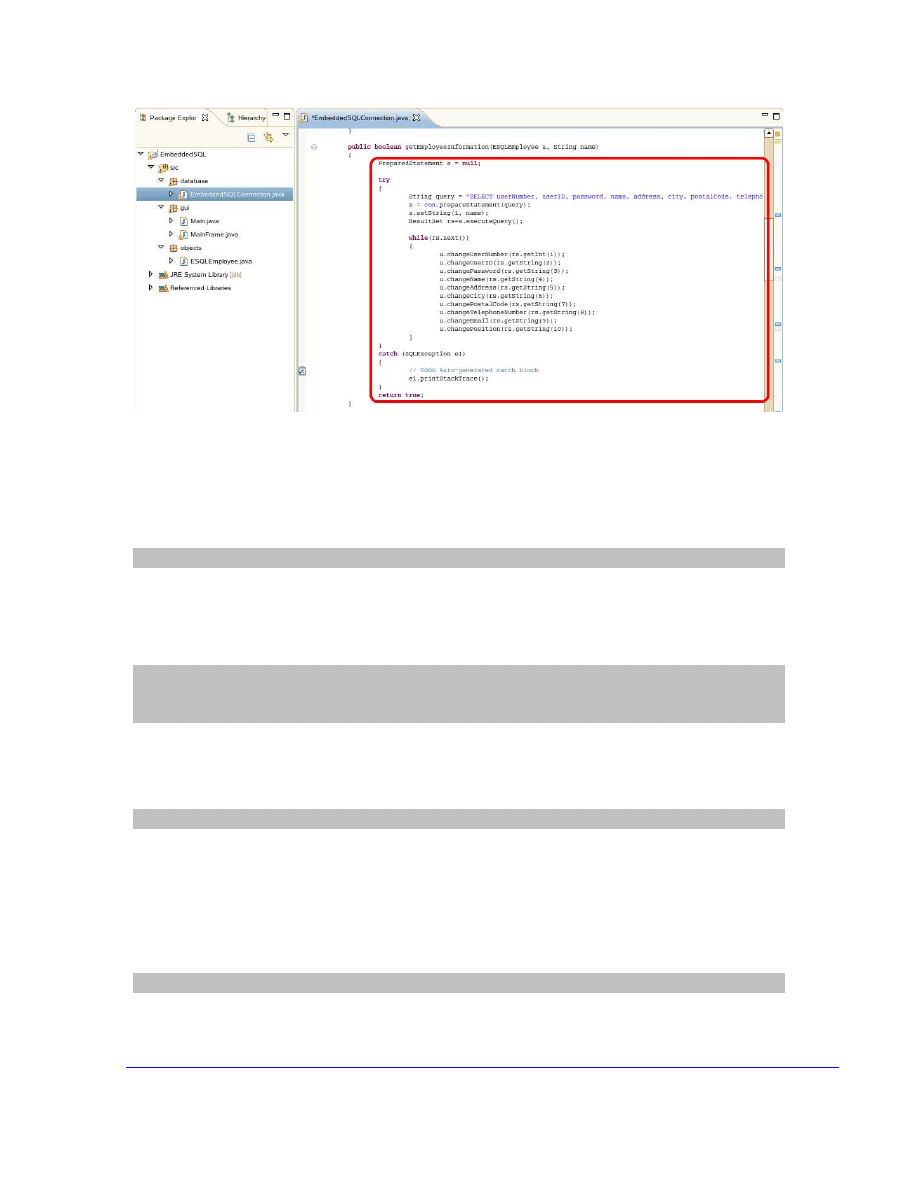
21
The getEmployeeInformation() function selects employee information based on a
provided name. It is used by the application to search through the database for a
specific employee.
2. In order to create and execute a query, an object of type
PreparedStatement must first be specified.
PreparedStatement s =
null;
The PreparedStatement object “
s
”, will be used to hold the SQL SELECT
statement.
3. The SQL statements itself is coded as a String.
String query =
"SELECT userNumber, userID, password, name, address,
city, postalCode, telephoneNumber, email, position FROM ESQLEMPLOYEE
WHERE name = ?";
4. We can now create the PreparedStatement using the Connection
object
con
and the prepareStatement() method. The resulting object is
stored in the variable “
s
“.
s =
con
.prepareStatement(query);
5. Looking at the query String, notice the “?”. This is called a parameter
marker. It marks the place where a value will be inserted during
runtime, in this case, the search criteria provided by the user when
executing the application.
The following command is used to associate a value with the
parameter marker.
s.setString(1, name);

22
For example: If we wish to search for an employee with the name Tu Tran, the
String query becomes,
"SELECT userNumber, userID, password, name,
address, city, postalCode, telephoneNumber, email, position FROM
ESQLEMPLOYEE WHERE name = Tu Tran";
.
6. As we execute the query, the results returned from the query must be
stored. We store the data in an object of the type ResultSet.
ResultSet rs=s.executeQuery();
7. Finally we can retrieve the data stored in the ResultSet.
while(rs.next())
{
u.changeUserNumber(rs.getInt(1));
u.changeUserID(rs.getString(2));
u.changePassword(rs.getString(3));
u.changeName(rs.getString(4));
u.changeAddress(rs.getString(5));
u.changeCity(rs.getString(6));
u.changePostalCode(rs.getString(7));
u.changeTelephoneNumber(rs.getString(8));
u.changeEmail(rs.getString(9));
u.changePosition(rs.getString(10));
}
8.1
Incorporating SELECT with the Application
We have created functions to create and close a connection to DB2 as well as to
return data using a SELECT statement. How can we use these functions in our
application?
1. In the GUI package, open the MainFrame class.
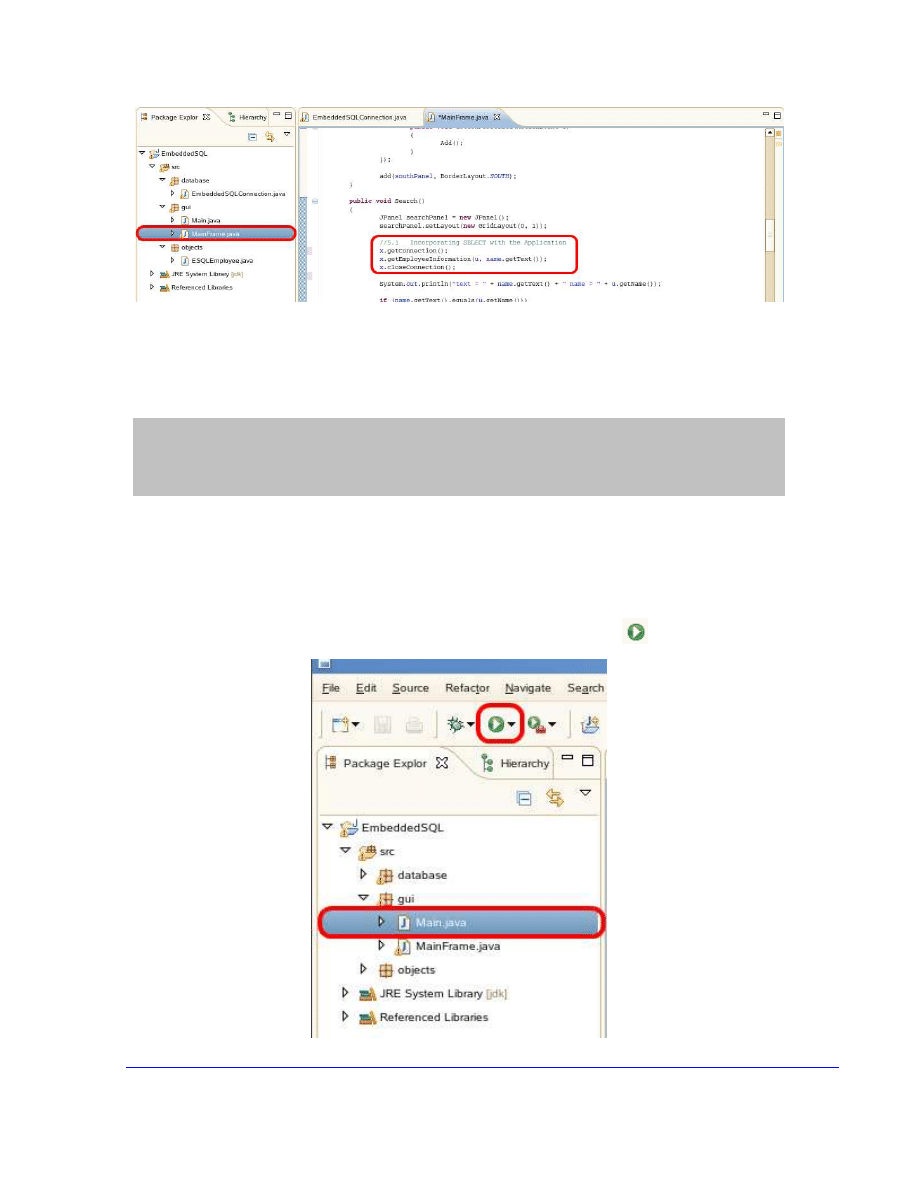
23
The MainFrame class is where we will be using the functions created to interact
with DB2. This class contains all the functions in the application that are
responsible for allowing the user to interact with the application.
2. Go to the Search() function and uncomment the code provided.
//5.1 Incorporating SELECT with the Application
x
.getConnection();
x
.getEmployeeInformation(
u
,
name
.getText());
x
.closeConnection();
8.2
Search the Database using the Application
The application is now capable of performing a SELECT statement on the
database and displaying the information returned.
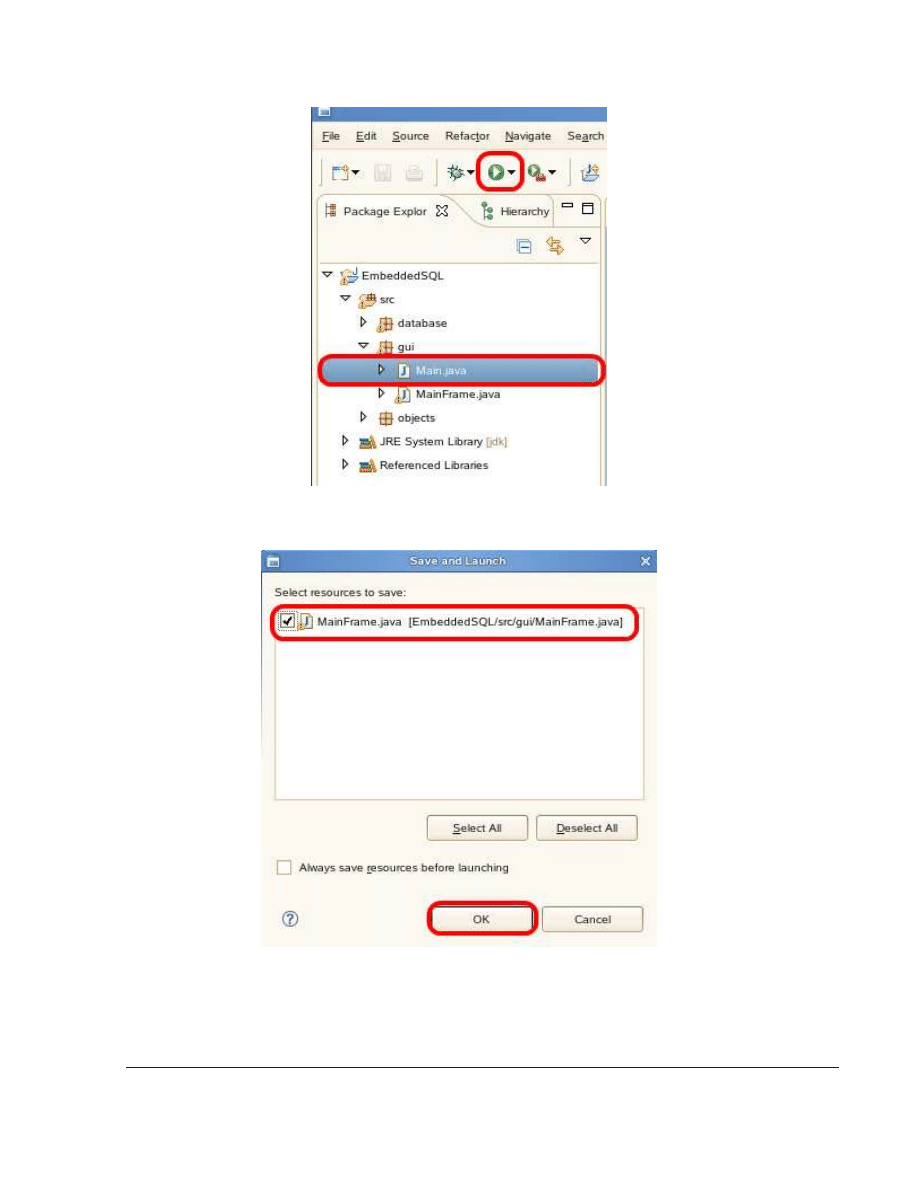
1. In the gui package, open the Main class and press
.
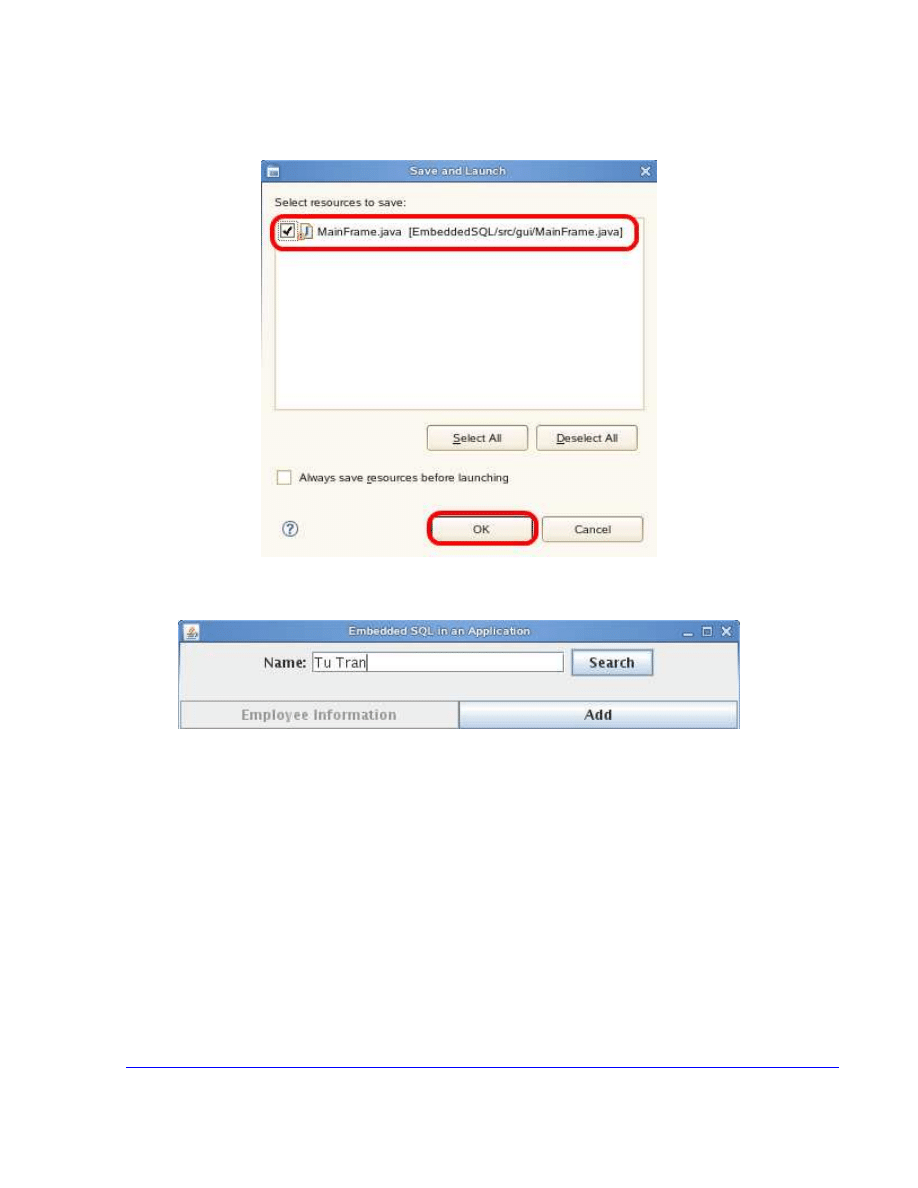
24
2. If you have not saved your changes, you will be prompted to save the
file(s). Select all the resources that need to be saved and press OK.
3. The following program will appear. Enter the name “Tu Tran” and
press Search.
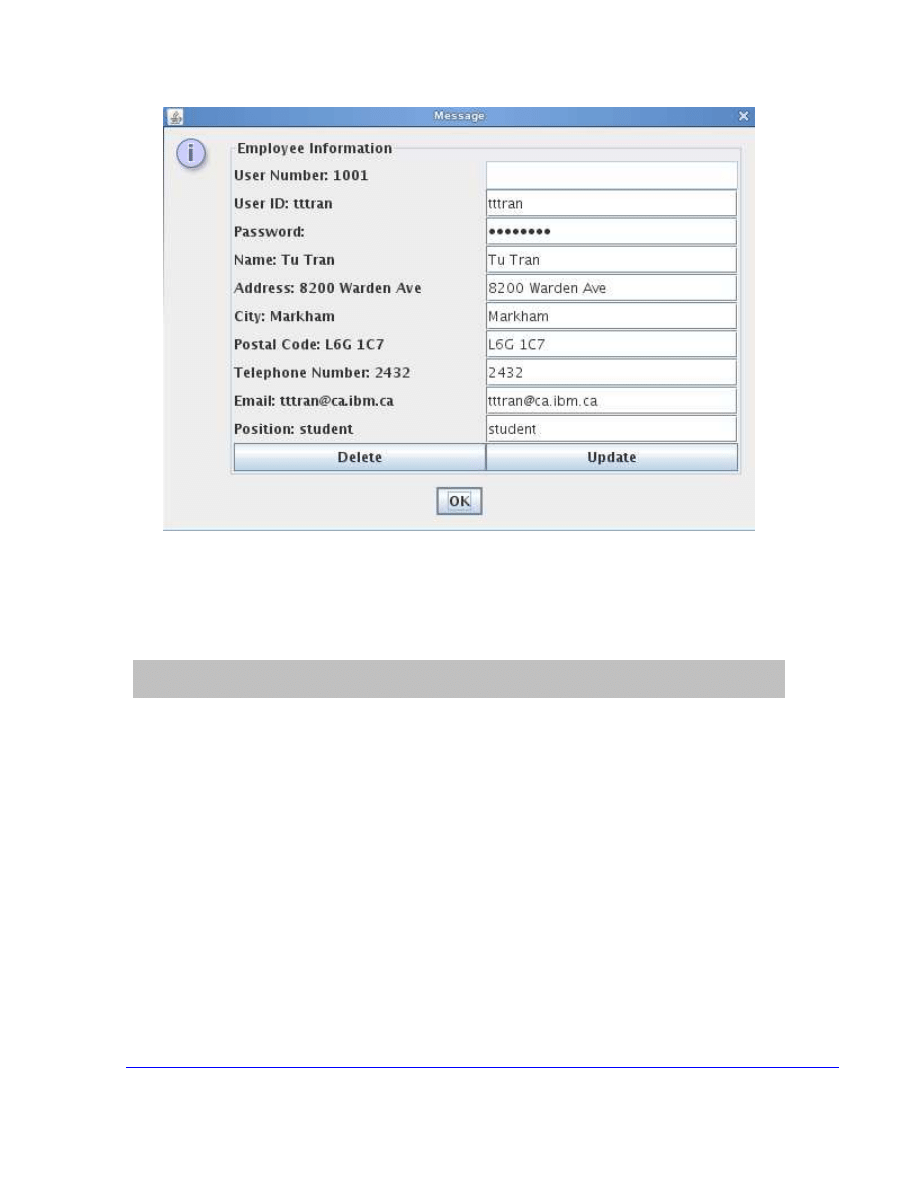
25
We can see that the following employee data was returned from the database.
4. Open a Terminal and connect to the Sample database to view the
ESQLEMPLOYEE table.
db2 connect to sample
db2
“
SELECT * FROM ESQLEMPLOYEE
”
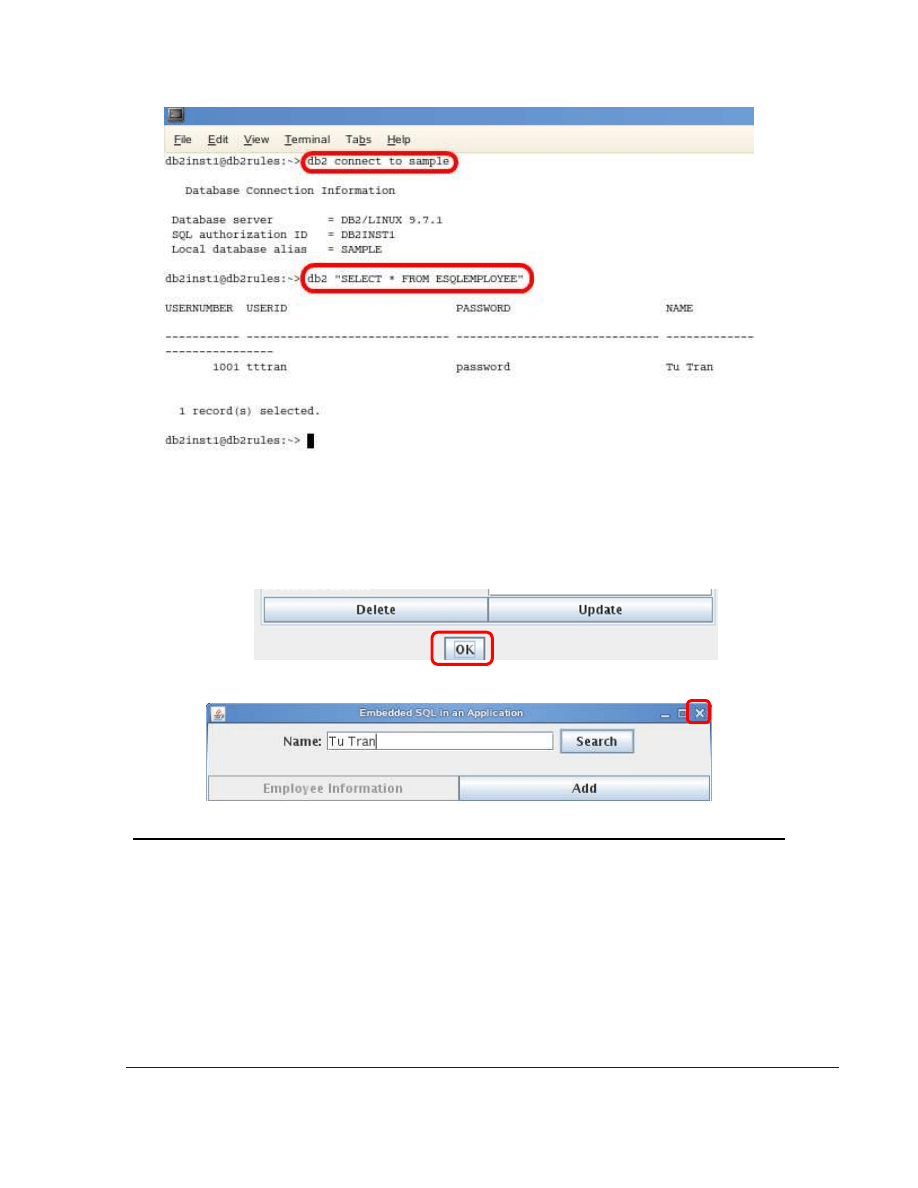
26
We can see that the data returned through the Embedded SQL application is the
same as the data we see by directly connecting to the Sample database.
5. Go back to the Java program and press “OK” to close the window.
6. Press “X” to close the application.
9.
Inserting Data
Using the INSERT statement is similar to using the SELECT statement except
we do not need to store data in a ResultSet.
1. In the EmbeddedSQLConnection class, complete the addEmployee()
function by uncommenting the code provided within addEmployee().
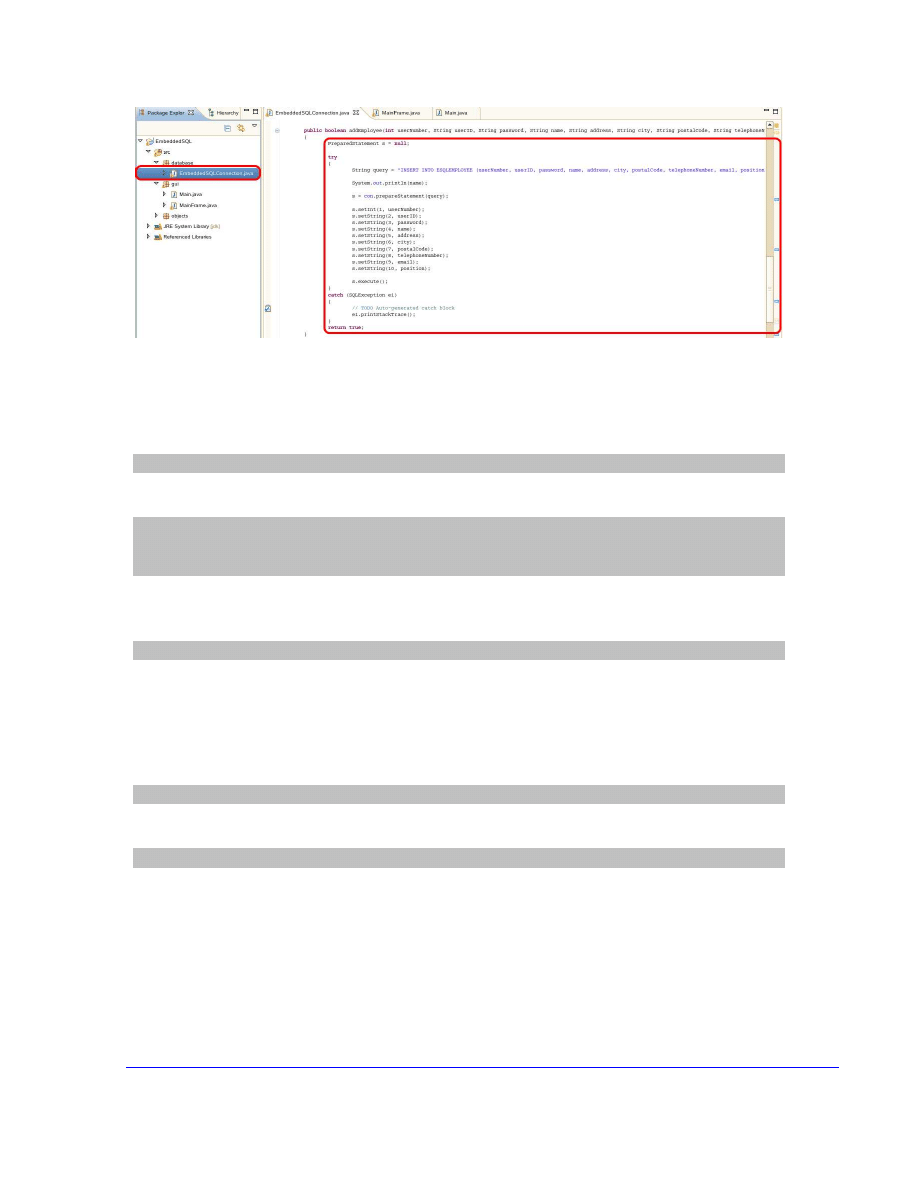
27
The addEmployee () function inserts new employee information into the table
ESQLEMPLOYEE.
2. As before, an object of type PreparedStatement is specified to store
the SQL statement.
PreparedStatement s =
null;
3. The SQL statement is coded as the following String.
String query =
"INSERT INTO ESQLEMPLOYEE (userNumber, userID, password,
name, address, city, postalCode, telephoneNumber, email, position)
VALUES (?,?,?,?,?,?,?,?,?,?)";
4. We can now create the PreparedStatement using the Connection
object
con
and the prepareStatement() method.
s =
con
.prepareStatement(query);
5. Notice the INSERT statement has several parameter markers. As
before, they are necessary to associate values provided by the user to
the SQL statement being executed.
A command like the one below is used to associate a value to one of
the parameters.
s.setString(2, userID);
6. The statement can now be executed.
s.execute();
9.1
Incorporating INSERT with the Application
We have created functions to create and close a connection to DB2 as well insert
data using an INSERT statement. How can we use these functions in our
application?
1. In the GUI package, open the MainFrame class.
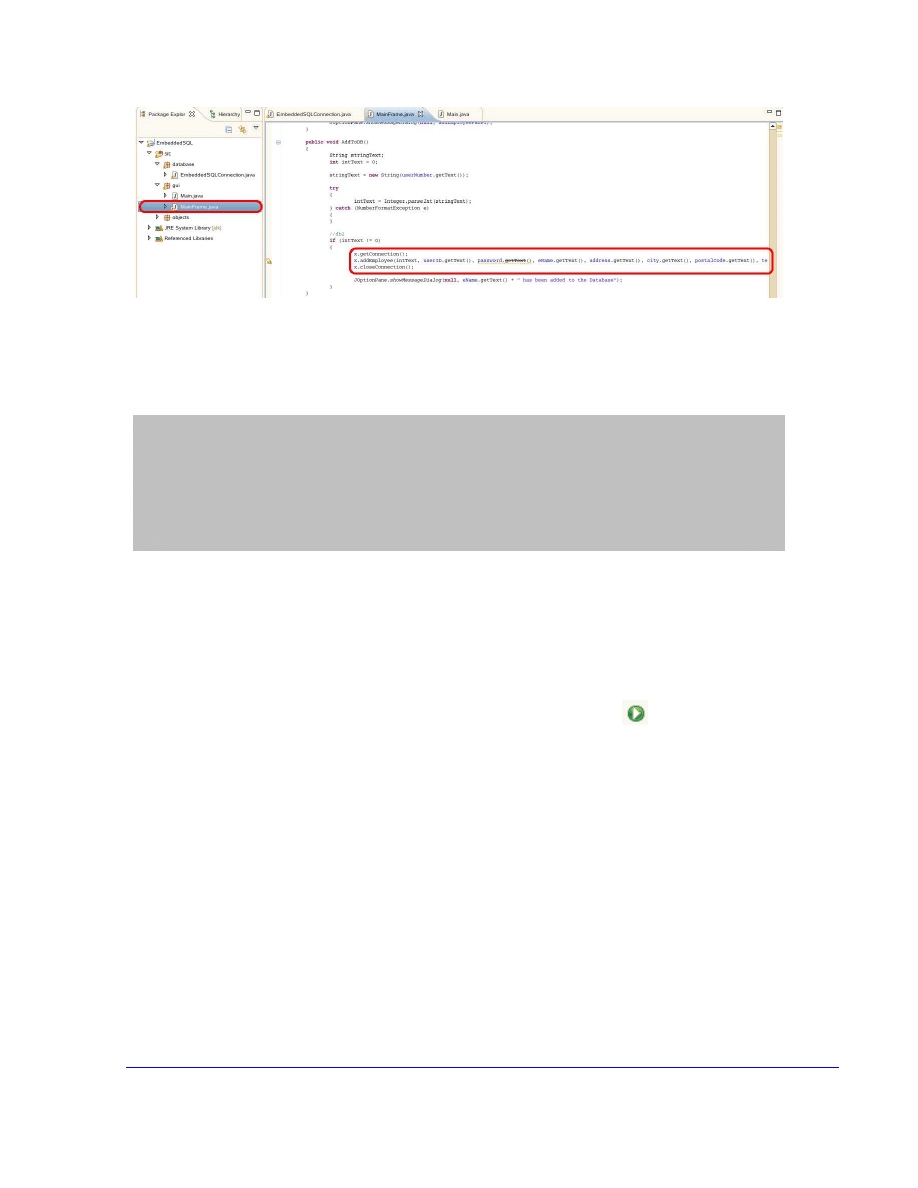
28
The MainFrame class is where we will be using the functions created to interact
with DB2. This class contains all the functions in the application that are
responsible for allowing the user to interact with the application.
2. Go to the AddToDB() function and uncomment the code provided.
//6.1 Incorporating INSERT with the Application
x
.getConnection();
x
.addEmployee(intText,
userID
.getText(),
password
.getText(),
eName
.getText(),
address
.getText(),
city
.getText(),
postalCode
.getText(),
telephoneNumber
.getText(),
.getText(),
position
.getText());
x
.closeConnection();
9.2
Insert into the Database using the
Application
The application is now capable of performing an INSERT statement to add new
employees to the database.
1. In the gui package, open the Main class and press
.
29
2. If you have not saved the changes, you will be prompted to save the
file. Select all resources that need to be saved and press OK.
3. The following program will appear. Press the Add button.
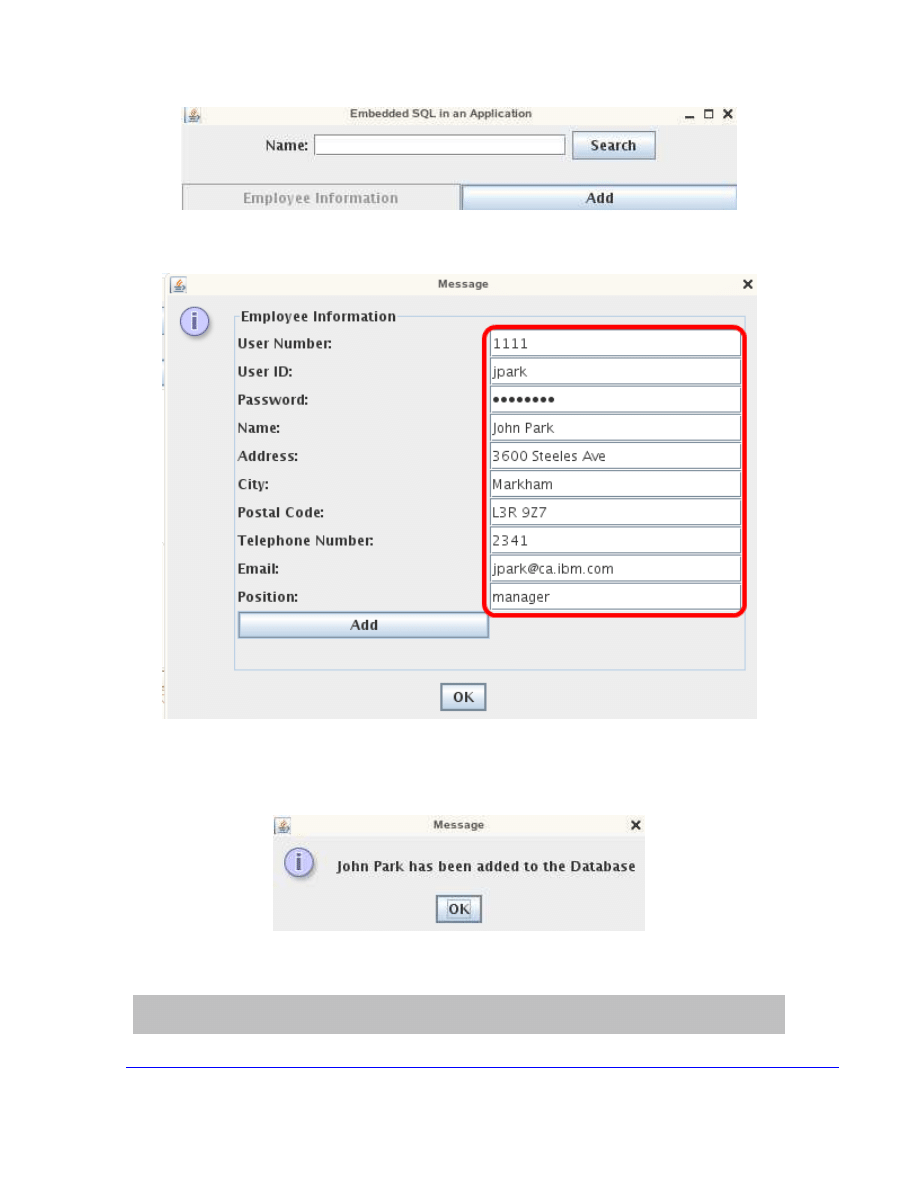
30
4. The following popup will appear. Enter the information as seen below
and press Add.
We can see that the employee data was successfully added to the database.
Press “OK” to close the popup message.
5. Open a Terminal and connect to the SAMPLE database to view the
ESQLEMPLOYEE table.
db2 connect to sample
db2
“
SELECT * FROM ESQLEMPLOYEE
”
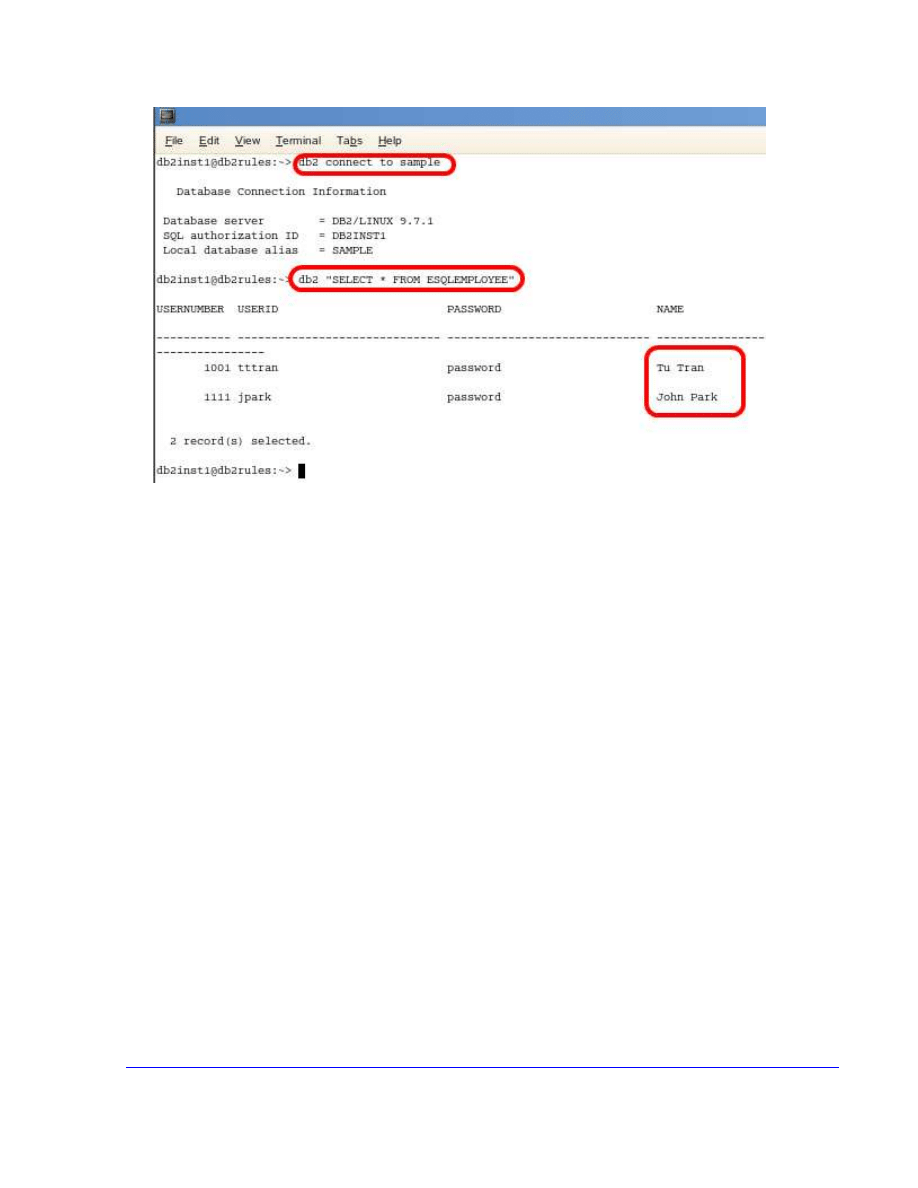
31
We can see that the employee “John Park” has been added to the Sample
database.
Congratulations! You have just created a simple application capable of
interacting with DB2. In this exercise we learned how to retrieve and insert data
from a database using the JDBC API. Included with the application, there are
also functions for the DELETE and UPDATE statements. Feel free to read
through the code for a better understanding of how we can use JDBC within a
Java application.

32
© Copyright IBM Corporation 2011
All Rights Reserved.
IBM Canada
8200 Warden Avenue
Markham, ON
L6G 1C7
Canada
IBM, IBM (logo), and DB2 are trademarks or registered trademarks
of International Business Machines Corporation in the United
States, other countries, or both.
Linux is a registered trademark of Linus Torvalds in the United
States, other countries, or both.
UNIX is a registered trademark of The Open Group in the United
States, other countries, or both
Windows is a trademark of Microsoft Corporation in the United
States, other countries, or both.
Other company, product, or service names may be trademarks or
service marks of others.
References in this publication to IBM products or services do not
imply that IBM intends to make them available in all countries in
which IBM operates. The following paragraph does not apply to the
United Kingdom or any other country where such provisions are
inconsistent with local law:
INTERNATIONAL BUSINESS MACHINES CORPORATION
PROVIDES THIS PUBLICATION "AS IS" WITHOUT WARRANTY
OF ANY KIND, EITHER EXPRESS OR IMPLIED, INCLUDING,
BUT NOT LIMITED TO, THE IMPLIED WARRANTIES OF NON-
INFRINGEMENT, MERCHANTABILITY OR FITNESS FOR A
PARTICULAR PURPOSE.
Some states do not allow disclaimer of express or implied
warranties in certain transactions, therefore, this statement may not
apply to you.
This information could include technical inaccuracies or
typographical errors. Changes are periodically made to the
information herein; these changes will be incorporated in new
editions of the publication. IBM may make improvements and/or
changes in the product(s) and/or the program(s) described in this
publication at any time without notice.
Any performance data contained herein was determined in a
controlled environment. Therefore, the results obtained in other
operating environments may vary significantly. Some
measurements may have been made on development-level
systems and there is no guarantee that these measurements will be
the same on generally available systems. Furthermore, some
measurement may have been estimated through extrapolation.
Actual results may vary. Users of this document should verify the
applicable data for their specific environment.
Information concerning non-IBM products was obtained from the
suppliers of those products, their published announcements or
other publicly available sources. IBM has not tested those products
and cannot confirm the accuracy of performance, compatibility or
any other claims related to non-IBM products. Questions on the
capabilities of non-IBM products should be addressed to the
suppliers of those products.
The information in this publication is provided AS IS without
warranty. Such information was obtained from publicly available
sources, is current as of June 2010, and is subject to change. Any
performance data included in the paper was obtained in the specific
operating environment and is provided as an illustration.
Performance in other operating environments may vary. More
specific information about the capabilities of products described
should be obtained from the suppliers of those products.
Wyszukiwarka
Podobne podstrony:
2 3 DB2 Application Development
delphi database application developers book eyyaqhfr7cd6iw5fef4bqjzmnt5lzbv63tgykwa EYYAQHFR7CD6IW5
2 2 DB2 pureXML Lab
Developing your STM32VLDISCOVERY application using the MDK ARM
Developing your STM32VLDISCOVERY application using the Atollic TrueSTUDIO
Developing Modular Applications
2 2 DB2 pureXML Lab
Developing your STM32VLDISCOVERY application using the IAR Embedded Workbench
Brzechczyn, Krzysztof On the Application of non Marxian Historical Materialism to the Development o
2008 08 Congestion Control Developing Multimedia Applications with Dccp
spis lab I sem 2010
III WWL DIAGN LAB CHORÓB NEREK i DRÓG MOCZ
Diagnostyka lab wod elektrolit
ZW LAB USTAWY, OCHRONA
LAB PROCEDURY I FUNKCJE
4 Plant Structure, Growth and Development, before ppt
więcej podobnych podstron